Setting up Chargebee webhooks is crucial for receiving real-time updates about subscription events and customer actions in your Chargebee account. Webhooks allow you to automate processes and keep your systems in sync with your billing platform. In this tutorial, we'll guide you through the process of setting up and handling Chargebee webhooks in Node.js platform.
Prerequisites
Before trying out this tutorial, you need to setup the following:
- Node.js installed on your development machine.
- A Chargebee account. If you don't have one, sign up for free at Chargebee.
- A publicly accessible server or hosting service where you can deploy your Node.js application. We'll use Express.js to create a simple webhook endpoint for this example.
Step 1: Create a Node.js Project
Start by creating a new Node.js project. Open your terminal and run the following commands:
mkdir chargebee-webhooks
cd chargebee-webhooks
npm init -y
npm install express body-parser
This will install the necessary dependencies, including Express.js and body-parser for handling webhook requests.
Create an app.js file in your project directory and set up an Express.js server to listen for incoming webhook events:
// app.js
const express = require('express')
const bodyParser = require('body-parser')

const app = express()
const port = process.env.PORT || 3000

// Configure the bodyParser middleware to parse JSON requests
app.use(bodyParser.json())


// https://apidocs.chargebee.com/docs/api/webhooks?prod_cat_ver=2
// US Region
const CHARGEBEE_WEBHOOKS_REQUEST_ORIGINS = [
  '3.209.65.25',
  '3.215.11.205',
  '3.228.118.137',
  '3.229.12.56',
  '3.230.149.90',
  '3.231.198.174',
  '3.231.48.173',
  '3.233.249.52',
  '18.210.240.138',
  '18.232.249.243',
  '34.195.242.184',
  '34.206.183.55',
  '35.168.199.245',
  '52.203.173.152',
  '52.205.125.34',
  '52.45.227.101',
  '54.158.181.196',
  '54.163.233.122',
  '54.166.107.32',
  '54.84.202.184',
]

// Define a route to handle incoming webhooks
app.post('/webhook', (req, res) => {
  const event = req.body
  const requestIp = req.headers['x-real-ip'] || req.headers['x-forwarded-for']

  // Verify the webhook request to ensure it's from Chargebee servers
  if (!CHARGEBEE_WEBHOOKS_REQUEST_ORIGINS.find((ip) => ip === requestIp)) {
    return res.status(403).send('IP Address Not Allowed')
  }

  // Handle the webhook event here
  console.log('Received webhook event:', event)

  const eventType = event.event_type;
  const content = event.content;

  switch (eventType) {
    case "subscription_created":
      // Handle subscription-created related changes here
      console.log("Subscription created:", content.subscription.id);
      break;
    case "subscription_changed":
      // Handle subscription-changed related changes here
      console.log("Subscription changed:", content.subscription.id);
      break;
    default:
      // Unhandled event type
      console.log(`Unhandled event type ${eventType}.`);
  }


  // Respond with a 200 OK status to acknowledge receipt of the webhook
  res.status(200).end()
})

// Start the Express server
app.listen(port, () => {
  console.log(`Server is running on port ${port}`)
})
Now run the following command to start the Express.js server:
node app.js
If you run your node server locally, you must expose your local server to the internet so that Chargebee can send webhook events to your server. To do this, you can use a freemium service like ngrok.
Step 2: Register Webhook
In your Chargebee Dashboard, configure the webhooks to point to the endpoint you've defined in your Express.js server. To do this:
- Log in to your Chargebee account.
- Go to Settings > Configure Chargebee > API Keys and Webhooks. Then switch to the Webhooks tab.
- Click the Add a Webhook button.
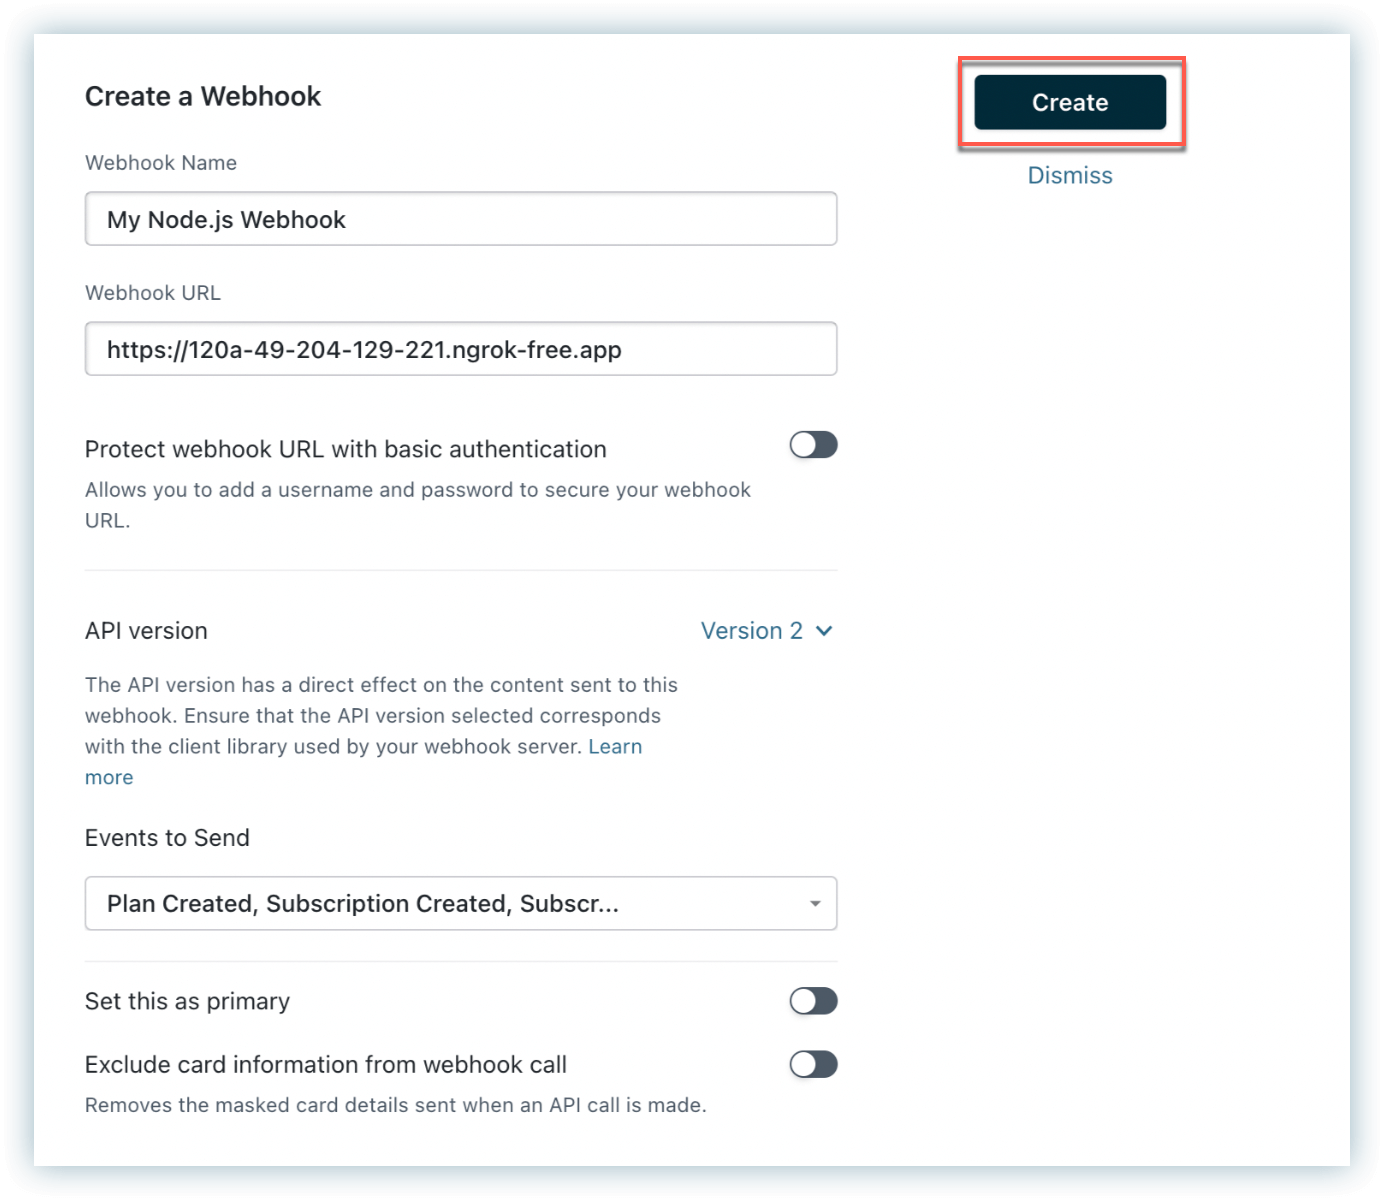
- Enter the following details:
- Webhook Name: Enter a name for your webhook. For example,
My Node.js Webhook. - Webhook URL: Enter the URL where your Express.js server is hosted, followed by
/webhook. For example,https://313e-49-204-129-221.ngrok-free.app. - Security: Choose the type of authentication you want to use. For our current example, we'll skip this authentication setup, but it is recommended to set the authentication method for production environments.
- Events to Send: Select the specific events you want to receive notifications for. Typical events include subscription created, subscription updated, and payment succeeded.
- Click Create to save your webhook configuration.

Learn more about Chargebee webhooks.
Step 3: Test the Webhook
Now that you have configured the webhook, you can test it by performing the following steps:
- Click on Test Webhook on the card for the webhook.
- Choose an event to test with.
- Click Test URL. The request is sent, the response received, and the status displayed.
Congratulations! You have successfully set up Chargebee webhooks in a Node.js application. You can automate various tasks and keep your application in sync with your Chargebee subscription billing system in real time. The same logic applies to other programming languages as well.
Resources
These resources will help you learn more about Chargebee webhooks and best practices:
We're always happy to help you with any questions you might have!
support@chargebee.com