Webhook Settings
Webhooks (or HTTP callbacks) can be used to notify your systems about events as they occur in your Chargebee instance. Using the Chargebee console, you can setup several webhook endpoints to be notified of such events.
Information
Webhooks are asynchronous and are not recommended for time-critical applications. It is very much possible and even likely that webhooks reach your application out-of-order and that they get duplicated. For time-critical applications, we recommend using the list events API to poll our system for events.
Choosing the right event delivery mechanism: EventBridge over webhooks
If your business processes a large volume of Chargebee events or operates primarily within AWS, Amazon EventBridge is the recommended integration method. It provides a secure, scalable, and fault-tolerant event delivery system that eliminates the need to manage webhook infrastructure.
EventBridge integrates natively with AWS services such as Lambda, SQS, and Step Functions, enabling seamless event-driven workflows across your AWS environment. It ensures reliable event delivery even when your downstream systems experience downtime, with minimal operational overhead.
For setup instructions and configuration details, see Event Streaming via AWS EventBridge.
See also
Discover an extensive tutorial that explains how to set up Chargebee webhooks for receiving real-time updates. Learn more.
Configure Webhooks
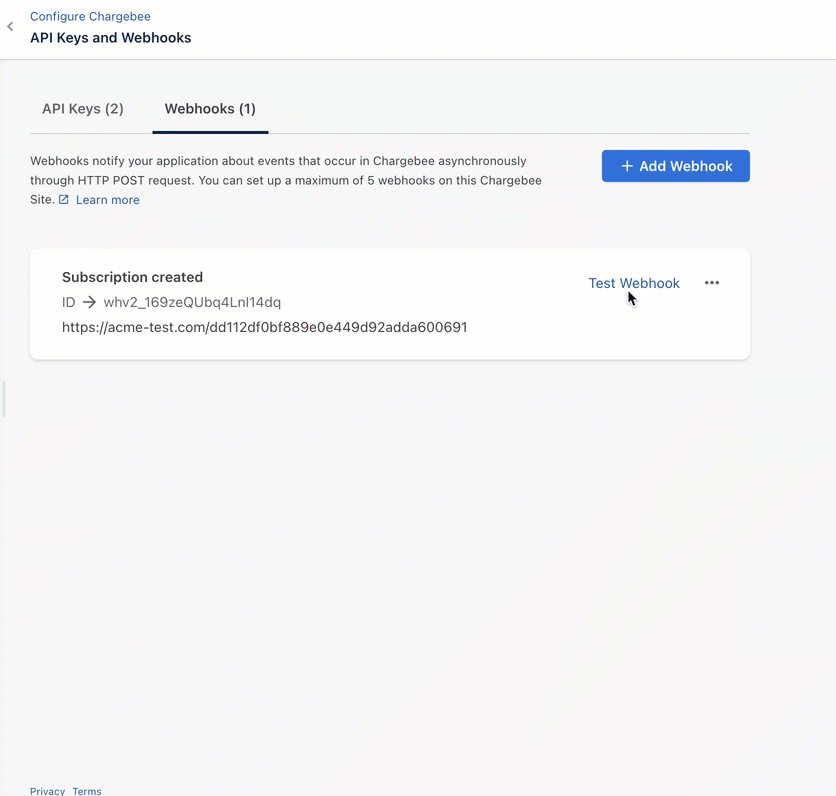
To configure your webhooks, go to Settings > Configure Chargebee > API Keys and Webhooks. Then switch to the Webhooks tab.
If you have not added a webhook already, click Add Webhook.
Note
You can create up to five Webhooks.
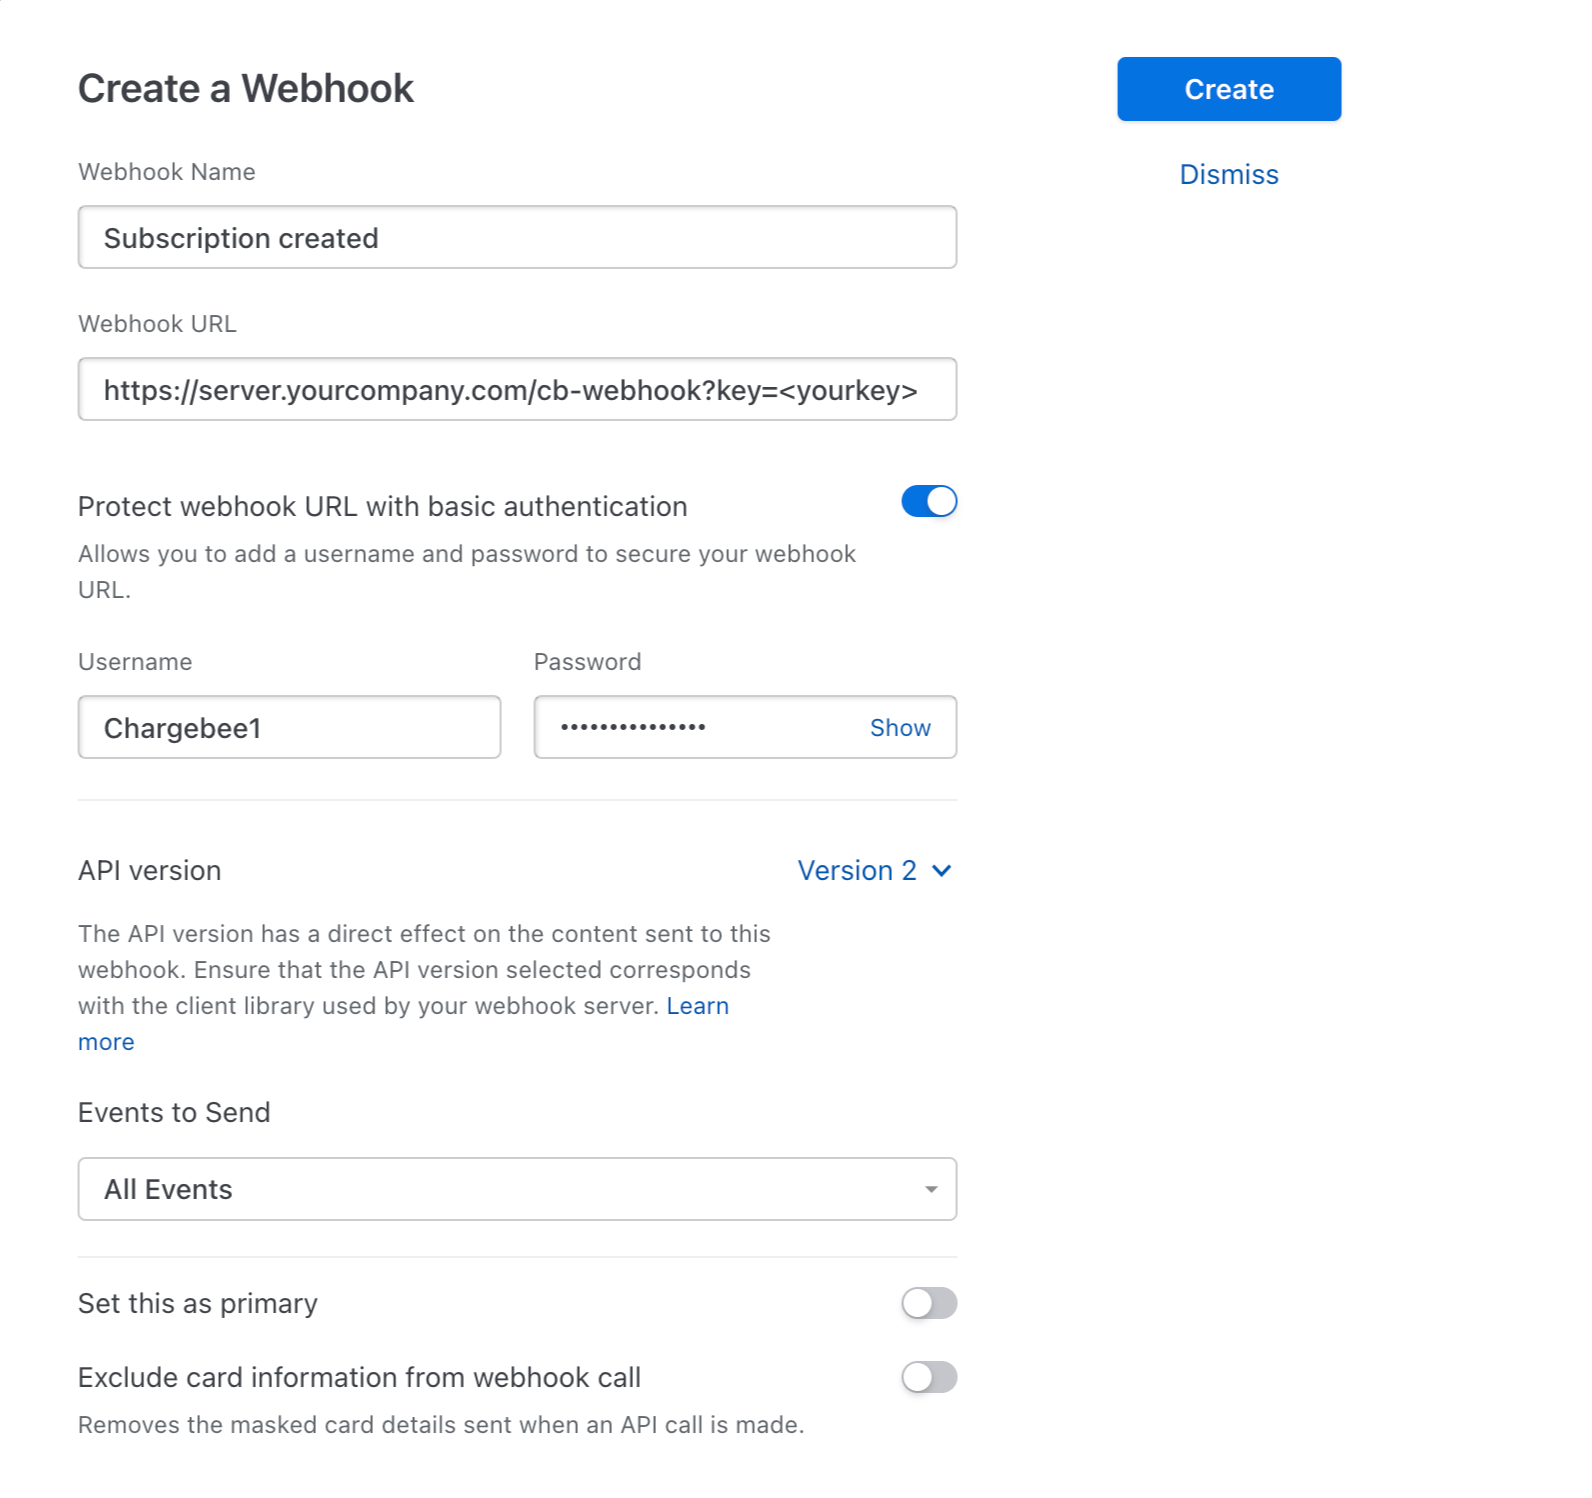
Webhook Name and URL
The Webhook Name is the name by which the webhook will be referred to in Chargebee. The Webhook URL represents the endpoint to which the webhook should be sent.
Basic Authentication
It is recommended that your webhook URLs be protected using basic authentication and/or HTTPS.
To use basic authentication, toggle Protect webhook URL with basic authentication and fill in the Username and Password.
Tip: Another (less secure) way of authenticating a webhook call is by including a key generated by you, as part of the webhook URL. For example, the URL could look like:
https://server.yourcompany.com/cb-webhook?key=<yourkey>
Events to Send
You can use this dropdown menu to select the Chargebee events that should be sent via this webhook. All Events are selected by default. However, select just the intended set of events in this list to enable your systems can handle the volume of webhooks triggered.
See also
List of events that webhooks are triggered for.
Set this as primary
The statuses of all webhooks for an event are available in the array attribute webhook inside the event resource.
When you define a webhook as primary, its status is supplied in the webhook_status attribute of the events resource. This is to ensure backward compatibility with an earlier API where only one webhook was configurable for a site.
Exclude card information
You also have the option to exclude card object from the webhook call. Enabling this will remove the masked card details object from the webhook call.
Note
Although only masked card details are sent as part of the webhook data, we recommend this option be enabled as the data could still be used for phishing attacks in case your site suffers a security breach.
Test Webhooks
You can test a webhook once it is created.
- Click on Test Webhook on the card for the webhook.
- Choose an event to test with.
- Click Test URL. The request sent, the status of the response received and the response itself is displayed.
Best Practices for Using Webhooks
To ensure the reliability, security, and maintainability of your webhook integrations, follow these best practices:
| Best Practice | Description |
|---|---|
| Validate signatures and ensure fresh payloads | Always verify that incoming webhook payloads are legitimately from Chargebee using the available basic authentication mechanism.
Check the |
| Use idempotency and deduplication | Webhooks may be delivered more than once due to retries. Ensure your handler processes each event only once by using the unique event ID to deduplicate. See the Duplicate Handling section. |
| Subscribe only to necessary events | Instead of selecting “All Events,” subscribe only to the webhook event types your system requires. This reduces noise, lowers processing overhead, and simplifies error handling. |
| Respond quickly and process asynchronously | Your webhook endpoint should return a |
| Use HTTPS and maintain valid TLS certificates | Ensure that all systems receiving webhooks have up-to-date TLS certificates. Use HTTPS with valid certificates, protect webhook URLs with basic authentication or similar mechanisms, and consider IP whitelisting if feasible. See the Webhook API documentation for more details. |
| Implement retry handling and plan for high-volume events | Be prepared for Chargebee’s retry schedule (see Automatic Retries). Your system should tolerate failures, handle retries idempotently, and not assume single delivery. If your system cannot process high webhook volumes efficiently, note that retries can increase overall webhook load, leading to potential delays in catching up. |
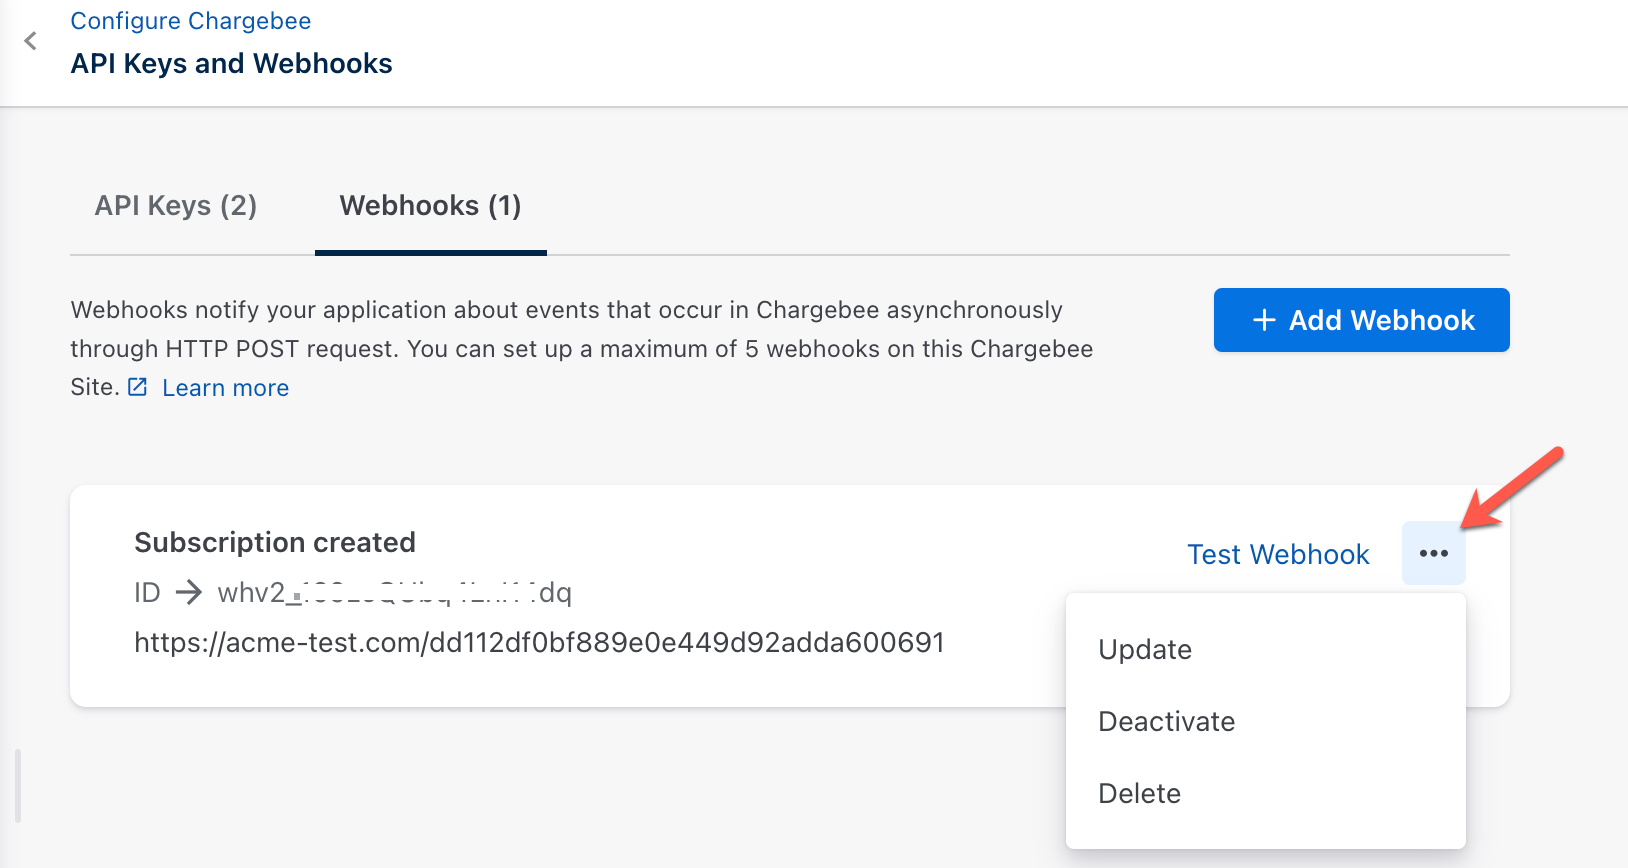
Manage Webhooks
You can manage your webhooks using the More Options menu on the webhook card. The available actions are:
- Update: Modify the webhook's configuration to reflect changes in your requirements.
- Deactivate: Temporarily disable the webhook on your site without deleting it. This is helpful if you need to pause notifications but want to retain the webhook's configuration. Note: On a test site, if a webhook is not used, you will receive an email notification prompting you to deactivate it. If no action is taken, the webhook will be automatically deactivated.
- Delete: Permanently remove the webhook from your Chargebee site.
Webhook Timeouts
There are 3 timeouts for Webhooks in Chargebee:
-
Connection Timeout: The connection timeout is the timeout for making the initial connection to the webhook URL's HTTP server.
-
Read Timeout: Once the initial connection has been made, at any time there is a possibility that there is an indefinite wait to read data from the HTTP server. The read timeout is the timeout for such a wait.
-
Total Webhook Timeout: In addition to the above timeouts, Chargebee also checks the total execution of time of any webhook call via the webhook execution timeout.
The values for each timeout are as follows:
| Timeout | For Test site | For Live site |
|---|---|---|
| Connection Timeout | 10,000 ms | 20,000 ms |
| Read Timeout | 10,000 ms | 20,000 ms |
| Webhook Execution Timeout | 20,000 ms | 60,000 ms |
Automatic Retries
Webhook execution can fail due to timeouts or errors. For each event whose webhook call fails, the calls are retried up to 7 times based on the following schedules:
| Retry | Time |
|---|---|
| 1 | 2 minutes after the failure |
| 2 | 6 minutes after the previous retry |
| 3 | 30 minutes after the previous retry |
| 4 | 1 hour after the previous retry |
| 5 | 5 hours after the previous retry |
| 6 | 1 day after the previous retry |
| 7 | 2 days after the previous retry |
Note
You could resend a webhook call manually, if you wish to sync your data immediately. Go to Logs › Events and open the page for the chosen event. On the right side, you will have the option to select the webhook and resend the same.
Duplicate Handling
Due to webhook retries, it's possible that your application receives the same webhook more than once. Ensure idempotency of the webhook call by detecting such duplicates within your application. This can be done by examining the id parameter since its value is unique to an event and thus identifies it.
Out-of-Order Delivery
Webhooks can also arrive at your application out-of-order. This can be due to issues such as network delays or webhook failures. However, you can determine the order of the events by examining the resource_version attribute of the resource sent by the webhook. resource_version is incremented once for every change made to the resource.
See also
Events API to learn more.
FAQ
1) What IP addresses does Chargebee send webhooks from that I should allow-list?
See this section in our developer documentation to know which IP addresses our webhooks are delivered from.
Was this article helpful?