Overview
Many products control access to advanced features and capabilities via entitlements. When a user tries to access a gated feature, showing a clear upgrade offer at that moment can turn intent into revenue. Use Chargebee Growth's Offers APIs to make offer decisions, while keeping full control over offer fulfillment.
This tutorial explains how to implement an entitlement-gated offer flow: your application detects when a user hits a gated feature, fetches a personalized offer from Chargebee using the Offers APIs, shows it in-product, and when the user accepts, your application runs its own upgrade processing and then updates the offer fulfillment status in Chargebee. Chargebee handles offer eligibility, selection, and reporting; you keep full control over payments and provisioning.
Note
This tutorial considers "Advanced Analytics" as an example gated feature. You can apply this to any feature or capability, for example, additional AI models, premium content, or additional storage.
Architecture overview
The flow splits responsibilities between your backend and Chargebee as follows.
Your application:
- Detects when a user tries to access a gated feature
- Requests an offer from Chargebee and renders it to the user
- Notifies offer engagement events to Chargebee
- Creates and updates offer fulfillments
- Handles payment collection and feature provisioning
Chargebee:
- Evaluates offer eligibility
- Selects the appropriate offer
- Records offer engagement events
- Records fulfillment status
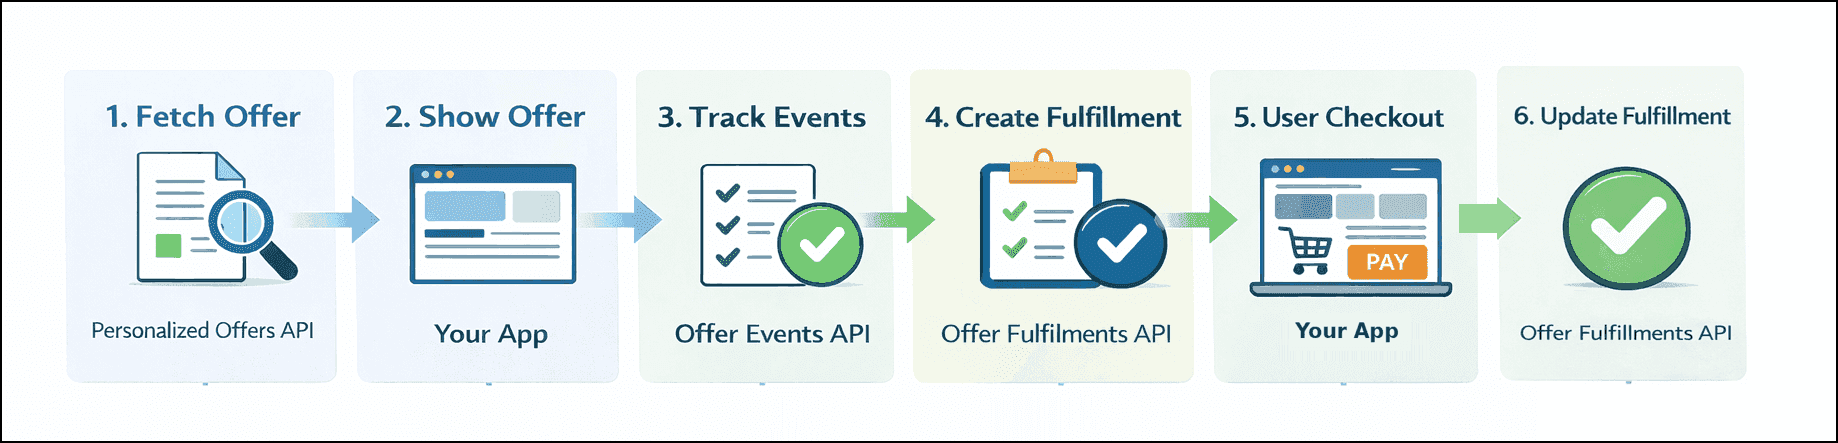
A typical flow:
- When a user tries to access a gated feature, fetch a personalized offer from Chargebee, passing the customer and subscription identifiers and the feature entitlement flag.
- If an offer is returned, show an in-product upgrade prompt using the offer content.
- For engagement tracking, notify Chargebee when the offer is viewed or dismissed. Stop here if the user dismisses the offer.
- When the user accepts the offer, create an offer fulfillment at Chargebee.
- Route the user into your upgrade or checkout flow (for example, collect payment, enable the feature flag, and provision access to the feature). You can optionally use the redirect URL provided in the offer response, if configured in the offer.
- When provisioning succeeds, update the offer fulfillment status in Chargebee to
completed.
Before you start
If you're new to Chargebee Growth's Offers APIs, complete Getting started with Chargebee Growth's Offers APIs first.
For this tutorial to work, you need the following setup:
Set up your development environment
- Obtain a full-access API key from Chargebee Billing.
- Install the Chargebee client SDK for your server-side stack.
- Have entitlement or feature-gating logic in your application.
Set up Chargebee Billing and Growth
Users with access to Chargebee Growth must complete these steps.
- Have Chargebee Growth enabled and connected to your Chargebee Billing site.
- Ensure that the required configuration has been completed in Chargebee so the APIs return offers at runtime.
Implementation steps
Follow these steps to implement the entitlement-gated offer flow using Chargebee Growth's Offers APIs with your own checkout or provisioning.
Security
- Never expose Chargebee API keys in client-side code.
- Call Chargebee REST APIs only from secure backend services.

Step 1: Detect entitlement-gated access
When a user tries to access a gated feature (for example, Advanced Analytics), your application should first check whether the feature is enabled for that user.
- If the feature is enabled, continue as normal.
- If the feature is not enabled, start the Growth offer flow.
This check typically runs when the user opens a gated screen, invokes a gated action, or when a permission check fails.
Step 2: Fetch the personalized offer
Fetch a personalized offer from Chargebee to see whether the user is eligible for an upgrade. Include the customer and subscription identifiers and any custom fields that are used in your Growth audience rules (for example, entitlement flags).
Call the Personalized Offers API from your backend:
curl  https://YOUR_CHARGEBEE_SUBDOMAIN.grow.chargebee.com/api/v2/personalized_offers \
     -u YOUR_CHARGEBEE_API_KEY:\
     --header 'Content-Type: application/json;charset=UTF-8' \
     --data '{
     "customer_id": "CUSTOMER_ID",
     "subscription_id": "SUBSCRIPTION_ID",
     "custom": {
       "has_advanced_analytics": false
     }
}'
If the subscriber matches one or more configured plays in Growth, Chargebee returns the offer corresponding to the play of highest priority. Example response:
{
  "personalized_offers": [
    {
      "id": "vdyjO2qlLD_715653d4",
      "offer_id": "vdyjO2qlLD",
      "content": {
        "title": "<div class=\"slate-p\">Unlock Advanced Analytics</div>",
        "description": "<div class=\"slate-p\">Get advanced dashboards, deeper insights, and custom reports.</div>"
      },
      "options": [
        {
          "id": "6cd5280e",
          "label": "Unlock now",
          "processing_type": "url_redirect",
          "redirect_url": "https://app.example.com/upgrade/analytics"
        }
      ]
    }
  ],
  "expires_at": 1732790400
}
Notice that the response includes a processing_type of url_redirect and a redirect_url. That means the offer is configured for fulfillment by your application, typically by redirecting the user to the redirect_url after they accept the offer.
When no offer is returned
If the response has an empty personalized_offers list, do not show an upgrade prompt. An empty response means the user isn't eligible (for example, the request parameters don't match any active plays, or the offer was already accepted or dismissed).
Ensure fields are mapped
An empty response from the Personalized Offers API may also happen if one or more of the parameters provided have not been mapped in Growth. Make sure to map fields in Growth before using them in API requests.
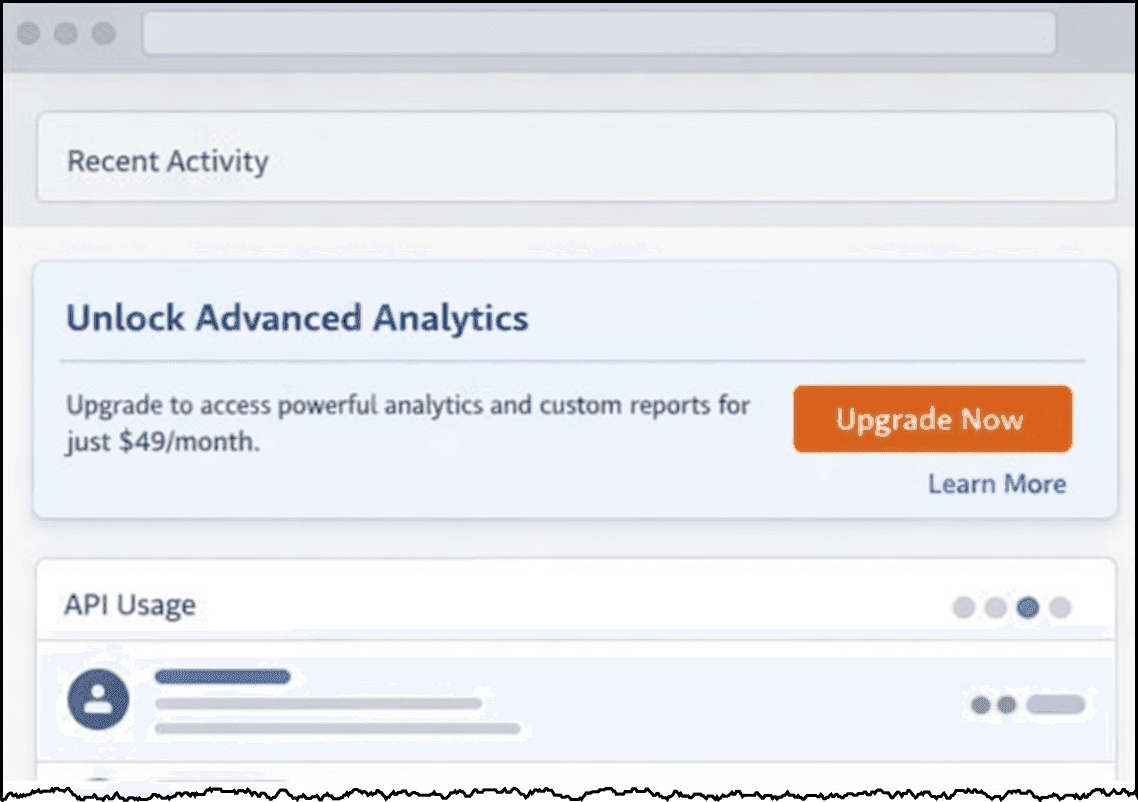
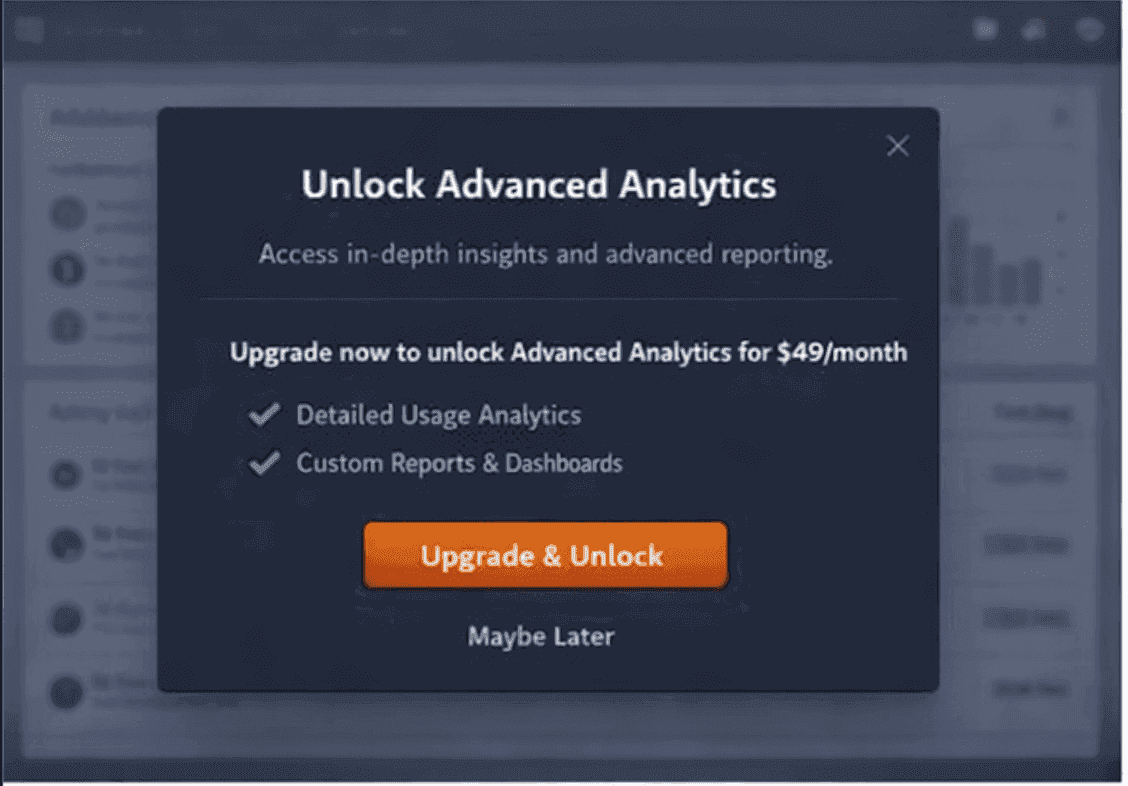
Step 3: Render the in-product upgrade prompt
If a personalized offer is returned, use the offer content to show an upgrade prompt inside your application. Depending on how prominent you want the message, you can use one of these UI patterns:
- A banner at the top of the dashboard
- A modal
- An inline callout near the gated feature or upgrade area
Use the offer content as follows to render the upgrade prompt:
- Title →
content.title - Description →
content.description - CTA label →
options[0].label
This ensures that the offer is displayed to the user dynamically based on the current configuration in Chargebee Growth.
Here are some examples of how to render the upgrade prompt:
Step 4: Track offer interactions
To measure engagement in Growth, record the following offer events:
- Record a
viewedevent each time the offer is displayed. - Record a
dismissedevent when the user closes or ignores the offer (for example, "Maybe later").
Send these events from your backend after the corresponding UI action using the Offer Events API with the personalized_offer_id from the Personalized Offers response:
curl  https://YOUR_CHARGEBEE_SUBDOMAIN.grow.chargebee.com/api/v2/offer_events \
     -u YOUR_CHARGEBEE_API_KEY:\
     --header 'Content-Type: application/json;charset=UTF-8' \
     --data '{
     "type": "viewed",
     "personalized_offer_id": "vdyjO2qlLD_715653d4"
}'
These events are for reporting; the dismissed event also affects offer cooldown. They do not affect fulfillment behavior.
Step 5: Create offer fulfillment on CTA click
When the user selects the acceptance CTA ("Unlock now"), call your backend to create an offer fulfillment. Use the Offer Fulfillments API with the personalized_offer_id and option_id from the offer returned in Step 2.
curl  https://YOUR_CHARGEBEE_SUBDOMAIN.grow.chargebee.com/api/v2/offer_fulfillments \
     -u YOUR_CHARGEBEE_API_KEY:\
     --header 'Content-Type: application/json;charset=UTF-8' \
     --data '{
     "personalized_offer_id": "vdyjO2qlLD_715653d4",
     "option_id": "6cd5280e"
}'
The API returns a response like the following:
{
  "offer_fulfillment": {
    "id": "507c340b",
    "personalized_offer_id": "vdyjO2qlLD_715653d4",
    "option_id": "6cd5280e",
    "processing_type": "url_redirect",
    "status": "in_progress"
  }
}
This records acceptance and sets the fulfillment to in_progress.
Best practice
Store the offer_fulfillment.id and map it to the customer_id and subscription_id. You will use it later to update the fulfillment status.
Step 6: Redirect and run your entitlement or billing logic
After creating the fulfillment, redirect the user to the URL returned in the personalized offer response to run your own upgrade logic. For example:
- Collect payment from the customer and update the subscription.
- Enable feature flags or entitlements.
- Provision access to the feature.
This step is entirely under your control and can involve multiple systems.
Step 7: Update the offer fulfillment status
When your provisioning or checkout has finished successfully, update the offer fulfillment in Chargebee:
- Set status to
completedwhen the user has successfully received the upgrade. - Set status to
failedwhen provisioning or payment fails. Ifstatusisfailed, you must include afailure_reasonto explain why the fulfillment did not succeed.
Important
If the fulfillment is not updated within 7 days of creation, Chargebee marks it as failed with the error.code external_fulfillment_failed.
Note
Avoid updating the fulfillment status prematurely. Update the fulfillment to completed only after you have confirmed that the upgrade has been fully provisioned. For example, if your entitlement system completes work asynchronously (queues, background jobs), update the fulfillment status to completed when that work finishes, not when you queue it.
Use the Update an Offer Fulfillment API:
curl  https://YOUR_CHARGEBEE_SUBDOMAIN.grow.chargebee.com/api/v2/offer_fulfillments/507c340b \
     -u YOUR_CHARGEBEE_API_KEY:\
     -X POST \
     --header 'Content-Type: application/json;charset=UTF-8' \
     --data '{
     "status": "completed"
}'
The API returns a response like the following:
{
  "offer_fulfillment": {
    "id": "507c340b",
    "personalized_offer_id": "vdyjO2qlLD_715653d4",
    "option_id": "6cd5280e",
    "processing_type": "url_redirect",
    "status": "completed"
  }
}
Error handling
Multiple CTA clicks by the same user
As a best practice, disable the offer acceptance CTA button in the UI immediately after it's clicked. If there's a duplicate click and you request a new offer fulfillment, the API returns an error because multiple fulfillments aren't allowed for the same personalized_offer_id.
Handle the error as follows:
- Fetch the
offer_fulfillment.idsaved earlier in Step 5. - Retrieve the fulfillment status and act on its current status.
- If
offer_fulfillment.statusiscompleted, inform the user that the offer has already been fulfilled. - If
offer_fulfillment.statusisfailed, check theoffer_fulfillment.error.codeto determine the reason.
User abandons after accepting
If the user closes the tab or leaves before your flow finishes, the fulfillment can stay in in_progress. Run a reconciliation job that periodically checks in_progress fulfillments and marks them failed or retries provisioning according to your business rules. If the offer fulfillment is not marked as completed or failed within 7 days, Chargebee will mark it as failed with the error.code external_fulfillment_failed.
Provisioning failures
You may encounter provisioning failures due to internal errors, downstream failures, or payment failures in your system. When you know the upgrade did not complete, update the fulfillment status to failed and include a failure_reason.
Same offer accepted by different users
Calling the Offer Fulfillments API succeeds only once for the same base offer_id when the offer originates from the same Play.
If you're a B2B business with multiple users per subscription, the same offer from the same Play can be seen by different signed-in users at the same time. In this case, after the first user accepts the offer, the Offer Fulfillments API returns the following error for subsequent users:
Fulfillment is already in progress/completed. Retrieve the fulfillment to know the latest status.
Show a message to the user such as, "This offer has already been accepted."
Summary
In this tutorial, you learned how to:
- Detect gated feature access and fetch a personalized offer from Chargebee.
- Use the offer content to render an in-product upgrade prompt.
- Record offer events (viewed, dismissed) for reporting.
- Create an offer fulfillment when the user accepts the offer.
- Run your own entitlement or checkout logic.
- Update the offer fulfillment status to
completedorfailedafter provisioning. - Handle duplicate clicks, abandonment, provisioning failures, and B2B scenarios where the same offer is accepted by different users.
Appendix
Details
Required setup in Chargebee
This section describes the setup required in both Chargebee Billing and Chargebee Growth to enable entitlement-gated offers to be returned by Chargebee APIs. The steps below configure an expansion offer that targets subscribers without the gated feature, shows copy such as "Unlock Advanced Analytics", and uses URL redirect for fulfillment by your application.
Administrators or growth marketers with access to Chargebee Growth and Billing typically handle this configuration.
1. Create and map custom fields in Growth
Important
If fields passed in the API request are not mapped in Growth, they are ignored.
- In Growth, navigate to Settings > Setup.
- Under Field mappings, select Map fields.
- Scroll down to Field Mapping and select the button View & map passed data. A modal appears.
- On the modal, under Custom Chargebee Retention fields, select the +add a new field button and enter the following details:
- Field Label: "Has advanced analytics".
- Data Type: "Boolean".
- JS Name: "
custom.has_advanced_analytics".
- Select the Save changes button. The modal closes.
- Scroll down and fill in the form above the Add custom field button:
- Name: "Has advanced analytics".
- Type: "Boolean".
- Source Field dropdown: Under API & Chargebee.js, select Has advanced analytics.
- Select the Add custom field button.
- Repeat for each custom field, then select the Save changes button.
2. Create an audience in Growth
- In Growth, navigate to People > Audiences.
- Create a new audience with the following rule (or rules that match your use case):
- Property: "Has advanced analytics" (or the label for your mapped field).
- Operator: "Is".
- Value: "false".
- Select the Done button to save the audience.
3. Create the offer in Growth
Define the entitlement-gated offer and how CTAs are handled.
- In Growth, navigate to Offers > In-app.
- Create a new offer with the following configuration:
- Offer objective: Expansion.
- Offer category: Subscription change.
- Under Button > Settings:
- Set Button processing to URL redirect.
- Set Button action > Choose button offer subcategory to the appropriate value. In this example, you may select Upgrade or Addon. This is for reporting purposes only and does not affect offer fulfillment.
- Select the < button and navigate to Button > Accept step.
- Set the Success action to Link.
- Set Button action > Link destination to URL and in the text box, enter the URL you will redirect the user to after they accept the offer.
- Select Done and then Publish now to save the offer.
- In the right pane, set the offer title, description, and button labels (for example, "Unlock Advanced Analytics" and "Unlock now").
- Select Done and then Publish now to save the offer.
4. Create a play in Growth
- In Growth, navigate to Plays > Expansion (or Acquisition, as appropriate).
- Create a new play.
- Select the in-app offer play type.
- Select the audience created in the previous step.
- For Trigger, select Any page load.
- For Action, select Show offer.
- Select the offer created in the previous step.
- Set the play priority.
- Select the Publish Play button.
We're always happy to help you with any questions you might have! Click here to reach out to us.