Configuring Account Statement
Overview
Account Statement in Receivables provides an overview of the customer's outstanding invoices and transactions for a specific period. By generating an account statement, you can view open invoices, credit notes, payments, and financial information for a customer. Receivables gives you the option to generate an account statement for a customer in PDF or Excel format for a specific time period. The account statement configuration allows you to manage the data columns—including rearranging columns—and configure additional properties of the statement, such as document type, date range, and more.
In Receivables, merchants/users can send account statements to customers in the following ways:
- Via email reminder
- Via self-serve client portal
Via Email Reminder
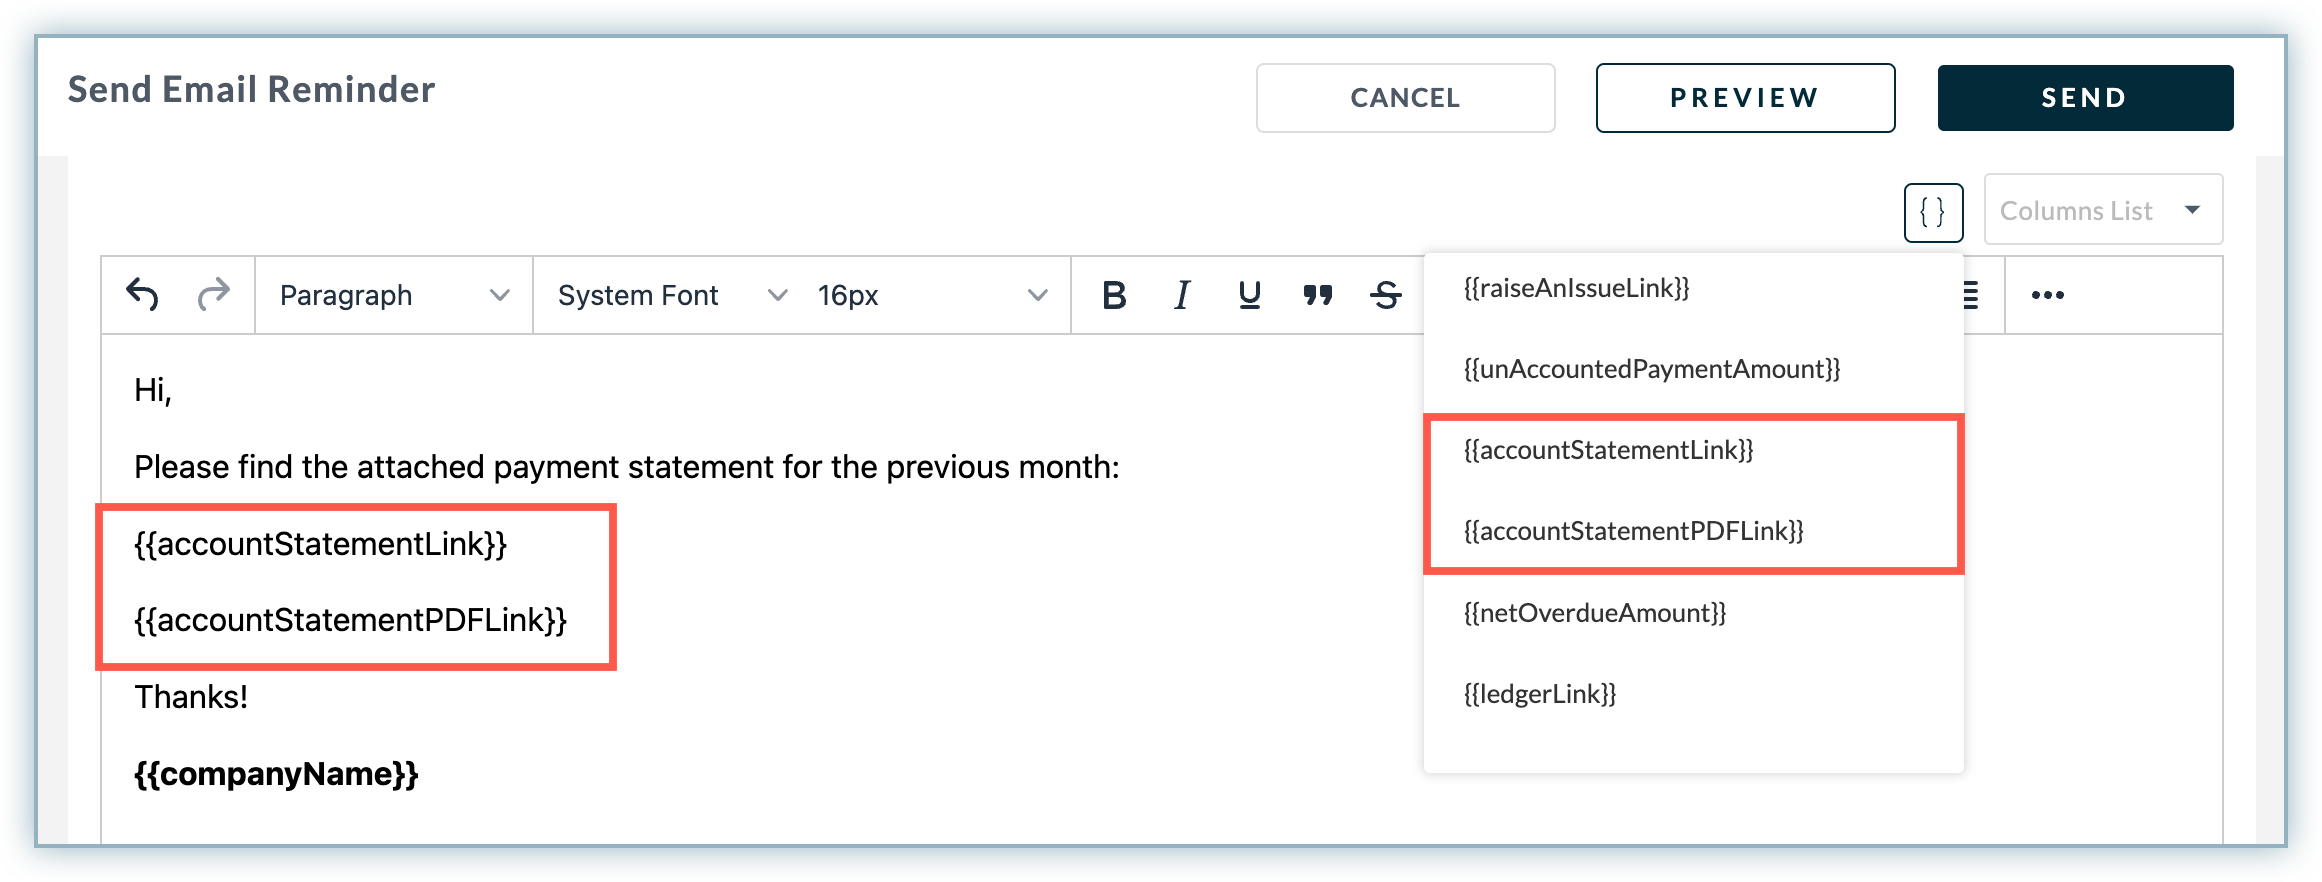
Receivables provides predefined template variables to generate the account statement directly from email reminders. Use the template variables accountStatementLink and accountStatementPDFLink in the email template to generate Excel/CSV and PDF-based statements. You can also set the date range of the account statement using the account statement configurations.
Via Self-Serve Client Portal
A self-serve client portal comes with various features and components that allow customers to view and manage their individual invoices and account receivables data. Your customers can download their account statements (Excel/CSV or PDF) for a specific time period. To enable this feature, follow these steps:
-
Click Settings > Configurations > Client Portal Settings.
-
In the Client Portal Settings page, enable the Allow Account Statement Download option to allow your customers to download the account statement. For more information, see client portal settings.
Configuring Account Statement Property
The account statement properties allow customers to view additional details in their account statement. You can configure the following options to make the information available on the account statement.
- Show Total: Enable this option to show the total of Amount and Balance columns in the account statement.
- Show Only Customer Currency: Enable this option to show invoices/transactions in customer's currency only. If there are invoices in multiple currency, then enabling this option will show invoices that have customer's default currency.
To configure the account statement property, follow these steps:
- Login to your Receivables account.
- Click Settings > Configuration > Account Statement.
- Under the Configuration section, toggle on/off the account statement properties.

Managing Data columns of Account Statement
For a downloadable account statement (Excel/CSV or PDF), you can insert, delete, and rearrange the columns as required.
You can perform the following operations to manage the data columns of account statement:
- Rearrange Columns: To rearrange the data columns of the account statement, click and drag the columns to a specific position. The other columns will automatically adjust their positions and appear in the account statement accordingly.
- Manage Columns: This allows you to manage and view the required columns in an account statement. This is beneficial if you want to keep track of a certain type of information or if you need to hide a specific column from the statement.
To manage the data column of the account statement, follow these steps:
- Login to Receivables.
- Click Settings > Configuration > Account Statement.
- On the Account Statement tab, in a specific account statement(Excel/CSV, or PDF) click Manage Columns. For the PDF statement, you can select maximum of seven columns due to the space constraint in PDF.
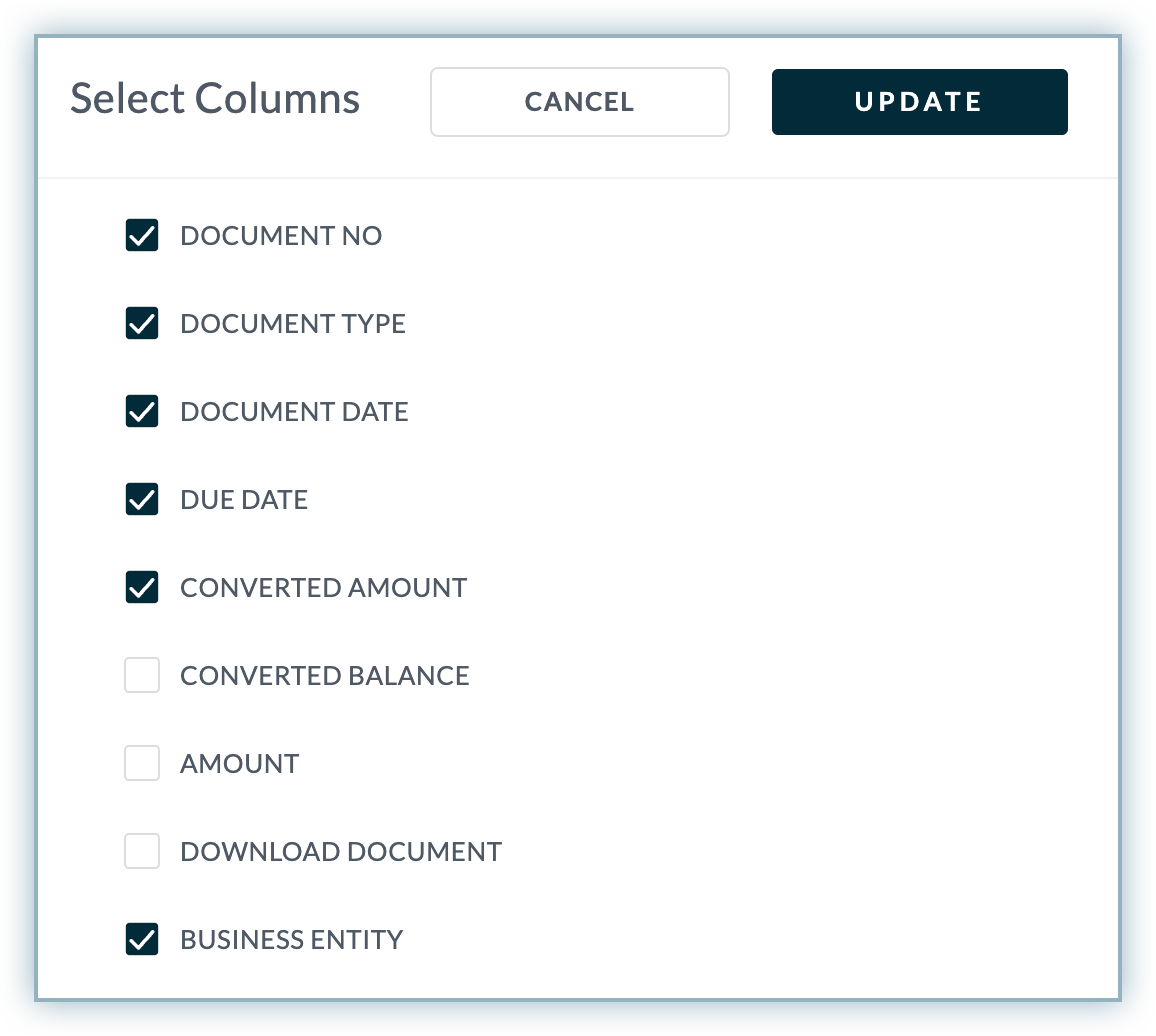
- In the Select Columns page, select the columns that you want to show or hide in the account statement.
- Click Update.
Configuring additional properties of Account Statement
An account statement can have additional columns such as document type, document status, and so on. With account statement configuration, you can configure the properties of additional data columns that are explicitly included in the account statement.
To configure the additional data properties for the account statement, follow these steps:
-
Click Settings > Configuration > Account Statement.
-
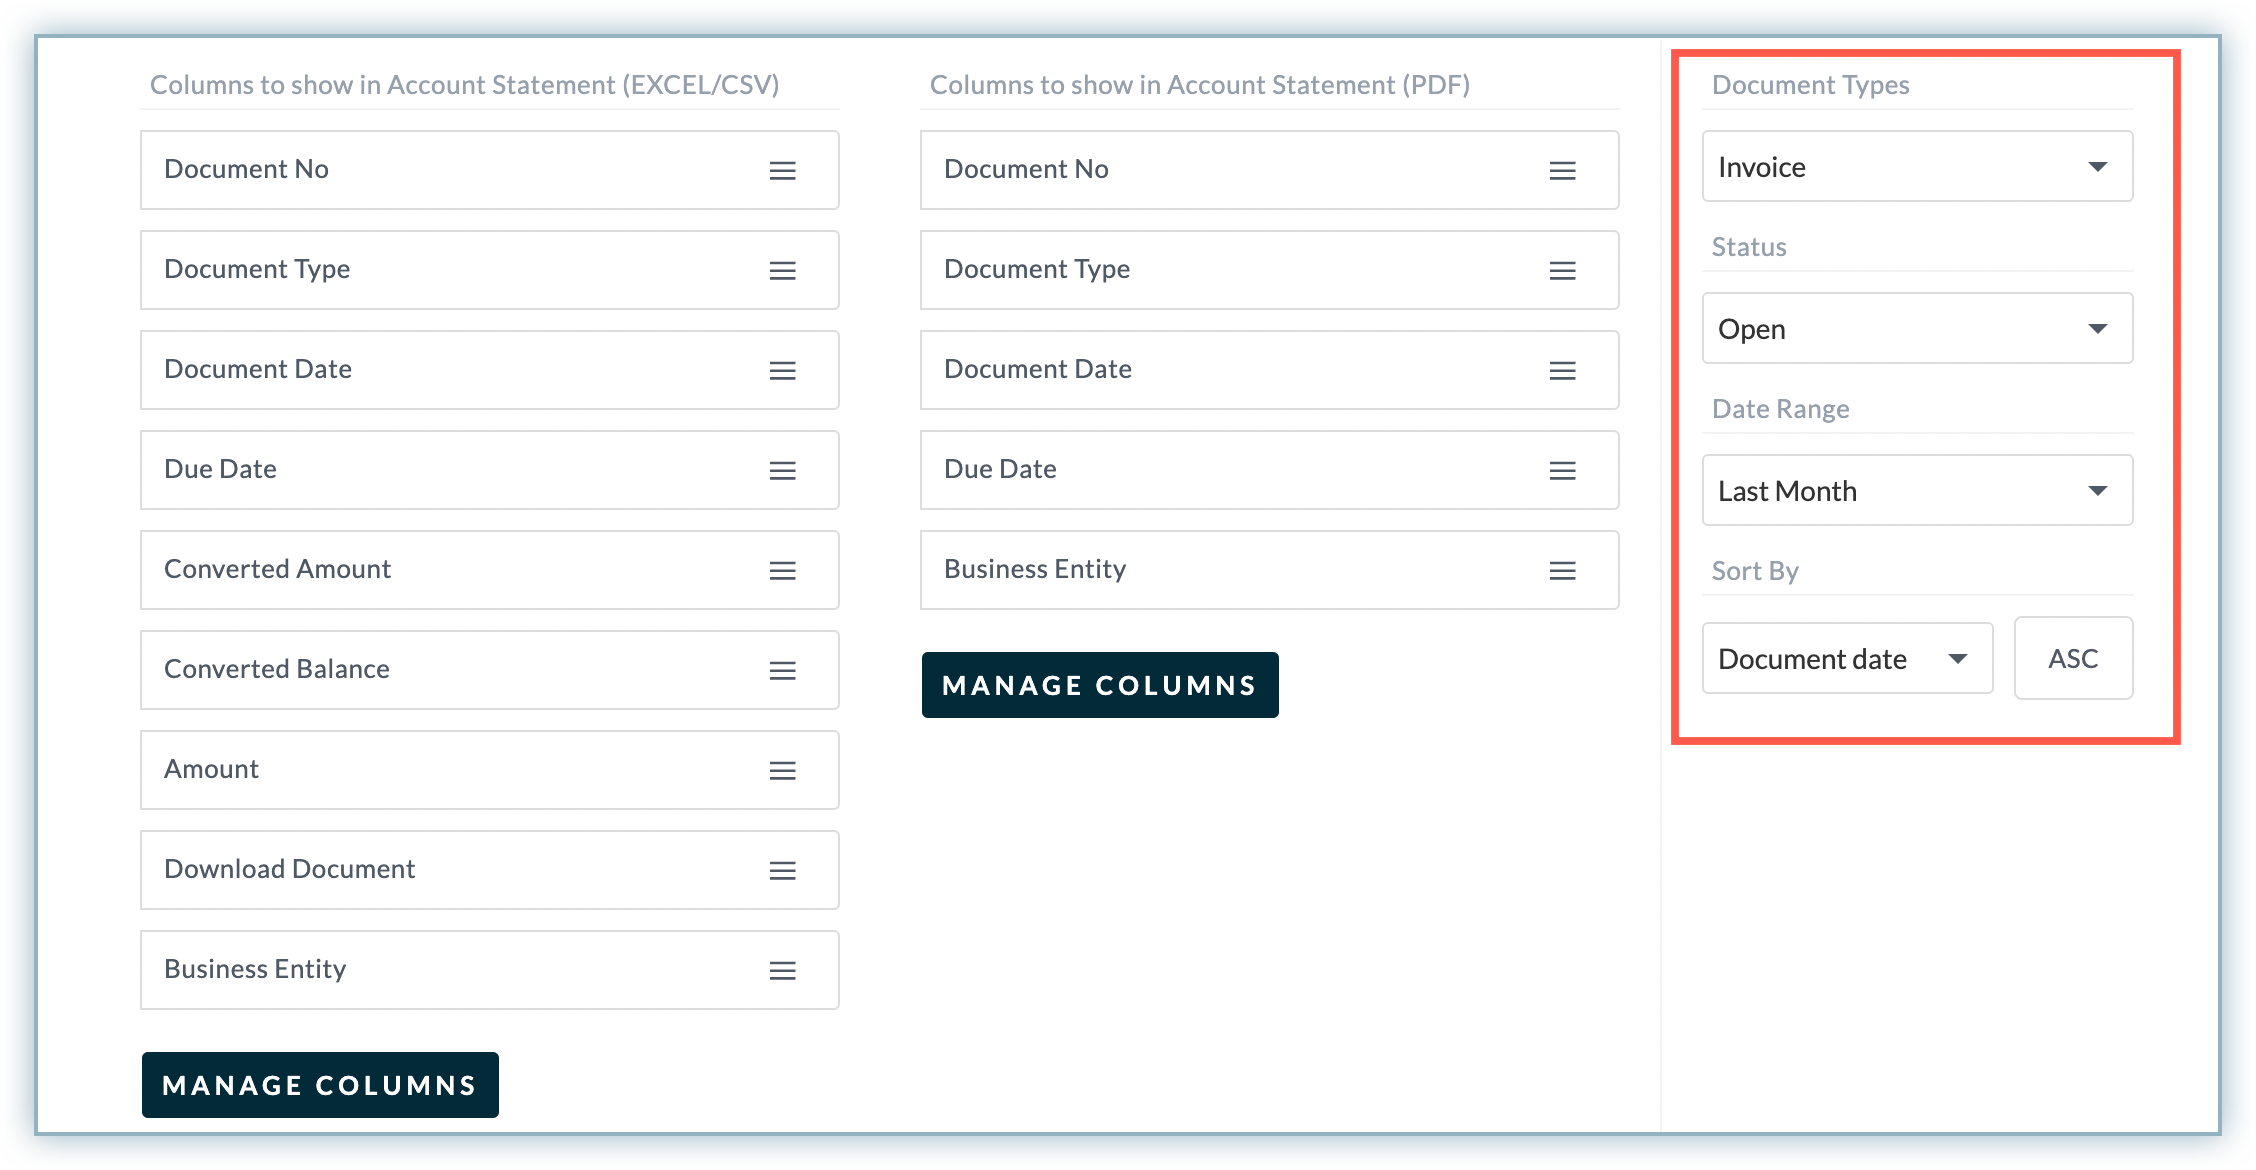
In the Account Statement tab, select the properties (in any order) and specify the details for it:
- Document Type: Select the checkboxes for document type that you want to show in the account statement. You can select the document type such invoice, debit note, credit note, and payments.
- Status: Select the status as open, closed, and all for the document type.
- Data Range: Select the date range based on which you want to display data in a particular document.
- Sort By: You can sort data for account statement based on specific criteria, such as document date, due date, amount, and balance.
The changes will be saved automatically after configuring the account statement properties.
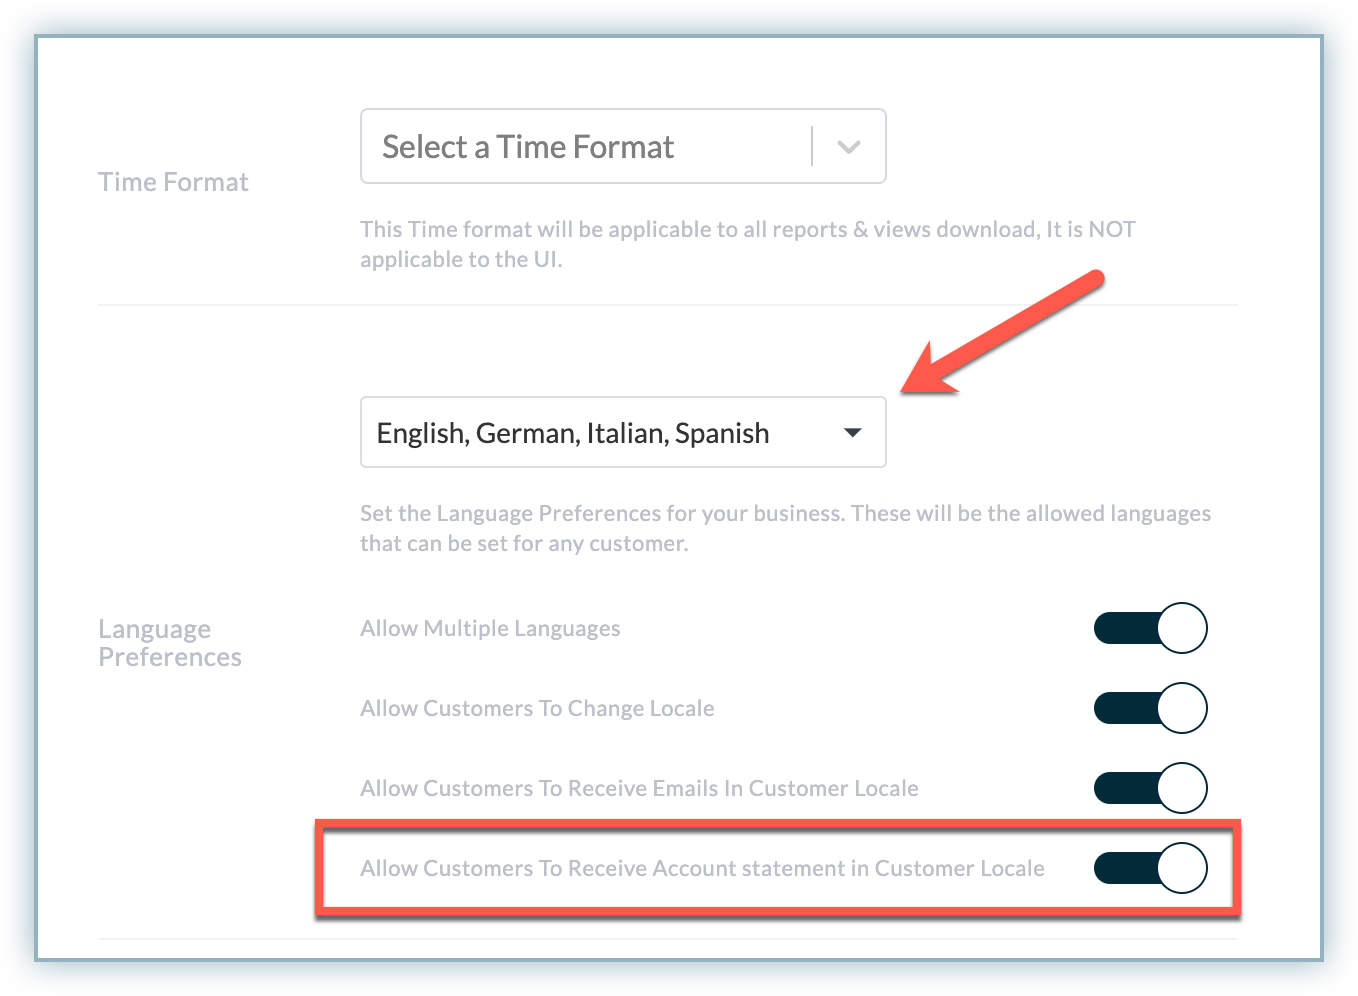
Multi-Lingual Account Statement
If multiple languages are enabled in your Receivables account, then you can send the Account Statements to your customers in multiple languages based on their preferred locale.
Before jumping onto different scenarios where you can use Multi Language, let us enable Multi-Locale for Account Statements:
Enabling Multi-Language for Account Statements
Follow the steps below:
-
Login to your Receivables account.
-
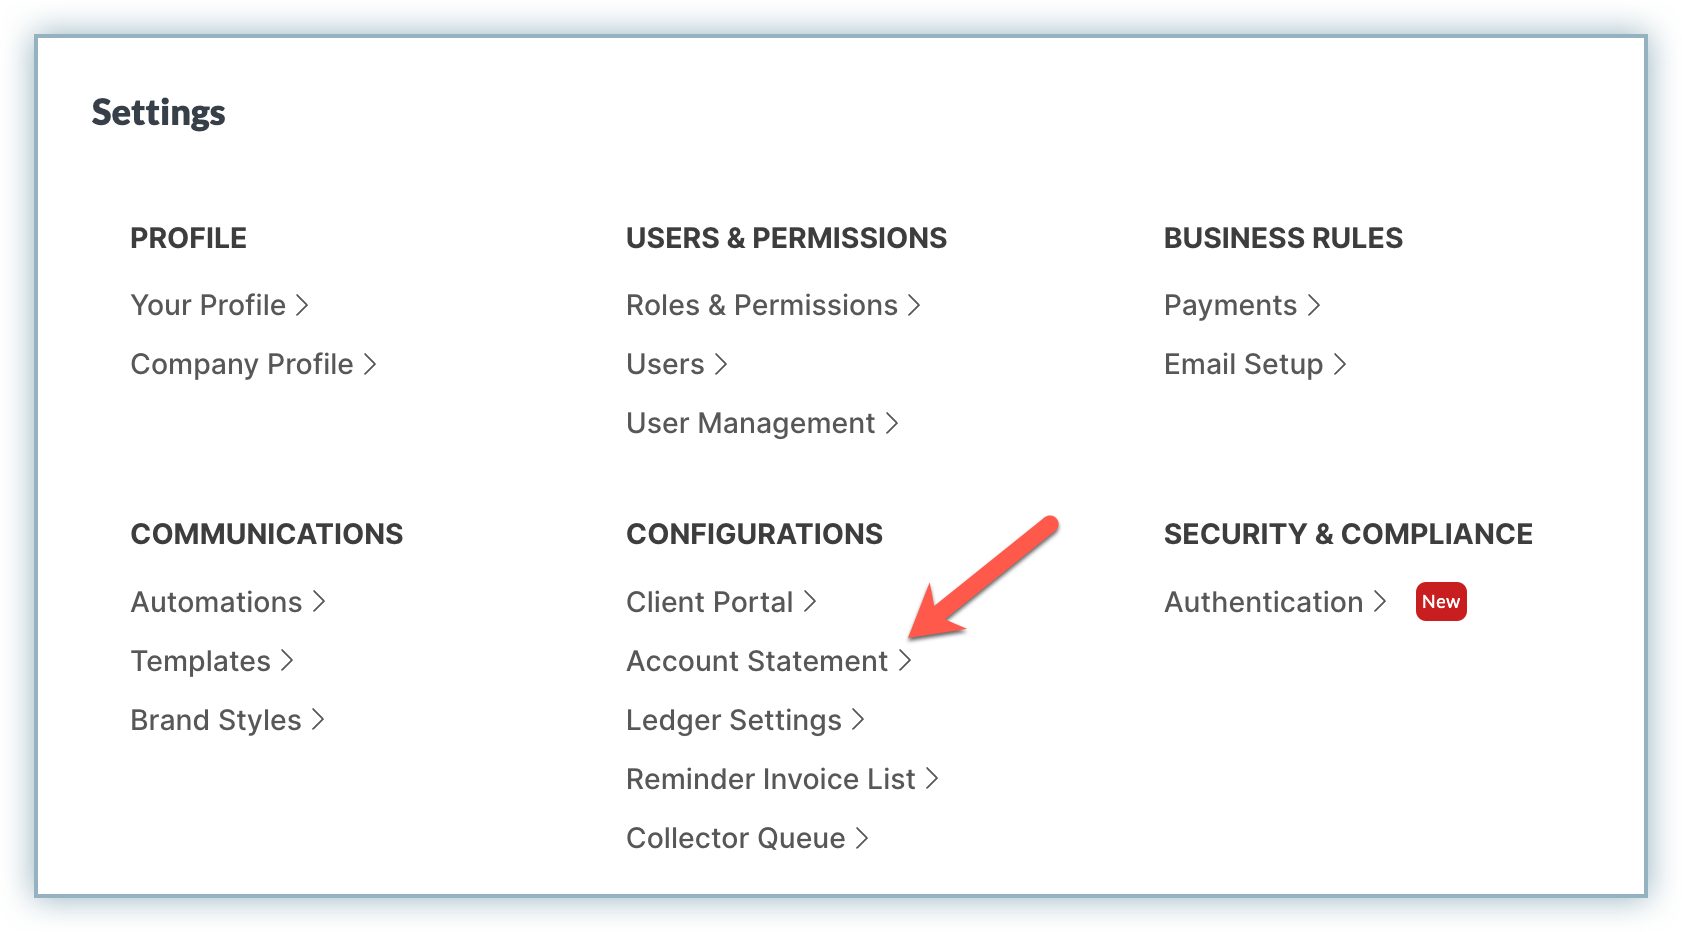
Go to Settings > Company Profile.

-
Enable the Allow Customers To Receive Account Statement in Customer Locale toggle.
-
Also, make sure you have selected the correct languages selected from the Language Preferences drop-down menu. These are the allowed languages that can be set for any customer.
Multi-Language Support in HTML Templates
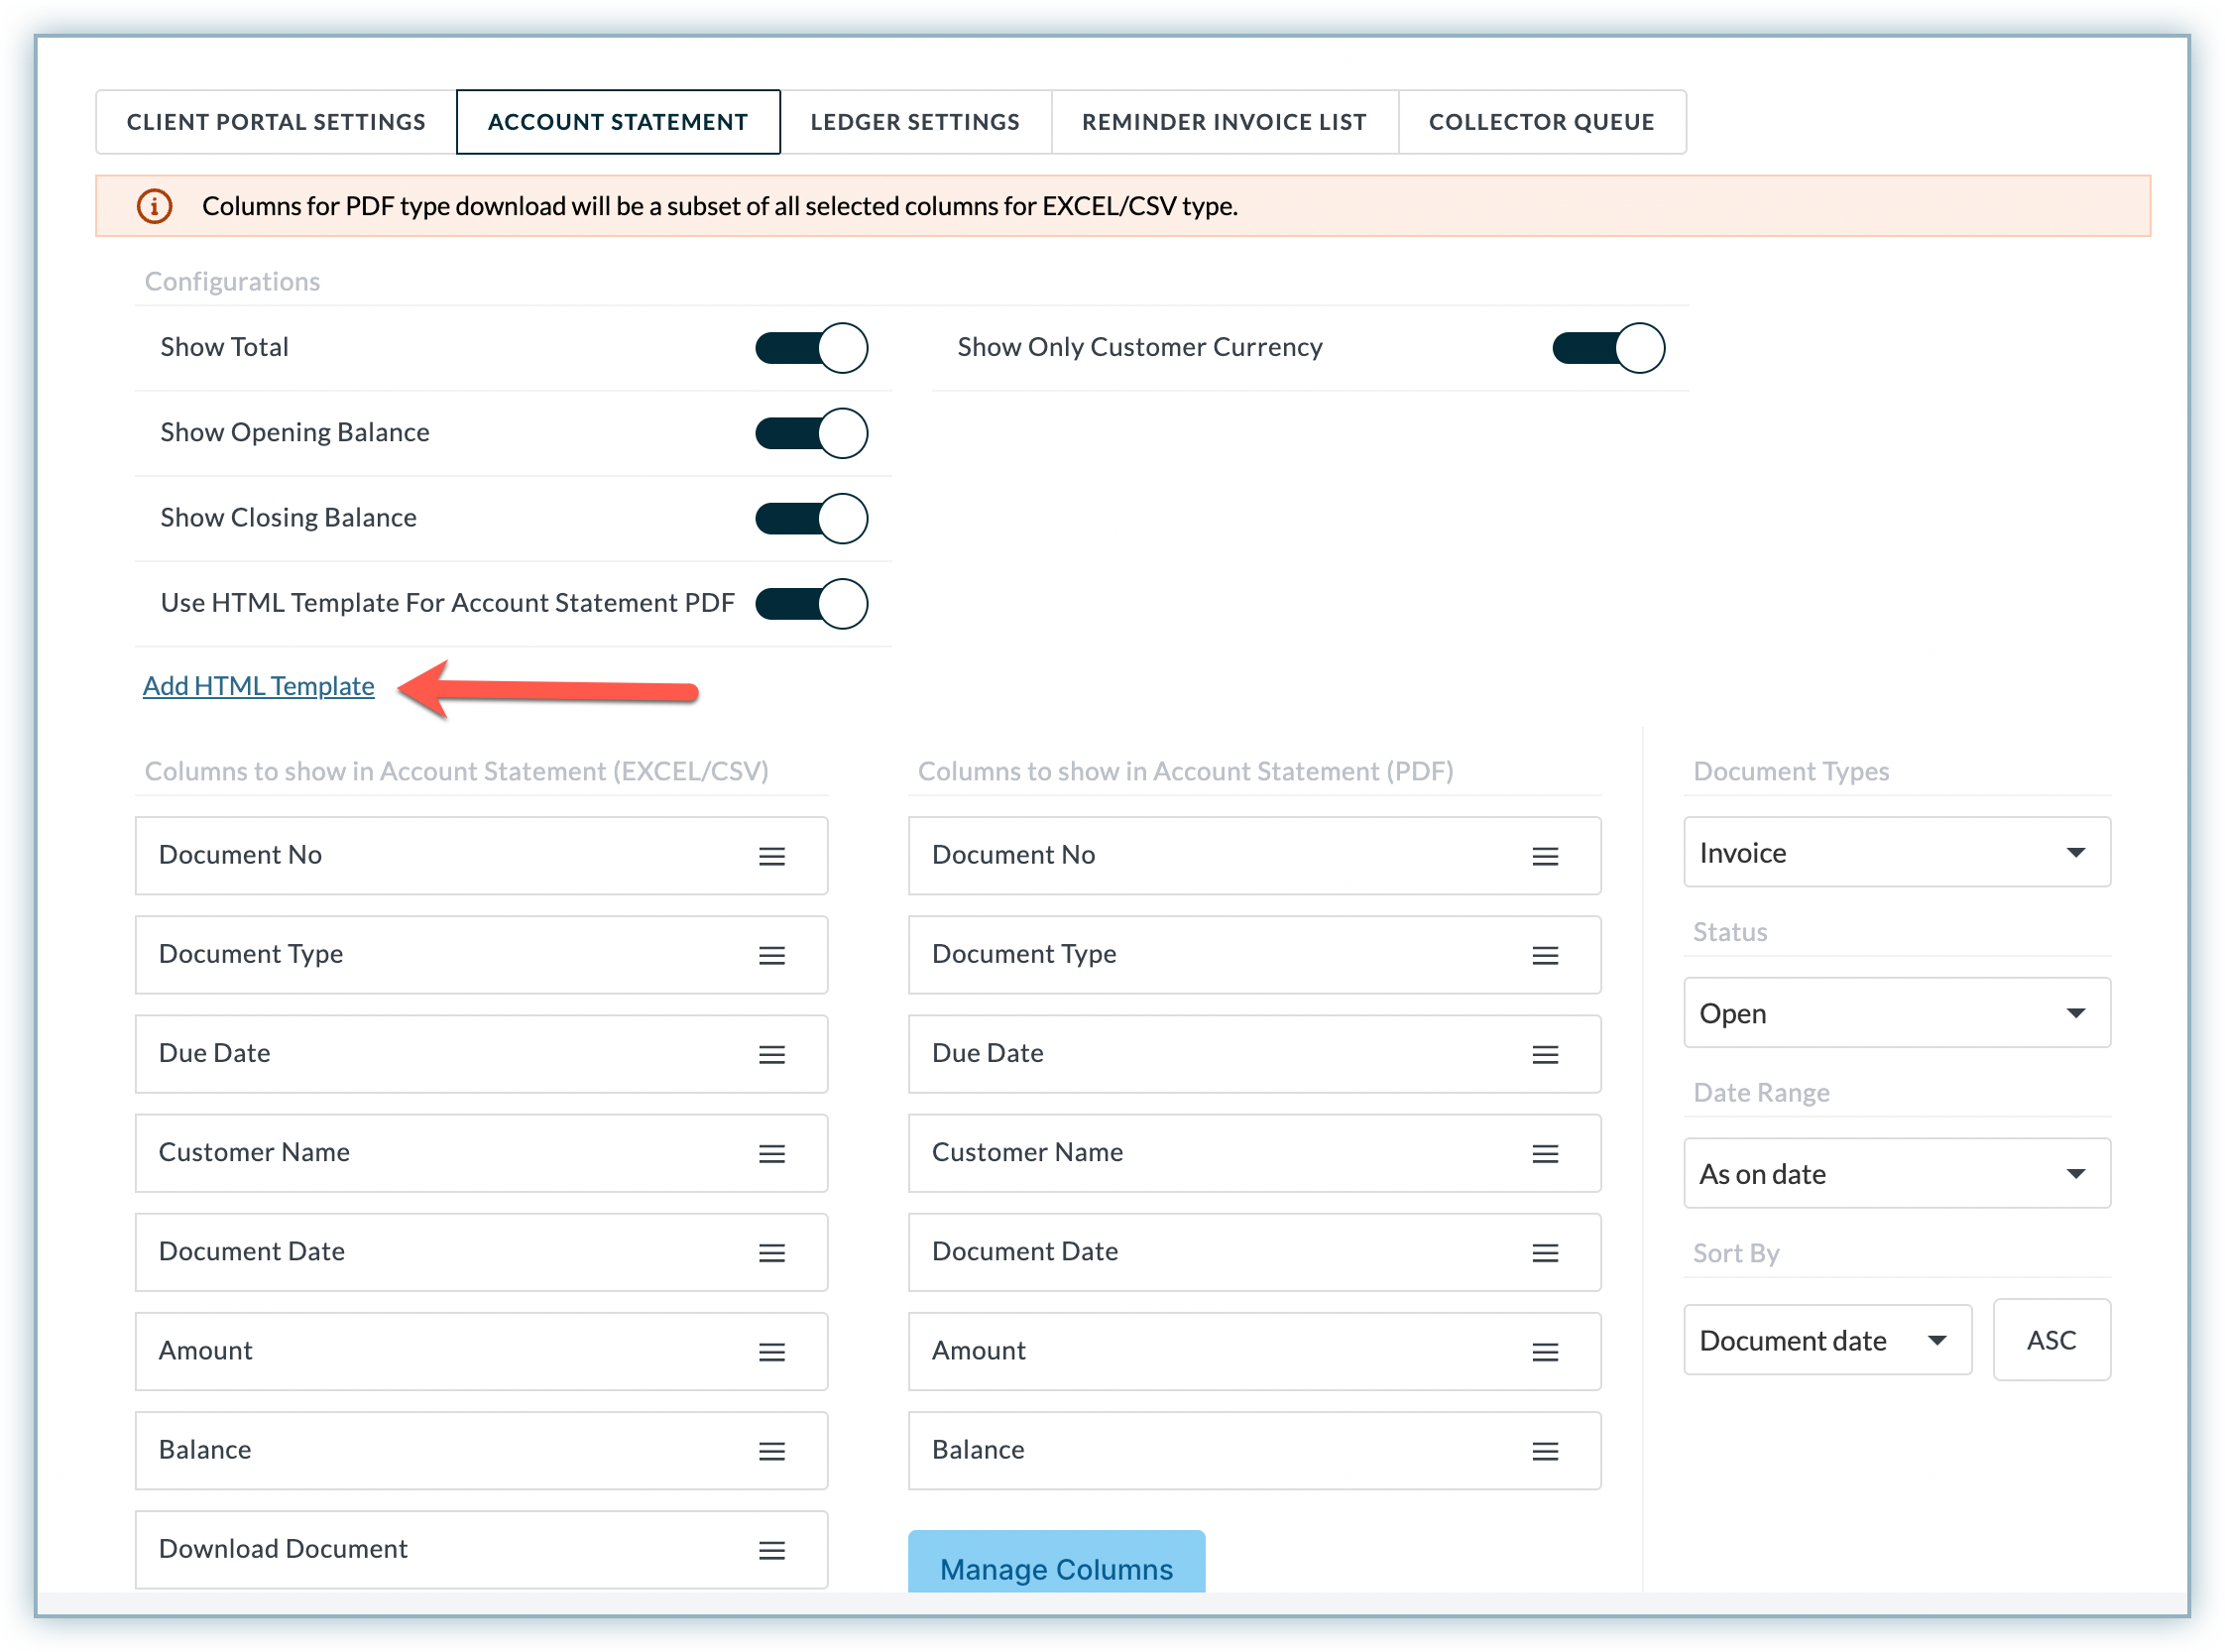
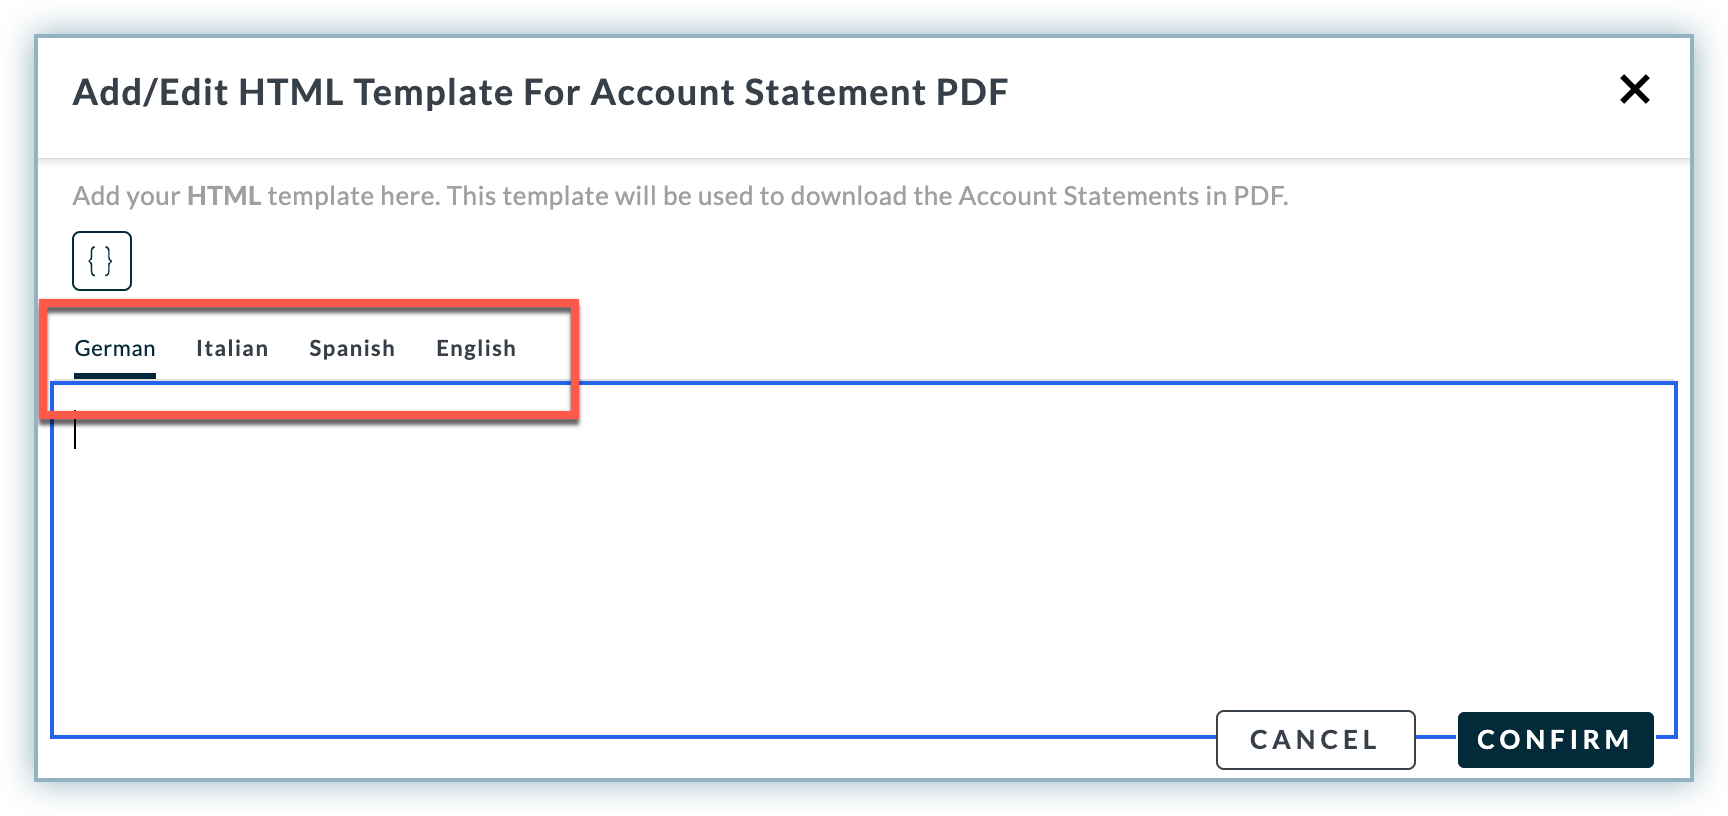
You can use customer-locale while editing an existing HTML account statement template or adding a new one. Let us see how and where you can use multi-locale for Account Statements:
-
Go to Settings > Account Statement.
-
Click Add HTML Template or Edit HTML Template. Make sure you have enabled the Use HTML Template for Account Statement PDF toggle.
-
The configured locales appear as tabs, and you can switch between them to edit the content.
Downloading Account Statement
You can choose to download Excel or PDF account statements in your customer locale either from the Customer View or the Customer Flyout.
Follow the steps below:
-
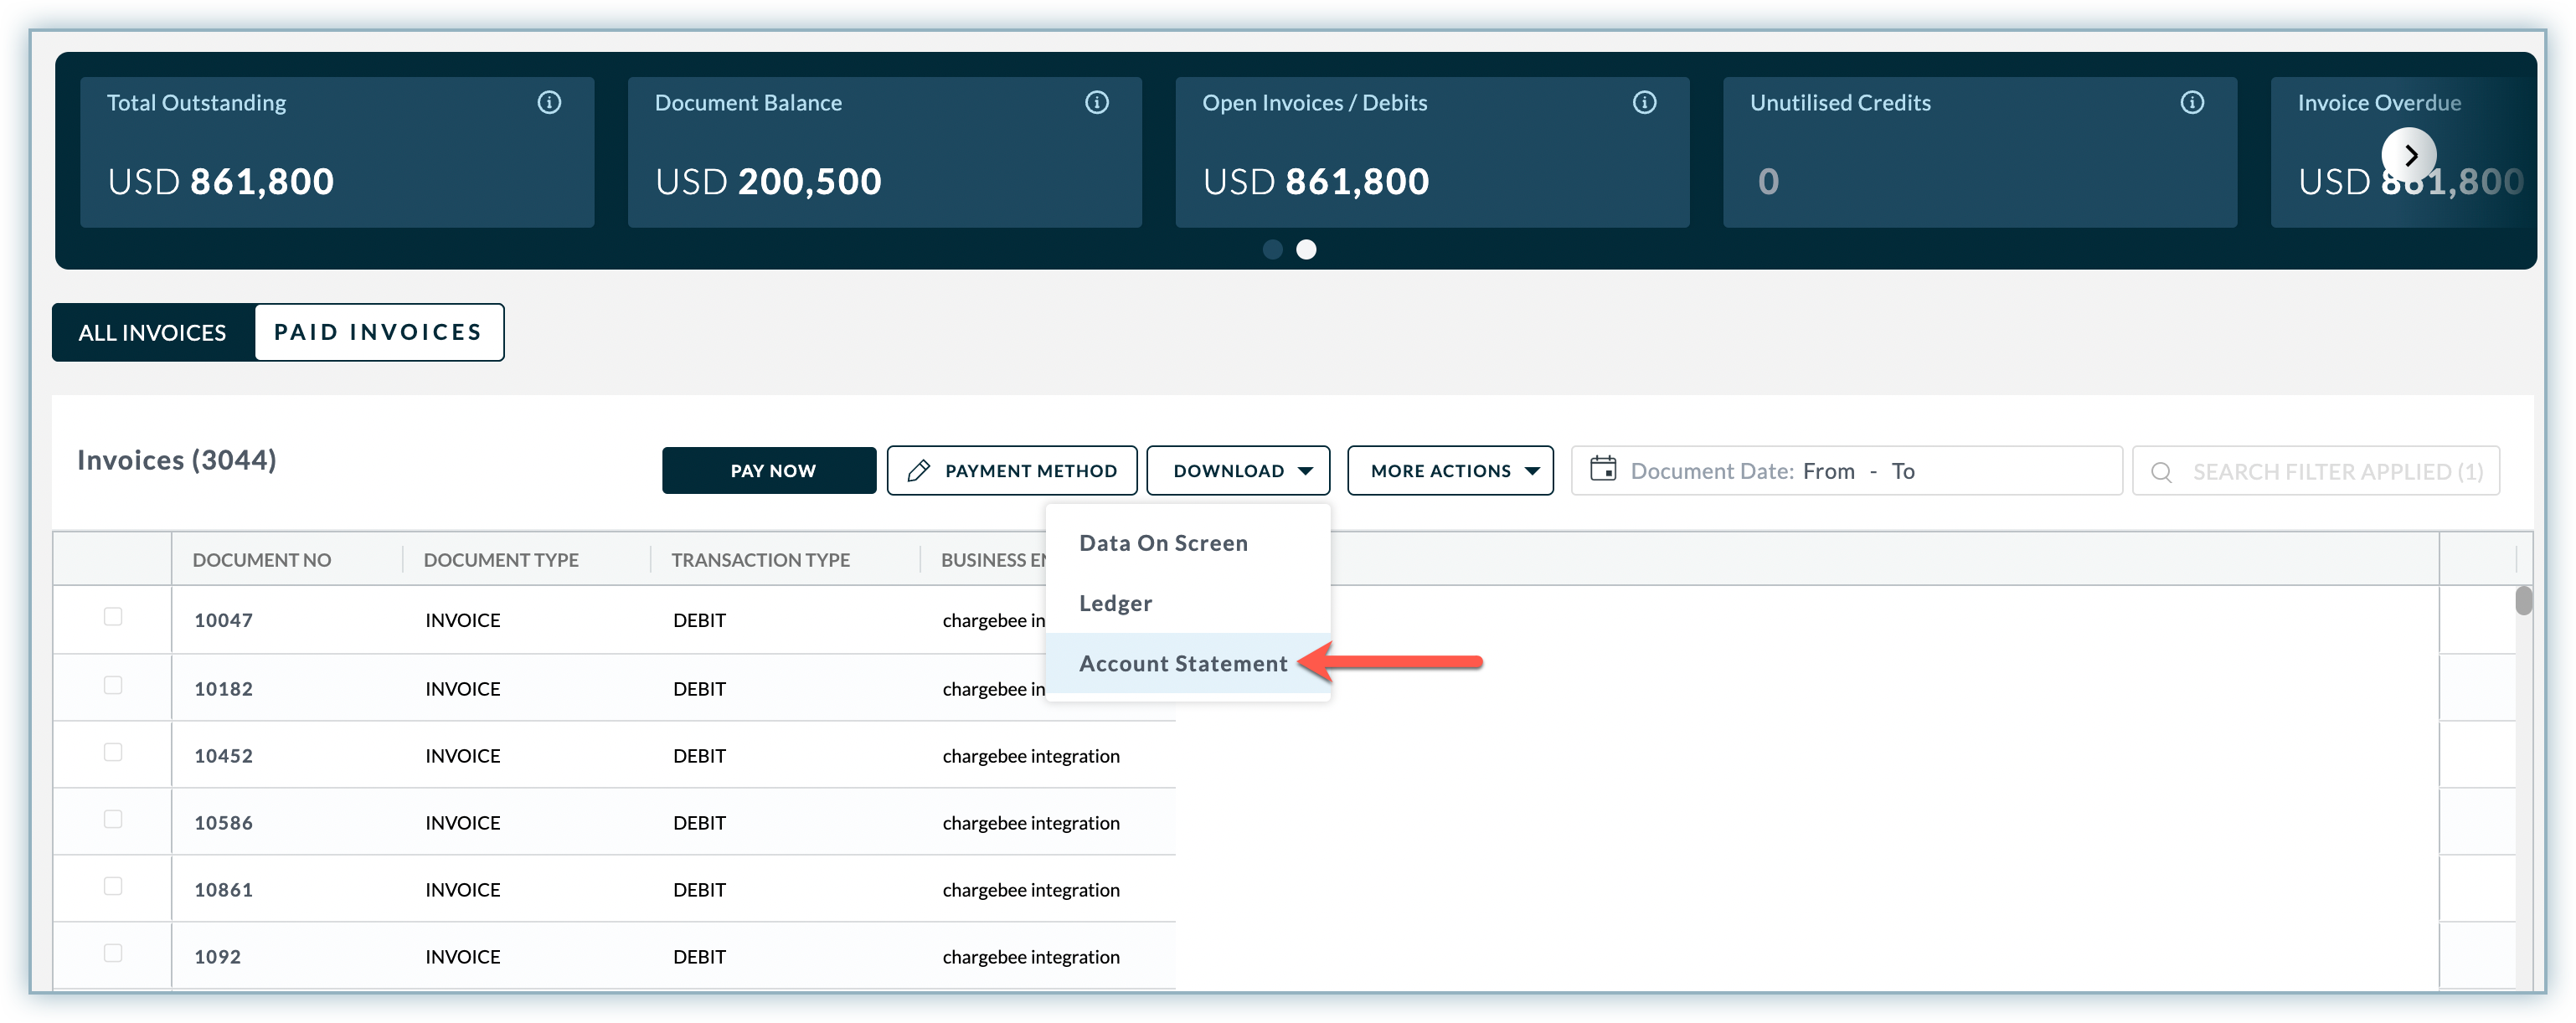
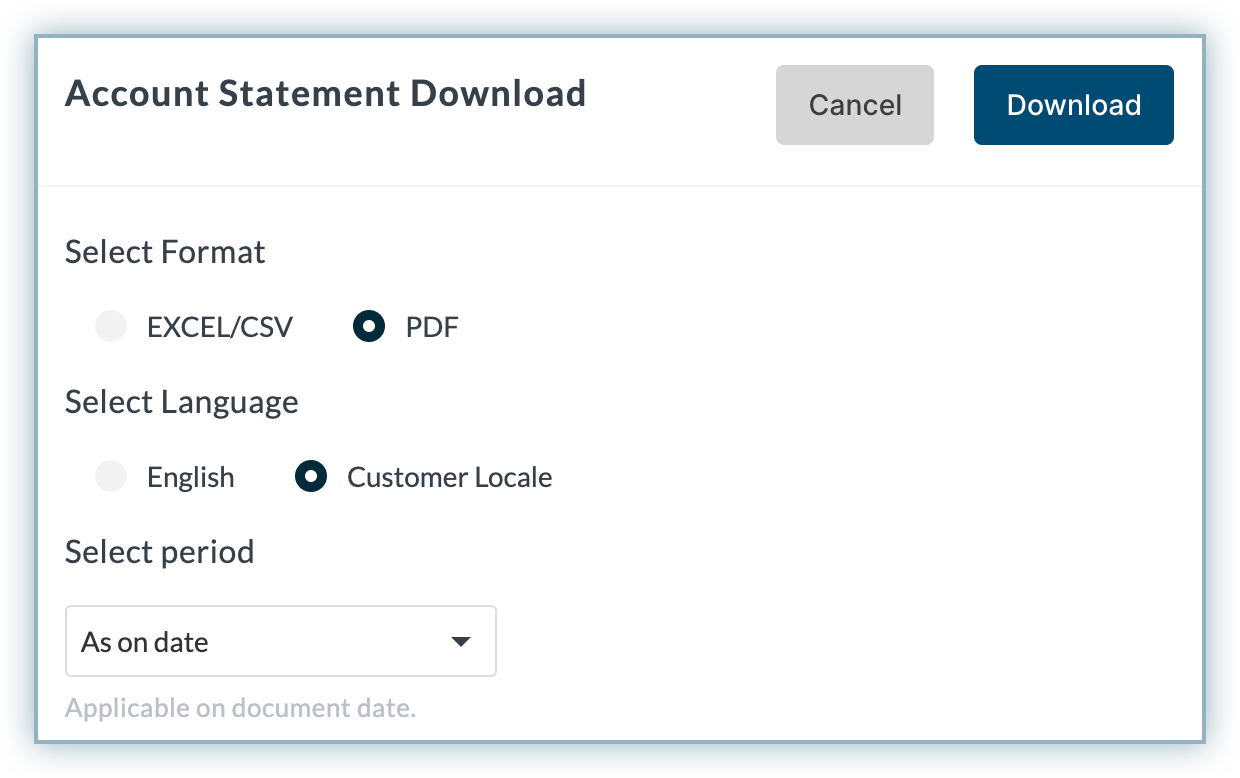
Go to Receivables View, expand the options for the desired customer and click Account Statement.
-
Select Customer Locale for Excel/CSV or PDF format.
-
Select the period and click Download.

-
Similarly, go back to the Customer View and click on the name of the desired customer.
-
In the customer flyout, click More Actions and then click Download Statement.
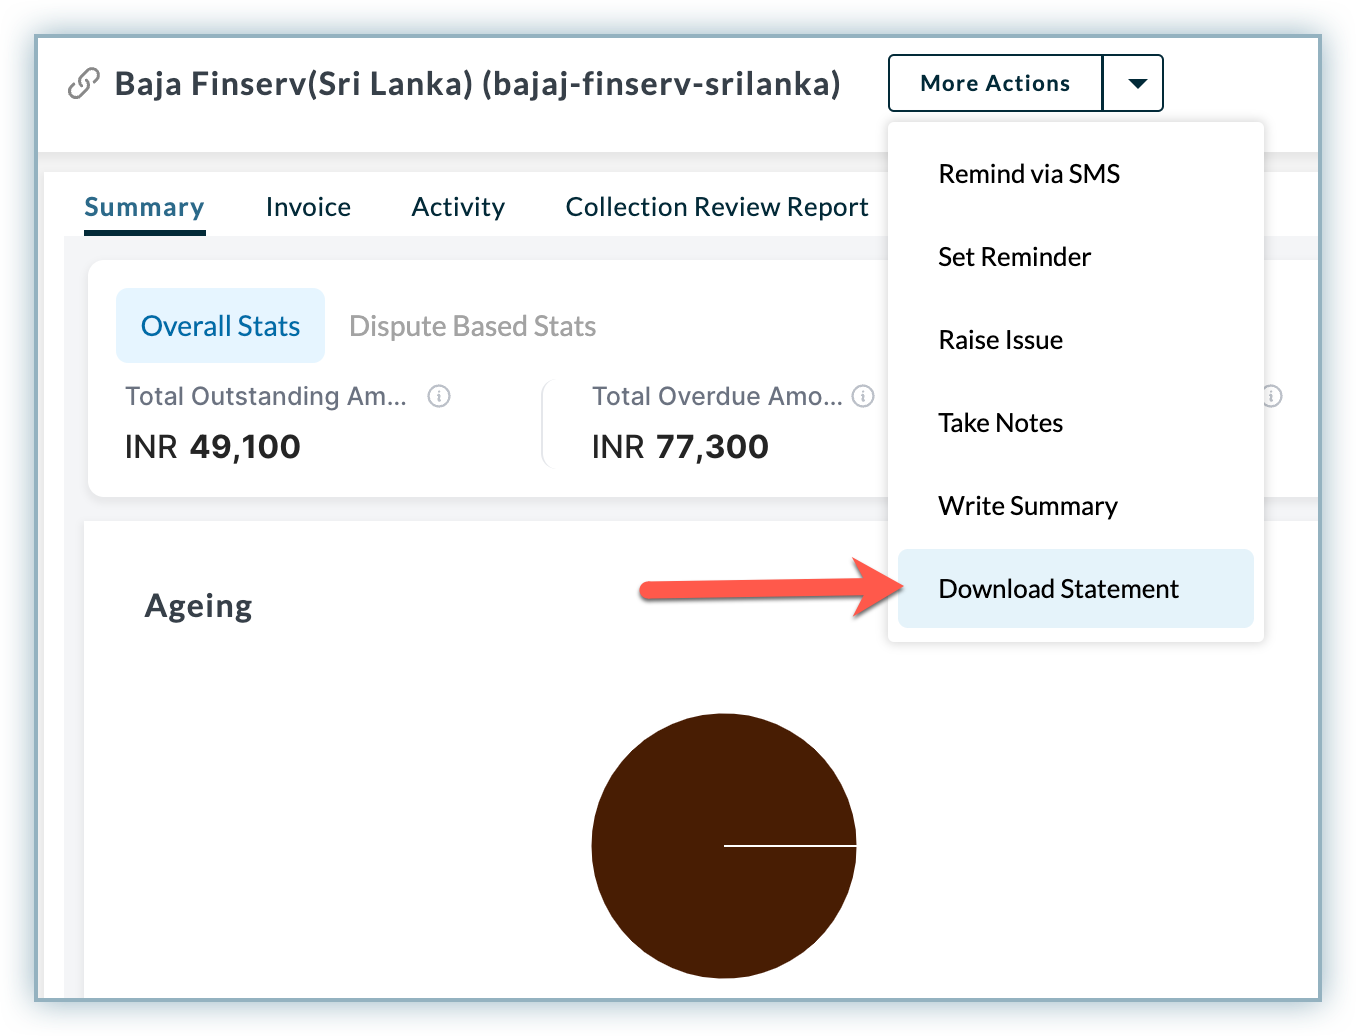
-
As shown earlier, a similar set of options appears to select Customer Locale and download the statement.
Multi-locale support for Automations
If you are setting up an automation cycle to periodically send Account Statements to your customers, you can customize these statements to be sent in each customer's preferred locale.
During this process, Receivables retrieves the customer's locale information, ensures it matches the language of the account statement, and if they align, sends the account statement via email in the customer's preferred language.
Was this article helpful?