Managing Customer Details
Overview
Chargebee Receivables simplifies the way you view your customer's data by providing a 360-degree view of their account receivables. It offers various functionalities to view consolidated data, take actions, and manage key details about a specific customer.
The customer details page in Receivables allows business teams and users to collaborate, communicate with the customer, and proactively manage the AR process for a customer in one place. It offers an intuitive dashboard where you can review all activities at the customer and transaction level, such as invoices, cases/issues, email reminders, and collection reports that intersect for one customer.
To open the customer details page, click the customer's name anywhere in the application.
The customer details page provides all the necessary information about your customer. It offers the following capabilities:
-
Customer Portfolio Summary: Helps you understand a customer's portfolio and get a quick overview of all collections/account receivables, payments, and transaction activities.
- Summary: Get an overview of customer data, including aging, net aging, notes, contacts, and more.
- Metrics Bar: View a consolidated report on collection activities such as total outstanding amount, overdue amount, unutilized credits, and more.
- Communication: See finance owners, collectors, and sales owners (if any) assigned to a customer and contacts. Displays the last five email interactions that a customer had with collectors or team members.
-
Collection Management: Provides an overview of all financial data, including invoice and transaction details for a customer.
- Timeline activities: View a detailed timeline of collection activities associated with a customer, such as reminders, case responses, and issues (if any).
- Receivables actions: Take actions for a specific customer, such as raising issues on cases, setting reminders, sending an email or SMS reminder, and more.
-
Dispute Management: Provides an overview of all cases and issues associated with the customer. You can also raise issues and take action on cases.
-
Collection Review Reports: Provides an overview of all collection-related activities, such as invoice/transaction data associated with the customer. It helps you analyze the intricacies and patterns of customers' payment behavior to target future incentive and discount campaigns.
Navigating to Customer Details Dashboard
The dashboard provides all the necessary information about your customer, such as aging reports, account receivables summary, cases/issues, payment and transaction information, email reminders activity, and more.
You can view and manage the details by switching to various categories on the top of the dashboard. A subset of these categories is displayed depending on your assigned roles and permissions.
The following categories display the important information about your customer and display the individual account receivables report in the dashboard.
Summary
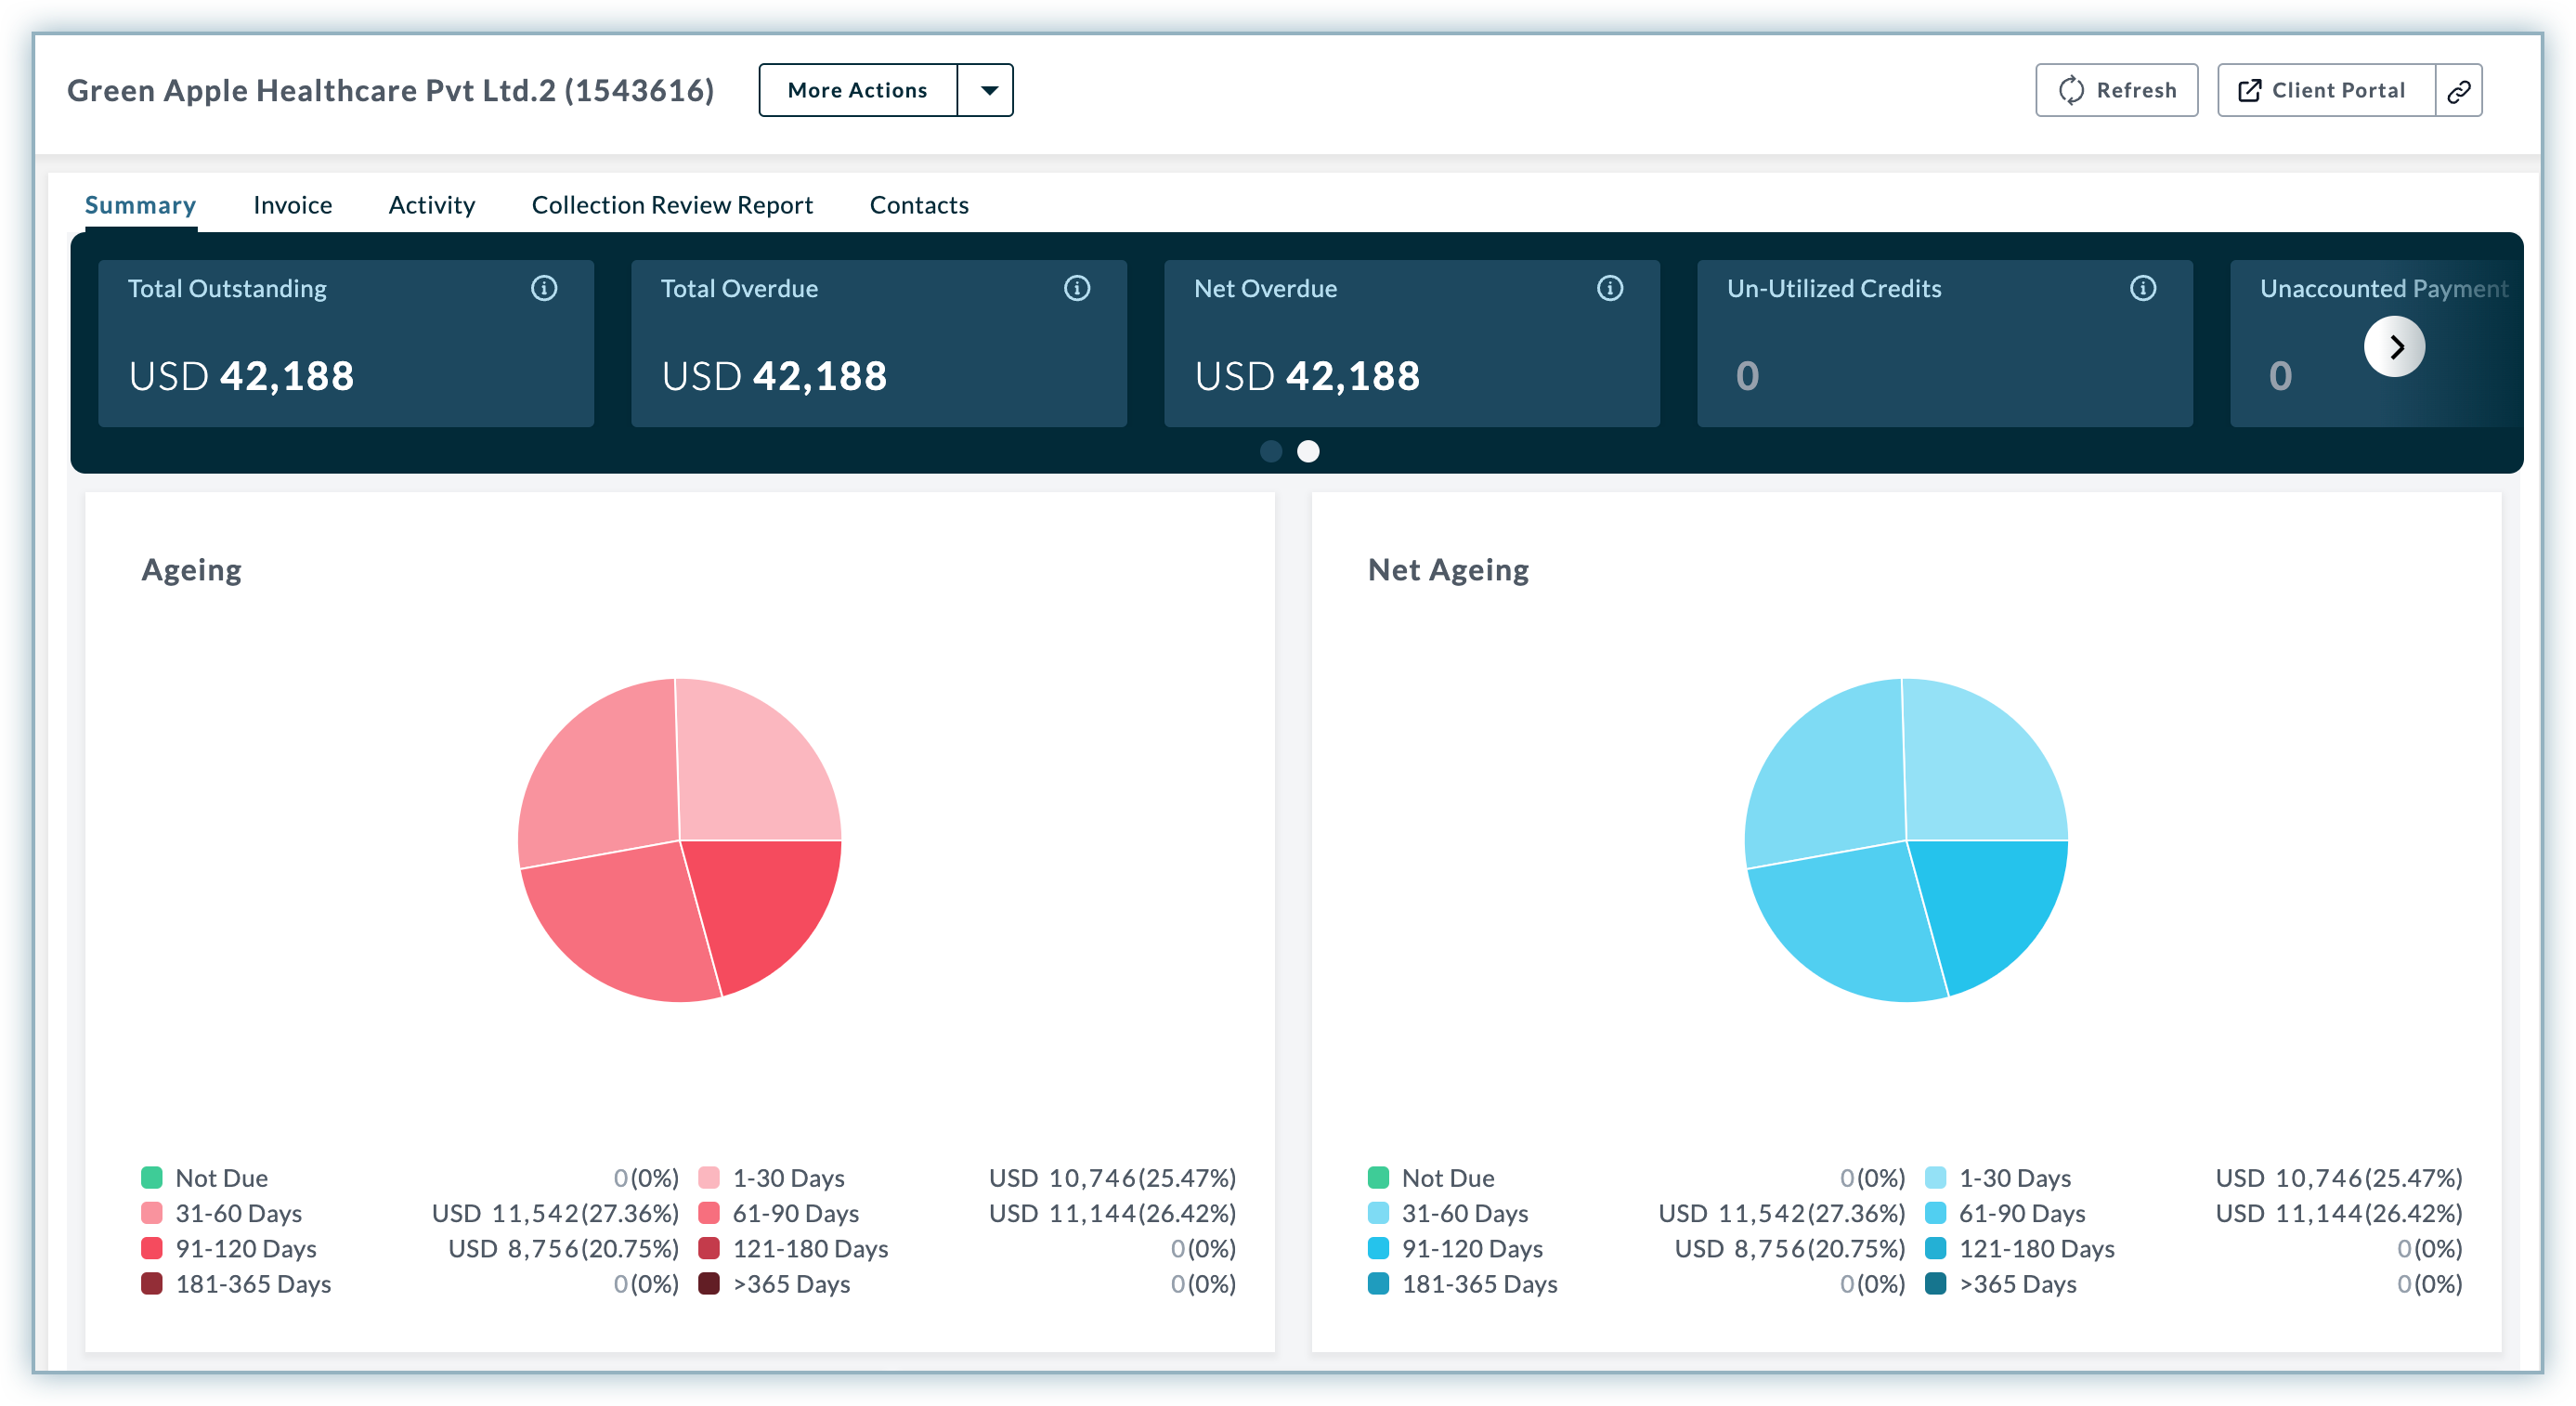
Summary displays a quick overview of customer's account receivables, cases/issues, and communication details with the collectors or team members. You can click the Summary tab in the details page to get a summarized overview of all the information about a customer in one place.
Receivables Metrics Bar: On the top of the Summary page, you will see the Receivables Metrics bar that displays the overview of account receivables data for a customer over the period of time.
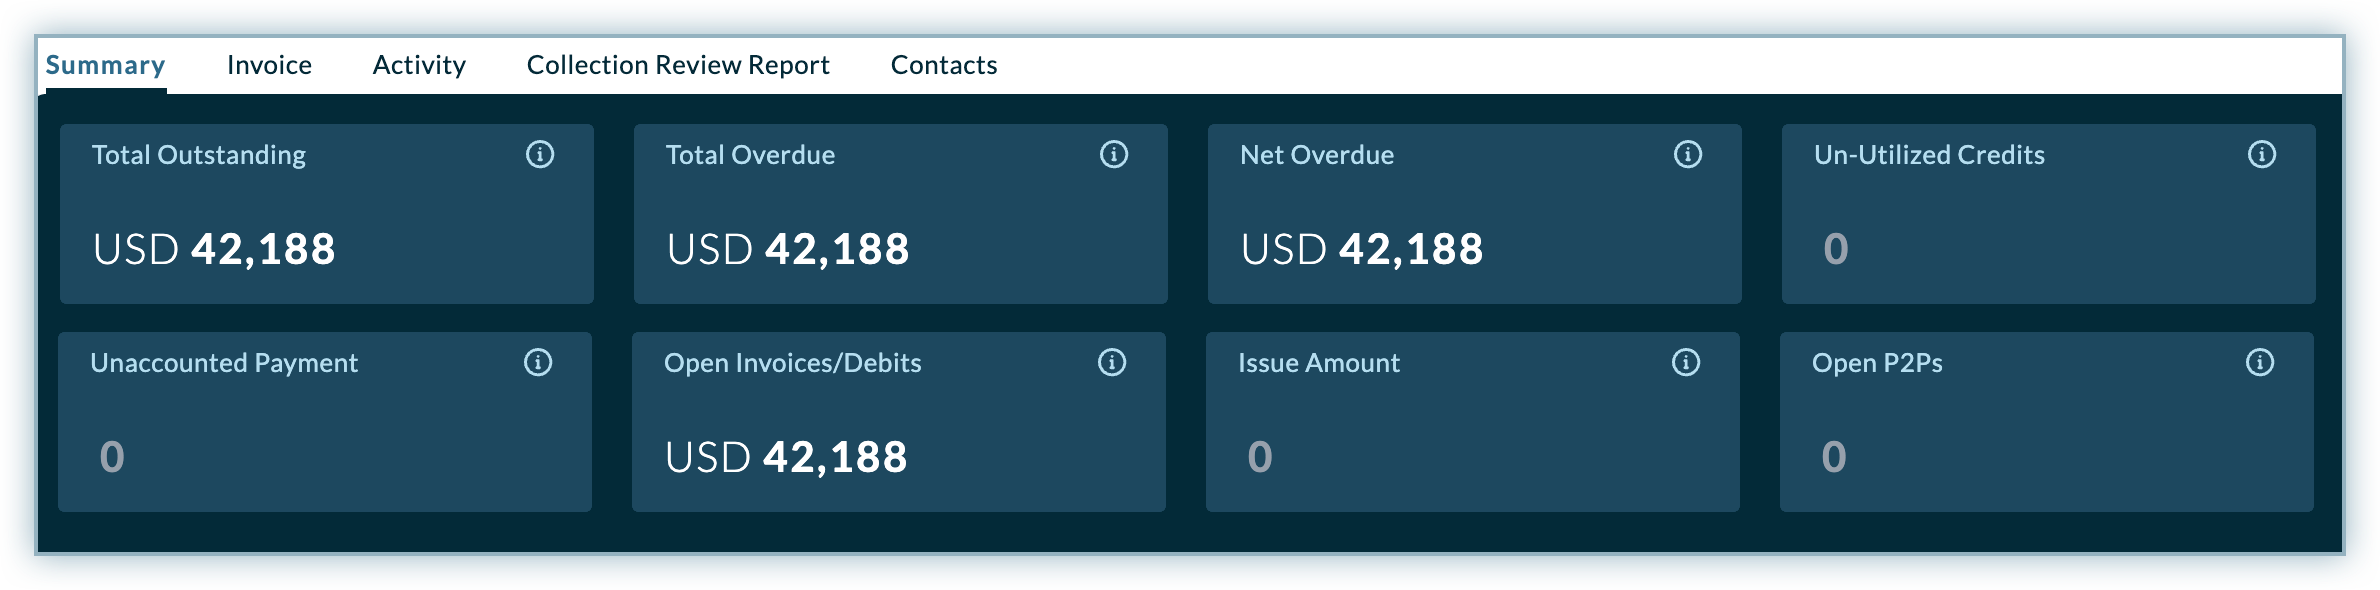
The following are the key components of the metrics bar described in the table below:
| Metrics | Description |
|---|---|
| Total outstanding | The aggregated principal amount that customer owe to the company. It is calculated by subtracting the customer's total debit and credit amount. |
| Total Overdue | The total amount from customer's overdue invoices, debit notes as on date. It includes the amount from all the debit entries for a customer. |
| Net Overdue | The net overdue amount is calculated by subtracting the total amount in un-utilized credit from the amount in overdue invoices for a customer. |
| Un-Utilized Credit | The total credit amount which is not adjusted against customer's invoice. It includes amount from credit notes, or any unadjusted credit entries on account payments. |
| Un-accounted Payments | The total payment amount that is not accounted against invoices for the customer. |
| Open Invoices/Debits | Total amount from all the invoices that is not paid. Open invoices and debits are often referred to as unpaid invoices. |
| Issue Amount | The total outstanding amount that is stuck in issue. |
| Open PTP | The total outstanding amount which is promised to be paid but not yet paid by the customer. It includes all the PTP amount from all open cases. |
Ageing and Net Ageing Charts: On the Summary page, the ageing and net ageing report is used by collection personnel to audit customer's invoices which are overdue for payment. The visual report helps you estimate the customer's potential debt percentage(%) based on the aging buckets.
Custom Fields: Displays the custom fields which are used to provide additional details about a customer or transaction while sending the email or SMS reminder to the customer. Receivables allows you to define the custom fields at Customer and Document level. In Receivables, users can define custom fields based on the following categories:
- Customer level Custom Fields
- Invoice/Document level Custom Fields
Note:
Contact Chargebee Receivables Support to define a custom field at Customer or Document level in your account.
Last 5 Cases: Displays the last five cases created for the customer and assigned to you or other users for escalation. Each of the case display the deadline date along with the Case Status. You can select a specific case to view its details.
Last 5 Emails: Displays the list of recent emails that are triggered automatically or manually by the collectors. It includes the list of last five emails sent manually by collectors or engagement cycle. You can further select a particular email to view its details.
Note: Displays the important note taken by the collectors for the customer. For more information, see notes in Receivables.
Summary: Represents an executive summary of collection status. You can write an outline for any collection activity related to the customer.
Assigned To: Displays the details of finance and sales owner(FPOC and SPOC) assigned to the customer.
Invoice
The Invoice tab helps you view and manage invoices and transactions in one place. In addition to showing the balance, amount, and payment status, it also provides additional information related to each document type and transaction associated with the customer. You can further see more detailed overview of invoice/transactions by selecting open, closed, and all sub-categories in the invoice tab.
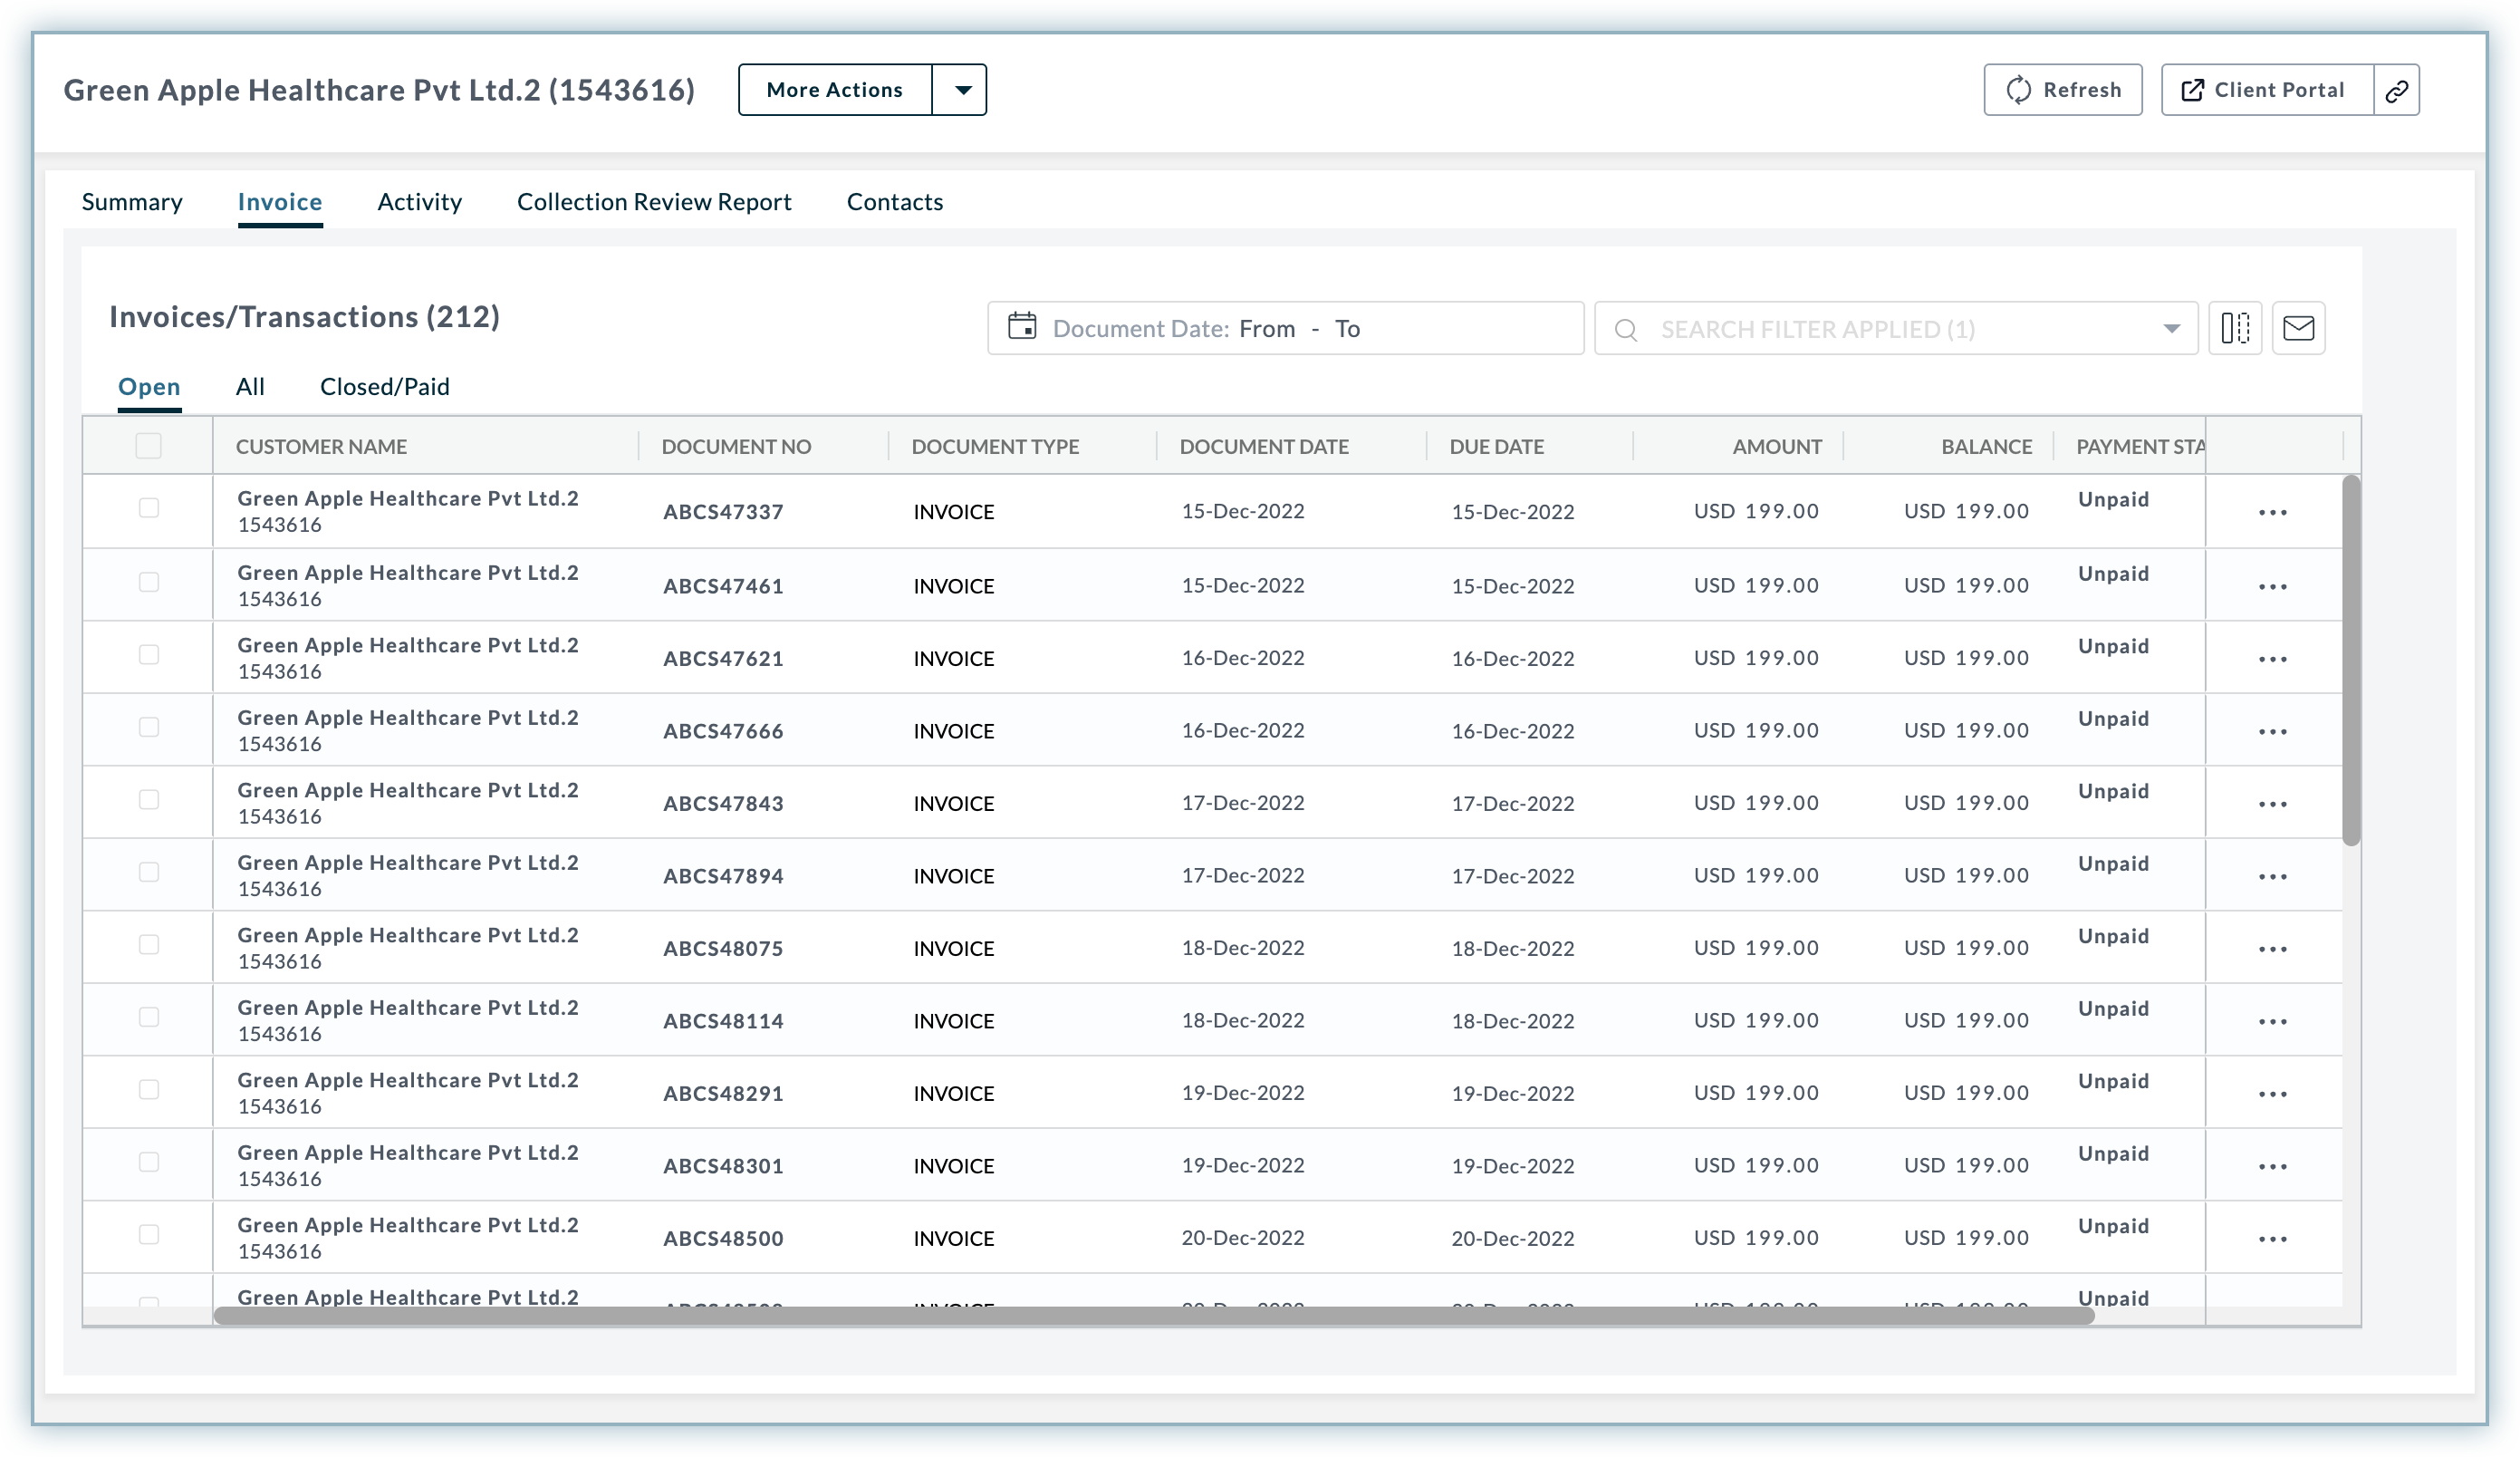
An invoice typically contains the following information:
- Customer Details
- Document Type such as Invoice, Debit Notes, Credit notes, and payments.
- Document Date corresponding to the document type.
- Due Date of the document.
- Amount, Balance and Payment Status.
- Custom Fields (if any).
In addition, the invoice tab in flyout allows you to perform the following actions:
Fundamental Actions: The fundamental operations consists of the following operations:
- Date Filter: The date filter allows you to sort the invoices/transactions based on document date, due date, and posting date. You can select a date filter category by clicking on the Date filter bar.
- Search and create a new filter: You can search and create a new filter for Invoices/transactions data based on certain conditions. For more information see, [creating and applying a new filter]
- Customising Invoices Data columns: You can show/hide some specific columns from the default view of the invoices/transactions data. For more information see, [customizing data columns].
- Generate Invoice Report: Click the Mail icon to generate a consolidated Excel/CSV based report that will be sent to your registered email address. For more information, see [generating email based report].
Bulk Actions: You can perform the following operations with respect to each Invoice/transactions:
- Set a Reminder
- Raise Issue
- Take Notes
Collection Activity
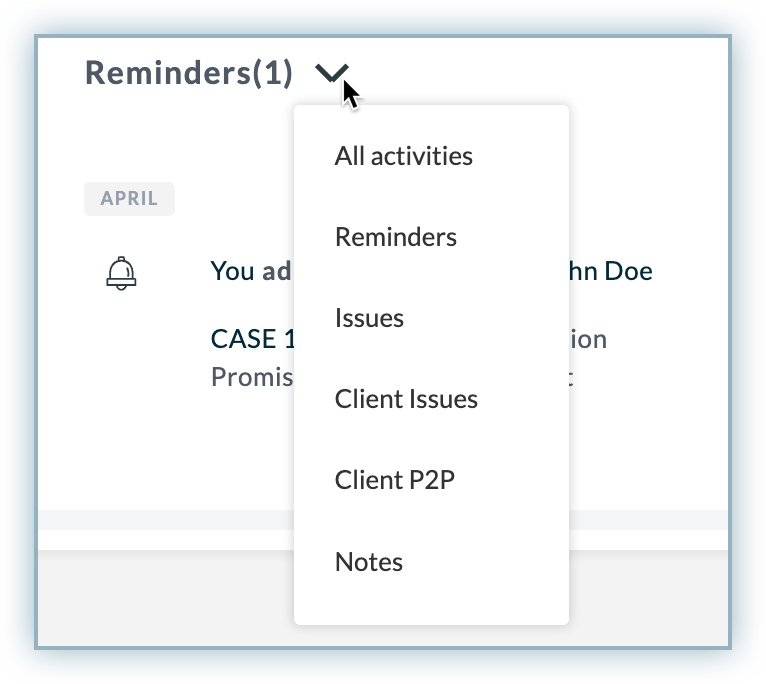
The Activity tab in the customer details dashboard allows you to see all the activities and the actions taken for this customer over the time period. The timeline displays all the activities along with the dates and summary of the activity.
The timeline can display the following types of activities:
- Reminders
- Issues
- Client Issues
- Client PTP
- Notes
By default, the timeline displays all the activities associated with the customer. You can also view the timeline for a specific activity by selecting it from the drop-down menu.
See also
Collection Review Report
The Collection Review Report in flyout dashboard allows you to view and manage the customer's collection and financial records. It gives you a detailed overview of customer's outstanding invoices, transaction status, and collection activities performed on the invoices/transactions. The report includes unpaid invoices, balance, due date, open issues, last activity, and more details about the collections and invoices for a customer.
Additionally, you can customize the view of the collection report by taking any of the following actions:
Applying Filters to Data
By applying filters to the data, you can customize the view of the collection review report. You can choose multiple filters from the filter categories and corresponding conditions to filter the report view.
To apply the filter, follow these steps:
-
Click the **Funnel **icon to open the filter sidebar in the Collection Review Report.
-
Under Advanced filter, hover over and select the filter categories in the filter sidebar, whichever is applicable. You can choose from the following filter categories:
- Transaction based filter
- Date based filter
- Aging based filter
- Collection Status based filter
- Custom field-customer and invoice based filter
-
After selecting the filter categories, add conditions corresponding to them. You can select a specific condition and the operator to apply the desired filter.
-
Click Apply.
The following illustration demonstrates how a transaction-based filter is applied to the collection review report for which the balance is greater than USD1000.
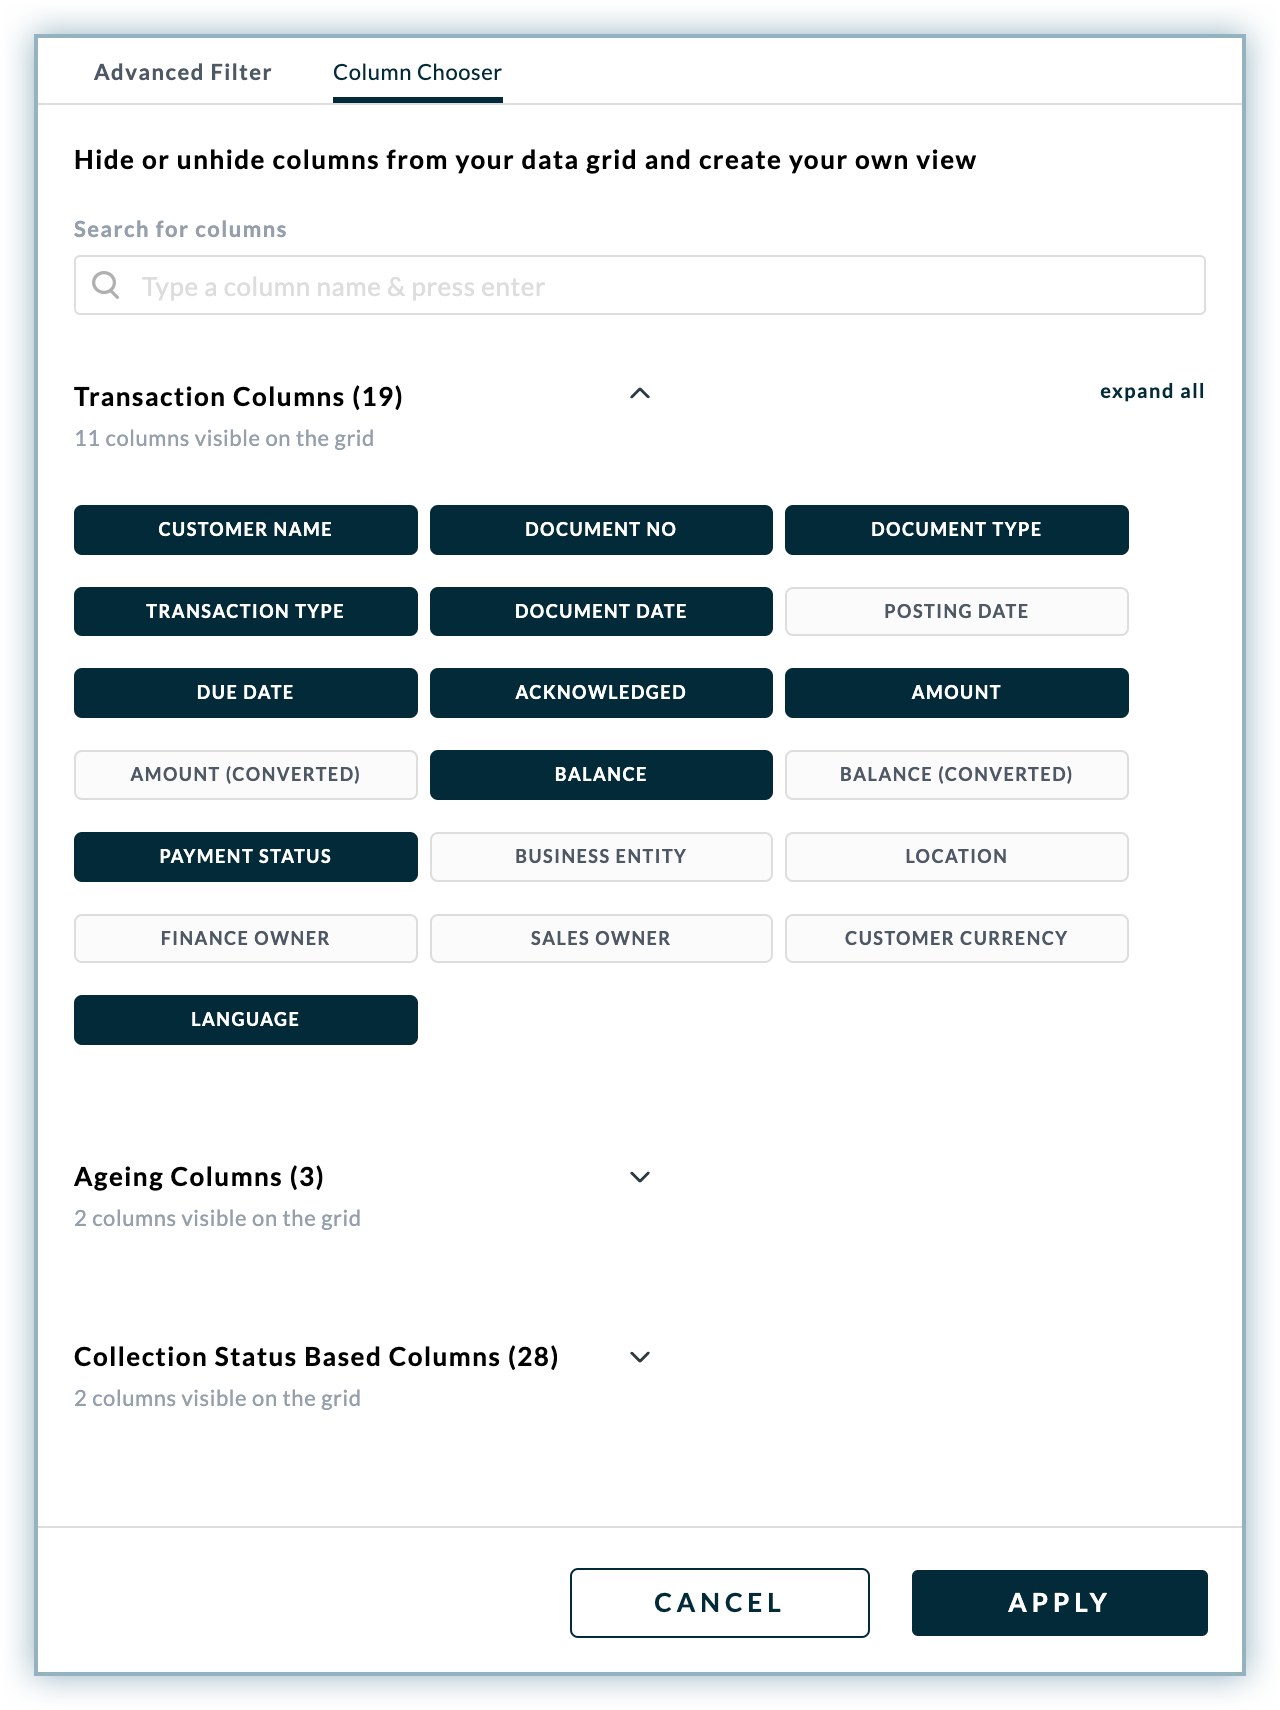
Customize the Data Columns
You can customize the report view by showing or hiding the data columns in the report.
To show/hide a specific columns from the report, follow these steps:
- Click the Funnel icon to open the filter sidebar in the Collection Review Report.
- In the filter sidebar, switch to the Column Chooser tab.
- Select/unselect the columns from each data category that you want to show/hide in the report.
- Click Apply.
Generating email-based reports
You can click the Mail icon to generate a consolidated Excel/CSV based report that will be send to your registered email address. For more information, see generating email based report.
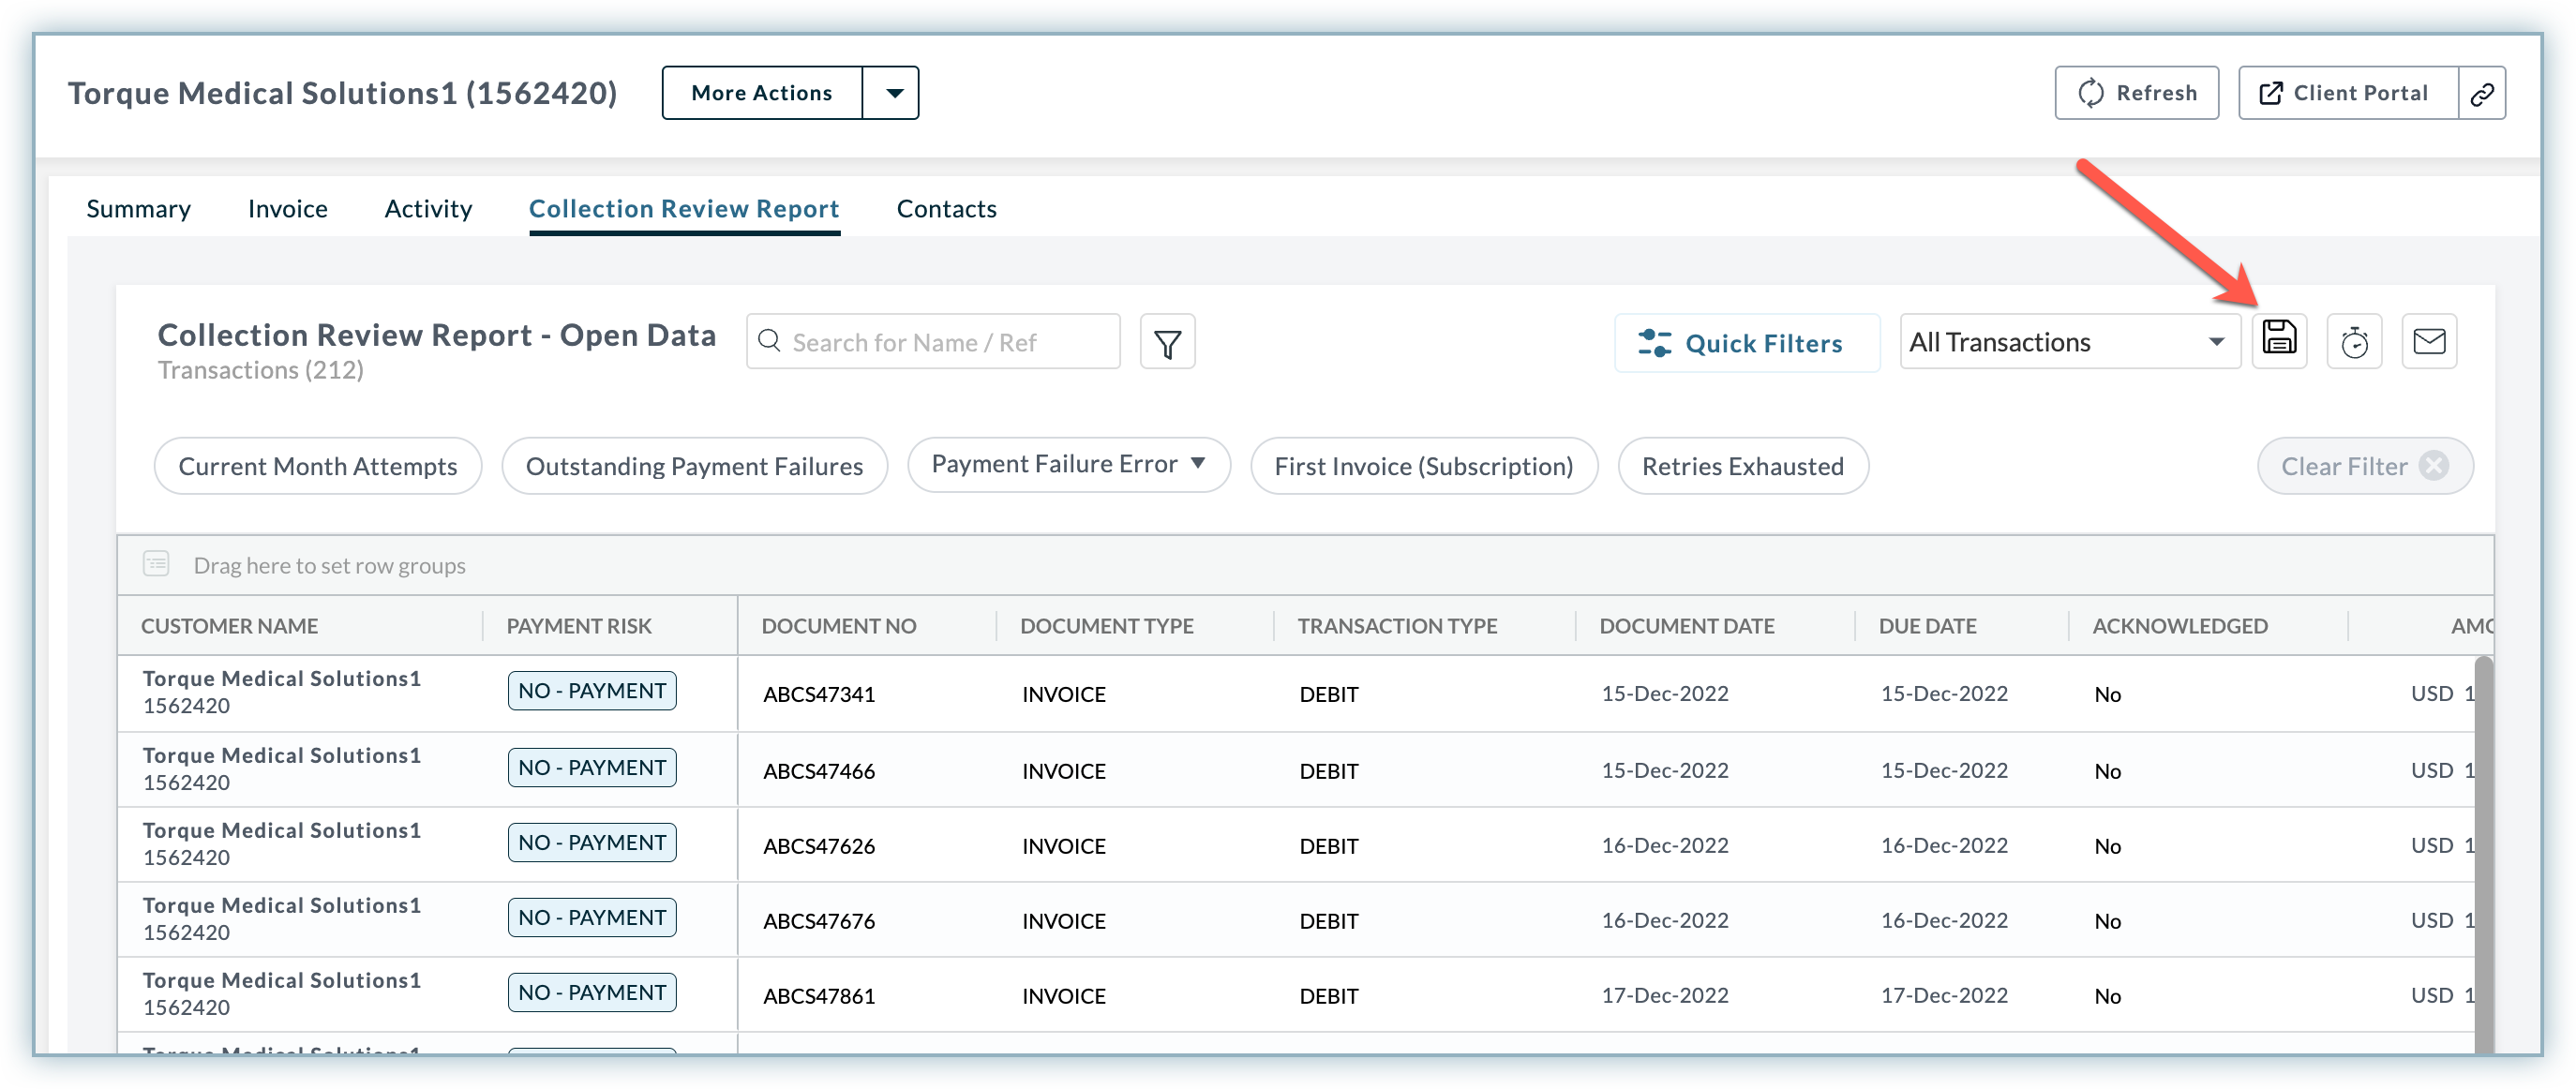
Saving the current View
Once you apply the filters to collection review report, you can save the current view for later use. This will allow you to quickly switch to the saved view whenever you want to view specific data. To save the current view, click the **Save **icon and enter the view name. Select the checkbox if you want to make it available for other users in your account as well.
Receivables allows you to view all your saved reports from configured reports, where you can schedule a subscription to these reports and make necessary adjustment to it.
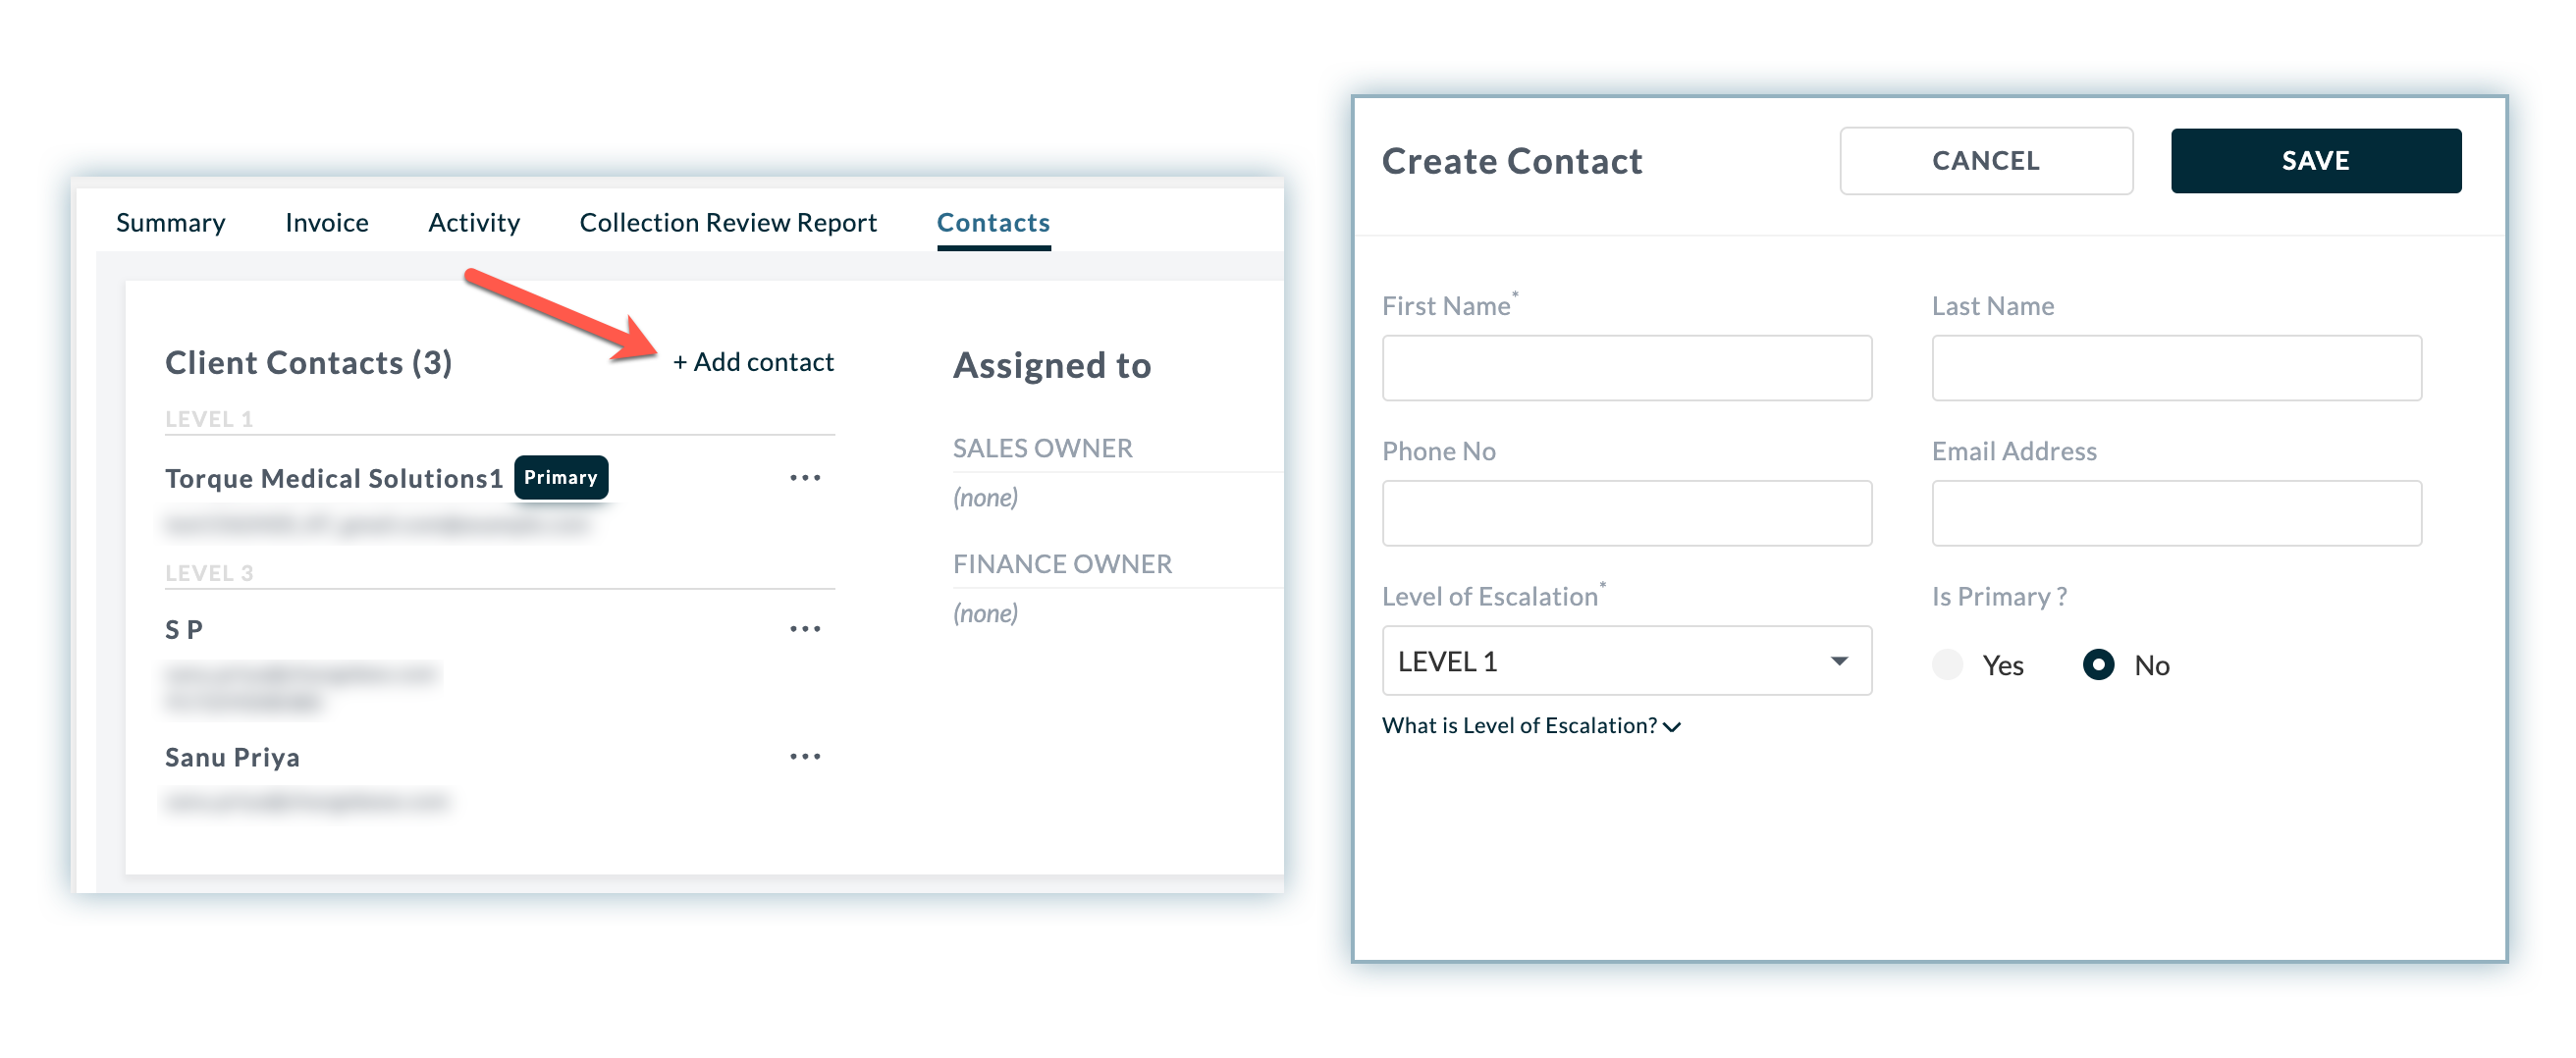
Contacts
The Contacts tab in the flyout dashboard display the client's contacts and assigned collectors. You can use this tab to set primary contacts and assign collectors for the customer. Adding Customer Contact allows you to send automatic and manual email reminders to the customer. This feature can help you keep track of payments and ensure that everyone is involved in the collections process. A customer can have multiple contacts and primary contact with a level of escalation. While sending an email reminder, you may select the contacts as the recipient in the email template. The customer's finance owner(FPOC)/sales owner(SPOC) can then follow up with reminders if it has not been acknowledged after initial reminders from customer.
Adding Customer Contacts
To add contacts information for a particular customer, follow these steps:
-
Click on the name of the customer.
-
In the master details dashboard, click the Contacts tab.
-
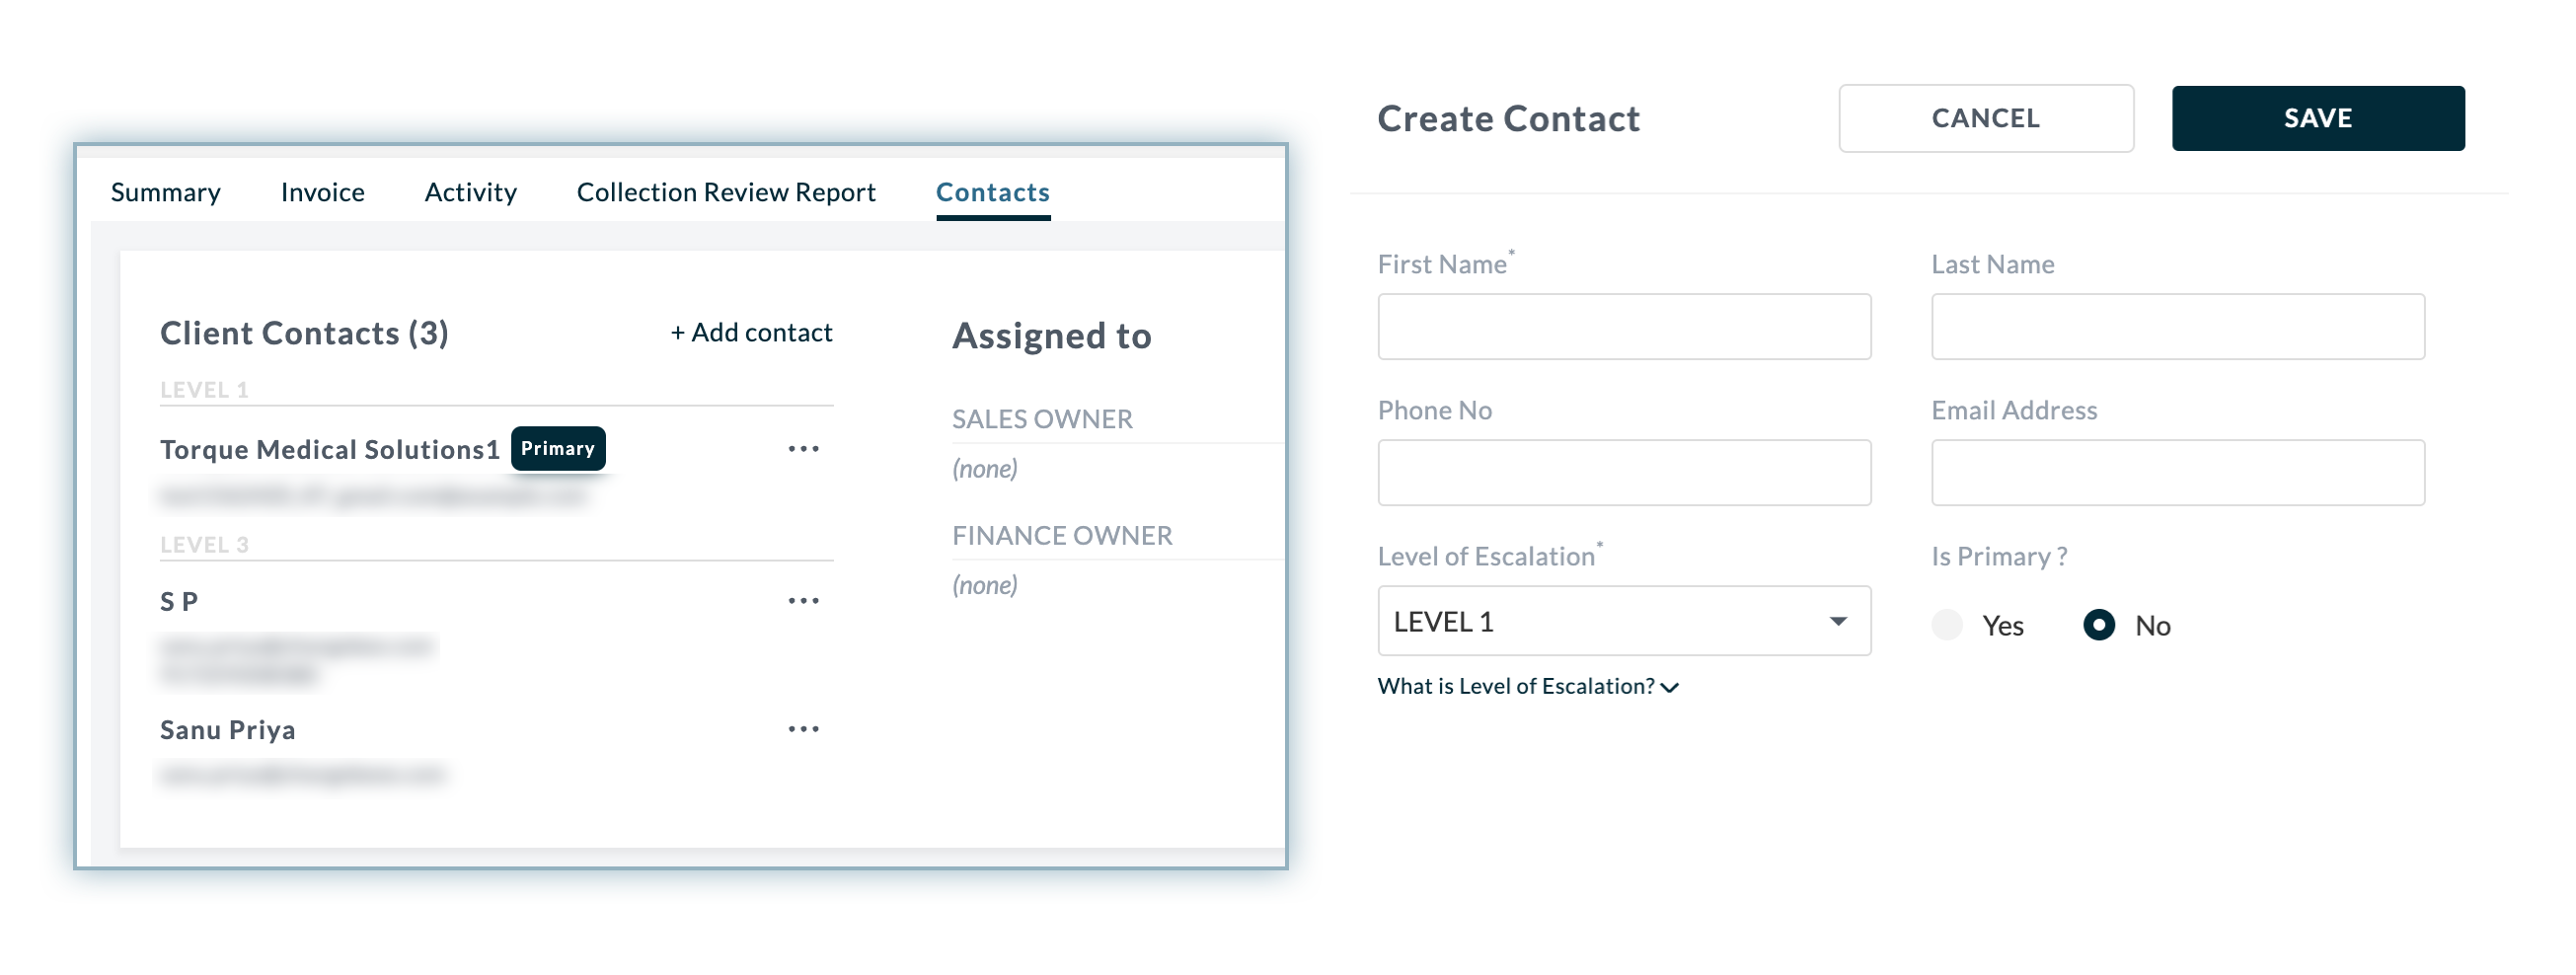
In Contacts tab, click +Add contact.
-
In the Create Contact page, specify the following details:
- Provide the contact's details such as full name, phone no, and email address.
- Type the department and designation of the contact(if any).
- Click the Level of escalation drop down and select the level of the contact.
-
Click Save.
Once contacts are added, you can edit or delete it at anytime from the contact tab in the customer details dashboard.
Level of Escalation
Customers can have multiple contacts, but not all contacts are their primary contacts. You can categorize a customer's contact based on various levels of escalation, where the first level is the primary contact. Primary contact is the first line of communication for a customer. They are responsible for handling all inquiries and ensuring that the customer's needs are met. If the primary contact is unavailable or unable to help, then the next escalation level should be contacted. This process can continue until the issue is resolved. With the level of escalation, you can additionally send email reminders to multiple contacts of a customer. Refer to the table below to understand the different level of escalations for a customer contacts.
| Level of escalation | Description |
|---|---|
| Level 1 | It corresponds to the primary contacts for payment follow-ups. All manual reminders are sent to the Level 1 contacts by default. |
| Level 2 | It corresponds to the Secondary contacts or first level of escalation who need not be included in every payment reminder by default. Level 2 contacts can be added as a recipient where required or configured to receive auto-reminders. |
| Level 3 | It corresponds to the Tertiary contacts or second level of escalation who need not be included in every payment reminder by default. Level 3 contacts can be added as a recipient where required or configured to receive certain auto-reminders. |
Was this article helpful?