Receivables View
Overview
Chargebee Receivables has an intuitive customer management interface that displays all your customer data and transaction activities involved in the collection process. It helps businesses to keep track of their account receivables and manage the collection-related activities in one place.
It also allows businesses to view and measure the key performance of their account receivables through aging reports and balance due reports that help collectors make necessary decisions for collection-related activities.
To open the Receivables View, log in via Numberz AR Enterprise, and click Receivables from the left menu.
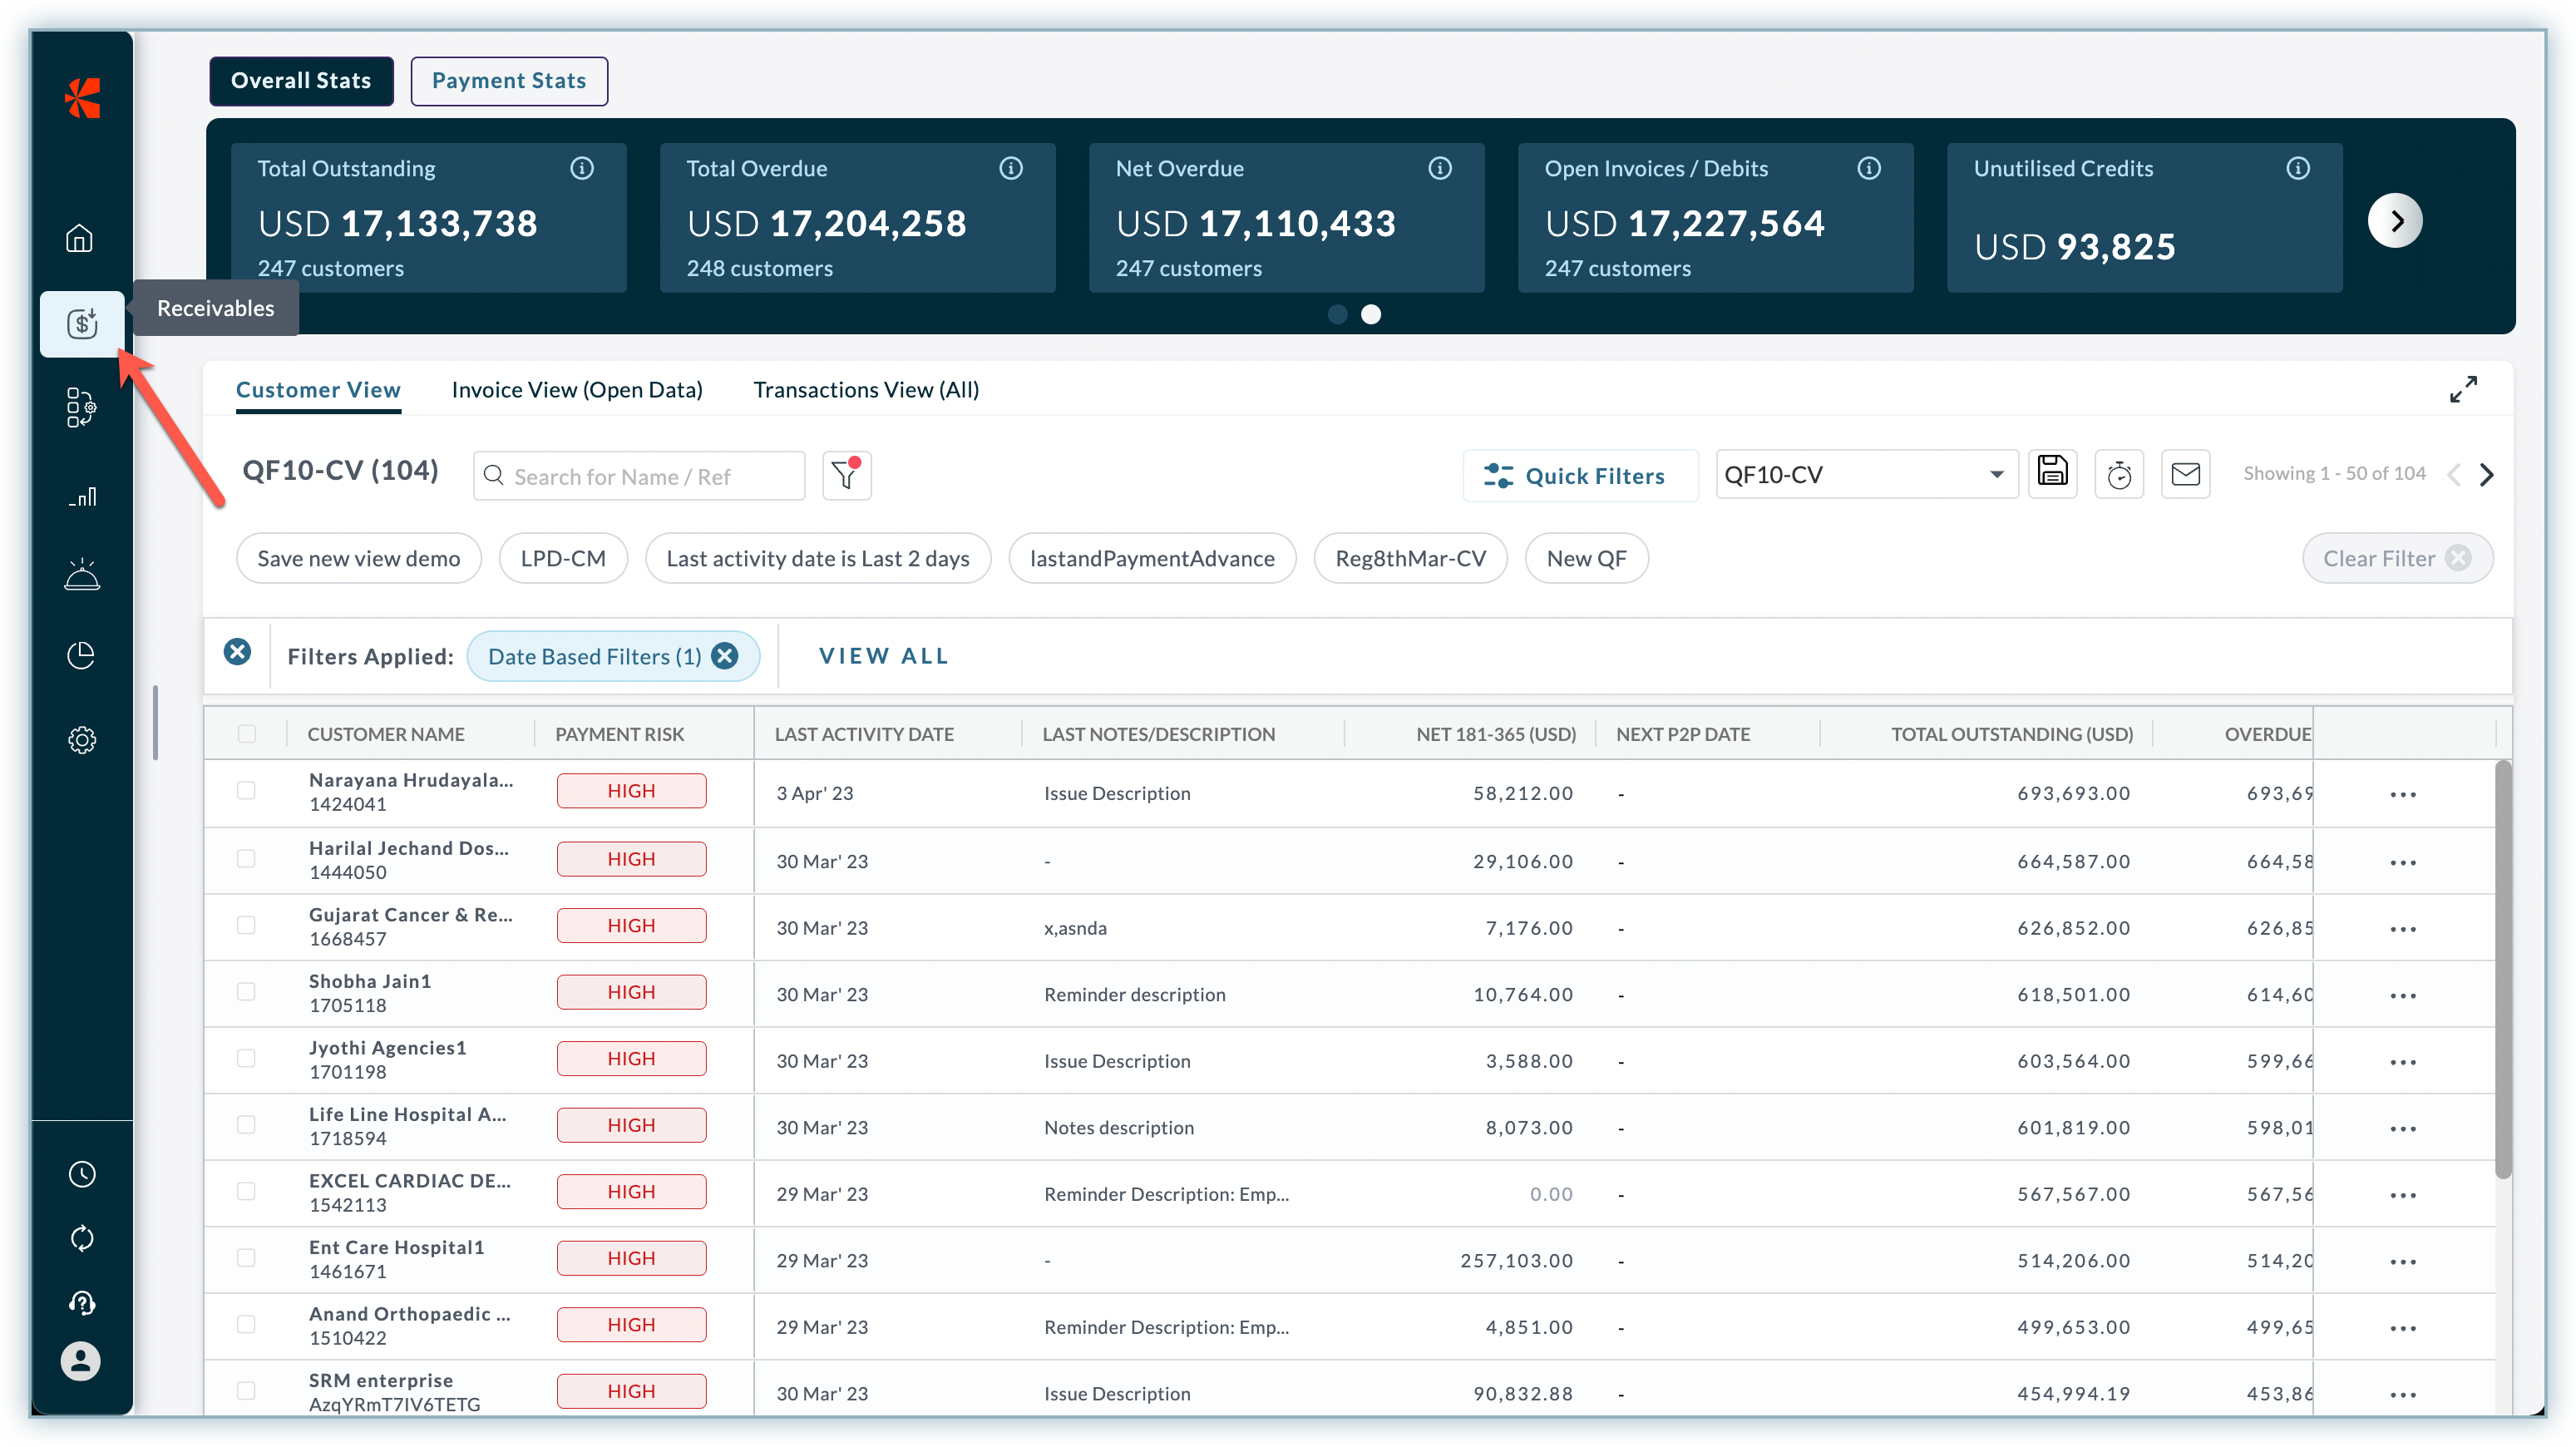
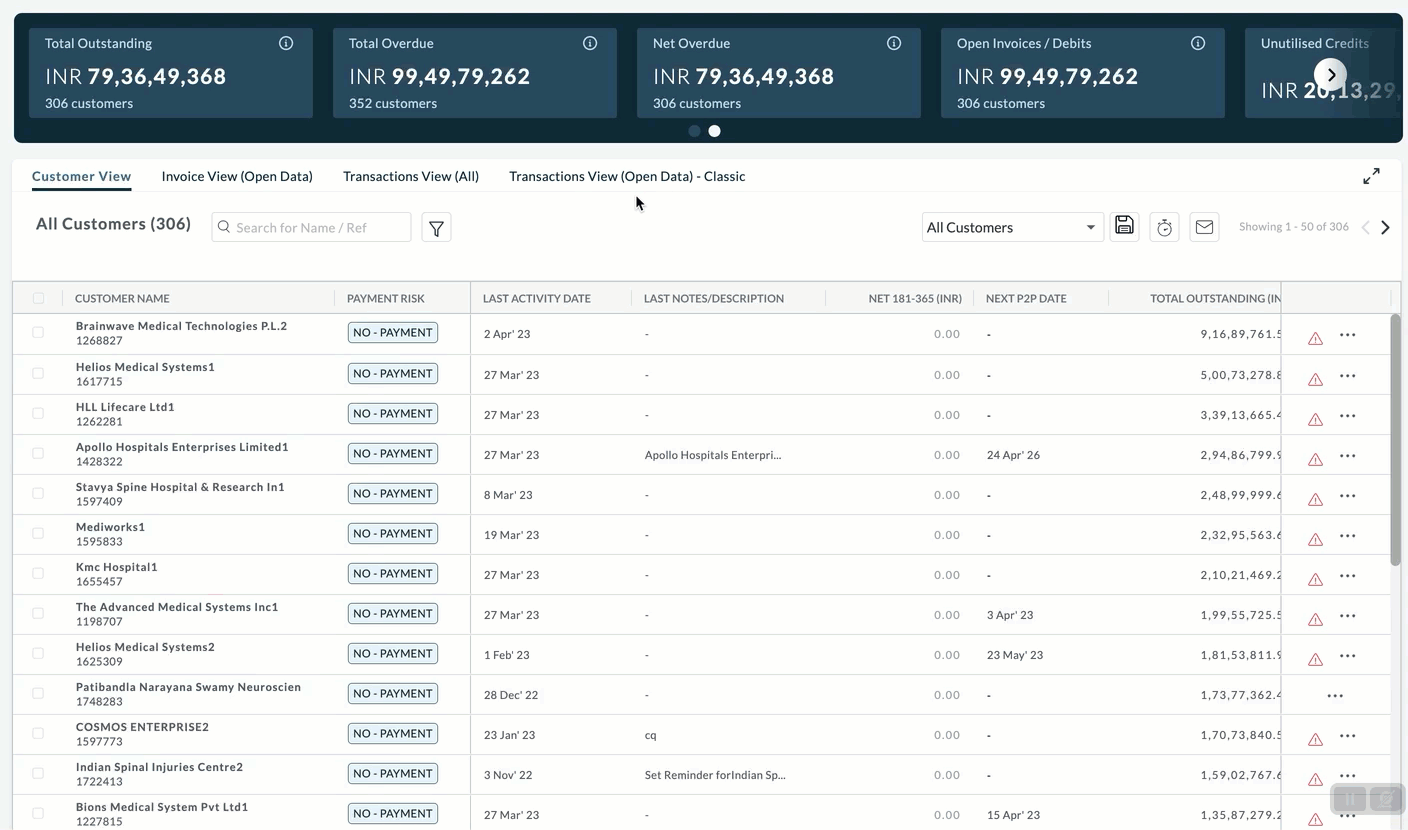
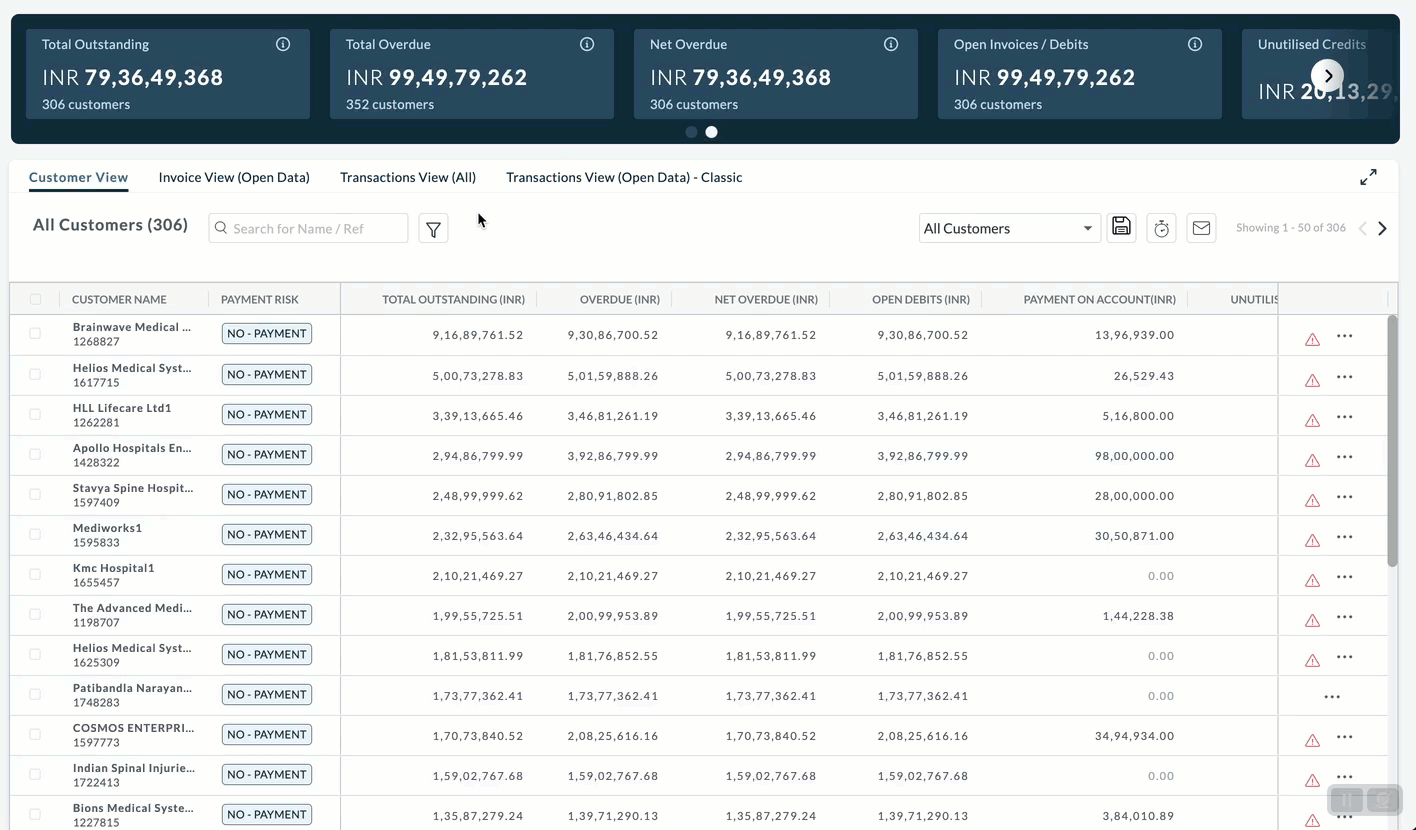
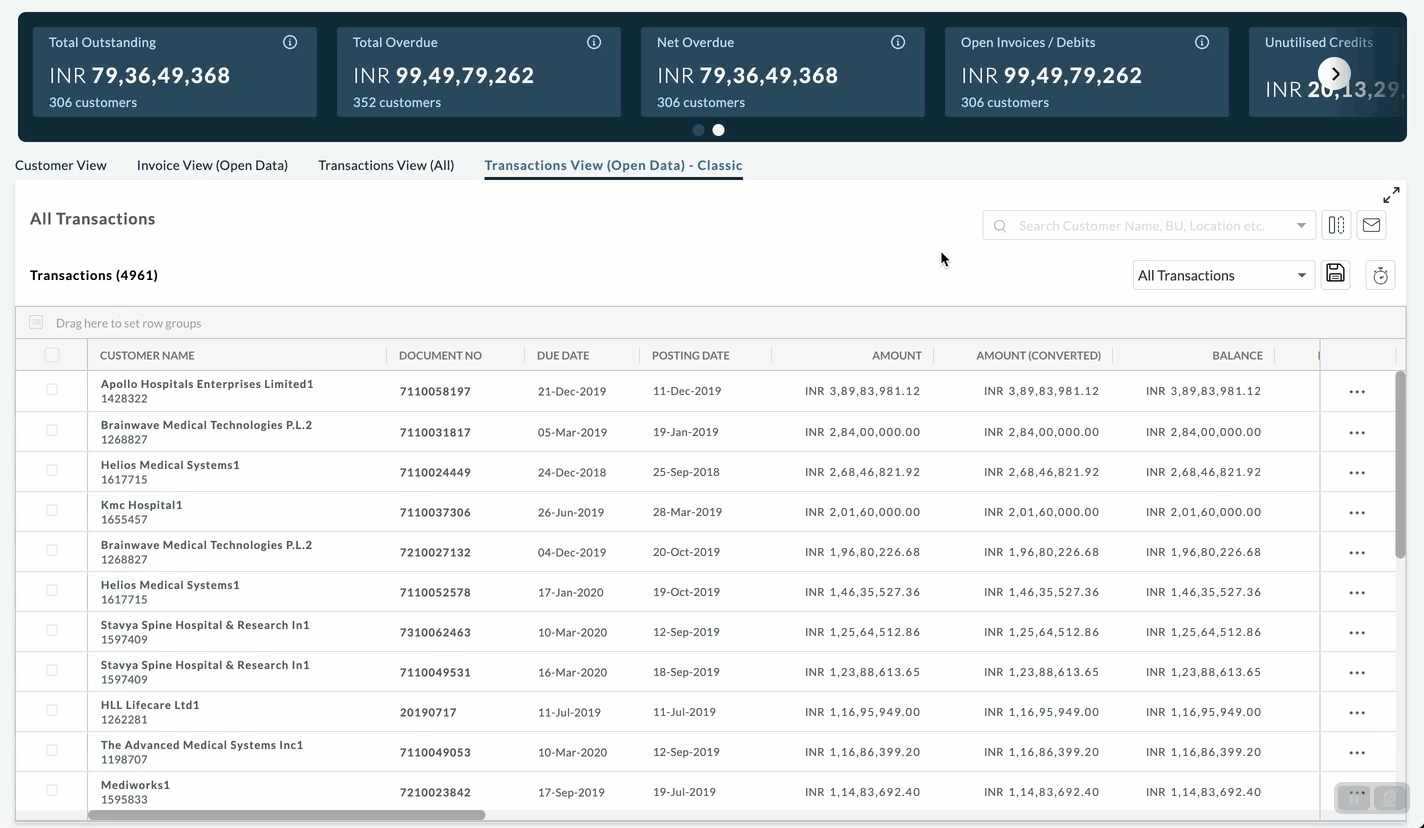
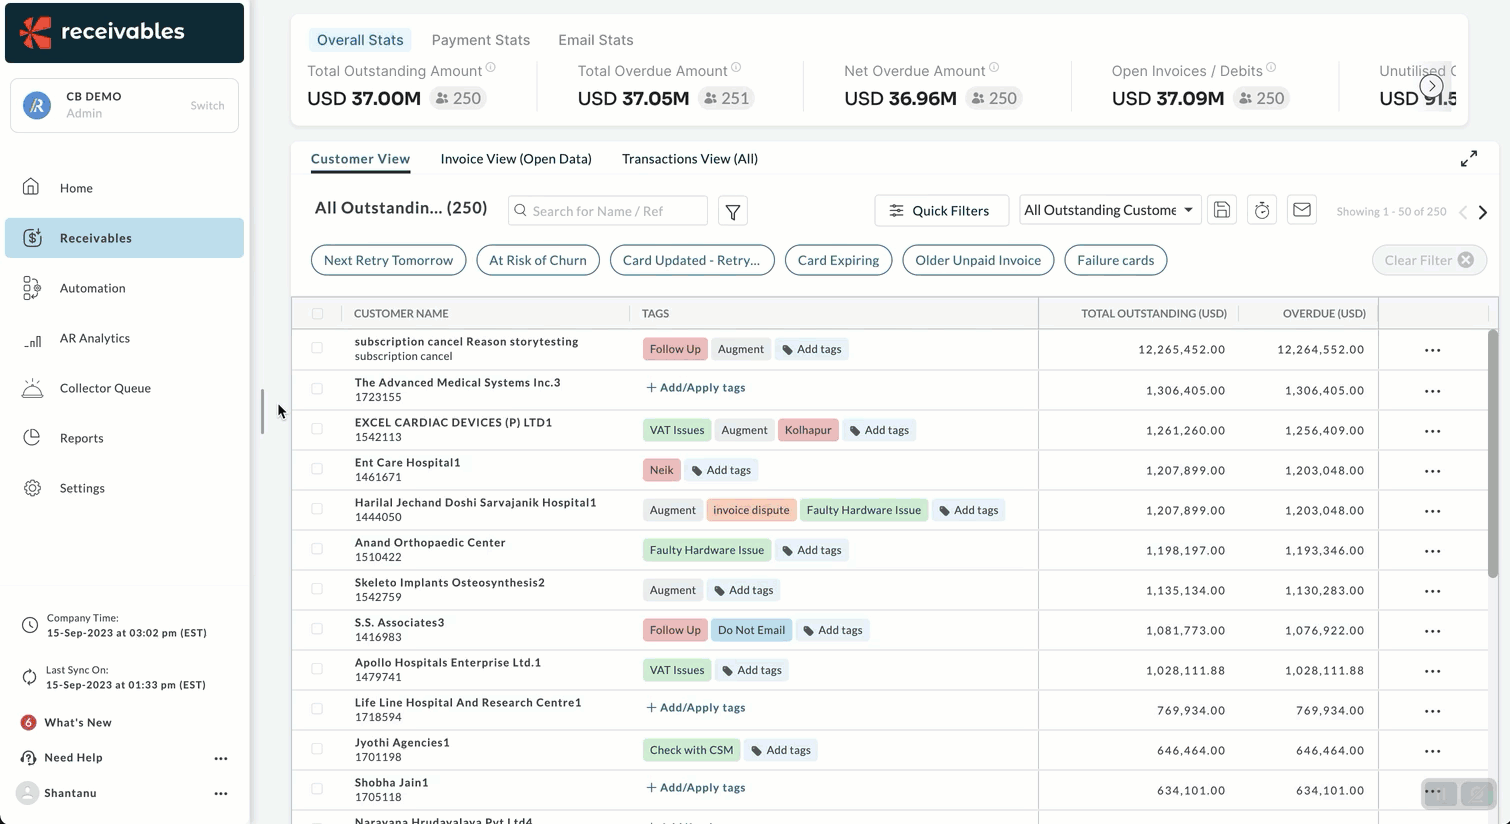
The Receivables main page contains the metrics bar, action panel, and a table widget that displays the list of all customer or transaction data. Receivables gives you access to all your customer and transaction data in one place using the following views:
Customer View
The Customer View shows all your customer and transaction data in one place. It displays all the information related to your customers and their account summary, such as outstanding invoices, balance, net overdue amount, collection-related activities that occurred in their account, and more.
To open the Customer View, click the Customer View tab on the top bar of the Receivables page. It displays the information in a grid table containing a list of customers and additional information related to outstanding, overdue, and collection activities data such as last follow-up date, summary, and more. Use the Customer View to see your assigned customers and manage the collection-related activities.
See also
Customize the Customer View by applying advanced filters and selecting the data columns.
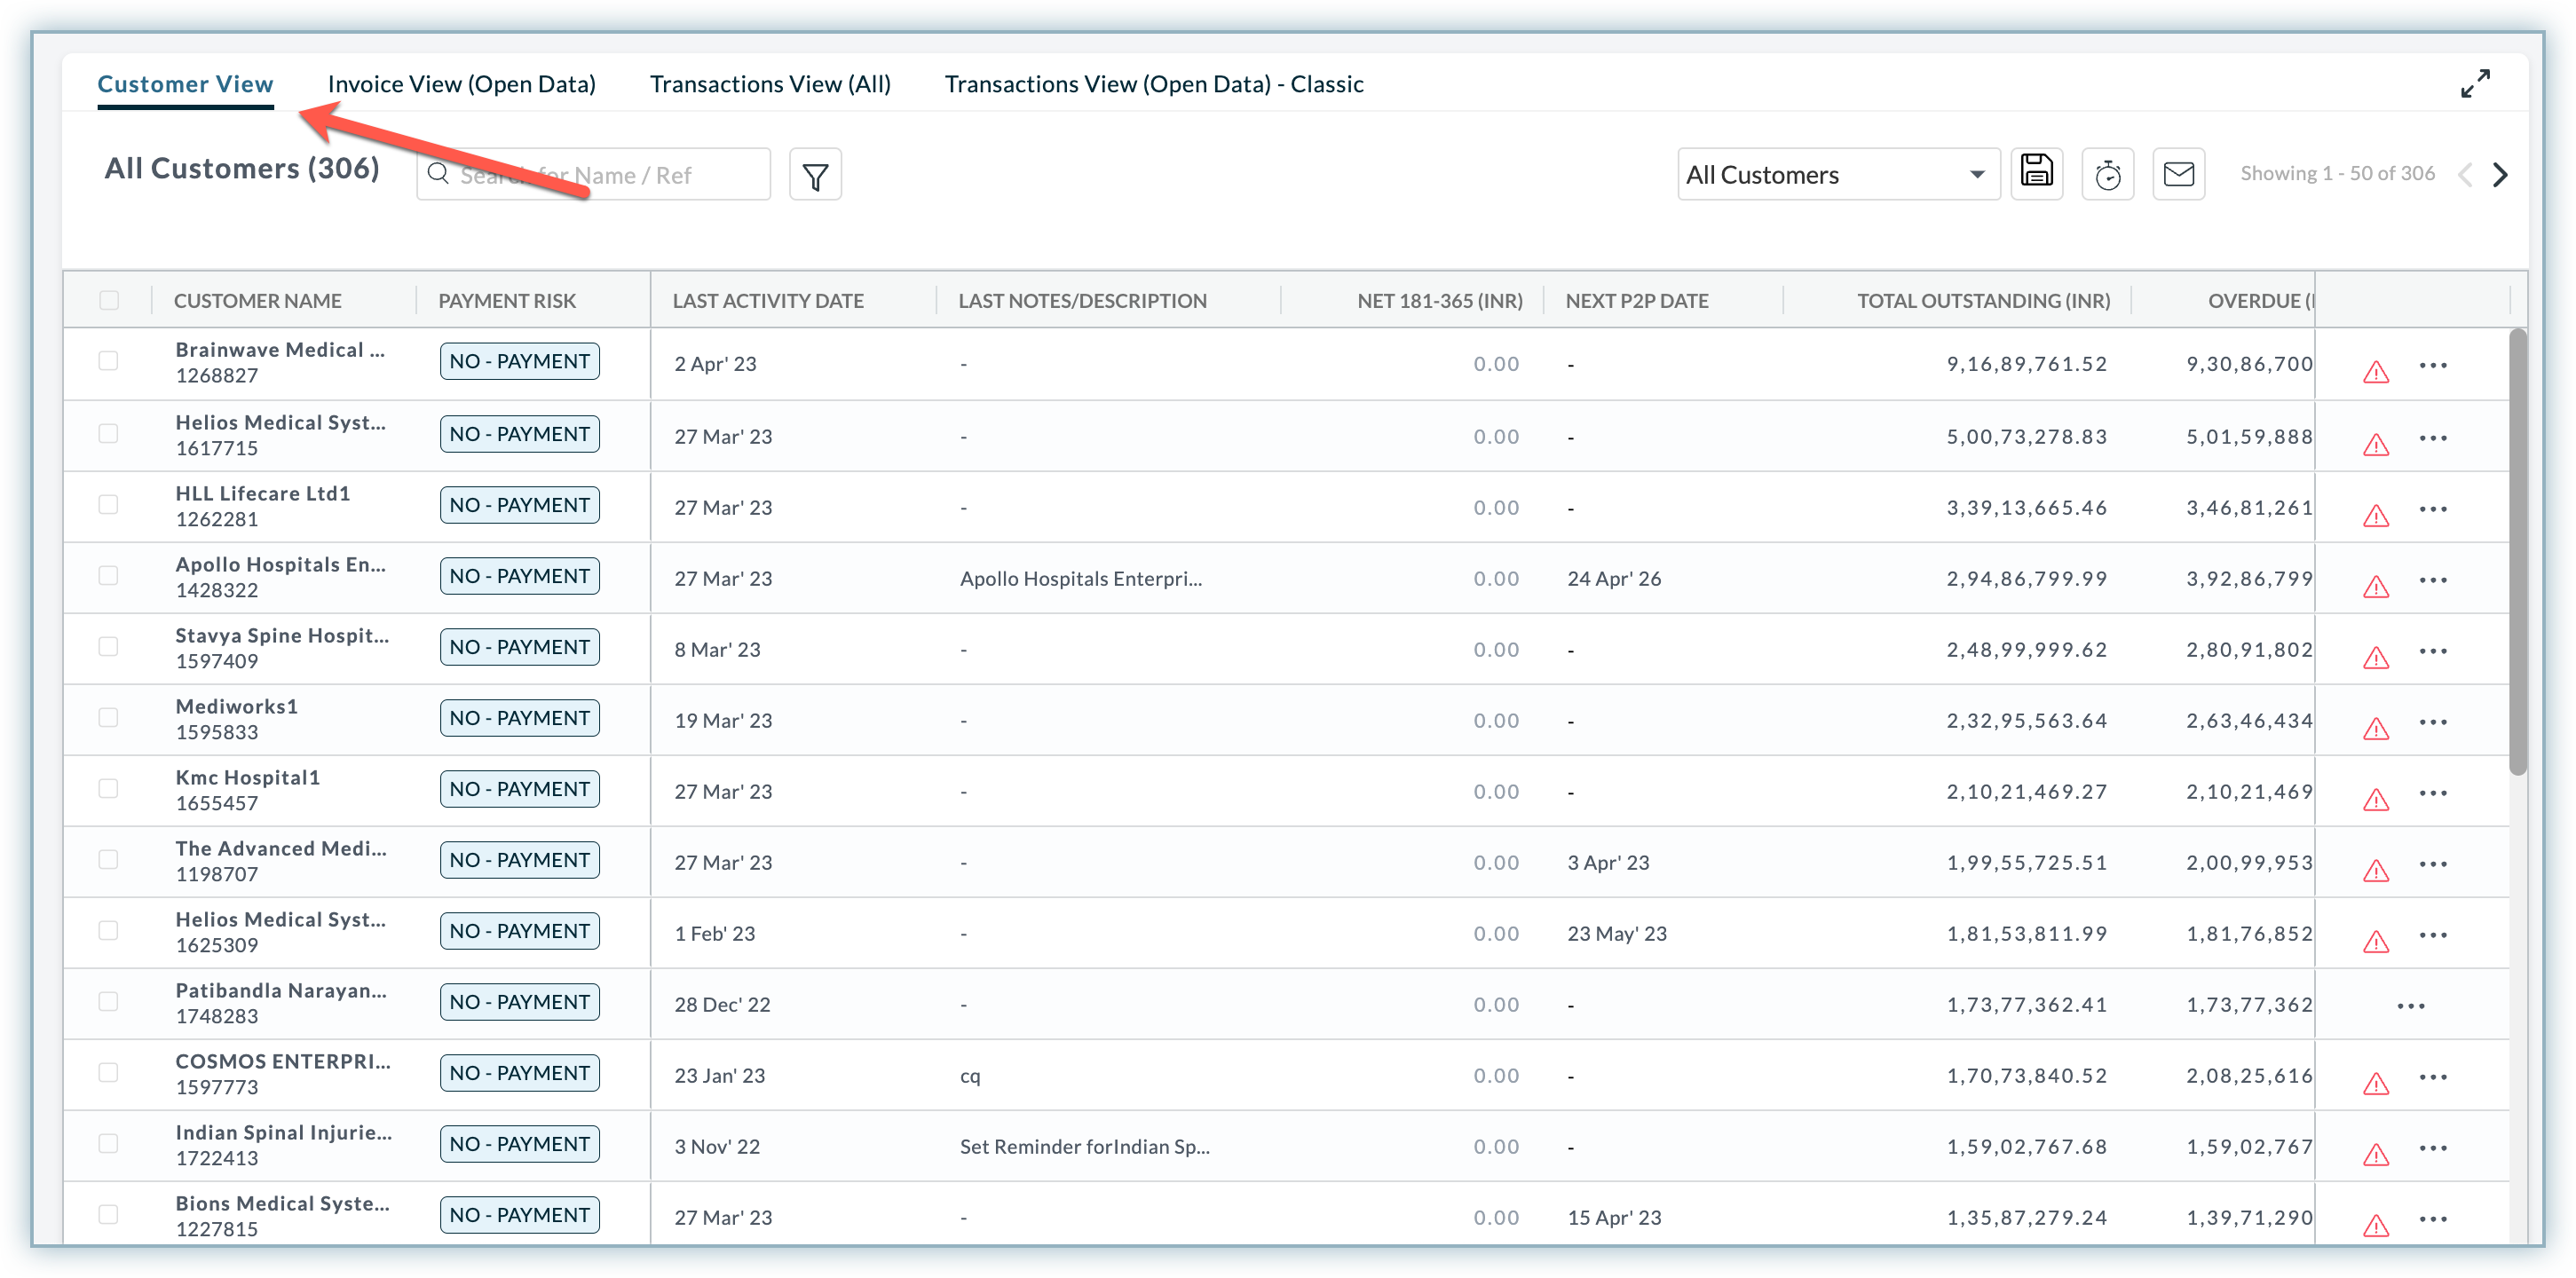
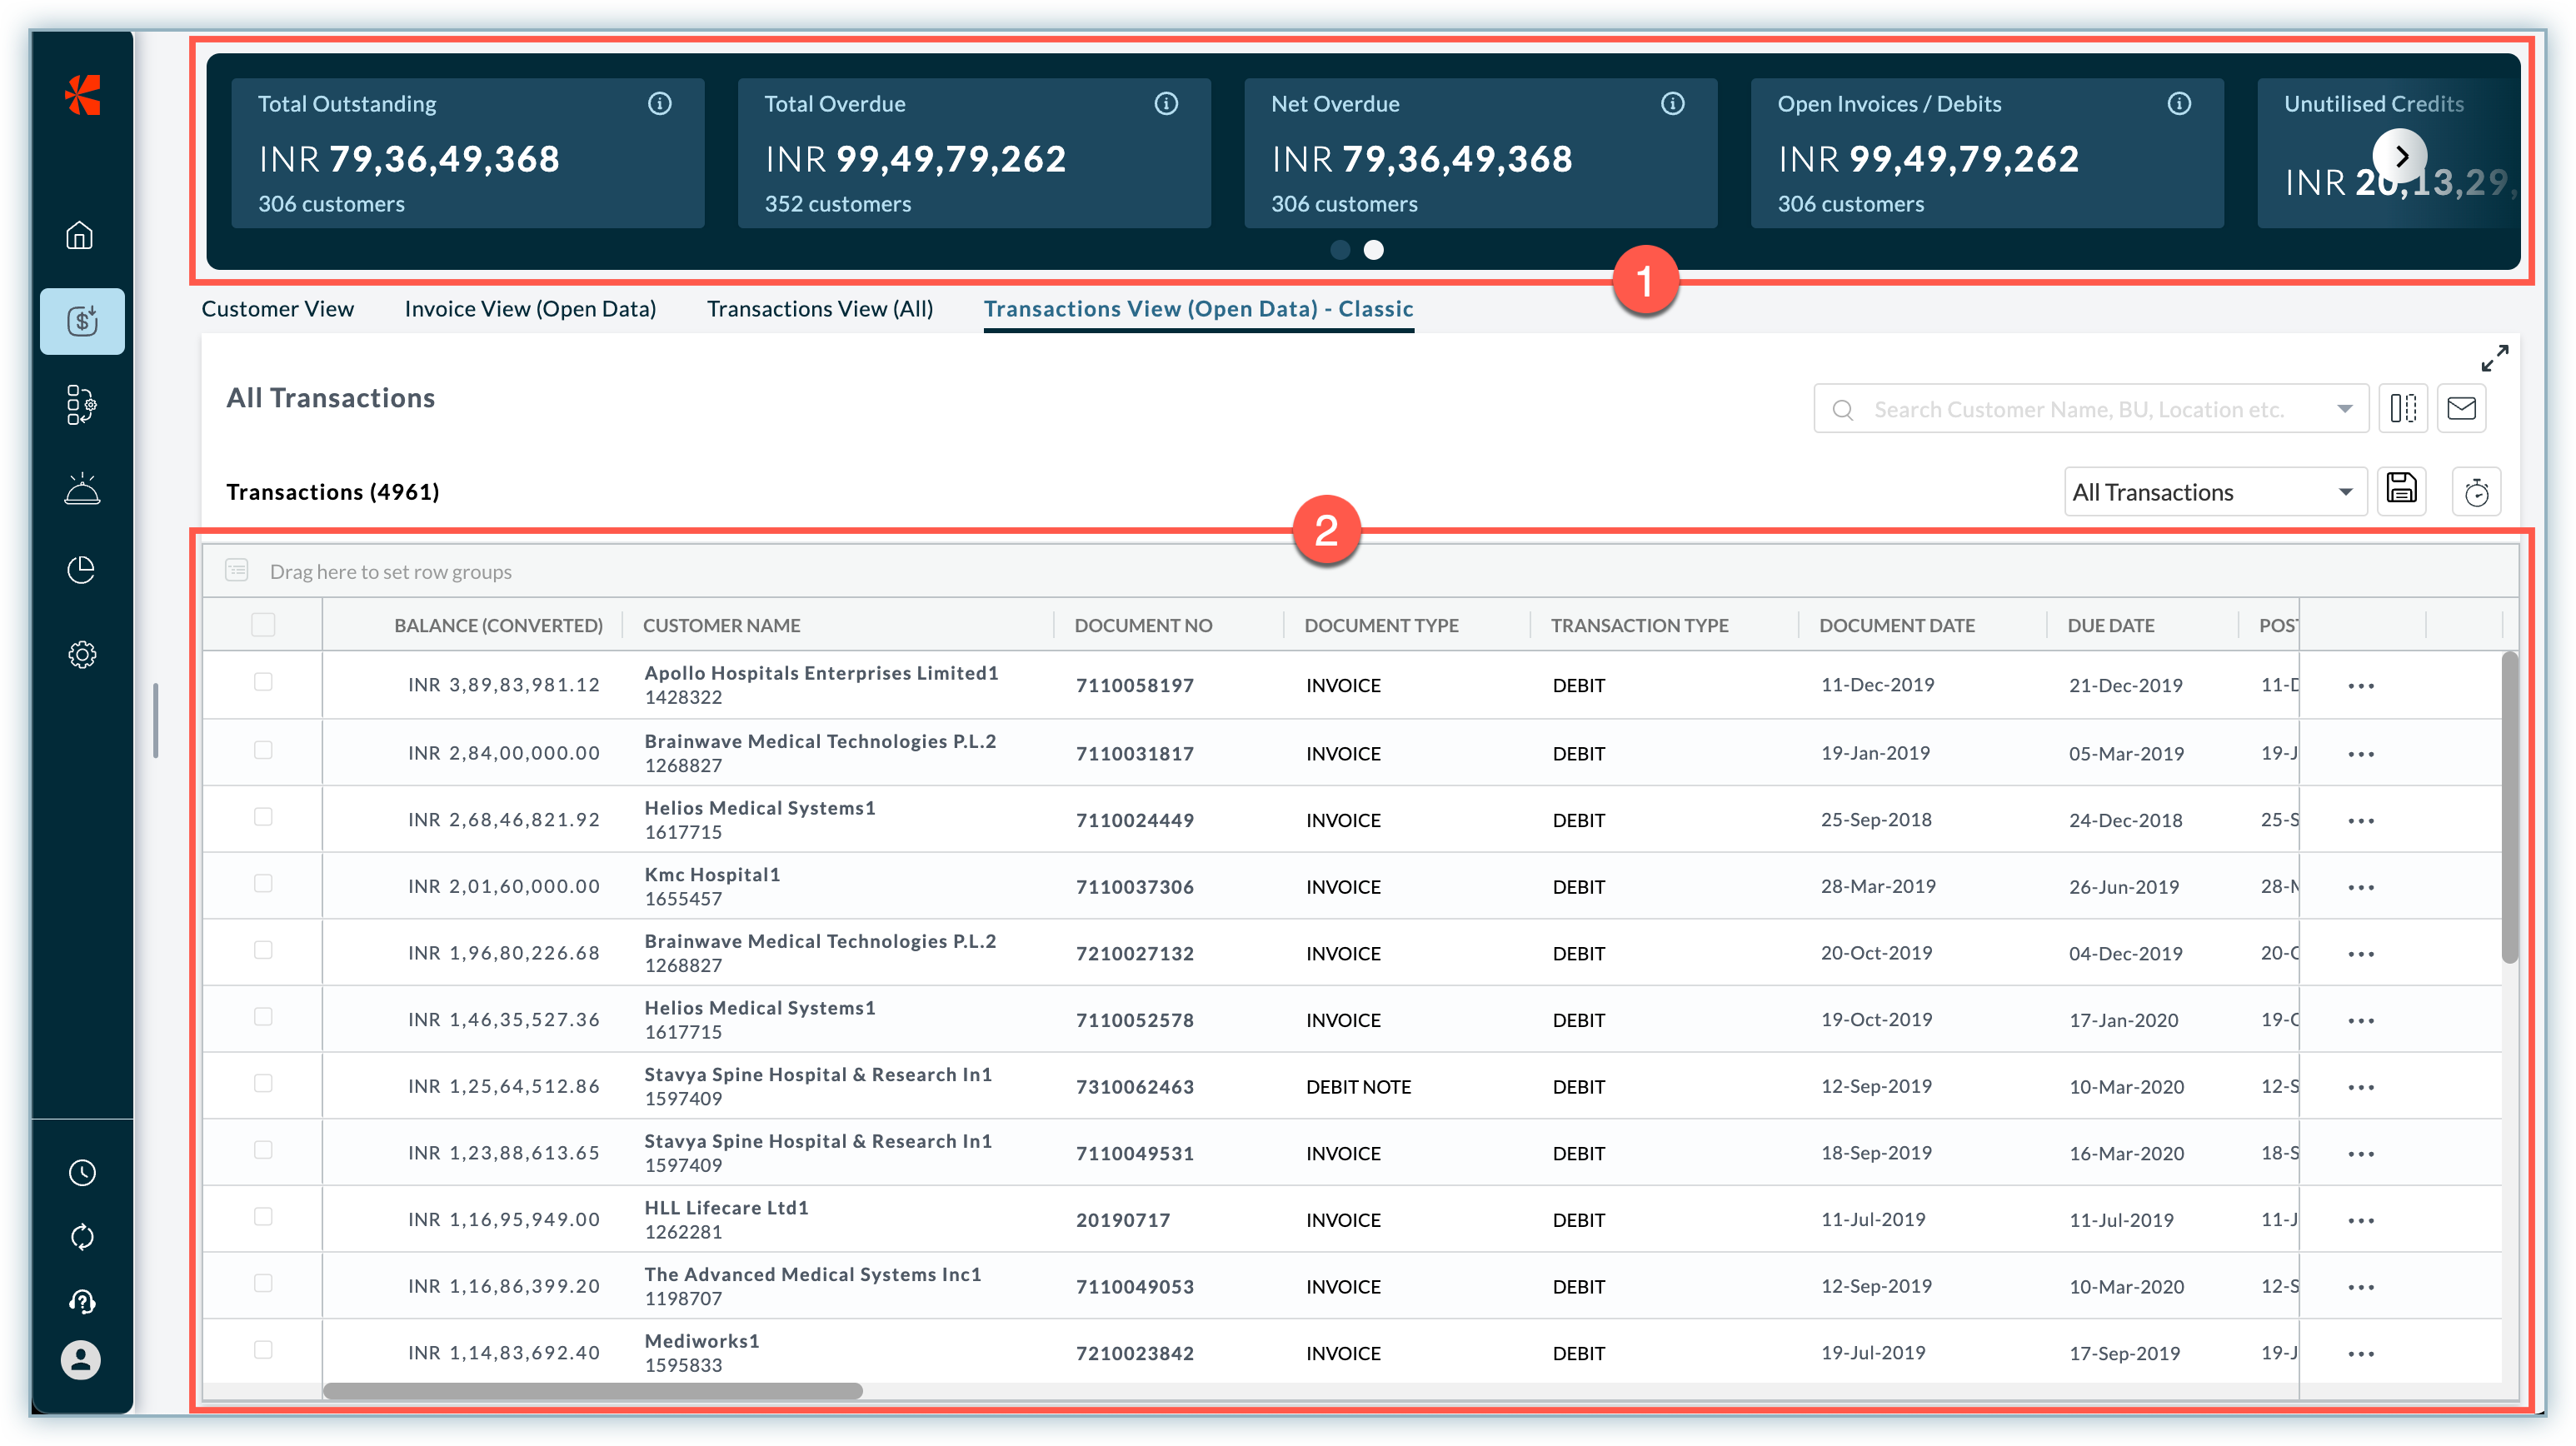
Transactions View (All and Open Data)
Transaction View in Receivables provides a real-time overview of important data points for each transaction associated with your customers. The significant use of Transaction View is to provide a list of invoices, debit notes, credit notes, payments, and other financial information associated with your customers.
To open the Transaction View, click the Transactions View(All) or Transactions View(Open Data) tab on the top bar of the Receivables page.
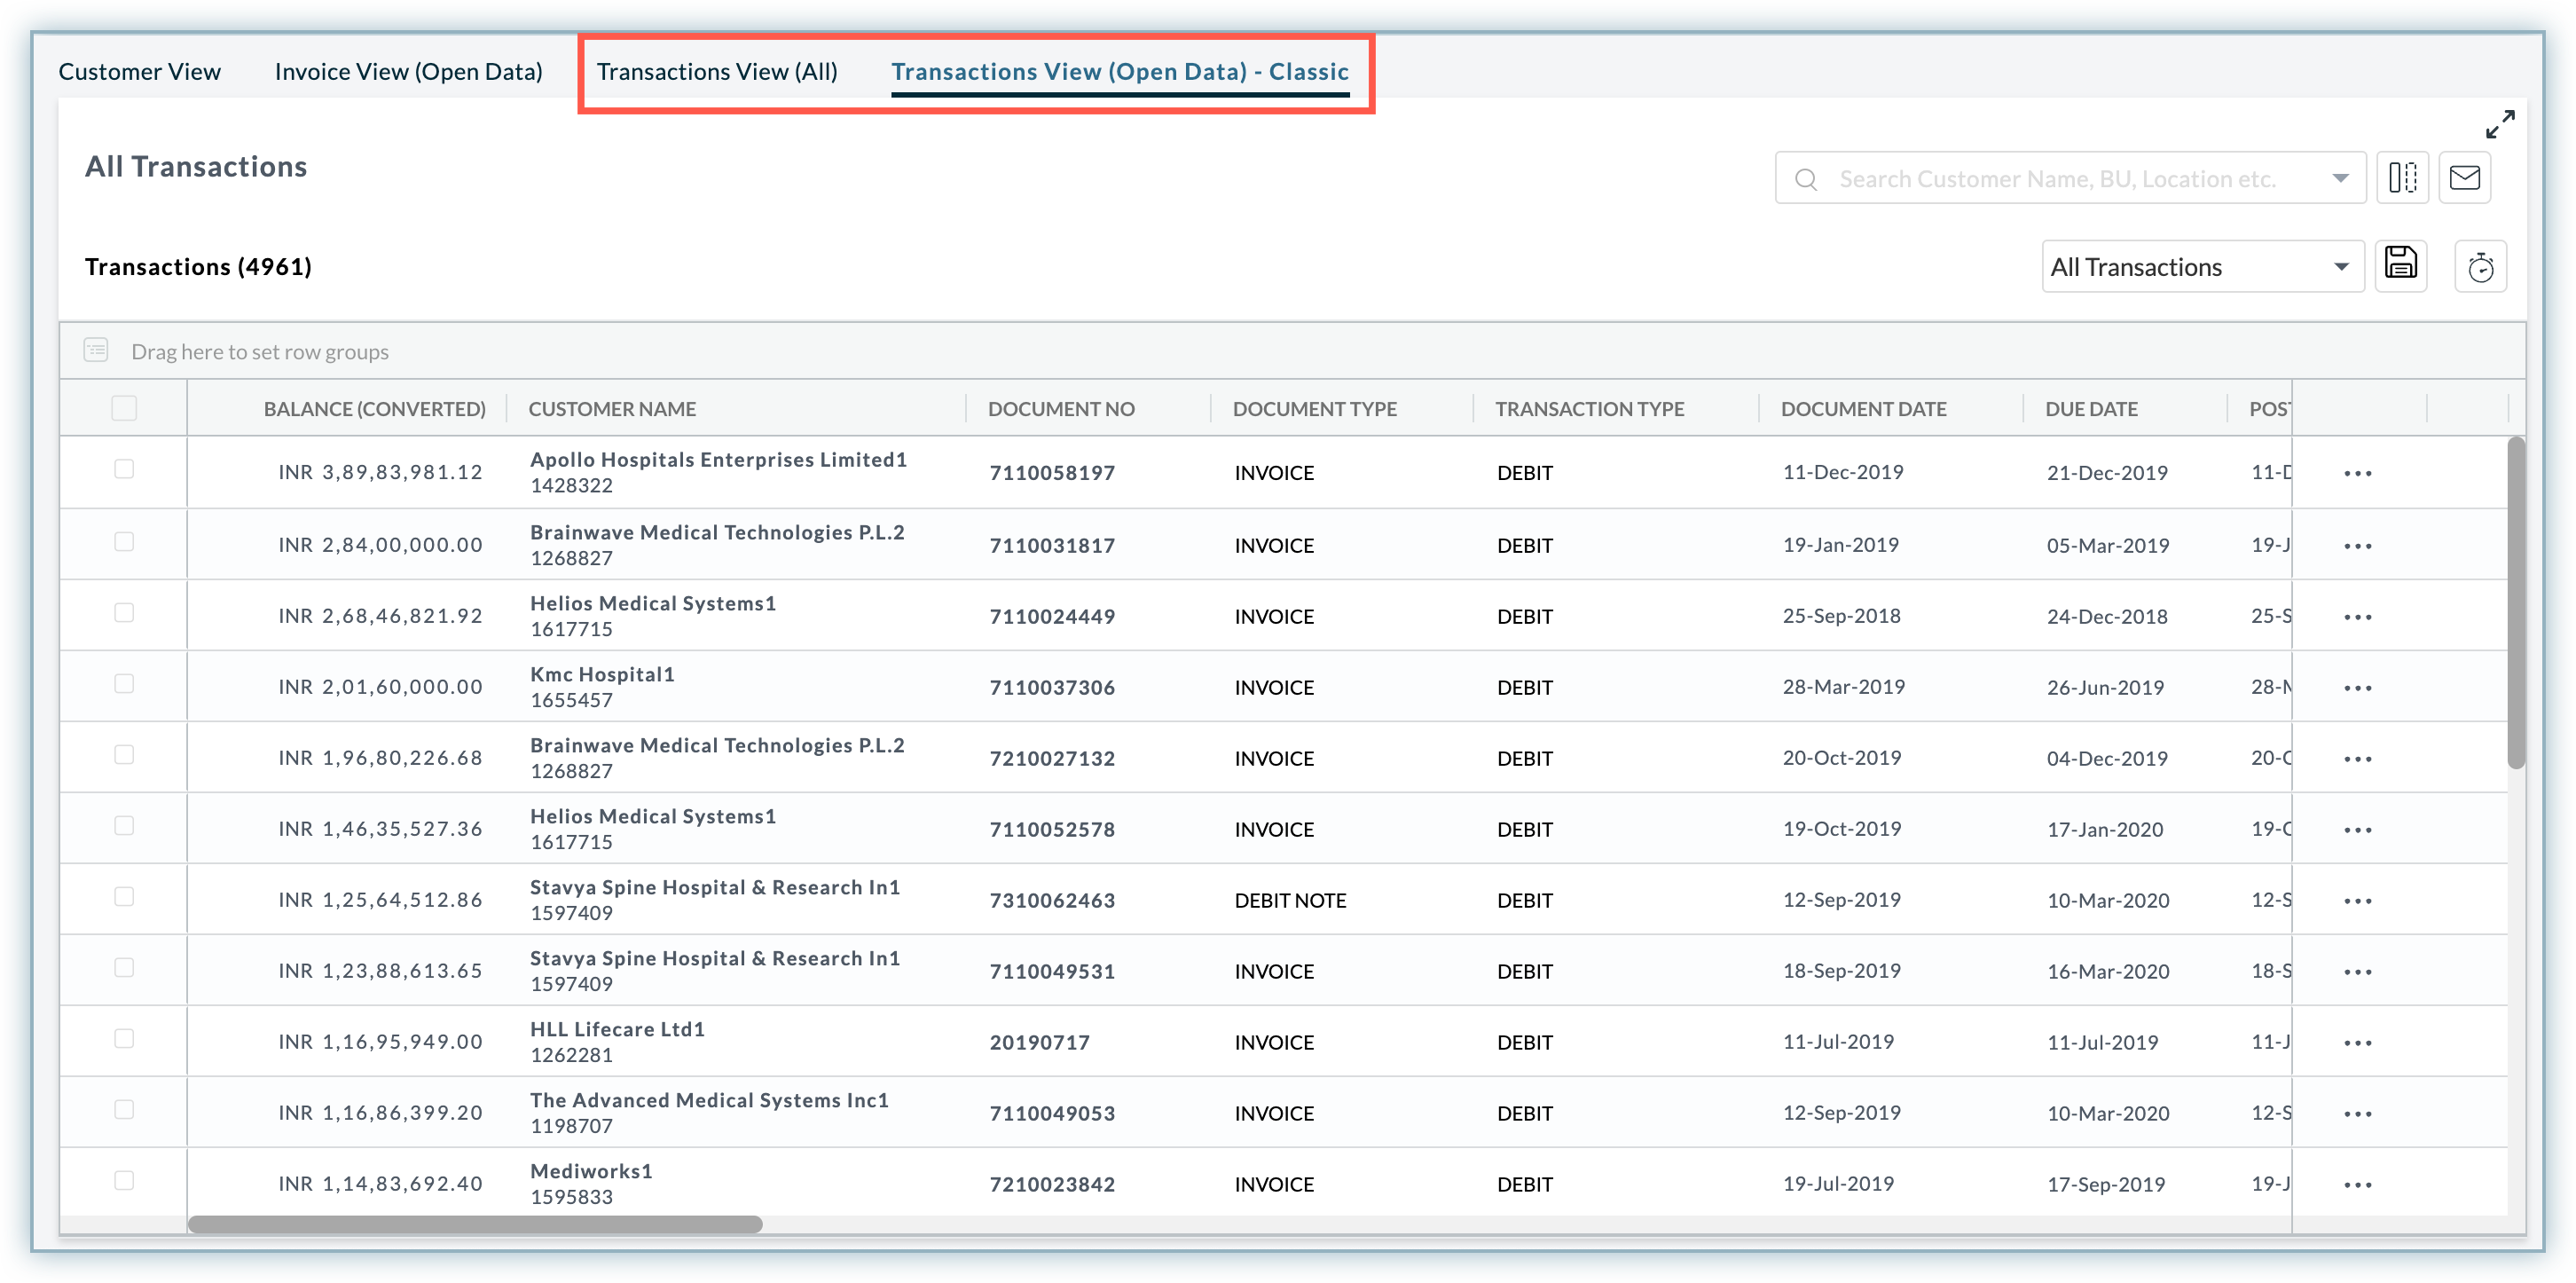
It displays the information in a grid table containing a list of documents associated with your customers, such as customer's invoice, credit and debit notes, balance, payment information, and other financial information. The Transaction View (All and Open Data) grid table can be customized by applying custom filters and selecting the additional columns.
Receivables provide two ways to see the transaction/invoice details associated with your business and customers:
- Transaction View (All): It displays all the transaction data associated with your customers. It includes the transaction data of paid and unpaid invoices, accounted and unaccounted payments, and more.
- Transaction View(Open Data): It displays open transactions across all the assigned customers. It includes unpaid invoices, on-account payments, unutilised credits, and any other open transactions. The Transaction View(Open Data) is significantly faster than the Transaction View(All), as it provides only the open list of invoices/transactions for all the assigned customers.
In Receivable View, click on the customer name to open the customer details page that contains all the details about a specific customer including collection data, account summary, invoices/transactions, balance, and more. The customer details page is a built-in dashboard that provides comprehensive overview of collections information related to a customer.
Components of Receivables Views
Receivables View has functional and viewable components that allows you to view the collection and AR data and take actions on it. The actions in components include customizing the grid view, advanced filters, selecting the data columns, performing collection-related activities on collection and AR data, and more.
Receivables consist of two main components. These components are detailed below:
Metrics Bar
The metrics bar represents the general statistics of your AR summaries on top of the Receivables View. It displays the overall collection statistics and AR data related to customers including total outstanding amount, overdue, open invoices, and unutilized credits amount. Here is the description of metrics shown in the metrics bar:
- Total Outstanding: The aggregated principal amount that customers owe to the company as of today. Total Outstanding is calculated by deducting the total credit amount from the debit amount of the customers.
- Overdue: The total amount from all the overdue invoices of a customer, debit notes, and amounts that have not yet been paid by the customer after the due date. It includes amounts from all the debit entries.
- Open Invoices or Debits: Total amount from all the open invoices or debits that have been recorded but not yet paid by the customers.
- Unutilized Credits: Total amount from unutilized credit which is not applied against the customer's invoices. For example, credit notes issued on customer accounts that have not yet been adjusted against the invoices.
See also
Customer and Transaction List
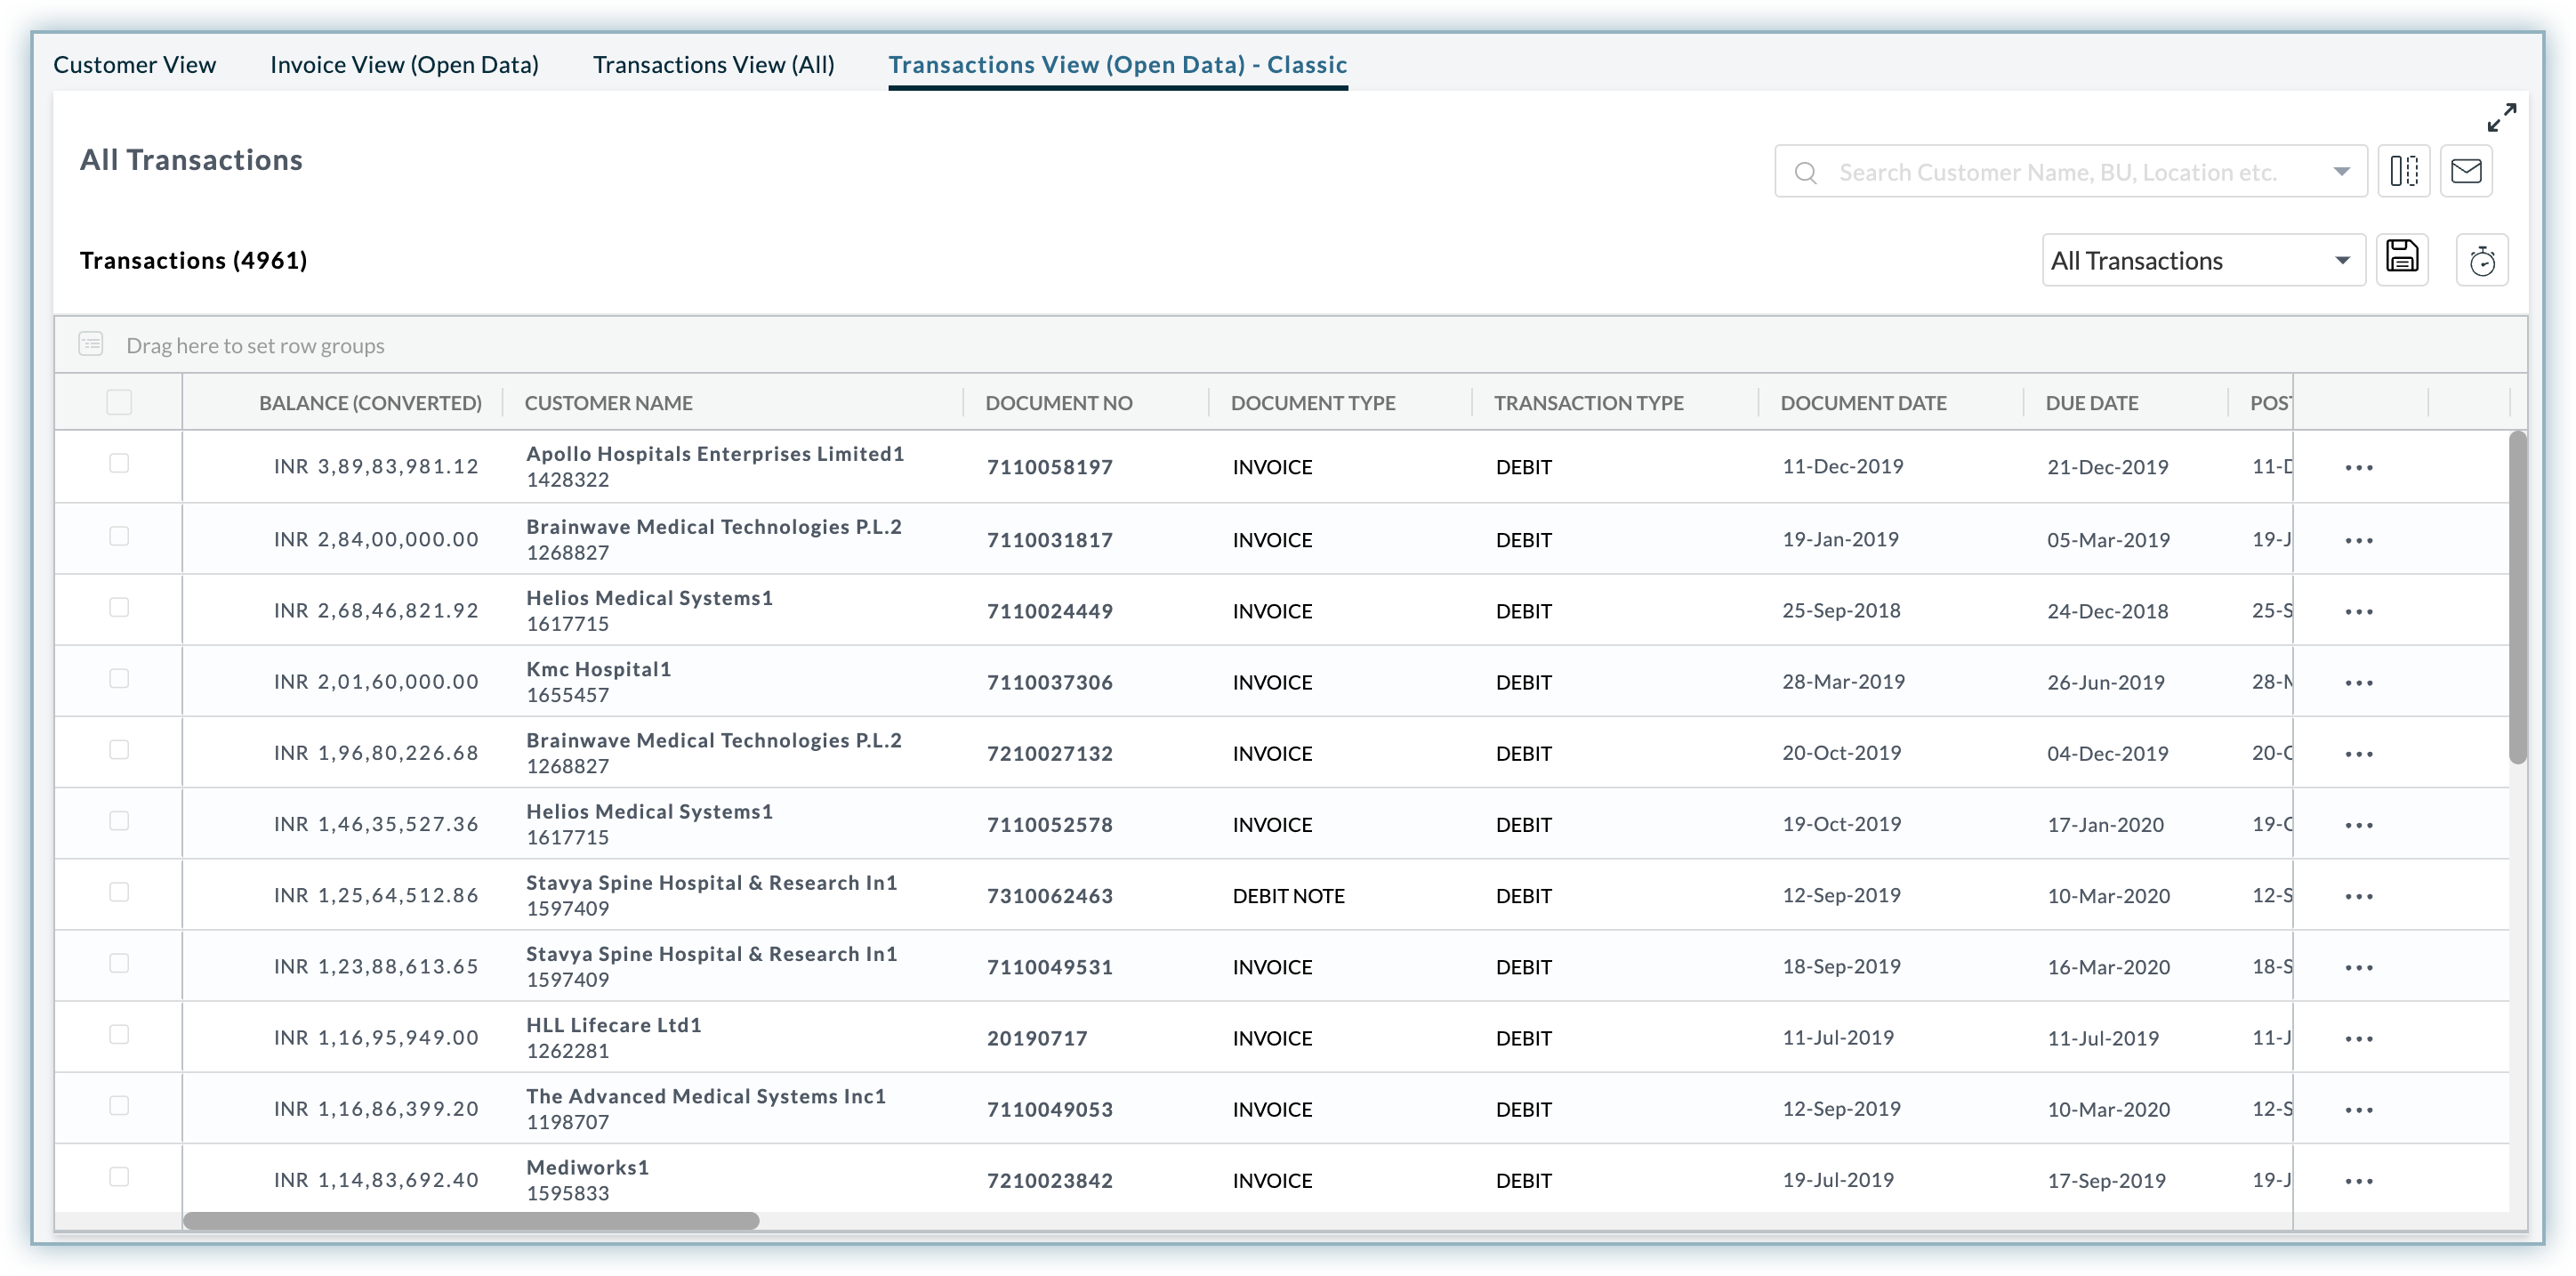
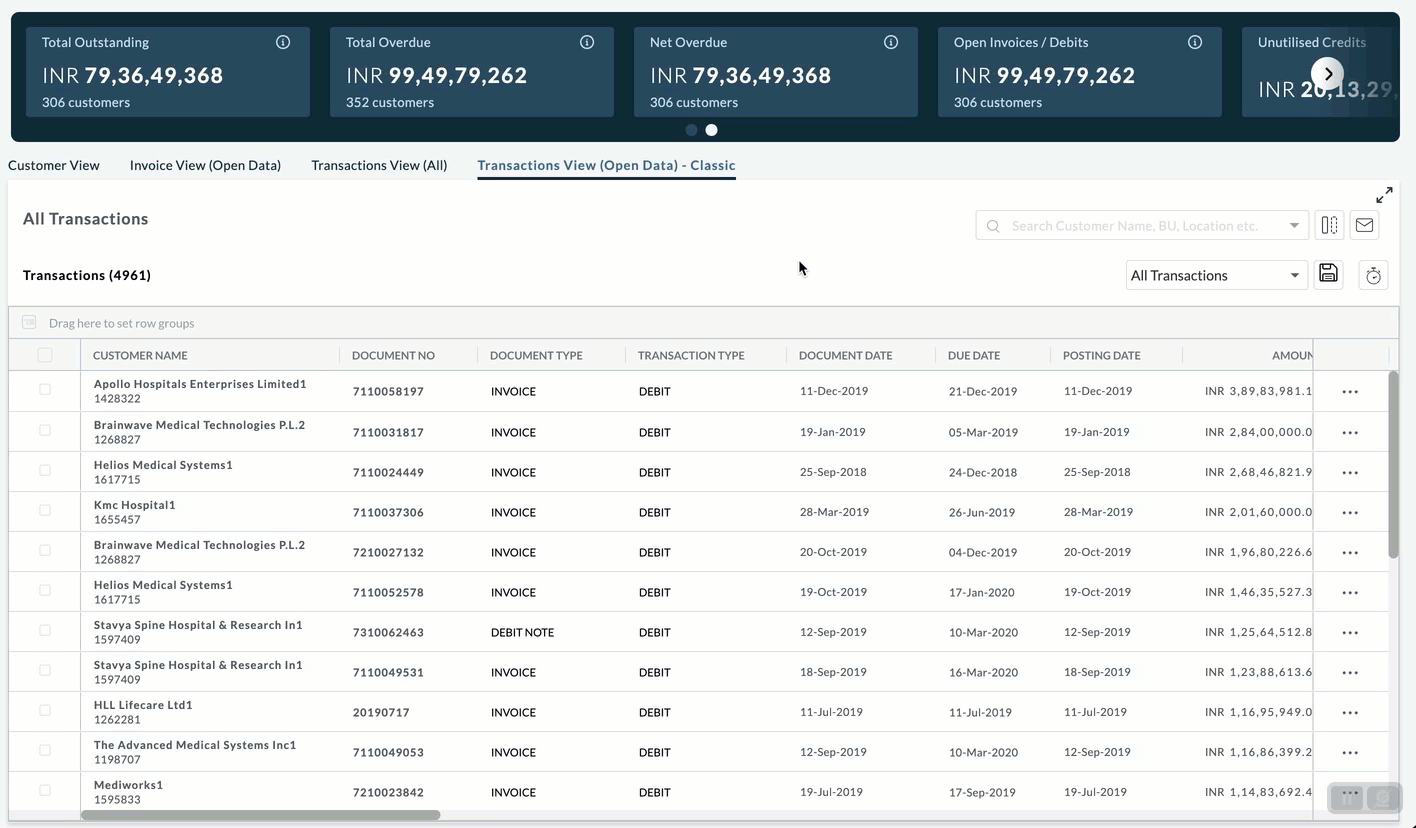
Receivables View provides clear visibility of your customers and transaction data in the form of a table. With an intuitive dashboard, you can select different views to display the list of customers and the transaction data related to them. Clicking the Customer View displays the list of customers along with the collection of related information in a grid table. Whereas, you can view the transactions and financial data by switching to the Transaction View.
Depending upon the selected view, you can customize the view of the grid table by performing bulk actions. You can also manage the Receivables data by performing collection-related activities such as sending email or SMS reminders, setting reminders, raising issues, and more.
To view the customers and transaction data separately, you can switch between the Customer View and Transaction View(All and Open Data) in Receivables.
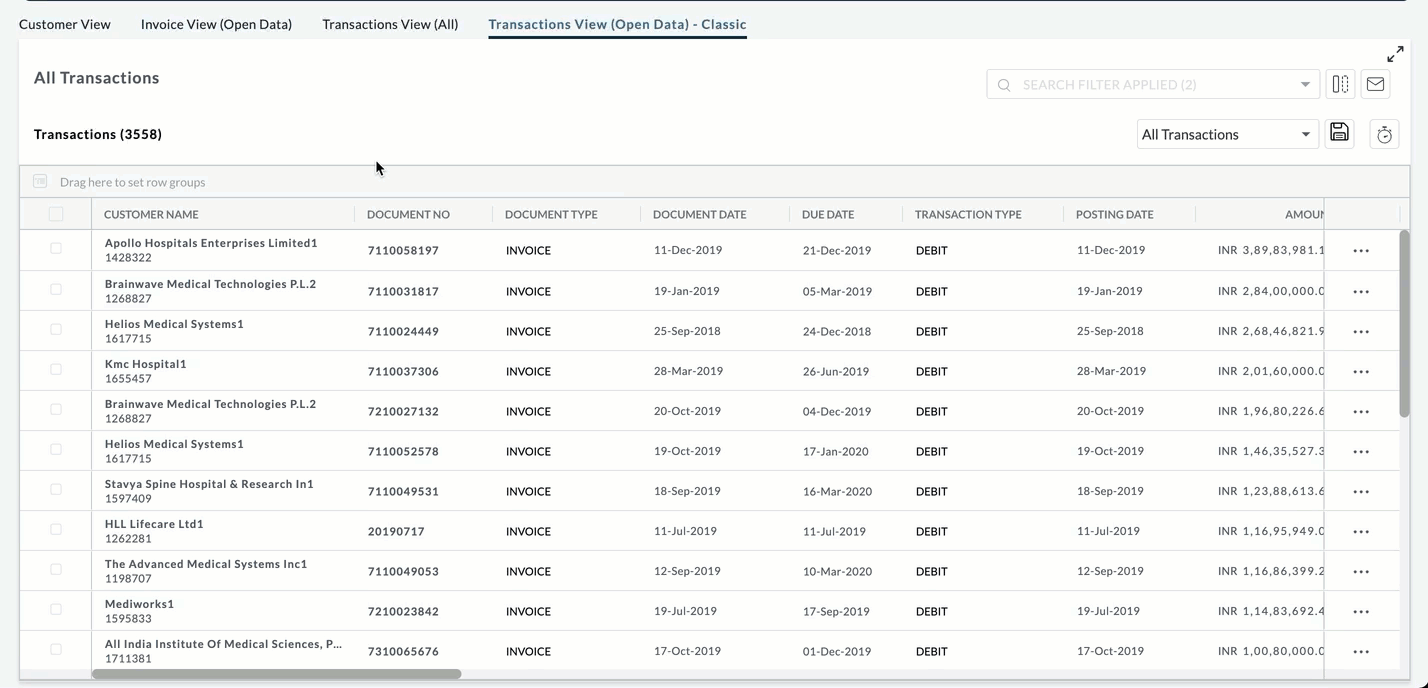
The following image displays the list of invoices or transactions associated with the customers.
Actions in Receivables View
Receivables offers a set of actions that allows you to manage and control the information displayed in the Receivables View. Depending on the selected view, you can customize the look and feel of grid table displayed in the Customer and Transaction View. You can apply filters, arrange data columns, show or hide the columns, search for customer and transaction data in the grid table, and more. The actions in Receivables View are divided into two categories:
- Bulk Actions
- Actions on Receivables View Data
Bulk Actions
If you want to perform actions an action on all the customers or transaction data at once, you can use the Bulk actions. It allows you to immediately perform certain actions for a large number of customers and transaction data. Using the Bulk actions, you can perform the following actions on Receivables data in Customer and Transaction View:
- Advanced Filter
- Selecting Data Columns
- Generating Receivables Report
Advanced Filter
You can use the advanced filter to filter data in the Receivables View based on specific data attributes and columns. An intuitive interface equipped with various filter options allows you to quickly find out the data based on your requirements. It has a great customization option, that allows you to select specific filter categories and corresponding filter conditions related to customer and transaction data.
In Customer View, the advanced filter is grouped into various filter categories. You can select any of the following filter categories to filter the data and properties of customer related data.
- Customer data based filters: Filter customers based on total outstanding, overdue amount, open debits, currency, and more. You can select the associated condition and value for a specific filter.
- Date-based filters: Used to filter the customers based on their last activity date. The last activity date retrieves the customers based on the collection activity that occurs in the give time period.
- Aging-based filters: The aging-based filter consists of various ageing buckets based on which you can identify the overdue amount of customers within an ageing bucket.
- Collection Status based filters: It helps you identify the customers based on a specific collection status category. You can retrieve customers by selecting one or more collection status as a filter.
- Custom fields based filters: The custom fields are defined at the customer and document or invoice level. You can use the filter to see the customer information based on defined custom fields.
Note
Contact administrator to define a new custom field at the customer or document level.
By default, "Customer Data Based Filter" category is automatically selected in advanced filter of Customer View that ensures all the customers in Customer View have outstanding amount greater than zero. You can customize the filters by selecting or unselecting the filter categories.
Note
You can remove the applied filter from the Customer View by clicking cross icon next to the filter-name on top of the grid table.
Example
The following illustration shows collection status based filters applied to the Customer View page. The filter condition selected for collection status includes the P2P amount greater than USD1000.
Selecting Data Columns
In the Receivables view, the grid table changes based on selected view. You can see the customer and transaction data in a normalized table spread across various rows and data column attributes. These data columns can also be customized for the selected views in Receivables. You can select which columns should be displayed in the table by adding or removing it from the table in Customer or Transaction view. The data is populated in Receivables view based on the import activity in Receivables. When you import the CRM activity and financial data of your organization into Receivables, it auto-populates the data across various rows and columns in Receivables view.
In Receivables View, the data columns are subjected to provide details about your customer and transaction activity. These data columns are grouped into two categories:
- CRM Data: The columns that map the customer data from the customer relationship management (CRM) system to various data columns in Customer and Transaction View. For example, importing the CRM data contains information about customer, currency, region, sales, account and finance owner, and more.
- Financial Data: The columns that include the financial information about your customers such as invoices, outstanding balance, open debits, payments, and more. You can further explore more columns by customizing the data columns in Receivables View.
Depending on the selected view, the columns can be customized using different options.
Customizing the Data Columns in Customer View
In the Customer View, you can show or hide the specific attribute columns using the Column Chooser option. You can select the specific columns to be shown in the Customer View table from the column sub-categories. The data columns of Customer View Grid table are grouped based on the following sub-categories:
- Customer Based Columns: Select the customer-based columns to display the information related to your customers and collection data in the grid table.
- Aging Columns: Select the aging buckets columns to show the overdue balance during a specific period for all your customers in the grid table.
- Collection Status Based Columns: Select the columns to show the collection status and sub-status of various collection activities related to your customers in the grid table.
- Custom Fields: Select the custom fields data columns that are defined at customer and document level to view the data entries (if any) of the custom fields for the customers in the grid table.
- Date Based Columns: Select the columns to show the data based on the specific period, such as last activity date.
To customize the data columns in Customer View, follow these steps:
- Click the Funnel icon at the top of the Customer View.
- Click Column Chooser tab and select the columns from the specific column sub-categories.
- Click Apply.
Example
The following illustration demonstrates how you can view the Issue Amount for all your customers by selecting the collection status column sub-categories.
Customizing the Data Columns in Transaction View
In Transaction View, you can show or hide the specific attribute columns using the column option given in the Transaction View Grid table. To customize the view of the Transaction View Grid table, follow these steps:
- Click the Column icon in the Transaction View.
- Select or remove a data columns to show/hide from the table.
- Click Apply.
In the following illustration the relevant columns are selected to display the document type, transaction type, and document date in Transaction View(Open Data).
Reordering Data Columns in Receivables View
If you want to change the order of a particular column in a grid table of Receivables View, then you can use the move the column using drag-and-drop feature. It allows you to control the column orders and visualizes header row column reordering. You can drag and drop a column into place by clicking and holding the column header. To reorder the data columns in Receivables View, hover over the column you want to move and reorder. Click and hold the column and place it at the desired location.
In the following illustration, columns are set to a specific position in Transaction View(Open Data).* The order of the columns is Customer Name > Document No > Document Date > Due Date > Document Type.
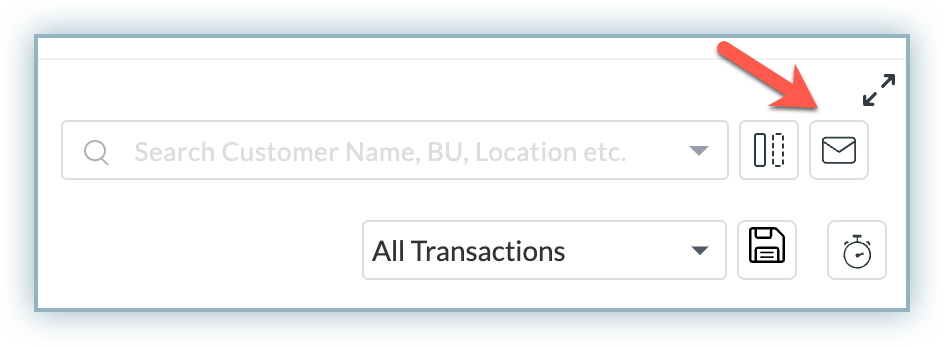
Generating Receivables View Report
Receivables gives you an option to generate email based report for any selected view or data. By generating an email report, you can view, and summarize all the data related to your customers and transactions.
To generate an email based report, click the Mailbox icon at the top-right corner of the selected Receivables View page. A report will be sent to your registered email address. You can download the report(Excel/CSV) by clicking the link in your email.
Creating a Custom Filter
Receivables custom filter option allows you to create a custom filter in the Transaction view. By creating a new filter, you can customize the default view of the Transaction View grid table.
To create a new filter in Transaction View, follow these steps:
- On the Transaction View page, click the arrow down in the search bar to create a new filter.
- Select the fields from the dropdown menu and select the corresponding conditions.
- Click Apply.
- Click the Save to retain the current view (optional).
The following illustration creates a filter in the Transaction View (Open Data) for which the document types are invoice and credit notes.
In order to reset the view and selected filters, click the Reset Filter option in the create filter window.
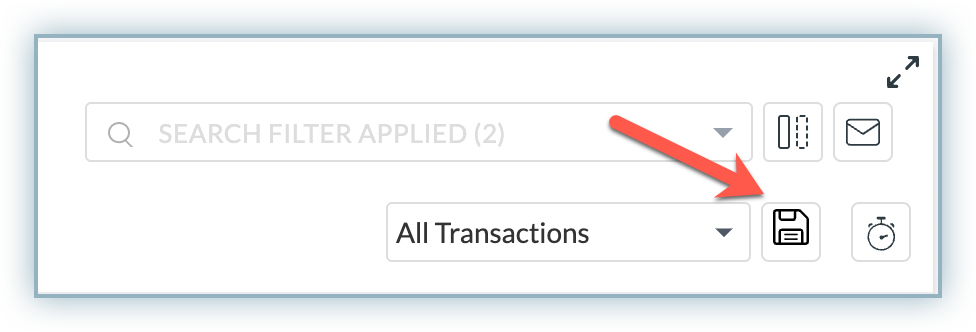
Saving the View and Filters
Once the filters are applied to data in Receivables View, you can save the current view for later use. This will allow you to quickly switch to the saved view whenever you want to apply the filter.
To save the current view or filter, click Save and enter the name of the view. You can also make it available for other members of your account.
Receivables allows you to view all your saved reports from configured reports , where you can view, schedule and manage the Report Subscription. After saving the report as a new view, you can subscribe to the configured report using the Report subscription feature in Receivables. To know more, see managing report subscriptions.
Setting Data Columns Into Row-Groups
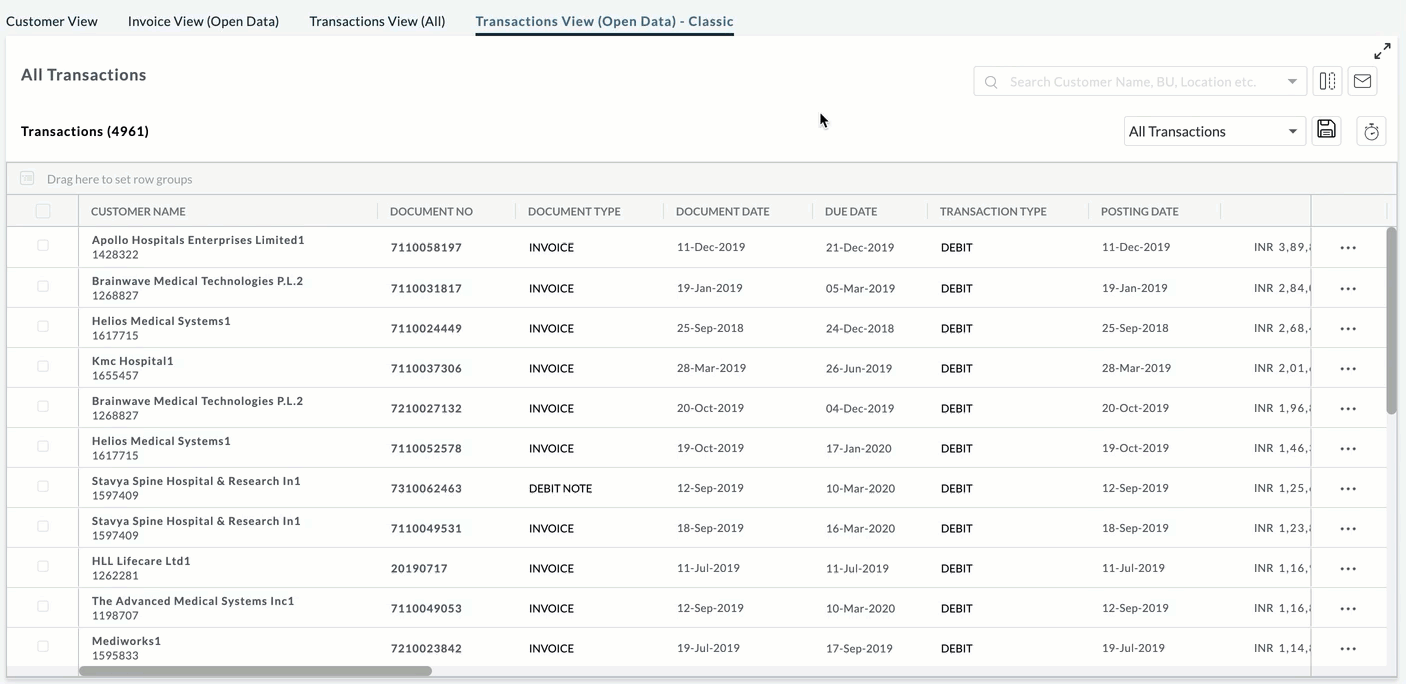
In Transaction View, you can view all the invoices and transaction data by setting a key attribute column as a row group. A row group can contain all the values and fields for a selected column which further can be nested by selecting another column within that value. After grouping the columns as row groups, you can click the primary column of the hierarchy followed by other columns to display the respective fields and values. You can group columns that only contain string and character values.
The following data columns in Transaction View can be grouped into a row group:
- Customer Name
- Document Type
- Business Unit
- Location
- Finance Owner
- Sales Owner
- Customer Currency
To group data columns, select one of the columns and drag and drop on the top of the header of the Transaction View table. It will display all the fields and values defined within that particular column as a row group. You can select a specific column from the row group and view all the entries within that column.
In the following illustration, columns are dragged to the top of the grid table to set the row-group as Customer Name > Document Type in the Transaction View(Open Data).
Tagging
Tags are customizable labels or user-defined keys that you can attach to a customer or an invoice to categorize them and organize your data as per your requirements. These tags offer various valuable functionalities:
- Group specific customers or invoices for a consolidated view within the Customer or Invoice Views.
- Generate targeted reports focusing on customers or invoices associated with specific tags.
- Implement customized auto-engagement cycles for customers bearing particular tags, allowing unique interaction strategies.
Prerequisite for creating tags
Note
You will be able to use tags only if it is enabled for your role.
Follow the steps below to enable tagging for your users:
-
Login to your Receivables site.
-
Go to Settings > Roles and Permissions
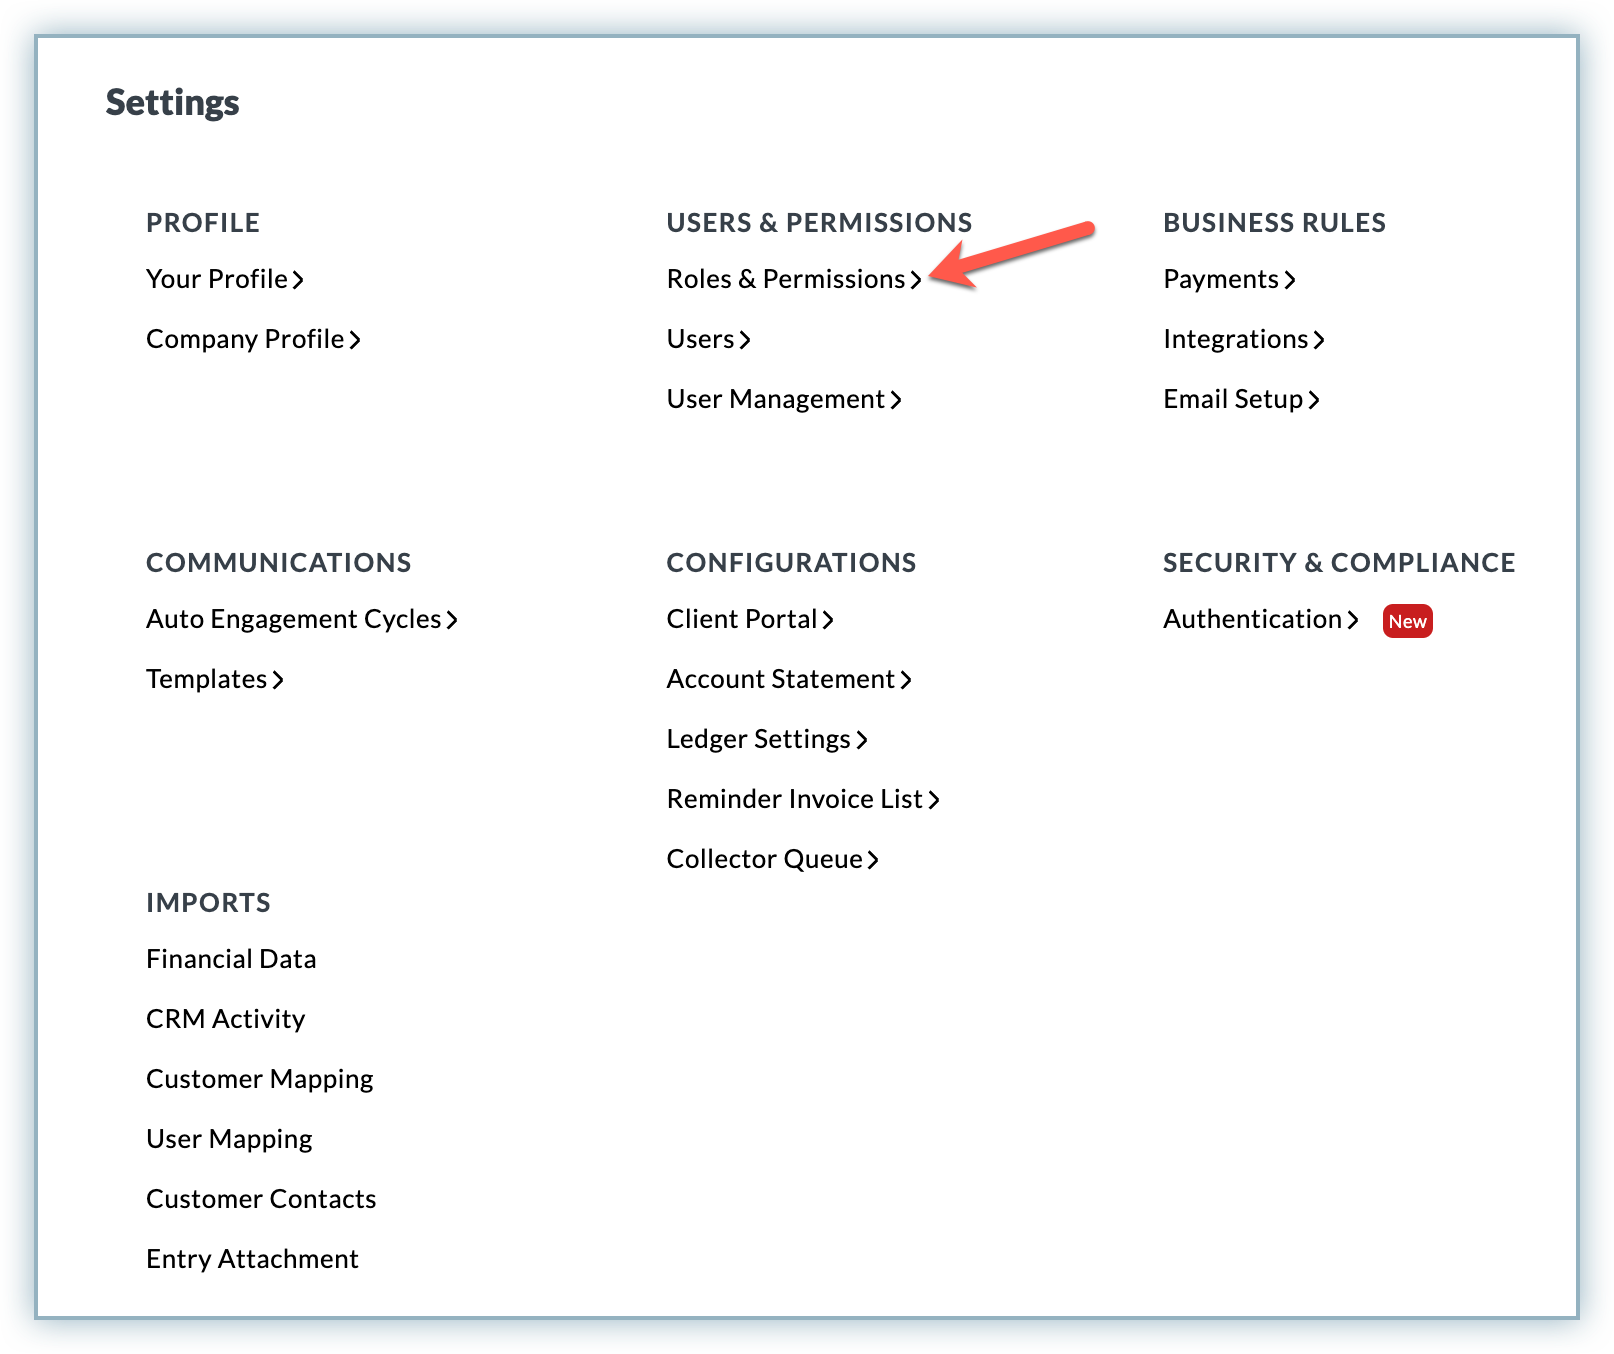
-
Click on the desired Role.
-
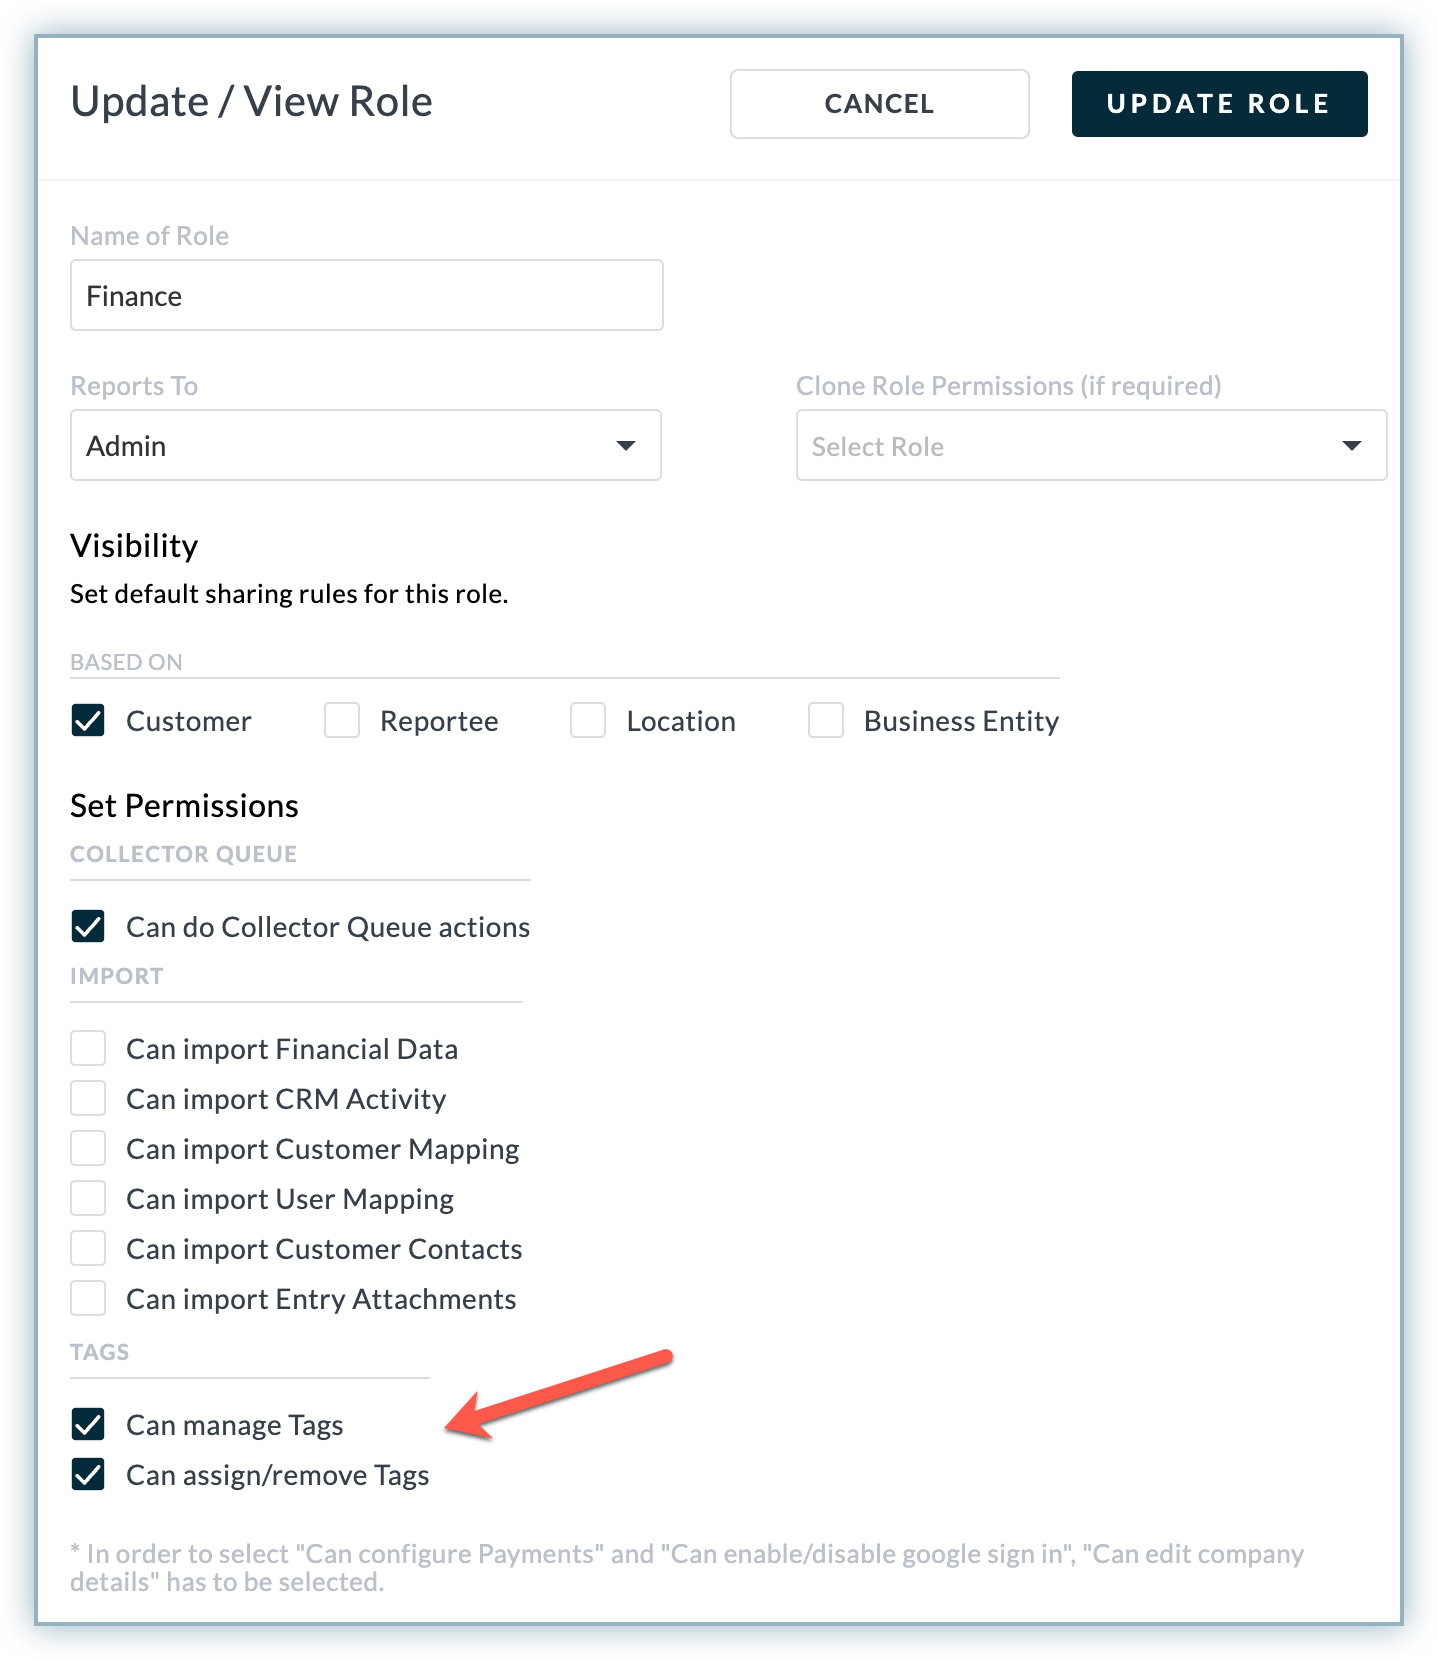
Scroll down to the Update/View Role pop-up to the TAGS section.
-
Enable one of the options as described below: a. Can manage Tags - If you want to allow the users belonging to the selected role to create, edit, delete, assign or remove tags. b. Can assign or remove Tags - If you want to allow the users belonging to the selected role to assign or remove the existing tags only
-
Click UPDATE ROLE
Let us see how you can create and manage tags.
Enabling Tags in Customer and Invoice Views
If you have the relevant permissions as discussed in the previous section, you can enable Tags as a column in the Customer and Invoice Views using the Column Chooser.
Customer View
Follow the steps below to add the Tags column:
-
Go to Receivables > Customer View
-
Click the Filter button
-
Click on the Column Chooser tab and select Tags under Customer Data Based Columns
-
Click Apply
Invoice View
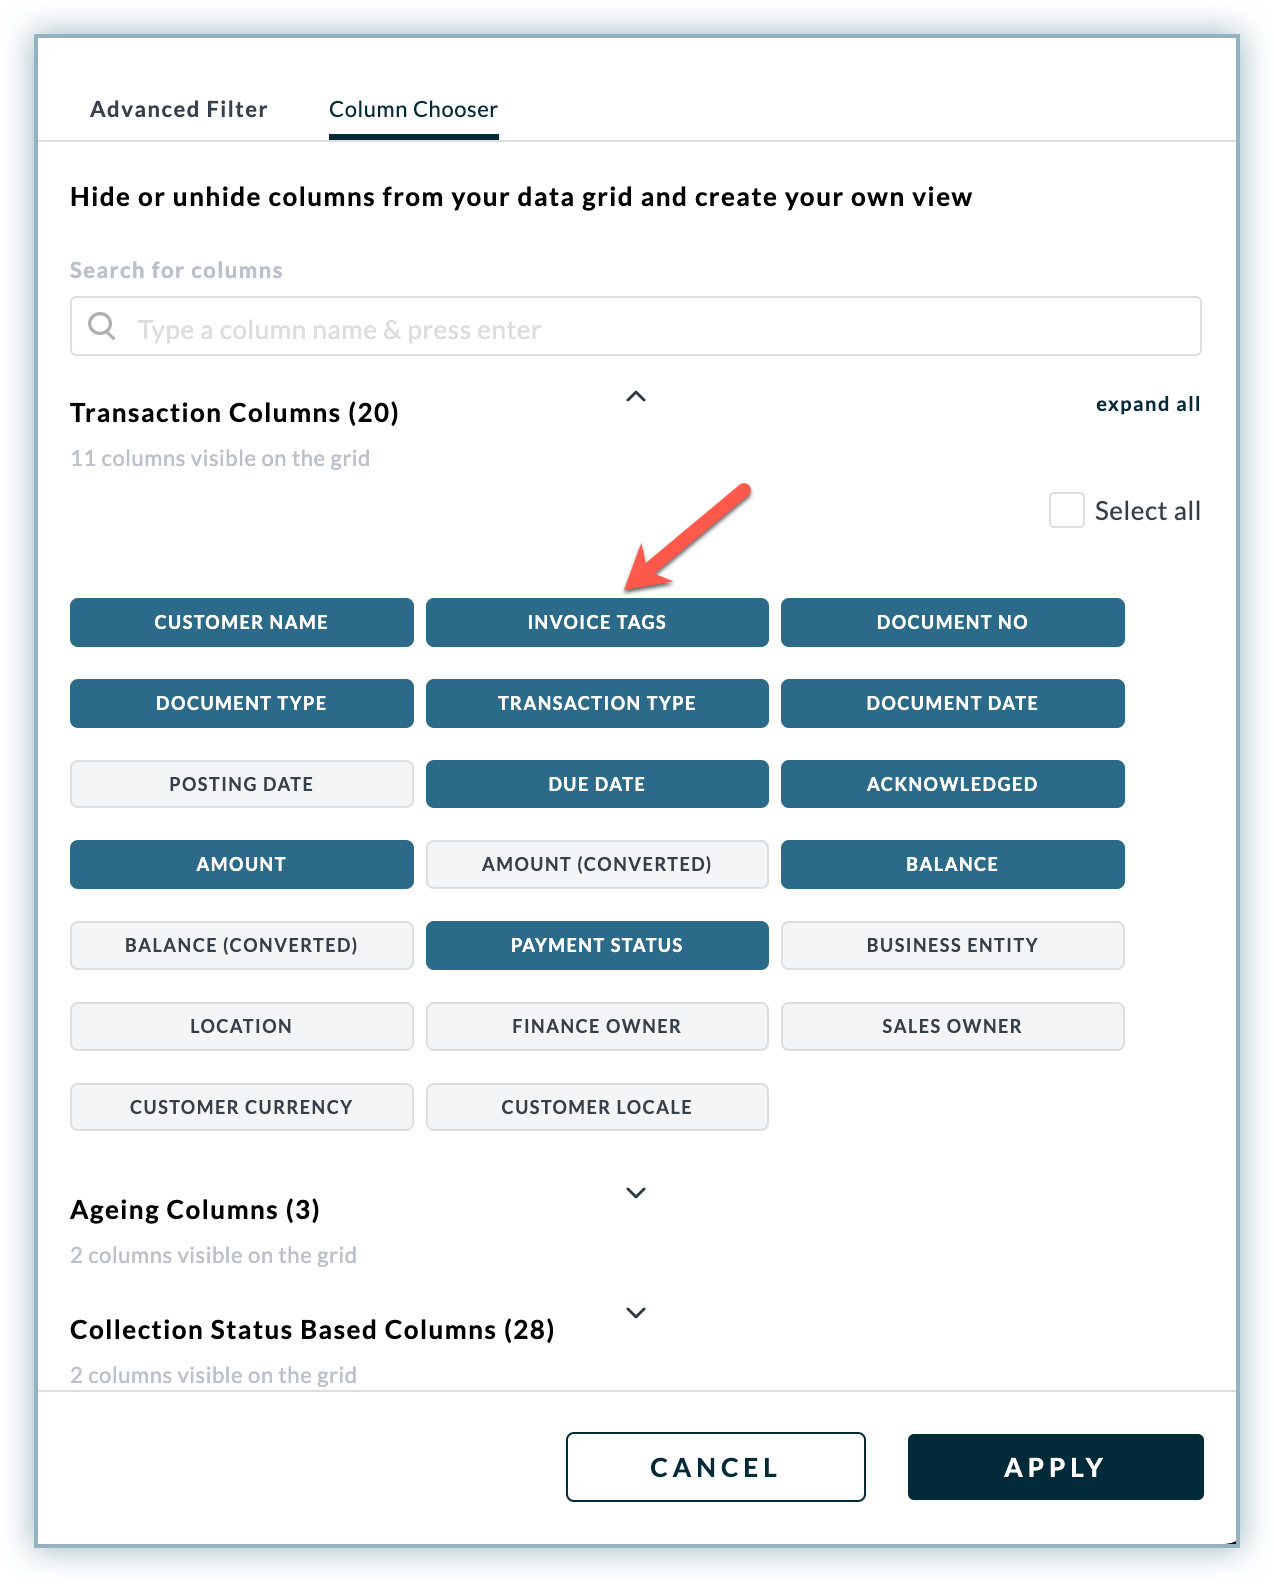
Follow the steps below to add the INVOICE TAGS column:
-
Go to Receivables > Invoice View
-
Click the Filter button
-
Click on the Column Chooser tab and select INVOICE TAGS under Transaction Columns
-
Click Apply
Managing and Assigning Tags
Once you have enabled Tags as a column in the Customer and Invoice Views, you can create tags and assign them to desired customers and invoices.
Assigning Existing Tags
Follow these steps to assign the existing customer or invoice tags:
-
Navigate to the Receivables > Customer or Invoice View. You must be already there if you followed the steps from the previous section.
-
Click Add/Apply Tags from the Tags column for the desired customer.
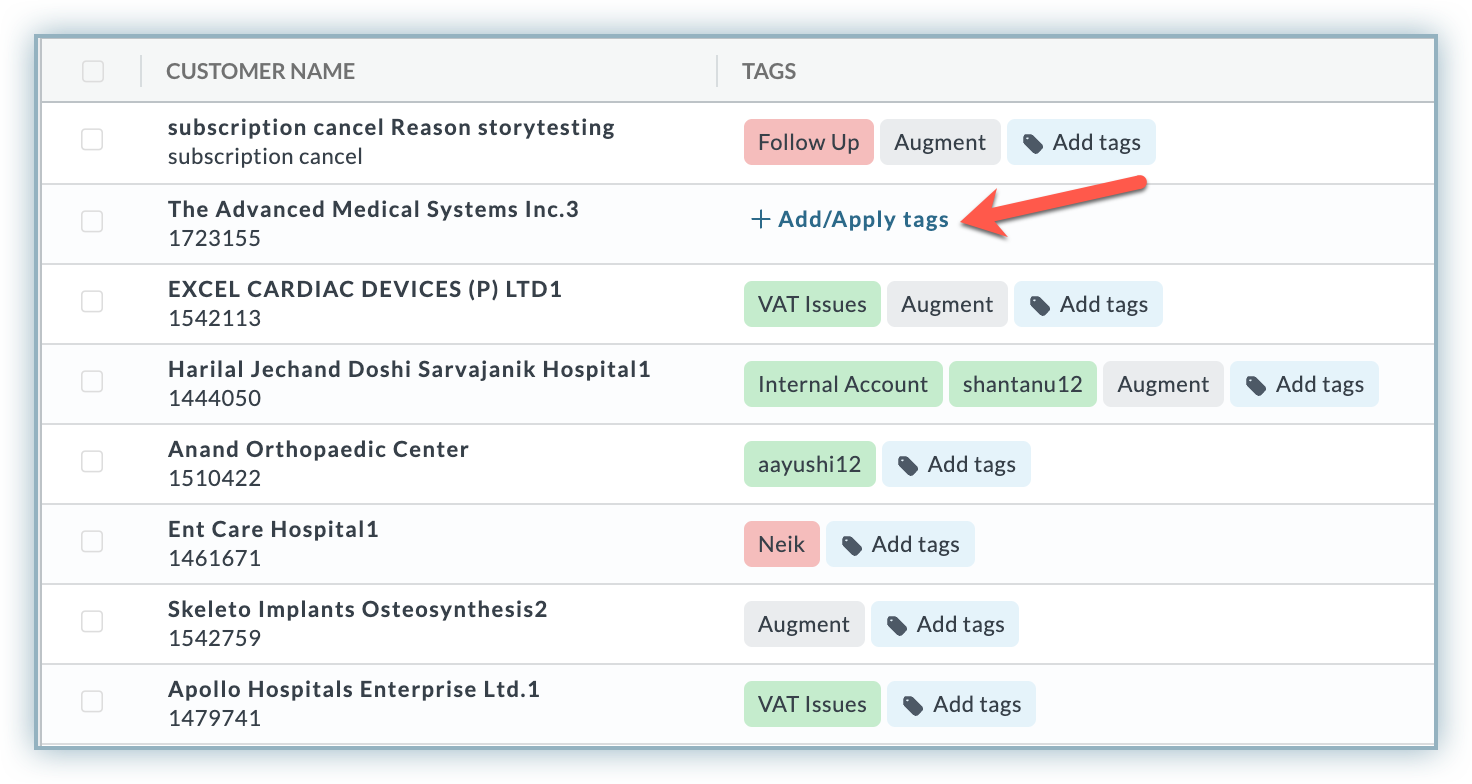
-
Search for the desired existing tag name in the field and click it. Make sure to click on the name of the tag to select it.
-
Click Add Tags if you want to add more tags from the existing set.
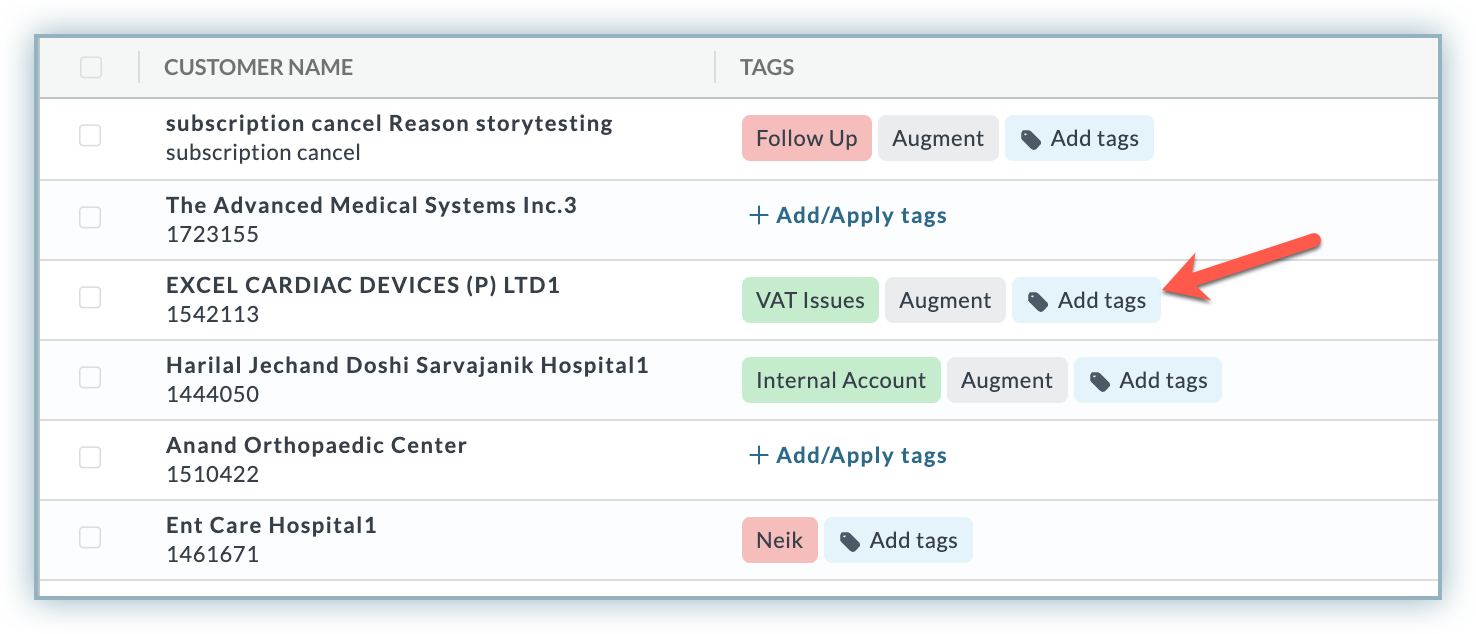
Creating Tags
Follow these steps to add/create a new tag:
-
Navigate to the Receivables > Customer or Invoice View. You must be already there if you followed the steps from the previous section.
-
Click Add/Apply Tags
-
Enter the desired name of the new tag in the text field at the top of the pop-up. If a tag with the same name exists, it will appear for you to select it.
-
If it does not exist, click Create or press the Enter/Return or Tab key from your keyboard to create the new tag. The system will create the tag with a random yet unique colour and it will be automatically assigned to the customer for whom it is created.
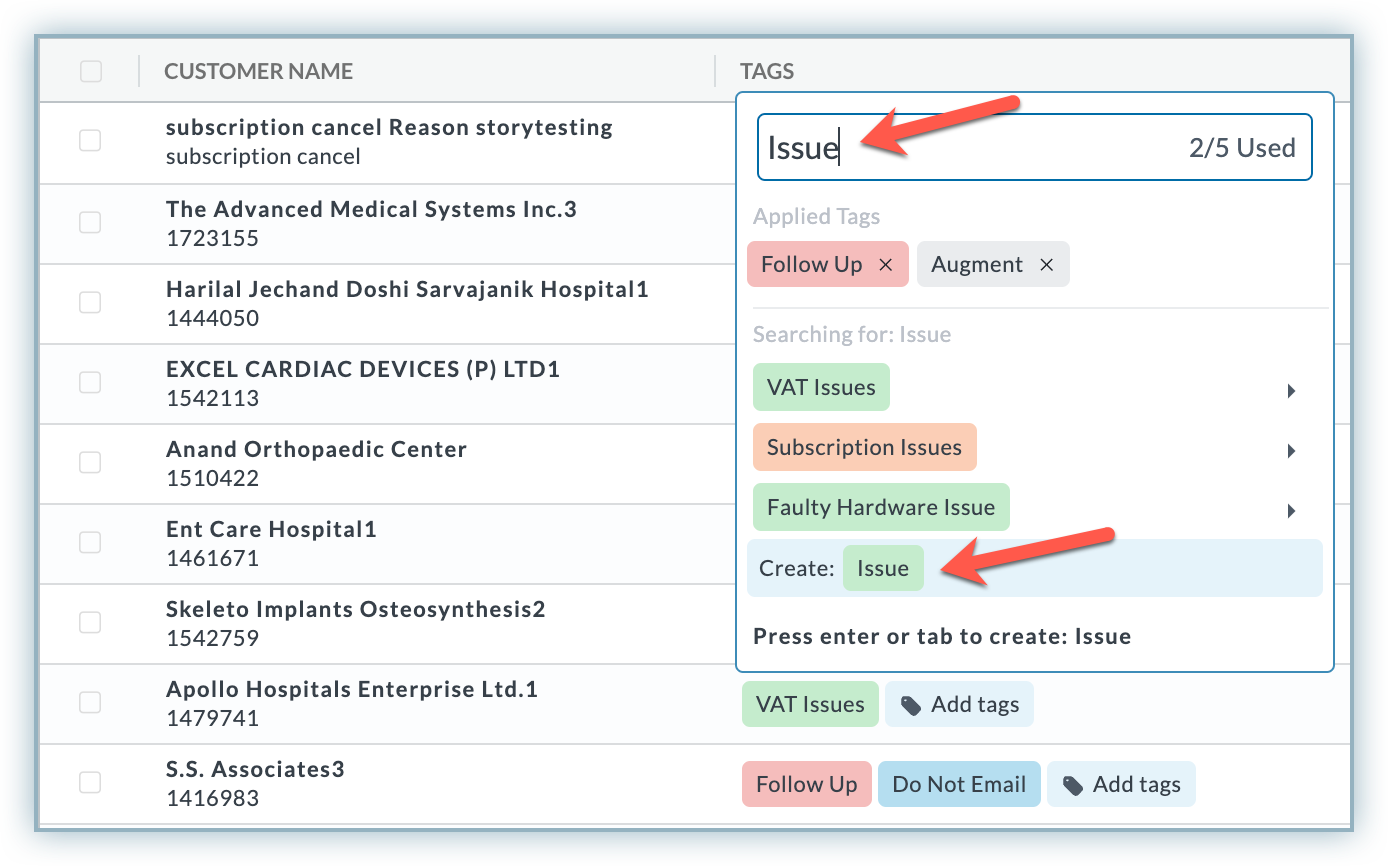
Editing and Deleting Tags
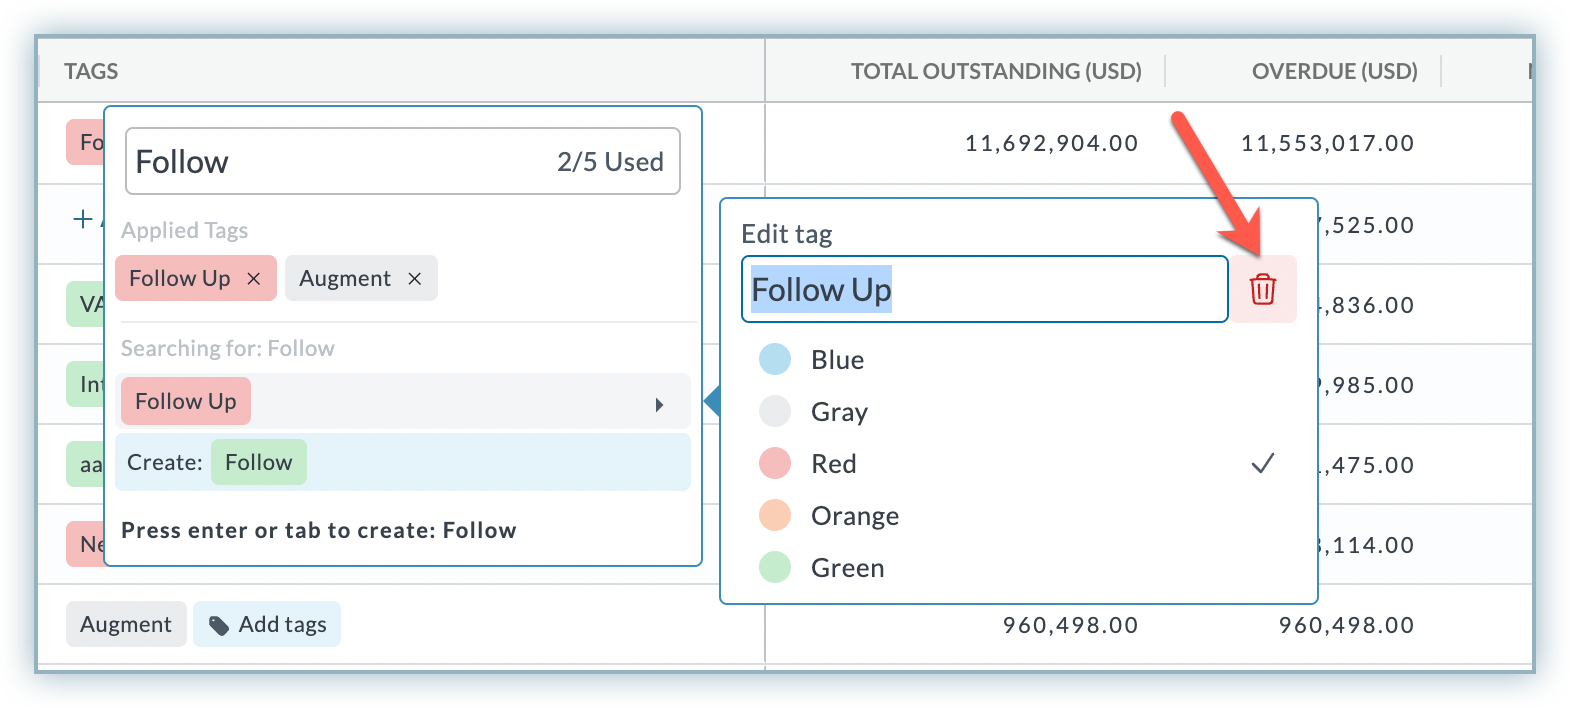
You can edit the tag name, tag color, or delete the tag after you have created it. Follow these steps:
-
Navigate to the Receivables > Customer or Invoice View. You must be already there if you followed the steps from the previous section.
-
Click Add/Apply Tags
-
Type the tag name in the text field.
-
Hover over the arrows on the right side of the desired tag name.
-
If you want to edit the tag name, rename the tag in the text field and press the Enter/Return key on your keyboard.
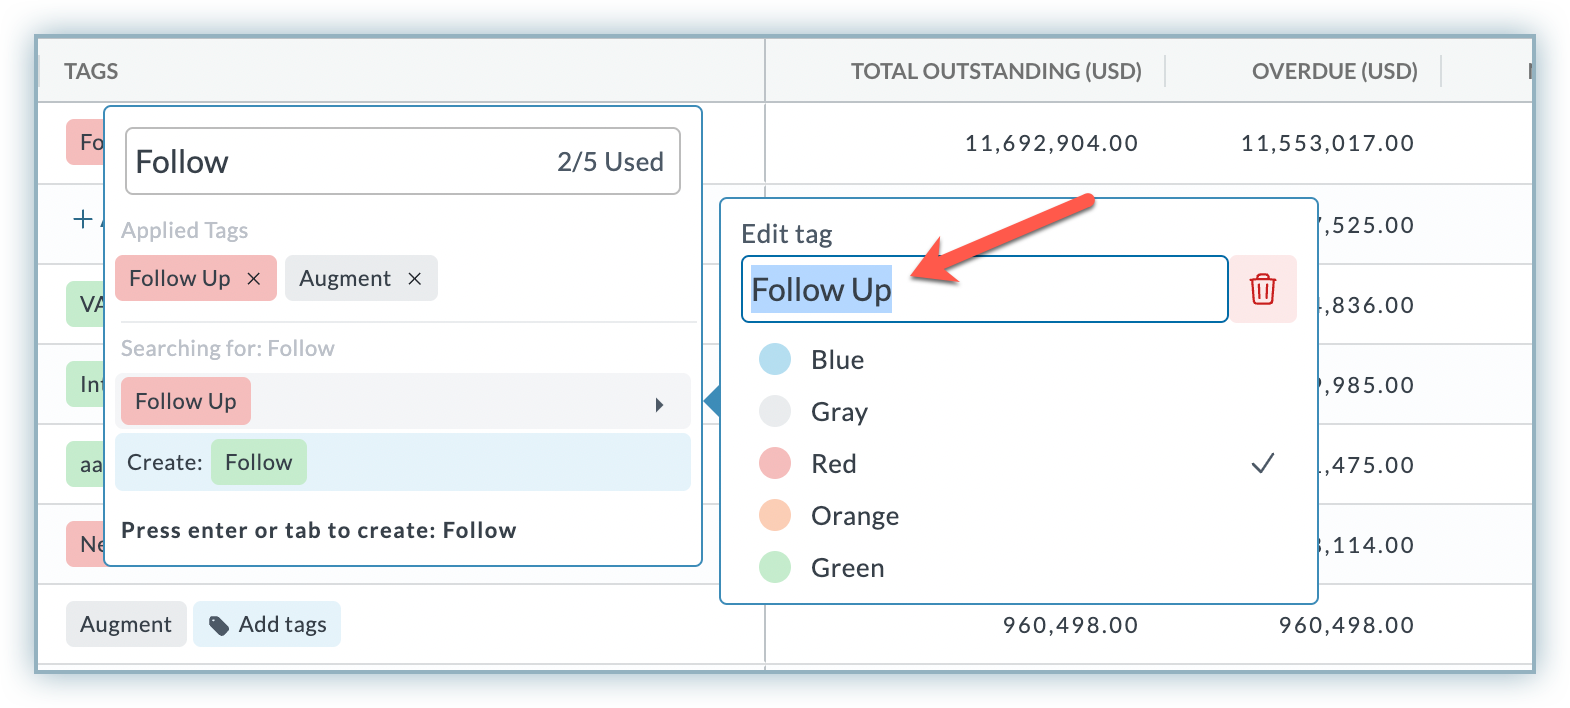
-
Click the desired colour from the list to change the tag colour.
-
If you want to delete the tag, click the delete button.
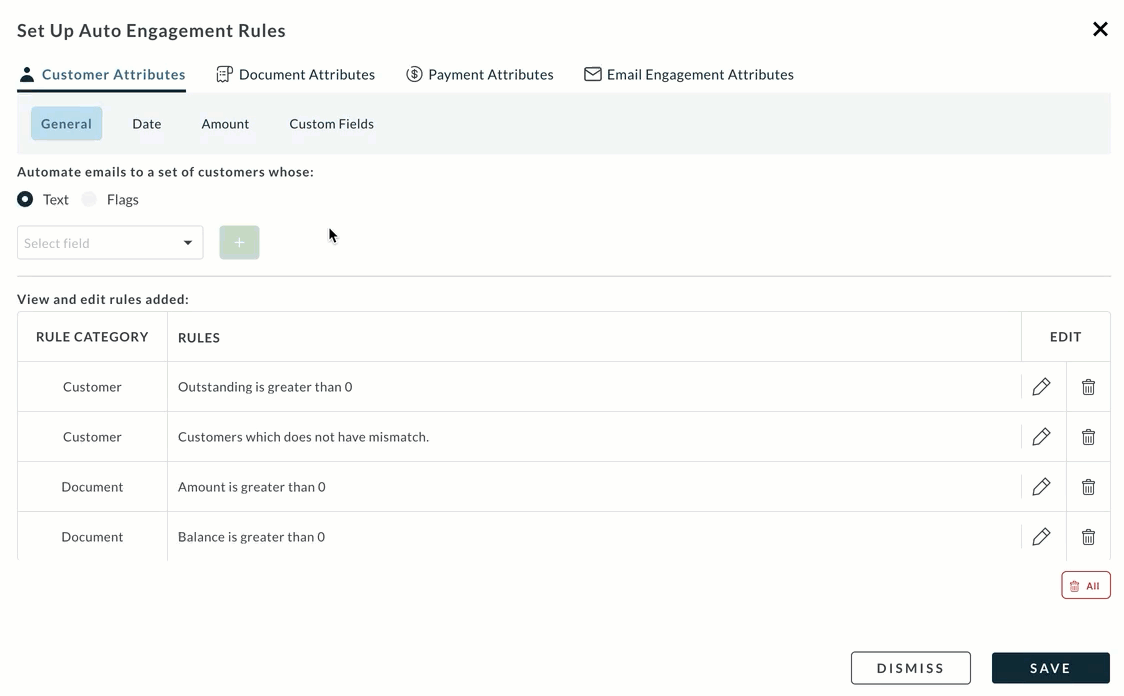
Adding a Tag as an Auto Engagement Cycle Rule
By incorporating customer tags into your Auto Engagement cycles, you gain the ability to engage with specific groups of customers sharing a common tag. This enhanced targeting enables you to refine your customer cohorts and focus on the most relevant set of customers for your engagement efforts.
Follow these steps to add a tag as a cycle rule:
-
Go to Auto Engagement
-
Select the auto-engagement cycle and click +Add Rules under Cycle Rules.
-
Under the Customer Attributes > General tab, expand the Select field drop-down menu.
-
Select Customer Tags and then select the relevant Tag Name from the other drop-down menu.
-
Click the + (add) icon and click SAVE.
Tagging Multiple Customers Simultaneously
You can also assign existing tags to multiple customers in the Customer or Invoice View. Follow the steps mentioned below:
-
Go to Customer or Invoice View
-
Select the desired customers from the list using the checkboxes on the left.
-
Click APPLY TAGS
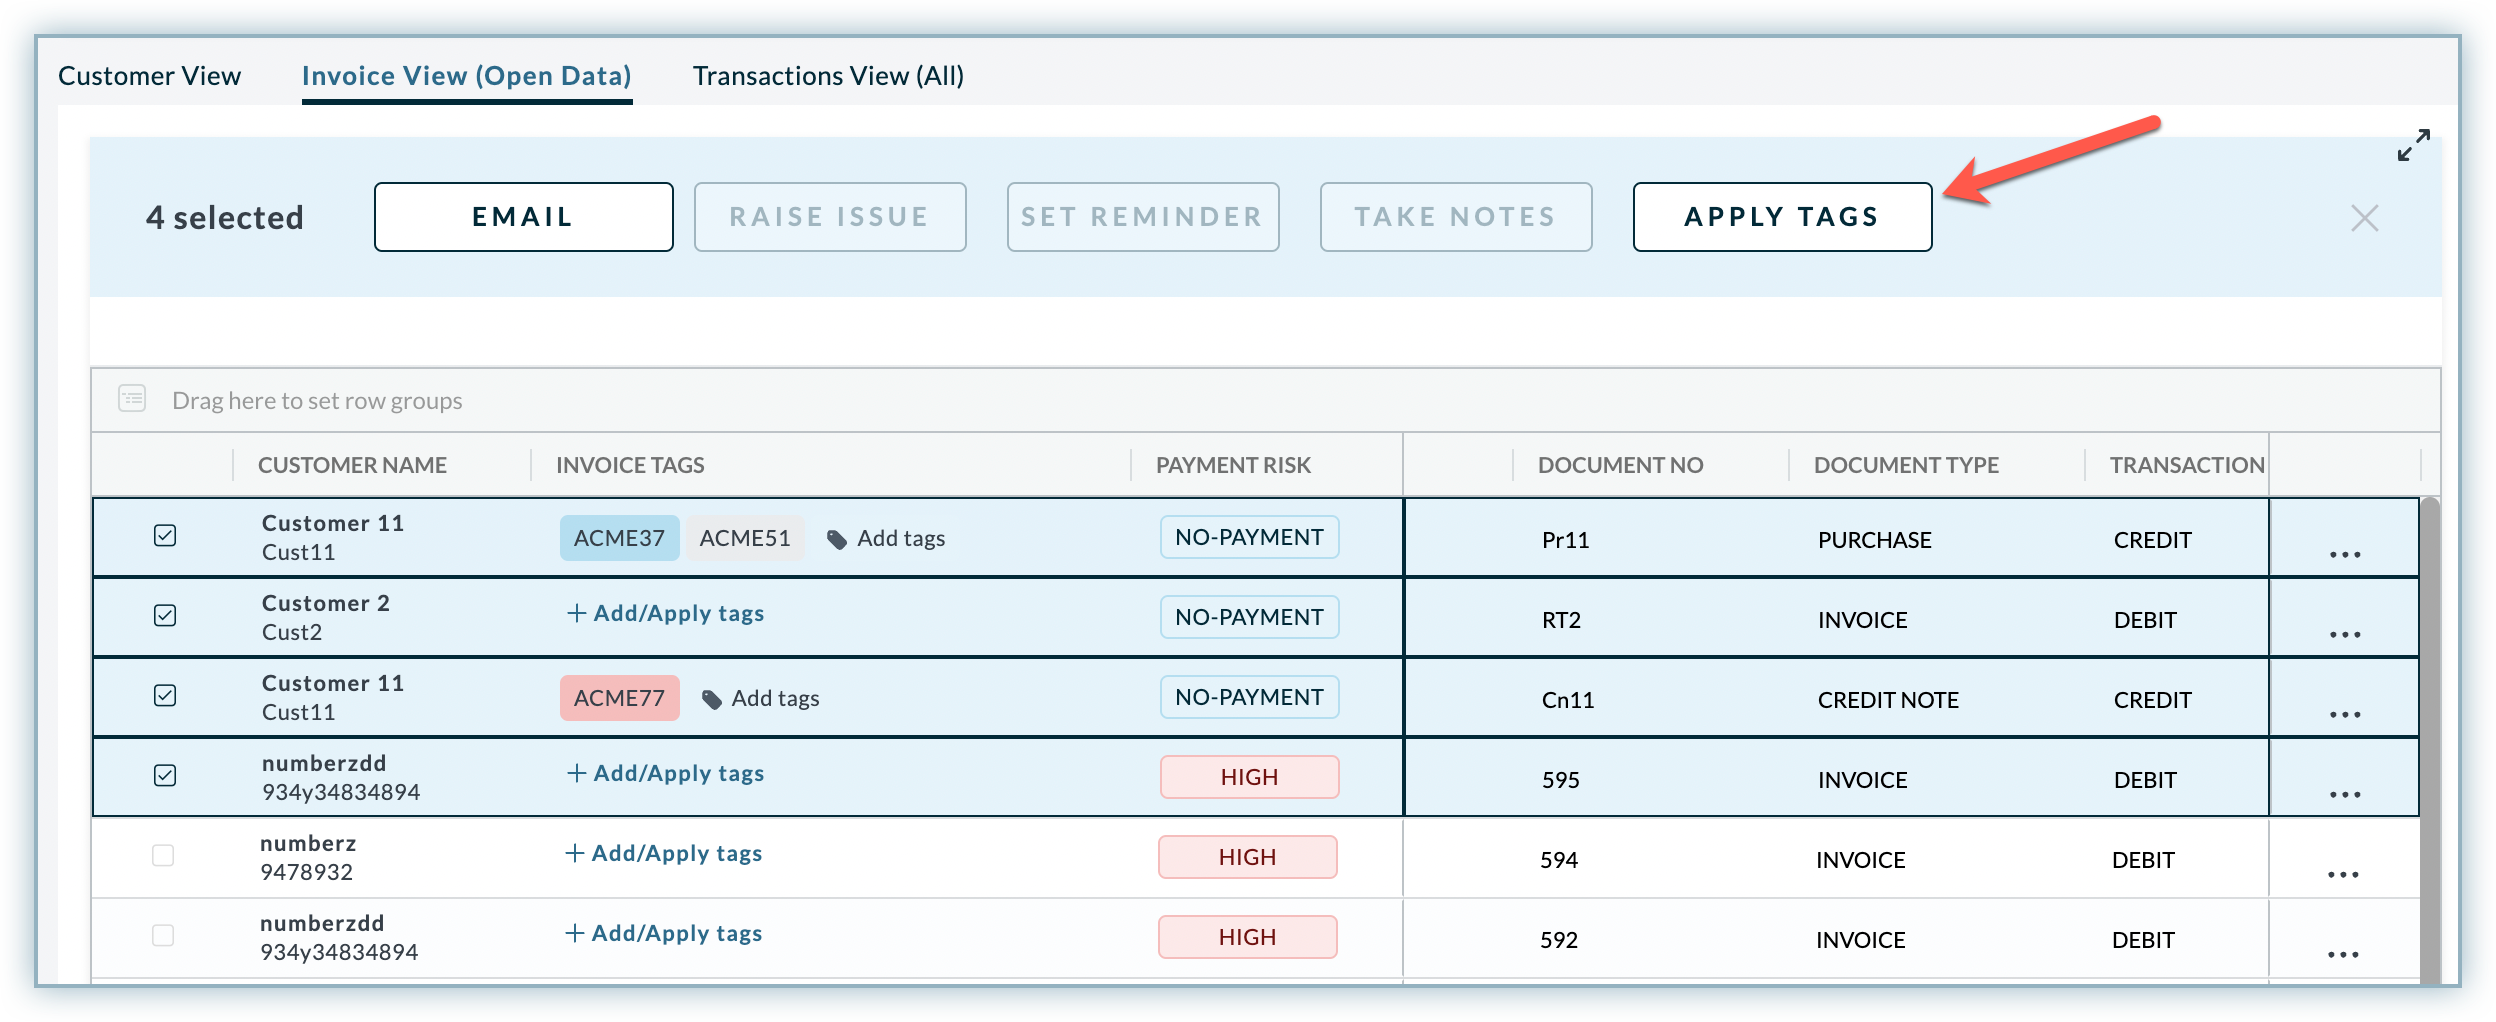
-
Search the tag name from the existing set of tags to apply and click the desired tag name from the search results to apply it.
Actions on Receivables Data
Apart from the fundamental actions, you can also perform actions at the customer and transaction levels. With these actions, you can quickly manage all your collection activities associated with a customer.
Given below is a table that lists out different types of actions based on Customer and Transaction View.
| Actions | Customer View | Transaction View(All and Open Data) |
|---|---|---|
| Reminder via Email and SMS | ||
| Set Reminder | ||
| Raise Issue | ||
| Take Notes | ||
| Write Summary | Not Applicable | |
| Download Statement | Not Applicable |
Reminder via Email and SMS
Use the Receivables reminder engine to remind your customers if they have any open and overdue invoices by sending an email or SMS. Based on the selected options, the customer receives the information with a particular subject that specifies the details about the reminder.
In the Receivables View, you can send an email and SMS reminder either of the following two ways:
- Single Email and SMS reminder
- Bulk Email and SMS reminder
Single Email and SMS Reminder
You can send email and SMS reminder to a particular customer. To send a reminder to a single customer, follow these steps:
- In the Customer View, select a customer.
- Click Email or SMS if you want to send email or SMS reminders to the selected customers.
- If you choose Email, then on the Send Email reminder page, select a specific category for which you have to send reminders from the given options:
- ALL OPEN INVOICES: Reminding customers of all their open invoices.
- OVERDUE INVOICES: Reminding customers of all their overdue invoices.
- Select the language to create the reminder in the customer locale.
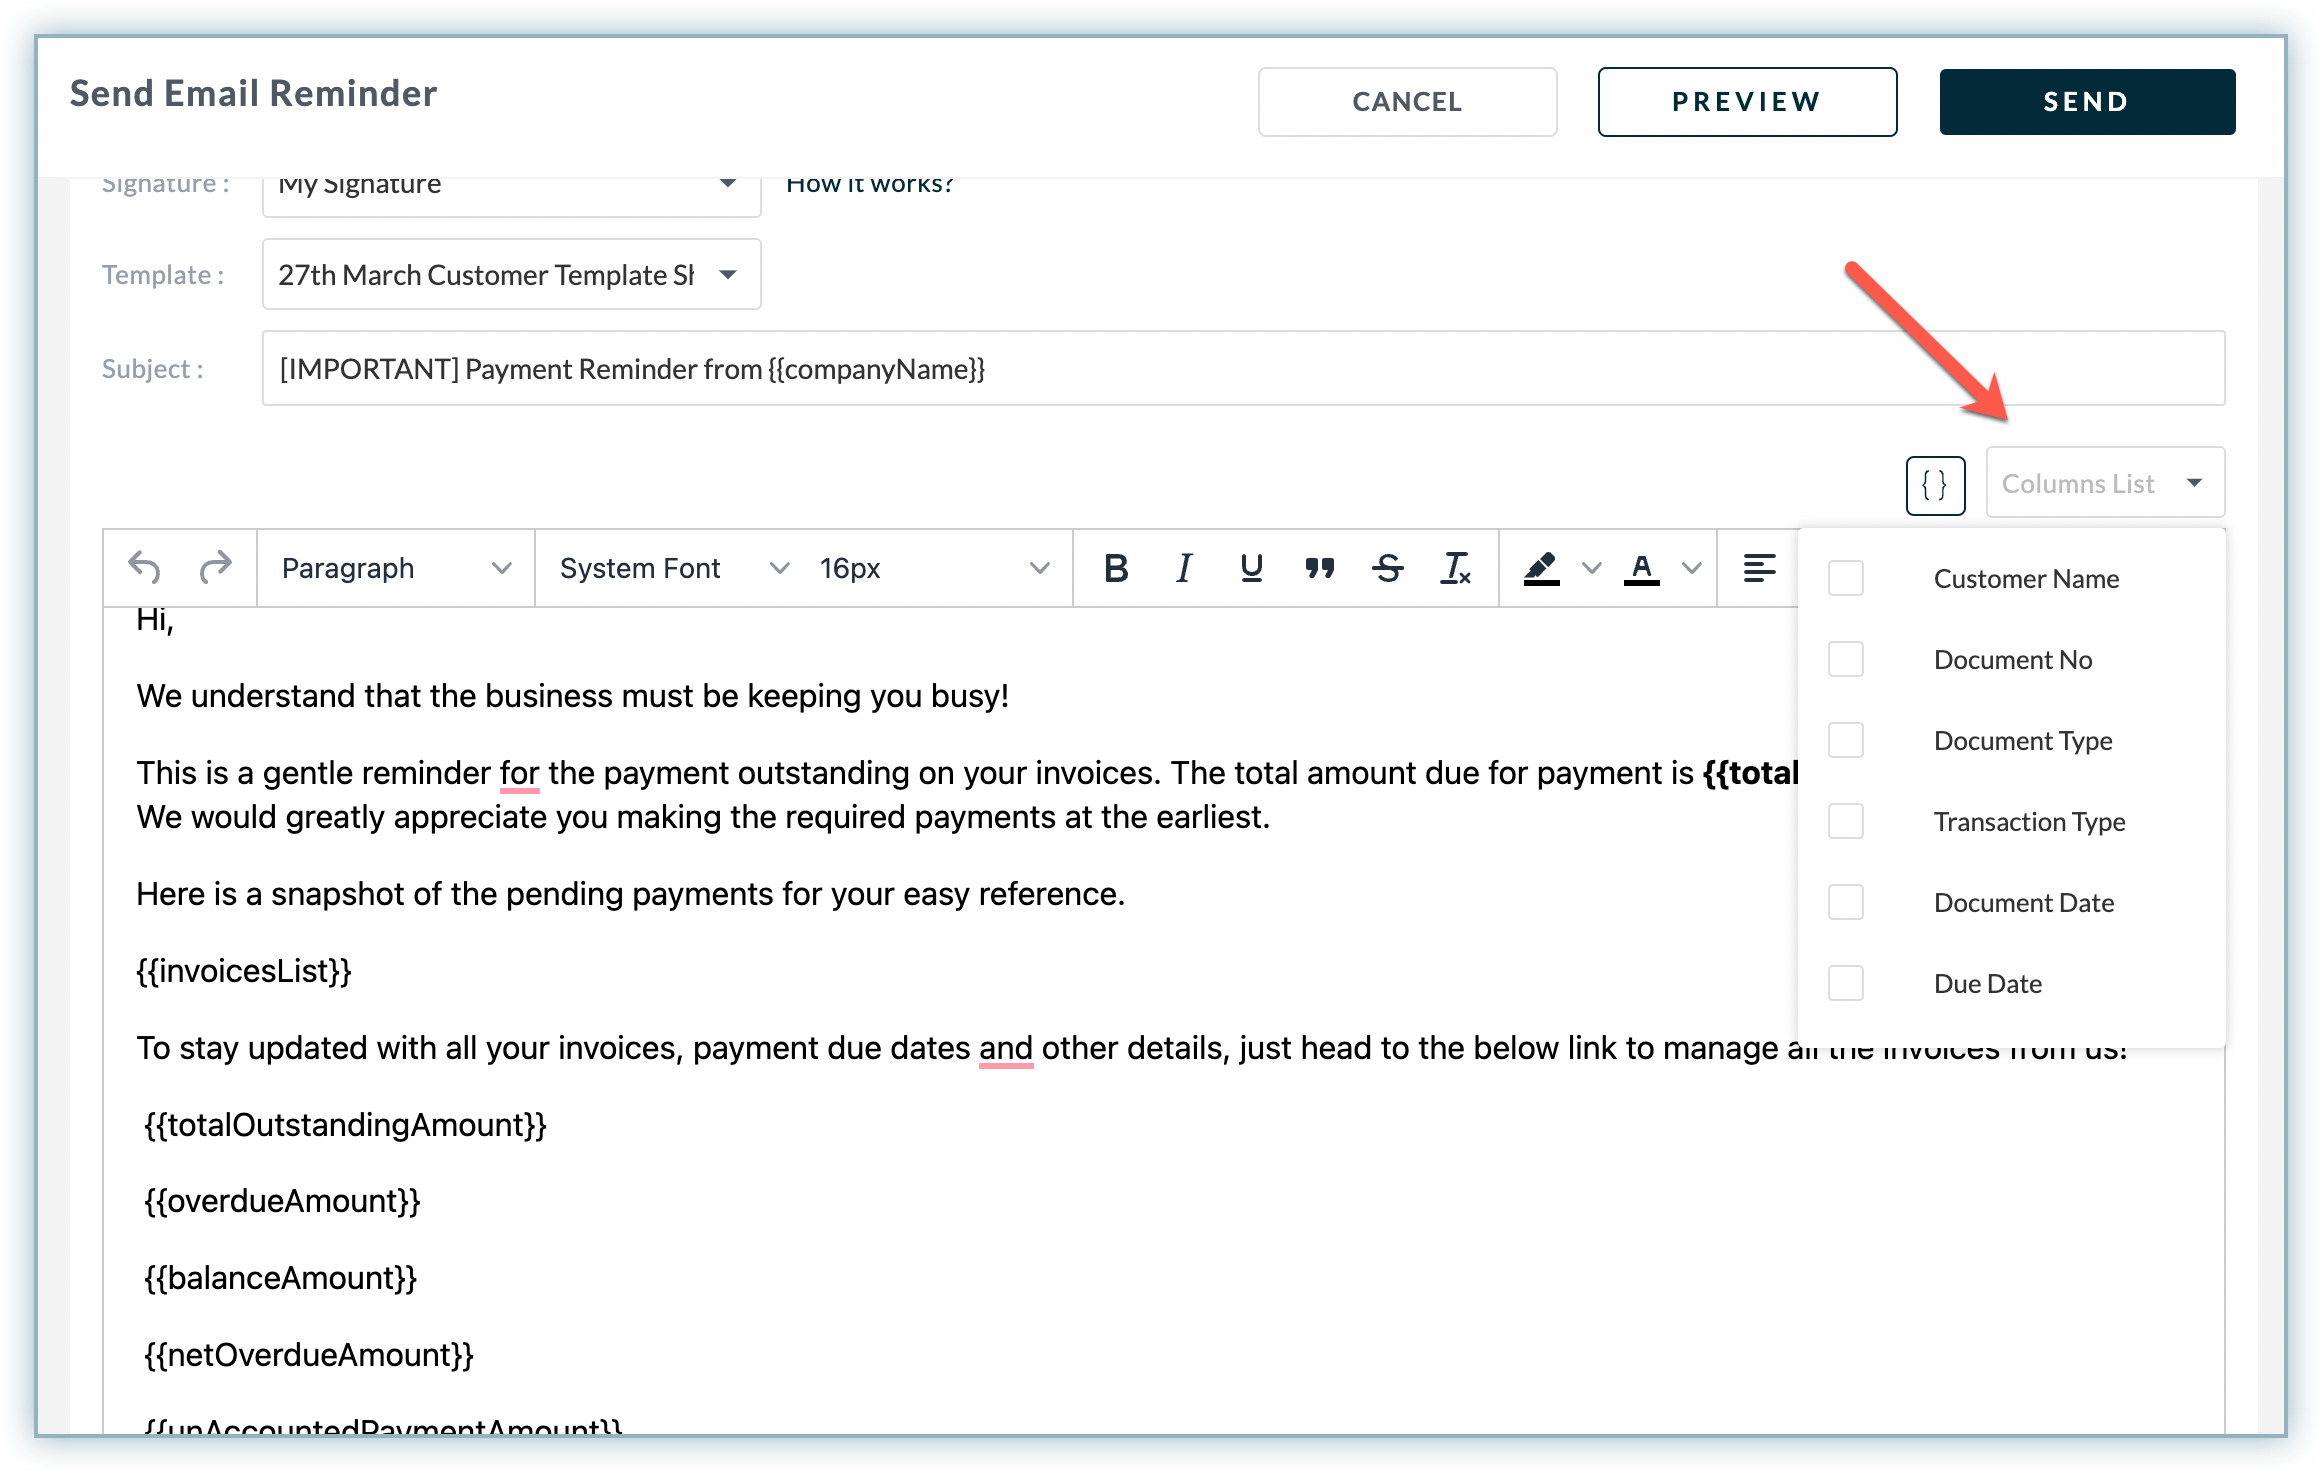
- Based on the selected category, specify the following details in the email reminder:
- Add the following details in the email header:
- Include all the customer contacts, and recipients email ID under the Recipients(To).
- Include those recipient who you want to inform about the reminder under the CC. You can also select the corresponding checkboxes for various levels of recipients and contacts.
- Select a Signature from the drop-down menu. You can include either your signature or the company's signature.
- Select a Template that represents the context of the email reminder.
- Add a Subject for this email reminder. It should be precise and to the point.
- Add the following details in the email body:
- Whether you have selected an email template or manually added the content in the email body, you can include additional information in the email body by using pre-defined template variables.
- Attach any external files to the email reminder(if required).
- Add the following details in the email header:
- Click Send.
Note
With the Multi-Language functionality in place, before sending the emails, Receivables will check the customer locale and also check if the required email template is available in the customer locale. If available, it will send it in the customer locale, otherwise, it will send it in English (default language).
Bulk Email and SMS Reminder
In addition to sending email and SMS reminders to one customer, you can also send reminders to multiple customers at once. The bulk operation facilitates sending email and SMS reminders at the customer and transaction level. You can select multiple customers or invoices from the Customer and Transaction View.
To send bulk emails and SMS reminders at customer and transaction level, follow these steps:
- In the Receivables View, select all applicable customers or transactions from the Customer or Transaction View.
- Click Email or SMS if you want to send email or SMS reminders to the selected customers.
- If you choose Email, then on the Send Email reminder page, select a specific category for which you have to send reminders from the given options:
- ALL OPEN INVOICES: Reminding customers of all their open invoices.
- OVERDUE INVOICES: Reminding customers of all their overdue invoices.
- Select the language to create the reminder in the customer locale.
- Add the following details in the email body:
- Add the template variables and column list, if you want to add additional information related to customer or transaction data in the email reminder. See the list of template variables that are available in Receivables.
- Click Send.
Note
With the Multi-Language functionality in place, before sending the emails, Receivables will check the customer locale and also check if the required email template is available in the customer locale. If available, it will send it in the customer locale, otherwise, it will send it in English (default language).
Using the template variables in email and SMS templates, you can send out the reports like invoice list and accounts and ledger statements to the customers. In some cases, you may want to show or hide specific columns of the report in the email reminders. Use the Column List to customize the columns of the reports. Additionally, you can show or hide the custom fields columns(if any) for reports when sending email or SMS reminders.
To customize the columns of the report, click Columns List option on the top of the email reminder page and select column checkboxes to show or hide specific columns from the report.
Set a Reminder
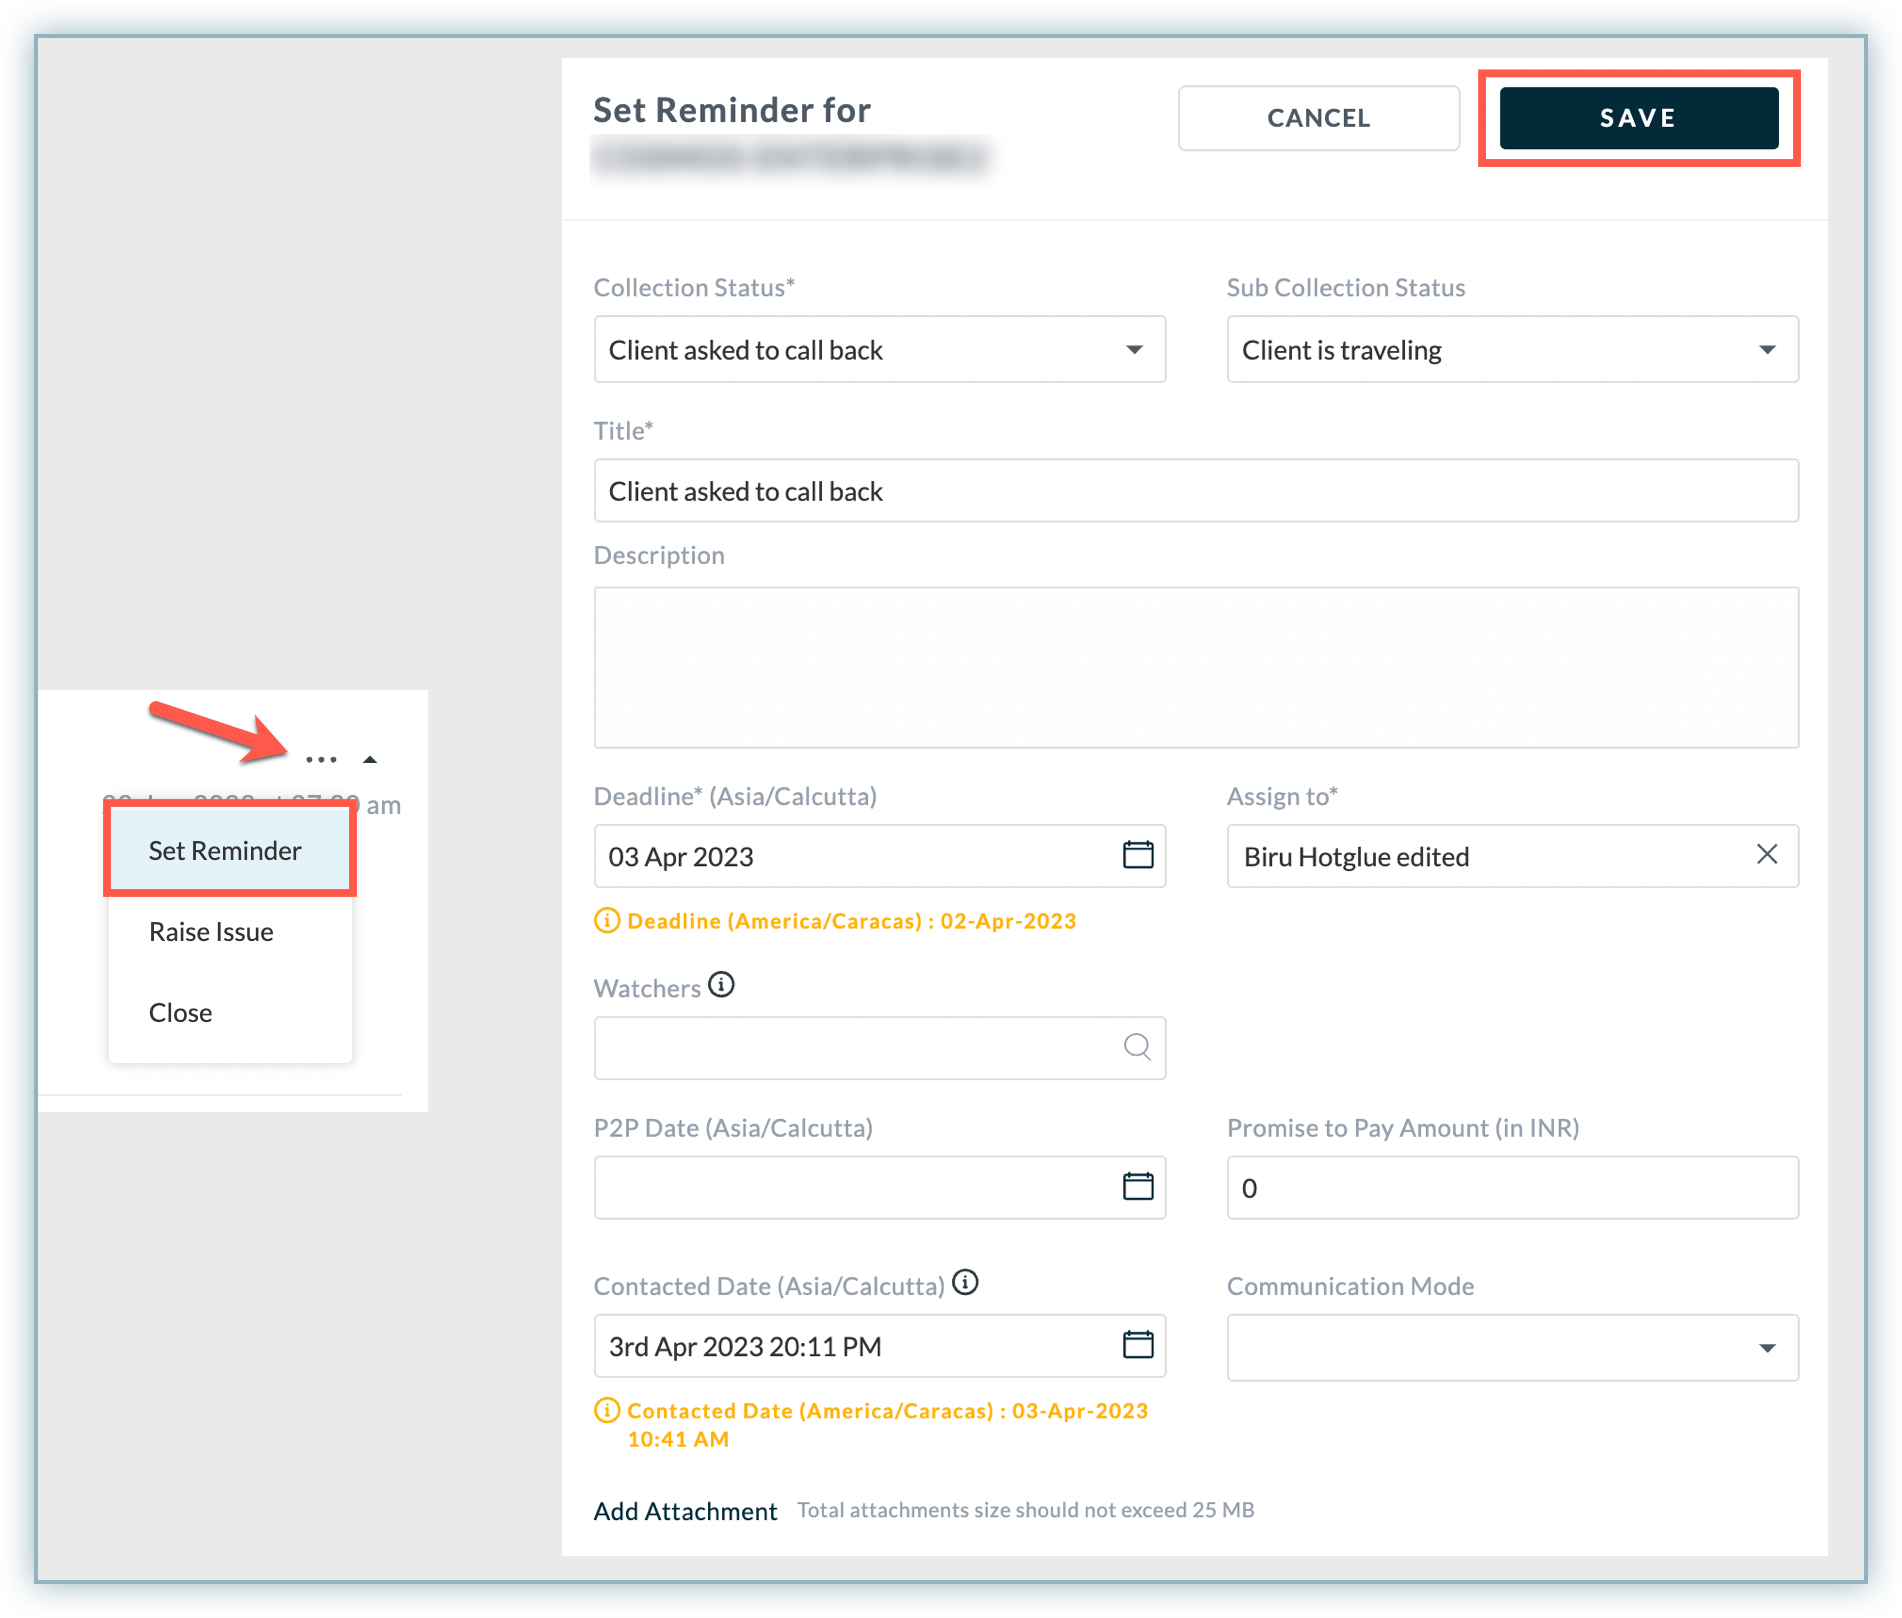
Reminders are important for businesses to keep track of the customer's invoice status, payment status, or other collection activities. In a large number of customer and transaction data, maintaining and tracking the collection activities becomes challenging. Using Receivables reminder feature, you can set up reminders for specific collection activities related to your customers or transaction activity to be emailed automatically to the assignee. You can choose to set reminders for any upcoming events by specifying the time to send reminder on or before the scheduled date.
Once you set the reminder, a case will be created in Collector Queue and assigned to the collectors.
To set a reminder, follow these steps:
- Click the ellipsis icon next to the specific customer.
- Click Set Reminder.
- In the Set Reminder window, specify the following details:
- Select a collection status and sub-status from the drop-down. You can also configure the collection status and sub-status from the settings.
- Include a description for the reminder (if applicable).
- Select Assign to option to remind the assignee about the collection activity.
- Add a Deadline when you want to notify yourself or the team you have assigned.
- Add Watchers (if any). Watchers also receive notifications when you create/update a reminder.
- Specify the P2P date and Amount if a customer has promised to pay a certain amount on a specific date(if any).
- Select the communication mode from the drop-down.
- You can also use Add Attachment option to attach the document along with this reminder.
- Click Save.
Raise an Issue
When an issue or dispute arises, it is important to have a system in place to track and manage it. An issue or dispute can be raised for reasons, such as customer issues, product quality issues, or disputes related to collection activities of a customer or transaction activity. Receivables issue tracking system allows you to raise, validate and assign issues. You can raise an issue for any particular event related to customer or transaction activity. You can choose to raise issues for any collection activity or event and assign them to other team members along with the issue deadline.
Once you raise an issue, a case will be created in Collector Queue and assigned to the collectors.
You can raise an issue concerning a specific customer or collection activity by following these steps:
- Click the ellipsis icon next to the selected customer.
- Select Raise Issue option from the menu.
You can follow the other steps that are outlined and similar to Set a Reminder operation.
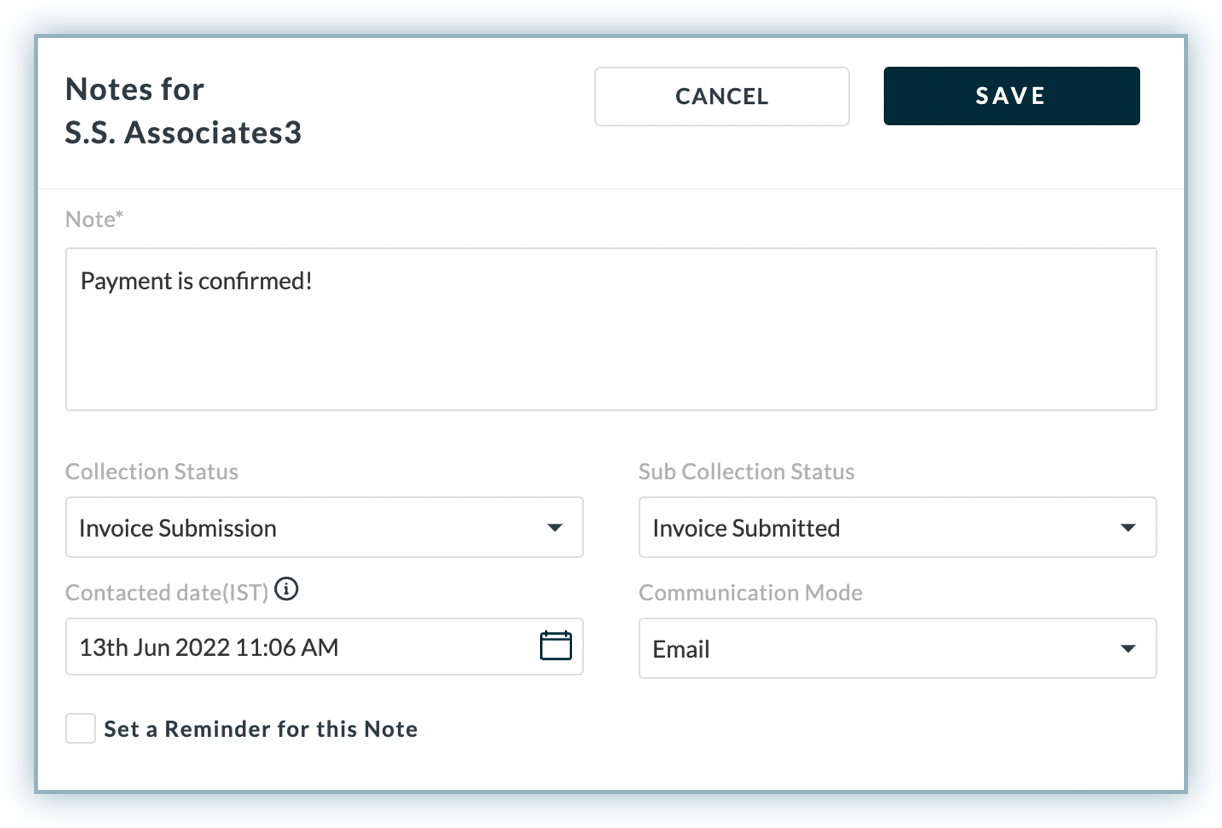
Take Notes
In Receivables, notes help collectors and team members to understand the account and collection summary of a specific customer. You can take a note, For instance, if there are any issues with a particular collection activity and the customer wants to generate a copy of the invoice and get notified for the proof of delivery (POD). Collectors can take a note of it
To take a note for a specific customer or transaction event, follow these steps:
- Click the ellipsis icon next to the customer.
- Click Take Notes.
- In the Notes page specify the following details:
- Add the Note description.
- Select a Collection Status and Sub Collection Status from the drop-down. You can also configure the collection status and sub-status from the Collection status settings.
- Select the customer contacted date and time from the Contacted date field. You can select up to 3 days backdated previous date in the calendar. Ensure to check the company timezone to select the appropriate date and time. You can also configure the company timezone from the settings page.
- Select the Communication Mode used to contact the customer.
- Check Set a Reminder for this Note option to set a reminder of the note for yourself or a team members. To set reminder for a note, follow the steps mentioned in the Set a Reminder action.
- Click Save.
When a note is taken for a specific customer, it will appear on the Customer Details page dashboard under the Notes section. For more information, see managing customer details.
Downloading a Statement
An account statement in Receivables is a useful document for businesses to analyze the customer's invoices and AR data over a period of time. It contains customer's account payables, total outstanding, overdue, balance, and all other transaction activities that occurred during a time period. A customer may also require an account and collection statement for a specific duration. Receivables Customer View allows you to generate the consolidated account statement for an individual customer in just a few clicks.
To download the account statement for a specific customer, follow these steps:
- Click the ellipsis icon next to the customer.
- Click on the Download Statement option from the menu.
- Click the Account Statement Download button and select either Excel/CSV or PDF as the preferred format.
- Select the duration for which the report has to be generated.
- Download the statement in the selected format by clicking the Download button.
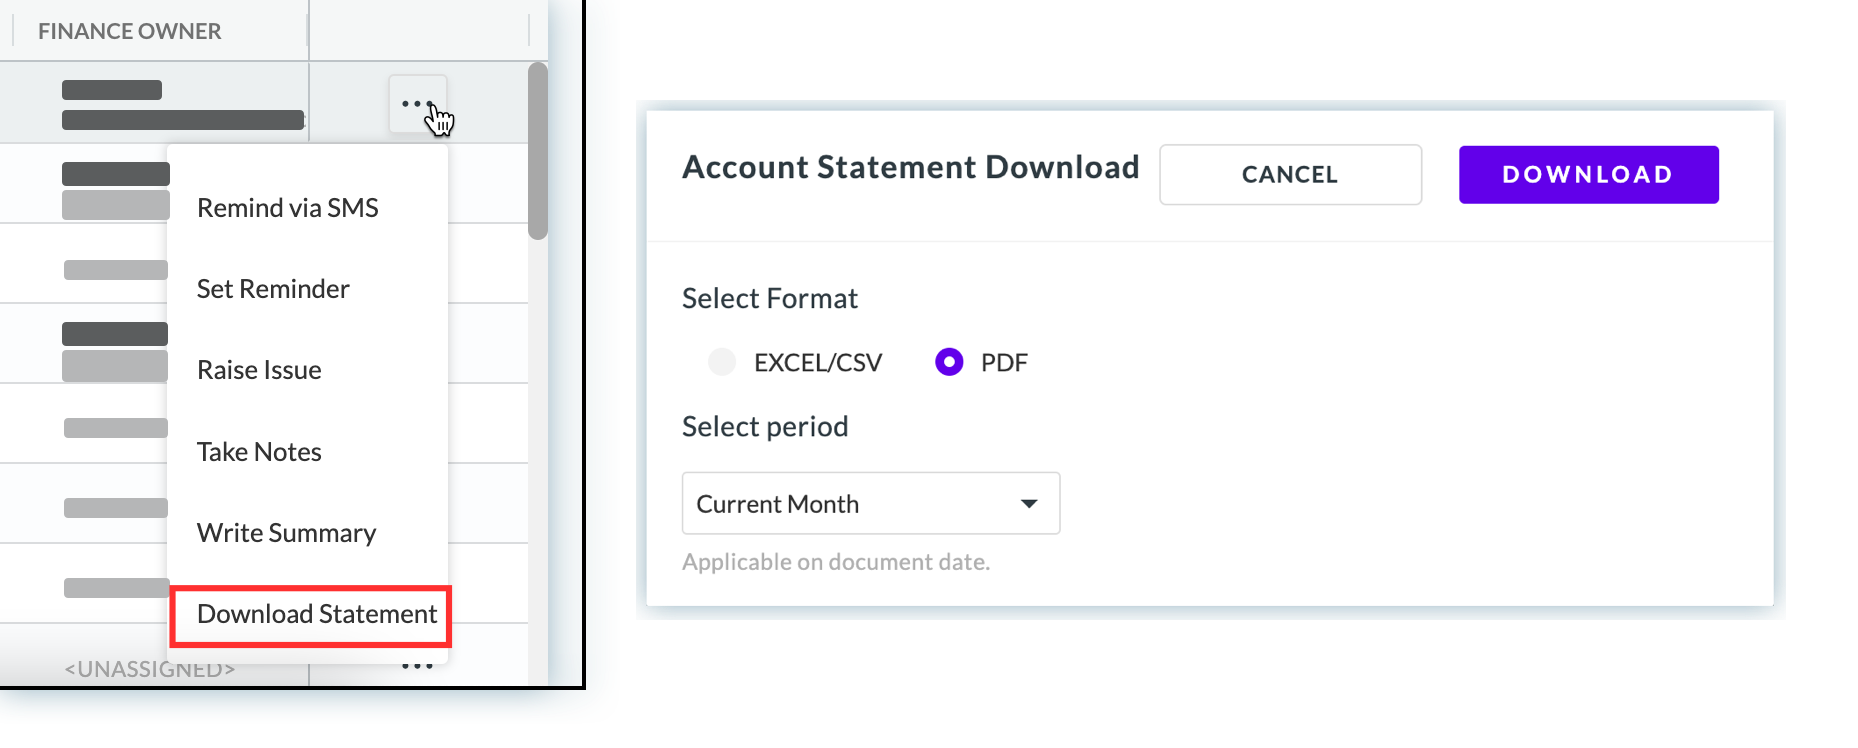
To customize the data columns of account statement, see configuring the account statement.
Once the statement is downloaded, you can send it to a specific customer by attaching to the email reminders. Alternatively, you can provide the account statement to your customer by:
- Configuring the self-serve client portal and allowing customers to download the account statement in Excel/CSV or PDF format from the client portal dashboard.
- Adding the
accountStatementLinkandaccountStatementPDFLinktemplate variables to add the account statement table within the email reminder.
FAQs
1. Can I send account and ledger statement via SMS reminders?
It is possible to send account and ledger statement from SMS. It can be sent using accountStatementLink and ledgerLink template variables.
2. Can I define a new custom field for Receivables View? Yes. The custom fields in Receivables are defined at the customer and document level. Contact your administrator to define a new custom field for your account.
3. Can I change the base currency across all the Receivables View metrics and data? Yes. Chargebee Receivables provides an option to change the default base currency that reflects across all the AR metrics and data in Receivables. To change your company's base currency in Receivables, contact your administrator.
Was this article helpful?