NetSuite
Introduction
RevRec seamlessly integrates with NetSuite to sync invoice data from NetSuite into RevRec or post your journal entries from RevRec into NetSuite. All you have to do is connect the two systems using the sync interface and configure the connection flow based on your business needs.
Sync Overview
You can integrate your RevRec site with NetSuite for two main flows such as:
- Invoices: Connecting RevRec with NetSuite for Invoices syncs your billing records from NetSuite into RevRec.
- Journal Posting: Connecting RevRec with NetSuite for journal posting pushes monthly journal entries to the NetSuite ledger.
Configuring Invoices Flow
If you are using NetSuite to send invoices to customers, RevRec can be used to pull invoice data from NetSuite.
RevRec tracks invoices at the customer level. All invoice data from NetSuite is pulled based on customer name mapping, while sales orders are pulled from the CRM system. It is therefore important that the customer name as specified in NetSuite matches with that in your CRM system.
Connecting RevRec with NetSuite for Invoices
Note
Only users with Admin role can connect your RevRec site with NetSuite.
You can connect your RevRec site directly to NetSuite. Follow these steps to integrate the two systems:
-
After logging in to your RevRec site, navigate to the right environment in which you are integrating NetSuite.
-
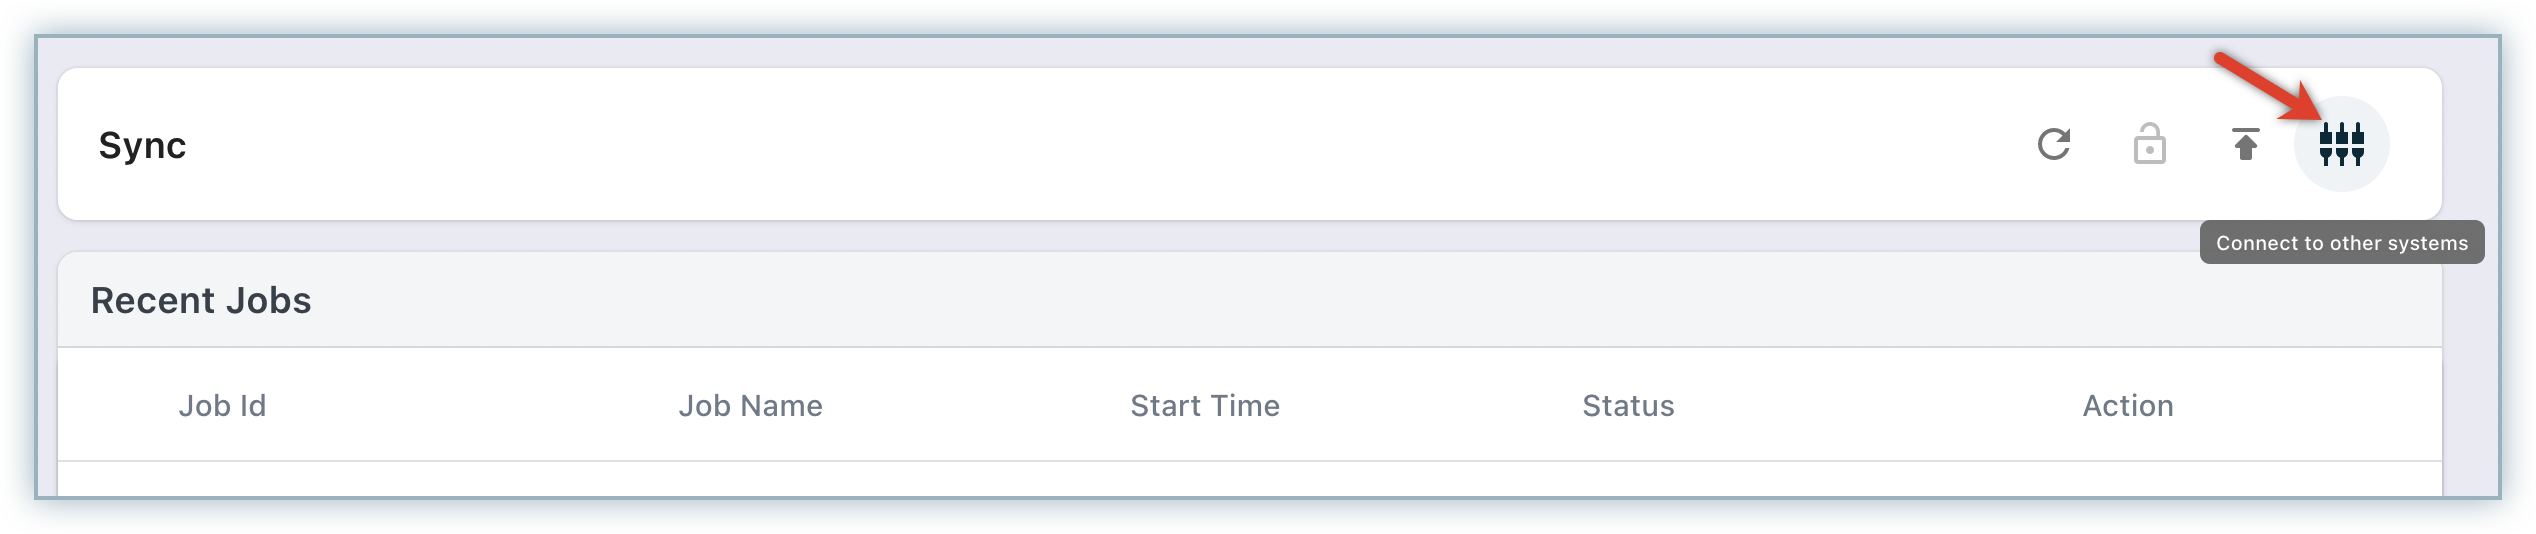
Click Sync > Connect to other systems icon.
-
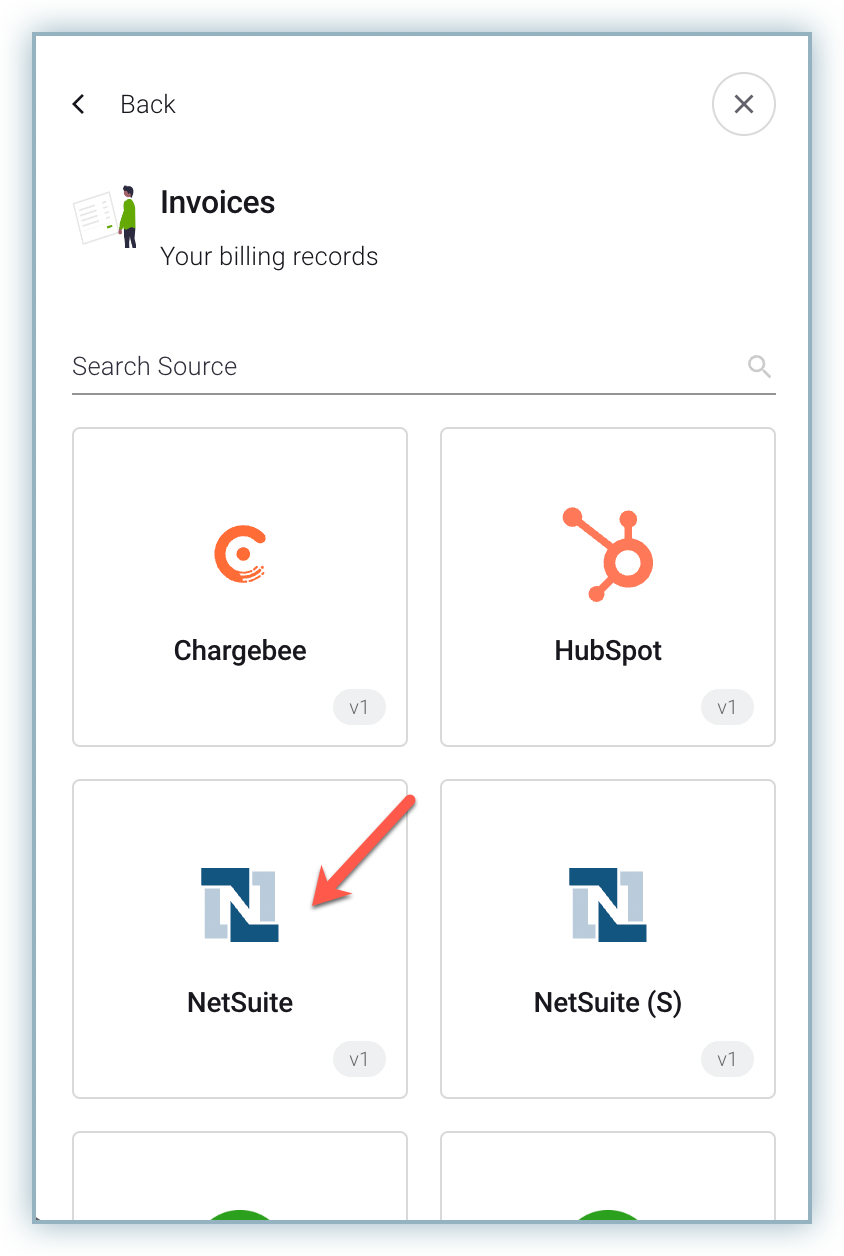
On the Connect your data pop-up, select Invoices > NetSuite.
-
On the Configure NetSuite screen, specify the following connection parameters. The following fields are Identification and Key values generated in NetSuite for each user account. You can provide the values for these fields to connect your NetSuite and RevRec accounts:
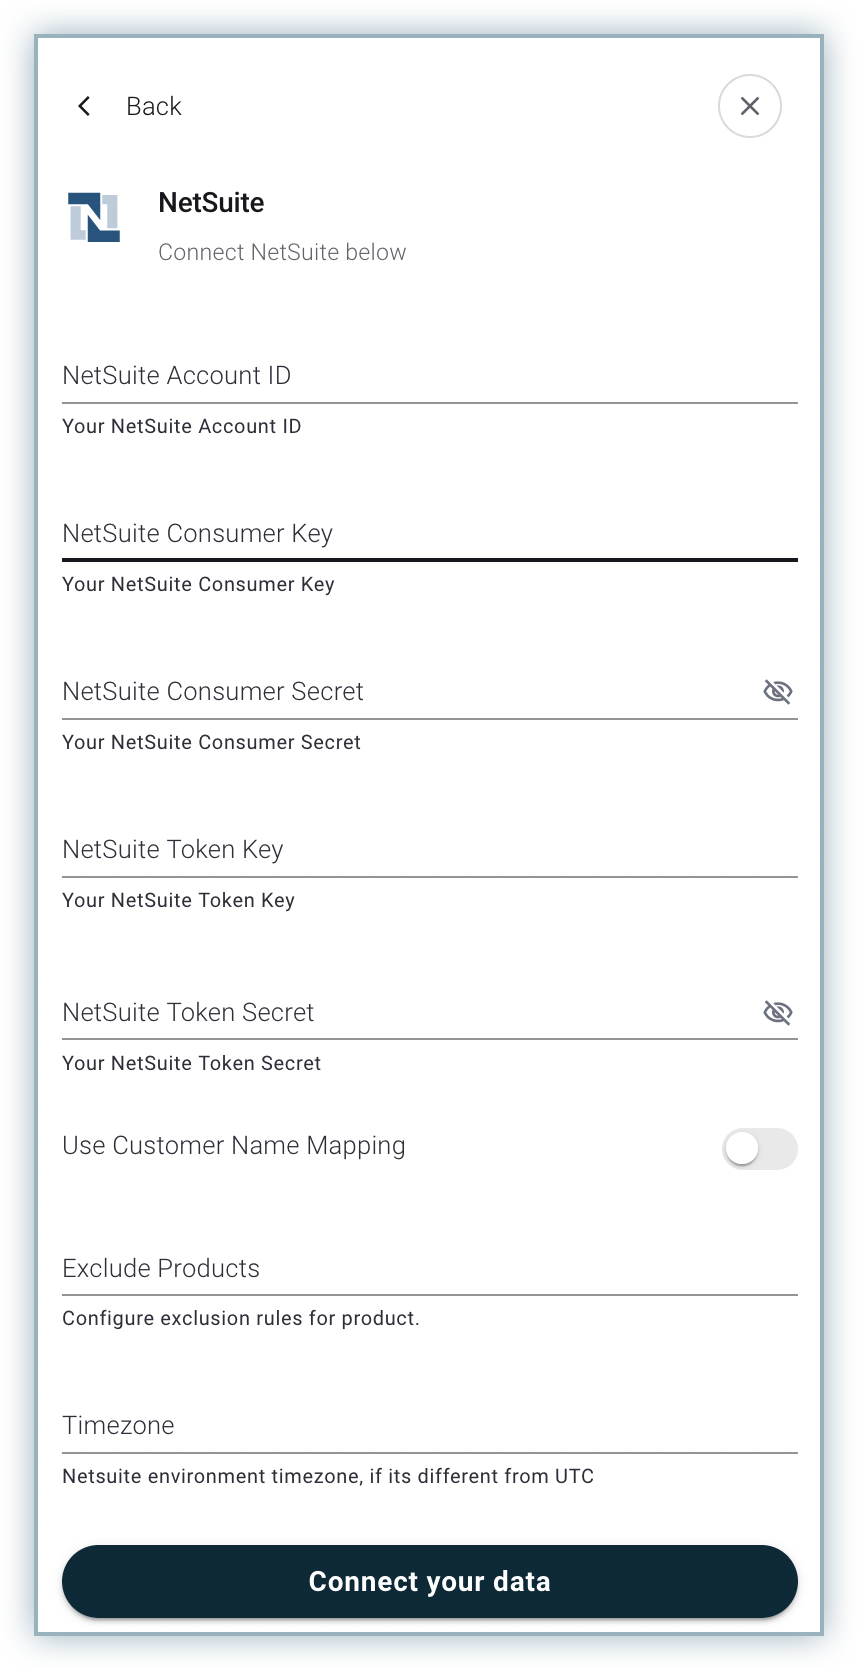
- NetSuite Account ID: NetSuite account ID is the beginning of your NetSuite account URL. For example, if the URL is https://example.app.netsuite.com/, your account ID is 'example'.
- NetSuite Consumer Key and NetSuite Consumer Secret: To generate the Consumer Key and Secret on your NetSuite account, navigate to Setup > Integration > Manage Integrations.
- NetSuite Token Key and NetSuite Token Key Secret: To generate a new Key and Secret, log into your NetSuite account as a user with the Access Token Management permission. Go to Setup > Users/Roles > Access Tokens and click New Access Token. Once you specify the details, the confirmation page displays the Token ID and Token Secret.
- Use Customer Name Mapping: Enable this setting to map records based on the Customer Name field. You can use this setting to map the invoice data from NetSuite using the customer's name with sales order data pulled from CRM.
- Exclude Products: This field is used to define item records for which invoice data needs to be ignored while pulling data from NetSuite. You can define a single item or multiple items to be excluded. Value for this field needs to be given in the format: {"product": {"name": "Name", "values": ["Product Name1", "Product Name2"]}}
- Timezone: This field is used to define the timezone set for the NetSuite account. This needs to be provided if the timezone set for your NetSuite account is different from UTC.
-
Once you are done, click Connect your data to establish the connection between NetSuite and RevRec.
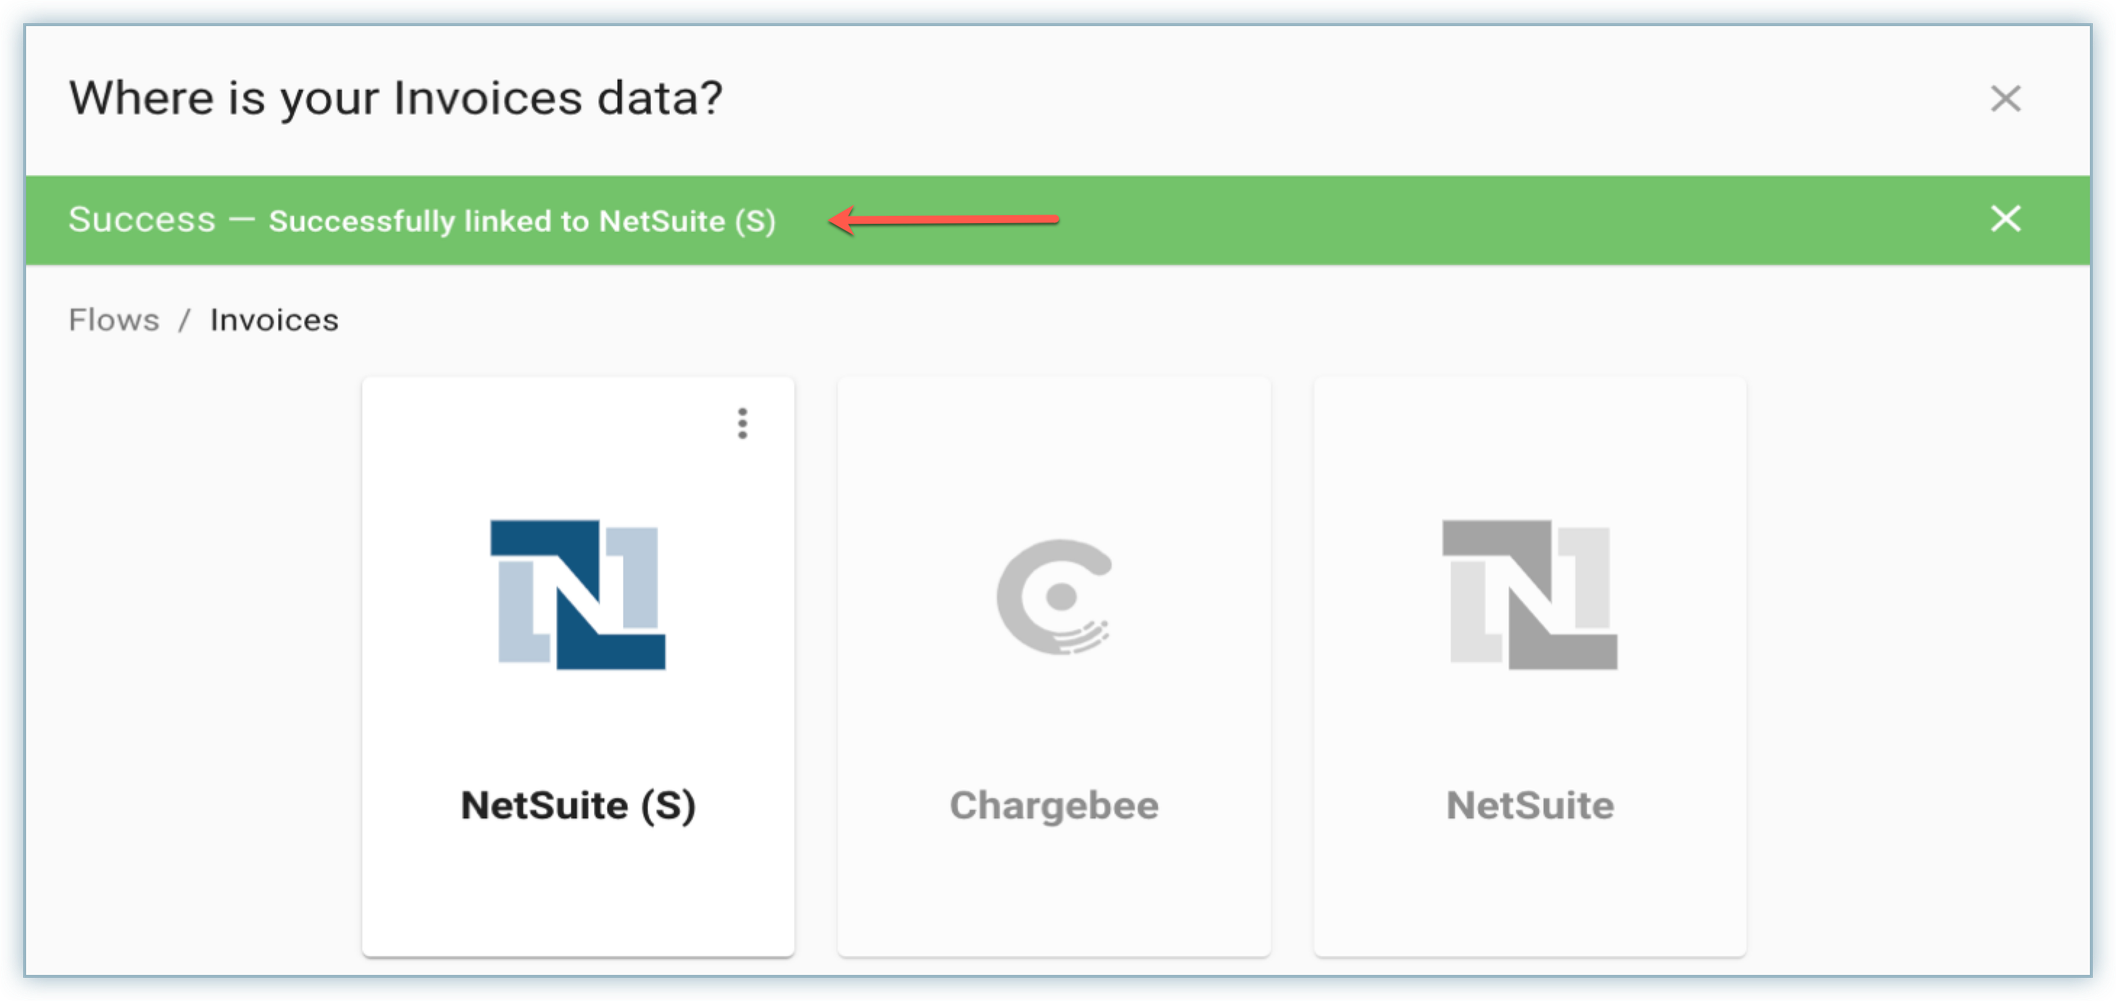
Upon establishing a successful connection with NetSuite, you will see a success message displayed as follows:
NetSuite User Role Permissions Required
Ensure that the keys provided in connection parameters for the NetSuite user role are provided with the required permissions for accessing data in NetSuite for Customer, Items (products), Invoices, and Credit Memos pages.
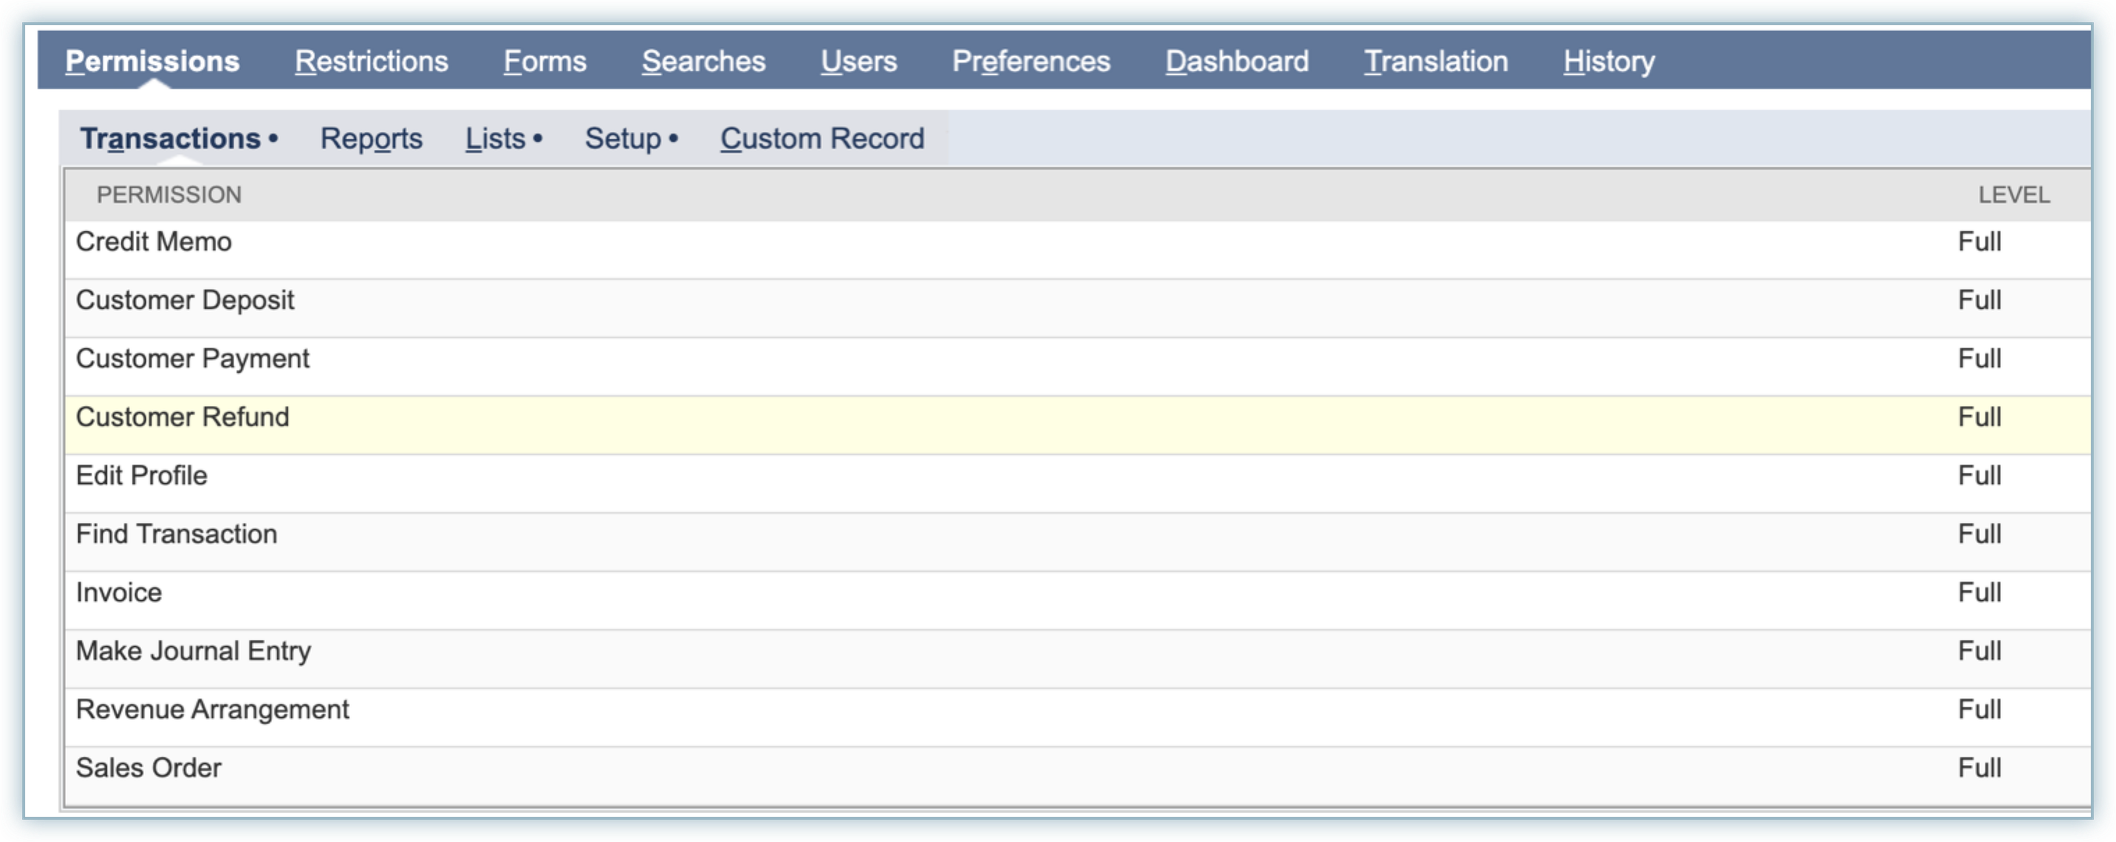
Login to your NetSuite account, navigate to Permissions > Transactions, and provide the below permissions:
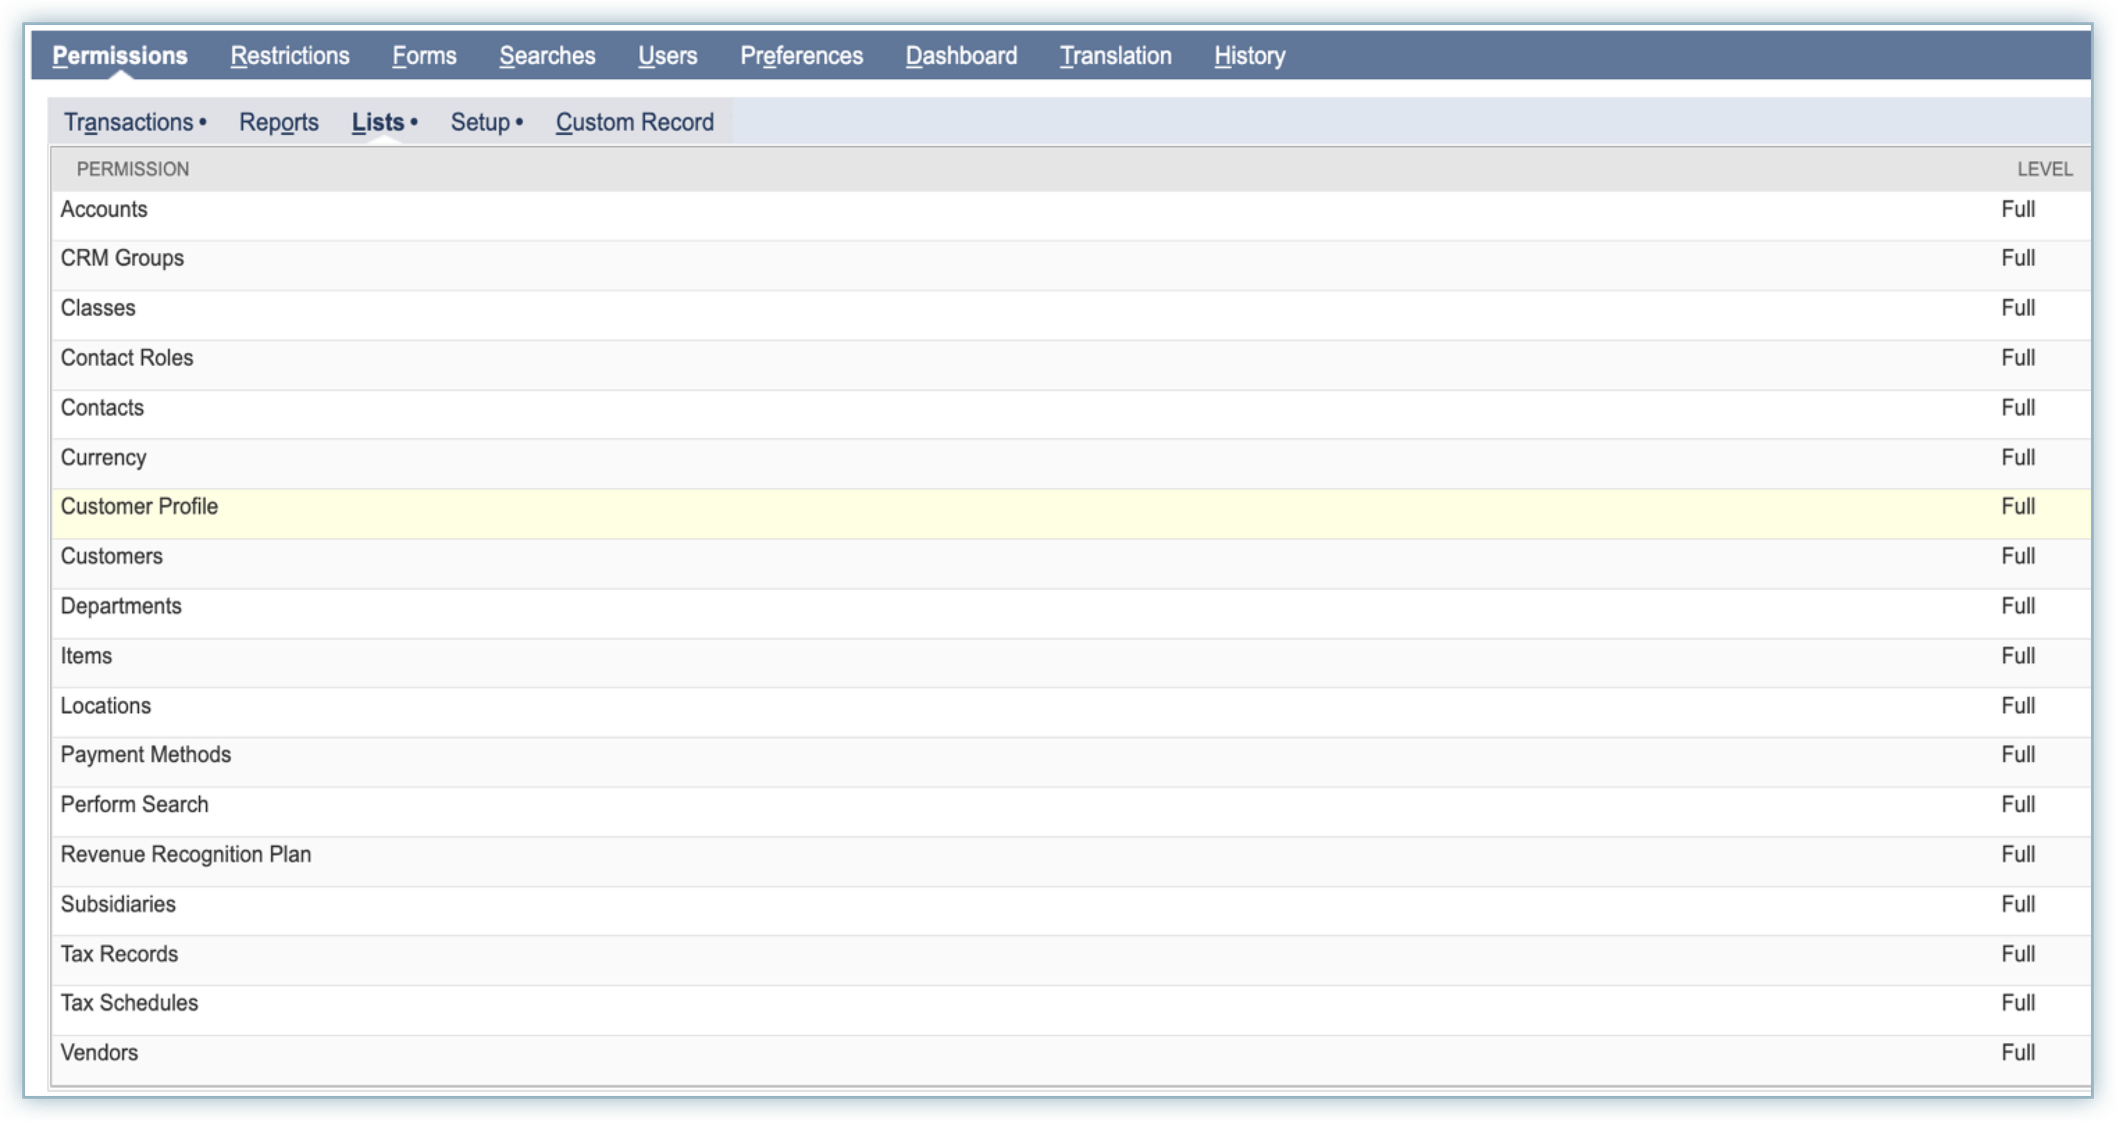
Navigate to Permissions > Lists, and provide the below permissions:
Execution of Invoices Flow
After establishing the link as described in the previous section, click the additional options icon visible in the top right corner of the NetSuite tab.

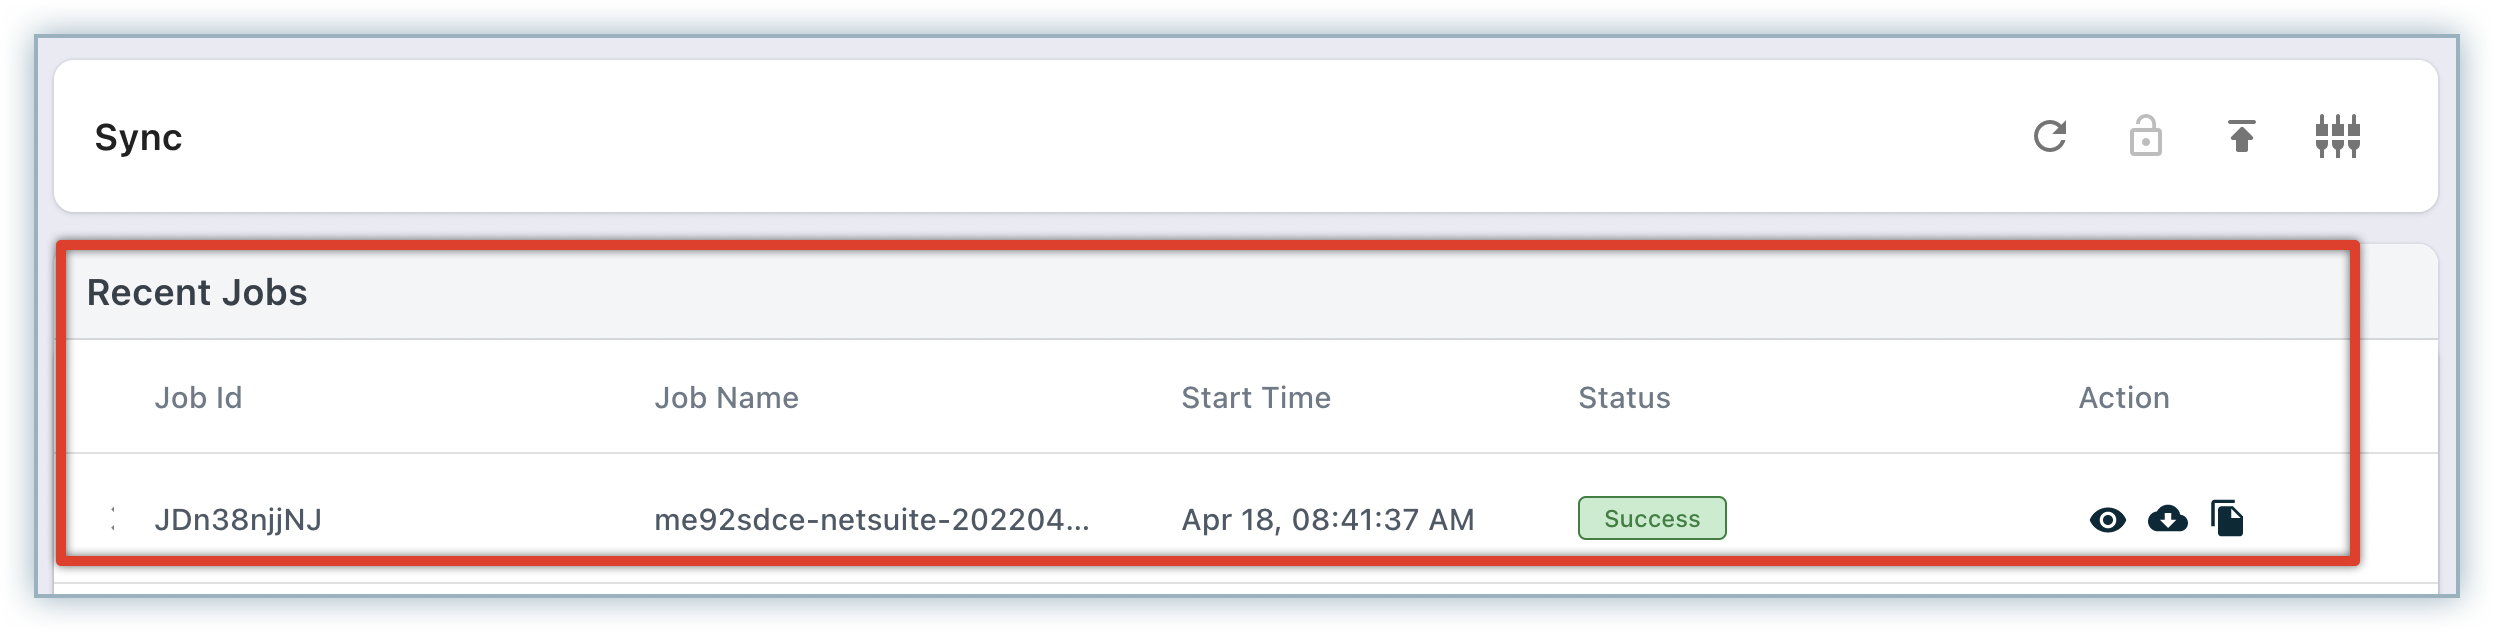
On the pop-up window that opens, click the Run job option to execute the invoice flow that picks data from NetSuite on-demand.
When you execute the invoice flow, you will see a job created on the Sync UI page. Details for different jobs created are as follows:
- If you have not set any accounting period yet, then all the jobs created will show up in the Conversion Data tab. Download the file and upload it manually using the Import Data in Bulk option. The file can be downloaded either by clicking on the download link or by clicking the job name and expanding the grid. Click the download icon that shows up in the right corner of the screen in front of the file name.
- If you have already set the accounting period, all the jobs created will show up in the Sync Jobs tab.
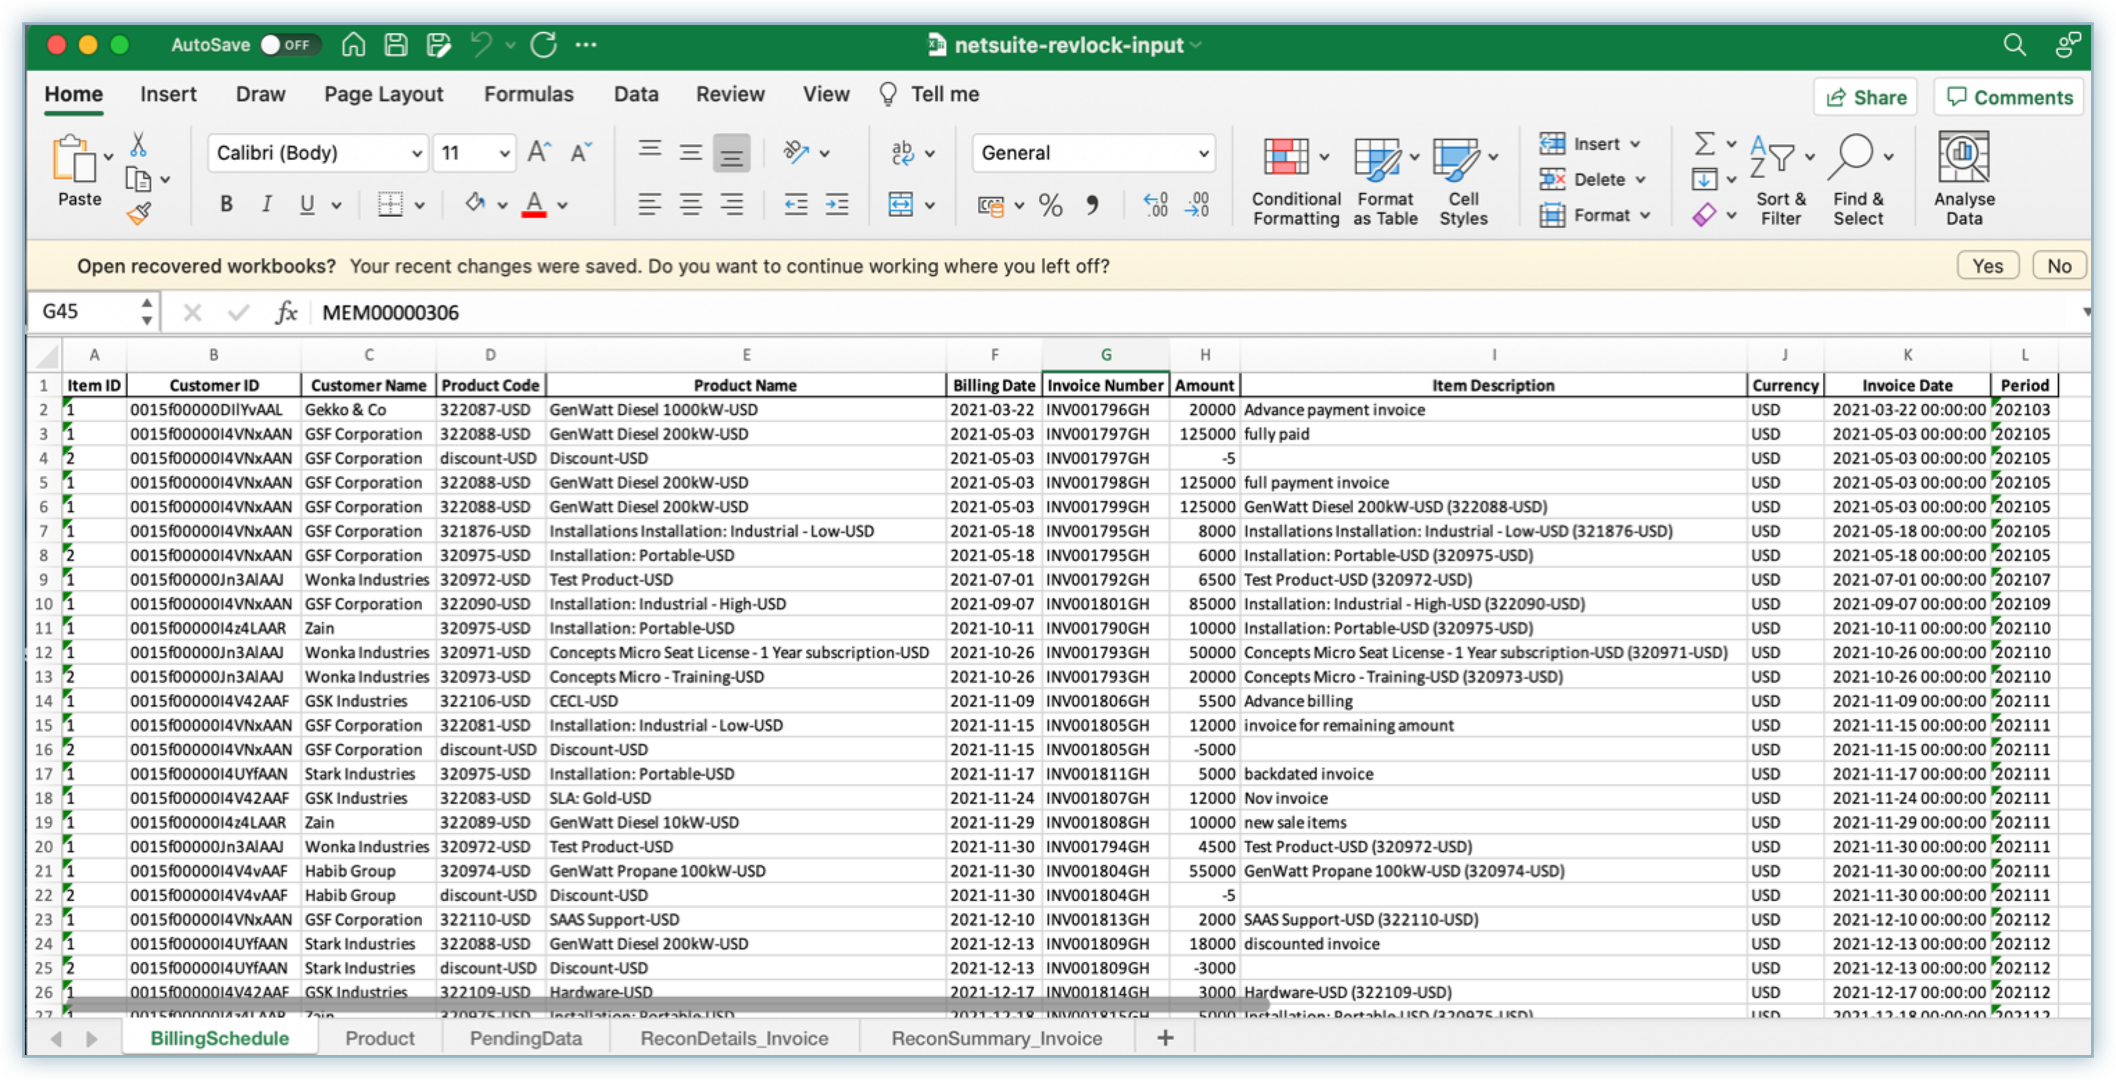
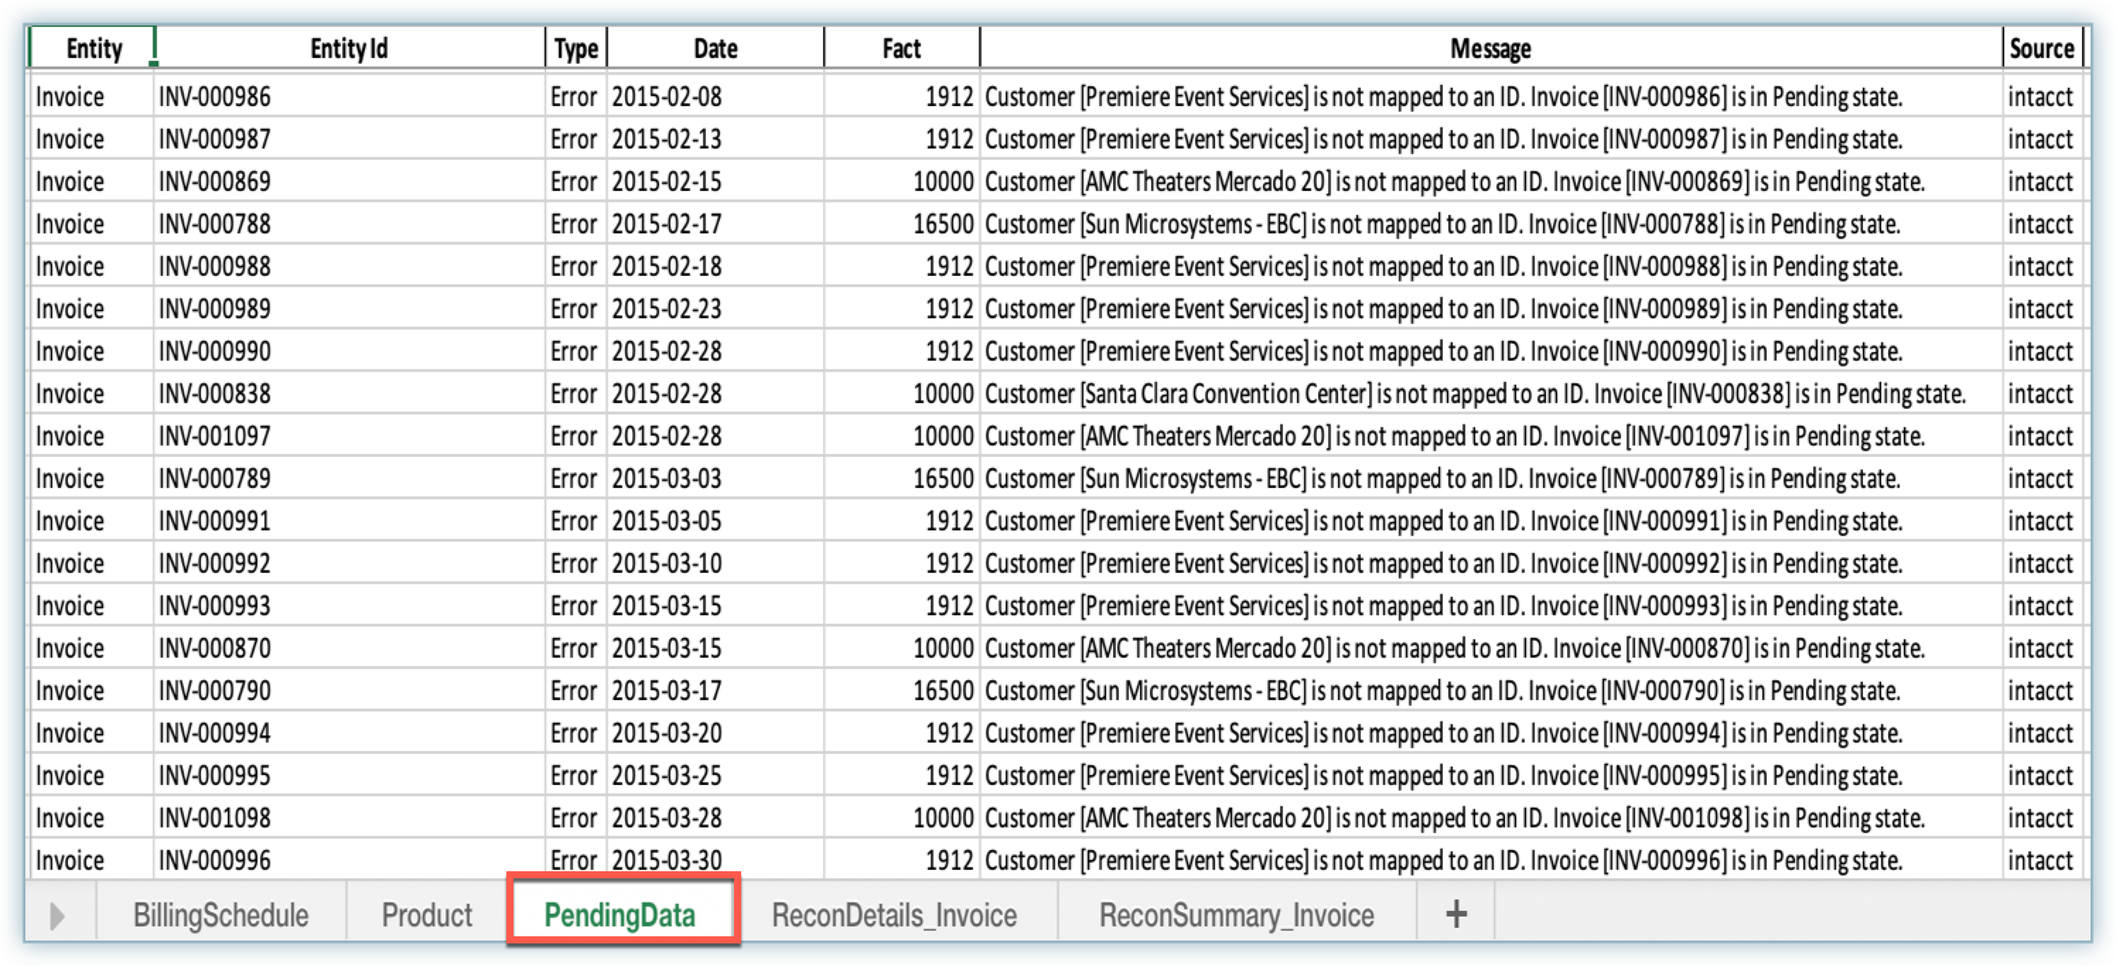
Jobs getting created after setting the accounting period will load the data automatically and you don't have to load the data manually. You can still download the data file created for a specific job by clicking that job name. The downloaded excel file will contain the following tabs:
- BillingSchedule: Displays all data pulled for invoices, and credit notes.
- Product: showing product data picked from NetSuit.
- PendingData: This tab will only show up if there are some invoices or credit notes created for a customer whose name doesn't match with any Customer records in CRM.
- ReconDetails_Invoice: This tab shows a reconciliation between data pulled from NetSuite and data that is loaded in RevRec for each period on a customer-by-customer basis.
- ReconSummary_Invoice: This tab shows a reconciliation between data pulled from NetSuiteand data that is loaded in RevRec grouped on a period-by-period basis.
Note
Contact RevRec Support for any sync failures due to recon errors.
Pending Data
Any invoice or credit memo created for a customer record, wherein the customer name doesn't match with records picked from other CRM systems like Salesforce or HubSpot, RevRec displays them as Pending Data.
Pending data can be cleared once you add/update the relevant customer record in NetSuite to match with the customer data in CRM. The next Invoice job executed in RevRec will automatically remove the respective updated records from the Pending Data list.
Use Cases Supported
RevRec supports the below use cases for pulling data related to Invoices, Credit Notes, and Adjustments from Intacct:
Invoice
- All sales invoice data gets pulled whether open or fully paid status.
- Deleted sales invoice data are not picked.
- Changes made to prior period or current period sales invoices are also picked.
Credit Memo
- All sales credit memo data gets pulled whether created directly as a sales credit memo or through converting a sales invoice to a credit memo.
- Credit Memos in Draft or Awaiting Approval status are not pulled.
- Deleted sales credit memos are not picked.
- Changes made to the prior period or current period sales credit memos are also picked.
Configuring Journal Posting Flow
You can configure the journal posting flow to post your journal entries automatically to NetSuite when you close an accounting period. Ensure that you configure your journal account mapping before posting your journal entries.
Connecting RevRec with NetSuite for Journal Posting
Note
Only users with Admin role can connect your RevRec site with NetSuite.
You can connect your RevRec site directly to NetSuite from within RevRec. Follow these steps to integrate the two systems:
-
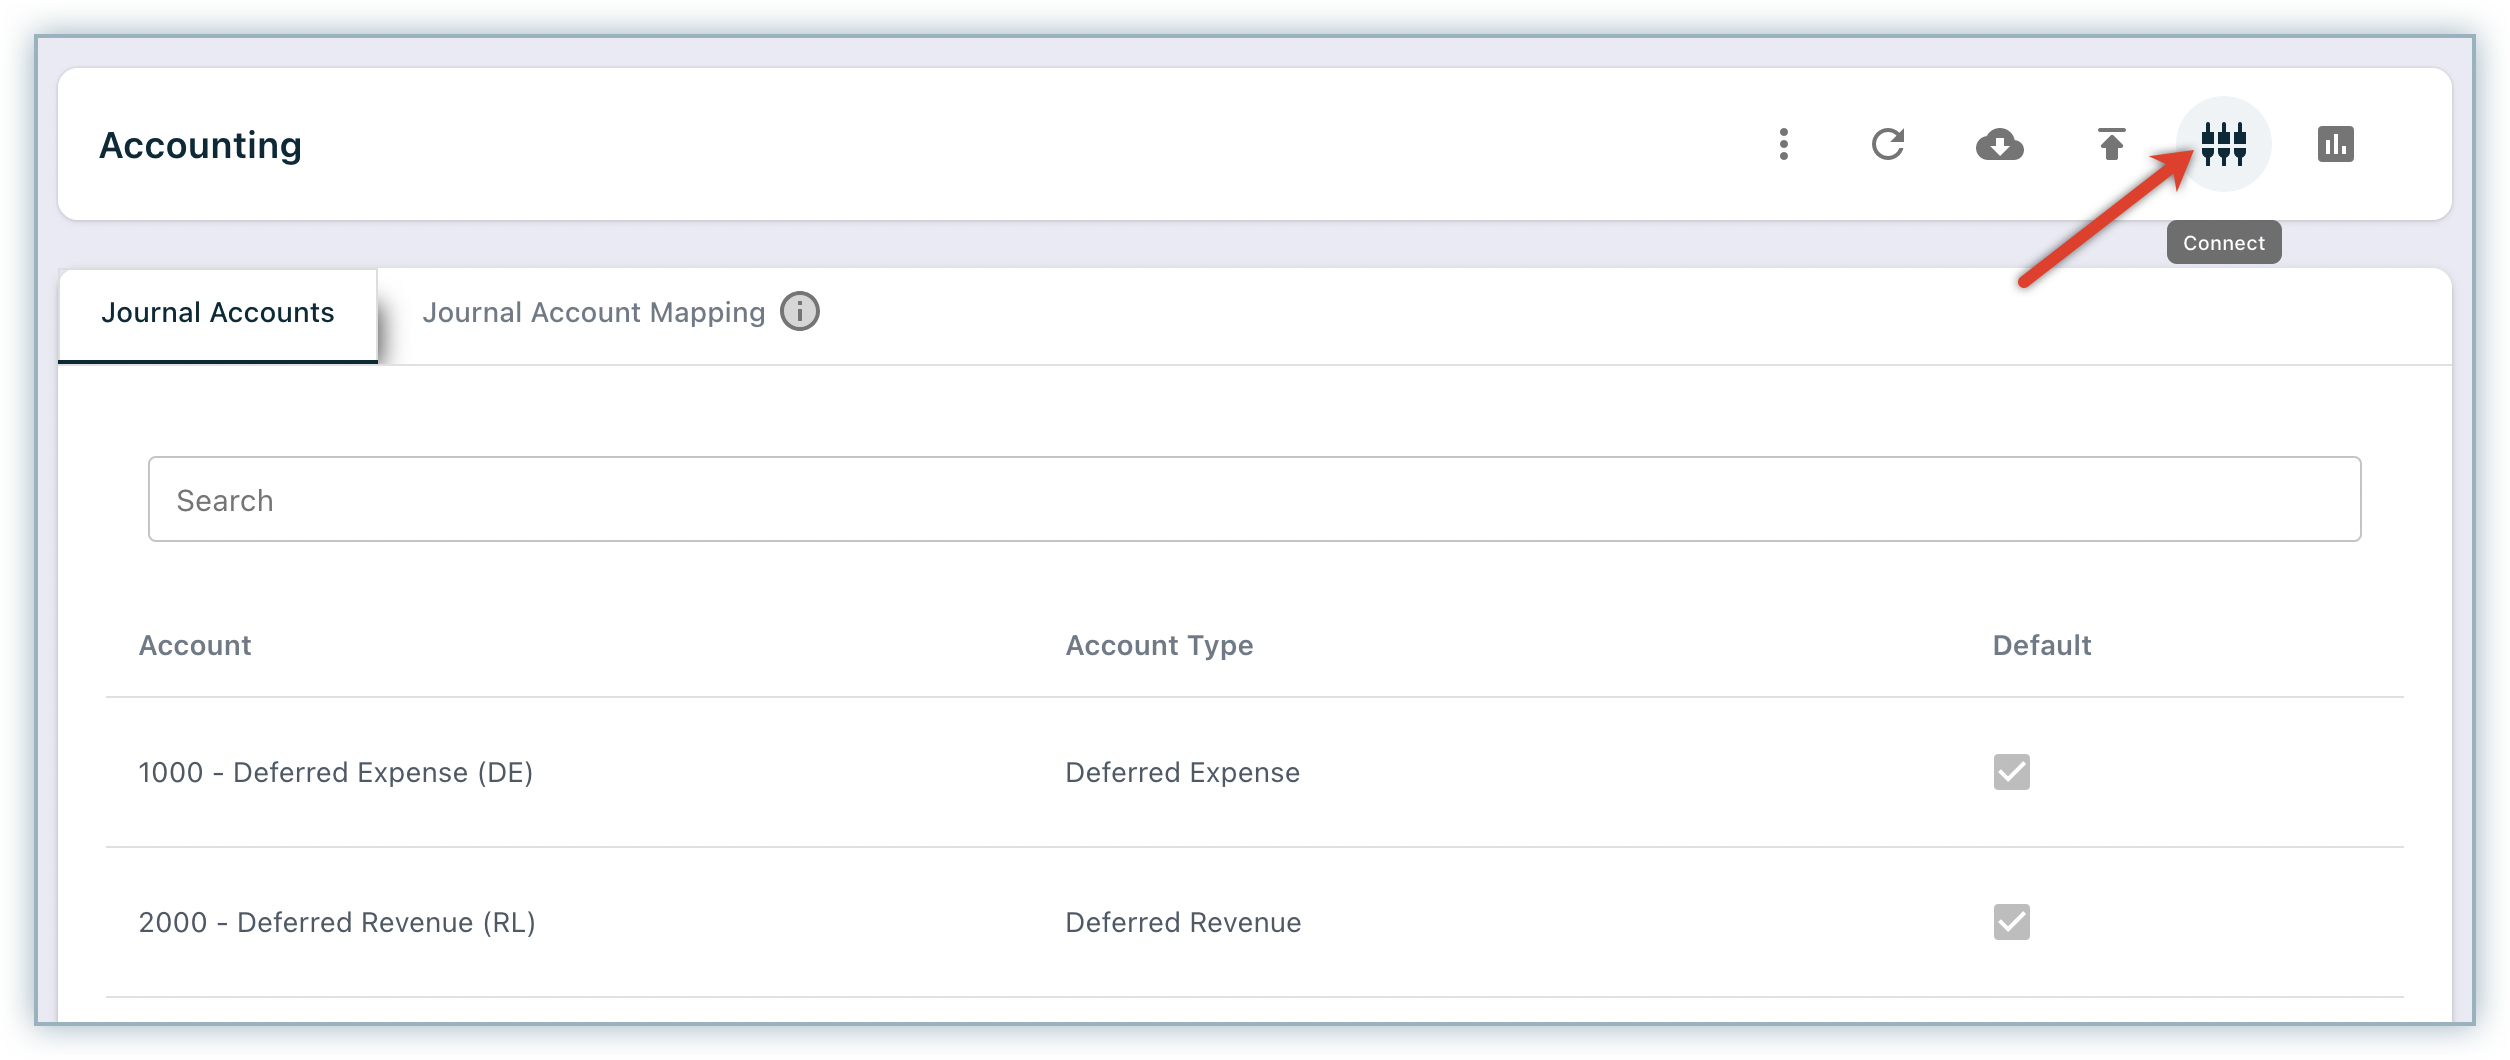
After logging in to your RevRec site, navigate to the right environment in which you are integrating NetSuite and click Accounting.
-
On the Accounting page, click the Connect icon.
-
On the Connect your data popup, select Journal Posting.
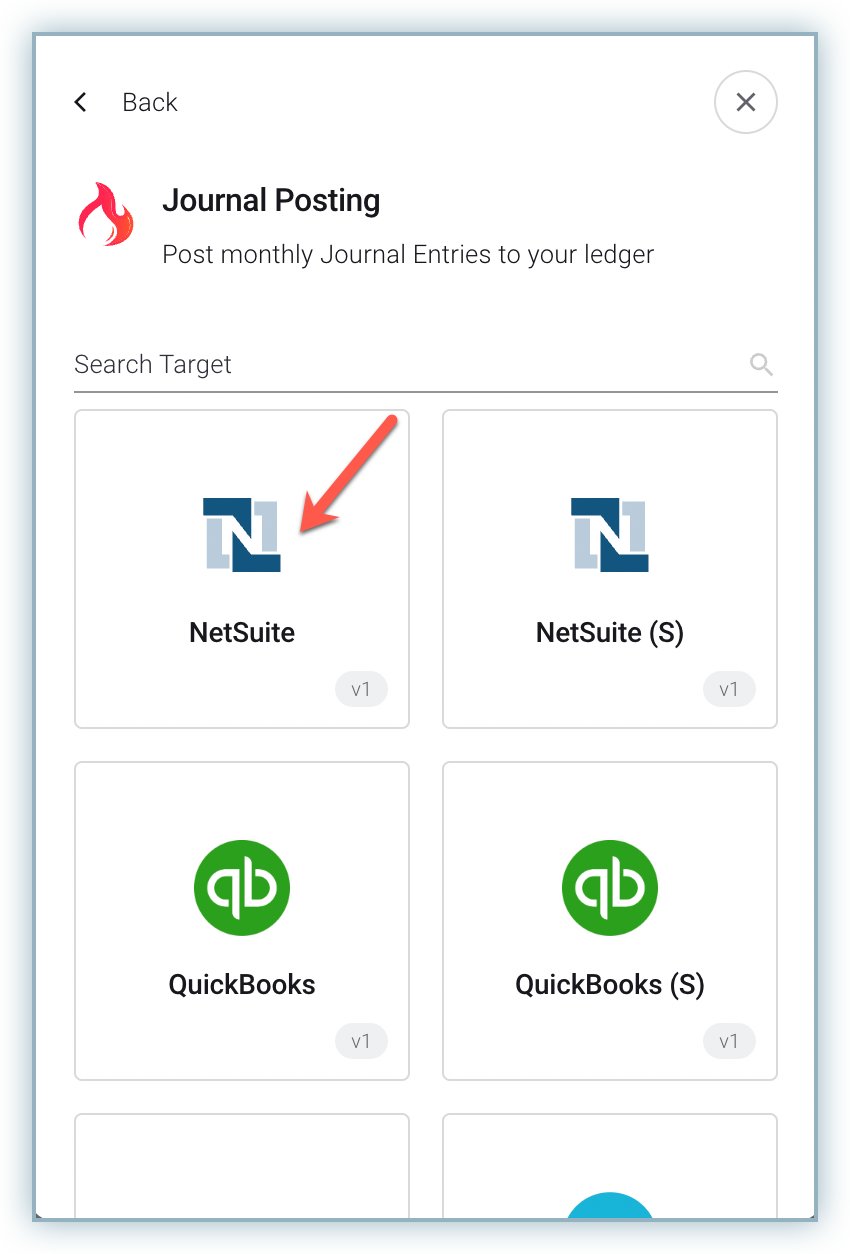
-
The Journal Posting popup displays all the available accounting systems for integration. Click NetSuite.
-
On the Connect NetSuite screen, specify the connection parameters.The following fields are Identification and Key values generated in NetSuite for each user account. You can provide the values for these fields to connect your NetSuite and RevRec accounts:
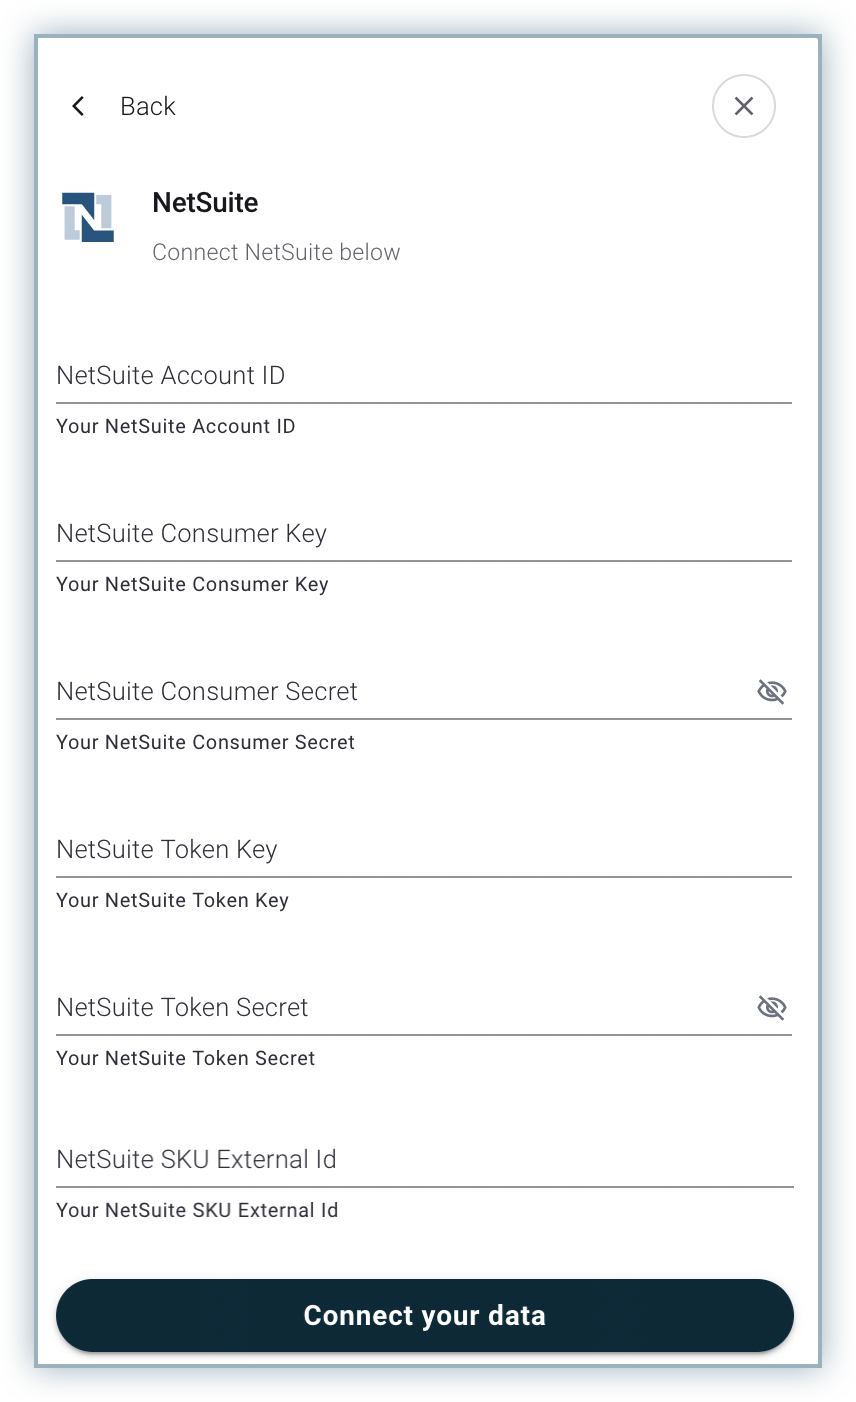
- NetSuite Account ID: NetSuite account ID is the beginning of your NetSuite account URL. For example, if the URL is https://example.app.netsuite.com/, your account ID is 'example'.
- NetSuite Consumer Key and NetSuite Consumer Secret: To generate the Consumer Key and Secret on your NetSuite account, navigate to Setup > Integration > Manage Integrations.
- NetSuite Token Key and NetSuite Token Key Secret: To generate a new Key and Secret, log into your NetSuite account as a user with the Access Token Management permission. Go to Setup > Users/Roles > Access Tokens and click New Access Token. Once you specify the details, the confirmation page displays the Token ID and Token Secret.
-
Click Connect your data and provide login details for your NetSuite account.
Once connected, RevRec will publish the Journal Entries created when you close the accounting period.
NetSuite User Role Permissions Required
Login to your NetSuite account, navigate to Permissions > Transactions, and ensure that the keys provided in connection parameters for the NetSuite user role are provided with Make Journal Entry permission.
Execution of Journal Posting
A message gets displayed on the Home page at the accounting period close for the initiation of the Journal Entries posting.

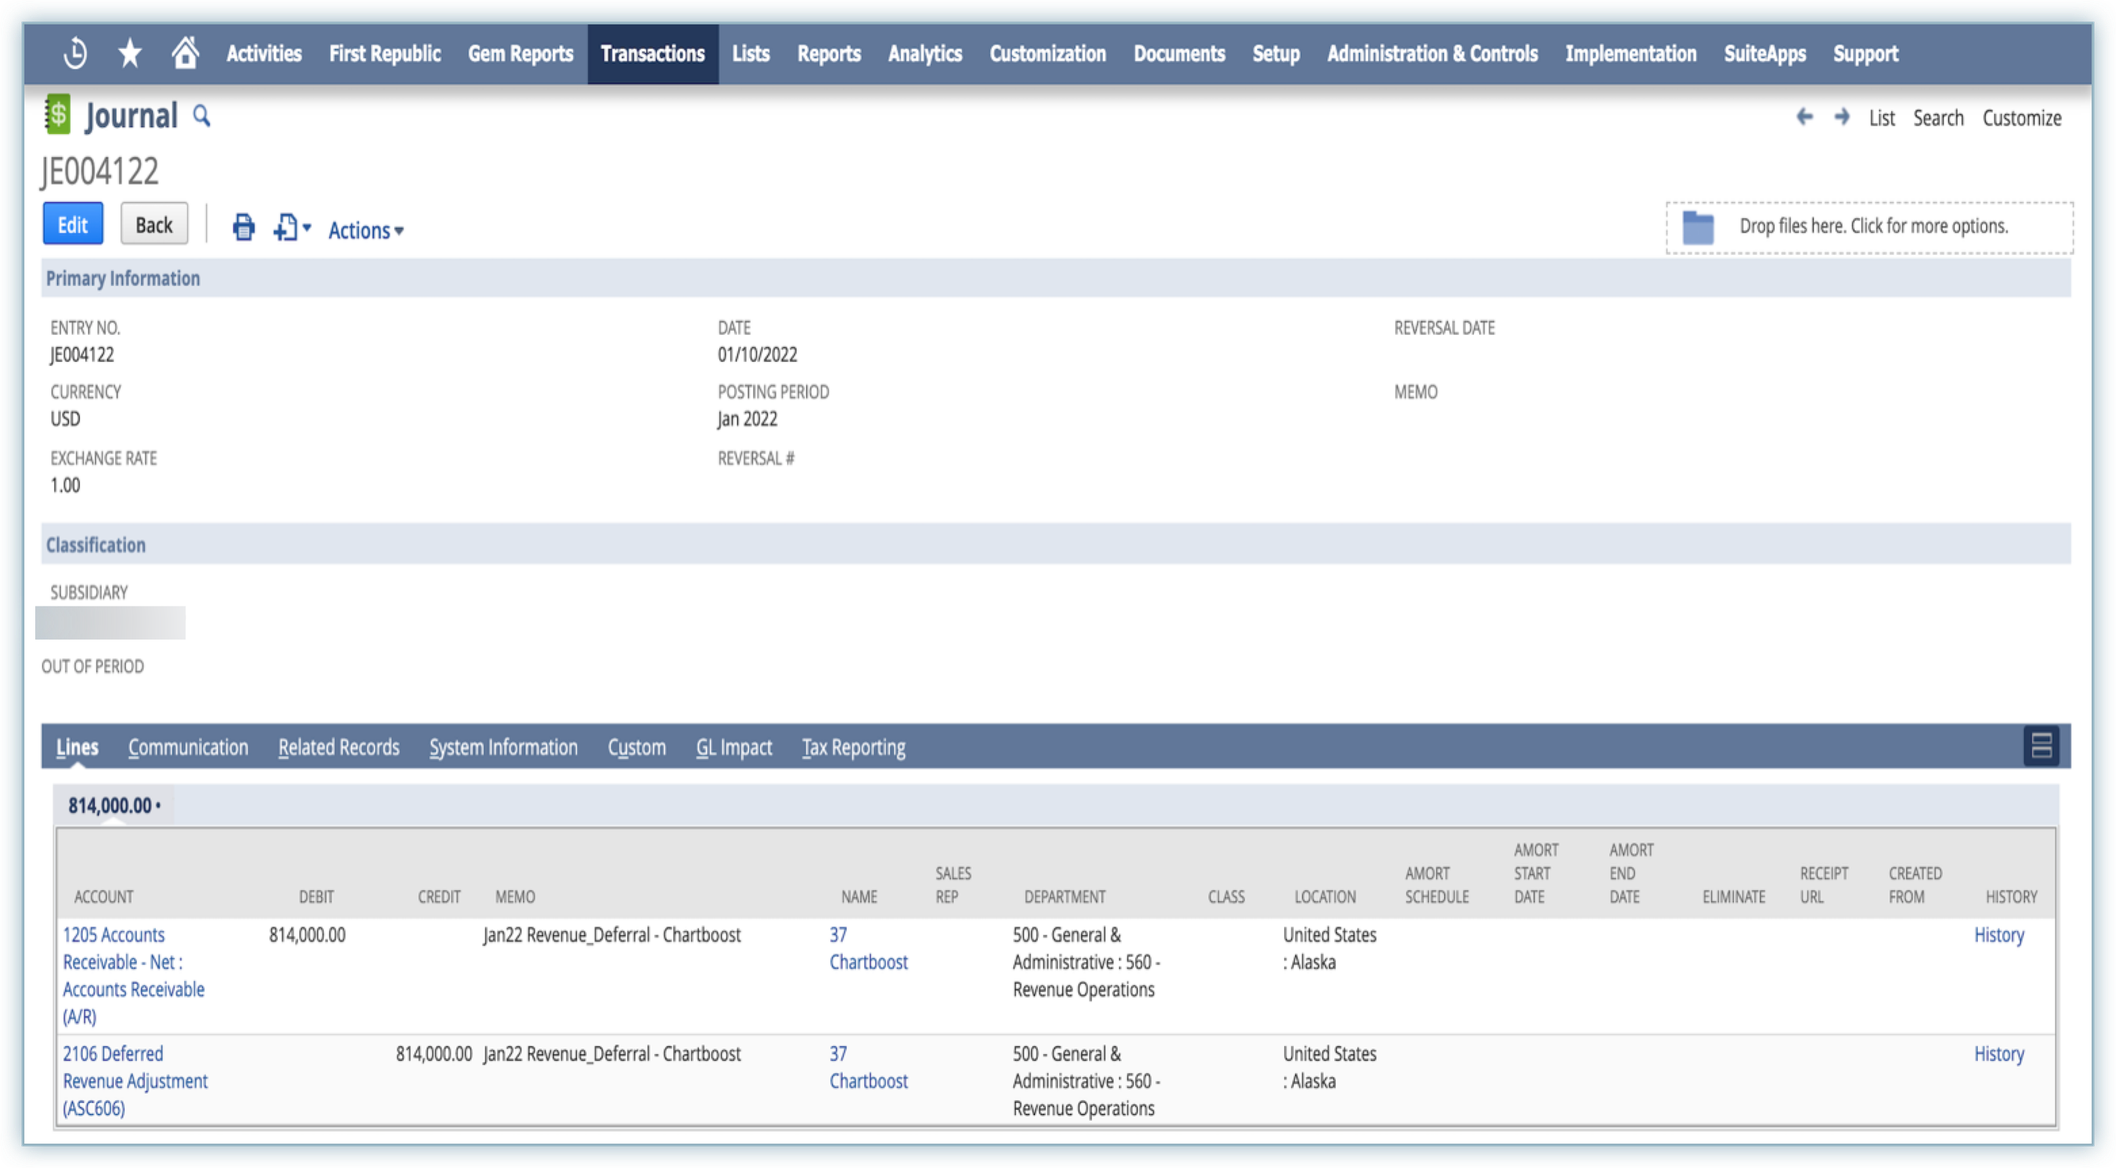
Once the posting flow is completed, you can check the journal entries posted in your NetSuite system by accessing the Journal Entries page.
Publishing Journal Entries Using Custom Fields
RevRec supports publishing journal entries to NetSuite based on the custom fields defined. You can configure RevRec to create and publish Journal Entries based on custom fields like Location, Department, Class, and so on.
For custom field posting, ensure that relevant permissions are provided to the user role being used to link NetSuite with RevRec. For example, to post Journal Entries using the Department custom field ensure that you provide permission to access the Department page in NetSuite.
Contact RevRec Support to set up custom fields that you want to use for Journal Entries posting.
Was this article helpful?