Hosted Pages v2: Plan Specific URL Options
With Chargebee's hosted page URL, you can pass additional customer and subscription information during sign-up. These details must be included in the hosted page URL when redirecting users to the hosted checkout page.
You can also retrieve subscription details after a successful sign-up. This information can be used to display custom messages to your customers.
Warning
Although customers are redirected to the redirect_url after successful checkout, do not rely on this for critical post-checkout actions. Redirection may fail due to unforeseen reasons. Chargebee recommends listening to relevant webhooks, such as subscription_created or invoice_created, to verify a successful checkout.
Specify plan quantity during sign up
Include addons in the hosted pages
Note
The parameters listed below cannot be used in plan specific hosted pages:
- billing_cycles
- subscription[trial_end]
- subscription[plan_unit_price]
- subscription[setup_fee]
Specifying plan quantity on hosted pages
This is only supported for plans with per unit pricing. To specify a different plan quantity during sign up, you can pass an additional parameter to your hosted page URL. Passing this can be done by either including the quantity as default or a custom form needs to be built. This custom form can be used to get the plan quantity as input during sign up and the value has to be passed on to the plan specific hosted page URL when the customer is being forwarded to the hosted pages.
This is the syntax:
your-domain.chargebee.com/hosted_pages/plans/plan_id?subscription[plan_quantity]=number
Sample URL:
https://labs-test.chargebee.com/hosted_pages/plans/basic?subscription[plan_quantity]=5
Note
Checkout our sample app to see how we collect plan quantity and addons on a form.
Including an addon during sign up
If you want to sell additional products as addons to your customers, you can build a custom form on your website. The form should contain all the available addons that customers can choose from. Once they have selected the addon they need, pass it on to the plan specific hosted page URL as an extra parameter.
This is the syntax:
your-domain.chargebee.com/hosted_pages/plans/plan_id?addons[id][0]=addon_id&addons[quantity][0]=number
"[quantity][0]=number" is optional and can be used for quantity based addons.
Sample URL:
https://labs-test.chargebee.com/hosted_pages/plans/basic?addons[id][0]=sms_credits&addons[quantity][0]=2
Note
If you'd signed up before March 1st 2014, and want to upgrade to the new hosted pages, email us at support.
Adding multiple parameters
To pass multiple parameters (whether it is subscription ID, plan quantity, addons or coupons) to the plan specific hosted page URL when creating a subscription, use an "&" symbol to separate parameters.
To illustrate, here is a sample URL for creating a subscription that includes subscription ID, plan quantity, addon with quantity and a coupon with each parameter separated by an "&" symbol:
https://yoursitename.chargebee.com/hosted_pages/plans/ ?subscription[id]= &subscription[plan_quantity]=2&addons[id][0]= &addons[quantity][0]=2&subscription[coupon]=
Passing custom field data to the hosted pages
Users signed up before 1st March 2014
If you're using custom fields in your Chargebee site, you can collect custom field data during sign up. This information can be collected on a form prior to redirecting users to the hosted checkout page. The custom field data that has been passed will remain hidden but once the customer subscribes successfully, the data will be available in the subscription.
For form users, here's a sample code for passing custom field data to the hosted checkout page:
<form action="acmeinc.chargebee.com/hosted_pages/plans/designer_tshirts" method="GET">

First Name: <input type="text" name="customer[first_name]" id="first_name" placeholder="First Name">

Last Name: <input type="text" name="customer[last_name]" id="last_name" placeholder="Last Name">

T-Shirt Size: <input type="text" name="subscription[cf_tshirt_size]" id="cf_tshirt_size" placeholder="T-Shirt Size">

<button type="submit" id="monthly">Continue Checkout</button>

</form>
In the sample code above, we've used "T-Shirt Size" as the custom field.
Users signed up after 1st March 2014
You can capture the custom field data directly on the hosted checkout page. If you want to use a custom form on your website to collect the custom field data, you can configure the custom fields as a Hidden parameter and pass the data. This will ensure that the custom field is not shown on the hosted checkout page.
Pre-filling fields on the hosted pages
It is possible to pre-fill fields on the hosted pages with data. Similar to collecting custom data on a form (explained above), you can pre-fill some of the fields on the hosted pages using the data you get from your customers.
Here's a sample code:
<form id="customer.formid" name="customer.formname" method="GET"

action="[https://acmeinc.chargebee.com/hosted_pages/plans/basic](https://acmeinc.chargebee.com/hosted_pages/plans/basic)" autocomplete="on">

<input id="credit_card.first_name" name="customer[first_name]" type="text" value="" validate="true" />

<input id="credit_card.last_name" name="customer[last_name]" type="text" value="" validate="true" />

<input id="customer.email" name="customer[email]" type="text" value=""/>

<input id="customer.coupon" name="subscription[coupon]" type="hidden" value="early_bird_offer" validate="true" />

<input type="submit" id="customer-user-submit" value="Subscribe"/>

</form>
This code sends across the customer's name and email address that is pre-filled on the hosted page when the user reaches there. Additionally, we've passed on a coupon code as well and this code is applied to the subscription and will be shown in the order summary.
Using this code, you can pre-fill all the customer related information (including custom fields (if any), billing address and shipping address). Credit card information cannot be pre-filled.
Note
If you are creating a new subscription for an existing customer, Chargebee will pre-fill the hosted page automatically, using existing data from the application.
Getting subscription details from the redirect URL
This is only for plan specific hosted pages and is not supported for API users.
After a successful checkout, your customer will be forwarded to a "Sign up Successful" or "Thank you" page. When they are being redirected to this page, you can get subscription details from the redirect URL.
This information can be quite useful to display custom messages to the user on the success page or can also be useful for affiliate tracking.
For example, you have a web based service and your customers need a customer ID to login and use your service. When John Doe signs up for your service, you would like to show him his new customer ID along with a message on your website. You want to do this immediately because he might want to start using your service right away, rather than having to wait for the sign up email from you (in case it gets delayed).
Using the redirect URL, you can get his subscription details with his name and customer ID and display that to him on your redirect web page.
Here's a sample of what the redirect URL would look like:
www.acmeinc.com/successpage.html?cus_id=`customer.id`&cus_fname=`customer.first_name`
So, on a successful checkout, the redirect URL will return something like this:
www.acmeinc.com/successpage.html?cus_id=B51XqSOLGTqCn1pq&cus_fname=John
"customer.id" and "customer.first_name" are Chargebee variables.
"cus_id" and "cus_fname" could be variables you define at your end and you can use them to get the subscription values and display an appropriate message.
Example
Hey John! Thank you for signing up to our awesome service.
Your customer ID is: B51XqSOLGTqCn1pq
To get started, go to https://login.acmeinc.com and set up your account.
Similarly, some users may store the return values in their own database for affiliate tracking.
Note
Data returned on the redirect URL should only be used for displaying the information to users on successful checkout. It should not be used for any validation purposes or for updating your database as malicious users can modify the return parameters.
If you want to validate or update the subscription details in your database, you should configure and use the "Subscription ID" returned in the redirect URL and then make a Retrieve Subscription API call. Use the details you receive from this response for updating your database or validating data.
Configuring the redirect URL to return subscription details
While creating a new plan or when editing an existing plan, the redirect URL can be configured. The list of all the available return variables that can be used along with the redirect URL are available right below the redirect URL field. You can use the Show/Hide MergeVars option to display the variable list.
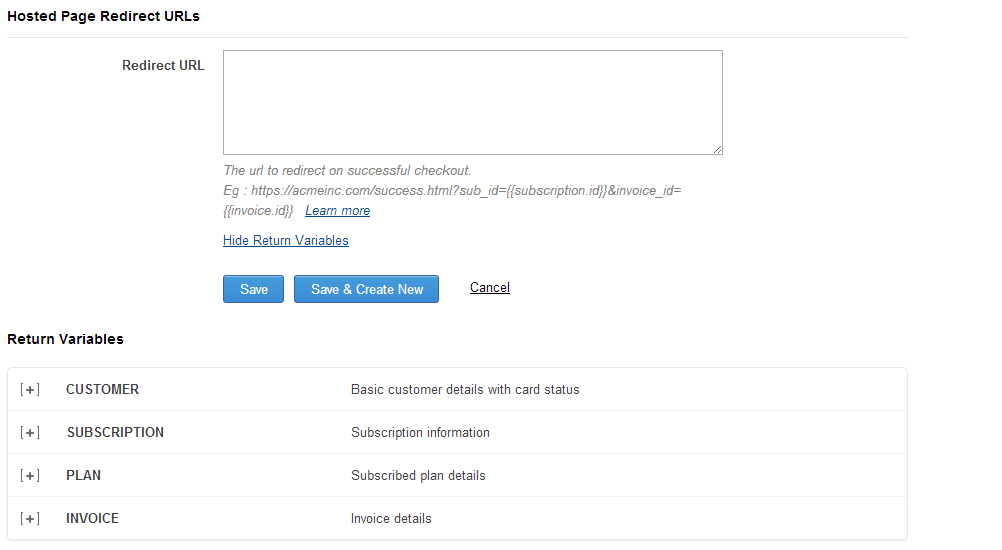
When constructing the URL, use "?" to add each return variable.
Note
- Using the redirect URL to return values for hosted page checkout is only supported for plan specific hosted page integration. For users integrating with hosted pages using the API, use the Retrieve a Hosted Page API.
- We recently released the Custom Domain feature, which lets you white label your own subdomain and use it in the customer portal URLs. If you'd like this feature enabled for your Chargebee site, write to support
Was this article helpful?