Consent Management
Introduction
In an age where more and more business activities are performed online, personal information of any given individual is processed in diverse ways, for many reasons and in several places. Obtaining consent from individuals before processing their personal information is crucial to ensuring their privacy. This is also why privacy regulation policies such as the GDPR make it mandatory to do so. Consequently, you may need to seek explicit consent from your customers for say, sending them marketing communication or capturing additional personal information.
Chargebee's Consent Management feature gives you powerful ways to capture consent from your customers and manage collected consent information.
Let's look at an example:
Consider that each time a customer comes on board with you, you wish to gather explicit consent from them for:
- Sending them email newsletters and information about new offers. In short, for marketing communications.
- Sending them alerts about beta-testing opportunities.
Also, you want to allow your customers to easily revoke consent whenever they wish.
Here's how you would accomplish this in Chargebee:
Step 1: Create Consent Fields
In Chargebee, any kind of customer consent that you wish to track is represented by a "consent field". For the example above, we would need one field each for "marketing" and "beta testing".
Here's how you can create the consent fields:
Go to Settings > Configure Chargebee > Customer Data Privacy > Consent Management and create the 2 consent fields for your Chargebee site:

There are two names for each field:
- Internal name: A short name used to refer to the field in the Chargebee web interface. In our example, this would be "Marketing" and "Beta Testing".
- API name: The attribute name that would be added to the
customerobject in the Chargebee API. Eg.cs_marketingorcs_beta_testing.
Note
- Consent-related customer attributes (such as
cs_marketingorcs_beta_testing) appear in Chargebee’s API documentation only when you are logged in to the site (test or live) where those fields were created. Otherwise, these attributes will not be visible undercustomerresource in API documentation. - Once set, the API names cannot be changed so choose carefully.
Once you create the fields, they become part of every customer record in Chargebee. The field values inside the customer records are initialized to null which means "consent not set". They may be changed to the following values hereafter:
True: meaning "consent given" False: meaning "consent not given"
Step 2: Obtaining and Managing Consent
Once the consent fields have been created, there are several ways to obtain and manage consent from your customers using Chargebee. Let's look at some ways to do this.
Case 1: Using Chargebee Checkout & Self-Serve Portal v3
Consent for each of the two actions can be obtained from customers using Chargebee Checkout and thereafter managed by the customer using Chargebee Self-Serve Portal.
Before we learn how to configure the settings, let's look at how the end result would look like for your customer:
Chargebee Checkout:
You can see how consent is solicited here via checkboxes during checkout.
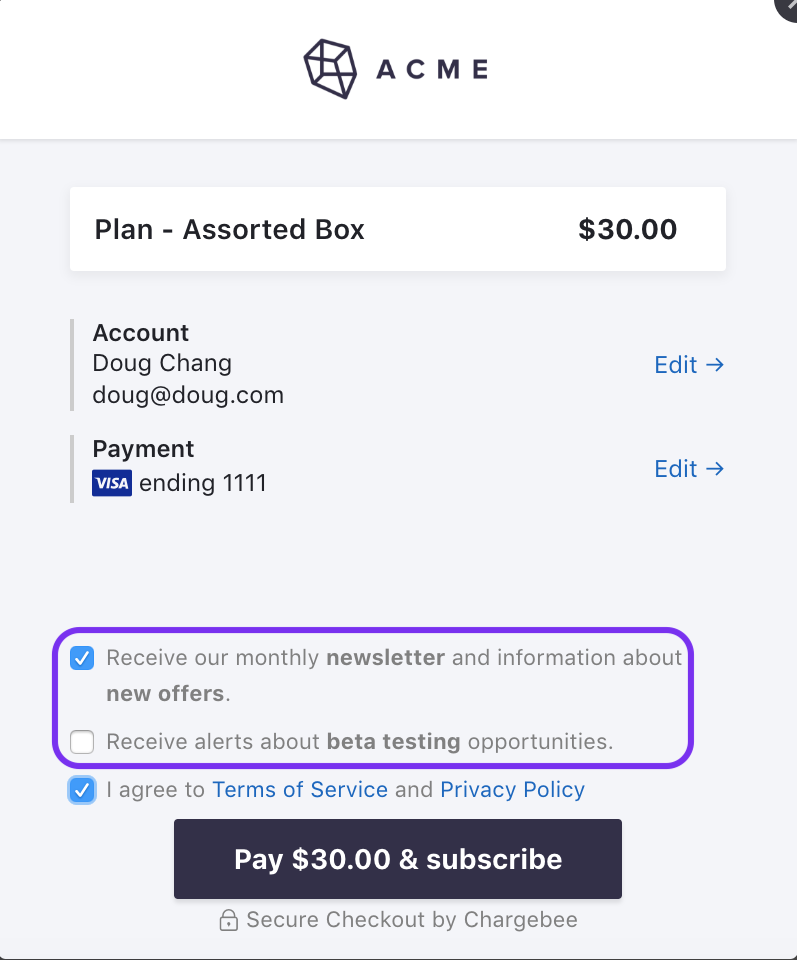
Note
If the checkout happens for an existing customer record in Chargebee, the checkboxes are not made available for the customer.
For existing customer records, we suggest one of these options:
- Direct them to their Chargebee-hosted Self-Serve Portal for them to grant or revoke consent themselves.
- Alternatively, use the API to set the consent field values for any customer record.
- For multiple customer records use Chargebee bulk operations to set the consent field values.
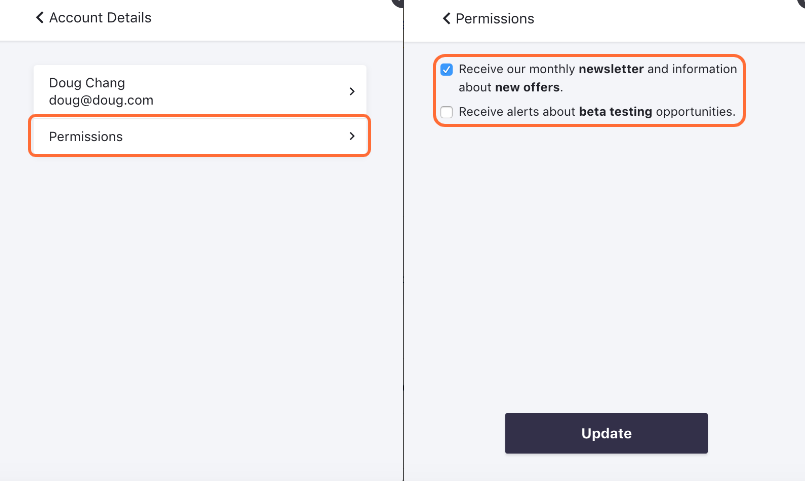
Chargebee Self-Serve Portal:
The Self-Serve Portal can be used by the customers to choose what options they would like to consent to. Here again, checkboxes under "Permissions" make it as easy for the customer to revoke consent as it was to provide it. This way, Chargebee allows you to be compliant with international privacy regulation policies such as the GDPR.
Now let's see how you can configure the above hosted pages to work as described:
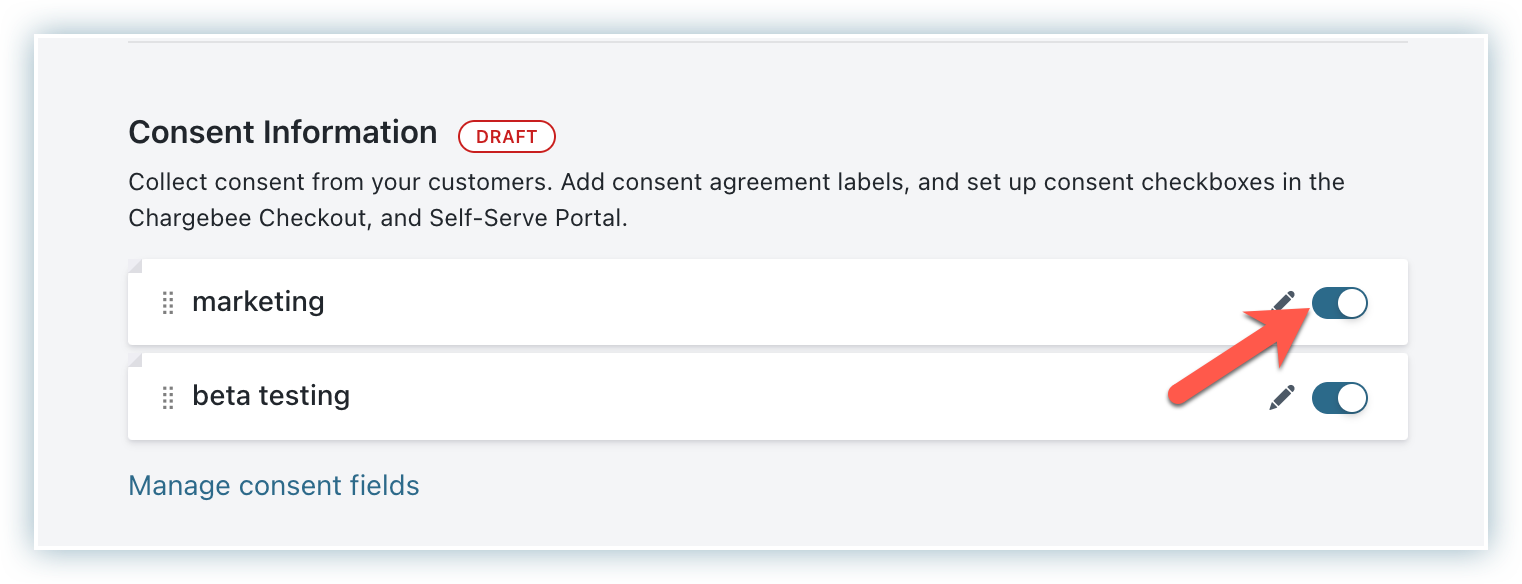
Once you have finished performing Step 1, navigate to Settings > Configure Chargebee > Checkout & Self-Serve Portal > Fields > Consent Information section and switch on the fields:
Once you click on the edit icon for any of the consent fields, the following settings are available:
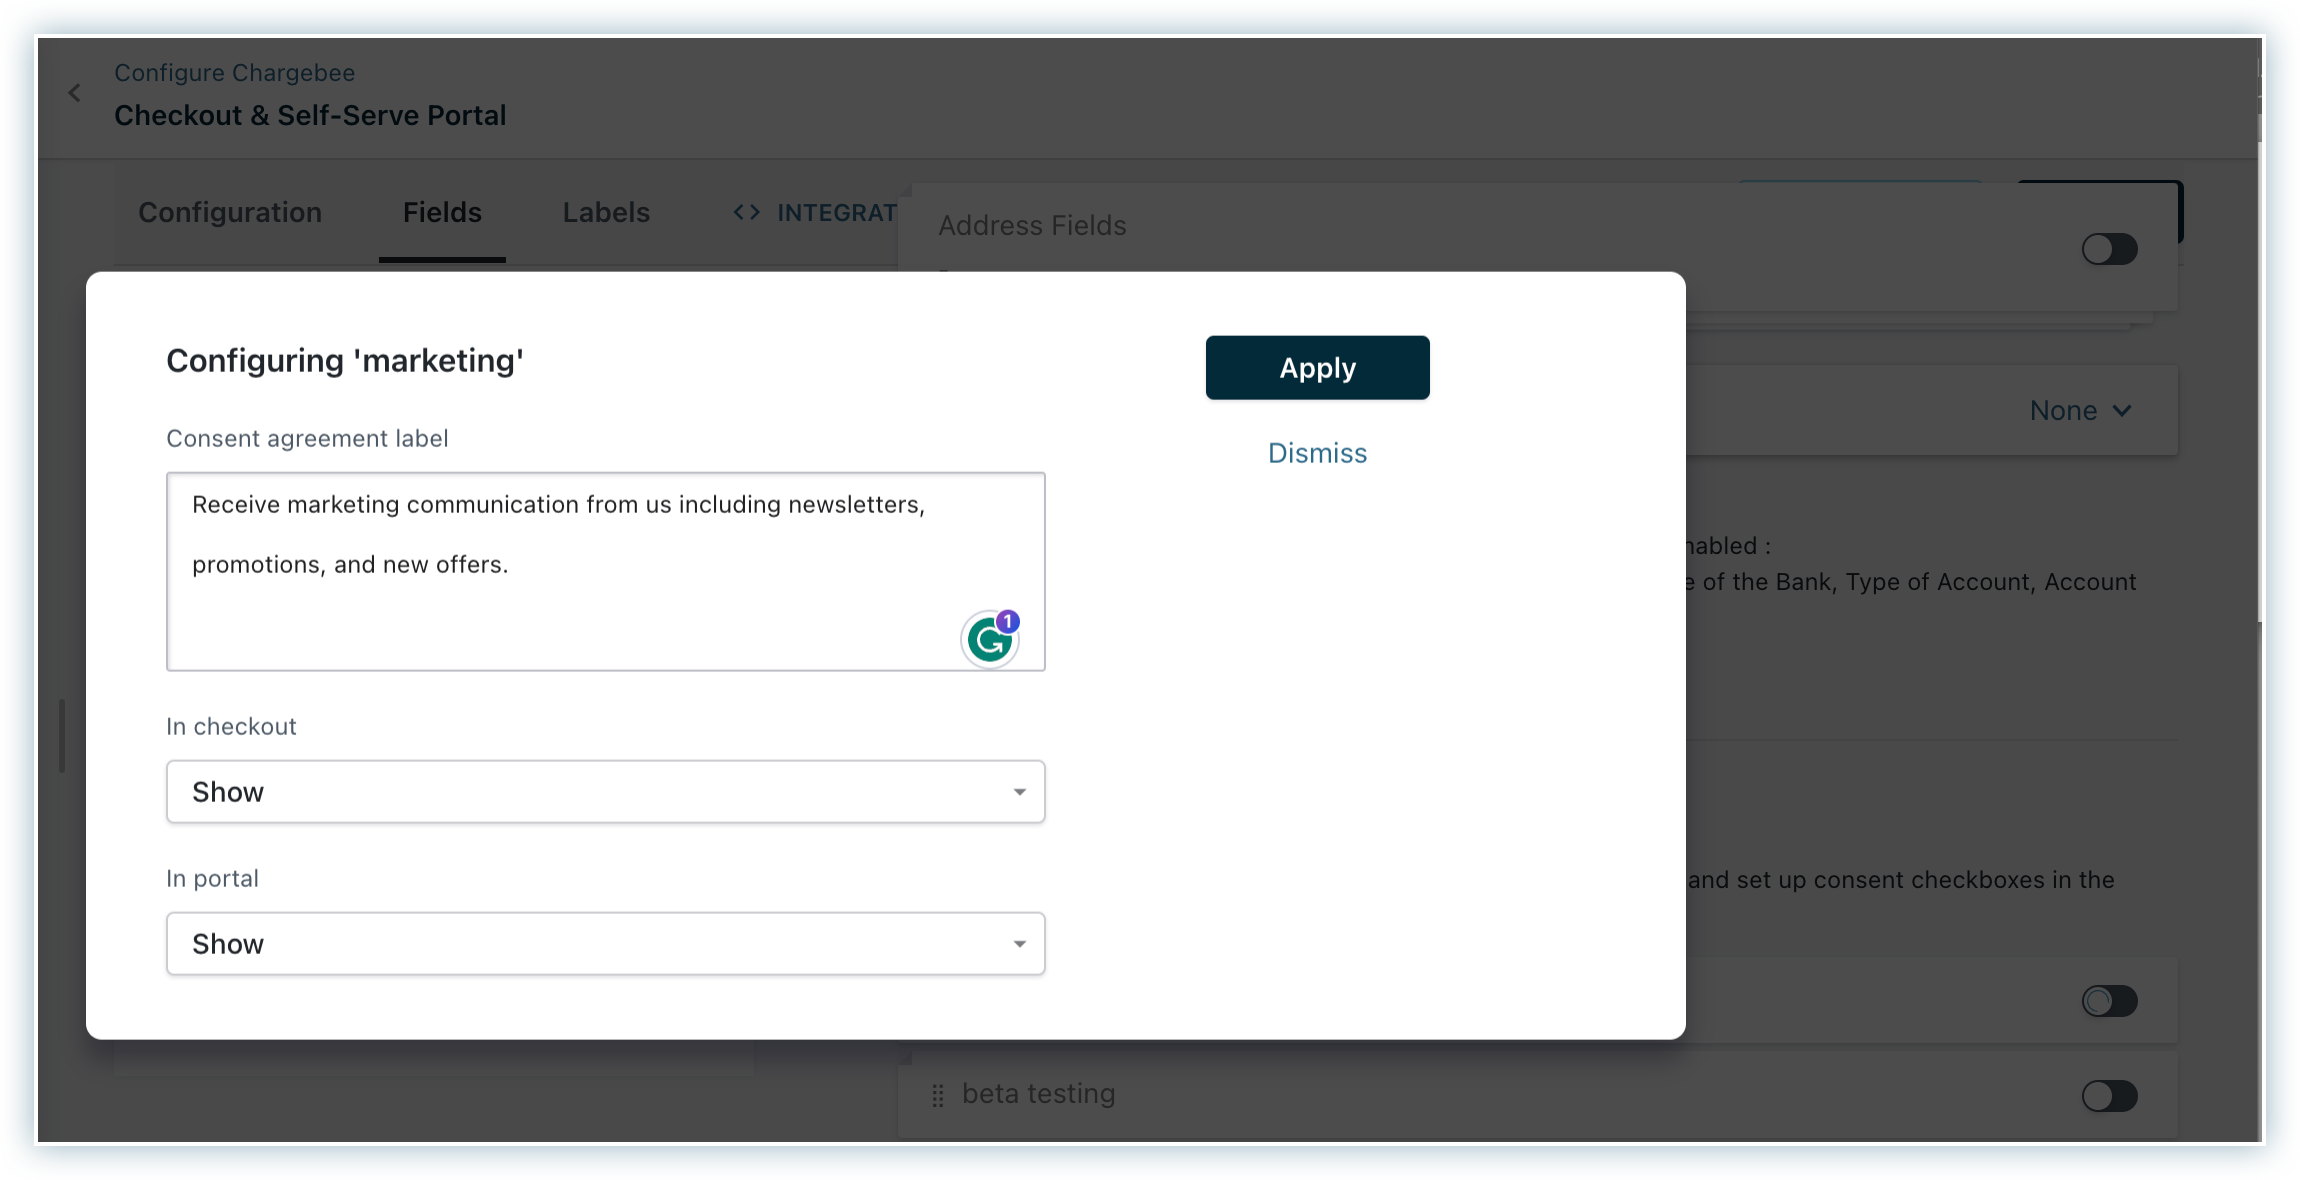
Consent agreement label: Here, enter the actual text that the customer would see on the Checkout page and/or Self-Serve Portal and based on which they would give their consent. You have the option to format text here and insert hyperlinks too.
The next two settings control if and how the consent text shows up on Chargebee Checkout and Self-Serve Portal.
| Visibility Option | Meaning | Available for Checkout Page? | Available for Self-Serve Portal? |
|---|---|---|---|
| "Show" | Show the checkbox and allow the customer to select/clear it. | Yes | Yes |
| "Hide" | Disable the consent field. (Don't show) | Yes | Yes |
| "Use as hidden parameter" | Don't show the field but keep it enabled so that its value can be passed as parameters in the hosted page API call. | Yes | No |
Case 2: Using the Chargebee API
Chargebee also provides API support for managing consent information. Using the API gives you the flexibility to design your own ways of managing consent for your customers.
As soon as the consent fields are defined in Step 1 the API name values are set as new API attributes in the Customer resource.
Existing Customer Records:
On creation of the consent API attributes, the consent fields are created for all existing customer records and initialized to null. Now, the consent fields for any customer record can be set to true or false using the Update Customer API call.
New Customer Records:
When creating new customer records, the consent fields can be set to true or false using any of the following API calls: Create Customer, Create Subscription + Customer or Import Subscription.
Case 3: Using Chargebee API along with Chargebee Hosted Pages
API calls can be used in tandem with Chargebee hosted pages. Here are a couple of situations that fall under this:
-
Obtaining consent via Chargebee Checkout and managing it via API:
- Obtain consent from your customers during checkout via Chargebee Checkout pages as described in Case 1 above.
- "Hide" the consent fields in Self-Serve Portal.
- Based on customer requests, update consent field values via API as described in Case 2.
- If needed, drive actions dependent on consent field values, such as sending/stopping emails by enabling Chargebee webhooks. (see FAQs).
-
Obtaining consent and storing them via API and allowing customers to self-manage it via Chargebee Portal.
FAQs
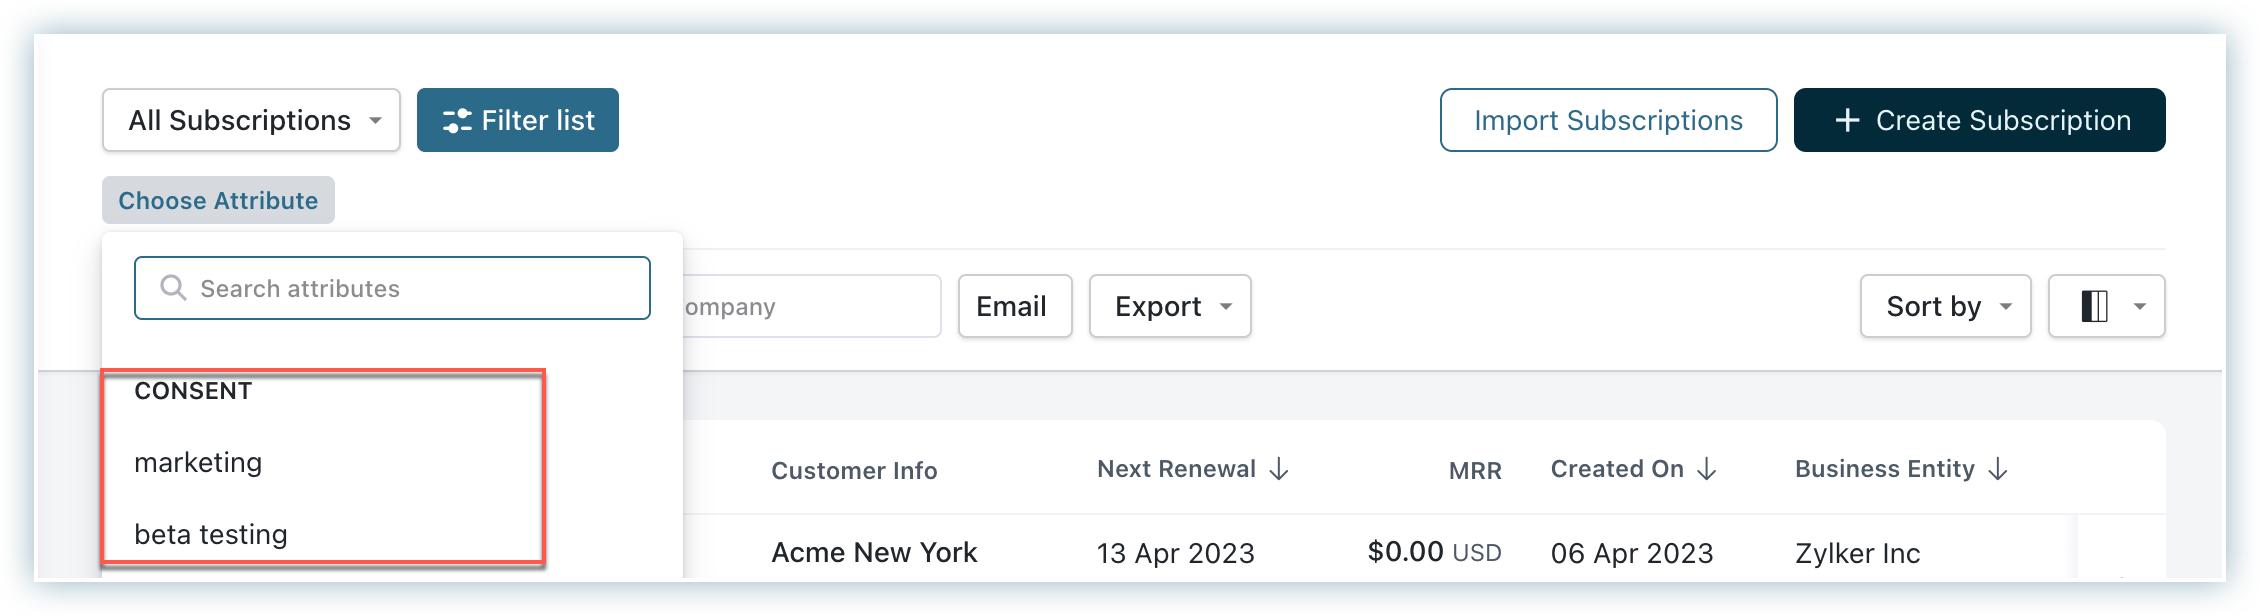
(1) How can I email existing customers requesting them to update their preferences?
You can send emails to several customers at once by navigating to Subscription and clicking the Email button. You may choose to apply filters to send emails to selected customers. For instance, if you wish to email all customers for whom the Marketing consent field is not set (is null), you must choose the filter as shown below:
(2) I send marketing emails to customers. What can I do if they choose to unsubscribe from them?
Direct them to their account portal where they can change their preferences around such emails. Chargebee's Self-Serve Portal can be a great place for this. Alternatively, use the Chargebee API to mark the consent field as "false" for the customer. You may use webhooks to inform your email system of the change made by the customer (see FAQ #5).
(3) Is there a way I can grant/revoke consent on behalf of a customer if they contact us?
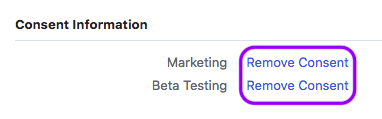
On behalf of a customer, you can revoke consent in the Chargebee web interface but not grant it.
To revoke consent, navigate to the Customer details page for the customer and under Consent Information, click Remove Consent.
(4) Why is there no option to grant consent on behalf of a customer on the Chargebee web interface?
As a privacy-by-design feature, granting consent on behalf of a customer is not allowed via the Chargebee web interface. This ensures that the customer always grants their consent directly and never through an unauthorized person, thereby helping you comply with privacy regulation policies such as the GDPR.
However, we make an exception for site admins, by giving them a way to grant or revoke consent on behalf of customers through bulk operations.
(5) I use an email-marketing system such as Mailchimp. How can I ensure that such systems are aware of consent information in Chargebee so that emails are sent only to the right customers?
This can be achieved using Chargebee webhooks. Once a webhook has been setup in Chargebee, you can have your system listen to Customer-related events such as customer_created, customer_changed, customer_deleted etc. The value of the consent field(s) can be checked in the webhook posts for such events (except customer_deleted) to determine whether your system should send the emails to the customer or not.
Was this article helpful?