Export data with Stitch
RevenueStory lets you replicate the underlying and historical data into your BI-based warehouse using Stitch. It uses Stitch to establish secure connections between your data in RevenueStory servers and your destination sources for reliable and rapid movement of data.
Intended audience
The information described in this document is specific (but not limited) to developers responsible for Freshworks backend integration with Chargebee. This includes developers and administrators with the appropriate authorization to Freshworks' database and related resources.
How it works?
RevenueStory data model configuration with Stitch enables it to listen and process your data easily.
Once the pipeline is established, RevenueStory then leverages Stitch's import API feature to push your data.
This capability creates a secure ecosystem to transfer data from source to destination.
Steps to establish a pipeline
Step 1: Generate an API Key
Generate a Chargebee API Key for Stitch. This will allow Stitch to read data from your Chargebee account using the Chargebee API.
- Sign into your Chargebee account.
- Click Settings > Configure Chargebee > API keys and webhooks.
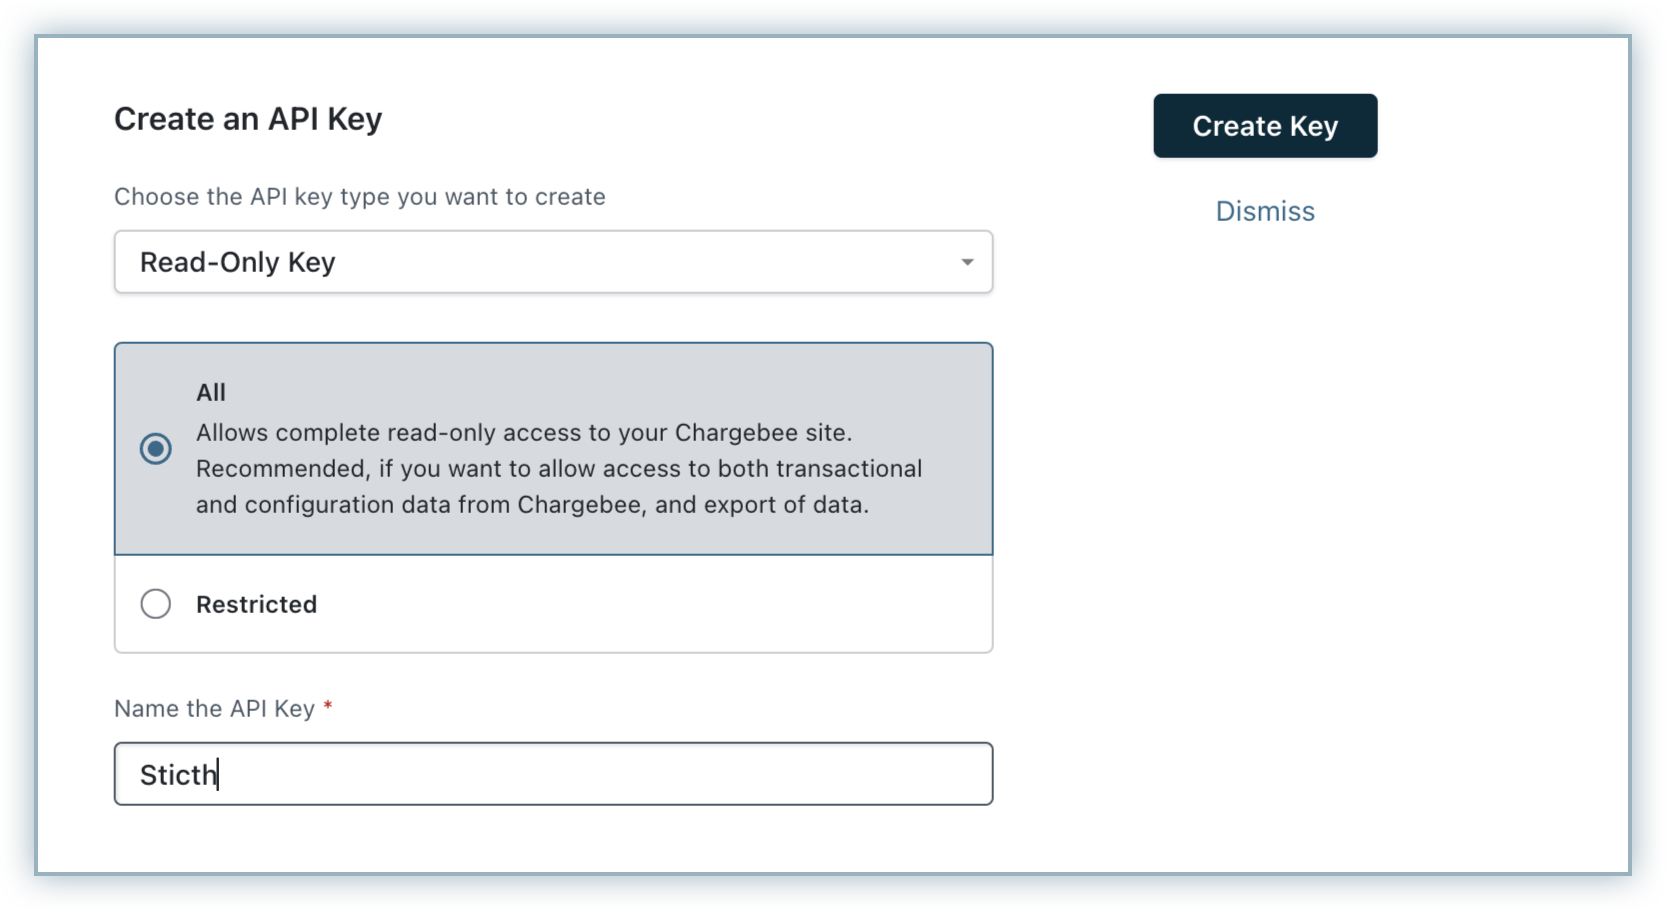
- On the API Keys page, click the + Add API Key button.
- On the Create an API Key modal, select Read-Only Key as the API key type.
- Select All to define the API key's access. This will grant read-only access to your Chargebee site.
- In the Name the API key field, enter "stitch".
- Click Create Key.
Chargebee creates the API key and redirects you back to the API Keys page.
Step 2: Integrate using Import API
- Sign in to your Stitch account.
- On your Stitch Data Loader UI, click Add Integrations.
- On the Add an Integration search box, search for "Import API" and select it.
- On the Configure your Import API Integration screen, enter an Integration Name. For example, "sample-integration". Use an easily identifiable name specific to your Chargebee site. It is recommended that you follow a convention.
- Click Save and Generate Tokens. This creates a Stitch API token which is used to authenticate data transfer from your Chargebee site to Stitch.
- Copy the Stitch API Token and click Close and Continue. This adds the Stitch Import API integration to your account.
- Click All Done.
Configuring your warehouse
The following steps describe how you can configure your warehouse.
For documentation purposes, we have taken the example of Amazon S3 server. If you wish to integrate Stitch for other storage resources, the settings may vary. Refer to the related documentation in Stitch to know more. Learn about details of choosing a destination for smooth data transfer.
Note
Values in resource_updated_at column are in user timezone but Stitch automatically adds a UTC text to its end.
At present, RevenueStory cannot capture deleted records. Once a record is synced to the destination, there is no way to remove this record if it is deleted from RevenueStory.
- On the Stitch Data Loader main menu, click Destination.
- On the Select a destination for your data screen, choose your destination server (in this case, Amazon S3).
- On your destination storage resource, create a new Bucket (or Host endpoint), say stitch-sample-demo-docs.
- Enter the name of the storage resource (or Host endpoint).
- (Optional) Under Store Data in this Format, select CSV.
- Grant Stitch access to write to your storage resource (Host endpoint):
- Click Copy Code.
- Navigate to your Amazon S3 instance, Buckets > stitch-sample-demo-docs > Permissions > Bucket Policy and enter the code copied to your clipboard.
- Click Save.
- Verify the connection by uploading a test file.
- Click Check and Save.
This will establish your pipeline through which Stitch writes into your storage resource.
Change Your Destination
If you wish to change your destination, follow these steps:
- On the Stitch Data Loader main menu, click Destination.
- Under the Historical Data section, choose:
- Replicate new data only: This will enable Stitch to only receive new data from your Chargebee site.
- Replicate historical data: This will initiate a full resync from the date specified at the Integration stage.
- Click Continue. This will delete the current destination.
- Click Remove.
This will remove the current destination and you can set up a new one from the configuring your warehouse step.
Installation
Copy and paste the following code snippet and save it as install.sh:
python3 -m venv ~/.virtualenvs/target-stitch
source ~/.virtualenvs/target-stitch/bin/activate
pip install target-stitch
deactivate
python3 -m venv ~/.virtualenvs/tap-chargebee
wget -O tap-chargebee-RsFreshworksStitchIntegration.zip https://github.com/cb-preethy/tap-chargebee/archive/RsFreshworksStitchIntegration.zip
unzip tap-chargebee-RsFreshworksStitchIntegration.zip
cd tap-chargebee-RsFreshworksStitchIntegration
source ~/.virtualenvs/tap-chargebee/bin/activate
pip install .
cd ..
cp tap-chargebee-RsFreshworksStitchIntegration/tap_chargebee/rs_resources_schema_meta.json ~/.virtualenvs/tap-chargebee/rs_resources_schema_meta.json
deactivate
rm -rf tap-chargebee-RsFreshworksStitchIntegration
rm tap-chargebee-RsFreshworksStitchIntegration.zip
Execute this saved file: sh install.sh
Data Synchronization
Copy and paste the following code snippet and save it as chargebee_revenuestory_sync.sh:
~/.virtualenvs/tap-chargebee/bin/tap-chargebee --config $1 --catalog ~/.virtualenvs/tap-chargebee/rs_resources_schema_meta.json | ~/.virtualenvs/target-stitch/bin/target-stitch --config $2
Execute this saved file:
nohup sh chargebee_revenuestory_sync.sh <chargebee config file> <stitch config file> > <outputlogfilename> 2>&1 &
Daily sync
After the first sync is completed fully, add a crontab entry to execute chargebee_revenuestory_sync.sh at the desired interval.
Example: To set up sync every day at 10 AM, add the following to the crontab entry:
0 10 * * * sh chargebee_revenuestory_sync.sh <chargebee config file> <stitch config file> > <outputlogfilename> 2>&1
The following data (API columns) is synced from RevenueStory:
Applied_credits
- amount
- currency_code
- date
- invoice_id
- credit_note_id
Coupons
- id
- name
- invoice_name
- discount_type
- discount_percentage
- discount_amount
- currency_code
- duration_type
- duration_month
- valid_till
- max_redemptions
- status
- apply_on
- plan_constraint
- addon_constraint
- created_at
- archived_at
- redemptions
Credit note discount lines
- discount_amount
- currency_code
- discount_type
- invoice_id
- credit_note_id
- credit_note_line_item_id
- coupon_id
Credit note discounts
- description
- discount_amount
- currency_code
- discount_type
- invoice_id
- credit_note_id
- coupon_id
Credit note line items
- id
- date_from
- date_to
- unit_amount
- quantity
- is_taxed
- tax_amount
- tax_rate
- amount
- discount_amount
- item_level_discount_amount
- description
- entity_type
- tax_exempt_reason
- currency_code
- invoice_id
- credit_note_id
- credit_note_date
Credit note tax lines
- tax_name
- tax_rate
- tax_amount
- taxable_amount
- is_non_compliance_tax
- is_partial_tax_applied
- currency_code
- jurisdiction_type
- jurisdiction_name
- jurisdiction_code
- invoice_id
- credit_note_id
- credit_note_line_item_id
Credit note taxes
- tax_name
- tax_description
- tax_amount
- currency_code
- invoice_id
- credit_note_id
Credit note transactions
- currency_code
- applied_amount
- applied_at
- refund_id
- credit_note_id
Credit notes
- id
- type
- reason_code
- status
- vat_number
- date
- price_type
- currency_code
- total
- amount_allocated
- amount_refunded
- amount_available
- refunded_at
- voided_at
- sub_total
- round_off_amount
- related_customers
- related_subscriptions
- invoice_id
Customers
- id
- first_name
- last_name
- country
- created_at
- business_type
- business_vertical
- acquisition_cost
- acquisition_cost_currency_code
- acquisition_channel
- acquisition_mode
- sales_agent
- customer_type
- phone
- company
- vat_number
- auto_collection
- net_term_days
- allow_direct_debit
- created_from_ip
- taxability
- exempt_category
- exempt_number
- consolidated_invoicing
- billing_day_of_month
- billing_day_of_week
- fraud_flag
- primary_payment_source_id
- secondary_payment_source_id
- account_manager
- customer_success_agent
- solution_partner
- freemium_blacklist_reason
Dunning details
- transaction_id
- dunning_type
- transaction_amount
- currency_code
- attempt
- created_at
- invoice_id
Invoice discount lines
- discount_amount
- currency_code
- discount_type
- invoice_id
- invoice_line_item_id
- coupon_id
- invoice_date
Invoice discounts
- description
- discount_amount
- currency_code
- discount_type
- invoice_id
- coupon_id
- invoice_date
Invoice line items
- id
- date_from
- date_to
- unit_amount
- quantity
- is_taxed
- tax_amount
- tax_rate
- amount
- discount_amount
- item_level_discount_amount
- description
- entity_type
- tax_exempt_reason
- is_metered
- currency_code
- invoice_id
- invoice_date
Invoice tax lines
- tax_name
- tax_rate
- tax_amount
- taxable_amount
- is_non_compliance_tax
- is_partial_tax_applied
- currency_code
- jurisdiction_type
- jurisdiction_name
- jurisdiction_code
- invoice_id
- invoice_line_item_id
- invoice_date
Invoice taxes
- tax_name
- tax_description
- tax_amount
- currency_code
- invoice_id
- invoice_date
Invoice transactions
- currency_code
- applied_amount
- applied_at
- payment_id
- invoice_id
Invoices
- id
- po_number
- is_recurring_invoice
- status
- vat_number
- price_type
- date
- due_date
- net_term_days
- currency_code
- total
- amount_paid
- amount_adjusted
- write_off_amount
- credits_applied
- amount_due
- paid_at
- dunning_status
- next_retry_at
- voided_at
- sub_total
- total_tax_amount
- is_first_invoice
- has_advance_charges
- expected_payment_date
- amount_to_collect
- round_off_amount
- term_finalized
- is_gifted
- related_customers
- related_subscriptions
- payment_owner
- customer_id
- subscription_id
Payment Sources
- id
- type
- reference_id
- status
- gateway
- gateway_account_id
- ip_address
- issuing_country
- card_first_name
- card_last_name
- card_iin
- card_last4_digit
- card_brand
- card_funding_type
- card_expiry_month
- card_expiry_year
- card_billing_addr1
- card_billing_addr2
- card_billing_city
- card_billing_state_code
- card_billing_state
- card_billing_country
- card_billing_zip
- card_masked_number
- bank_last4_digit
- bank_name_on_account
- bank_name
- bank_mandate_id
- bank_account_type
- bank_echeck_type
- bank_account_holder_type
- amazon_email
- amazon_agreement_id
- paypal_email
- paypal_agreement_id
- deleted
- customer_id
Payments
- id
- gateway_account_id
- payment_source_id
- payment_method
- reference_number
- gateway
- type
- date
- settled_at
- currency_code
- amount
- id_at_gateway
- status
- fraud_flag
- fraud_reason
- error_code
- voided_at
- masked_card_number
- subscription_id
- unused_amount
- capturable_amount
- authorization_reason
Products
- id
- name
- invoice_name
- product_type
- price
- currency_code
- period
- period_unit
- charge_model
- charge_type
- product_group
- trial_period
- trial_period_unit
- free_quantity
- setup_cost
- status
- billing_cycles
- enabled_in_hosted_pages
- enabled_in_portal
- sku
- accounting_code
- accounting_category1
- accounting_category2
- tax_code
- taxable
Refunds
- id
- gateway_account_id
- payment_source_id
- payment_method
- reference_number
- gateway
- type
- date
- settled_at
- currency_code
- amount
- id_at_gateway
- status
- fraud_flag
- fraud_reason
- error_code
- voided_at
- masked_card_number
- subscription_id
Subscriptions
- id
- initial_plan_id
- current_plan_id
- currency_code
- created_at
- activated_at
- mrr
- status
- plan_quantity
- plan_unit_price
- setup_fee
- billing_period
- billing_period_unit
- plan_free_quantity
- start_date
- trial_start
- trial_end
- current_term_start
- current_term_end
- next_billing_at
- remaining_billing_cycles
- po_number
- started_at
- cancelled_at
- cancel_reason
- created_from_ip
- has_scheduled_changes
- payment_source_id
- auto_collection
- due_invoice_count
- due_since
- total_dues
- initial_active_plan_id
- product_usage
- sales_agent
- solution_partner
- acquisition_cost
- customer_id
- next_billing_amount
Daily subscription histories
- mrr_sub_status
- mrr_status
- subscription_id
- status
- currency_code
- period_end
- period_start
- date
- mrr_diff
- discount
- mrr
Weekly subscription histories
- mrr_sub_status
- mrr_status
- subscription_id
- status
- currency_code
- period_end
- period_start
- date
- mrr_diff
- discount
- mrr
Monthly subscription histories
- mrr_sub_status
- mrr_status
- subscription_id
- status
- currency_code
- period_end
- period_start
- date
- mrr_diff
- discount
- mrr
Quarterly Subscription Histories
- mrr_sub_status
- mrr_status
- subscription_id
- status
- currency_code
- period_end
- period_start
- date
- mrr_diff
- discount
- mrr
Yearly subscription histories
- mrr_sub_status
- mrr_status
- subscription_id
- status
- currency_code
- period_end
- period_start
- date
- mrr_diff
- discount
- mrr
Useful Resources
The following are some useful resources that will help you in your integration.
| S.No | Item | Description |
|---|---|---|
| 1. | Python 3.7.9 | Installer Script |
| 2. | Sync Dependencies | |
Chargebee config | Sample config: | |
Stitch config | Sample config: | |
| 3. | Environment variable: CB_RS_STATE_FILE_NAME | Set to the file where sync state has to be stored. Note: It is recommended to take backup of this state file periodically. |
Was this article helpful?