Single Page Customer Portal
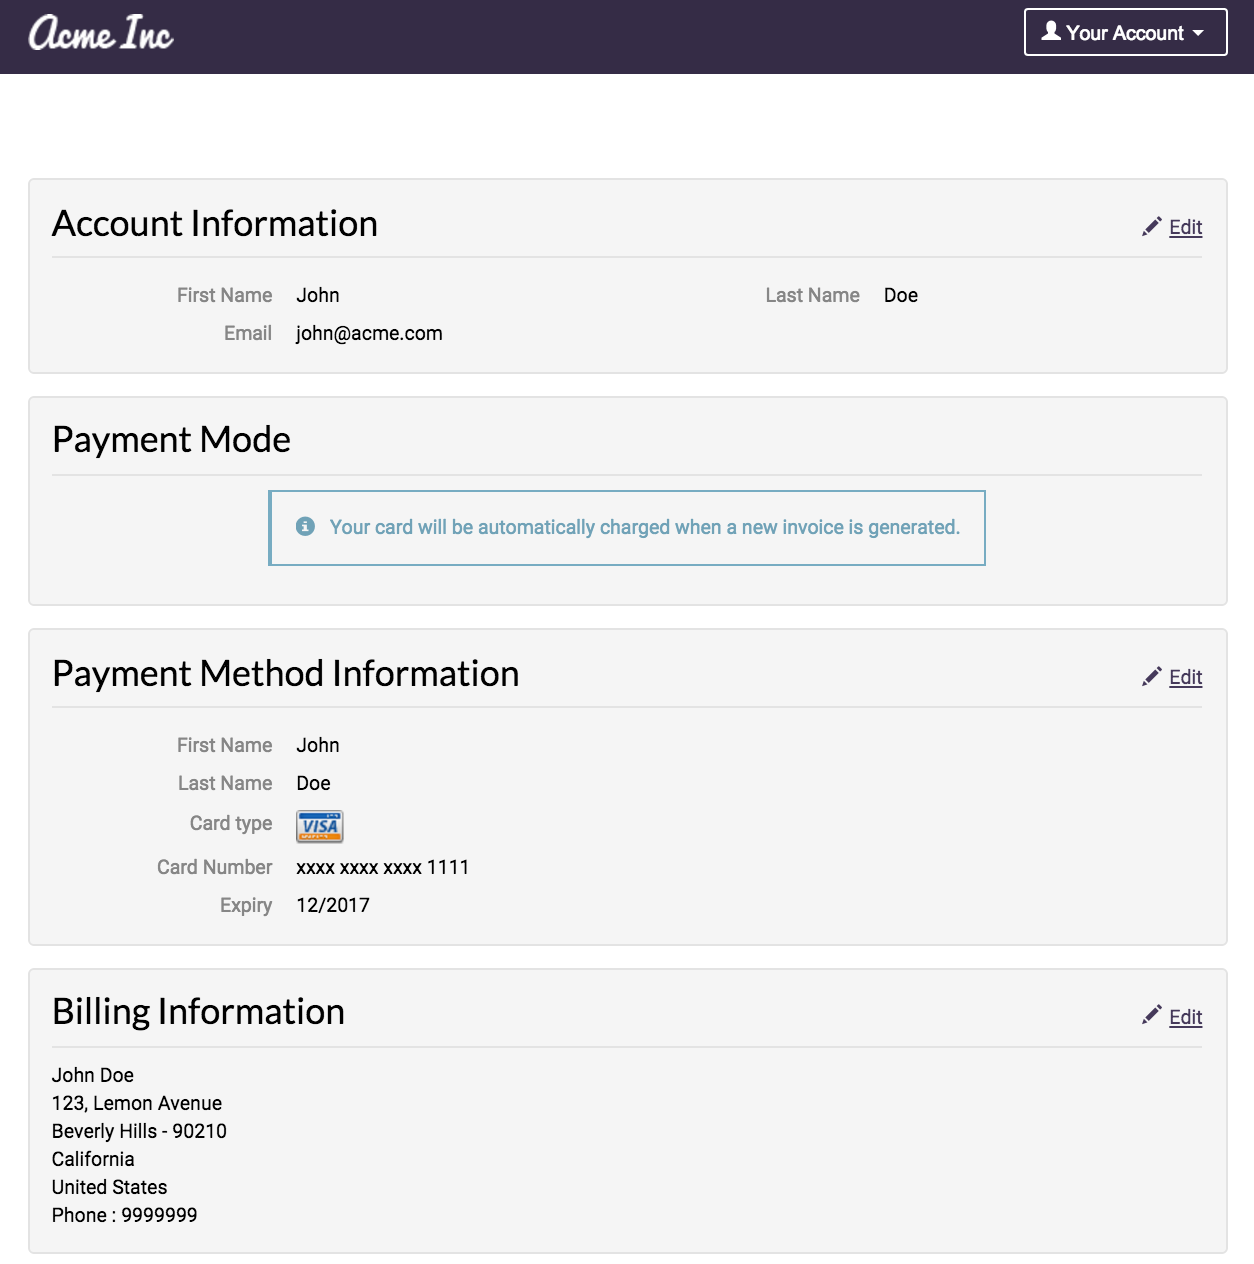
Chargebee's Single Page Checkout provides an out-of-the-box customer portal system to help your customers manage their accounts. The portal lets your customers view and update their account details, subscriptions (upgrade/downgrade plans and add-ons), card details, billing address, past payments, subscription details, shipping address (if present), and cancel their subscriptions themselves.
Offering these self-serve options reduces the need for customers to contact you for account management and billing, giving you more time to focus on growing your business.
Chargebee's customer portal is part of the Single Page Checkout solution. Our hosted payment pages use mobile-ready, Bootstrap-based themes that can be customized extensively to suit your needs. You can also customize the look and feel of your customer portal.
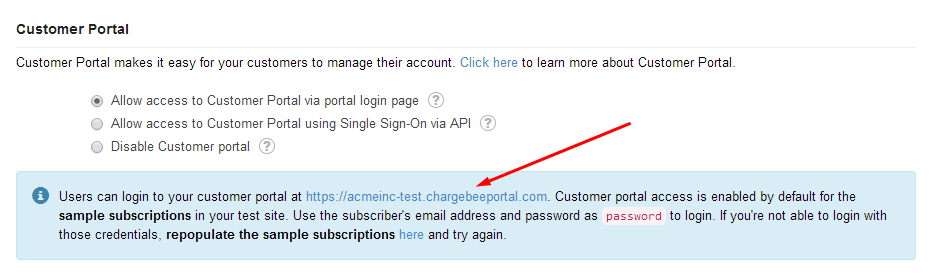
The portal is hosted at "<your-domain>.chargebeeportal.com" and is enabled by default.
Enabling the customer portal
You can enable the customer portal in your web interface under Settings › Hosted Pages Settings › Customer Portal.
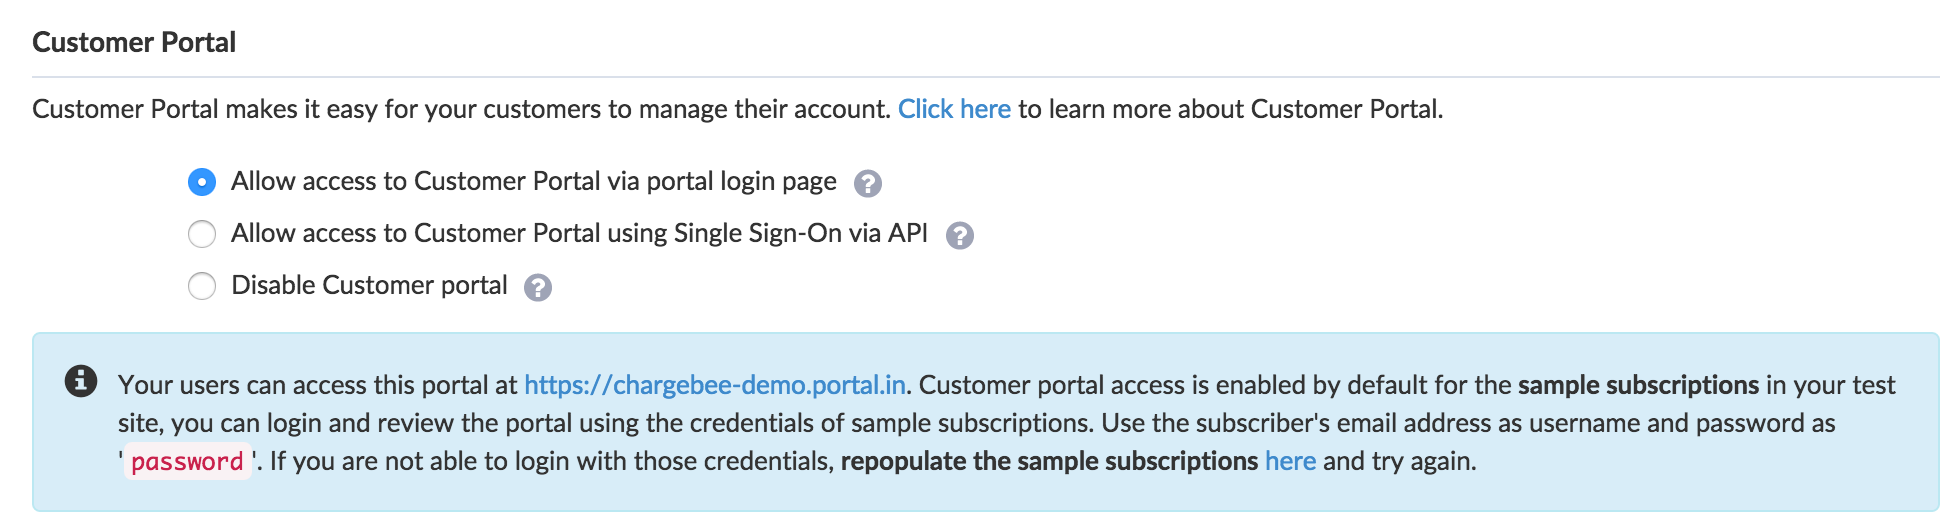
Allow access to Customer Portal via portal login page
Choosing this option will require your customers to setup their login credentials via the sign up link in the customer portal login page. This option is recommended when you do not want to handle the authentication at your end.
Allow access to Customer Portal using Single Sign-On via API
Choose this option only if you have your own authentication for your application/website. This option reduces the need for separate login credentials for your customers to access the portal. This requires you to integrate using the Chargebee API to allow your customers to seamlessly access the portal from your application/website. Read more about the API integration here.
How can your customers access their portal?
If you're using option 2 (Single Sign-On via API), your customers will access the customer portal via your application/website and this section is not applicable to you.
If you've selected option 1 (via portal login page), your customers should create their account through your portal (https://<your-domain>.chargebeeportal.com) using the email address they signed up with.
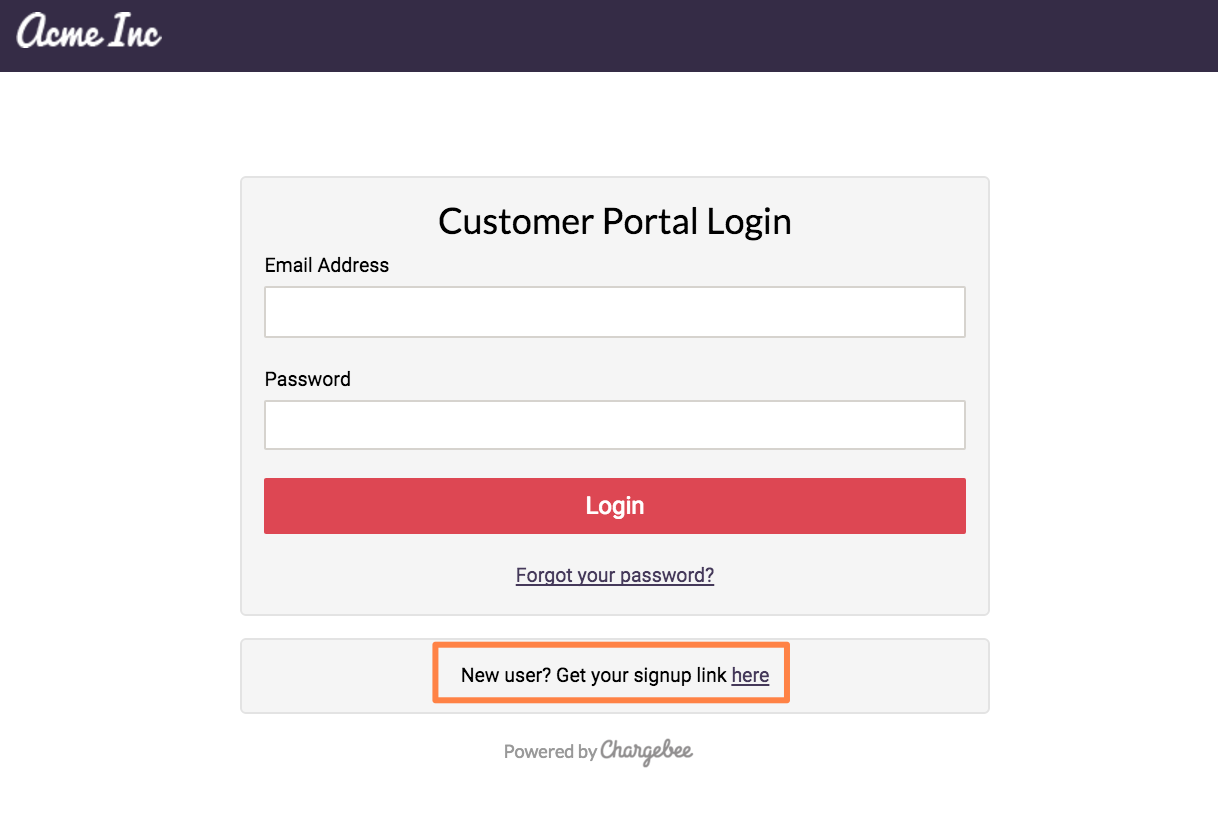
When they click on the sign up link, they will be prompted to enter their email address as shown below:
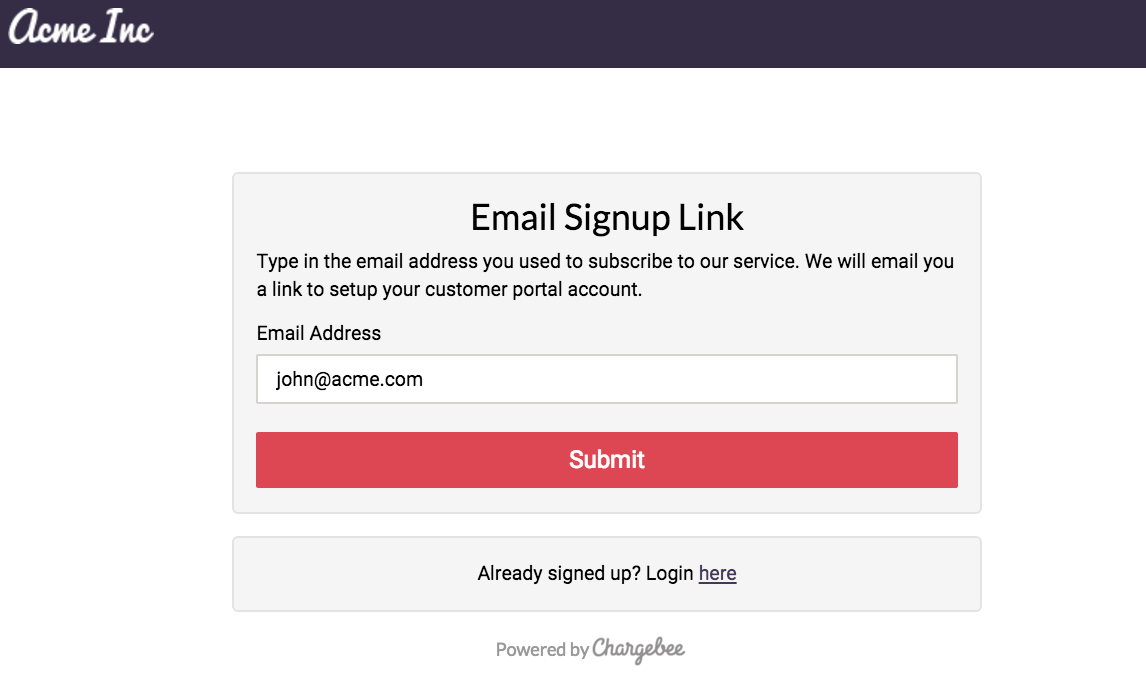
After customers enter their email address and submit it, the system checks if the email address is present in your Chargebee site. If the email address is not present, then the customer will get an error that the email address provided was not found. If it is present, the customer will receive a confirmation email with a link to create their account with the password. Once customer created the account, they can access the portal any time using their credentials.
You can send the customer portal URL via email as part of the subscription life-cycle. All the email notifications have default content available, which you can modify to your liking. Emails sent by Chargebee vary based on the version of email notification you have enabled for your Chargebee site.
Email Notification V1
When you have email notifications V1 enabled for your Chargebee site, the customer portal URLs are added using one of the following mail merge fields:
customer_portal.signup_url: Included in the email for signing up in the portalcustomer_portal.login_url: Included in the email for signing in to the portal
The mail merge fields will be added to the content by default, with respect to context of the email sent.
For example, if you include the portal sign up URL mail merge field in the Subscription Created email notification. When customers sign up, they will receive the email with the URL to create their customer portal account. Here the portal sign up URL mail merge field is appropriate, as customers are signing up for the first time.
Email Notifications V2
When you have email notifications V2 enabled for your Chargebee site, you can configure the customer portal URL in the master template. In the footer section of the master template, you will find the option to 'Add self-service portal details'. Here you can configure the URL to redirect the customer to. It will be configured by default based on your Customer Portal Settings.

When you want to notify a bulk of your customers with instructions to create their customer portal account, you can use the Send Email option present in the Subscriptions interface by including the appropriate mail merge fields.
What actions can customers perform?
When the customer portal is enabled, your customers can login and:
- Update their account information
- Add or update their credit card, billing & shipping address details
- View and download their past invoices and current subscription details
- Upgrade or downgrade their subscription
- Add or remove coupons to their subscription (coupons can be added by entering a promotional code)
- Cancel their subscription
- Pause subscriptions
- Resume subscriptions
To configure what customers can do in the portal, go to Settings › Hosted Pages Settings › Customer Portal › Allowed Actions.
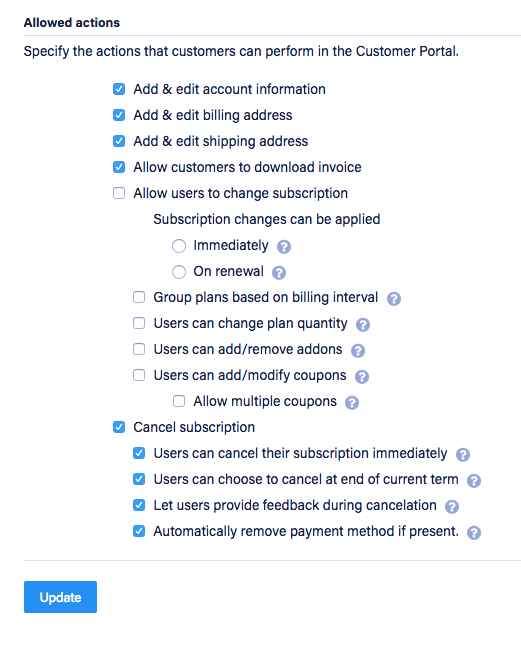
Note
By default, users can add/update their credit card details. This action cannot be disabled. When they update their credit card information, the existing card details will be replaced with the new one.
Updating account information
Users can update information related to their account through the portal. Details including the name, company, phone number and custom fields (if present) can be updated by the user.
The fields they can view/edit can be specified under Field Configuration.
Note
The email address cannot be edited by the user since this is what they use to login to the account. Only you can update the user's email address either through the web interface or using the API.
Updating address details
You can allow users to update their billing and shipping address details. The fields they can view/edit can be specified under Field Configuration.
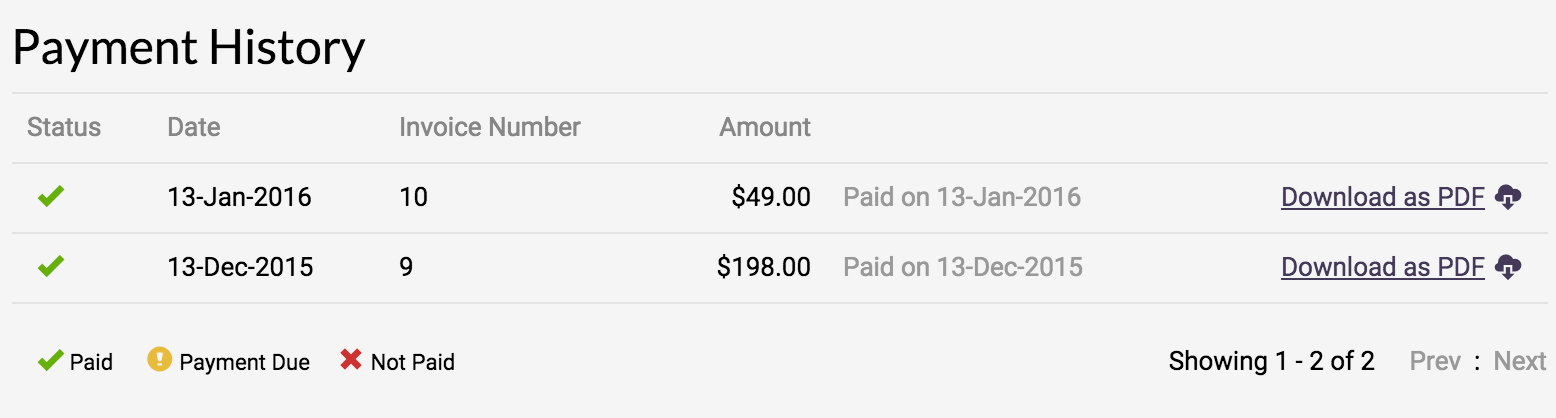
Download invoices
Users can directly download their past invoices as a PDF file if they need them.
If this option is not enabled, they will only see the basic details of their invoices including invoice amount, date and status.
Change subscription
This allows users to change their subscription plan and addons (if any). When changing the subscription, you can allow users to either allow the change to happen immediately (with/without proration) or at the next renewal. You can also limit the subscription change to just plans or addons.
Note
- Only customers on an Active or Non Renewing subscription can change their plans and addons.
- For Non Renewing subscriptions, Auto Collection should be On and a card should be present.
- For Non Renewing subscriptions, changes will be applied immediately and the subscription will remain in Non Renewing state even if there is a plan change.
- For subscriptions that are currently in Non Renewing state, if they were never Active before and were in Trial state before becoming Non Renewing, the subscription cannot be changed.
- The option to change the subscription will not appear in the portal if there are no applicable plans and addons.
There are 3 possible steps when a customer changes their subscription:
Step 1 involves changes to the plan.
Step 2 involves changes to the addon.
Step 3 is for verifying the changes and confirmation.
Note
Based on your Change Subscription configuration, their maybe 2 or 3 steps when changing the subscription.
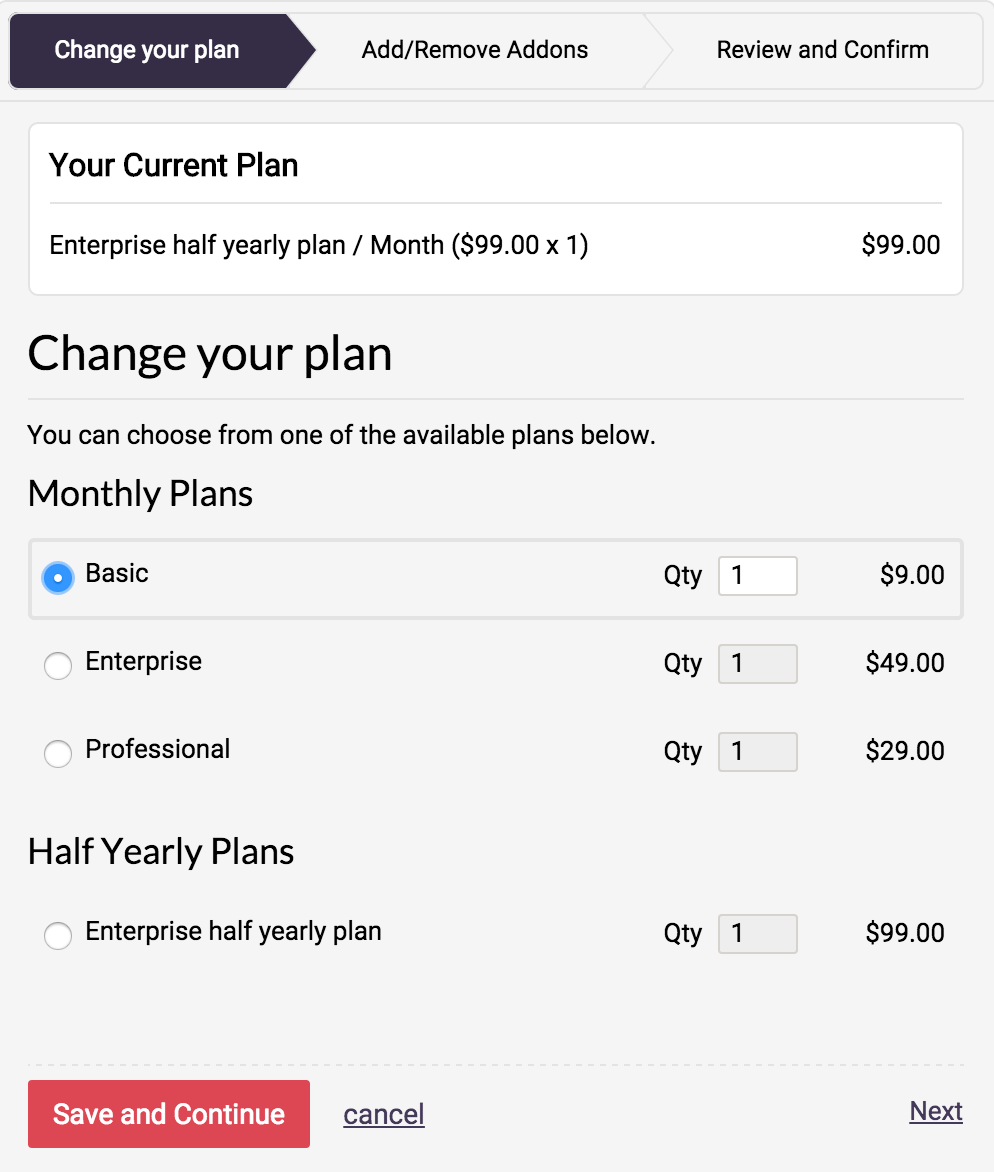
Plan Modification:
- If you've enabled Group plans based on billing interval, plans with the same billing interval will be grouped together (weekly, monthly, etc.) as shown above. The titles for these plan groups can be configured in your label configuration in the "change-subscription" section.
- For plans with Recurring charge model configured as Per Unit, users can change the plan quantity only if Users can change plan quantity is enabled.
- If you've provided a plan description, it will be shown in step 1 as indicated above.
- If Users can change plan quantity is disabled, the option to change the plan quantity will not be shown.
- For plans with a $0 price, we do not show the plan price or allow users to change the quantity.
Addon Modification:
- Step 2 is shown only if Users can add/remove addons is enabled in your customer portal settings.
- Only recurring addons will be shown. All Non Recurring addons will be hidden.
- If no addons are present in your site, step 2 will be hidden.
- The addon is shown in step 2 if A) the billing frequency of the addon is in sync with the billing frequency of the plan (monthly addon for a monthly plan) or B) the billing frequency of the addon naturally accommodates the billing frequency of the plan (semi-annual addon for a monthly plan). Addons are not shown if their billing frequency cannot be accommodated by the plan (bi-monthly addon for a quarterly plan).
- If Users can add/remove addons is enabled, and if all your addons are archived but the current subscription has one of the archived addons, the archived addon will be shown in step 2 allowing the customer to increase/decrease the addon quantity.
Review and Confirmation:
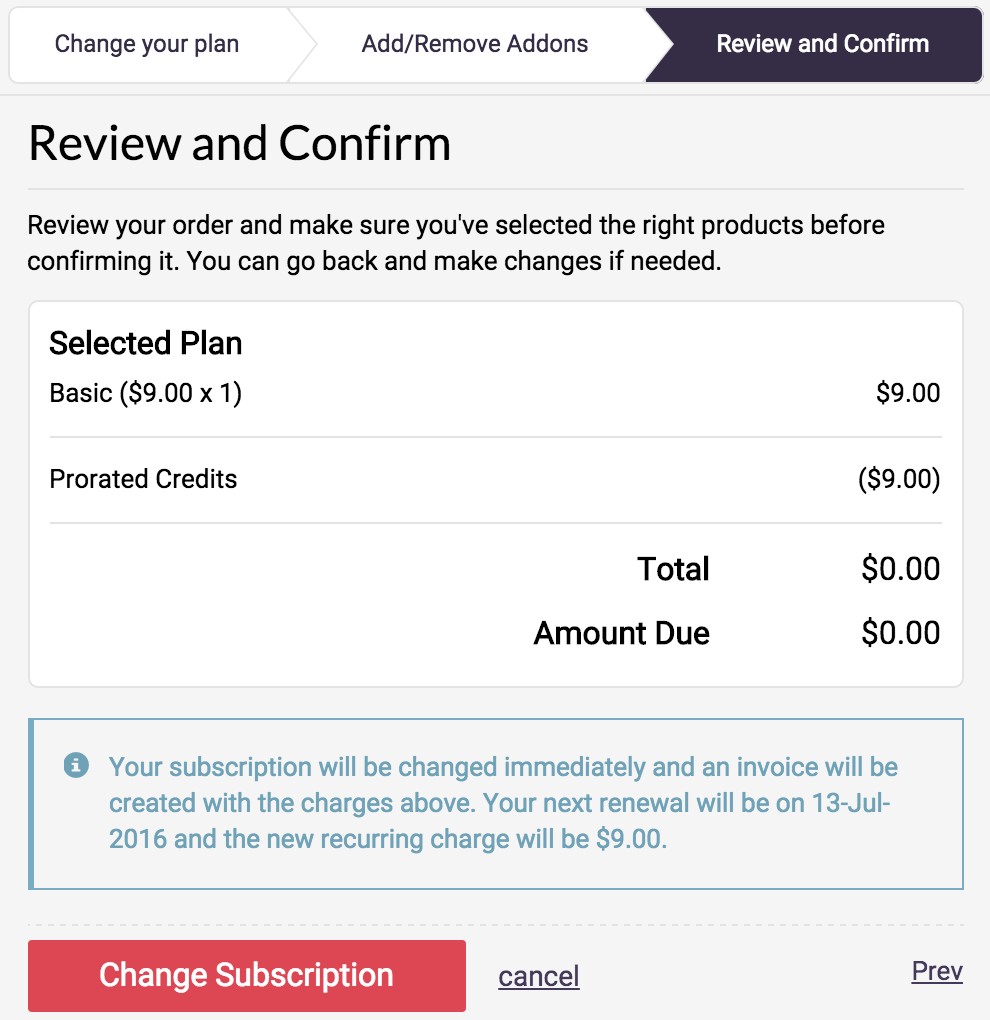
Note
If Auto Collection is On, and a payment needs to be collected, the subscription change will only happen if the payment goes through successfully.
Customizing the look and feel of the customer portal
Since the customer portal is built using themes, you can customize its appearance completely. You can also control what fields can be shown/hidden. This can be done under field configuration.
Field labels, button labels and text content displayed can be configured in the labels configuration section and warning messages and user alerts can be configured at labels and messages section.
Testing the customer portal in your test site
To login and test the customer portal in your Chargebee test site:
- Enable the customer portal for your test site
- Do the needed configuration
- Ensure a subscription with a valid email address is present for creating the portal account.
The customer portal URLs for your test & live sites will look as follows:
Test: https://<your-domain-test>.chargebeeportal.com
Live: https://<your-domain>.chargebeeportal.com
You can also find out the test and live portal URLs under Settings › Hosted Pages Settings › Customer Portal*.
Sign up using the email address present in the subscription to create a portal account. An email with the sign up link will be sent to that email address. Click on the link and create the account and login.
You can also access the customer portal instantly by using the email address of any of the sample subscriptions that are present in your Chargebee test site as they are already pre-signed up. The password for these sample accounts is "password".
Note
The Custom Domain feature lets you white label your own subdomain and use it in the customer portal URLs. If you'd like this feature enabled for your Chargebee site, write to Chargebee support
3DS Support for Customer Portal
Chargebee's Single Page Customer Portal supports 3DS transactions. All you need to do is complete our facilitating Chargebee to start handling 3DS transactions via Single Page Customer Portal.
Since no payment is involved during portal actions such as Update Payment Method and Add Payment Method, it will trigger a minimum amount 3DS authorization during those operations. The amount deducted for authorization would be voided automatically.
If there is any immediate charge involved during actions such as Change Subscription and Resume Subscription, 3DS verification will be triggered accordingly.
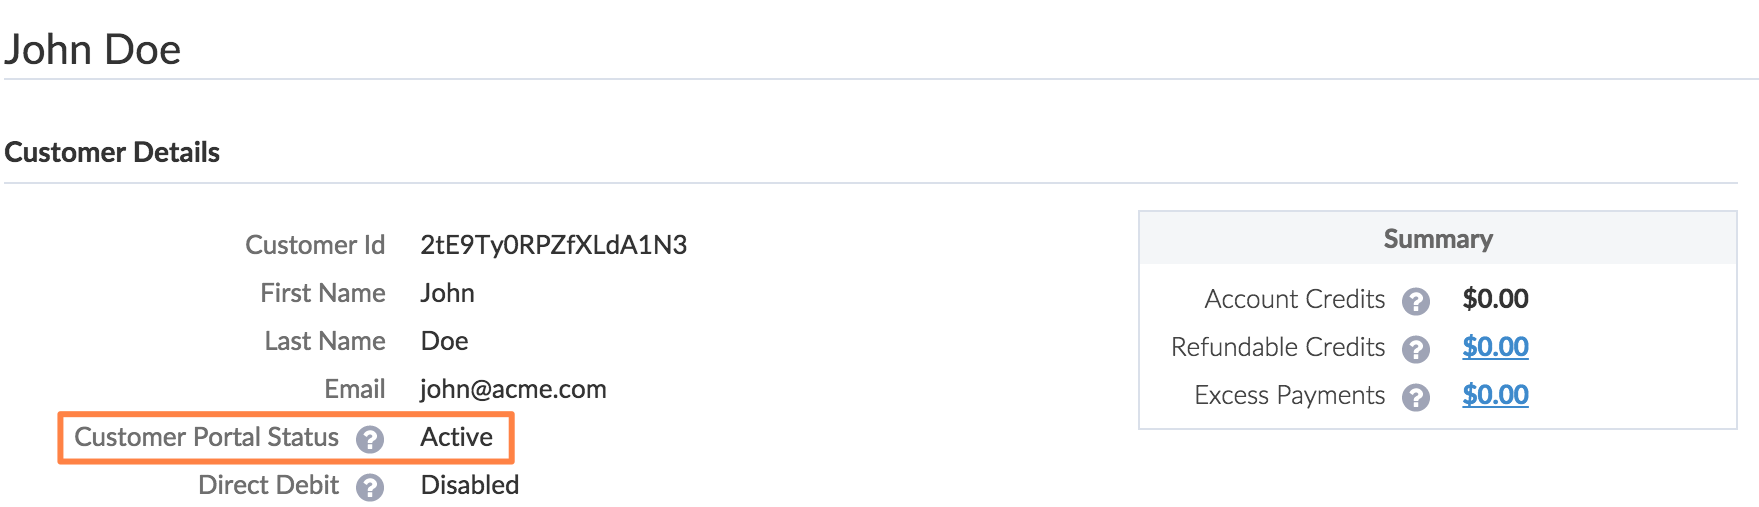
How can I find out if my customers have setup their portal account?
You can check whether a customer had created their portal account by viewing their customer or subscription details.
Note
Portal status can be viewed only in Classic UI.
This will only be shown if the customer portal is enabled for your Chargebee site.
The three types of statuses are:
Active – The customer has set up their portal account.
Not Signed-up – The customer does not have a portal account yet.
Pending – The customer has signed up but has not completed setting up their portal account.
Click here to find out how to let users create their customer portal account.
What if a customer has two subscriptions with the same email address?
If a customer has signed up for more than one subscription using the same email address, they will see all the subscriptions using the same address as soon as they login to the customer portal. They can select the subscription they want to access.
How does the portal handle customers with multiple subscriptions?
If you've created multiple subscriptions for a customer using the API, when the customer logs in to the portal, all their subscriptions will be shown on the same page.
Was this article helpful?