Installing Chargebee Retention via the pre-cancel API
Chargebee Retention cancel sessions start by identifying a subscriber to Chargebee Retention and fetching a unique cancel page URL for your customer. This article describes how to create a session from your server without adding Javascript in the client's browser. Note, if you are a Chargebee Billing Customer you will want to use either the Customer Portal or Retention API integrations for this use case.
For an overview of how to integrate Chargebee Retention in your application's front end using our snippet check out the article here.
Prior to the moment when the user clicks cancel you would initiate a Precancel request to Chargebee Retention in your application. There is no limit to how many installations you can make or where they live. You are free to make requests from your website, server, or from inside of your application.
Making Precancel requests from your server
If you would like to make your Precancel requests from your infrastructure's back end, all you'll need is to POST a valid JSON object to our Precancel endpoint along with your unique Chargebee Retention application id.
{
  "app_id": "APP_ID",
  "subscription_id": SUBSCRIPTION_ID,
  "account": {
    "internal_id": BILLING_ID
  }
}
Chargebee Retention's server will respond with a status of 200 if minimum conditions are met and include a unique URL for that canceller's session.
{
  "valid": true,
  "message": "https://cancel.example.com/session/12345ABCDE"
}
or if an invalid request was sent you'll receive a response in the 400's and an error message highlighting the issue.
{
  "valid": false,
  "message": "ERROR_MESSAGE"
}
Note
Your Precancel URL should be created prior to the moment of cancel so that a new session is created in Chargebee Retention that includes your canceller's current profile information.
API Authentication (enabled on request)
As an additional layer of security, Chargebee Retention provides precancel request authentication in the form of a public/private keypair and signature in the HTTP request header.
Warning
If you are already sending traffic to Chargebee Retention it's recommended that you test the authentication method first by leaving the toggle in the off position or by testing your method in a Chargebee Retention Sandbox. Failure to do so could result in all of your precancel traffic being denied.
How it works
Chargebee Retention will issue both a Private and Public key for your account which you will use to create a unique signature to include in the header of your precancel request along with the public key. On your side, you'll add an ISO8601 formatted timestamp to your request and create an HMAC-SHA-512 "signature" prior to the precancel POST request, and include both the Signature and Public Key to your request header.
Step 1. Start by creating your secure access tokens by navigating to Settings > Setup and clicking "Add API Token".
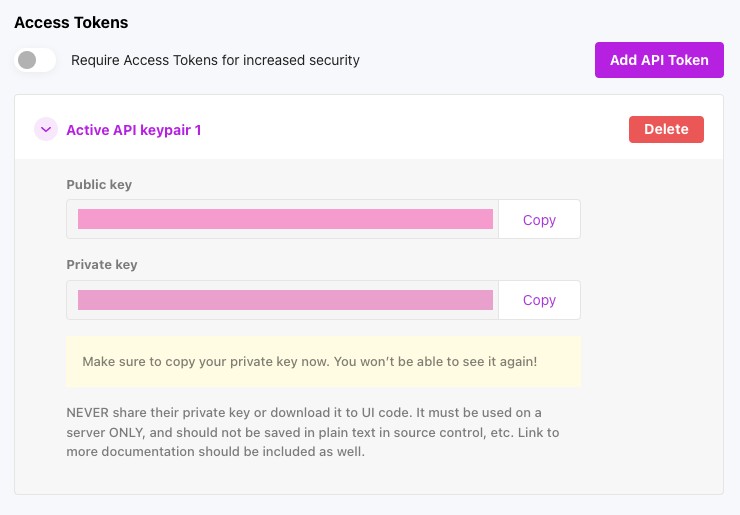
Step 2. Store your credentials in a secure location such that you can make precancel requests from your server rather than from the client's browser.
Warning
Never share your private key or use it within client-side UI code.
Step 3. When you programmatically create your precancel request you must include a current ISO8601 formatted timestamp in the request body at the root level. Authentication requests should fall within one hour of the timestamp or they will be rejected.
Using the same "minimal" request example from above your JSON should have the following structure, where the timestamp is within 1 hour of your precancel request.
{
  "app_id": "APP_ID",
  "subscription_id": SUBSCRIPTION_ID,
  "timestamp": "1970-01-01T00:00:00Z",
  "account": {
    "internal_id": BILLING_ID,
  }
}
Step 4. With the body of your precancel request complete, create an HMAC-SHA-512 digest of it using your private key. The resultant hash serialized as a UTF-8 HEX String is your "signature". The method varies slightly depending on the language you are working with internally but the outcome should be the same.
const hash = CryptoJS.HmacSHA512(<BODY>, <PRIVATE KEY>);
const signature = hash.toString(CryptoJS.enc.utf8);
Then add your signature and public key as headers prior to sending your request exactly as follows.
headers: {
        'Content-Type': 'application/json',
	...
        'Signature': <SERIALIZED SIGNATURE>,
	'Signature-Public-Key': <PUBLIC_KEY>
}
Step 5. POST your request! If the signature is correct, and a timestamp is included, Chargebee Retention will return a session URL.
If for any reason your signature or public key doesn't match Chargebee Retention's value you will receive a 400 response with an error message.
Example
{
    "valid": false,
    "message": "Invalid Key Id"
}
{
    "valid": false,
    "message": "Invalid timestamp"
}
{
    "valid": false,
    "message": "Invalid Signature"
}
Summary
In this example, we used JavaScript and the CryptoJS library to create our signature but you may use any language you like so long as you ensure you complete the following steps.
-
Include a timestamp property formatted as an ISO8601 time string in the request body.
-
Create an HMAC-SHA-512 signature of the request body exactly as you intend to send it using the private key.
-
Include your request's signature as the value of the
SignatureHTTP header when you make a post to /precancel -
include your public key as the value of the
Signature-Public-KeyHTTP header.
HMAC-SHA-512 References
Was this article helpful?