RevRec Premium - Journal Account Mapping
Introduction
RevRec Premium allows you to customize its chart of accounts and map them to the accounts in your accounting system. The platform supports a variety of general ledger (GL) mapping scenarios, enabling flexible configurations based on your business needs.
If no account mapping is provided, RevRec applies a default chart of accounts automatically.
Journal Account Types
Journal account types classify financial transactions for accurate bookkeeping and reporting. Each type is linked to specific GL accounts in your accounting system.
Note
You cannot add new journal account types. However, certain types, such as Clearing Account, can be excluded if not needed. GL accounts can be customized per type.
RevRec Premium uses the following journal account types:
Accounts Receivable
The accounts receivable report all the money owed to your business from customers for goods or services they have received but have not yet paid for. RevRec Premium comes with the following default accounts receivable accounts:
-
Accounts Receivable (AR): Assets on the company’s balance sheet that represent money owed from customers for goods or services provided.
-
Unapplied Payment: This represents the excess payments received from the customer and booked as a liability.
-
FX Gain/Loss - Payment: This reflects the income or expense recognized due to differences in exchange rates between the invoice date and the payment date.
Clearing Accounts
The clearing accounts are temporary holding account balances used to facilitate the booking of the journal entries. RevRec Premium comes with the following default clearing accounts:
-
AR Clearing: This is used to facilitate GL booking for AR-related accounts such as deferred revenue, sales tax liability, etc.
-
Conversion Clearing: This is used for the currency conversion from the functional currency to the posting currency defined for the account.
Cash Accounts
The cash accounts help you track and report the cash inflows and outflows of your business. RevRec Premium comes with the following default cash accounts:
-
Cash Clearing: for tracking cash balance in the payment gateway that has yet to be transferred to merchants' bank accounts
-
Cash at Bank: for tracking cash in merchants’ bank accounts
Tax Accounts
The tax accounts help you track and report various taxes collected by your business that need to be paid to the government. RevRec Premium comes with the following default tax account:
- Sales Tax Liability: The amount of tax that a taxpayer owes to the government. This amount is calculated based on the amount invoiced for a subscription and the applicable tax rates.
Revenue Accounts
The revenue accounts report all the income earned by your business from selling your products or services. RevRec comes with the following default revenue accounts:
-
Deferred Revenue: Liability on the company’s balance sheet that represents amounts billed or received in advance for goods or services that have not yet been delivered or earned.
-
Revenue: Income earned from providing products and services in the current period.
-
FX Gain/Loss - Revenue: This reflects the income or expense arising from differences in exchange rates between the rate used to record deferred revenue and the rate applied at the time of revenue recognition.
-
Bad Debt Expense: This is the estimated amount of receivables a company doesn’t expect to collect.
Expense Accounts
The expense accounts help you track and report various operational costs or expenses related to sales. RevRec comes with the following default expense accounts:
-
Expense: Costs that are recognized as expenses incurred for the current period in RevRec.
-
Deferred Expense: Expense costs that are already paid are yet to be recognized until a later period.
-
Gateway Fees: Fees paid to the payment gateway or payment processor that are recognized as expenses incurred for the current period.
You can map these account types to the corresponding account numbers in your accounting system.
Default Chart of Accounts
RevRec Premium comes pre-configured with a chart of accounts. You can update the Account Number and Account Name to match your GL setup.
| Account Number | Account Name | Account Type |
|---|---|---|
| 10000 | AR | AR |
| 10001 | AR Clearing | AR Clearing |
| 20000 | Cash | Cash Clearing |
| 20001 | Cash - Bank | Cash - Bank |
| 70000 | Deferred Expense | Deferred Expense |
| 50000 | FX Conversion Clearing | Conversion Clearing |
| 10002 | Unapplied Payment | Unapplied Payment |
| 90000 | Bad Debt Expense | Bad Debt Expense |
| 70001 | Expense | Expense |
| 20002 | Gateway Fee | Gateway Fee |
| 80000 | Realized FX Gain Loss | FX Gain Loss - Payment |
| 80001 | Realized FX Gain Loss - Revenue | FX Gain Loss - Revenue |
| 60000 | Revenue | Revenue |
| 30000 | Deferred Revenue | Deferred Revenue |
| 40000 | Sales Tax Payable | Sales Tax Liability |
Journal Mapping Fields
Journal Mapping Fields allow you to define how journal entries are assigned to GL accounts. These fields are highly customizable and allow for both simple and advanced configurations.
You can:
- set up a basic journal mapping with one GL account per account type, or
- use one or more mapping fields for detailed segmentation. By specifying mapping fields, you can split a single account type into multiple GL account mappings. This enables the use of different GL accounts based on business attributes.
For example, in a basic setup, all tax entries may map to a single Sales Tax Liability account. If you want to track sales tax liability by country, you can add the Tax Jurisdiction - Country field as a mapping field for the Tax business event.
If your business involves selling multiple products or services, or serving customers across various regions, and you need more detailed tracking of GL balances, RevRec Premium supports that as well. You can define additional mapping fields to associate multiple GL accounts with a single account type.
For instance, you can map cash to different GL accounts based on gateway or payment method, helping improve financial reporting across these dimensions.
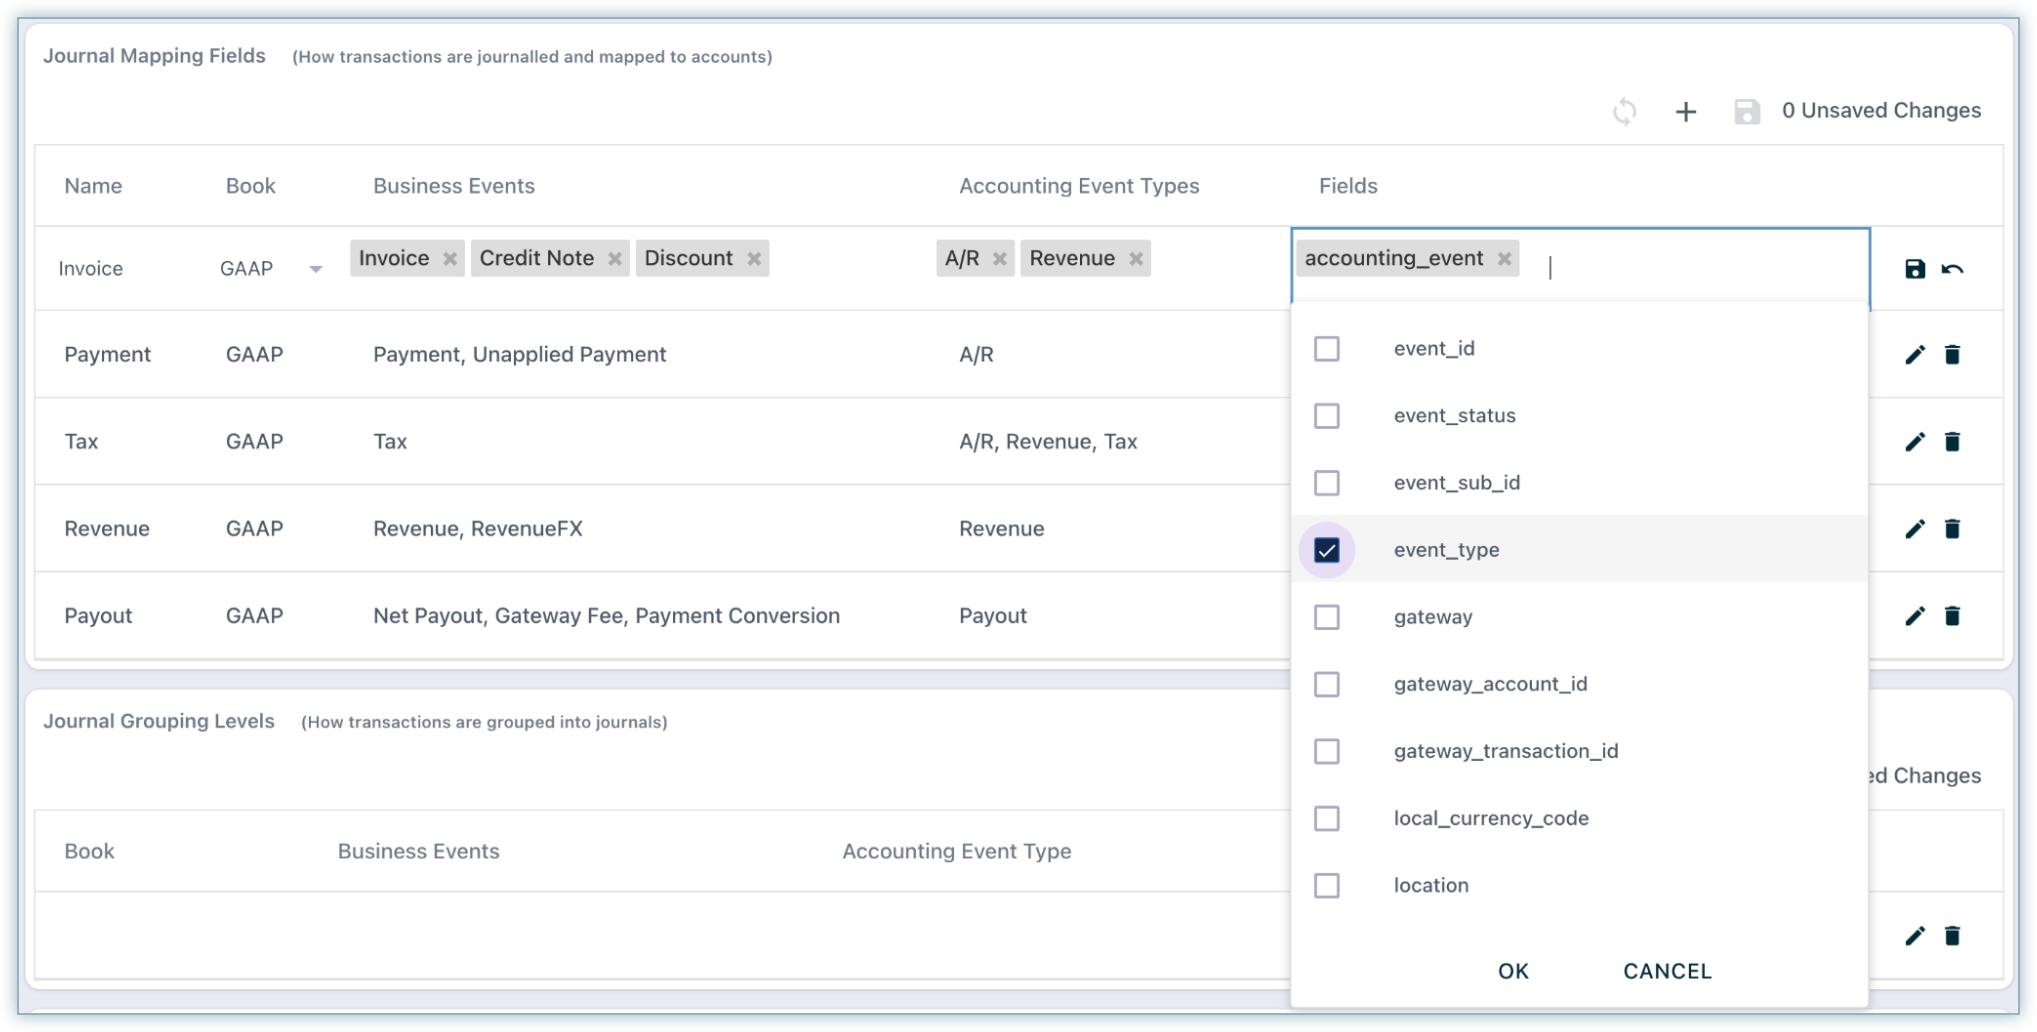
Understanding the Journal Mapping Fields UI
Before setting up journal mappings in RevRec Premium, it’s helpful to understand how the Journal Mapping Fields interface is organized and what each part means. This setup helps determine how transactions are recorded in your GL accounts based on business activities.

- Name (Grouping Label)
The Name column acts as a label or folder that groups related journal mapping rules. These names—like Invoice, Payment, Tax, Revenue, or Payout—are shown on the mapping screen to help you organize your accounting logic in a clear and manageable way.
- Book
This tells you which accounting book (e.g., GAAP) the mapping applies to. Currently, RevRec Premium only supports the GAAP.
Note
Booking to multiple accounting books (such as GAAP and IFRS) from the same set of inputs (e.g., a single invoice) is not supported at this time. Only one accounting book can be used for journal generation.
- Business Events
Under each name group, you define which business events should trigger accounting entries.
Examples include:
- Invoice-related events like: Invoice, Credit Note, Discount
- Payment-related events like: Payment, Unapplied Payment
- Tax transactions
- Revenue recognition events like: Revenue, RevenueFX
- Payout-related events like: Payment Conversion, Net Payout, Gateway Fee
These events represent real-world transactions that need to be captured in your GL.
- Accounting Event Types
Each business event is linked to one or more accounting event types that reflect the nature of the entry, such as:
- A/R (Accounts Receivable)
- Revenue
- Tax
- Payout
For example, an invoice can affect both A/R and Revenue, while a tax entry affects Tax and A/R.
- Fields (How to Split GL Accounts)
This is where the customization comes in. You can choose fields to tell the system how to split entries across different GL accounts based on attributes of the transaction.
For example:
- You may use a field like product_Id to separate mapping by product.
- Or use cn_reason_code to post different types of credit notes (e.g., bad debt vs. price adjustment) to different accounts.
- You can even include custom fields related to Product, Subscription, or Customer if you want more detailed tracking, like splitting revenue by product line or region.
Note
accounting_event is a mandatory field for all mappings.
This allows you to move beyond “one account per type” and instead map to multiple accounts for the same type, based on business needs.
Follow the steps below to configure journal fields on your RevRec Premium site:
-
Click Settings > Accounting > Journal Posting Settings, and navigate to Mapping Fields.
-
Click the drop-down and select the desired fields. You can select one or more fields from the available options for each Name group label.
- Following is the list of the fields available:
| Field Name | Description |
|---|---|
| accounting_event | Type of accounting transaction, such as AR, Cash Clearing, or Deferred Revenue. |
| app_name | Name of the application or system where the event originated (used internally for system tracking). |
| applied_at | Date and time when the business event, such as a credit note or payment, was applied to an invoice. |
| base_currency_code | The base currency used in your accounting setup (e.g., USD, EUR). |
| business_entity_currency_code | Currency used by the business entity involved in the transaction. |
| business_entity_id | Unique ID representing the legal or business entity within the system. |
| business_event | The actual transaction or change that occurred, such as an invoice created or a payment refunded. |
| business_event_group | A higher-level grouping of related business events. |
| channel | Sales channel or medium through which the customer was acquired (e.g., online, reseller, or mobile stores). |
| cn_reason_code | Reason for issuing the credit note (e.g., product_return, service_cancellation). |
| currency_code | Currency in which the transaction was carried out (e.g., USD, INR). |
| customer_id | Unique identifier assigned to the customer in Chargebee. |
| discount_code | Promotional or discount code applied to the invoice. |
| discount_type | Type of discount (fixed amount or percentage). |
| dunning_status | Current dunning (payment collection retry) state of the subscription or invoice. |
| event_description | Description of the event used for easier identification in reports. |
| event_id | Unique identifier for the system's event or transaction (e.g., Inv-001 for an invoice). |
| event_status | Current status of the business event (e.g., successful, failed, pending). |
| event_sub_id | Sub-identifier to further break down events under the same group, e.g., Inv-001 has two line items, i.e., li_001 and li_002. These line item IDs will appear as event_sub_id. |
| event_type | Type of the event for the business event group; credit note and payment (e.g., refundable, adjustable type of the credit note). |
| gateway | The payment provider used (e.g., Stripe, PayPal). |
| gateway_account_id | An identifier for the specific account used within a payment gateway. |
| gateway_transaction_id | Unique transaction ID provided by the payment processor. |
| local_currency_code | Currency based on the customer’s region or transaction origin. |
| parent_id | Parent transaction or event ID (e.g., refund linked to original payment). |
| parent_business_event | The main event to which this sub-event is related (e.g., if a refund is linked to the credit note, then the parent business event will be “Credit Note”). |
| payment_method | Mode of payment used by the customer (e.g., card, bank transfer). |
| payout_currency_code | The currency in which payment or settlement was received by the merchant. |
| price_type | The nature of the price, such as recurring, one-time, or setup fee. |
| pricing_model | Structure of the pricing used (e.g., flat, per unit, tiered). |
| product_id | Unique ID of the product being invoiced or credited. |
| recurring | Indicates if the transaction or charge is part of a recurring subscription. |
| subscription_id | Unique ID of the customer’s subscription plan. |
| tax_juris_code | Jurisdiction code used to classify tax reporting areas. |
| tax_juris_name | Name of the jurisdiction for tax purposes (e.g., California, EU). |
| tax_juris_type | Type of jurisdiction for the tax (e.g., state, country, region). |
- Once you're done, click Save.
Once a field is configured, it shows up in the journal account mapping fields table. You can configure the journal account mapping for all accounts based on these new fields.
Note
It is required to configure Journal Account Mapping fields upfront before any data is loaded into RevRec Premium.
Configuring the Chart of Accounts
The Chart of Accounts is a list of all the financial accounts used by your organization to record transactions and report financial information. Properly configuring the Chart of Accounts ensures accurate financial reporting and seamless integration with your accounting system.
You can set up the Chart of Accounts via:
Through UI
If your company has a limited set of accounts, then you can use the chart of accounts table to add the accounts manually.
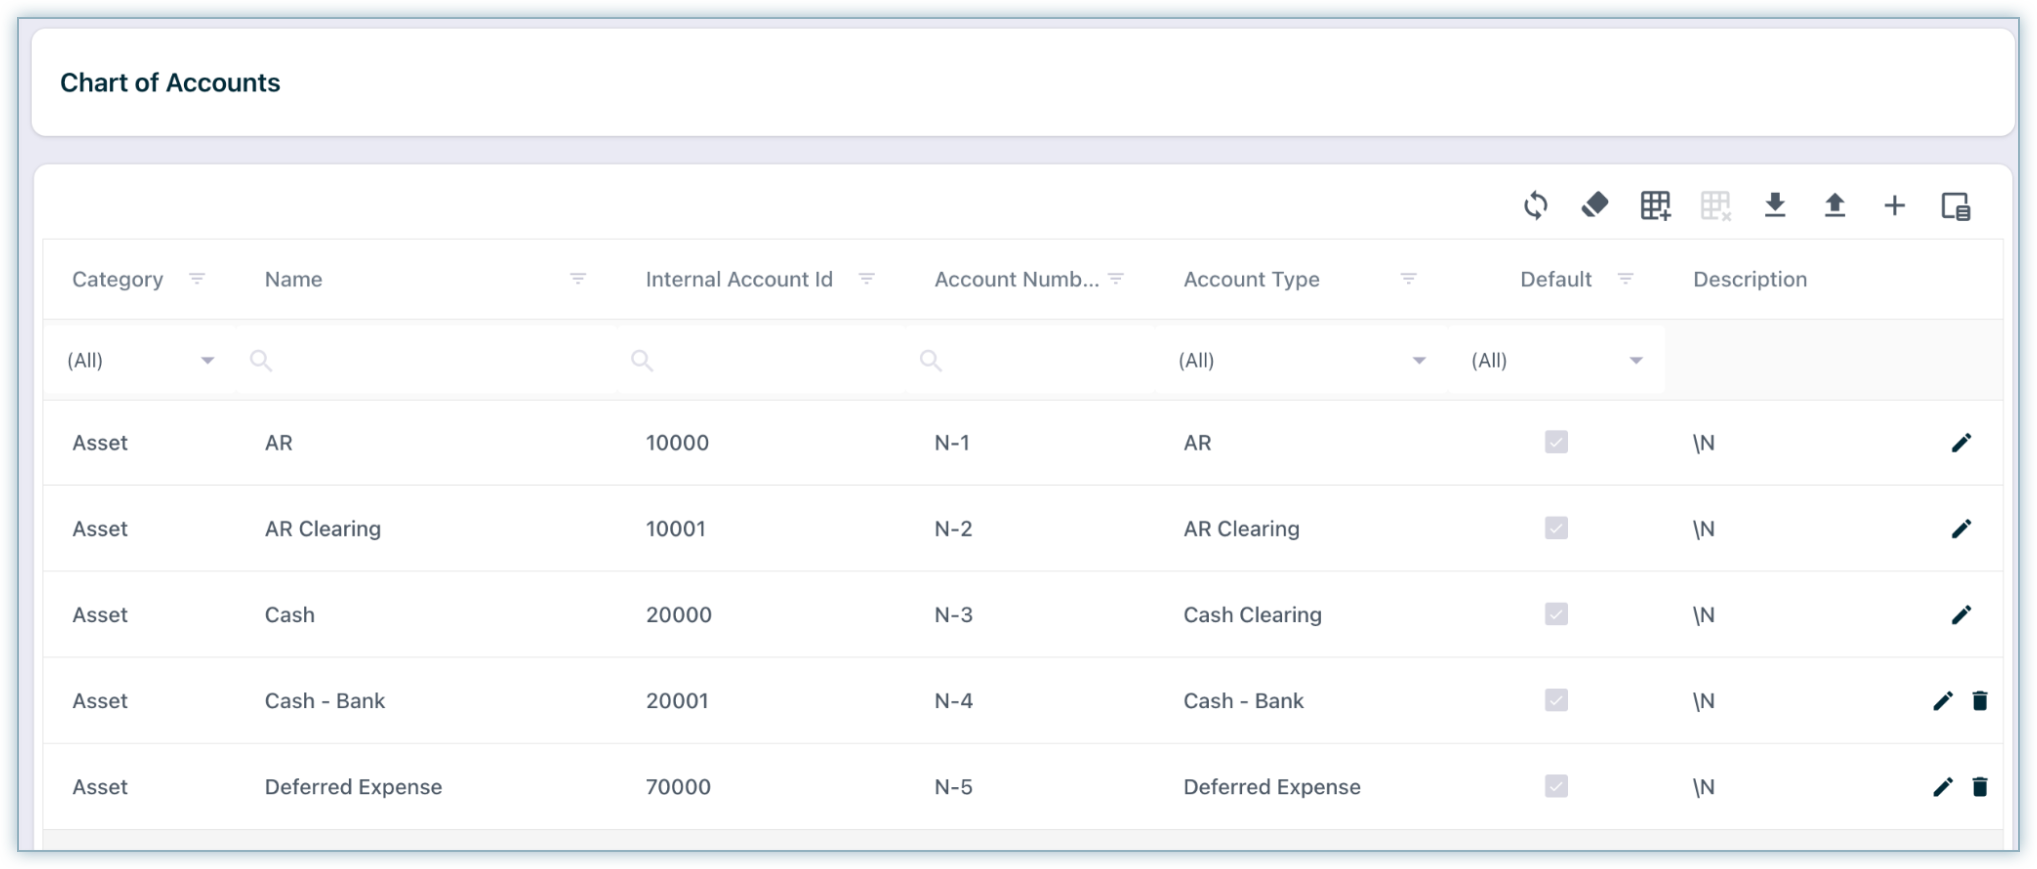
Here are the options available on the page:
- Refresh the Grid.
- Clear the filter applied to the columns.
- Add the default journal accounts.
- Remove the default journal accounts.
- Export the COA to a CSV file.
- Upload the COA from a CSV file. (More Info)
- Add a journal account manually.
- Columns Chooser.
Follow these steps to customize and map the account type in RevRec Premium with your ledger accounts:
-
Click Settings > Accounting > Chart of Accounts on the left navigation bar.
-
On the Chart of Accounts page, click the + icon to add a new account.
-
In the new row that appeared in the table, specify Category, Account Number, Account Name, and select an Account type.
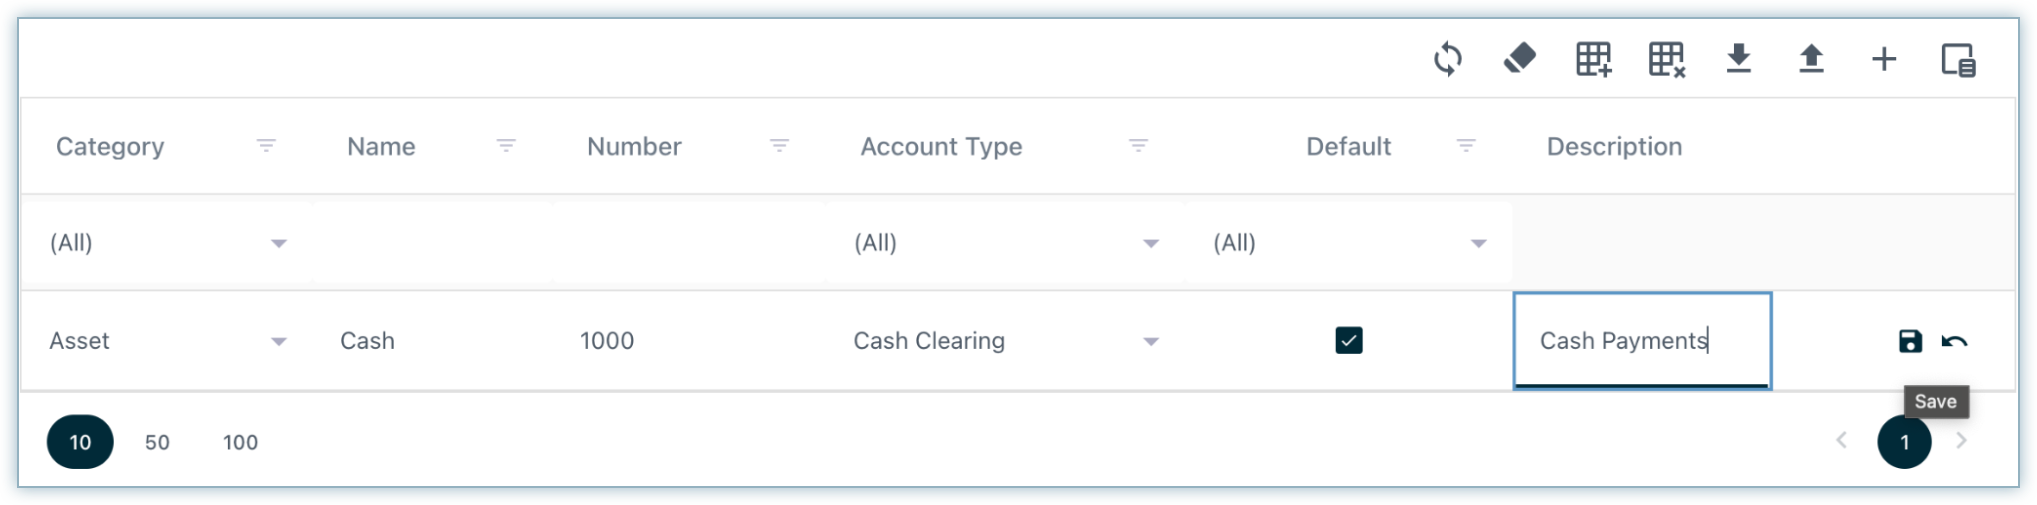
- Click the toggle to mark this Account as Default.
- Click Save.
You have successfully added a new Journal Account. This will be used as the default Journal Account for your selected account type. That means if the system uses this account for journal account mapping. However, you can still update the mappings to use any other account.
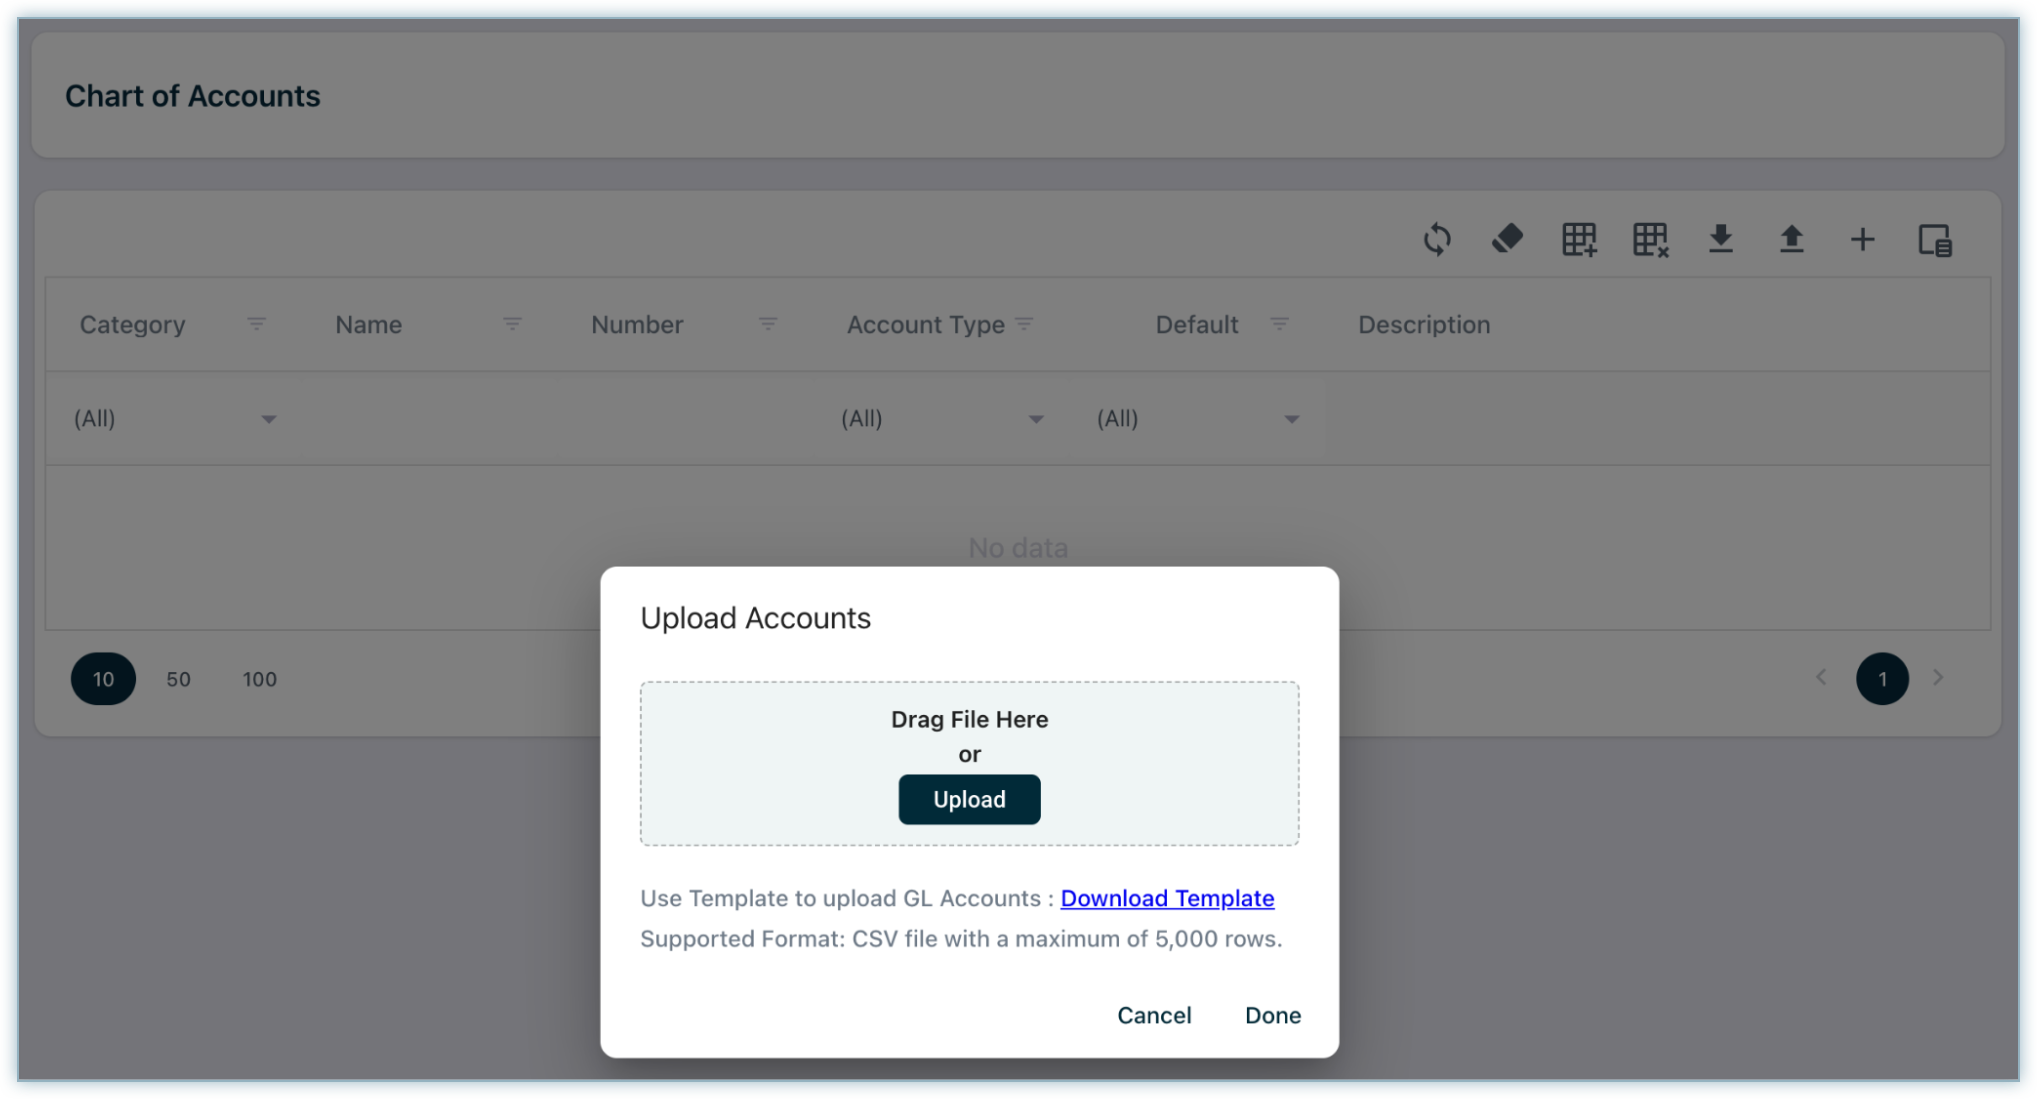
Through Bulk Upload
You can use the bulk upload functionality to create multiple accounts at once, instead of one account at a time through the UI.
Follow these steps to do a bulk creation of your journal account.
- Click the Upload Accounts icon and download the template as a CSV file. The CSV file comes with the sample data that will help you add your ledger account.
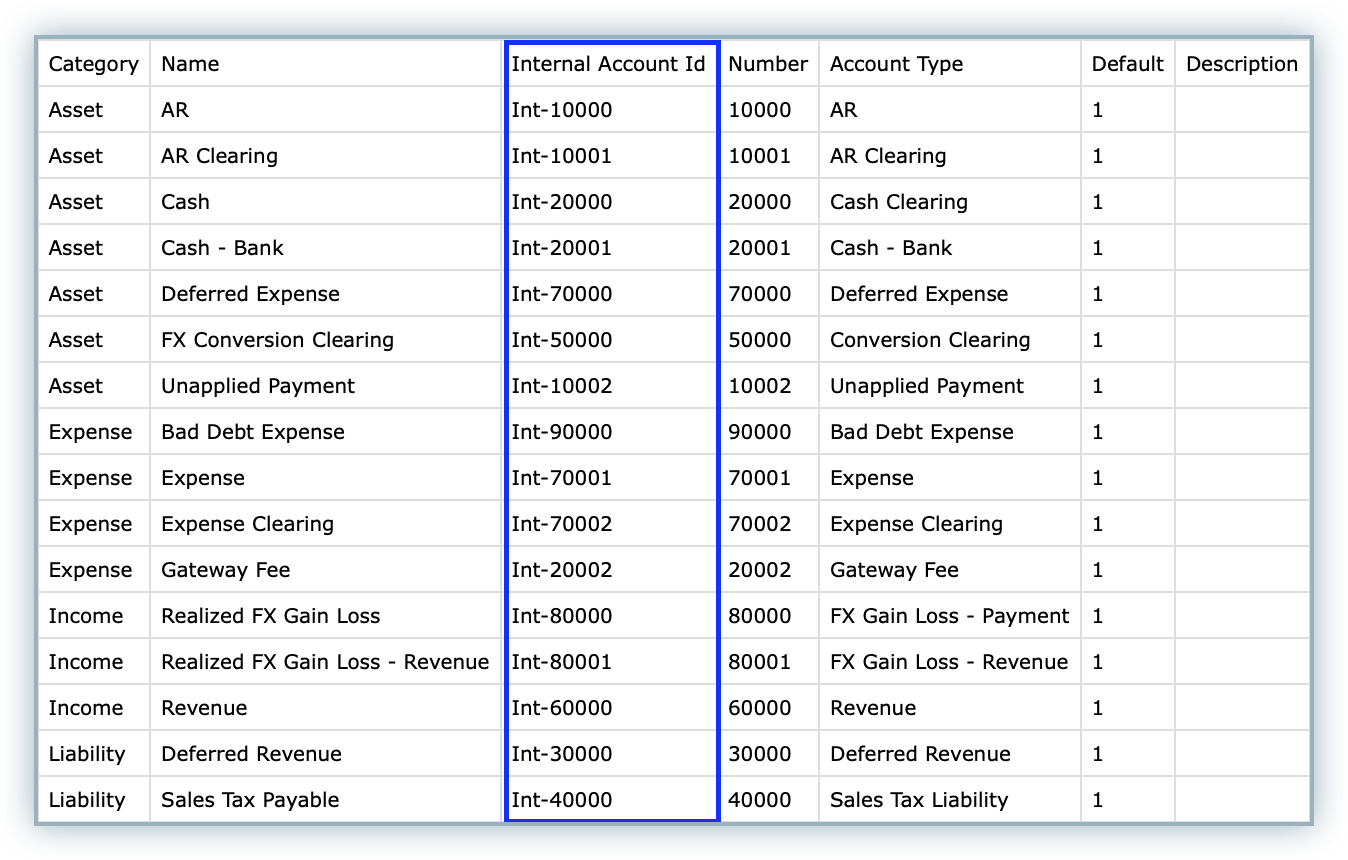
| Field Name | Description |
|---|---|
| Category | It's a high-level financial classification of the journal account. |
| Internal Account Id* | The unique internal account ID. |
| Account Number* | The unique account number. |
| Account Name* | A descriptive name for the account. |
| Account Type* | Denotes the type or nature of the account. You can select from the pre-configured internal chart of accounts. |
| Default* | Set this value to 1 if you want RevRec Premium to use this as the default account. |
| Description | Purpose of the account. |
Fields marked with * are mandatory fields.
Note
The Internal Account ID field is only required if the Use Internal Account ID for Journal Posting feature is enabled. To enable the feature, navigate to Settings > Accounting > Journal Posting Settings. Turn on the toggle Use Internal Account ID for Journal Posting. Click Save.
-
Update the mapping on the CSV file as required and save the file.
-
Click the Upload Data icon and upload the new accounts in bulk.
-
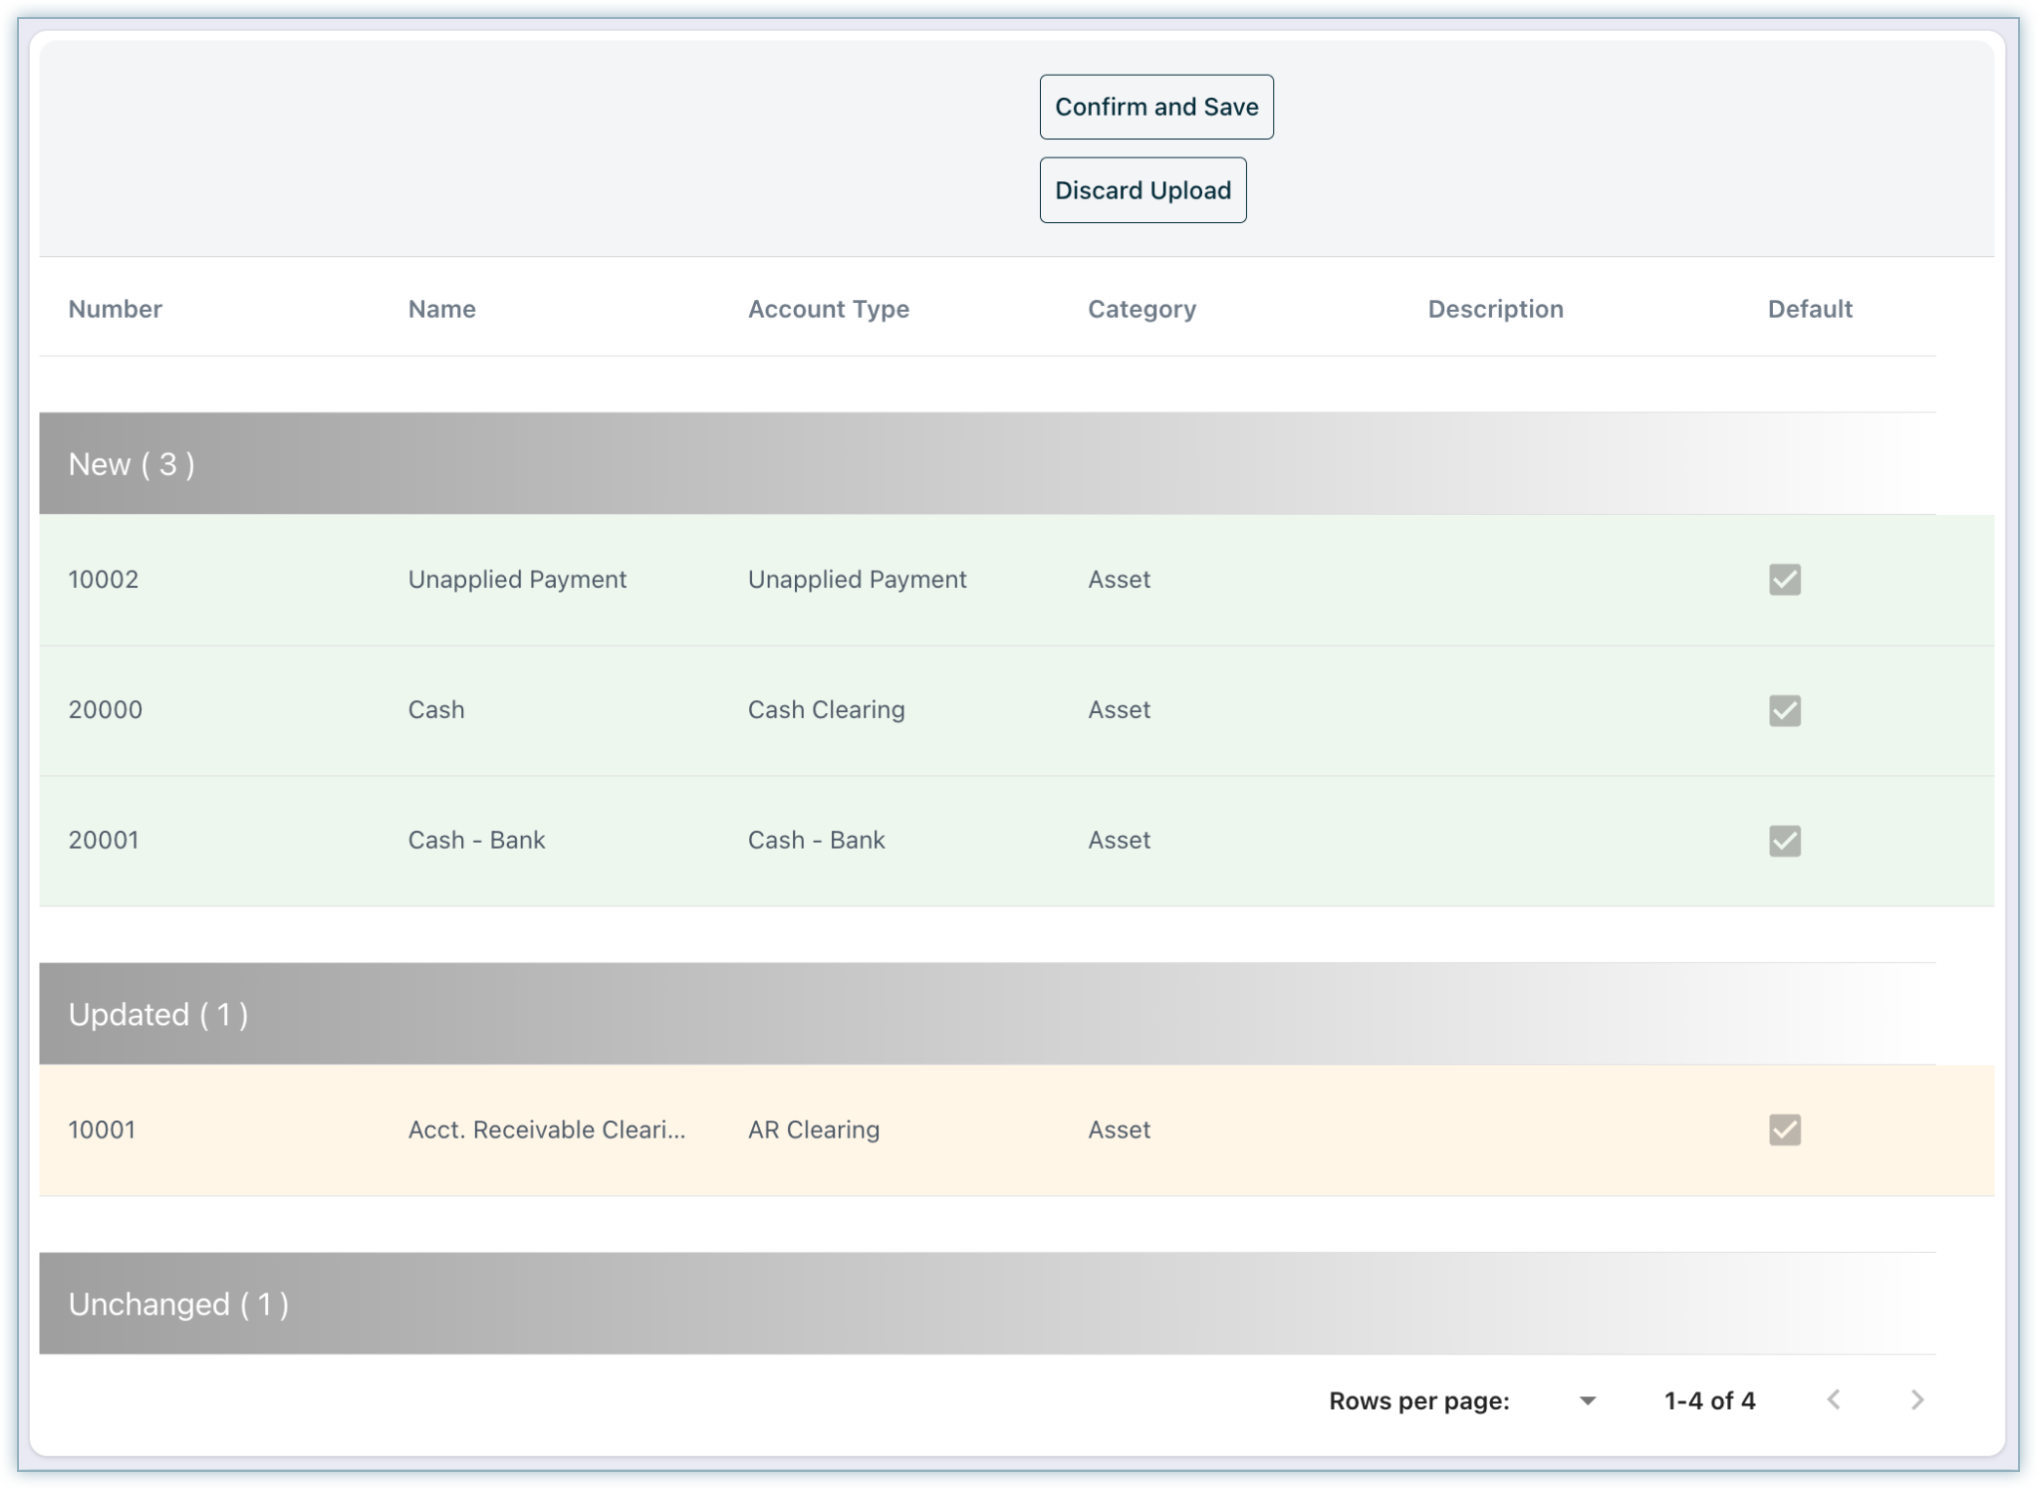
After processing the CSV file, an Upload Result page will appear with records grouped as New, Invalid, Unchanged, Duplicated, and Updated. If existing accounts are modified.
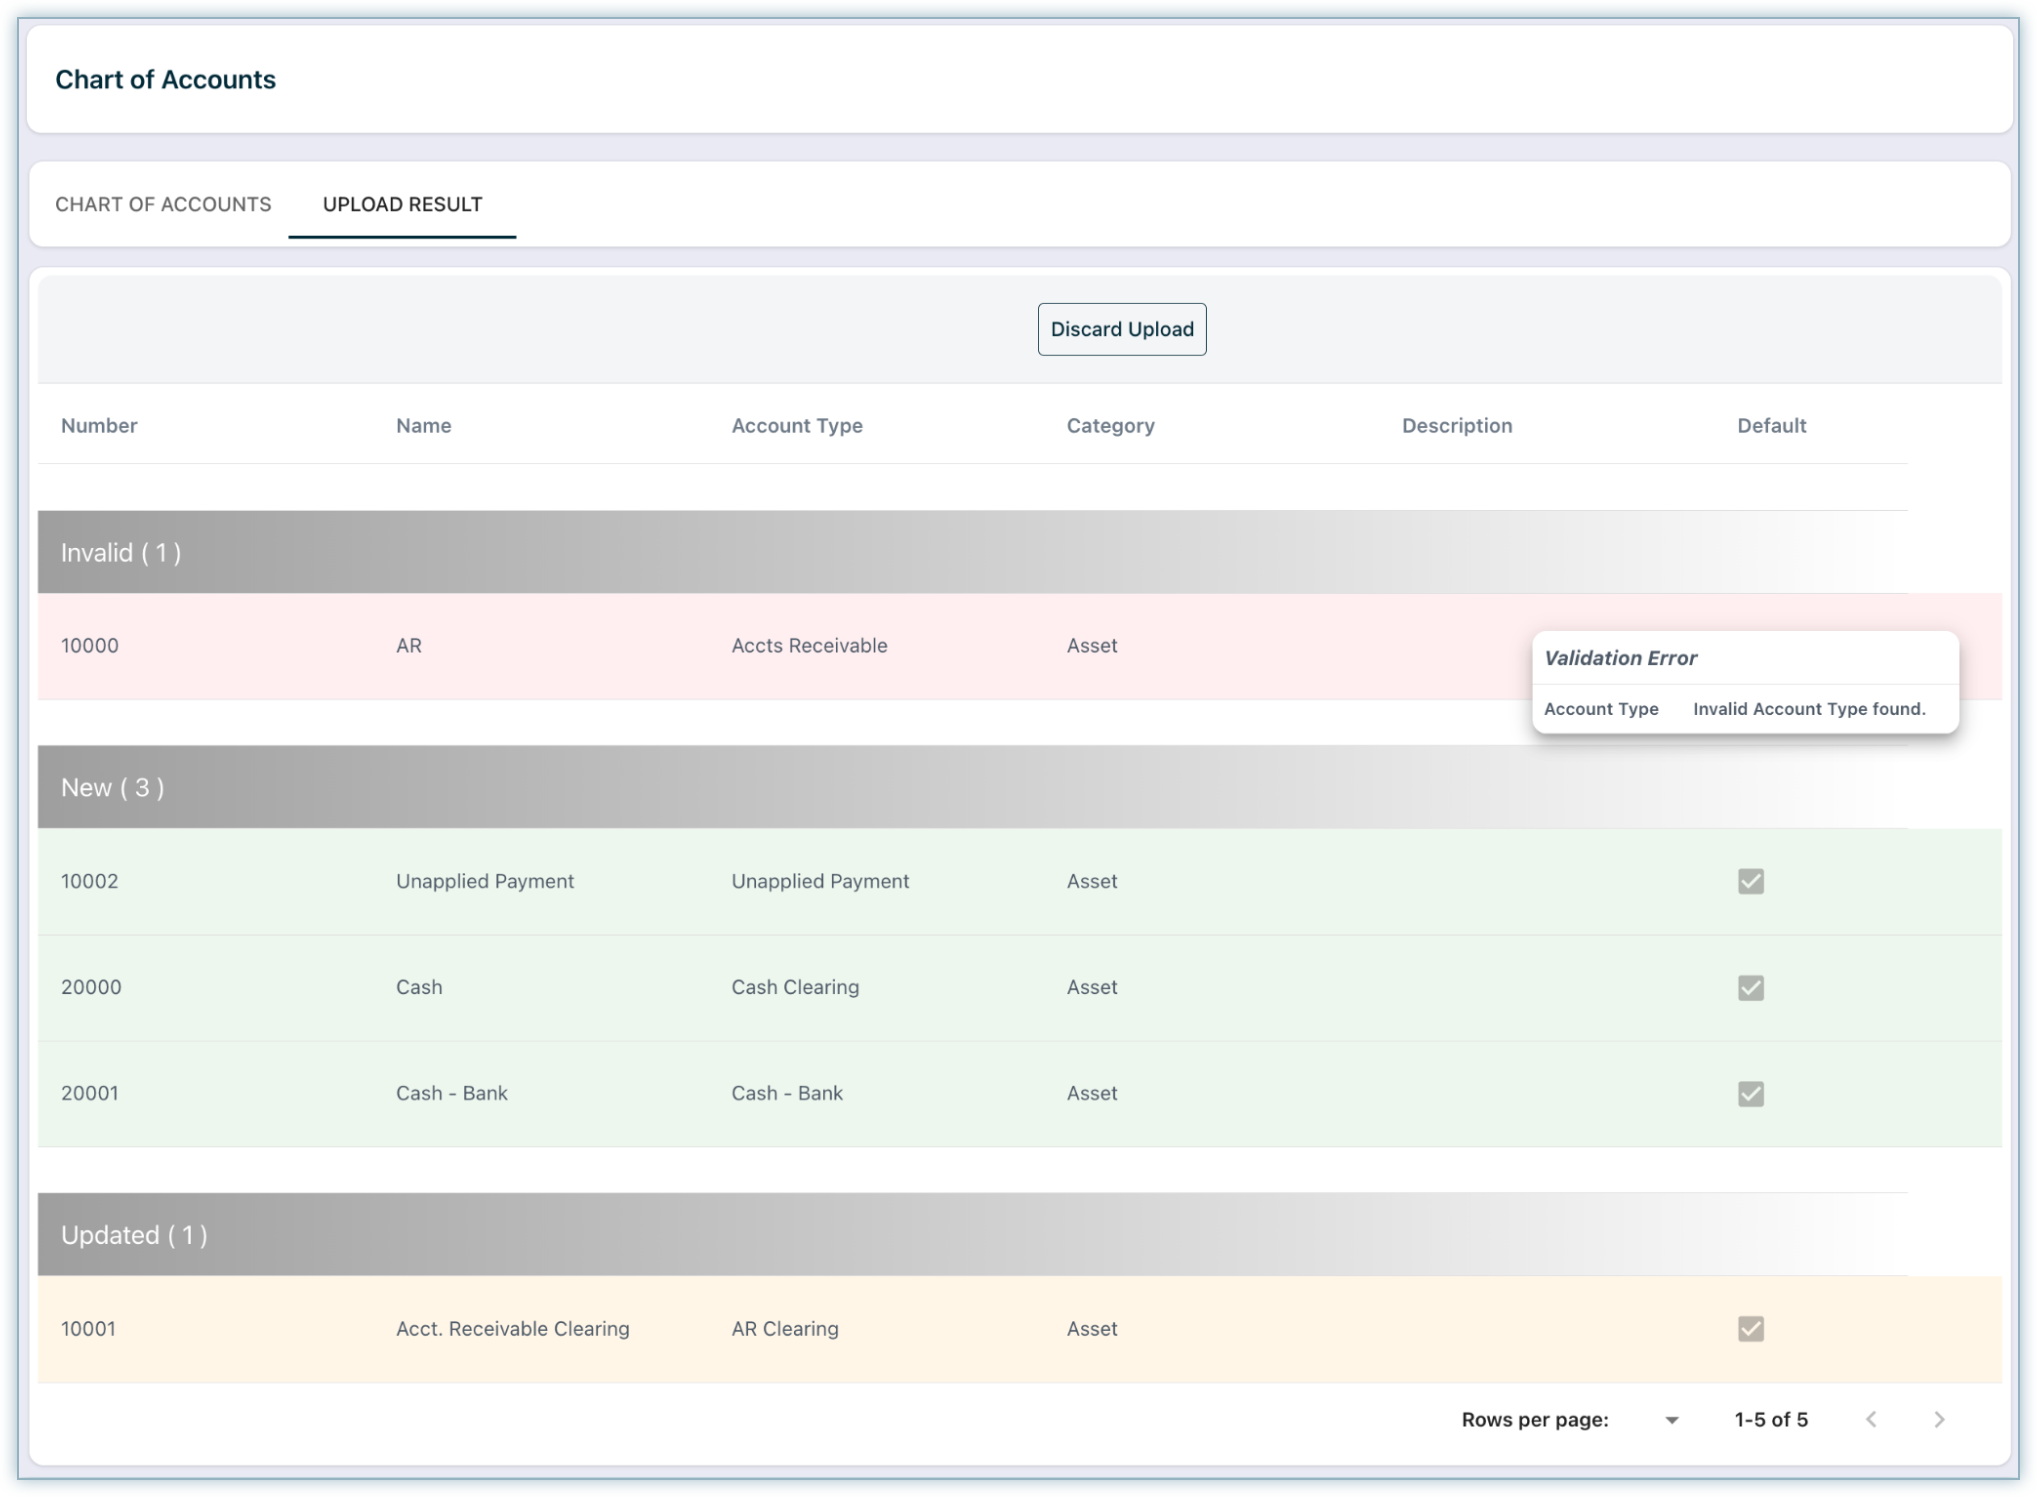
-
Any record that appears under invalid will not be processed, and you will see the validation error to resolve.
-
Once all errors are corrected, you upload the CSV file again and click Confirm and Save.
Note
Please make sure that there is one account defined for the account type to avoid any errors.
Mapping the Journal Accounts
In RevRec Premium, Mapping Rules define how General Ledger (GL) accounts are assigned to different business events and transactions. These rules play a critical role in ensuring that your financial data is accurately represented in the GL and that journal entries are correctly created for posting into your accounting system.
By configuring mapping rules, you align each type of transaction, such as invoices, payments, taxes, or credit notes, with the appropriate GL account. This helps maintain accuracy in financial reporting.
Note
Do not manually create Mapping Rules from the UI. These rules are automatically populated by the system during data synchronization.
Once the rules are generated, users can update or assign GL accounts for each mapping.
- Directly through the UI, or
- By exporting the mapping rules, making updates, and re-uploading the file.
Understanding the Journal Mapping Rules UI
Before mapping the chart of accounts to the mapping rules in RevRec Premium, it’s helpful to understand how the Journal Mapping Rules interface is organized and what each part means.
The Mapping Rules screen in RevRec Premium is structured into intuitive sections that help users manage how transactions are mapped to GL accounts. This layout ensures financial teams can easily review and maintain their accounting mappings with accuracy and consistency.
- To access the Journal Mapping Rules, navigate to Settings > Accounting > Mapping Rules from the left menu.
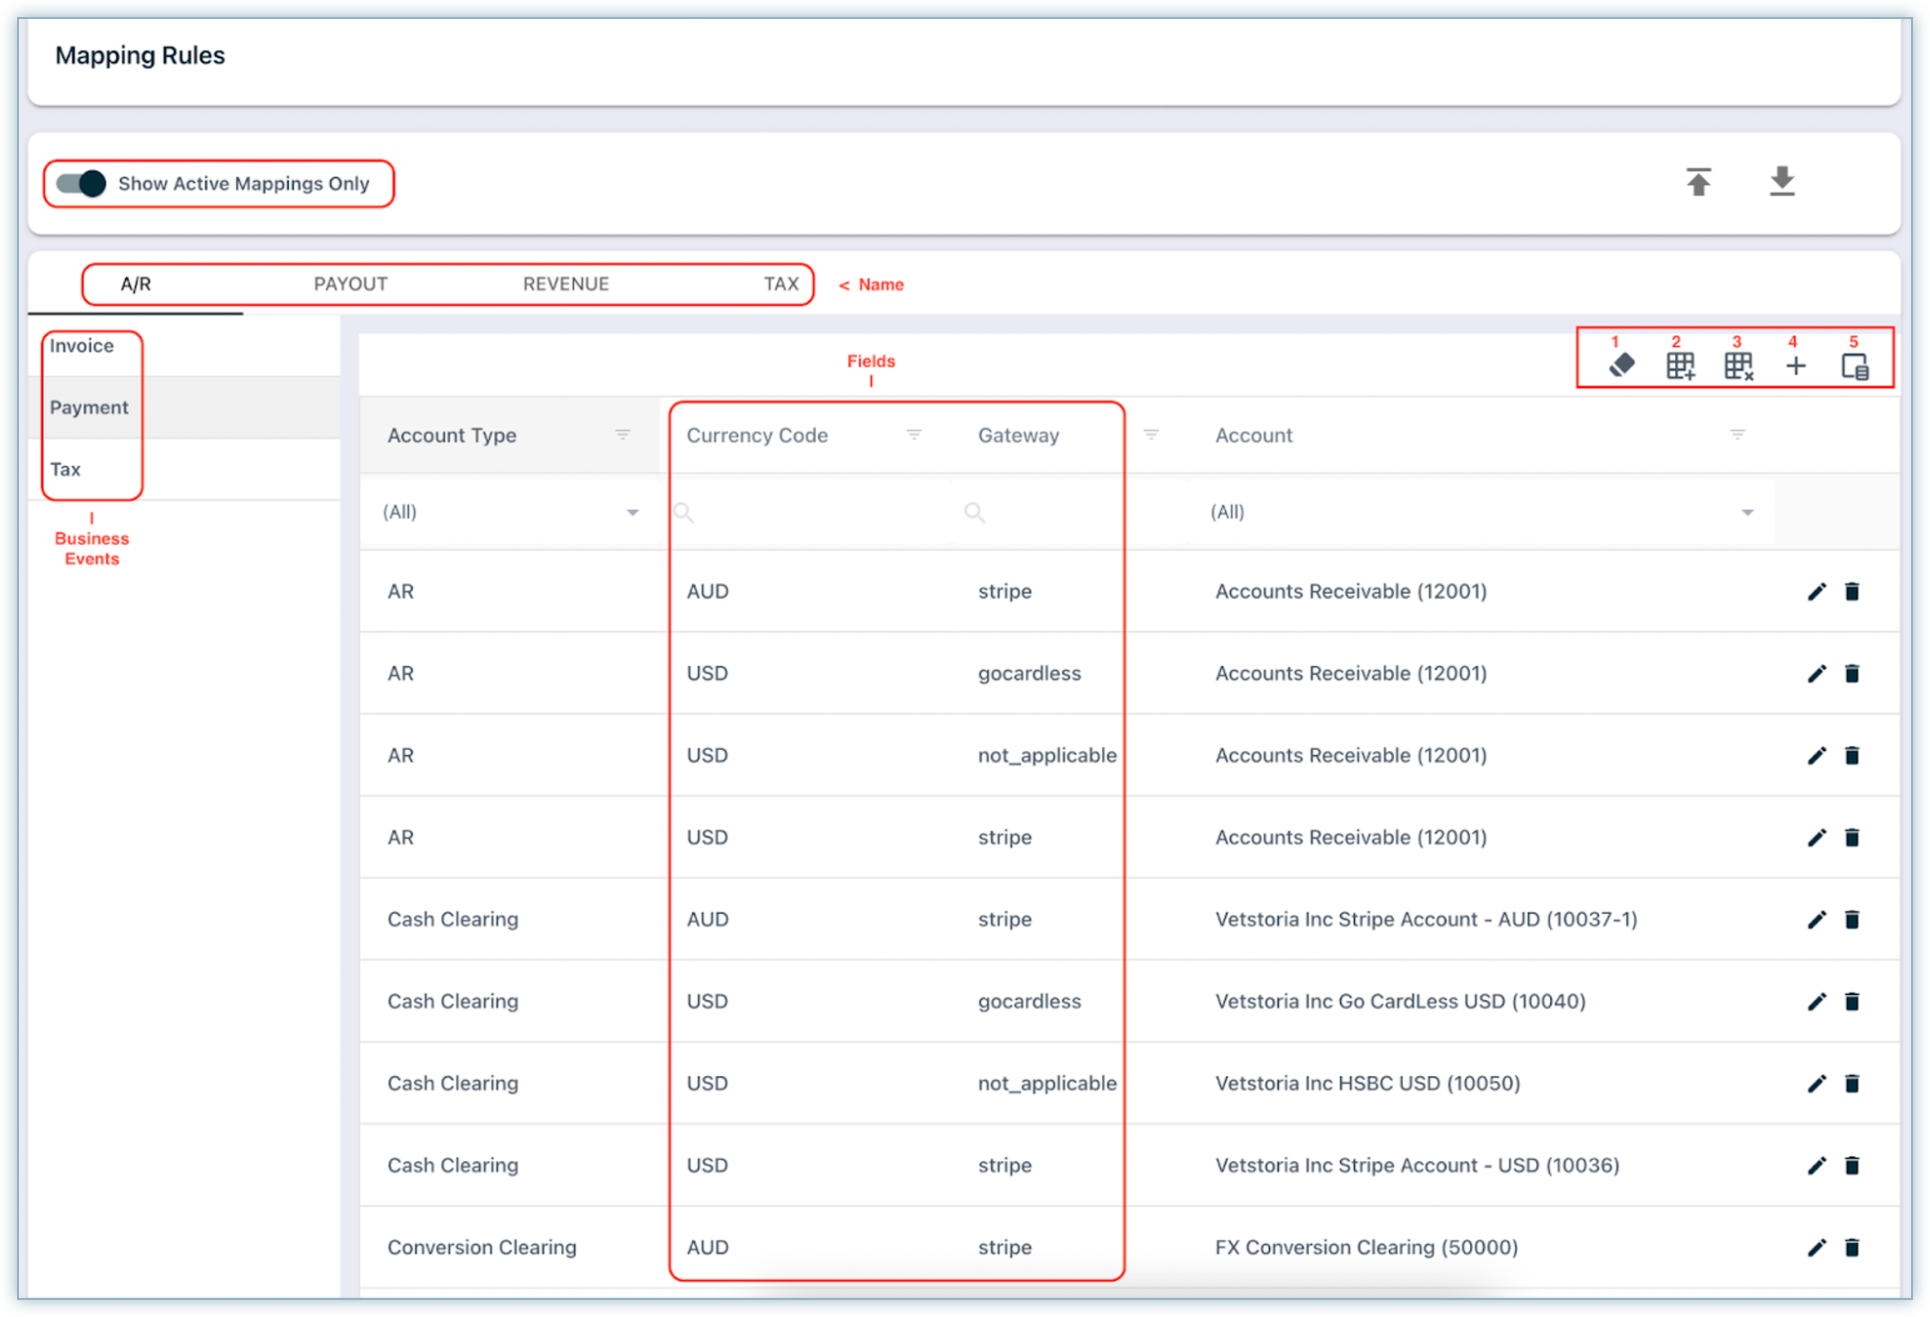
-
At the very top, mapping rules are grouped by Name, which corresponds to the high-level accounting categories (e.g., A/R, Revenue, Tax, Payout). These groupings reflect how the rules are organized based on accounting event types configured in the Mapping Fields.
-
Sub-Level Grouping: Business Events
Within each Name group, the next level of organization is by Business Events. These are specific types of transactions, such as:
- Invoice
- Payment
- Tax
Each business event triggers different journal entries in the system and appears as a separate tab or list in the interface.
- Field Combinations
Within each business event, the system displays combinations of mapping fields defined earlier in the Mapping Fields UI. For each combination, you can assign a specific GL Account.
For example, fields like:
- Currency Code (e.g., USD, AUD)
- Gateway (e.g., Stripe, GoCardless)
Gateway (e.g., Stripe, GoCardless)
- Table Columns Overview
Each row in the table represents a unique mapping combination, with the following columns:
- Account Type: The nature of the accounting impact (e.g., A/R, Cash Clearing).
- Currency Code: The transaction currency used for mapping.
- Gateway: The payment provider involved in the transaction.
- Account: The GL account the combination is mapped to.
- Actions Toolbar
On the right-hand side, you’ll find tools for managing mappings:
- Edit icon: Change the assigned GL account for a specific rule.
- Delete icon: Delete the specific mapping rule.
- Additional Mapping Options in the UI
In addition to reviewing and editing mapping rules through the interface, you also have the option to upload mapping rules in bulk using the upload button available at the top-right corner of the Mapping Rules screen. This is especially useful when managing large or complex mappings across multiple currencies, gateways, or account types.
- Toolbar Actions – Top-Right of the Grid
The toolbar at the top-right of the grid provides several key actions to help manage your mapping data efficiently:
| Icon | Action | Description |
|---|---|---|
| ① | Clear Search | Resets any filters or search terms currently applied to the mapping grid. |
| ② | Populate Missing Mappings | Automatically fills in missing mapping combinations based on existing business events and fields. |
| ③ | Delete All Mappings | Removes all current mappings under the selected group. Use with caution. |
| ④ | Create New Mapping | Manually add a new mapping rule. Note: Manual creation is not recommended. |
| ⑤ | Column Customization | Show or hide additional columns in the grid, such as Starting Period and Ending Period. |
Accounting Period-Based Mapping Versions
RevRec Premium supports version control for journal account mappings using accounting periods. This ensures accurate financial reporting, even if mappings are changed over time.
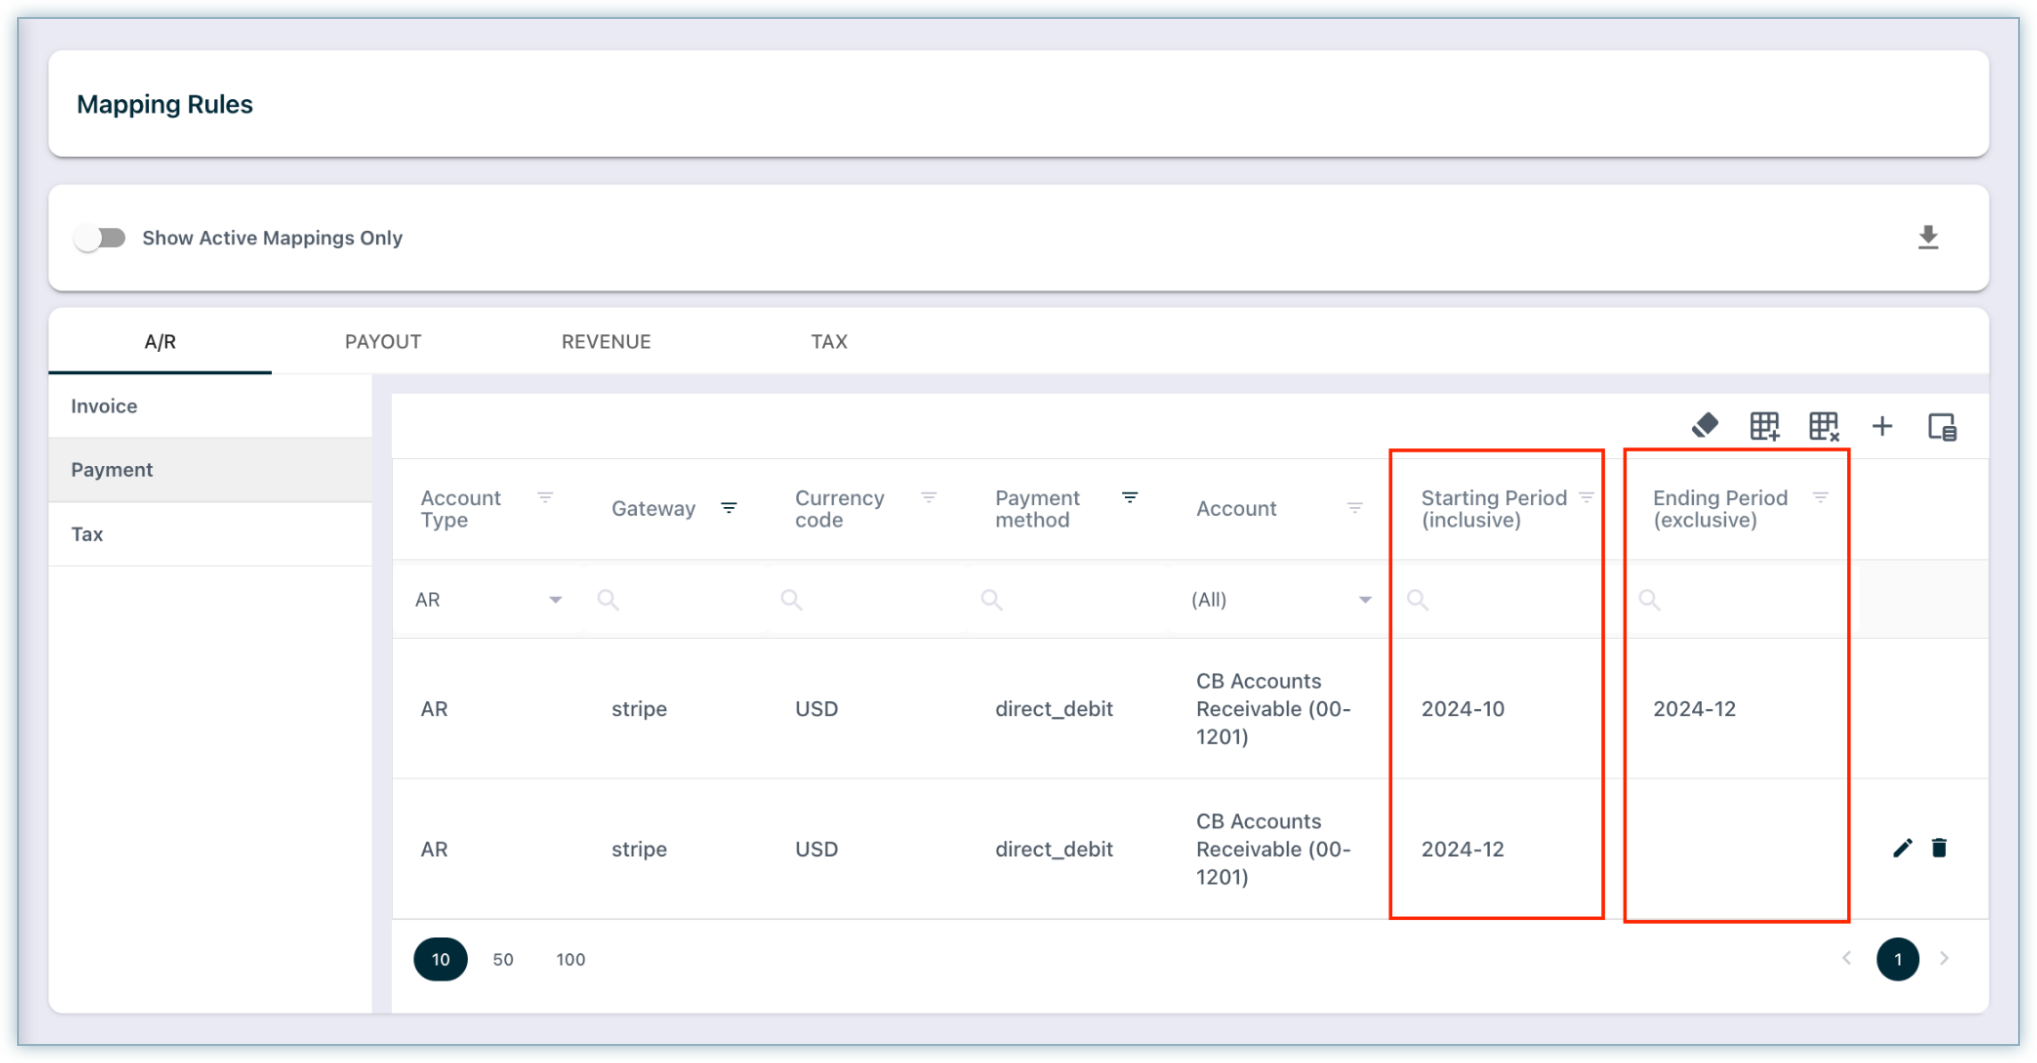
Each mapping rule includes:
- Starting Period (Inclusive) – The first period the mapping is valid for.
- Ending Period (Exclusive) – The last period before which the mapping stops being valid.
For example:
If a mapping has a starting period of 2024-10 and an ending period of 2024-12, it will be applied to transactions in October and November 2024 only.
December 2024 and onward will follow the next active mapping version, if available.
This design allows you to change GL mappings going forward without affecting historical data.
Reposting Journal Entries
When journal entries are deleted and re-posted (e.g., due to corrections or changes in configuration):
- RevRec Premium will use the applicable mapping version based on the original transaction’s accounting period.
- This ensures consistency and prevents older entries from being posted to newly defined GL accounts.
Assigning GL Accounts through UI
If you have a simple mapping setup, where each account type maps to a single GL account, you can manage this efficiently through the UI. This approach is ideal when your mappings don’t vary by fields such as currency, product, or gateway.
Follow the steps below to assign GL accounts directly from the interface.
- Use the tabs at the top (e.g., A/R, Revenue, Tax) to select the relevant mapping group.
- Under the appropriate Business Event (e.g., Invoice, Payment), review the list of mappings.
- For each row, locate the Account column.
- Click the edit icon on the right to edit the GL account.
- Select the appropriate account from the dropdown menu.
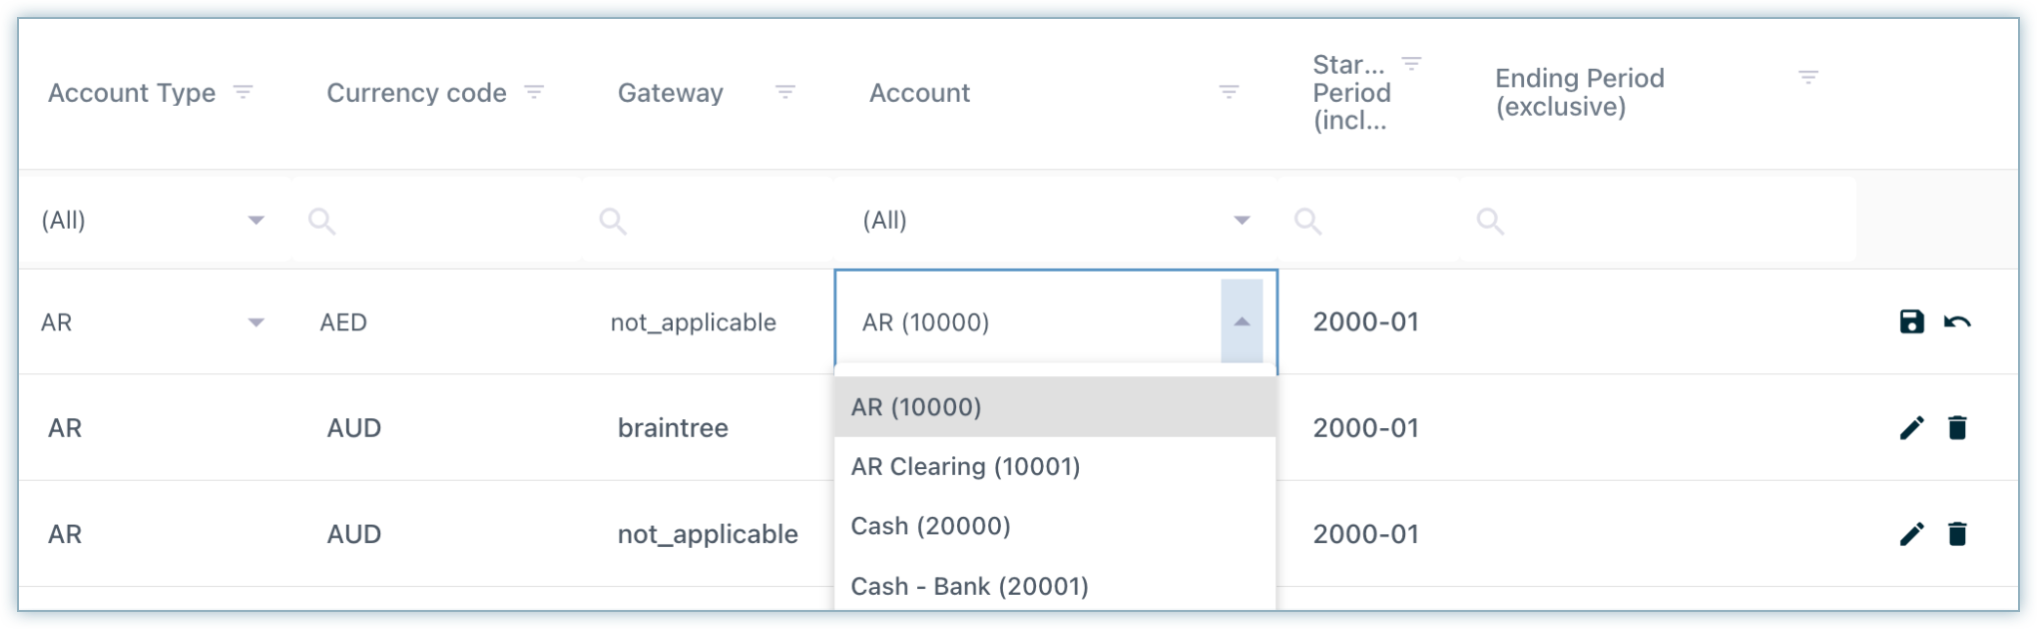
- Click Save to confirm your selection.
Assigning GL Accounts through Bulk Upload
For more complex setups—such as when you need to assign different GL accounts based on multiple fields like currency, gateway, or product type—it’s more efficient to use the bulk upload option. This allows you to update or assign multiple mappings in one go, rather than editing each rule manually through the UI.
Follow these steps to perform a bulk upload of mapping rules:
- Navigate to the Mapping Rules screen in RevRec.
- At the top-right of the grid, click the download icon to export the existing mapping rules as a CSV file.

In the downloaded file, you will find the following fields.
| Field Name | Description |
|---|---|
| Book | Accounting book (e.g., GAAP) to which the mapping applies. |
| Accounting Event Type | A logical grouping that represents the nature of the accounting transaction—e.g., A/R, Revenue, Tax, Payout. This determines how transactions are categorized and mapped. |
| Account Type | Defines the type of the account, such as Accounts Receivable, Deferred Revenue, Tax Liability, etc. |
| Account Number | The specific GL account number you want to assign for this mapping. This ties the mapping to your external accounting system’s chart of accounts. |
| Starting Period | The first accounting period (e.g., 202410) for which the mapping should be valid. This marks the beginning of the rule’s applicability. |
| Ending Period | The exclusive cutoff period for the mapping. If set to 202412, the rule is applied up to and including 202411. Useful for versioning and historical accuracy. |
| Mapping Fields | Mapping Fields define the specific attributes or dimensions used to split the same account type into different GL accounts. |
All Fields are mandatory fields.
- Open the CSV file and locate the column labeled Account Number.
- For each row, fill in the appropriate Account Number based on your accounting configuration.
- Keeping the Starting Period as “200001” and Ending Period as “300001” will be considered as the active mapping.
- Once completed, save the file in CSV format.
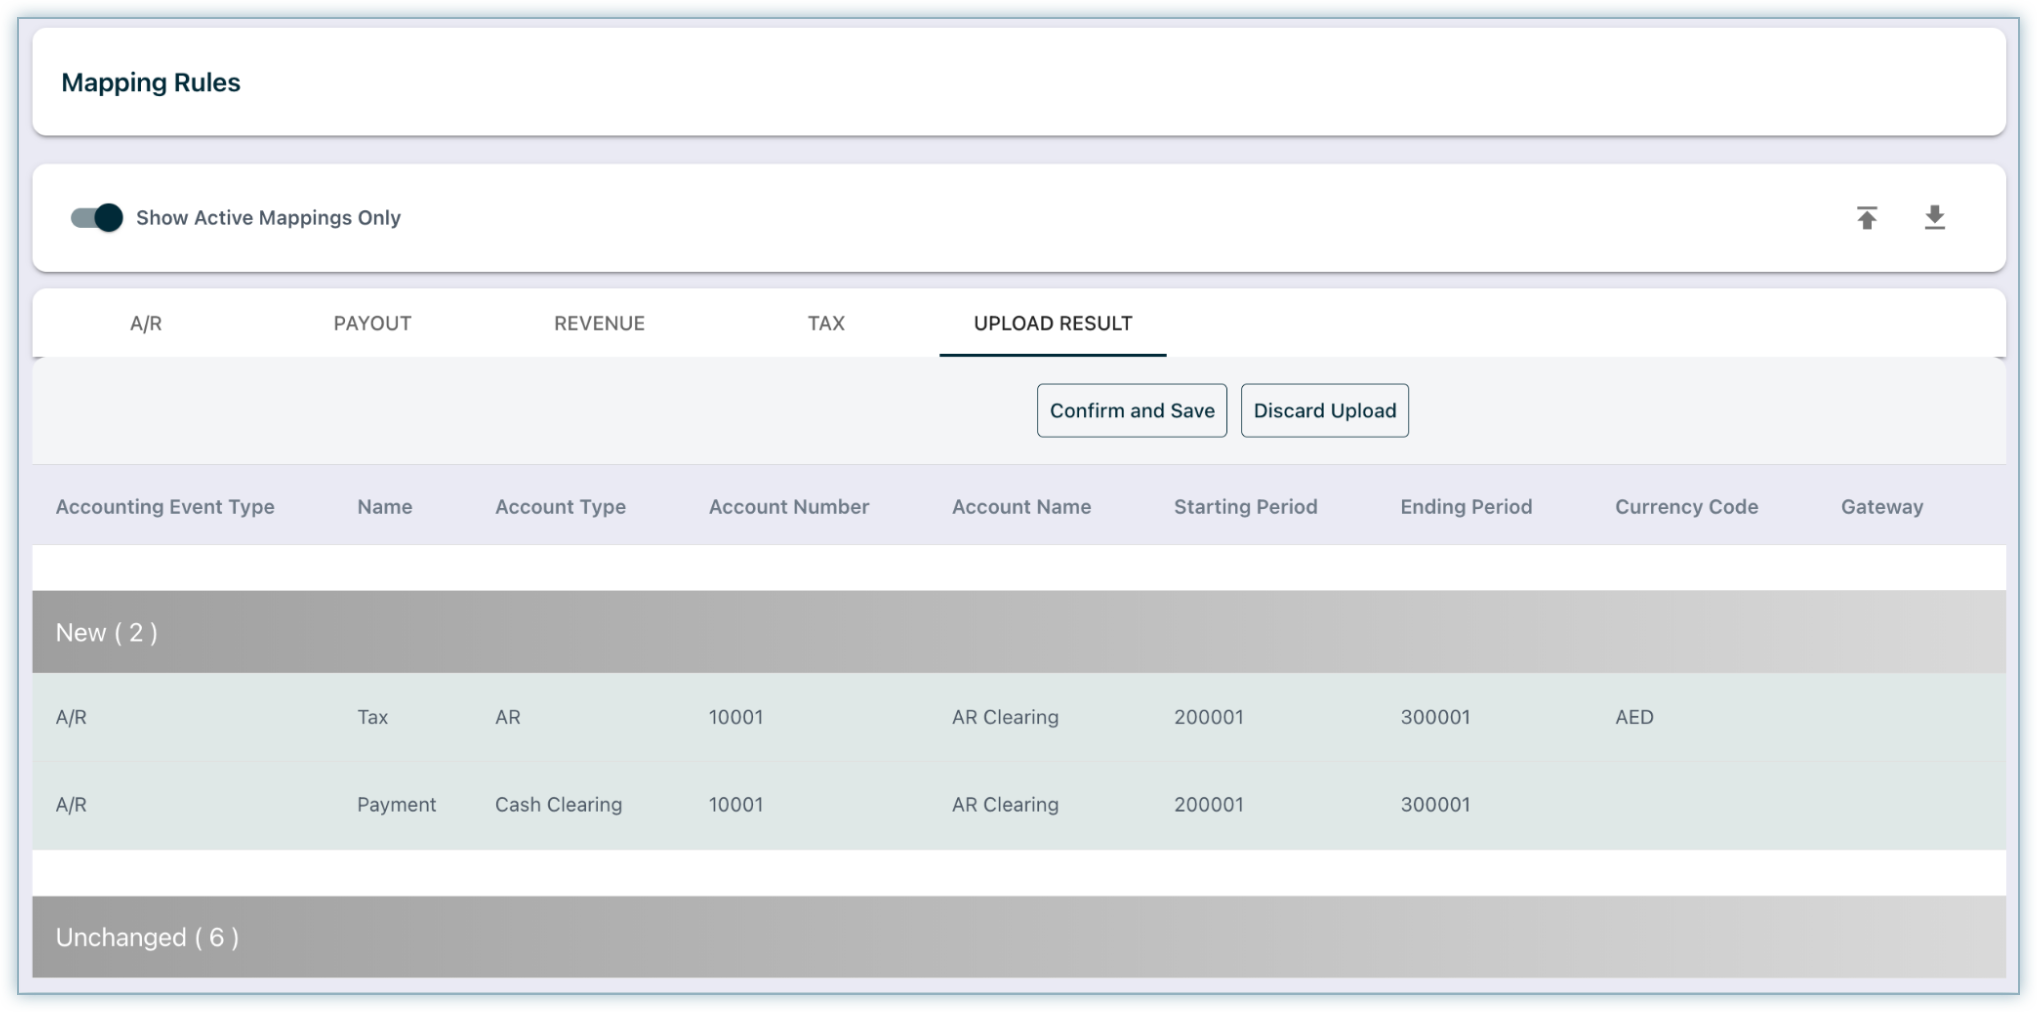
- Return to the Mapping Rules screen and click the upload icon (next to the download button).
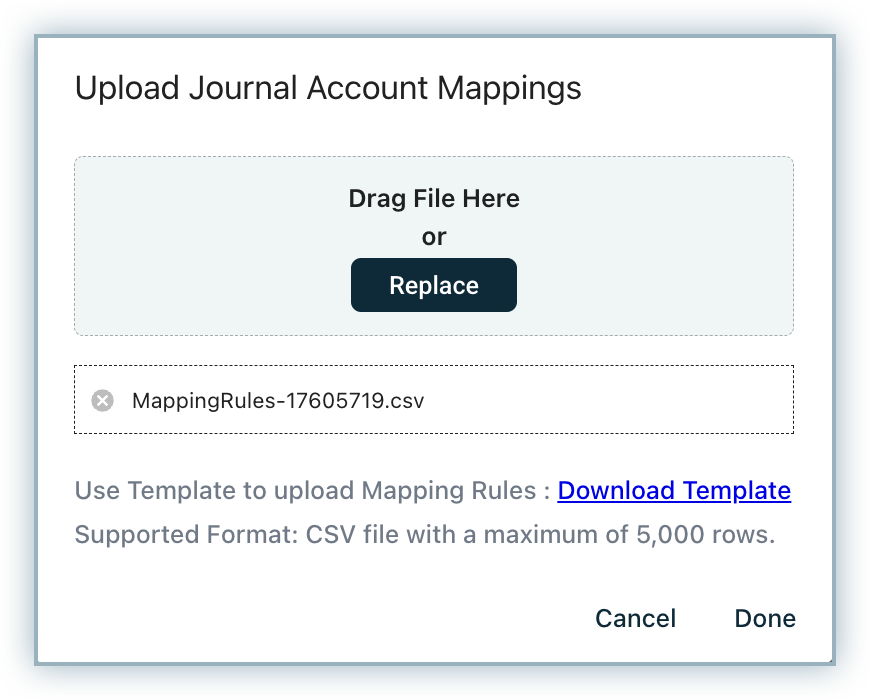
- Click the Upload Data icon and upload the mapping in bulk.
- After processing the CSV file, an Upload Result page will appear with records grouped as New, Invalid, Duplicate, Unchanged, and Updated (If existing accounts are modified).
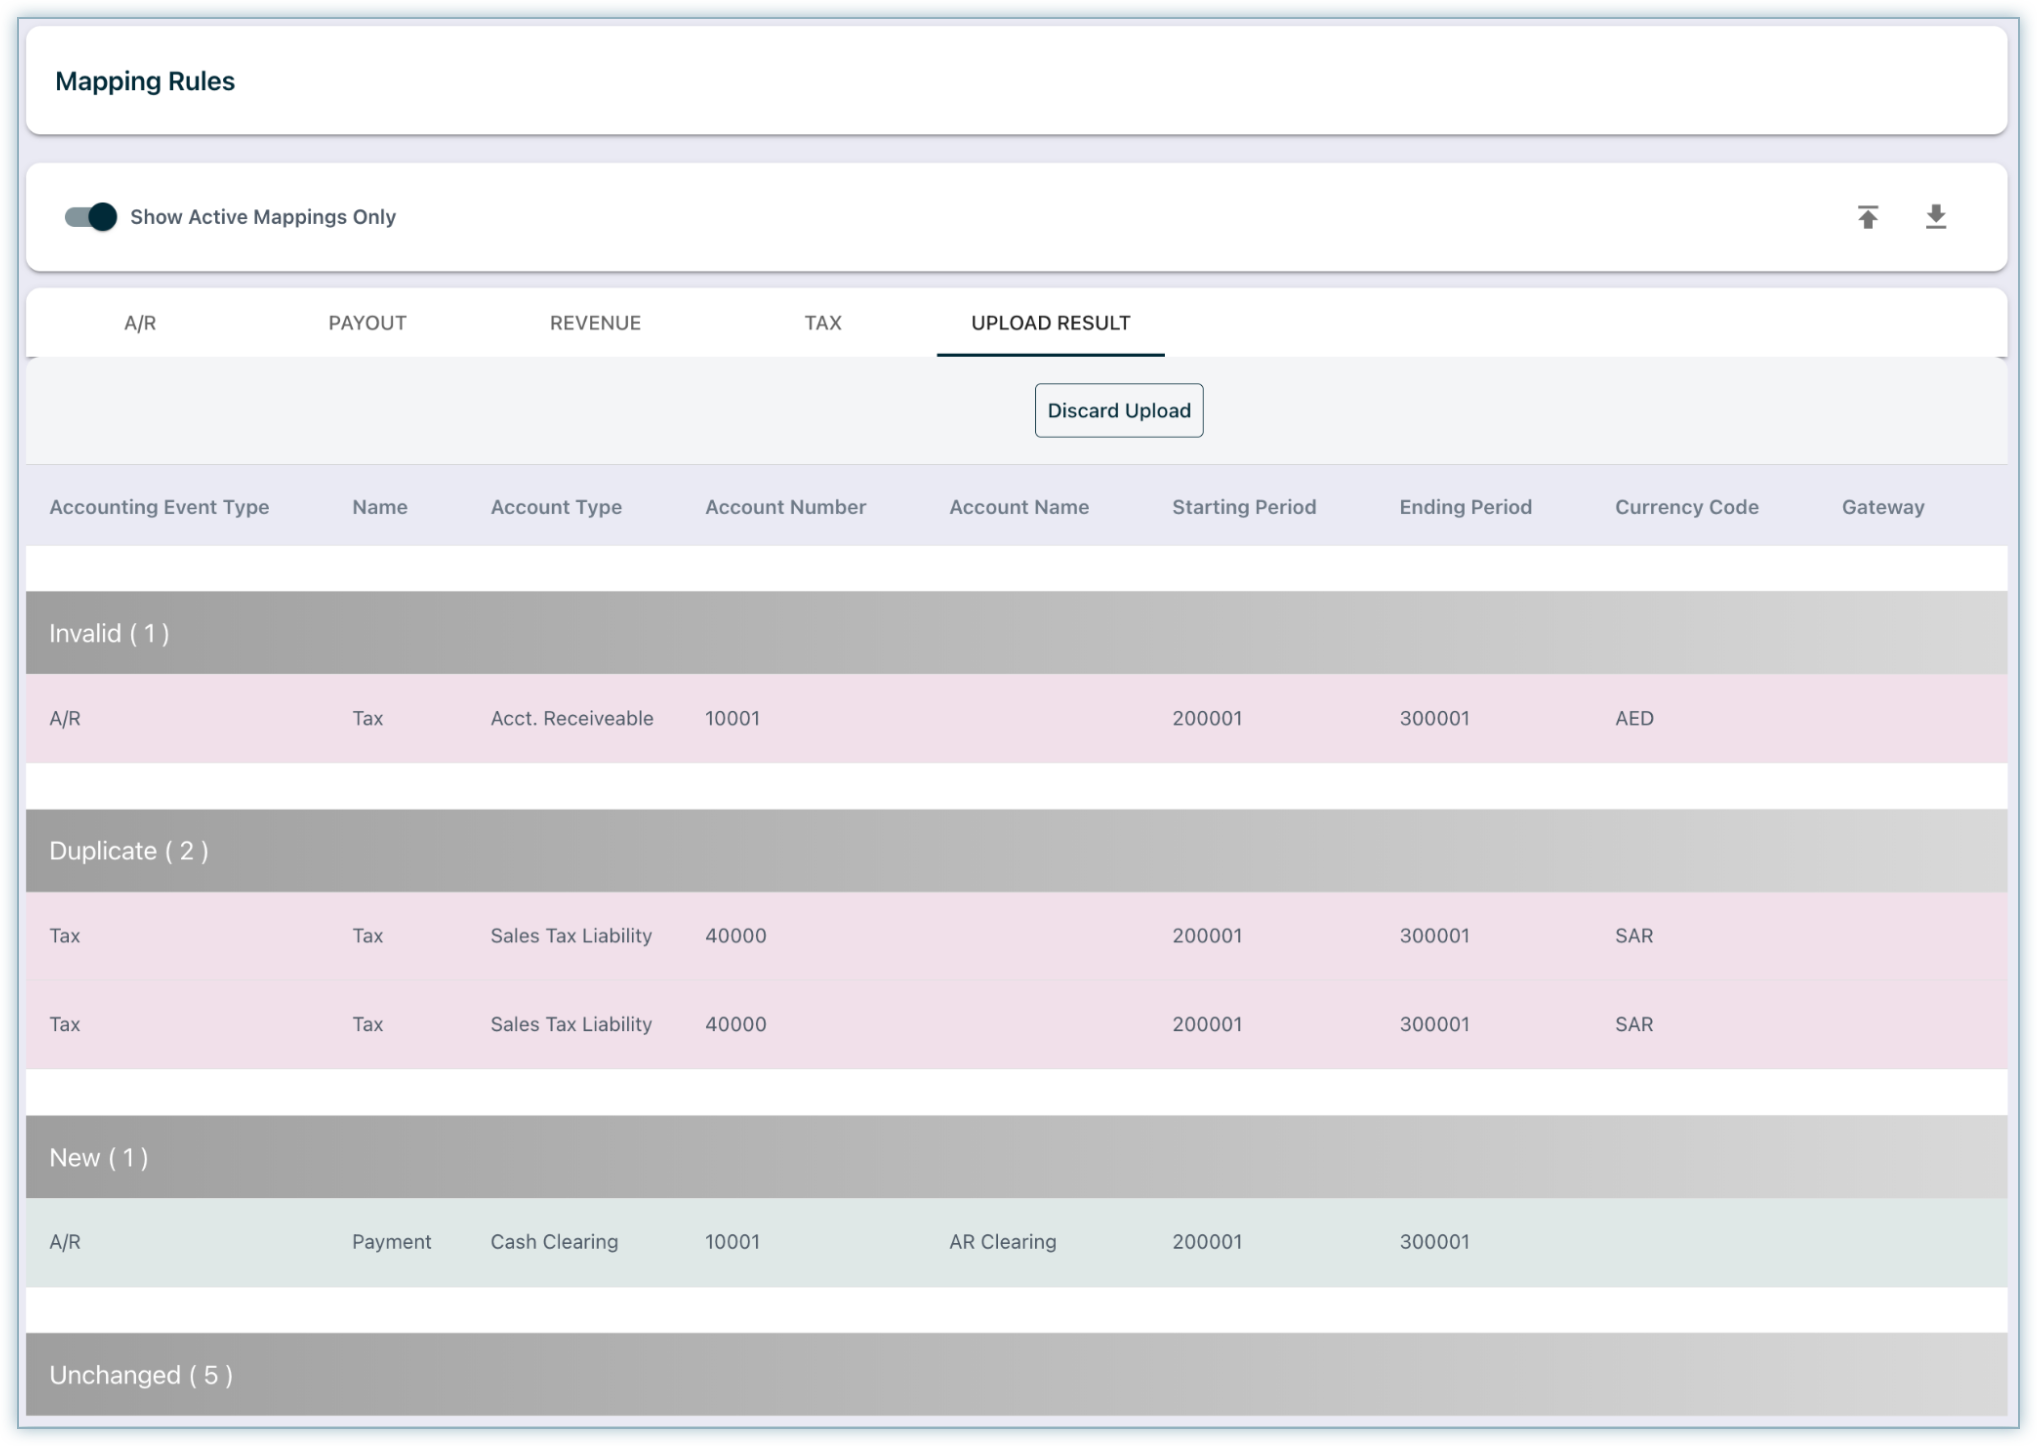
- Any record that appears under invalid will not be processed, and you must correct it before uploading.
- Once all errors are corrected, you upload the CSV file again and click Confirm and Save.
Do not manually create new rows from scratch. Always start with the system-generated export to ensure proper format and field alignment.
Was this article helpful?