AvaTax for Sales
AvaTax for Sales calculates sales tax efficiently and facilitates sales tax compliance requirements delivered on-demand. Integrate your Avalara AvaTax for Sales account with Chargebee and have sales tax applied on your invoices automatically.
Note
- To avoid unnecessary API calls to the tax system for zero-value invoices, and to optimize your usage and reduce associated fees. Reach out to Chargebee Support for assistance.
- To know about the availability of this integration, visit our plans and pricing page.
The necessary changes related to Brexit are available for you to update in your Chargebee site as applicable. They require your action to take effect, and will not be automatically updated on your behalf.
Prerequisites
Chargebee
1. Organization Address
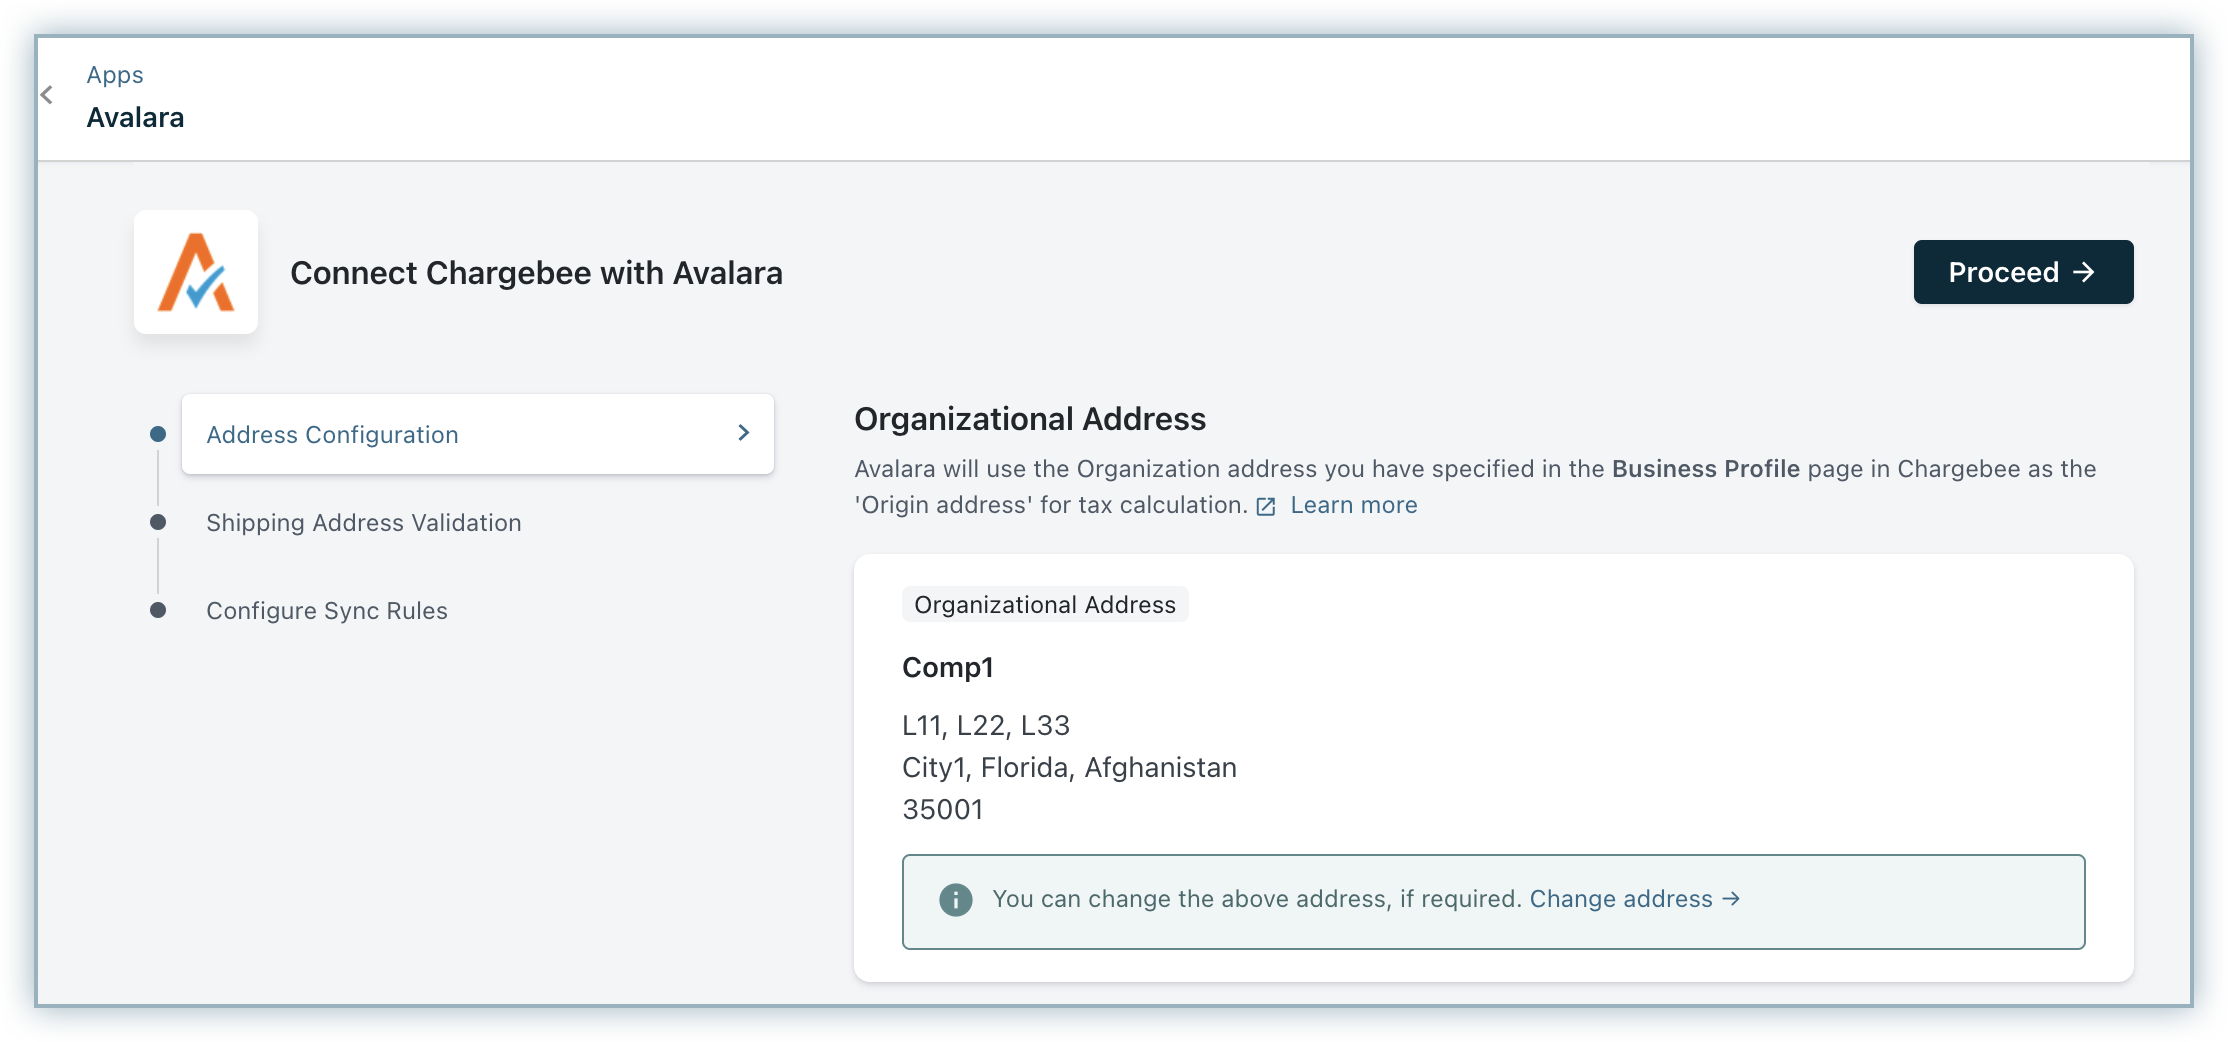
Avalara requires your business' address to calculate tax for an invoice. The Organization Address you provide in your Chargebee site will be used by Avalara for this purpose, and will also be stored as the Origin Address in Avalara. In order to use the Avalara integration, the Organization Address in Chargebee should have at least the Country, State, and Postal Code filled.
The Organization Address can be configured for your site under Settings > Configure Chargebee > Business Profile.
2. Address for Tax Determination
Chargebee will use your customer's shipping address to calculate tax. If the shipping address is unavailable, then the billing address would be used for the same.
Note
If you're using Hosted Pages, ensure that:
- The Shipping/Billing Address field has been enabled. This can be done under Settings > Configure Chargebee > Checkout & Portal > Fields.
- The Zip Code, Country, and State fields are made mandatory in the hosted pages.
3. Plan and Addon Details
Given that the taxes are subject to each type of charges that are added in an invoice, it is required of you to add tax codes for your Plans and Addons for Avalara to calculate tax accordingly.
Avalara
1. Nexus Jurisdictions
When your business has 'nexus' in a tax jurisdiction, it has a physical presence and connection in that jurisdiction and is thereby obligated to collect and remit taxes to the State. Configure nexus jurisdictions in your Avalara AvaTax account to let Avalara know where to tax. Country, regional, and local jurisdictions can be added for this purpose. While configuring nexus jurisdictions, you will be prompted to add the 'begin' and 'end' dates. Avalara requires these dates to determine when to process transactions.
Read more about nexus jurisdictions.
Configuration
To have Avalara apply taxes on your Chargebee Invoices automatically involves 5 major steps.
Step1 : Connecting Avalara account with your Chargebee site
To integrate Avalara with your Chargebee site,
-
Navigate to Apps > Go to Marketplace > Tax Management > Avalara.
-
In the Avalara configuration page, if you have an Avalara account, click Get Started or if you don't have one already, click Sign up to create your Avalara account and continue.
-
Choose the AvaTax Type to be AvaTax for Sales.
-
Enter your Avalara credentials - Account number, License key and Company Code, and click Proceed.
-
Enter/confirm your organization address, without which you will not be able to proceed. Chargebee will populate the address that is specified in your settings, you can change this if you'd like to or click Proceed.
-
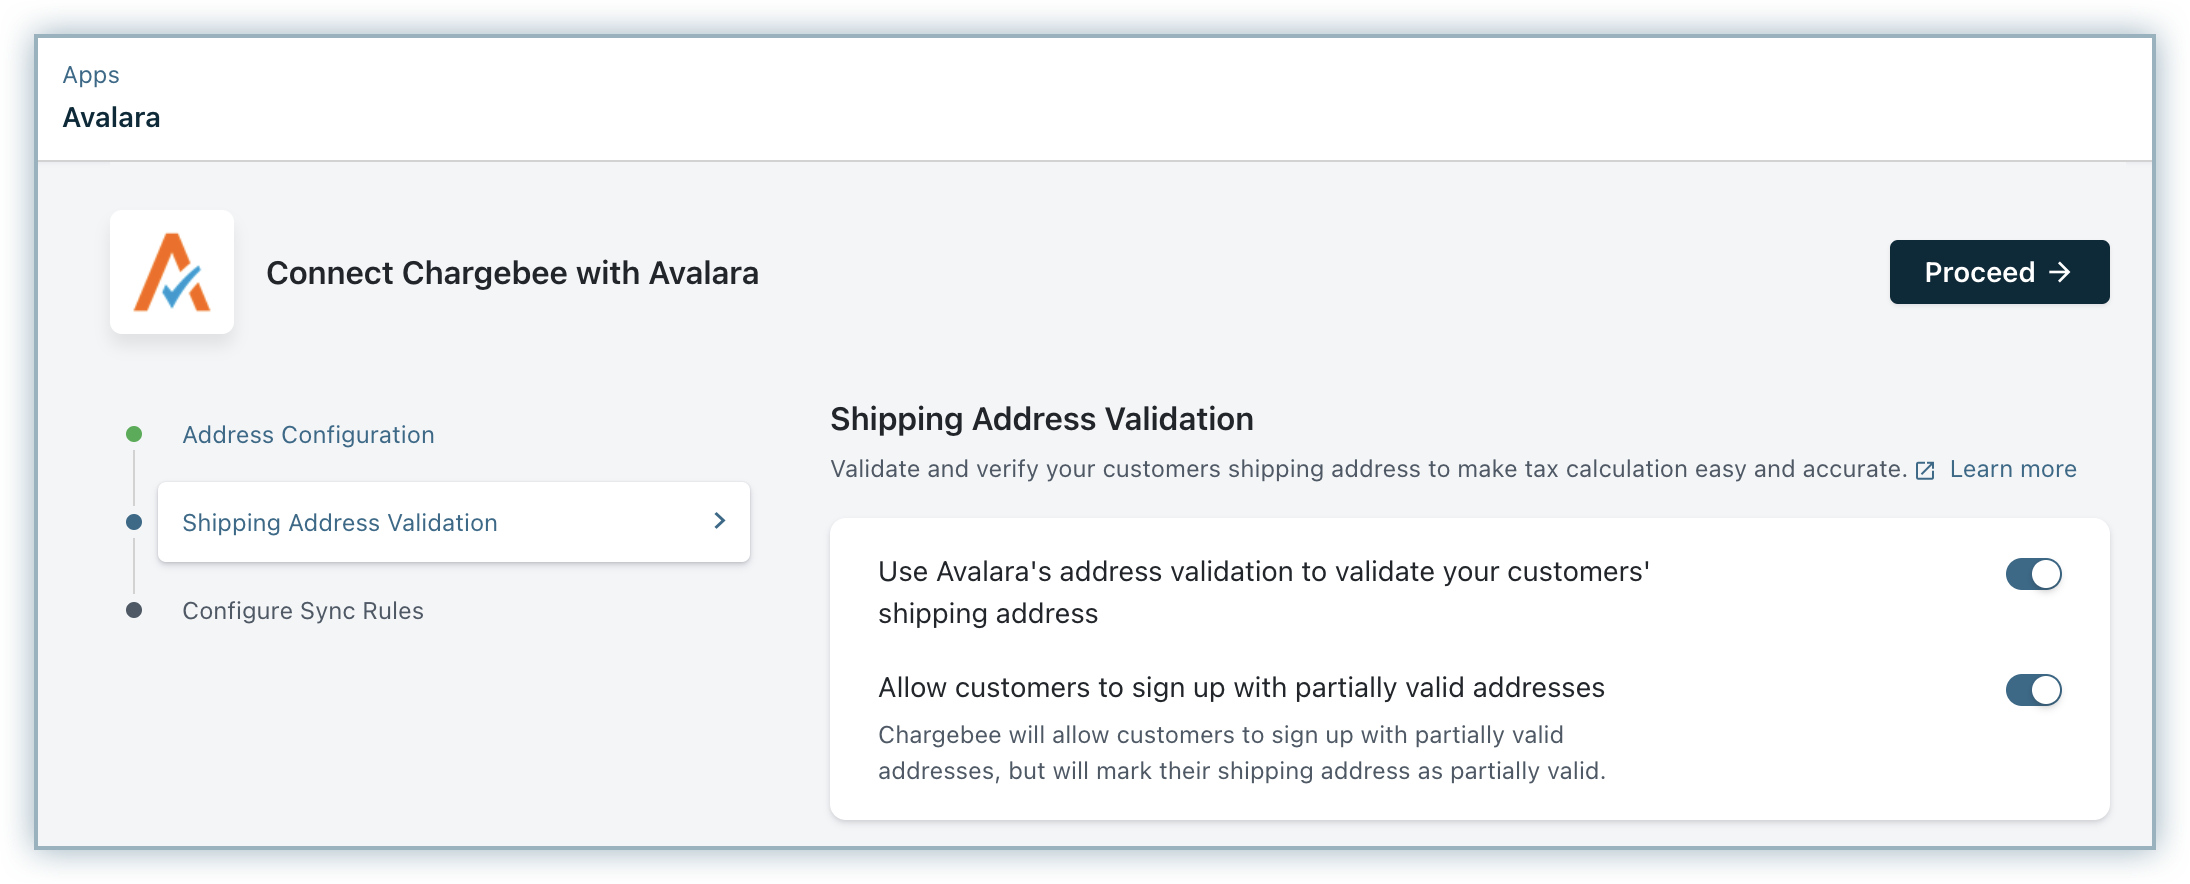
Under Shipping Address Validation you can,
- choose to turn on Avalara's address validation support to validate your customers' shipping addresses.
- allow customers to sign-up with partially valid addresses, and Chargebee will mark their shipping addresses as partially valid.
Once you are done, click Proceed.
-
Lastly under Configure Sync Rules you can,
- turn the toggle on to allow Chargebee to post invoices and credit notes to Avalara.
- choose how you'd want the invoices and credit notes posted to Avalara.You
can choose to
- commit all invoices and credit notes - all your invoices and credit notes will be sent to Avalara as Committed.
- commit only paid invoices and adjusted/refunded credit notes - Only paid invoices and adjusted/refunded credit notes will be sent to Avalara as 'Committed'. Remaining invoices will be sent as Uncommitted.
- don't commit: All your invoices and credit notes will be sent to Avalara as Uncommitted.
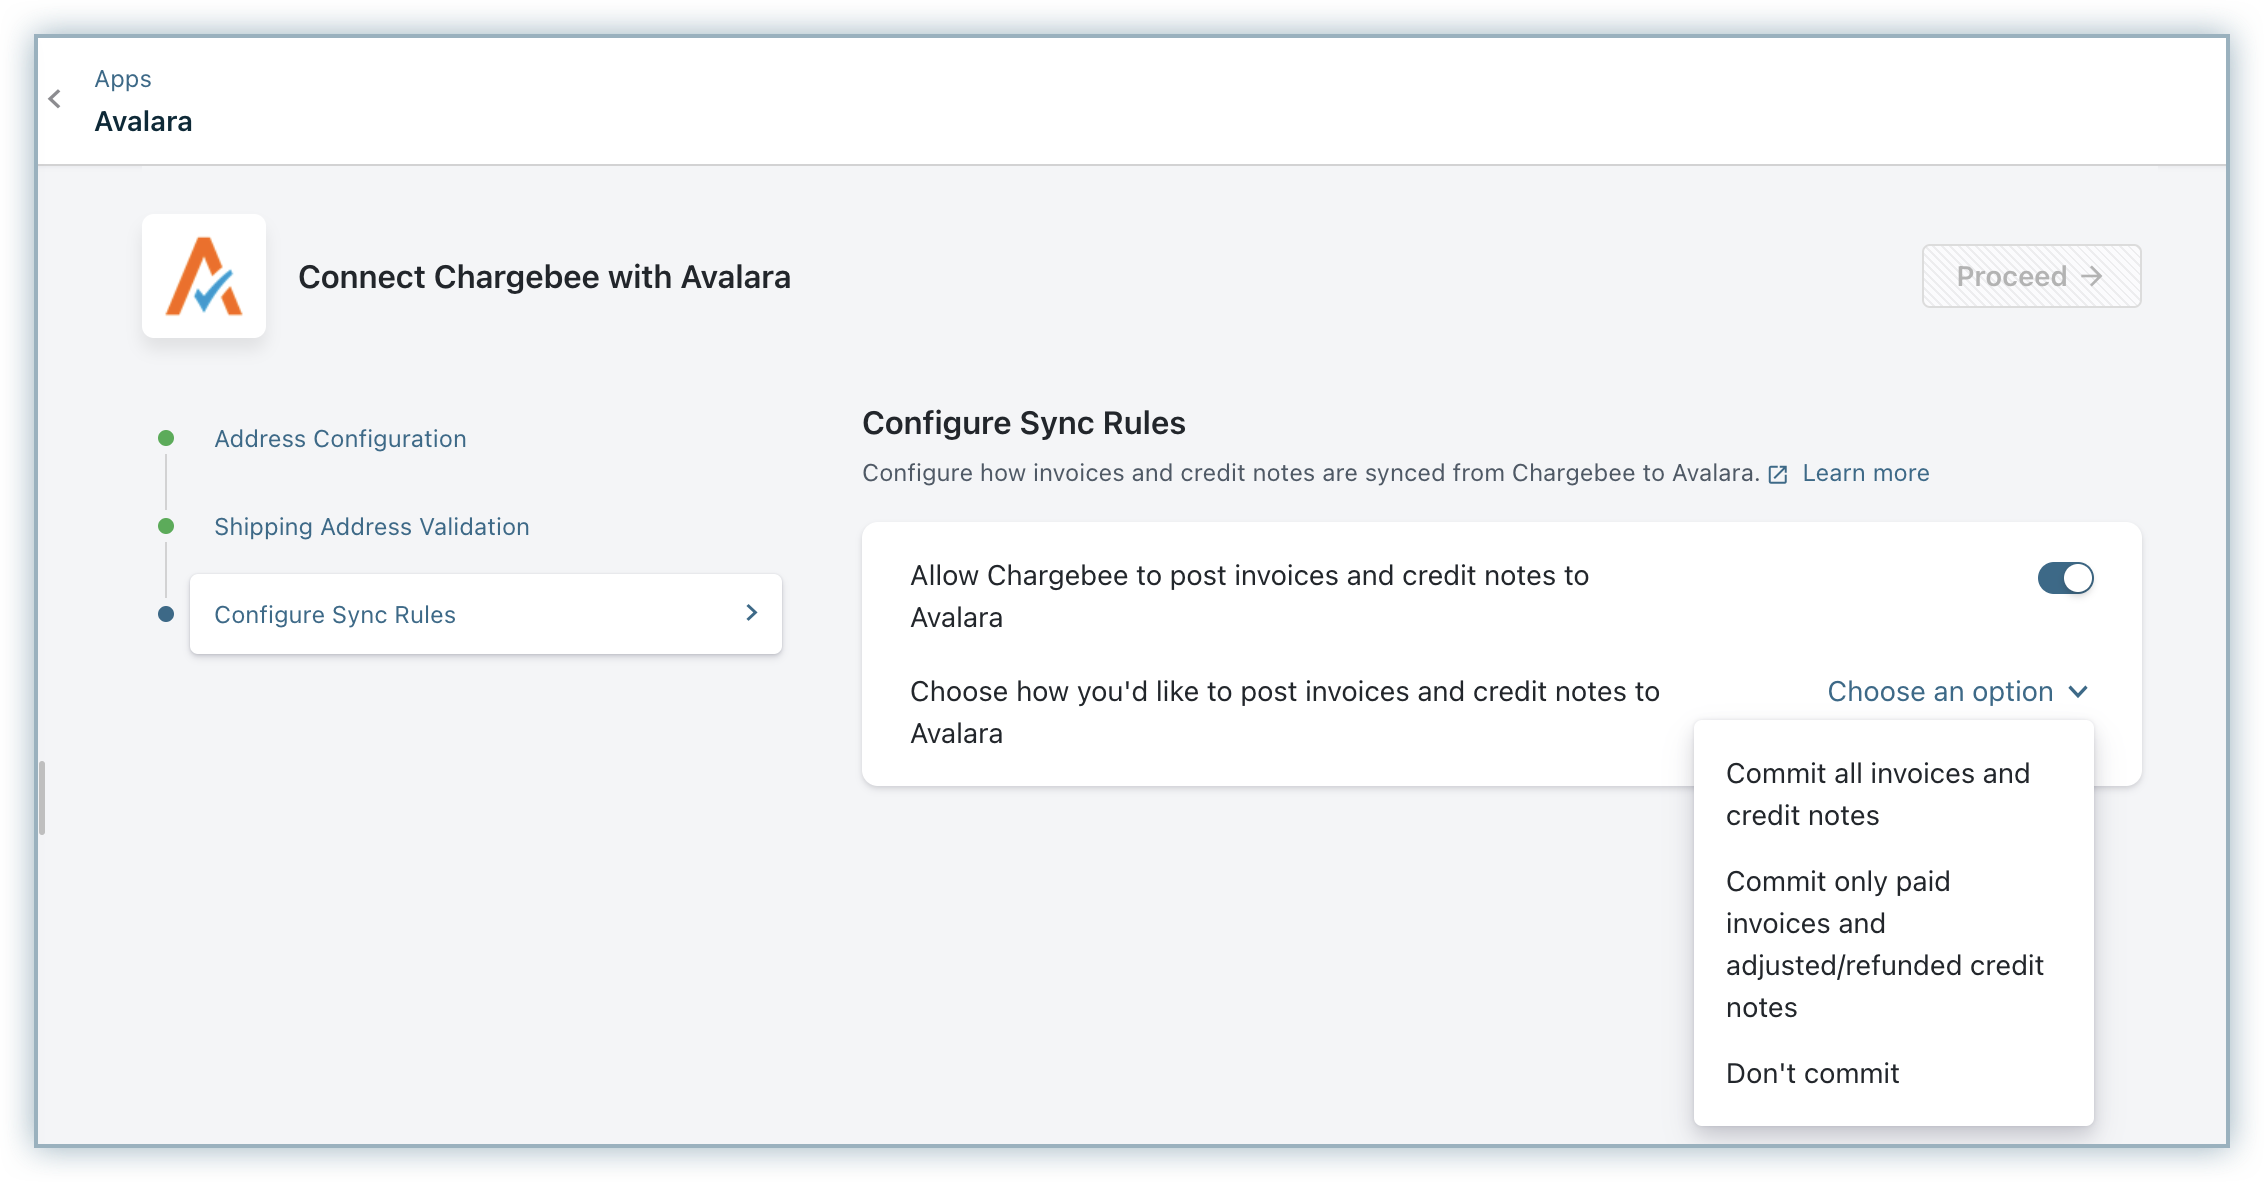
Learn more about how this works in Avalara.
Once you are done with the settings, click Proceed.
Note
- Ensure that the Invoice/Credit Note numbers of the documents in Chargebee that are yet to be committed, are different from the numbers used for documents that have already been committed in Avalara.
- You can make changes to the integration preferences at any point of time by going to Apps > Go to Marketplace > Tax Management > Avalara > Manage and clicking on Manage Preferences in the Avalara integration page.
Step 2 : Validating Addresses for Existing Customers
For customers who have signed up before enabling Avalara, Chargebee will cancel their subscriptions during renewal if tax cannot be determined. To identify subscriptions that are at a risk of getting cancelled, Chargebee provides a validation tool. The subscriptions which are at the verge of cancellation can be determined using this tool and you can view the Invalid address details.
Under Validate Existing Addresses, choose your respective taxable regions for which you want to run validation, and click Run Check.
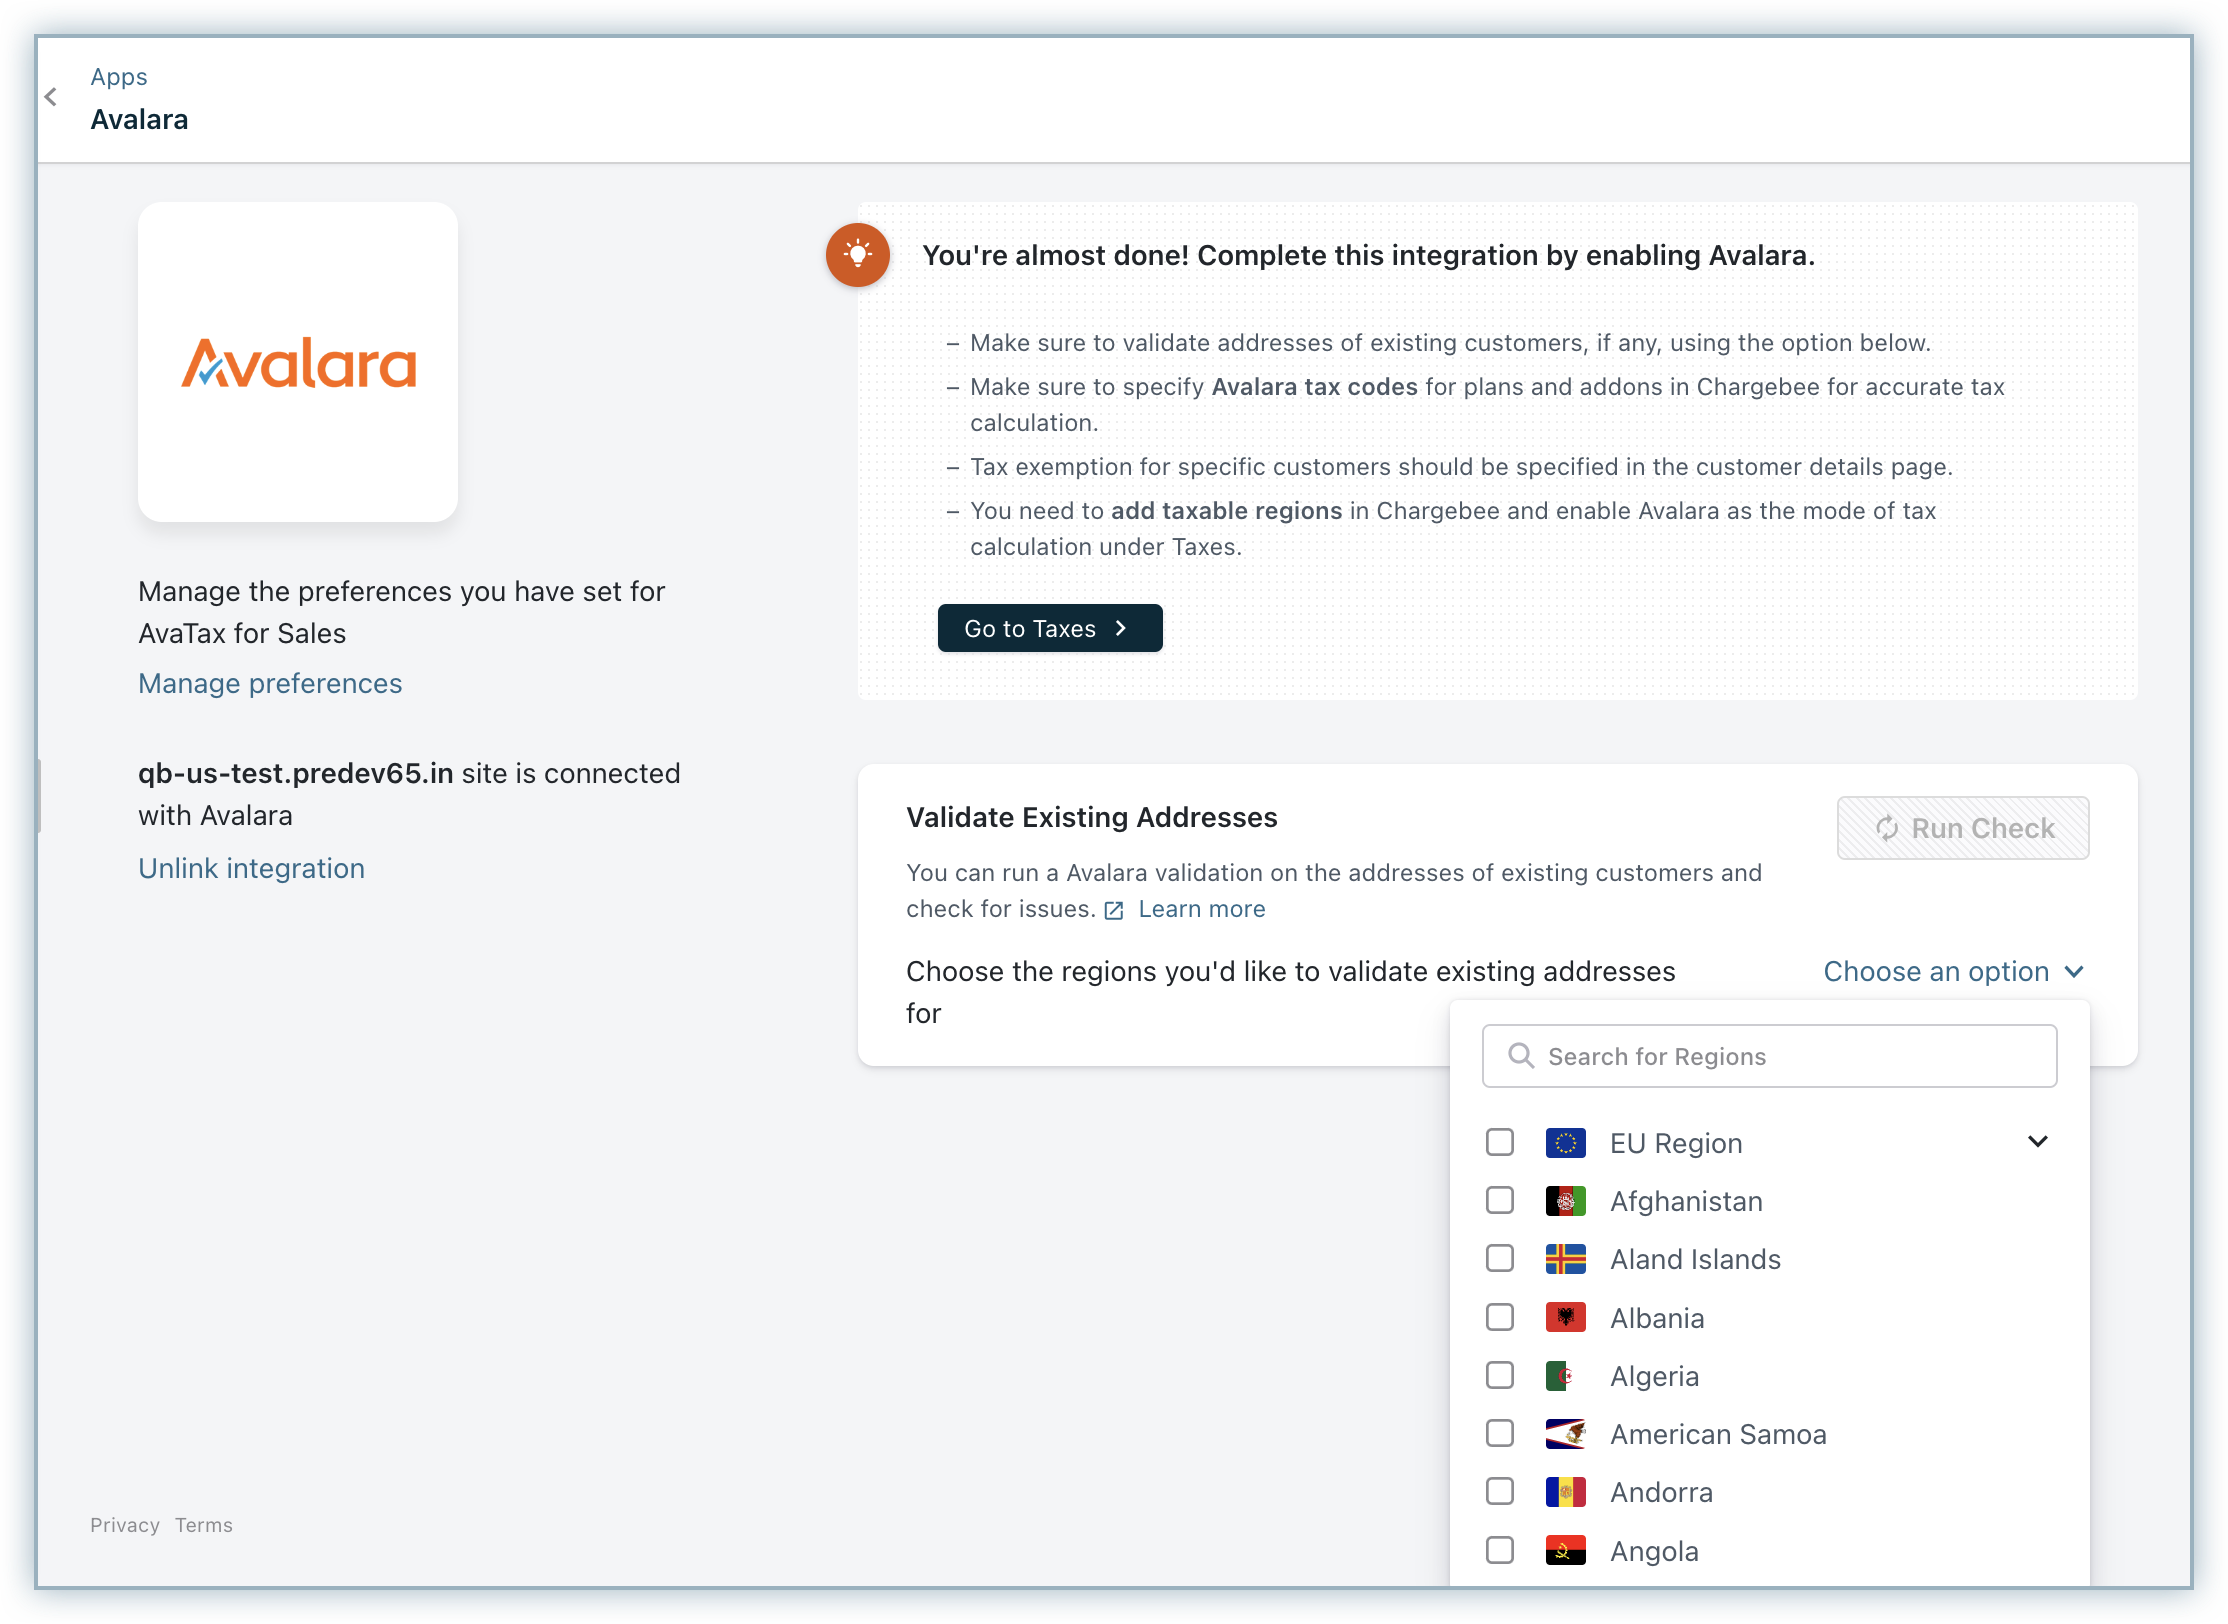
During the first ever check that is run after the integration is configured, the tool will validate all the existing Subscriptions' taxable address. If the shipping address is present, then it will be used for the validation. If the shipping address is not present, then the billing address will be used instead. Subsequent checks for address validation will check only the addresses that are added after prior validation and not all the addresses. You can look for any possible address errors and have them fixed.
In order to validate the address, Chargebee will make a tax estimate call to check if the address is taxable. If the taxable address happens to be the Shipping Address and if Avalara's Shipping Address Validation is enabled, an additional check will be made to validate the complete address.
Step 3 : Configuring Tax Codes for your Plans and Addons
Avalara uses a tax codeto determine the tax rate for each product. Additionally, taxable, nontaxable, and, partially taxable products are automatically differentiated using tax codes.
After configuring Avalara for your Chargebee site, the Avalara Tax Code field is displayed for Plans, Addons, and Charges Price Points. You can add the corresponding tax codes using the Avalara tool.
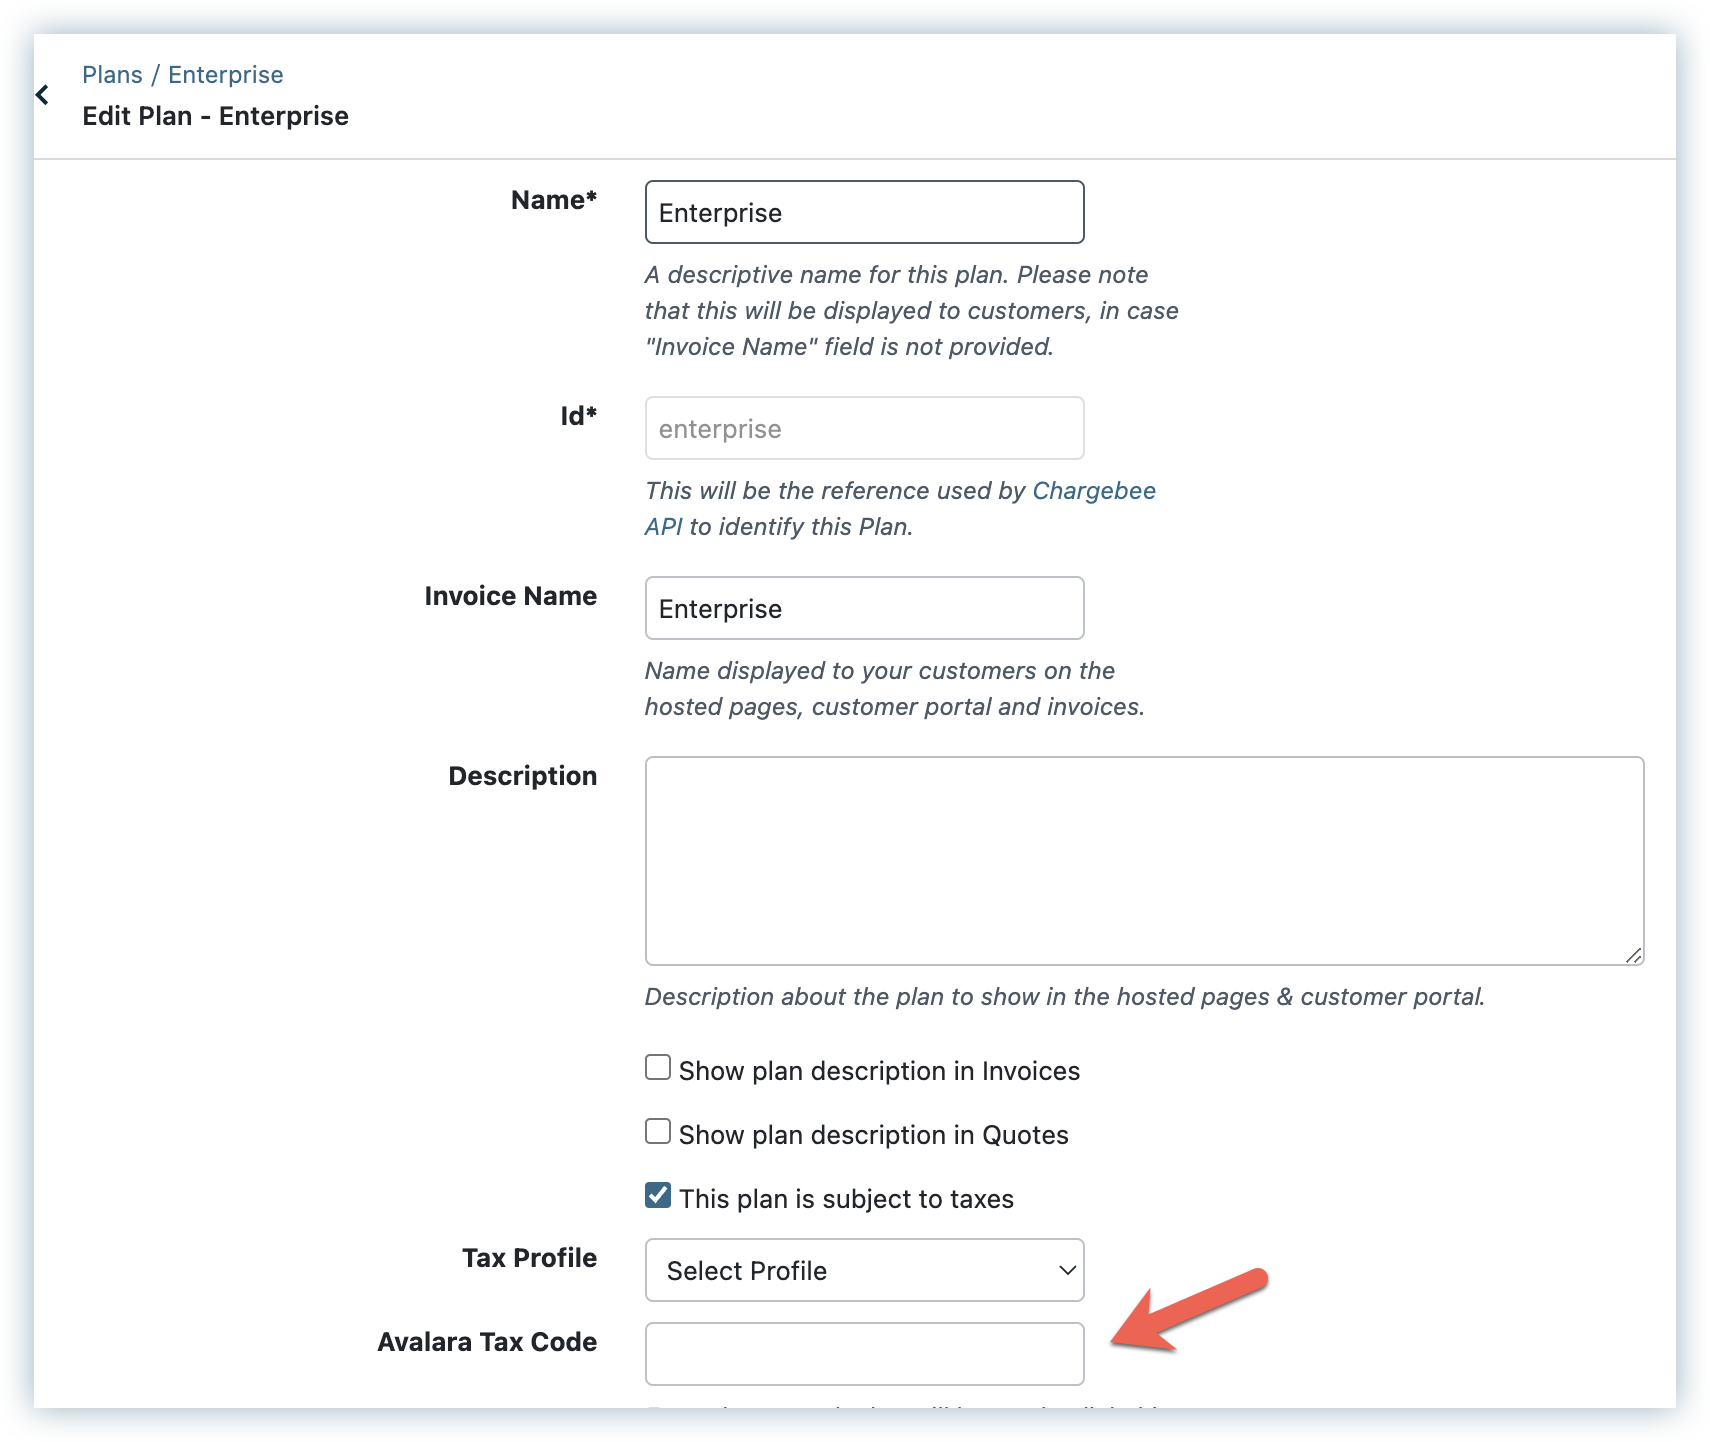
You may choose to configure tax codes on your Chargebee site or Avalara and the following guidelines apply:
Warning
It is essential that the Tax Codes configured in Avalara are the same codes allocated to your product catalog in Chargebee to ensure accurate tax calculation or exemption.
Chargebee
-
In the case of nontaxable products, a default tax code is used by Avalara if the tax code field is left blank.
-
All nontaxable products are assigned a default code (NT) automatically by Chargebee. Since a tax code is not required, the Avalara tax code field is not displayed.
-
For taxable products, if the Avalara Tax Code field is not filled in Chargebee, the default tax code will be used by Avalara for that product.
Avalara
-
While creating items in Avalara, ensure the Item ID in Avalara matches the product ID (Plan/Addon) in Chargebee.
-
Applicable tax code must be provided for each item created in Avalara.
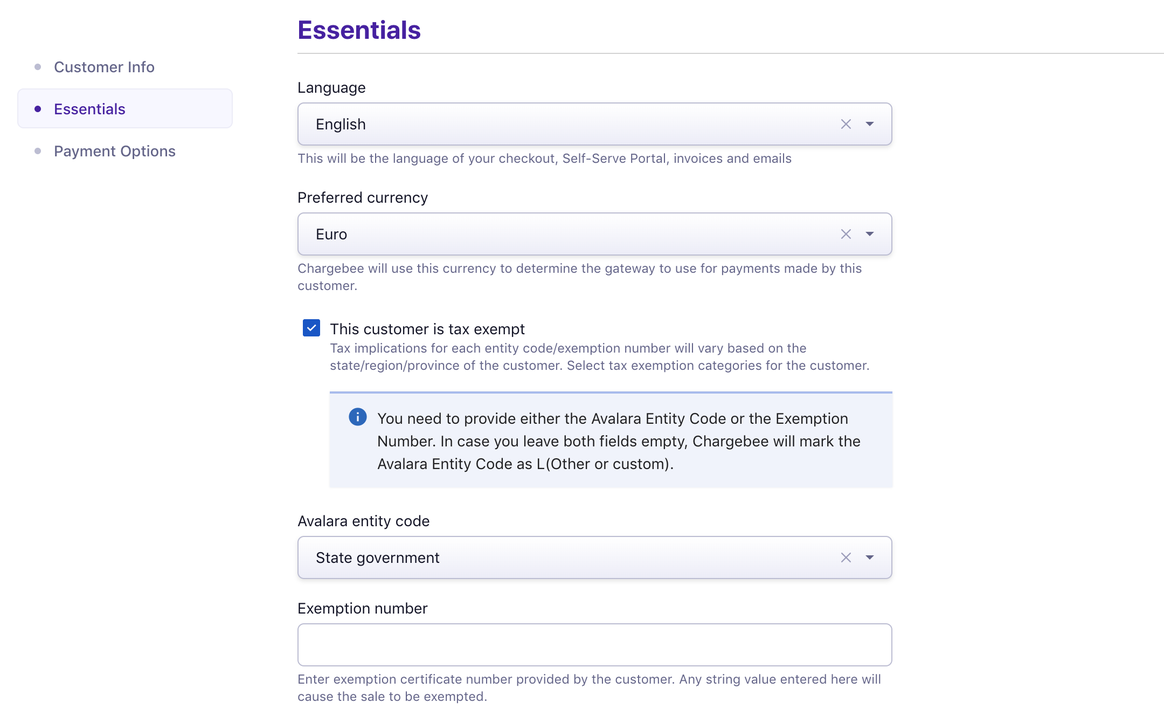
Step 4 : Configuring Customer Tax Exemption
If you'd like a particular customer to be exempted from tax, you could do so while creating the customer in Chargebee by:
- Enabling the option This customer is exempted from tax payment.
- Specifying the exemption reason using Avalara Entity Type or the Exemption Number field. If you don't provide either, then Chargebee will default the Avalara Entity Code to "Other or custom".
Note
- Tax exemption rules vary per US State and Territory/ Canada province, use codes to exempt customers in Avalara. Refer to this matrices for states and countries organized by business type and reason for exemption.
- A customer flagged as exempt from taxes (based on the Entity Code/Exemption Number provided) may be taxed in a state/province, but may not be taxed in another state.
- If Avalara returns taxes for a state/province, then Chargebee will apply the taxes in the invoice in this case, even though the customer is marked as exempt.
Shown below is the details page of a customer with the Avalara tax fields:
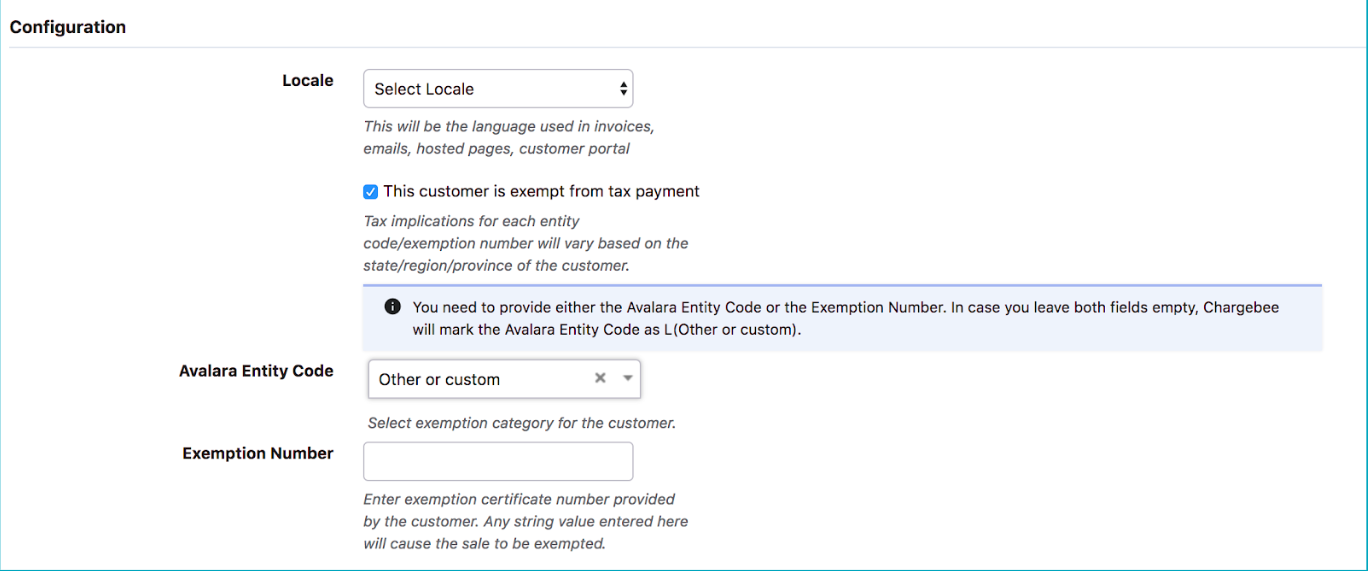
Classic UI users
The Avalara Entity Code option is displayed in Change customer details page as shown here:
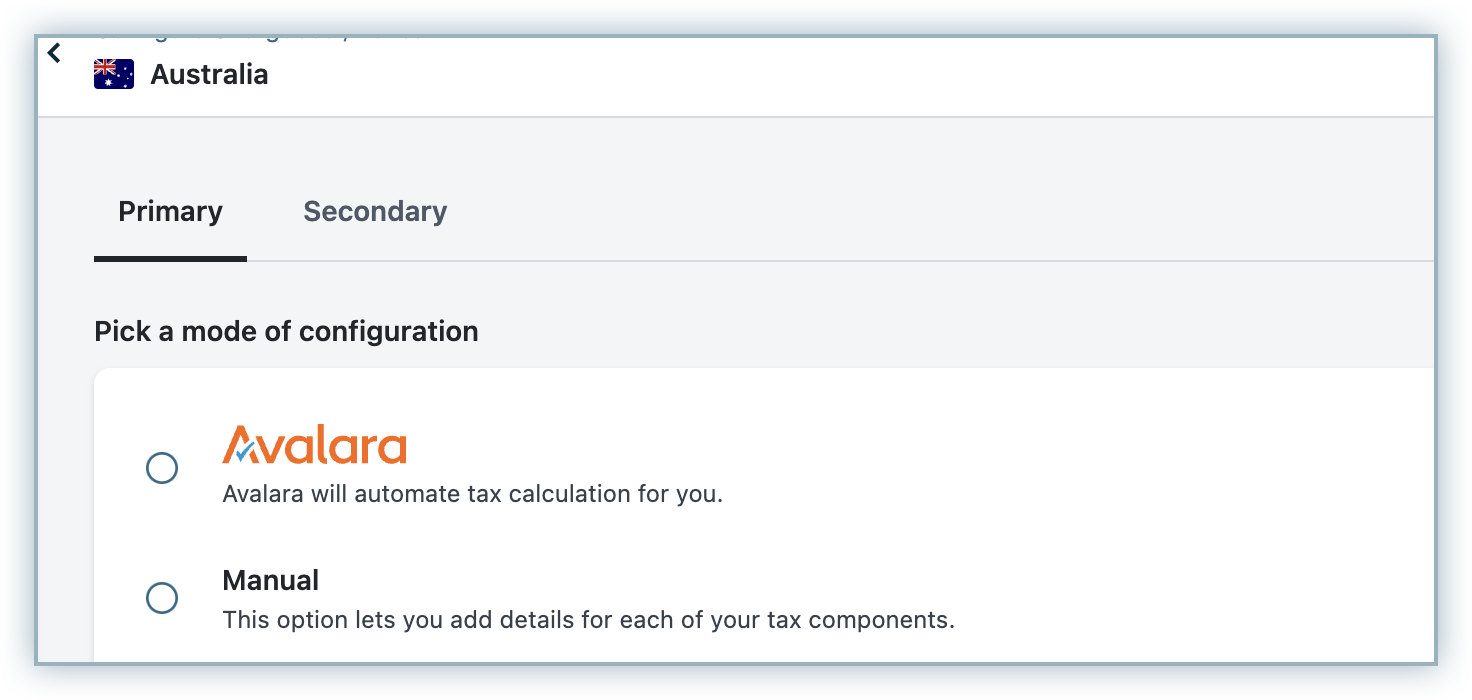
Step 5 : Enabling Avalara as your Mode of Tax calculation
This is the final yet most important step in the integration. Unless you execute this step, Avalara will not be used for automatic tax calculation in Chargebee.
After you are done with all the steps to configure your Chargebee site with Avalara, go to Settings > Configure Chargebee > Taxes. Go to the respective taxable regions and click Switch from the Avalara banner, to choose Avalara as your preferred mode of tax calculation.
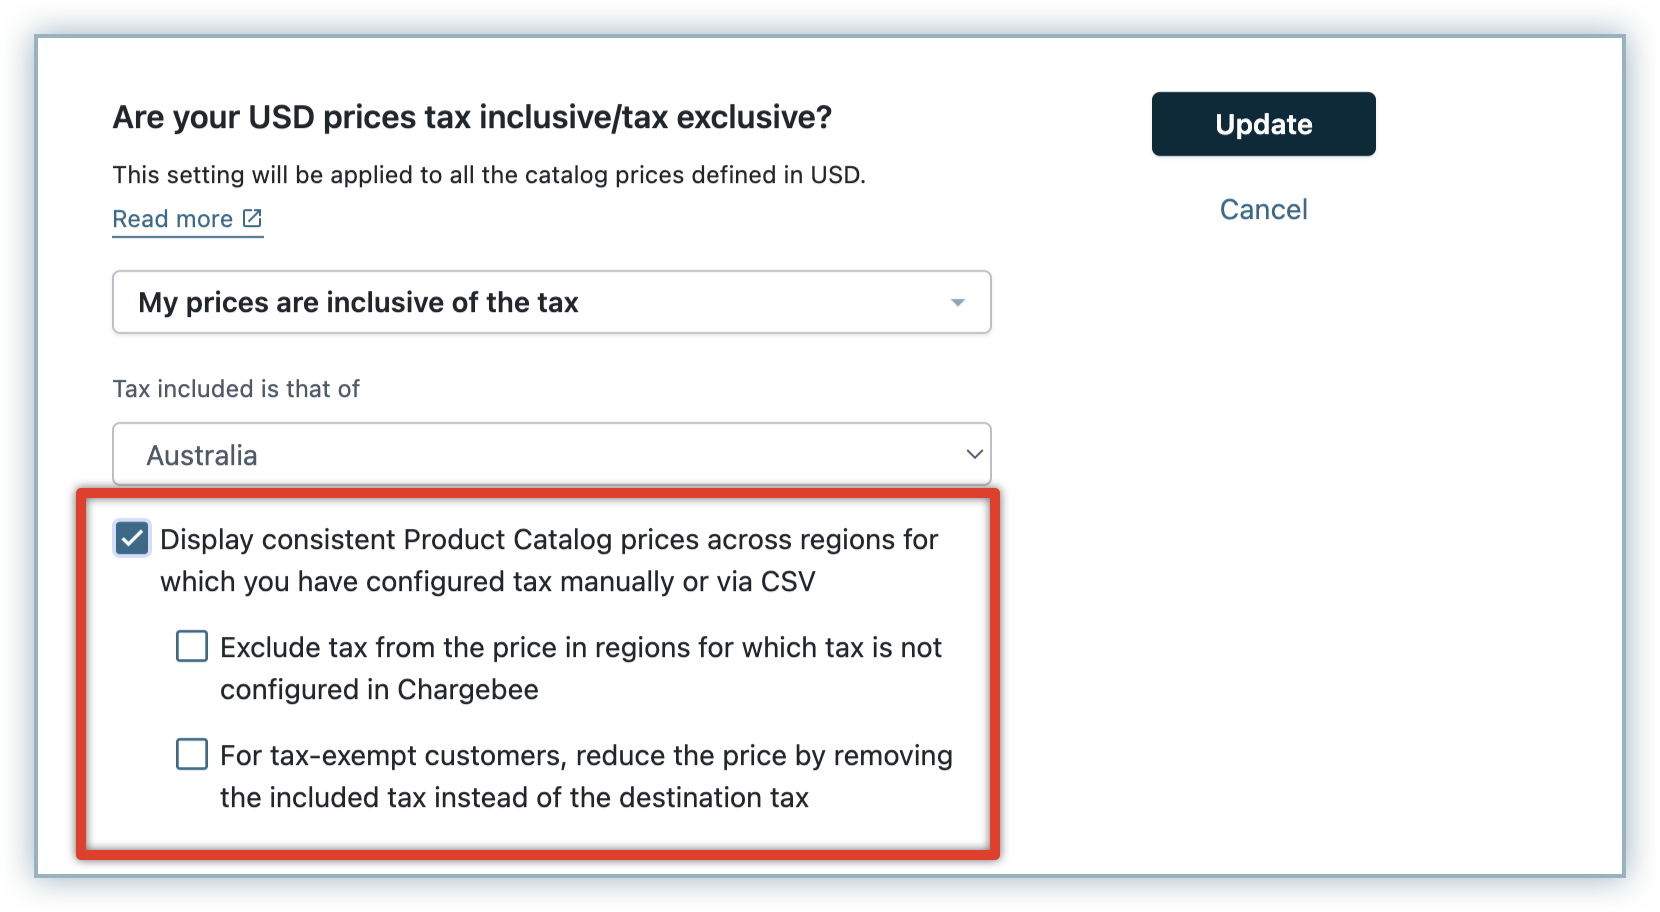
- Avalara supports both exclusive and inclusive price types for catalog price of currencies and for regions.
- If you are using consistent pricing for tax inclusive price type, you can enable consistent pricing in regions for which Avalara is configured. While a consistent rate is charged for your product or service, Avalara calculates the tax included from the catalog price for these regions.
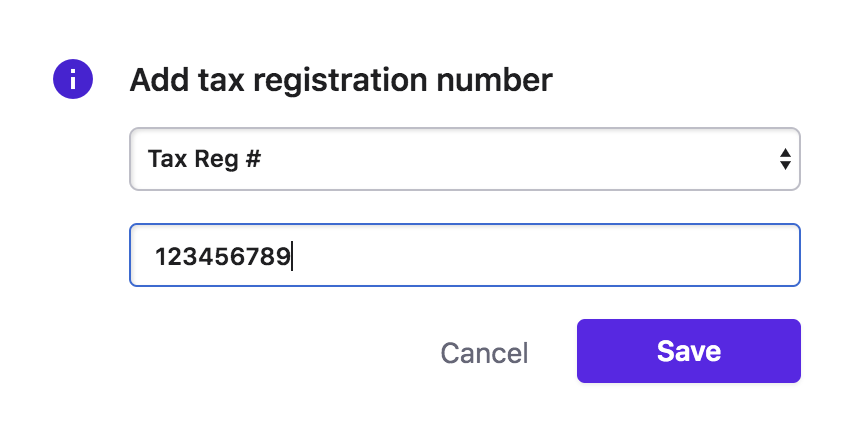
Enabling Avalara as your Mode of Tax Calculation for EU region : While you are enabling Avalara as your preferred mode of tax calculation for EU region, you will be prompted that the Tax Registration Number specified will be displayed on your customers' Invoices.
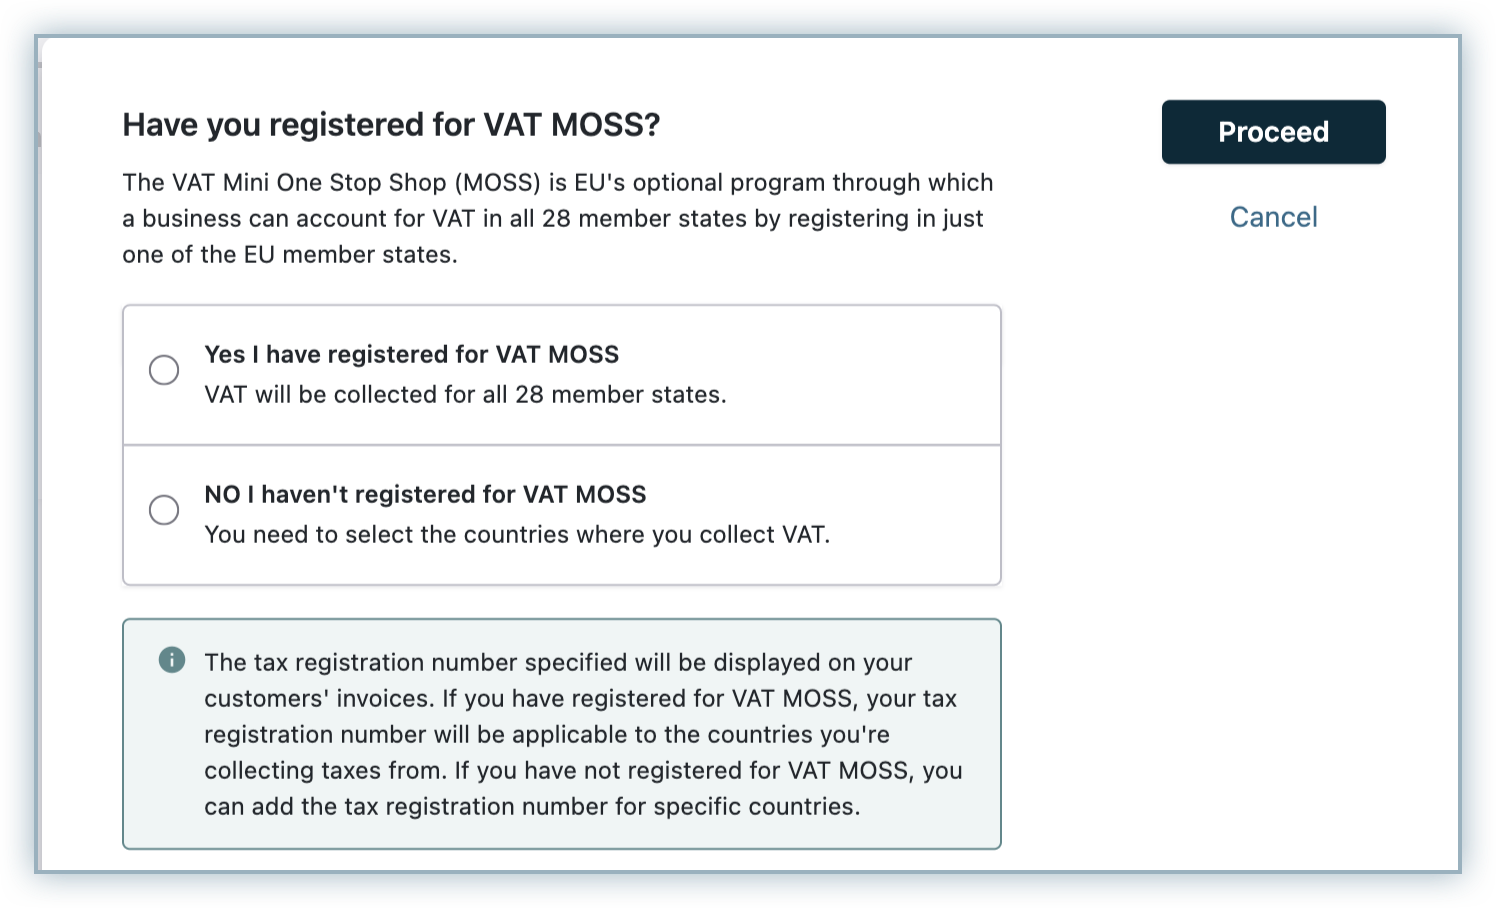
If you have registered for VAT MOSS, you can enter your registration details and click Proceed. You can even add tax registration numbers for specific countries if required.
If you have not registered for VAT MOSS, you will be prompted to add tax registration numbers manually, for countries where you have registered for VAT.
Enabling Avalara as your Mode of Tax Calculation for Indian GST :
While you are enabling Avalara as your preferred mode of tax calculation for India, ensure that you add the HSN(India Harmonized System of Nomenclature) Codes for all your plans, addons, and charges. To add HSN code for a plan, follow these steps:
-
Click Plans > Create/Edit Plan.
-
On the Plan details page, specify the plan details and enter the HSN Code for the plan.

-
Click Save.
Similarly, you can add the HSN code for addons while creating or editing the record.
The appropriate tax rate gets applied for subscription invoices based on the associated plan or addon's HSN code. In the absence of an HSN code, Avalara applies the default tax rate of 18% on the invoices.
While enabling Avalara as your preferred mode of tax calculation, click Add tax registration number to add your tax registration numbers / Goods and Service Tax Identification Numbers (GSTIN) for the individual states in which your business is domiciled.
Avalara Address Validation
You can use Avalara's Shipping Address Validation (for example Street Address) for a more accurate tax calculation. This is especially useful if your business involves delivering physical goods. A valid street address would mean lesser goods returning to you. The Shipping Address will be validated for every "Add/Update Shipping Address" operation. When this option is enabled, the customer's shipping address is checked, if the address is invalid, an error is generated. The customer will then have to edit the address before completing the sign up process.
Allow Customer to sign-up with/update Partially Valid Address
If the address is incomplete but Avalara is still able to return the tax rate, then this address is considered as a partially valid address.
The "Allow Customer to sign-up with/update Partially Valid Address" option has been provided to ensure that your sign up are not affected due to invalid street addresses. If this option is enabled, Chargebee will allow partially valid addresses during checkout. These will be marked as ‘partially valid' in your Chargebee site. You can then filter the addresses from the web interface, and contact the customers to receive the correct address details.
Note
- The address validation check for existing customers has to be done before going live with Avalara.
- Once an address is validated and its validation status has been set, the address will be ignored during subsequent checks.
- If you're collecting the Billing Address from your customer, the billing address will be marked as partially valid/invalid.
- The addresses for sign ups that occur after validation and before enabling tax might get through without validation/might surpass the validation check.
Validation Status
The possible address validation statuses are:
-
Not Validated: No validation check has been done. As default, all addresses will be marked as not validated.
-
Valid: Avalara address validation is successful.
-
Partially Valid: Address validation was not successful but essential fields for tax calculation are present. The error message Avalara address validation has failed will be displayed.
| Valid Address | Partially Valid Address |
|---|---|
| 340 S, Lemon Ave #1537, Walnut, 91789 California, United States | 340 S Avenue #1537, Walnut, 91789 California, United States |
- Invalid: Address validation was not successful and tax could not be calculated. The error message Tax cannot be computed for this address will be displayed.
| Valid Address | Invalid Address |
|---|---|
| 340 S, Lemon Ave #1537, Walnut, 91789 California, United States | 340 S Avenue #1537, Walnut, 08999 California, United States |
Automatic Retries for Renewals and Activations
When Avalara Credentials are invalid
Chargebee will notify you via email if the Avalara credentials are invalid, and will prevent sign ups.
Chargebee will set off retry attempts for renewals and activation as follows:
| Retry | Time |
|---|---|
| 1 | 20 hours after the initial failure |
| 2 | 40 hours after the previous retry |
| 3 | 60 hours after the previous retry |
When Avalara's server is down
If Avalara's server goes down, Chargebee will prevent sign ups, and will set off retry attempts for renewals and activations as follows:
| Retry | Time |
|---|---|
| 1 | 30 minutes after the initial failure |
| 2 | 60 minutes after the previous retry |
| 3 | 120 minutes after the previous retry |
You can check Avalara's status.
Handling Refunds Made Through Chargebee
When a payment is refunded to the customer, Chargebee will create a Credit Note for the refunded amount. This Credit Note will then be pushed to Avalara and be displayed as a "Returned Amount".
Handling Deleted/Voided Invoices
When an invoice is voided/deleted in Chargebee, it's status will be marked accordingly in Avalara. However, going forward (from October 2019), when an invoice is voided/deleted in Chargebee, it will be voided and never deleted in Avalara.
Things to check before you start using the Avalara integration
Here's a checklist you could use to integrate Avalara with your Chargebee site:
- Ensure that your site's Organization address is filled out accurately in both Avalara and Chargebee.
- If you're using Hosted Pages, ensure that the shipping/billing address field has been enabled and the Zip Code, Country, and State fields are made mandatory.
- Configure Nexus jurisdictions in your Avalara AvaTax account.
- If you're an API user, ensure that the address is passed in the estimate API only if you want tax to be calculated. If the address is present, you will be charged for the tax estimate lookup.
- Test the integration in your sandbox site.
- Enable Avalara for your Chargebee live site.
Managing API Calls to Avalara
Note
This feature is available and applicable only for the US and Canada regions.
You can optionally use the Manage API Calls to Avalara and limit the API calls to Avalara application for customers of only those states where you have nexus. By default, the Chargebee application makes API calls to Avalara for customers of all states, whether or not you have nexus in all of them to:
- Fetch tax rates for invoices created in Chargebee application.
- Sync invoices and credit notes from Chargebee application to Avalara.
Your Avalara payable is calculated based on the number of API calls made by Chargebee and it can be optimized by managing API calls to Avalara. Here's how you can do it :
- Click Settings > Configure Chargebee > Taxes > United States/Canada.
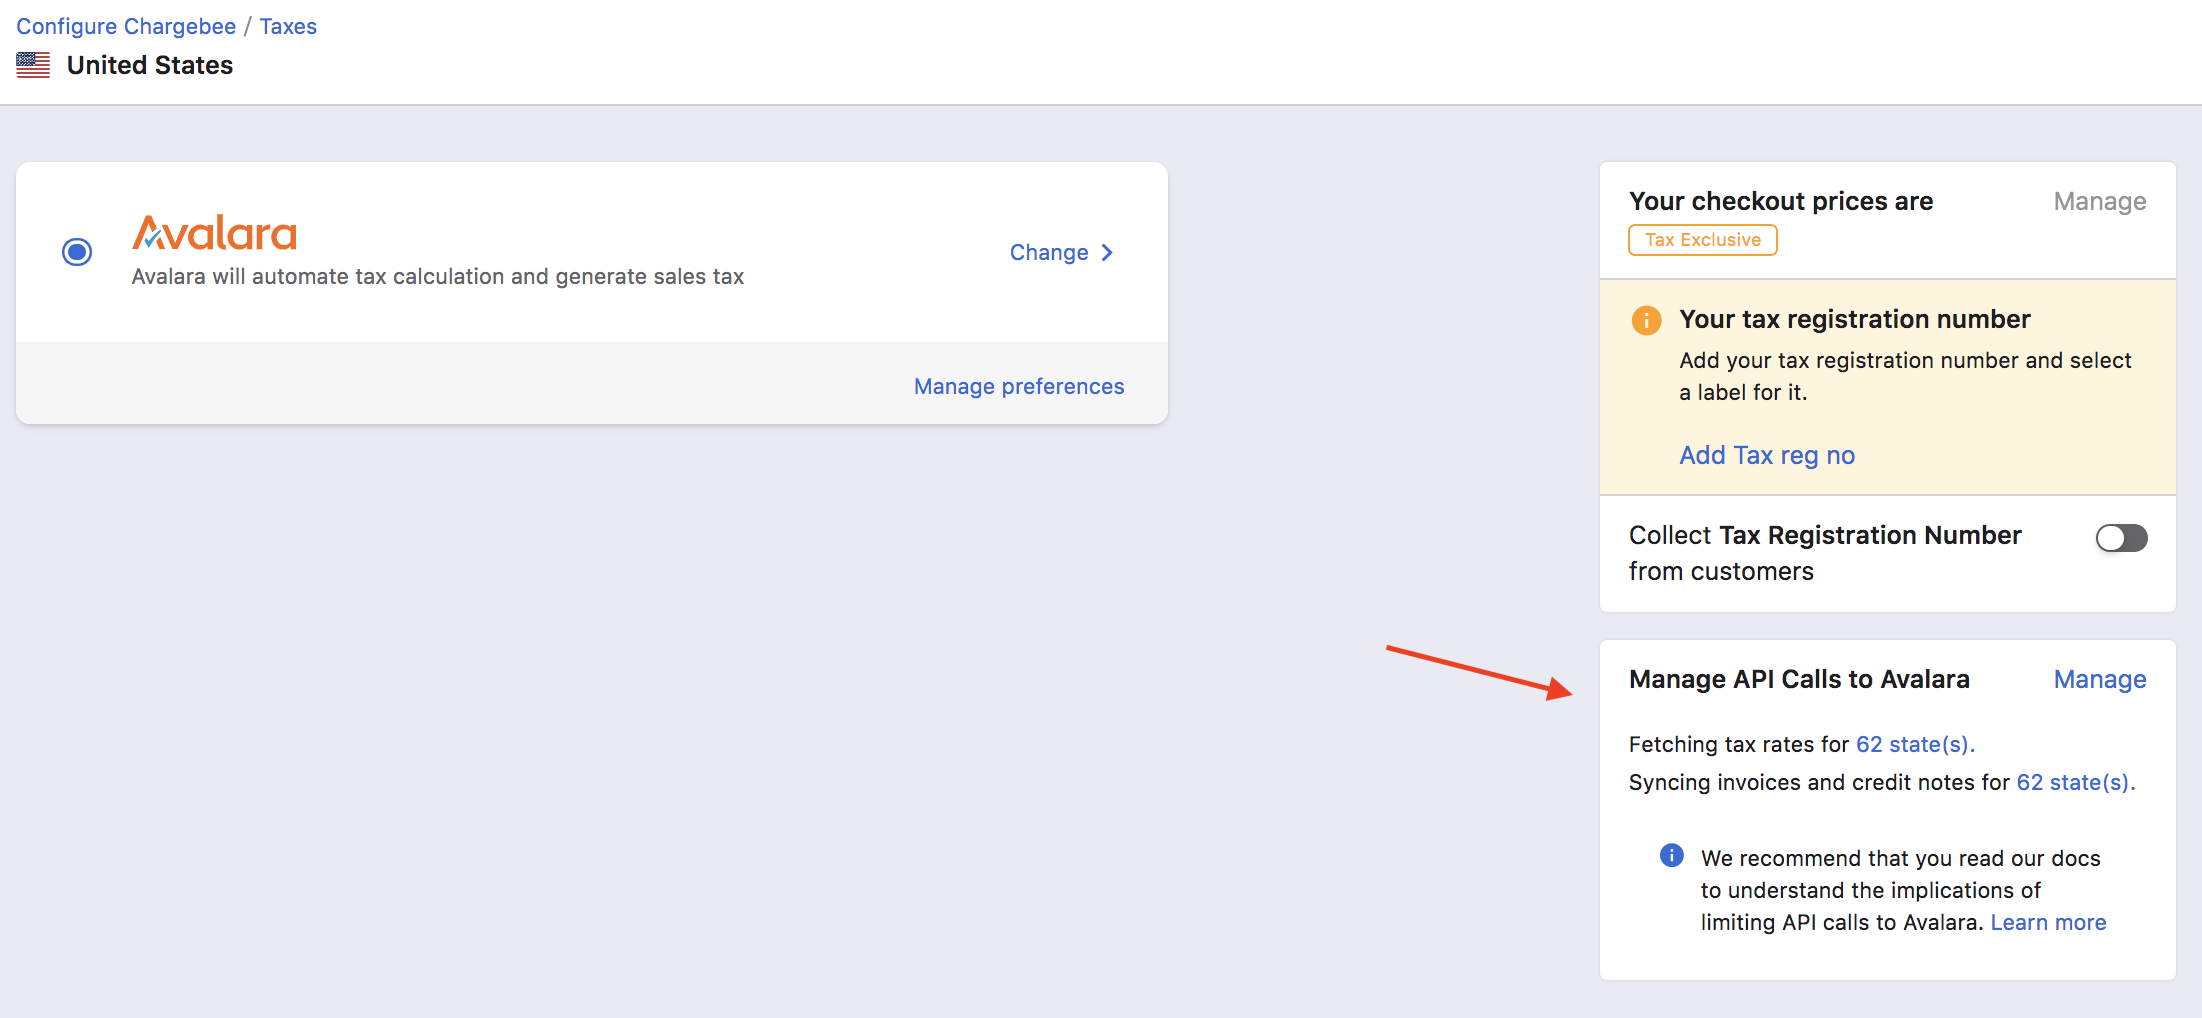
-
Click Manage in the Manage API Calls to Avalara section.
-
By default, all the states will be selected for fetching tax, and syncing invoices and credit notes. Unselect all, and then select states for which you'd like to make API calls to Avalara.
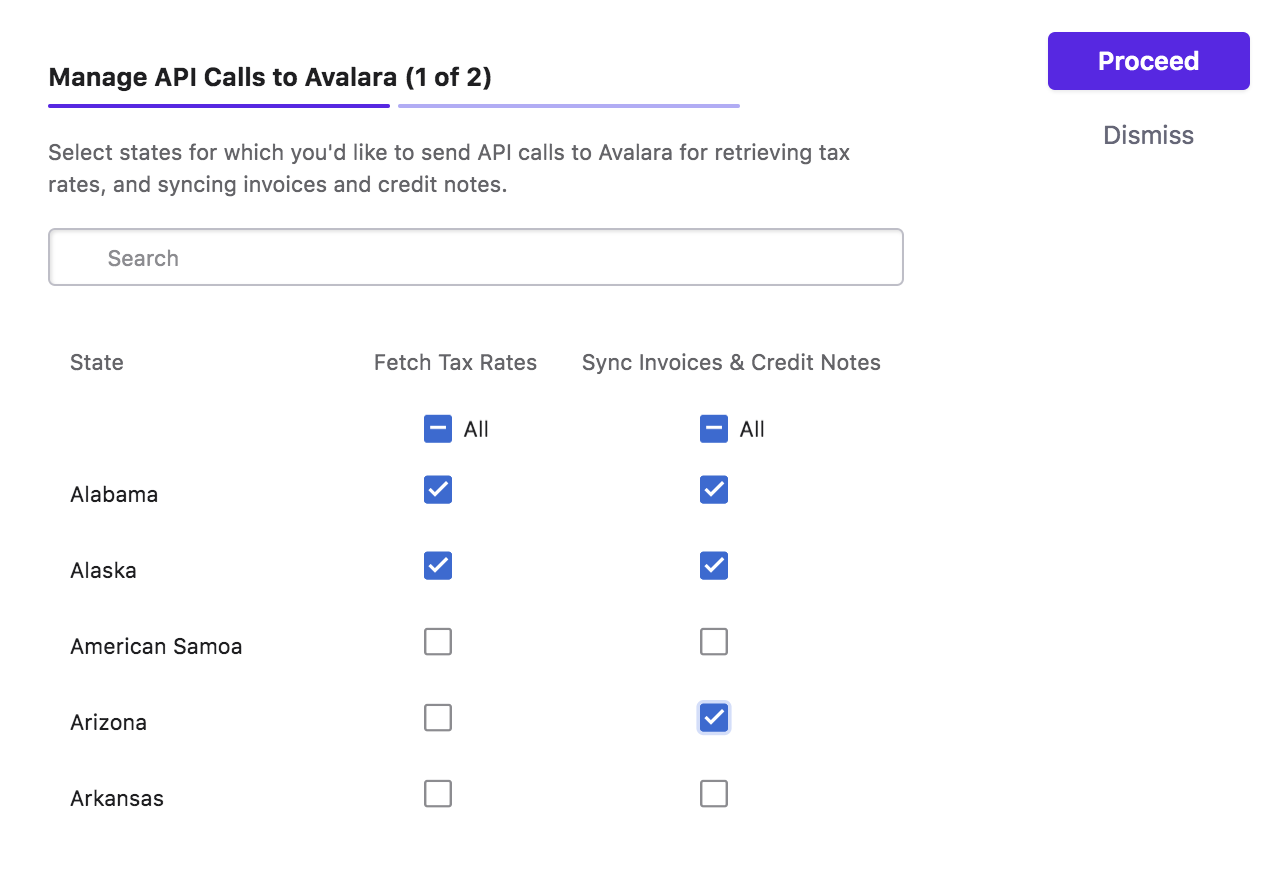
You can select states for fetching tax and syncing invoices and credits notes individually. For example, though you might not be currently liable to collect and remit sales tax in a particular state in the US, it is advised to sync your invoices and credits notes for the state. This will help you to track your economic nexus in Avalara.
-
Click Proceed.
Caution! Any changes that you make in your Avalara account do not reflect in Chargebee automatically. If you add a new state under Where you collect and pay tax in your Avalara account, you have to update the state selection in the Chargebee application by following the above steps.
For example, if you have configured nexus for Alaska and Alabama in Avalara, but you have only selected Alaska in Chargebee for API calls, Chargebee will not contact Avalara for Alabama customers. Chargebee will not include tax rates for invoices of Alabama. On the other hand, configuring more states in Chargebee for API calls than those in Avalara does not impact your tax calculation, except for your Avalara payable.
Limitations
This integration has the following limitations:
-
The hosted pages theme "Rhapsody" does not support Avalara integration
-
When Avalara integration has been enabled (or disabled), the next billing amount is not recalculated for the existing subscriptions until the subscription is renewed or updated. This is to avoid the sudden surge of API calls that would be made to Avalara since Avalara charges are based on the number of API calls.
-
Enabling Invoice amount rounding in Chargebee will result in a total amount mismatch between Avalara and Chargebee.
-
While using third-party integrations for taxation in the EU region, note that the value for ‘isTaxed' field will be false in the invoices(unlike how it would be true with manual taxation) for reverse charge scenario, even when reverse charges are applied in the invoice as applicable.
-
Chargebee's integration with Avalara does not support tax calculations for Brazil.
Unlink Avalara Integration
If you ever want to unlink the Avalara integration from your Chargebee account,
- Go to Settings > Configure Chargebee > Taxes and switch from Avalara to your preferred mode of tax calculation from all the regions where you have chosen Avalara by clicking Change.
- Next, go to Apps > Go to Marketplace > Tax Management > Avalara and click Unlink integration.
Articles & FAQs
Was this article helpful?