Google Play Store Notifications
After successful Chargebee API integration, new subscriptions will be synced to Chargebee from Google Play Store. To maintain any changes to the status of a subscription, it is important to set up Chargebee to receive notifications from Google. We will now guide you through the process of configuring Chargebee to receive notifications from Google publishing APIs.
The status of a subscription may change based on customer actions and the change must be effectively captured on your Chargebee site too. This can be accomplished by enabling real-time notifications via Google Real-Time Developer Notifications (RTDN) to Chargebee.
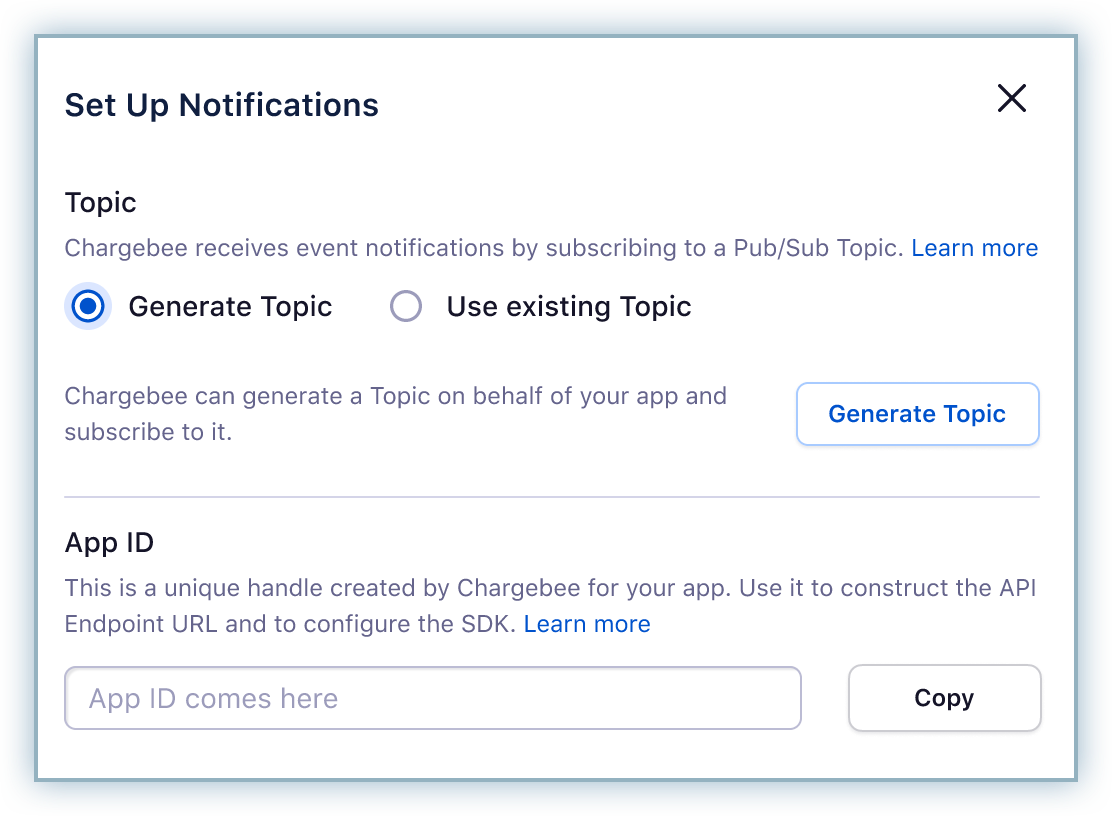
You must configure a Topic id for Chargebee to receive notifications from Google publishing APIs. Click here for more information about Topics.
This can be achieved using one of the following options:
- Allow Chargebee to generate a Topic ID to receive notifications.
- Configure an existing Pub/Sub Topic.
Note
Irrespective of which option you choose, you must ensure the following:
- Pub/Sub API is enabled for your project within Google Cloud Platform. Read more here.
- The service account has pub/sub-admin access to the project associated with the topic id in Google Cloud Platform. Refer here for additional information.
- Chargebee can subscribe to only one topic at a time to receive notifications from the Google Play Store. This topic can either be linked to the test or live site of Chargebee. Therefore, we recommend you to complete the testing on the test site first and then configure the topic ID for the live site.
Generation of a Topic ID
You can choose from the following options:
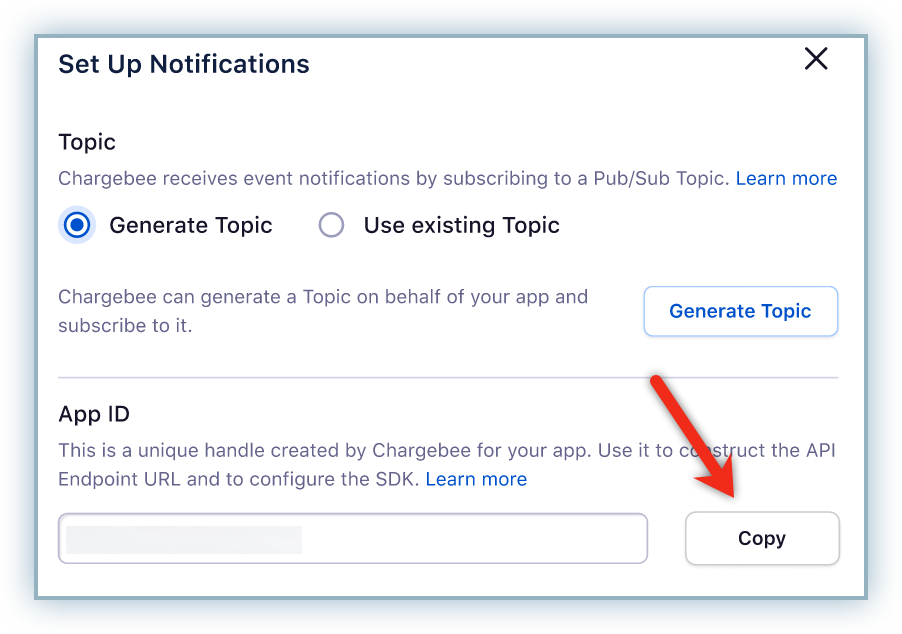
Allow Chargebee to Generate Topic ID
Note
- This is the recommended option as it is easy to configure and avoids discrepancies between the topic id configured in Chargebee and Play Store.
- When subscribing to a topic ID generated / configured in Chargebee, the expiration period for this subscription is set to never expire. This ensures a continuous flow of notifications from the Google Play Store to Chargebee, regardless of extended periods of inactivity. Learn more about topic subscription properties in Google.
Follow the steps below to allow Chargebee to generate a Topic ID:
-
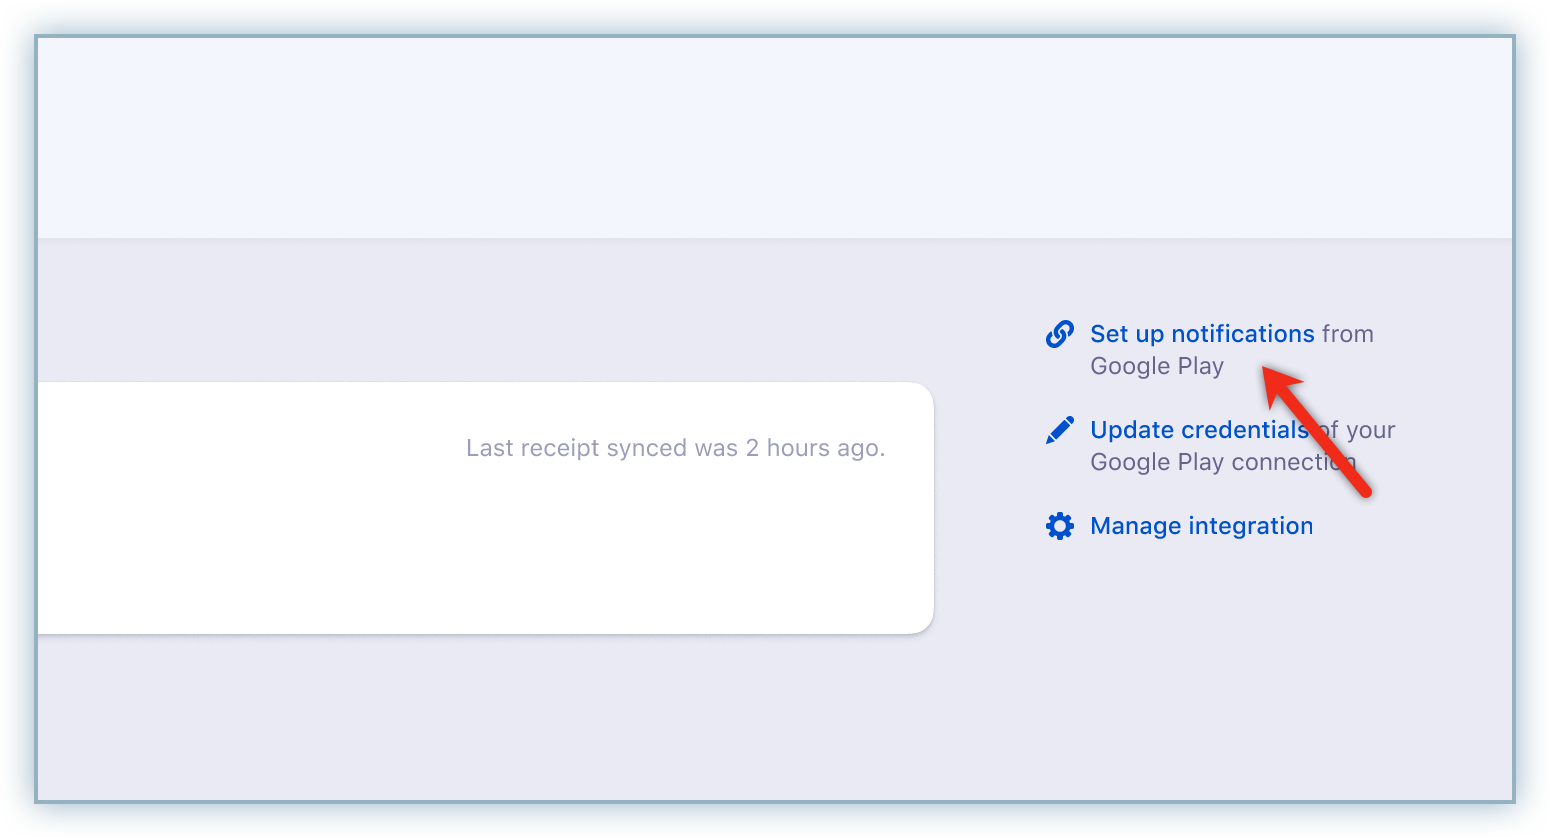
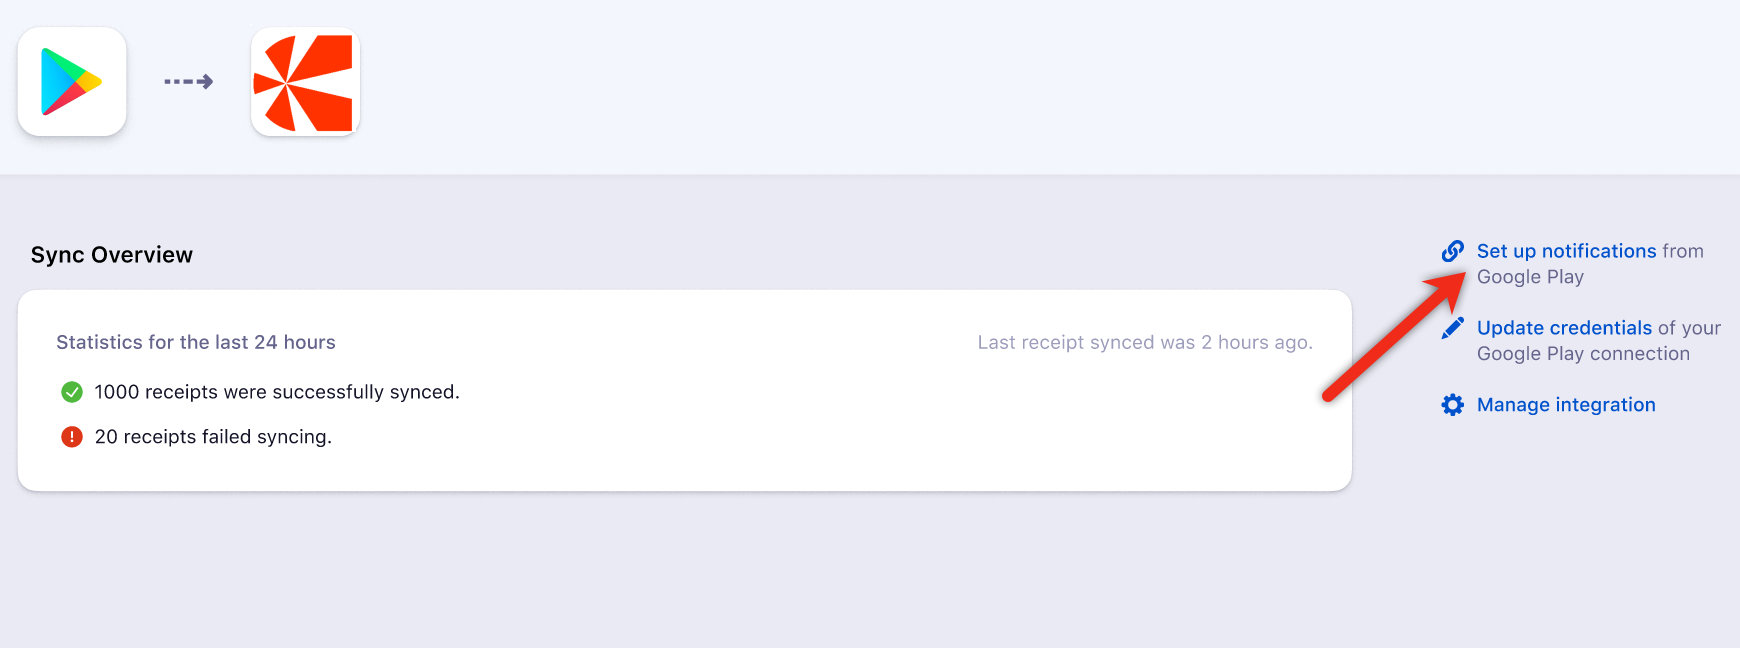
Login to your Chargebee site and click Settings > Third-Party Integrations.
-
Click Set up Notifications from the Overview page.
-
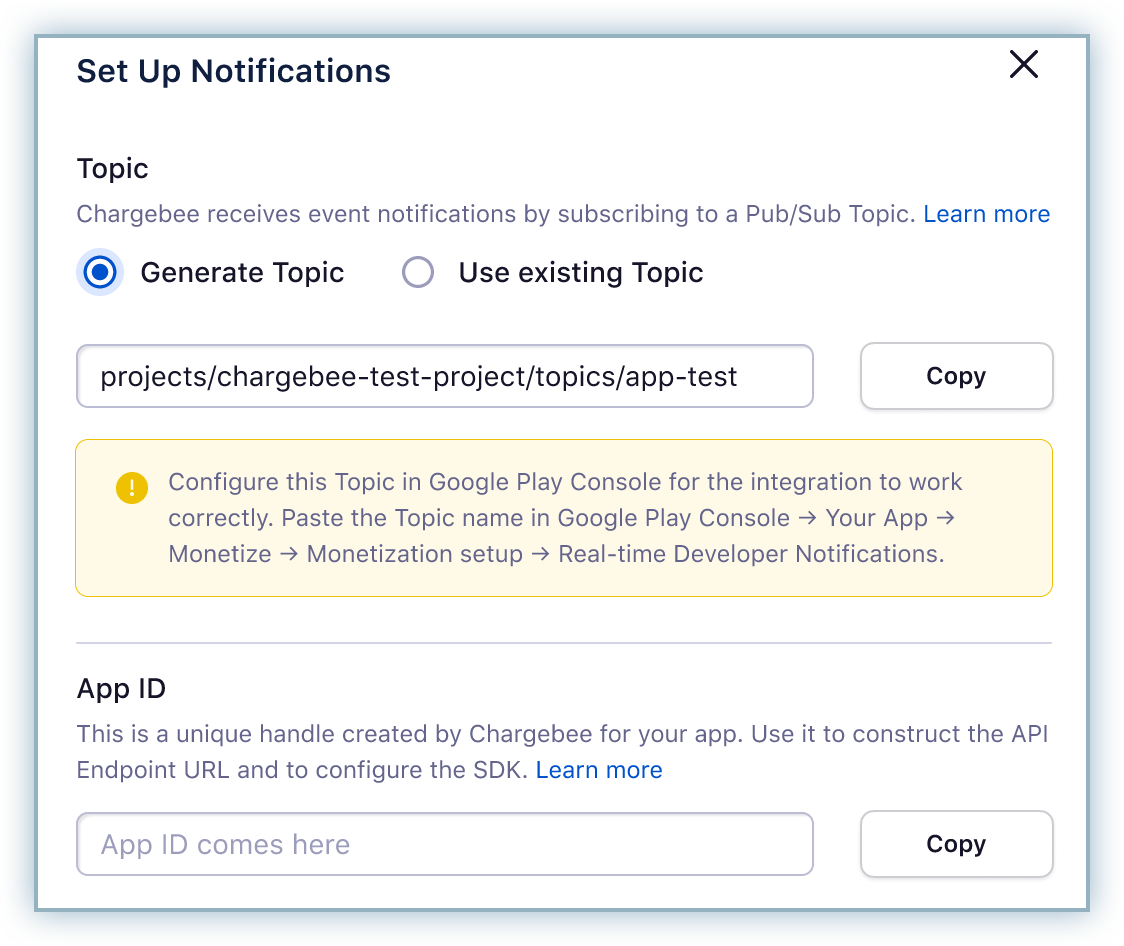
Click to select the Generate Topic radio button and click Generate Topic.
-
Upon completion, a Google Cloud Pub/Sub Topic ID is generated.
-
Click Copy to add the generated Topic ID to your clipboard.
-
Access your Google Play Console and select the applicable App.
-
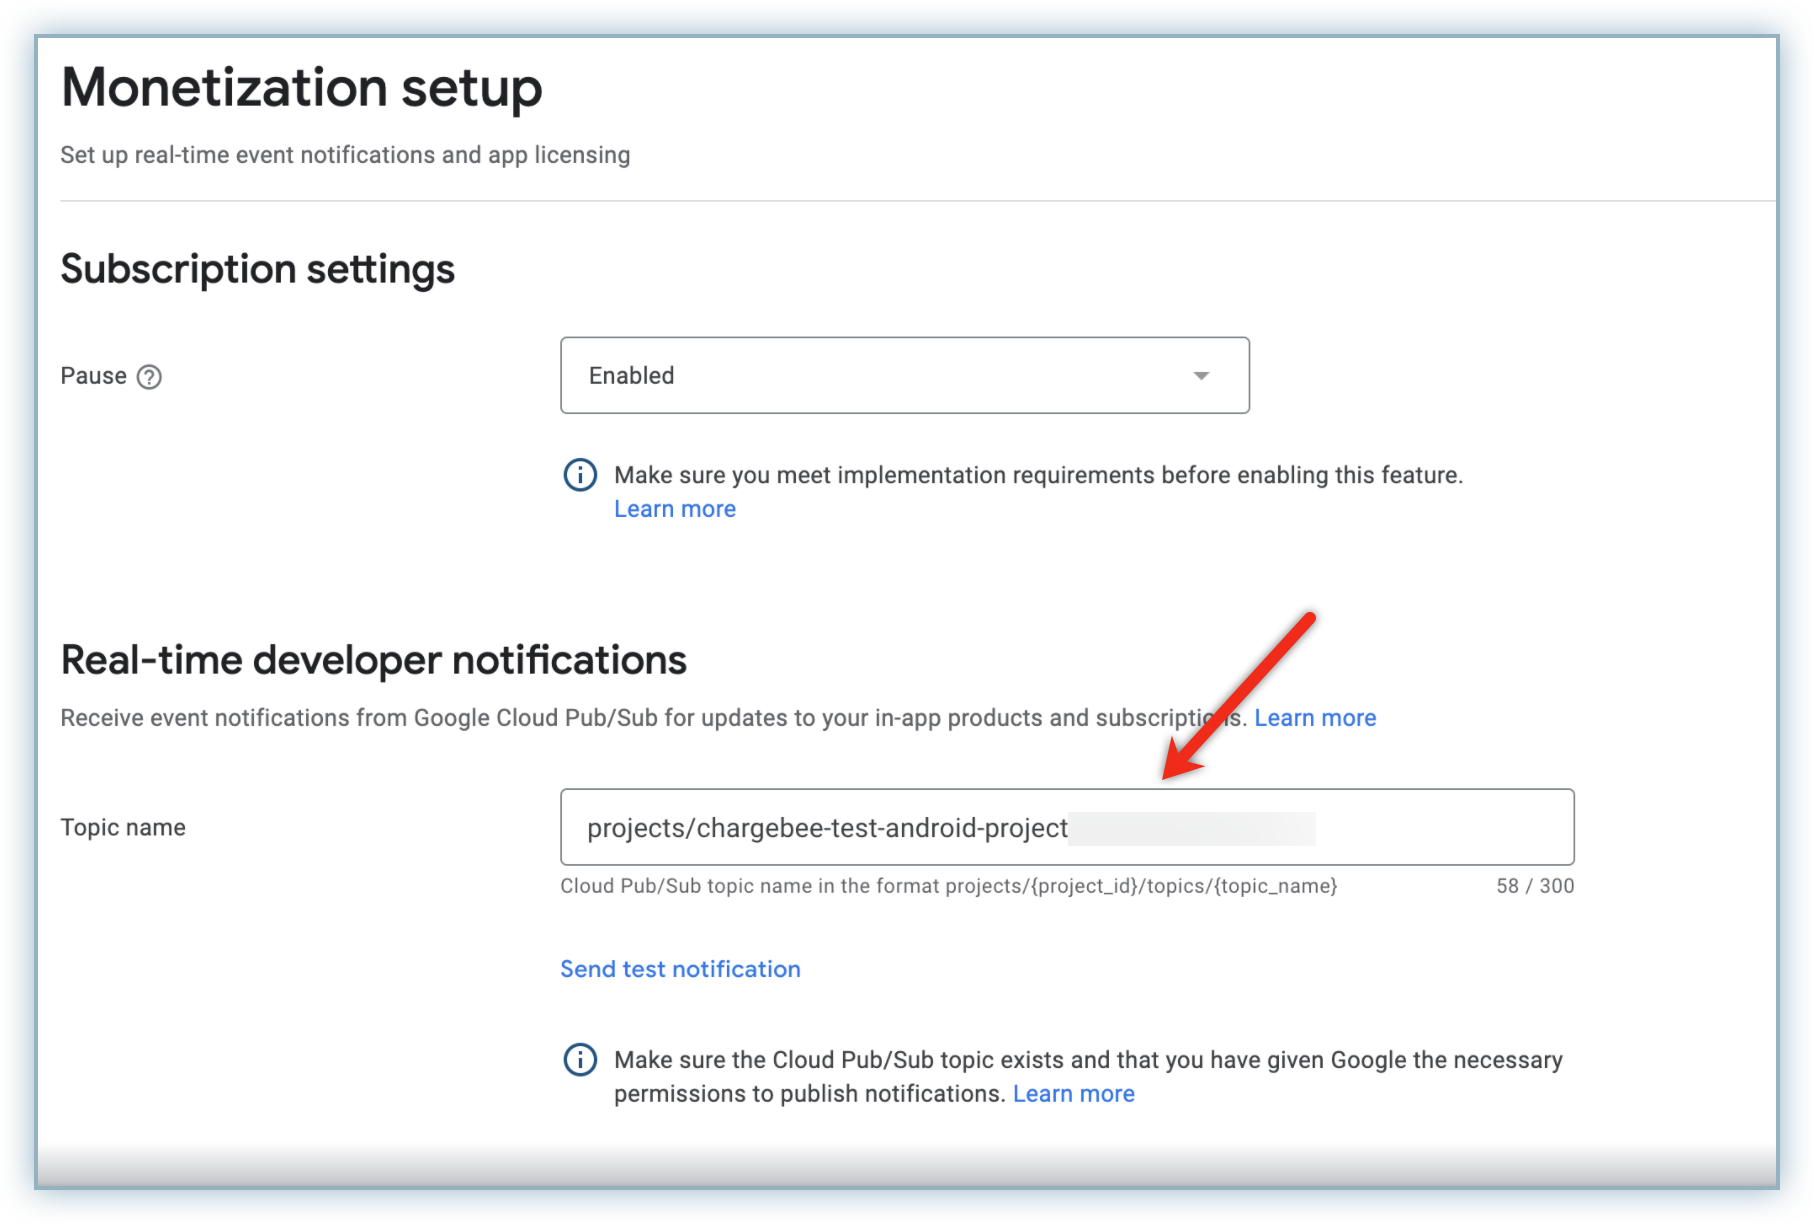
Navigate to Monetize → Monetization setup.
-
Paste the Topic ID in the Topic Name field in the Real-time developer notifications section.
-
Click Save and Send test Notification.
Note
- If the test-publish succeeds, a message displays stating that the test publish was successful.
- If the test-publish fails, review the error messages to rectify and retry. Contact support if you need additional assistance.
- You can configure only one topic under Monetization setup in Google Play Console; therefore, make sure to configure the topic ID generated by Chargebee's test site during the testing phase and replace the same with the topic ID generated by Chargebee's live site post testing.
- Chargebee subscribes to only one topic at a time. If you generate a topic from Chargebee's live site or decide to use an existing topic on live site then Google Play Store notifications will not be processed on Chargebee's test site.
- If you want to receive the notifications from Google Play Console at your backend server along with Chargebee, then make sure that you create a push subscription to the topic configured in Chargebee from Google Cloud. Learn more.
Configure an existing Pub/sub Topic ID
Follow the steps below to configure an existing Topic ID:
-
Access your Google Play Console and select the applicable App.
-
Navigate to Monetize → Monetization setup.
-
Copy the Topic ID in the Topic Name field in the Real-time developer notifications section.
-
Login to your Chargebee site and click Settings > Third-Party Integrations.
-
Click Set up Notifications from the Overview page.
-
Click to select the Use existing Topic radio button.
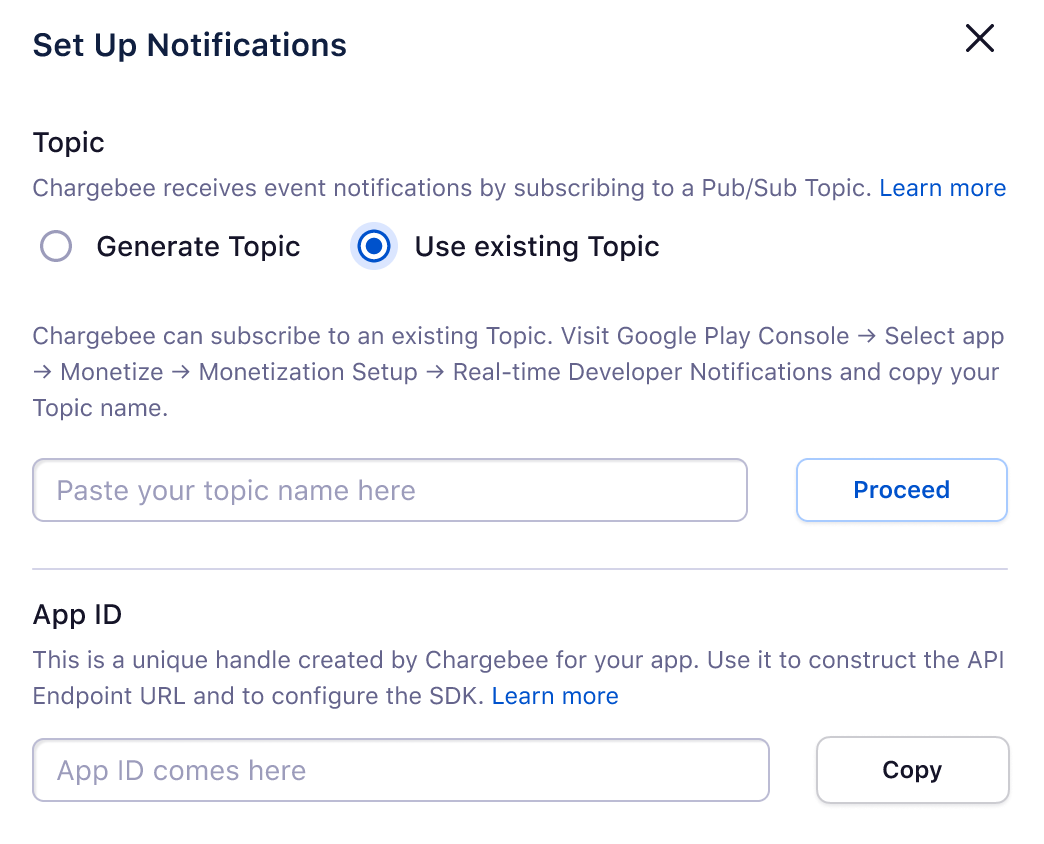
-
Paste the Topic ID from the Google Play Console in the Topic field and click Proceed.
-
Upon completion, Chargebee is subscribed to the Topic.
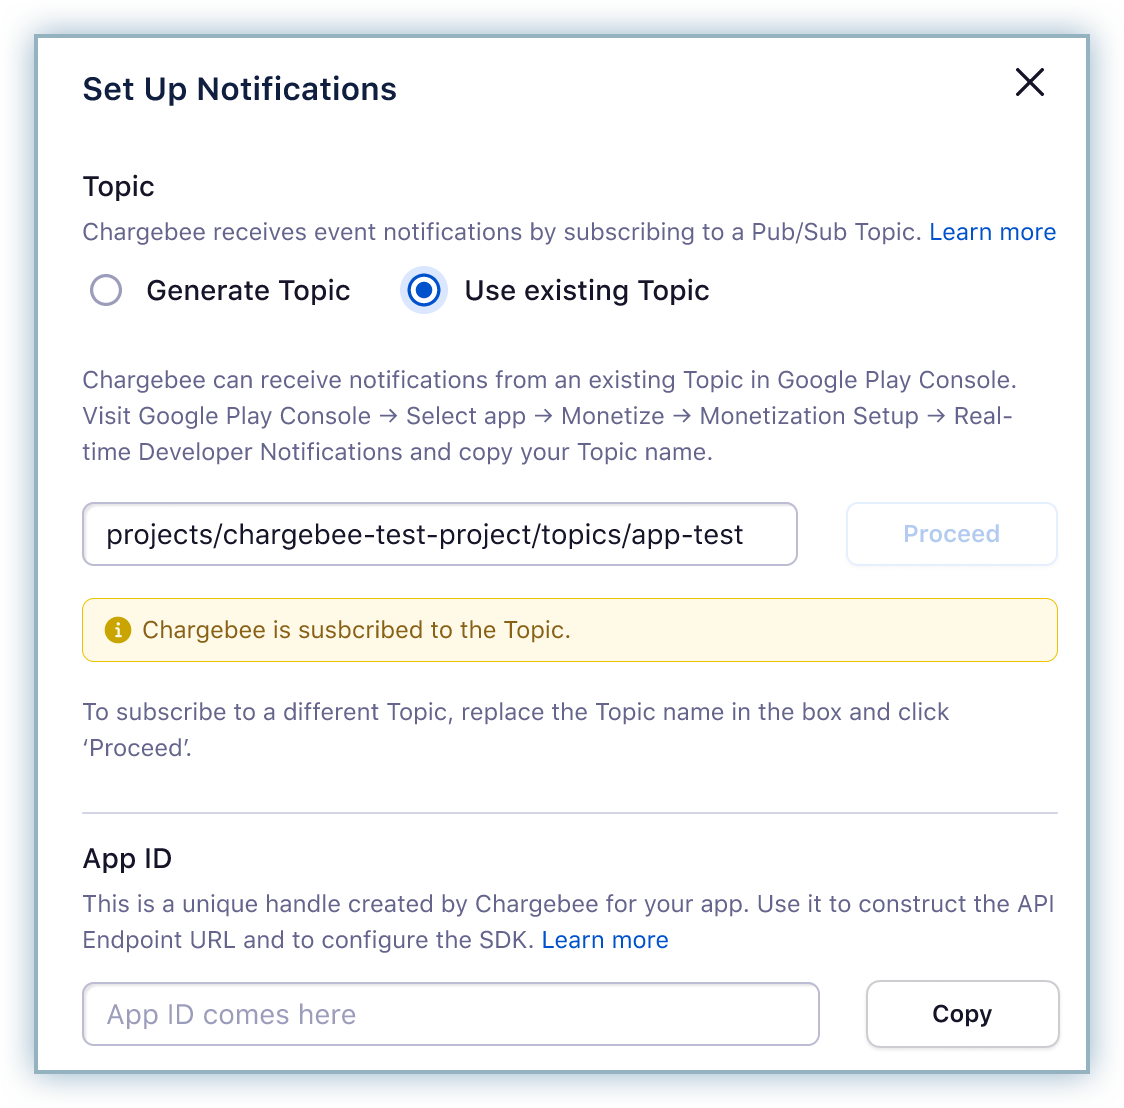
Note: Review the status of the subscription: Performing a test publish helps to ensure that everything is set up and configured properly.
- If the subscription to the topic is successful, Chargebee is set to receive notifications.
- If the subscription to the topic is unsuccessful, rectify the errors or contact support for additional assistance.
Update Topic ID
You can choose to update your subscription to the Topic ID at any time. This can be accomplished with the same steps as the first time setup. You need to choose between generating or using an existing topic with appropriate Pub/Sub admin roles assigned.
Error Management
You may encounter various errors while configuring notifications associated with Topic ID. Review the error messages and resolutions listed below:
Service Account Permissions
If you receive an error during the generation or configuration of an existing Topic ID, it is most likely due to inadequate permissions in the Service Accounts. Ensure that the service account has pub/sub admin & monitoring viewer permissions. Click here for assistance with configuring appropriate permissions to your Service Account on the Google Cloud Platform.
Validation Errors
Any validation errors while configuring an existing Topic ID is most likely due to a mismatch between the existing topic id configured in Chargebee and Google Cloud platform.
General Errors
If you encounter errors while creating or subscribing to a Topic ID not listed above, we recommend you retry the notification setup again. If the issue persists please contact [support.
App ID
The App ID is a unique identifier created for your Play Store application within Chargebee. This identifier is configured in the backend server of your app to create unique API endpoints which can be used extensively for completing API actions and to configure the SDK. Follow the steps below to retrieve this information:
-
Click Set up Notifications from the Sync Overview page.
-
Click Copy to add the App ID to your clipboard.
Additional Information
The following information provides you with additional assistance with your Google Cloud Console Project.
Create a Topic
Follow the steps below to set up the Pub/Sub access to your Google Cloud Console project:
-
Access Google Cloud Console and click Sign up to initiate the creation of a project if you don't have Google Cloud Access.
-
Specify the details required in the applicable fields and click Continue to proceed with the sign-up process.
-
Complete the contact number verification and create a payment profile to complete the setup of your Google Cloud account.
-
Review the details within the Google Cloud Dashboard.
-
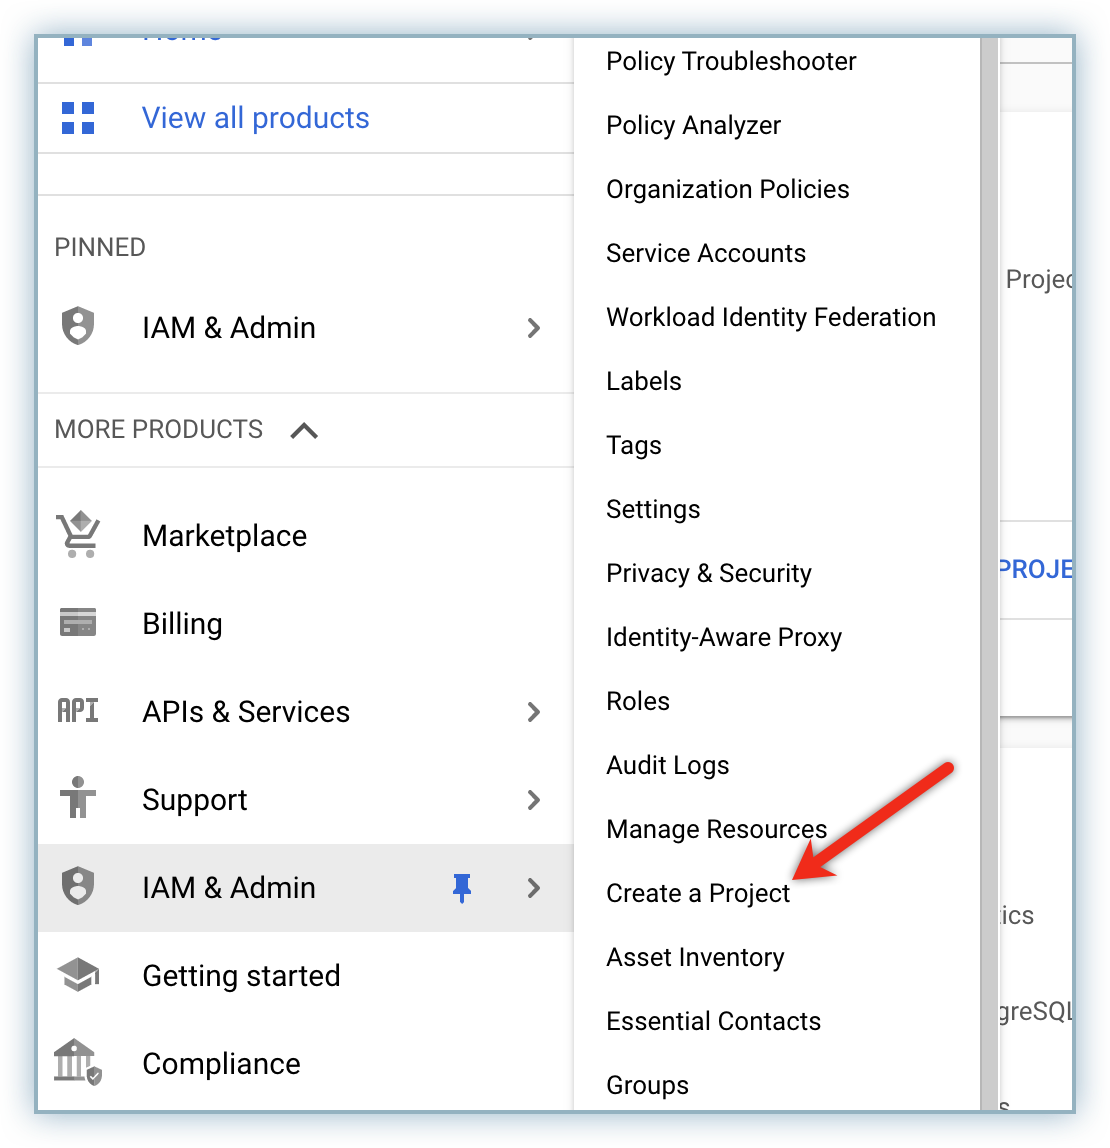
Click Create a Project from IAM & Admin in the left nav menu. Note: If you have already created a project, skip to Step 7.
-
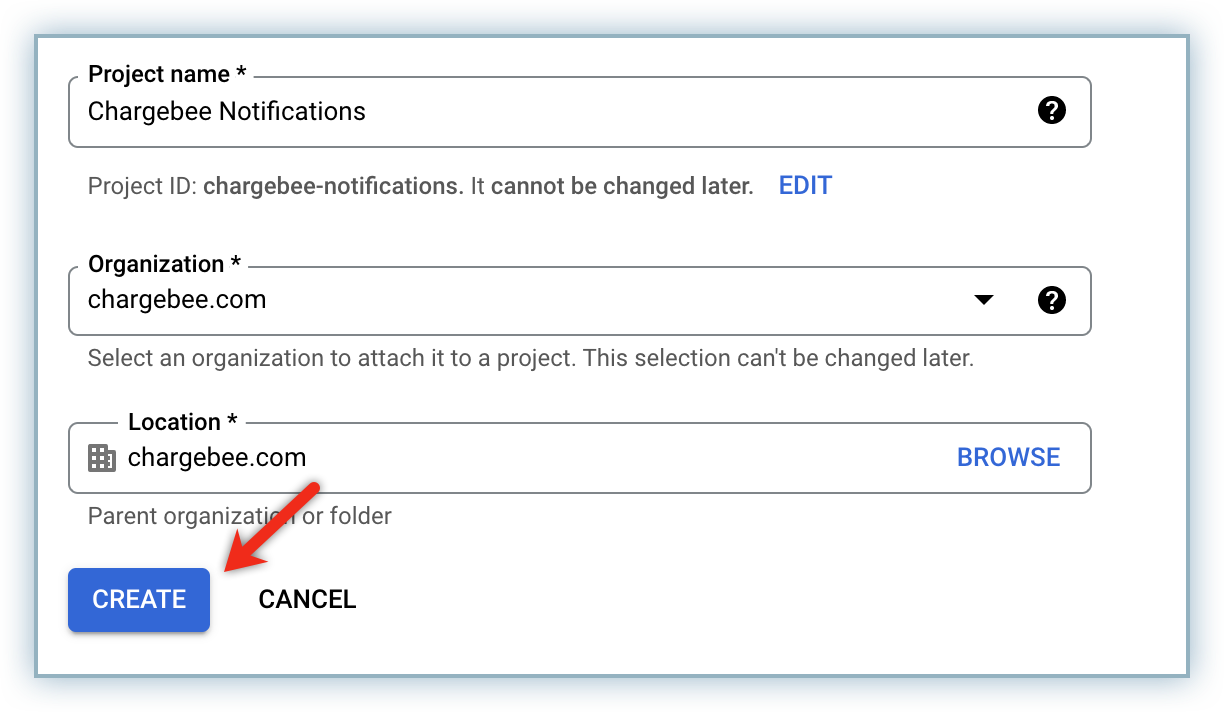
Specify the desired name in the Project Name field and click CREATE. Note: This project name cannot be edited or changed later.
-
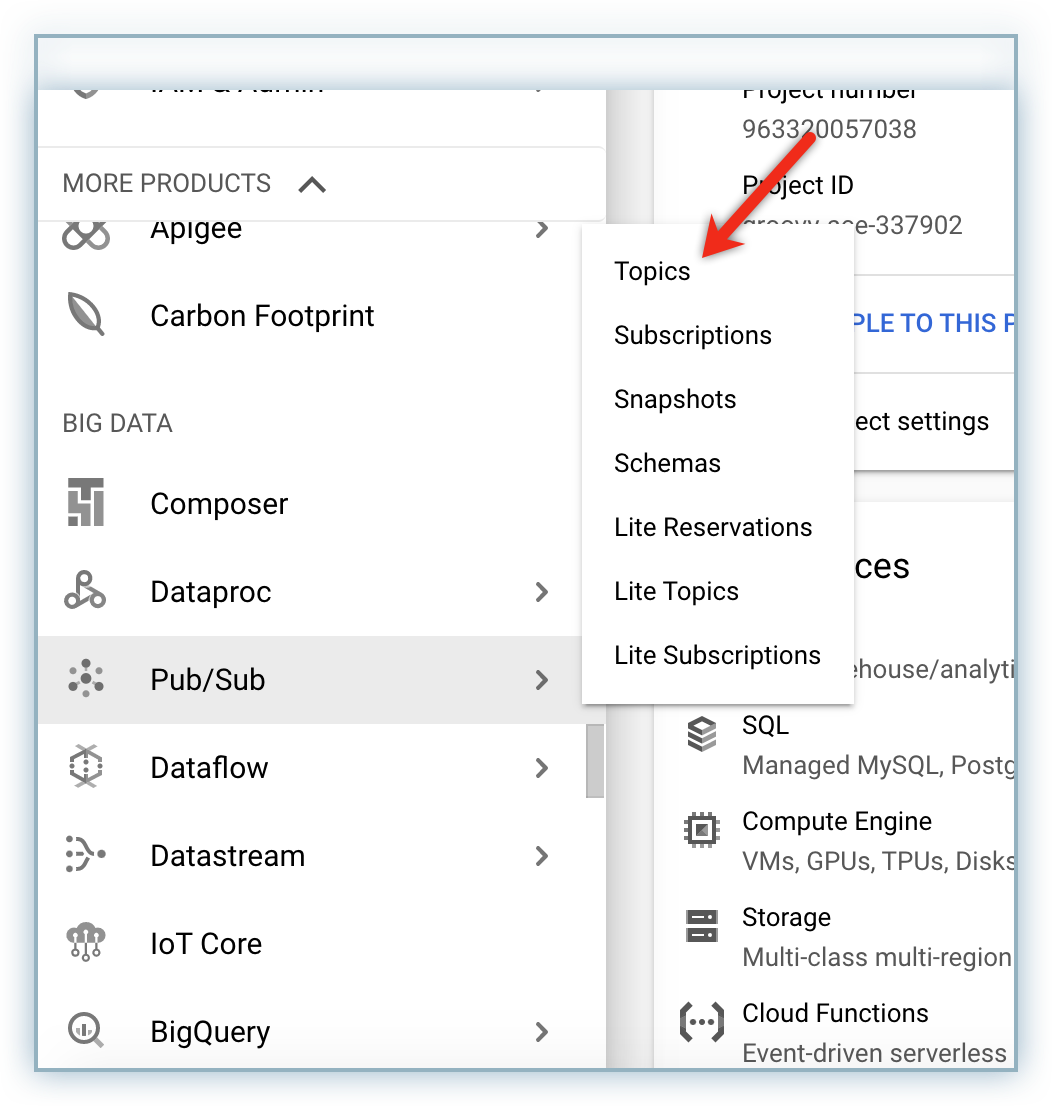
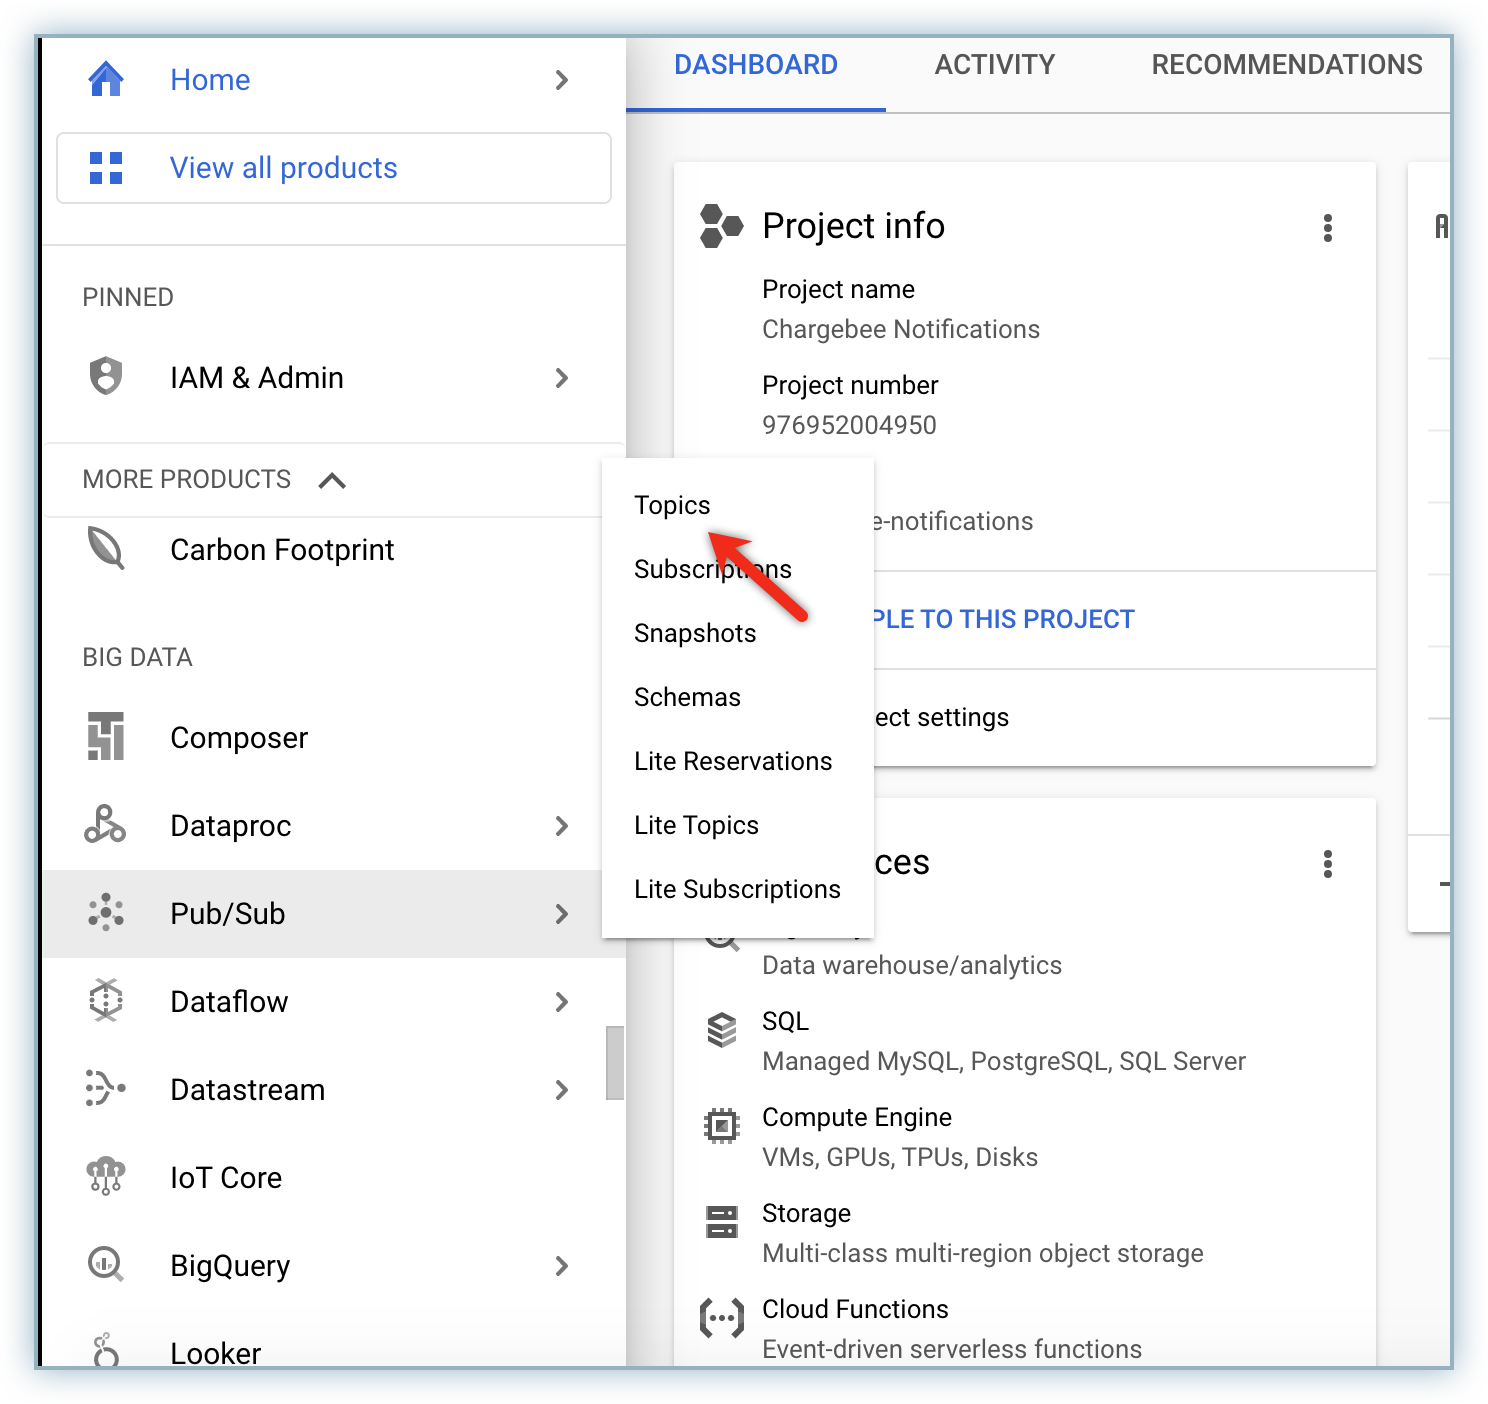
Click Topic from the Pub/Sub menu in the BIG DATA section on the left nav. Note: This project name cannot be edited or changed later.
-
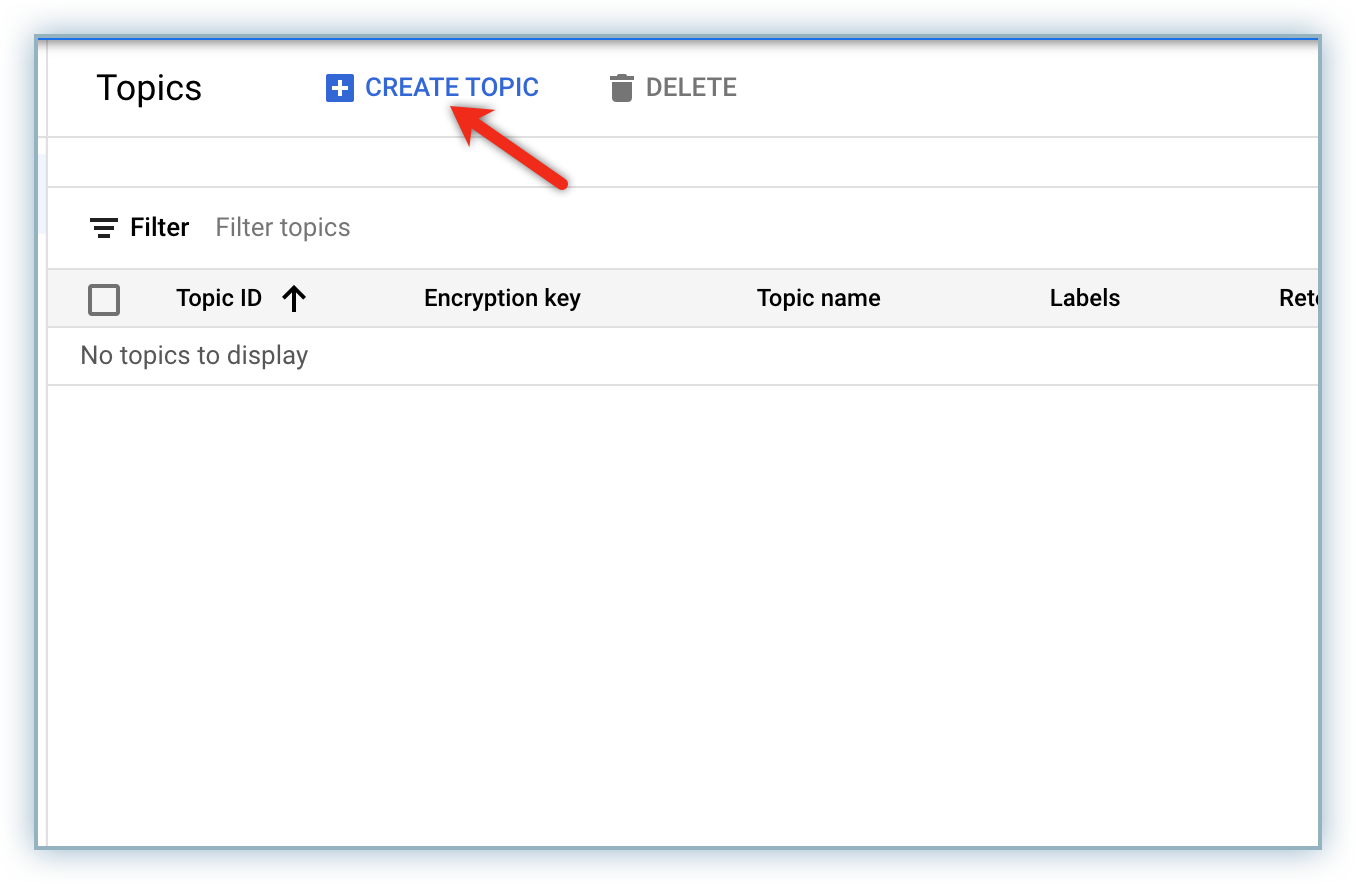
Click Create Topic.
-
Specific an applicable name for the topic in the Topic ID field, enable the checkboxes as in the image below and click CREATE TOPIC.
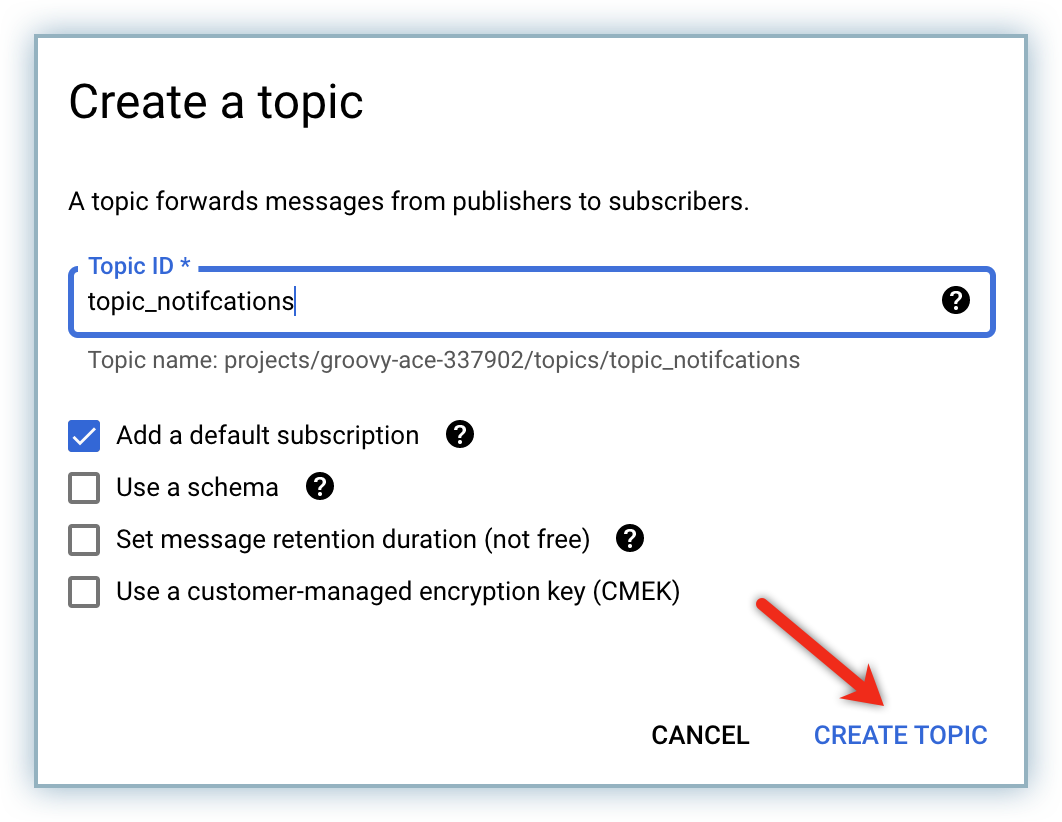
Note: After the topic is created, if you are redirected to a new page click to return to the topic list view. Also, make a note of the name as it would be needed later for the configuration of your app to receive notifications.
Configure Subscription to Receive Messages
Follow the steps below to configure subscriptions to receive messages:
- Click Create Subscription from the More Actions menu.
- Update the following details on the Create subscription page.
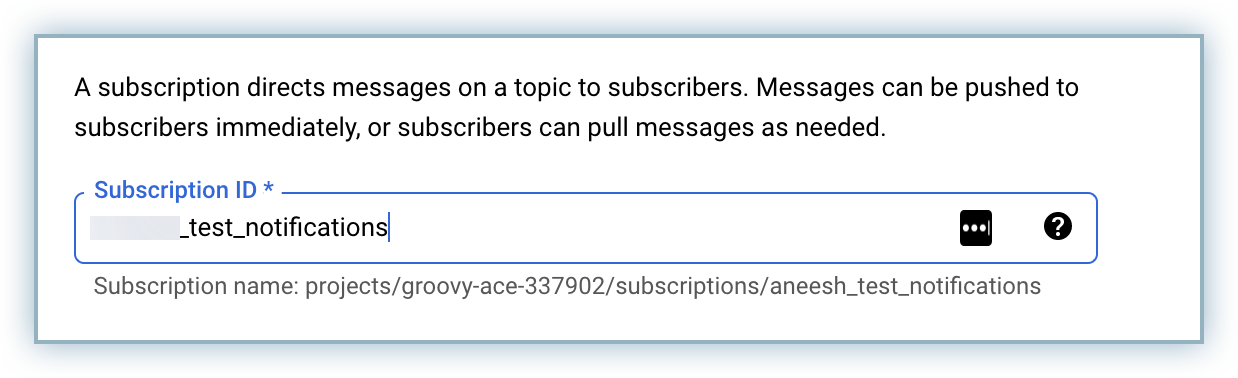
- Type applicable name in the Subscription ID field.
- Select the Push radio button from the Delivery Type section. Note: Push & Pull is explained below: Pull: Message that is published to topic id will have to be pulled by subscription id. Push: A mechanism for Chargebee to listen to notifications from the topic automatically.
- Type applicable name in the Subscription ID field.
- Click CREATE.
- Publish a test message to the Topic id to confirm functionality.
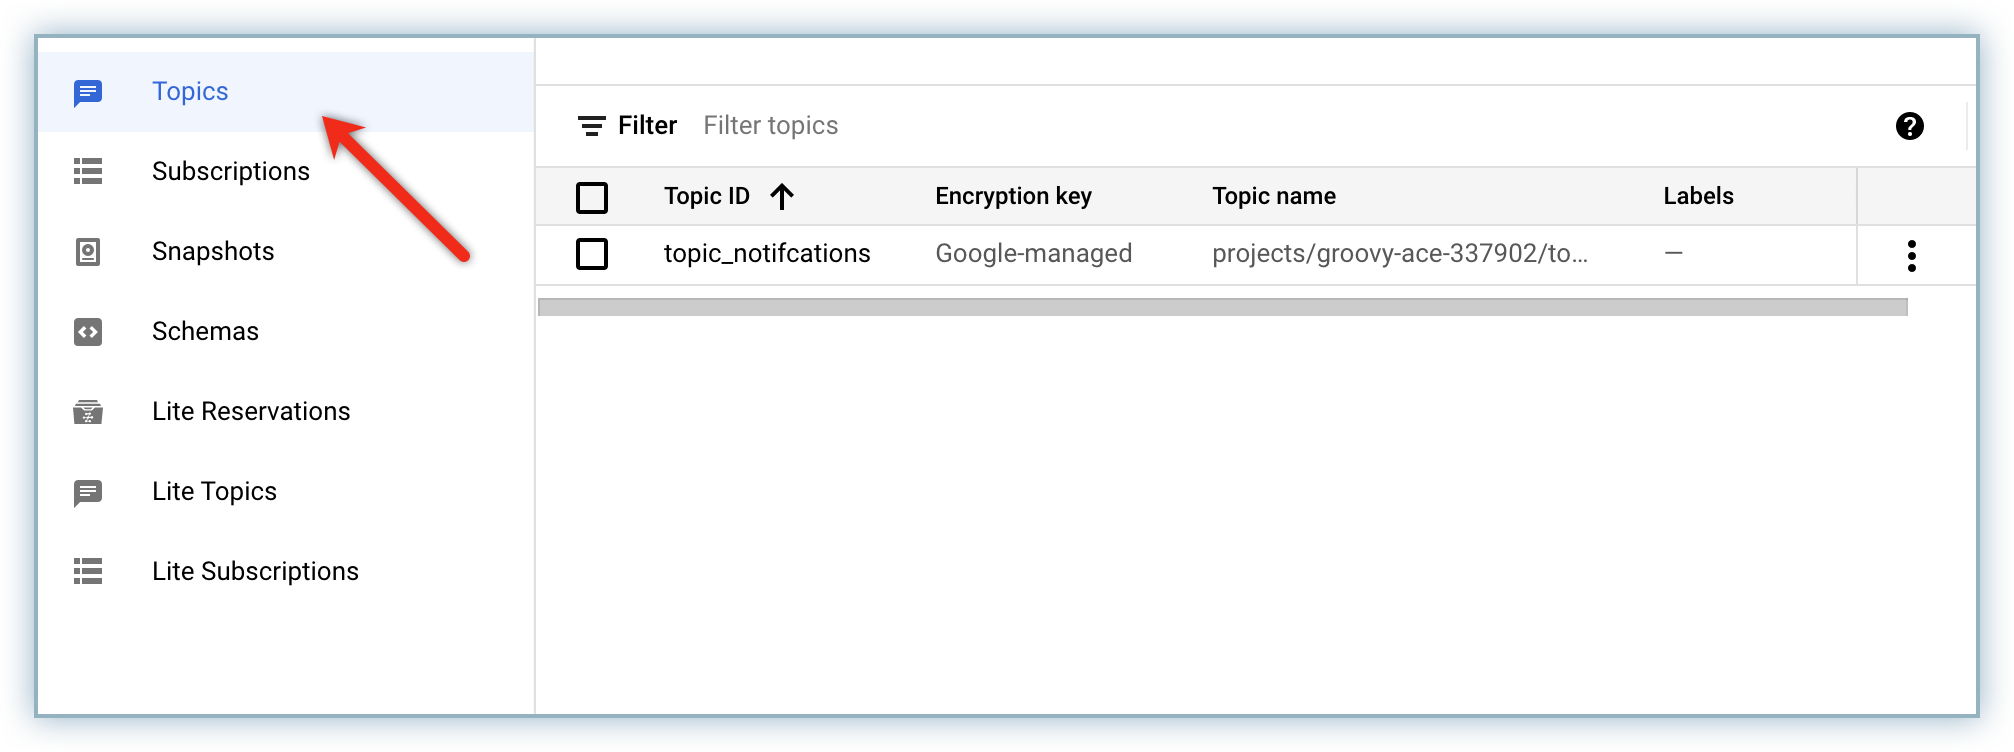
- Click Topics to return to the topic list view.
- Click applicable Topic ID to view details of the topic.
- Scroll to the bottom of the page and click the MESSAGES tab.
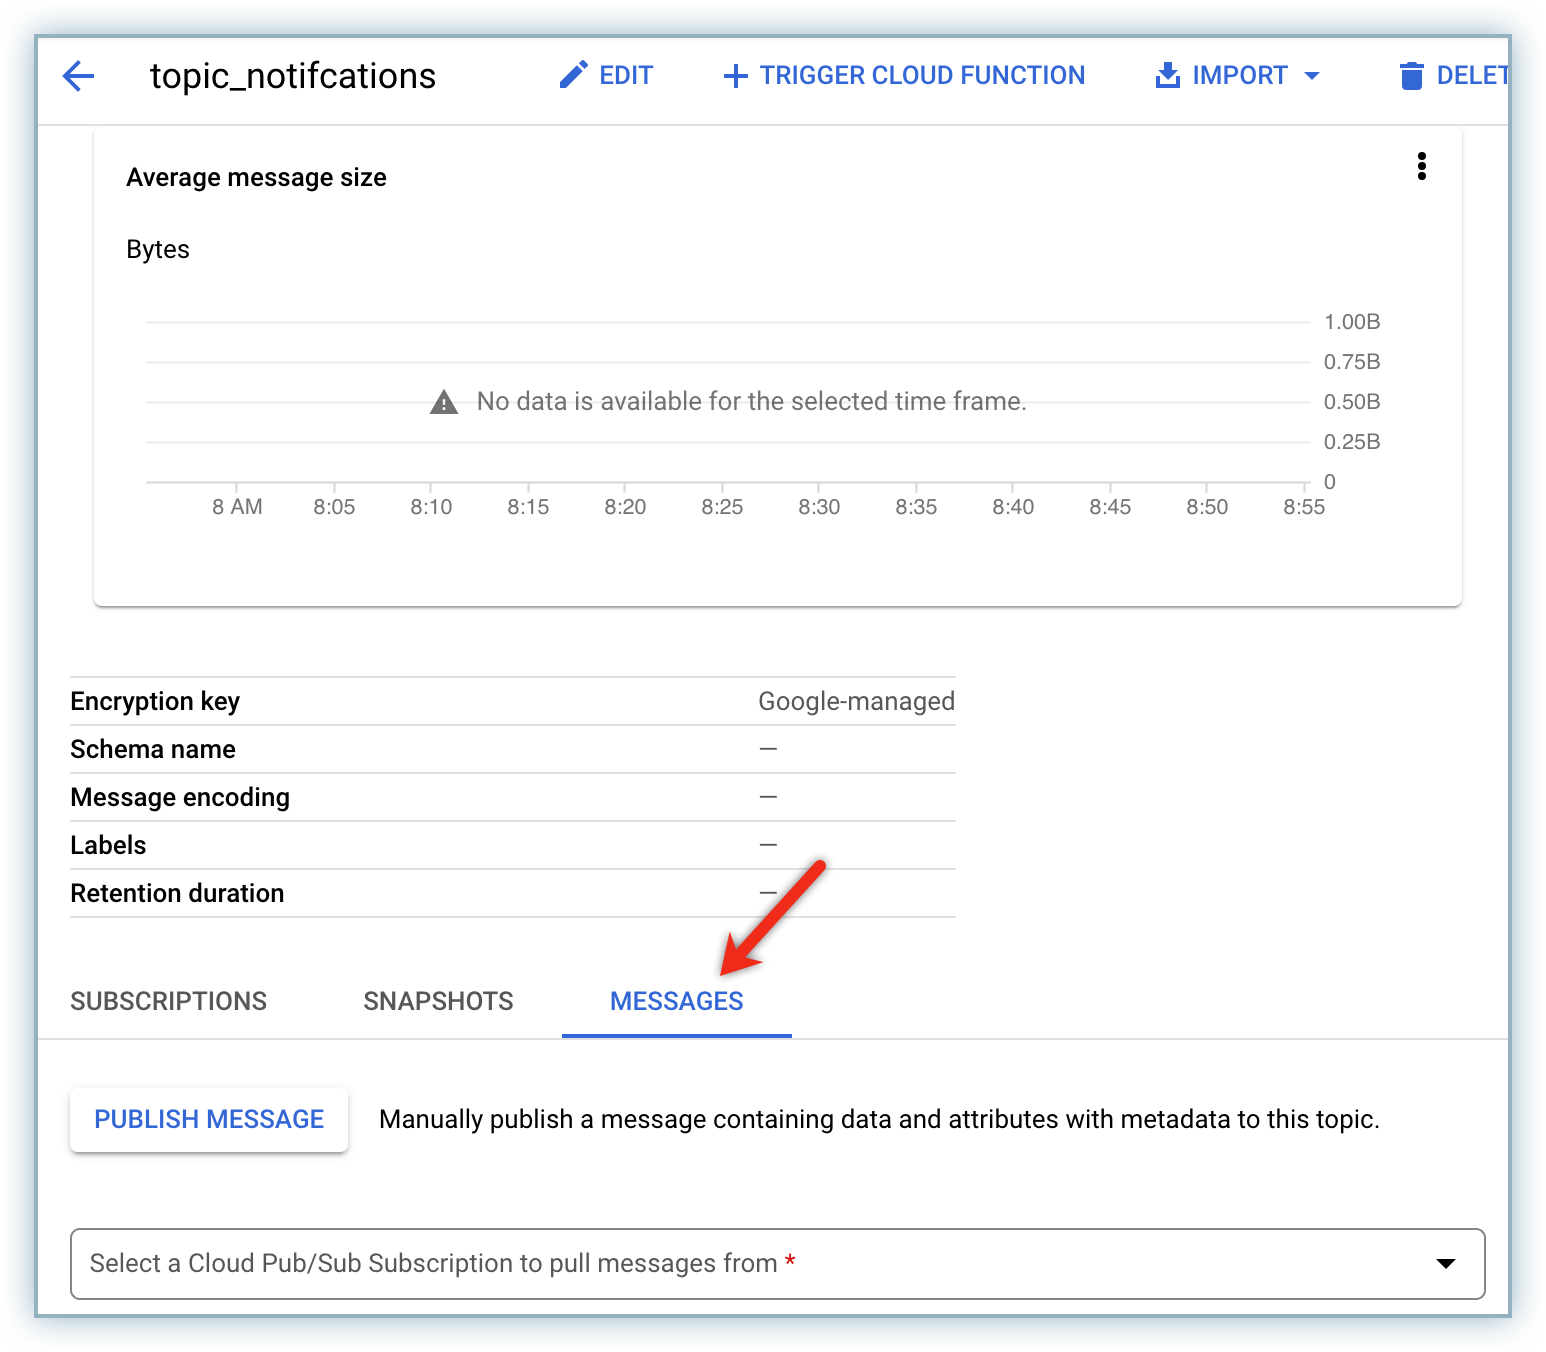
- Click Publish Message
- Type applicable test message in the Message text-box and click PUBLISH.
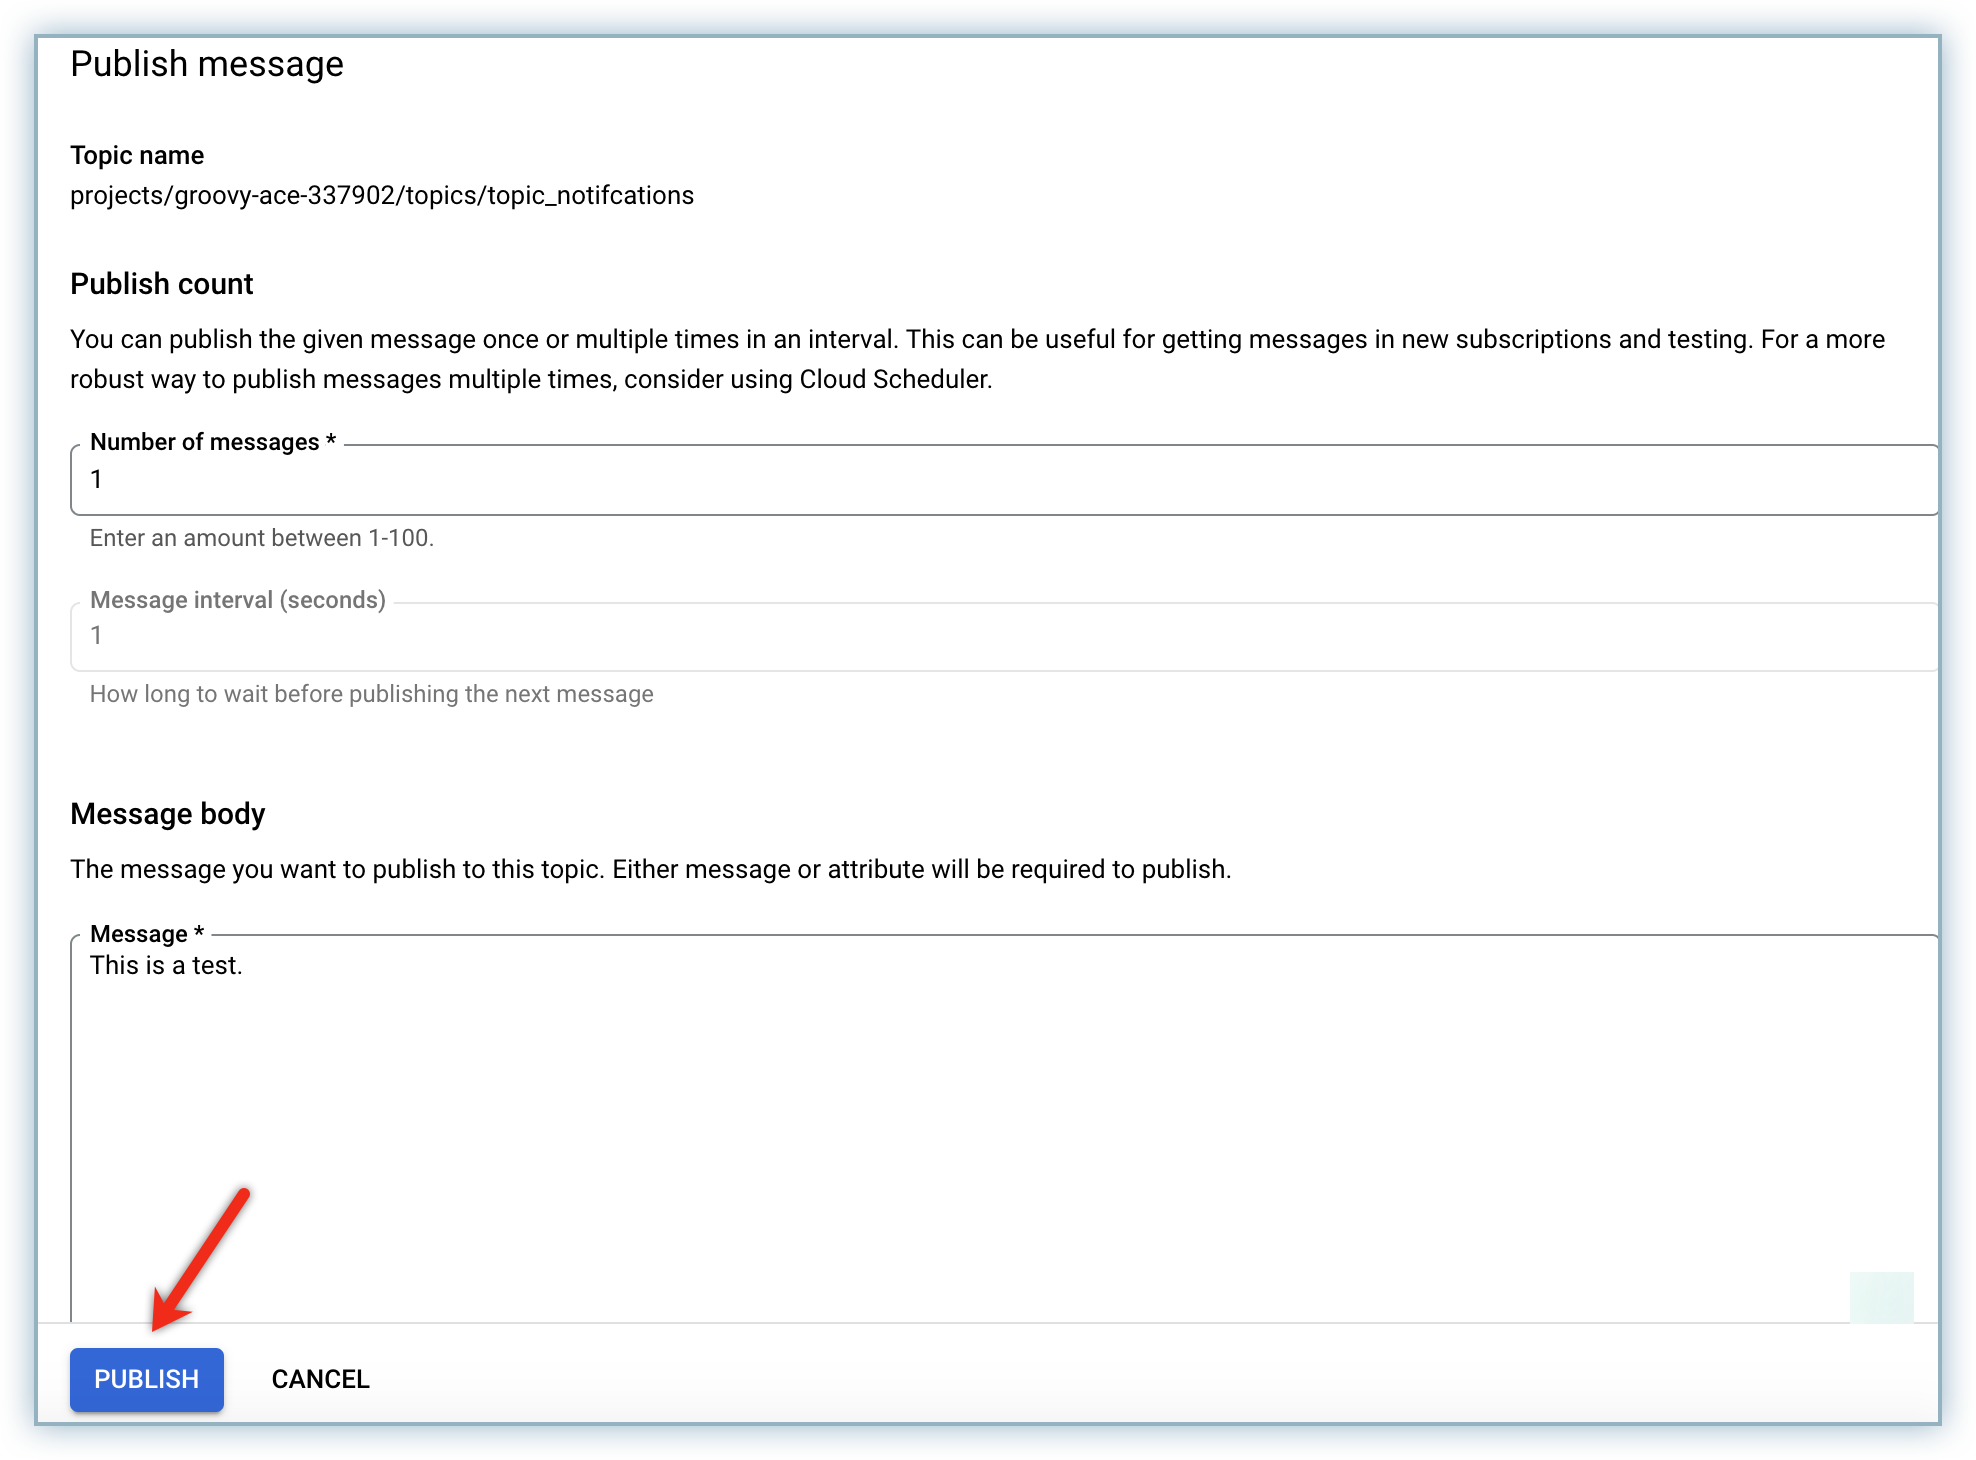
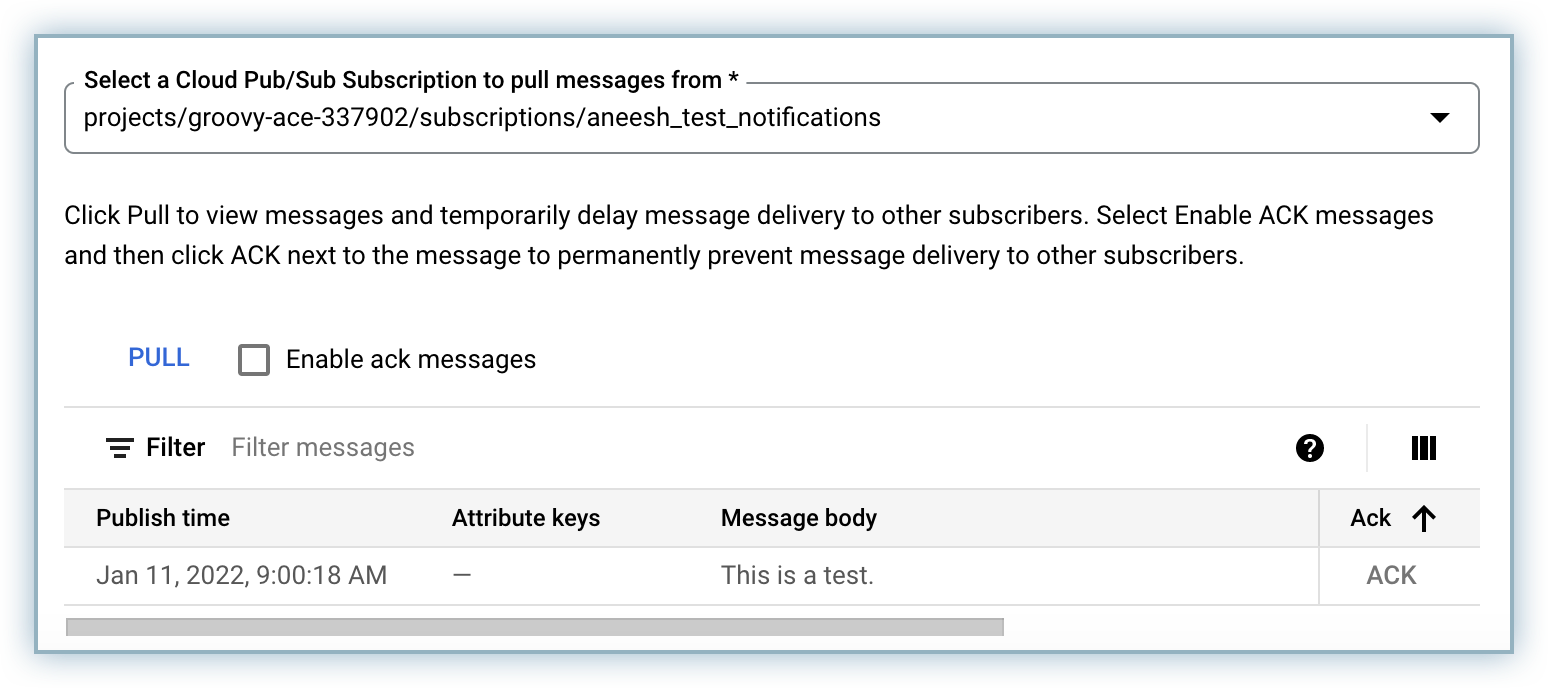
- Select the subscription from the drop-down list and check the message.
- Click back to return to the topic list page.
- Click Topics to return to the topic list view.
Setting up a Topic to Receive Notifications from Google
Follow the steps below to associate your topic with a project to receive notifications from Google:
-
Login to Google Cloud Platform.
-
Click the drop-down list to select the applicable project that is linked to the Topic ID for which we want to receive notifications. Note: Make a note of the project name as it is required to configure your app to receive notifications.
-
Click Topics from the Pub/Sub menu from the BIG DATA left nav.
-
Select the applicable topic checkbox and click ADD PRINCIPAL in the PERMISSIONS tab.
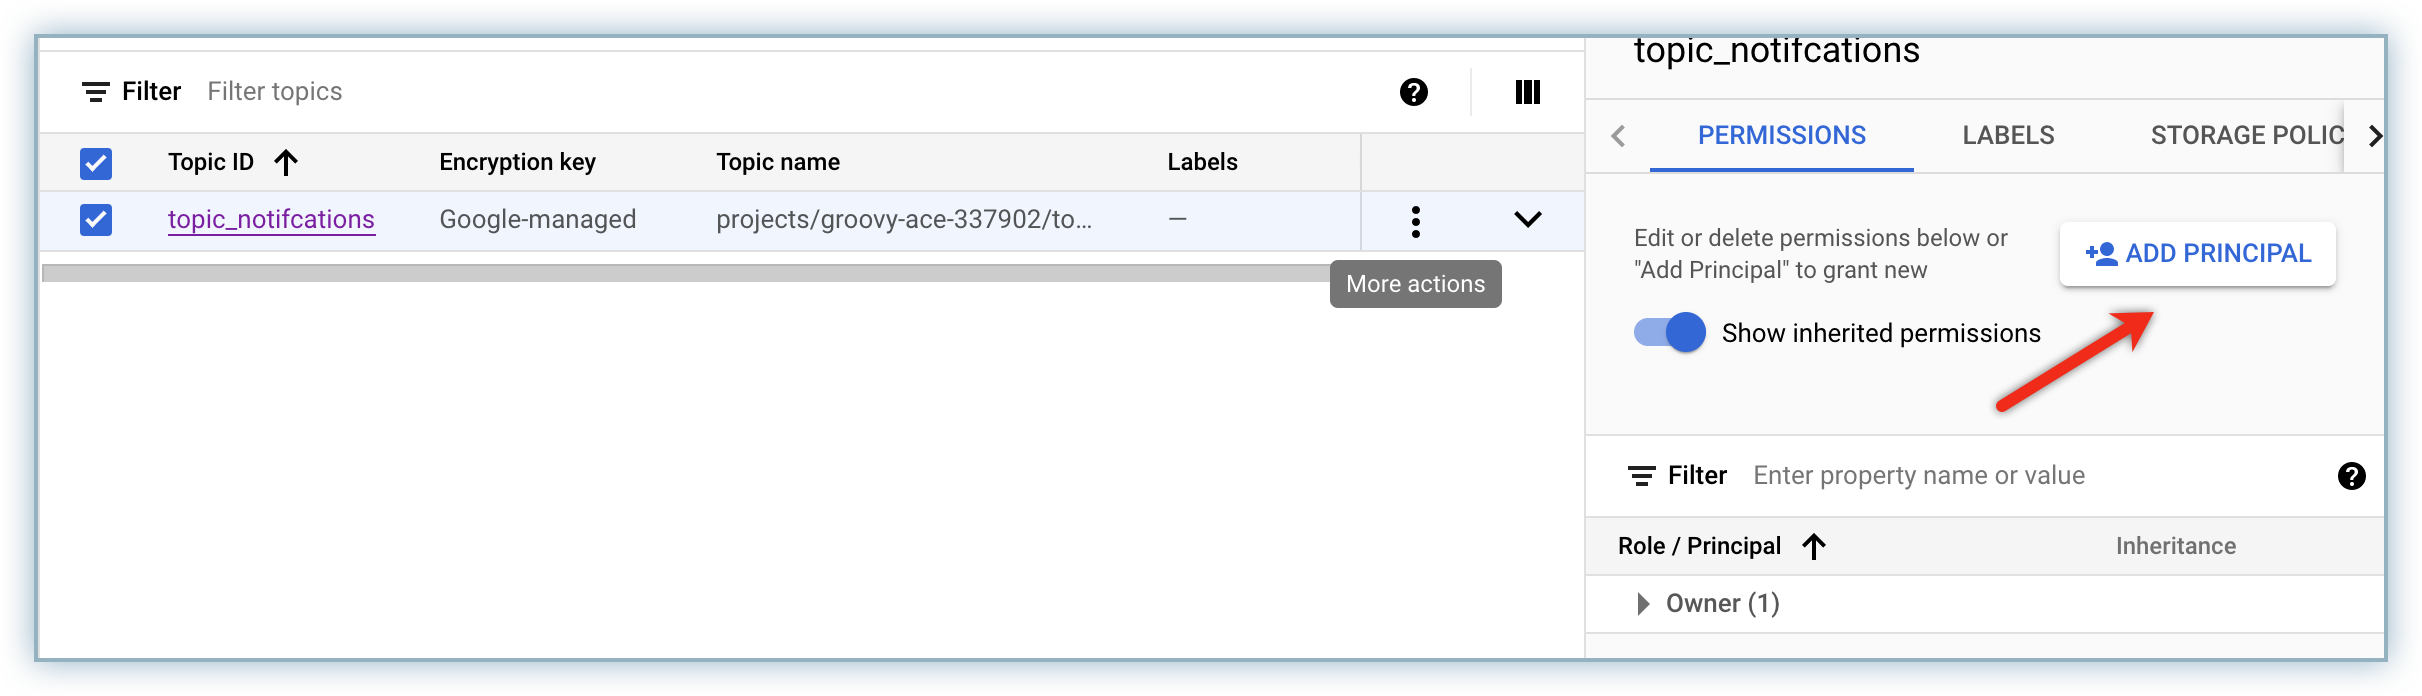
-
Update the following details in the Add Principals pop-up box.
- Type google-play-developer-notifications@system.gserviceaccount.com in the New Principal field.
- Select Pub/Sub > Pub/Sub Publisher from the Role drop-down list.
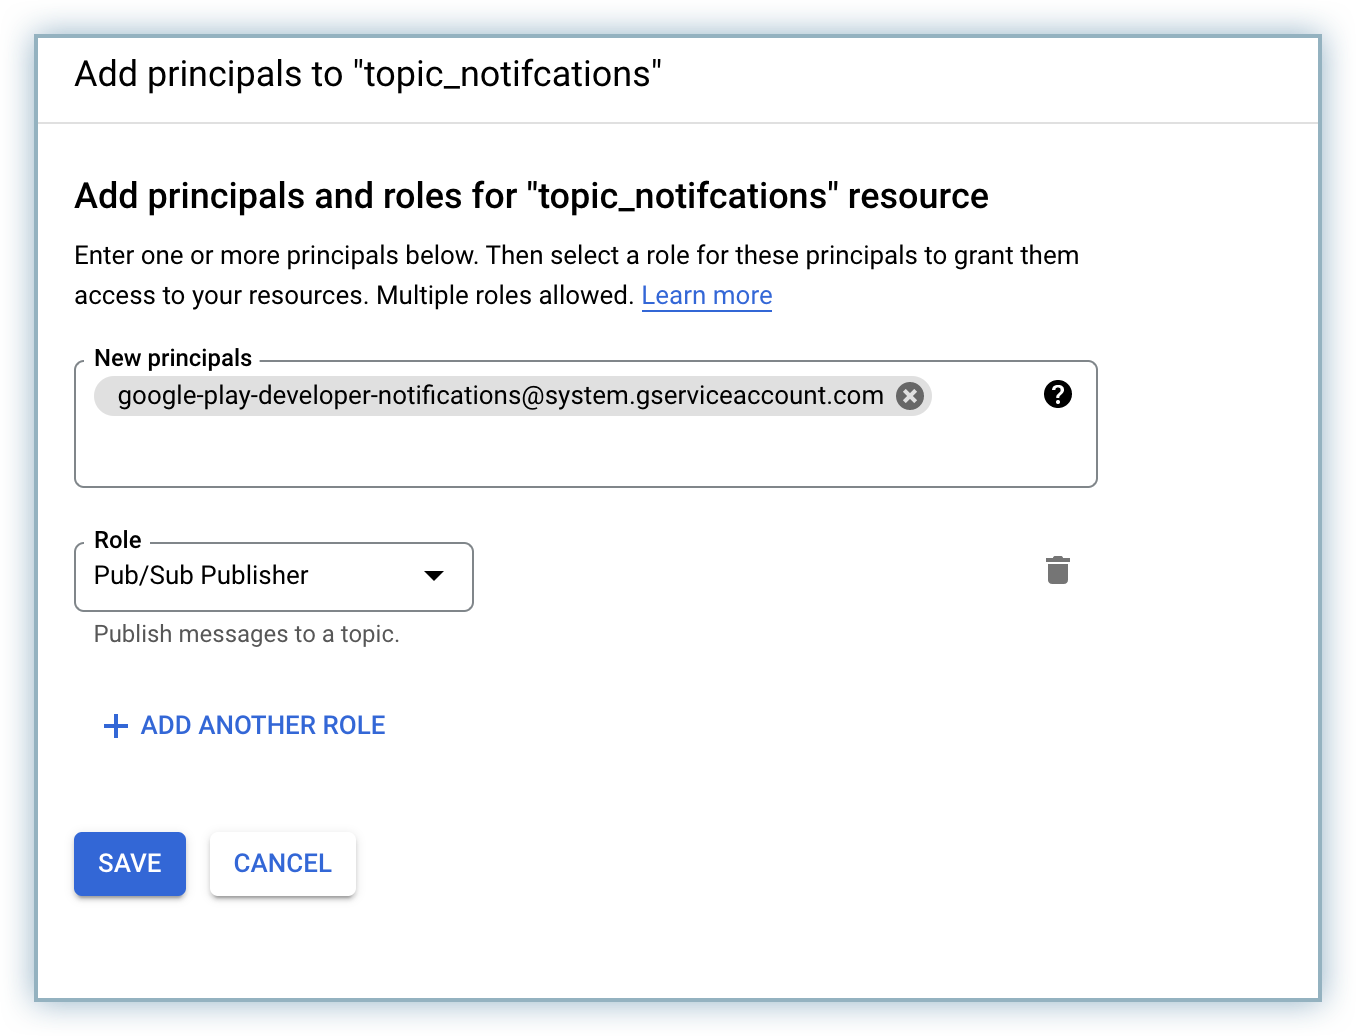
- Click Save.
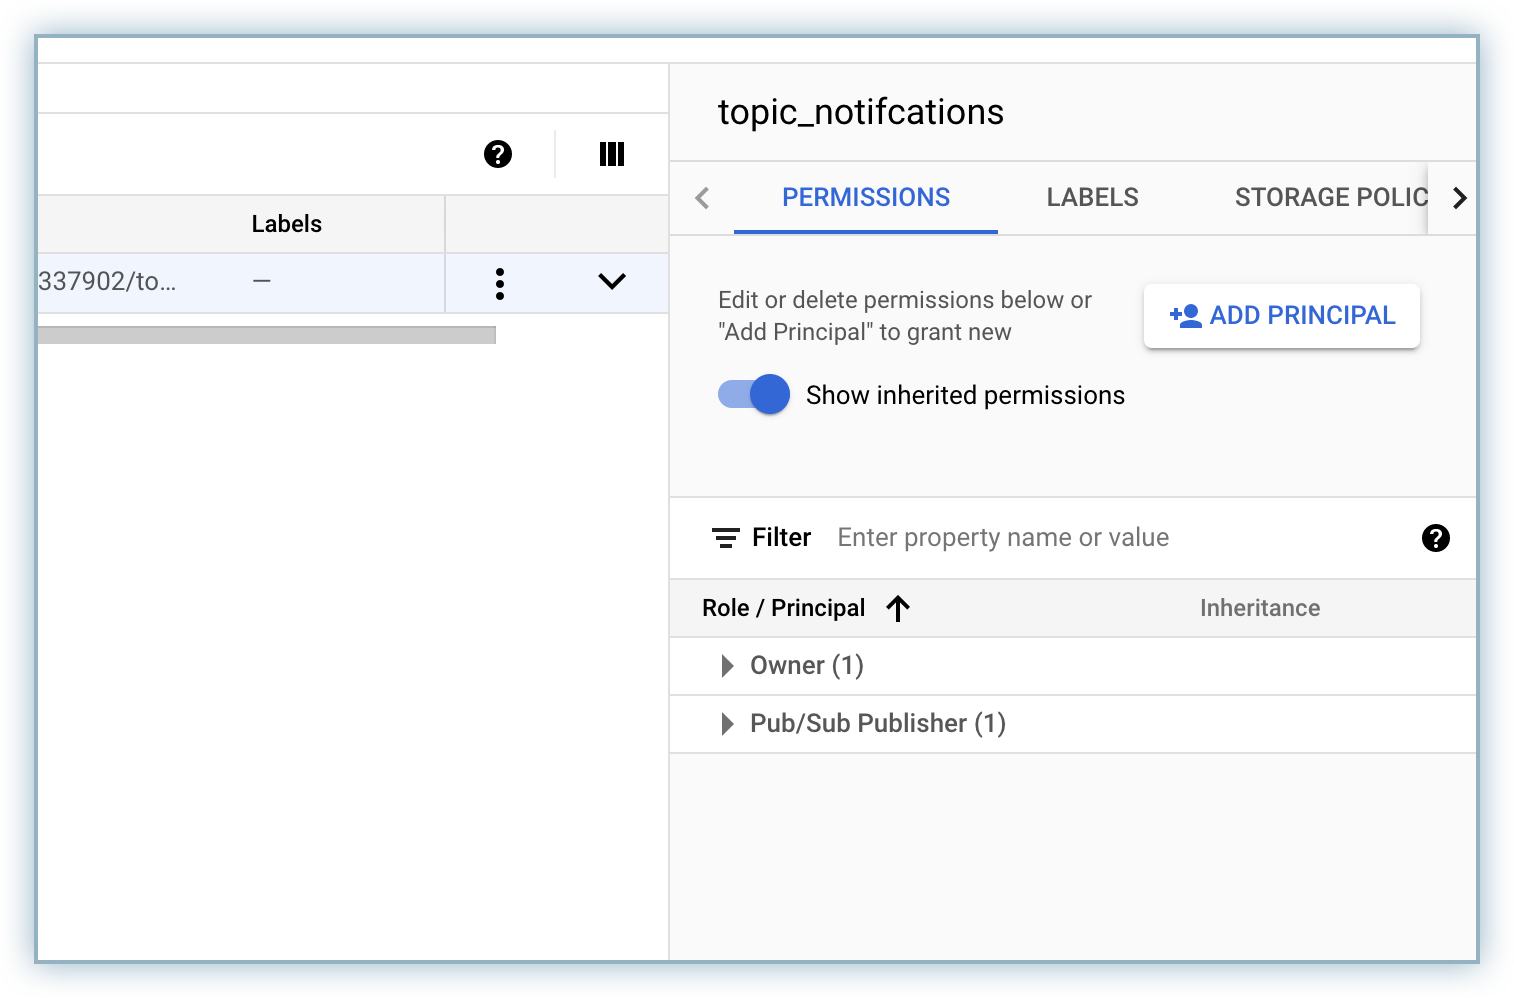
- The new principal with Pub/Sub access is added to the PERMISSIONS list.
See also
API References
Was this article helpful?