How to perform the Anrok integration in Chargebee?
Problem Statement
You want to know how to perform the anrok integration in chargebee.
Related Scenarios
- How to configure Anrok integration in Chargebee?
- How to configure nexus jurisdictions on Anrok?
- I cannot find Anrok integration in Marketplace.
- What are the Anrok limitations in Chargebee?
Solution
Currently, Chargebee supports inbuilt tax configurations such as Taxjar and Avalara, which can be configured within Chargebee. Although Anrok will be the first integration performed using Tax API offering advanced configuration. Chargebee and Anrok integration automates synchronized transactions and updates sales tax to your Chargebee invoices and credit memos.
- This integration is available on all plans.
- The Anrok application, and consequently the Chargebee-Anrok integration are currently available to users in the United States (US) and EU regions.
- We recommend that you test the integration on your Chargebee TEST site before configuring it on the LIVE site.
Steps to configure Chargebee with Anrok Integration
Step 1: Create a Chargebee API key from Chargebee.
Navigate to Settings → Configure Chargebee → API keys → Add API Key.
Step 2: Add Chargebee as a Data Source in Anrok.
Navigate to Data Sources → Integrate Chargebee → Chargebee API Key & Site name.
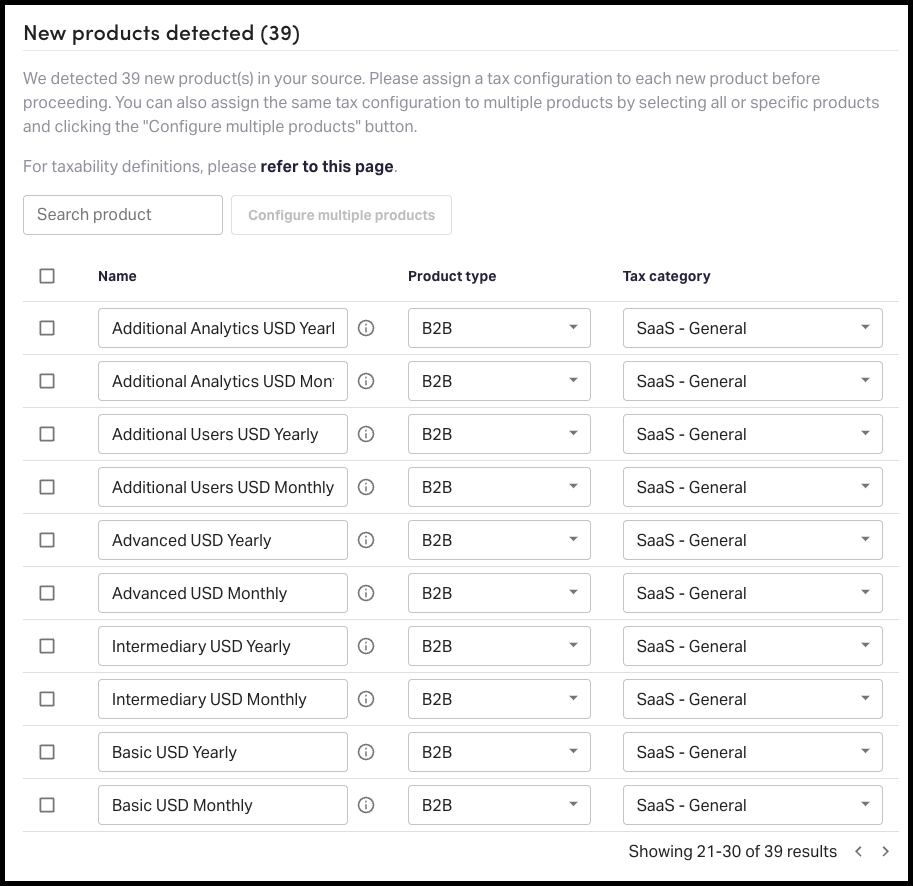
Step 3: Assign Product Catalogs with the tax Category on Anrok.
You will be prompted to assign a Tax Category for each of your Chargebee products.
Step 4: Generate Anrok API Key.
Navigate to Data Sources → Click on the ellipsis '...' menu for your Chargebee Data Source → Manage Anrok API key → Generate Anrok API Key.
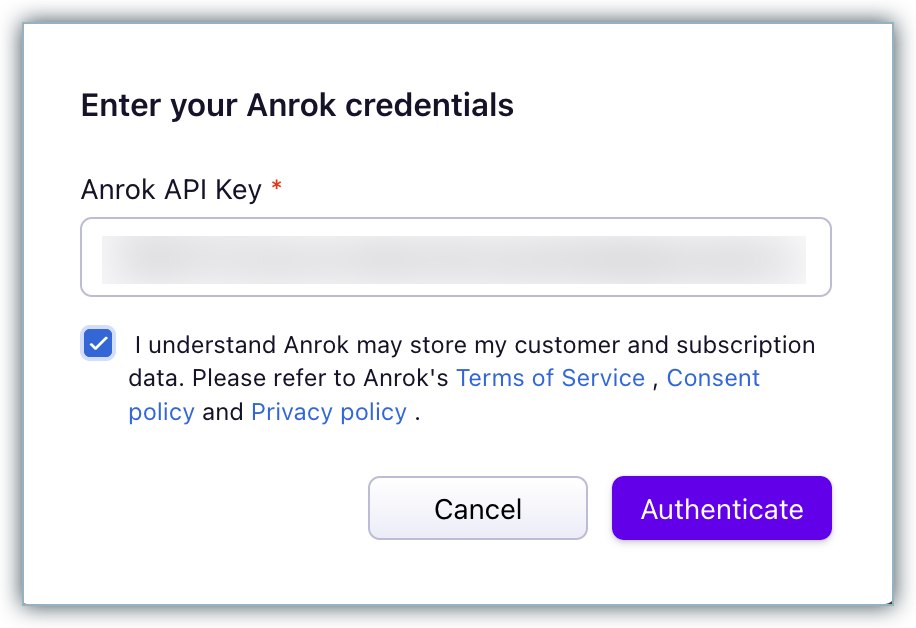
Step 5: Update the Anrok API key in Chargebee.
Click Apps > Go to Marketplace > Tax Management > Anrok. On the Anrok configuration page, click Get Started > Enter Anrok API Key.
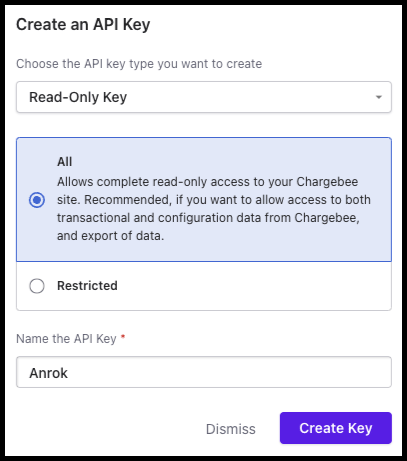
Create Chargebee API Key
A Chargebee API key is required to import your product pricing catalog and ingest your historical transactions. On your Chargebee account:
- Navigate to Settings → Configure Chargebee → API keys
- Click + Add API Key
- API Key Type: Read-Only Key / All
- Name: Anrok
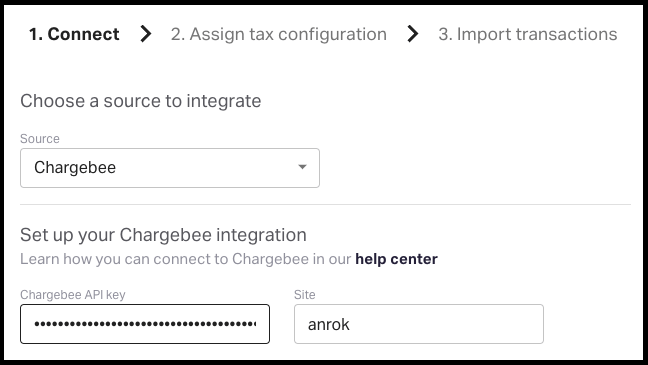
Add Chargebee as a Data Source
If you haven't signed up or to configure nexus jurisdictions, refer to this link. Next, you need to add Chargebee as a Data Source in Anrok. This will allow Anrok to import your product catalog, and historical transactions, and begin receiving live transaction data from Chargebee. On your Anrok account:
- Navigate to Data Sources → Integrate
- Select 'Chargebee' from the source pulldown
- Chargebee API Key: Paste the API key you generated in the previous step
- The site name: .chargebee.com
- Click Connect
Once connected, you'll be prompted to assign a tax category for each of your Chargebee products. Refer to this link for more on Tax configuration by category.
For Quick Charges (Non-Recurring addon), make sure to also specify a default product on this page to use for those transactions
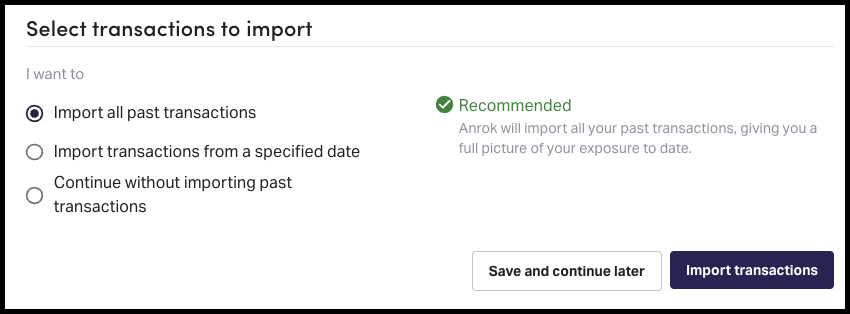
Finally, you can select how you'd like to import your historical transactions. 'Import all transactions' is recommended for most sellers for accurate historical exposure calculations.
Create Anrok API key
The Chargebee Tax Adapter is used to add the tax to invoices, credit memos in Chargebee and to ingest live transaction data. The Chargebee support team will assist in provisioning your Chargebee account with the tax adapter. Once provisioned, setup instructions can be found in the Chargebee Help Center. As part of the setup, they will request your Anrok API Key. You can generate that API key using the steps below in Anrok:
- Navigate to Data Sources
- Click the '...' menu for your Chargebee Data Source
- Click 'Manage Anrok API key'
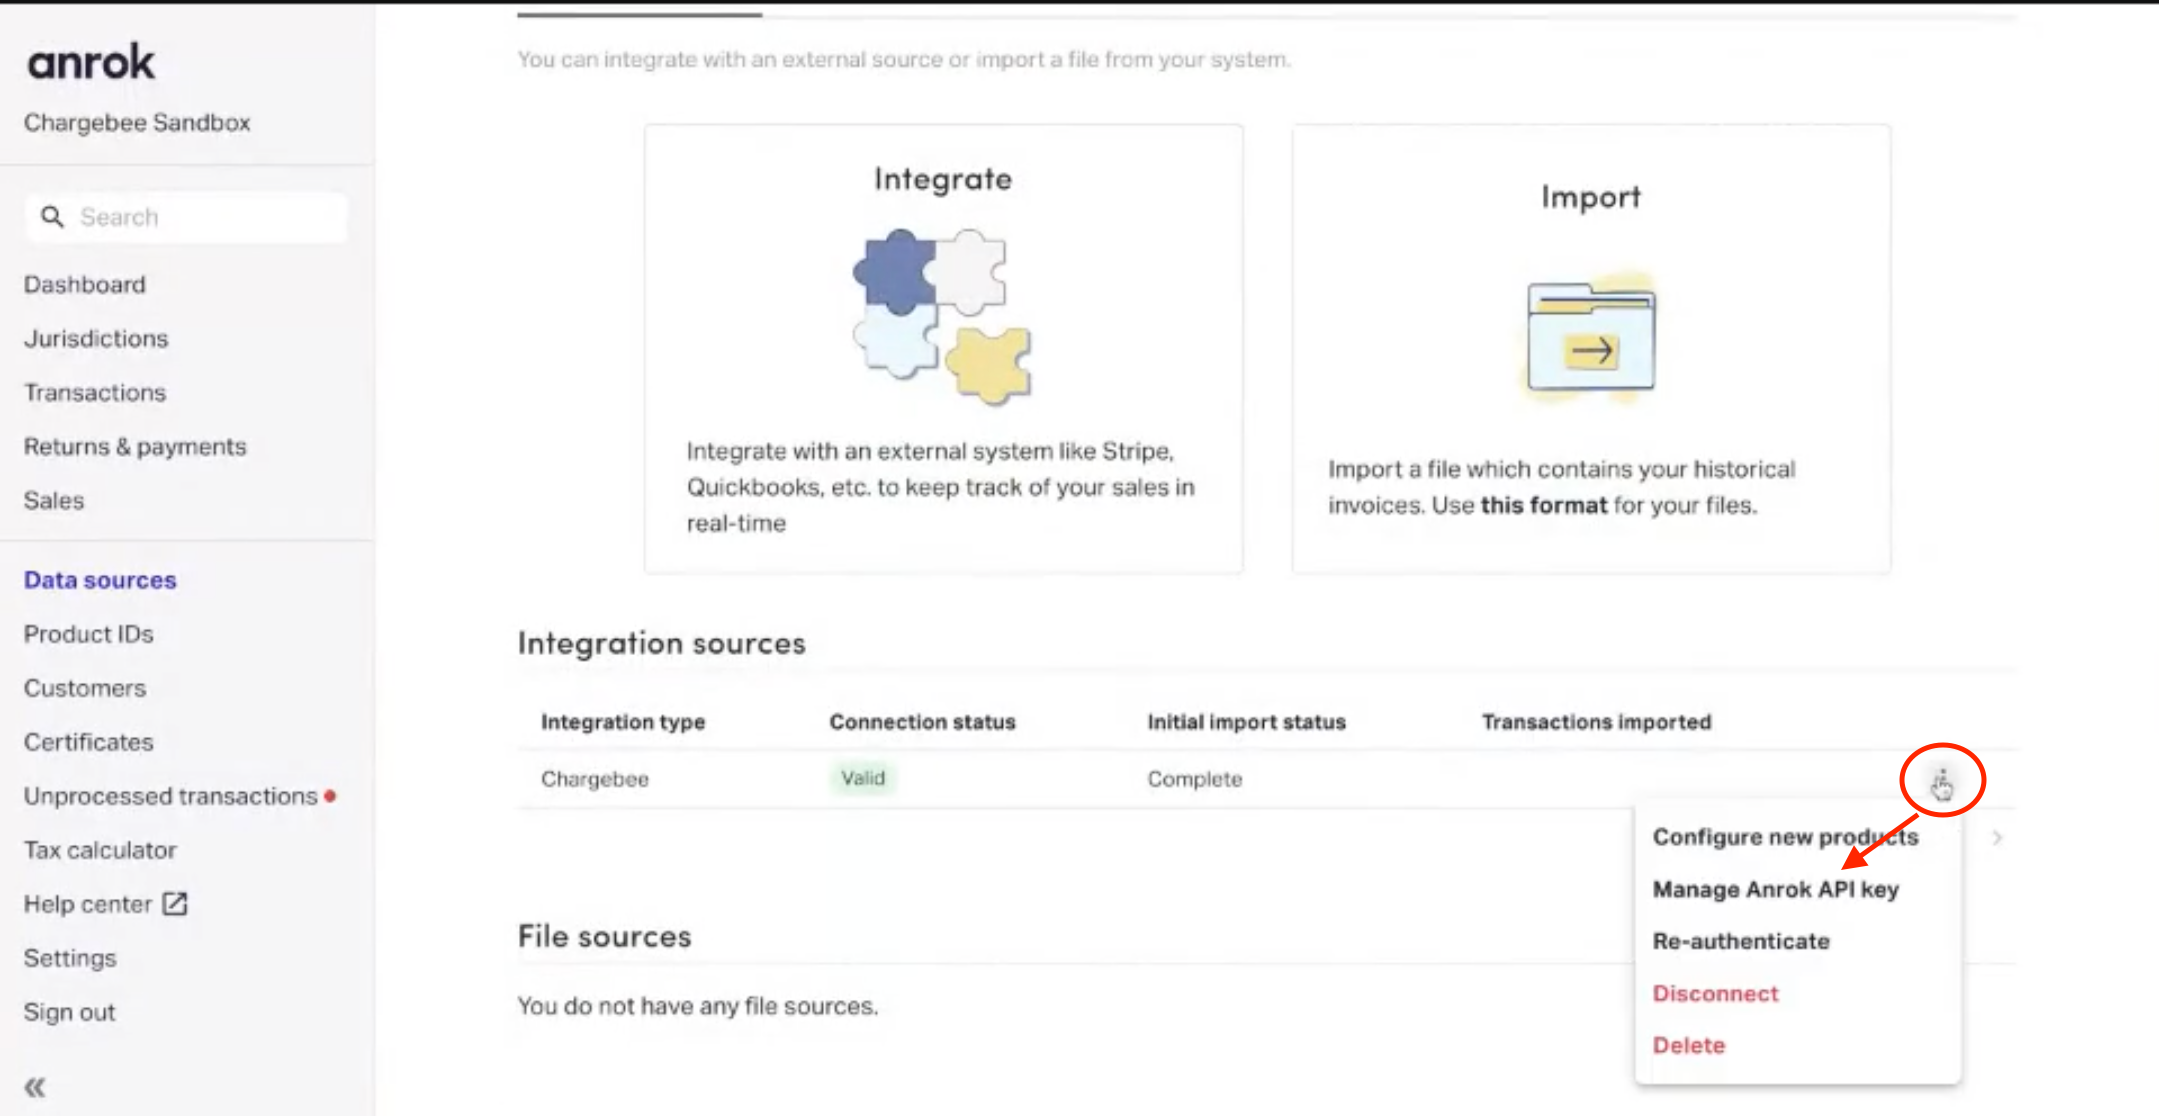
Click 'Generate Anrok API Key'

Connecting Anrok Account with Chargebee Site
Follow the steps below to connect the applications:
On the marketplace landing page, you need to click on the connect button, which will take you to the configuration page.
-
Click Apps > Go to Marketplace > Tax Management > Anrok.
-
On the Anrok configuration page, click Get Started if you already have an Anrok account, or click Sign up to create a new account and continue.
-
Enter your Anrok credentials by specifying the Anrok API Key that you retrieved for Chargebee. Click the "I understand Anrok.." checkbox for affirmation and click Authenticate.
-
Enter or confirm your organization address. Chargebee auto-populates the address that is specified in your settings, you can change this if required or click Proceed.
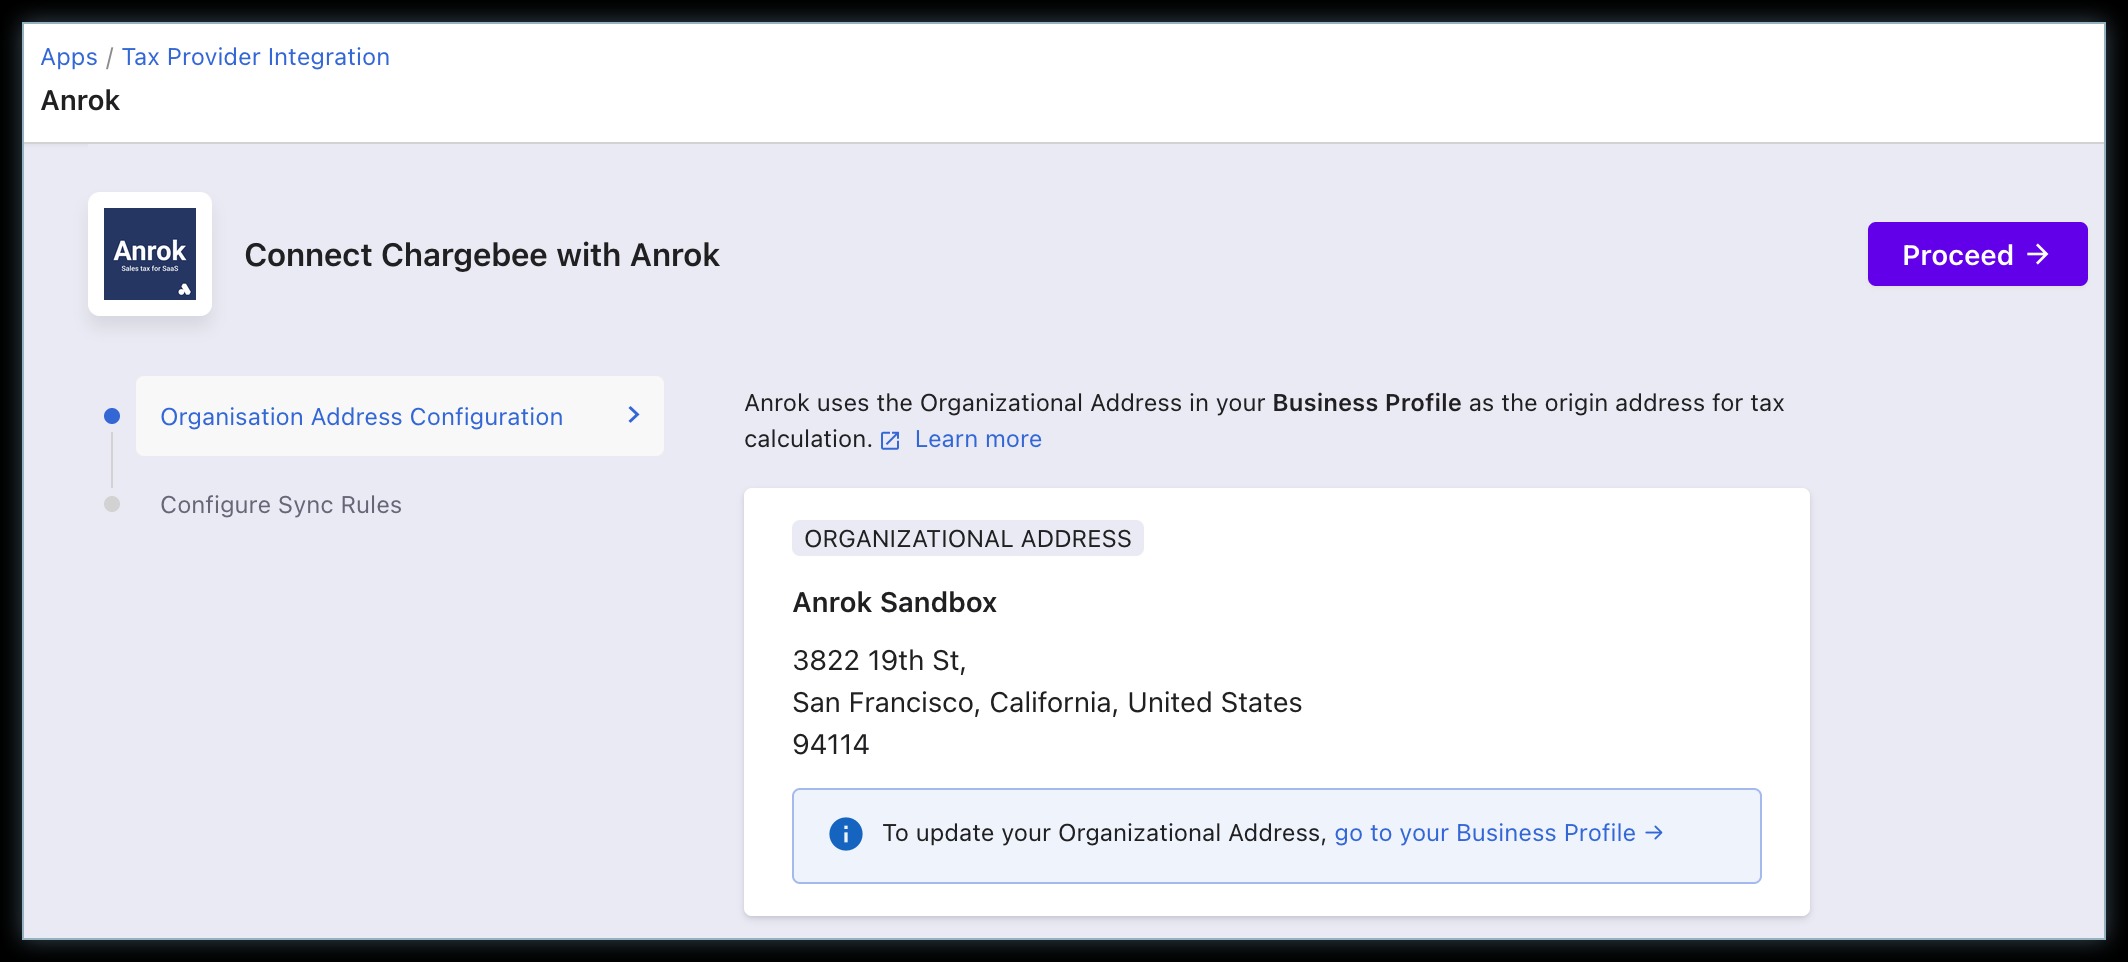
- Organization Address: The organization address that is configured in your Chargebee site is used as the origin address for tax calculation by Anrok. Ensure that your organization address in Chargebee is added and up-to-date. You can verify and update your organization addresses on your Chargebee site by navigating to Settings > Configure Chargebee > Business Profile.
-
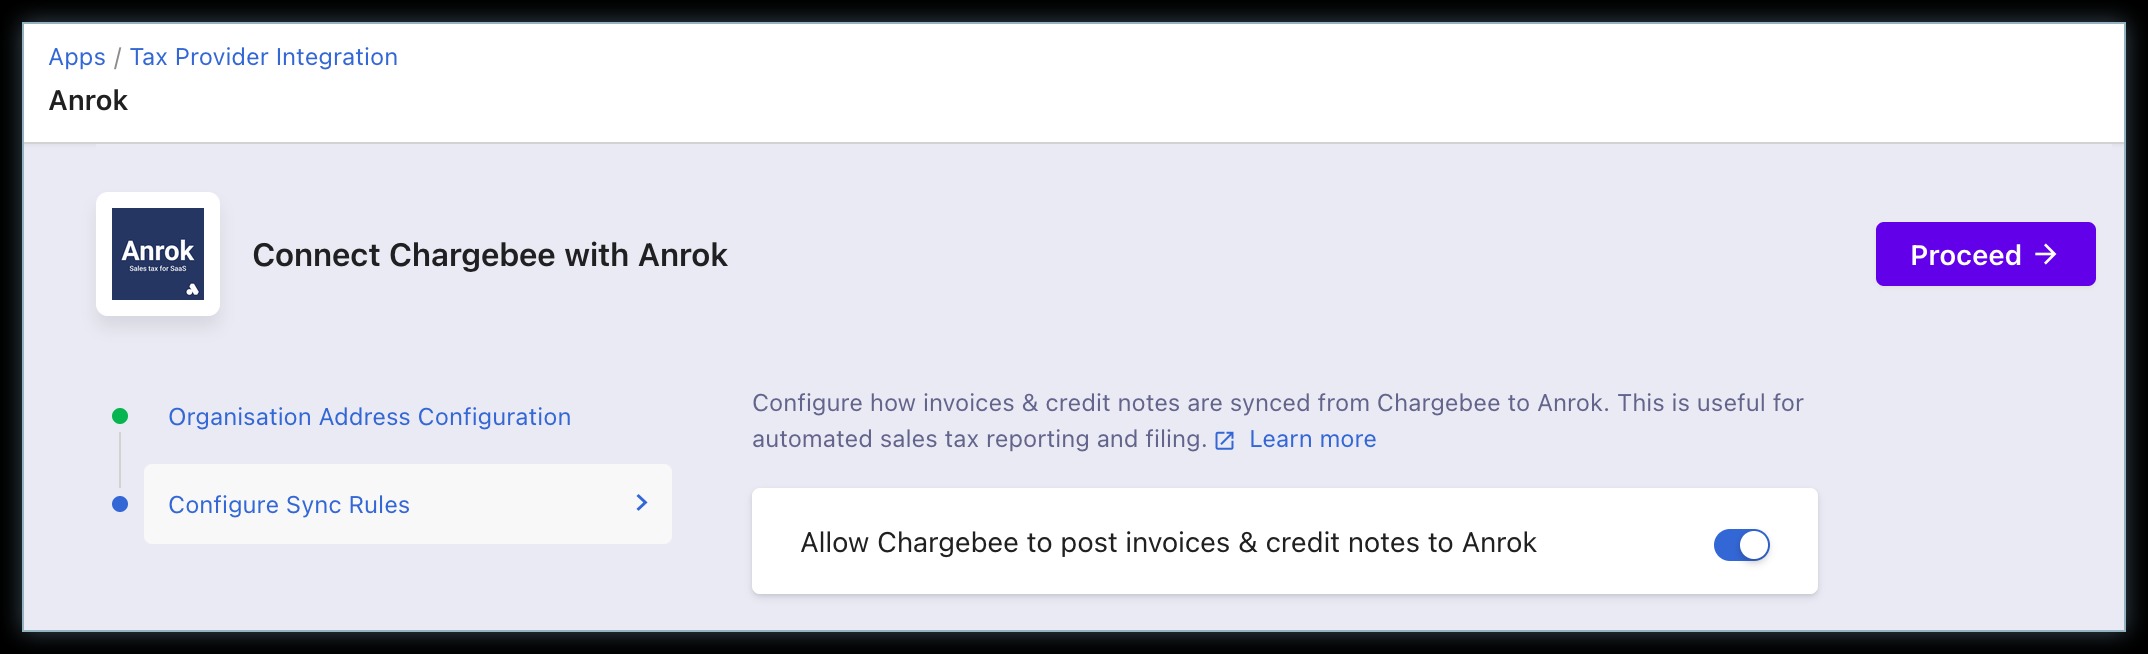
In Configure Sync Rules, enable the toggle button to allow Chargebee to sync invoices and credit notes to Anrok.
-
Click Proceed.
The Anrok account is successfully connected with your Chargebee site.
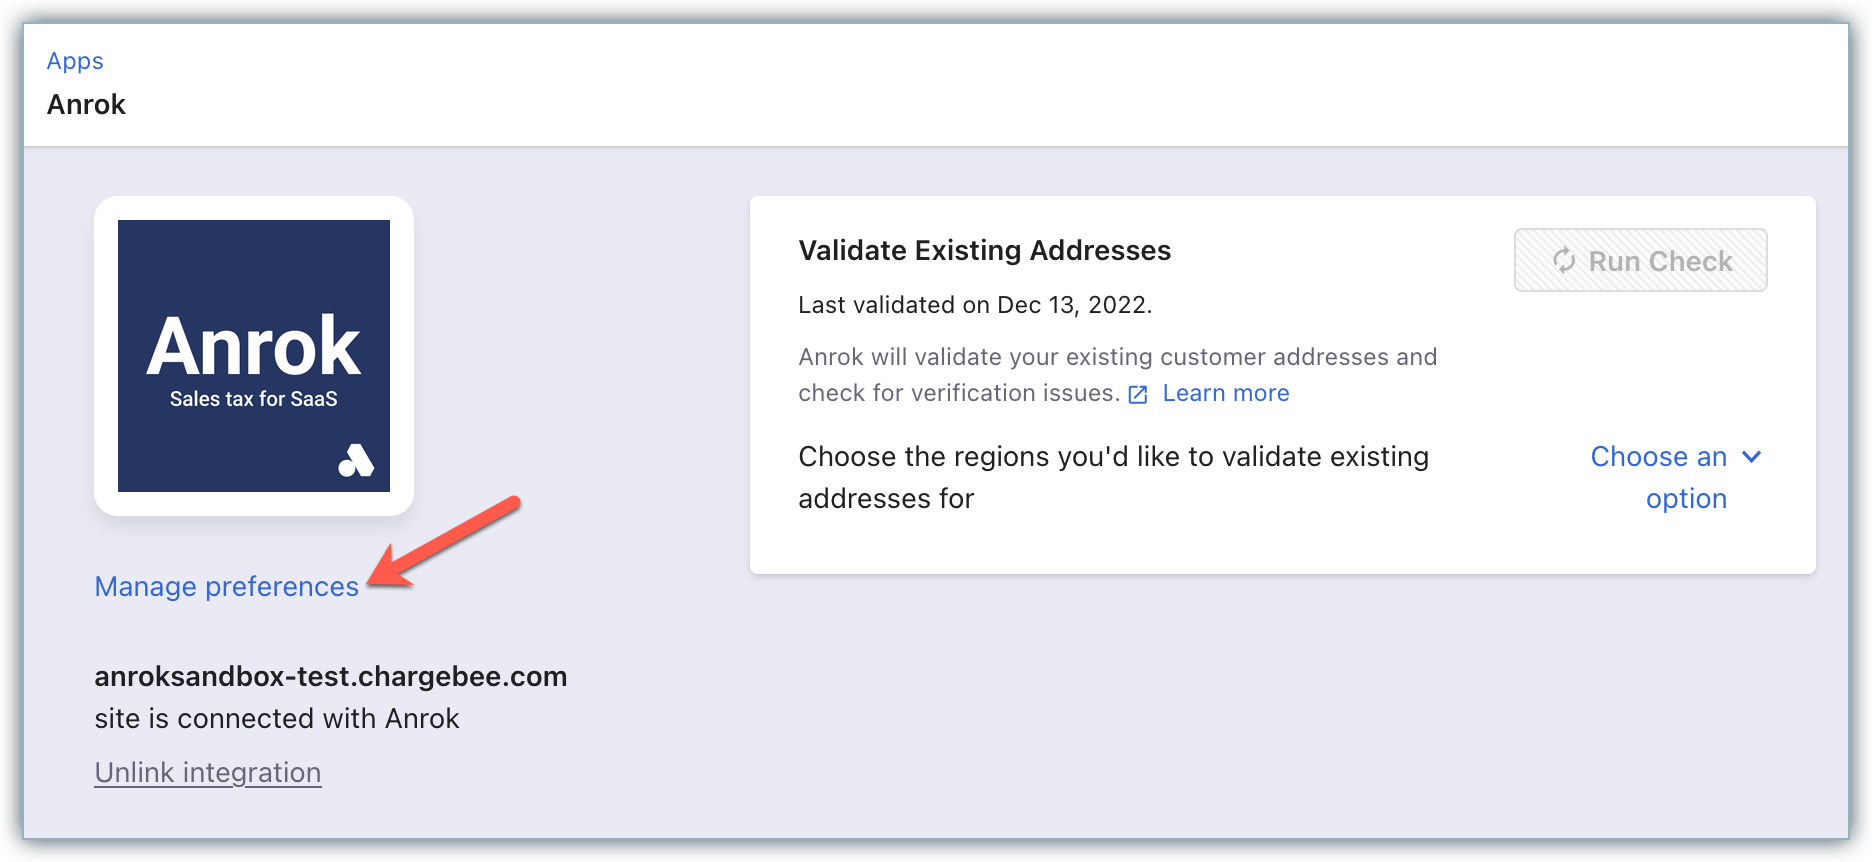
You can make changes to the integration preferences at any point in time by clicking Apps > Apps Connected > Anrok > Manage > Manage Preferences.
Enabling Anrok for Tax Calculation for Taxable Regions/United States
This is a crucial step in the integration. Unless you execute this step, Anrok will not be used for automatic tax calculation in Chargebee. After connecting the Anrok account with your Chargebee site, click Go to Taxes on the Anrok app page.
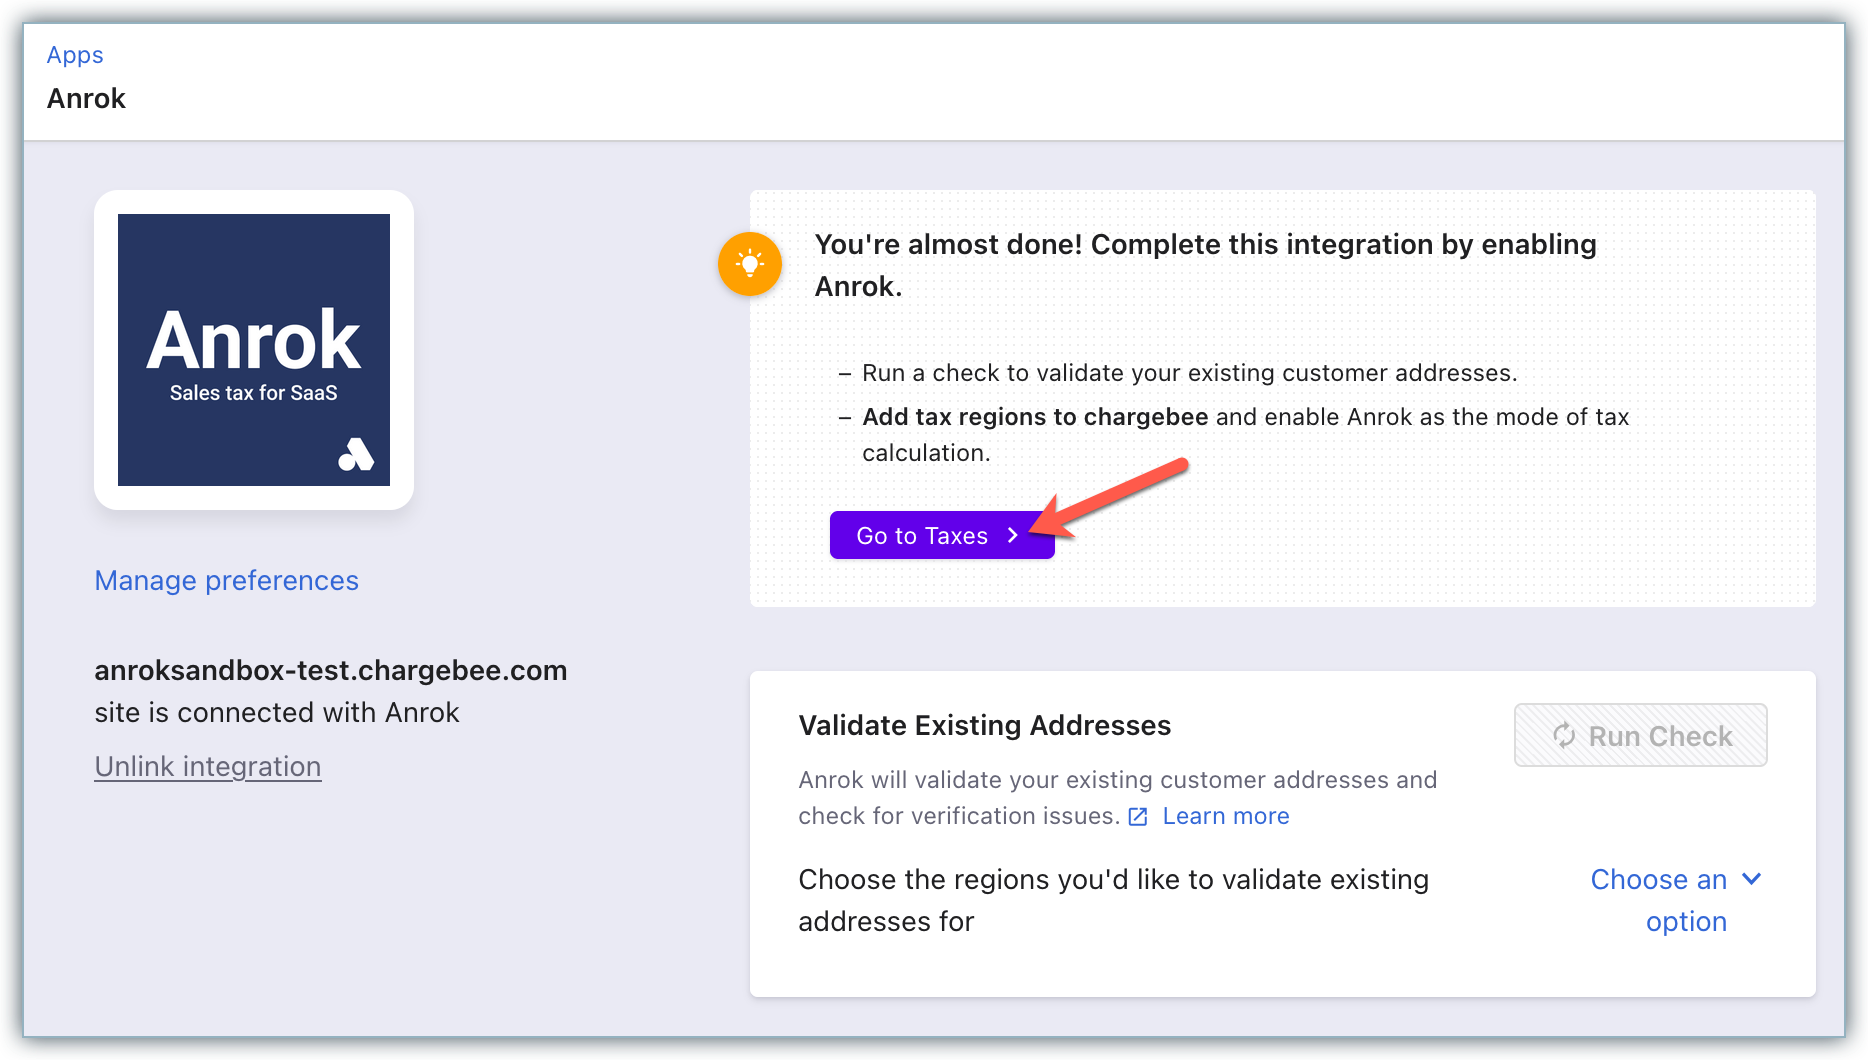
Alternatively, you can click Settings > Configure Chargebee > Taxes.
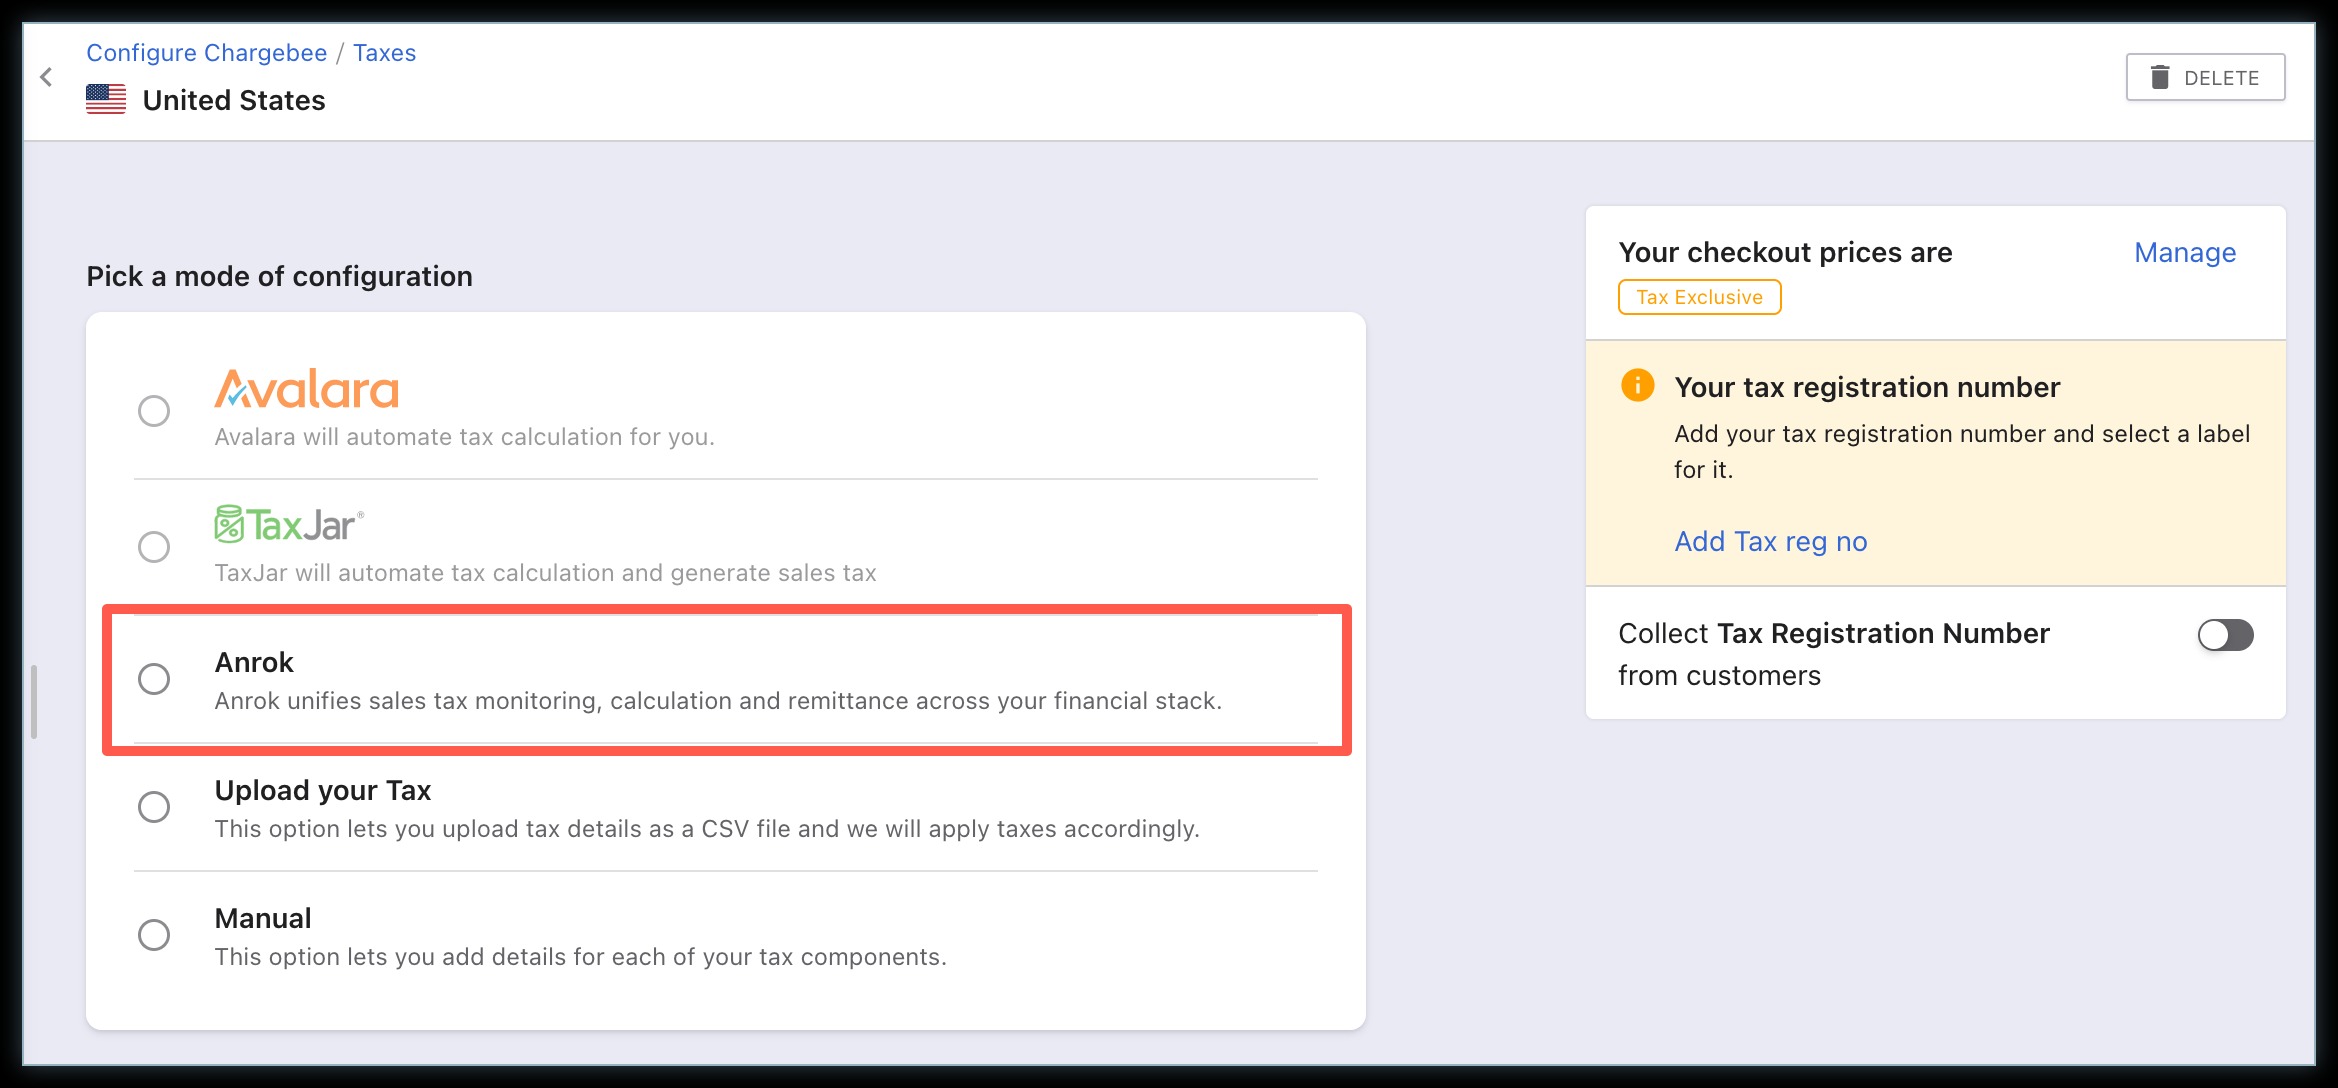
Go to the taxable region - United States and select Anrok as your preferred mode of tax calculation.
Limitations
- Currently Tax inclusive price type is not supported by the Chargebee-Anrok integration.
- The tax rates sent from Anrok to Chargebee are rounded off to two decimal places. This could lead to a slight variation in the tax rates and consequently - cent mismatch in the total invoice amount between the two application
Related Articles
Show more
Was this article helpful?