Checkout.com
Checkout.com is a unified platform that manages all stages of a payment cycle. Chargebee's integration with Checkout.com enables card payments for merchants from North America and Europe.
Types of platforms
Checkout.com supports the NAS platform, the latest platform for new business workflows, such as sub-entities, marketplaces, and more. It also supports backward compatibility.
Note:
To find out the platform type of your Checkout.com account, contact your Account Manager or the Checkout.com support team.
Supported payment methods
Click the links below to learn more about configuring the desired payment method:
Limitations of NAS platform
The following are the limitations:
- Reconciliation is not supported for the NAS platform using the API.
Types of accounts
Checkout.com has two types of accounts: test account and live account. You can integrate the test account of Checkout.com with the test site of Chargebee and the live account of Checkout.com with the live site of Chargebee.
Prerequisites
Contact Checkout.com's support and get full API access for your test and live site.
Integration options
Listed below are the integration options available between Chargebee and Checkout.com:
Information
In order to receive payments from customers via Checkout.com, it is necessary for Chargebee to have customer's billing address.
| # | Methodology | Description | PCI Requirements | 3DS supported? |
|---|---|---|---|---|
| 1 | Chargebee API + Checkout.com Gateway | In this method, collecting card information should be handled at your end and passed on to Chargebee via the API. Chargebee will route this card information directly to Checkout.com. | High (card information will be collected by you directly, you will have to take care of PCI Compliance requirements) | NoFor more info, contact support |
| 2 | Chargebee Checkout + Checkout.com Gateway | In this method, the card information of the customers are collected by Chargebee's checkout and directly passed on to Checkout.com. | Low (Your PCI compliance requirements are greatly reduced because of Chargebee's checkout. As a merchant using Chargebee's checkout, all you have to do is submit a Self Assessment Questionnaire to stay compliant.) | Yes |
| 3 | Checkout.com.js + Chargebee API | In this method, the card details are captured and tokenized on your side by Checkout.com's javascript library and the token is sent to Chargebee. | Low (card details are tokenized by Checkout.com) | Yes |
| 4 | Chargebee.js (JS helper) + Checkout.com gateway | There are multiple ways to interact with Chargebee.js. * You can use Chargebee Components and Hosted Fields to collect the card details.
| Low High (card information will be collected by you directly, you will have to take care of PCI Compliance requirements) | Yes |
Retrieving the API Key and Secret Key
While configuring Checkout.com in your Chargebee site, you are required to enter the API Key and Secret Key. You must get these keys from your Checkout.com account.
Follow these steps to retrieve the API Key and Secret Key:
-
Login to your Checkout.com account (NAS platform).
-
Go to Developers > Keys.
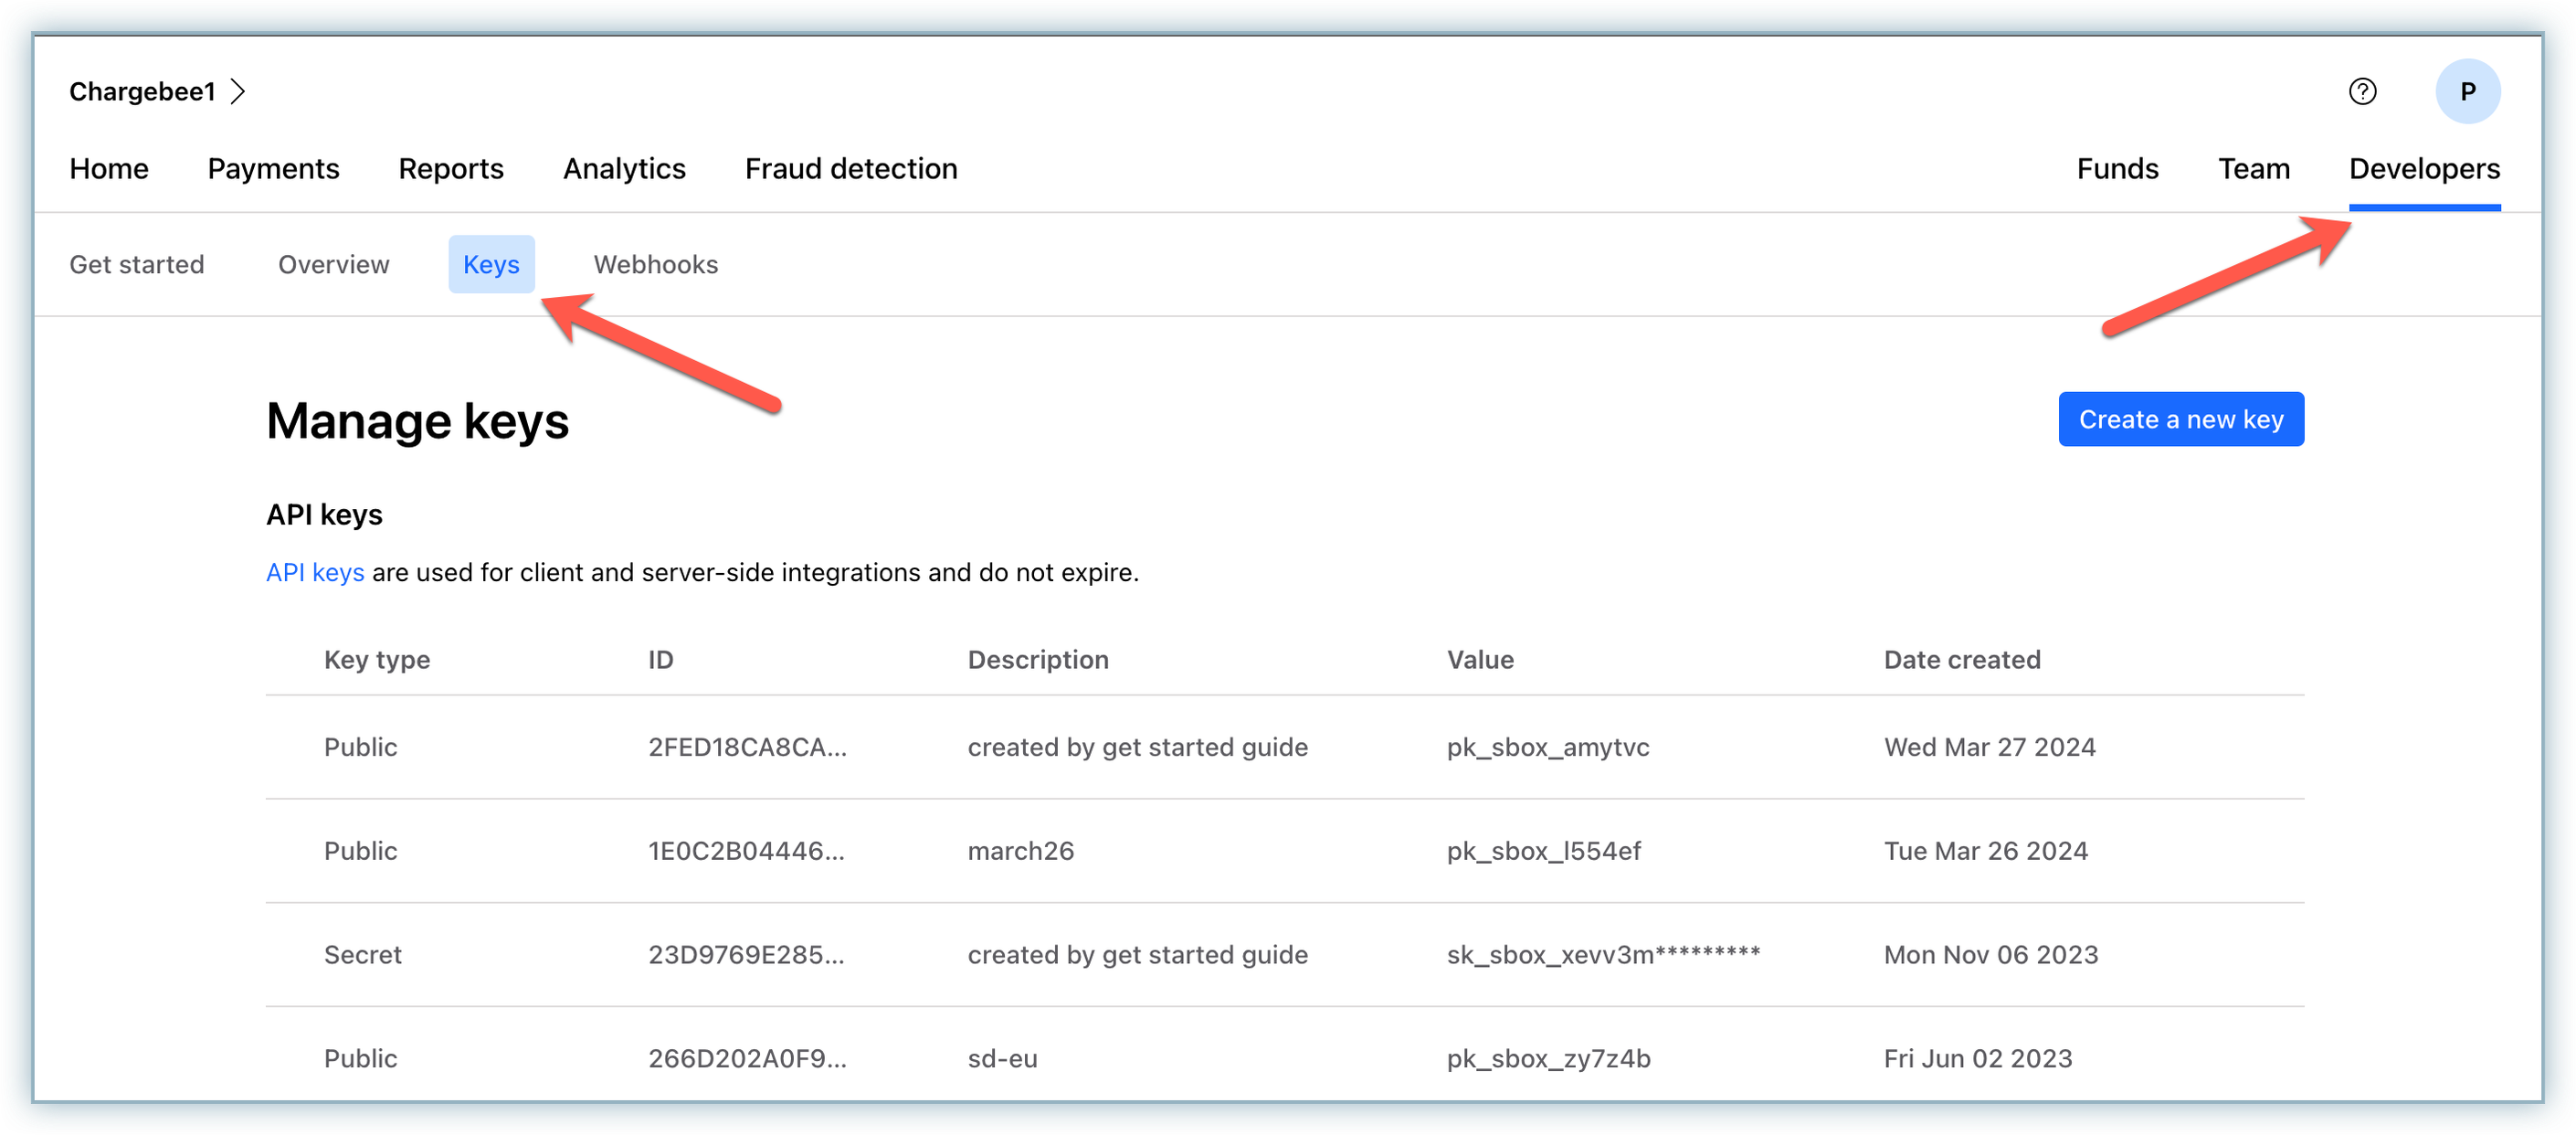
-
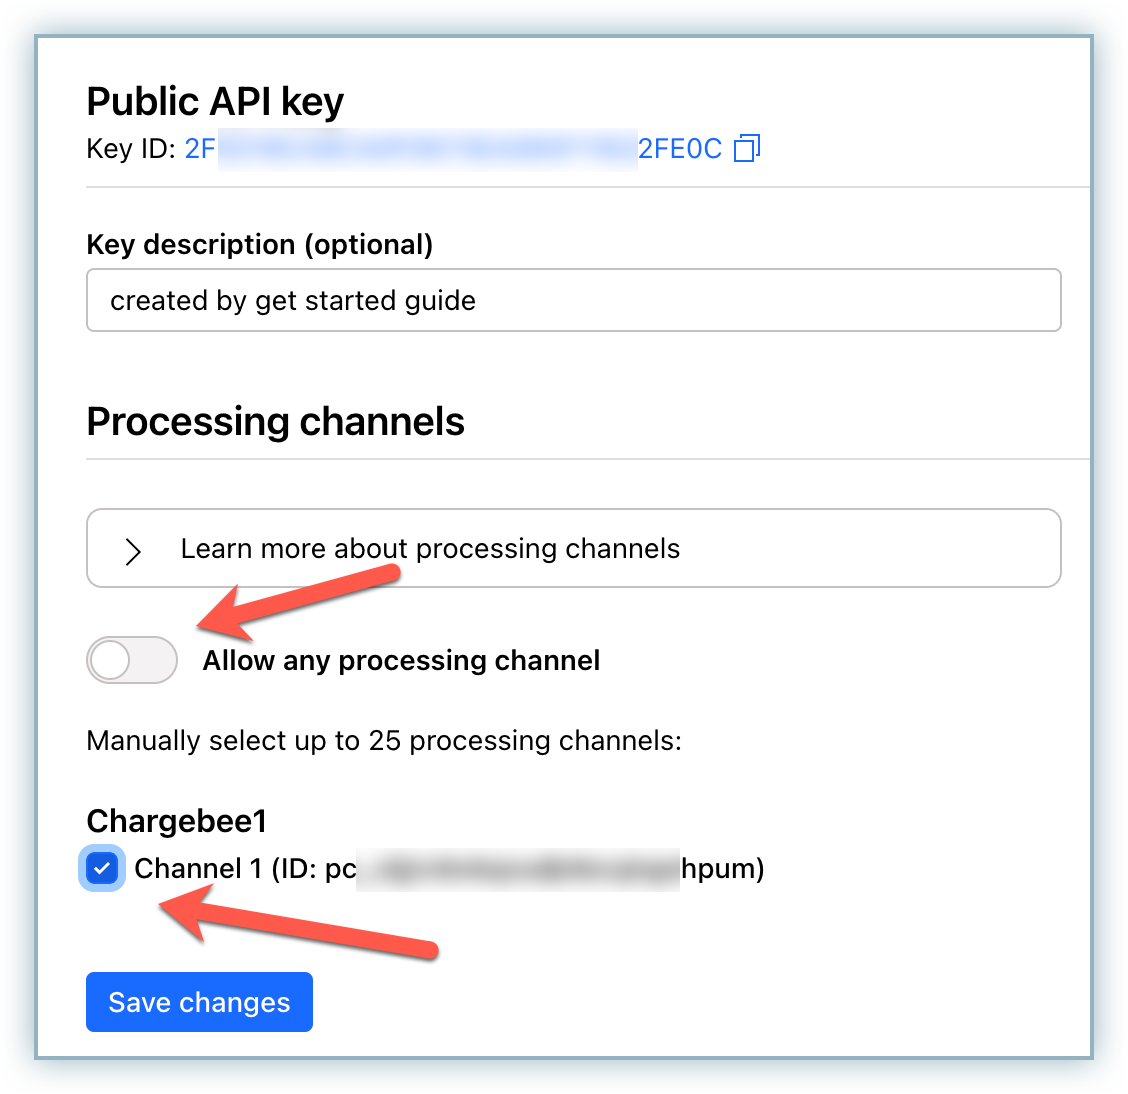
Click on any existing Public key and Secret key, and copy the Value. If you don't have an existing key, create a new one using the Create a new key button in the top-right corner.
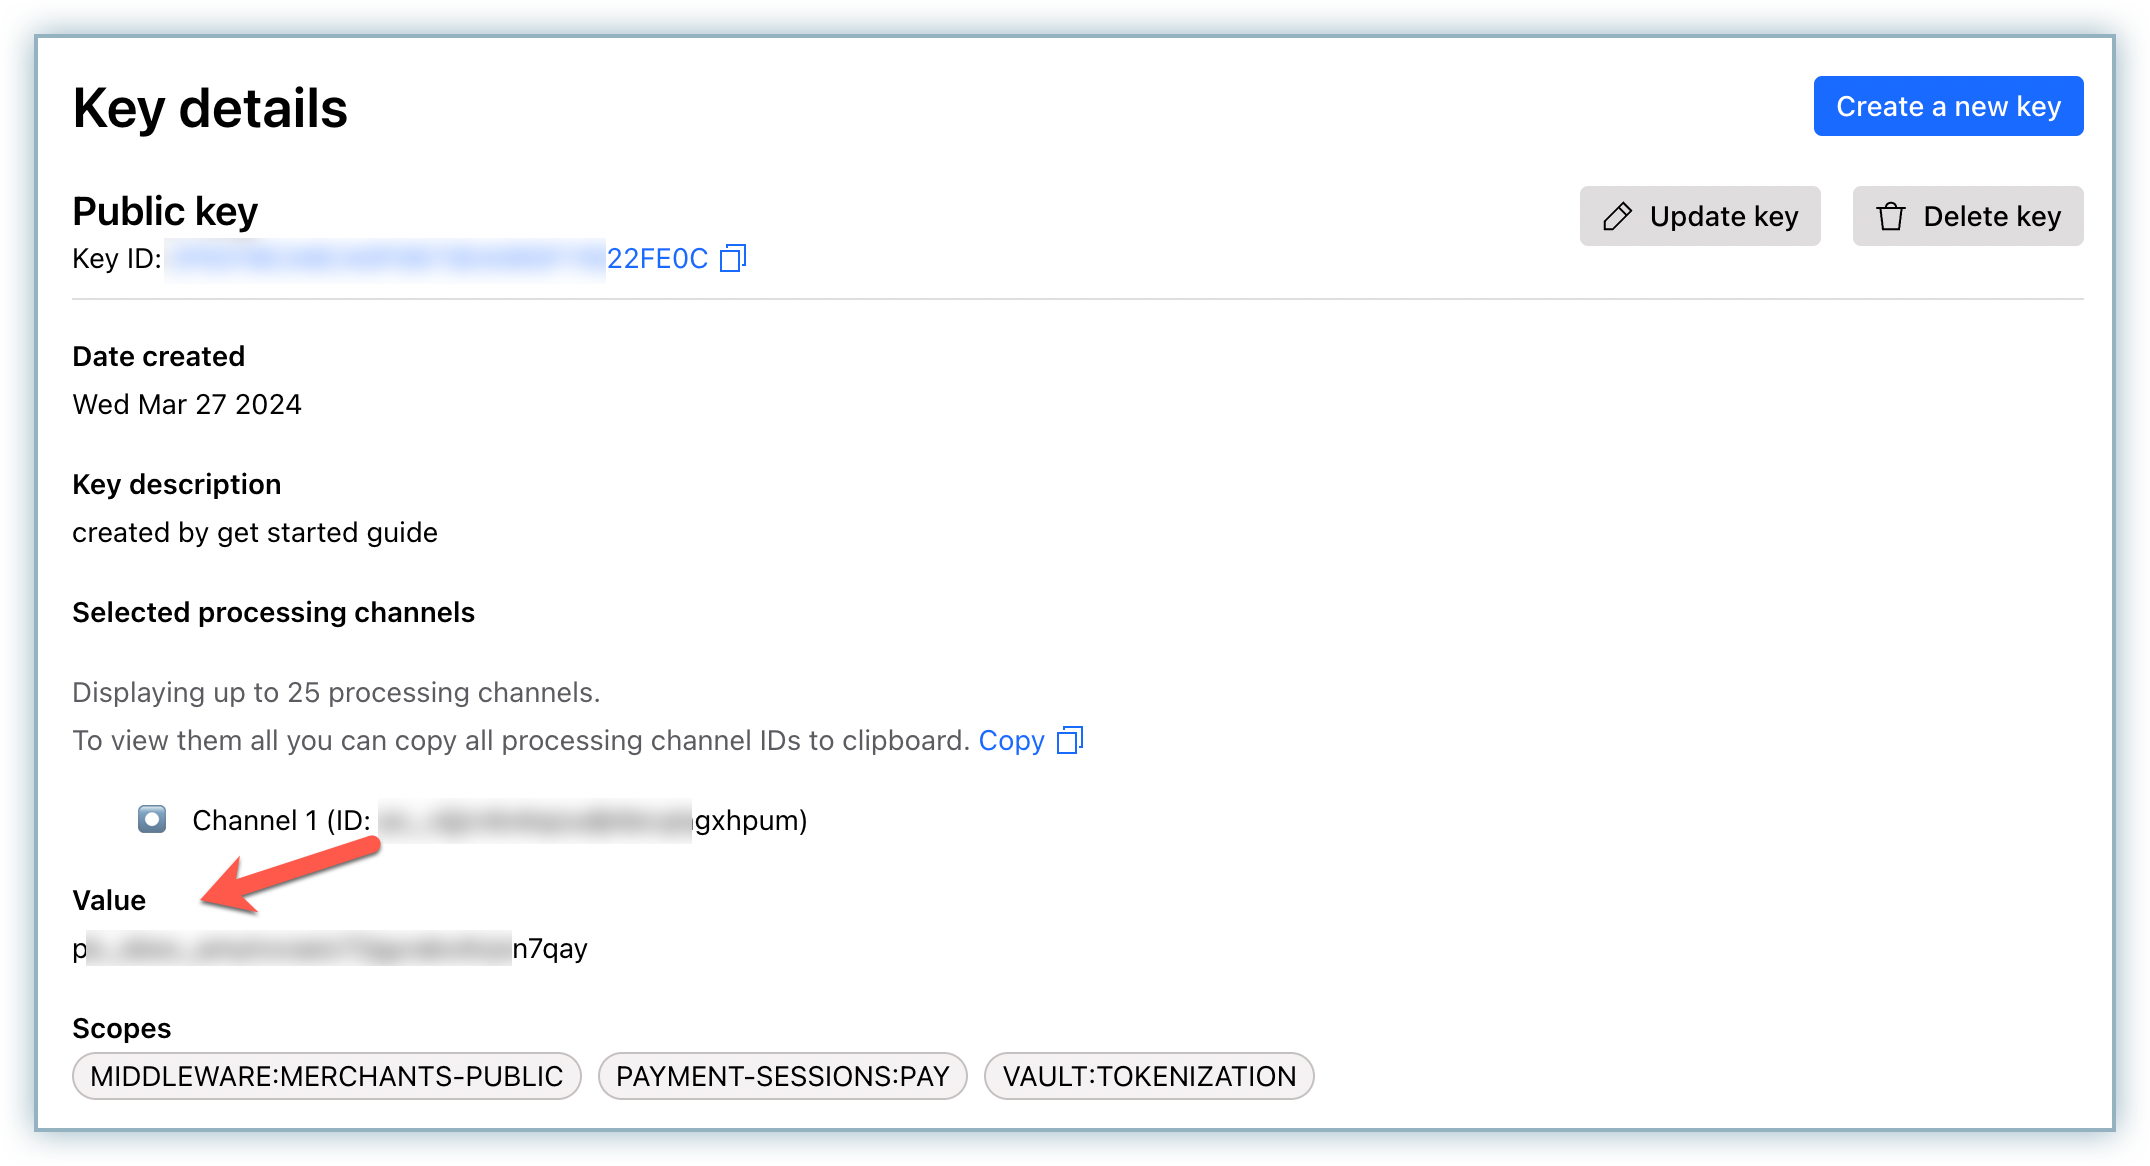
Note:
Whether you are creating a new key or using an existing one, make sure to uncheck Allow any processing channel and select the required channel from the list below. You can do this while creating a new key or updating an existing key.
Configuring Checkout.com
To set up this integration, you need to obtain your Secret API and Public API key from Checkout.com as explained in the previous section. Once you have noted the keys, follow these steps to integrate with Checkout.com:
-
Login to the Chargebee app.
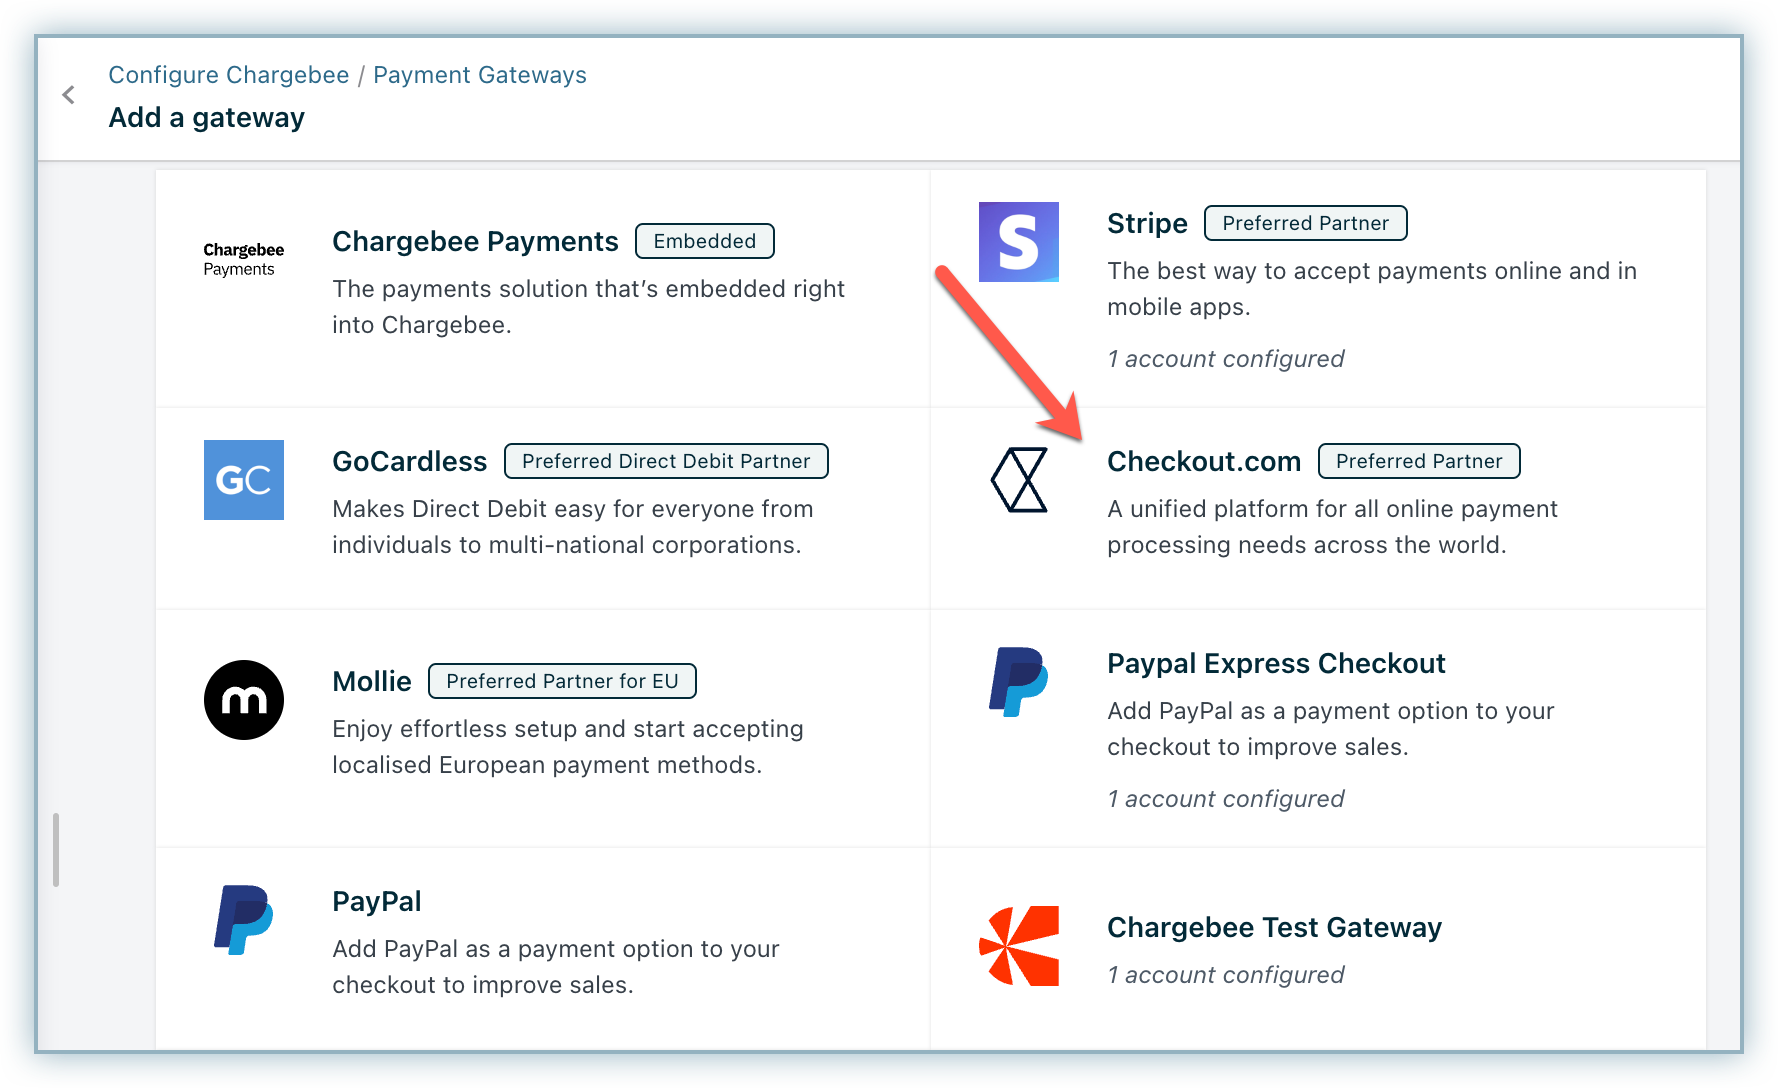
-
Click Settings > Configure Chargebee > Payment Gateways > Add Payment Gateway > Checkout.com
-
Enter the API Secret Key and API Public key.
-
Click Connect.
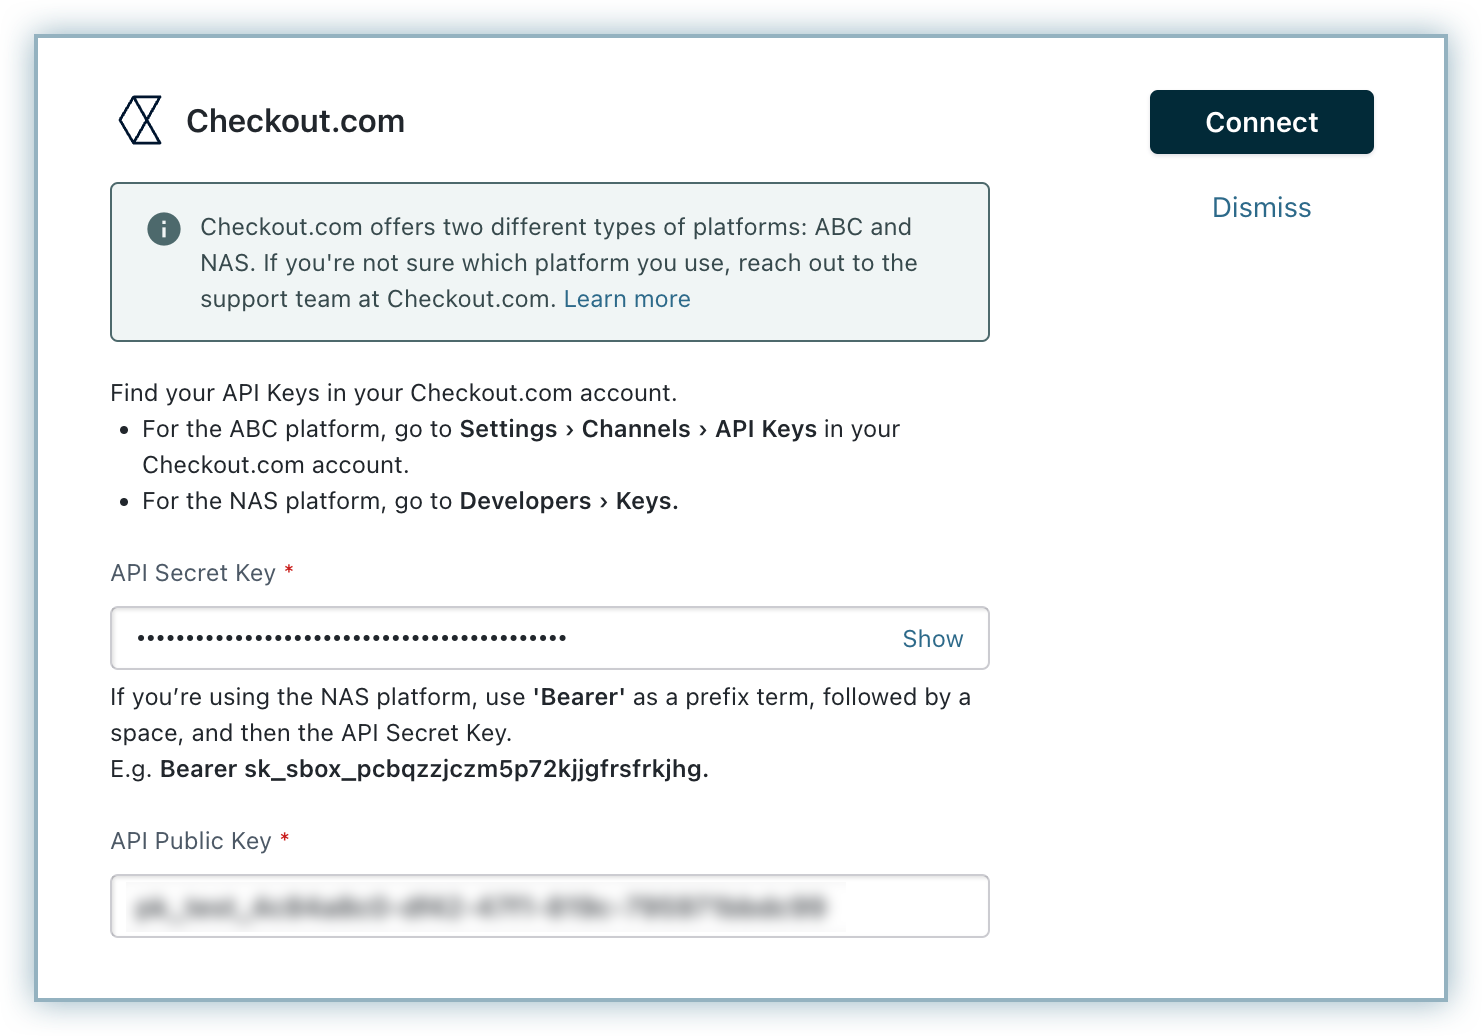
Note:
As Chargebee supports the NAS platform only, you must enter the API Secret Key as Bearer space Secret Key. For example, Bearer sk_sbox_pcbqzzjczm5p72kqdgfrsfrkjhg
You have now successfully configured the integration between Checkout.com and Chargebee. You can manage the settings from the Configure Checkout.com Settings page shown below.
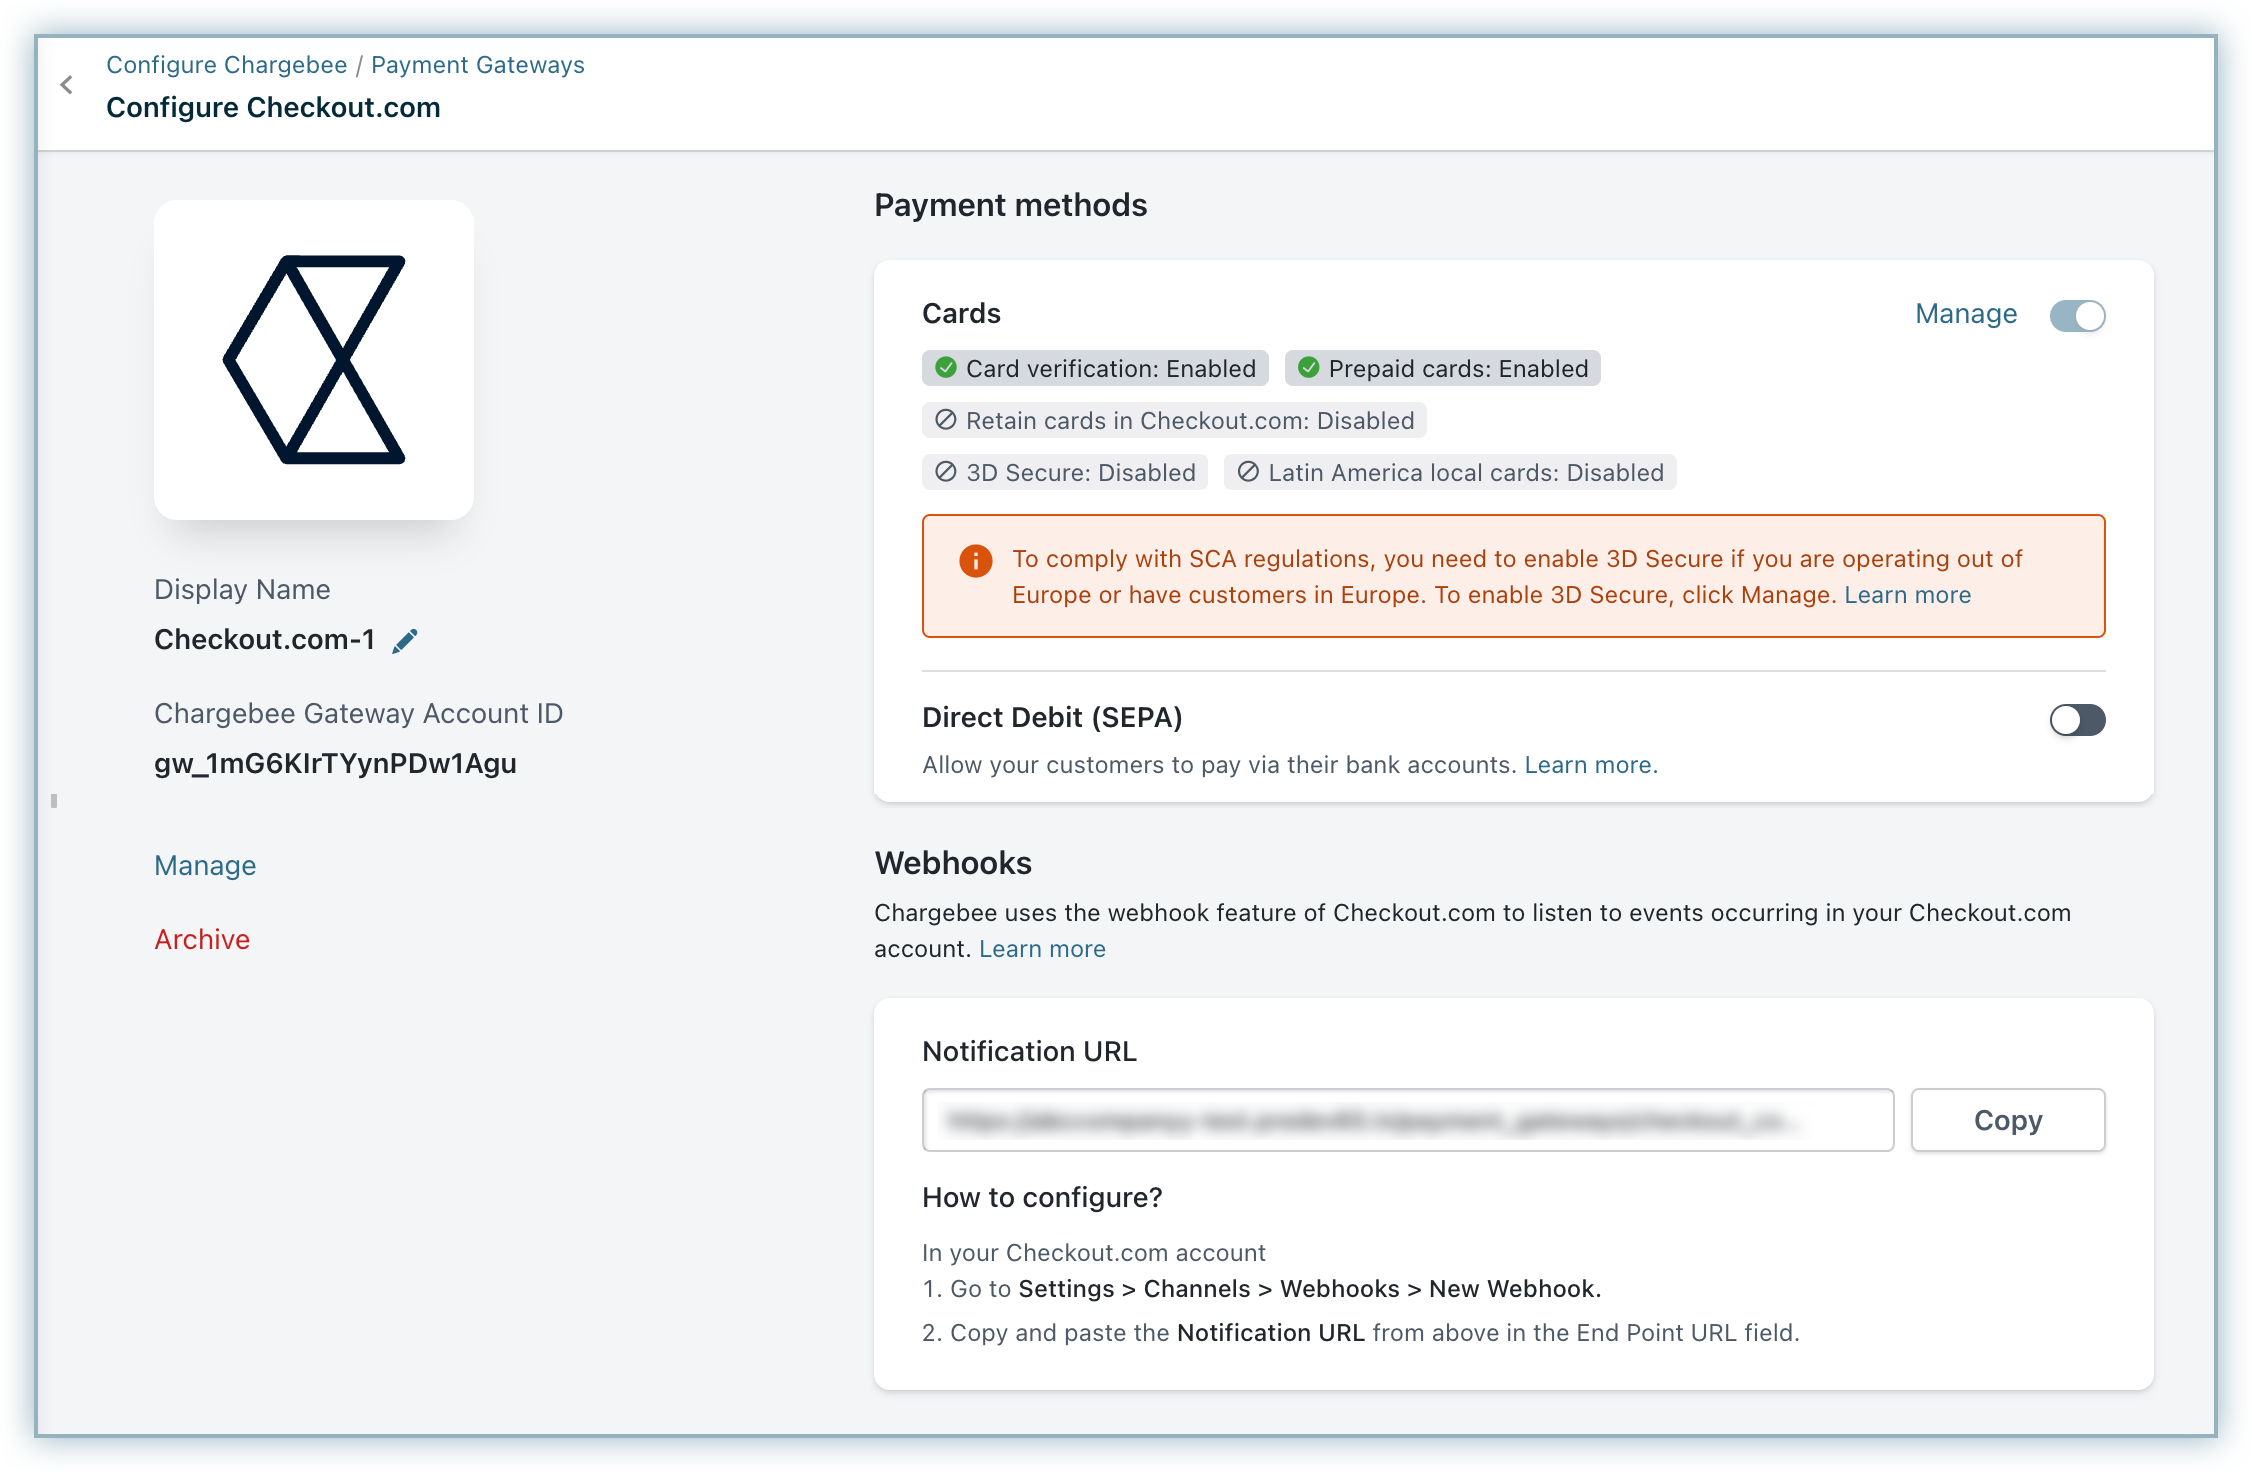
Due to recent world events, you may experience failures for payments originating from Russian financial institutions or instruments. We recommend reviewing guidelines issued by respective payment gateways for additional information.
Cards
To change the Cards Setting, click the Manage link. The Cards Settings page is displayed.
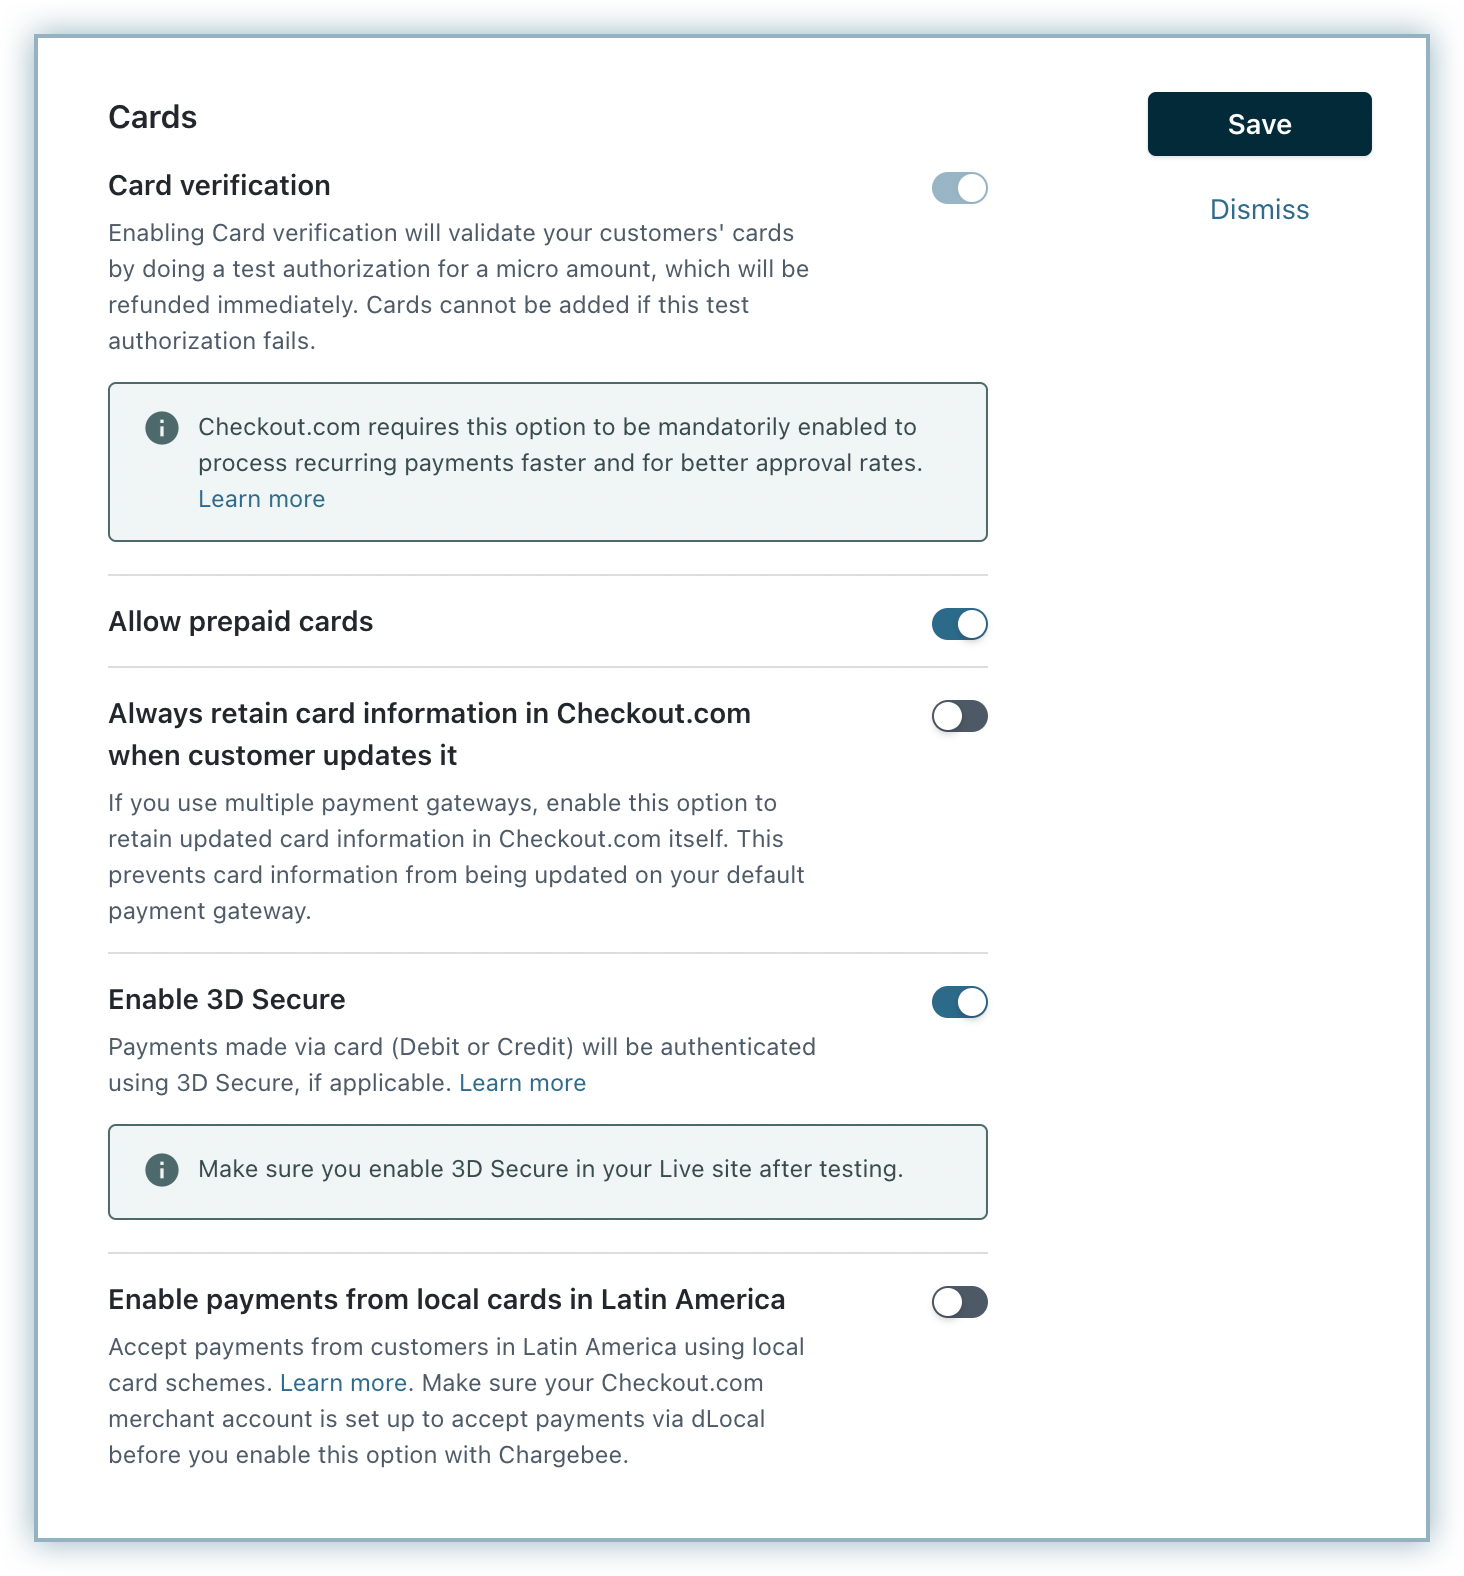
- Card Verification: This is a mandatory option. An amount of $1 is deducted from the customers' card for validation. This amount is refunded immediately. Cards that do not pass this validation, will not be added.
Checkout.com mandates to send the Source Transaction ID for recurring payments which helps in better payment approval rates. This setting is made mandatory as it allows Chargebee to send the information to Checkout.com even for cases where there are delayed payments (like trial). It ensures that all cards are verified before being vaulted in the gateway.
- Allow Prepaid cards: Enabling this option allows your customers to use a prepaid card for their transaction.
- Always retain card information in Checkout.com when customer updates it: Enabling this option stores the updated card information in Checkout.com rather than the default gateway.
Once you have made the necessary changes, click Save.
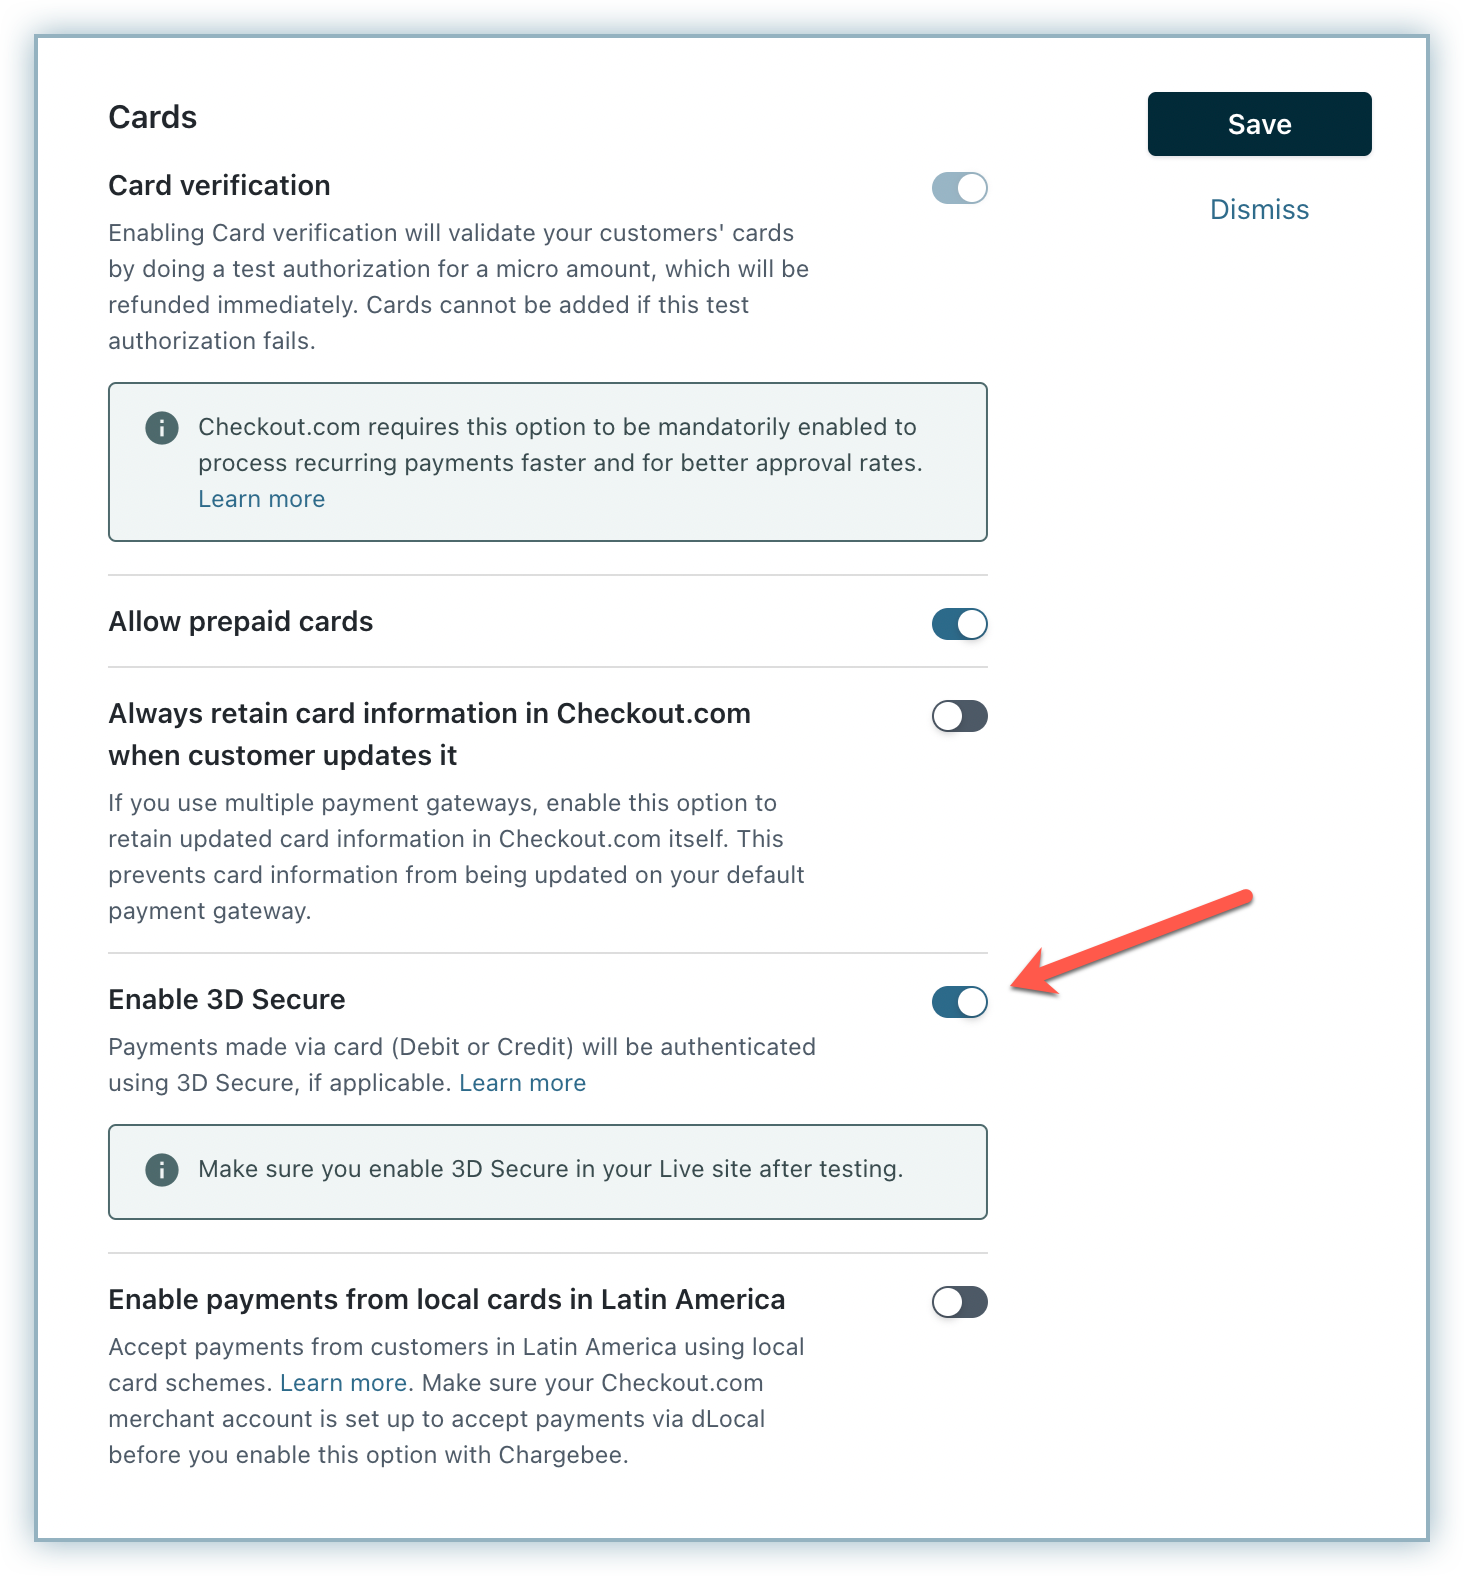
Enable 3D Secure Authentication
Complete the steps below to enable 3DS for this integration:
-
Click Manage to view the Card settings screen.
-
Toggle Enable 3D Secure.
-
Click Save.
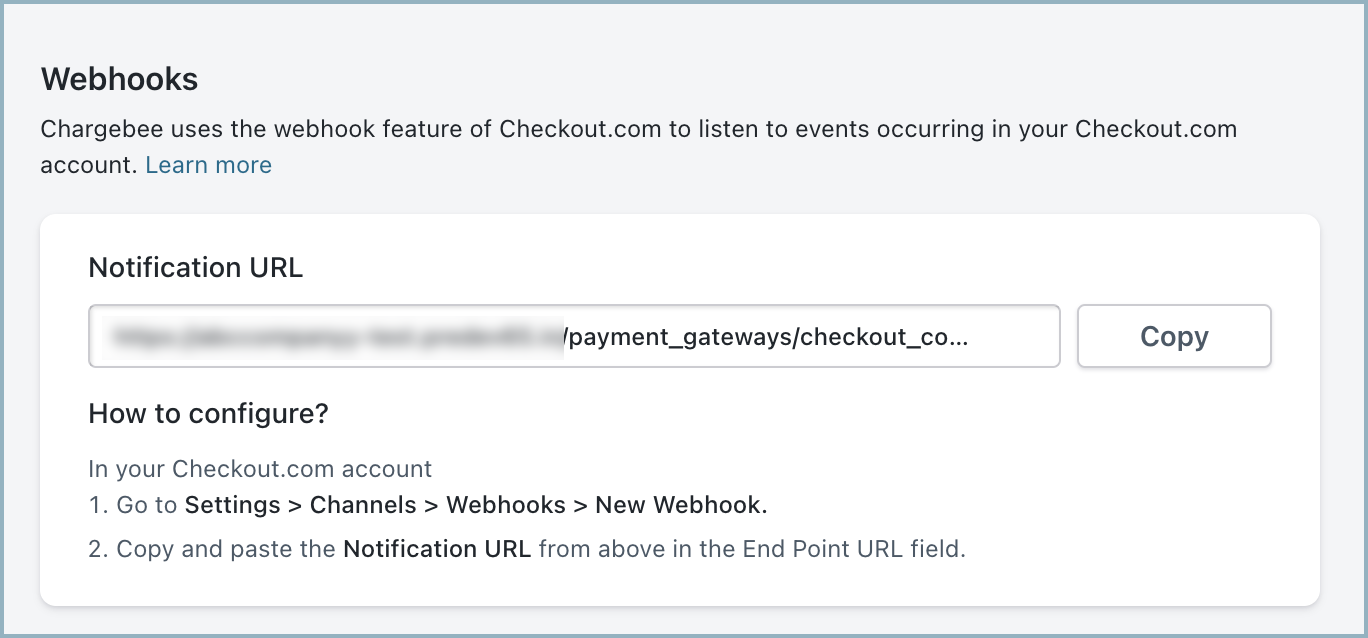
Webhooks
The configuration of Webhooks is a mandatory prerequisite for this integration to function effectively. Follow the steps below to configure webhooks:
-
On the Configure Checkout.com page, copy the Notification URL. This URL must be used on your Checkout.com site to ensure that Chargebee receives notifications for all events associated with this account.
-
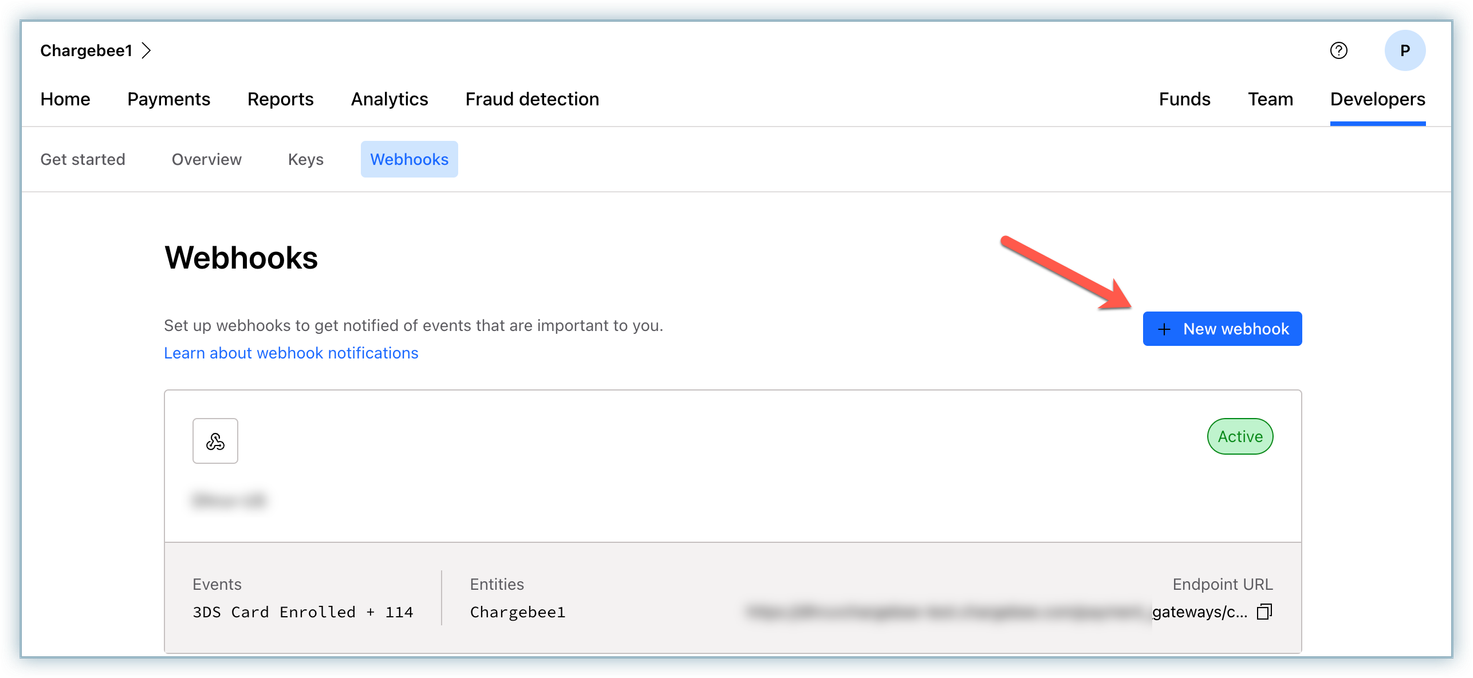
Log in to your Checkout.com account (NAS platform), and navigate to Developers > Webhooks.
-
Click + New webhook.
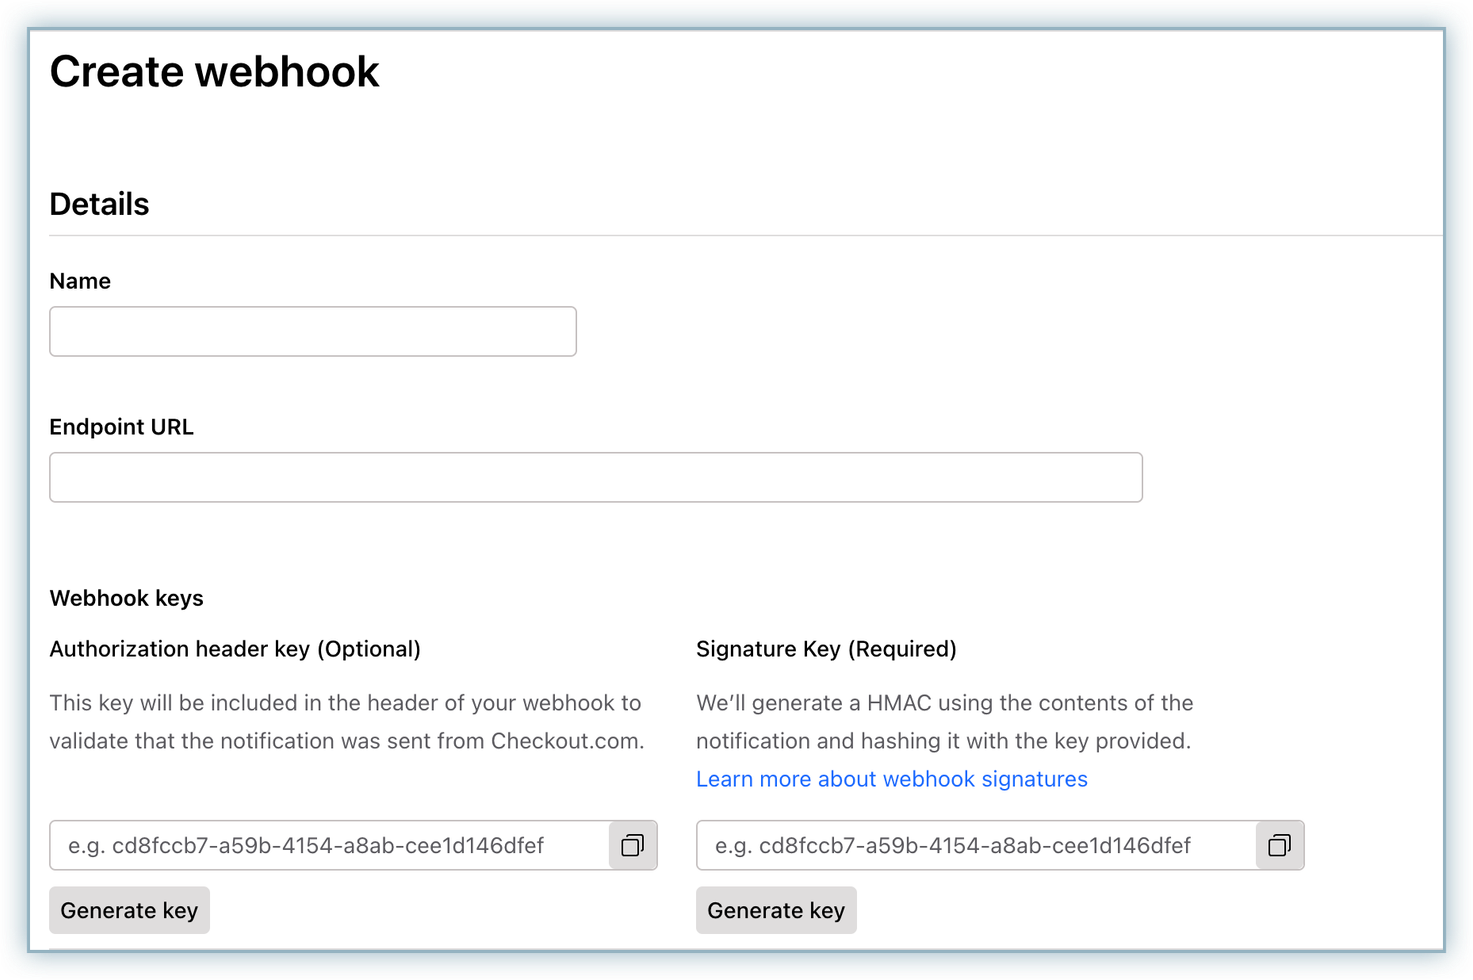
-
Enter the notification name in the Name field.
-
Paste the Notification URL copied from your Chargebee site in the Endpoint URL field.
-
In the Webhook keys section, enter the API Secret Key retrieved from your Checkout.com account in the Signature Key field. Make sure to use 'Bearer' as a prefix term, followed by a space, and then the API Secret Key. For example, Bearer sk_sbox_pcbqzzjczm5p72kqdgfrsfrkjhg
-
Skip the Authorization header key field.
-
Select all the events under the Events section.
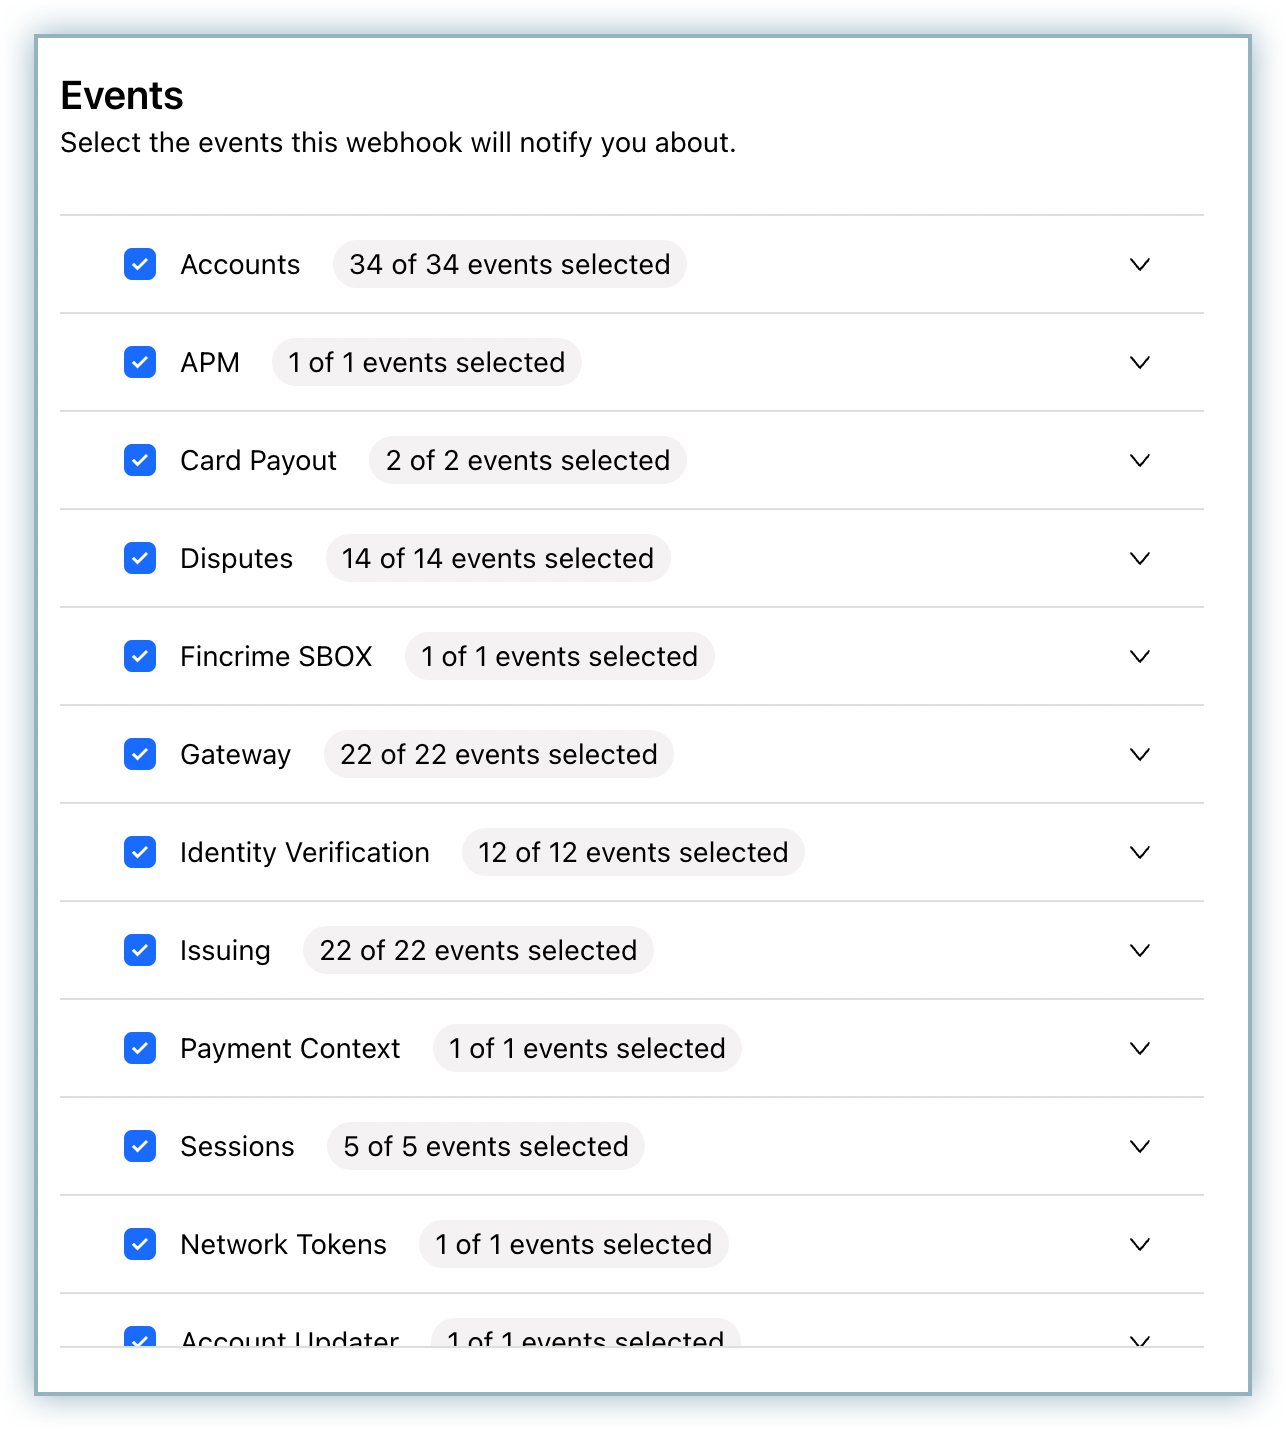
-
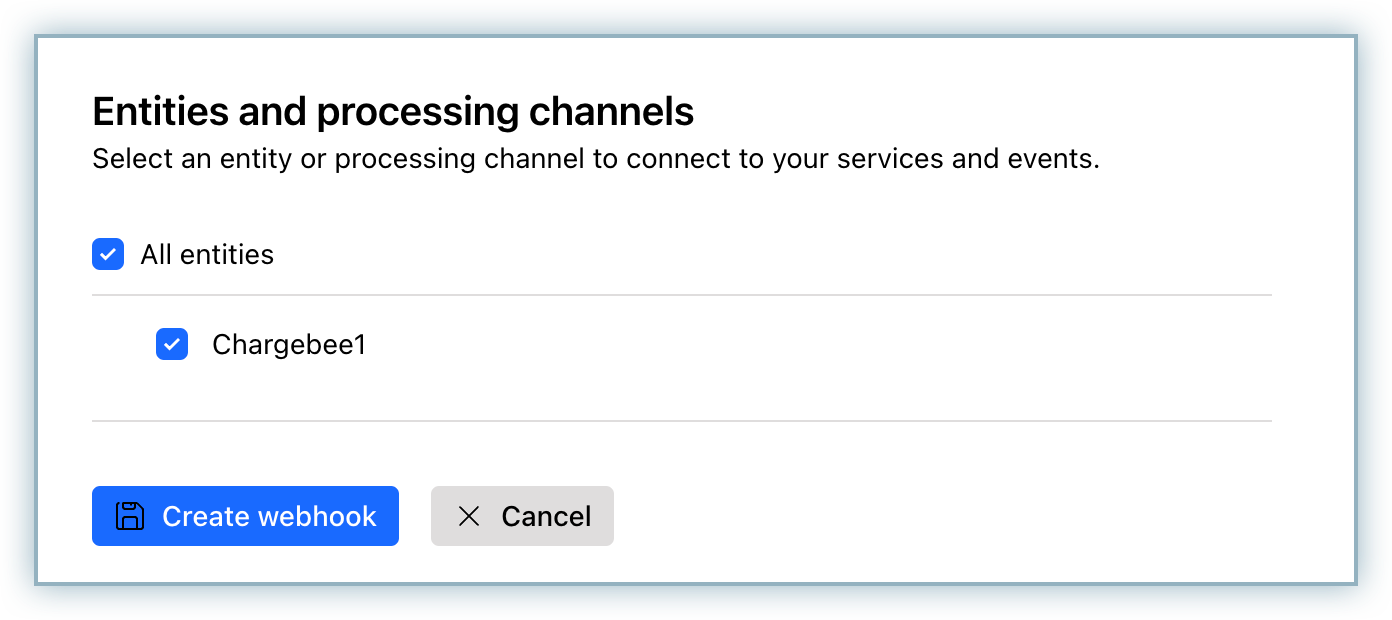
Select the All Entities checkbox under the Entities and processing channels section.
-
Click Create webhook.
Automated Account Updater
This integration supports automated account updates for cards.
Payment failures and recovery are the most difficult aspects of recurring billing businesses due to the sheer complexities involved. In most cases, payment failures occur as a result of an expired or updated card. Chargebee supports an automated account update for Checkout.com. Each time there is an update to the customer's card number, expiry, or Customer Verification Value (CVV), the details are updated in Chargebee (in real-time) with the help of card networks and the Checkout.com gateway. This helps avoid any manual efforts for your customers and more importantly, avoid payments failing due to outdated card information.
Supported Currencies
Checkout and Chargebee support 100+ different currencies for charging customers across different geographical locations. If you intend to use Checkout+Chargebee for your business, ensure that your transactional currencies are supported by both. Find the complete list of currencies supported by:
Additional Fields for Fraud Screening
Checkout.com, a trusted payment gateway provider, understands the critical need for robust fraud screening and efficient payment approval processes. Checkout.com recommends sending specific information or fields about payers to enhance these measures. By collecting this valuable data, you can bolster your defences against fraudulent transactions and streamline the payment approval process, ensuring a safer and smoother experience for businesses and customers.
The fields include:
- firstName
- lastName
- phone
- addressLine1
- addressLine2
- addressLine3
- city
- state
- stateCode
- countryCode
- zip
- paymentIp
Note:
Please contact Chargebee Support to enable the paymentIp field to be passed.
Lets us see how you can enable and send these fields when using Chargebee's Hosted Pages or Chargebee JS:
Using Chargebee Hosted Pages
Follow the steps below to enable these fields when using Chargebee's Hosted Pages:
-
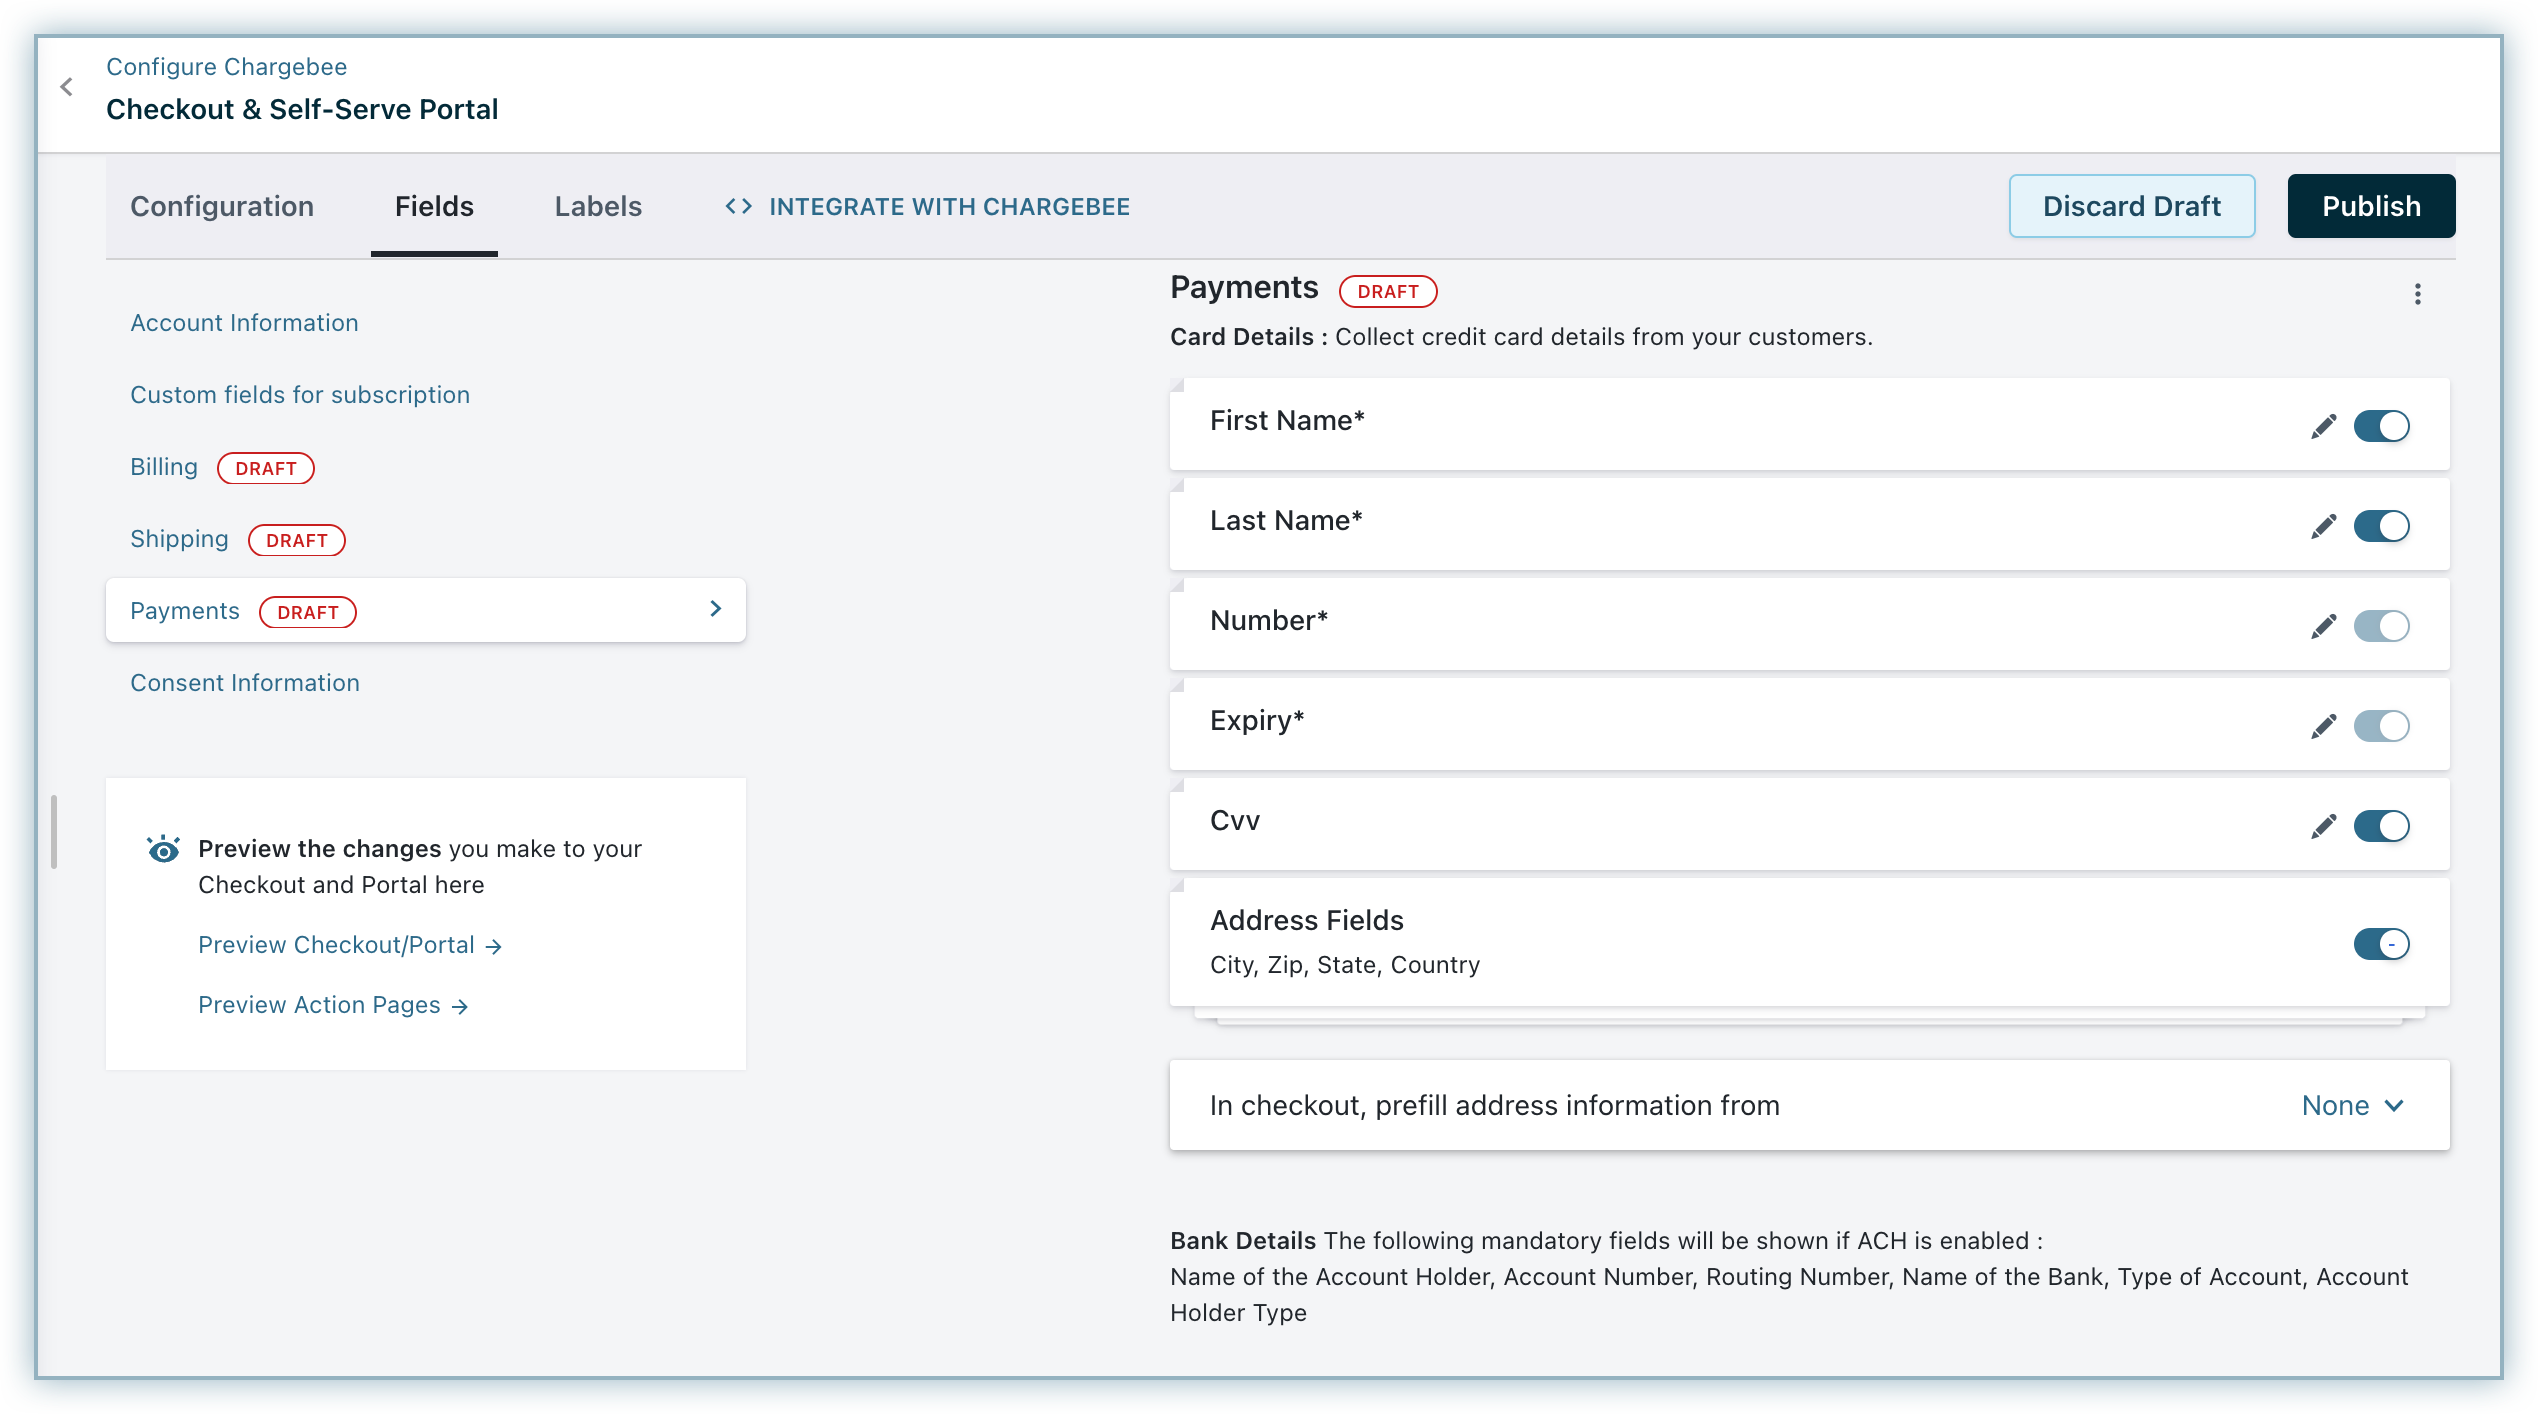
Go to Settings > Configure Chargebee > Checkout and Self-Serve Portal.
-
Switch to the Fields tab and select Payments.
-
You must enable the above-listed fields. Click Publish. Address fields will appear only if None is selected from the In checkout, prefill address information from drop-down menu.
-
Choose to prefill address-related information from Billing or Shipping details by selecting the relevant option under the In checkout, prefill address information from drop-down menu.

Using Chargebee JS
Chargebee JS provides a comprehensive set of tools and functionalities that allow you to harness the capabilities of Checkout.com within your billing and subscription management workflows.
If you are utilizing Chargebee JS, it is recommended to pass these fields as parameters via appropriate handler methods based on your chosen payment method. The following payment method handlers are supported via Chargebee JS:
Was this article helpful?