Setting up a custom domain
By default, Chargebee Growth hosts your cancel experience on a Chargebee domain. You can configure a custom domain to provide a branded experience for your users.
When a custom domain is configured, users see your domain (for example, cancel.example.com) instead of a Chargebee-hosted URL.
Before you begin
Before you configure a custom domain, make sure that you have:
- Access to your DNS provider.
- Permission to create and update DNS records, such as CNAME and, optionally, CAA records.
Configuring a custom domain
To set up a custom domain, complete the following steps.
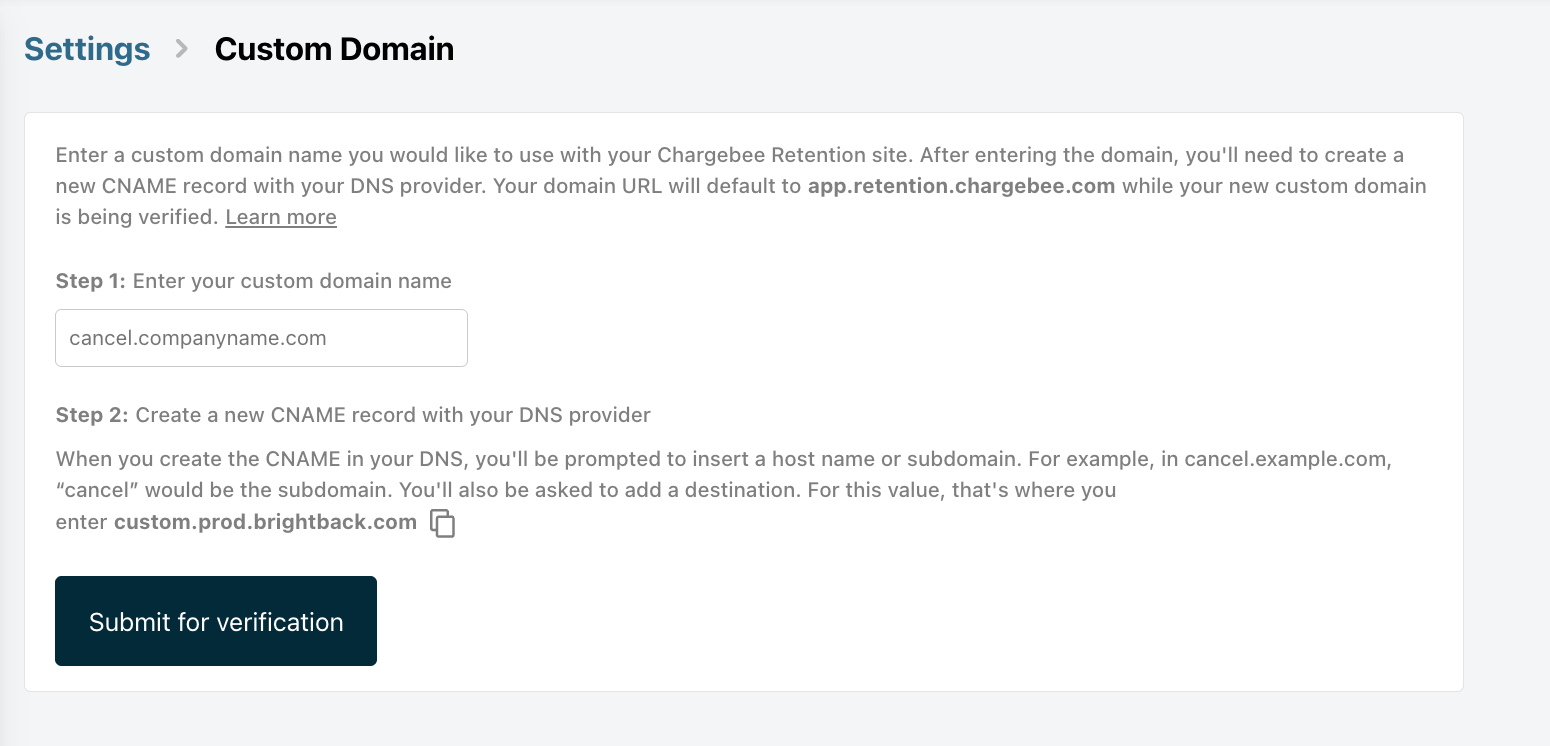
-
Go to Settings > Custom domain.
-
Enter the subdomain you want to use, for example,
cancel.example.com. -
In your DNS provider, create a CNAME record with the following values:
- Host / Name:
cancel - Destination / Target:
custom.prod.brightback.com
This maps your domain to the Growth experience.
- Host / Name:
-
Return to the Custom domain page and click Submit for verification. Chargebee Growth validates your DNS configuration, SSL certificate setup, and domain reachability. You receive a confirmation email once the domain is ready.
-
After verification succeeds, enable the custom domain from the Settings page to start using it.
How custom domain routing works
When a user visits your custom domain, your DNS configuration routes the request to the Growth infrastructure while preserving your branded URL:
cancel.example.com → custom.prod.brightback.com
DNS propagation
DNS changes are not always immediate. Keep the following timings in mind after you create or update your records:
- DNS changes can take up to 24 hours to propagate.
- Changes often take effect within 1–2 hours.
- The recommended TTL is 300 seconds.
Troubleshoot verification failures
If verification fails, review the following common issues.
CNAME or DNS record is not configured correctly
Make sure that:
- The CNAME record exists.
- The destination is exactly
custom.prod.brightback.com.
Invalid domain format
Enter a valid subdomain, such as cancel.example.com. The following formats are not valid:
http://cancel.example.comcancel
Connection or SSL issues
The following errors usually indicate a DNS propagation delay or an SSL handshake issue:
connect_timeoutio_exceptionnon_200_status
If you see these errors, wait for DNS to finish propagating and then try again.
Certificate issues
certificate_expired: Renew the certificate.expected_certificate_authority_not_found: Make sure that Let's Encrypt is allowed to issue certificates for your domain. See Configure a CAA record.
Configure a CAA record (advanced)
If your domain uses CAA records, you must allow Let's Encrypt to issue certificates for it.
Example CAA record
example.com. 1800 IN CAA 0 issue "letsencrypt.org"
Check your existing CAA records
To check the CAA records for your domain, run:
dig +noall +answer example.com caa
Allow Let's Encrypt when a CAA record exists
If a CAA record is already configured, use one of the following options:
- Update the root domain: Add
letsencrypt.orgas an allowed certificate authority on your root domain. - Use a subdomain: Create a subdomain with its own CAA record and use it for your custom domain, for example,
cancel.subzone.example.com.
Verification error reference
| Error | Description |
|---|---|
| CNAME/CAA step incomplete | DNS configuration is missing or incorrect. |
| Healthcheck failed | The domain could not be validated. |
For persistent issues, contact growth-support@chargebee.com.
Additional resources
For provider-specific guidance on creating DNS records, see:
Was this article helpful?