Email Notifications
See also
Email is a prime channel of communication with your customers.
Chargebee can send emails to your customers on your behalf. The emails can be triggered for subscription, payment & invoice, customer retention and self-service related events.
With Chargebee, you can customize the style, template and content of the email notifications that Chargebee sends to your customers.
The emails will be compatible and responsive across all platforms. You can customize your emails and enable them individually.
Note
- Some features are available only in selected plans. To know more, visit Chargebee's Plans and Pricing page.
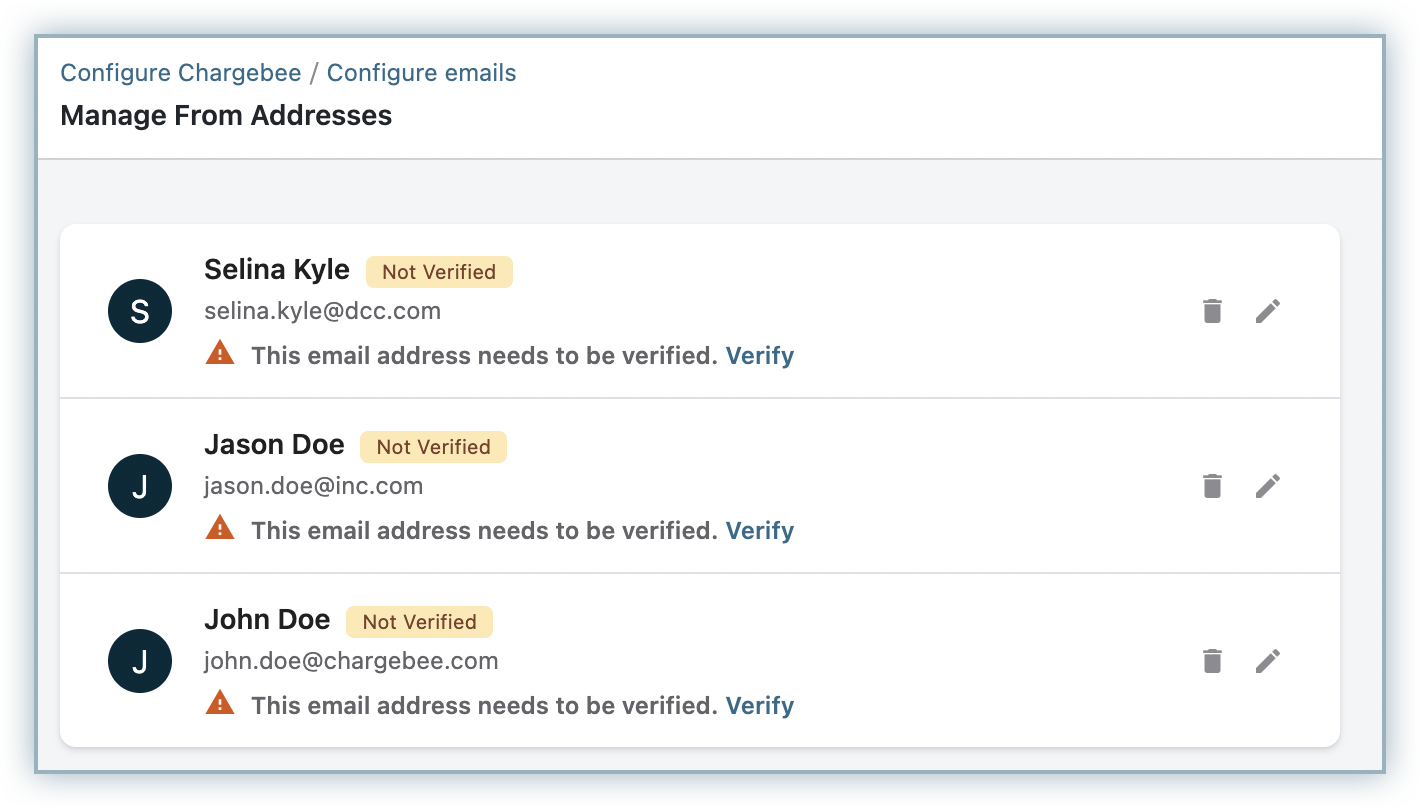
We have updated our security policy to verify existing sender(from)addresses. Please verify them in your Chargebee user interface under the Manage From Addresses page.
Setup Email Notifications
Customize Email Branding
Every email that your customer receives should look and feel like it's been sent by you.
Chargebee gives you the option to customise the way your email looks. This will help you align the emails that are sent by Chargebee with your branding. To know how to set up your branding with Chargebee, check out Chargebee's Branding page.
Note
Logo displayed on an invoice can be changed only using Customize Branding Styles option. You can no longer change the logo in an invoice in Customize Invoice & Credit Note Settings page (by navigating to Settings > Customize Invoice & Credit Note). The existing logo will show up in your branding page.
Customize Master Template
All of the emails you send out should look uniform. The master template allows you to customize elements that appear across all the emails you send out so they remain consistent from your customer's point of view.
Once the branding is in place, here you get to choose the information each email should contain by default. To get there, navigate to Settings > Configure Chargebee > Email Notifications
You will find the option Customize Master Template
Here's what you can configure in the master template:
- Sender Addresses
- Header
- CC/BCC
- Subject Prefix
- Footer
Sender Addresses
This feature helps you setup Sender Profiles. A Sender Profile consists of an email address, name, reply-to and a signature; this information will be added to all the emails that are sent using this profile.
A domain allowlisting feature is implemented for all the Test Sites to restrict unwanted test emails to your customers. You can only send emails to the default domain. The domain used for creating Test Sites and Email Notifications is known as the default domain. Allowlisting of the domain is applicable for all the email recipients mentioned in TO, CC, and BCC. Configure the list of domains that can receive test emails by raising a request to Contact Chargebee Support.
Here is a domain allowlisting scenario that benefits the users a lot.
- Consider Acme as a merchant with a default domain - acme.com who has a subscription customer - John Doe. During an email test, a example invoice is sent from test@acme.com to john@xzy.com. This incorrect invoicing can lead to false accounting for the customer. But due to the allowlisting feature test@acme.com cannot send a test email to xyz.com or any other domain than the default domain (acme.com).
To add a new Sender Address, log into your Chargebee user interface and navigate to Settings > Configure Chargebee > Email Notifications > Manage From Address > Add New
Verifying Sender Addresses
Click Verify against each sender address that has a verify prompt associated with it. The respective address would then receive an email requesting consent for being added as a Sender Address. Following affirmation, the email address will be made available in the sender address list.
All the existing Sender Addresses, excluding the owner and team members' email ids should be verified. Emails could still be sent using the existing unverified addresses until the deadline.
For every new Sender Address being added, which is different from the team members' email ids, verification is mandatory prior to being used in emails.
Note
- Sender profiles are different from the users in your site. The owner will have a default sender profile created. Other sender profiles should be added manually.
- Sender profiles can be edited only until the Sender Address is unverified. Verified addresses cannot be edited and can only be removed.
- If you have Action Emails enabled, you would have the option to allow team members to use their email addresses as from addresses in Action Emails. Enabling this option would allow team members to add and use their email address as from address.
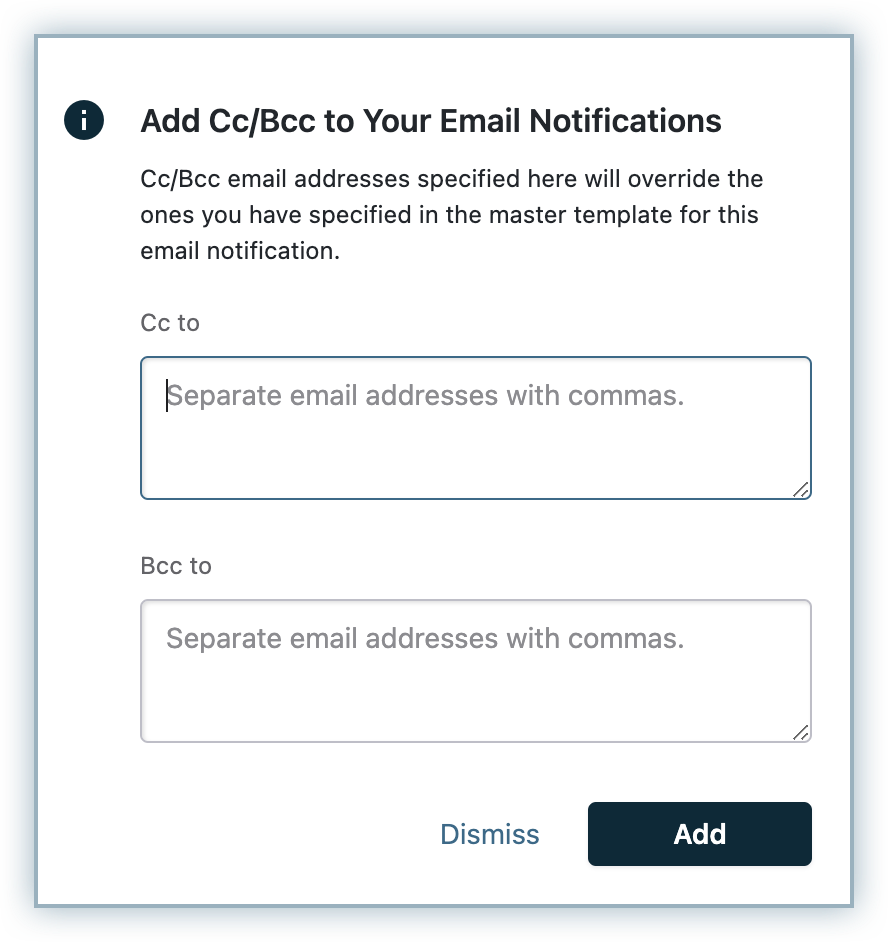
- Sender profiles are not applicable for CC/BCC set up, you need to manually enter the email address for CC/BCC.
Header
The logo/icon that you have configured in Chargebee's Branding page will be displayed in the header. You also have the option to add a normal text in the header in the template. You can choose from the logo, icon, or normal text to be displayed at the top of your email and set its alignment. You can override these details at the individual email notification level, if you want a particular email to break convention.
CC/BCC
Include one or more CC/BCC email addresses which are comma separated. You can override the email address at the individual email notification level.
Subject Prefix
You can configure a default subject prefix to be used for all emails.
Note
- Subject prefix cannot be overridden at email notification level.
- ‘[Test]' will be a default prefix in emails send from Test Site.
Footer
Footer consists of 3 sections, where you can:
- Add notes
- Add self-service portal details
- Add social media links
You can override the details at the individual email notification level.
Note
- You can override the templates by editing individual email notifications.
- Links added by Chargebee in the test mails are inactive.
Once the template is ready, you can send a test email to check how the email will look on the other end.
Configure Email Notifications
The email notifications sent to your customers, by Chargebee, are broadly categorized into:
- Subscription Management
- Invoices, Credit Notes & Payments
- Revenue Recovery
- Customer Retention
- Self-Service Portal Emails
- Cart Abandonment Emails
- Gift Subscriptions
Within each category, there are default email notifications available. You can edit, make changes to the default email notifications or create your own email notifications.
Click here to see the complete list of default email notifications that can be sent to your customers from Chargebee.
Add Notification
The ‘Add Notification' option in each category will allow you to create emails. You can create your own emails based on the events in each category. The following are the features you can use:
Customising Email Content: You can either edit the default content, or add your own. Mail Merge fields help you add further information you want to display in the subject and the mail body. You can setup a fallback for cases where in case value is not present.
Segments: Here, you set the targeted audience of the email. There are preset filters you can choose from. You can also create your own filters by clicking on the ‘Manage Filters' option and choose a custom segment to whom the email should be sent. Read further to know more about setting up segments.
Add Text : You can add text content.
Insert Image: Adding an image to the email is made easy with this option.
Add Button: You can add buttons in the email. You can name it and attach a link to it.
Add Attachment: Chargebee allows you to add attachments to the emails that are sent to your customers. This enables you to share documents/agreements with your customers easily.
Note
- This feature is available only on select plans. To know more, visit our plans and pricing page.
- To add attachments in emails you need to configure your own SMTP Server. Using your SMTP server also enables you to send more emails on a daily basis. Learn more.
Click the Attach File option in the email and select the file you wish to attach. Please do note that you can attach only PDF Files with the maximum size being 500 KB.
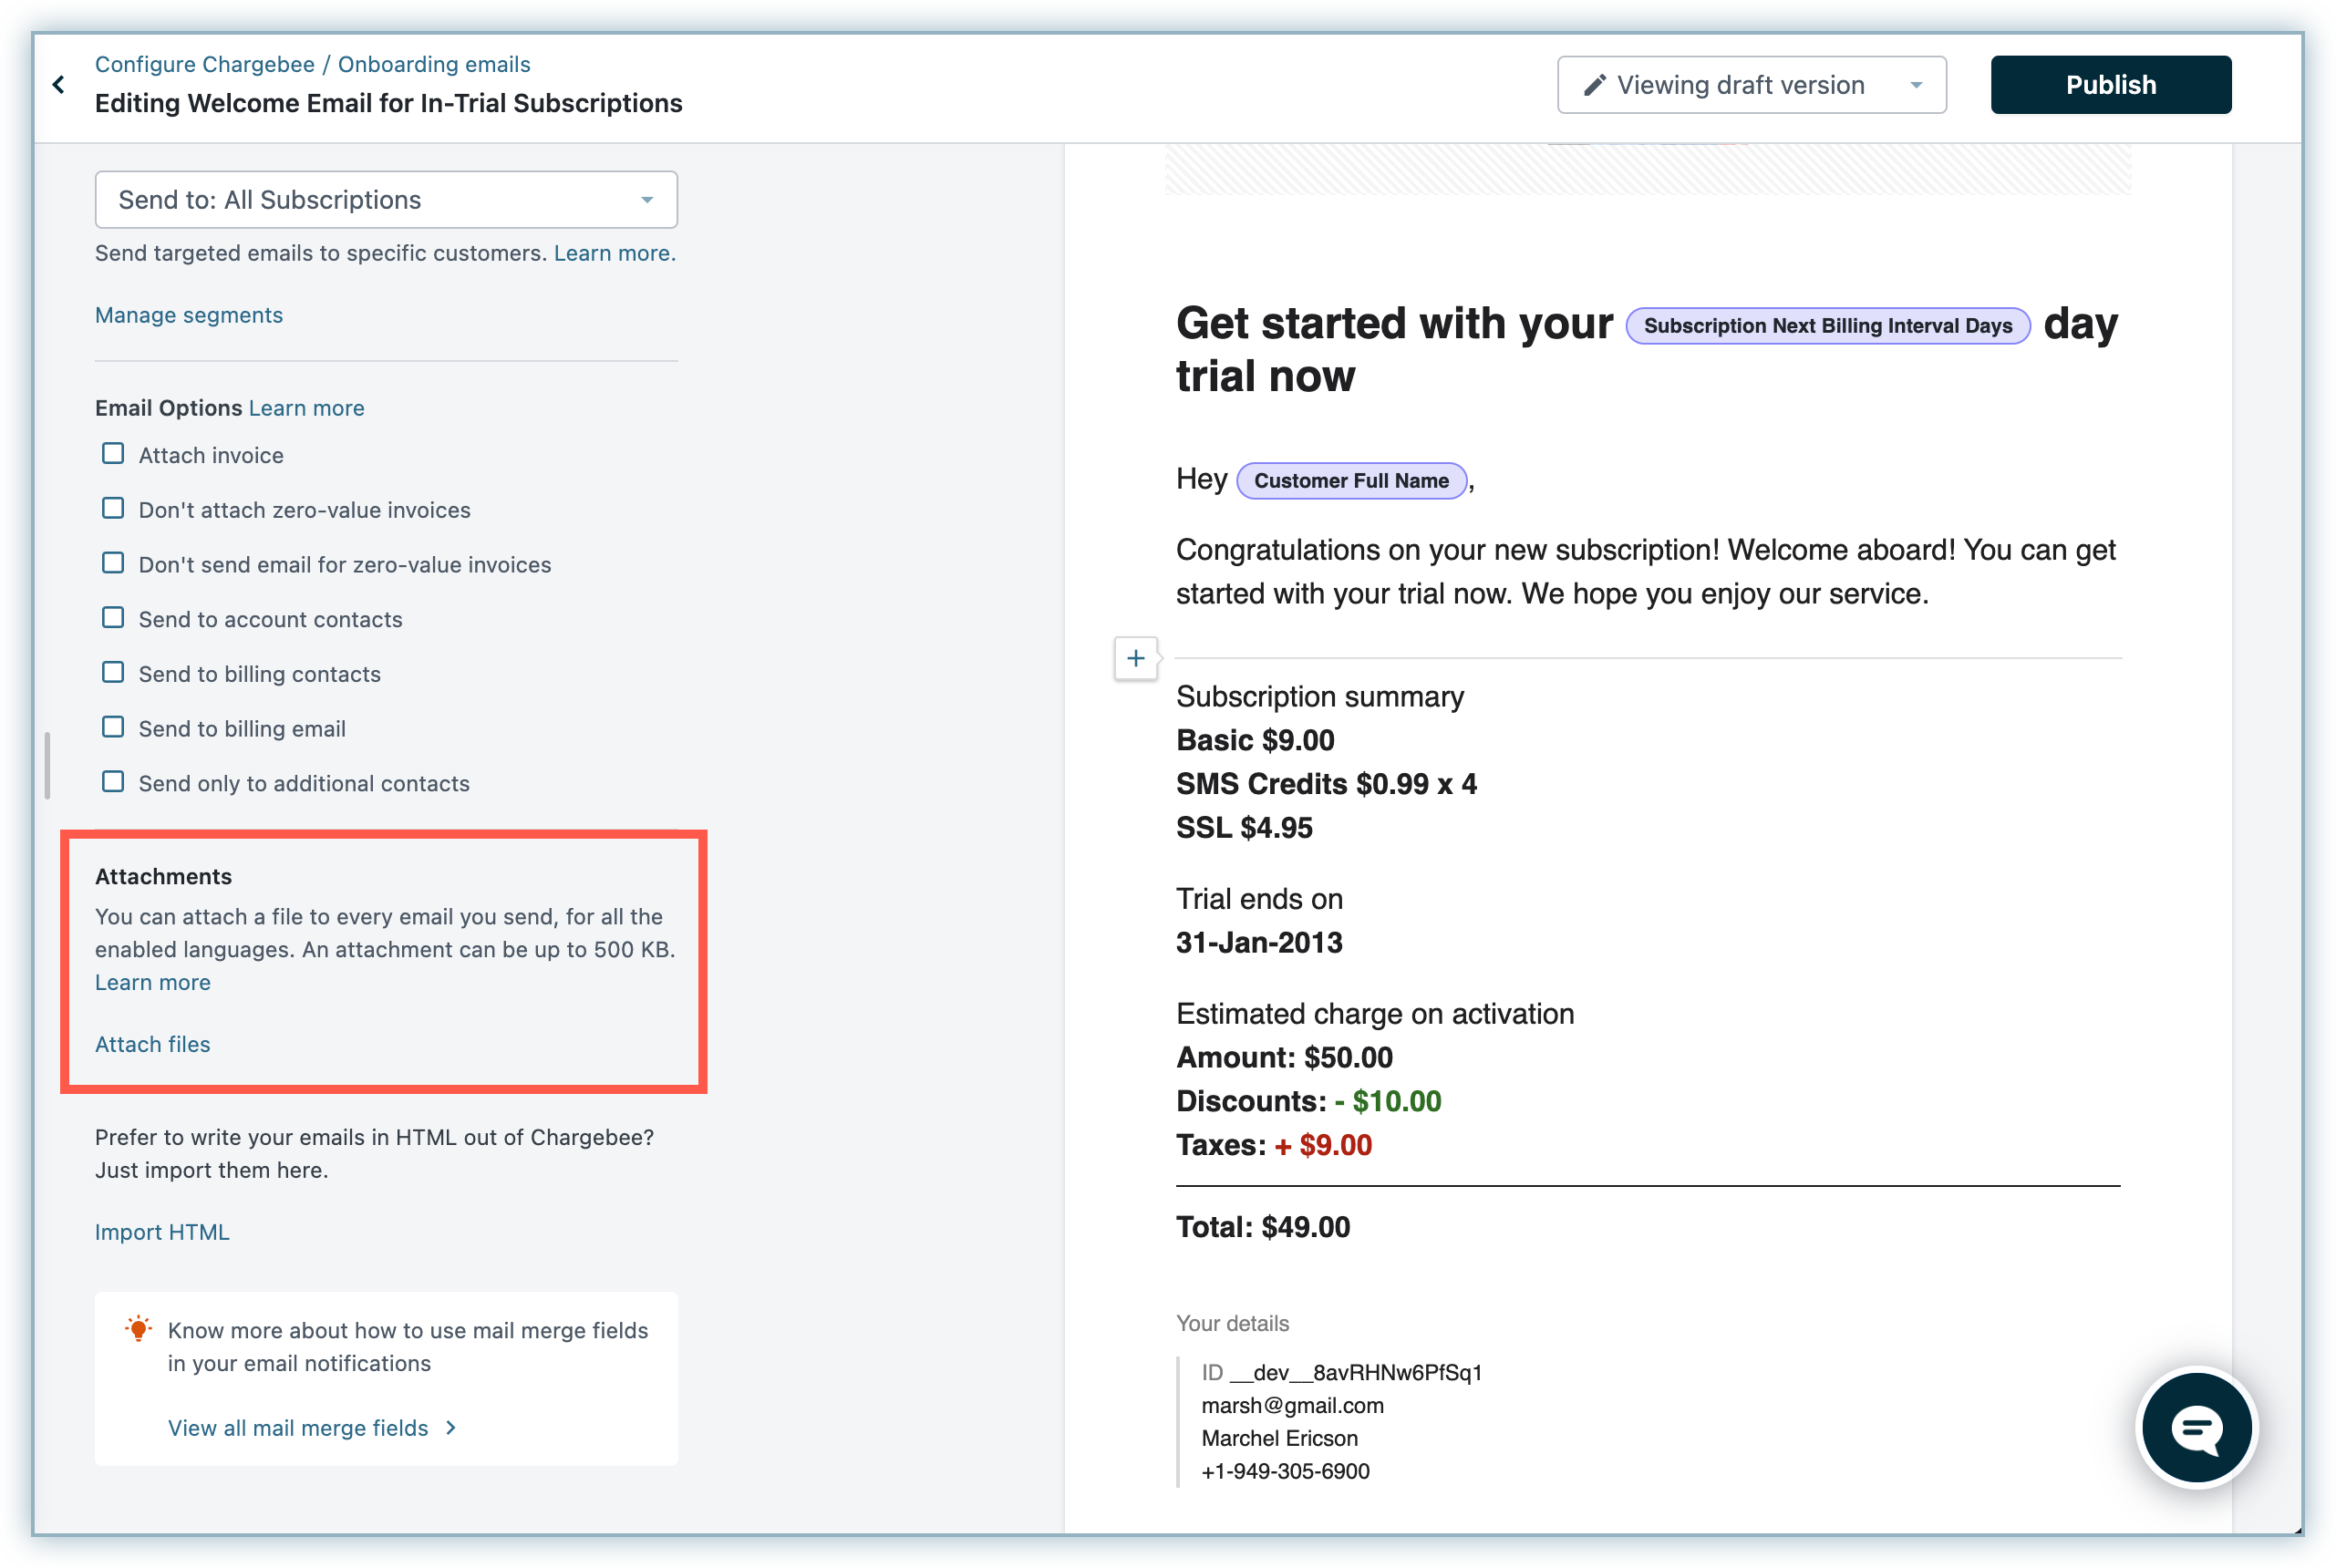
You can add one attachment for each language that you have configured in your site. In case you wish to move from your custom SMTP to Chargebee's SMTP, please Contact Chargebee Support.
Add Section: The following sections can be added to an email:
-
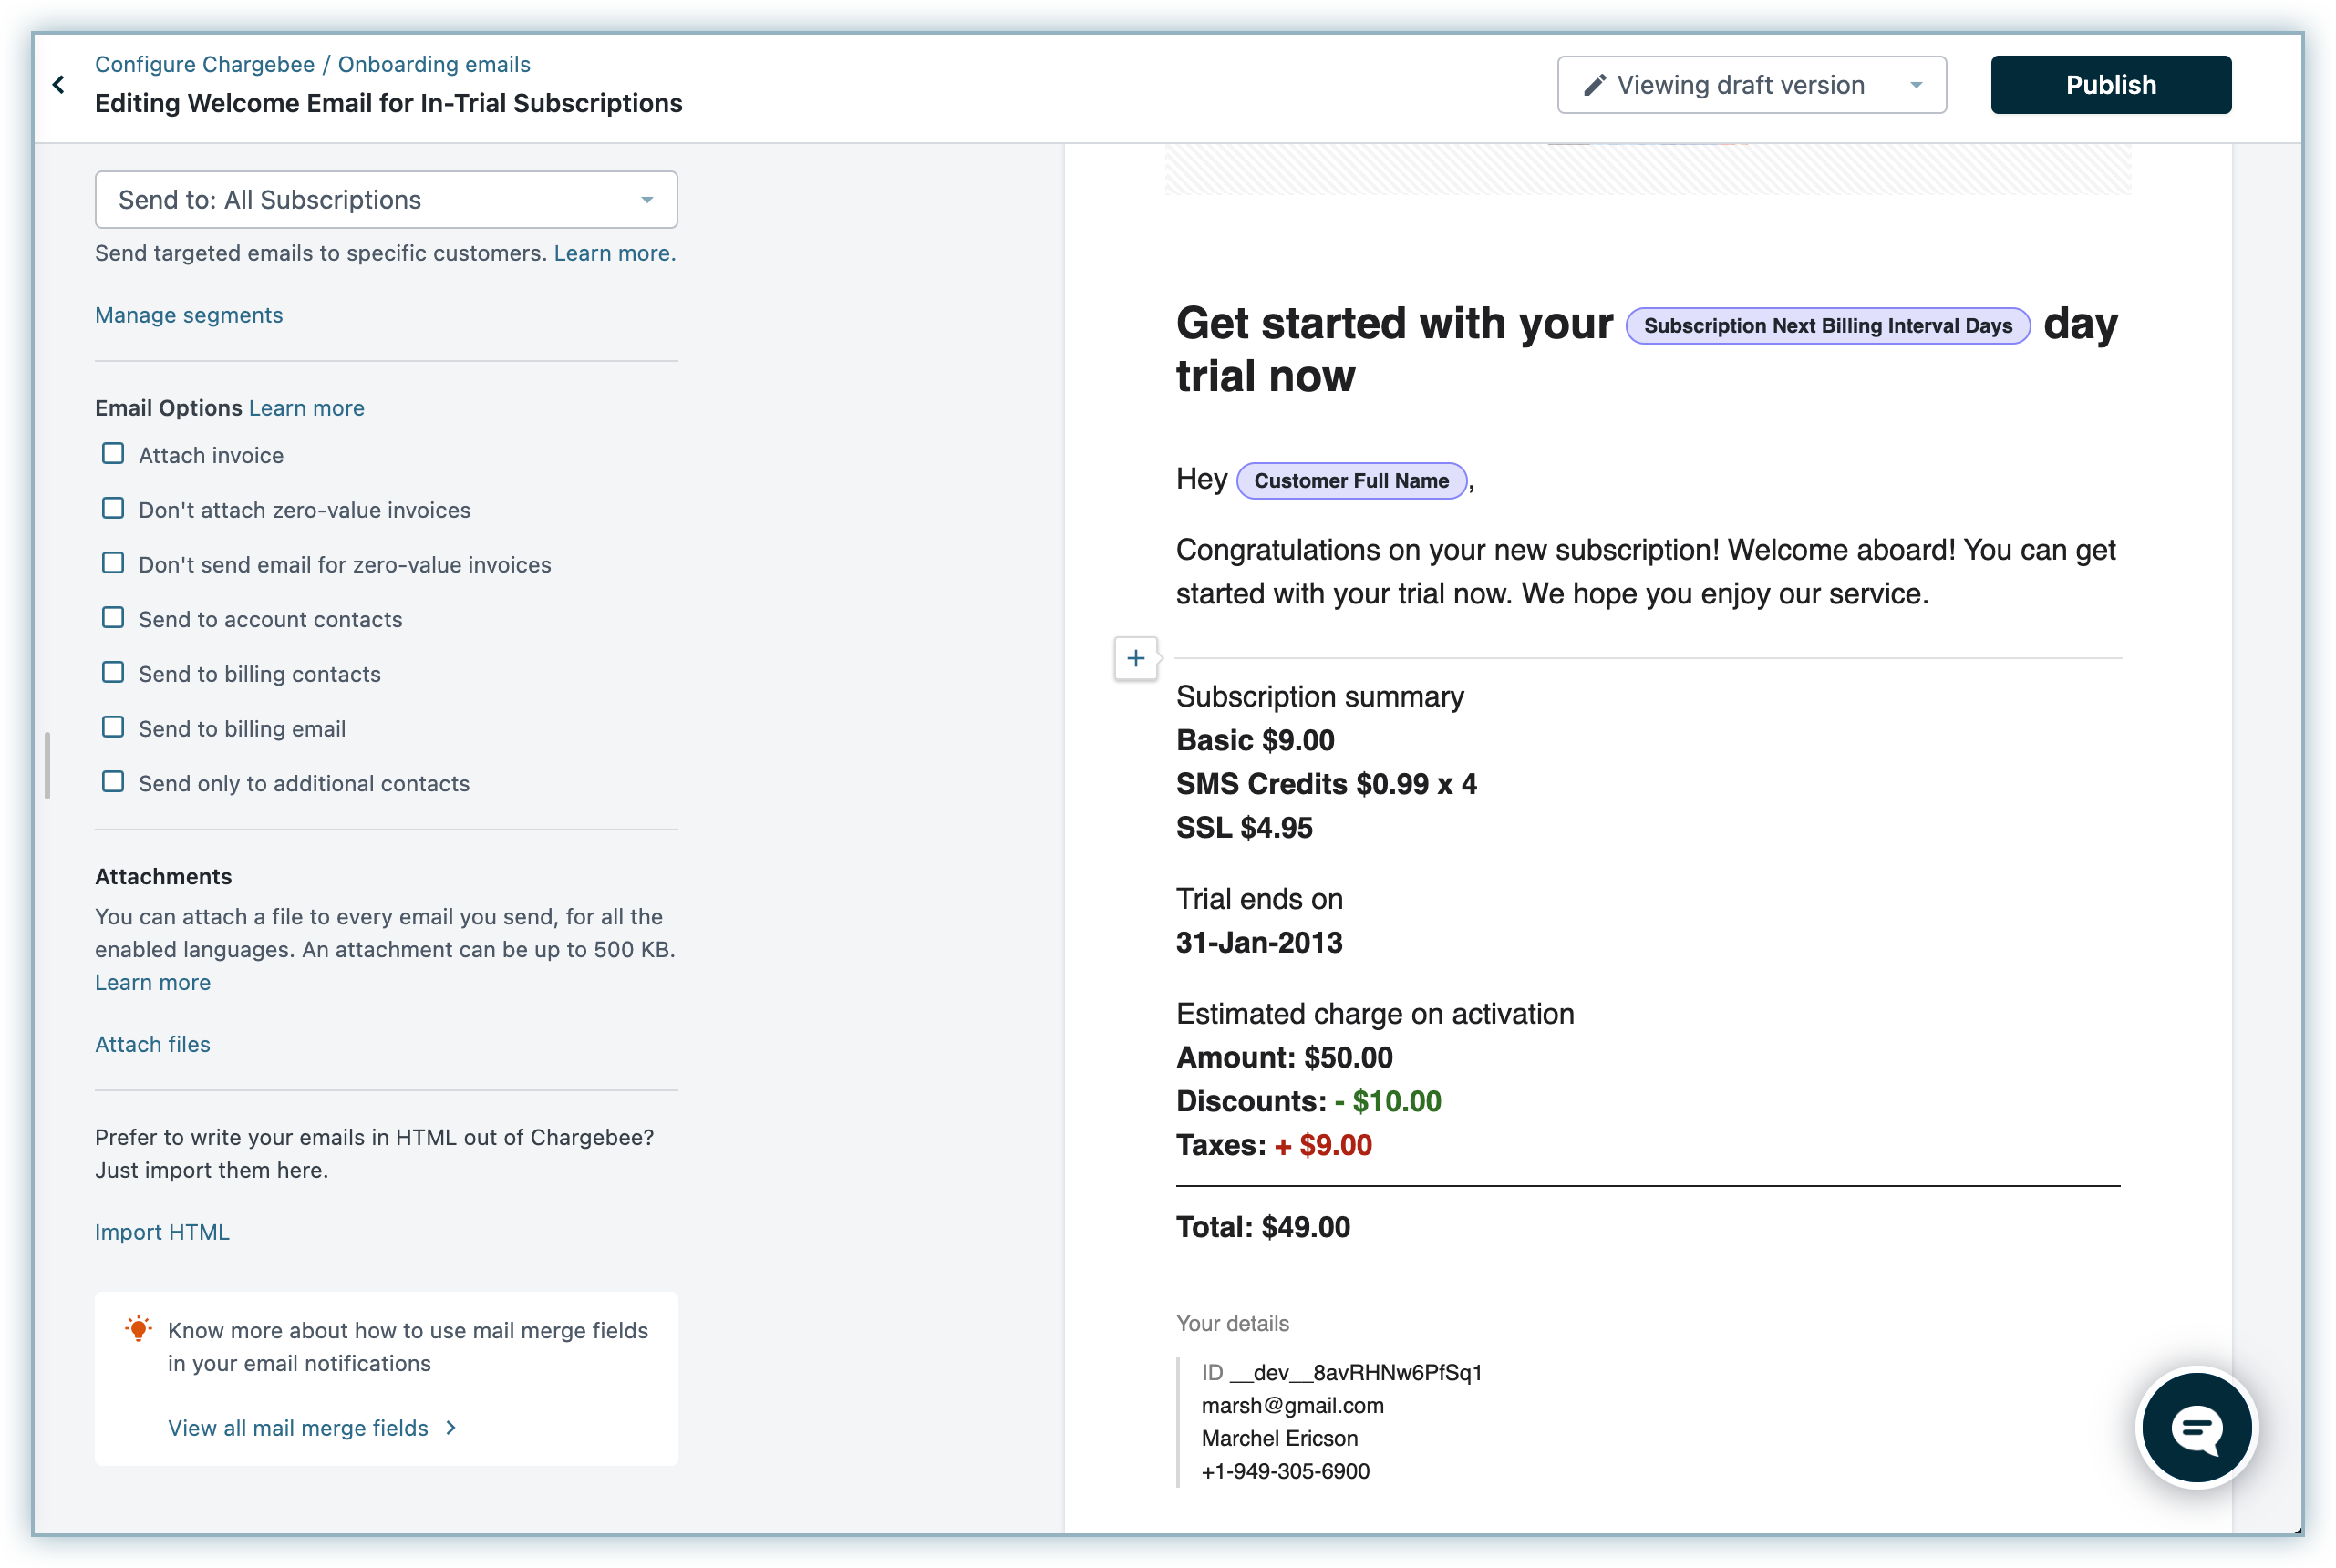
Information Overview: The content of this section is based on the email event. It ideally consists of general information, such as charge, date, and card details. The information will vary based on the nature of the email.
-
Customer Details: This section will add your customer's details. You can choose the information you want to display from the given list.
-
Subscription Details: In this section, you can choose to add the customer's Subscription ID, PO number, Plan, Addons.
-
Address Details: You can add either the customer's billing address, shipping address or both.
-
Contract Details: Include this section to display the following - Contract Period, Total Contract Value, Total Billing Cycles, Current Cycle, At Term-End and Termination fee. You can deselect the items which you don't want to display. Do note that this section is only available if Contract Terms is enabled on your Chargebee site.
-
Invoice Details: Include this section to display the details of invoices that are paid. It is available on the Initial/Recurring charge is successful and Subscription is changed emails.
- For an invoice count of less than five, details of all the invoices are displayed in the section.
- For an invoice count of more than five and with collective size less than 7mb, the invoices are aggregated and attached as a zip file.
- For a collective size of more than 7mb, download link for downloading the invoices is provided. This link remains valid only for seven days.
For Subscription is changed emails, the current invoice is also attached to the email along with the created adjustment credit-note and the new invoice for changed subscription.
Draft: The changes you made to the email will be saved automatically and you can work on it later if you'd like.
You can use the option Discard Draft to go back to the original message and drop all the changes that you made before publishing it. View Published Version option will let you preview the published version of the email. Reset to Defaults will bring back the preset content from Chargebee.
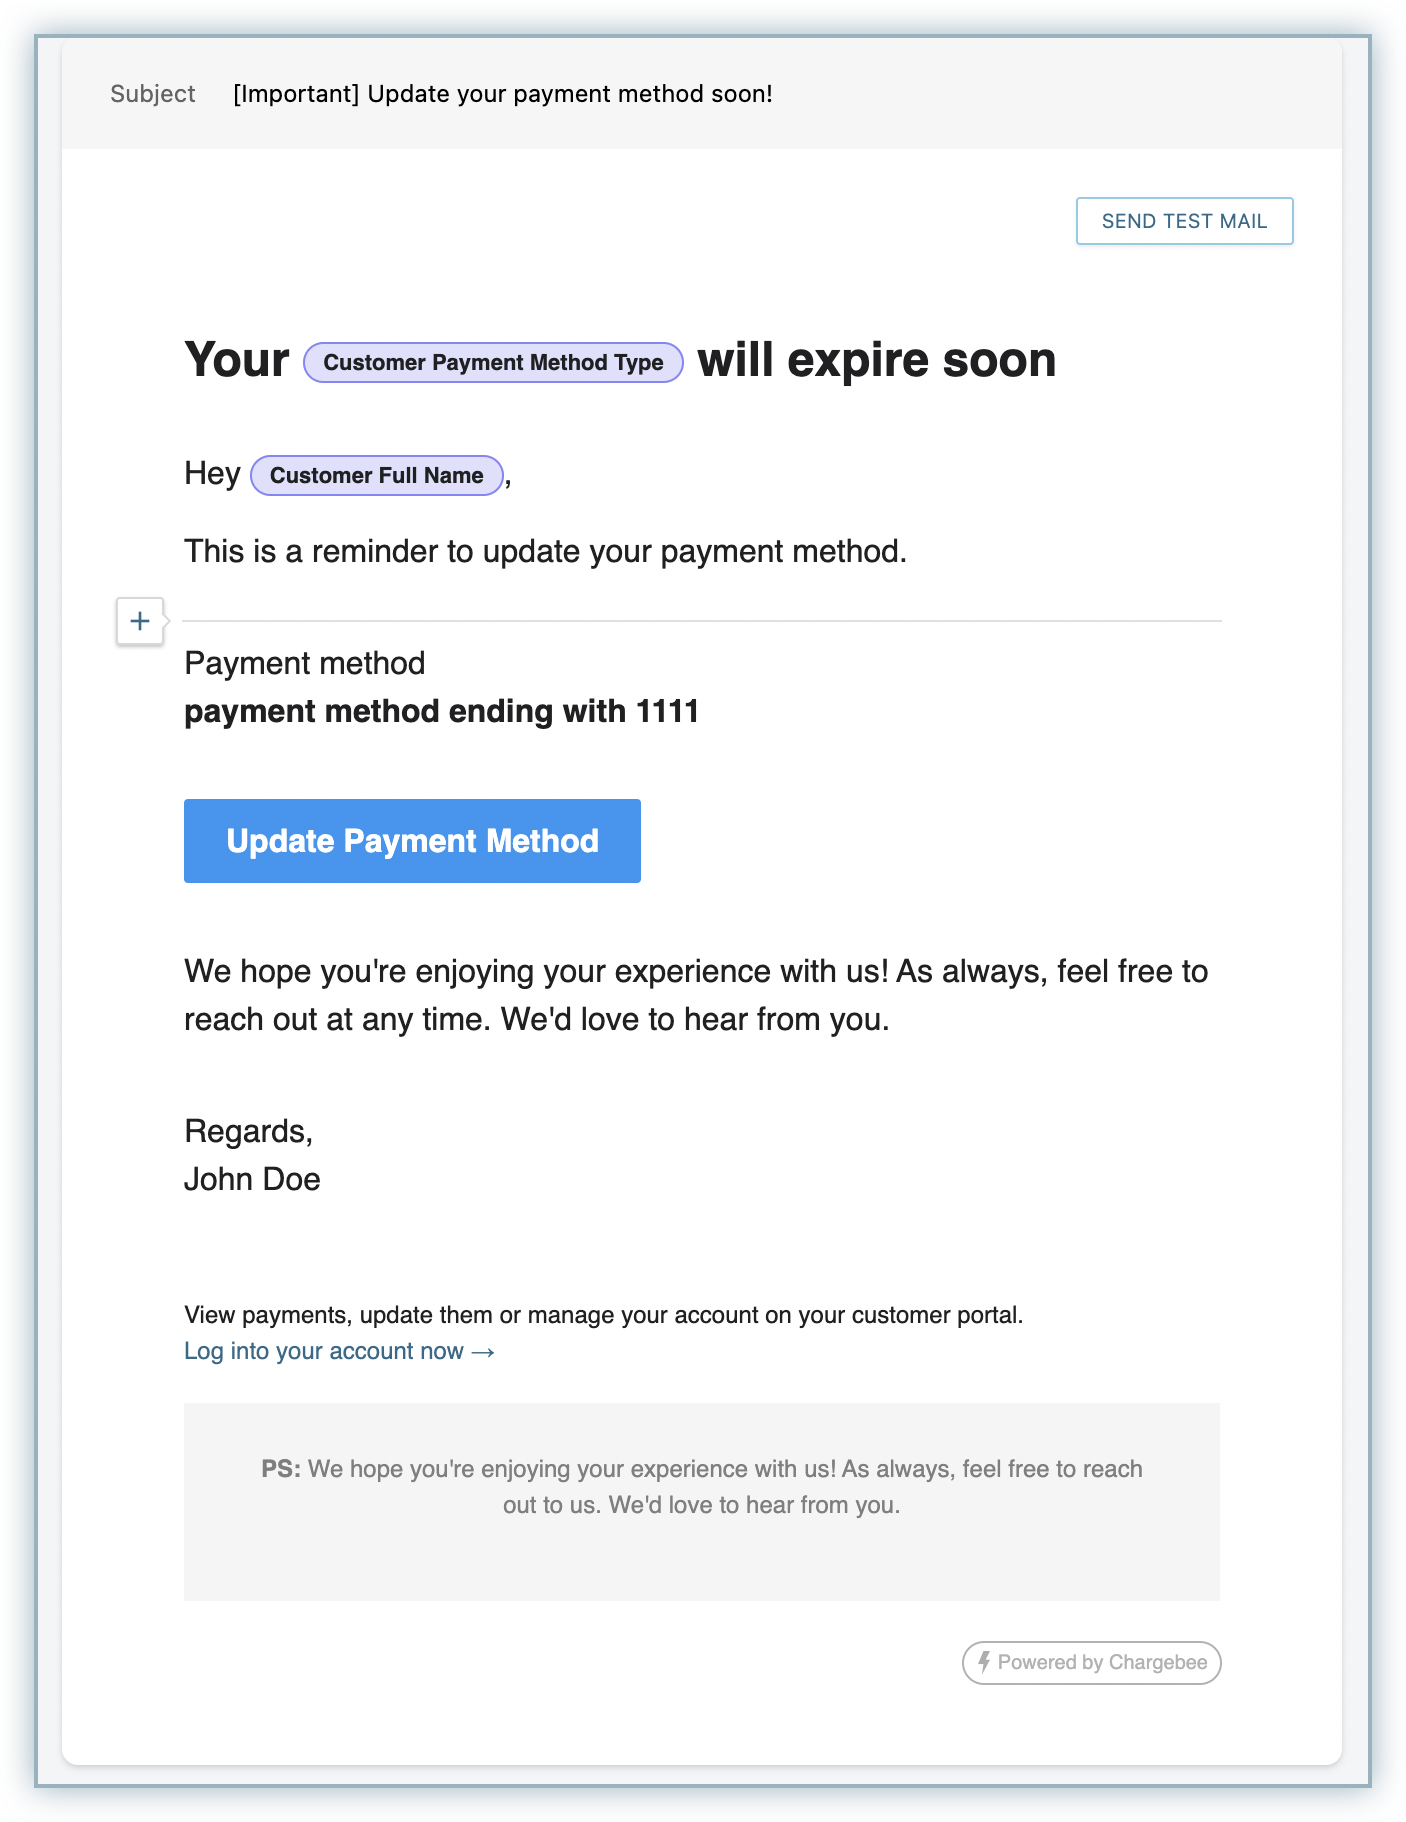
Send Test Mail: You can send a mail out to preview how the email looks.
Email Options:
- Attach Invoice: The option will let you attach the invoice generated in PDF format.
- Attach Credit Note: You can attach a credit note to a refund-related email, a subscription is changed email or a subscription cancellation email.
- Don't Attach Zero Value Invoices: Zero value invoices are generated in cases say when the customer uses a coupon and the total amount comes down to zero. With this option, you can choose not to attach the Zero value invoice with the email.
- Don't Send Email for Zero Value Invoices: Checking this option will not send the email notification when the invoice is a Zero Value Invoice.
- Don't Send Email for Zero Value Estimated Invoices: While sending reminder emails, Chargebee calculates the billing estimate. You get a Zero Value Estimated Invoice if the total amount of the estimate is ‘0'. With this option, you can choose not to send the email notification when the total amount of the estimate is ‘0', i.e., no email will be sent when the invoice generated for the estimate is a Zero Value Estimated Invoice.
- Send to payment method email address: Select this option to send the desrired email to the address added while configuring a payment method.
Note
The Send to payment method email address email option is mandatory and enabled by default for emails specific to Direct Debit payments.
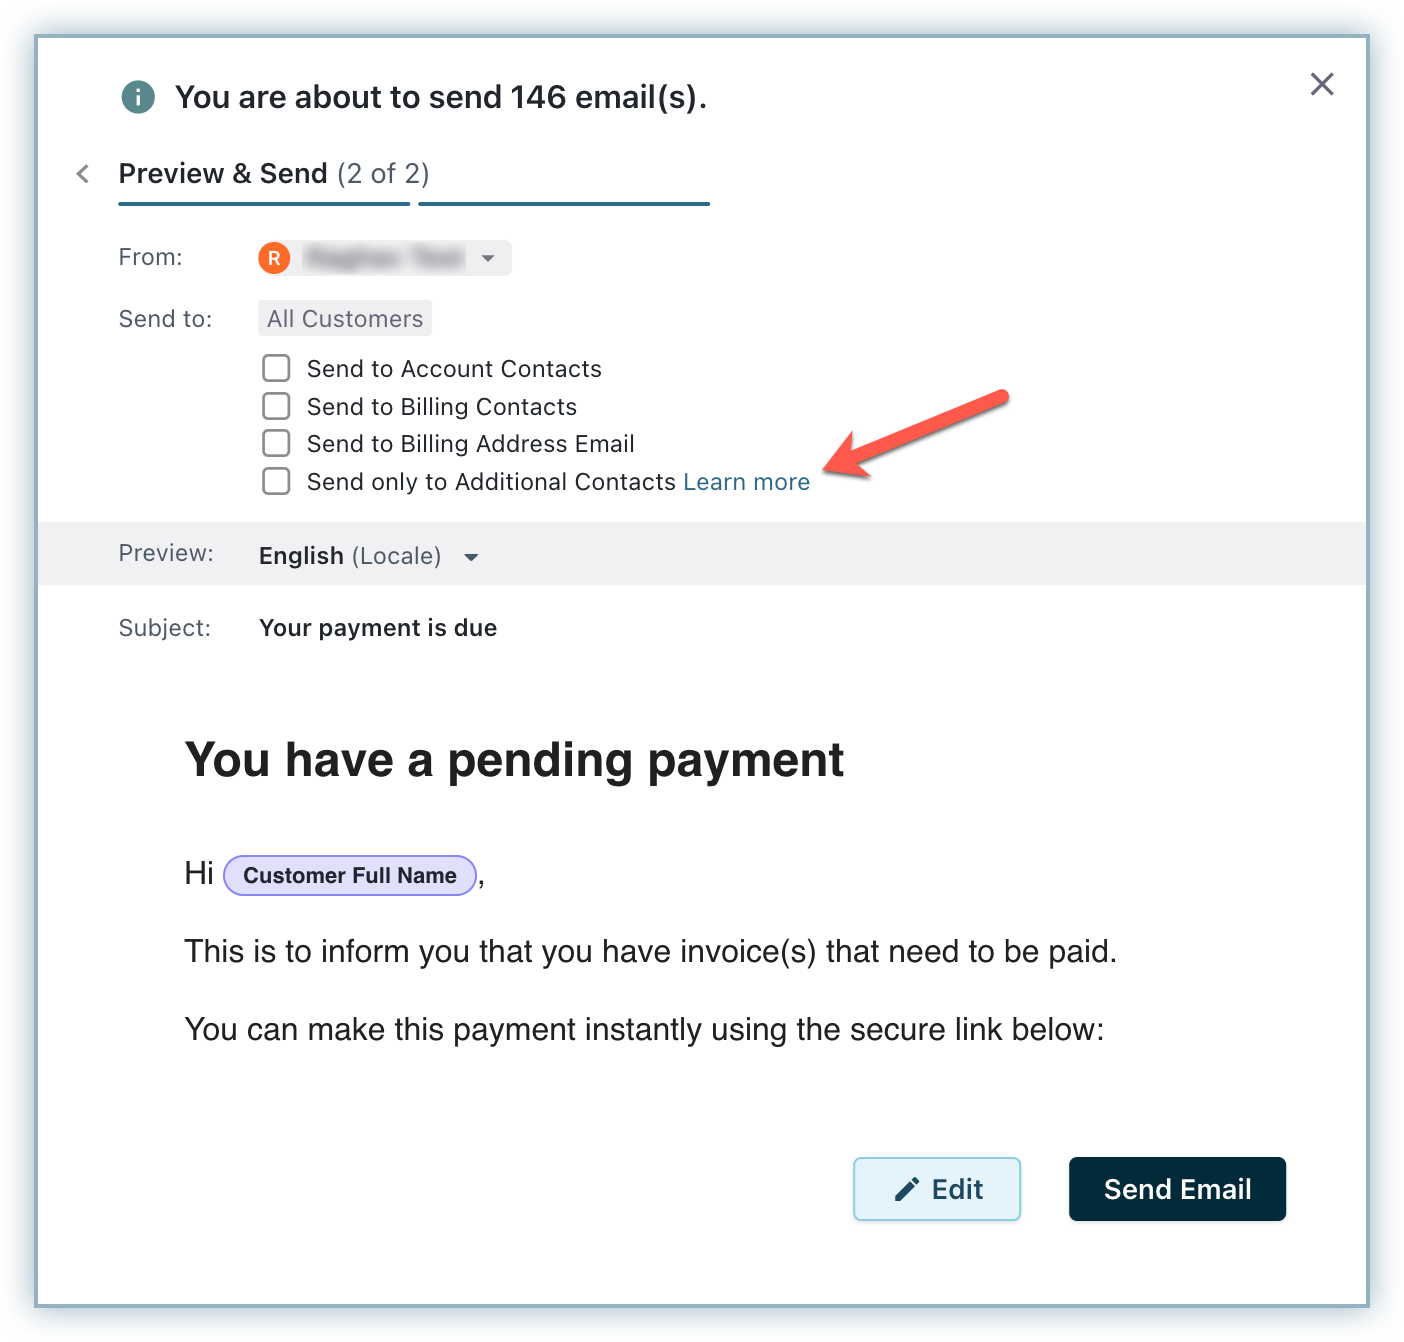
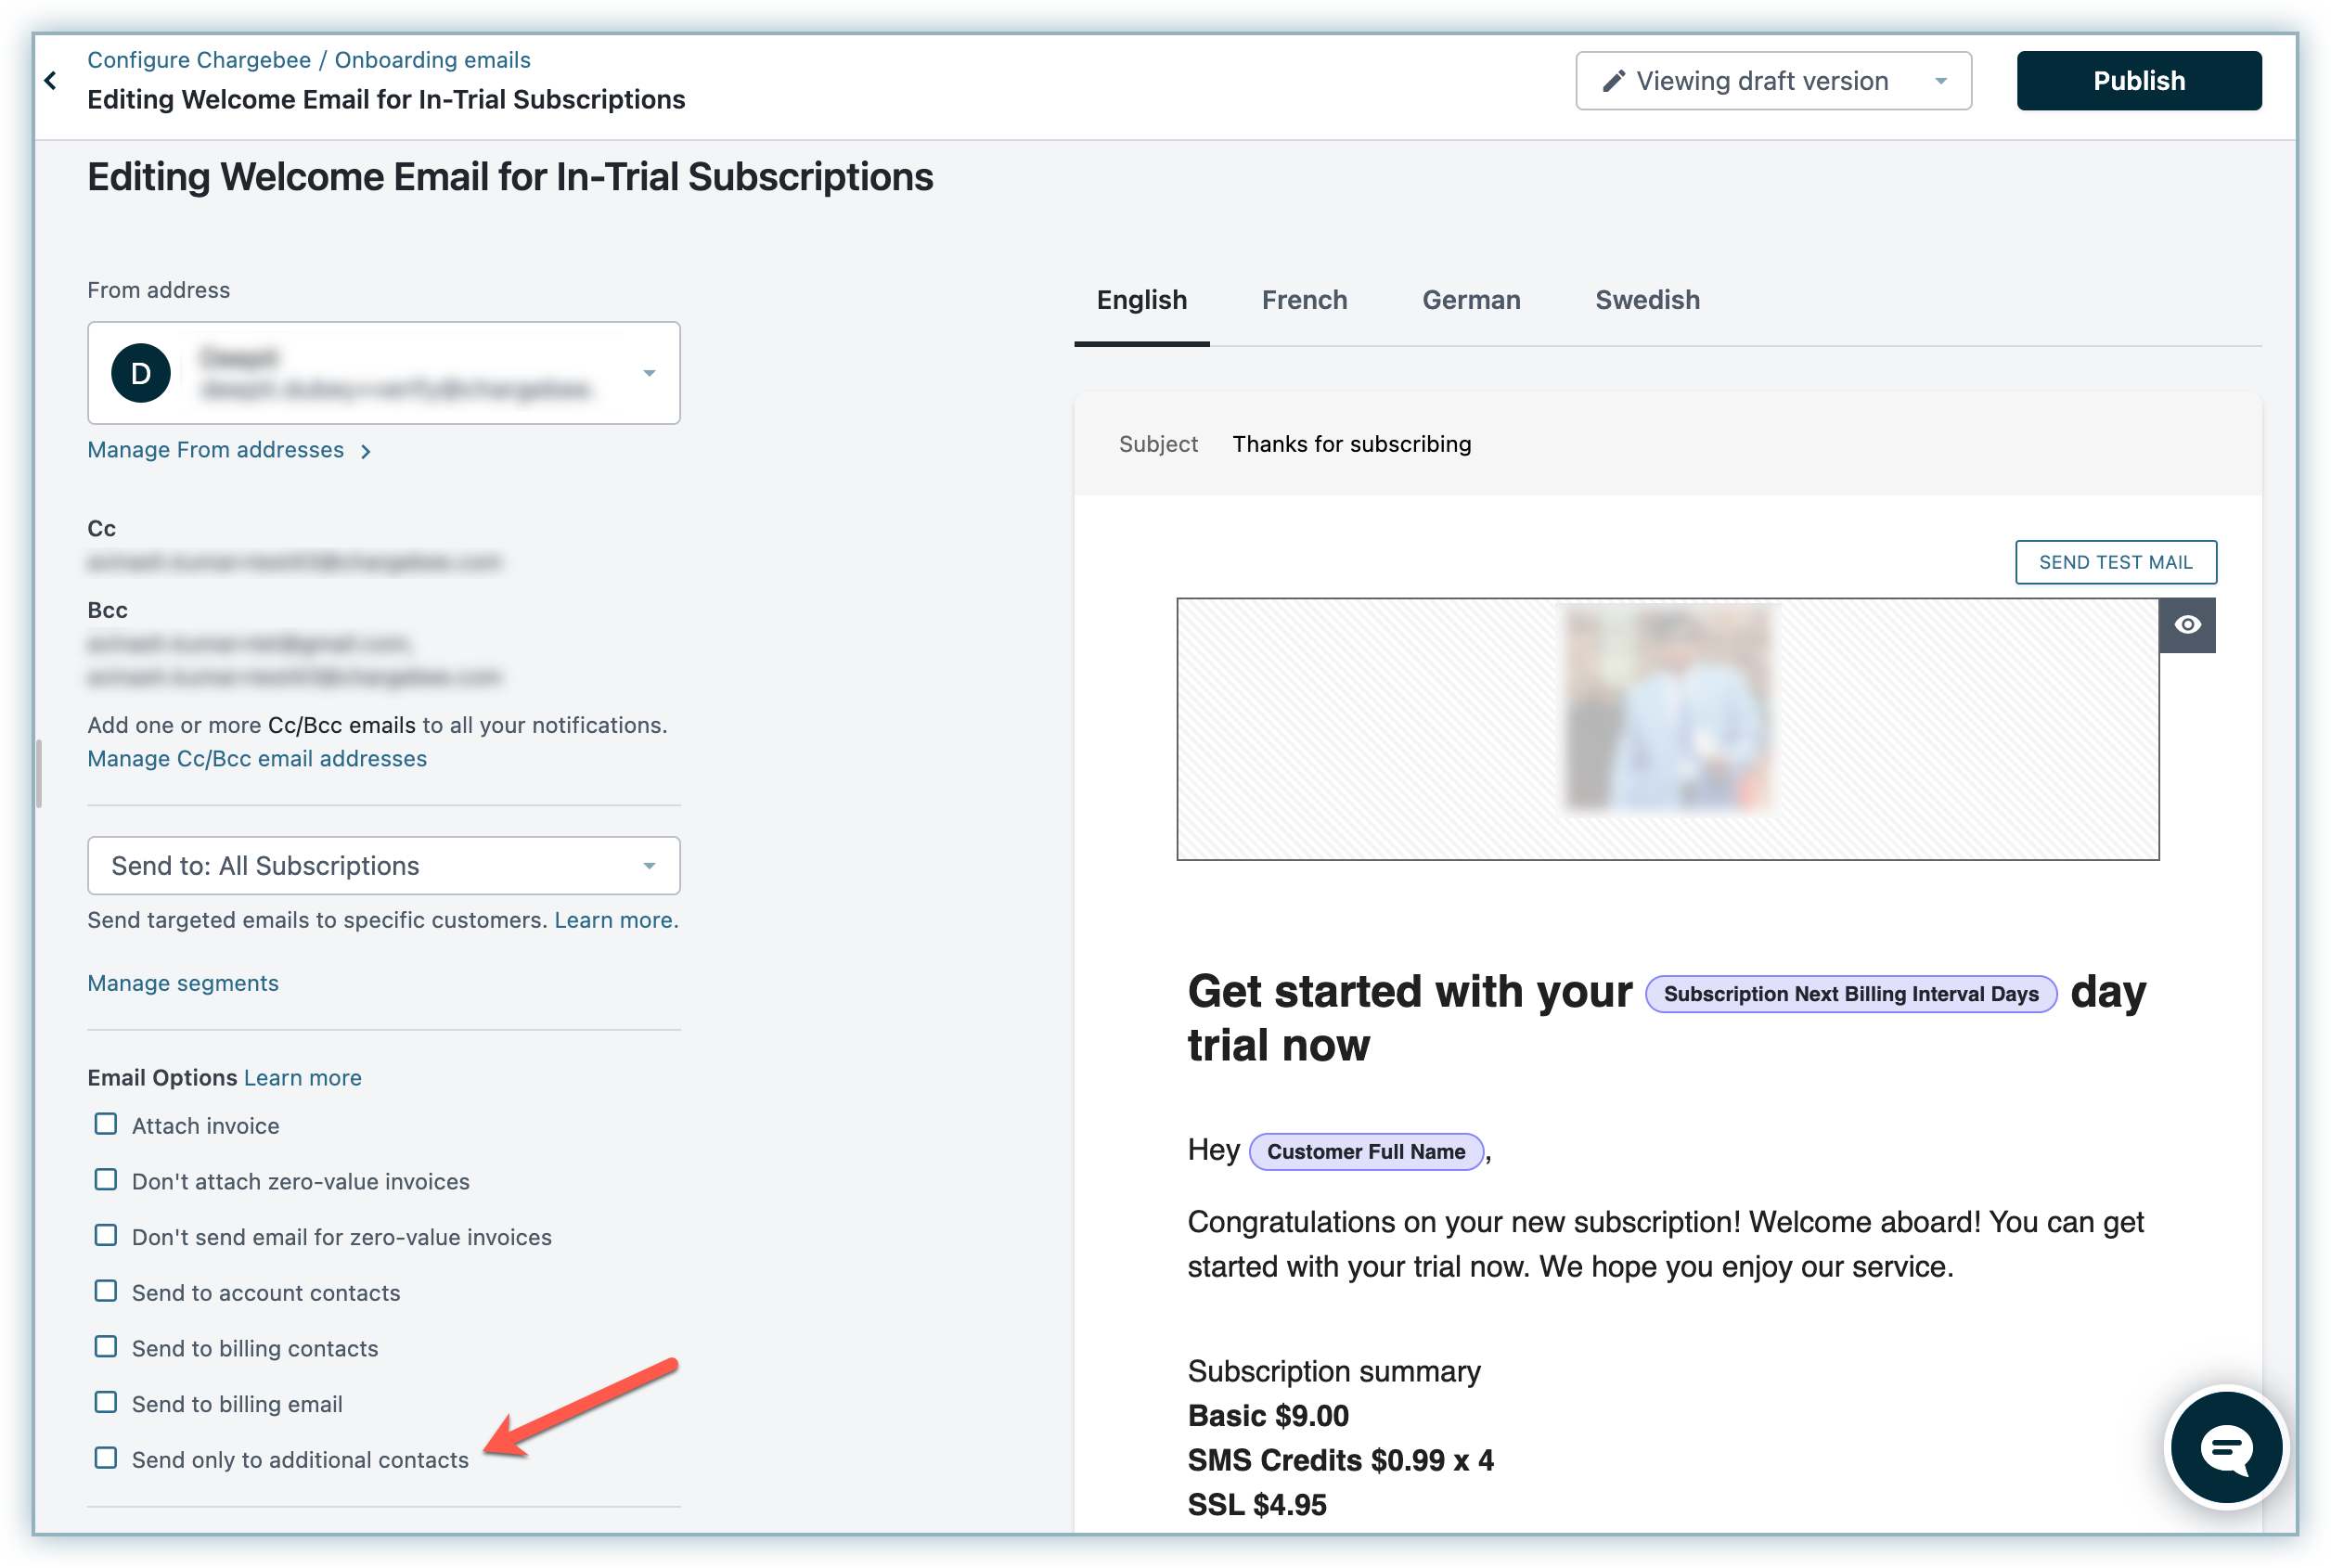
- Send to Account Contacts/ Send to Billing Contacts: You can choose whether to send to Account / Billing contacts which contact the email should be sent. Click here to know how to set account contacts and billing contacts for a customer.
- Send to Billing Email: Select this option to send the desired email to the billing email address along with the primary email address (default).
- Send Only to Additional Contacts: Select this option to send the desired email only to your additional contacts. Make sure to select at least one of the above options (Send to account contacts, Send to billing contacts, or Send to billing email) for this option to work. You can use this option in the following scenarios:
- Manual Email (Bulk or Single):
- Adding or Editing Email Template:
- Manual Email (Bulk or Single):
Import HTML: To send emails in a format that you've designed, instead of using Chargebee's templates, you can paste the HTML code for the email using this option. Chargebee supports only inline CSS styles.
Publish: Once you're ready with the final draft and are ready to send the email out, you can choose this. This option will ideally enable the new email notification and start sending mails to your customers.
Set up Segments
You are likely to have had troubles in the past in sending emails to a specific segment of customers, maybe to send a reminder, or an offer, or even an invoice.
Chargebee allows you to filter/segment your customers the way you like, so you can create and send targeted emails.
Segments are customised filters that help you filter your customers. You can add multiple filters to create one segment.
Note
- Some features are available only in selected plans. To know more, visit Chargebee's Plans and Pricing page.
In email notifications, segmenting your customers will help you set a target audience for a specific email.
How to create a segment?
To create an email and send it to a segment of customers, follow the steps below:
Step 1: Click on ‘Add Notification' option and choose the event which the email is being sent for
Step 2: Click on ‘Manage Segments'

Step 3: You will now find a list of filters and an option to ‘Create New Filter'
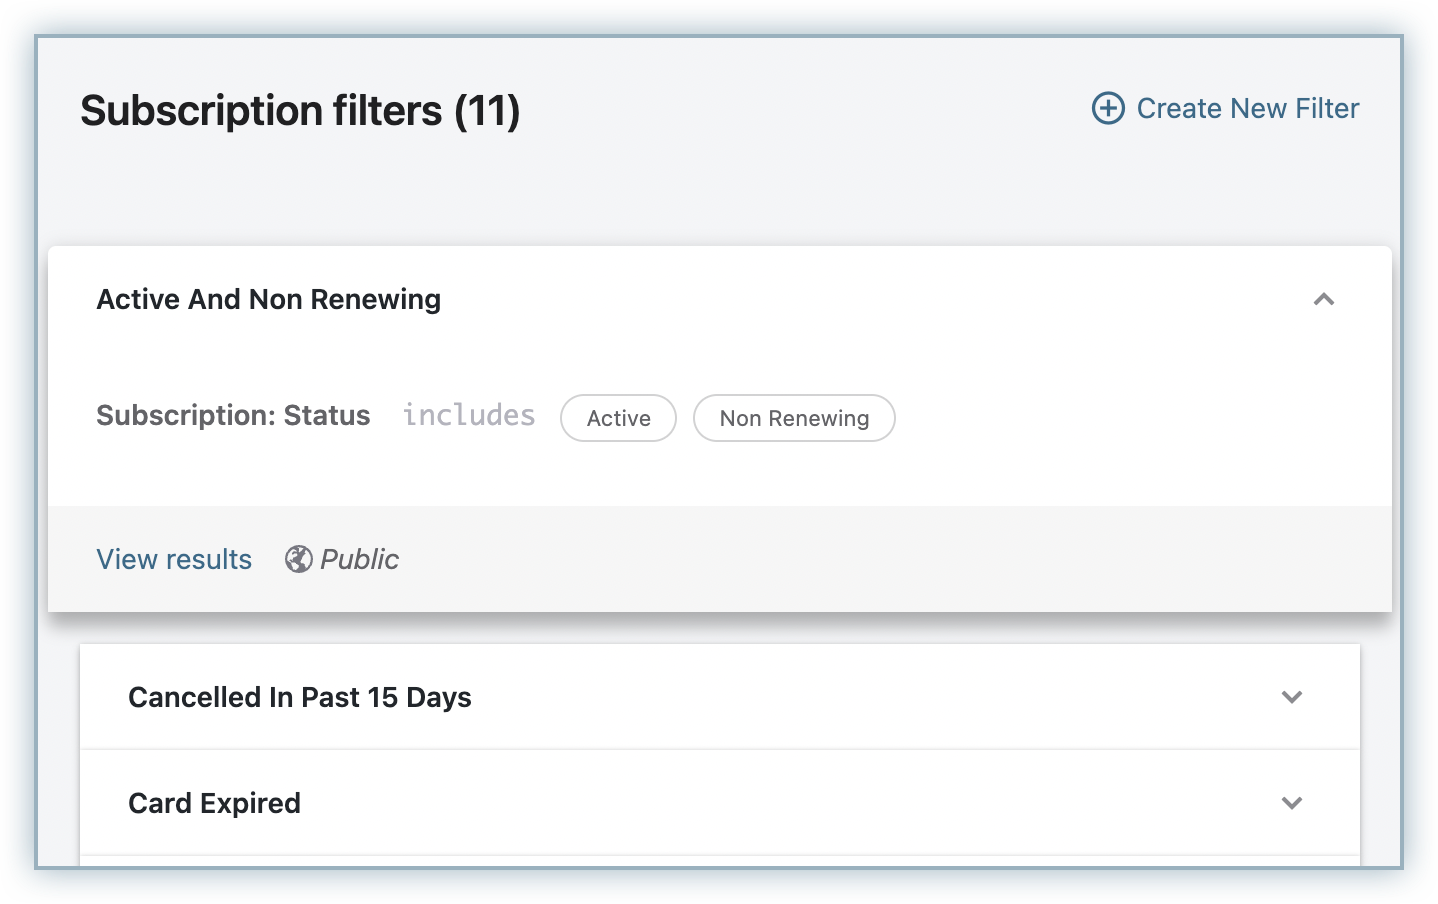
Step 4: You can now create filters with desired search criteria and these filters will be used for Segments. The filters will vary based on the context of the email.
Classic UI users
Creating filters in Classic UI is shown here:
Email Workflow and Prioritization
There are a list of events that occur when a customer checks out through Chargebee - subscription is created, payment is processed, invoice is created, and a customer profile is created.
Chargebee will send one email when a customer checks out containing customer and subscription info, invoice info, payment info based on details relevant for each customer.
Note
Chargebee will not send an email notification for each event individually.
Here's a sample scenario - A subscription is created and payment is successful:
In Email notifications -
Scenario 1: Assuming all the notifications are enabled, only one email will be sent.

Scenario 2: Assuming ‘Subscription Created' notification is disabled, only one email will be sent.

Scenario 3: Assuming ‘Subscription Created' notification is enabled, and target segment is ‘PRO Plan' customers alone and only one email will be sent.

SMTP Settings
Email notifications can be sent out to your customers using either Chargebee's SMTP server or your own SMTP server.
To know more, visit Chargebee's SMTP Configuration page.
Reminders and Follow-ups
Sending reminders and follow-ups are helpful for you as well as your customers. With Chargebee, you can send emails to remind and follow-up about subscription, payments, retention and gift subscriptions.
Set up Reminders
You can set up reminders to be sent to your customers in the following events:
- Subscription Trial Expiry
- Subscription Renewal
- Subscription Cancellation (for non-renewing subscriptions)
- Card Expiring
- Cart Abandonment
- Unclaimed Gift
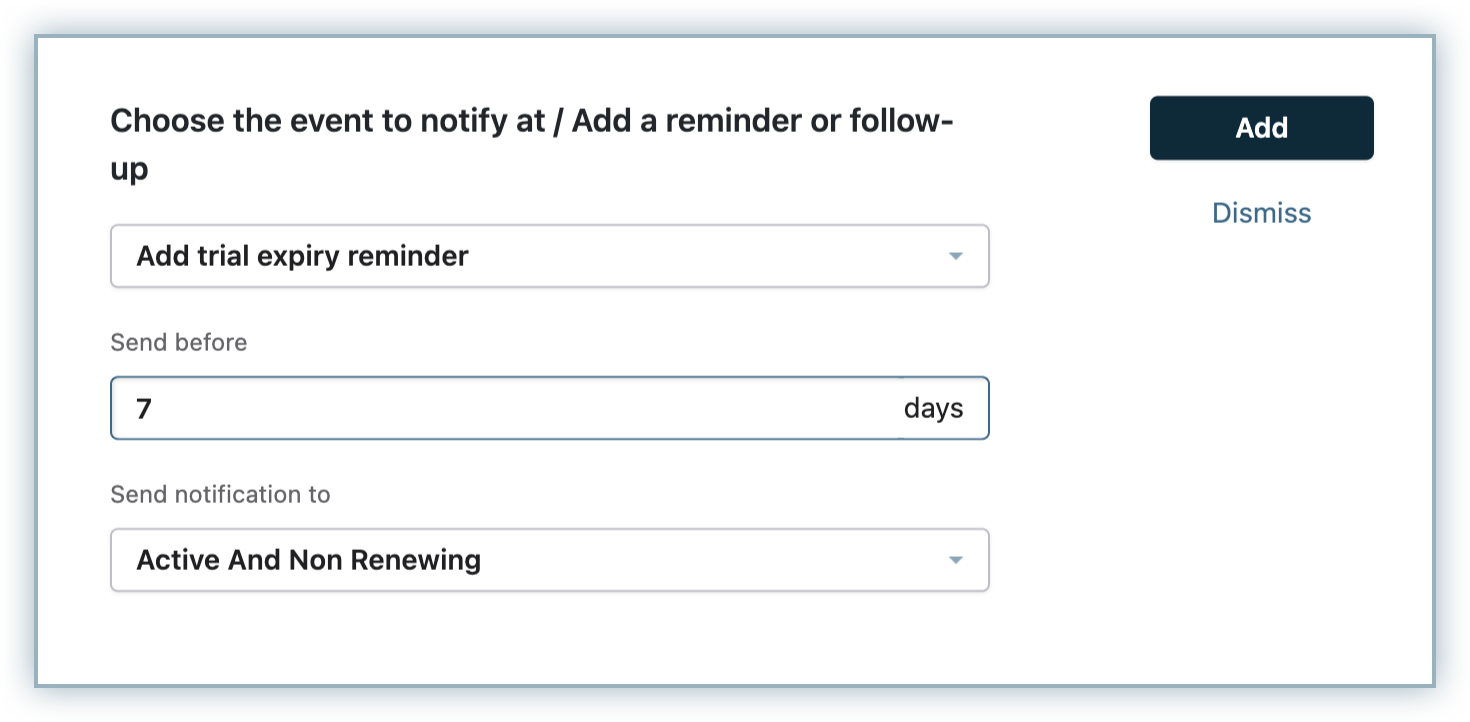
To add a reminder, you should navigate to the specific event in the category of emails and choose to add a notification. You'll then be asked to choose the reminders and give the number of days as well as the segment of customers to be sent to.
Multiple Reminders
If you would like to remind your customers about an upcoming event, Chargebee offers automatic email reminders, which you can configure to go out at a particular day before the event. For example,
- 3 days before the card expires
- 15 days before the card expires
- 30 days before the card expires
Set up Follow-ups
You can set up follow-ups for the following events:
- Welcome mail followup
- Trial Expiry
- Payment Method (Credit/Debit card )Expiry
- Subscription Expiry and Cancellation
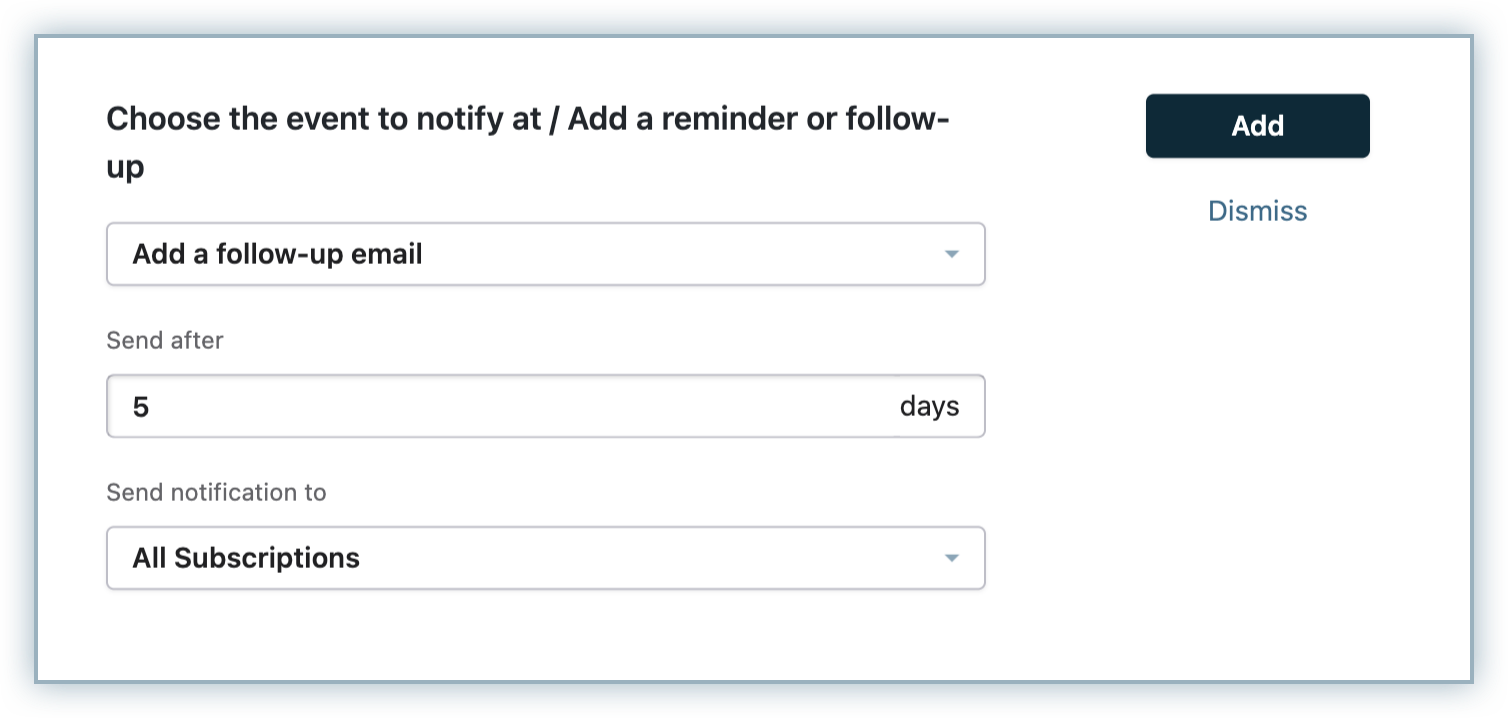
To add a follow up, you need to navigate to one of the events mentioned above, and choose the follow-up email. You have to mention the number of days after the given event and also the segment of customers who will receive the email.
Note
Available only in select plans. To know more, visit Chargebee's Plans and Pricing page.
Push to Live [For Test sites only]
(push email configuration from Test site to Live site)
Chargebee encourages you to try out Email Notifications in your Test site up to your satisfaction. The settings are the same as they would be in the Live site. However, replicating the same changes in the Live site that were made in the Test site, is difficult and time consuming. Chargebee has a solution for the same, it's called Push to Live.
The emails that are configured in your Test site can be pushed to your Live site, one by one, given the configurations in Test site are the same as the configurations in Live site.
Prerequisites:
- Email Notifications should be enabled in your Live site [Recommended: Dry Run Mode is enabled, before publishing your emails to customers]
- Ensure Branding is set up in your Live site
- It is recommended to maintain the same set of segments/filters in your Live & Test site
- ‘Multiple Segments' is a plan specific feature. Ensure you're signed up for the right plan to have Multiple Segments enabled in your Live site. Refer Plans and Pricing to know more.

Here's how Push to Live works:
- You create an email notification in your Test site
- Test the email notification
- Click on ‘Push to Live' when it's ready
- Find the email notification in your Live site (in Draft status)
- Hit Publish.
Dunning Email Notifications
A recurring payment can fail due to one or more reasons. Dunning is way of re-trying to capture a payment that is due. To know more about dunning and how it is set up in Chargebee, check out page.
You can send multiple mails during each dunning attempt. To configure the email notifications and their content, navigate to Settings > Configure Chargebee > Email Notifications > Dunning for Online Payments/Dunning for Offline Payments.
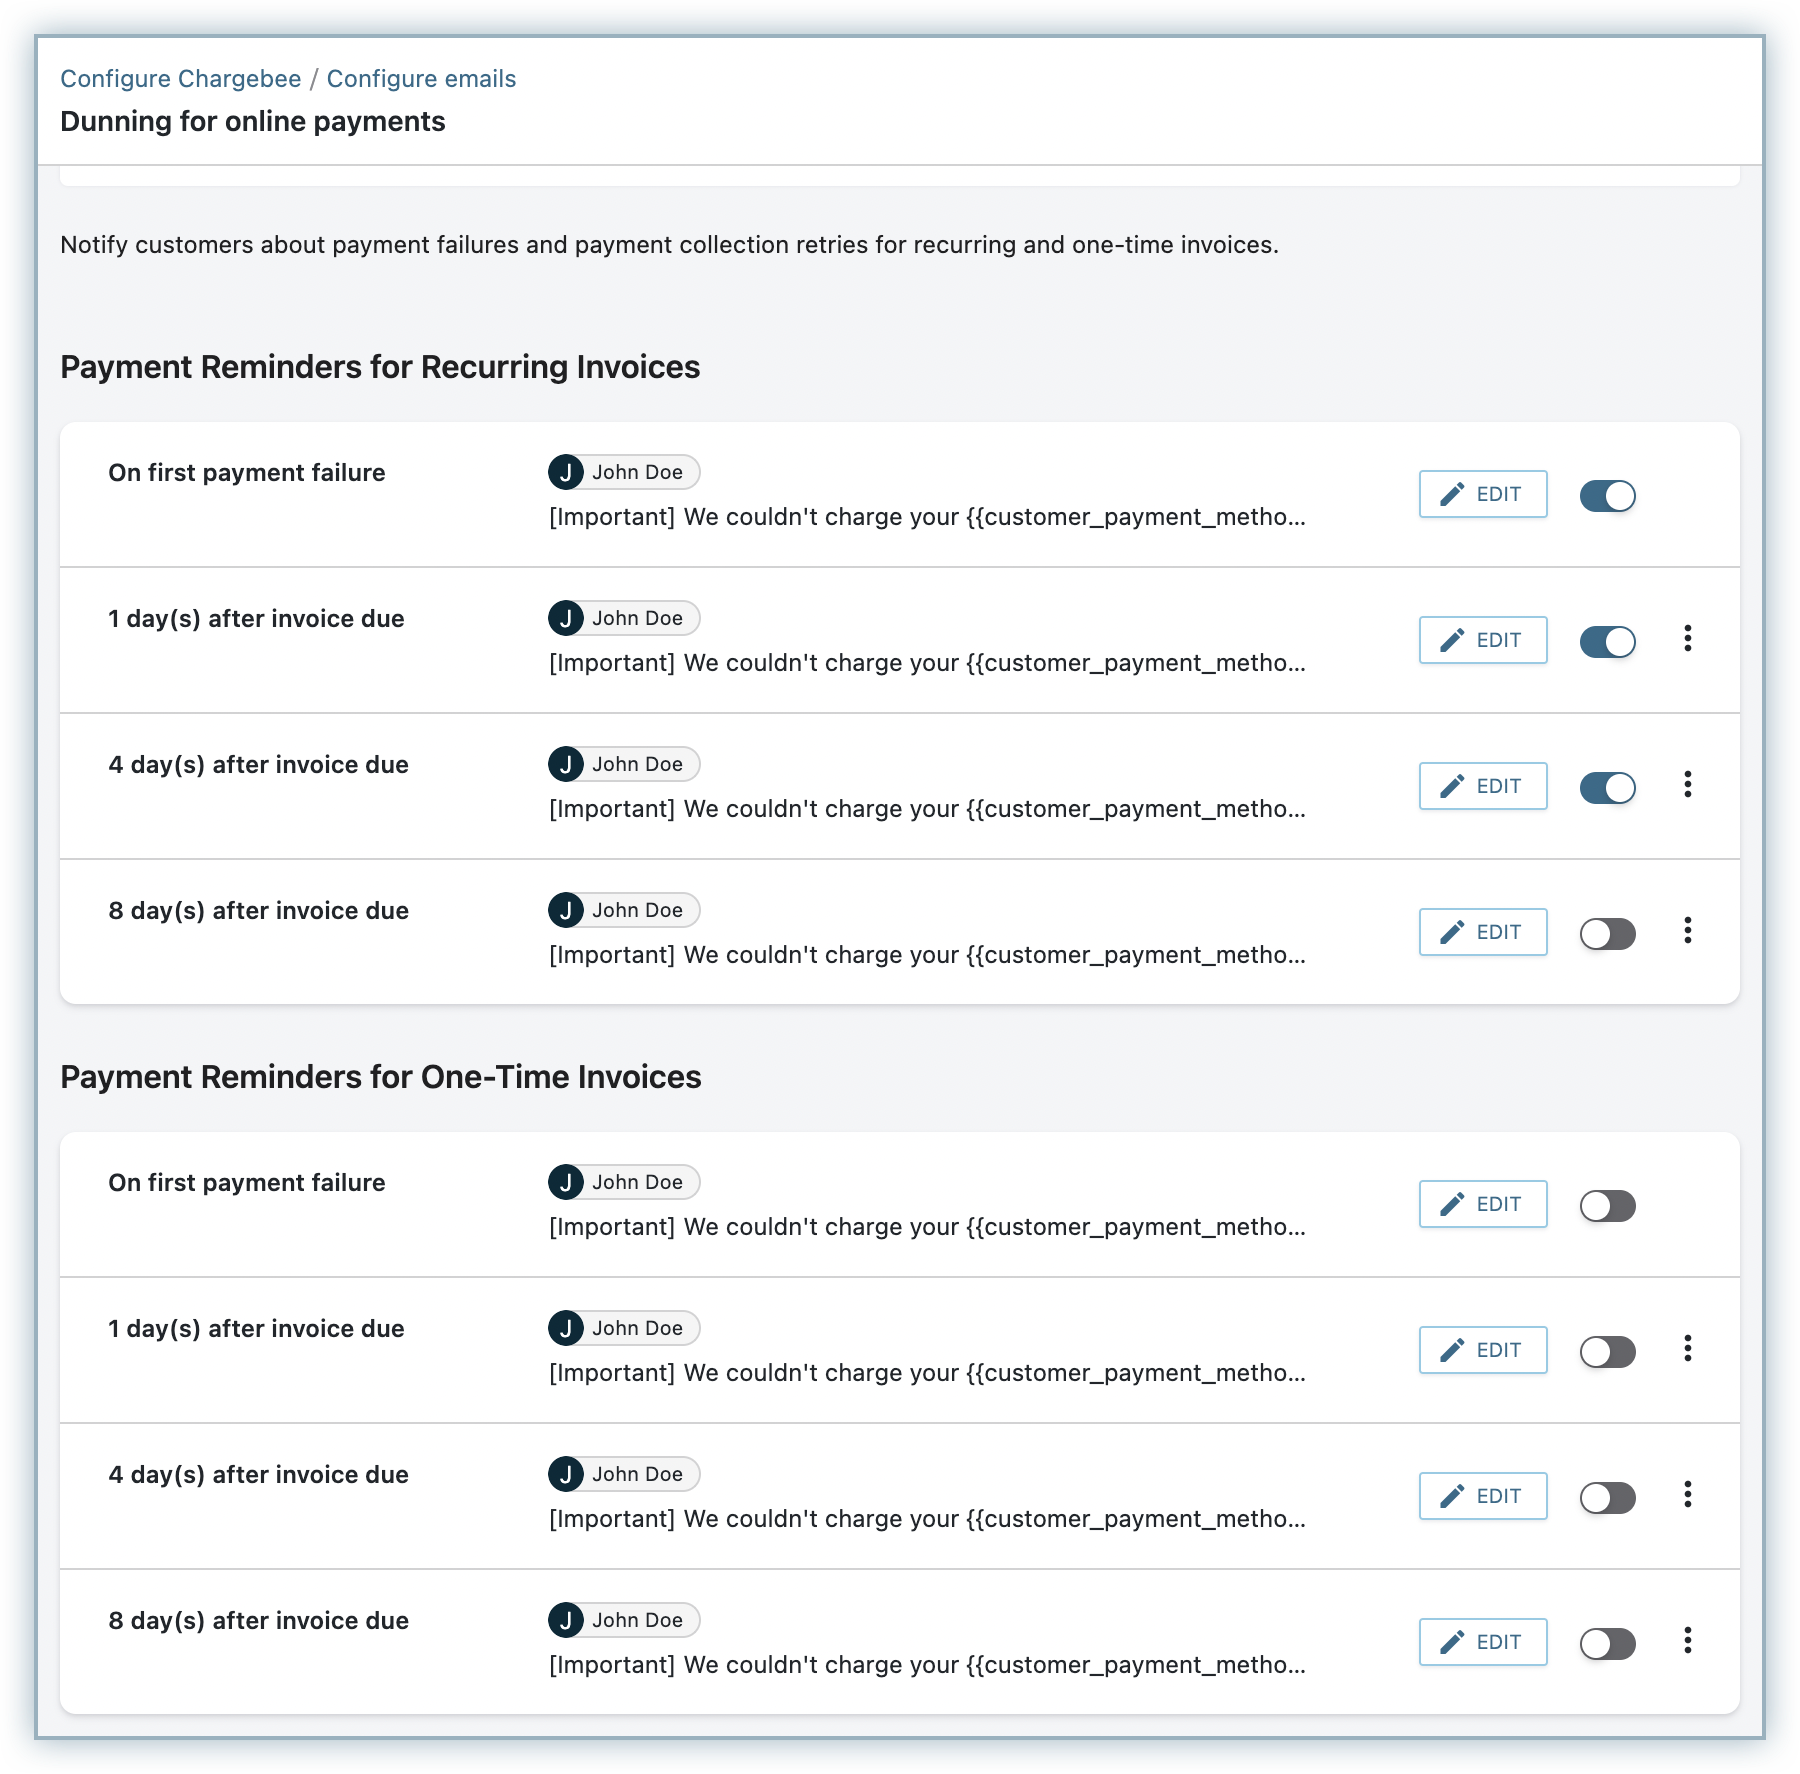
After setting up how dunning is managed in your Chargebee app, here you can configure and enable email notifications that need to be sent for each online and offline dunning attempt. You can send separate notifications with exclusive content for each attempt.
Here's what you can do with the dunning email notifications:
- Enable or disable email notifications for each attempt
- Edit the email notifications that are sent for each attempt.
- Add new notifications for an attempt which can be sent to segment of customers
Abandoned Carts Email Notifications
Note
Available only in selected plans. To know more, visit Chargebee's Plans and Pricing page.
Sometimes customers abandon the checkout process leaving items in their cart. Such cart details are recorded by Chargebee for 30 days when the feature is enabled. You can send emails to such customers reminding them about their abandoned carts so that they may finish checking out.
To configure the email notifications and their content, navigate to Settings > Configure Chargebee > Email Notifications > Abandoned Cart Reminders.

The reminder emails can be configured to be sent from 30 minutes, to up to 30 days of cart abandonment. Multiple such emails can be configured.
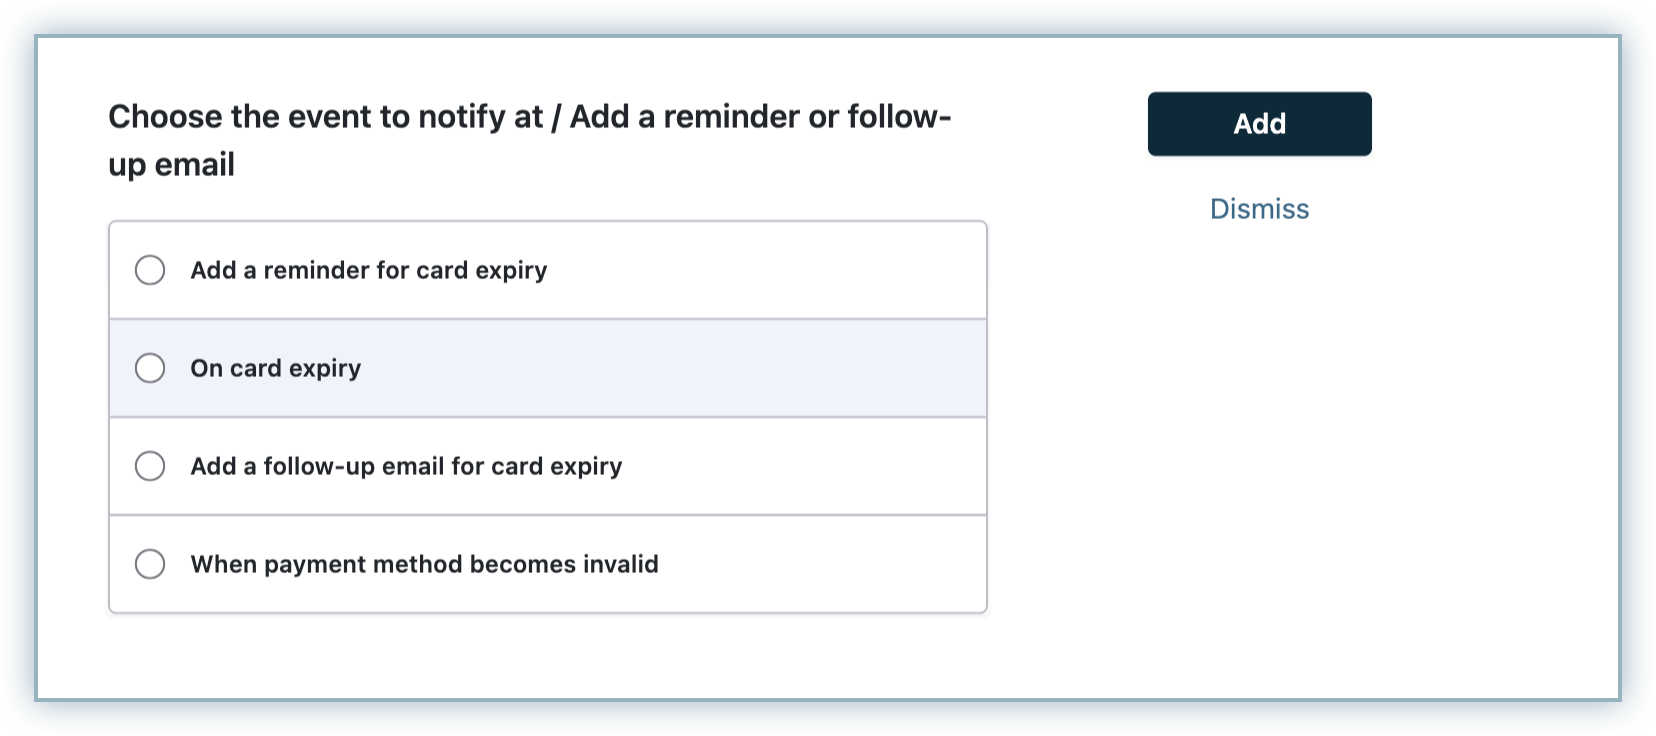
Invalid Payment Method
When a direct debit payment fails, the payment method is marked as Invalid. You can configure the email notifications that are to be sent to the customers from the Invalid Payment Method section.
To configure these notifications, navigate to Settings > Configure Chargebee > Email notifications > Invalid Payment Method

Chargebee allows you to configure the following emails:
- Reminder for card expiry
- On card expiry
- Follow up email for card expiry
- Request payment method
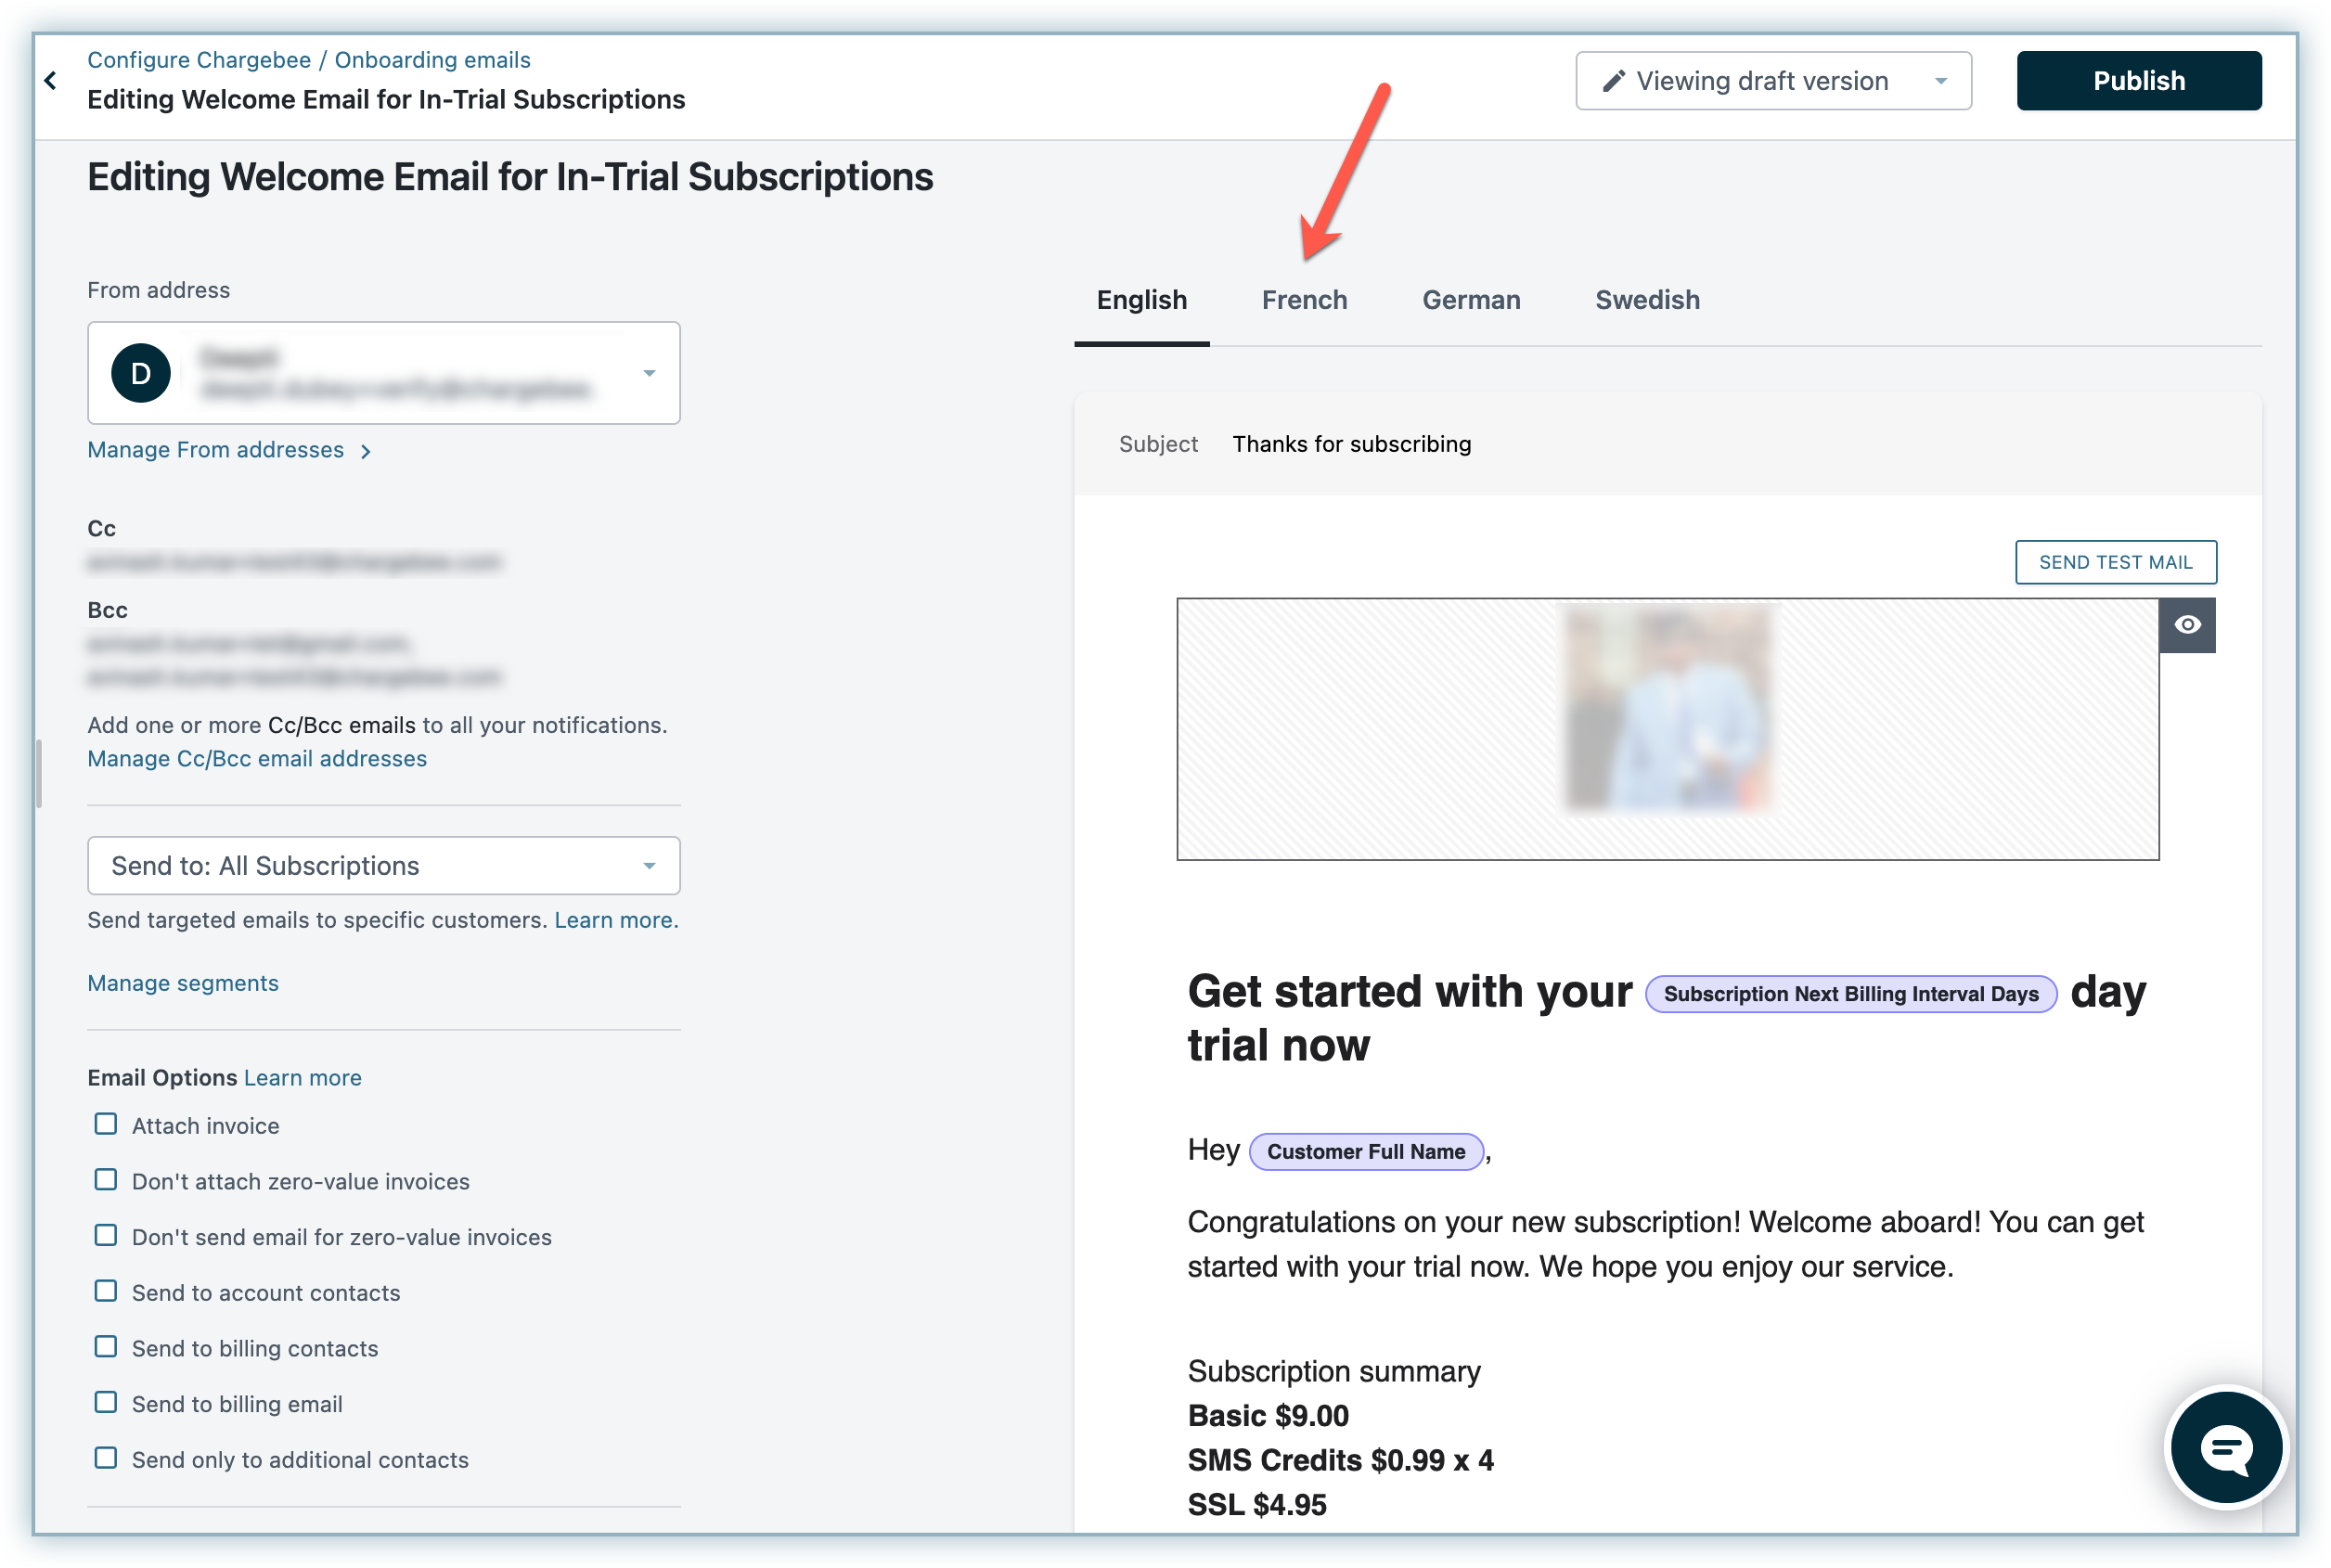
Configuring Multiple Languages in Email Notifications
You can send email notifications to your customers in the language of your choice. Login to your Chargebee site and navigate to Settings > Configure Chargebee > Languages and add the language of your choice from the list given.
Note
Contact Chargebee support to list a language not mentioned in Chargebee.
Say, you chose French to send emails to your customers. You'll find options to either Enable Draft or Activate the language for your Chargebee site.
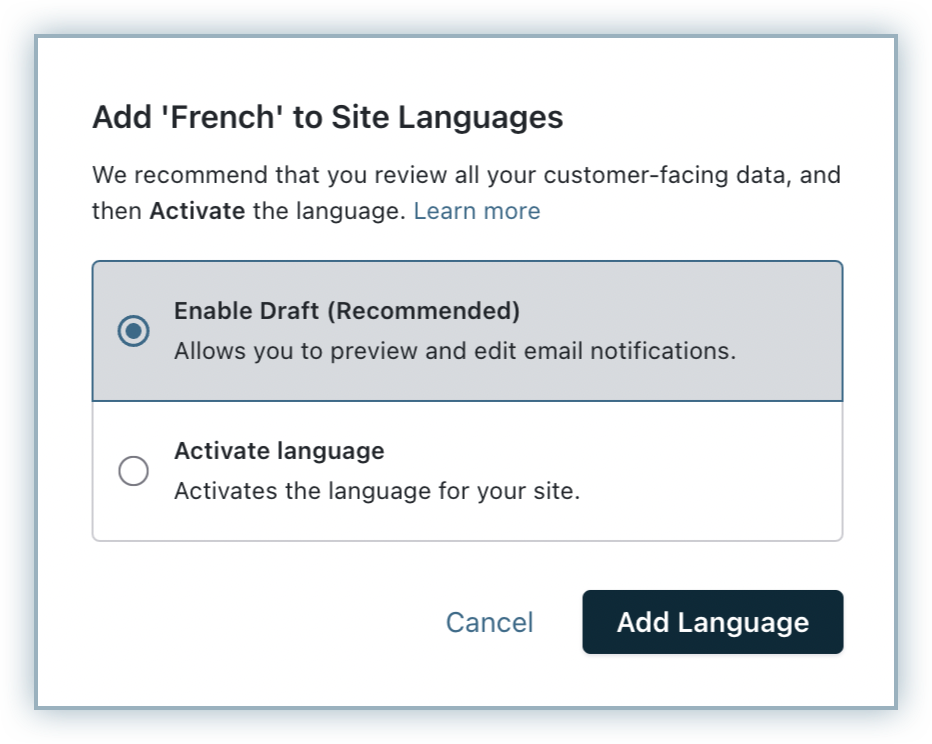
Enable Draft option will allow you to edit the content of the email notifications and test them before sending it over to your customers.
Activate Language will allow you to send the emails to your customers with the content you have set.
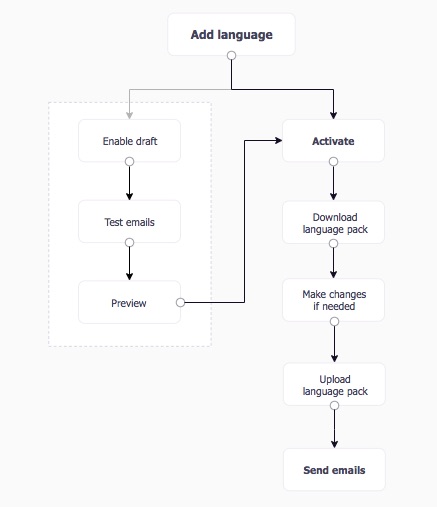
When multiple languages are added to your Chargebee site, you will find a section called ‘Language packs' appear in the page.
Language Packs
Choosing a language in Chargebee will result in modifications in your email content. With the help of Language pack, you can:
- Edit and translate the content in Master Template
- Provide translation for sender address signature
Translating Emails
The content of the individual emails can be edited in their respective edit page:
Notifying 3DS Payment Failures
If your business is based out of Europe or has a significant customer base in the EEA, it is recommended that you authenticate payments via 3D Secure. This is to ensure that you are SCA compliant and in line with the PSD2 regulation. To be compliant, complete Chargebee's .
Configuring emails to inform customers of the failure is necessary, as 3DS failures are hard card declines and require customer intervention. You can configure the email templates under Settings > Configure Chargebee > Email notifications > Dunning for online payments.
Make sure you include the Failure reason and Pay Now button. This helps customers understand that the failure was due to 3DS authentication requirement and can easily pay by clicking on Pay Now.

Tip:
It is advisable to configure the "On first payment failure" template. This ensures that your customers are notified as soon as the payment fails due to 3DS authentication requirement. You can further configure other email reminders to be sent on different dates or even refrain from configuring more such reminders.
FAQ
How to upload logos in the Email Notifications?
To configure branding in Chargebee, navigate to Settings > Configure Chargebee > Brand Styles > Email and you'll be given the options to add a logo. To know more, checkout Chargebee's Branding page.
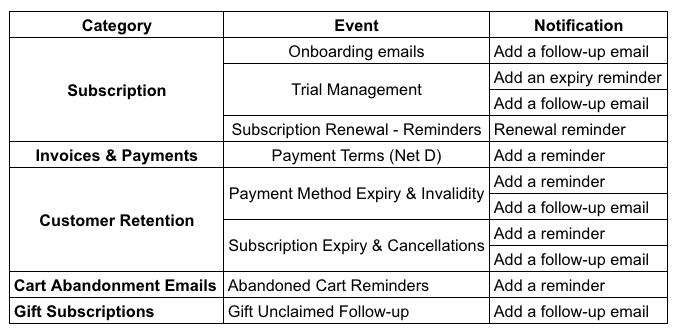
On what events can you set up reminder and follow-up emails with Chargebee's email notifications?
Chargebee sends emails for trial reminders and follow-ups, subscription renewal (reminder), payment method expiration (credit/debit card expiry), subscription expiry, subscription cancellation, abandoned carts and unclaimed gift subscriptions. Here's a summary:
Was this article helpful?