PayPal Express Checkout
This information is specifically tailored for our existing users currently utilizing PayPal Express Checkout. Please note that we are not onboarding any new customers for PayPal Express Checkout.
For new customers, we recommend exploring PayPal Commerce as an alternative.
Please note that any forthcoming upgrades or additions to our platform will apply exclusively to PayPal Commerce.
Express Checkout is a fast, easy way for buyers to pay with PayPal. In Chargebee, PayPal Express Checkout is an additional payment method you can offer your customers.
Note
- Chargebee supports other PayPal payment services as well.
- If multicurrency is enabled in your Chargebee site, ensure that the currencies configured in your Chargebee site are also configured in your PayPal merchant account. Chargebee will mark the invoice as 'void' if the customer makes a payment using a currency not configured in your Chargebee site.
The PayPal Express Checkout experience
To offer PayPal as a payment method, you'll need to set up PayPal Express Checkout as a payment gateway in Chargebee. Details about configuring PayPal in Chargebee are discussed in the later sections.
When users choose to pay using this during checkout, they are redirected to the PayPal login page. After they authenticate their PayPal account, they are taken to the checkout page where they can confirm their Billing Information and then complete their orders. The PayPal Checkout Experience is discussed in detail in later sections.
Apart from the checkout pages, you can allow customers to choose PayPal as a payment method via the customer portal and also via Chargebee's secure Hosted Update Payment Method page.
Subscriptions using PayPal Express Checkout with Chargebee
When a customer subscribes to a product/service from your website for the first time and chooses to pay using PayPal Express Checkout, a PayPal Billing Agreement is created which has a Billing Agreement ID (BAID). Chargebee associates this Billing Agreement ID (BAID) with that customer. The Billing Agreement allows Chargebee to charge your customers automatically without them having to perform any action (such as logging into PayPal and approving the transaction) during each renewal. In addition, it can be used to pay one-time charges as well. The Billing Agreement does not expire unless the customer cancels it.
Note
Chargebee uses the default payment method in the customer's PayPal account to charge them.
Prerequisites - Chargebee's Test Site
Note
'Reference Transactions' is a permission PayPal gives a merchant to collect recurring payment from your customer. Hence it is mandatory that you have reference transactions enabled in your PayPal Live Account. This feature will not be enabled by default in your PayPal Sandbox Account. To enable this feature, contact PayPal support over phone and specify the business account in which you would want this feature enabled. In case you are not able to get it enabled, contact support.
Ensure that you have the following requirements in place to test PayPal Express Checkout in Chargebee's Test Site:
1. Have a PayPal Sandbox Business Account
Chargebee's Test site makes use of PayPal Sandbox Business Account. Details about testing your PayPal Sandbox Business Account in Chargebee's Test site are discussed in later sections.
See also
2. Ensure Reference Transaction is Enabled in your PayPal Sandbox Business Account
3. Configure Supported Currencies
Ensure that you have configured the same list of currencies in both your PayPal Sandbox Account and your Chargebee Test Site. Find a list of currencies supported by both PayPal and Chargebee here.
Prerequisites - Chargebee's Live Site
Ensure that you have the following requirements in place for accepting payments via PayPal Express Checkout with Chargebee.
1. Have a PayPal Business Account
Please note that a PayPal Business Account is not the same as a PayPal Personal Account. Find more on the types of PayPal accounts here.
2. Enable Reference Transactions in your PayPal Business Account
It is mandatory that you have reference transactions enabled in your PayPal Business Account. For this to be enabled in your live account, you will have to reach out to PayPal Customer Support and raise a request. Please note that PayPal has an approval process to enable reference transactions in your business account and this process usually takes some time.
3. Configure Supported Currencies
Ensure that you have configured the same list of currencies in both your PayPal Business Account and your Chargebee Live Site. Find a list of currencies supported by both PayPal and Chargebee here.
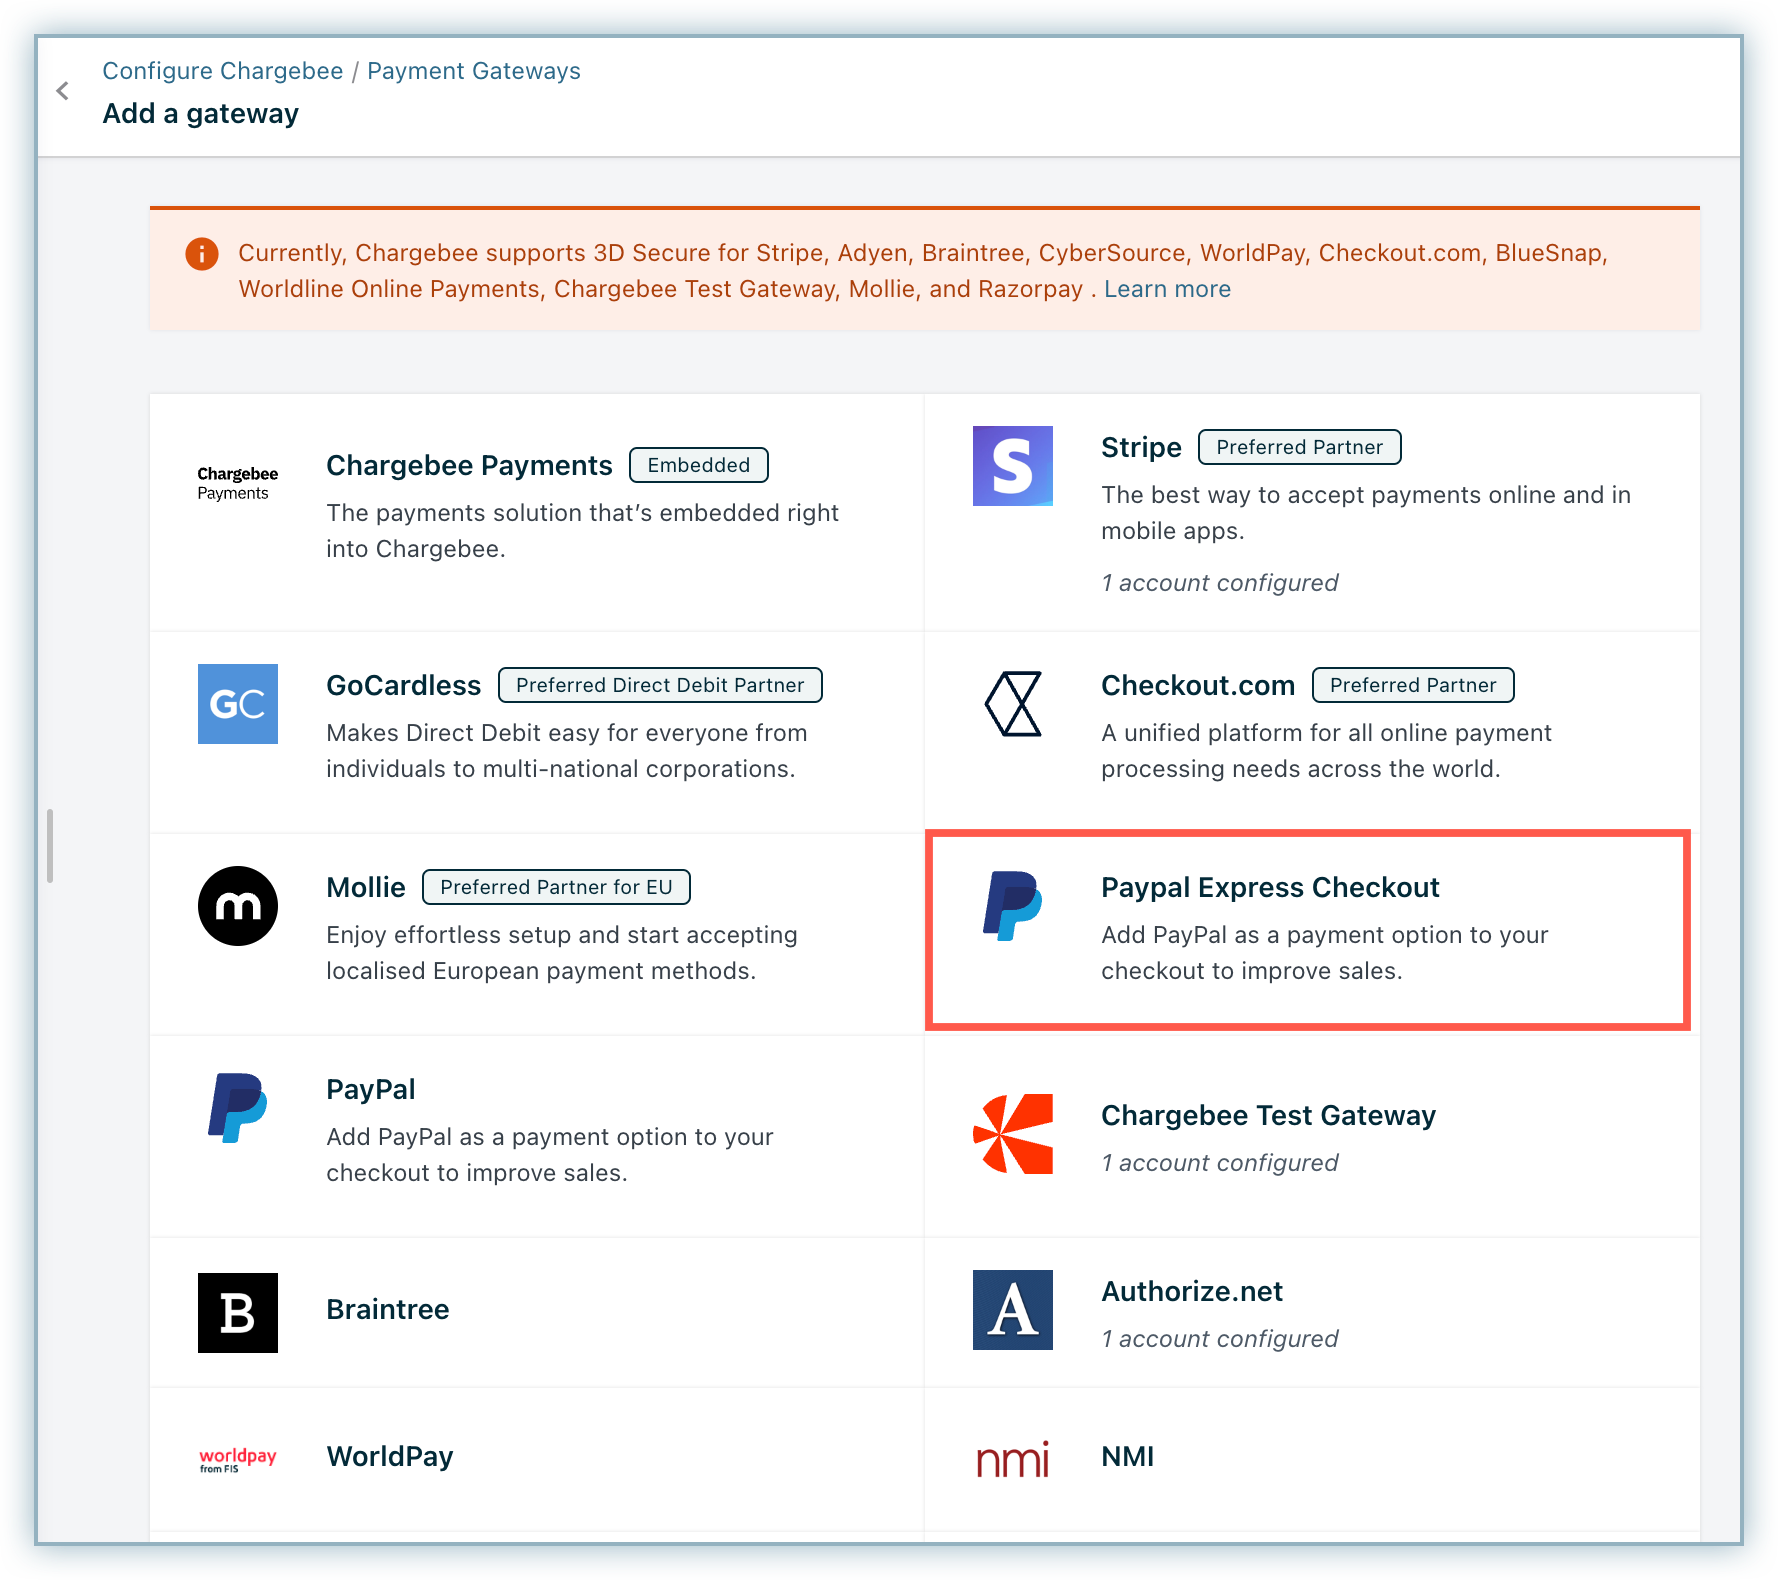
Setting up PayPal Express Checkout in Chargebee
To set up PayPal Express Checkout, go to Settings > Configure Chargebee > Payment Gateways and click Add a Gateway.
Select PayPal Express Checkout from the list, this will take you to the configuration page.
Once you are on the configuration Page, follow these steps to configure PayPal Express Checkout:
Step 1: Link your PayPal Business Account by configuring API credentials
Enter the API Username, Password and the Signature from this list onto Chargebee.
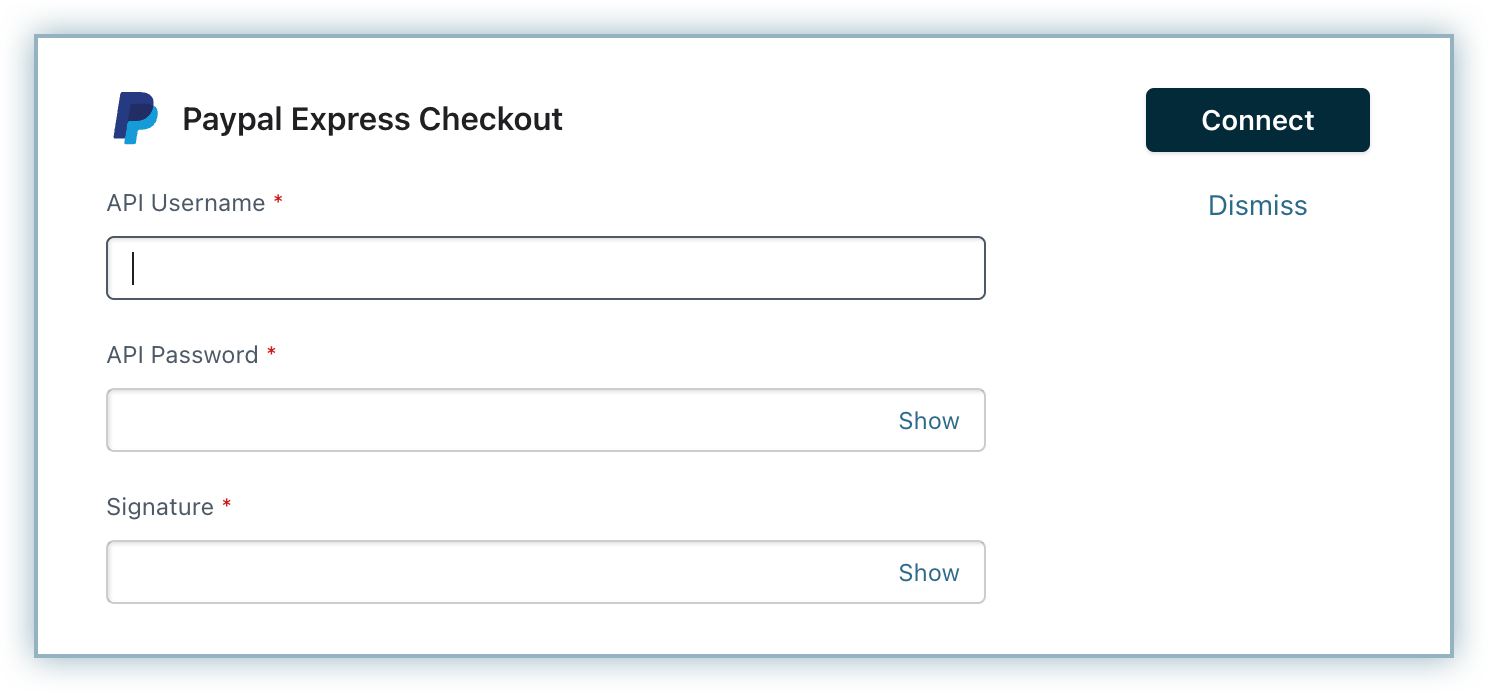
Refer to this FAQ to learn how you can request API credentials or Certificate credentials in your PayPal site.
If you are using the In App Checkout then these details are enough to configure PayPal Express Checkout.
Configuring Instant Payment Notifications
Instant Payment Notification (IPN) is a message service of PayPal that automatically notifies merchants of events related to PayPal transactions.
This service notifies various events related to PayPal transactions to a notification URL which is configured in PayPal. Once the notification URL provided by Chargebee is configured, it watches out for these transaction related events. Though Chargebee receives notifications related to all events, it reacts only to the Billing Agreement canceled event, by marking the PayPal Payment method associated with the customer as INVALID; resulting in the cancellation of the subscription upon renewal. Other operations performed directly in your PayPal account such as refunds, will not be reflected in Chargebee.
Say, your customer has canceled the Billing Agreement in their PayPal account, this is notified as an IPN message. Chargebee will receive this message via a notification URL and will then remove the corresponding billing agreement automatically. Hence, the customer will have to update their payment method to continue their subscription.
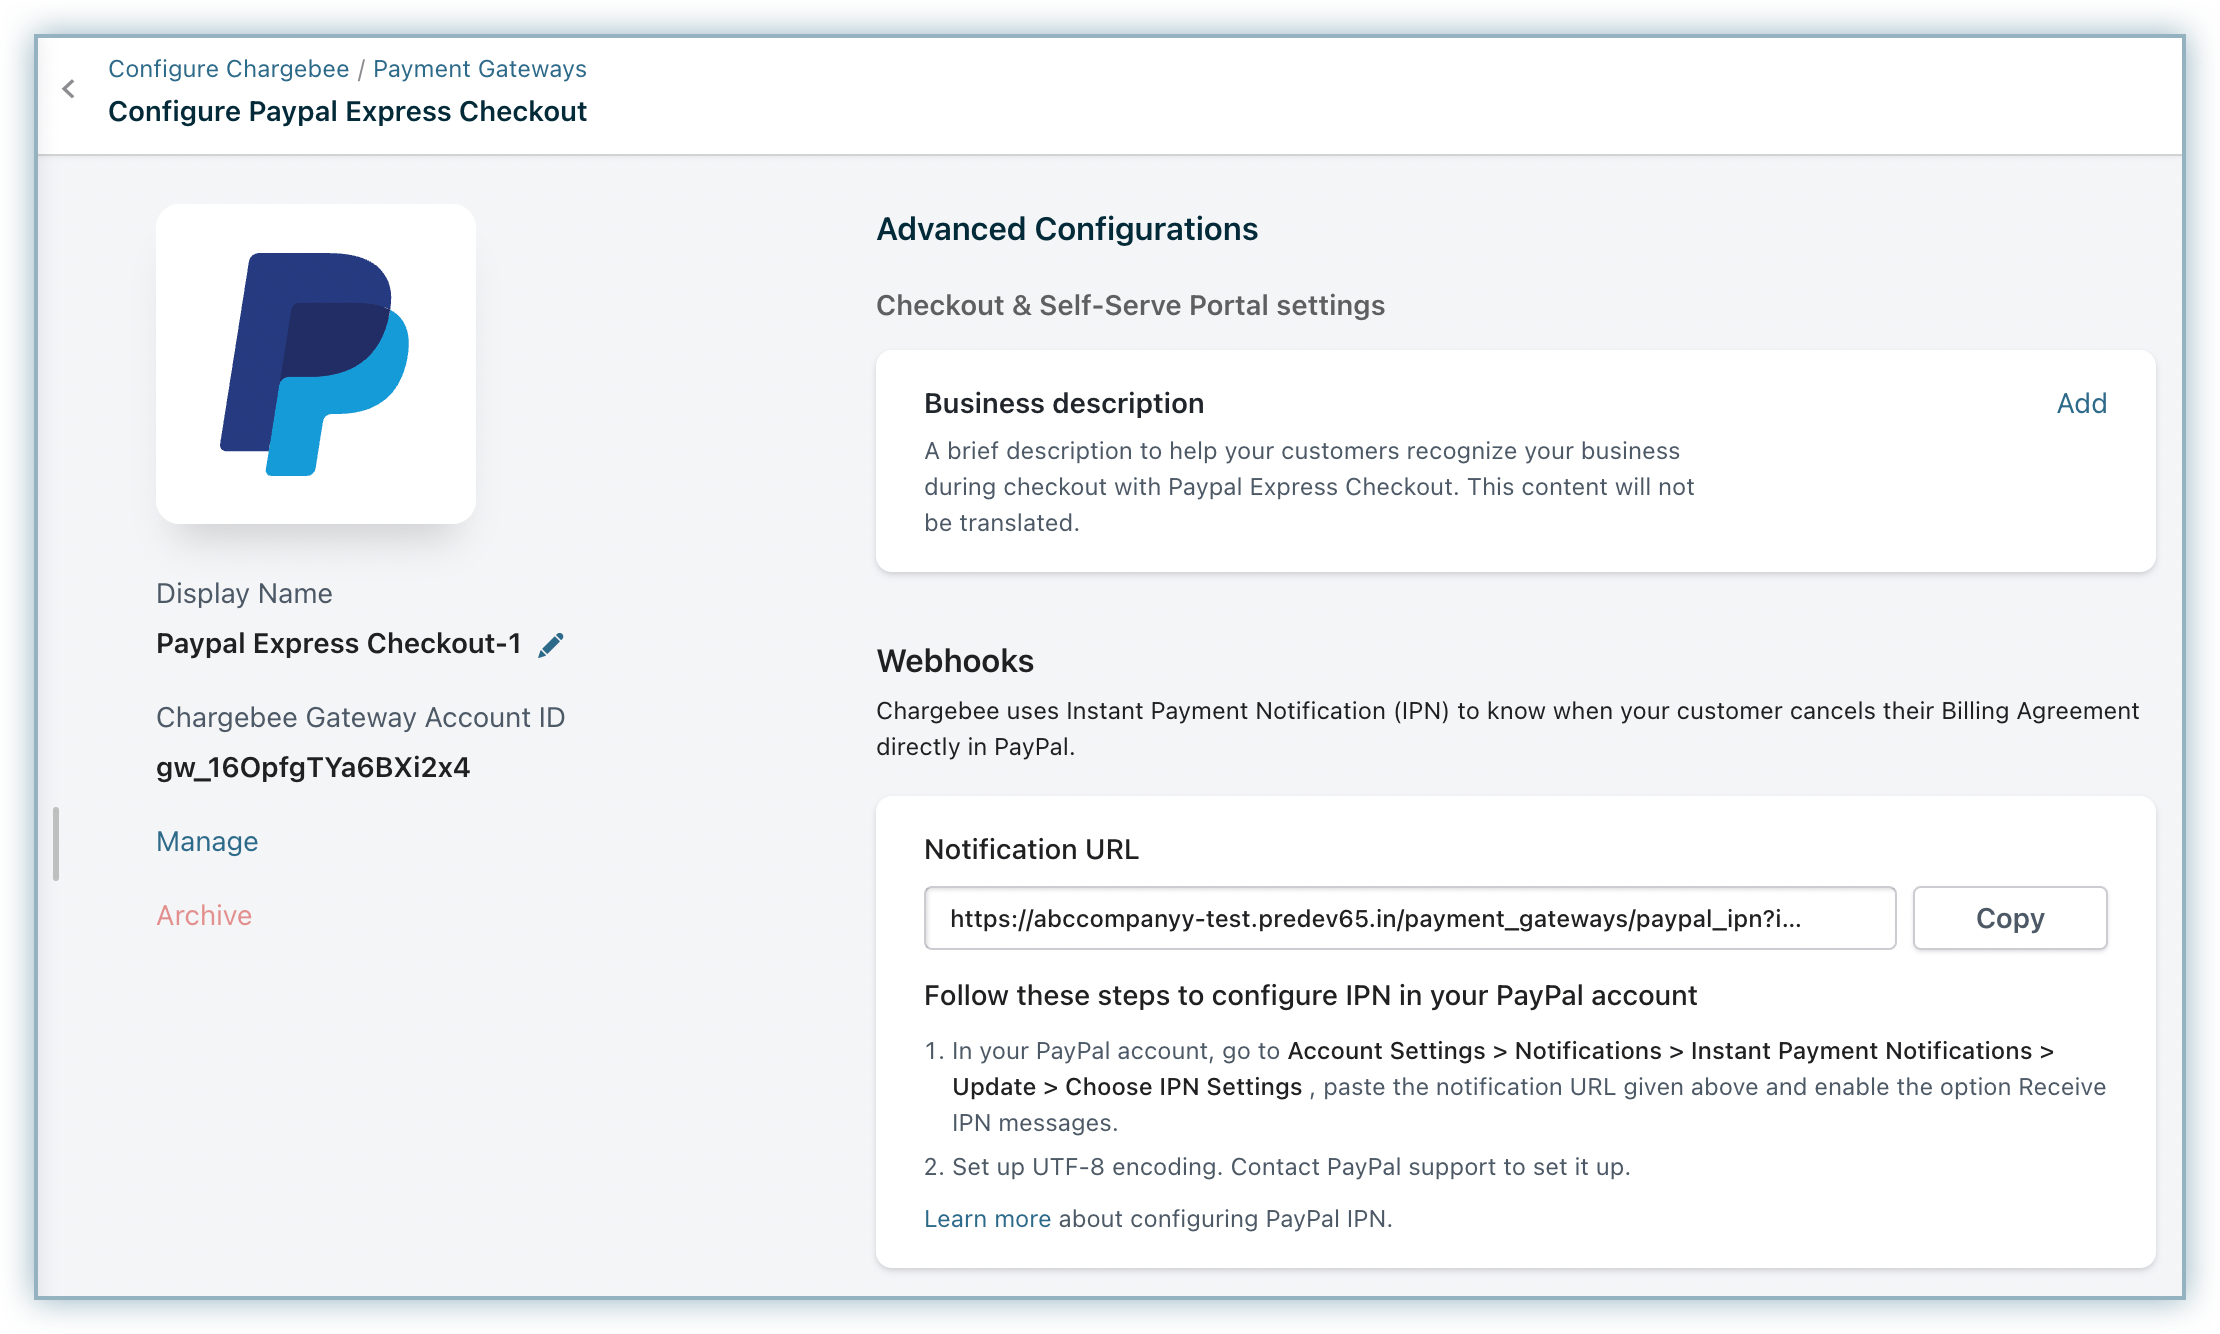
To configure IPN in your Chargebee dashboard, go to Settings > Configure Chargebee > Payment Gateways > PayPal Express Checkout and copy the Notification URL.
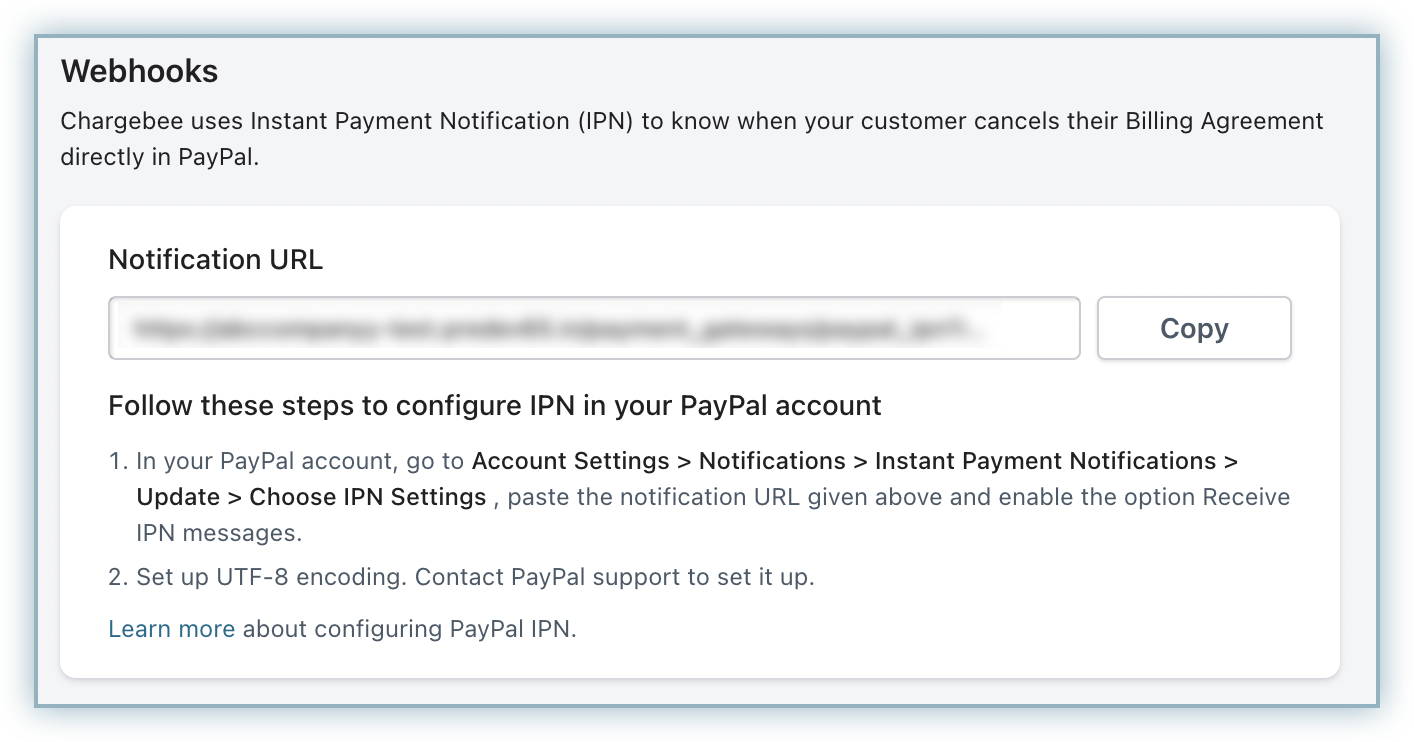
Now in your PayPal Business account, click Account Settings > Notifications > Instant Payment Notifications > Update > Choose IPN Settings and paste the copied notification URL. Also, enable the option Receive IPN messages.
Additionally, you need to ensure that PayPal encodes the information it sends across to Chargebee in a way that Chargebee can understand i.e. UTF-8. If the encoding differs, you might receive errors while using your IPN. To make sure you are using UTF-8 encoding, navigate to My Account > Profile > My Setting Tools > PayPal button language encoding > More Options and choose UTF-8 from the drop down menu.
Note
-
If you are using Chargebee's test site, copy the notification URL from your test site and configure it in your PayPal SandBox Business Account.
-
If you have multiple live sites configured in Chargebee and all the live sites are mapped to the same PayPal Business Account, you will find multiple notification URLs in all your sites. However, in your PayPal Business Account, you can configure only a single IPN URL. In such cases, it will suffice if you configure any one of the notification URLs (from any Chargebee live site) in your PayPal Business Account. Chargebee smartly maps the IPN messages from all your Chargebee live sites to your PayPal Business Account. This is applicable for your test sites as well.
The PayPal Checkout Experience
If you have enabled PayPal Express Checkout as a payment method for your customers, it will be available as a payment option while checking out, in the hosted pages.
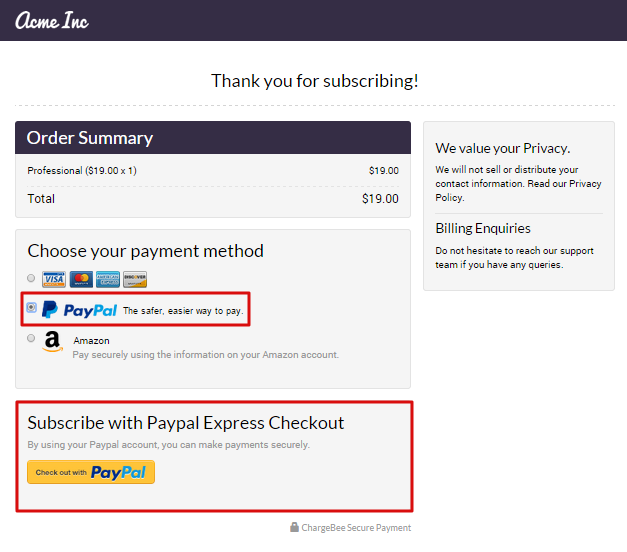
After they choose the PayPal option, and click on Checkout with PayPal, they will be redirected to the PayPal login page.
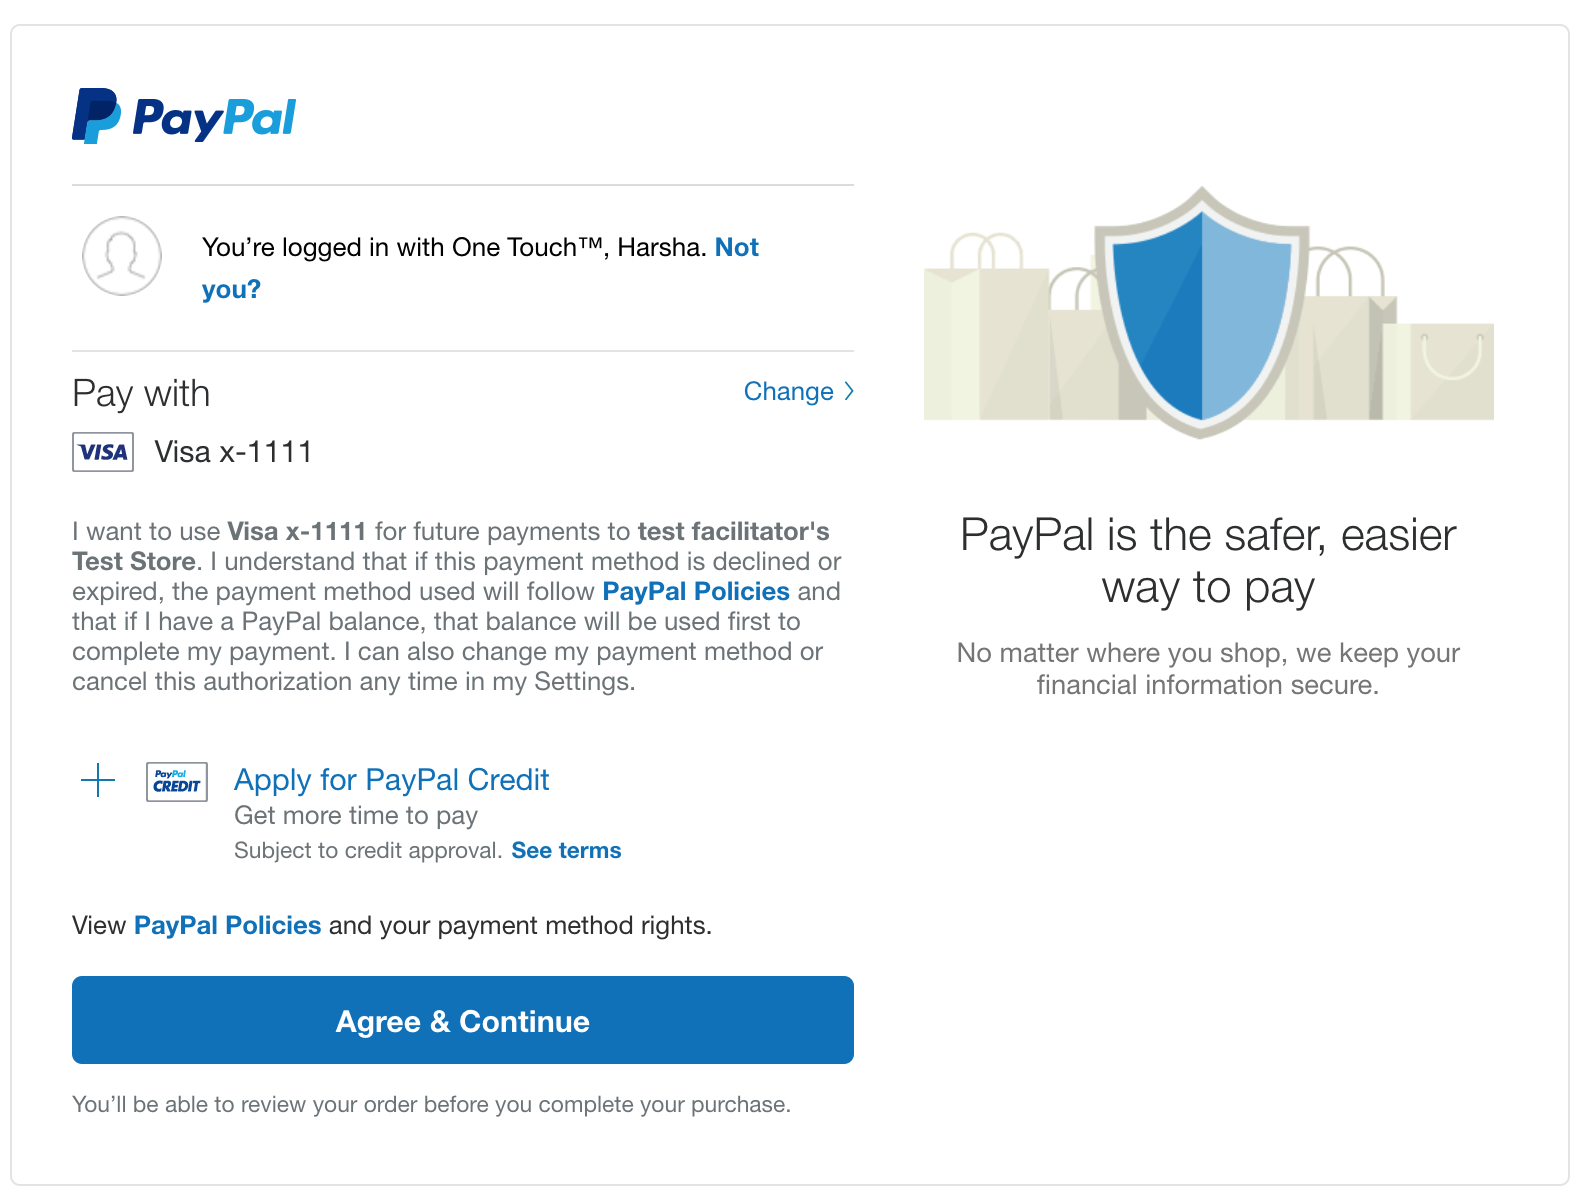
Once they log in to PayPal, customers will see their PayPal account information being displayed along with the Billing Agreement Description which was configured in earlier steps. After they click on Agree and Continue, they will be redirected to their Order Summary Page in Chargebee. They can now verify their Orders and edit their Billing/Shipping Addresses as well if needed. The edited Shipping/Billing Addresses will be saved only with Chargebee and will not affect the ones saved in the customer's PayPal account.
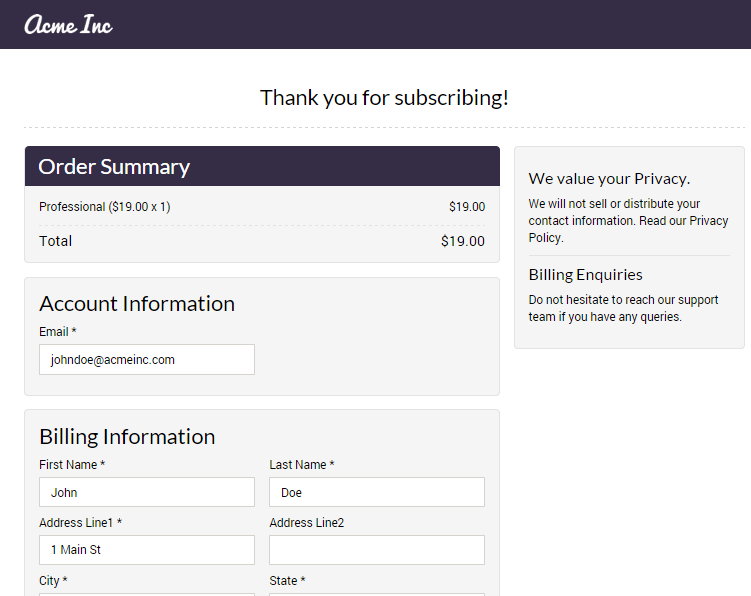
The Payment Information section is displayed at the bottom of the checkout page. It contains the customer's email address associated with PayPal and also has a link which allows them to change their Payment Method if needed.

PayPal Express Checkout with Chargebee's API
To accept payments via PayPal Express Checkout using your custom checkout page, here's the process to be followed in a nutshell:
- Integrate your site with PayPal Express Checkout. Learn more.
- Configure PayPal Express Checkout in Chargebee. Learn more.
- Push information to Chargebee whenever a customer adds/updates their payment method. Push Billing Agreement id obtained from PayPal, to Chargebee. Learn more.
Note
Chargebee's Hosted Pages can still come to your rescue if you'd want to skip integrating with PayPal directly and quickly start accepting payments via PayPal.
Integrating with PayPal Express Checkout
Chargebee uses PayPal Express Checkout (Reference transactions) for capturing recurring payments..
Setting up a reference transaction using Express Checkout requires:
- Setting up the payment authorization.
- Redirecting the customer to PayPal for authorization
- Creating the billing agreement after customers authorize payment via PayPal.
- Capturing future payments.
Chargebee takes over from Step 4 (Capturing future payments) of the above process. You first need to set up PayPal Express Checkout in your website (Step 1, 2 and 3).
After you complete Step 3, you will have a Billing Agreement id which needs to be passed on to Chargebee.
Pushing information to Chargebee - Billing Agreement id
When a customer authorizes a payment via PayPal for the first time, a billing agreement is created. This generates a unique billing agreement id using which customers are charged for every future transaction.
The Billing Agreement id can be passed to Chargebee with the payment_method[reference_id] parameter, using any of the following APIs:
Chargebee then sends this billing agreement id to PayPal to validate it. After validation, the Billing Agreement id is stored at Chargebee's end and used to charge the customer for future payments.
Refer here for further information.
Note
While creating a subscription for an existing customer, the option to specify the payment method information is not available. This is because, the payment method information is linked to customers and not the subscriptions.
Testing in Chargebee's Test Site
It is recommended that you set up PayPal Express Checkout in Chargebee's Test site before setting it up in the Live Account.
PayPal SandBox Account
"The PayPal Sandbox mirrors the features found on the PayPal production servers with minor limitations. By using fictitious Sandbox test accounts and their associated authentication credentials in your PayPal API calls, you can test and debug your application without referencing any real PayPal users or their live PayPal accounts." Read more about PayPal SandBox here.
PayPal SandBox environment provides virtual PayPal accounts for testing purposes.
They are of the following types:
Business Account:
It represents the merchant and mirrors the functionalities of a PayPal Business account.
Personal Account:
It represents the customer and mirrors the functionalities of a PayPal Personal Account.
See also
Accessing PayPal SandBox Accounts
To access your PayPal SandBox Account, follow the steps given below,
Step 1: Login to the PayPal Developer Site using your PayPal Live Business Account credentials.
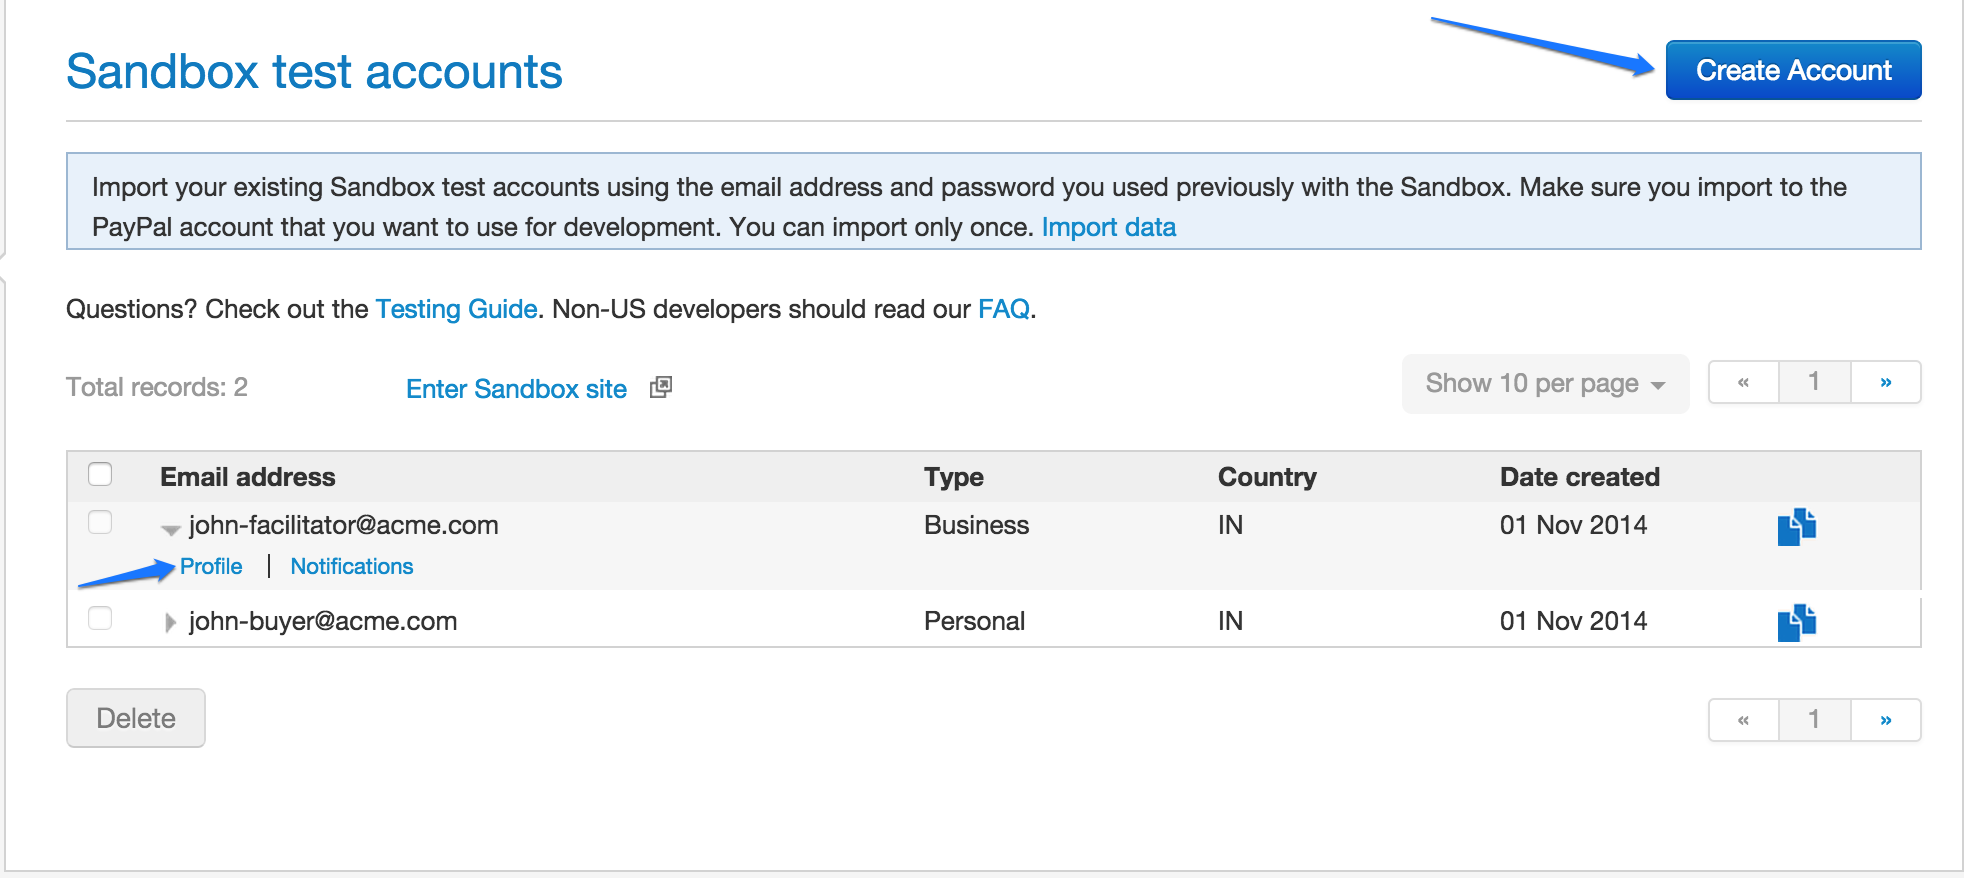
Step 2: Go to the Dashboard and click on Accounts under SandBox.
Step 3: PayPal creates two test accounts - one buyer test account and one business test account by default. If necessary, you can create multiple buyer and business accounts by clicking on "Create Account" as shown in the image below.
Step 4: Login to the test accounts created using the PayPal Sandbox Site. You can find the credentials to be used under the Profile section of the corresponding account as shown in the image below.
Supported Currencies
The following currencies are supported by both Chargebee and PayPal:
- AUD - Australian Dollar
- CAD - Canadian Dollar
- CHF - Swiss Franc
- CZK - Czech Koruna
- DKK - Danish Krone
- EUR - Euro
- GBP - British Pound Sterling
- HKD - Hong Kong Dollar
- HUF - Hungarian Forint
- ILS - Israeli New Sheqel
- MXN - Mexican Peso
- NOK - Norwegian Krone
- NZD - New Zealand Dollar
- PHP - Philippine Peso
- PLN - Polish Zloty
- RUB - Russian Ruble
- SGD - Singapore Dollar
- SEK - Swedish Krona
- THB - Thai Baht
- TWD - New Taiwan Dollar
- USD - U.S. Dollar
Additionally, the following currencies are supported only if you have a PayPal account in the corresponding country as mentioned:
- BRL - Brazilian Real
- MYR - Malaysian Ringgit
- TRY - Turkish Lira
Limitations
- PayPal Express Checkout is only supported on hosted pages when used with the Minimal, Elegant or Inspire themes. It does not work with Chargebee's Rhapsody theme.
- As the customers are redirected to PayPal while using PayPal Express Checkout, the option of embedding into an iFrame is not supported in hosted pages.
Migration
In case you wish to migrate to subscription information to Chargebee, contact support. Please note that PayPal requires a Billing Agreement ID to migrate the payment methods from PayPal to a third party tool such as Chargebee. You will have to help us with the Billing Agreement ID at the time of migration. Payment Methods of customers without the Billing Agreement ID cannot be migrated.
FAQs
1. I received an email from PayPal titled: "PayPal Instant Payment Notification Warning". What should I do about this?
Each IPN message sent from PayPal has to be acknowledged by Chargebee. If PayPal doesn't receive this acknowledgement, it treats the IPN as a failure and sends this email. Check if you've configured the PayPal IPN as per instructions here and reach out to Chargebee support with details, for further assistance.
2. How is the waiting period for refund handled in Chargebee if there is a delay?
Chargebee waits until 3-8 business days to check the status of the refund. In the meanwhile, the status of the refund in Chargebee will be in_progress. When the refund is processed successfully from PayPal, Chargebee changes the refund status from in_progress to success and the related Credit Note will be marked as Refunded.
Was this article helpful?