Setting up your Cancel Pages
Overview
Cancel Pages in Chargebee Growth allows you to design, personalize, and optimize the cancellation experience for your subscribers. Instead of directing customers straight to cancellation, you can present targeted messaging, retention offers, and exit surveys to better understand why customers are leaving and increase deflection rates. Using the Page Editor in the Growth Experience Manager, you can:
- Personalize messaging based on customer data.
- Present loss aversion messaging and offers.
- Collect structured cancellation insights.
- Control routing behavior after cancellation.
- Configure how cancellations are processed.
- Test and compare experiences using a Control page.
This document explains how to configure and edit each section of your Cancel Page.
Editing your Cancel Page
To edit a Cancel Page in your Growth site, follow these steps:
- Click Experiences > Pages. Your Chargebee Growth site comes with a Default Test Page that can be previewed and edited. select the relevant Cancel Page.
- Click New test page to create a new cancel page by copying the default page.
- The Cancel page opens and displays the Page Editor. The Page Editor is where you personalize your cancel experiences to your end-users. It is organized into three primary sections:
Refer to the respective sections to learn more about customizing specific elements in each section.
- Once you’re done editing your page, click Publish to save and publish your changes.
Page Personalization
Page Personalization allows you to tailor messaging and components to your canceling subscribers. You can configure:
- Page Headline: The Headline is the line of text just below the logo on the Chargebee Growth Page. It's your first shot at saving your customer, by meeting them with a personalized message.

The Headline can be personalized by pulling any of your mapped fields in Chargebee Growth to display directly in the Page when the user initiates a session. Some common examples that you can use to personalize your Cancel Pages include Owner First Name, Organization Name, First Purchase Date, Owner Email, Subscription Renewal Date, Lifetime Value, and Domain.
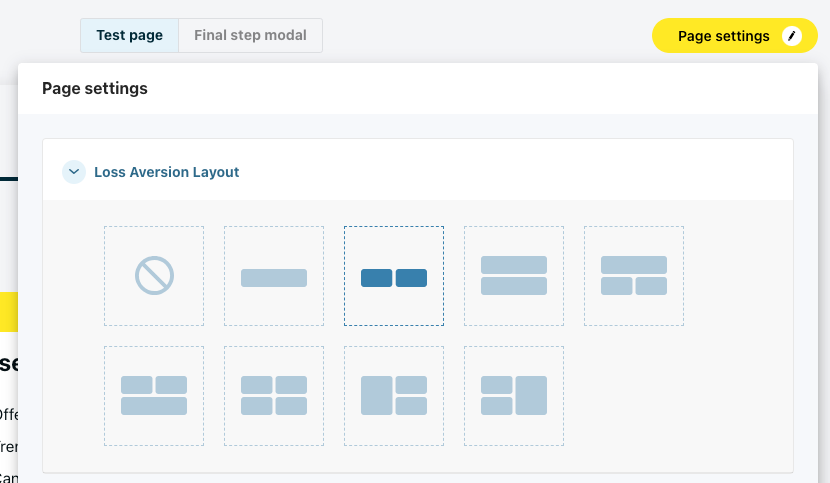
- Loss Aversion Cards: Each Cancel Page includes two Loss Aversion (LA) Cards by default. Loss Aversion Cards allow you to:
- Reinforce product value
- Highlight unused benefits
- Present retention offers
- Display personalized messaging
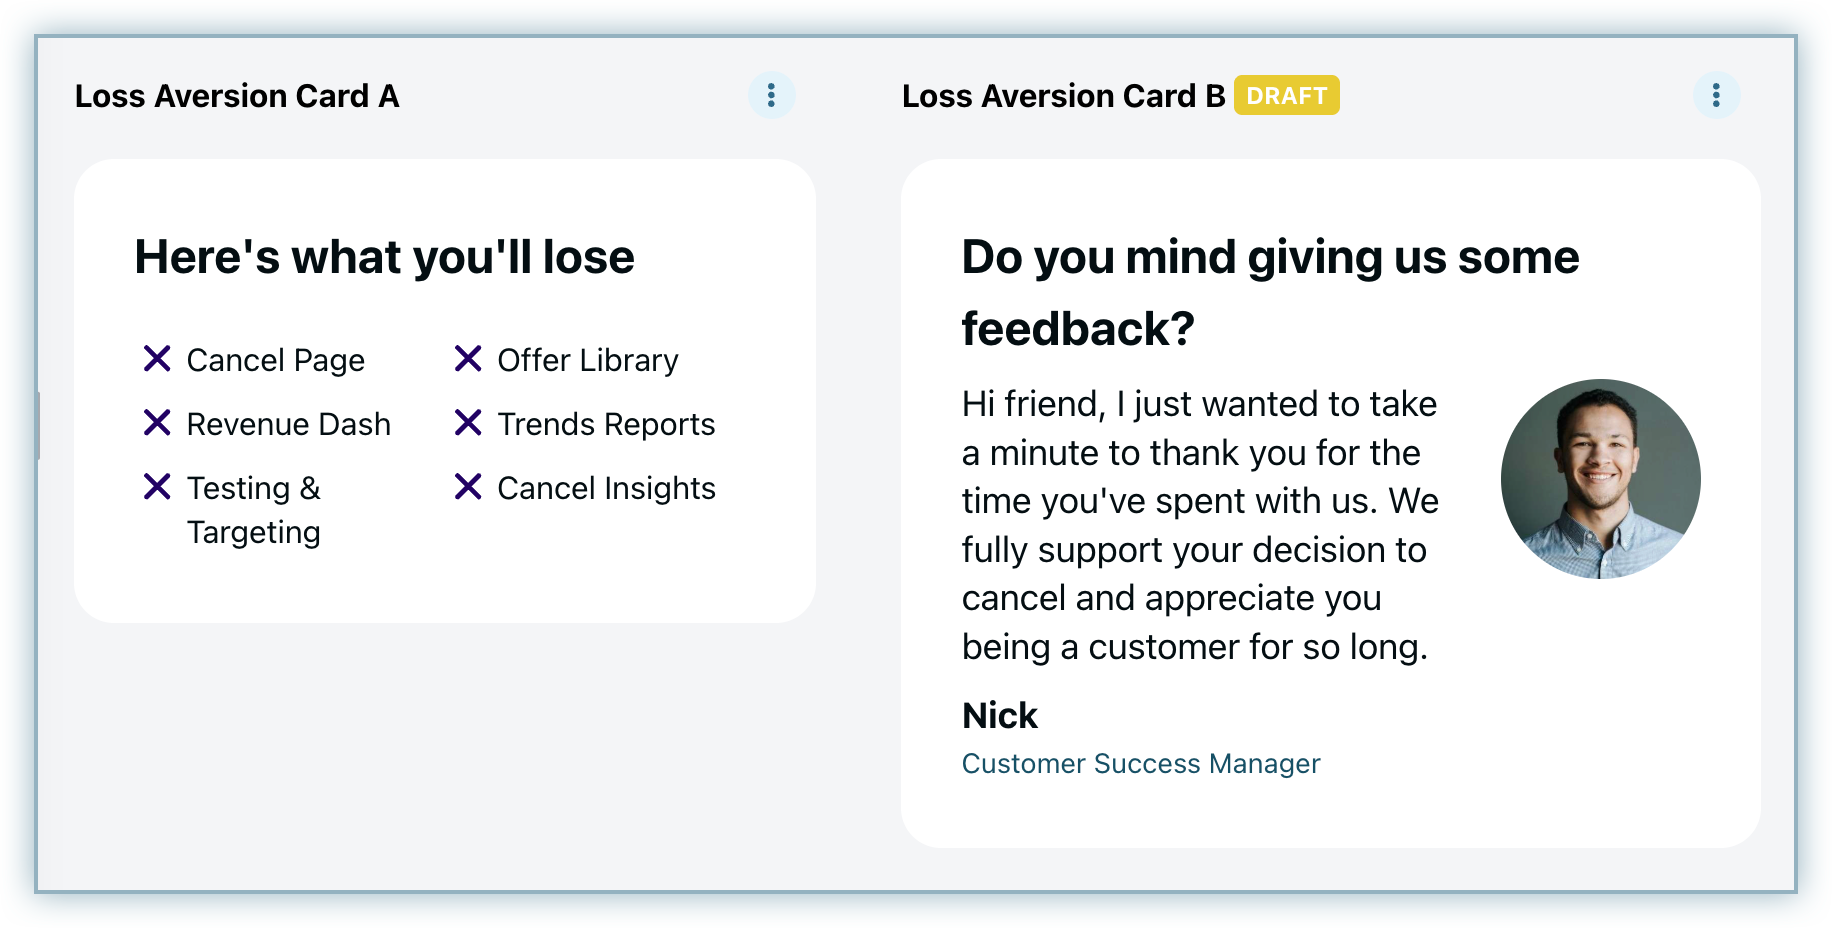
You can edit existing cards, replace cards, add new cards, or remove cards.
You can configure the page to display between 0–4 LA cards from Page Settings, depending on the selected layout. Testing combinations of personalization and offers is recommended to optimize performance. Learn more.
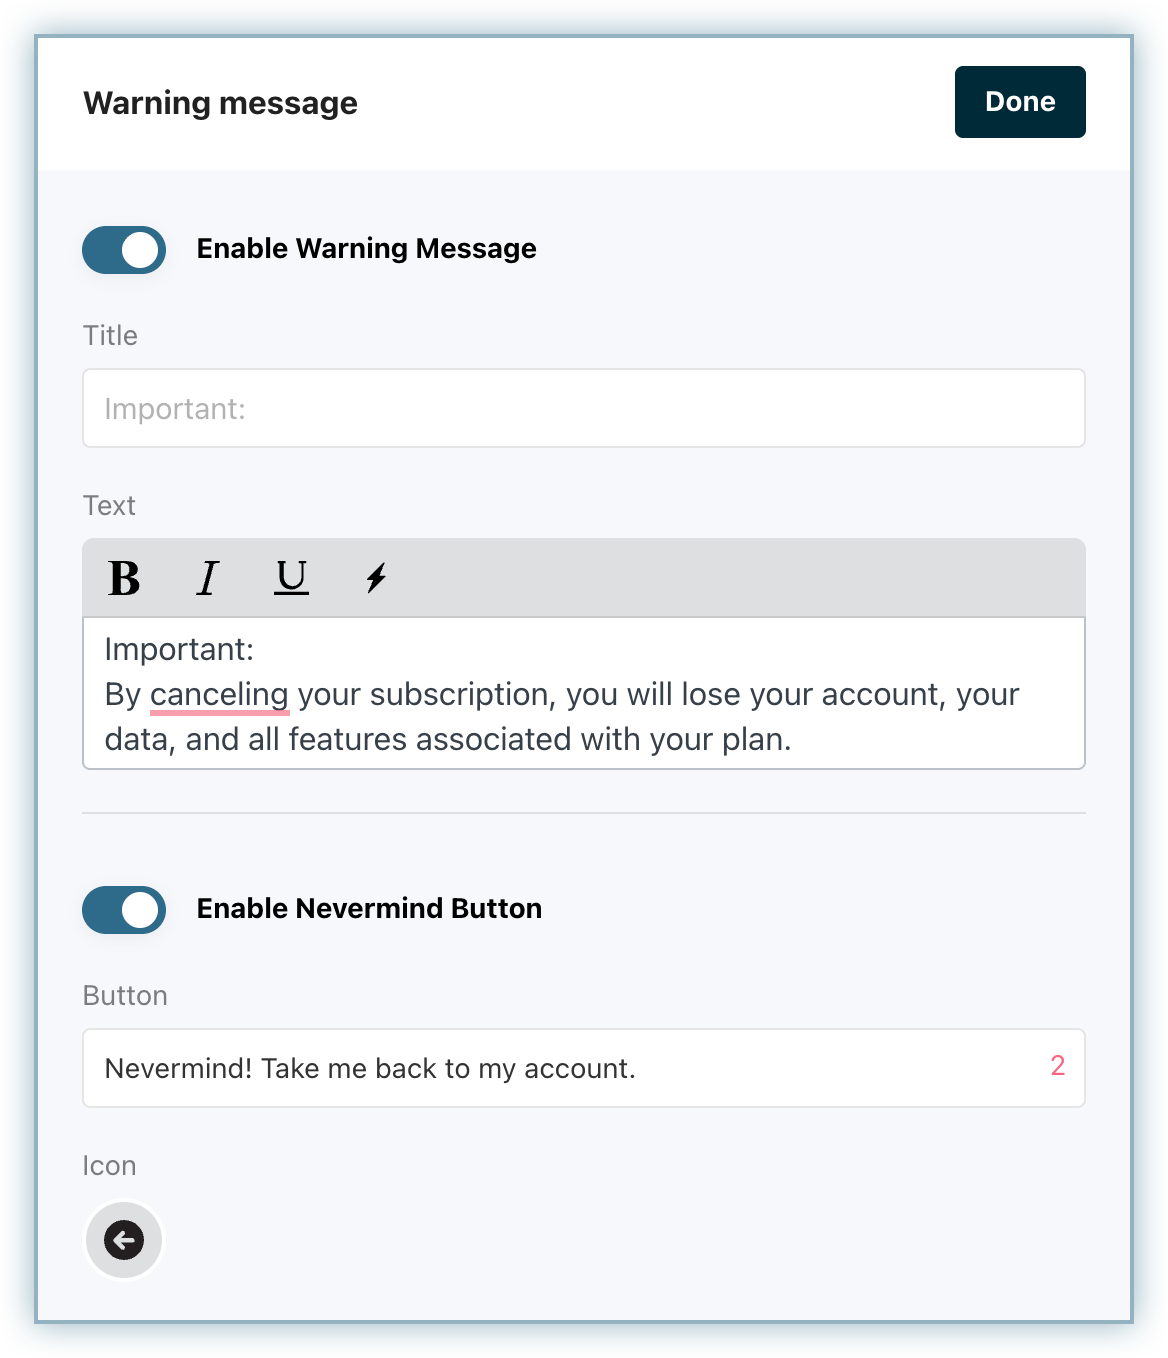
- Upper Nevermind: The Upper Nevermind is the button below the Loss Aversion Cards that allows your subscribers to exit the cancel flow and return to your product or site while it's not too late. Clicks on this button are tracked as Passive Deflections in reporting.
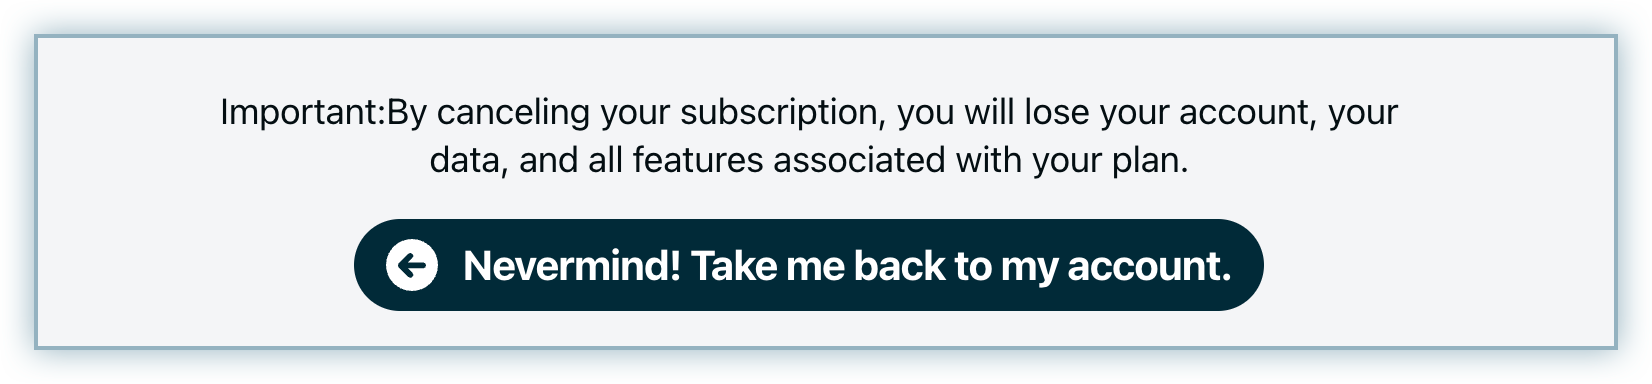
You can edit this section by clicking the Upper Nevermind section in the Page Editor. Update the button text and destination URL. Configure the warning message if applicable.
- Footer section: The footer section is everything that is displayed near the bottom of the page that includes a confirmation message, Cancel button, and a Nevermind button.
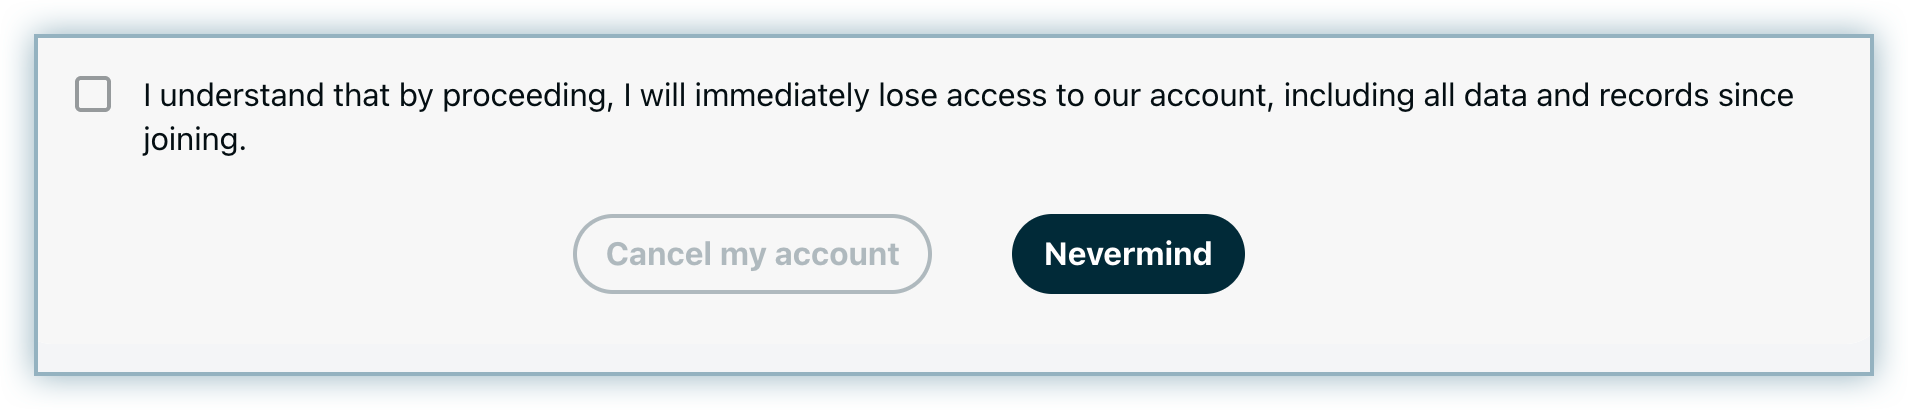
The confirmation message confirms that the subscriber fully understands the impact of cancellation. You can click anywhere in this section to edit the following:
- keep or hide the confirmation section.
- display the confirmation as a checkbox.
- keep or hide the Cancel button.
- keep or hide the Nevermind button. Making this field required may increase Passive Deflection rates, but some businesses prefer to reduce friction in the cancellation process.
- You can edit the footer message or even the button texts.
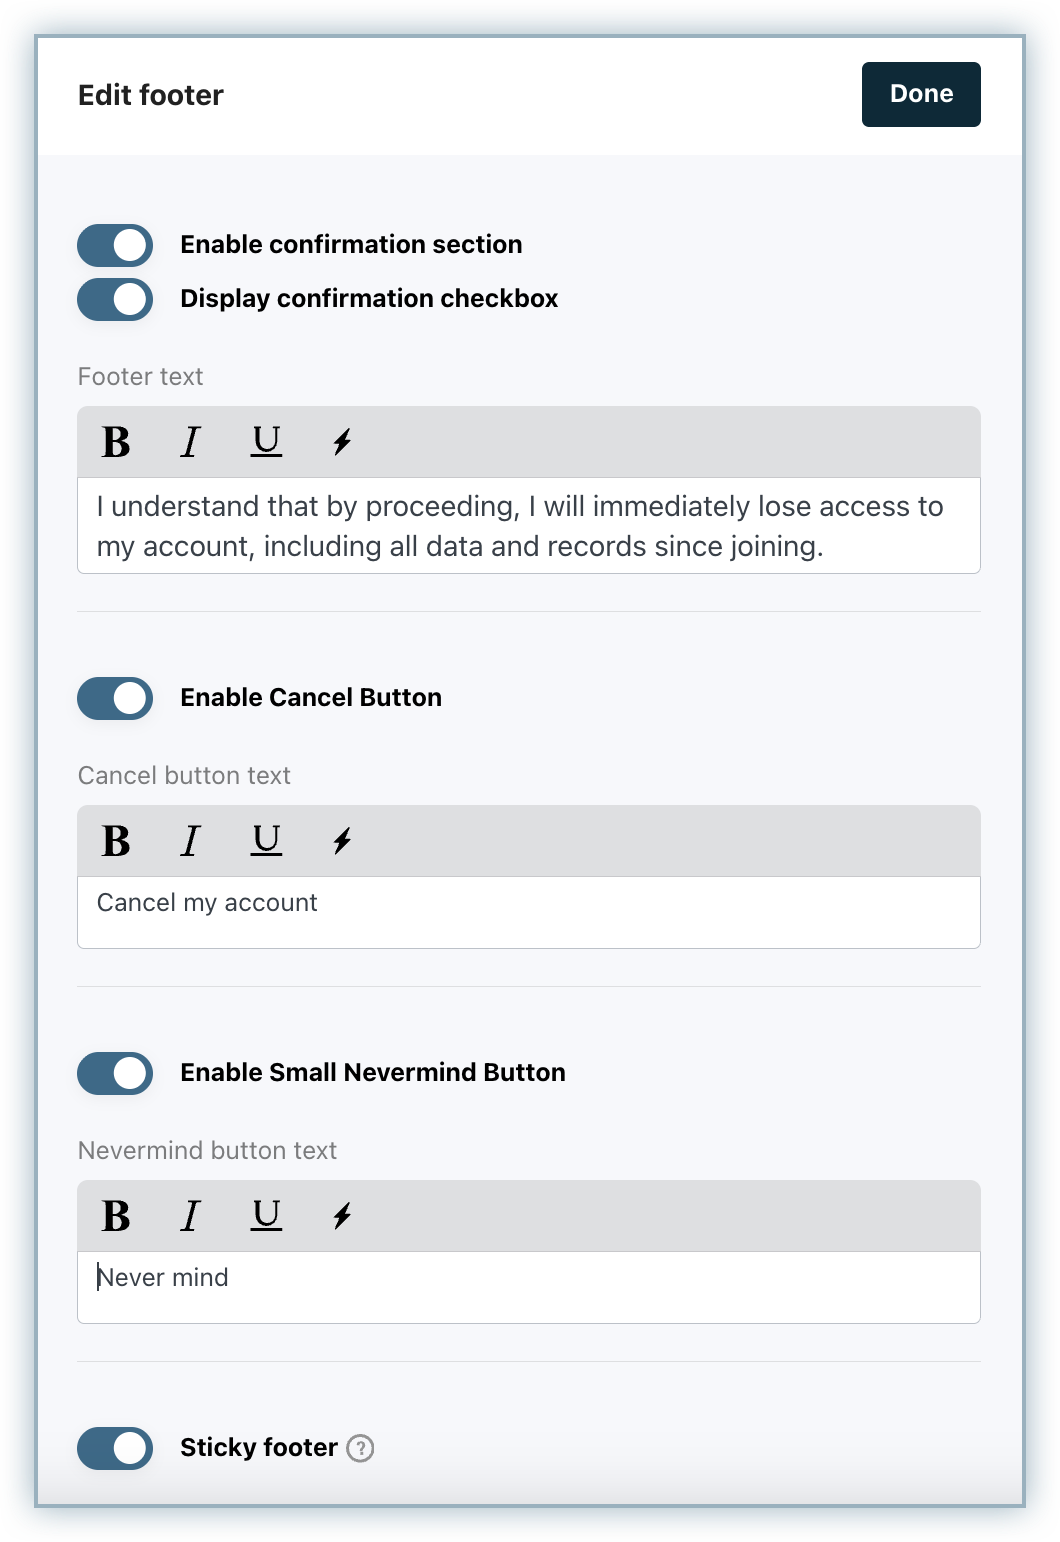
You can also enable a Sticky footer option so the entire footer section remains visible as subscribers scroll.
Survey Elements
Cancel Pages include configurable exit surveys to collect structured feedback and improve reporting. Available survey components include:
- Survey Question + Cancel Reasons: Each Chargebee Growth Cancel Page allows you to present your canceling customers with Cancel Reasons. The Cancel reasons are divided into Categories for benchmarking purposes. Each Cancel Reason allows you to present an Offer when the user clicks on it, or show nothing. Note: The Essentials Plan will only allow you to place a single Offer behind each of the reasons within a page, whereas the Performance Plan allows for multiple Reason Based Offers within a single page.
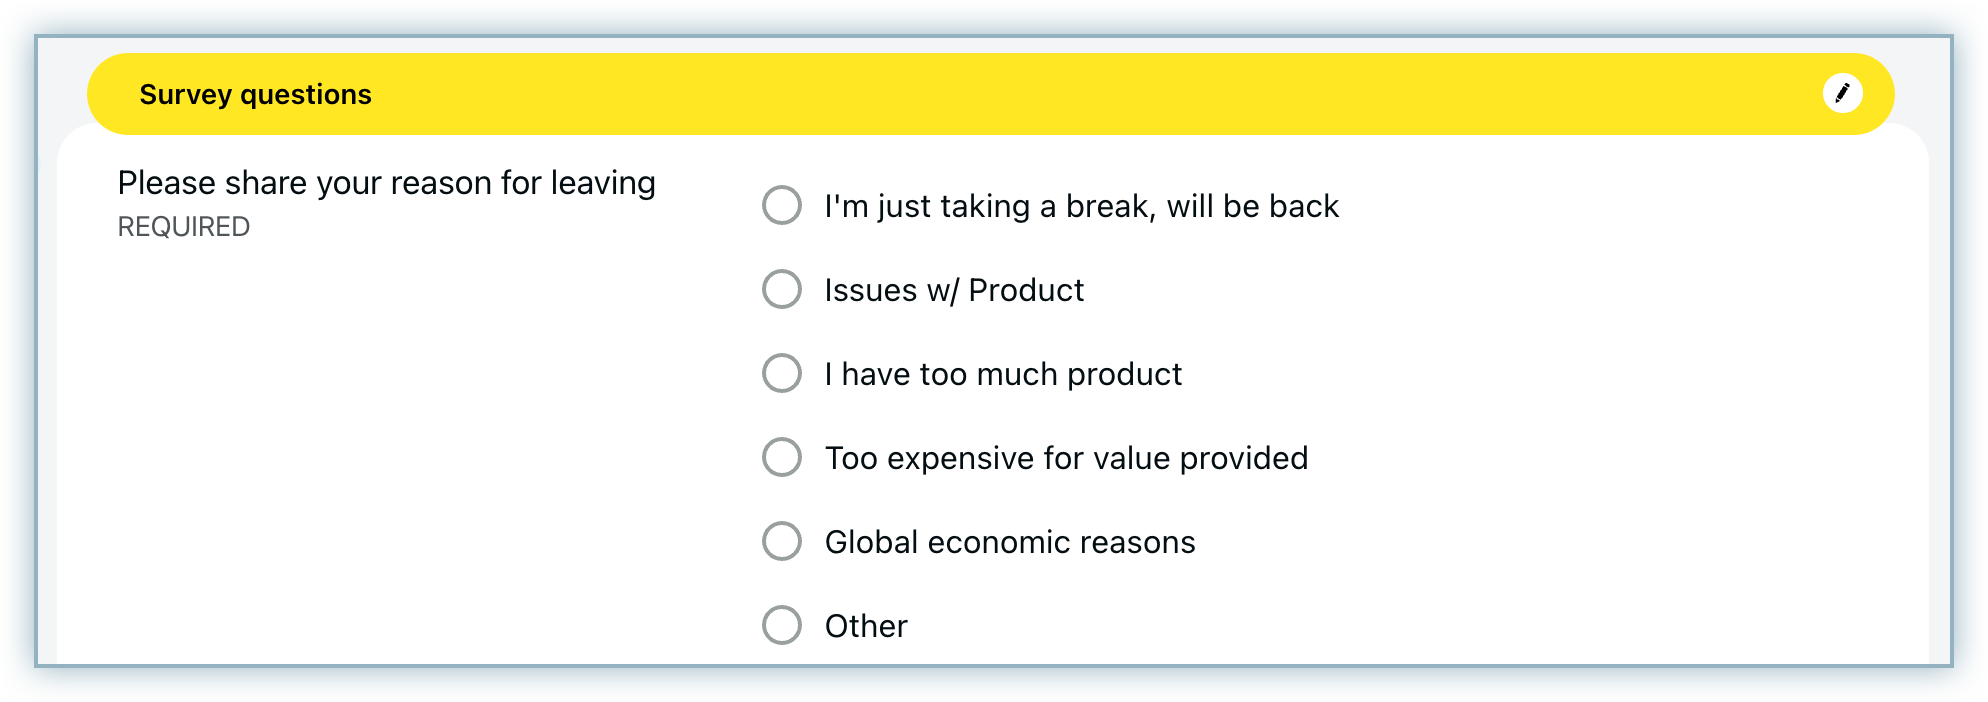
You can configure the Cancel Reasons and the Offers that are presented when a user selects them from directly within the Page Editor.
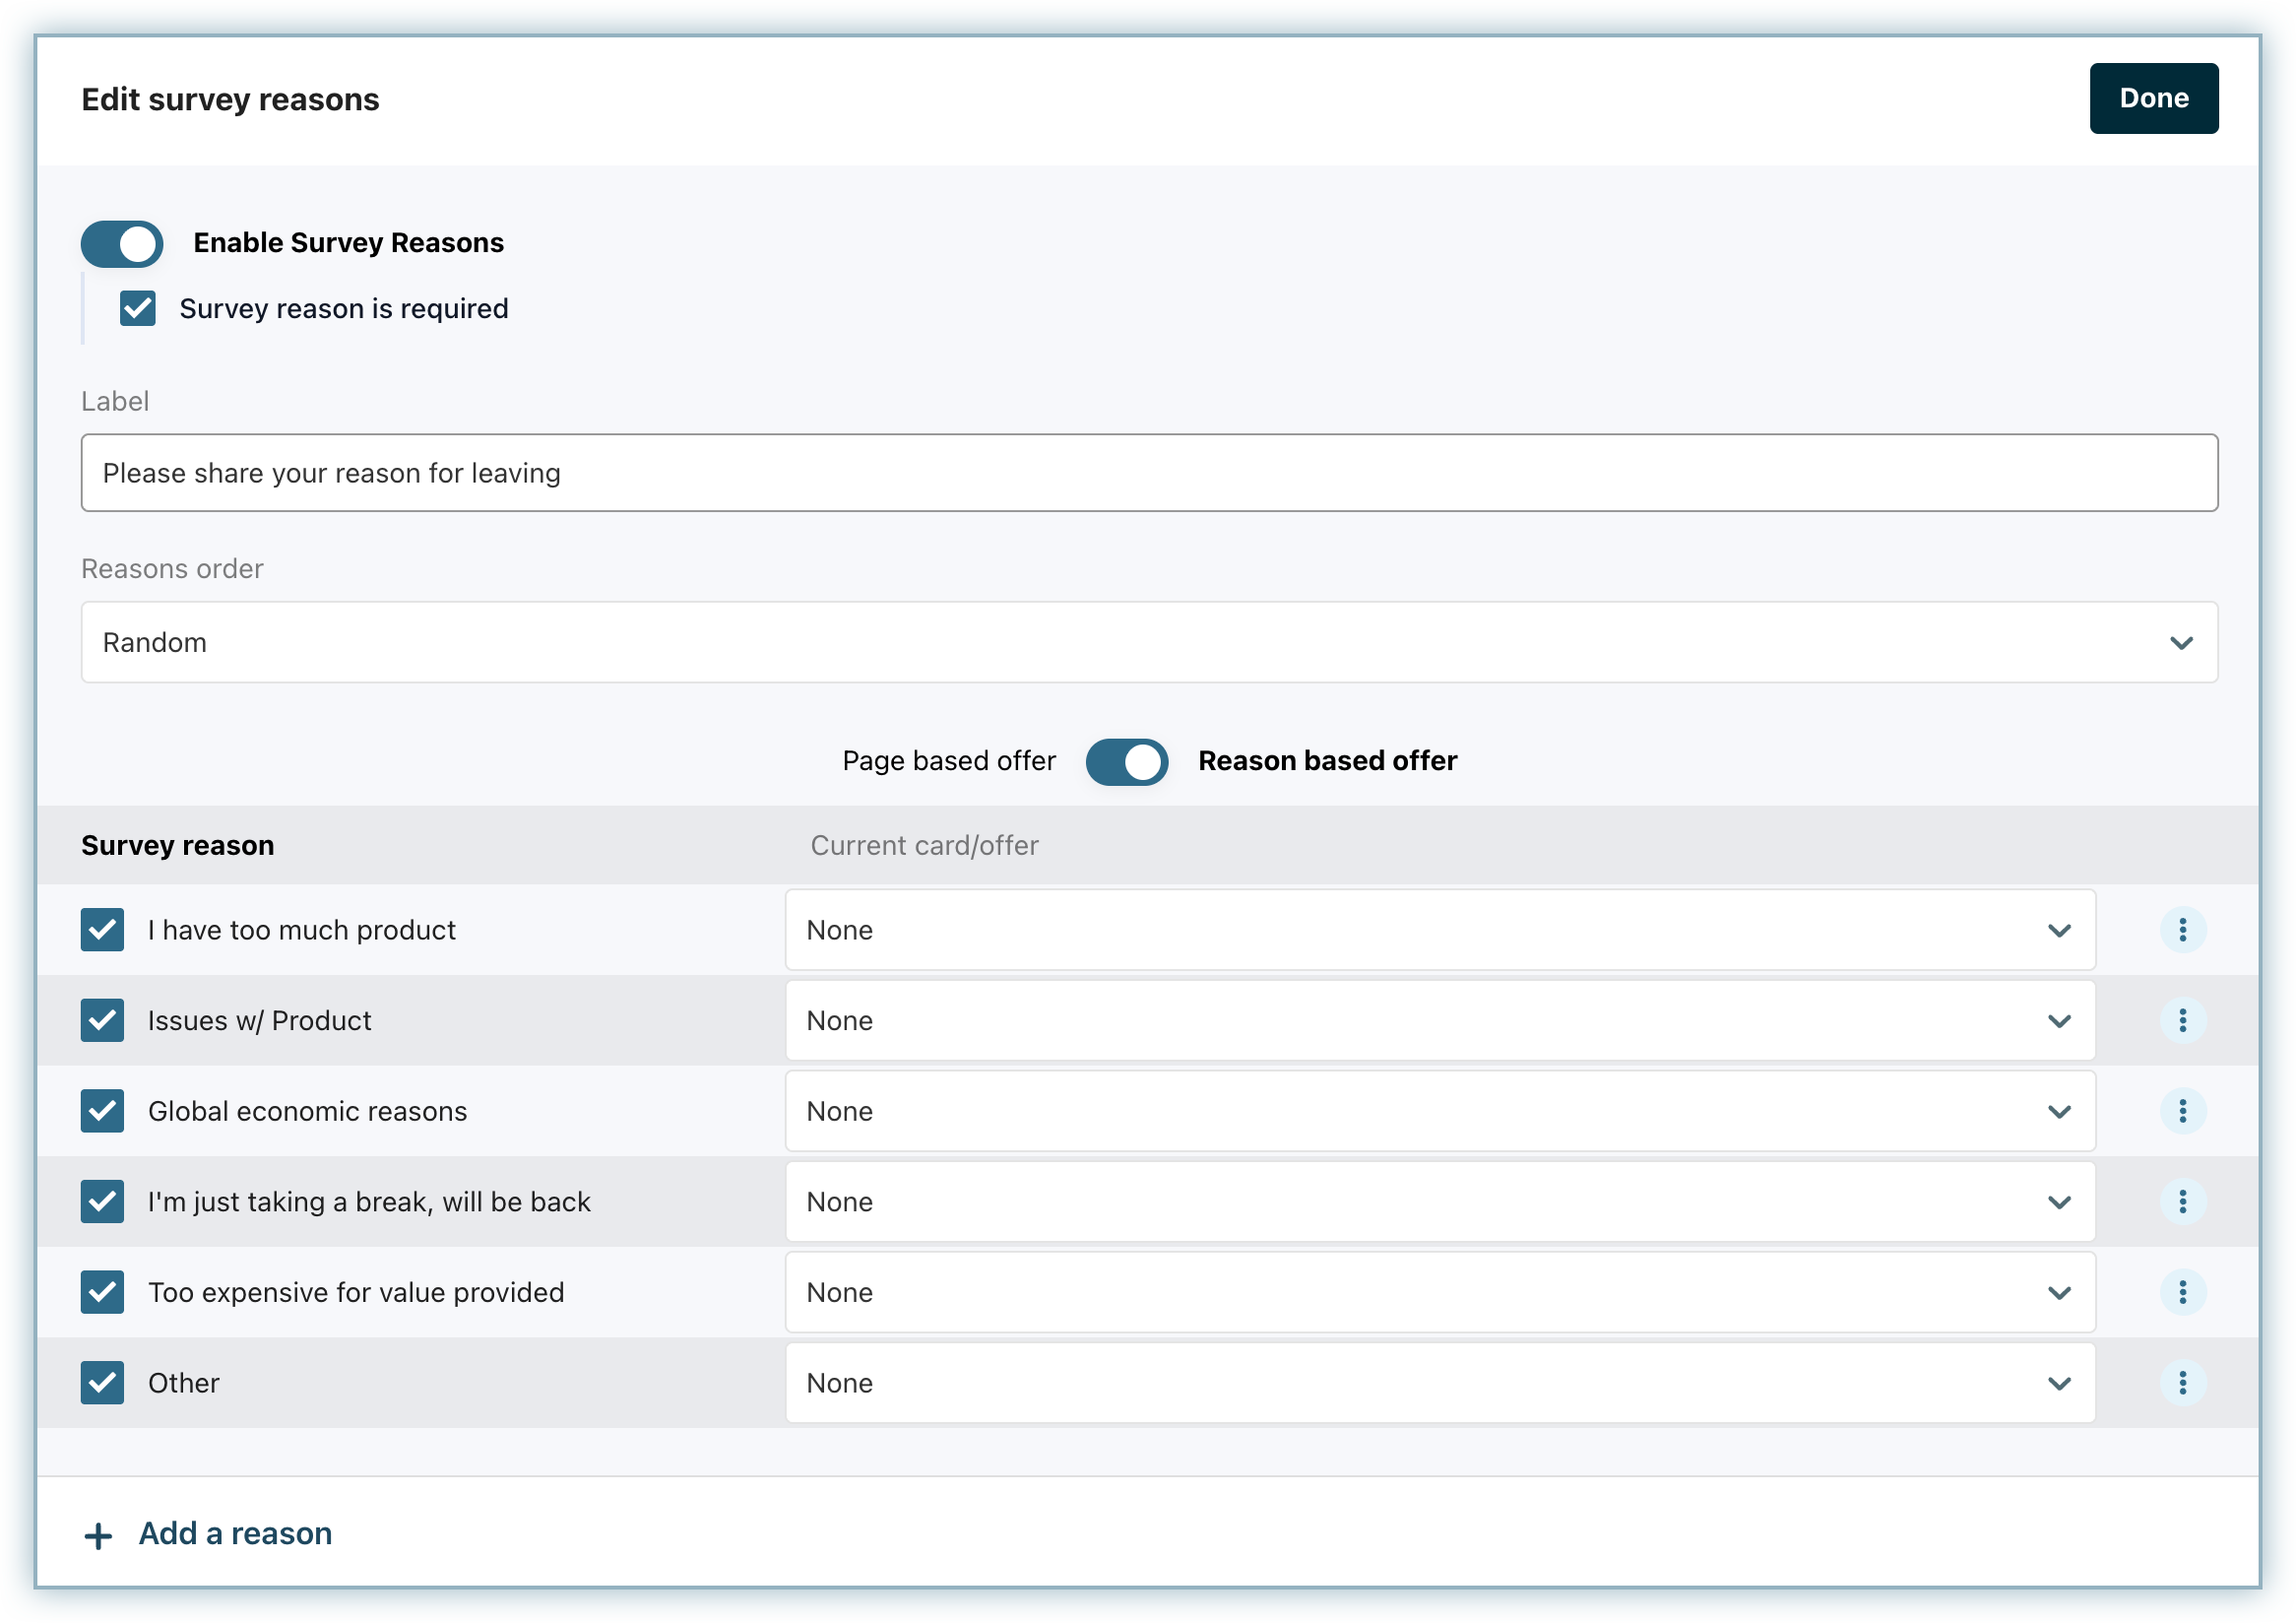
When a user selects this reason in the cancel experience, they will be presented with the offer you define here. The reasons selected are reflected on the Cancel insights report.
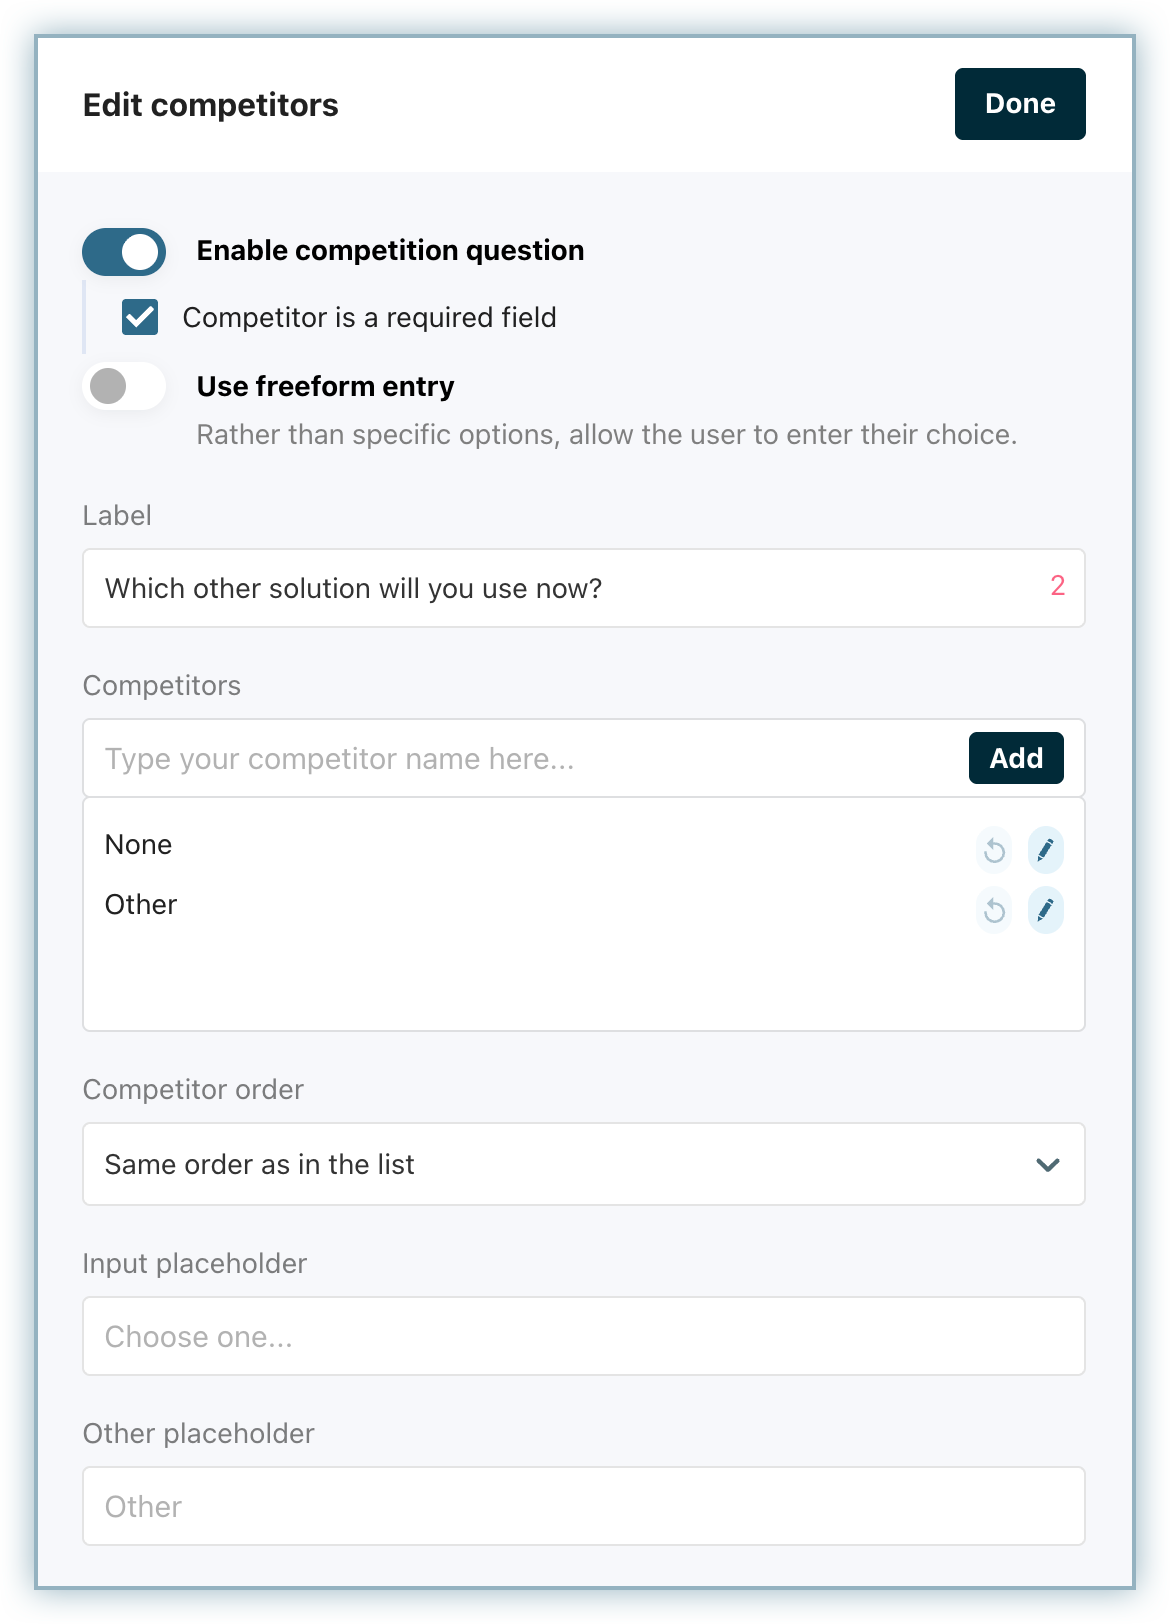
- Competitor: The Competitor survey field helps you keep an eye on upticks in competitive trends and activity over time. Seeing upward trends in a specific competitor can key you into competitor strategies, like offering discounts to win over your customers or launching a new product. Early insights into competitor advantages allows you to take action and stay competitive before it's too late. Outline which competitors you want to keep tabs on with your Customer Success Manager. Competitors appear in the Trends Report Drilldowns and the Customers Pages.

You can configure the Competitor list from directly within the Page Editor. You can use the Edit Competitors module to enter competitor options in English or other languages as per your requirements. You can also edit the None and Other options and update them in the language of your choice.
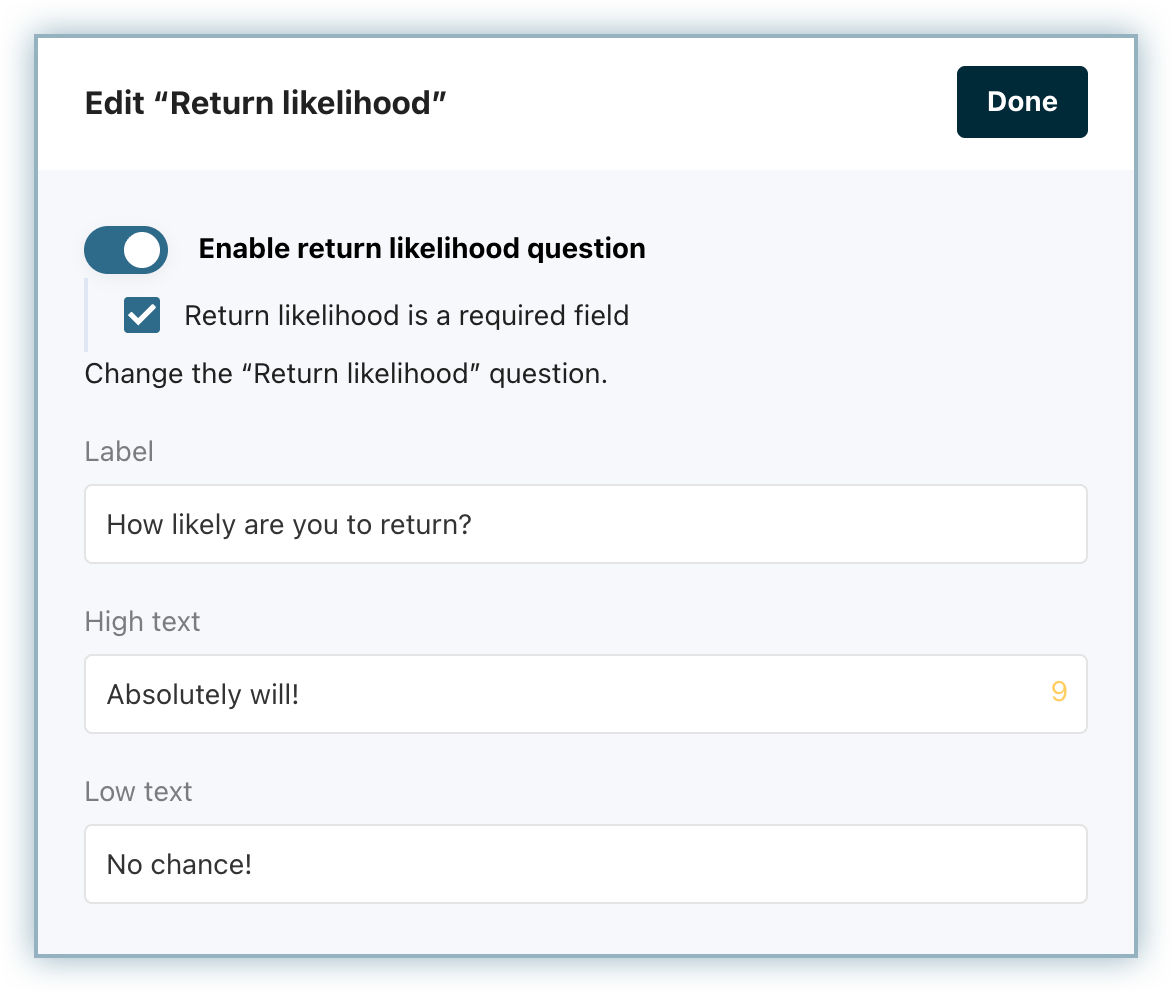
- Return Likelihood: The Return Likelihood Survey captures your customer's true feelings at the moment of their exit. For customers that exit at a seven and above, add them to nurture campaigns to keep them warm and win them back when the time is right. View Return Likelihood Survey results in the Trends Report Drilldowns and the Customers Pages.

You can edit the Return Likelihood section from directly within the page editor.
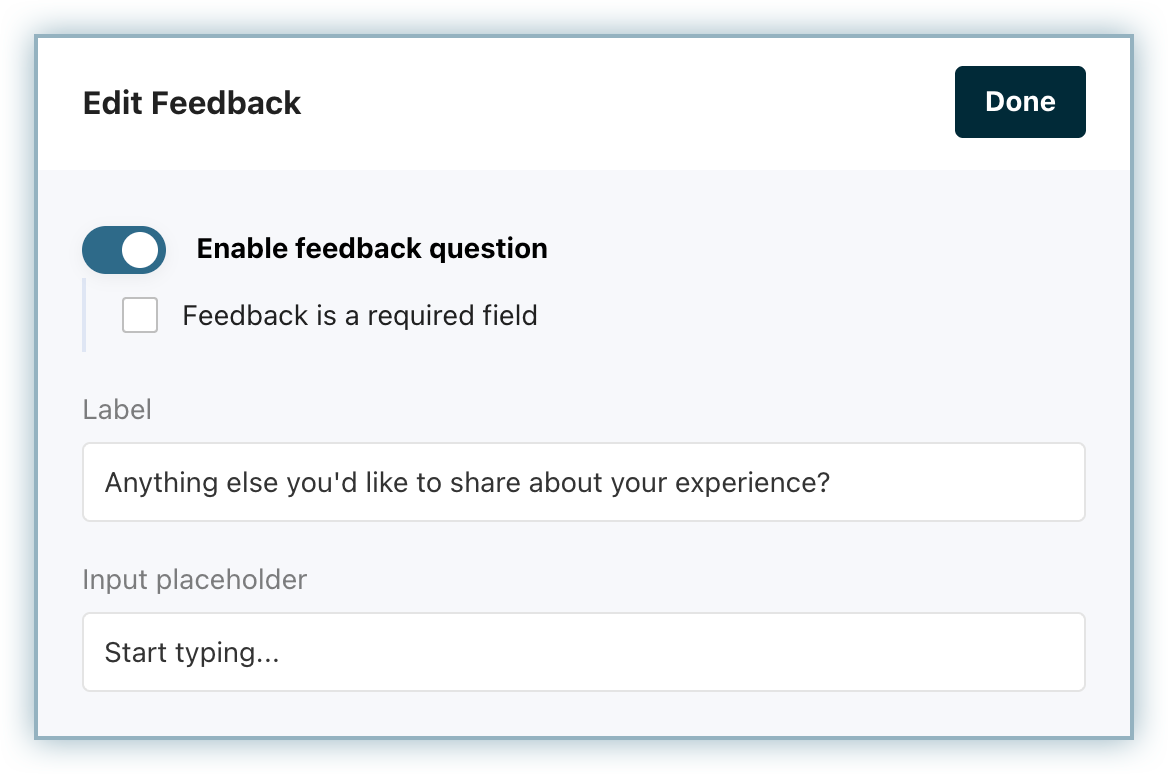
- Feedback: Comments can unearth potential winback campaigns, negative support experiences, technical hiccups, product feedback, or feature requests that might otherwise fly under the radar. You can find all Comments under Comments in the Customer Reports and Trends Report Drilldowns.

You can edit the Feedback input from directly within the page editor.
Page Settings
In addition to configuring your Loss Aversion Layout, the Page Settings section allows you to configure Button Configurations, Offer Configurations, and Labels.
- Button Configurations control routing behavior and cancellation handling. It allows you to configure the key end-user actions and determine how the cancelation response will be sent.
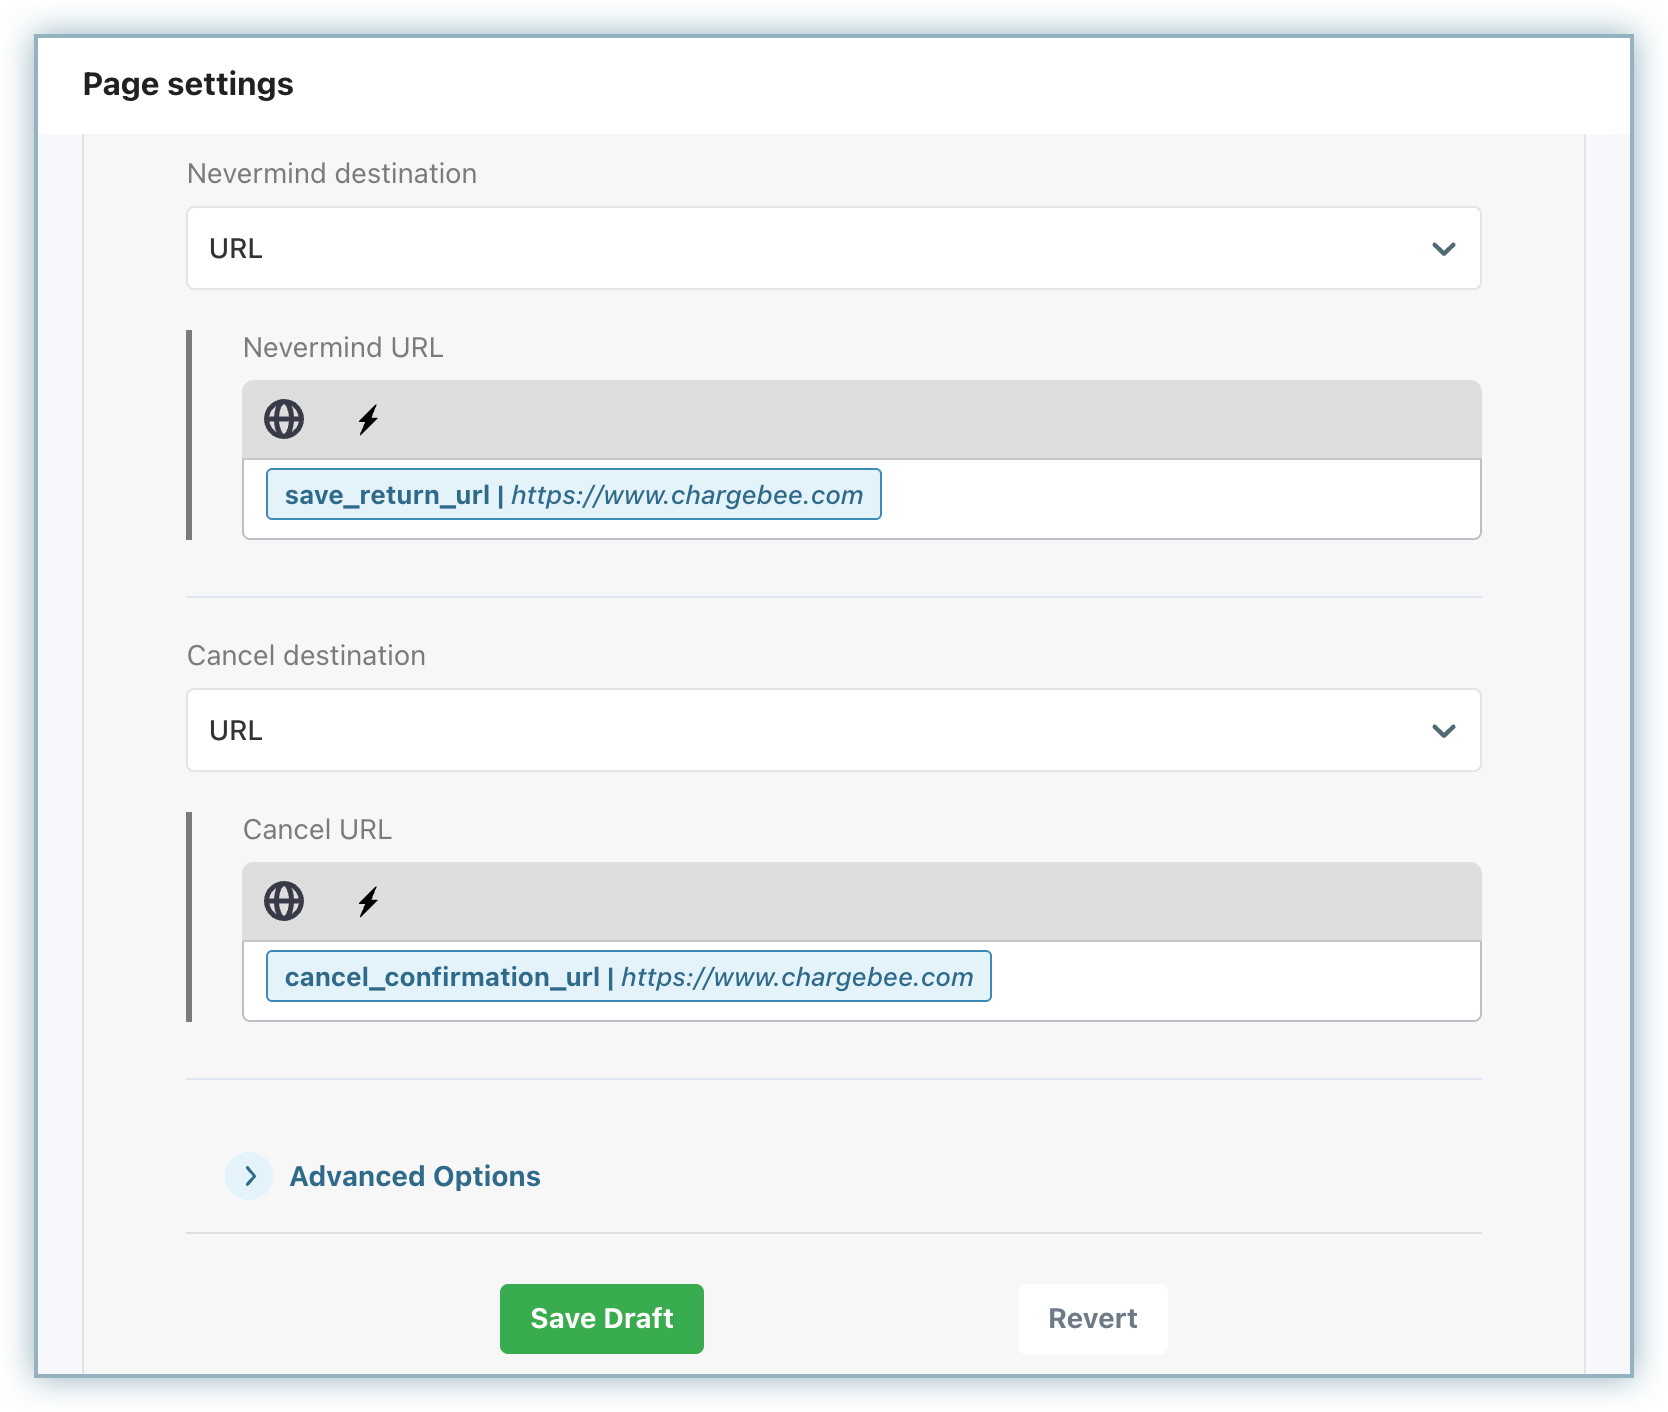
The Nevermind URL and Cancel URL button designations are important as they determine where the subscribers will be routed when they click the respective buttons. Each cancel page in Chargebee Growth must have valid return URLs, which need to be set here if they are not passed via the Chargebee Growth.JS.
You also have the Advanced Options to:
- Include survey answers during submit
- Append the answers to the hash not as a query
Which will adjust how these are included in the URL structure when the event is triggered.
- Offer Configurations allows you to select an entry offer to appear when the page loads. You can select from any of the offers you have in your existing library here and pull that component into the page.
Note
Entry offer is only available for Performance and Enterprise customers.
- Labels allow you to enable and configure per-page labels that comes useful in multi-language pages wherein the labels are used for translation.
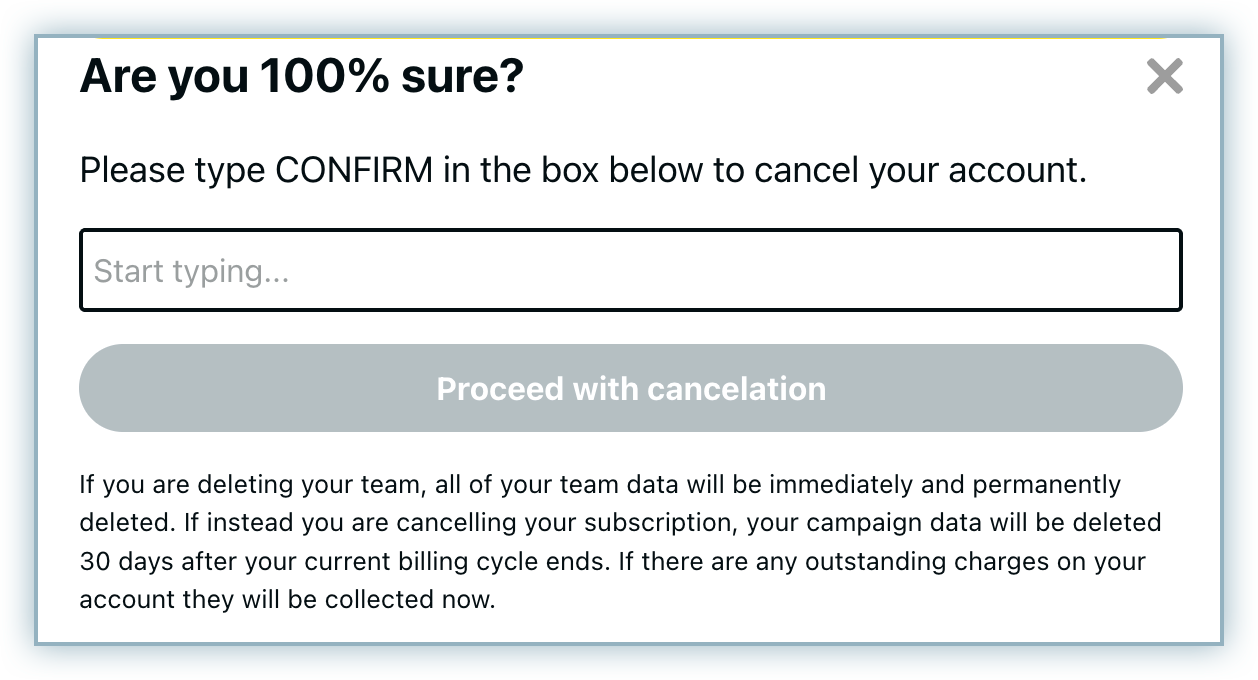
Final Step Modal
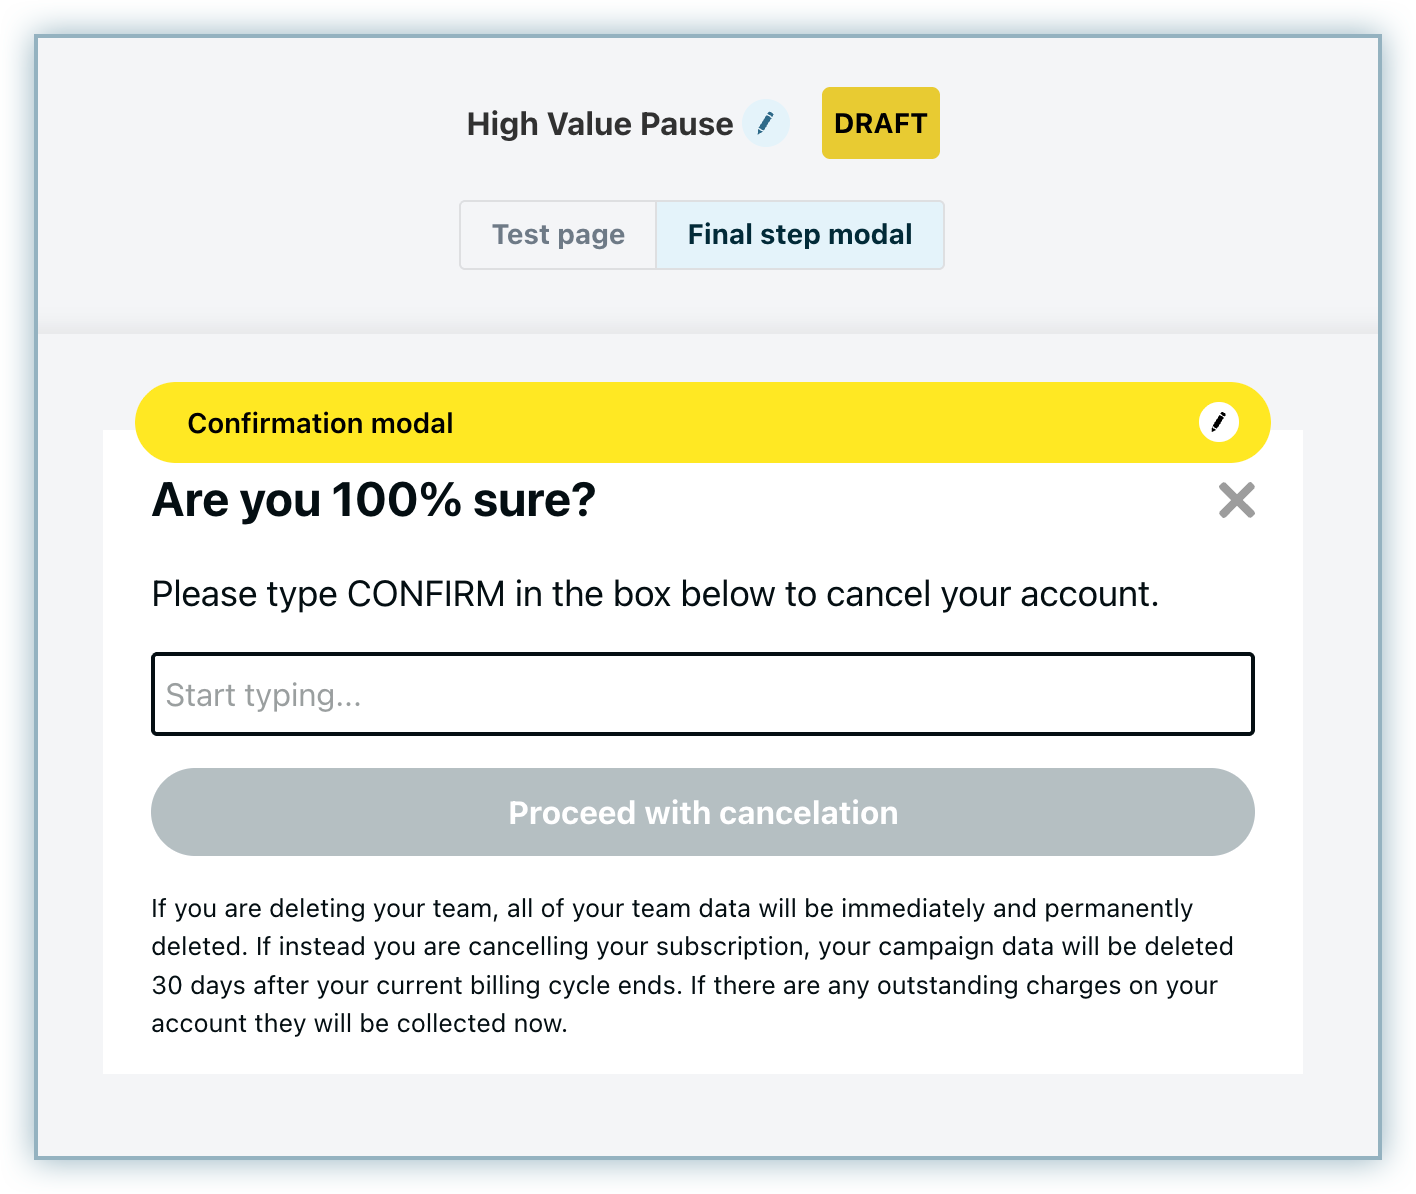
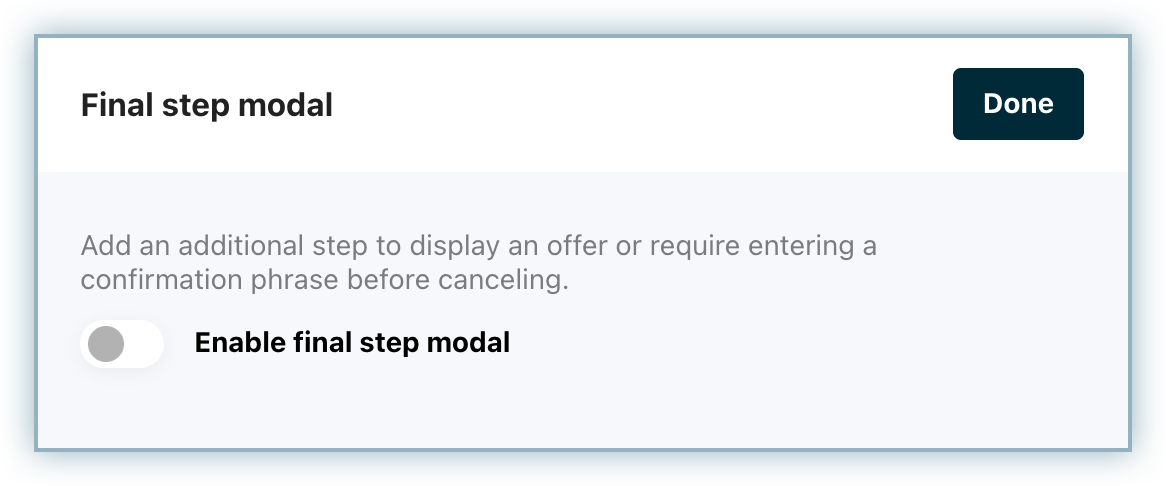
The Final step modal allows you to present your user with one last confirmation before they complete their cancelation. You have the option to display either a Confirmation modal, a final offer, or no confirmation at all, which bypasses this modal entirely. All of this can be controlled from within the Final step modal editor.
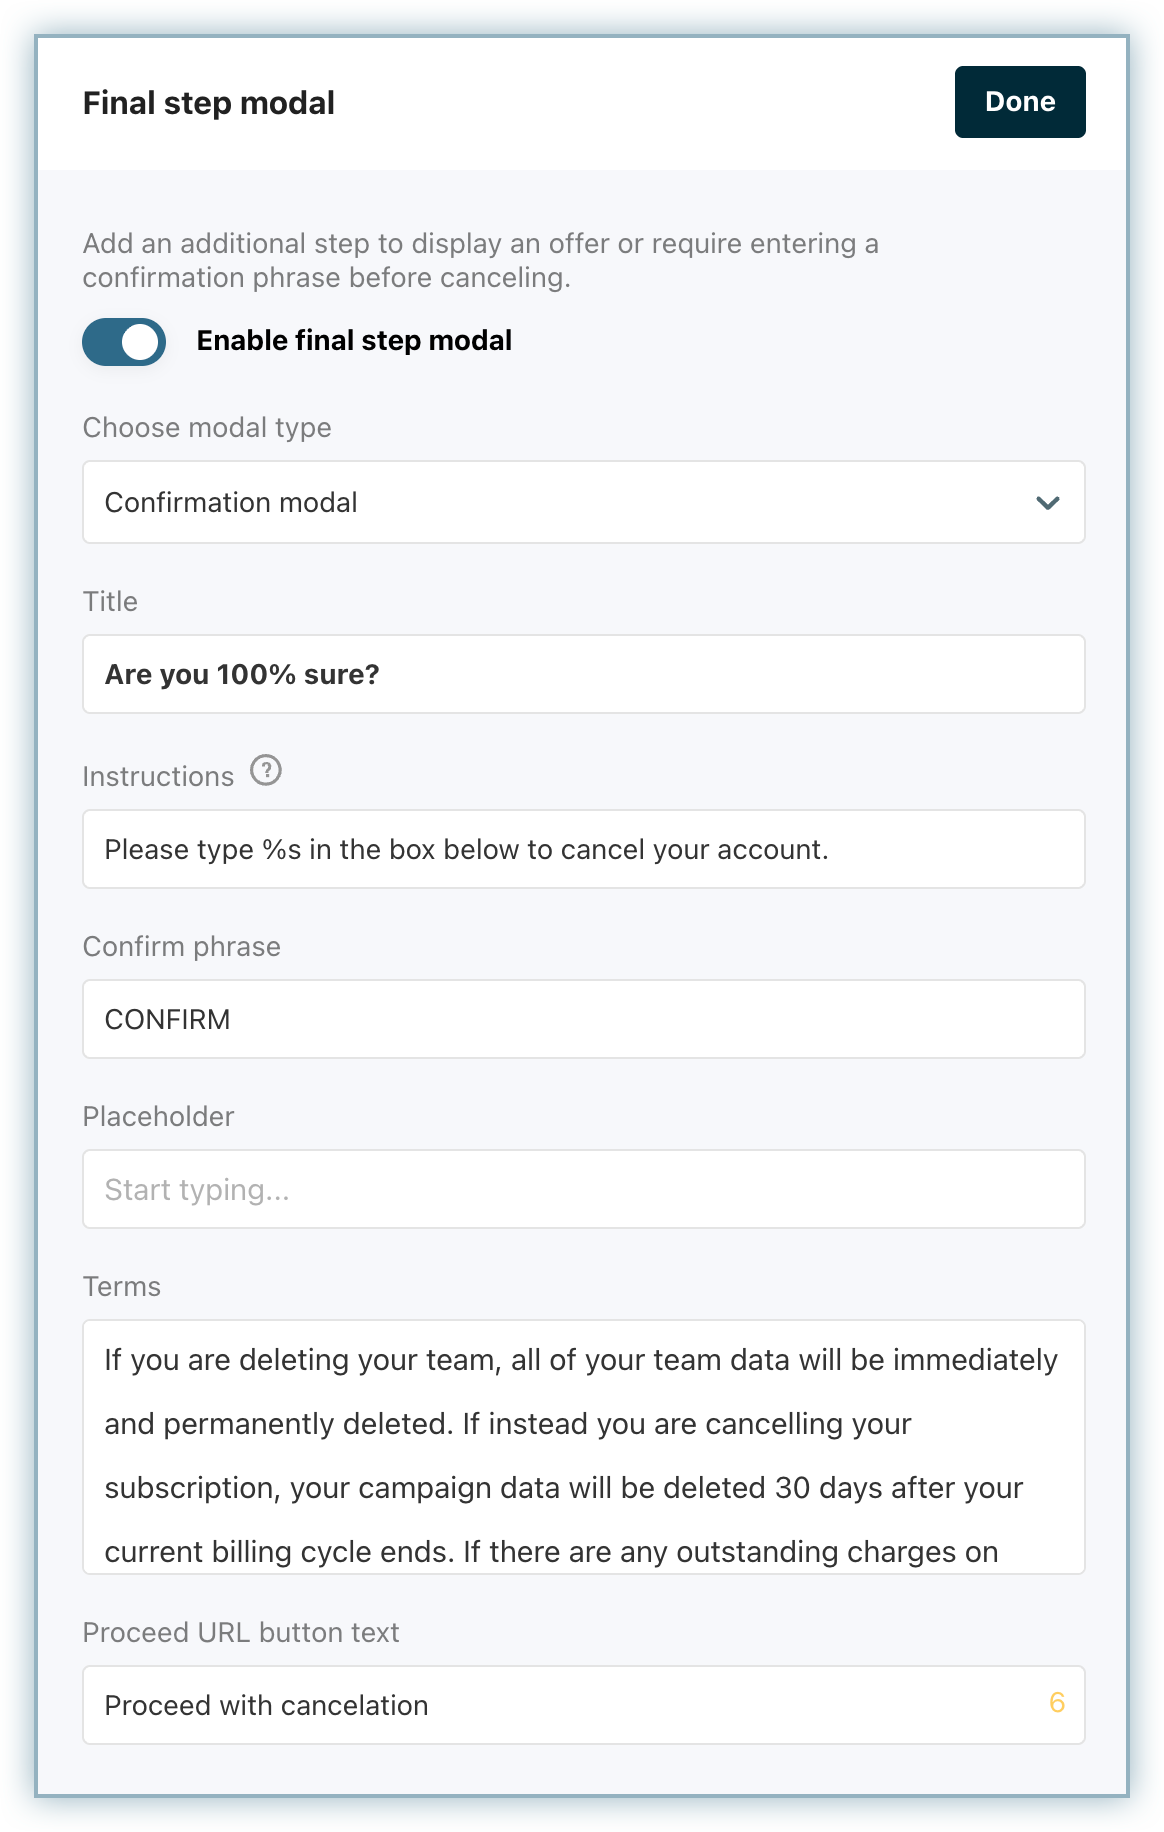
If you do not want to display a Final step modal, simply disable this toggle and you are good to go.
However, there could be a drop-off in deflect rates when this modal is removed as it does provide an extra step for the user to complete. That being said, some businesses do not like the added friction this puts in front of the customer, and opt to remove it.
You can use this as an opportunity to communicate any terms and conditions (example proration or credits) associated with the cancellation. This can be a good way to let the subscriber know what will happen next so that you avoid any support tickets in the future.
Finally, Performance and Enterprise customers have the option to select to display a Final Offer here instead of a confirmation tab.
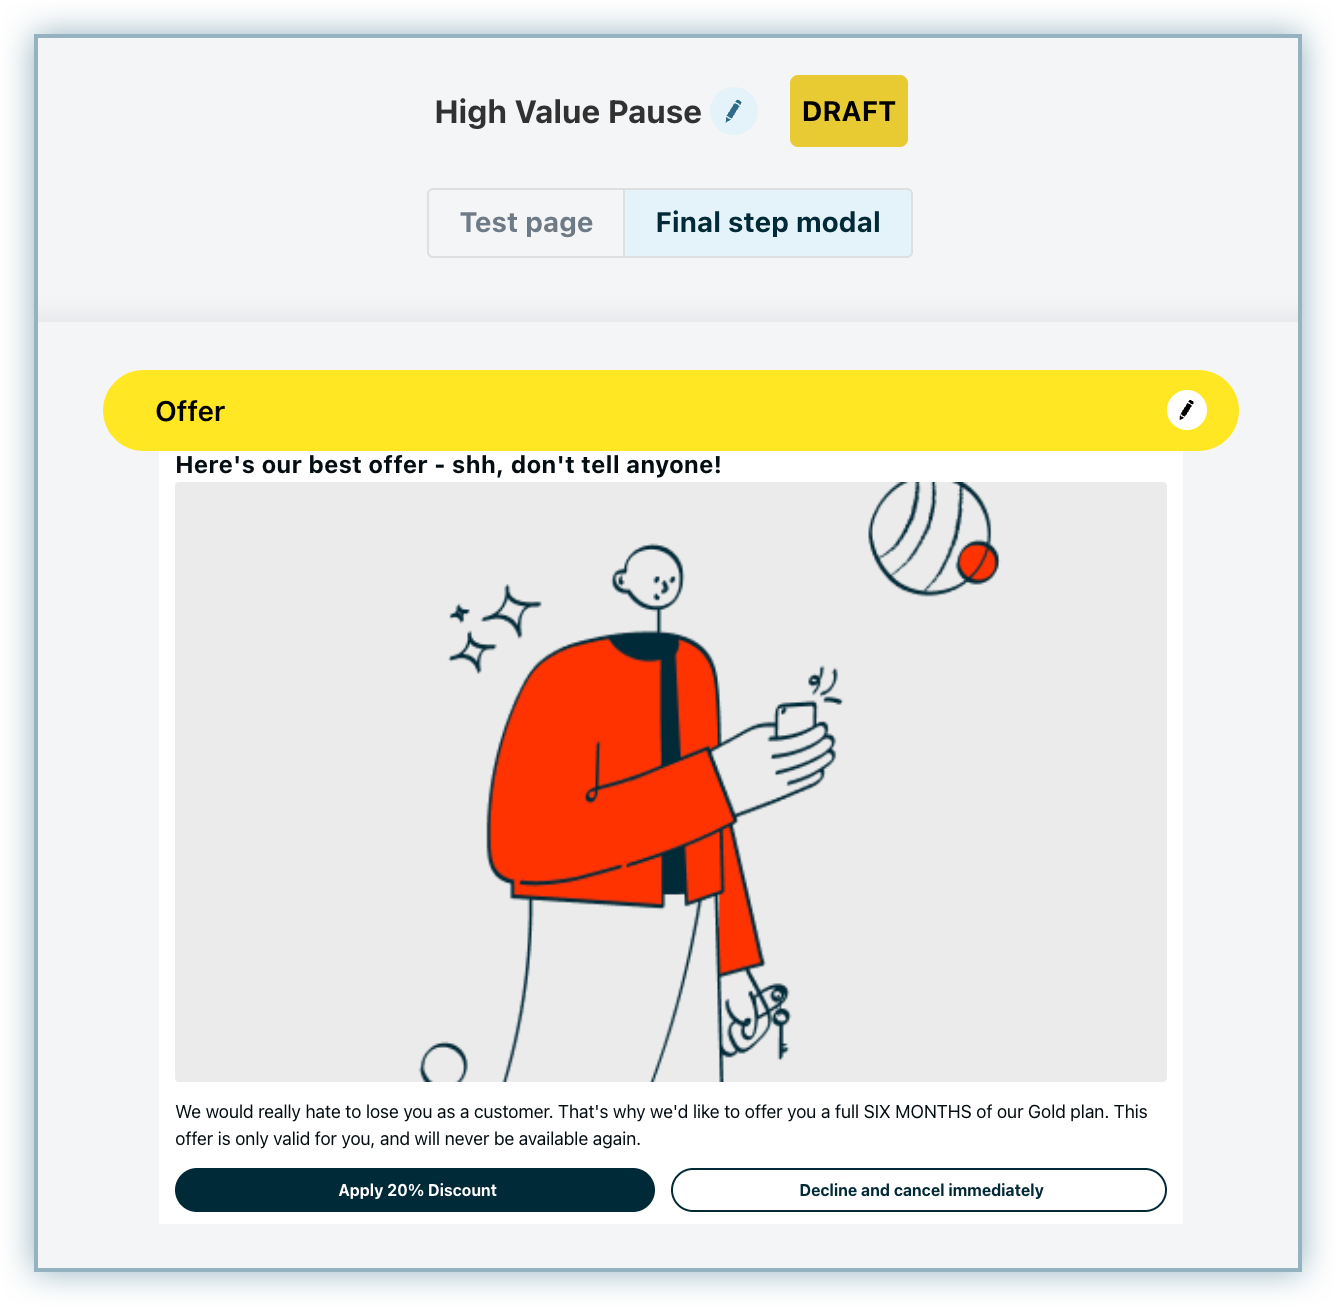
This is a good opportunity to make a last ditched effort to retain a customer by presenting them with a Pause or "Sleep my account" offer.
Setting up a Custom Domain
When your subscriber hits Cancel or Downgrade, they get redirected to a page hosted on Chargebee Growth, but you can make it look and feel like the customer is never leaving your site or app by setting up a custom domain using a CNAME.
Send us the custom domain you'd like to use for your cancel or downgrade page, like cancel.yourcompany.com, and we'll apply it to your account on the backend, but we'll need a little bit of lightweight lifting from your end too.
Configuring Cancel Management
In Chargebee Growth you have the option to configure Cancel Management at the Page-level or App-level.
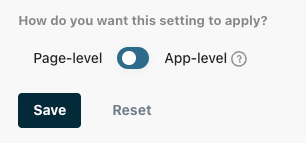
This feature allows Chargebee Billing, Stripe Billing, and Recurly users to process their cancels directly via the billing system API. However, many some businesses might not want all of your customers to be able to automatically cancel. You may want to have certain audiences go to a page that has a manual cancelation process or an email based cancelation process instead of automatically updating the subscription via the Billing system API. If this is the case, we recommend that you configure this setting to be at the Page-level instead of the App-level.
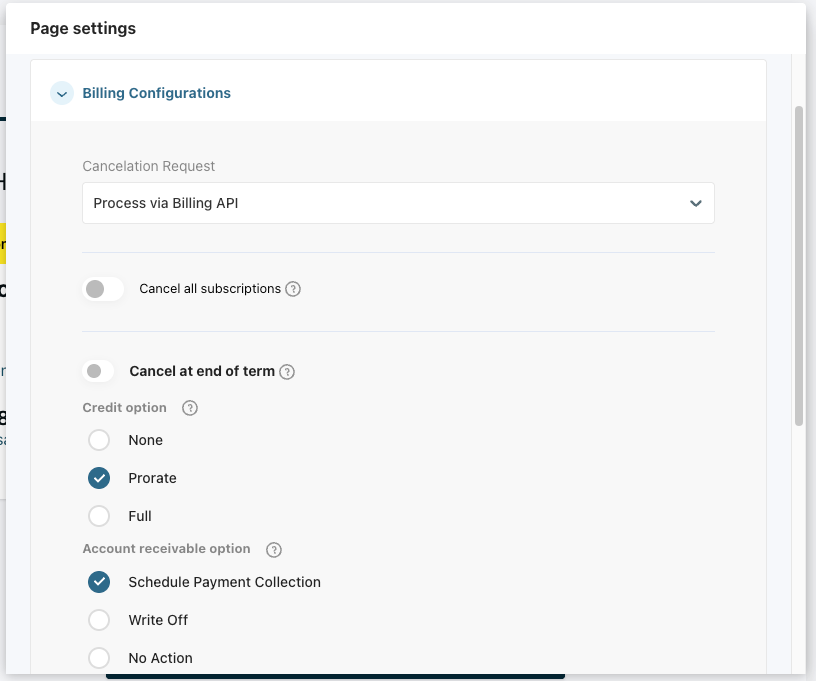
Once configured, go to the Settings Tab in the Page editor to configure how that individual page will have Cancelations applied.

The Billing Configurations option allows you to configure how that page processes the Cancelation Request.
- You can choose to Process via Billing API, and will be presented with all the configurations you use to have at the app level for this individual page.
- Or you can choose to Override Billing API which will disable the API for this page and fall back to whatever method of canceling the subscription you previously had (email, url redirect, or webhook).
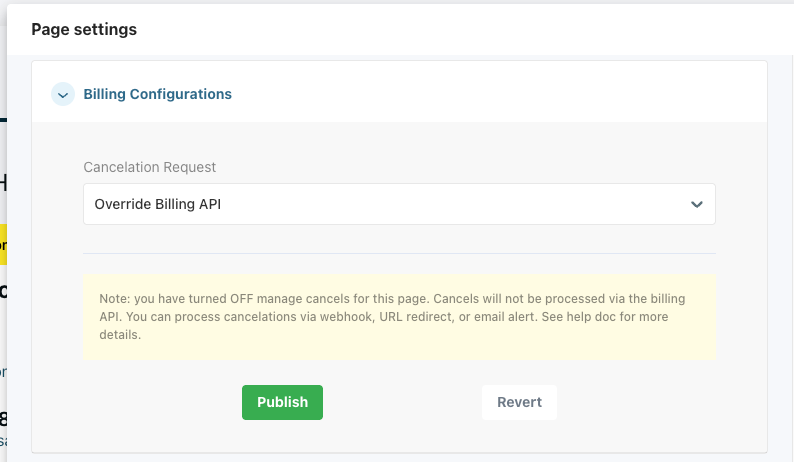
These changes will be published as soon as you hit Publish, so be sure you have selected everything correctly before doing so.
Configuring Control Page
Chargebee Growth allows you to configure a Holdout or Control page which is a no offer experience that will serve as your default cancel experience and it cannot be archived or removed. Editing or archiving this page is restricted, so that you cannot place an offer within it and the page would serve as a true "no offer" comparison to your test pages.
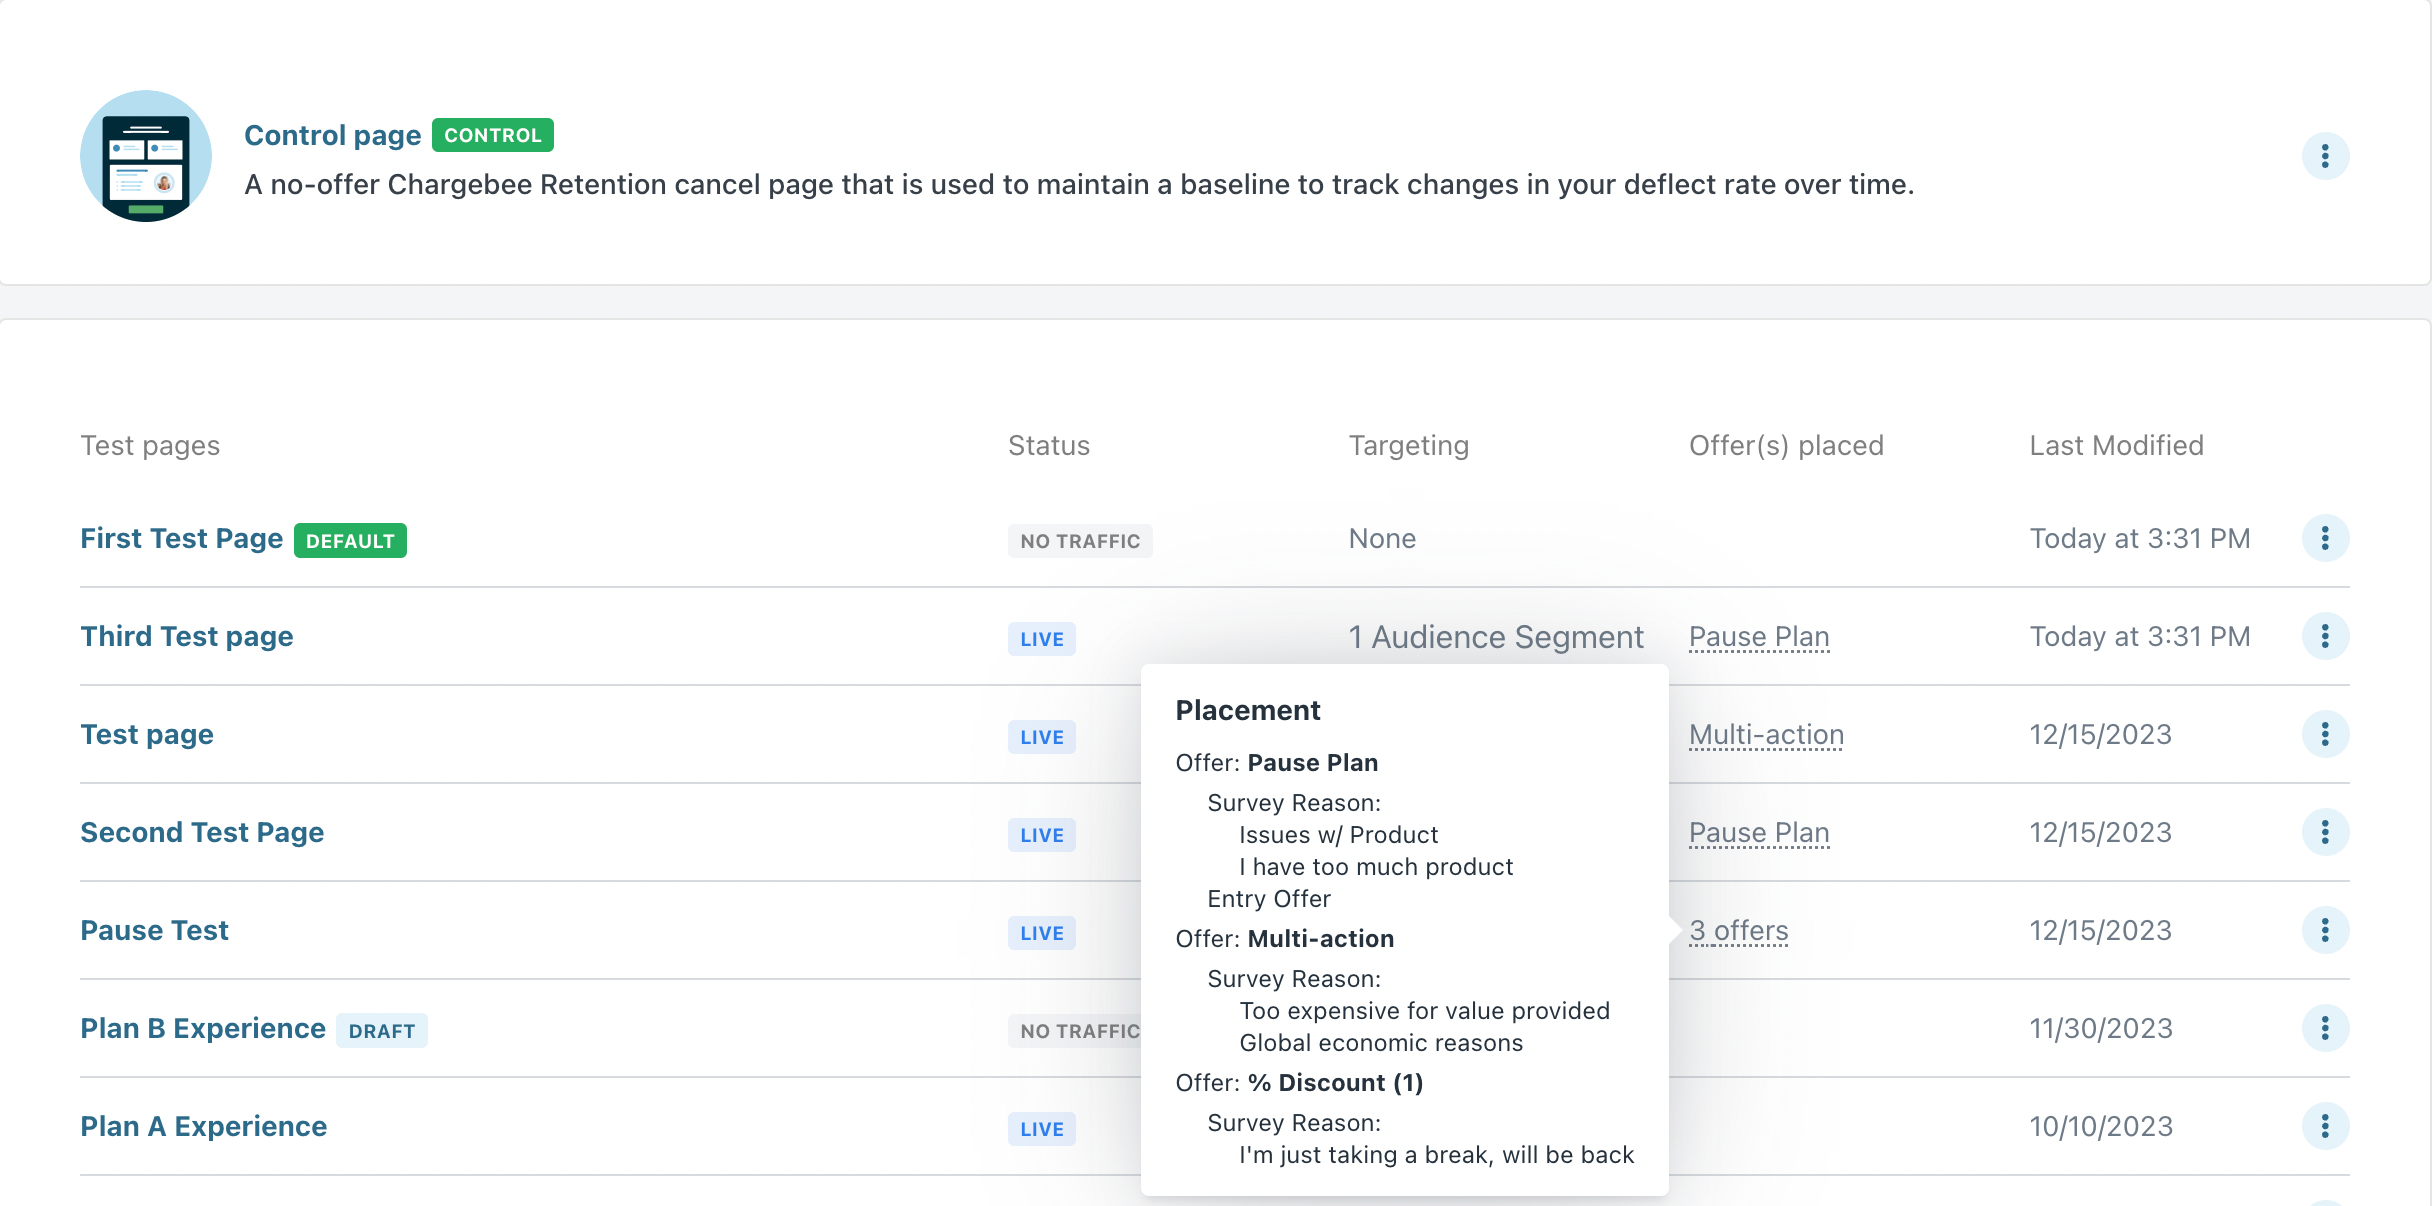
This page should always have a small % of traffic routed to it so that any external changes in performance can be isolated out from your Test Experiences. It is recommended that you send between 1-5% of traffic to this page. The key with the holdout page is changing it as little as possible so that it provides a consistent baseline over time.
To preview or edit your Control Page, follow these steps:
- Click Experiences > Pages.
- The Control Page is displayed right on top of the page. Click the Ellipsis icon to edit, preview, share, or generate sample session for the control page.
Was this article helpful?