Transaction Lifecycle
The Transaction Lifecycle helps you understand what happened to a payment, from initiation to settlement, refund, or failure. It displays the complete history of status updates, gateway events, and error messages, allowing you to identify issues and take action with confidence.
How to access Transaction Lifecycle
- Log in to your Chargebee Billing site.
- Go to Logs > Transactions.
- Click on any transaction to open the details view.
- Check the Transaction Lifecycle section on the right side.
A timeline of all major events is available, connected visually and ordered chronologically.
Why Transaction Lifecycle Matters
The problem it solves
Without the Transaction Lifecycle, tracing a payment's journey was time-consuming and fragmented:
- Authorization info might be in one place
- Refunds are listed somewhere else
- Status updates are buried in transaction metadata
The solution
Now, you get one unified timeline that answers:
What is the Transaction Lifecycle?
The Transaction Lifecycle is a visual tracker built into the transaction detail page. It shows the full journey of a transaction, step by step, from initiation to authorization, capture, status updates, and any refunds or reversals.
Each event includes:
- A clear label (e.g., "Authorized", "Refunded")
- Timestamp
- Linked entity or reference ID
- Relevant metadata (amounts, statuses)
This timeline helps you, support teams, and finance teams understand what happened at a glance.
For Direct Transaction, when the status is ”In Progress”
For Direct Transaction, when the status is “Success”
For a transaction via Payment Intent
Key Benefits
- Complete visibility: Understand exactly what happened for a payment.
- Reduced support load and enhanced customer support: You can self-diagnose payment failures, resulting in quicker resolution times. Quickly identify what happened with a payment to provide accurate information to customers and resolve issues faster.
Use case: Refund inquiries
A customer asks why their refund is still pending.
With the Transaction Lifecycle, you quickly see the refund status, amount, timestamp, and related entity links, all in one place.
You can respond: “Your refund was initiated on [date] and is currently being processed by the gateway. It should be completed within 5 to 7 business days.”
Clear, accurate updates — fewer follow-ups.
What you'll see: Timeline events
The transaction timeline may include any of the following stages, depending on the type of transaction and on how far the payment has progressed:
-
Intent created
- The transaction was initiated by the customer.
- Often triggered by a checkout or invoice flow.
-
Authorized
- The payment intent was successfully authorized.
- Includes timestamp and no.of attempts for that particular intent.
-
Intent consumed The payment was applied to a specific transaction or invoice.
-
Transaction created
- A new transaction was registered in the system.
- Shows transaction ID and Timestamp
-
Transaction status
- Success: Payment processed successfully.
- Failed: Payment attempt failed.
- Pending: Awaiting final status from the gateway.
- Voided: Manually canceled or system-canceled.
- Reversed: Rolled back after initial success.
-
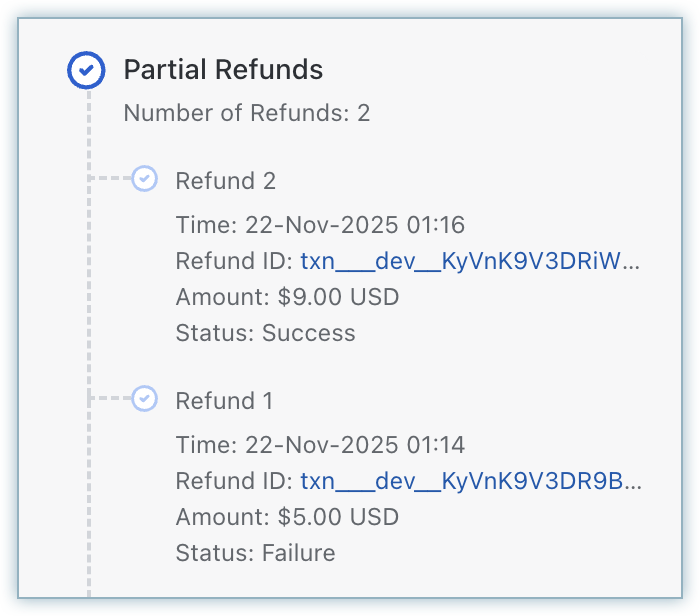
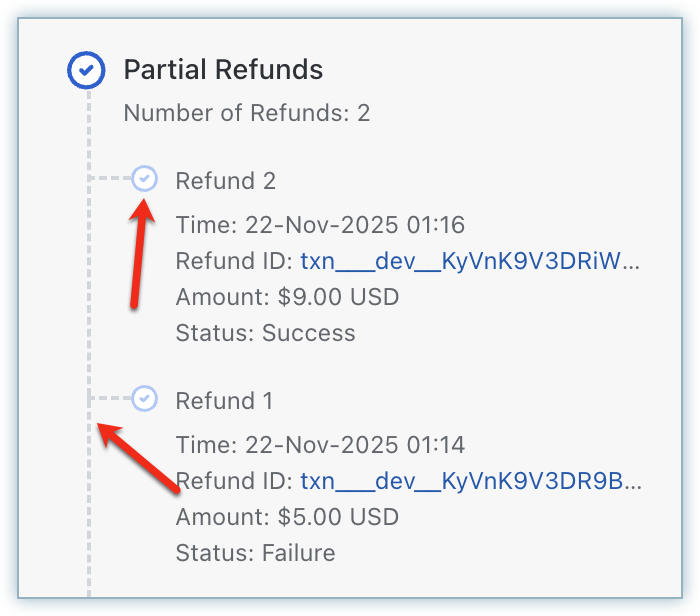
Refunds and Reversals (if any)
- Shows if money was returned or reversed.
- Types of actions shown:
- Full Refund
- Partial Refund
- Transaction Reversed
- Needs Attention
- Late Failure
Each refund can be clicked for more details and includes linked entity IDs for easy navigation:
- Timestamp
- Refund ID
- Amount Refunded
- Status
Who is this for?
- Support teams: to answer “what happened?” quickly and clearly
- Finance teams: to audit or verify status and refunds
- Product/engineering teams: to trace issues in the payment flow
- Chargebee users: to resolve customer disputes confidently
How to use Transaction Lifecycle
Follow these steps to use the Transactions timeline effectively:
Step 1: Open the timeline
- Go to Logs > Transactions in your Chargebee Billing site.
- Click any transaction to open the detail page.
- Check the Transaction Lifecycle section on the right side.
Step 2: Follow the flow
- Events are listed top to bottom in the order they happened.
- Start with "Intent Created/Transaction Created" and trace top to the latest step.
Step 3: Explore each step
- For multiple partial refunds:
- Timestamp
- Related IDs (e.g., Refund ID, Transaction ID)
- Amount Refunded
- Status
Step 4: Investigate or take action
Depending on what you see:
- If a payment failed: Check where it broke.
- If a refund was issued, see the amount, status, and the date it was processed.
- For more context, use linked IDs to navigate to related records (e.g., Refund ID).

When to Use Transaction Lifecycle
Use Transaction Lifecycle when you need to:
- Troubleshoot failed payments: Understand why a payment didn't go through by checking its status or reviewing the related connected entities (e.g., navigate to the linked entity IDs details page and check statuses and related error details)
- Explain payment status to customers: Show them exactly what happened with their payment
- Review payment history: Get a complete picture of a transaction's journey
- Audit transactions: Have a clear record of all events related to a payment (e.g., check statuses at each step, view timestamps for each event, or access related entity IDs that link to detail pages)
Tips for using the timeline effectively
- Use visual cues: Icons and dashed lines help you understand flow and relationships.
- Expand step: For additional details
- Follow connected entities: Click into payment intents, refunds, and transactions (e.g., Intent ID).
Was this article helpful?