Venmo via Braintree
Venmo is a US-based peer-to-peer (P2P) payment solution that allows users to transfer and receive money easily and quickly via a smartphone application. It is one of the most popular payment methods in the US. With this integration, Braintree allows you to add and configure Venmo as a payment method option. Learn more about Venmo via Braintree integration.
Integration options
You can integrate Venmo via Braintree using the following:
- Chargebee hosted pages
- Chargebee JS
- Gateway JS
- API
Retrieving key information from Braintree
While configuring Venmo via Braintree in Chargebee, you will require the Merchant Account ID and Venmo Profile ID from your Braintree account to be entered in Chargebee. Here is how you can retrieve these IDs:
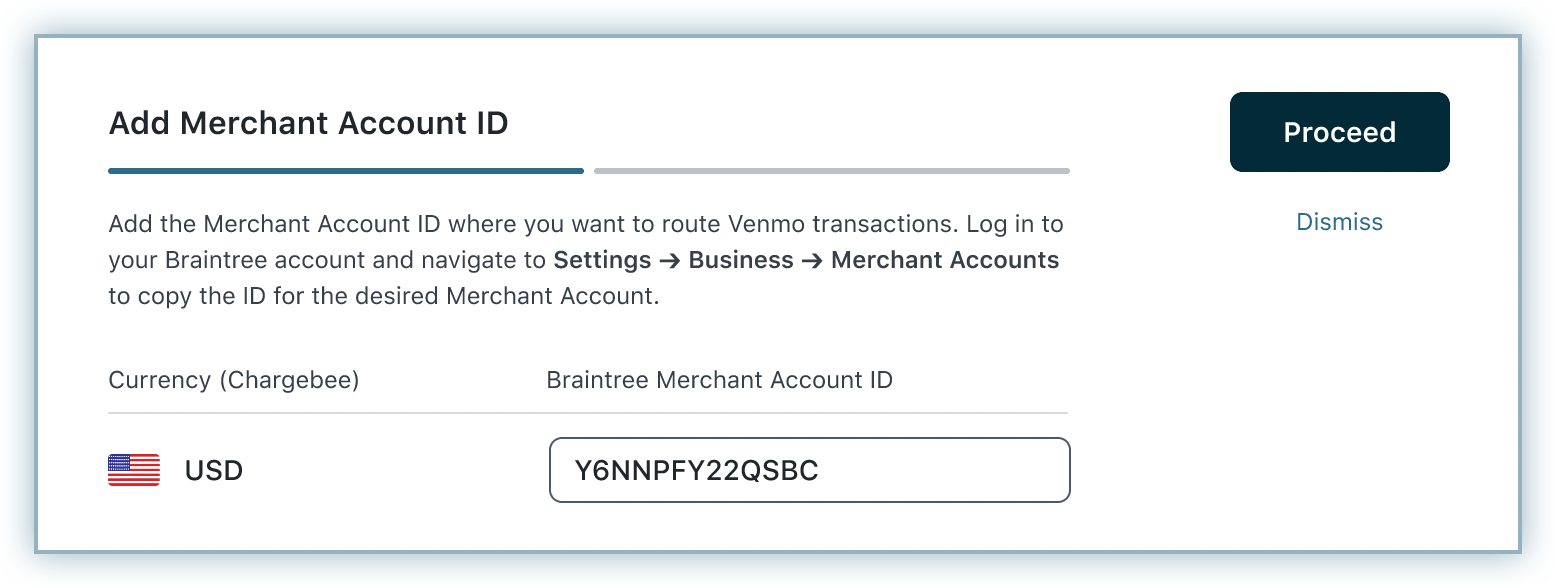
Retrieving Merchant Account ID
Merchant Account ID is the ID for the account that you want to use to redirect users while paying using Venmo. Follow these steps:
- Log in to your Braintree account.
- Click the Settings icon on the top-right corner and then click Business.
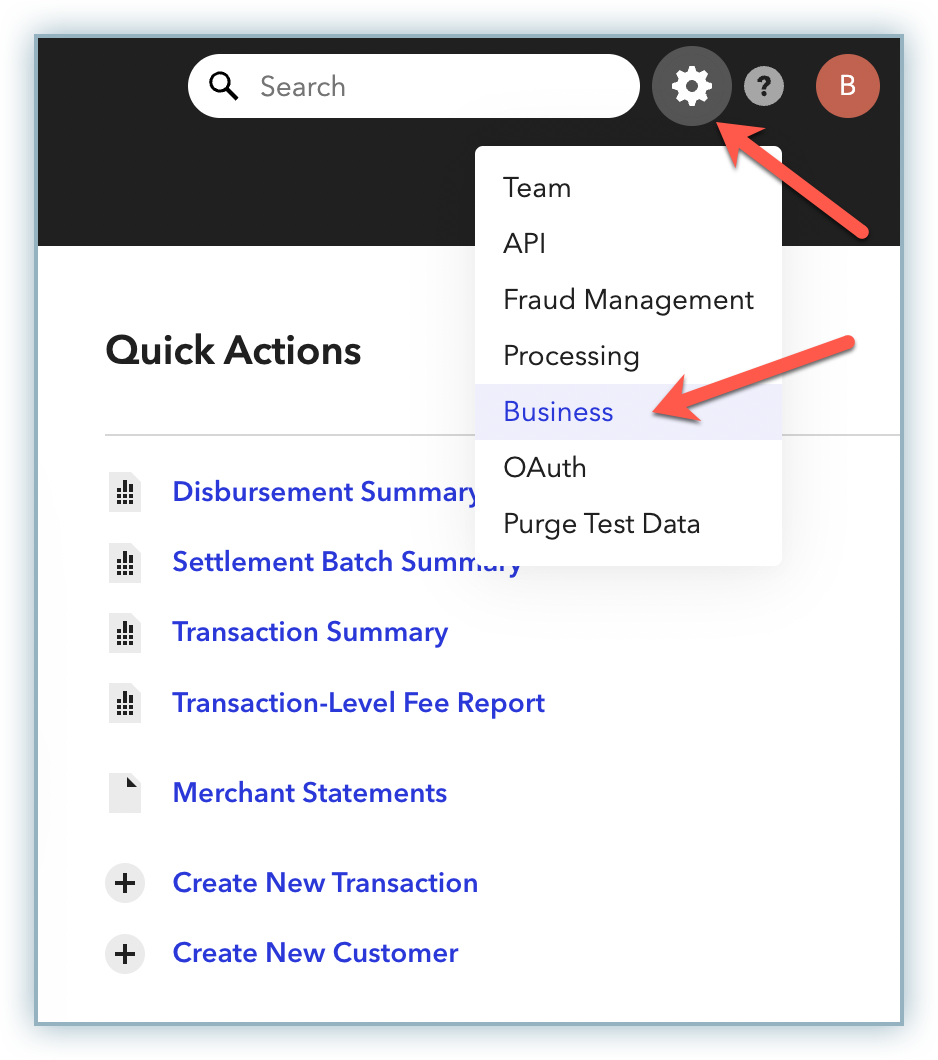
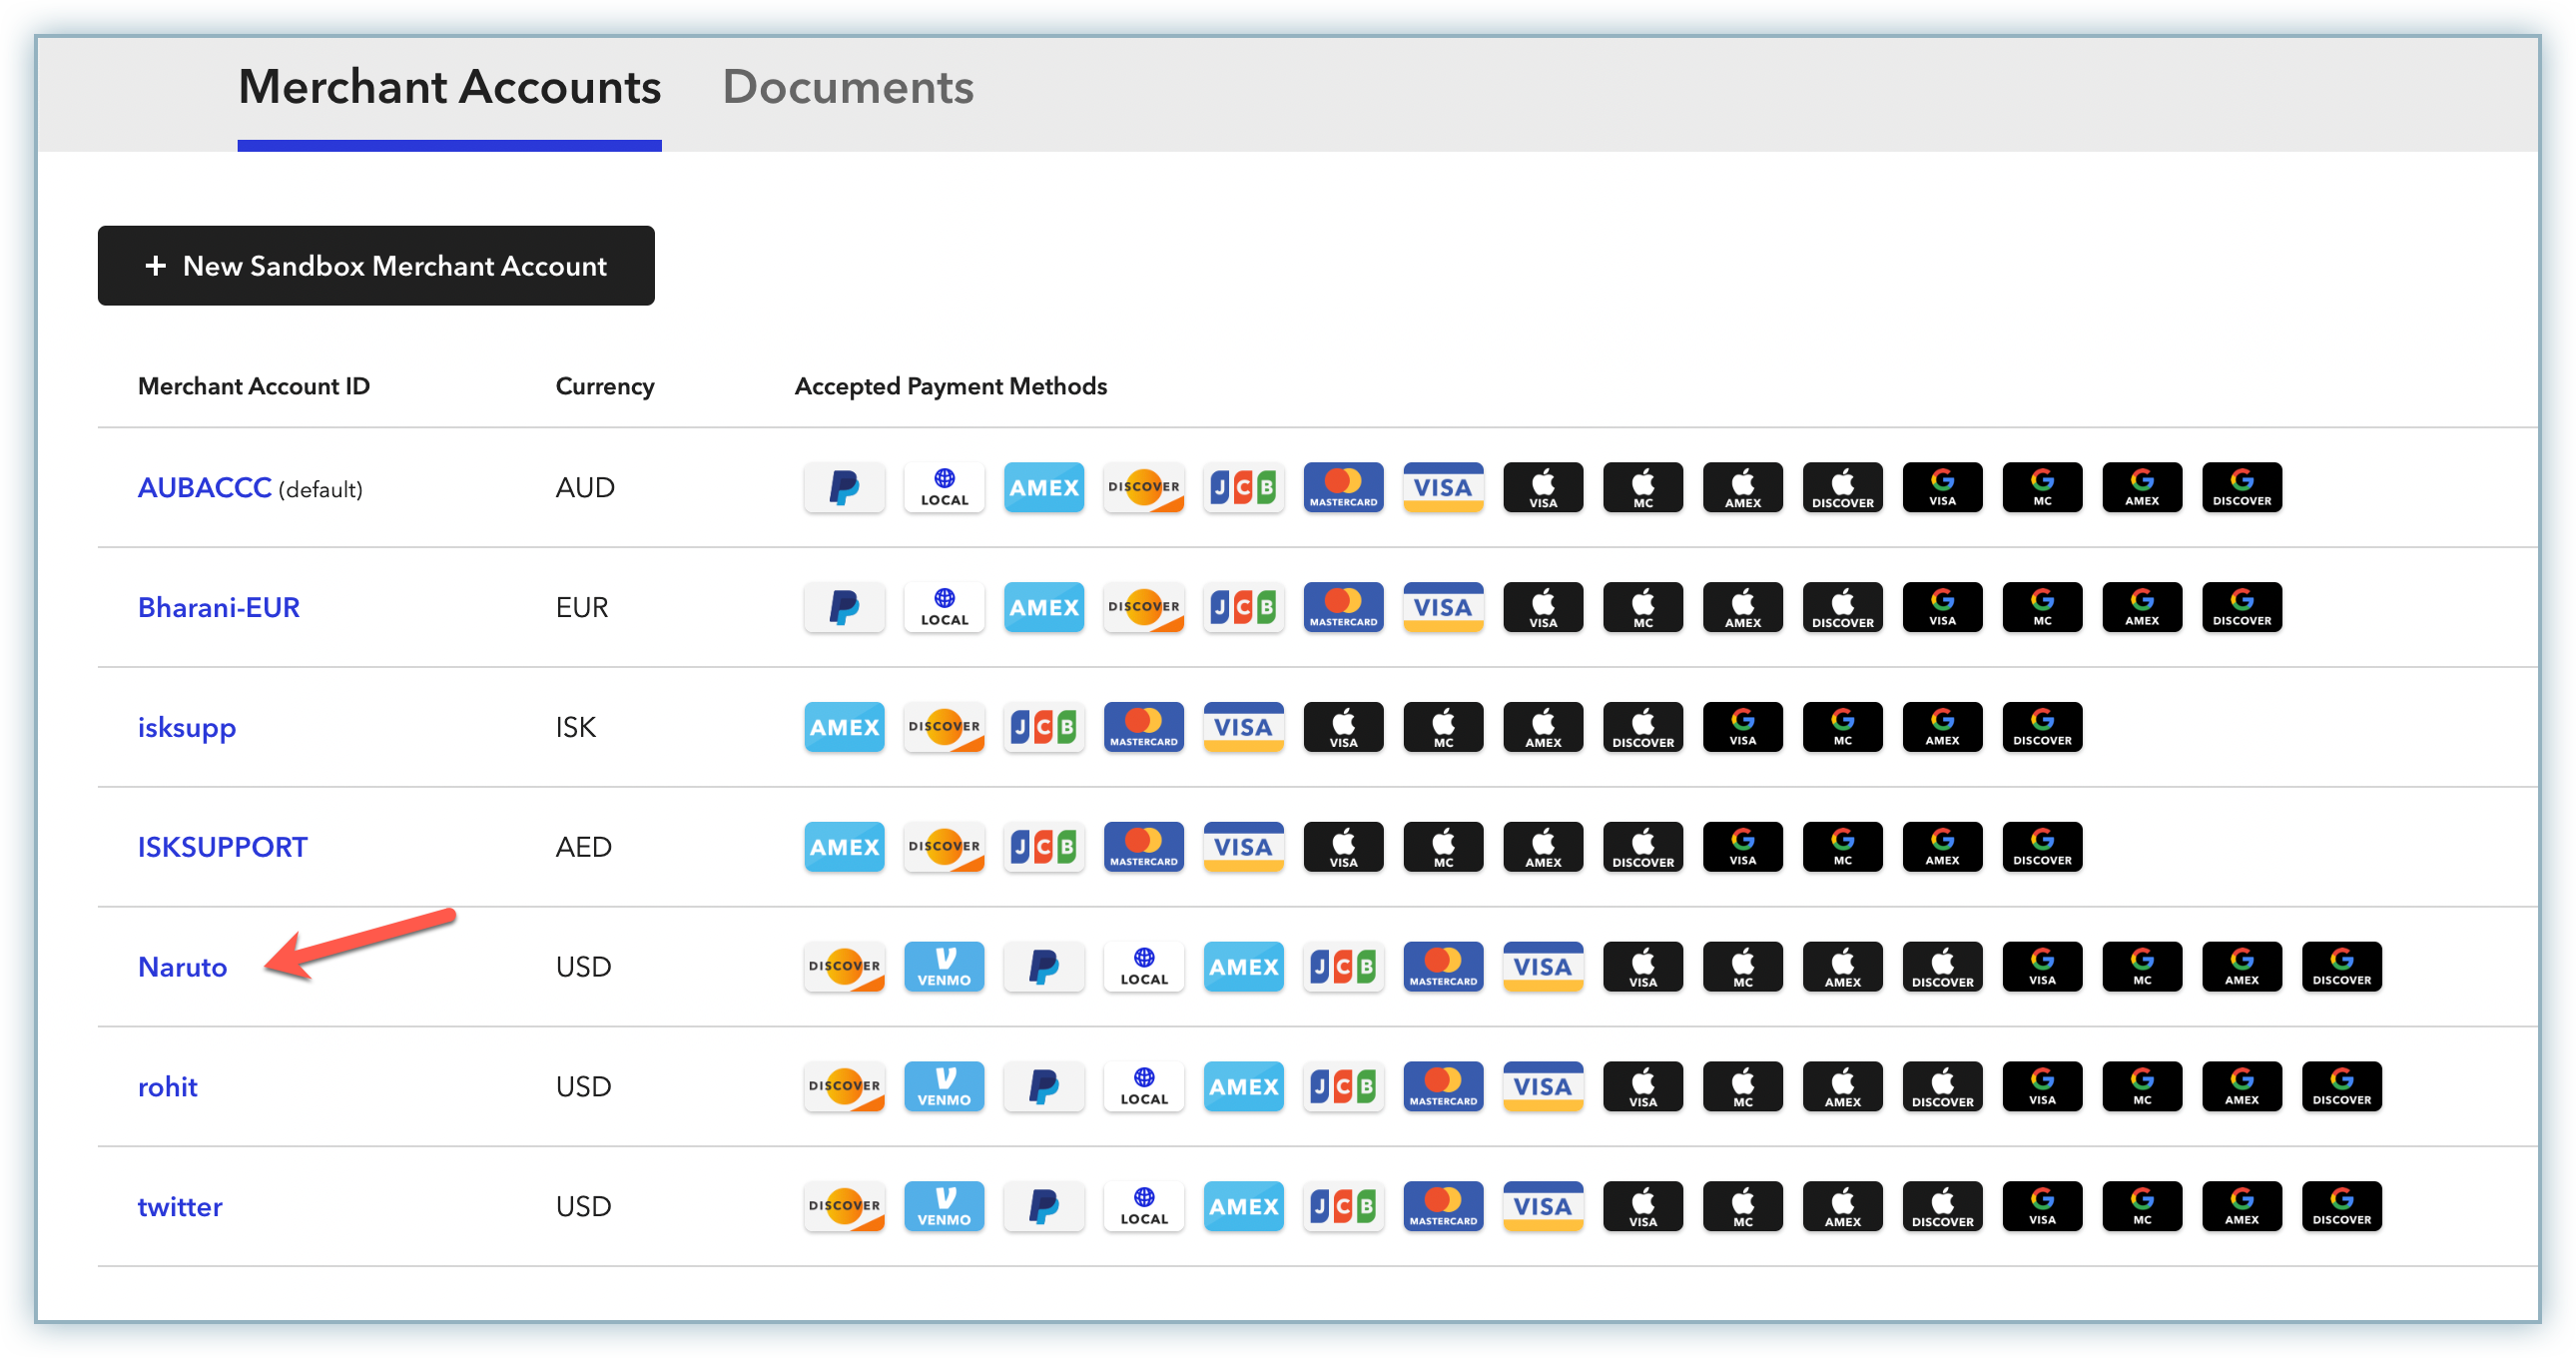
- Scroll down to the Merchant Accounts section, copy the desired Merchant Account ID from the first column, and keep it saved for later use.
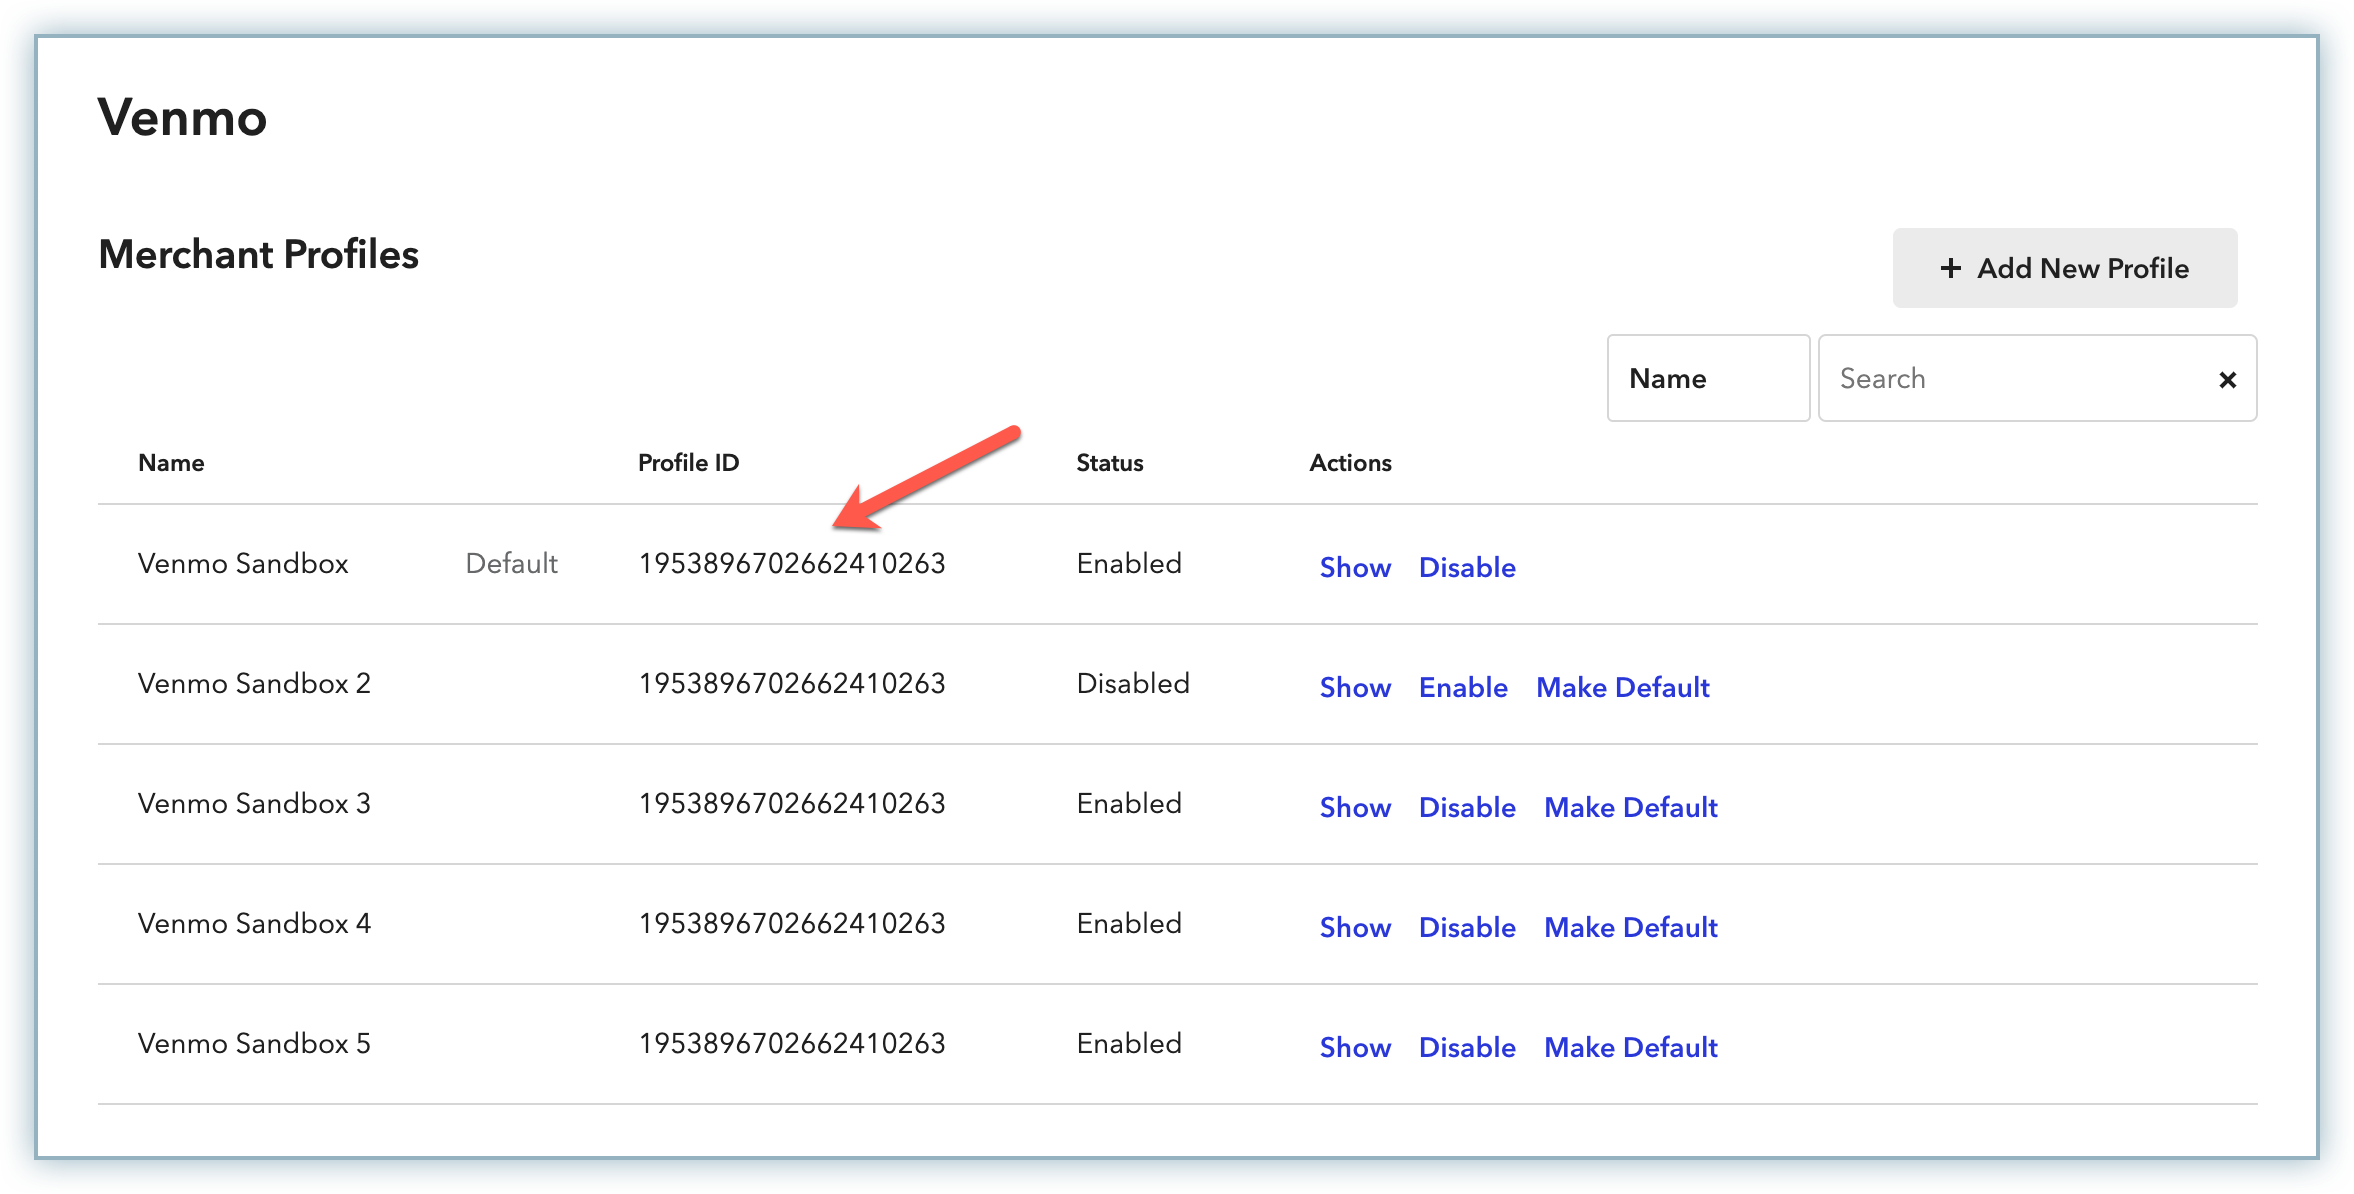
Retrieving Venmo Profile ID
Follow these steps to retrieve the Venmo Profile ID from your Braintree account:
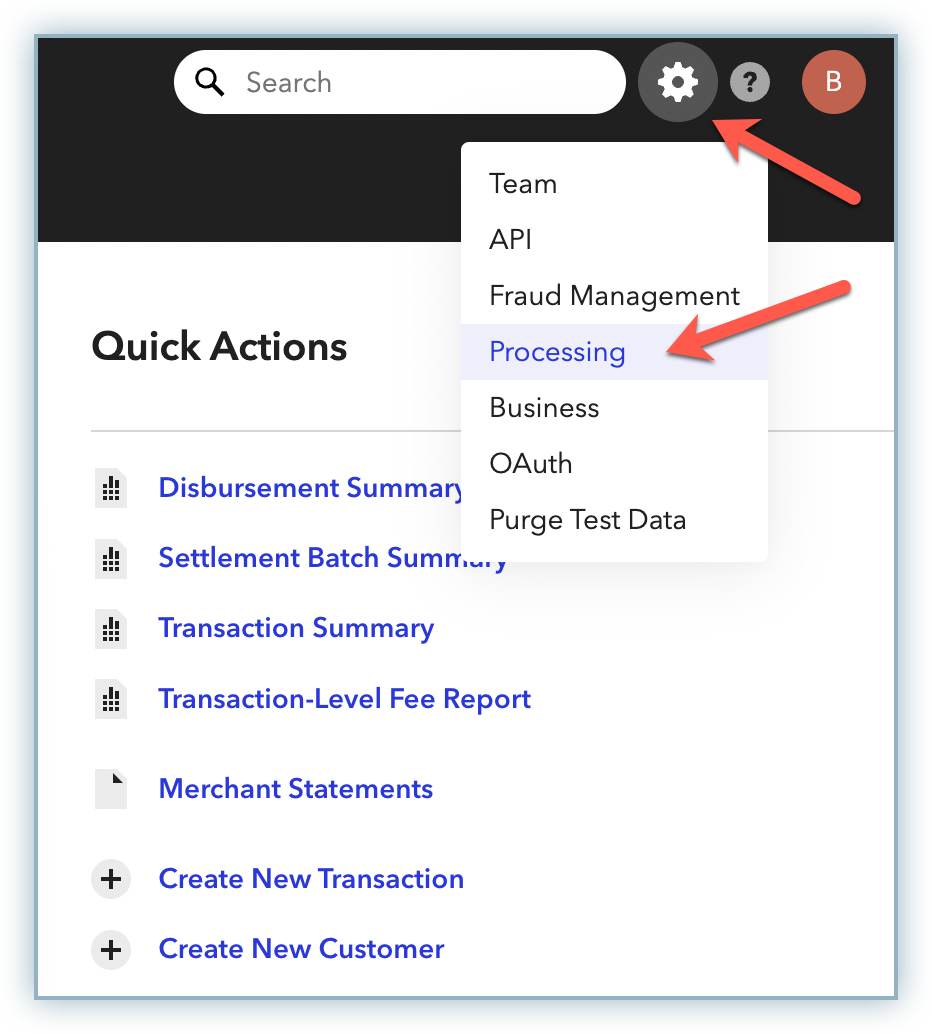
- Log in to your Braintree account if not logged in already.
- Click the Settings icon on the top-right corner and click Processing.
- On the Processing Options page, click Options for Venmo from the Payment Methods list.
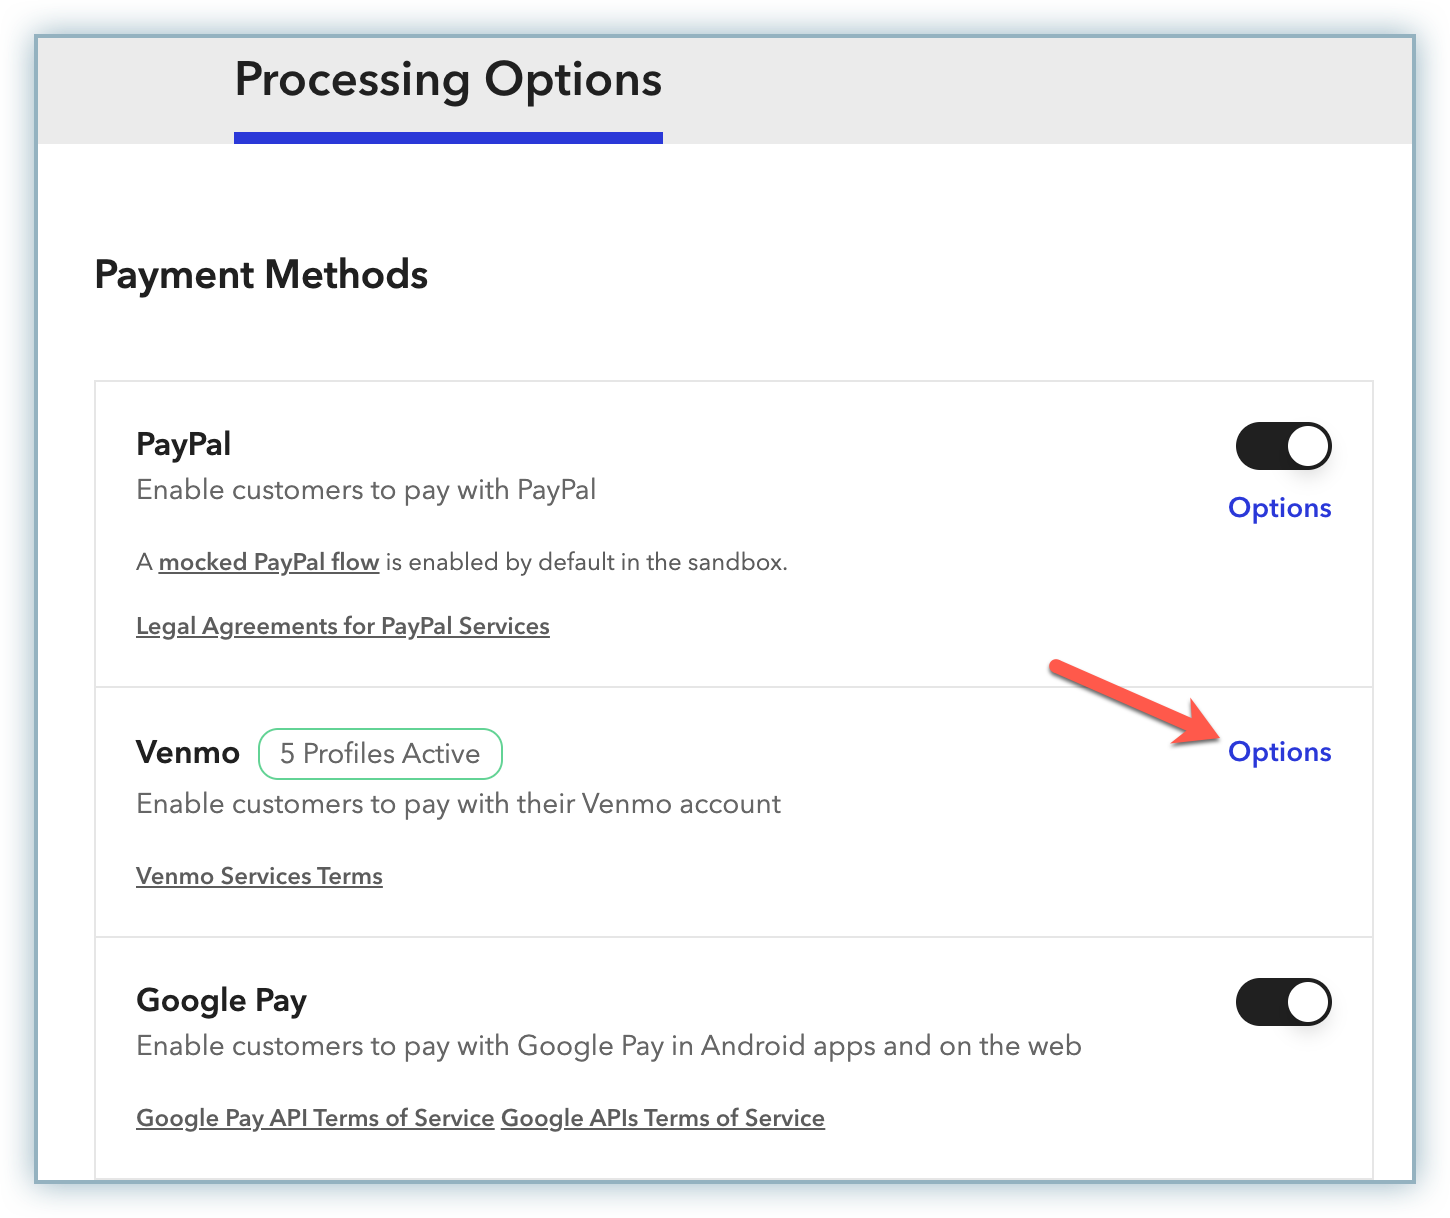
- On the Venmo Merchant Profiles page, copy the Profile ID of the desired profile and keep it saved for later use.
Configuring Venmo via Braintree in Chargebee
Follow these steps to enable and configure Venmo via Braintree:
- Log in to your Chargebee site.
- Go to Settings > Configure Chargebee > Payment Gateways.
- Click the Braintree instance in which you want to enable Venmo. The Configure Braintree page appears.
- Enable the toggle button for Venmo.
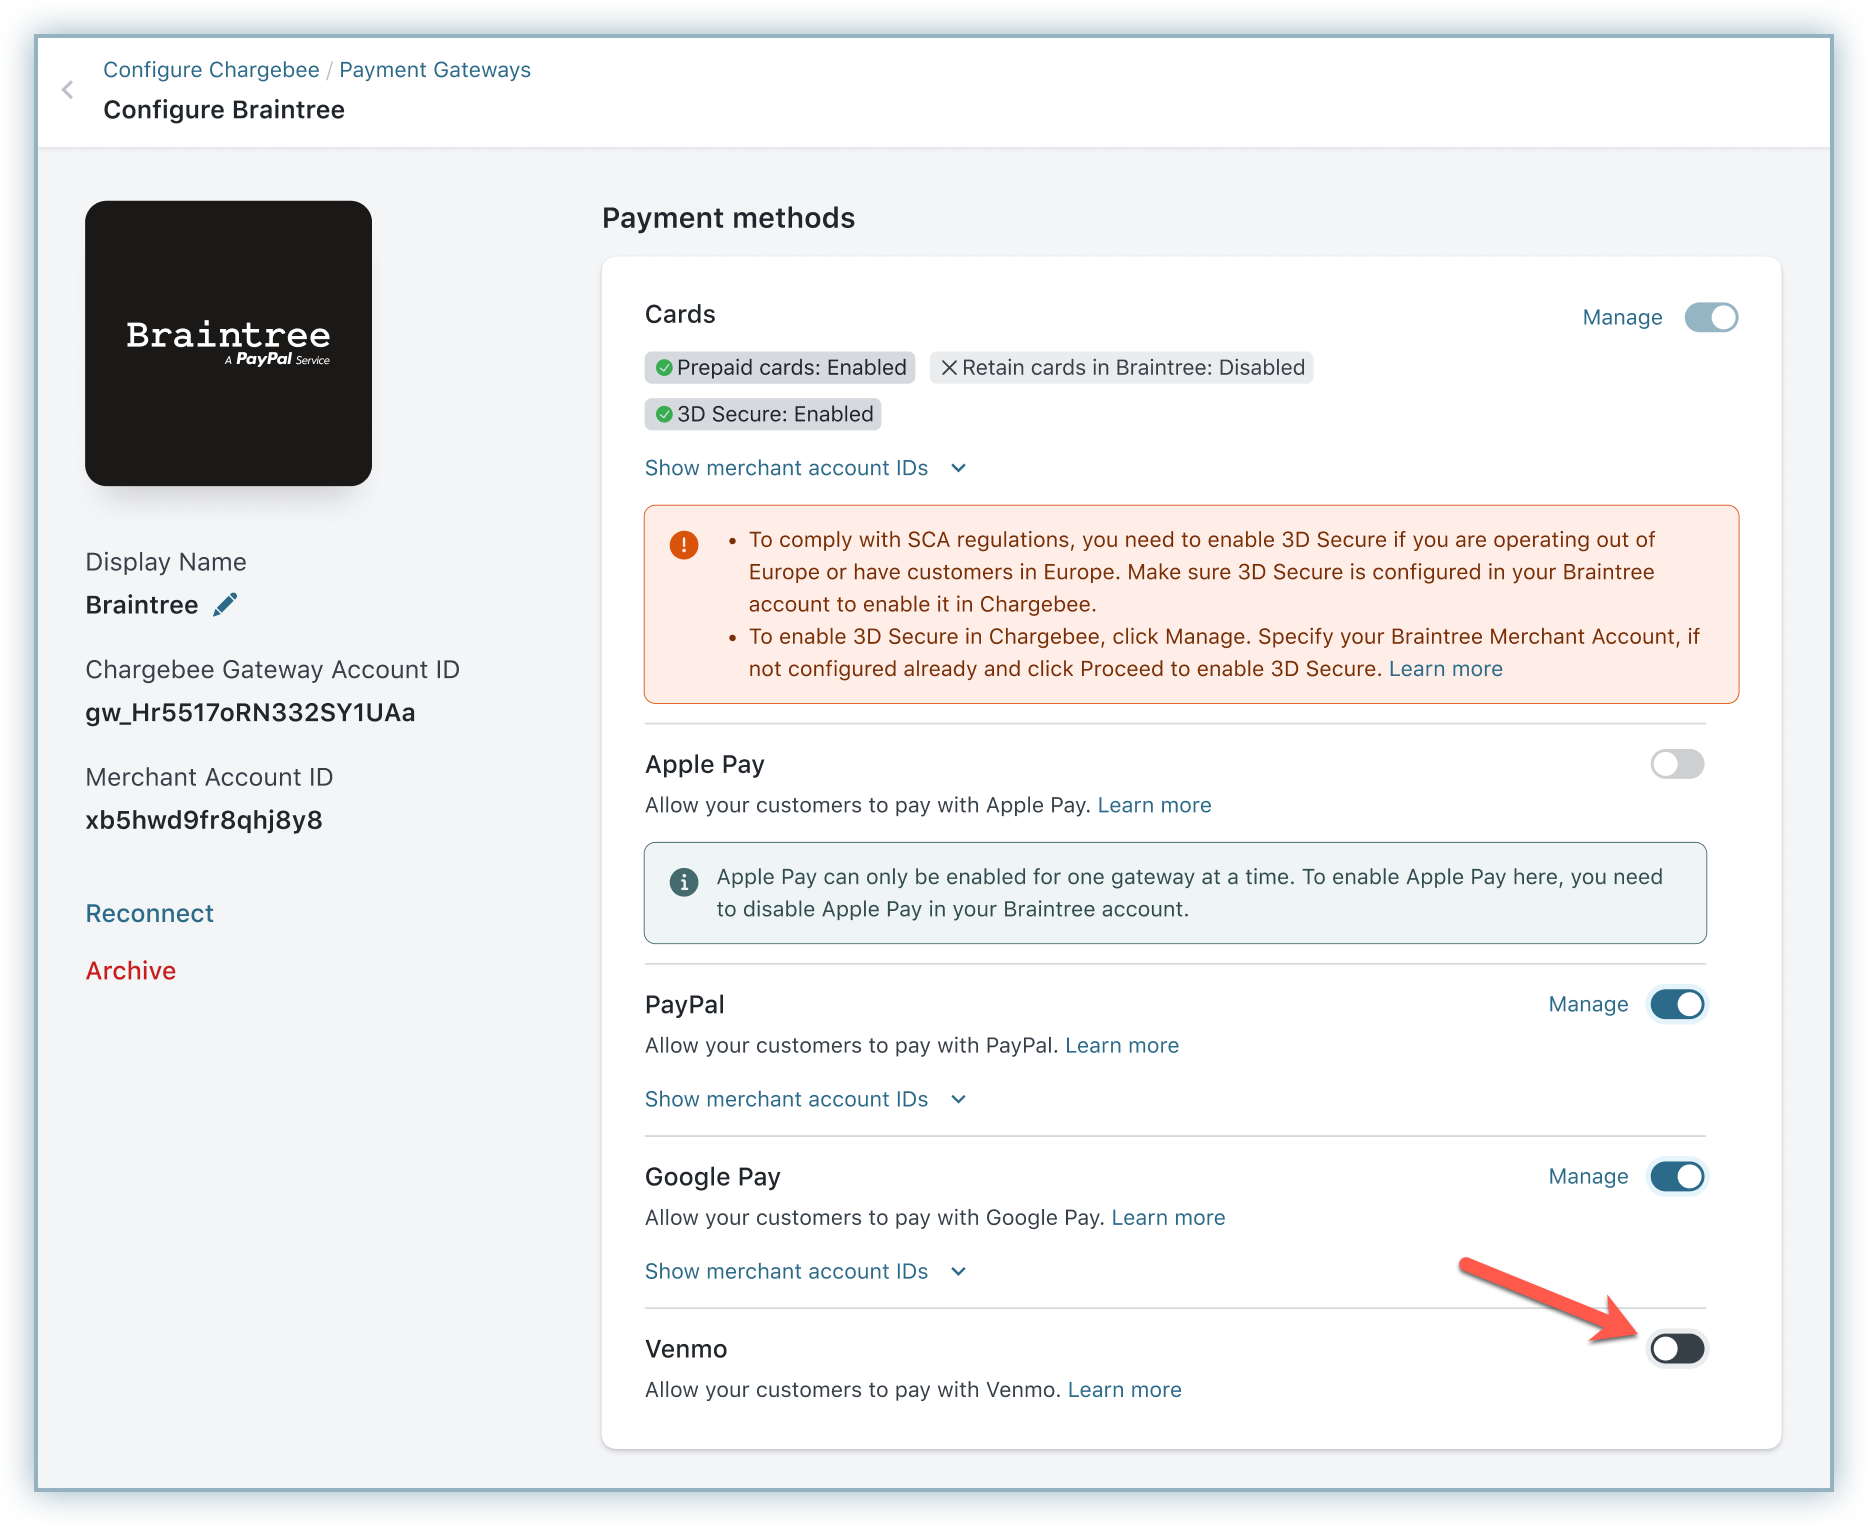
- Enter the Merchant Account ID copied from your Braintree account and click Proceed.
- Enter the Venmo Profile ID copied from your Braintree account.
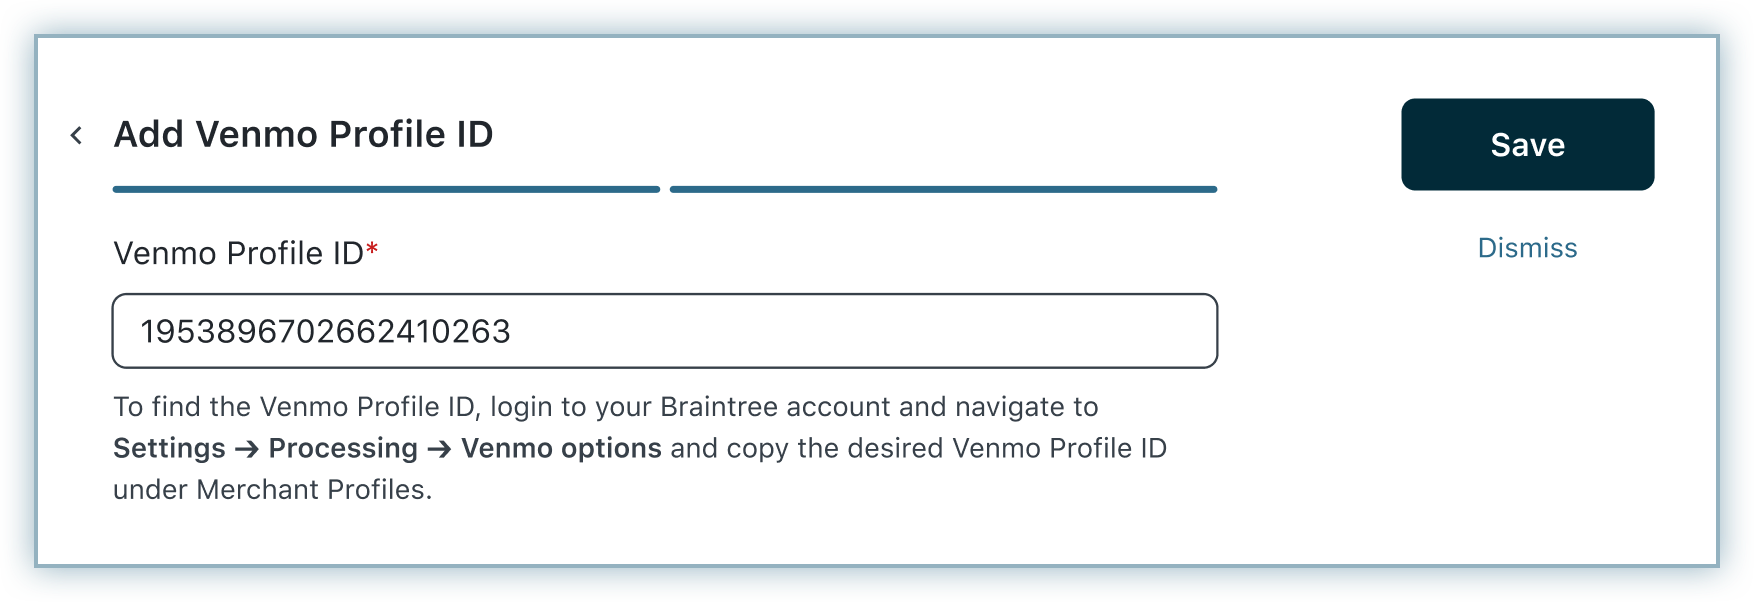
- Click Save.
Supported tokens
This integration supports the following tokens in the mentioned format:
Token | Description | Format and Sample |
|---|---|---|
| Permanent Token | Permanent token is a combination of the customer ID and payment method ID available at the gateway. | Format: customer_id/payment_method_id Sample: 17629028099/8ck8p8pc |
| Temporary Token (Nonce) | Temporary tokens are tokenized card/bank details provided by the gateway. For this integration, we pass this token as we receive from Braintree. | NA |
| Chargebee Payment Intent ID | This is the Payment Intent ID returned after a successful bank authorization process. | Format - payment_intent[id] Sample -
|
Payment flow
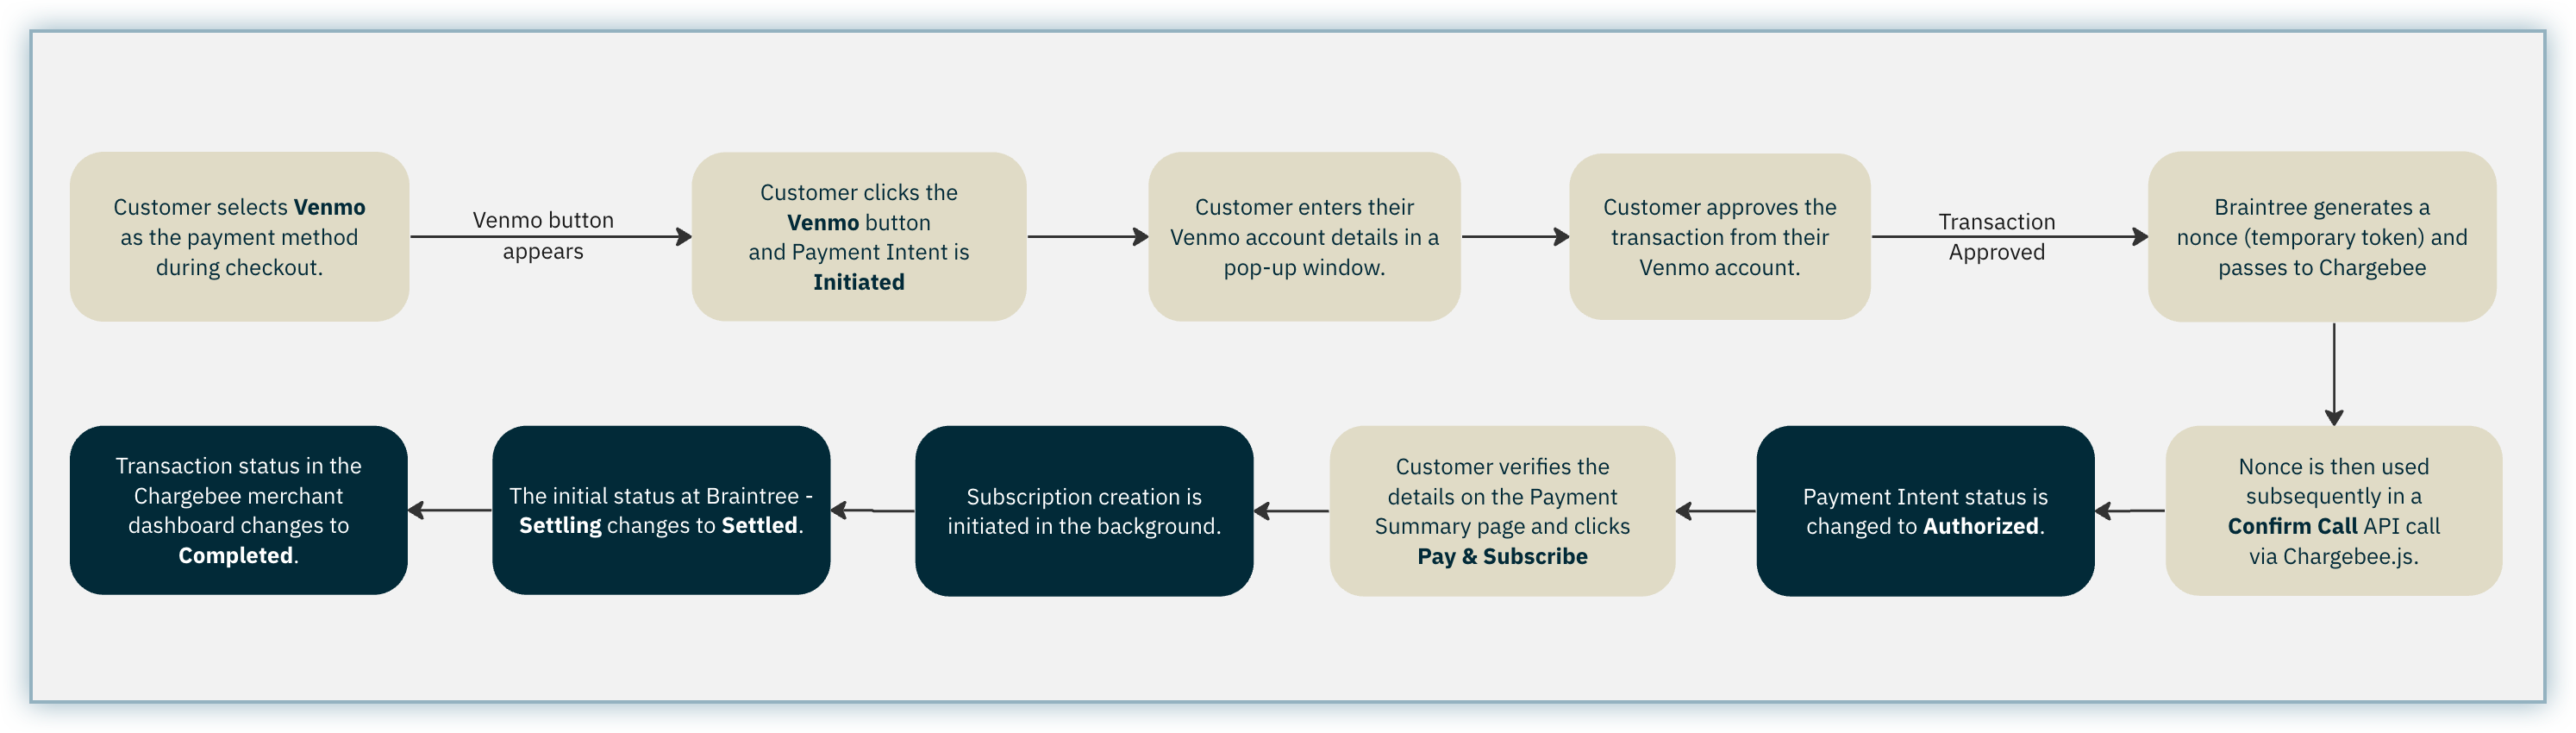
- Customer selection and interaction: The customer selects Venmo as the payment method during checkout followed by a Venmo button.
- Initial payment intent:
- When the Venmo button is clicked, the Initiated phase of payment intent status begins.
- A pop-up window appears allowing customers to enter their Venmo account details.
- Afterwards, they select the preferred payment method within their Venmo account and approve the transaction.
- Authorization and nonce generation:
- Upon customer approval from their Venmo account, a unique nonce (temporary token) is generated by Braintree and passed to Chargebee.
- This nonce is then used in the subsequent Confirm Call API call via Chargebee.js, resulting in the payment intent status changing to Authorized.
- Payment summary page:
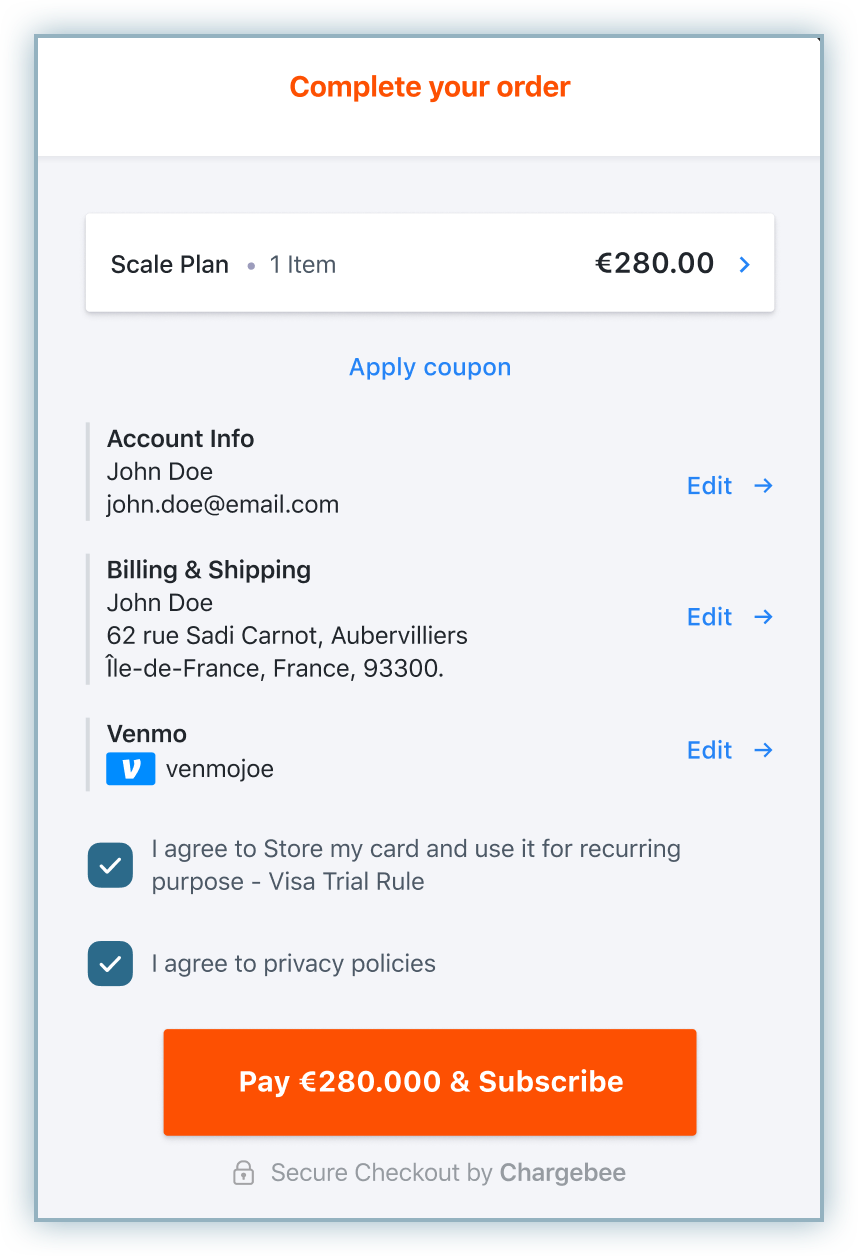
- The customer is presented with a payment summary page, encompassing essential details like account information and billing particulars.
- The payment details section specifically highlights the Venmo username as part of the Venmo payment method.
- Subscription creation:
- Upon clicking Pay and Subscribe, the subscription creation process is initiated.
- Regarding payment at the Braintree side, the initial status is set as Settling and then transitions to Settled.
- Since Braintree does not send webhooks, Chargebee continues to display the transaction status as Capture but the transaction status displays as Completed in the merchant dashboard.
Checkout flow
Braintree supports Venmo via the mobile and desktop browser flow. The desktop browser flow has two types—Desktop Web Login and Desktop QR Code. In this integration, we offer support for the Desktop Web Login. This means that at the end of the checkout, customers will be redirected to the Venmo desktop webpage where they can log in and complete their payments.
The checkout flow contains the following steps:
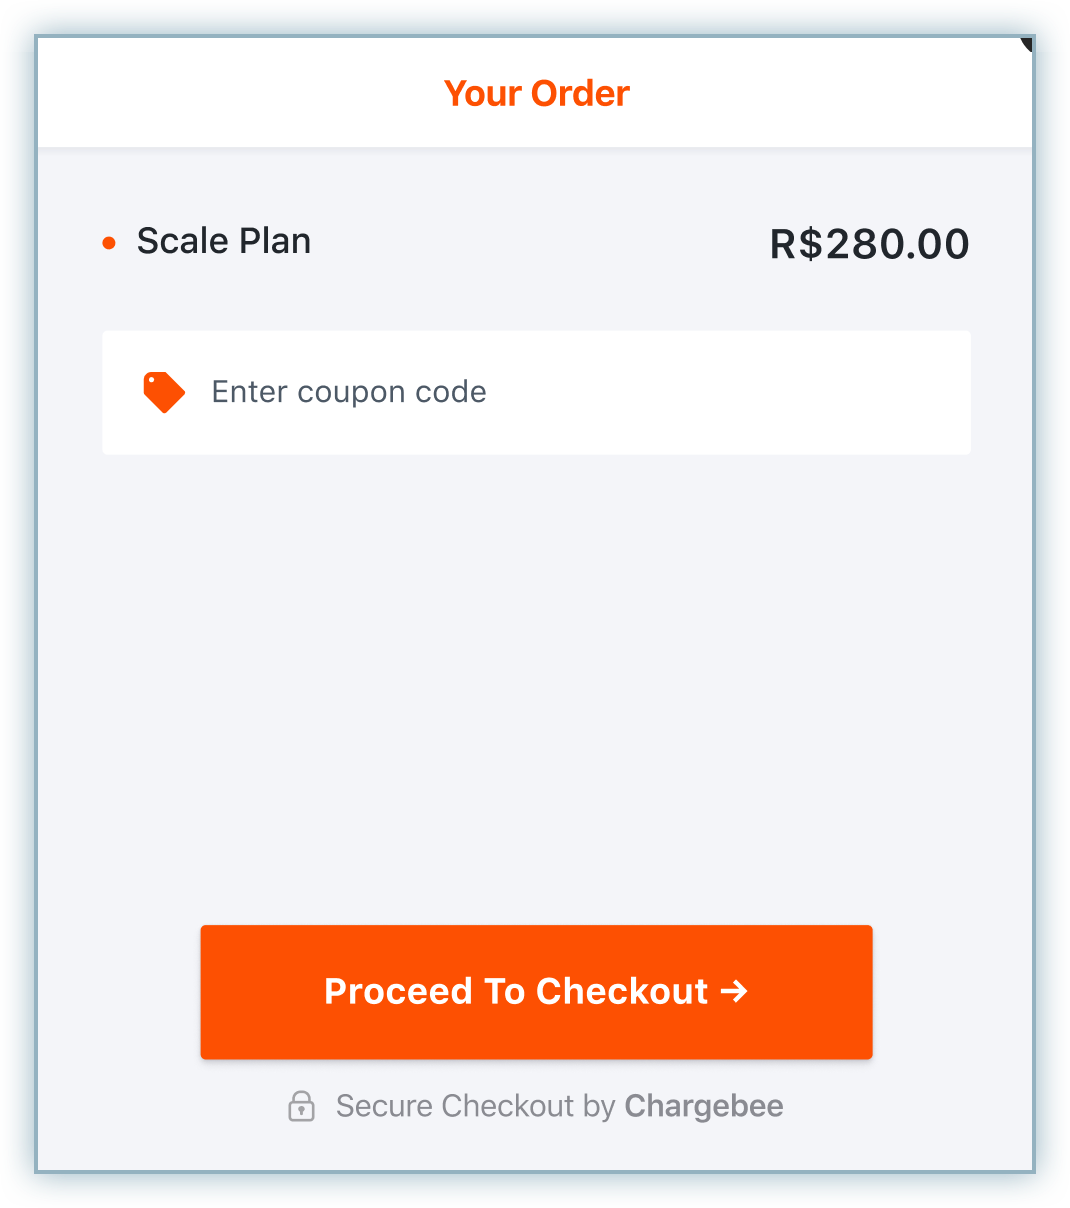
- Click Proceed to Checkout from the Your Order page to initiate a purchase.
- Enter your email to proceed and click Next.

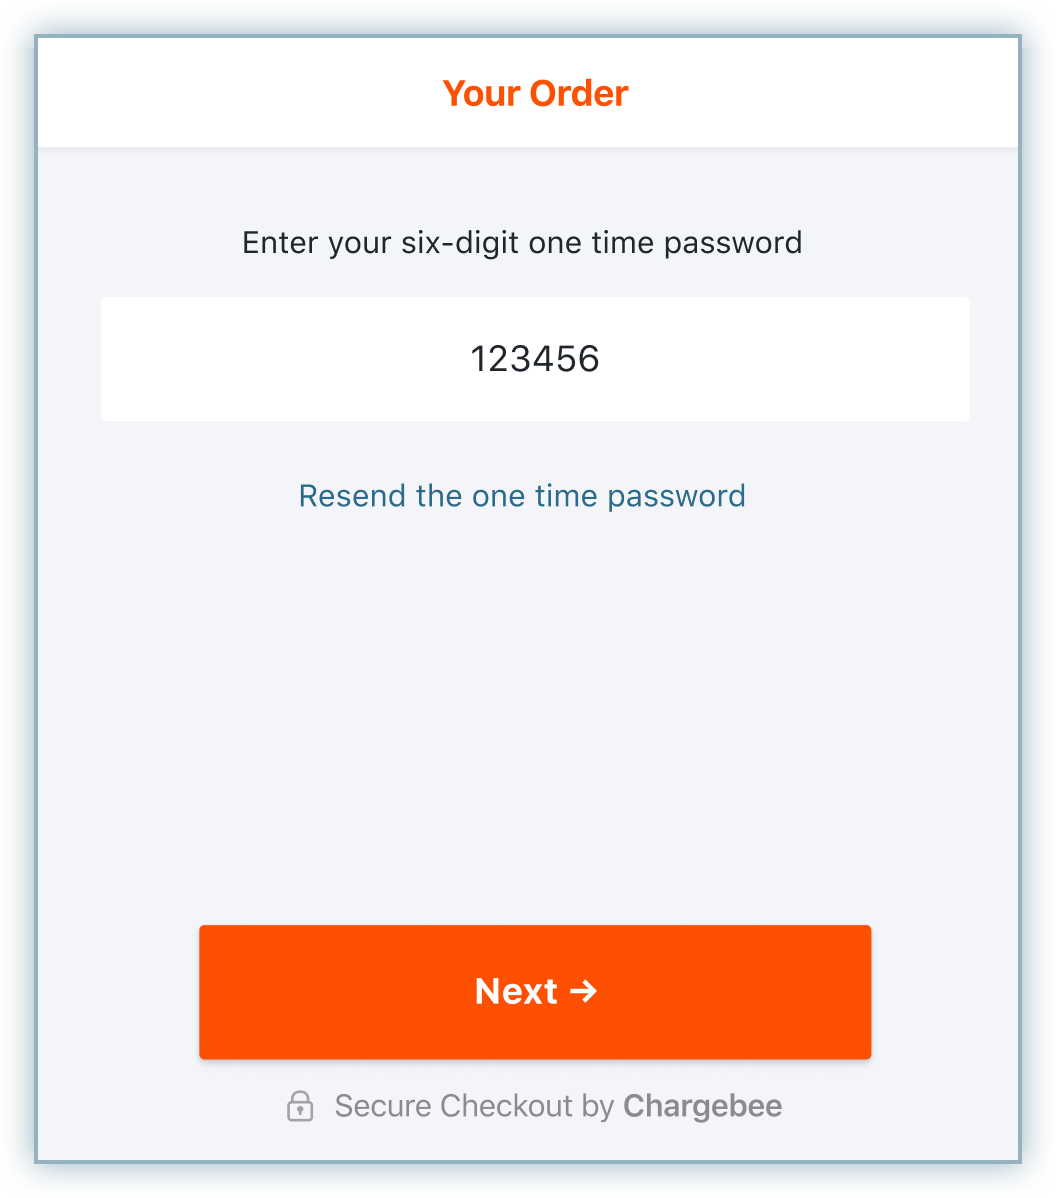
- Enter the One Time Password (OTP) received on your email address and click Next.
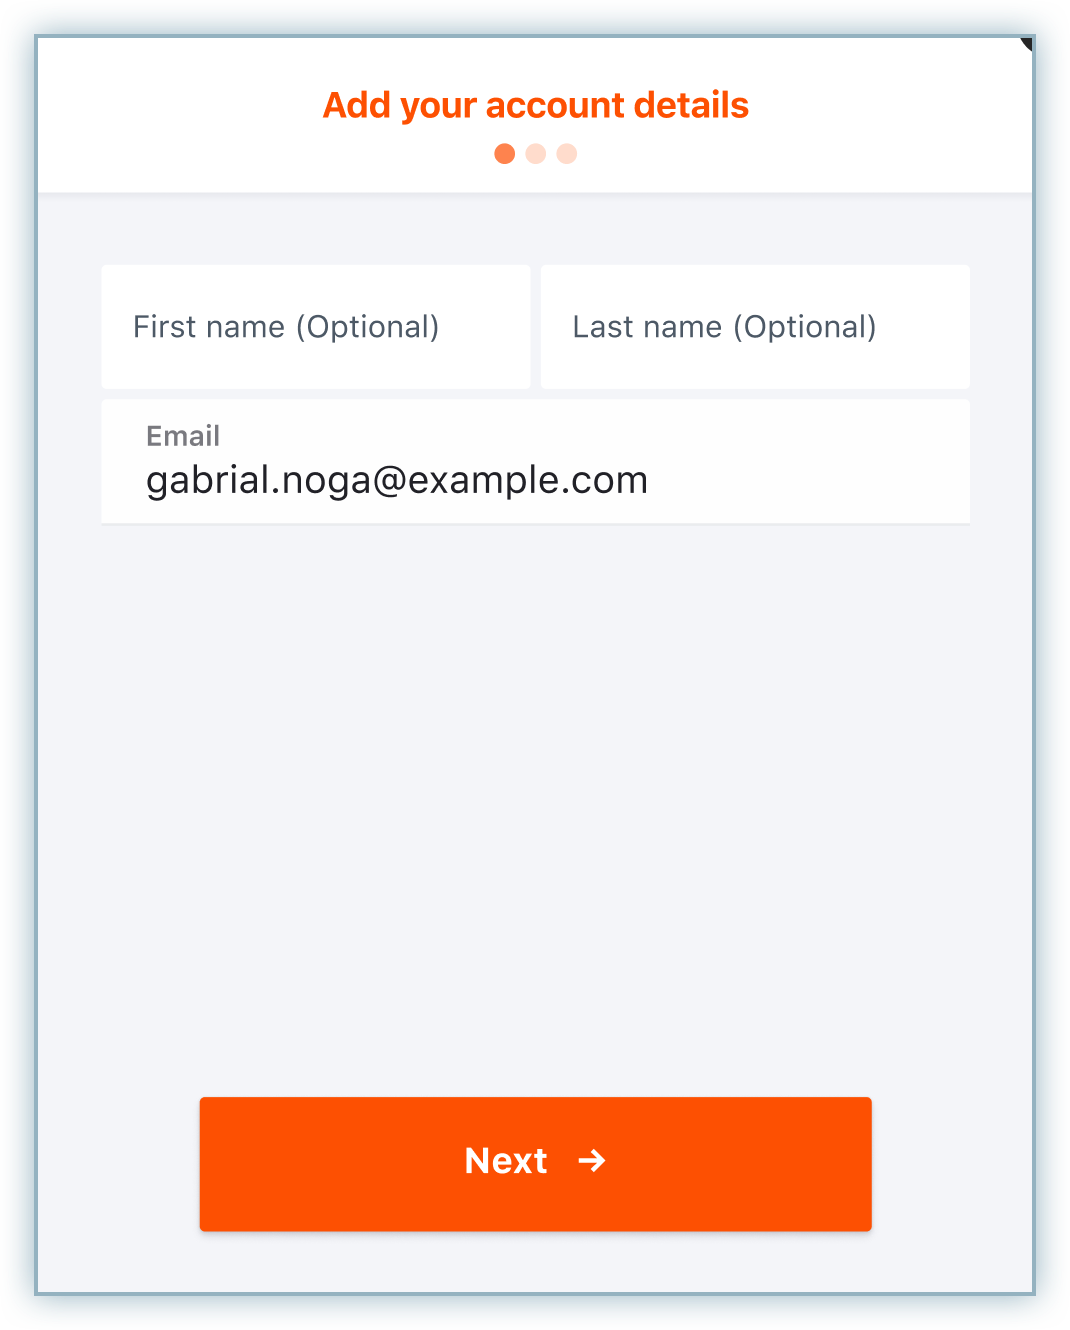
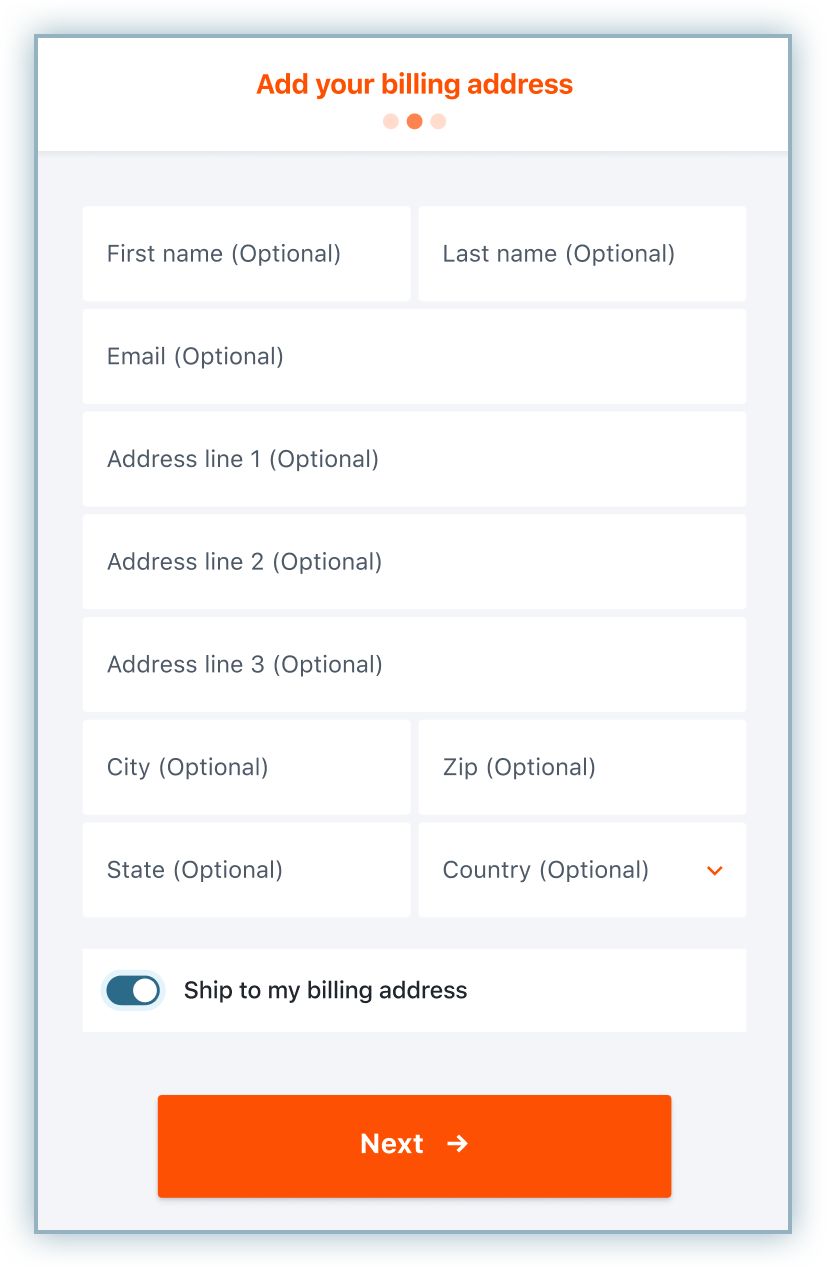
- Enter your Account Details—First Name, Last Name, and Email Address—and click Next.
- Enter the Billing Address details and click Next.
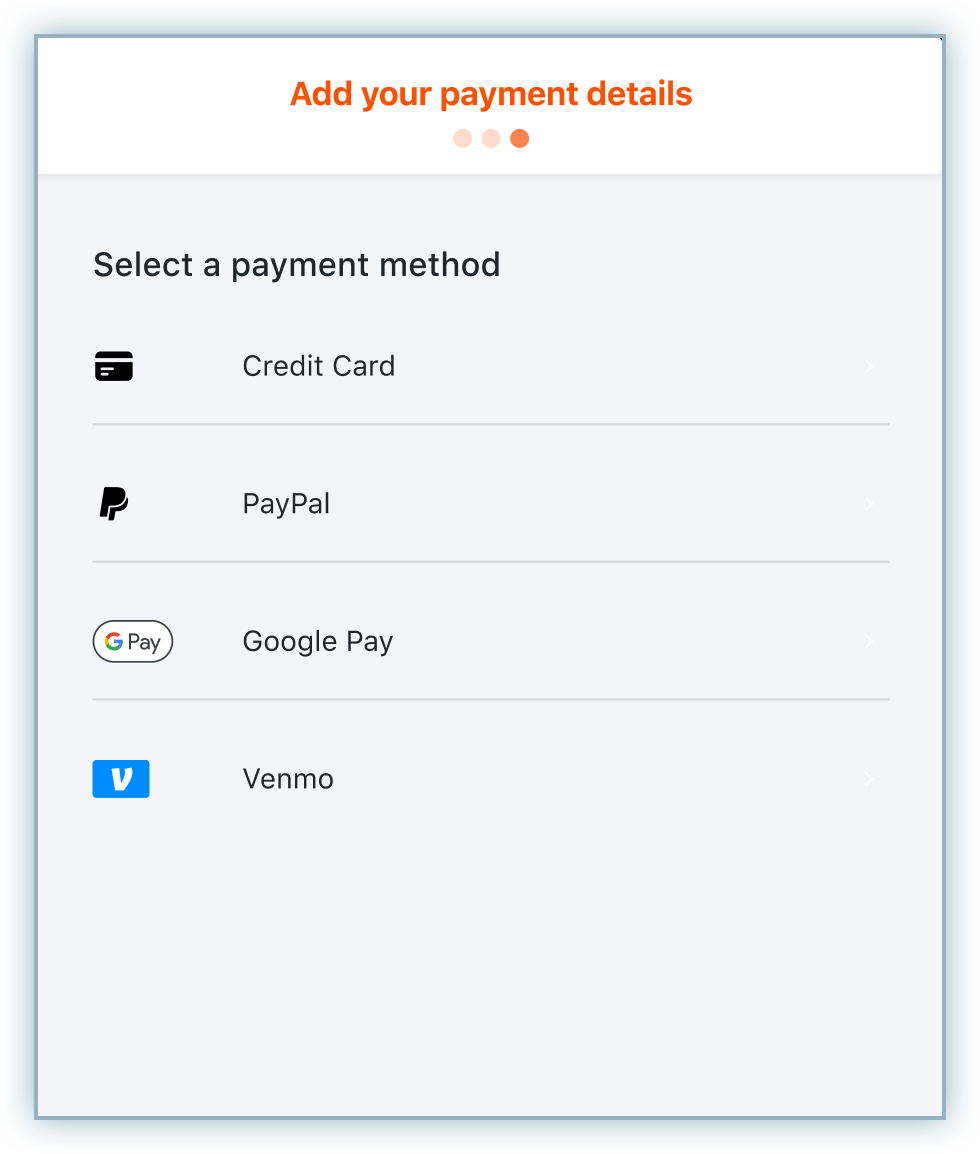
- Select Venmo as the payment method.
- Click the Venmo button.
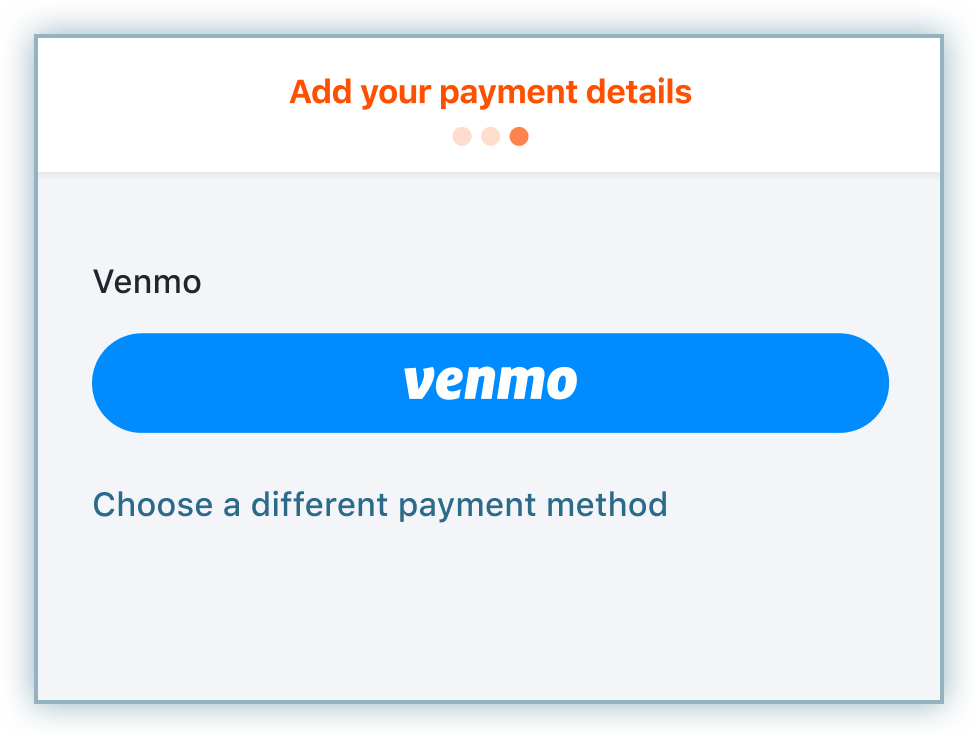
- You will be redirected to the Venmo desktop webpage in a pop-up where you can log in, select the desired payment method, and approve the payment in your Venmo account.
- Then you will be redirected back to Chargebee's checkout where you can review all the important information and check the boxes at the bottom.
- Once reviewed, click Pay and Subscribe.
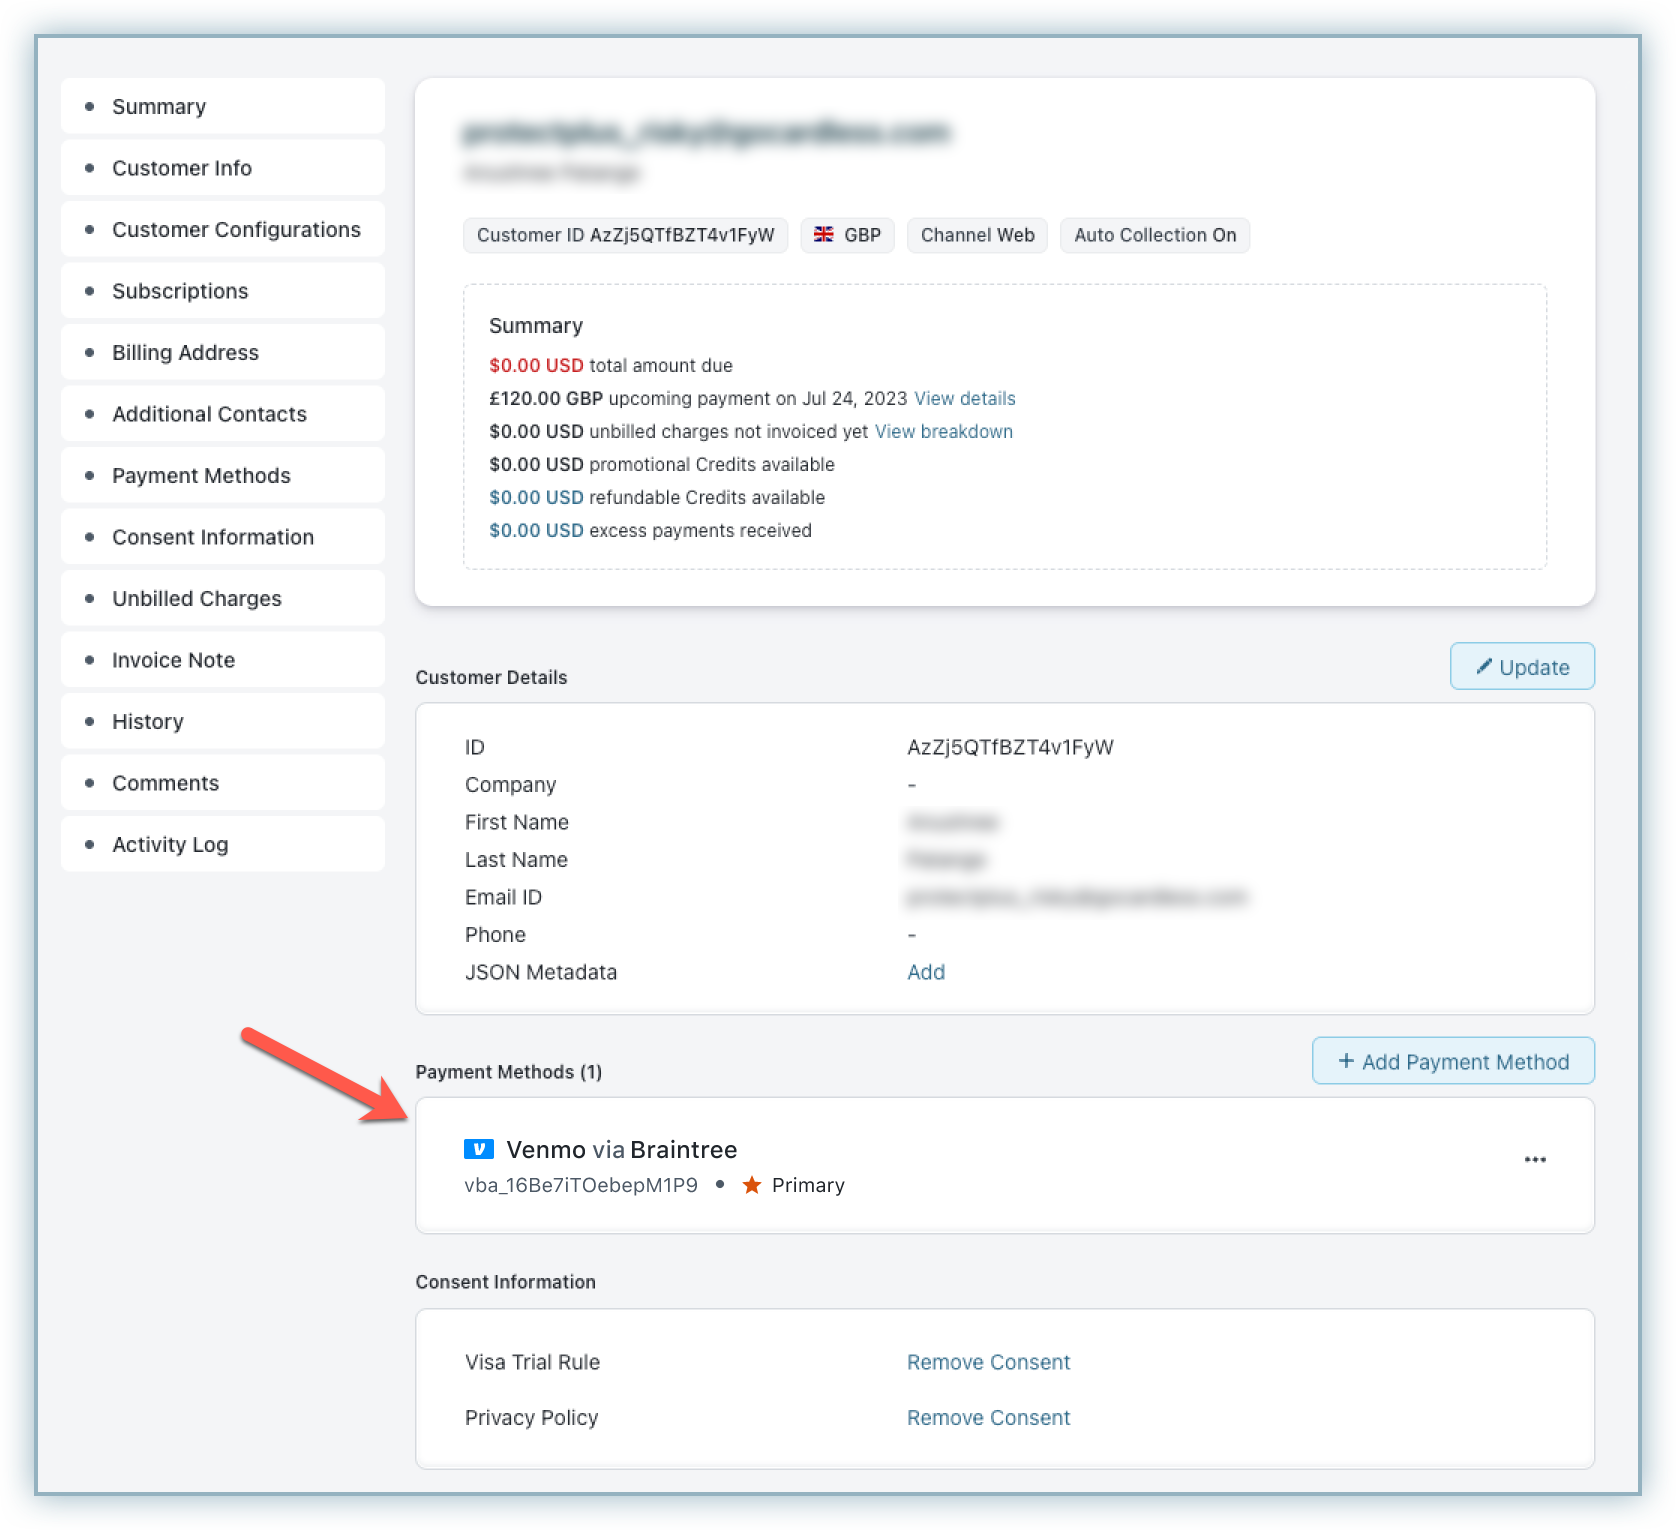
Add or update Venmo as a payment method
You can add Venmo as a payment method for a customer in two ways:
- Via API: Venmo can be added as a payment method via API using the permanent token only.
- Via checkout: As shown in the previous section, when the customer completes the checkout flow and checks the box at the end for vaulting (storing or saving) the payment method for future/recurring use, it automatically gets saved for that customer as shown below.
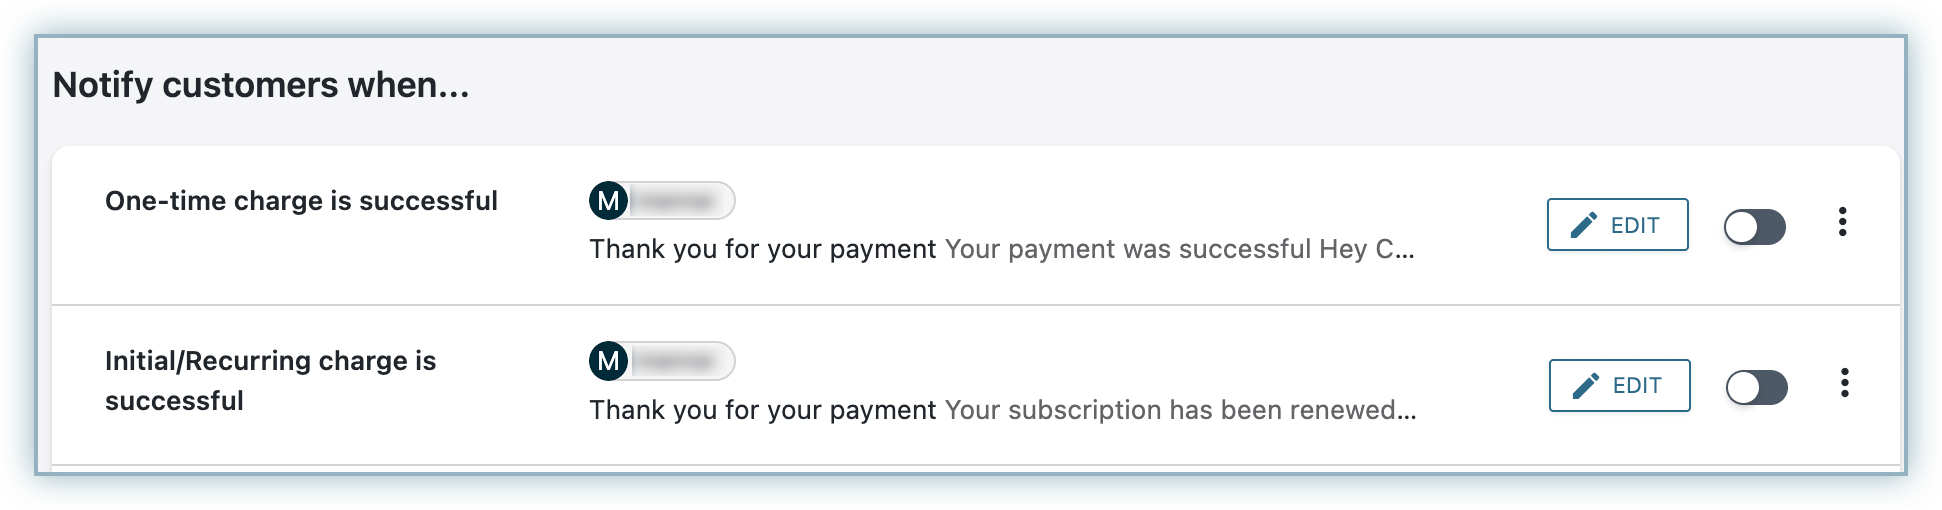
Email notifications
Venmo via Braintree recommends sending email notifications for payments done using Venmo. In this process, you have to add a mergevar called Venmo Username in the following email notifications:
- One-time charge is successful
- Initial/Recurring charge is successful
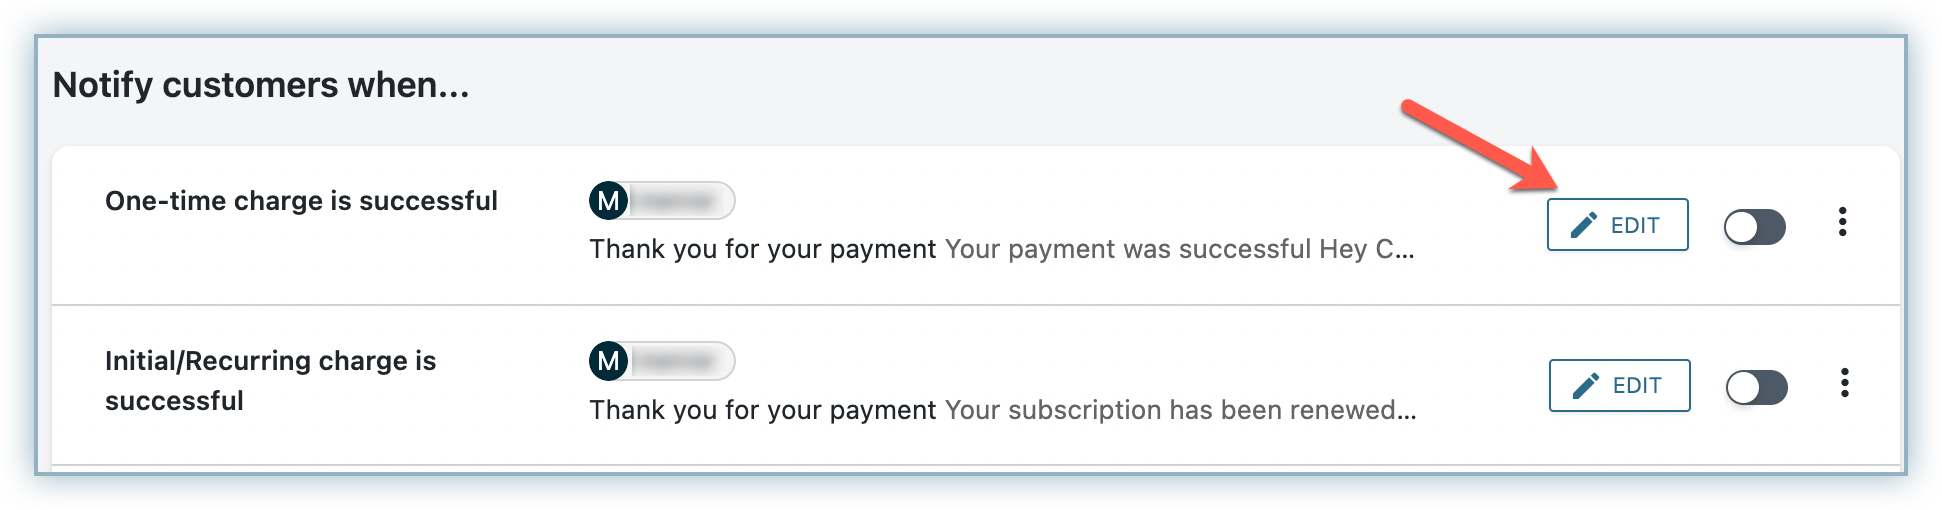
Follow these steps to navigate to these notification templates and add the Venmo Username mergevar:
- Go to Settings > Configure Chargebee > Email Notifications.
- Select Payments and credits.
- Click Edit for any of the two notifications (listed above).
- In the template, click on any of the existing sections or add a new text box in the template and click the
{}button on the right. - Search the name of the mergevar (mail merge field) and click it from the result to add it to the email.
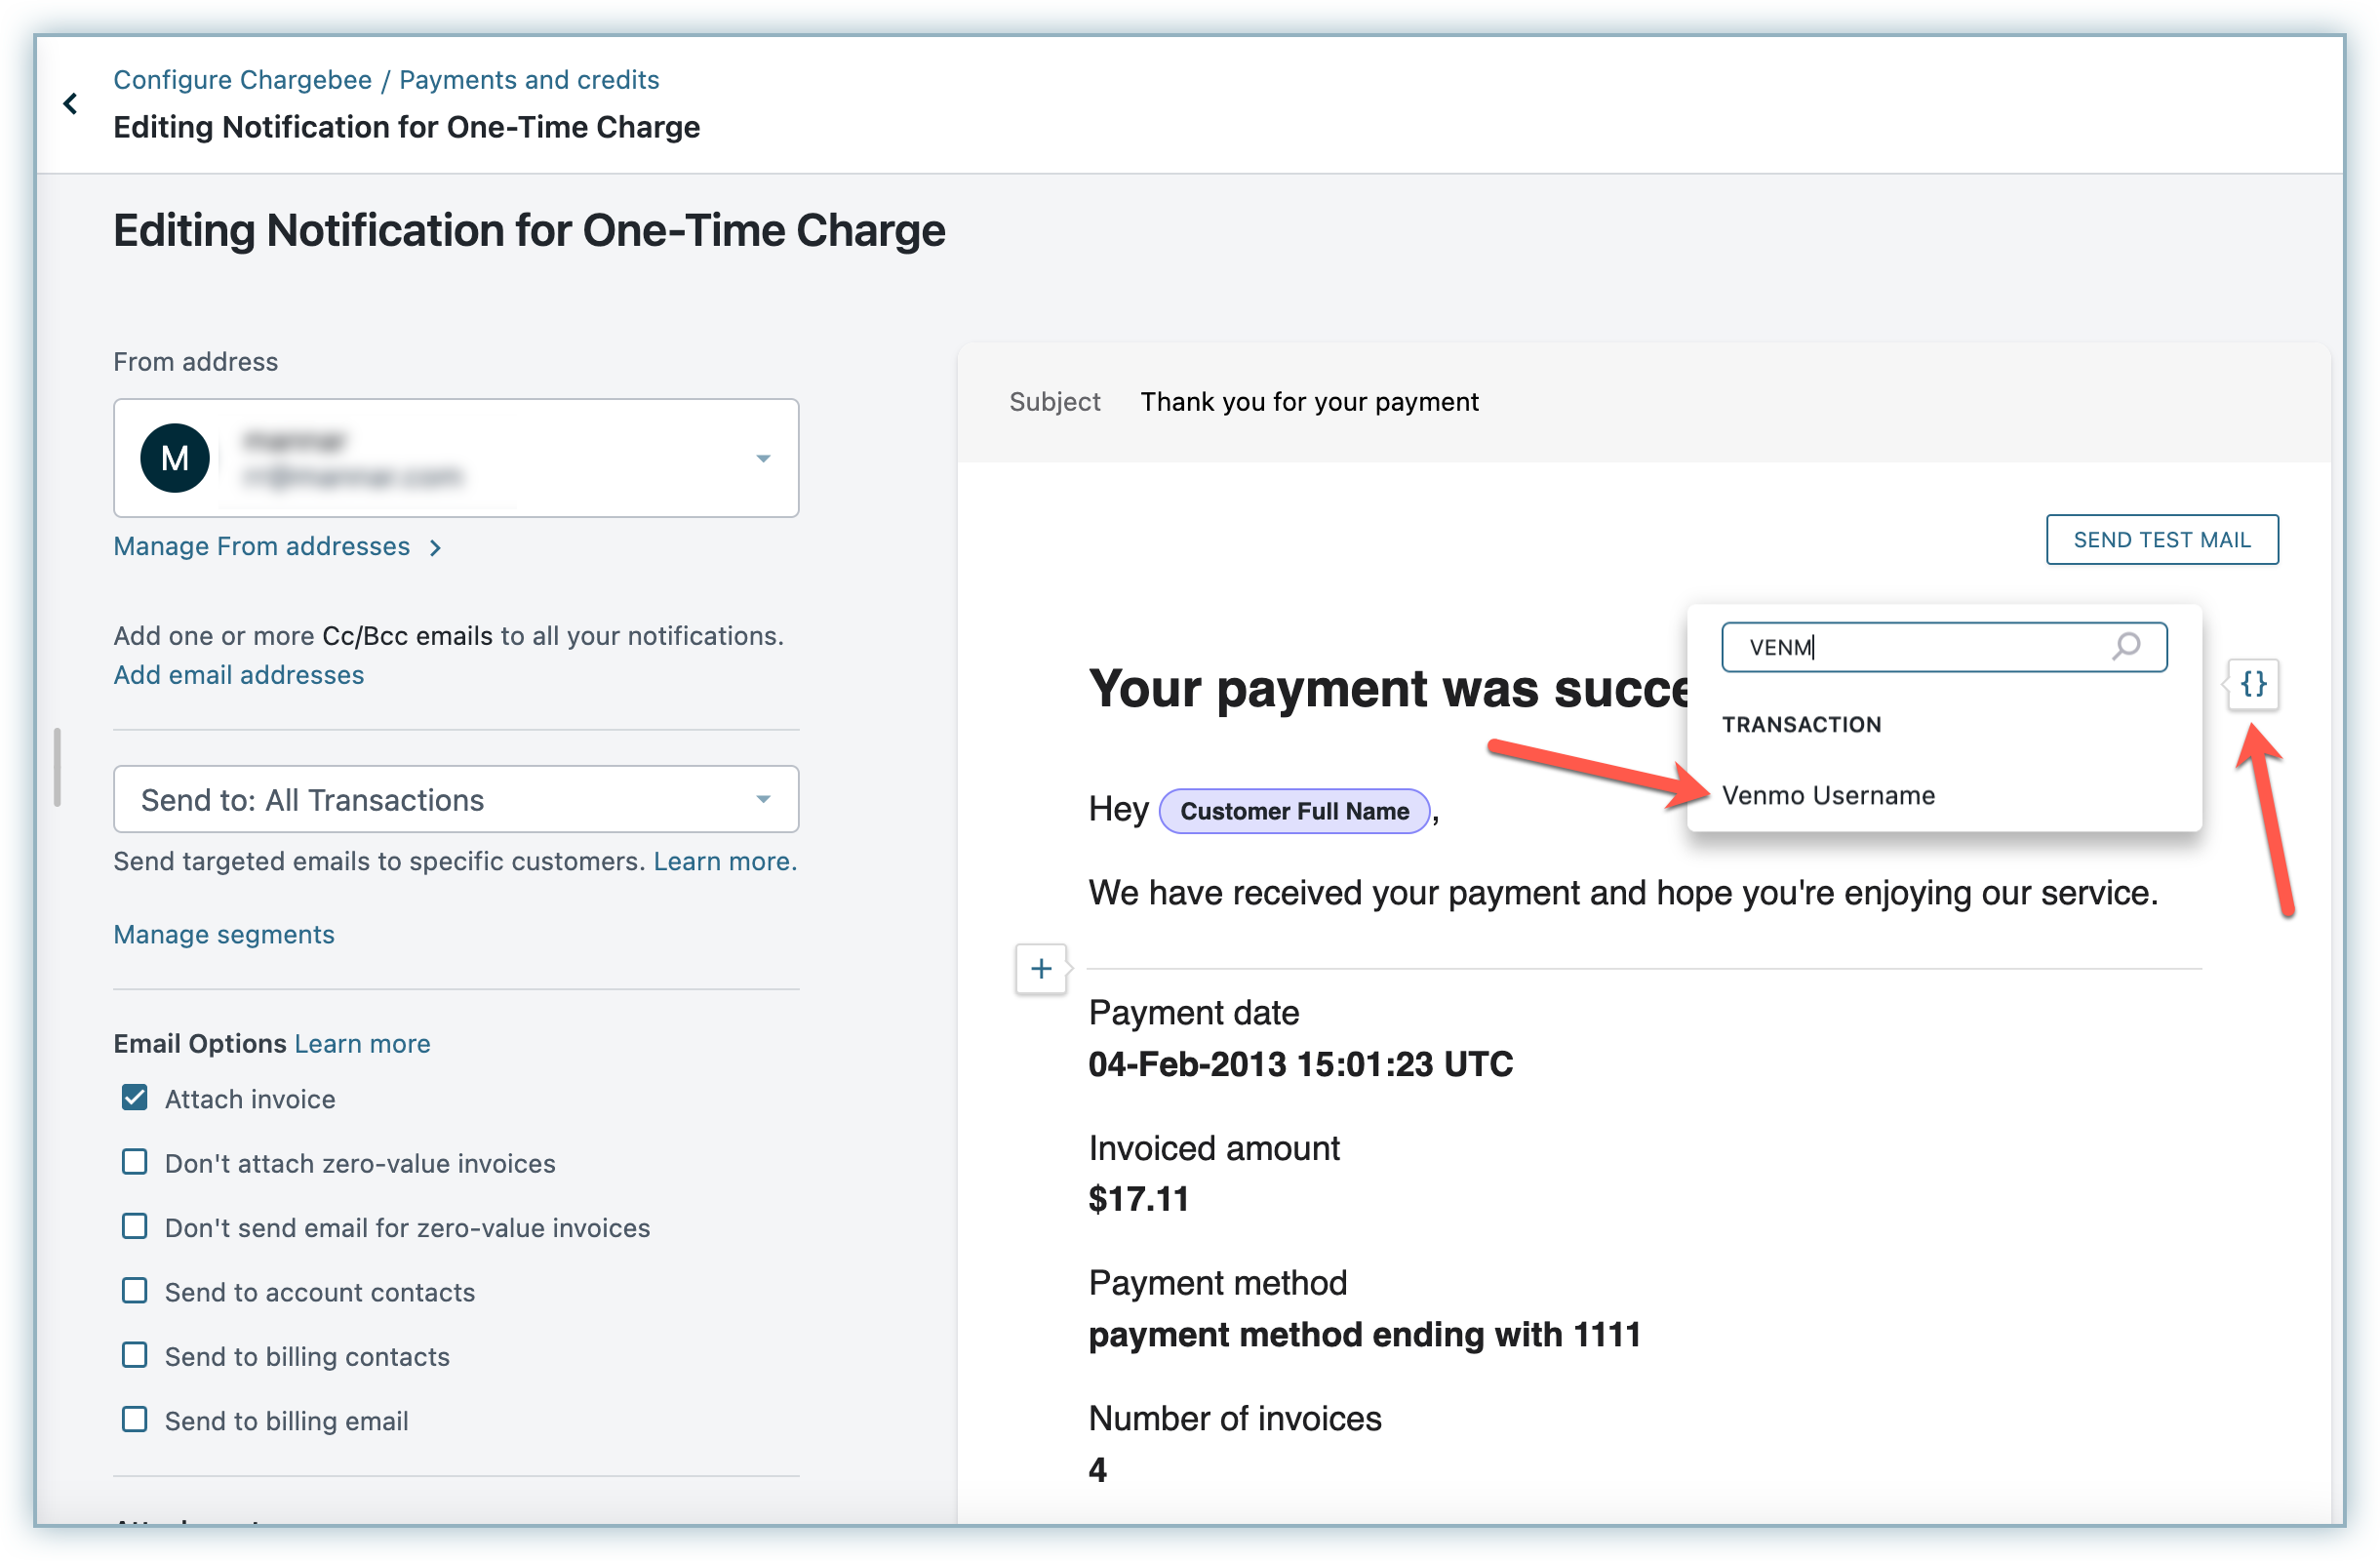
- Publish your template when you are done with all changes.
- You will be redirected to the Venmo Desktop Webpage in a pop-up where you can log in, select the desired payment method and approve the payment in your Venmo account.
- Then you will be redirected back to Chargebee's checkout where you can review all the important information and check the boxes at the bottom.
- Once reviewed, click Pay
& Subscribe.
Add or Update Venmo as a Payment Method
You can add Venmo as a payment method for a customer in two ways:
- Via API - Venmo can be added as a payment method via API using the permanent token only.
- Via Checkout - As shown in the previous section, when the customer fills through the Checkout flow and checks the box at the end for vaulting (storing or saving) the payment method for future/recurring use, it automatically gets saved for that customer as shown below.
Email Notifications
Venmo via Braintree recommends sending email notifications for payments done using Venmo. In this process, you have to add a mergevar called Venmo Username in the following email notifications:
- One-time charge is successful
- Initial/Recurring charge is successful
Follow these steps to navigate to these notification templates and add the Venmo Username mergevar:
-
Go to Settings > Configure Chargebee > Email Notifications.
-
Select Payments and credits.
-
Click Edit for any of the two notifications (listed above).
-
In the template, click on any of the existing sections or add a new text box in the template and click the
{}button on the right. -
Search the name of the mergevar (mail merge field) and click it from the result to add it to the email.
-
Publish your template when you are done with all changes.
Was this article helpful?