Razorpay
Razorpay is a payment solution that offers a fast, affordable, and secure way to accept and disburse payments online. It has quickly grown to be the preferred payment gateway for businesses across India. Chargebee now offers Razorpay as a payment gateway for customers based in India.
Choosing Razorpay
Consider the following criteria before choosing Razorpay as your payment solution:
- Payment methods: The current integration with Chargebee supports card, UPI mandates, and Netbanking (e-mandate) payments.
- Pricing: Read more here.
- Transaction settlements: It is recommended that you contact Razorpay for additional information on transaction settlements.
- Currency support: Chargebee currently supports payments made only in Indian Rupee (INR).
Integration options
Chargebee offers the following options to integrate with Razorpay:
- Chargebee hosted pages
- Gateway JS
- Chargebee JS and API
Review the table below for additional information:
| Integration Type | Description | PCI Requirements | 3DS supported? |
|---|---|---|---|
| Chargebee Hosted Pages | In this method, the card information of the customers are collected by Chargebee's checkout and directly passed on to Razorpay. | Low(Your PCI compliance requirements are greatly reduced due to usage of Chargebee's checkout) | Yes |
| Gateway JS Note: Netbanking is not supported by this mode of integration | In this method, the card details are captured and tokenized on your side by Razorpay and the token is sent to Chargebee. | Low(Since the card details are tokenized by Razorpay) | Yes |
| Razorpay Checkout + Chargebee's APINote: Netbanking is not supported by this mode of integration | In this method, the card details are captured and tokenized on your side by Razorpay and the token is sent to Chargebee. | Low(Since the card details are tokenized by Razorpay) | Yes |
| Chargebee JS + Chargebee API | In this method, you can use Chargebee Components and Hosted Fields to collect the customers card details. | Low | Yes |
Account types
Razorpay supports various account types and additional options to cater to different business needs, such as collecting both domestic and international payments. Previously, the Chargebee and Razorpay integration only supported domestic accounts with INR currency. To facilitate export payments for India-based businesses, the integration now also supports export accounts, allowing for payments in non-INR currencies.
Domestic accounts
- Ideal for: Businesses based in India or with a local entity in India looking to collect payments in INR from customers within India.
- Currency: INR only.
Export-enabled Domestic accounts
- Ideal for: Businesses looking to expand and collect payments from customers outside of India in non-INR currencies.
- Presentment Currency: a. Domestic only: INR b. Export-enabled: Supported currencies are listed here.
- Settlement Currency: INR
Enabling export payments within your domestic account allows you to seamlessly handle both domestic and international transactions.
Note
To handle export payments (collecting payments in non-INR currencies for India-based businesses), you need to enable international payments separately. This feature is not enabled by default. Please refer to this Razorpay documentation to understand the steps required to enable international payments and cards, which is mandatory for collecting non-INR payments through Chargebee with Razorpay.
Prerequisites
The following prerequisites must be met prior to configuring this integration:
- You must configure your test and live sites with Razorpay independently. Payment information and data on the test site will not be available on the live site.
- S2S (Server to Server) integration, Virtual Payment Address (VPA) validation, recurring CAW (Charge_At_Will), and recurring emandates must be enabled in your Razorpay account. Contact support for additional assistance. Razorpay may take 25 to 30 business days to connect with the bank and enable these permissions in your Razorpay account as per the regulatory requirements..
- Razorpay supports INR currency only and this currency must be enabled within your Chargebee app.
- Configuration of webhooks is mandatory to ensure that the integration functions effectively.
- It is recommended that the Auto Capture with Custom time out is enabled on Razorpay. This delayed capture of authorized payments will enable merchants to process authorized payments to be refunded or voided. Read more here.
Configure Razorpay with Chargebee
This configuration is completed on your Razorpay and Chargebee site:
Retrieving Razorpay Key ID and Key Secret
Prior to configuration, you must retrieve the Key ID and Key Secret for your Razorpay account. Follow the steps below to retrieve this information.
-
Log into your Razorpay account.
-
If you have a copy of the previously generated Key ID and Secret Key, then make a note of these and proceed to Add Razorpay Gateway. If you don't, Navigate to Settings > API Keys, and Click Regenerate Key.
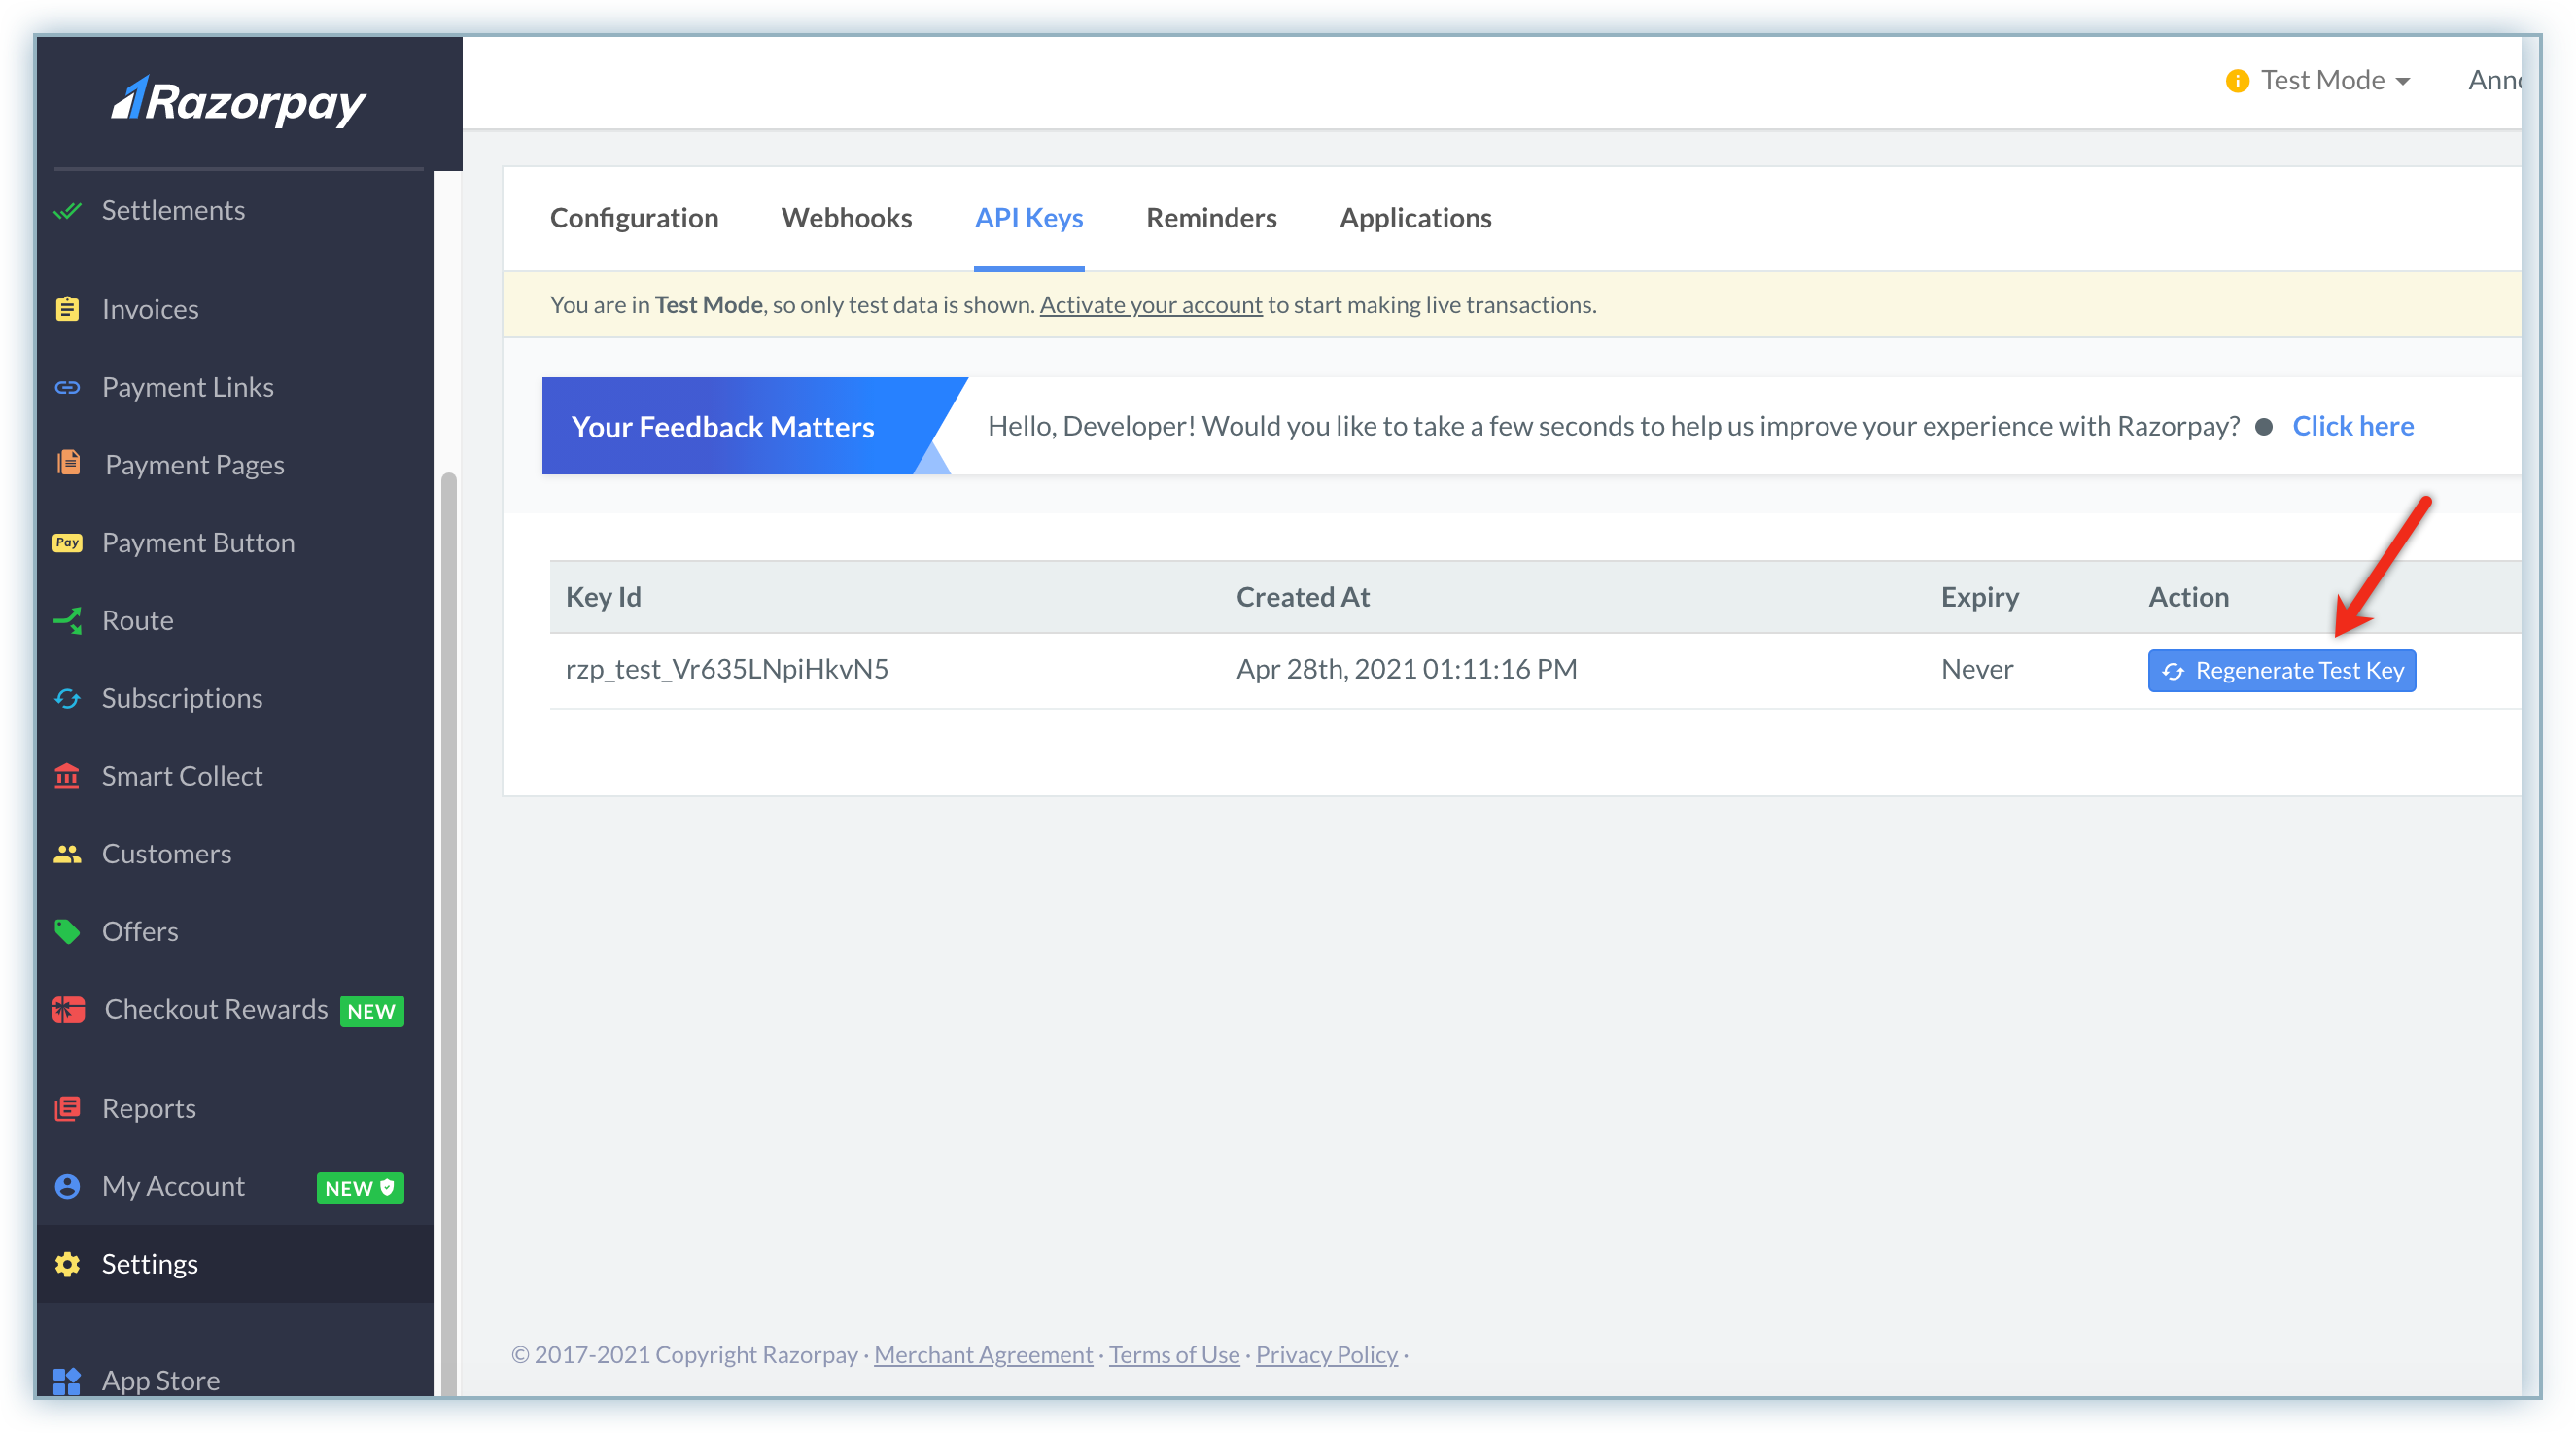
-
Select the applicable option to disable the previous key in the Roll Key pop-up, and click OK to view the details.
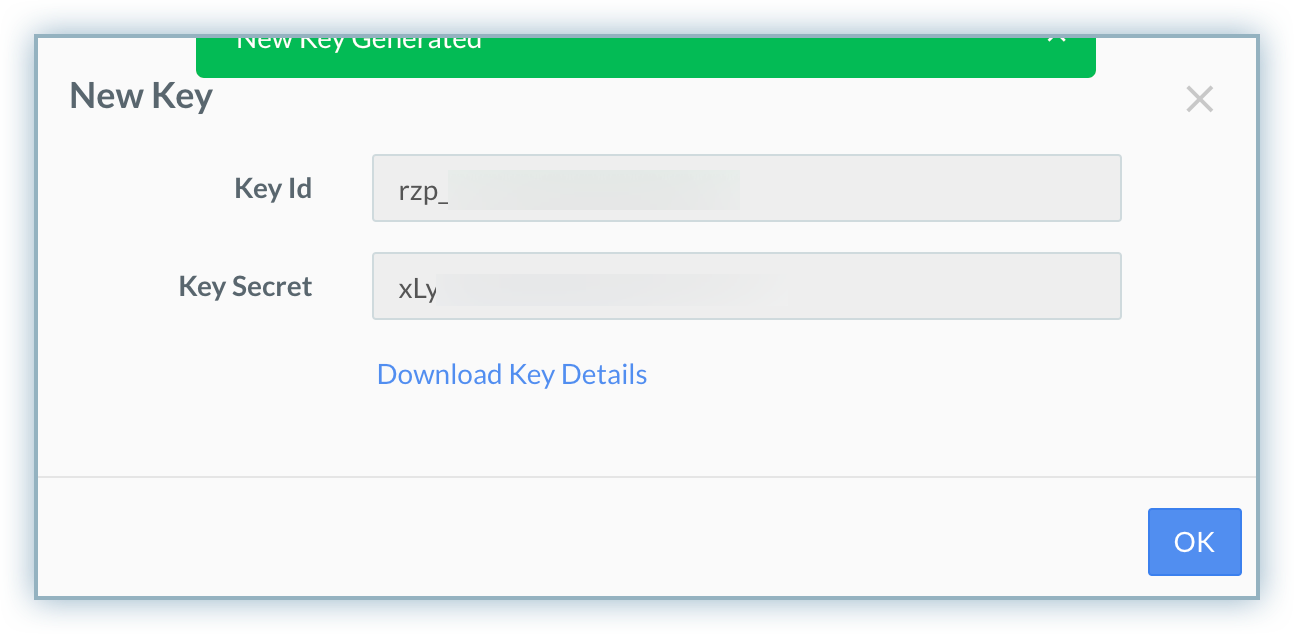
Note:
- The details cannot be viewed at a later time, ensure to make note of the details or utilize the Download Key Details feature to save these details.
- If you chose to regenerate a new Secret Key and Key ID, ensure that you update this to any instances or systems where the old IDs were used to avoid any disruptions.
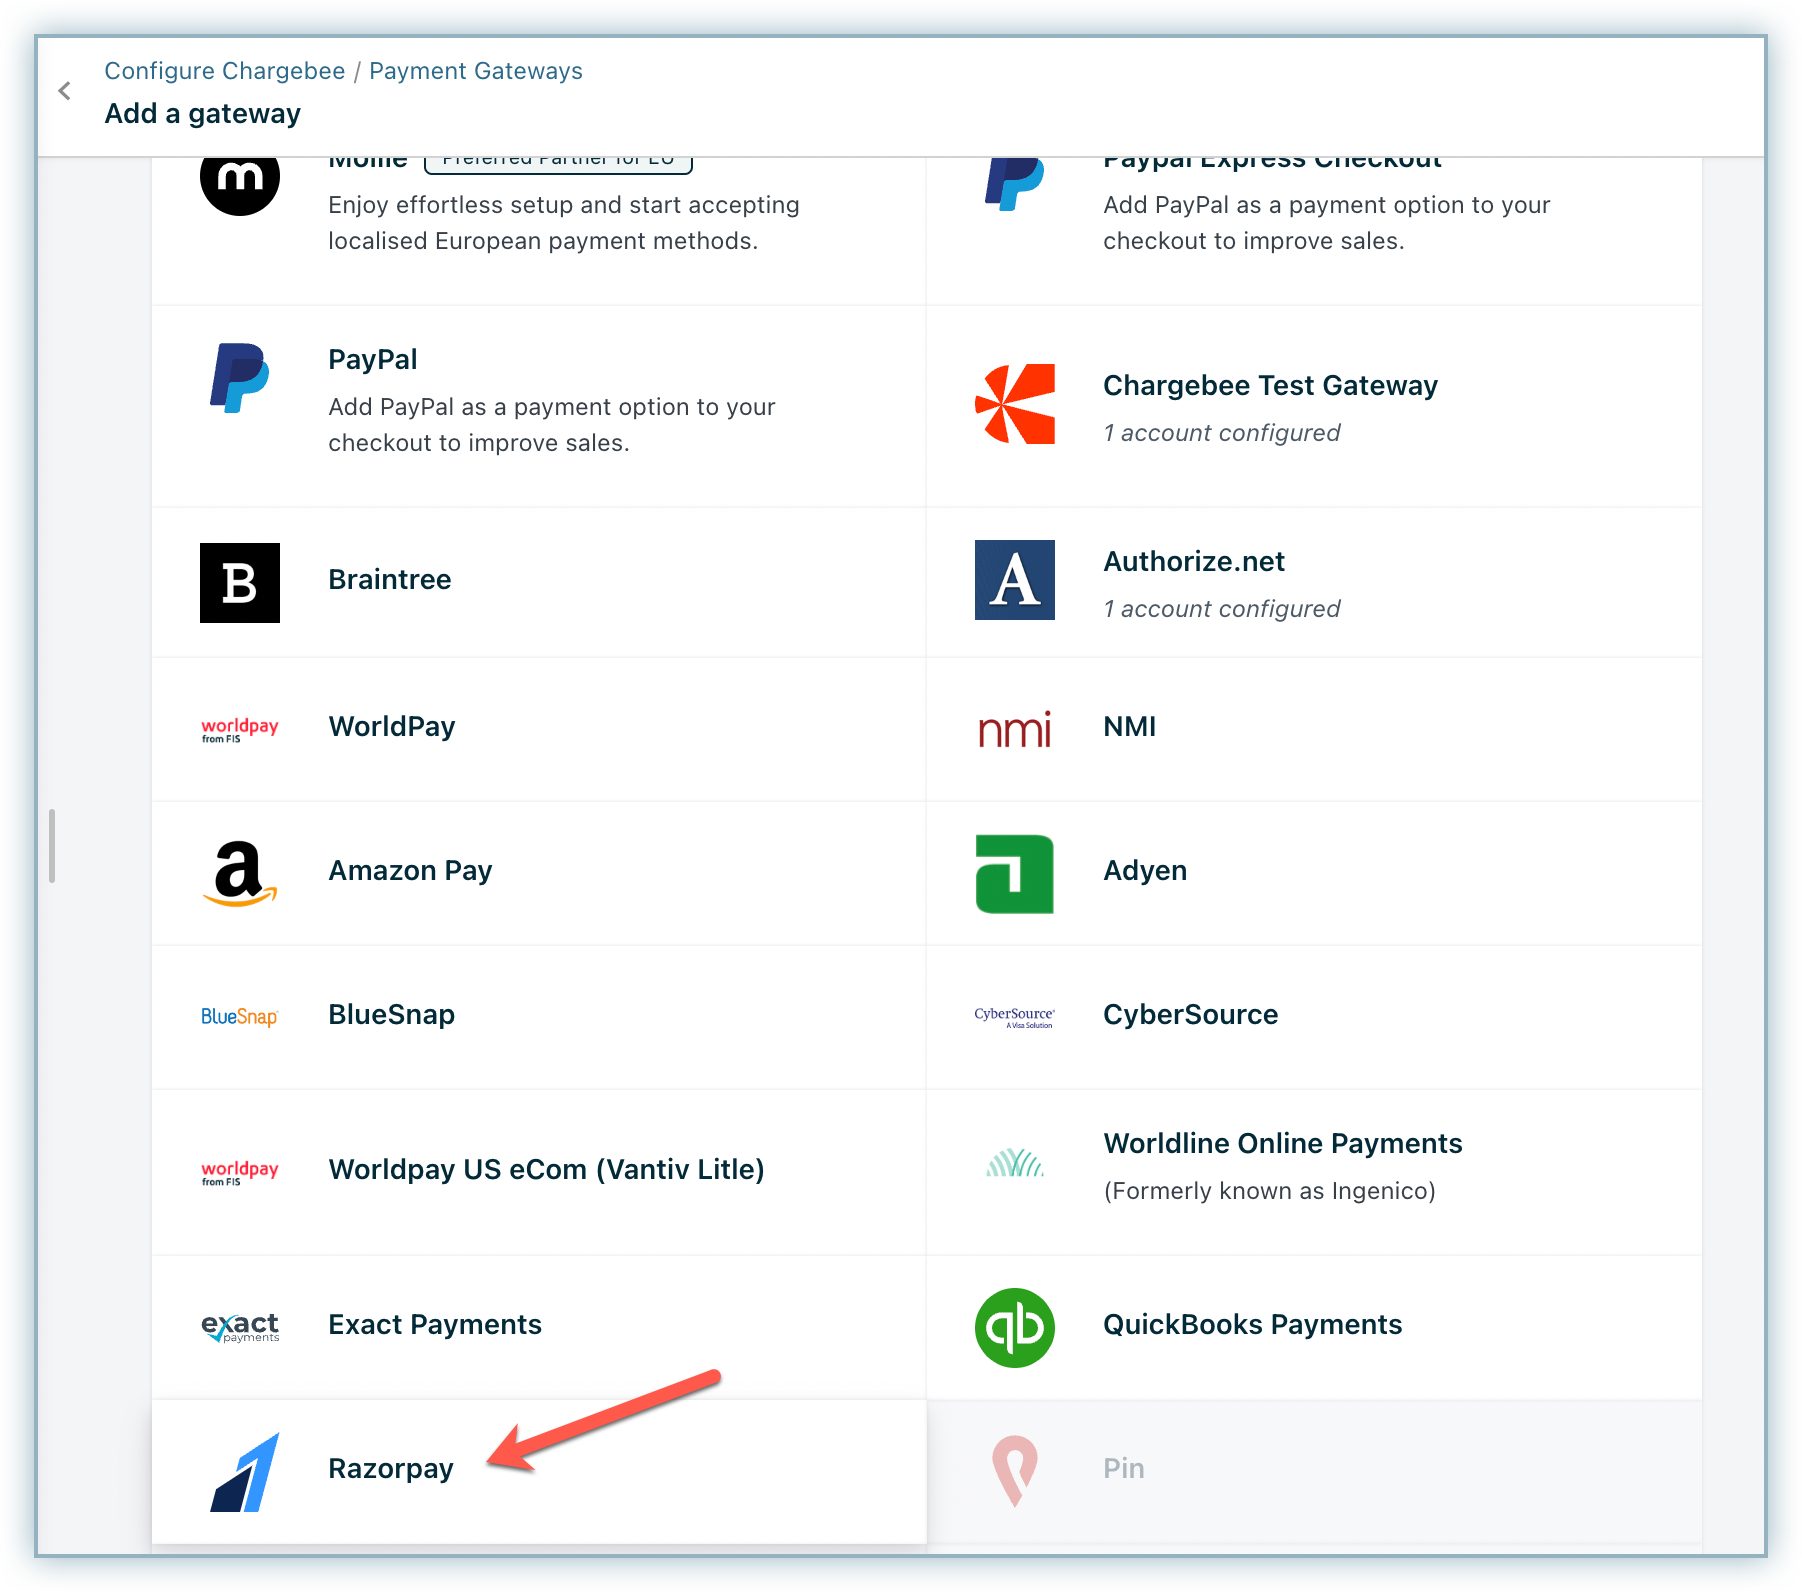
Add Razorpay to Chargebee
Follow the steps below to configure Razorpay with your Chargebee site:
-
Navigate to Settings > Configure Chargebee > Payment Gateways > Add Gateway.
-
Click Razorpay.
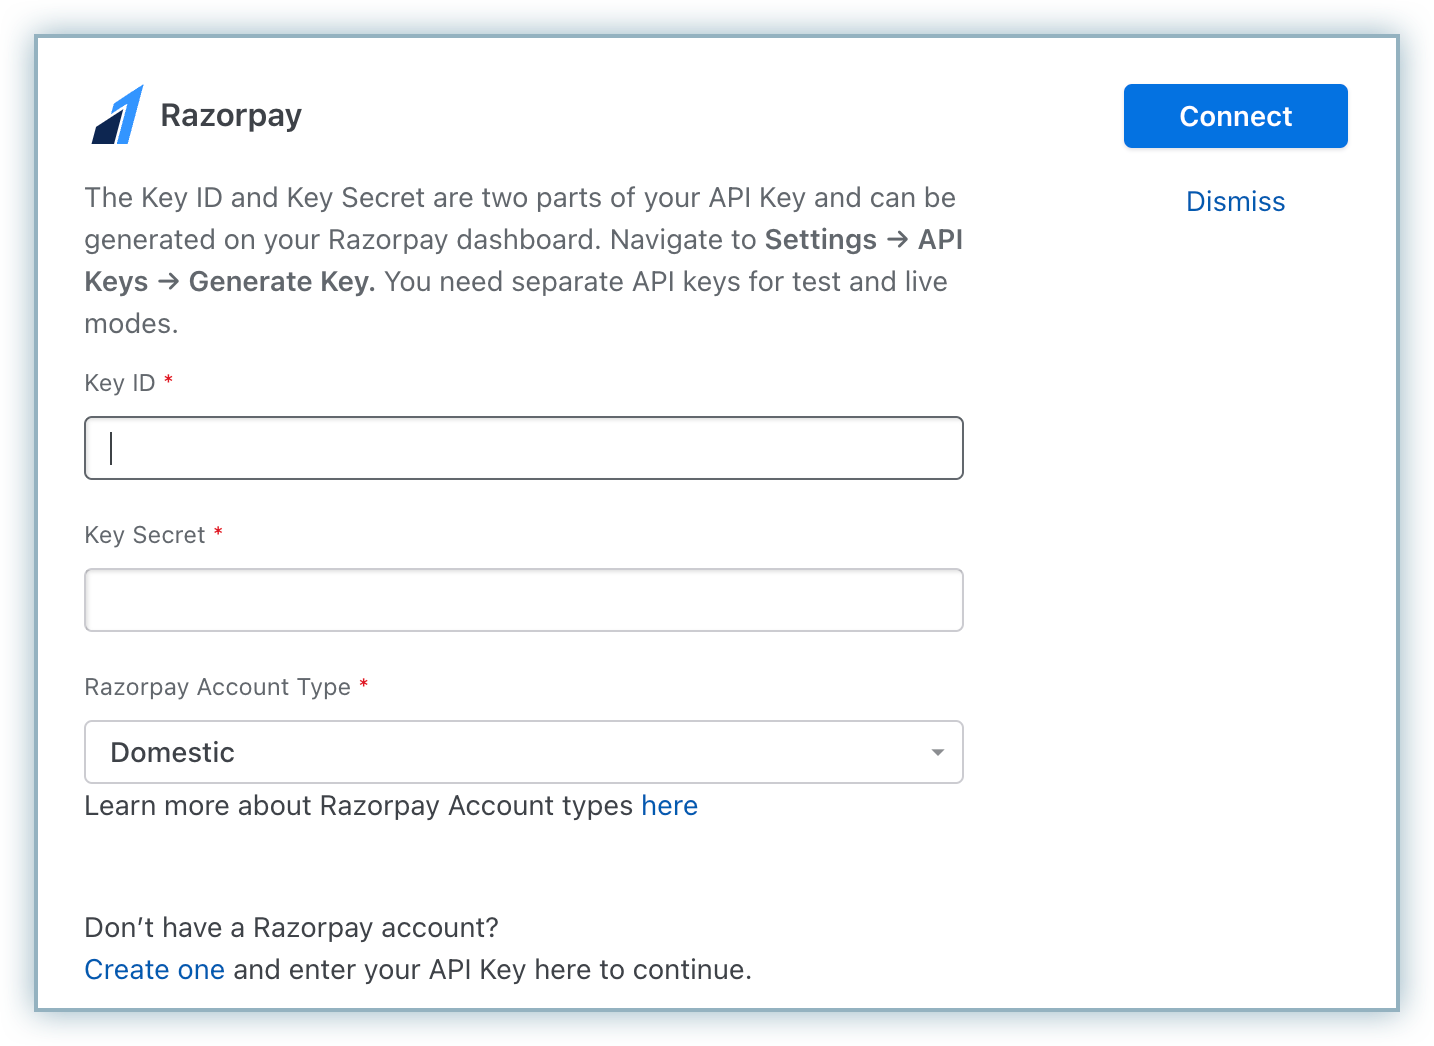
-
Enter the Key ID and Key Secret from your Razorpay account in the applicable fields.
-
Select the relevant account type from the Razorpay Account Type drop-down menu and click Connect.
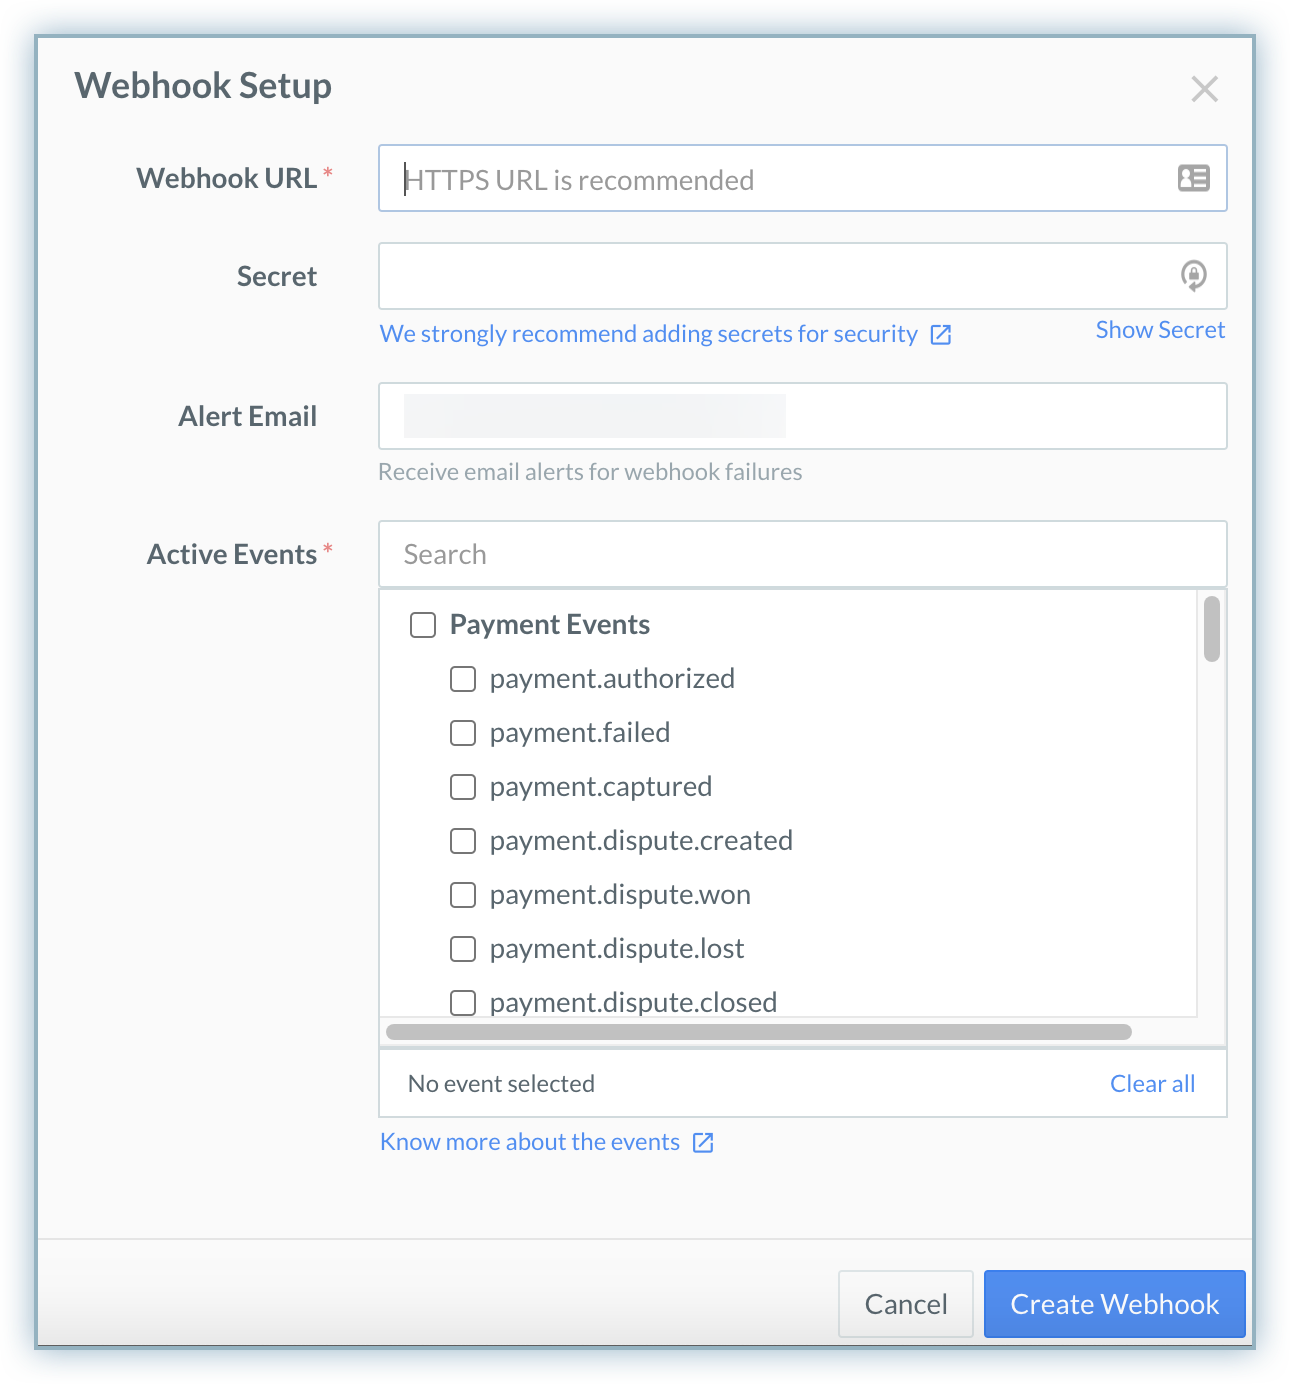
Configuring webhooks
The configuration of the Webhooks is a mandatory prerequisite for this integration to function effectively. Follow the steps below to configure Webhooks:
-
Review the Notification URL and Secret in the Notification URL pop-up, these must be copied to your Razorpay site to ensure that Chargebee receives notifications for all events associated with this account.
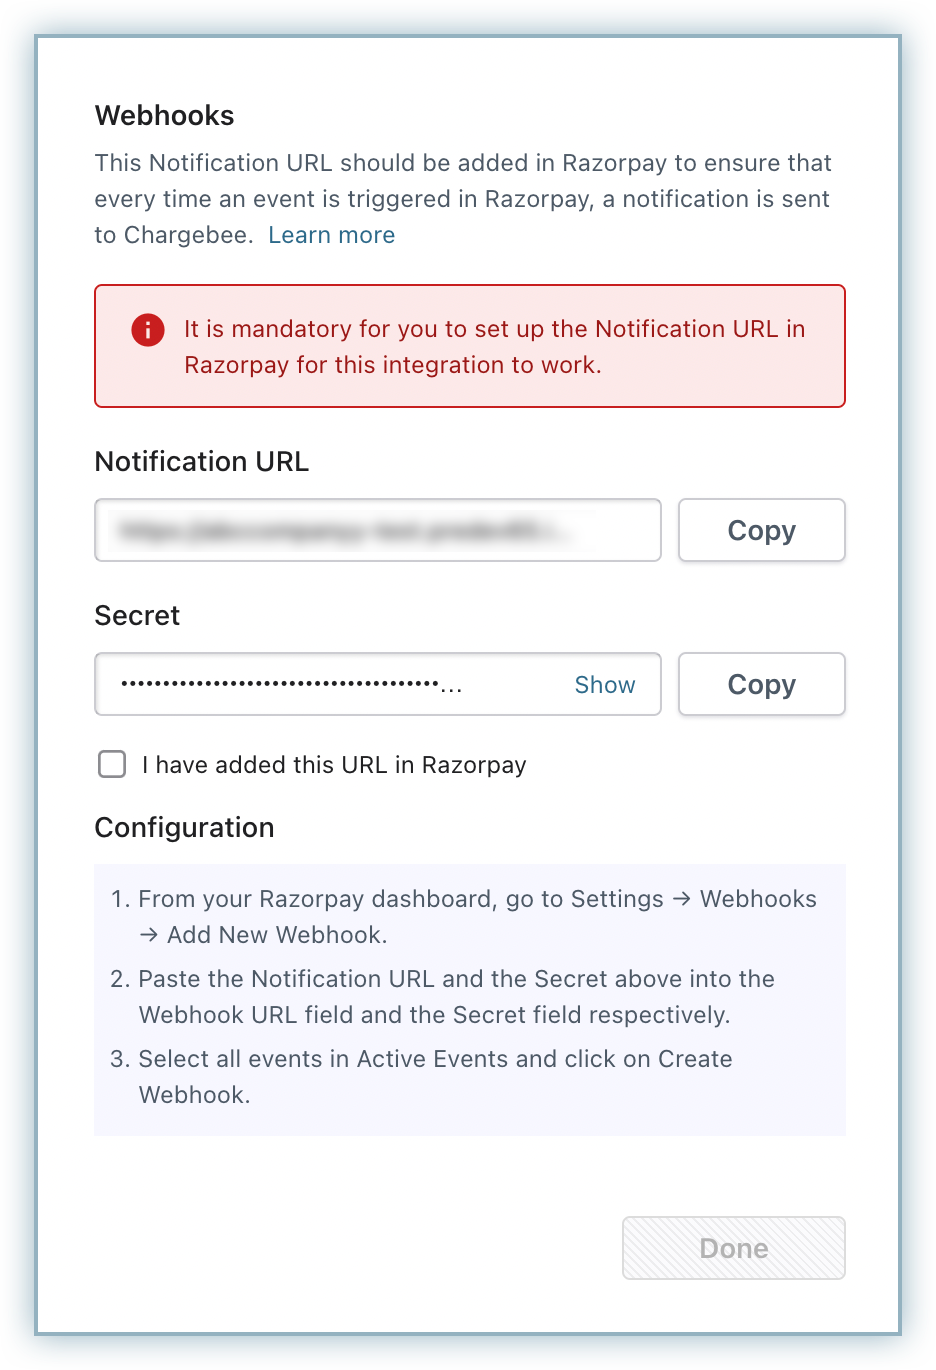
-
Login to your Razorpay account, Navigate to Settings > Webhooks > Add new Webhook.
-
Copy and paste the Notification URL in the Webhook URL field.
-
Copy and paste the Secret from the Notification URL pop-up and check all events within Active events to receive notifications.
-
Enter the email you want to use for webhook alerts and notifications.
-
Click Create Webhook.
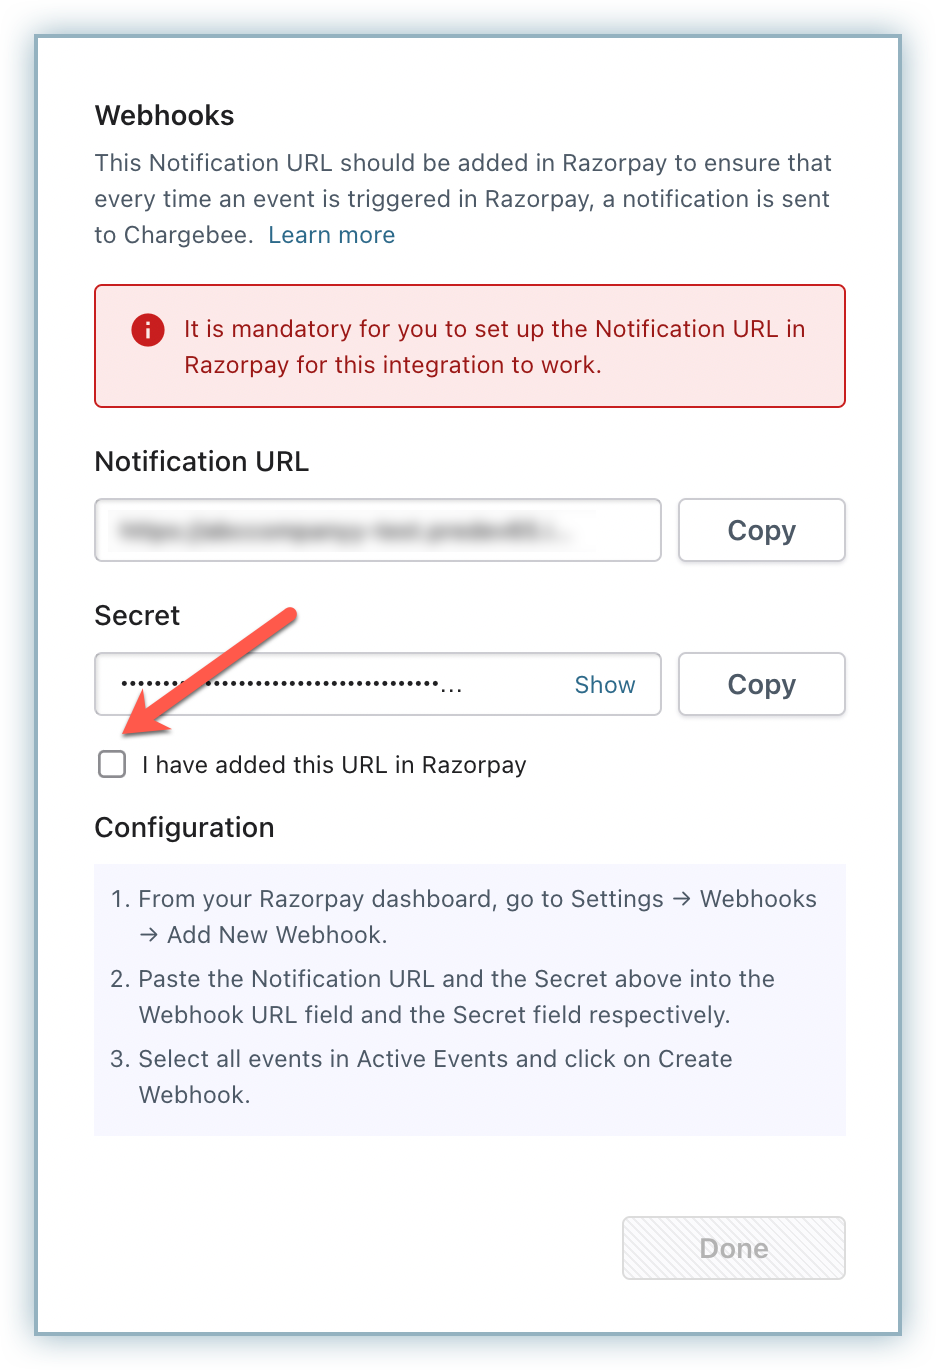
-
Once complete return to the Chargebee configuration page, check the I have added this URL in Razorpay box, and click Continue.
Enable Payment Methods
You can choose to enable the payment methods to support your Razorpay- Chargebee integration. It is important that you ensure the applicable payment methods are enabled in Razorpay.
Netbanking e-mandate and UPI mandate payment methods differ from conventional Netbanking and UPI which are used for P2P or A2A transfers. Chargebee's implementation of Netbanking mandate and UPI mandates are optimized for recurring payments and adhere to limitations prescribed by Razorpay and banks.
Follow the steps below to enable payment methods for your Razorpay payment gateway:
-
Toggle-on the applicable payment methods (Cards, UPI, and Netbanking e-Mandate) you would like to enable for your Chargebee site.
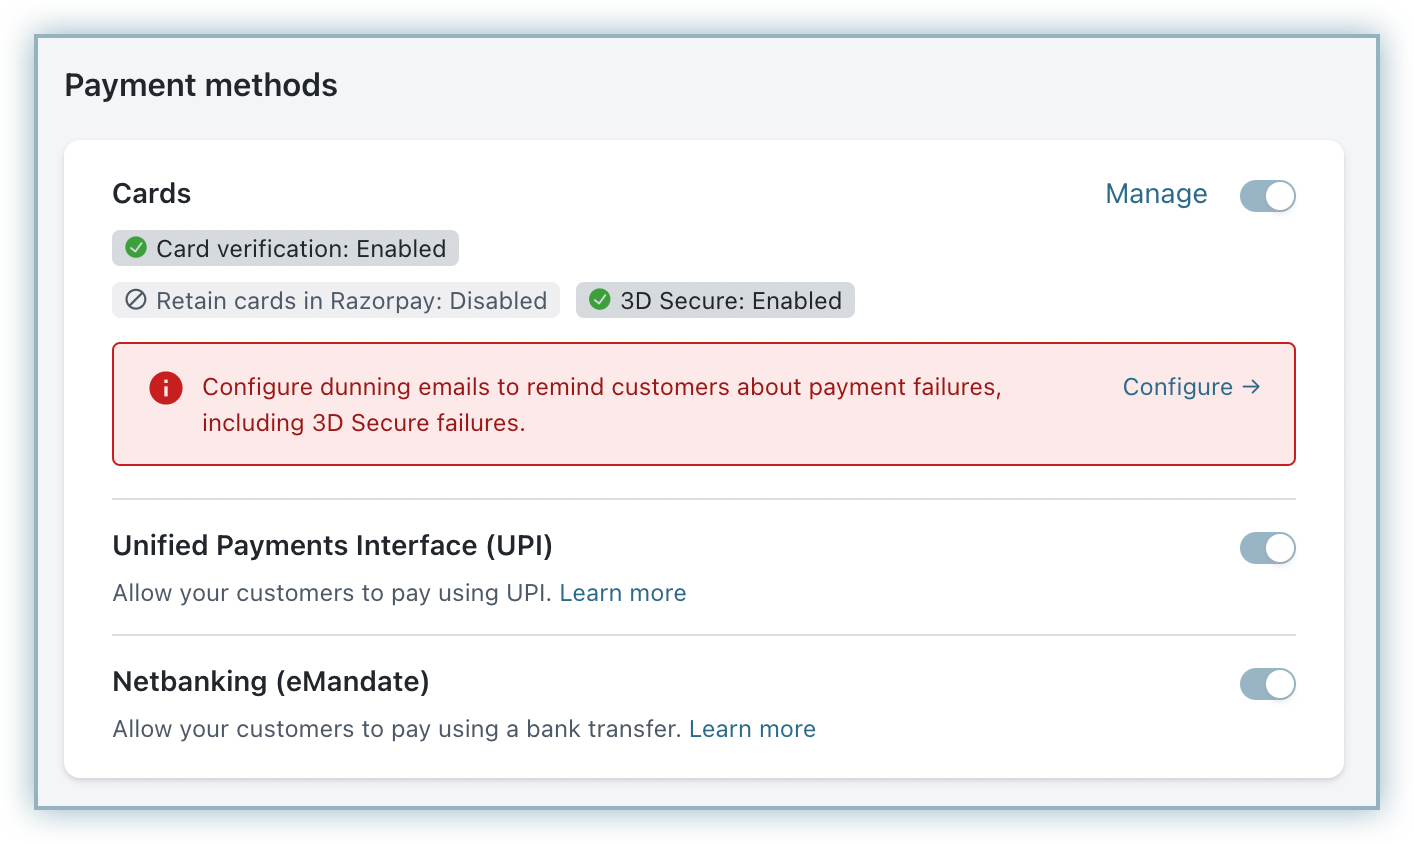
-
Review your Smart Routing settings to choose Razorpay as the preferred gateway for UPI and Netbanking (eMandate) payments. Outcome: The Razorpay gateway is now configured for your Chargebee site.
Processing Card Payments via Razorpay
See also
Click here to review the checkout flow for Netbanking and UPI payment methods.
Customers can choose to process card payments via Razorpay. However, the following conditions will apply:
- Your customers cannot use setup recurring payments if the card-issuing bank does not support e-mandates or is not supported by Razorpay. It is recommended you explore other options such as Netbanking and UPI. Click here to view the list from Razorpay.
- Due to Razorpay's limitation, customers have to add a new payment method on the checkout or Pay Now pages to purchase/set up other subscriptions. Unlike other gateways, their saved payment method (Card or Netbanking eMandate) would not show up on clicking on Pay Now button.
- Upgrades to an existing subscription via Chargebee Portal are not supported. Customers must cancel an existing subscription and buy a new one.
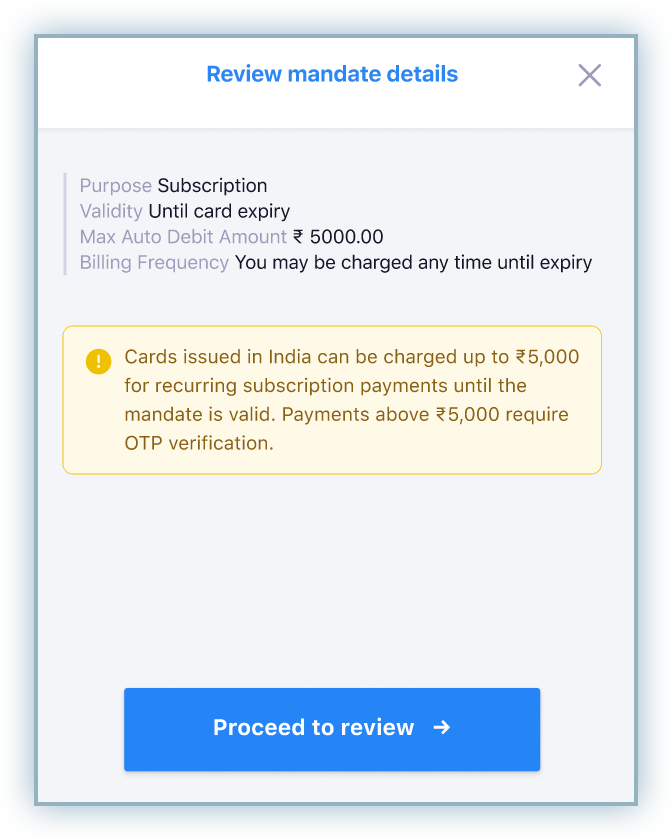
- The e-mandate is setup with the following guidelines:
- The maximum amount is set up to be INR 15,000.
- The validity will cease along with the expiry date of the card.
- Billing frequency is set up to be sporadic, meaning as and when presented.
Checkout Flow
The following steps indicate the checkout process for a subscription while using card transactions:
Note
Click here for the checkout flow associated with Netbanking and UPI payment methods.
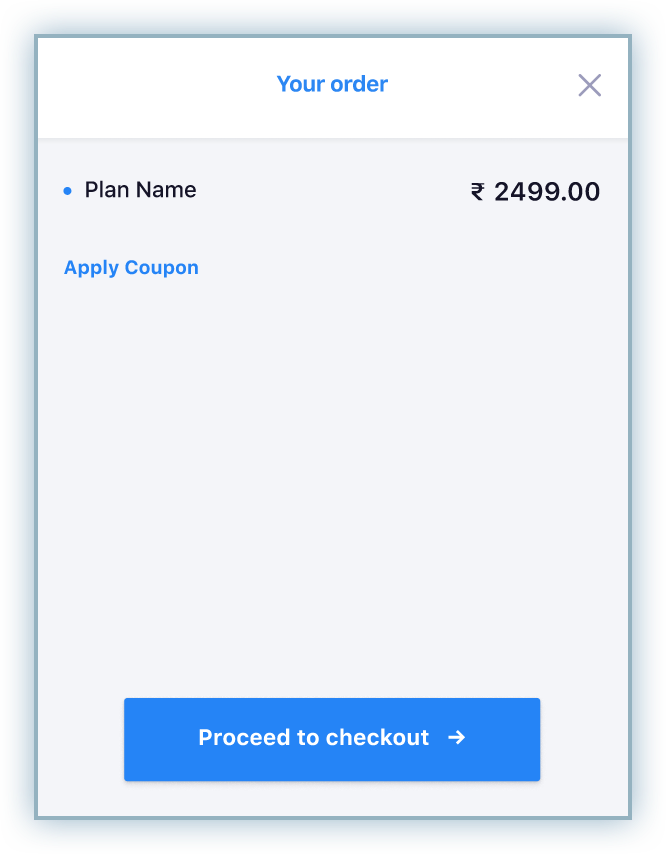
-
Review the order details and click Proceed to checkout.
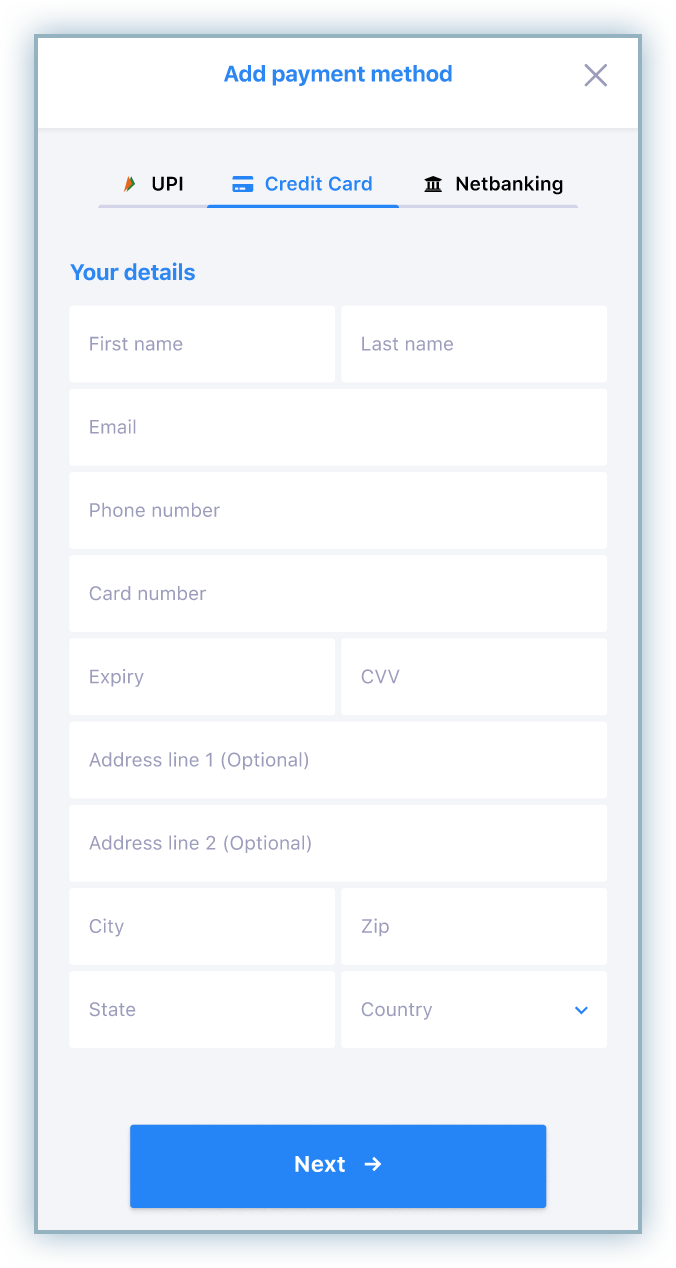
-
Enter your account details and shipping addresses in the subsequent screens to proceed.
-
Click the Credit Card tab and enter the card details into each of the fields. Click Next to proceed.
-
Review the details for the mandate to be set up and click Proceed to review.
-
Click the pay button to proceed to complete your transaction.
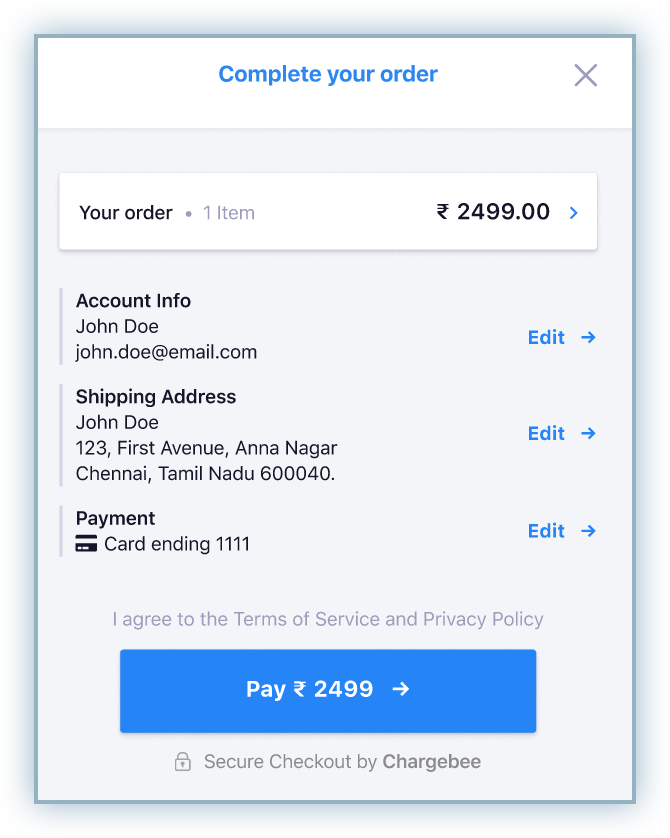
-
Complete the 3DS authentication when redirected to the bank page.
-
Upon successful authentication, customers are redirected to the checkout to confirm the subscription purchase.
Was this article helpful?