GoCardless
GoCardless is a global direct debit platform that allows you to collect recurring payments from your customers' bank accounts and settle them back in your home country, with FX handled automatically.
With GoCardless, you can accept electronic fund transfers such as direct debit payments, ACH, and e-checks from your customers in:
- The US via ACH (Automated Clearing House)
- The UK via BACS (Bankers' Automated Clearing System)
- The Eurozone via SEPA (Single Euro Payments Area)
- Sweden via AutoGiro
- New Zealand via BECS (Bulk Electronic Clearing System)
- Australia via BECS (Bulk Electronic Clearing System)
- Canada via PADs (Pre-authorized debits)
ACH, BACS, SEPA, BECS Australia, BECS New Zealand, PAD, and Autogiro are networks of financial institutions that process payments directly from one bank account to another in a particular country or group of countries.
Creating a merchant account with GoCardless automatically registers you on the BACS network. However, you will have to reach out to GoCardless support to register for other schemes and to accept payments from customers using GoCardless.
Note
- Ensure the corresponding scheme(s) is enabled in your GoCardless account before collecting payments via Chargebee.
- Once you configure the scheme in Chargebee, the corresponding information will be automatically fetched from your GoCardless account.
- GoCardless supports the following currencies: GBP, EUR, SEK, DKK, AUD, NZD, CAD, and USD. You can transact in all these currencies from your GoCardless account.
- Bank accounts cannot be added via the Chargebee Merchant App UI.
Understanding payments via GoCardless
When a customer initiates a direct debit payment, an instruction is sent to their bank to allow an authorized third party (your business, in this example) to collect a certain amount of money from their account.
This section explains what the process looks like from your perspective—everything from how your customer can authorize collection of funds from their bank account to how the GoCardless-Chargebee integration can make things more convenient.
Mandates
If you are using GoCardless, then your customer authorizes your withdrawal of funds from their account using a Direct Debit Mandate.
GoCardless generates a mandate for a particular customer during the checkout process. The funds will be withdrawn from the account after the mandate is verified; the entire process takes a minimum of three and a maximum of five days.
Checkout flow
If you are using the GoCardless-Chargebee integration, you have two options for checkout:
The redirect flow in action:
Here's what the redirect flow would look like from your customer's perspective:
- When your customer is ready to check out, the redirect flow begins. They are navigated from your website to GoCardless' hosted checkout pages, which are fully compliant and available in multiple languages. The first hosted page looks like this:

- After your customer has entered the bank details, they need to confirm them for a mandate to be generated. This mandate authorizes GoCardless to collect this payment and future payments from them on your behalf. The confirmation page will look like this:
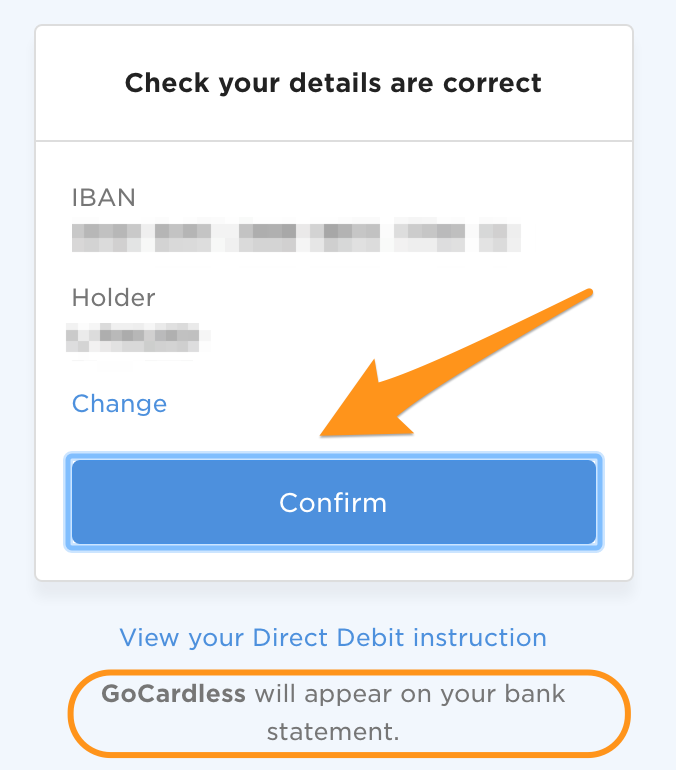
- Once your customer has confirmed that the details are correct, a mandate is generated. It will be verified by GoCardless in three to five days. Finally, a customer object is created in your GoCardless account and their mandate ID is attached for your reference.
Note
Depending on your bank, GoCardless will appear against transactions that your customer makes on your website. If you would like to customize what appears on the bank statements, navigate to Settings > Merchant Settings from your GoCardless dashboard or contact GoCardless support.
In-app flow in action:
If you have enabled the Allow customers to enter bank account details in Chargebee checkout option, your customers will not be redirected to GoCardless during checkout.
Note
- The in-app checkout option can be enabled only if your GoCardless plan supports it. Read more about this here.
Here is how the in-app flow would look from the customer's perspective:
- When your customers check out, they will have to enter their details in the checkout pop-up as shown below.
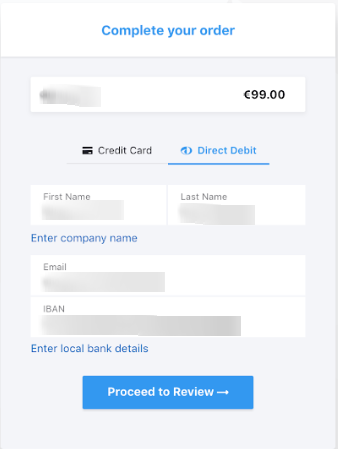
- The authorization agreement along with the payment details will show up.
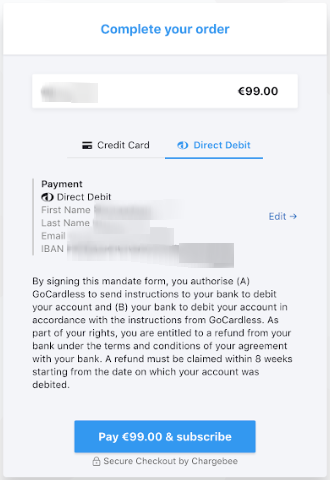
- They will have to click the Pay and Subscribe button to initiate the payment.
Card payments vs. direct debit payments: The waiting period
Unlike card payments, payments via direct debit have a waiting period. This waiting period is typically from three to four business days (five, if the mandate needs to be verified—in the case of a first payment or a one-time payment). Settlement usually doesn't take more than five working days.
Refunds
GoCardless processes refunds via bank transfer since the direct debit networks do not support refunds. Refunds can sometimes fail or be charged back as a result. To avoid this, GoCardless recommends initiating the refund two days after the settlement to avoid refunding a failed payment.
The direct debit workflow
The payment flow on Chargebee looks like this:
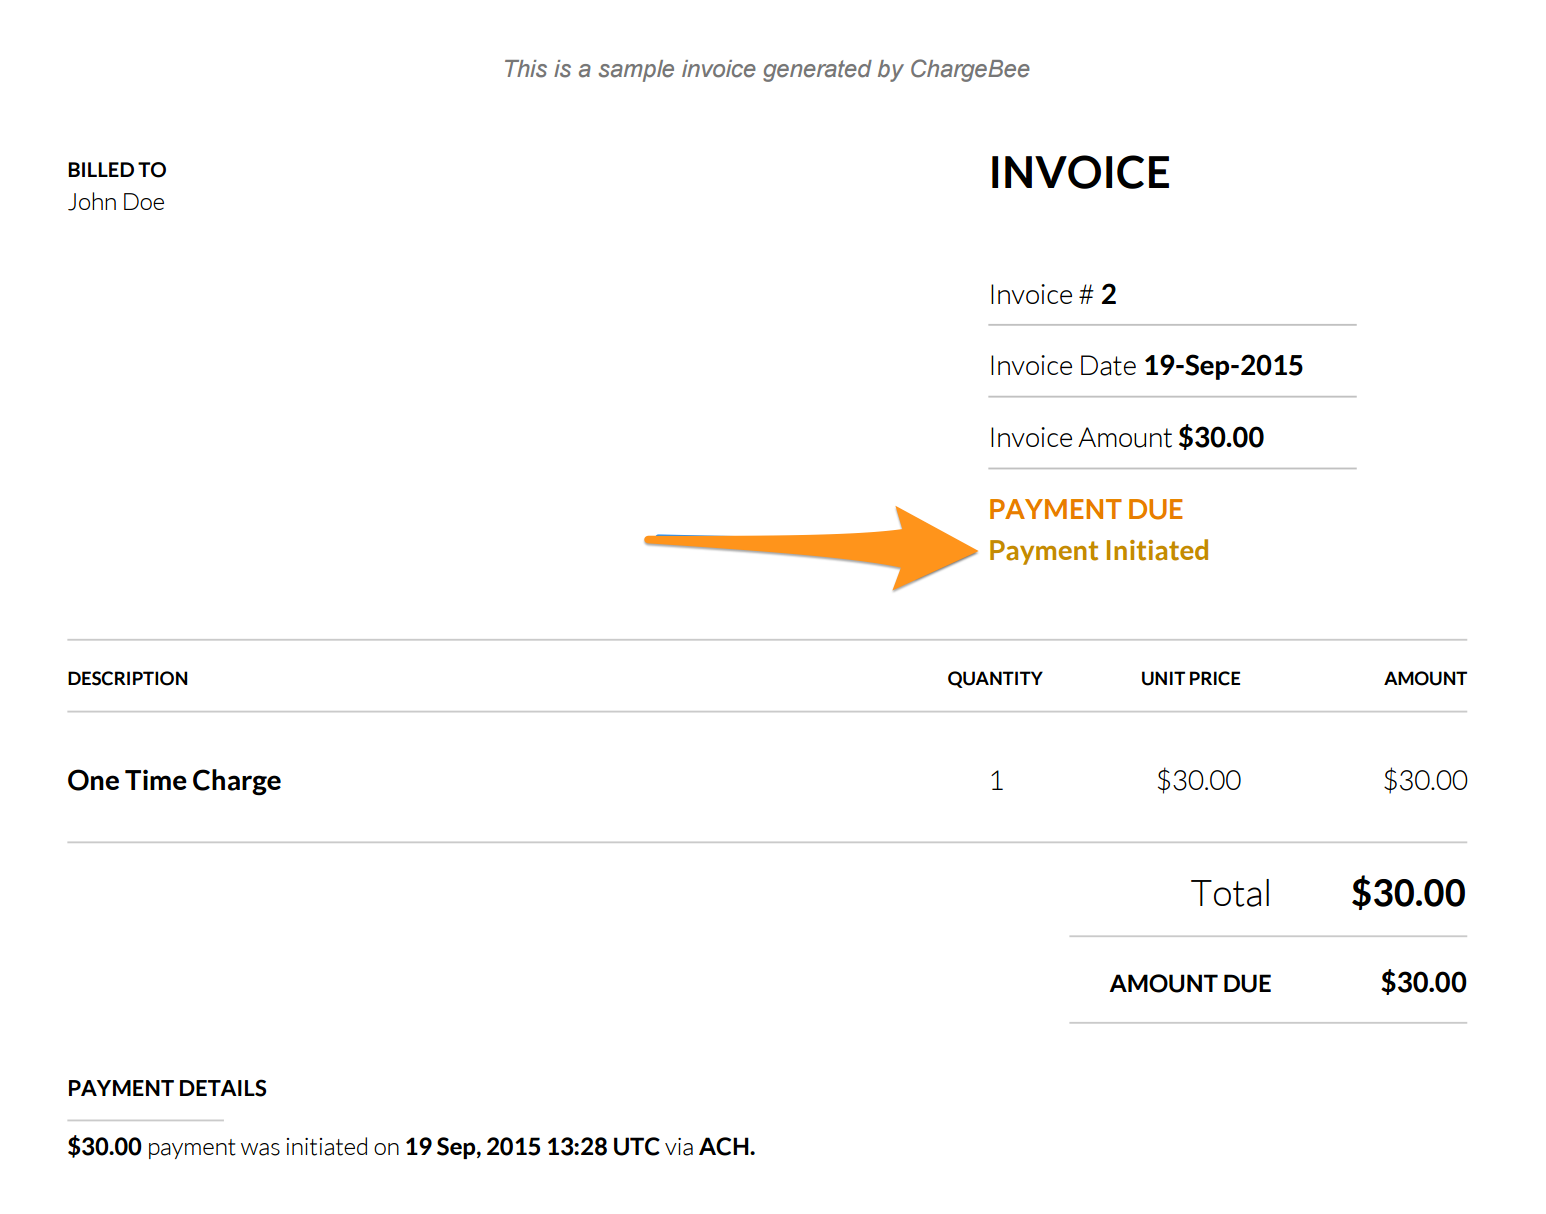
- When a direct debit payment is initiated against a customer (and this holds for both one-time payments and recurring payments), a payment due invoice with a payment initiated tag is created in Chargebee.
- Direct debit payments take between 3 to 5 working days. When the funds are received, GoCardless marks the payment as successful. If they are not, it marks the payment as failed.
- Chargebee is notified of the change in the status of the payment (via webhook) and consequently marks the invoice as either paid (for a successful payment) or not paid (for a failed payment). For more, check out our invoices page.
- In the event of a chargeback, you will be notified with an email from Chargebee. Additionally, Chargebee will add a comment to the transaction in your Transaction details page for reference.
An invoice looks like this:
Configuring your GoCardless Account in Chargebee
Chargebee makes use of GoCardless's OAuth feature to safely connect to your GoCardless account. This means that you will be redirected to GoCardless's login page where all you will need to do is enter your login details to configure your account with Chargebee. If you do not have a GoCardless account, you can create a new one.
Step 1: Navigate to the GoCardless configuration page
Navigate to Settings > Configure Chargebee > Payment Gateways and click Add a Gateway. From the list of payments gateways, select GoCardless.
On the GoCardless configuration page, you have an option to either create a new GoCardless account or connect to an existing account.
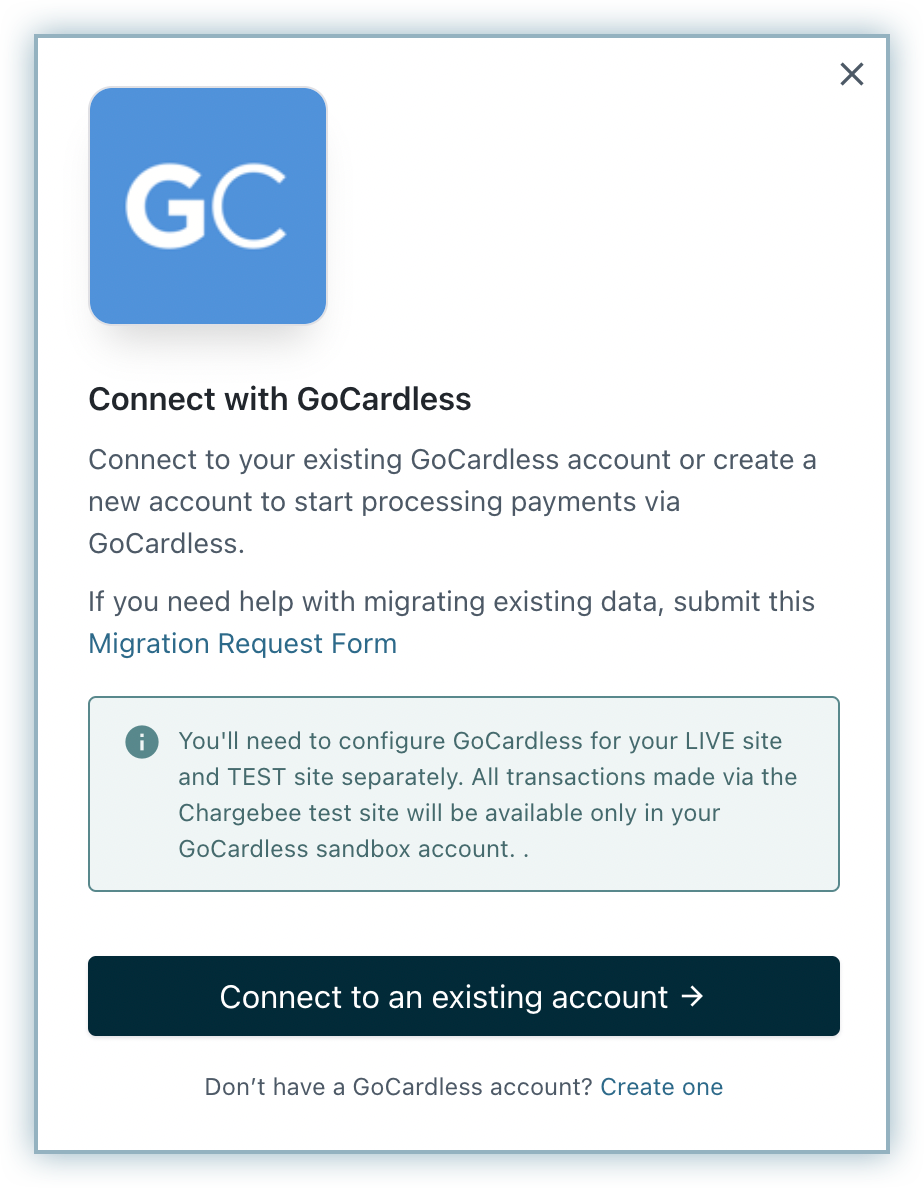
Step 2: Connect to a GoCardless account
Option A Create a new account
If you choose to create a new account you will be redirected to the GoCardless website where you can sign-up for a GoCardless account:
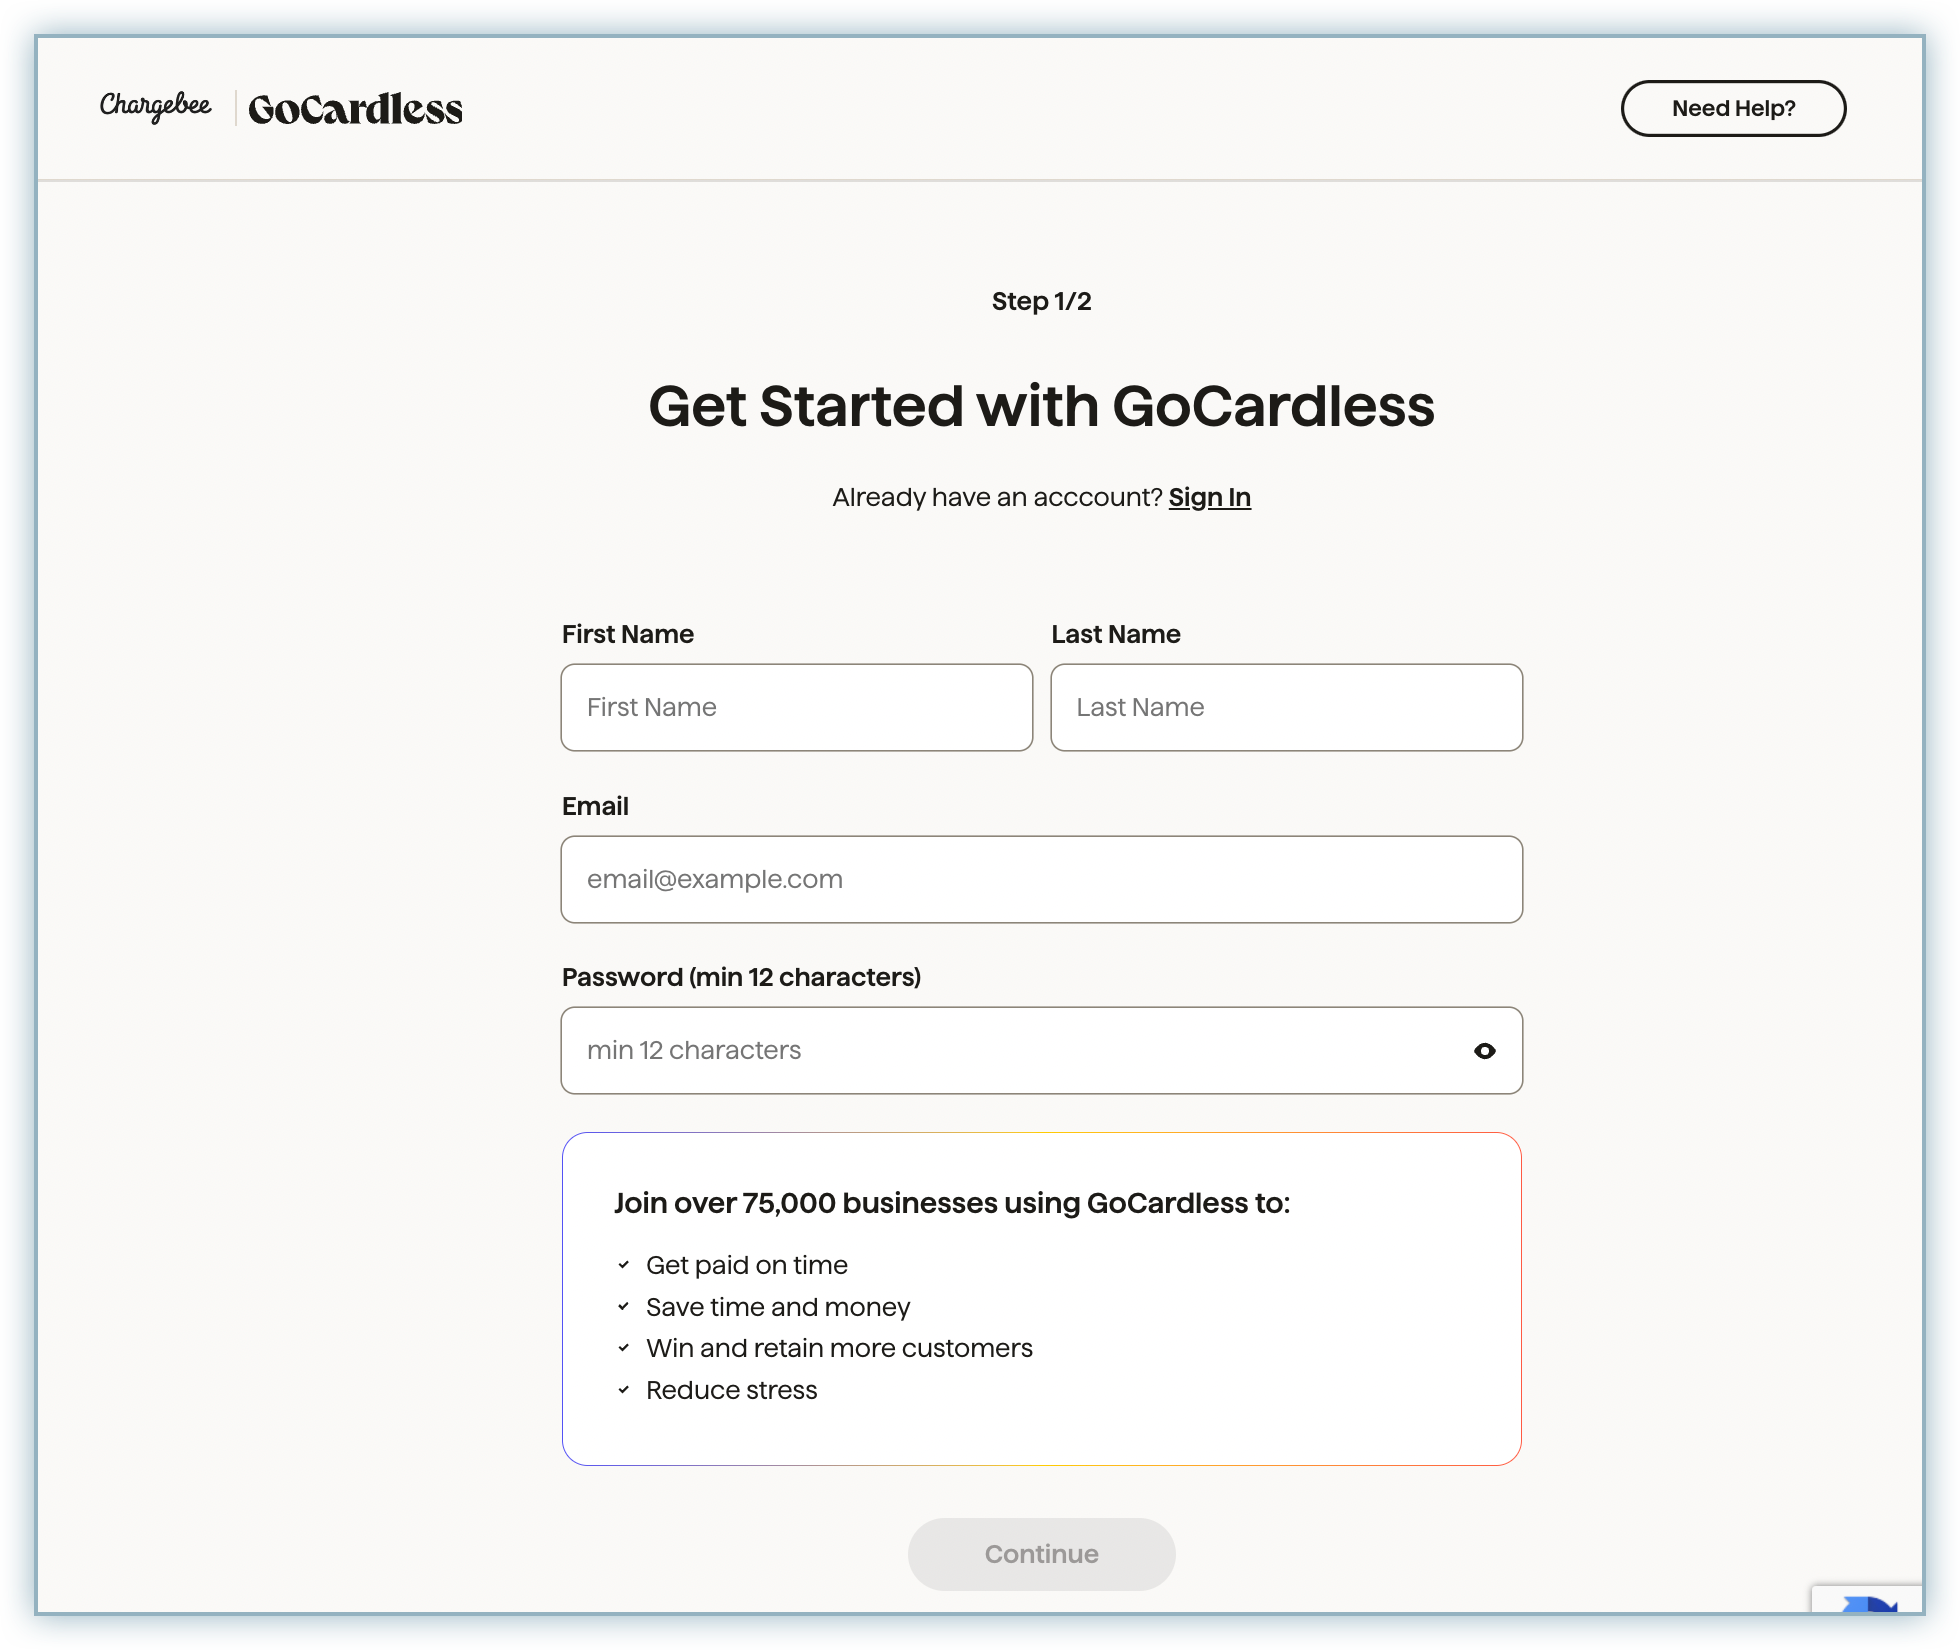
If you are creating a new account, don't forget to complete your setup later. Navigate to Settings > Company Info from your GoCardless dashboard.
Note
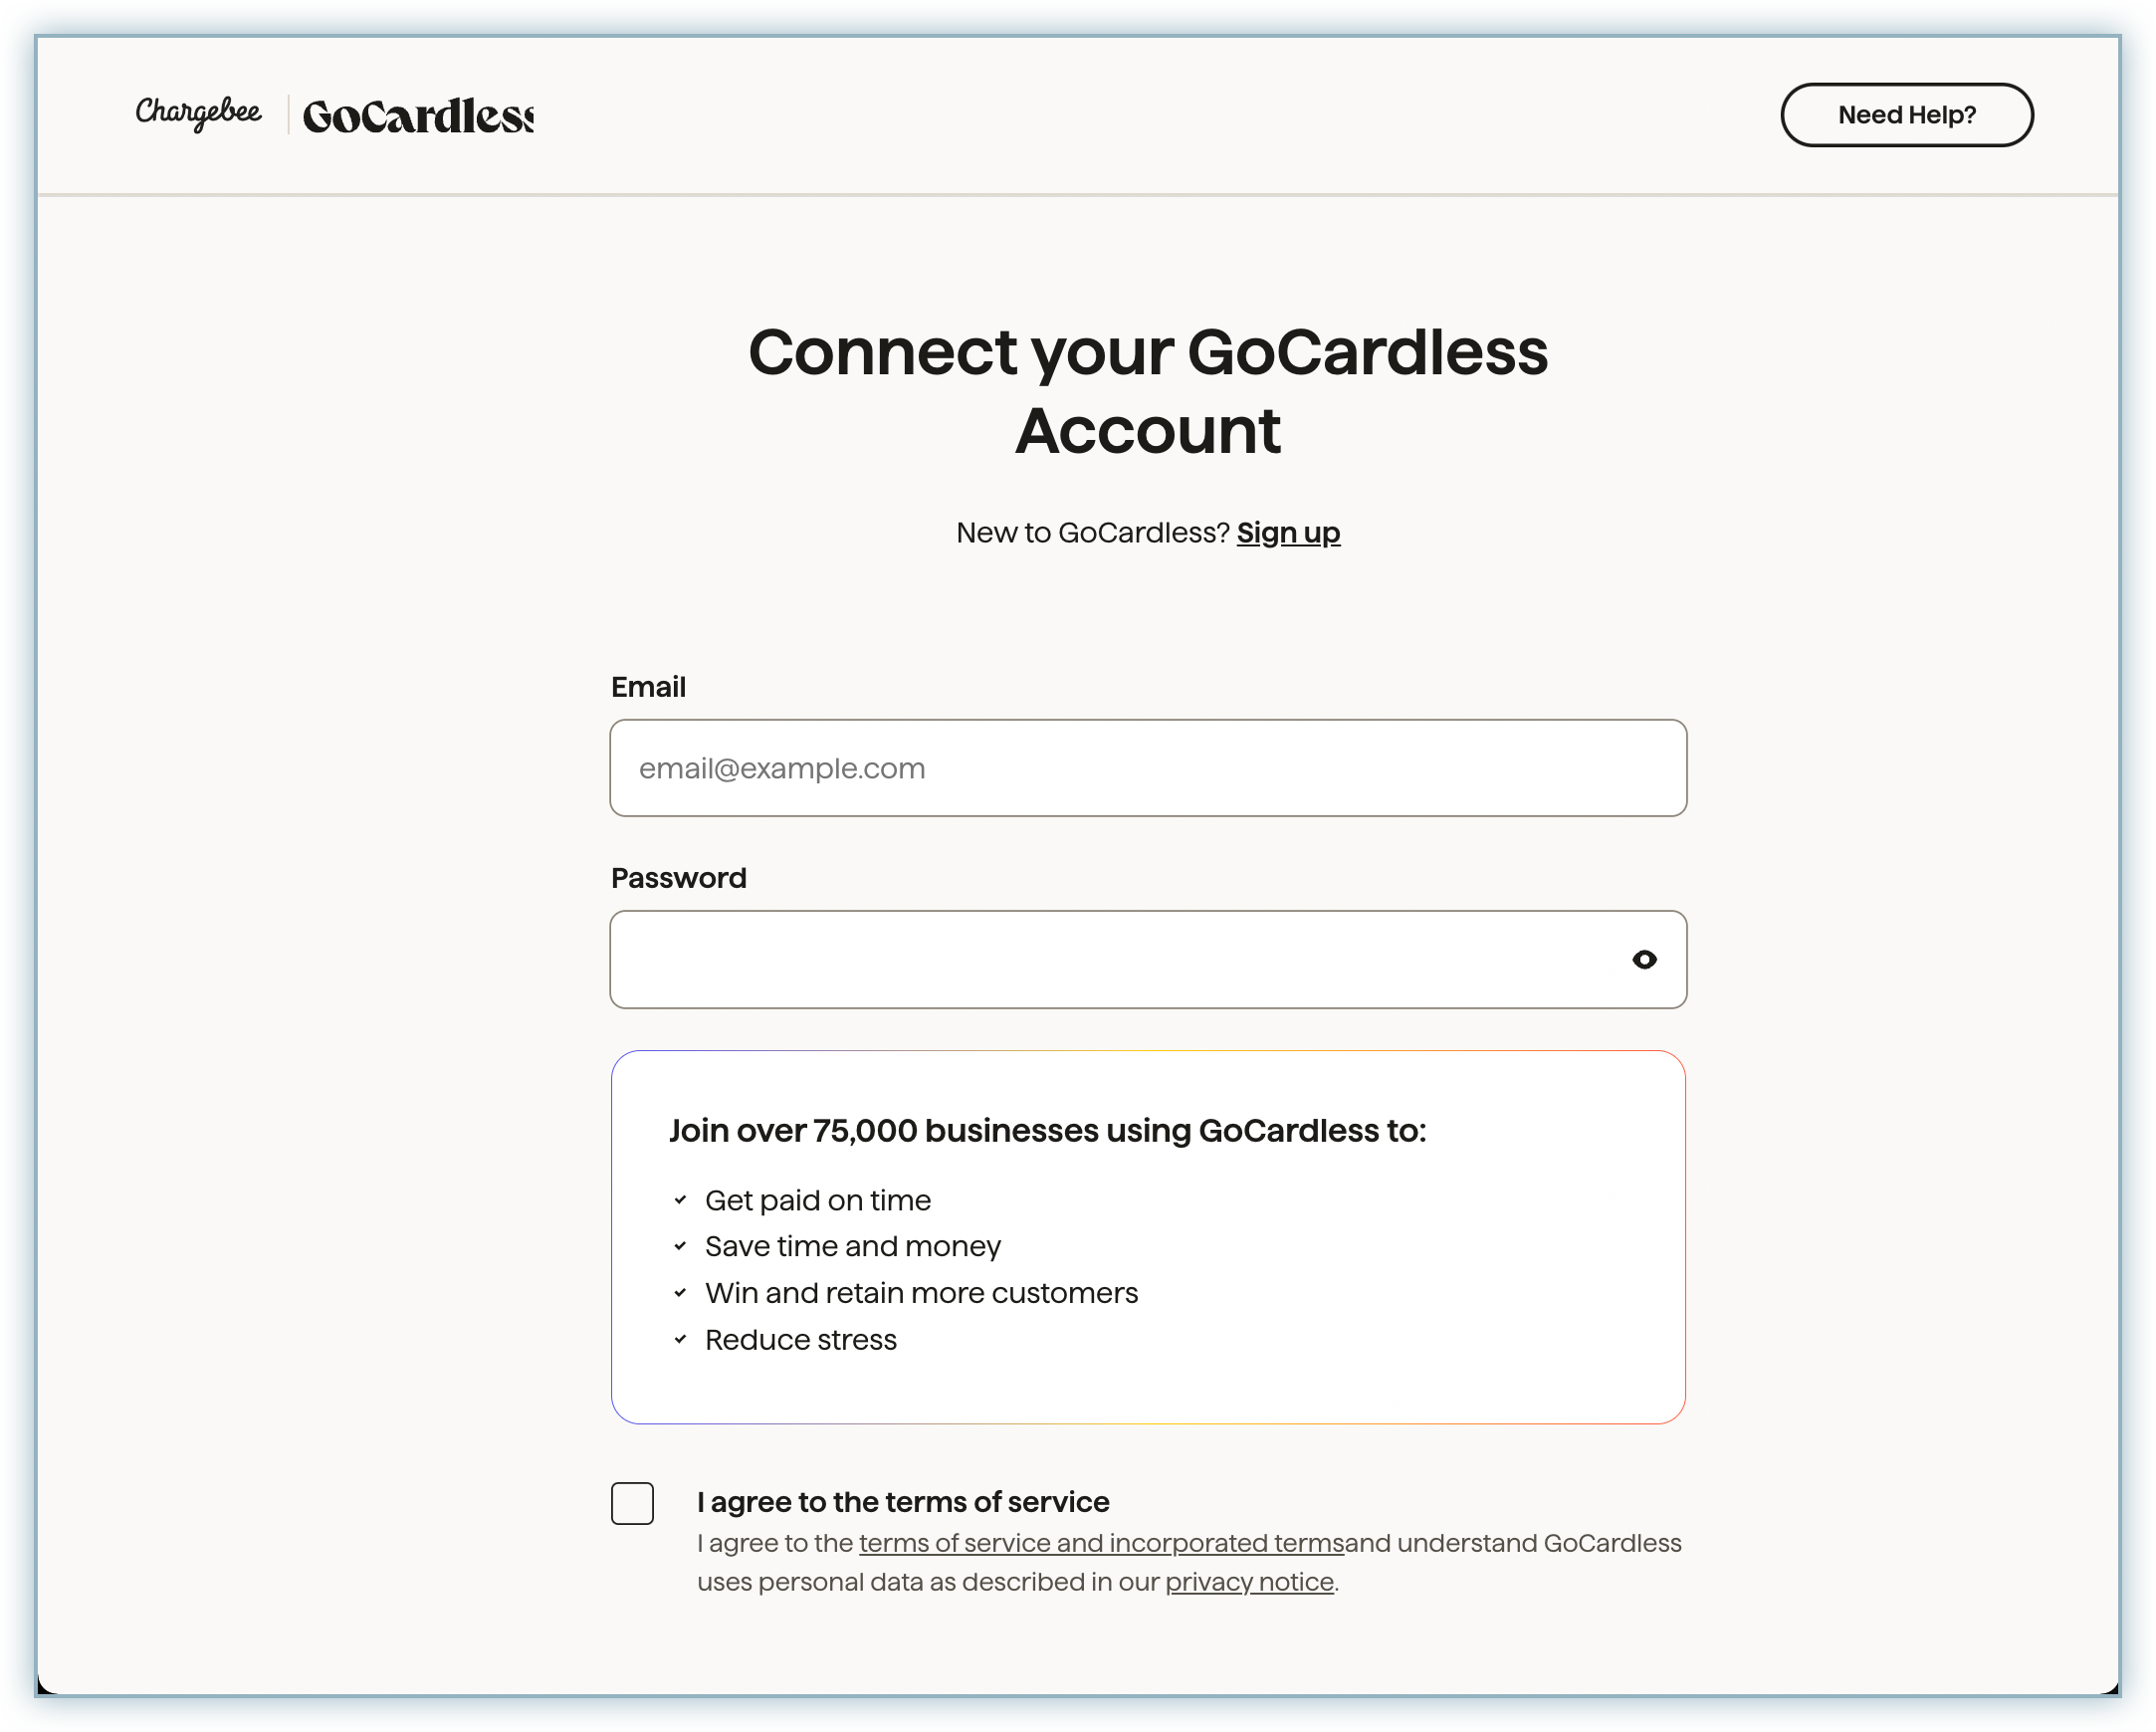
The bank details you enter on this page will be the bank account GoCardless uses to settle any payments that you receive.
Option B Connect to an existing account
If you choose to connect an existing account, you will be redirected to the GoCardless login page. When you authenticate your account with your unique username and password, it will connect to Chargebee automatically.
Step 3: Configuring your account
The Configure your GoCardless account page will open as shown below.
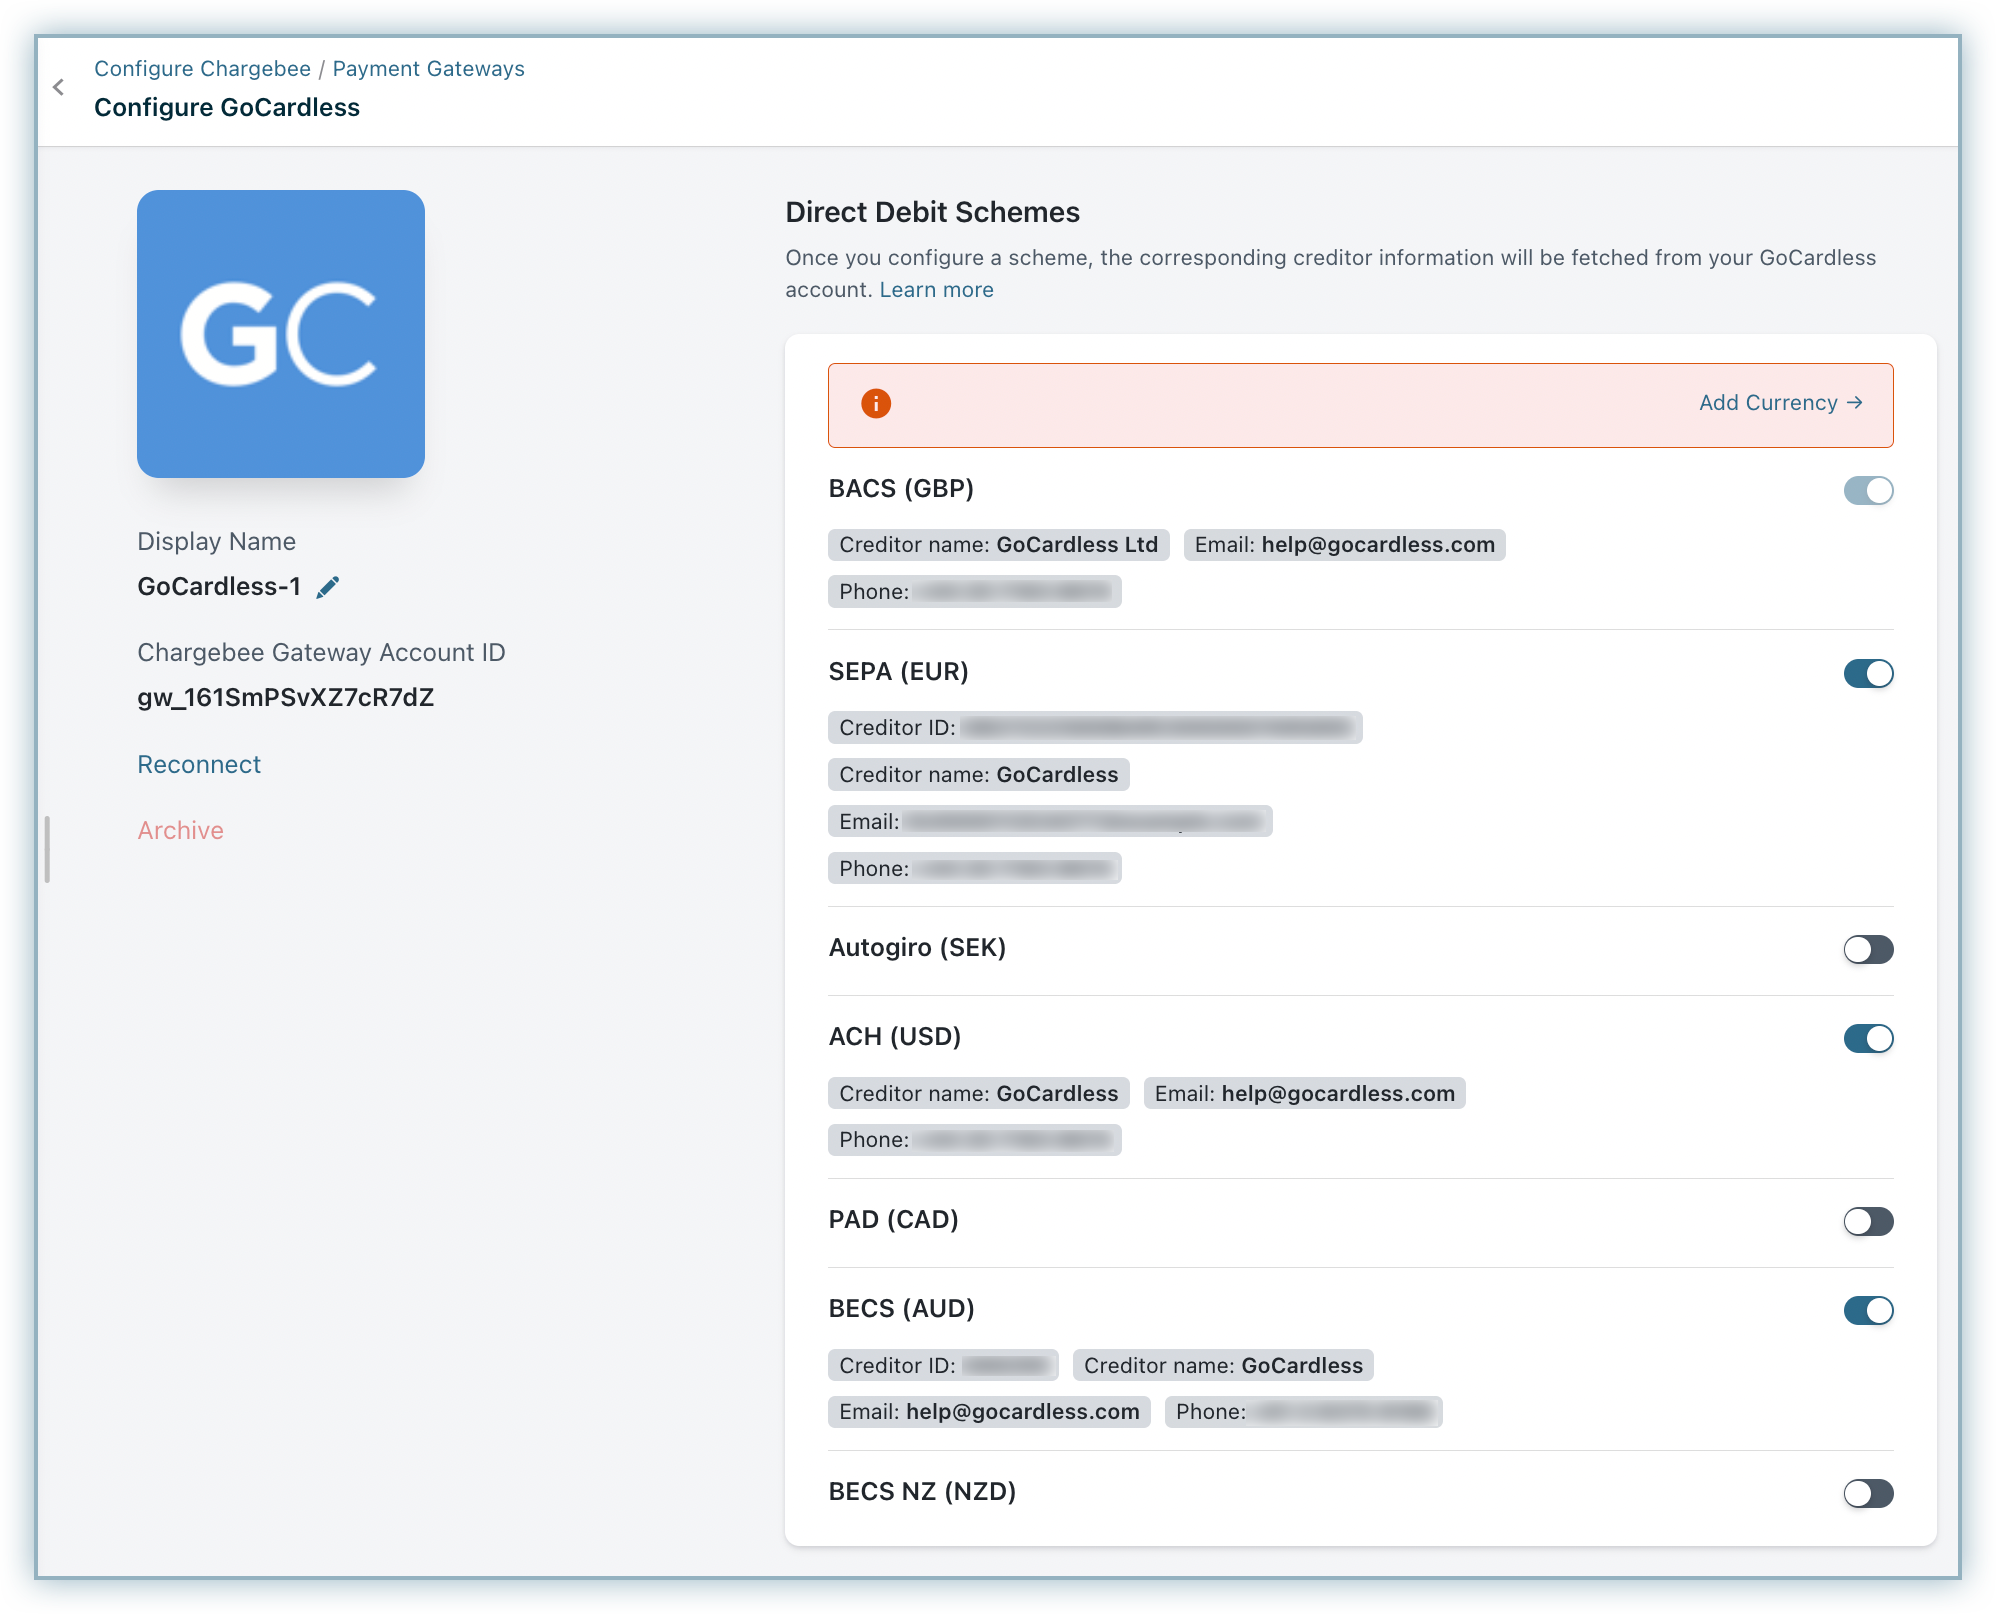
- Select the Direct Debit Scheme for which you want to collect payments via GoCardless. Once you configure the scheme, the corresponding creditor information will be automatically collected from GoCardless.
Note
Customers in the Starter plan will be able to use only one payment gateway for a payment method. Therefore, if you have setup SEPA via Stripe, you cannot set it up in GoCardless. Please upgrade to a [higher plan] to use this feature.
-
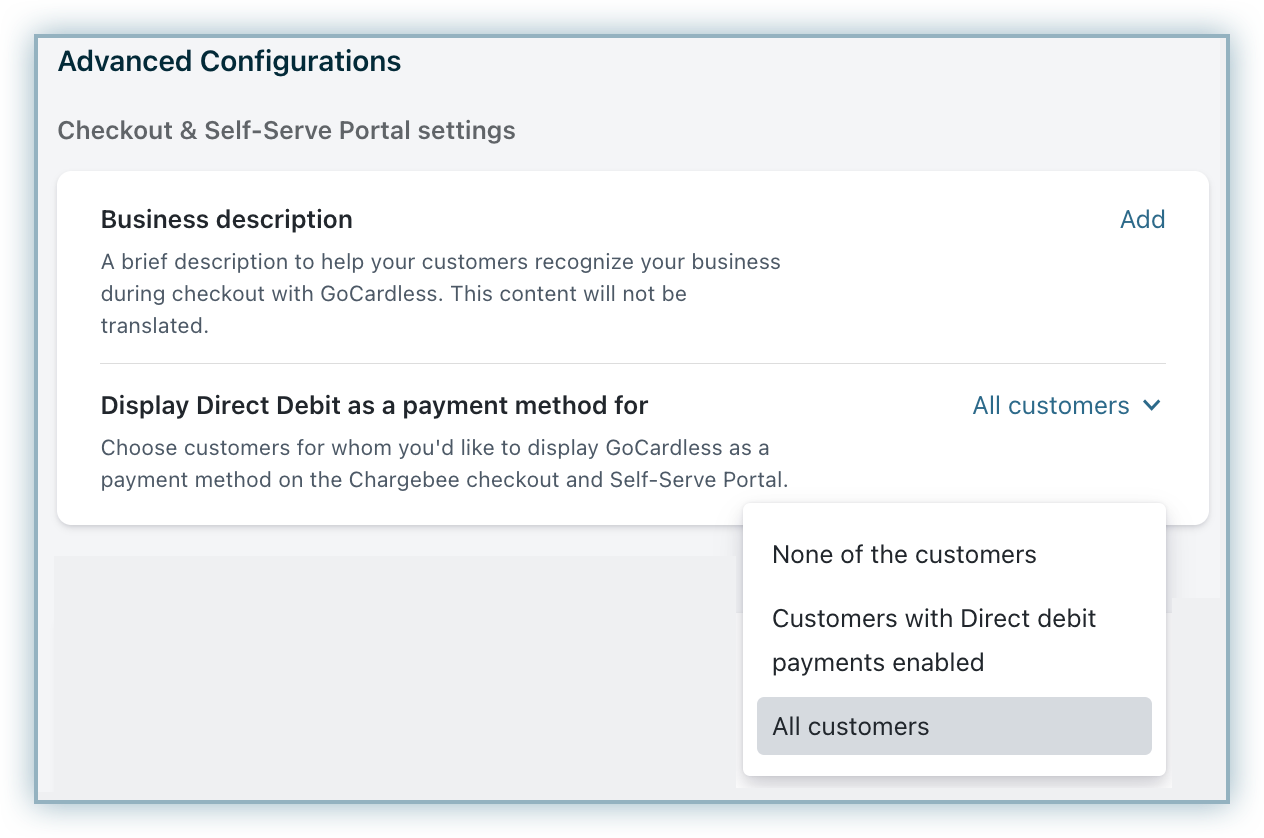
Enter your Business Description. This message will appear to your customers when they are redirected to GoCardless's hosted pages.
-
Depending on when you would like GoCardless to appear on your hosted pages, you can set the Display Option For to one of the following:
-
None of the customers: Choose this option if you do not want GoCardless to appear as a payment method option for any of your customers.
-
Customers with Direct Debit payments enabled: With this option, GoCardless will appear only if you have manually enabled the Allow this customer to pay via his/her bank account option on a customer's details page in the web interface.
-
All customers: Choose this option if you want GoCardless to appear as a payment method for all of your customers on Chargebee's hosted pages and Customer Portal.
-
Advanced Features
Based on your plan in GoCardless, Chargebee offers certain advanced features that will enhance the user experience for your customers. To enable advanced features, you must have subscribed to a GoCardless plan that supports custom email notifications and custom payment pages.
Please contact support to enable the below-mentioned advanced features.
-
In-app checkout flow: Customers can make their Direct Debit payment from the Chargebee checkout page itself. Learn more.
-
Custom Emails: It is a regulatory compliance to notify your customers regarding mandate creation and payment pre-notification. You can either choose Chargebee or GoCardless to send these emails. Sending these emails from Chargebee enhances the experience for your customers and allows you to maintain your brand identity in these emails.
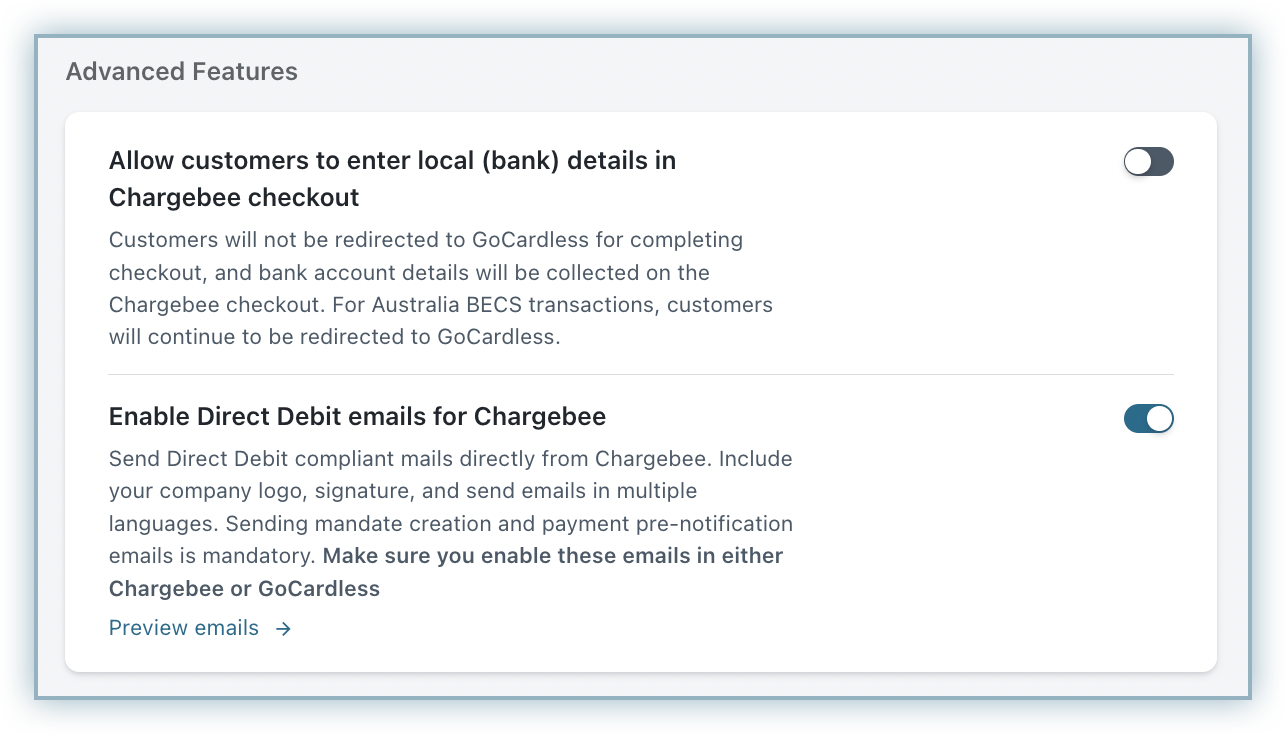
Read more about the email notifications.
Reconnecting to your GoCardless account
In the event that your GoCardless account gets unexpectedly disconnected with Chargebee, you can use the Reconnect option on the integration page to re-establish a connection. Use this option to troubleshoot transaction failures with the message access token not active, as a faulty integration is usually the cause of these.
Using Chargebee and GoCardless
New Customers
Once you have configured your GoCardless account with Chargebee, your customers can begin to pay you via direct debit. Here's how you can allow new customers to pay you via GoCardless.
Option A Use Chargebee's Hosted Pages
If you have chosen New & Customers with Direct Debit payments enabled as your Display Option For on the GoCardless configuration page then GoCardless will appear as a payment method on Chargebee's checkout page.
Here's what the flow is going to be like:
-
Upon clicking the Direct Debit/GoCardless option on the checkout page, your customers will be redirected to GoCardless' hosted payment pages if you have not enabled the advanced features.
In case you have enabled the advanced features option, your customers can checkout using Chargebee's interface itself.
-
They will have to enter and confirm their bank details. Then, they have to authorize the withdrawal of funds from their account towards this payment and upcoming payments.
-
GoCardless generates a Direct Debit Mandate to your customer, for authorisation and confirmation.
-
Once GoCardless sets up a direct debit successfully with the customer's bank, the funds will be withdrawn; the entire process takes a minimum of three and a maximum of six days.
A customer object will be created in Chargebee, fully equipped with all the details that your customer has just entered. Once this customer object exists, Chargebee will take over sending payment instructions to GoCardless i.e. you will be able to initiate payments against the customer directly from Chargebee.
Note
If your customer chooses to use GoCardless as a payment method on checkout, the Allow this customer to pay via his/her bank account option in the respective customer's details page will be enabled automatically.
Option B Use Chargebee's API
If you don't want to use Chargebee's hosted pages or you have chosen Customers with Direct Debit enabled as your Display Option For on the GoCardless configuration page, you can use this option to create a customer and add payment details in Chargebee.
Once you have configured your GoCardless account with Chargebee, you can use the create a customer or create a subscription parameters to create a customer on Chargebee before you initiate the mandate verification procedure.
Note
Remember to pass the allow_direct_debit=true field or click the Allow this customer to pay via his/her bank account option in the Customer Details page.
Once the customer is created, you have a few options on how to proceed. GoCardless will create a mandate and verify it in three to five days. You can add your customer's bank details using one of the following options:
-
You can request that you customer add a payment method. Navigate to Customers > [Customer Name] > Request Payment Method. An email will be sent to the customer with instructions on how to add or update payment information.
-
Ask the customer to add a payment method via the customer portal.
-
Generate an Update Payment Method URL and forward it to the customer to use.
A webhook will reach Chargebee if the customer updates their payment information. Assuming that a mandate has been generated, Chargebee will set the customer's status to Pending Verification. The status will move to Active after the customer's mandate has been verified and their payment has been processed.
Information
- GoCardless will notify Chargebee if the verification of the mandate fails, expires, or gets cancelled. In this case, Chargebee will mark the payment method as INVALID and the whole process must be repeated.
- In case of payment failure during renewal, GoCardless will notify Chargebee. Chargebee will retry charging the customer at three different intervals, if Dunning has been enabled. If the payment is not collected or Dunning is disabled, the final action set in the Dunning settings will take place.
Note
Your customer will be able to make use of your service as soon as their bank details are confirmed; before their bank account has been verified. This leaves you susceptible to fraud (people who will make use of your service only to cancel the mandate before it is verified). We recommend enabling direct debit only for customers you know and trust.
Existing Customers
Step 1: Allow your customer to pay via bank account in Chargebee In the customer's profile, enable the option to pay via their bank account.
Step 2: Set the customer's preferred currency to either USD, CAD, GBP, EUR, AUD, NZD or SEK
In order for GoCardless to appear as a payment method when your existing customers are checking out or updating their payment details, you will have to set their preferred currency to USD, CAD, GBP, NZD, EUR, AUD, or SEK.
You can set a customer's preferred currency by navigating to the customer details page and clicking Edit Customer option or via the API using the preferred_currency_code parameter.
Note
The Preferred Online Currency option will appear only if you have multi-currency enabled for your site. If you don't, your site's base currency will be set for the customer as well.
Step 3: Ask the customer to update their payment details
With Steps 1 and 2 are complete, your customer is authorised to pay via direct debit and they will need to update their payment information, choosing GoCardless and submitting and confirming their bank information, so a mandate can be created and verified.
You can ask your customer to update their bank details using one of the following options:
-
Via a request that you send across. Navigate to Customers > [Customer Name] and click the Request Payment Method option to send an email to the customer. The email will contain instructions on how to add and/or update payment information. Alternatively, you can generate an Update Payment Method URL and forward it to the customer to use.
-
Via API. Please do note that you cannot use this API to collect the customers' bank details for the BECS Scheme.
-
Via the customer portal.
As with new customers, if the verification of the mandate fails, expires or is cancelled, GoCardless will notify Chargebee about it. Chargebee will mark the payment method as INVALID and the whole process must be repeated.
Types of Accounts
GoCardless is available in two modes: Test and Live. The test account is similar to the live account but is mainly for testing purposes. You can test out transactions from end to end, with the test account.
Chargebee supports integrating with both GoCardless's test as well as live accounts. The mapping is as follows:
Chargebee Test Site - GoCardless Test Account
Chargebee Live Site - GoCardless Live Account
Chargebee's Test site can be connected only to a GoCardless's Test account and Chargebee's Live site, only to a GoCardless's Live account.
Testing with GoCardless
You can test the workflow after you integrate your Chargebee account with GoCardless.
To test payments, you will have to
-
Create test mandates in GoCardless. Check out the GoCardless testing page for information on how to go about doing this.
-
Update the payment method for a customer in your Chargebee test site using the API.
You can simulate all possible payment scenarios including payment success, payment failed, payment cancelled, payment charged back, mandate cancelled and mandate failed.
Email notifications
According to the direct debit network, customers must be notified of mandate creation and before charging their account. You can either choose GoCardless or Chargebee to notify the customers regarding this. Refer to this section to learn about how you can use Chargebee to send these notifications.
In case you have enabled this notification email in Chargebee, then the following emails will be sent to the customers. As these are mandatory compliance emails, the content cannot be edited.
-
Mandate Creation - An email to inform customers that the mandate has been created.
-
Payment Pre-notification - A reminder email to inform customers that their bank account will be charged for the subscription. This mail will contain details about the charge amount, due date, creator information, and contact details. Please do note that the Pre-notification email is sent to the customer before collecting any type of payment such as subscription renewal, one time charges and so on.
Note
- You can view the content of these emails by clicking Settings > Configure Chargebee > Email Notifications > Payments & Credits.
- Available only on certain plans of GoCardless.
- GoCardless sends out its own email notifications. We recommend enabling these email notifications either from Chargebee or GoCardless.
- In case you have enabled these notifications in Chargebee, you must disable them in GoCardless. If not, duplicate emails will be sent.
- The Payment initiated email notification will not be sent if these emails are enabled.
- Even if you have enabled custom languages, the email will be sent in English only.
- These emails can be enabled and disabled only by Chargebee support.
Invalid Payment Method Email Notifications
You can also configure the Invalid Payment Method notifications to inform your customers about card expiry or payment failure.
You can setup these notifications by clicking Settings > Configure Chargebee > Email Notifications > Invalid Payment Method.
Refer to this section to learn more.
Limitations
Following are some of the limitations when using Chargebee with GoCardless:
- It is not possible to dispute a chargeback on GoCardless.
- GoCardless is not supported on Chargebee's Rhapsody theme of old hosted pages.
- Payments made through GoCardless is supported only in Dunning v2.
- GoCardless does not support iframe tags.
- Gocardless via BECS & PAD is currently not supported for the Full-page checkout layout.
Frequently Asked Questions
How is the waiting period handled in Chargebee?
Chargebee waits until three days to check the status of the direct debit transaction. After three days, Chargebee updates the status of the transaction as success or failure based on the input from GoCardless.
Sometimes despite the transaction being marked as settled in GoCardless, there are chances of a return. Therefore, Chargebee checks-in periodically with GoCardless to see if there are any returns (between 7-15 days).
In cases of failures, Chargebee records an offline refund and marks the Invoice as 'Not Paid'. Payment can then be collected for the invoice using alternate methods.
Articles & FAQs
Show more
Was this article helpful?