Two Factor Authentication
Chargebee's Two Factor Authentication feature allows you to secure your Chargebee site with both a password and an additional code (valid once). It ensures that only authenticated users can access the site, keeping your sensitive payment and sales information safe, and affording you greater peace of mind.
Setting up Two Factor Authentication on Chargebee
Two factor authentication is easy to set up and will keep your account safe from unwanted access, even if your password is compromised. To set it up, log into Chargebee and follow these steps
-
Log in to your Chargebee user interface. On the bottom left corner, click Profile name > Manage Account/Edit profile > Two-factor authentication.

-
Click Enable.
-
You are presented with a QR code to be scanned using the authenticator app on your mobile device.
-
Enter the 6-digit code that appears in your authenticator app and click Submit. This connects your authenticator app with Chargebee.
-
Having successfully set up 2FA, you can use the 6-digit code generated by your authenticator app the next time you log into Chargebee.
-
You need to disable Single Sign-On to enable two-factor authentication. To disable SSO, click Profile name > Manage Account/Edit profile > Go to Security. Under Authentication > SSO > click Disable > Confirm.
Note
You can disable the 2FA feature at any time by clicking the Disable option in the 2FA section on your Profile page. Once disabled, your account will be secured by your password alone. If you would like to enable 2FA once again, follow steps 1-5 again.
Recovery Codes
It might be that you don't have access to your mobile device/authenticator app. Chargebee's recovery codes will come in handy at times like these. Enter one of your recovery codes when you don't have access to your authenticator app and you'll be able to access your account.
To download your recovery codes, go to your Profile from the Navigation Bar click Username > Edit Profile. You can also generate new recovery codes anytime by selecting Generate New Codes on the Profile page Username > Edit Profile, and download the updated set.
Note
-
Each recovery code is valid once. You cannot use the same recovery code twice.
-
Recovery codes are available only when two-factor authentication (2FA) is enabled.
-
Recovery codes are available for download as a .TXT file.
Remember device for 30 days
It might be difficult to employ two factor authentication every time you are logging in to Chargebee, so the 2FA feature comes with a Remember me on this device for 30 days option. Enabling this option after you have setup two factor authentication means you won't have to use your authenticator app for the next 30 days. Added security, no extra hassle.
Reset Two Factor Authentication
This feature allows site admins to reset Two-Factor Authentication (2FA) for team members under specific conditions, preventing unauthorized 2FA resets.
Note
A 2FA reset is allowed only if the admin and the user are associated with the same company. This means all sites associated with the admin and user must share the same Chargebee's customer identifier.
Step 1: Request for resetting two-factor authentication
When a user logs in, a message is displayed indicating if the user is eligible for a 2FA reset by their site admins. This message provides clear guidance on the available options. Learn more.
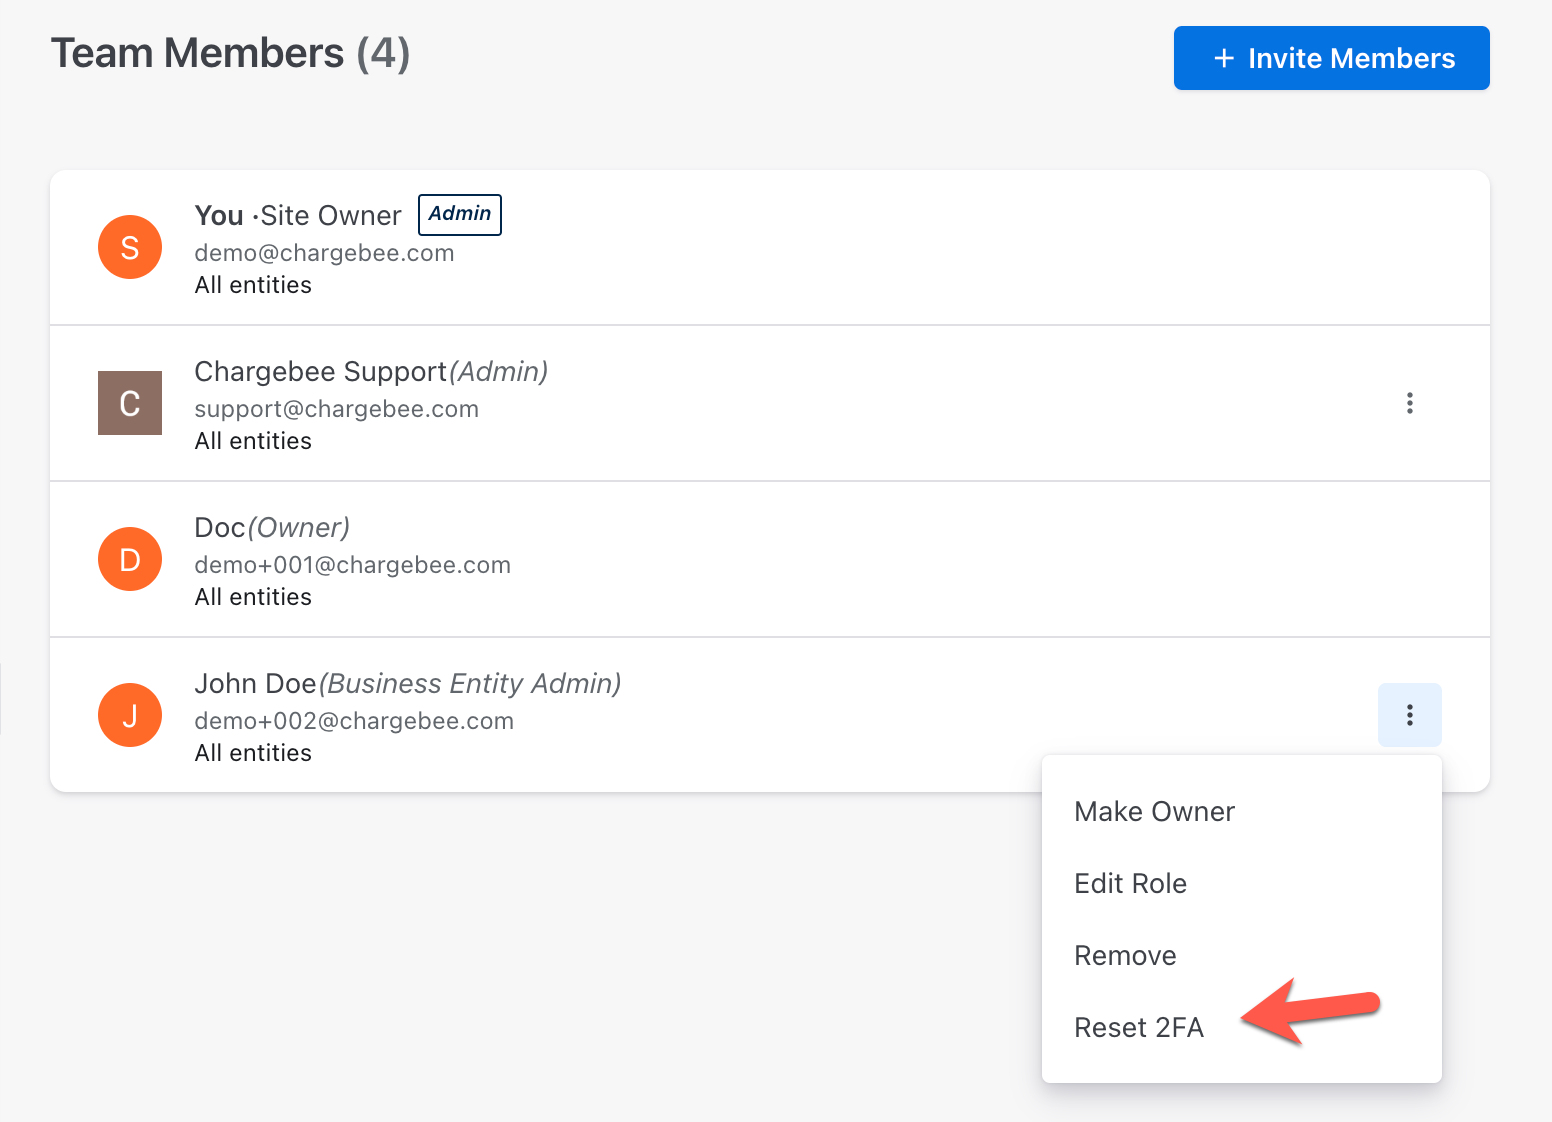
Step 2: Reset two-factor authentication for a user
Only the Admin can perform the Reset action for a user by following these steps:
-
Login to the Chargebee site.
-
Navigate to the Settings > Team Members page. The admin can view users whose 2FA can be reset.
-
Click the Reset 2FA option to reset the user's 2FA.
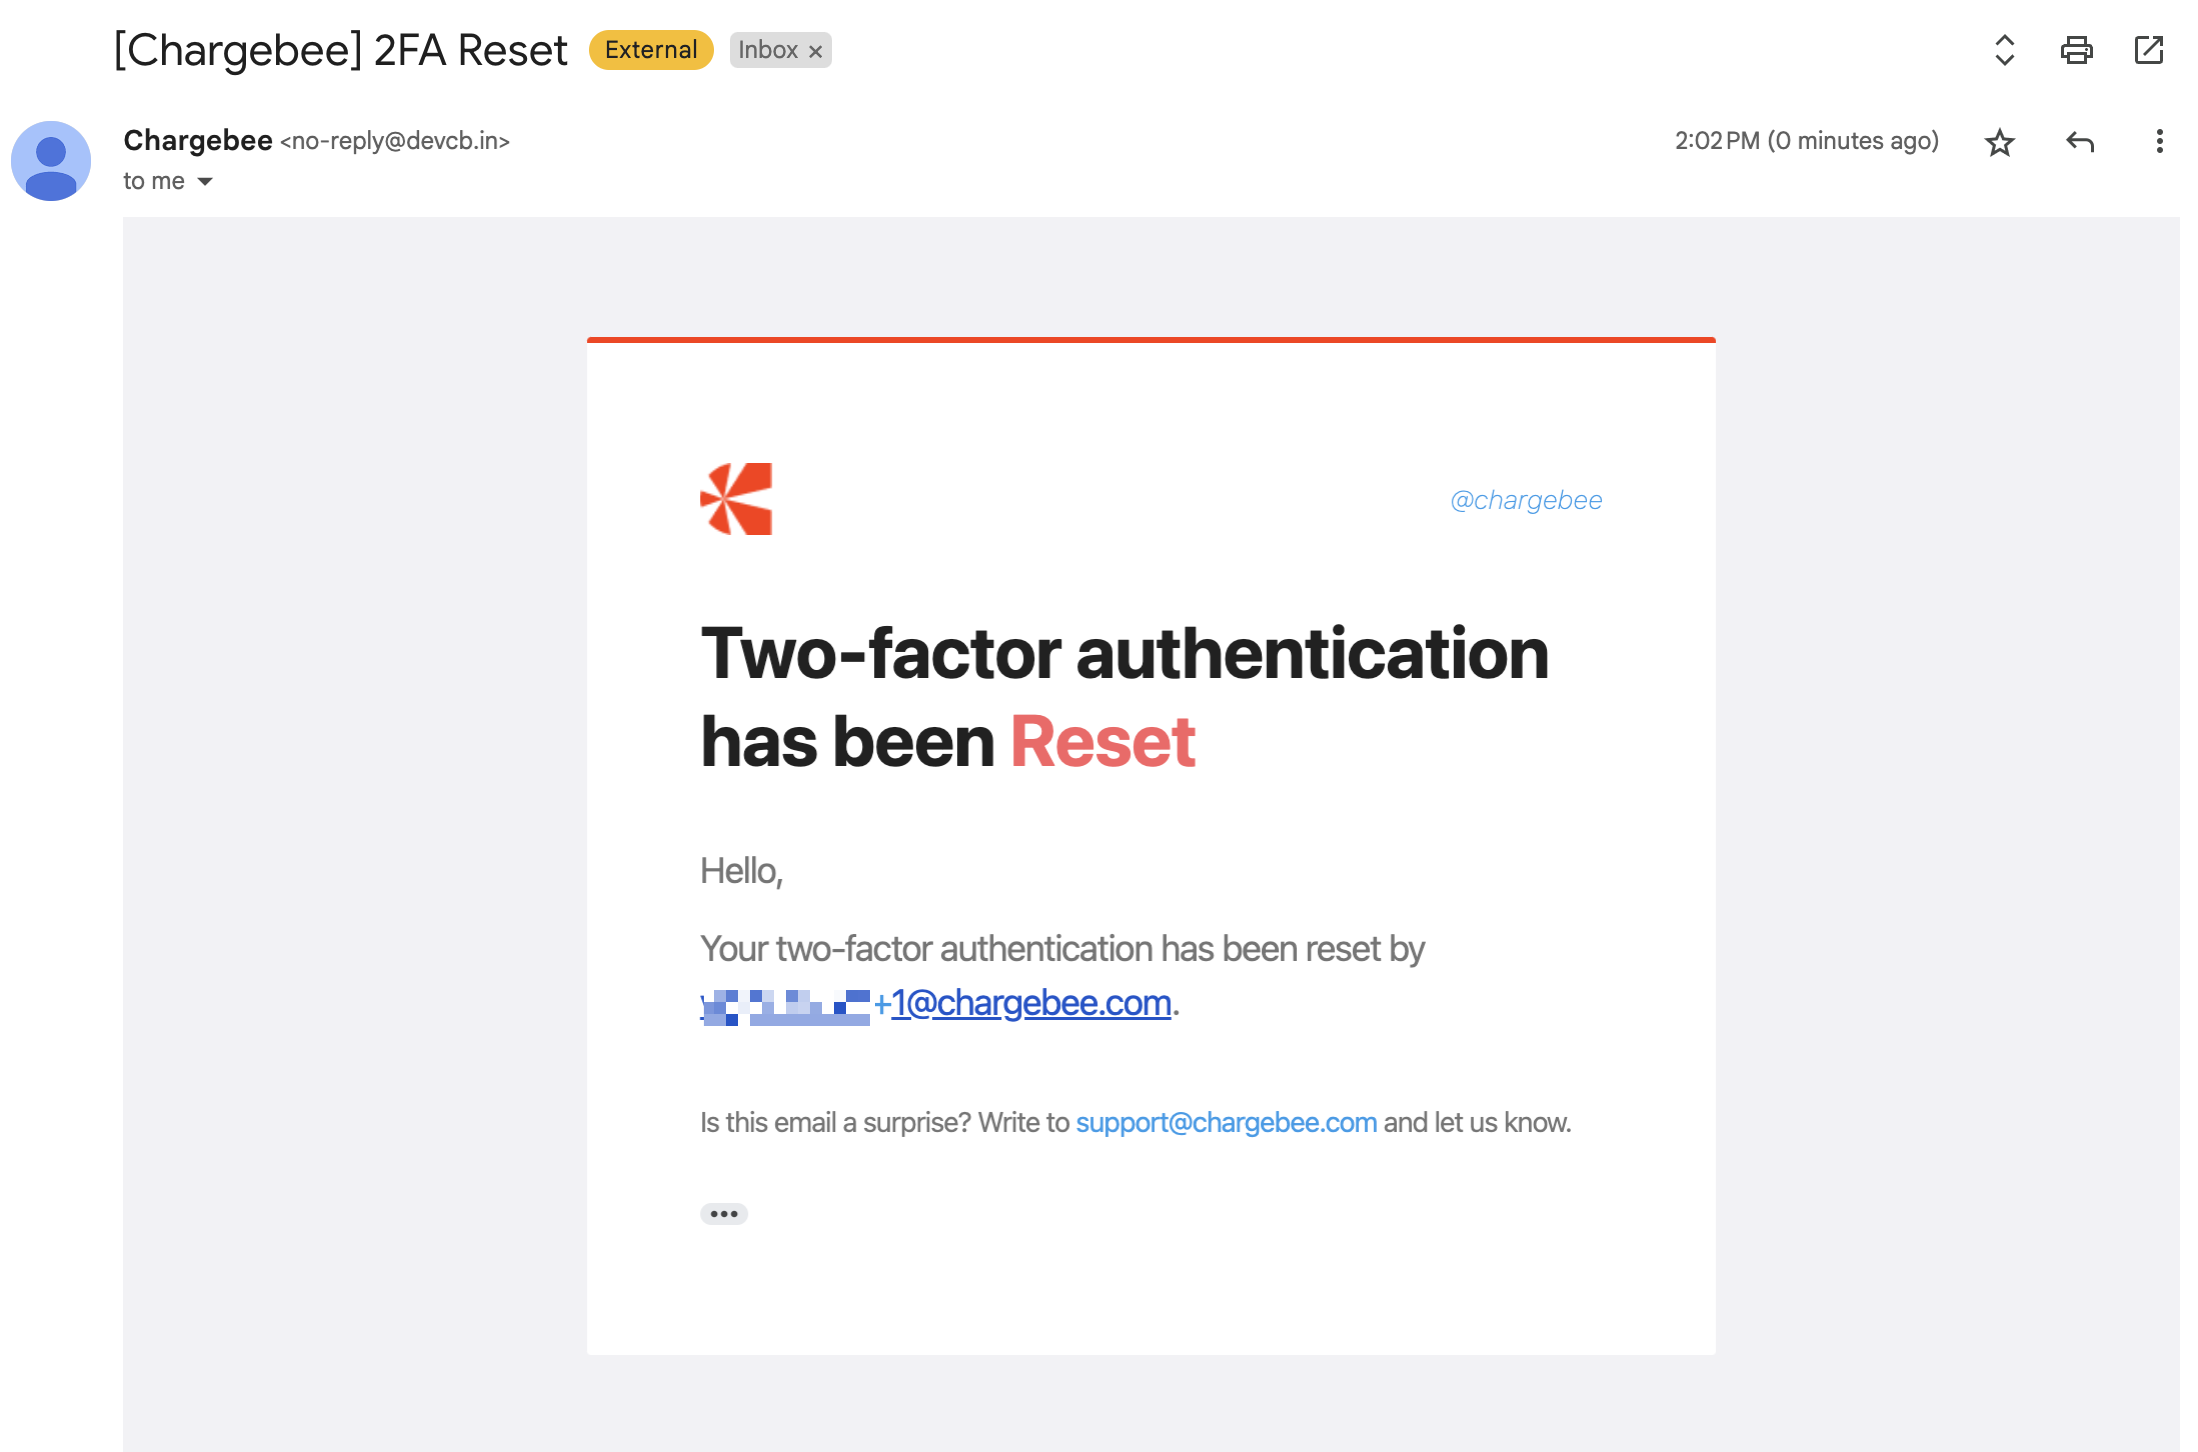
Step 3: Notify user about the two-factor authentication reset via email
After the admin resets a user's 2FA, the user receives an email notification about the reset. The user needs to login to their Chargebee site to setup their 2FA again.
Enforce User Authentication Policy
If there are multiple people using your site, security might be a concern. To set up an authentication policy for all the users of your site, check out our users page .
FAQ
1. What happens if I lose my phone or don't have access to my mobile authenticator app?
If you lose your phone or otherwise don't have access to your mobile authenticator app, you can use Chargebee's recovery codes to log into your account. Remember to download your recovery codes after you finish setting 2FA up for your site. More on Recovery Codes here.
2. What happens if I don't have access to my mobile authenticator app or my recovery codes?
Your site admin can reset your 2FA by following these steps.
Why am I prompted to contact Chargebee Support for a 2FA reset?
When the Chargebee sites you belong to are associated with multiple companies (Chargebee's customer identifier), you may be prompted to contact Chargebee Support for a 2FA reset.
Example 1: Alice is part of three Chargebee sites:
- acme (belongs to company Acme)
- acme-test (belongs to company Acme)
- securepay-test (belongs to company SecurePay)
Since Alice is associated with sites from two different companies (Acme and SecurePay), her 2FA cannot be reset by an admin.
Example 2: Bob is part of three Chargebee sites:
- acme (belongs to company Acme)
- acme-test (belongs to company Acme)
- acme-migration (belongs to company Acme)
Since all three sites belong to the same company (Acme), any admin of these sites can reset Bob's 2FA, provided the admin is also associated only with Acme's sites.
This restriction ensures security by preventing unauthorized 2FA resets across multiple companies.
Was this article helpful?