Docschargebeedocs

HomeBillingPaymentsRevRecGrowthReveal
Support

Product Updates


  • Release Notes

Getting Started


  • Overview
  • Chargebee Billing Data Centers
  • Object Relationship Model
  • Understanding Sites
  • Chargebee Tech Glossary
  • Articles and FAQ

Implementing Chargebee


  • Implementation Guide
  • Go-live Checklist
  • Articles and FAQ

AI in Chargebee


  • Chargebee Agents
  • Chargebee Copilot
  • Chargebee MCP Server (Model Context Protocol)

Developer Resources


  • Developer Resources Overview
  • Articles and FAQ

Product Catalog


  • Product Catalog Overview
  • Coupons
  • Articles and FAQ

Subscriptions


  • Working with Subscriptions
  • Billing
  • Orders
  • Articles and FAQ

Customers


  • Managing Customers
  • Account Hierarchy
  • Email Notifications
  • Branding
  • Configure Multiple Languages
  • Articles and FAQ

Entitlements


  • Entitlements Overview
  • Features Overview
  • Feature Management
  • Managing Product Entitlements
  • Subscription Entitlements
  • Customer Entitlements
  • Grandfathering Entitlements
  • Articles and FAQ

Usage Based Billing


  • Understanding Usages
  • Setting up Usage Based Billing
  • Metered Billing
  • Articles and FAQ

Chargebee CPQ


  • Chargebee CPQ
  • Chargebee CPQ for Salesforce
  • Chargebee CPQ for HubSpot

Invoices, Credit Notes, and Quotes


  • Invoices
  • Credit Notes
  • Quotes [Legacy]
  • Transactions
  • Articles and FAQ

Taxes


  • Overview
  • Configuring Taxes
  • Country-specific Taxes
  • Articles and FAQ

Hosted Capabilities


  • Overview
  • Hosted Checkout
  • Hosted Self-Serve Portal
  • Hosted Pages Features
  • Additional Hosted Pages
  • Payment Components
  • Pricing Table
  • Managing Payments with Chargebee.js
  • Mobile-Optimized Hosted Pages
  • Articles and FAQ

Site Configuration


  • Users & Roles
  • Custom Fields & Metadata
  • Approvals
  • Mandatory Fields
  • File Attachments & Comments
  • Advanced Filter Options
  • Multicurrency Pricing
  • Multi-decimal Support
  • Configuring Reason Codes
  • Events and Webhooks
  • API Keys
  • Time Zone
  • Time Machine
  • Transfer Configurations
  • Articles and FAQ

Multi Business Entity


  • Multi Business Entity Overview
  • Customer Transfer Overview
  • Articles and FAQ

Mobile Subscriptions


  • Overview
  • Omnichannel Subscriptions
  • Omnichannel One-Time Orders
  • Mobile Subscriptions (Legacy)

Reports and Analytics


  • RevenueStory
  • Home Dashboard
  • Frequently Asked Questions
  • FAQs for Classic Reports Sunset
  • Articles and FAQ

Integrations


  • Sales
  • Customer Support and Success
  • Finance
  • Tax
  • Marketing
  • Stitch
  • Collaboration
  • Contract Management
  • Ecommerce Management
  • Articles and FAQ

Data Privacy & Security


  • Two Factor Authentication
  • SAML Single Sign-On
  • System for Cross-Domain Identity Management (SCIM)
  • EU-GDPR
  • Consent Management
  • Personal Data Management
  • Compliance Certificates
  • HIPAA Guidelines
  • PCI Recommendations and Integration Types
  • Articles and FAQ

Data Operations


  • Bulk Operations
  • Migration
  • Articles and FAQ
  1. Billing
  2. Site Configuration
  3. Articles and FAQ
  4. Custom Fields
  1. Billing
  2. Site Configuration
  3. Articles and FAQ
  4. Custom Fields

How to display custom fields to customers?

This article covers

Creating custom fields

Displaying Custom Fields on hosted pages, emails, and invoices.

Add custom questions at checkout

Summary

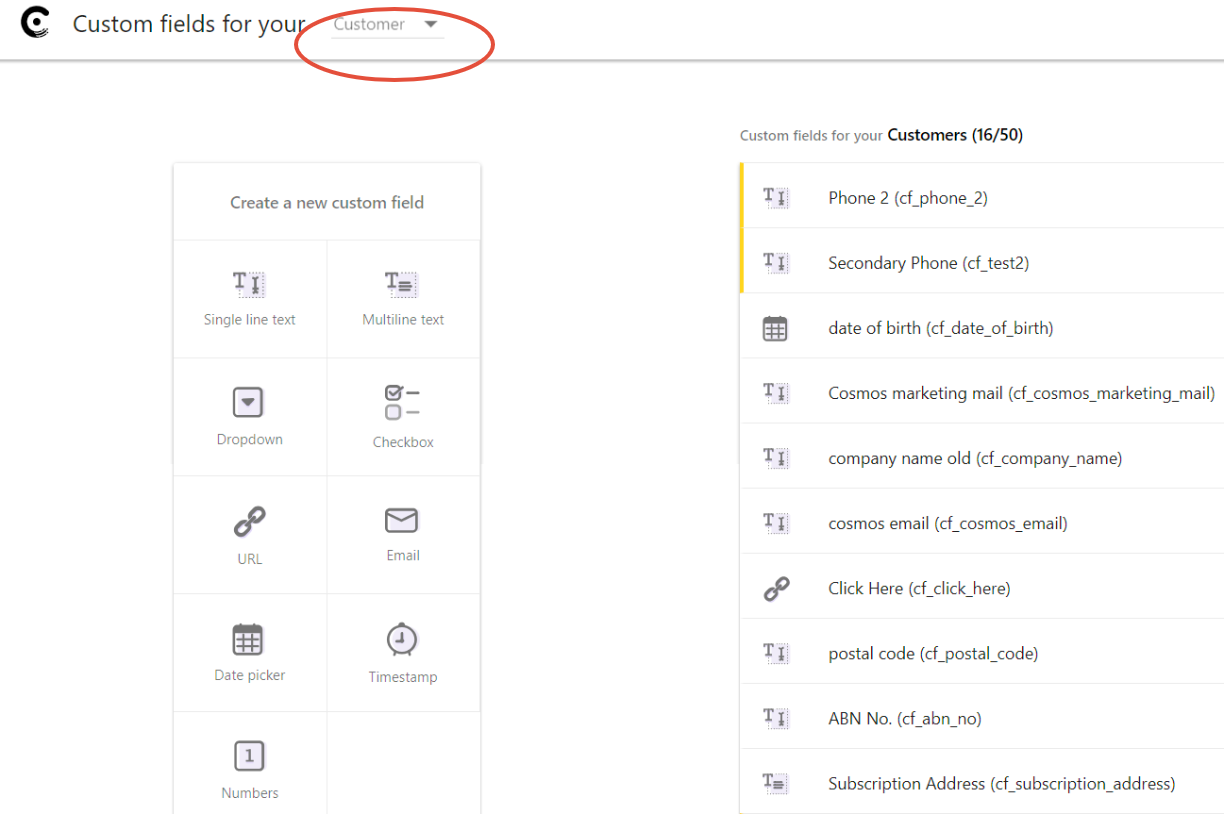
Custom Fields can be created to track additional information about a customer or their subscription in addition to the default fields present in Chargebee. To create a custom field, head to Settings > Configure Chargebee > Custom Fields. Click Here for more information on creating custom fields.

Note:  The user will need to have access to the Test site

Solution

The supported custom field types are:

  • Single line text: This field will appear as a text box, and the maximum character limit is 99.

  • Multiline text: This field will appear as a text area, and the maximum character limit is 250.

  • Dropdown: This field type will appear as a dropdown menu. You can add as many options as you'd want, but ensure that the total number of characters used for all the options put together, does not exceed 5000.

  • Checkbox: As is evident from the name, the field type can be used for creating checkbox options. The default value of this field type will be false.

  • URL: This field type will appear as a text area. The URL provided here will be validated for "http://" and "https://".

  • Email: This field type will appear as a text box. The email address will be validated.

  • Date picker: Use this field type if you want to collect date-related information.

  • Timestamp: If you need to collect information related to date as well as time as a timestamp, use this field type.

  • Numbers: You could use this field type for collecting information such as phone number. This field does not accept input other than numbers.

You can add up to a total of 50 custom fields each to Customers, Subscriptions and Plans/Addons modules.

The breakdown is as follows:

  • 30 String fields (includes single line text, multiline text, dropdown, checkbox, URL and email)
  • 5 Date fields
  • 5 fields of the type Timestamp
  • 10 fields of the type Numbers

Once you create the custom fields, you can collect or store values in them in multiple ways:

  1. From the Web interface - you can add the custom field value while creating a customer/subscription/plan/addon.

    image
  2. Using APIs - you can also add or update a custom field value using the custom fields. The custom fields would be listed on the API docs under the list of input parameters. Click here to know more.

Displaying Custom Fields

The custom field values captured can be used in different ways to create filters/segments, and display additional information to your customers on the checkout pages or/and on the customer portal. These custom field values will also be present in the API & Webhook responses, which can then be used to carry out conditional workflows.

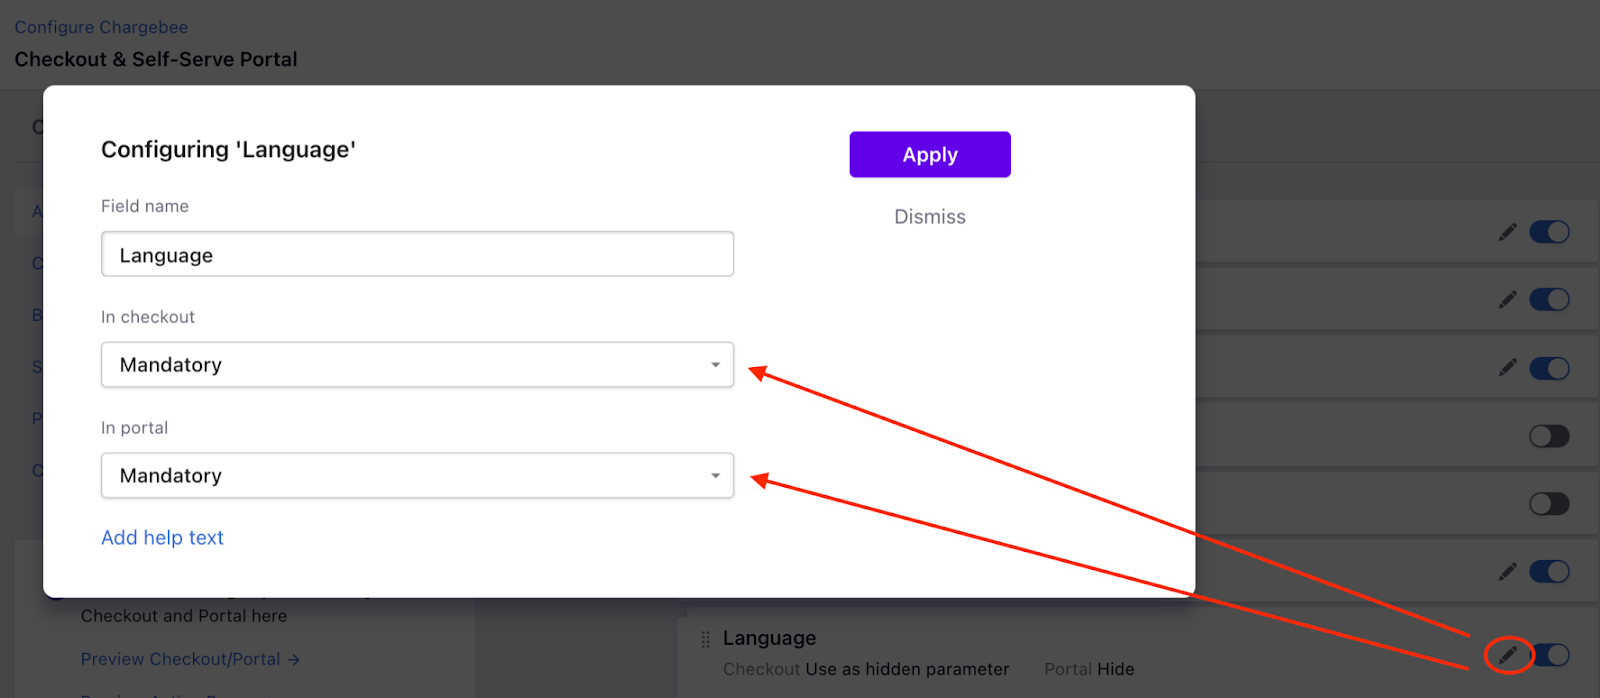
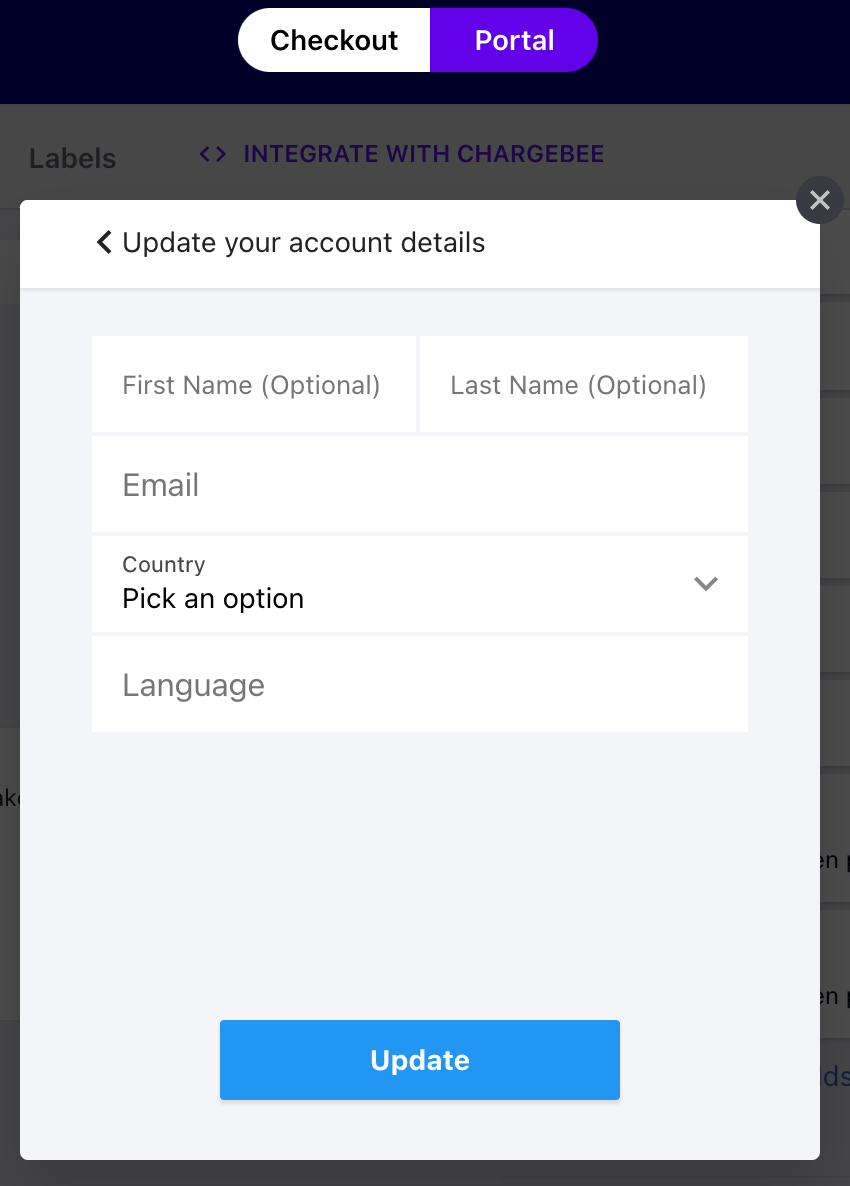
  1. Checkout pages: To display the custom fields on the checkout pages, head to Settings > Configure Chargebee > Checkout & Self Service Portal > Fields.
image

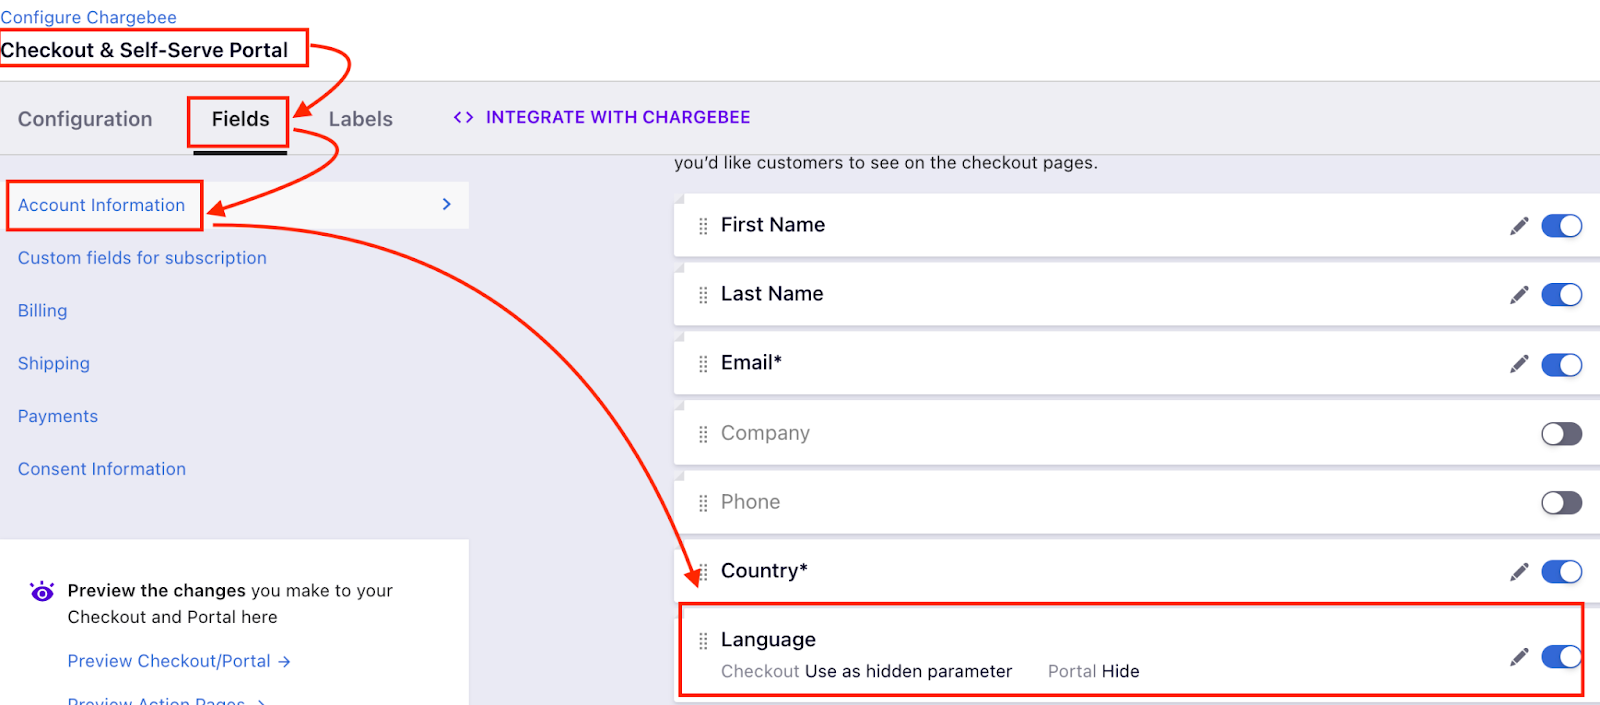
Then click on the pen icon and set it as 'Mandatory' In Checkout and In-Portal.

image

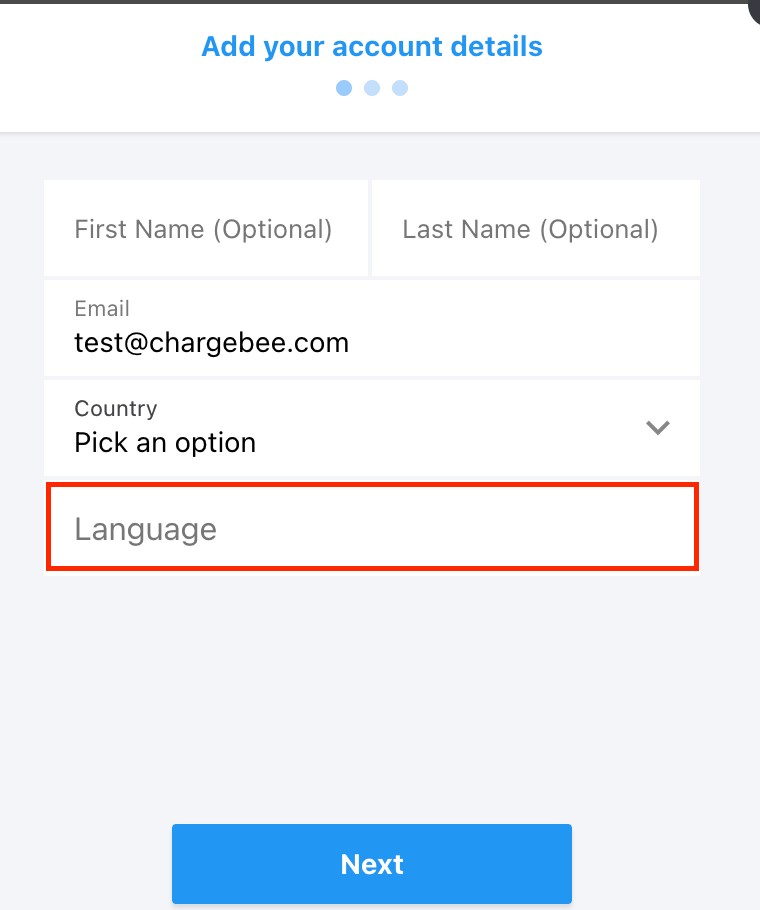
Sample Checkout and portal pages with Custom field - Language

image
image
  1. Invoices: To add custom fields on the invoice template, navigate the Settings > Configure Chargebee > Customize Invoices & Credit Notes > Invoices.

  2. Email Notifications: You can also include the custom field values in the email notifications template using the mail merge field icon on the edit template section. Click here to know more about mail merge

Related Articles

Is it possible to filter set custom fields as filters via the APIs?
How do I create a Custom Field in my Chargebee account?
How to delete a Custom Field?

Was this article helpful?