Shopify
Selling physical goods on a recurring basis? Managing customers, subscriptions, orders should be taking a toll on you and your business operations. Chargebee integrates with Shopify to help you manage your physical goods' subscriptions, fulfillment and billing with ease. Your customers can make a purchase and orders will be created and notified to Shopify. If you are using Shopify already, you need not create orders in Shopify manually, Chargebee will create orders on a recurring basis.
Note:
- We are unable to onboard merchants with the previous integration. We recommend you to contact [mailto_support] to learn more.
- Shopify is supported only for In-app Checkout and Self-Serve portal.
- Shopify App Store listing: Chargebee is not listed on Shopify's App store, the partnership agreement is a work in-progress. The plugin is available via Chargebee app.
- It is recommended to test the integration in Chargebee and Shopify sandbox environments before integrating in the Live environment.
- If you are using Shipstation for order fulfillment, you should connect Shipstation with Shopify and not with Chargebee.
- This Shopify integration supports sites hosted on the Chargebee US server only.
Workflow
Here's a simple purchase flow in Chargebee and Shopify:
- Your customer makes a purchase from your website/app
- A subscription is created in Chargebee
- Orders are created based on the shipping frequency
- Orders sync to Shopify instantaneously
- You fulfill the orders in Shopify
- Fulfillment status is synced to Chargebee
- Your customers can view/manage their subscription details in Shopify
Sync Overview
Data synchronization between Chargebee and Shopify happens at multiple stages. Each of it is explained below:
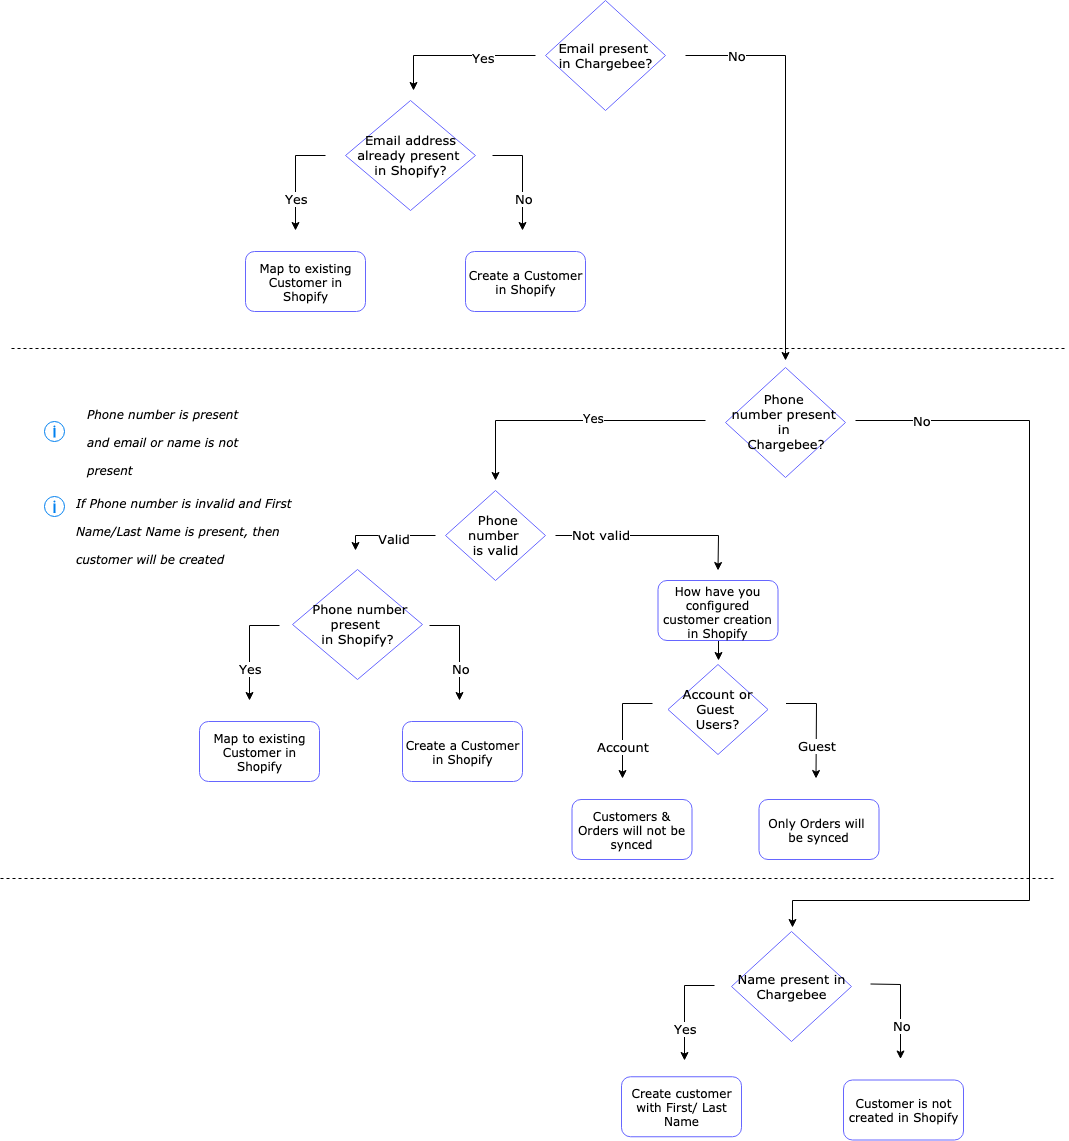
Customers
- Customers in Chargebee will be synced as Accounts/ Guest users to Shopify as per the configuration you provide
- Customers that have orders in Chargebee, will be synced to Shopify
- Email address is a duplicate check criterion, if email address is not present, Phone number will be used.
- For Account users,if the phone number is not valid then it will not be able to sync the customer information to Shopify (resulting in sync error). Please refer the flow chart below.
- For Guest users,the customer will not be created
- If email address and phone number are not present, Chargebee will consider the First Name and Last Name to create a customer.
- Existing customer profile identified via email address or Phone number will not be updated by Chargebee
- Deleting customer information in either of the systems after it has been synced from Chargebee to Shopify or vice versa, does not automatically delete the information in the other system. Ensure that you perform the required clean-up in both the apps to meet the global data privacy standards, such as GDPR.
Note:
Customers and Orders will be synced when Customer Sync preference. is set as Account use.
Products & Discounts
- Plans/Addons in Chargebee will be synced as Products/ Custom Items in Shopify
- If there are Products existing in Shopify, you can map the Products to Plans/Addons in Chargebee. Refer to FAQ#3 to learn about mapping products.
- Coupons will be synced as custom discounts (in Orders) to Shopify
Subscriptions/Checkout
- Multiple Products cannot be added in a single purchase during Checkout via Chargebee
- Shopify Checkout/Cart cannot be used for accepting payments using this integration
Orders
- Orders in ‘Queued' status within Chargebee will be synced to Shopify.
- When the order is synced, Order Reference Number will be synced to Chargebee.
- When the order is fulfilled, Order Tracking ID and Shipment Carrier Info will be updated to Chargebee. When the order contains "tracking_url" field, then the Tracking URL is also synced to the respective order in Chargebee.
- Order status from Shopify will be updated in Chargebee:
- ‘Awaiting Shipment' status will be synced as ‘Unfulfilled' to Shopify.
- Once ‘Fulfilled' in Shopify will be updated as ‘Shipped' in Chargebee.
- An order partially fulfilled in Shopify, will be updated as Fulfilled for that line item in the Order in Chargebee.
- On refunding a Paid invoice, the order will be marked as ‘Refunded' or ‘Partially refunded' in Shopify.
- Orders canceled in Shopify will be canceled in Chargebee and vice versa
- Orders deleted in Chargebee are also deleted in Shopify. However, when an order is deleted in Shopify, no change is made on the Chargebee side.
Prerequisites
Chargebee
- Configure Orders in Chargebee
- If you want to allow your customers to manage their subscriptions, enable SSO in the Self-serve Portal settings in Chargebee. Login to your Chargebee Site, navigate to Settings > Configure Chargebee > Checkout & Self-serve portal > Portal > Select via Single Sign On for Portal access options.
- It is recommended to have Shipping and Billing information for all Orders in Chargebee to prevent processing errors by 3rd-party fulfillment platforms linked to Shopify
Shopify
- Customer records will sync as Account or Guest users to Shopify. Verify this in Shopify at Settings > Checkout > Customer Accounts.
Configuration
Step 1: Integrate Chargebee with Shopify In your Chargebee app, click Settings > Third-party Integrations > Shopify > Connect.
Enter your Shopify store domain URL when prompted. This will authenticate Chargebee to access Customers, Products, Orders in your Shopify account.
Next you will be redirected to Shopify and allowed to review the access permissions. After reviewing, click Install unlisted app.
Step 2: Enter details in Shopify Enter details about your business in Shopify:
Step 3: Configure Order sync preferences Configure how you want to sync orders from Chargebee to Shopify:
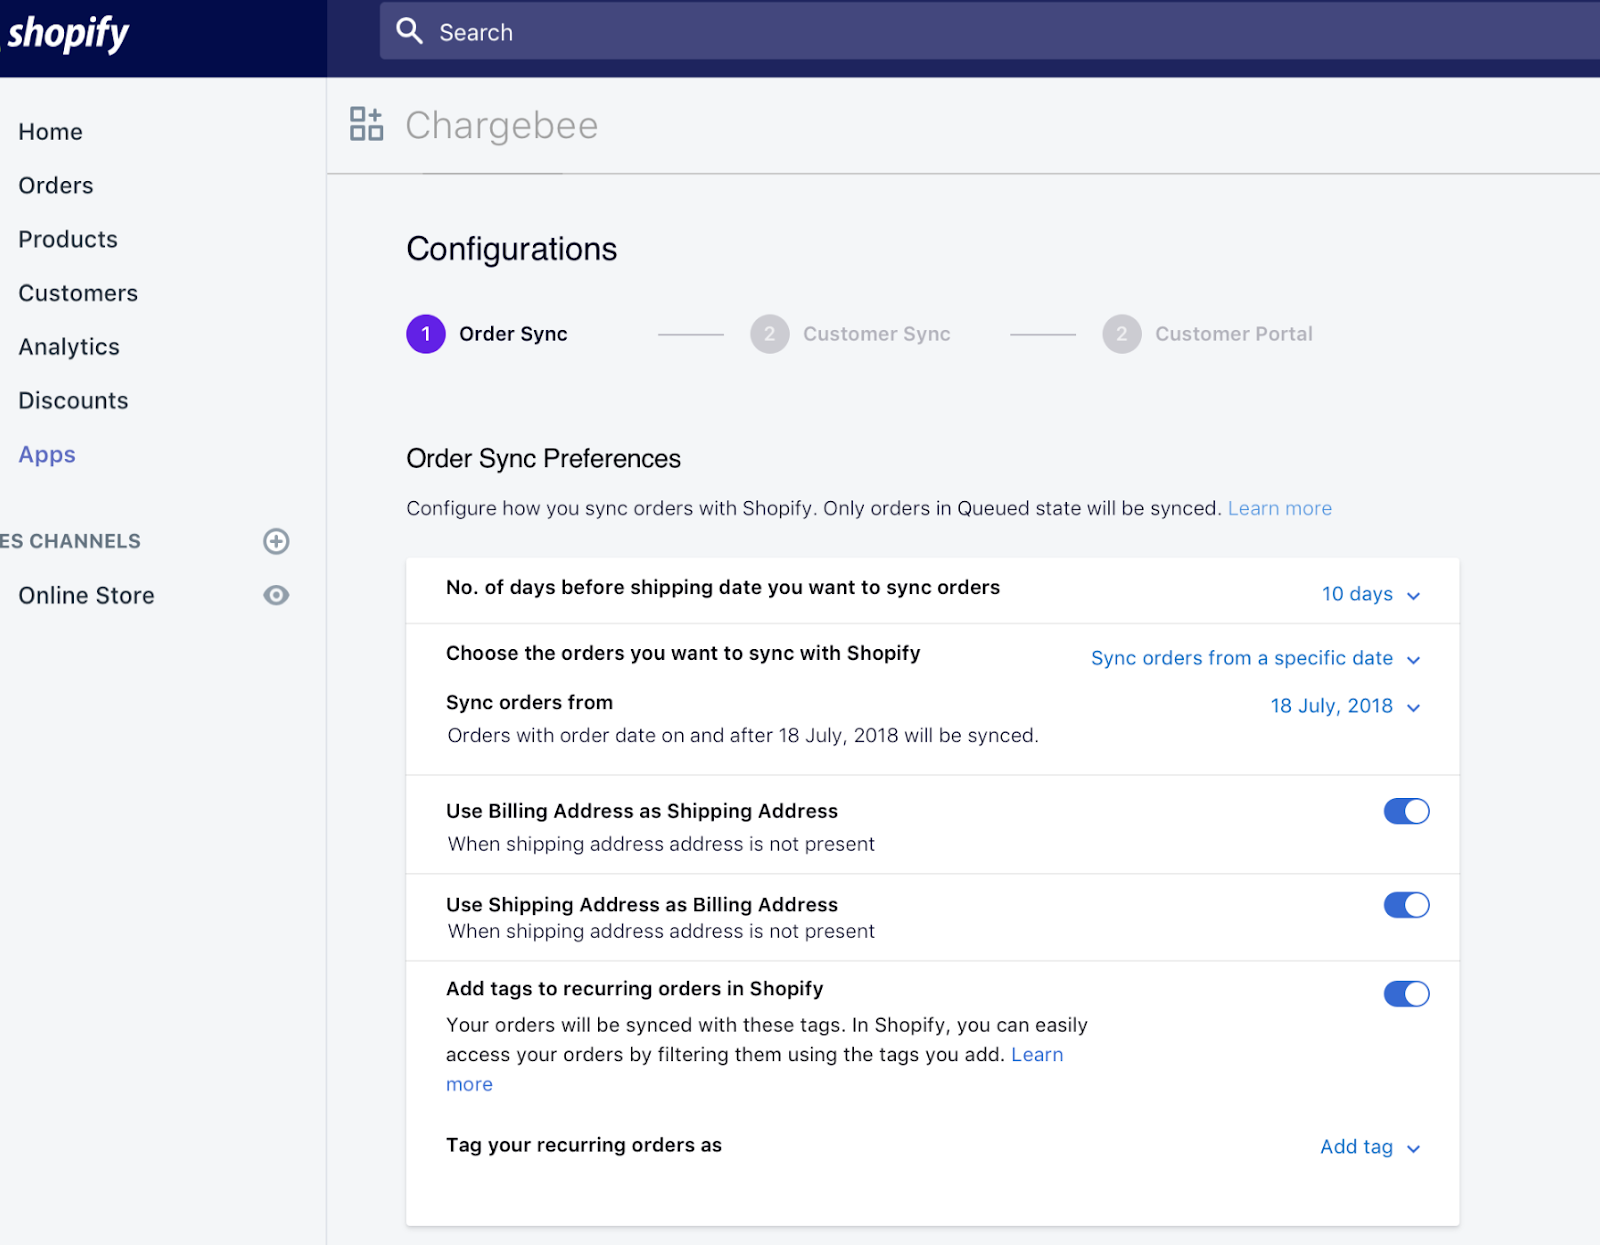
- No. of days before shipping date you want to sync orders: Enter the number of days before shipping date the orders should be synced to Shopify
- Choose a date from which the orders should sync from Chargebee - All orders to be picked or pick orders from a specific Order Date to be synced to Shopify
- Use Billing Address as Shipping Address: If shipping address is not present for an order in Chargebee, the billing address will be used as the shipping address
- Use Shipping Address as Billing Address: If billing address is not present for an order in Chargebee, then the shipping address will be used as the billing address
- Add tags to orders in Shopify: You can add tags to orders for ease of filtering in Shopify
Step 4: Configure Customer sync preferences Configure how you want to sync customers to Shopify:
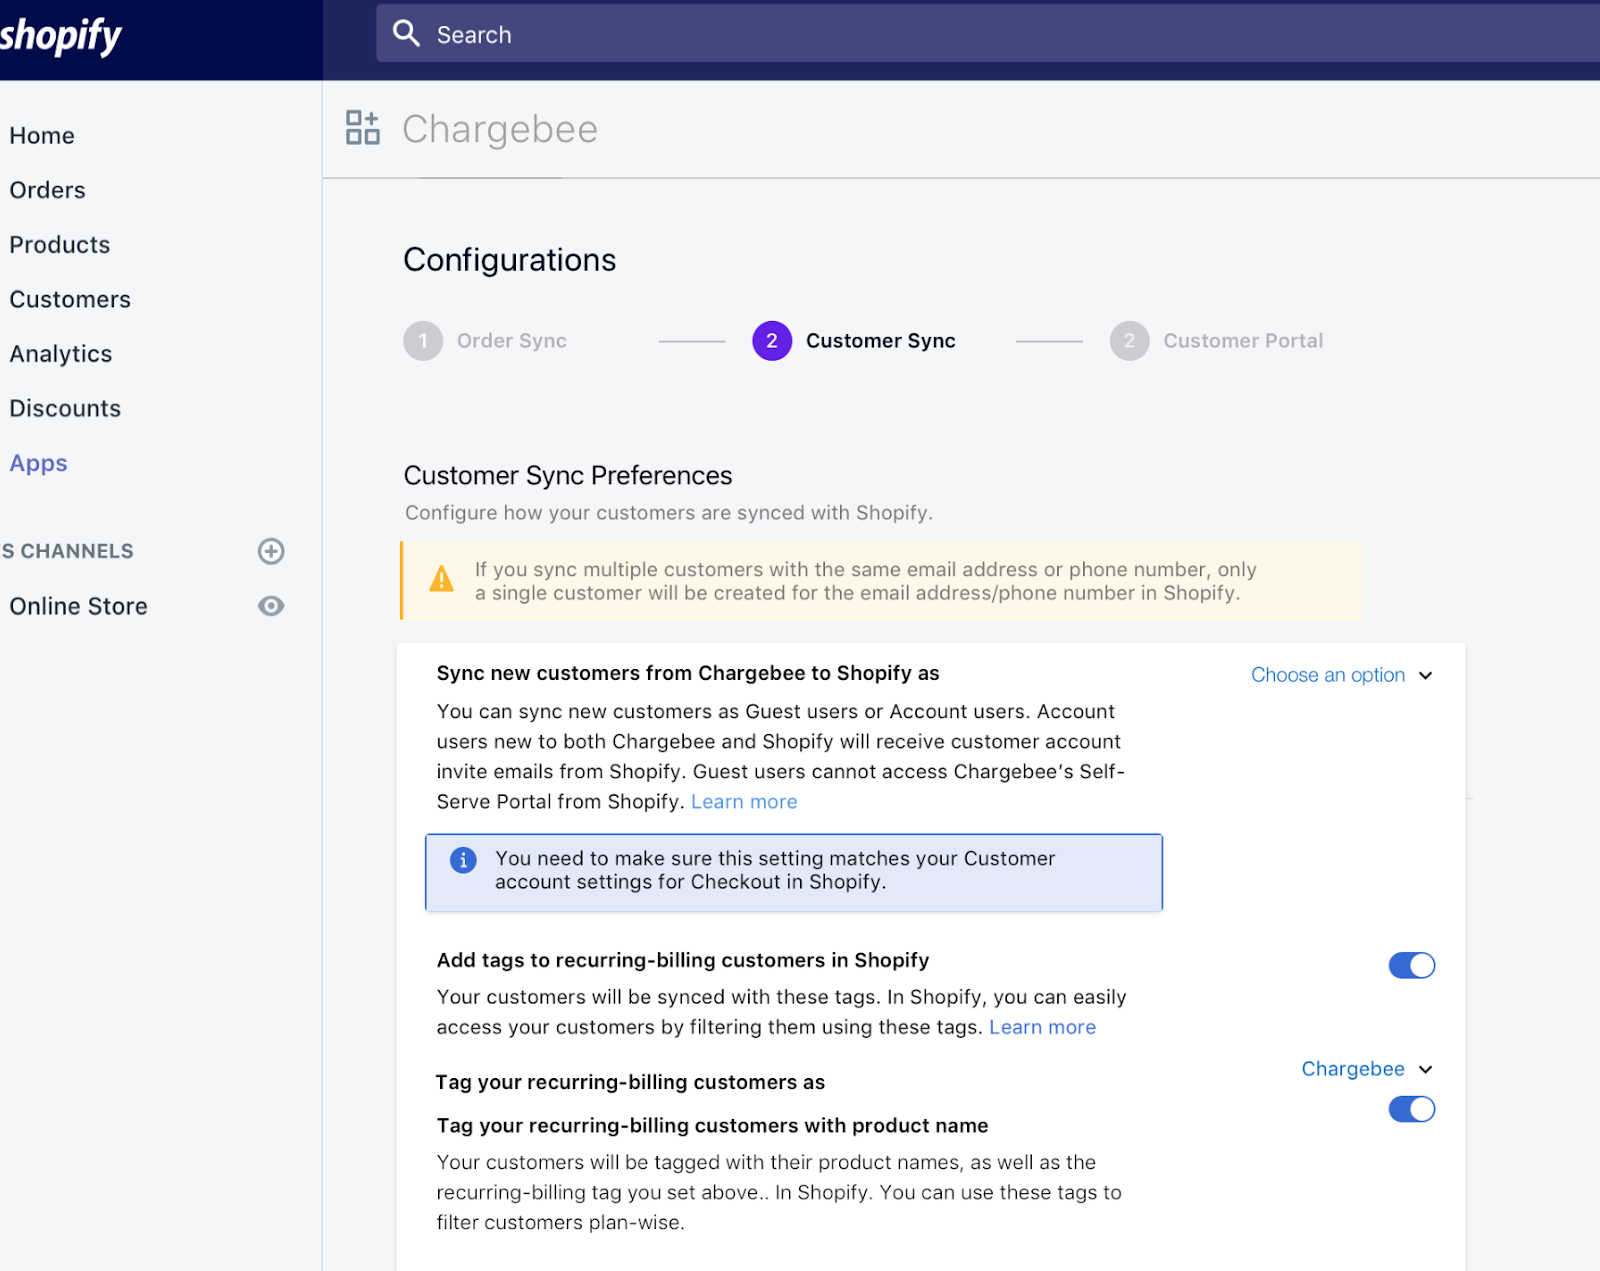
- Sync new Customers from Chargebee to Shopify as
- Guest users: a customer who does not have a Shopify account
- Account users: a customer who has a Shopify account
- For Account users, Account Activation email will be sent for new Customers from Shopify
- Add tags to recurring-billing customers in Shopify: You can choose to add a tag to the customer information** **
- Tag recurring billing customers as: You can choose to tag customers as say, "Chargebee" for ease of identification in Shopify
- Tag your recurring-billing customers with product name: Automatically tag customers with the name of the product
Step 5: Configure Self-serve Portal preferences Setup how your customers can login and manage subscriptions via Chargebee's Self-serve Portal
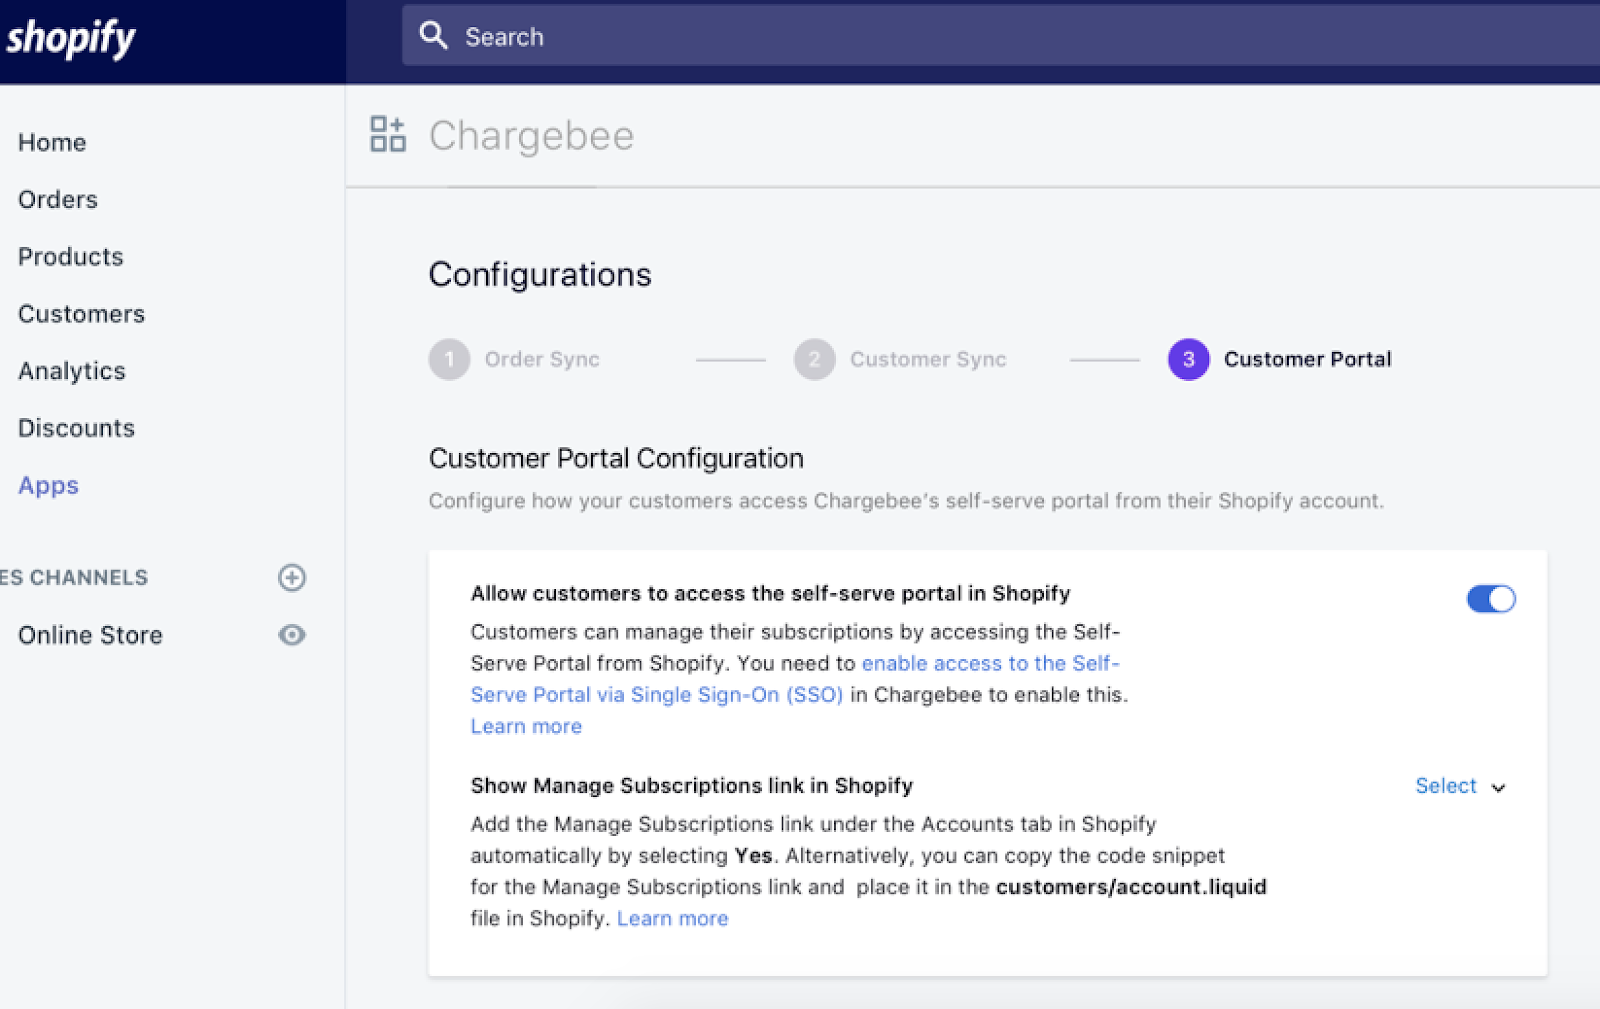
- Allow customers to access self-serve portal in Shopify: Enable if you want to allow your customers to manage their subscription.
- Show ‘Manage Subscriptions' link in Shopify: Choose how you want to add the Self-serve Portal code in Shopify > Accounts tab:
- Allow Chargebee to add the code snippet in the customers/account.liquid file automatically
- Or choose to add the code snippet in the customers/account.liquid file manually
Step 6: Initial Sync Once the configuration is complete, Chargebee will sync first 10 orders to Shopify. You can view the information and then proceed to sync all the orders to Shopify which completes the setup.
Manage Sync Preferences
Chargebee will sync orders regularly based on the configuration provided. You can view the details of the orders successfully synced and edit preferences if required.
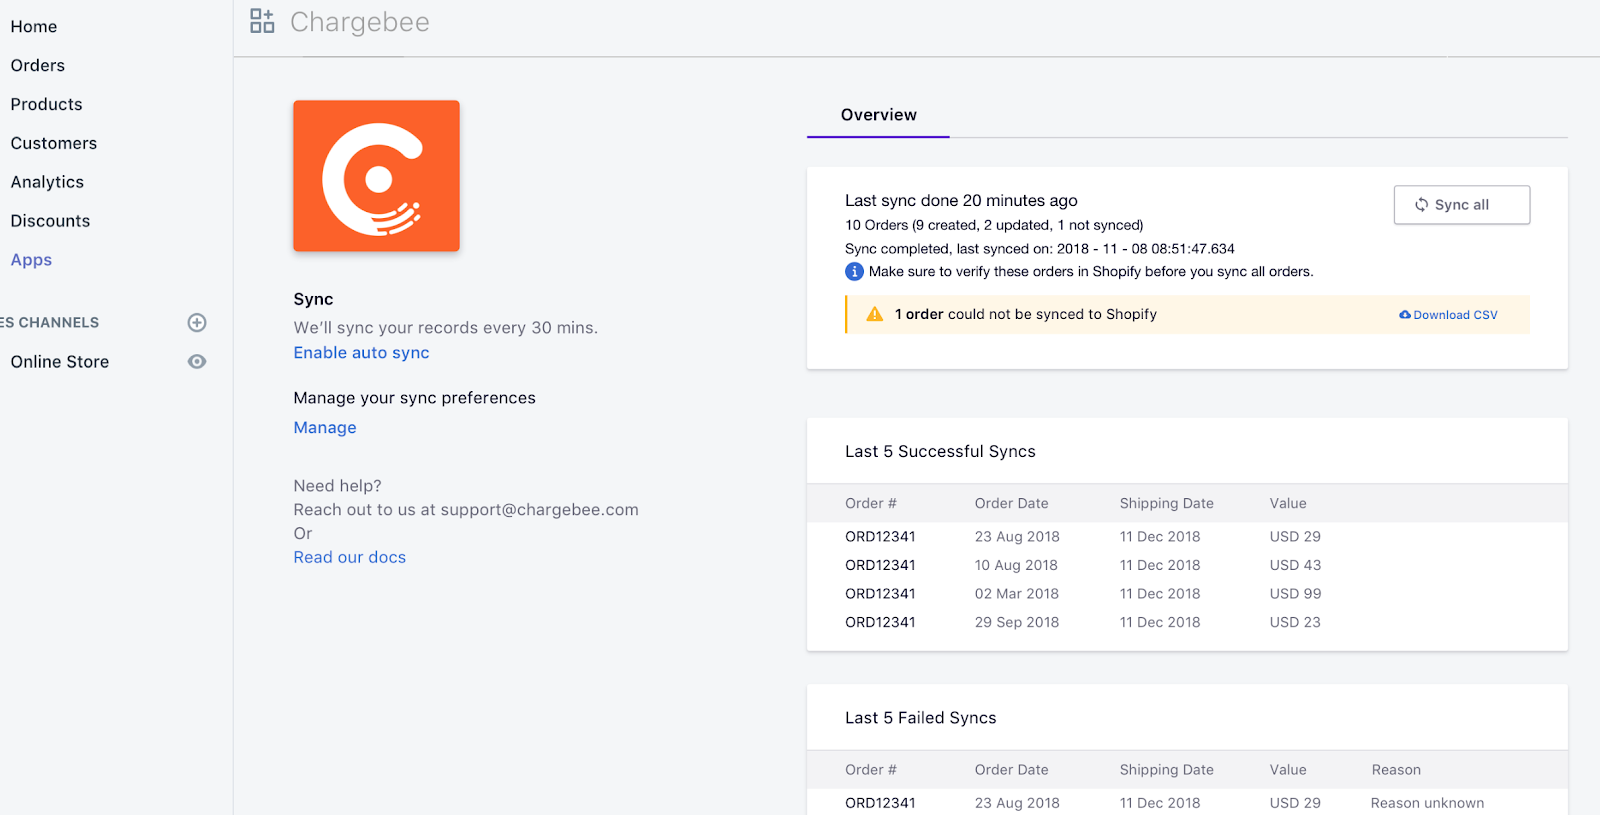
Auto Sync: Information will be synced automatically instantaneously.
Sync Now:You can sync order information on-demand, by clicking the Sync Now option.
Manage Preferences: You can edit the preferences provided during the initial setup. Success/Failed Sync Attempts: You can view the last 5 attempts of successful and failed attempts to sync orders.
Integrating Checkout
Integrate Chargebee with your Shopify site to maintain all your customer and subscription information acquired through checkout, in Chargebee. This step is crucial and is required after completing the Shopify integration.
All the details entered in the Chargebee In-app Checkout window during checkout is saved in the respective customer record. To know more, take a look at our docs on working with subscriptions and managing customers in Chargebee.
Chargebee supports three ways of integrating checkout:
The first approach of using drop-in script is where you in Chargebee, and include the generated drop-in-script in your Shopify site's checkout page to initiate In-app Checkout. This is the recommended approach as it is easy to implement and maintain.
Second approach is to use Plan based URL, which you have to construct using the instructions provided and embed the final URL in your Shopify site's checkout page to initiate In-app Checkout.
The third approach is where you integrate using Chargebee's backend APIs and frontend APIs. This gives you more control over the appearance and workflow of your checkout.
Note:
Ensure that you are PCI level 1 compliant before collecting and sending card details through API.
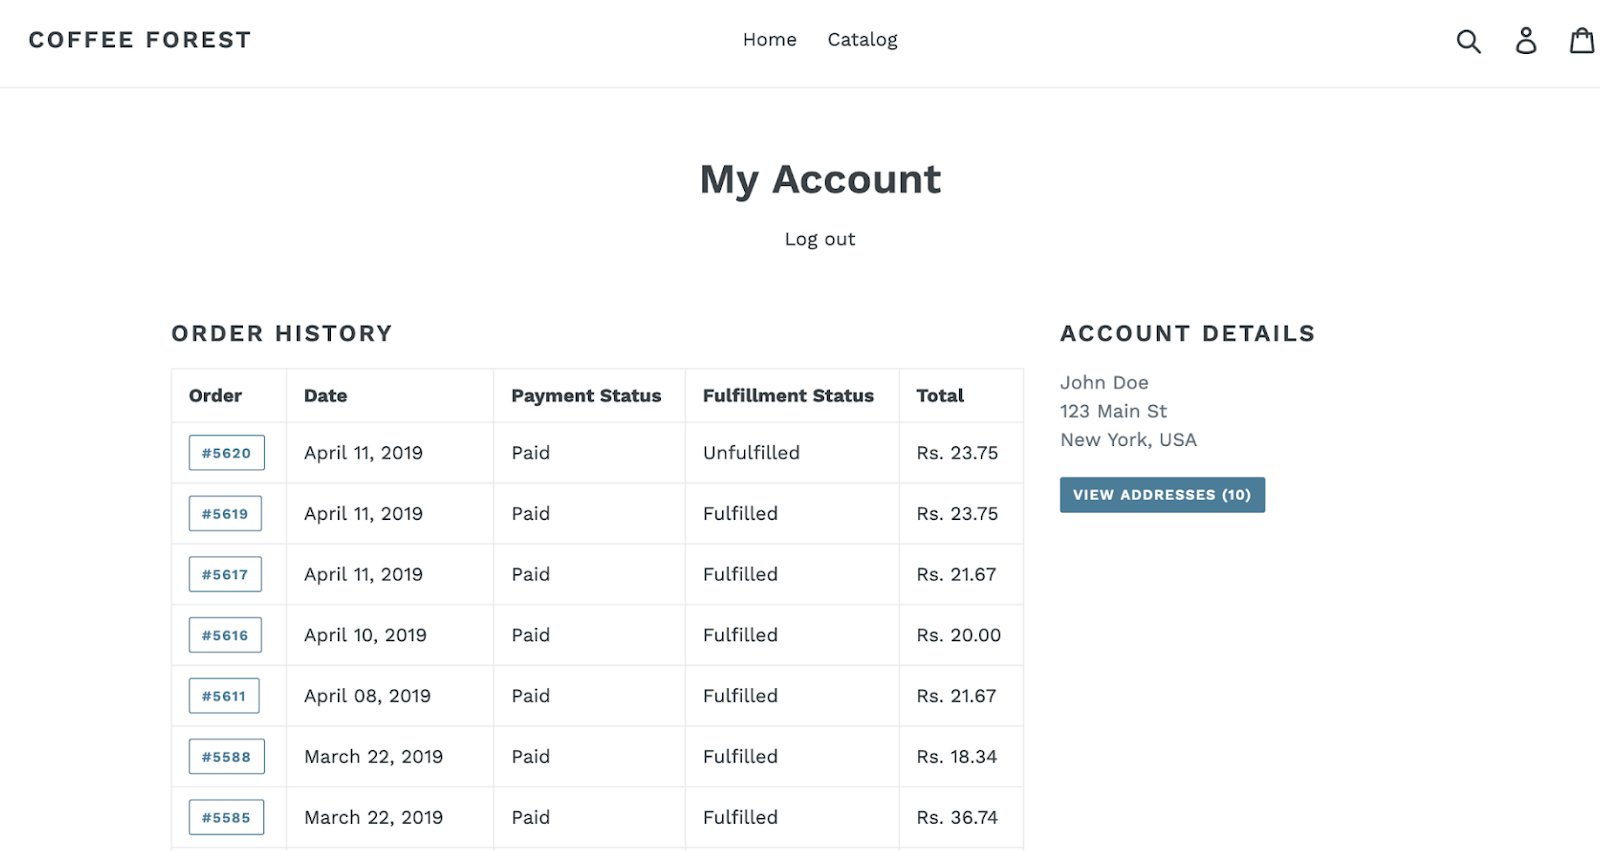
Customer Self-serve Portal
Your customers can manage their subscription using Chargebee's In-app Self Serve portal embedded in your Shopify site. Take a look at our for directions on how to configure and use it on your Shopify site. Users can login and view their order details here:
FAQ
1. I'm using a 3rd party authentication provider, will Chargebee's Portal be accessible to my customers?
Yes, once your customers log in to Shopify, they can access the Portal and view/manage their subscription details.
2. How do I sell products (one-time, not subscriptions) via Chargebee?
Yes, you can create Non-recurring addons (shippable) in Chargebee. On purchase, an order will be created and synced to Shopify.
3. How to map Product ID in Shopify to plans/addons in Chargebee?
- Login to Shopify, select Products and open the product page.
- Modify the page URL in the browser by appending
.xml. For example, if the URL is https://xyz.myshopify.com/admin/products/2673823744064, modify it to https://xyz.myshopify.com/admin/products/2673823744064.xml and load this URL. - Look for the
<variants>element in the XML. Each variant of the product will be listed as a<variant>child element under that. Determine the appropriate variant by looking at the<title>child element for each<variant>element. - Copy the
<id>. - Access the Chargebee App to create a single-line-text custom field for Plan Price. Refer to the documentation here. Note: Be sure to type sku which will show up as cf_sku.
- Navigate to Product Catalog > Plans from the Main Menu to view the list of available plans.
- Click applicable Plan to view plan details.
- Click Frequency and edit the Price Point.
- Paste the
idin the custom field named sku and click Update Plan to save the details.
4. How does Self-Serve portal work for Guest users in Shopify?
Your guest users cannot use the Portal to manage subscriptions, as they cannot login to Shopify.
5. I'm selling memberships (digital services/goods), will my customers still be able to manage their subscriptions in Shopify?
Yes, your customers can view/manage their subscription using Chargebee's Portal within Shopify, irrespective of whether orders are created and synced from Chargebee or not. Additionally, you can sync customer details using Chargebee's integration with Zapier.
6. Will Chargebee update the Product pages in Shopify?
No, Chargebee will not update the Product pages in Shopify. You will have to add the necessary details on the Product page/ Product details page in Shopify on your own, such as adding ‘Subscribe' button, ‘Billing frequency' etc. On clicking Subscribe button, Chargebee's Checkout will be loaded.
7. How to setup Paywall/gated content and sell on subscription model?
You can assign ‘tags' to customers. You can then code in your Shopify site to display/restrict content based on the tags assigned to the customers.
8. How do I uninstall the Chargebee app in my Shopify Store?
- Login to Shopify and select Apps > Chargebee and click on the Delete option.
- Select Online Store > Themes. Under the theme that was modified by the Chargebee app, select Actions > Edit code.
- Open the customers/account.liquid template and remove the code delimited by the comments
<!-- CB START -->and<!-- CB END -->.
You can also use the backup file named customers/account-cb-bk.liquid to restore the changes to the form before Chargebee was installed.
9. When Chargebee app is un-installed, will the ‘Manage Subscription' option (Customer Portal) be removed as well from my Shopify store?
No, you should remove the Chargebee Portal code from the customer/account.liquid file manually.
10. Can I re-install the app after uninstalling it?
Yes, you can repeat the installation steps to install the Chargebee app in your Shopify store.
Was this article helpful?