ACH Payments via NMI
This feature is a Private Beta release. Contact Chargebee Support to enable ACH Payments via NMI for your live and test sites.
ACH is a US-based payment method for processing recurring or one-time payments. Chargebee lets you configure ACH (Direct Debit) payments using NMI. ACH applies only to payments made in USD.
To set up the NMI gateway first, see Configure NMI in Chargebee.
Integration options
You can integrate ACH via NMI using the following methods:
| Integration method | Description |
|---|---|
| Chargebee Hosted Pages (in-app checkout) | Accept ACH payments using Chargebee's in-app hosted checkout with minimal integration effort. |
| Chargebee Hosted Pages (full-page checkout) | Accept ACH payments using Chargebee's full-page hosted checkout. |
| Chargebee JS | Collect bank account details in your custom checkout using Chargebee JS. |
| API | Process ACH payments using Chargebee APIs for a fully custom checkout and payment flow. |
Prerequisites
Before you enable ACH Payments via NMI:
- Ensure NMI is configured in your Chargebee site.
- Make sure you have a merchant account with NMI. If you don't, create one.
- Keep the following details ready, because they're used in the ACH authorization agreement:
- Company name
- Phone
Configure Direct Debit (ACH)
Follow these steps to enable Direct Debit (ACH) via NMI in your Chargebee site:
- Log in to the Chargebee app.
- Go to Settings > Configure Chargebee > Payment Gateways > NMI.
- Turn on Direct Debit (ACH/eCheck).

- Enter your Company Name, Email ID, and Phone. The Company Name value appears in the ACH authorization agreement.
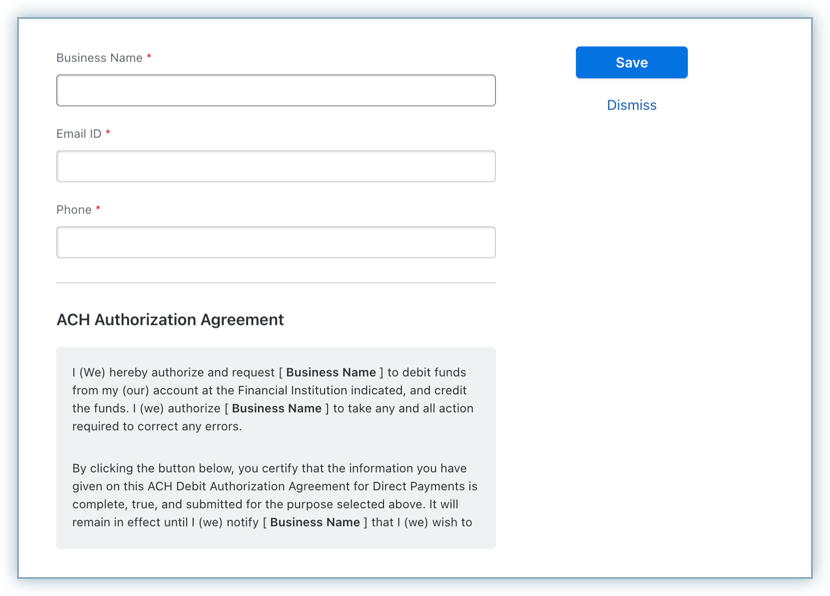
- Click Save.
- Click Apply on the Configure NMI page.
Configure Smart Routing
When you activate ACH through NMI, you must also setup Smart Routing for USD payments. To adjust this setting, follow these steps:
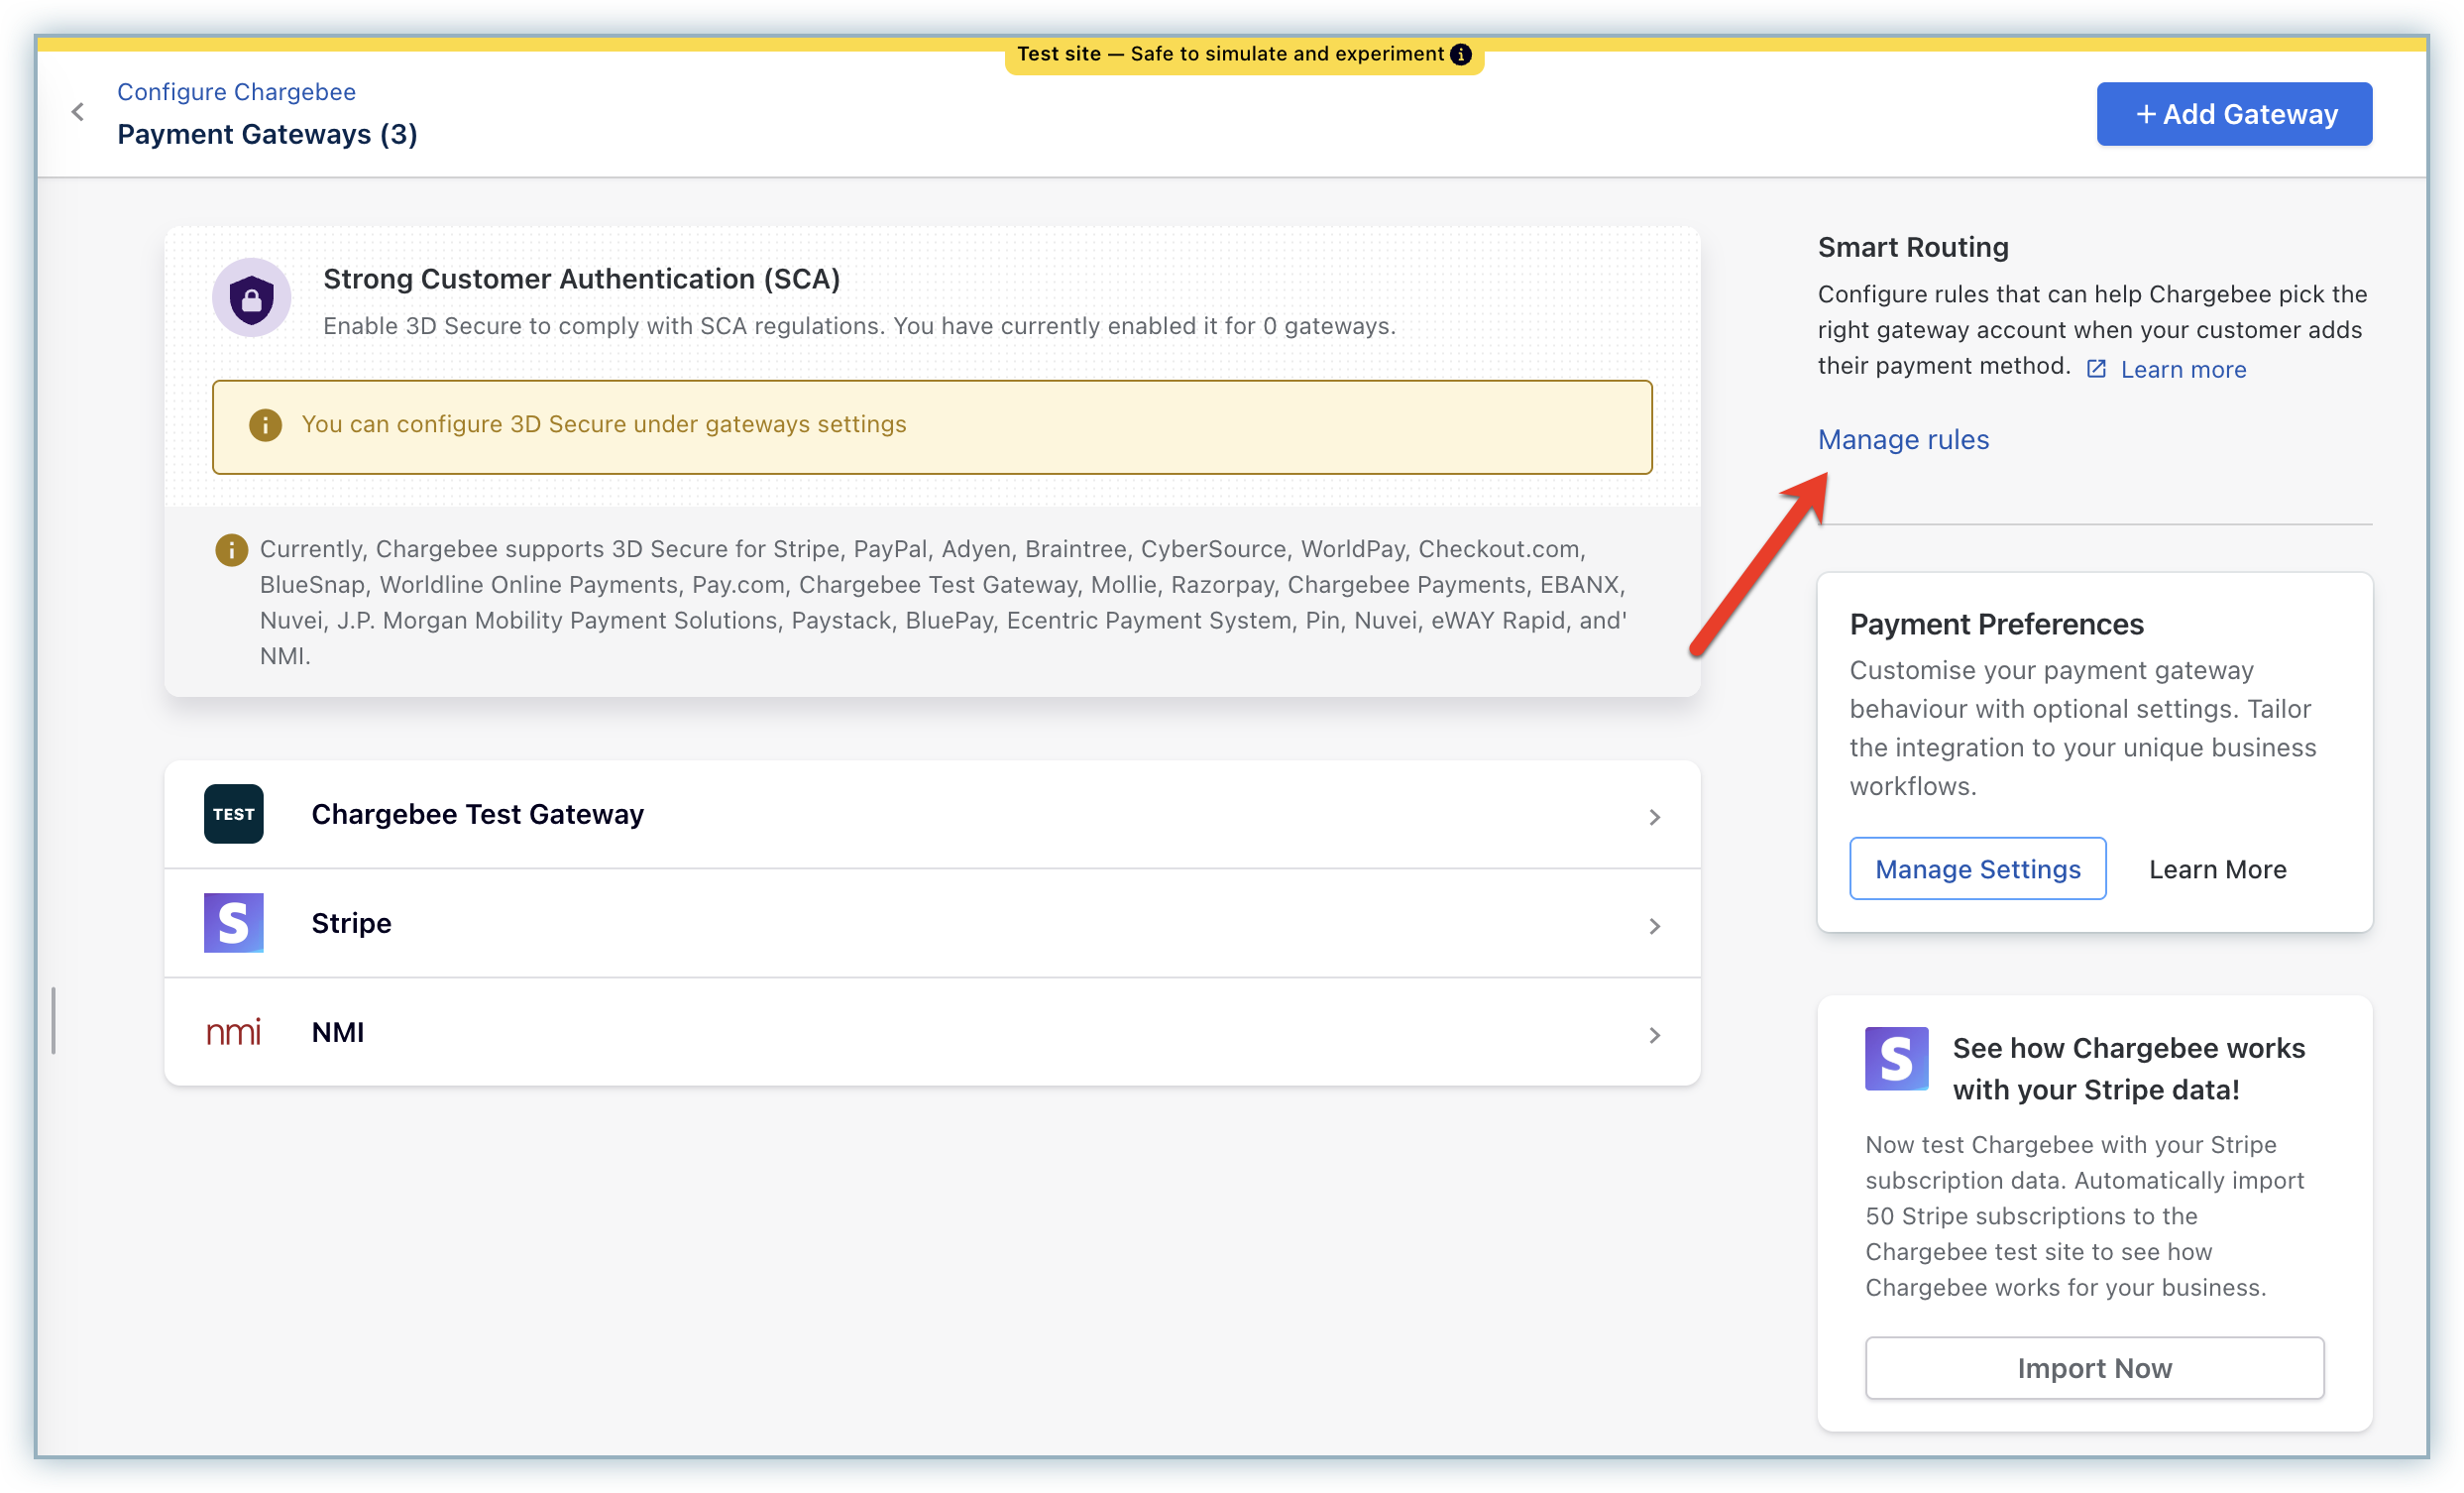
- On the Payment Gateways page under Settings > Configure Chargebee, click Manage Rules under Smart Routing.
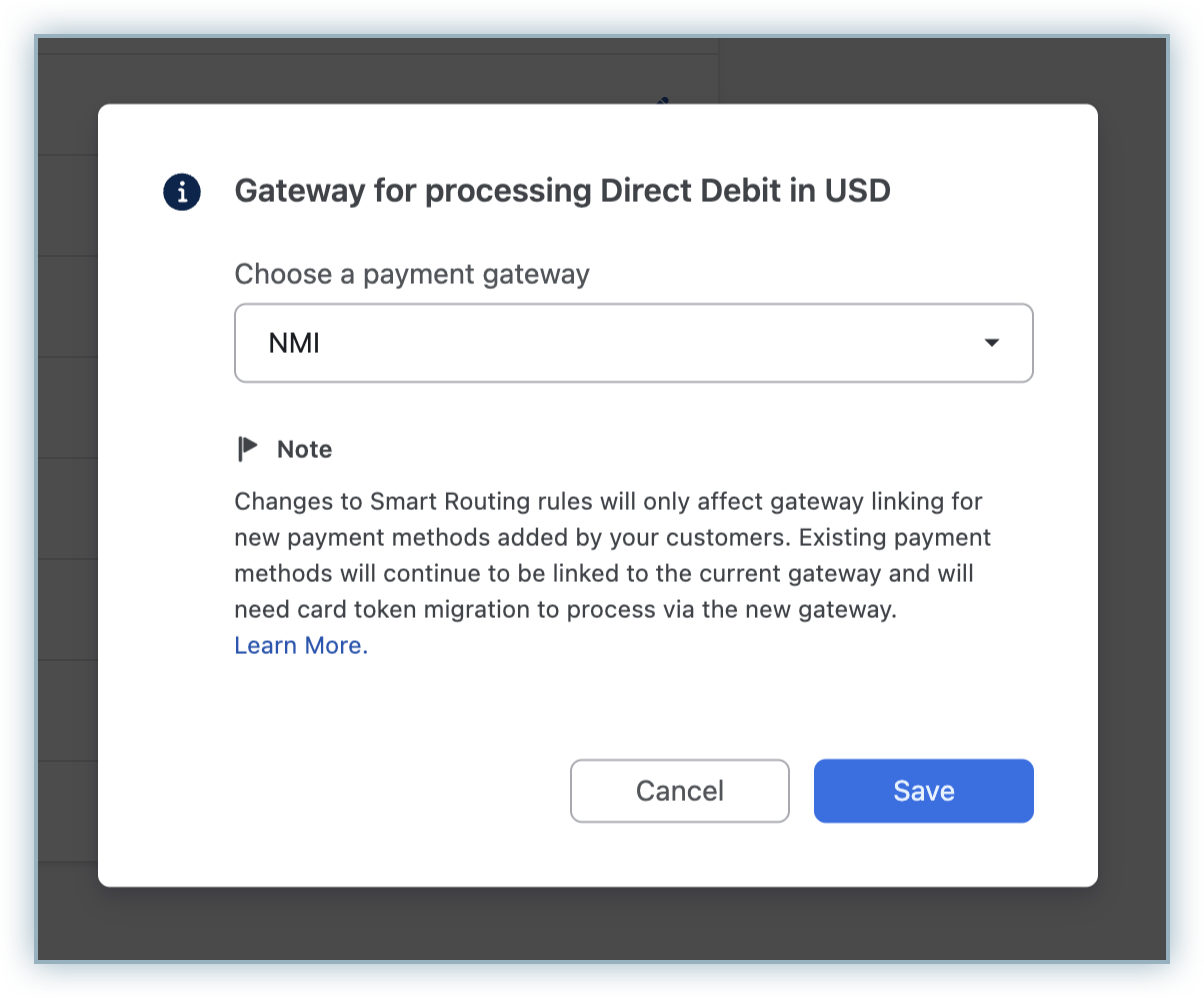
- Go to the Direct Debit section and click Edit for USD.

- From the Choose a payment gateway dropdown, select the NMI gateway instance that has ACH enabled.
- Click Save.
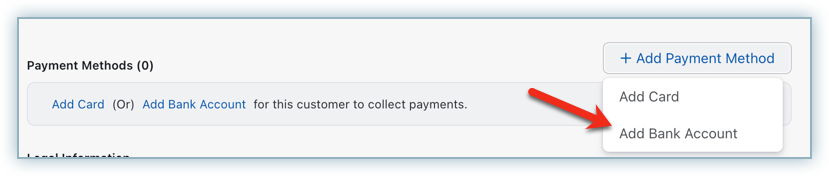
Add bank account details
To add a customer's bank account in Chargebee, go to the Payment Method section on the customer's details page and click Add Bank Account.
Information
This option is unavailable if the Allow customer to pay via their bank account option is turned off when you create the customer.
To add a bank account, you need the following information:
- Payer info
- Account number
- Routing number
- Account type
You can also use the Create a bank account payment source API to collect bank details from the customer.
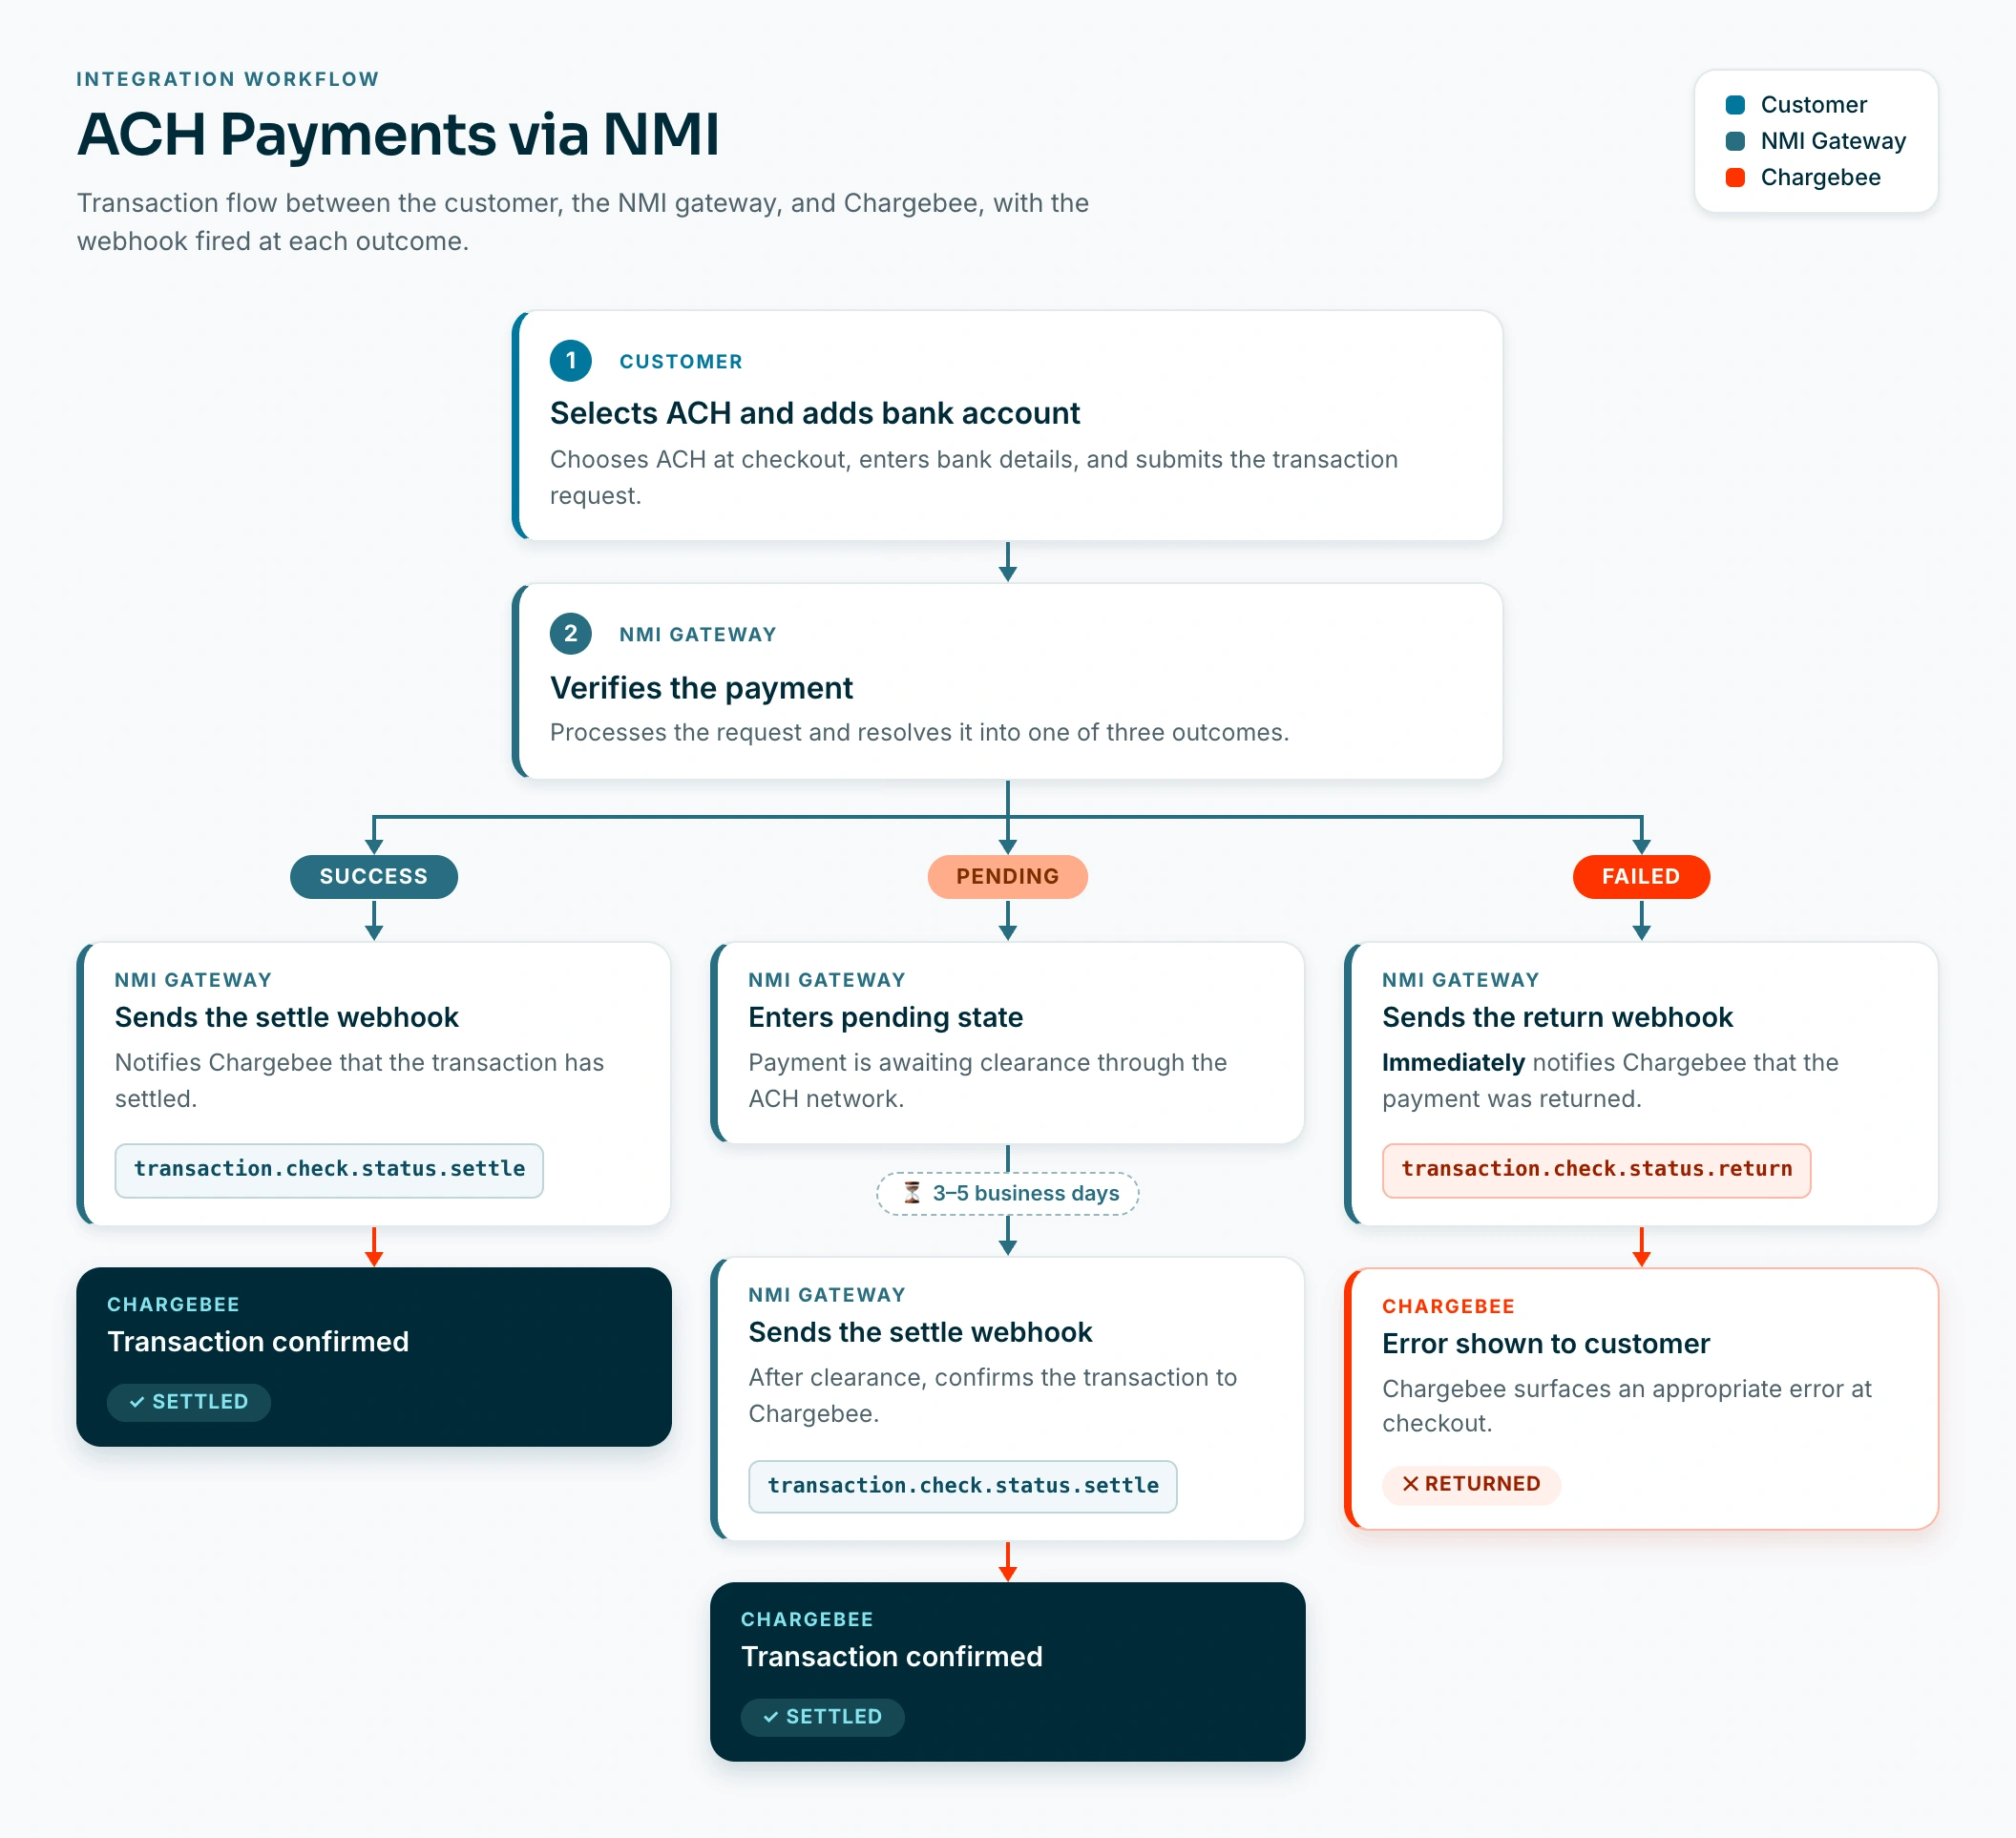
How ACH payments work
The ACH transaction flow via NMI works as follows:
- The customer selects ACH, adds their bank account at checkout, and submits a transaction request.
- NMI verifies the payment and proceeds with one of the following outcomes:
- If the payment succeeds, NMI sends the
transaction.check.status.settlewebhook to Chargebee. - If the payment fails, NMI immediately sends the
transaction.check.status.returnwebhook to Chargebee, and Chargebee shows the customer an appropriate error.
- If the payment succeeds, NMI sends the
- After the payment enters the pending state, NMI takes 3–5 business days and then sends the
transaction.check.status.settlewebhook to Chargebee to confirm the transaction.
Checkout flow
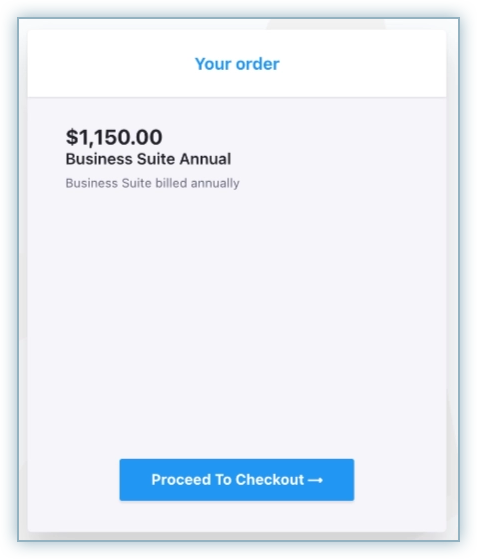
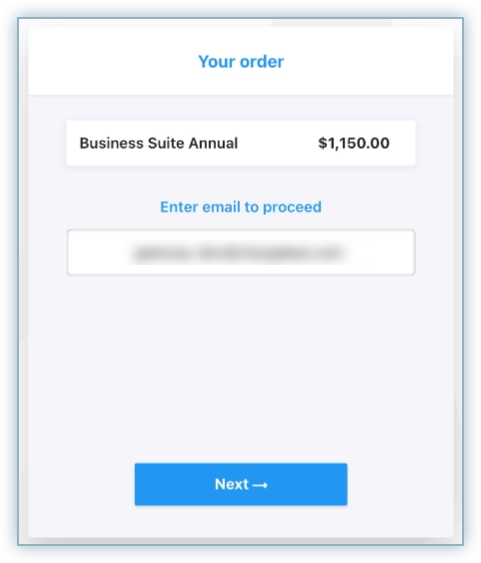
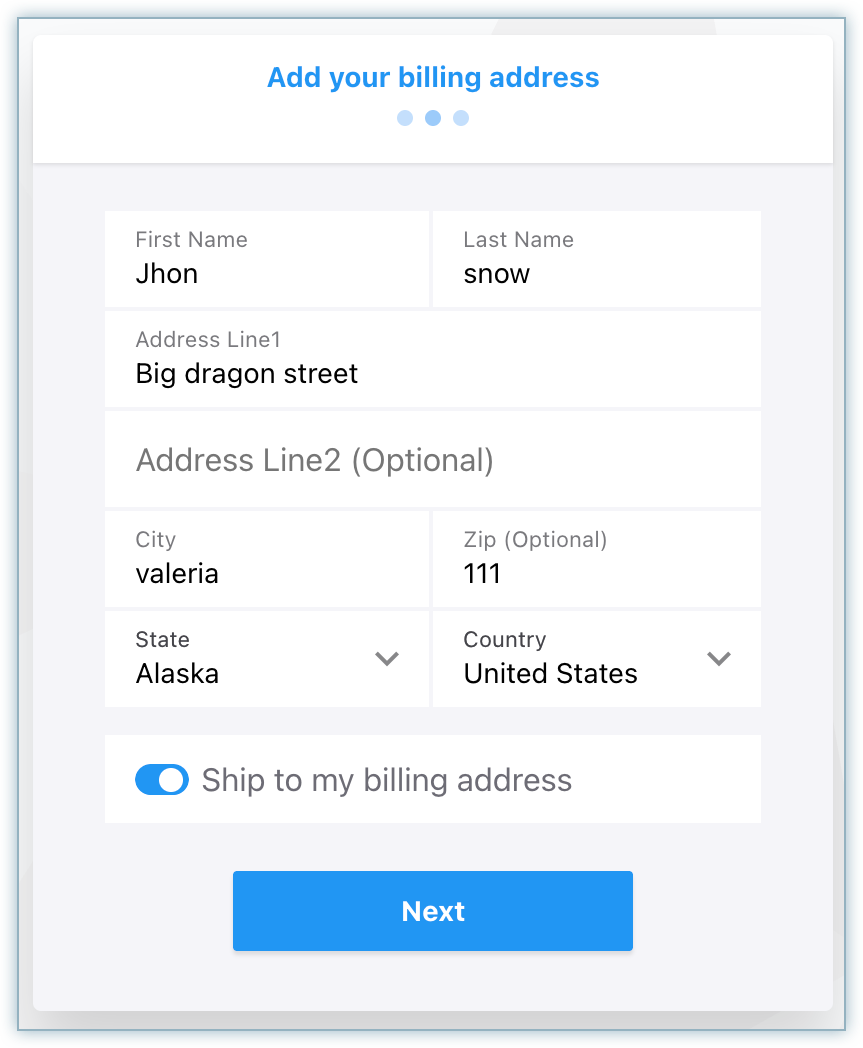
Your customer completes the following steps during checkout with ACH via NMI:
- Review the order details on the Your order page and click Proceed To Checkout.
- Enter the email address on the Enter email to proceed page and click Next.
- Enter the billing address details on the Add your billing address page and click Next.
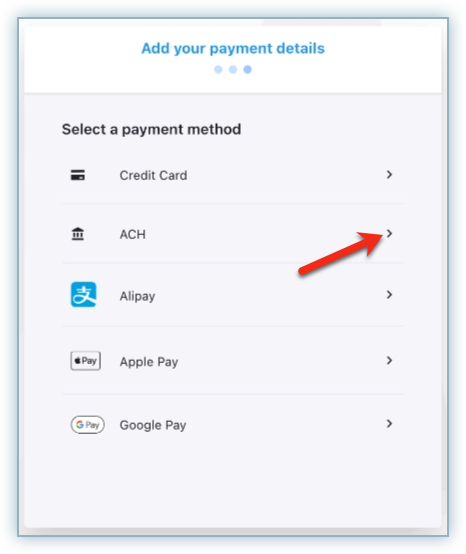
- On the Add your payment details page, select ACH as the payment method.
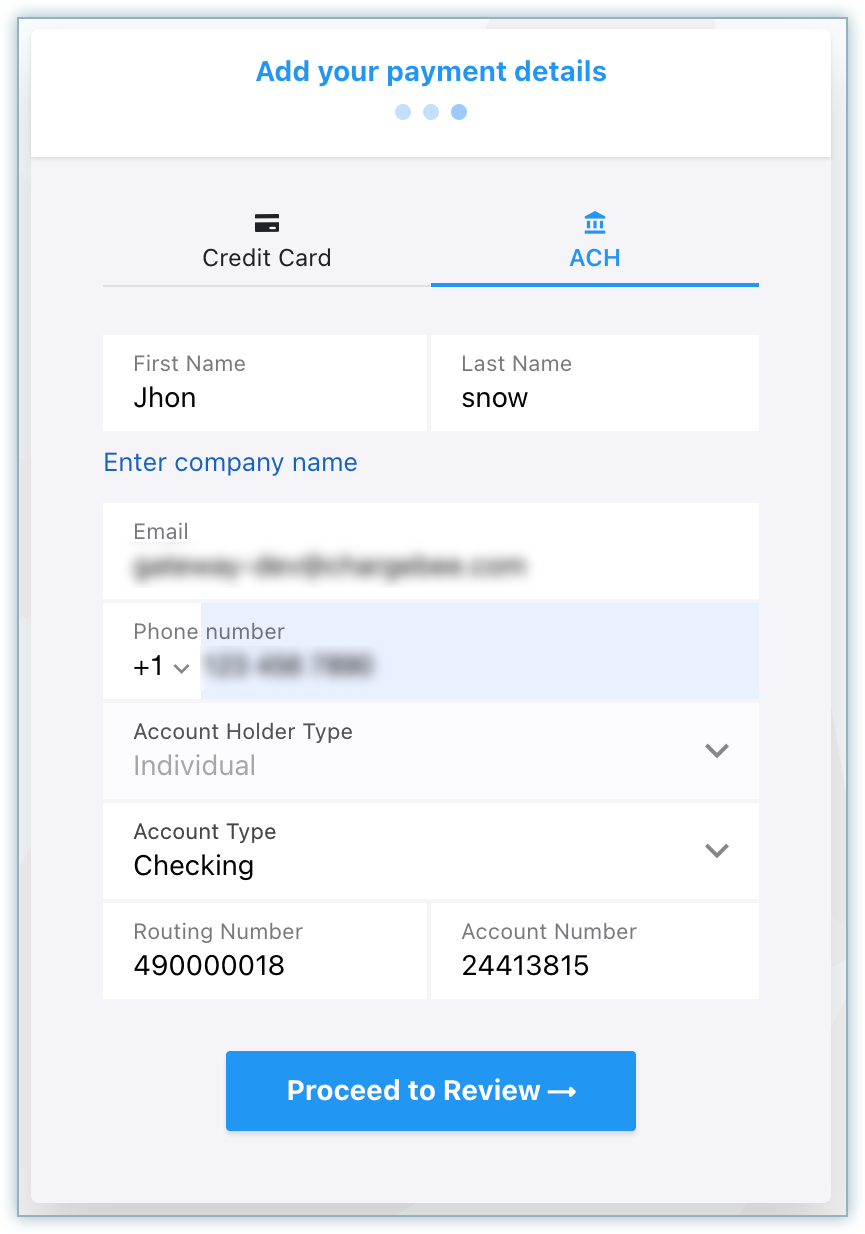
- Enter all required bank account details and click Proceed to Review.
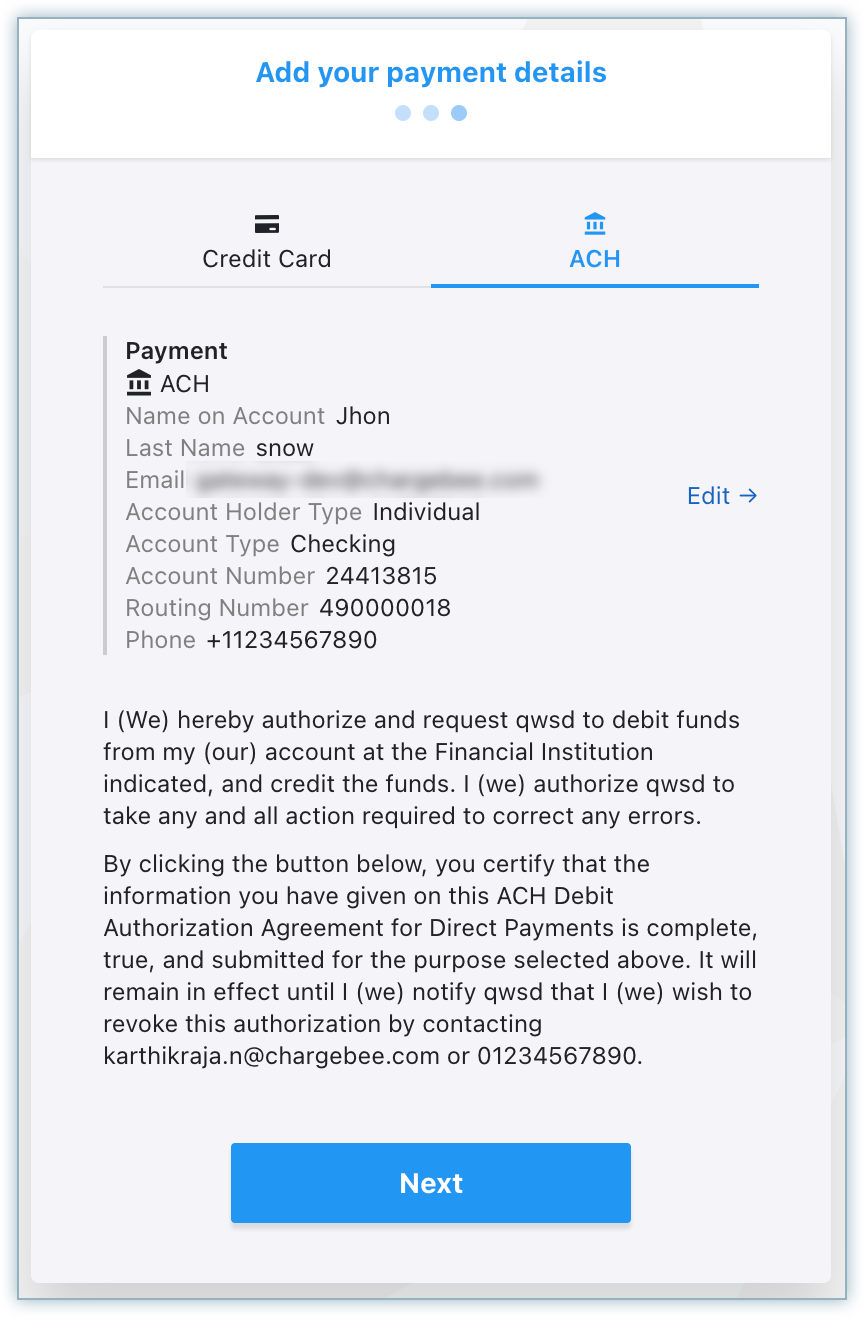
- Review the details and the ACH Debit Authorization Agreement, then click Next.
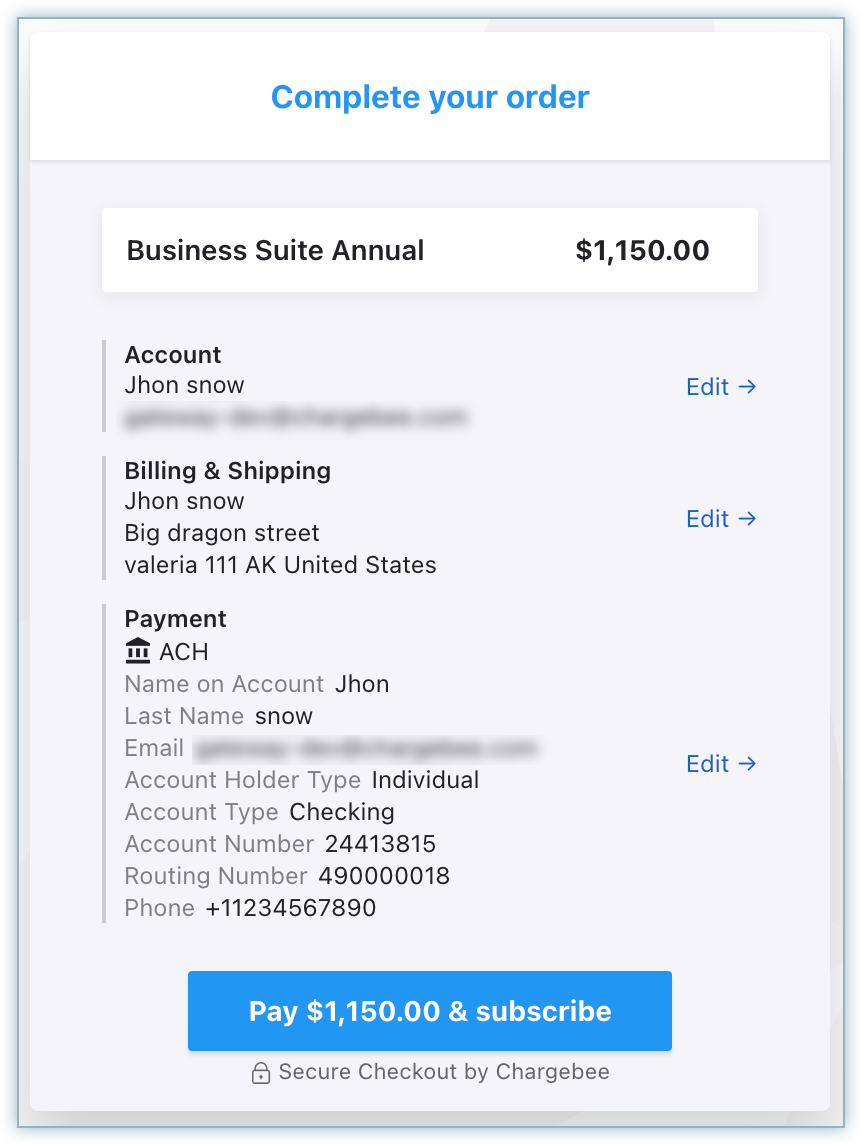
- Review the order summary on the Complete your order page and click Pay.
After the customer clicks Pay, the checkout page closes automatically and returns to Chargebee for processing.
Note
Chargebee processes ACH payments asynchronously. The transaction stays in a pending state until NMI confirms settlement, which can take 3–5 business days.
Payment features
The following table lists the features for this integration and their details.
| Feature | Description | Supported | Default state | Configuration or behavior |
|---|---|---|---|---|
| Integration sync mode | Defines the integration mode between Chargebee and NMI, including how payment requests are processed and statuses are communicated. | Yes (asynchronous mode only) | Asynchronous | NMI processes ACH payments asynchronously. Chargebee receives the final payment status through the transaction.check.status.settle and transaction.check.status.return webhooks. Webhooks are mandatory, and the final status can appear with a delay of 3–5 business days. |
| Capture settings | Payment processing involves two stages: authorization and capture. Capture settings determine when and how funds are collected after authorization. | Yes | Auto capture | No configuration is required. Auto capture is the only supported capture setting for NMI ACH. |
| Verification modes | Defines how customer bank accounts are validated before Direct Debit starts. | Yes | Enabled | No configuration is required. NMI verifies the payment before the transaction is processed. |
| Statement descriptor | A statement descriptor is the business name shown on a customer's bank statement. It helps customers recognize charges and reduces disputes. | Yes | Disabled | Configure this under Settings > Configure Chargebee > Transaction Descriptor. |
| Chargeback management | Processes chargeback events through webhooks and automatically applies configured actions on invoices and subscriptions. | No | Not applicable | Chargeback management isn't supported for NMI ACH. ACH returns are communicated through the transaction.check.status.return webhook. |
| Fraud management | Automatically interprets fraud signals from the payment gateway to identify and flag high-risk transactions. | No | Not applicable | No NMI ACH-specific fraud configuration is available in Chargebee. |
| Transaction initiation type | Identifies whether a transaction is customer-initiated (CIT) or merchant-initiated (MIT). | Yes | Supported | The initial ACH payment is customer-initiated when the customer adds their bank account at checkout. Subsequent recurring charges are merchant-initiated. |
| Error intelligence | Provides standardized categorization of payment failures. | Yes | Enabled | Supported for NMI ACH. No configuration is required. |
| Gateway transaction details | Provides access to raw gateway responses for transactions. | Yes | Enabled | Available on the transaction page under Error details. No configuration is required. |
| Addition of payment methods in Chargebee dashboard | Ability to add a payment method in Chargebee when details are collected outside the platform. | Yes | Enabled | Add a customer's bank account from the Payment Method section on the customer's details page, or use the Create a bank account payment source API. |
Supported token formats
This section is relevant if you're building a custom checkout or migrating bank accounts from another provider to NMI.
| Token type | Description | Supported | Token field | Token format |
|---|---|---|---|---|
| Raw bank account details | Bank account details collected directly through your checkout: account holder name, account number, routing number, and account type. | Yes | bank_account[] | Not applicable |
| Chargebee Payment Intent | Recommended token format when you build a custom checkout using Chargebee JS. | Yes | payment_intent[id] | payment_intent_id |
| Chargebee token | Legacy token format supported for selected payment methods and gateways with Chargebee JS. Not recommended for new implementations. | No | token_id | Not applicable |
| Gateway permanent token | Permanent reference provided by NMI and used for future recurring payments or migrations from another PSP to NMI. | Yes | payment_method[reference_id] | customer_vault_id |
Testing
Test in sandbox
Test the integration on your Chargebee test site before you enable it in production.
- Ensure NMI is configured and Direct Debit (ACH/eCheck) is turned on in your Chargebee test site.
- Ensure webhooks are configured so that Chargebee receives the
transaction.check.status.settleandtransaction.check.status.returnupdates. - Complete an ACH checkout using test bank account details, and verify that the transaction status updates correctly in Chargebee.
Note
- Use only the email address associated with your NMI sandbox merchant account as the checkout email. Other email addresses aren't valid for test checkouts.
- The sandbox allows vaulting a maximum of 25 customers. After you reach this limit, you can't store additional test customers.
Test in production
Before you move to live:
- Ensure ACH Payments via NMI is fully configured in NMI and Chargebee.
- Perform end-to-end testing using a real US bank account to validate the complete payment flow, including the 3–5 business day settlement window.
Reconciliation
For financial reconciliation between Chargebee and NMI (for example, matching transaction records), follow these steps:
- Use the Chargebee transaction field
id_at_gatewayas the mapping key. This value corresponds to the NMI transaction ID. - To reconcile transactions, locate the Chargebee transaction's
id_at_gatewayvalue and use it to find the corresponding transaction in NMI.
Was this article helpful?