Chargebee actions in Salesforce CPQ
This page describes the actions you can perform in Chargebee for Salesforce CPQ after successfully installing it.
Prerequisites
- The CPQ integration requires Salesforce CPQ version 242.2 or higher.
- The Chargebee for CPQ integration cannot operate concurrently with the Chargebee Salesforce integration.
- Before you perform any of the actions outlined on this page, make sure that the integration package is correctly set up.
Terminology
To ensure brevity and clarity in this documentation, we've introduced some new terminology that you may encounter while reading about the Chargebee for Salesforce CPQ integration:
- Plan quote line: A Salesforce CPQ quote line created from a product with Chargebee Type as Plan.
- Plan subscription: A Salesforce CPQ subscription created from a product with Chargebee Type as Plan.
- Synced plan subscription: The initial plan subscription associated with a contract. The system automatically generates this subscription when you create a contract. Additionally, this plan subscription is linked to a subscription in Chargebee, as indicated by its Chargebee ID field containing the ID of the Chargebee subscription.
Products and pricing
When you create products in Salesforce CPQ and set up their prices, the integration syncs them to Chargebee as Plan, Addon, or Charge records, along with their respective Pricing records.
See also
Field mapping for Product and Price Book Entry objects.
Product synchronization
This section explains the synchronization process of a product and price book entry record from Salesforce CPQ to Chargebee. A product and its price book entries sync to Chargebee as either a plan with plan price points, an addon with addon price points, or a charge with charge price points.
Note:
After you create products, the integration syncs them to Chargebee during the subsequent sync job.
Consider the following Salesforce product record:
| Product Name | Product Code | Subscription Term | Billing Frequency | Pricing Method | Chargebee Type |
|---|---|---|---|---|---|
| Office Supplies | office-supplies | 12 | Monthly | List | "Plan" or "Add-on" |
And the corresponding Salesforce price book entry record:
| Product Code | List Price |
|---|---|
office-supplies | USD 1200 |
Through the integration, the above data synchronizes as a Chargebee plan/addon record:
| Plan/Addon Name | Plan/Addon ID |
|---|---|
| Office Supplies | office-supplies |
Additionally, the system creates Chargebee price point records:
| External name/Internal name/ID | Billing frequency | Pricing model | Currency | Price |
|---|---|---|---|---|
| office-supplies-USD-1_MONTH | Monthly | Per unit | USD | 100 |
| office-supplies-USD-3_MONTH | Every 3 months | Per unit | USD | 300 |
| office-supplies-USD-6_MONTH | Every 6 months | Per unit | USD | 600 |
| office-supplies-USD-1_YEAR | Annual | Per unit | USD | 1200 |
Charge price points
When a Salesforce product has an empty Chargebee Type field, the system synchronizes it, with its price book entries, as a charge with charge price points in Chargebee. The system creates a corresponding charge price point for each price book entry associated with the product.
Syncing products from Salesforce to Chargebee
Prerequisite Ensure that the billing frequencies supported in Salesforce have also been created in Chargebee.
- Open the product list page.
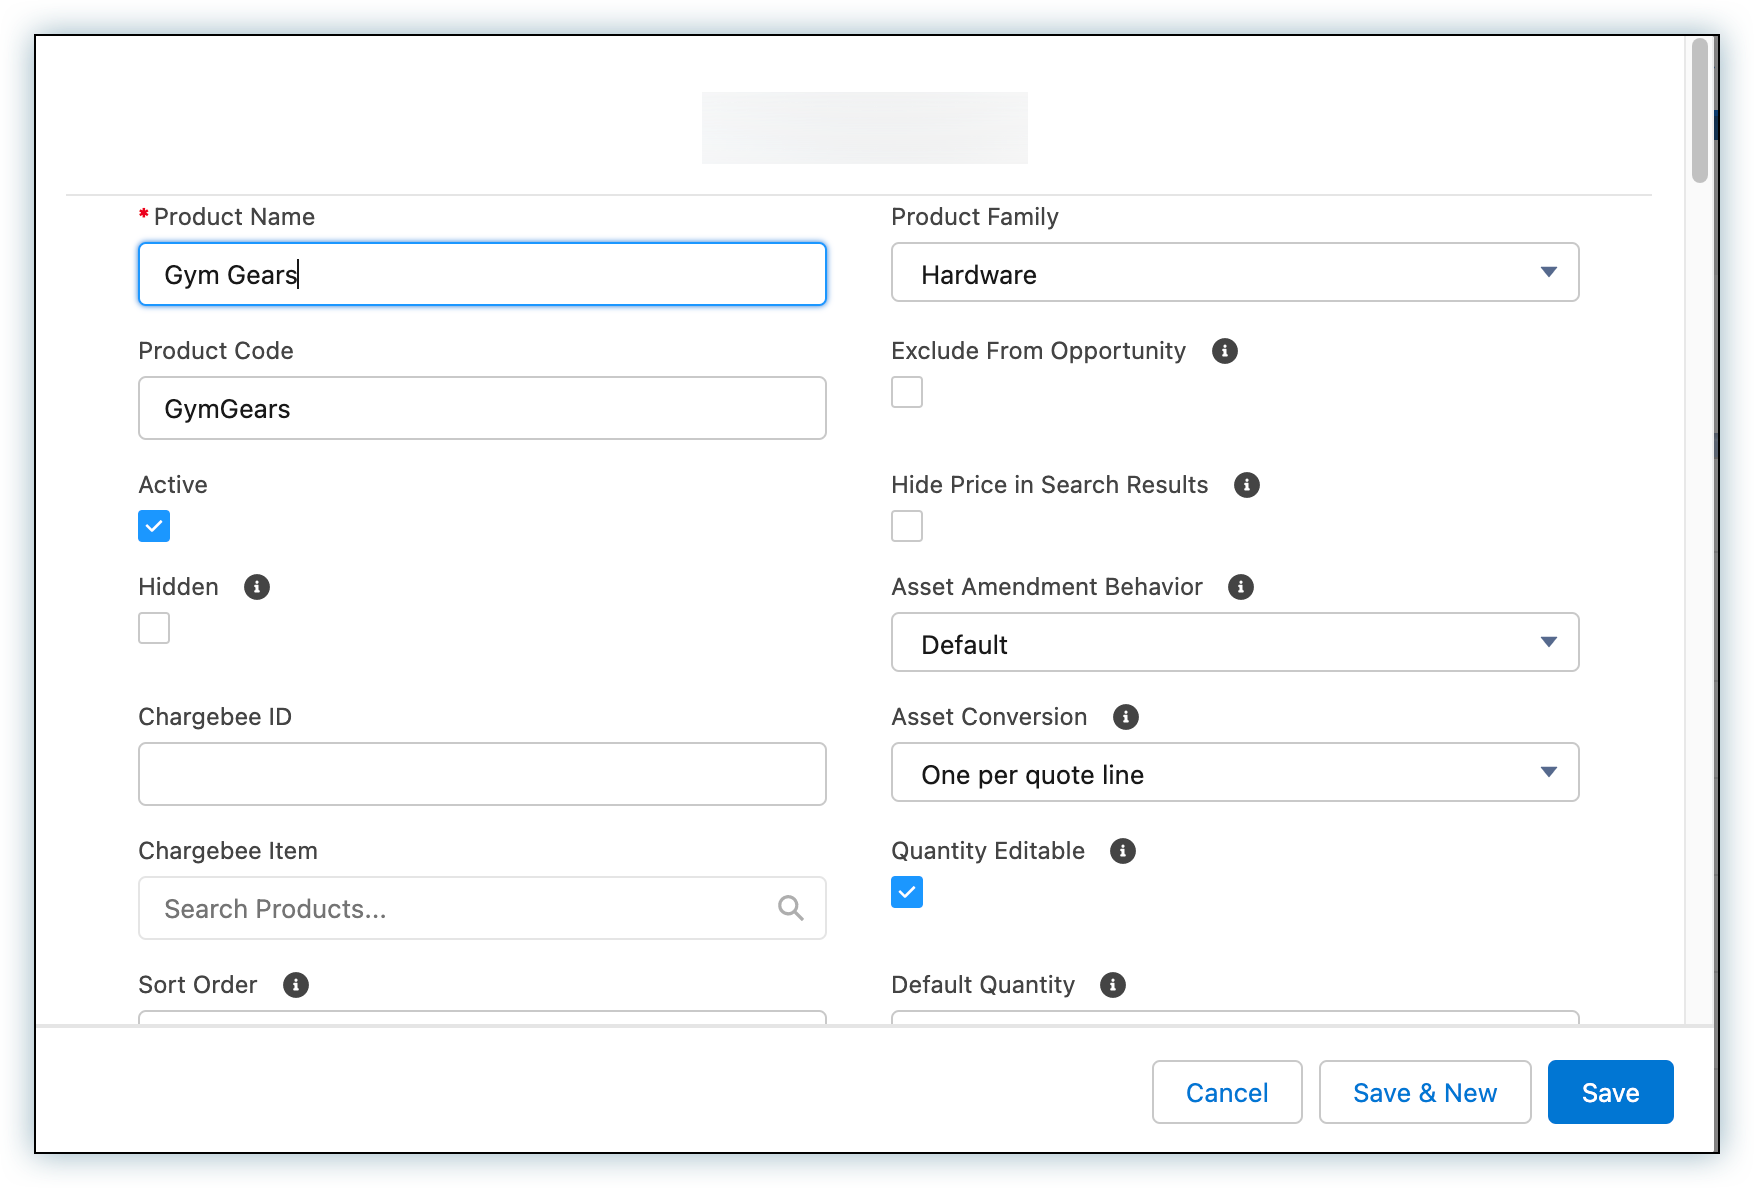
- Click New to create a new product.
- Enter the Product Name and Product Code. Both are mandatory. Avoid using spaces or special characters in the product code.
- Select the appropriate Product Family. The field value must match the ID field of a product family in Chargebee.
- Select the Active checkbox.
- Choose a Pricing Method from the supported options. See the list of supported pricing methods.
- For Chargebee Type, select one of the following values:
- Plan: Sync the product to Chargebee as a plan.
- Add-On: Sync the product to Chargebee as an addon.
- None: Sync the product to Chargebee as a charge.
- Set the Subscription Pricing. This field is mandatory when Chargebee Type is set to Plan or Add-On.
- Enter the Subscription Term. This field is mandatory when Chargebee Type is set to Plan or Add-On. The value determines the length of time for which the product price is applicable.
- Click Save.
- On the Related list for the product, under Price Books, click Add Standard Price. Note that the standard price book isn't required for the integration to work; you only need to configure a price book with a Chargebee site.
- In the New Price Book Entry dialog, enter a standard price and click Save.
- On the Related list for the product, under Price Books, click Add to Price Book.
- In the Add to Price Book dialog, select the Price Book that corresponds to the Chargebee site you want to sync the products to. If you select a non-Chargebee price book here, the product won't sync to Chargebee and billing won't occur.
- Choose the Currency.
- Click Next.
- In the New Price Book Entry dialog, modify the List Price as needed.
- Select the Send to Chargebee checkbox.
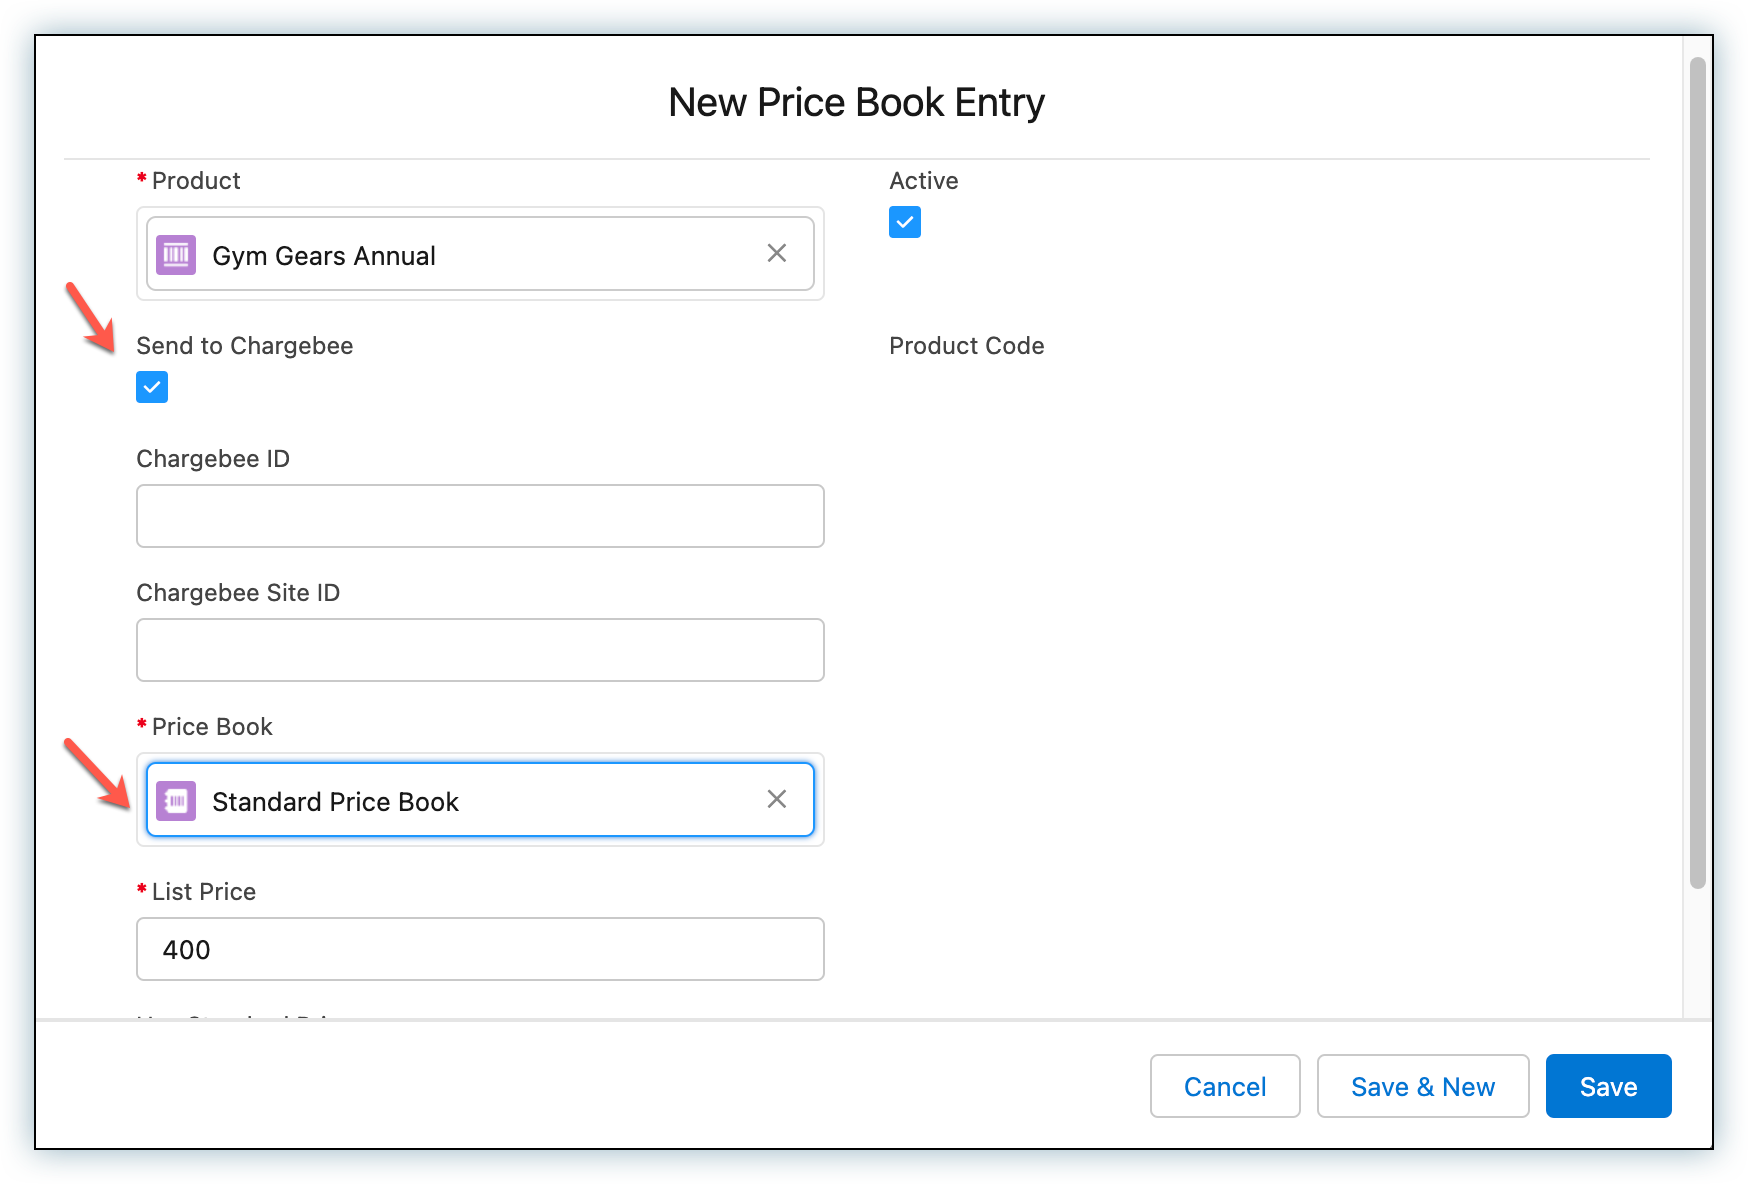
- Click Save.
This creates an item record (plan, addon, or charge) in Chargebee during the next sync. The system creates pricing records in Chargebee for the supported billing frequencies defined in Chargebee. The Chargebee ID field on the product is filled with the ID of the plan, addon, or charge record in Chargebee. The Chargebee Site ID field on the product is filled with the name of the Chargebee site in which the plan, addon, or charge records were created.
Confirming product sync from Salesforce to Chargebee
You can perform the following steps to confirm that a product record in Salesforce has successfully synced to Chargebee.
Important If you can't locate the record in the list during step 7 below, the subsequent sync following product creation likely hasn't completed yet. Allow some time before checking again.
- In Salesforce, click on the app launcher and select Chargebee.
- Click Chargebee Tracker on the navigation bar.
- Click on the Time Stamp column heading to sort the list in descending order of the record timestamp.
- Click on the filter icon and select the CREATE_ITEM_PRICES checkbox on the Apply Filters dialog that appears.
- Click Apply Filters.
- Open the first record by clicking the hyperlinked Salesforce Record field value.
- Check the value of the Integration ID field to ensure that it has the value of the Product Code field as the prefix. If the value isn't the same as the Product Code, the record corresponds to a different product in Salesforce. Go back a step and check the next record until you find the one with the right value for Integration ID.
- Check the Status field. If it's SUCCESS, the product has successfully synced to Chargebee.
- Click the back button on the browser to go back to the filtered records.
- Repeat steps 7 and 8 for the next set of records until you have ensured all required prices have been created in Chargebee.
Editing prices for subscription products
Sometimes, you may need to modify the default prices that the integration generates for different billing periods. For instance, let's assume the List Price of a product is EUR 1400 per year. When the plan prices are created in Chargebee through the integration, the system automatically generates a monthly plan price with a unit price of EUR 1400 ÷ 12 = EUR 116.67. However, you might want to adjust this to EUR 120. You can edit the CB Item Price custom object associated with the plan price to make this change.
- Open the Related list of the product.
- Under the CB Item Prices list, click View All to see the full list.
- Open a record and review the Price and Frequency fields.
- Edit the value of the Price field as necessary and click Save.
- Navigate to the product's Related list and repeat the previous three steps for any remaining CB Item Price records.
Creating an account
The system syncs accounts in Salesforce to Chargebee as customer records. The system only syncs accounts to Chargebee when you create a subscription or one-off charge against them.
Steps to create an account
- Edit the Chargebee Site field and select the Chargebee site to sync the account to. This tells the integration which Chargebee site should be used if multiple sites are connected.
- Optionally, set the Locale field for the account. This configures the Language field for the customer record in Chargebee, ensuring that the system generates invoices in the correct language. When left blank, Chargebee's default settings apply.
- Select the Auto Collection checkbox if you want the system to charge the customer automatically using their payment method.
- Choose a Chargebee Primary Contact or create a new one. The system syncs the contact details to Chargebee as the customer record details.
- Optionally, set the Net Term Days field for the account. You can skip this step and set the field only at the quote level. If you choose to set the field at the quote level, it will override the value set on the account for the deal.
- Click Save.
Creating a subscription
Overview
Prerequisite: Before creating subscriptions, make sure your Chargebee site is configured to allow manual discounts and multi-decimal support.
Note:
To reduce the number of non-subscription customer records in Chargebee, you can't sync a Customer from Salesforce CPQ to Chargebee without an associated Subscription or Charge.
The system creates subscriptions in Chargebee from contracts in CPQ that have been properly configured. The CPQ subscriptions created under the contract correspond to the items within the Chargebee subscription.
Information
We recommend automating as many post-sales steps as possible to reduce manual input and potential user error.
Steps to create a Chargebee subscription from CPQ
- Create a new account in Salesforce, or navigate to an existing account you'd like to sync to Chargebee.
- In the Related list of the account, under the Opportunities section, choose an existing opportunity or click the New button to create a new opportunity.
- Enter the following fields Opportunity Name, Close Date, and Stage.
- Click Save.
- Open the opportunity.
- In the Related list of the opportunity, under the Quotes section, select the existing primary quote or click the New button to create a new quote.
- When creating a new quote, make sure the Account and Opportunity fields are filled with the values for the account and opportunity created in the earlier steps.
- Select the Primary checkbox for the quote.
- Optionally, choose the appropriate Payment Terms. This will override the value set on the account for this deal.
- Optionally, select the Create Unbilled Charges checkbox for contracts that are scheduled to start in the future. Read this section for more information about this feature.
- Click Save.
- Click Edit Lines on the quote page.
- In the Choose Price Book dialog that appears, select the price book associated with the Chargebee site you selected for the account.
- Click Add Products and add any pre-configured products. You may also add metered products. Note that subscriptions in Chargebee can only have one plan item, so make sure to select only one product with a Chargebee Type field value of Plan.
- Add any applicable discounts to the quote. The system eventually adds these to the Chargebee subscription as Manual Discounts
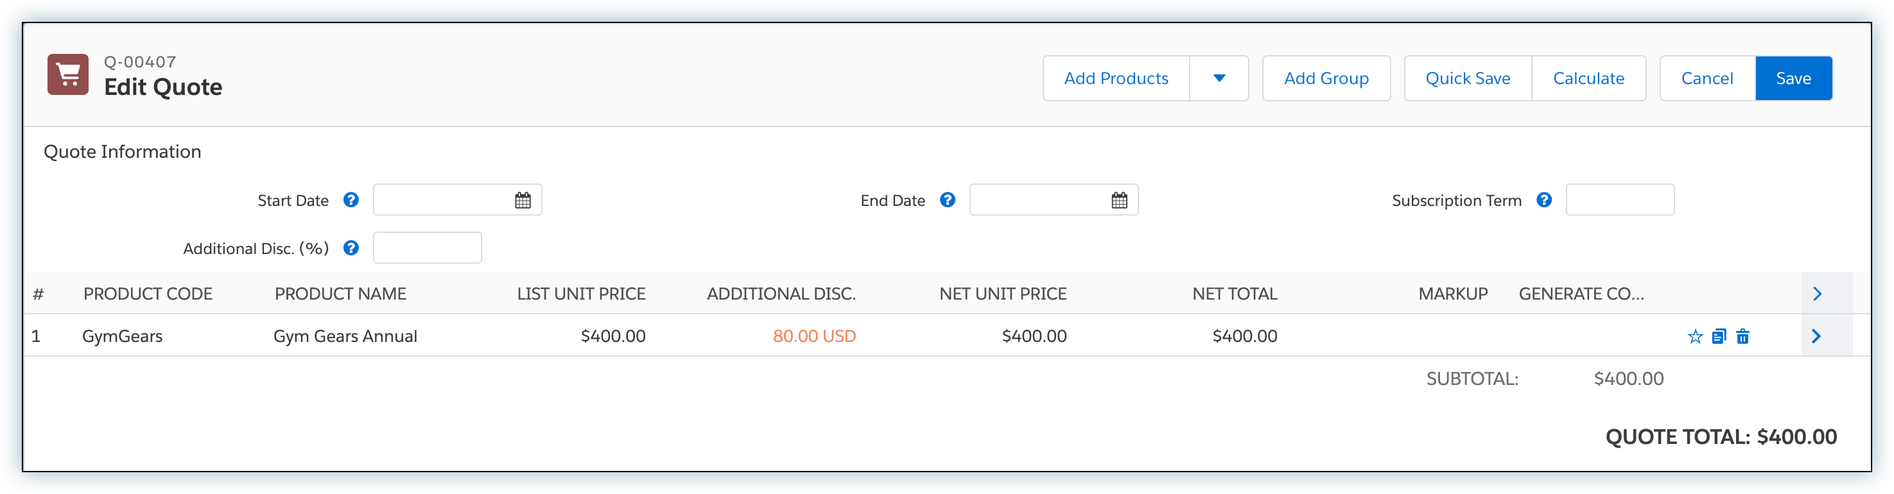
- Enter any additional details and click Save.
- Edit the quote you created and select the Ordered checkbox.
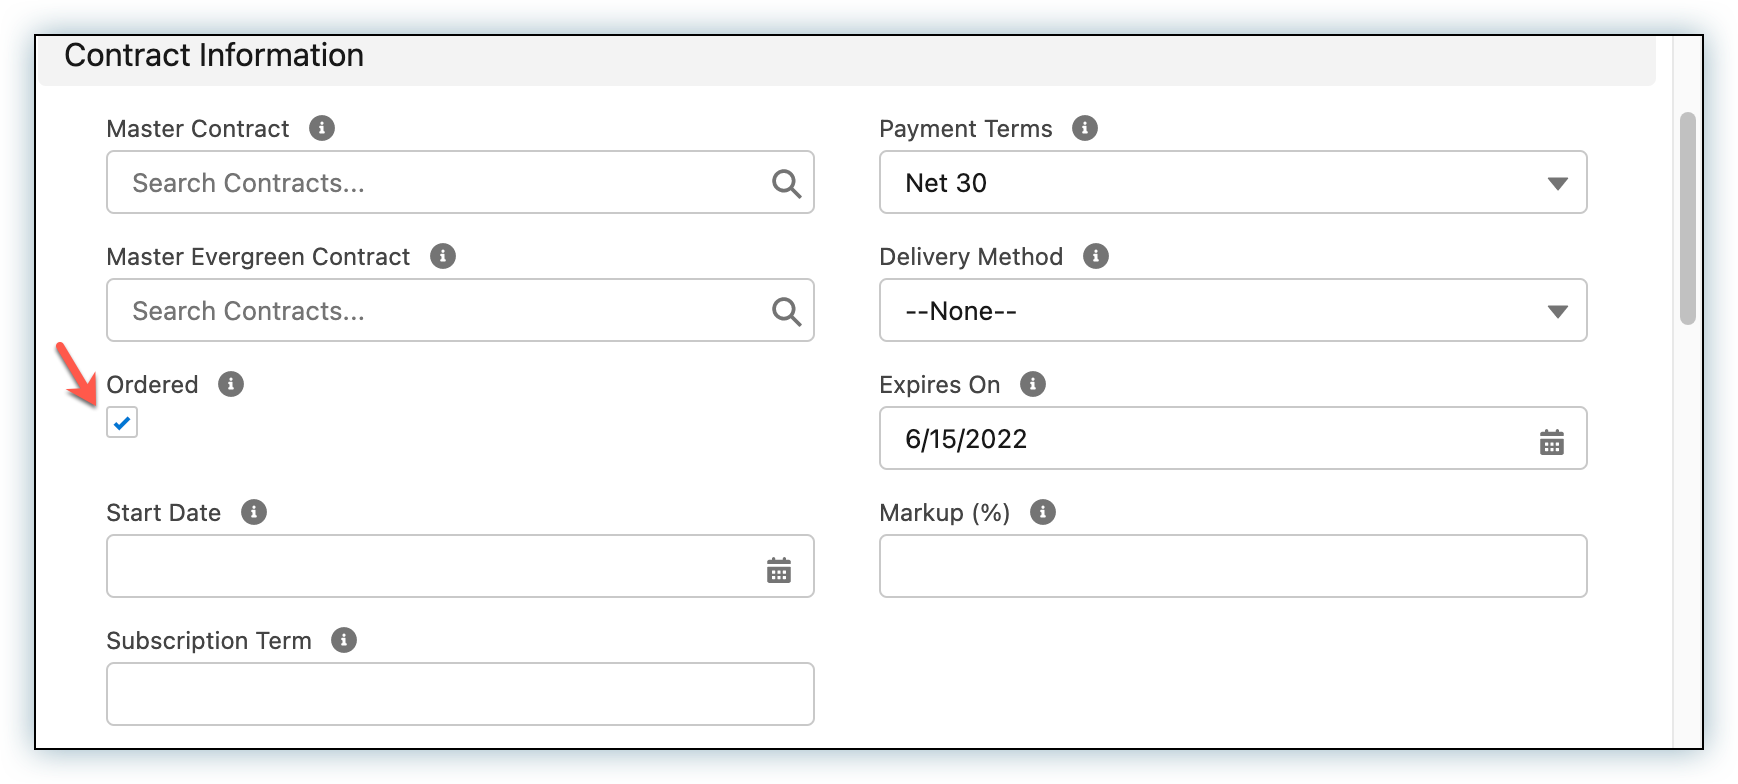
- Click Save. The system creates an order record for the quote.
- In the Related list of the quote, under the Orders section, click on the order number of the newly created order.

- Click Edit on the order detail page.
- Select Activated as the Status.
- Select the Contracted checkbox.
- Click Save. Allow a few seconds for the system to create the contract.
- In the Related list of the quote, under the Contracts section, open the newly created contract by clicking on its Contract Number. Refresh the contract detail page if the contract isn't visible yet.
- In the Related list of the contract, under the Subscriptions section, copy the value of Subscription #. If there are multiple subscriptions under the contract, copy from the plan subscription.
- Go back to the order detail page.
- From the Order Products related list, open any one of the order products.
- Paste the value copied in step 18 into the Chargebee Plan field of the order product and click Save.
- Repeat steps 19 to 21 for the remaining order products, excluding only those that shouldn't be included as an item in the single subscription that will be created in Chargebee for the contract.
- Click the field value of Chargebee Plan on the last edited order product to open the subscription.
- Select the Send to Chargebee checkbox and click Save. The system immediately creates a new subscription in Chargebee.
Amending a subscription
Considerations for subscription amendment
-
The start date for the subscription changes is taken from the order product start dates. If the start dates are different for different order products, the latest start date is considered for scheduling subscription changes in Chargebee.
-
While editing the quote lines, a plan quote line must be provided or the Chargebee subscription will cancel.
Steps for subscription amendment
Information
We recommend automating as many post-sales steps as possible to reduce manual input and potential user error.
- Open the contract that is associated with the subscription you want to amend in Chargebee.
- Click on Amend.
- All the CPQ subscriptions are listed.
- Click on Amend.
- You are now presented with the Edit Quote page for a new amendment quote for the contract. The quote is created as a primary quote under a new amendment opportunity for the contract.
- Make the changes to the quote lines. See the considerations for amending a subscription.
- Click Save.
- On the quote detail page, select the Ordered checkbox.
- Click Save. An order is created with order products for any additional products added. For example, if the quantity for a quote line was changed from 1 to 3, the order product is created for the additional quantity, which is 2.
- In the Related list of the quote, open the order.
- On the order detail page, change Status to Activated.
- Select the Contracted checkbox.
- Click Save. Allow a few seconds for the contract to be amended.
- In the Related list of the order, open the contract.
- In the Related list of the contract, under the Subscriptions section, you will see new subscription(s) created for any new subscription-order product(s).
- In this list, locate the synced plan subscription record for the contract. You can identify the synced plan subscription by checking its Chargebee ID field. The field value would be the subscription ID from Chargebee.
- Copy the Subscription # of this subscription.
- Go back to the Related list of the order.
- Open one of the order products.
- Edit the Chargebee Plan field and paste the Subscription # into it.
- Click Save.
- Perform the above three steps for all the order products under the new order.
- We must now sync these changes to Chargebee. On the just saved order product, click the Chargebee Plan field value to open the synced plan subscription.
- Open the Edit dialog and click Save. The Chargebee subscription is immediately updated/scheduled with the changes.
Renewing a subscription
Once a renewal contract has been created in Salesforce CPQ, you can sync it to Chargebee to update the original subscription.
Information
We recommend automating as many post-sales steps as possible to reduce manual input and potential user error.
- Open the contract.
- Under the Salesforce CPQ Information section, select the following checkboxes:
- Renewal forecast
- Renewal quoted
- Save the contract. This will create a renewal opportunity and renewal quote.
- Allow the renewal job to complete.
- In the Related list of the contract, under Renewal Opportunities, open the renewal opportunity.
- Open the quote created under the opportunity.
- Click Edit Lines and modify the quote lines as needed.
- Select the Ordered checkbox.
- Save the quote. An order is created for the quote.
- From the Related list of the quote, open the order.
- On the Order detail page, if the start date displays the current date, change it to the contract renewal date. (See Considerations for Amendments.
- Edit the Status to Activated.
- Select the Contracted checkbox.
- Click Save. This will create a new contract.
- Refresh the page.
- From the Related list of the order, open the contract.
- On the Contract detail page, open the renewal opportunity by clicking on the Opportunity field value.
- On the opportunity detail page, open the original contract by clicking on the Renewed Contract field value.
- From the related list of the contract, under Subscriptions, copy the subscription number of the synced plan subscription.
- Go back two steps on the browser to the original contract.
- From the Related list of the contract, open the renewal opportunity.
- From the renewal opportunity detail page, open the Primary Quote.
- From the Related list of the quote, open the order.
- Open one of the order products.
- Edit the Chargebee Plan field and paste the Subscription # into it.
- Click Save.
- Return to the order product list by clicking the browser's Back button.
- Perform the previous four steps for the remaining order products.
- On the just saved order product, click the Chargebee Plan field value to open the synced plan subscription.
- Open the Edit dialog and click Save. The Chargebee subscription is immediately updated to reflect the contract renewal changes.
Canceling a subscription
When you amend a contract to no longer include a plan subscription, the associated Chargebee subscription is canceled. You can accomplish this while amending the contract by either removing the plan quote line from the contract or changing its quantity to zero:
- Open the contract associated with the subscription you want to amend in Chargebee.
- Click on Amend.
- All the CPQ subscriptions are listed.
- Click on Amend.
- You are now presented with the Edit Quote page for a new amendment quote for the contract. The quote is created as a primary quote under a new amendment opportunity for the contract.
- Set the quantity of all the quote lines to zero. Alternatively, you can set the plan quote line quantity alone to zero. Also see the considerations for amending a subscription.
- Click Save.
- From the quote detail page, click on the Opportunity field value to open the amendment opportunity.
- On the amendment opportunity detail page, select the Contracted checkbox. Allow a few seconds for the contract to be amended.
- On the opportunity detail page, open the contract by clicking on the Amended Contract field value.
- In the Related list of the contract, under the Subscriptions section, new record(s) would have been created with negative quantity value(s).
- In this list, locate and open the synced plan subscription record for the contract and open it. You can identify the synced plan subscription by checking its Chargebee ID field. The field value would be the subscription ID from Chargebee.
- Open the Edit dialog and click Save. The Chargebee subscription is immediately canceled or scheduled for cancellation.
Adding one-off charges to an account
If you want to quote a non-subscription product for an account, Chargebee also supports billing for this. As discussed in another section, non-subscription products sync with Chargebee as charges. The steps below show how to order a quote for a non-subscription product for an account and sync the order as an invoice in Chargebee.
Information
We recommend automating as many post-sales steps as possible to reduce manual input and potential user error.
Part 1: Creating the order and sending it to Chargebee
- Create a new account in Salesforce, or navigate to an existing account you'd like to sync to Chargebee.
- In the Related list of the account, under the Opportunities section, choose an existing opportunity or click the New button to create a new opportunity.
- Enter the following fields Opportunity Name, Close Date, and Stage.
- Click Save.
- Open the opportunity.
- In the Related list of the opportunity, select the existing primary quote under the Quotes section. Alternatively, click the New button to create a new quote.
- When creating a new quote, ensure you fill the Account and Opportunity fields with the values from the account and opportunity you created in previous steps.
- Select the Primary checkbox for the quote.
- Optionally, choose the appropriate Payment Terms. It will specifically override the value set on the account, for this deal.
- Click Save.
- Click Edit Lines on the quote page.
- In the Choose Price Book dialog that appears, select the price book associated with the Chargebee site you selected for the account.
- Click Add Products and add one or more one-off charges to the quote. One-off charges have no value in the Chargebee Type field and can be identified as such.
- Add any applicable discounts to the quote.
- Enter any additional details and click Save.
- Edit the quote you created and select the Ordered checkbox.
- Select the Send Charges checkbox.
- Click Save. An order record is created for the quote.
- In the Related list of the quote, under the Orders section, click on the order number of the newly created order to open it.
- In the Related list of the order, open any one of the order products listed under Order Products.
- Edit the order product and select the Send to Chargebee checkbox.
- Return to the order page and repeat the preceding two steps for any other order products you need to sync to Chargebee as one-off charges.
Part 2: Verifying the invoice in Chargebee
- In Salesforce, click on the app launcher and select Chargebee.
- Click Chargebee Tracker on the navigation bar.
- Click on the Time Stamp column heading to sort the list in descending order of the record timestamp.
- Click on the filter icon and select the CREATE_INVOICE_CHARGE checkbox on the Apply Filters dialog that appears.
- Click Apply Filters.
- Examine the Status field of the first record. If it shows Success, the invoice has been created in Chargebee successfully.
- Open the first record by clicking the hyperlinked Salesforce Record field value.
- Note the value of the Integration ID field. This is the # of the invoice created in Chargebee.
- Open Chargebee > Invoices & Credit Notes > Invoices > Look for the invoice with the correct invoice number in the list that appears.
Adding one-off charges to a future subscription as unbilled
In Chargebee, you can leave immediate charges unbilled, allowing them to be billed in the next billing cycle. However, when new subscriptions (contracts in Salesforce) are scheduled to start in the future, the charges incurred upon subscription activation must be invoiced and cannot be left unbilled.
The Chargebee for Salesforce CPQ integration addresses this limitation. When creating a quote for a contract with a future start date, you can select the Create Unbilled Charges checkbox. This ensures that the charges raised for the contract within the Chargebee subscription remain unbilled during subscription activation and are only billed in the subsequent billing cycle.
Manage Chargebee account hierarchy
Prerequisite
You must enable account hierarchy in Chargebee for this feature to work.
Use this feature to align the account hierarchy in Chargebee with the hierarchy set for the accounts in Salesforce. If any accounts in the pair haven't been synced to Chargebee before, this feature syncs them before setting the hierarchy. Invoke this feature from the child account. If you need to create a hierarchy in Chargebee that involves multiple customer records, build it from the bottom, linking one parent after another.
If you've already set the account hierarchy in Chargebee, this feature displays the current hierarchy.
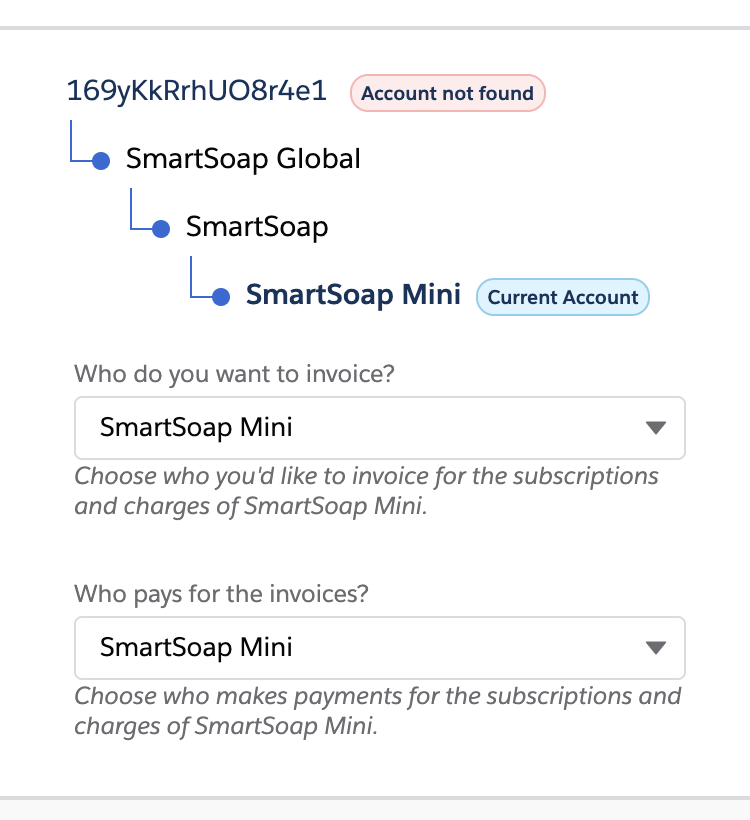
When setting the hierarchy in Chargebee, you also need to designate the invoice owner and payment owner for the child account's subscriptions. Here are your options:
- Who do you want to invoice? Choose the account that should receive the invoice for the customer's subscriptions. The options are the child customer or any of its ancestors.
- Who pays the invoice? Choose the entity responsible for payment. Your options depend on your choice of invoice owner:
- If you select the child customer as the invoice owner, the payment owner can be the same customer or any of its ancestors.
- If an ancestor is the invoice owner, the payment owner must be the same entity.
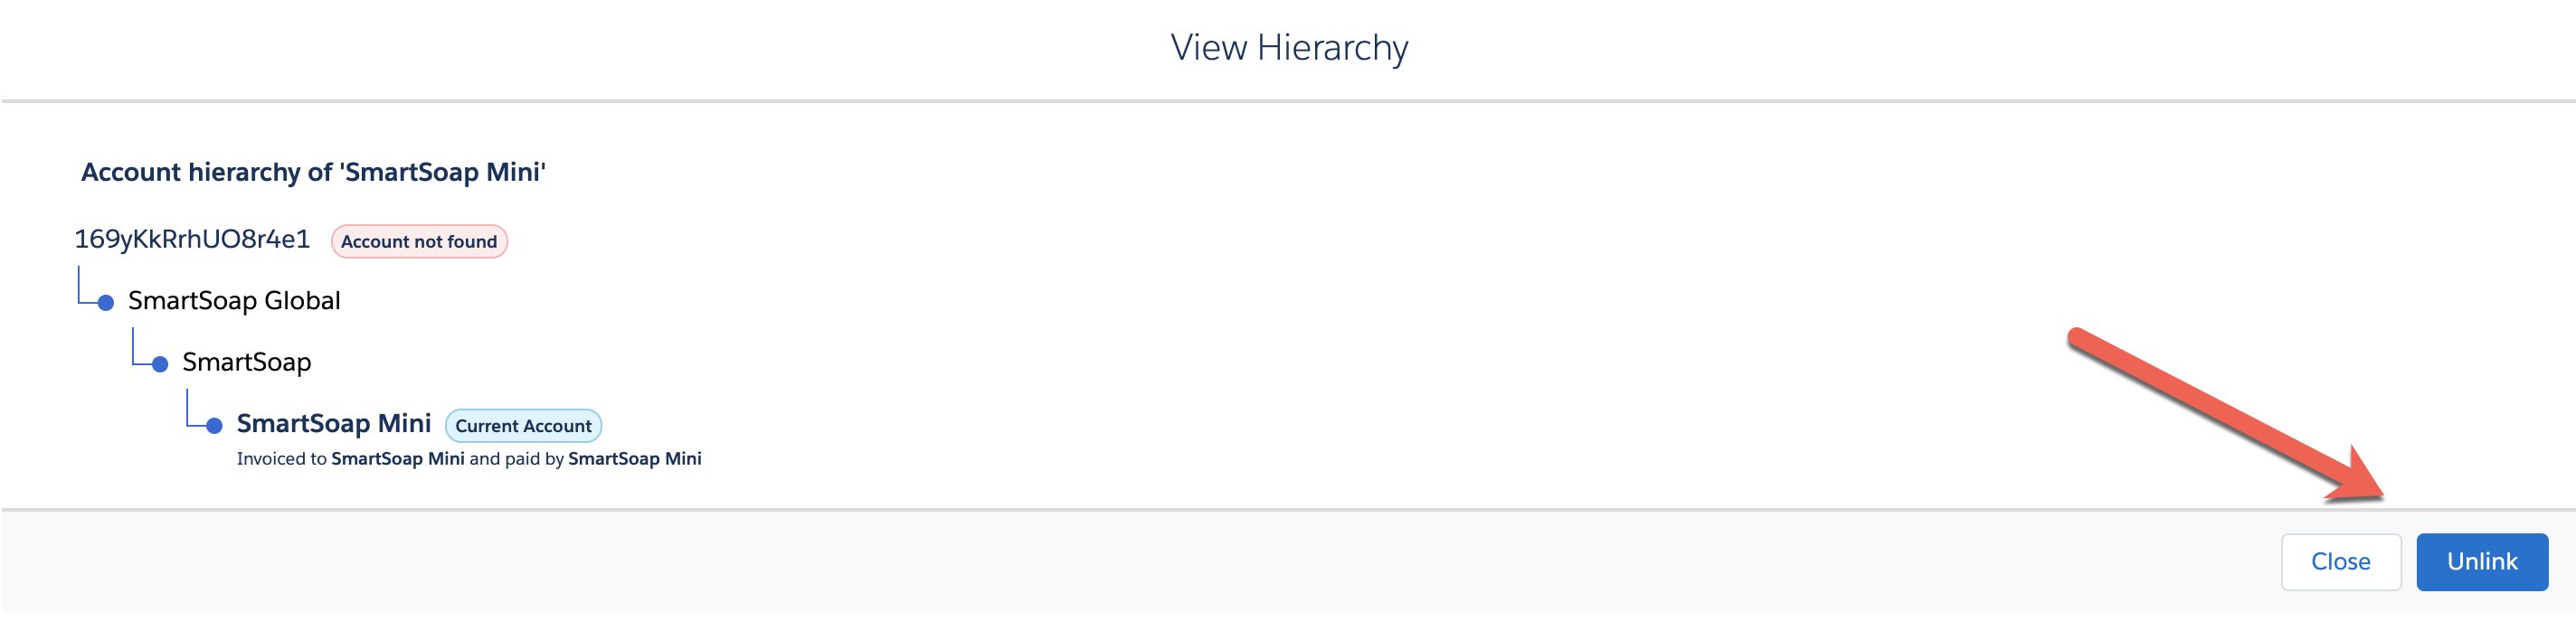
Unlinking a hierarchy
If you've already established a hierarchy in Chargebee, you can use this feature to remove it.
Was this article helpful?