Docschargebeedocs

HomeBillingPaymentsRevRecGrowth
Support

Product Updates

  • Release Notes

Getting Started

  • Overview
  • Chargebee Billing Data Centers
  • Object Relationship Model
  • Understanding Sites
  • Chargebee Tech Glossary
  • Articles and FAQ

Implementing Chargebee

  • Implementation Guide
  • Go-live Checklist
  • Articles and FAQ

AI in Chargebee

  • Chargebee Agents
  • Chargebee Copilot
  • Chargebee MCP Server (Model Context Protocol)

Developer Resources

  • Developer Resources Overview
  • Articles and FAQ

Product Catalog

  • Product Catalog Overview
  • Coupons
  • Articles and FAQ

Subscriptions

  • Working with Subscriptions
  • Billing
  • Orders
  • Articles and FAQ

Customers

  • Managing Customers
  • Account Hierarchy
  • Email Notifications
  • Branding
  • Configure Multiple Languages
  • Articles and FAQ

Entitlements

  • Entitlements Overview
  • Features Overview
  • Feature Management
  • Managing Product Entitlements
  • Subscription Entitlements
  • Customer Entitlements
  • Grandfathering Entitlements
  • Articles and FAQ

Usage Based Billing

  • Understanding Usages
  • Setting up Usage Based Billing
  • Metered Billing
  • Articles and FAQ

Chargebee CPQ

  • Chargebee CPQ
  • Chargebee CPQ for Salesforce
  • Chargebee CPQ for HubSpot

Invoices, Credit Notes, and Quotes

  • Invoices
  • Credit Notes
  • Quotes [Legacy]
  • Transactions
  • Articles and FAQ

Taxes

  • Overview
  • Configuring Taxes
  • Country-specific Taxes
  • Articles and FAQ

Hosted Capabilities

  • Overview
  • Hosted Checkout
  • Hosted Self-Serve Portal
  • Hosted Pages Features
  • Additional Hosted Pages
  • Payment Components
  • Pricing Table
  • Managing Payments with Chargebee.js
  • Mobile-Optimized Hosted Pages
  • Articles and FAQ

Site Configuration

  • Users & Roles
  • Custom Fields & Metadata
  • Approvals
  • Mandatory Fields
  • File Attachments & Comments
  • Advanced Filter Options
  • Multicurrency Pricing
  • Multi-decimal Support
  • Configuring Reason Codes
  • Events and Webhooks
  • API Keys
  • Time Zone
  • Time Machine
  • Transfer Configurations
  • Articles and FAQ

Multi Business Entity

  • Multi Business Entity Overview
  • Customer Transfer Overview
  • Articles and FAQ

Mobile Subscriptions

  • Overview
  • Omnichannel Subscriptions
  • Omnichannel One-Time Orders
  • Mobile Subscriptions (Legacy)

Reports and Analytics

  • RevenueStory
  • Home Dashboard
  • Frequently Asked Questions
  • FAQs for Classic Reports Sunset
  • Articles and FAQ

Integrations

  • Sales
  • Customer Support and Success
    • Groove
    • Freshdesk
    • Zendesk
    • Intercom
    • Intercom Inbox
  • Finance
  • Tax
  • Marketing
  • Stitch
  • Collaboration
  • Contract Management
  • Ecommerce Management
  • Articles and FAQ

Data Privacy & Security

  • Two Factor Authentication
  • SAML Single Sign-On
  • System for Cross-Domain Identity Management (SCIM)
  • EU-GDPR
  • Consent Management
  • Personal Data Management
  • Compliance Certificates
  • HIPAA Guidelines
  • PCI Recommendations and Integration Types
  • Articles and FAQ

Data Operations

  • Bulk Operations
  • Migration
  • Articles and FAQ
  1. Billing
  2. Integrations
  3. Customer Support and Success
  4. Groove
  1. Billing
  2. Integrations
  3. Customer Support and Success
  4. Groove

Groove

You can take customer support to the next level with the Chargebee-Groove Integration, which allows you to access customer and payment related information directly from a support ticket.

This plugin is available only in selected plans. To know more, visit Chargebee's Plans and Pricing page.

Setting up your Chargebee-Groove integration

Step 1

Login to Groove and navigate to Account > Apps.

Step 2

Click on the Custom Profile option and then click on Install.

Step 3

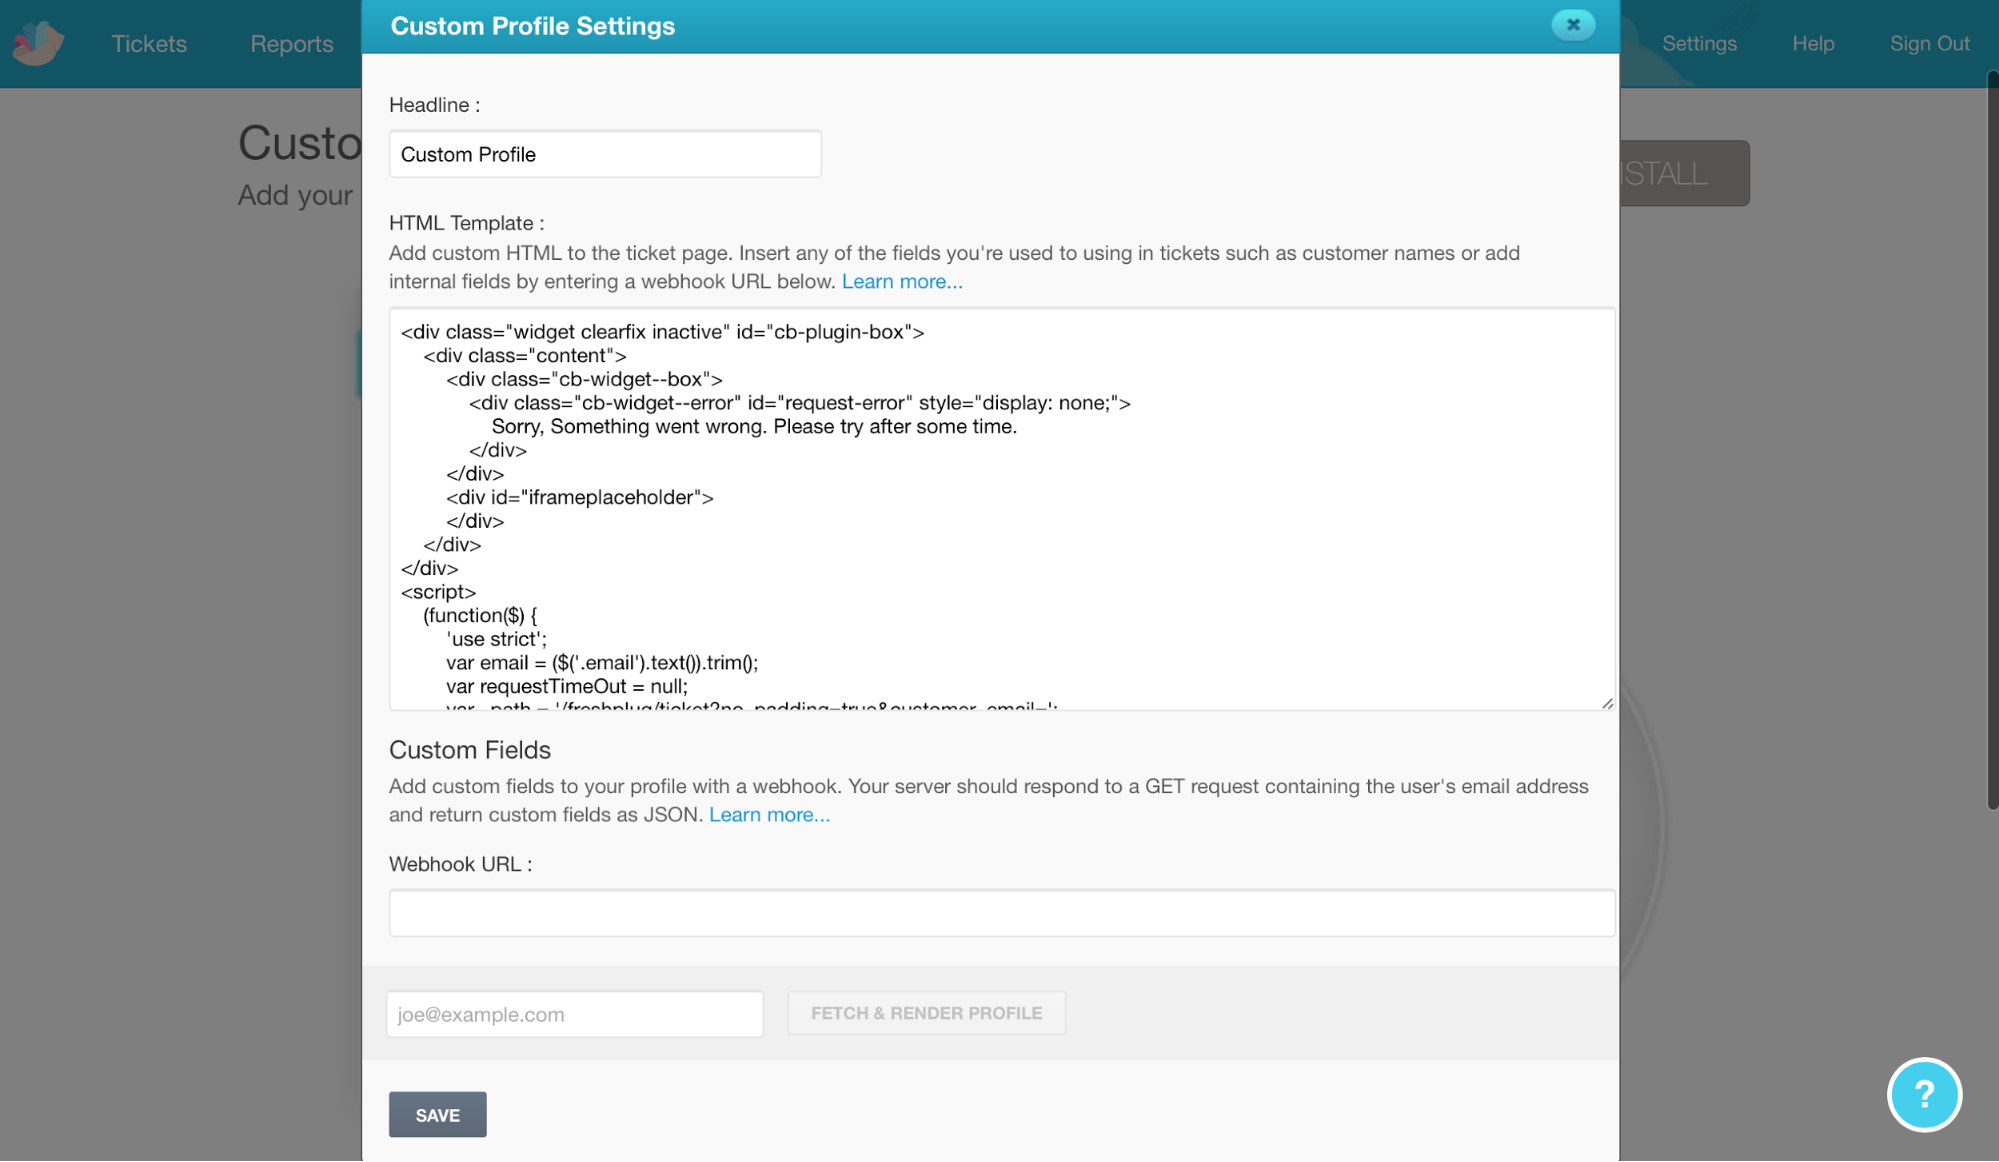
Configure the Chargebee plugin by inserting the HTML Code Snippet into the HTML Template section as shown below:

<iframe src="https://app.chargebee.com/freshplug/ticket?no_padding=true&customer_email=email" style="width: 100%;border: 0;height: 475px;" />

Remember to add a headline and custom fields (if required) before you proceed.

Step 4

Click Save to complete your configuration and save your custom profile.

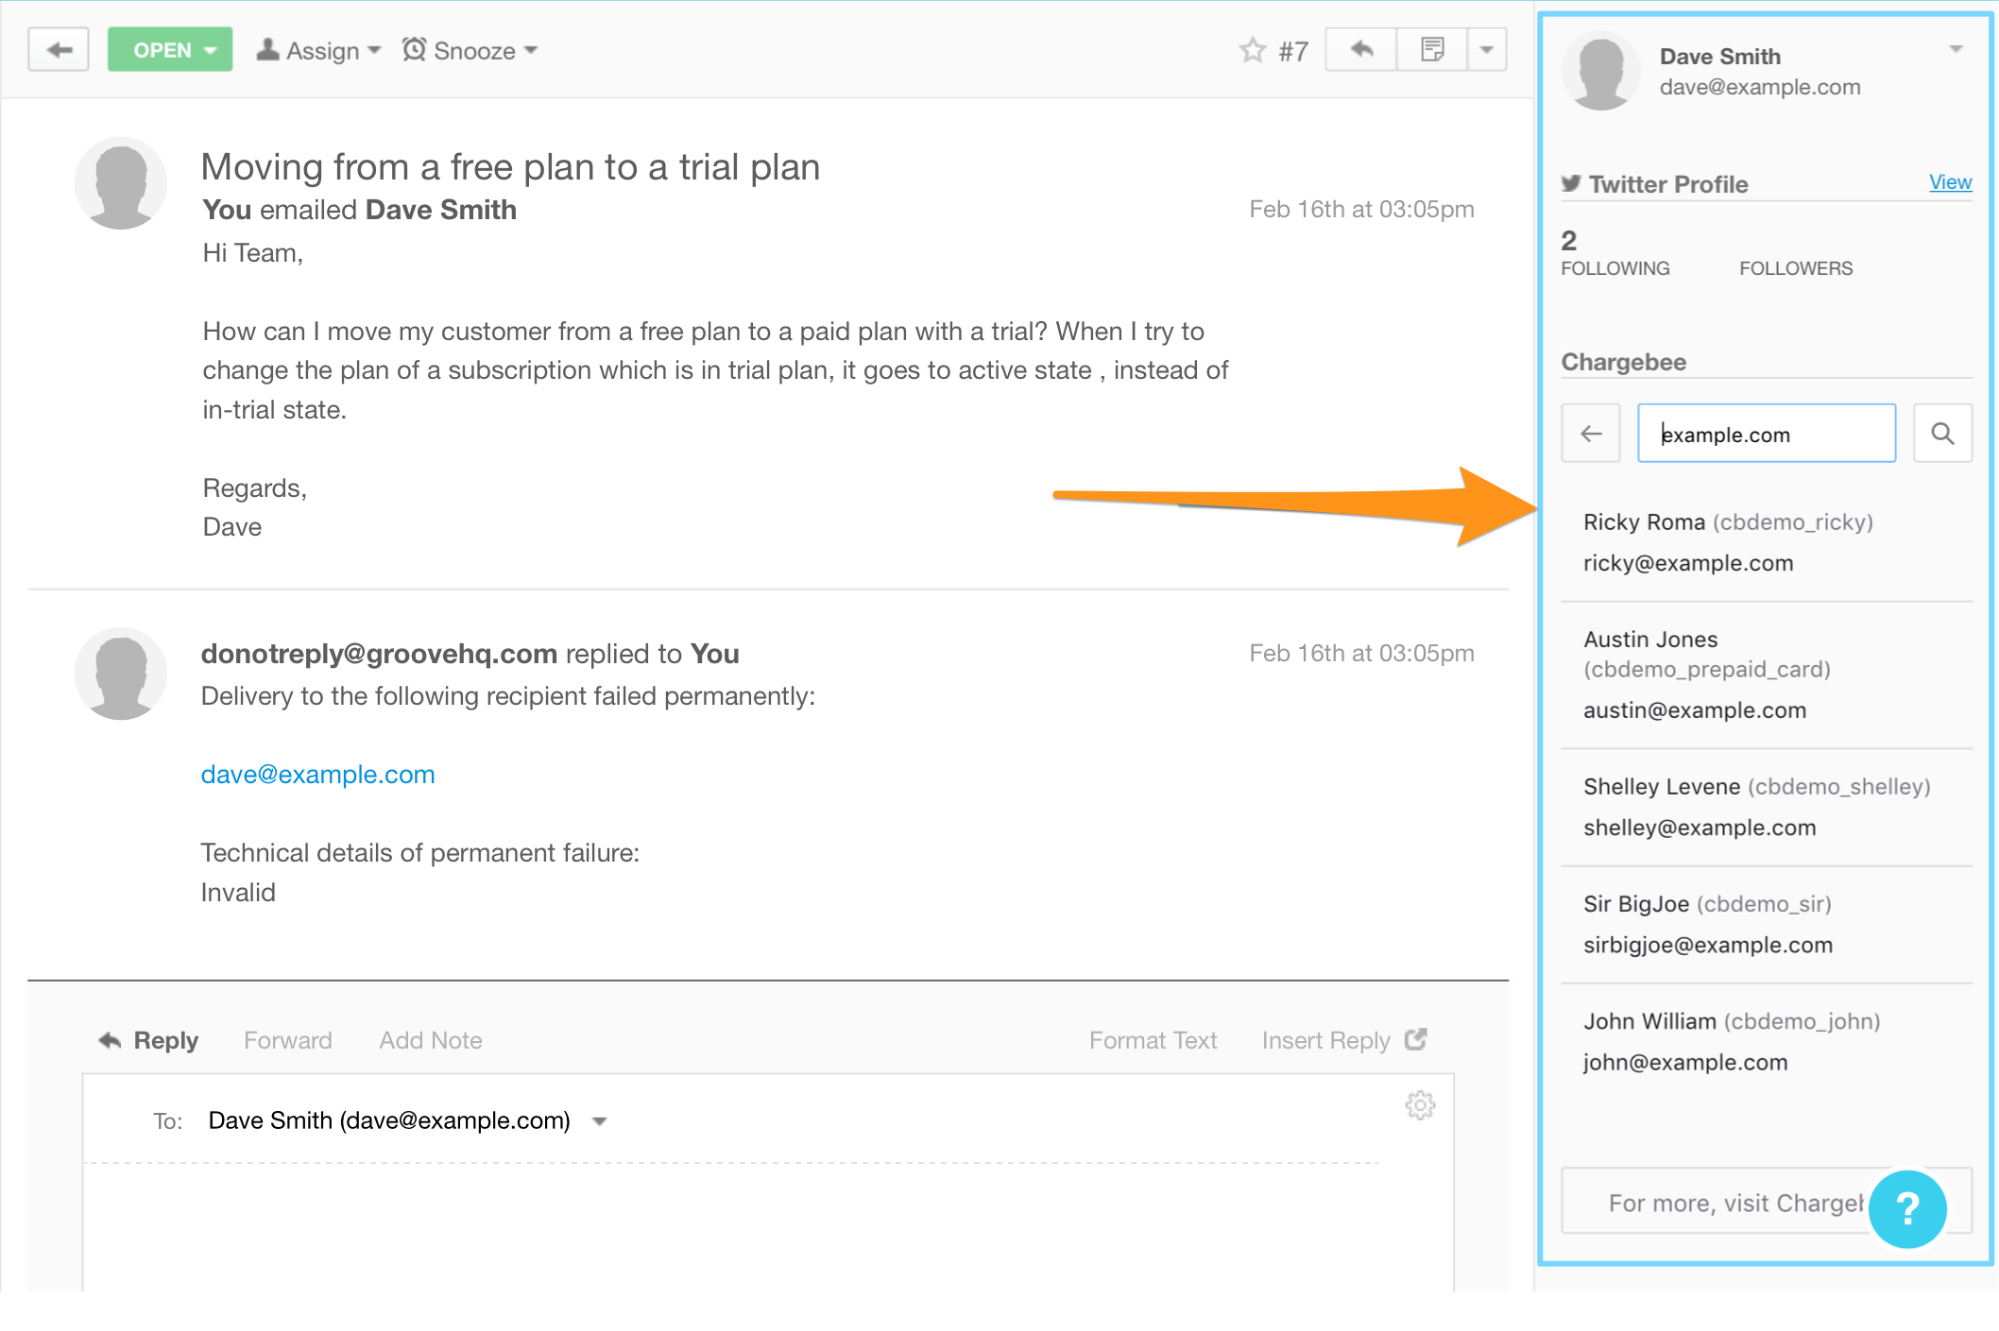
Once you've setup your custom profile, information from Chargebee will appear on the right on your support tickets, as in this screenshot:

Was this article helpful?