Upgrade to Leap User Interface
If you are using Chargebee's Classic user interface (UI), this document provides a detailed comparison of Leap UI and Classic UI features. The following tables highlight module-specific feature enhancements.
Subscriptions
| Feature | Leap UI | Classic UI |
|---|---|---|
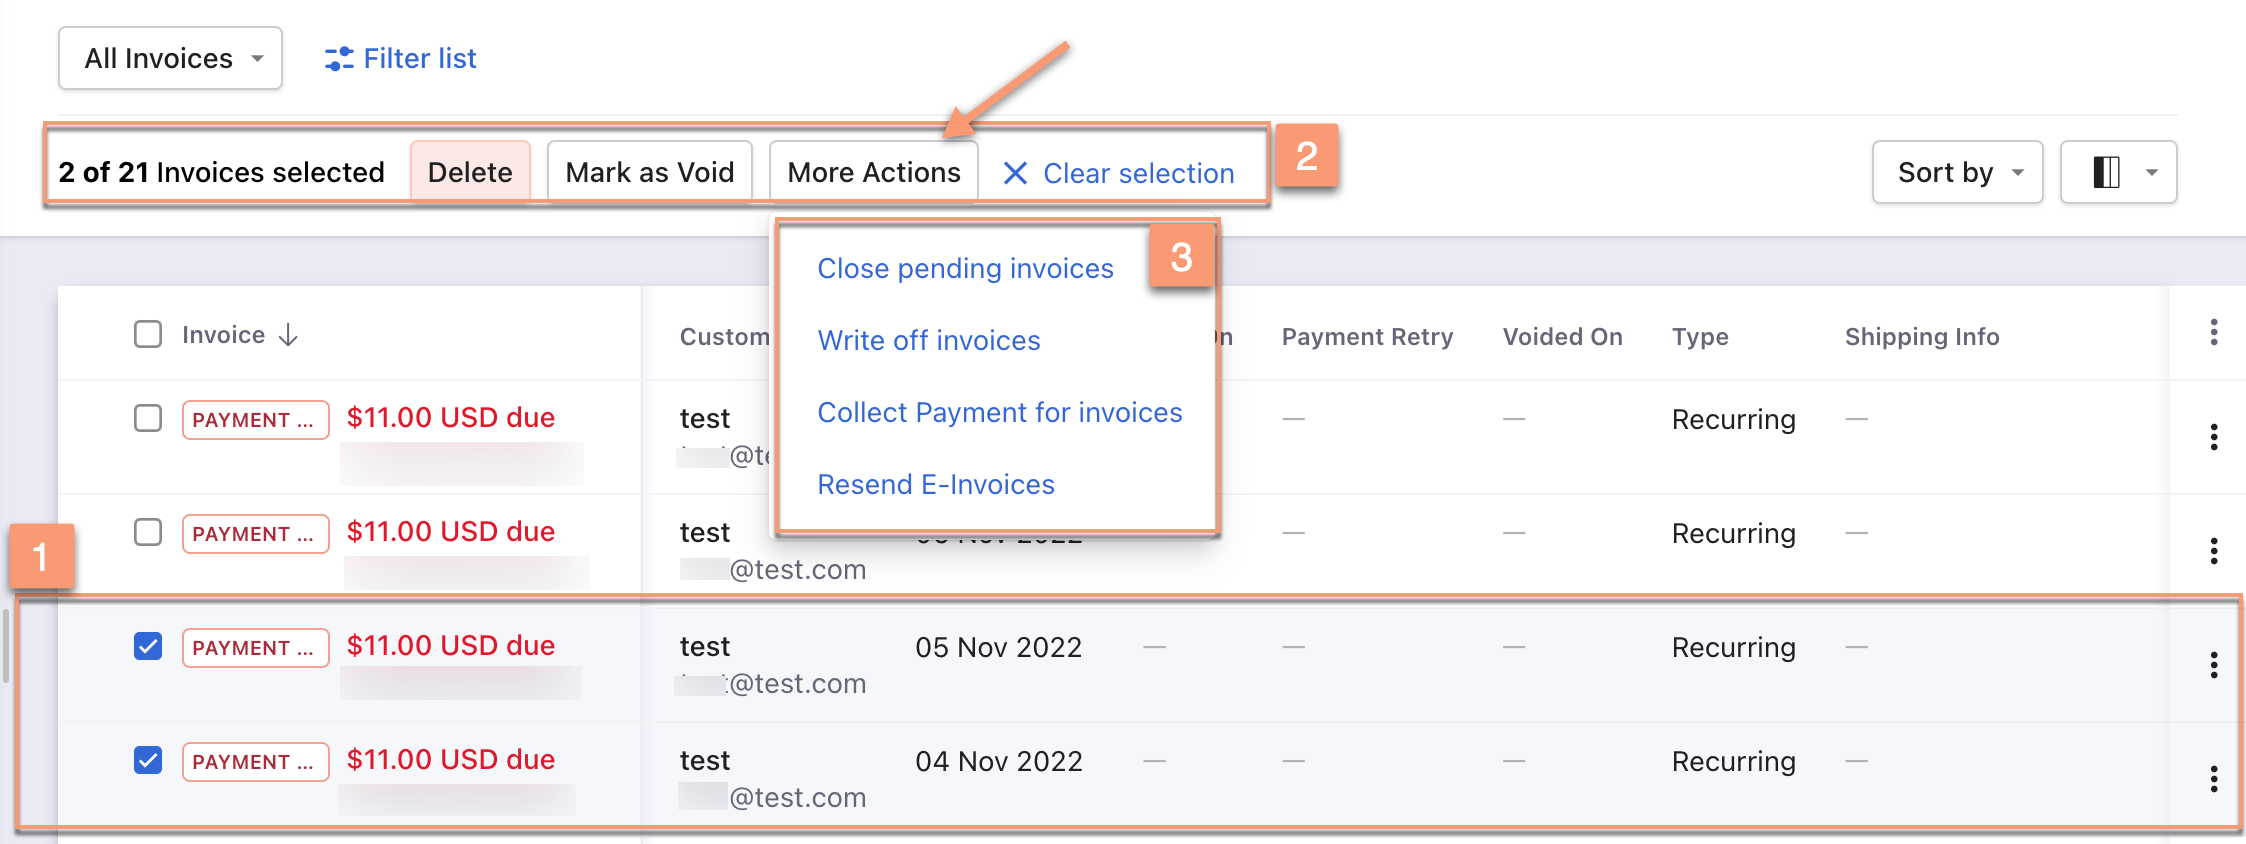
| Bulk Actions | The following are the steps:
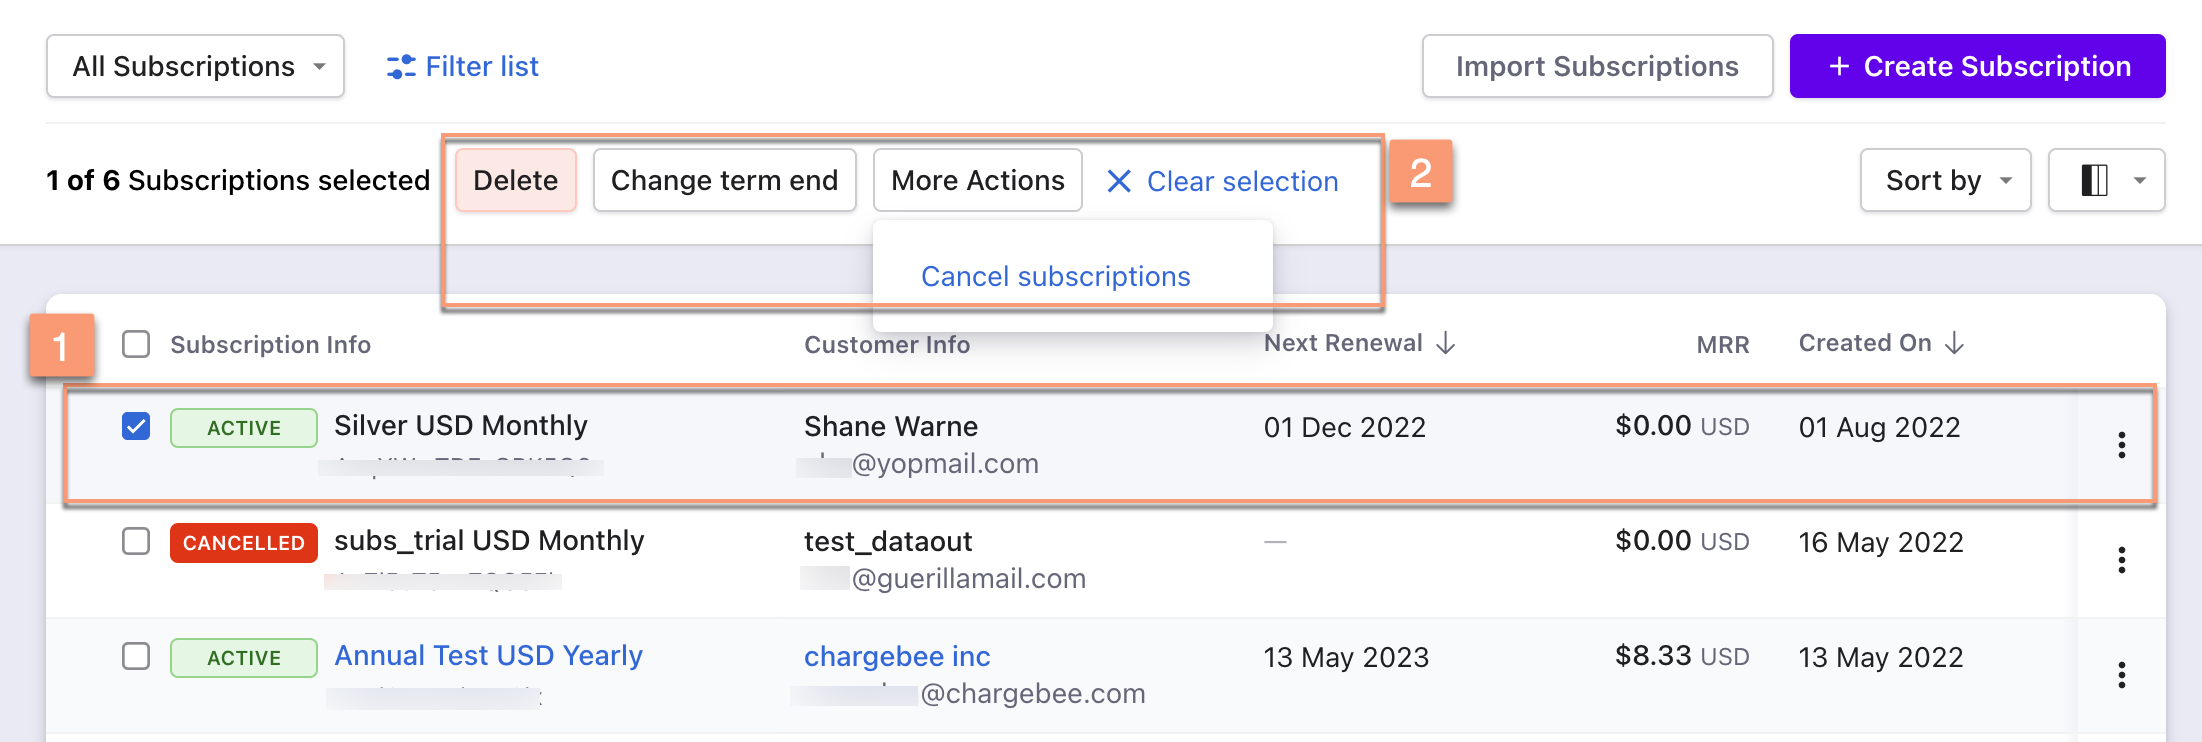 Summary: Delete, Change term ends, or More Actions operations appear automatically after selecting one or more entries. | The following are the steps:
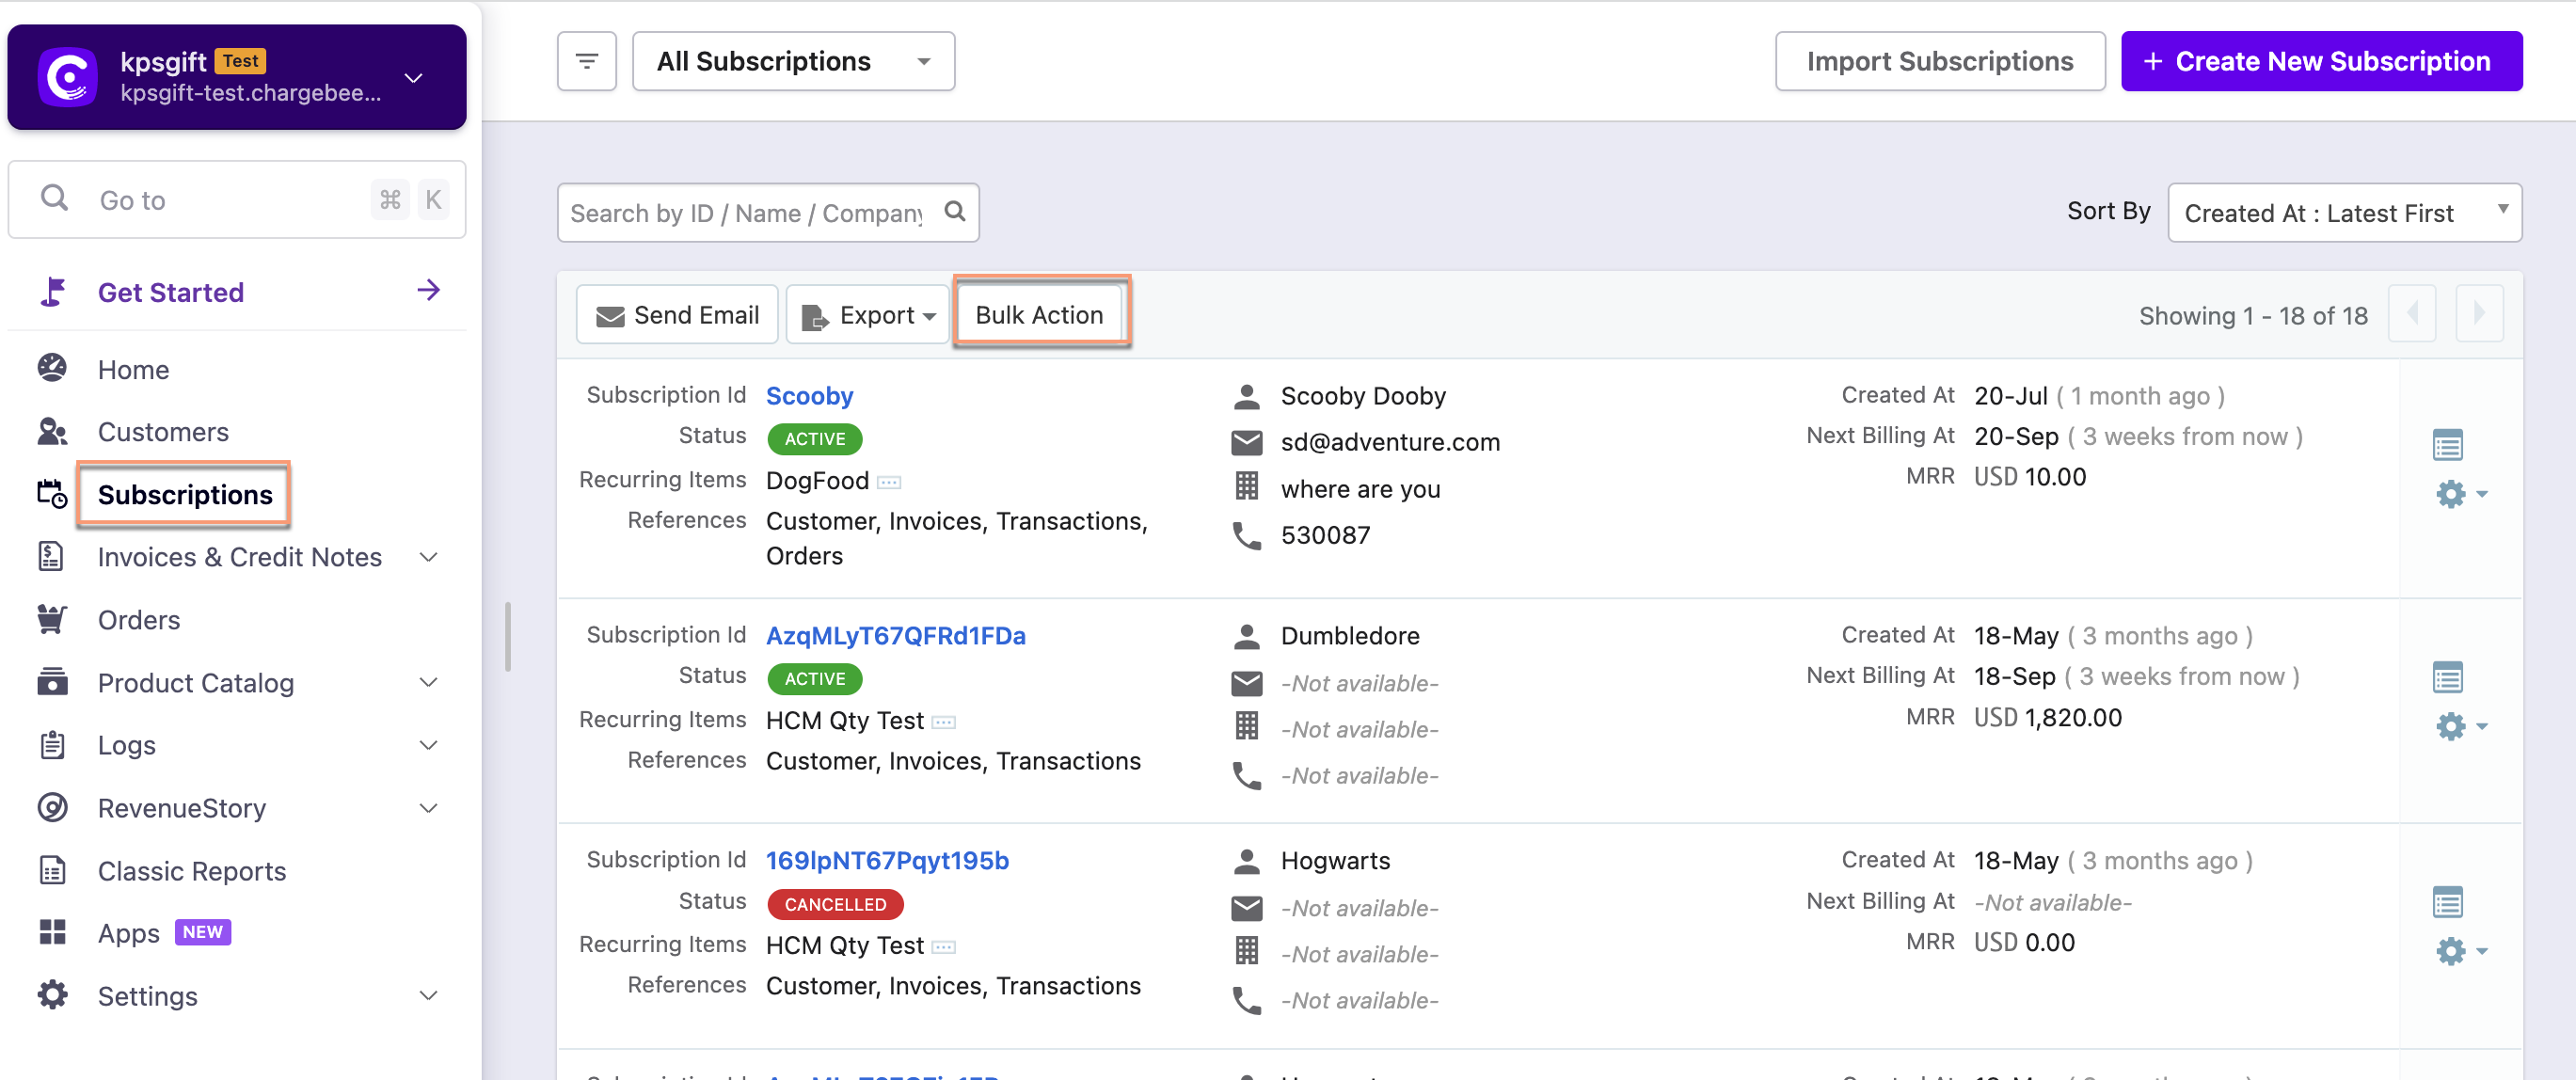
Summary: Bulk action operations appear by clicking the Bulk Actions button. These operations are enabled after selecting one or more entries. |
| Sorting | Click the column name or the arrow beside the column name to sort the column in ascending or descending order. Also, use Sort By drop-down options to sort the entries. 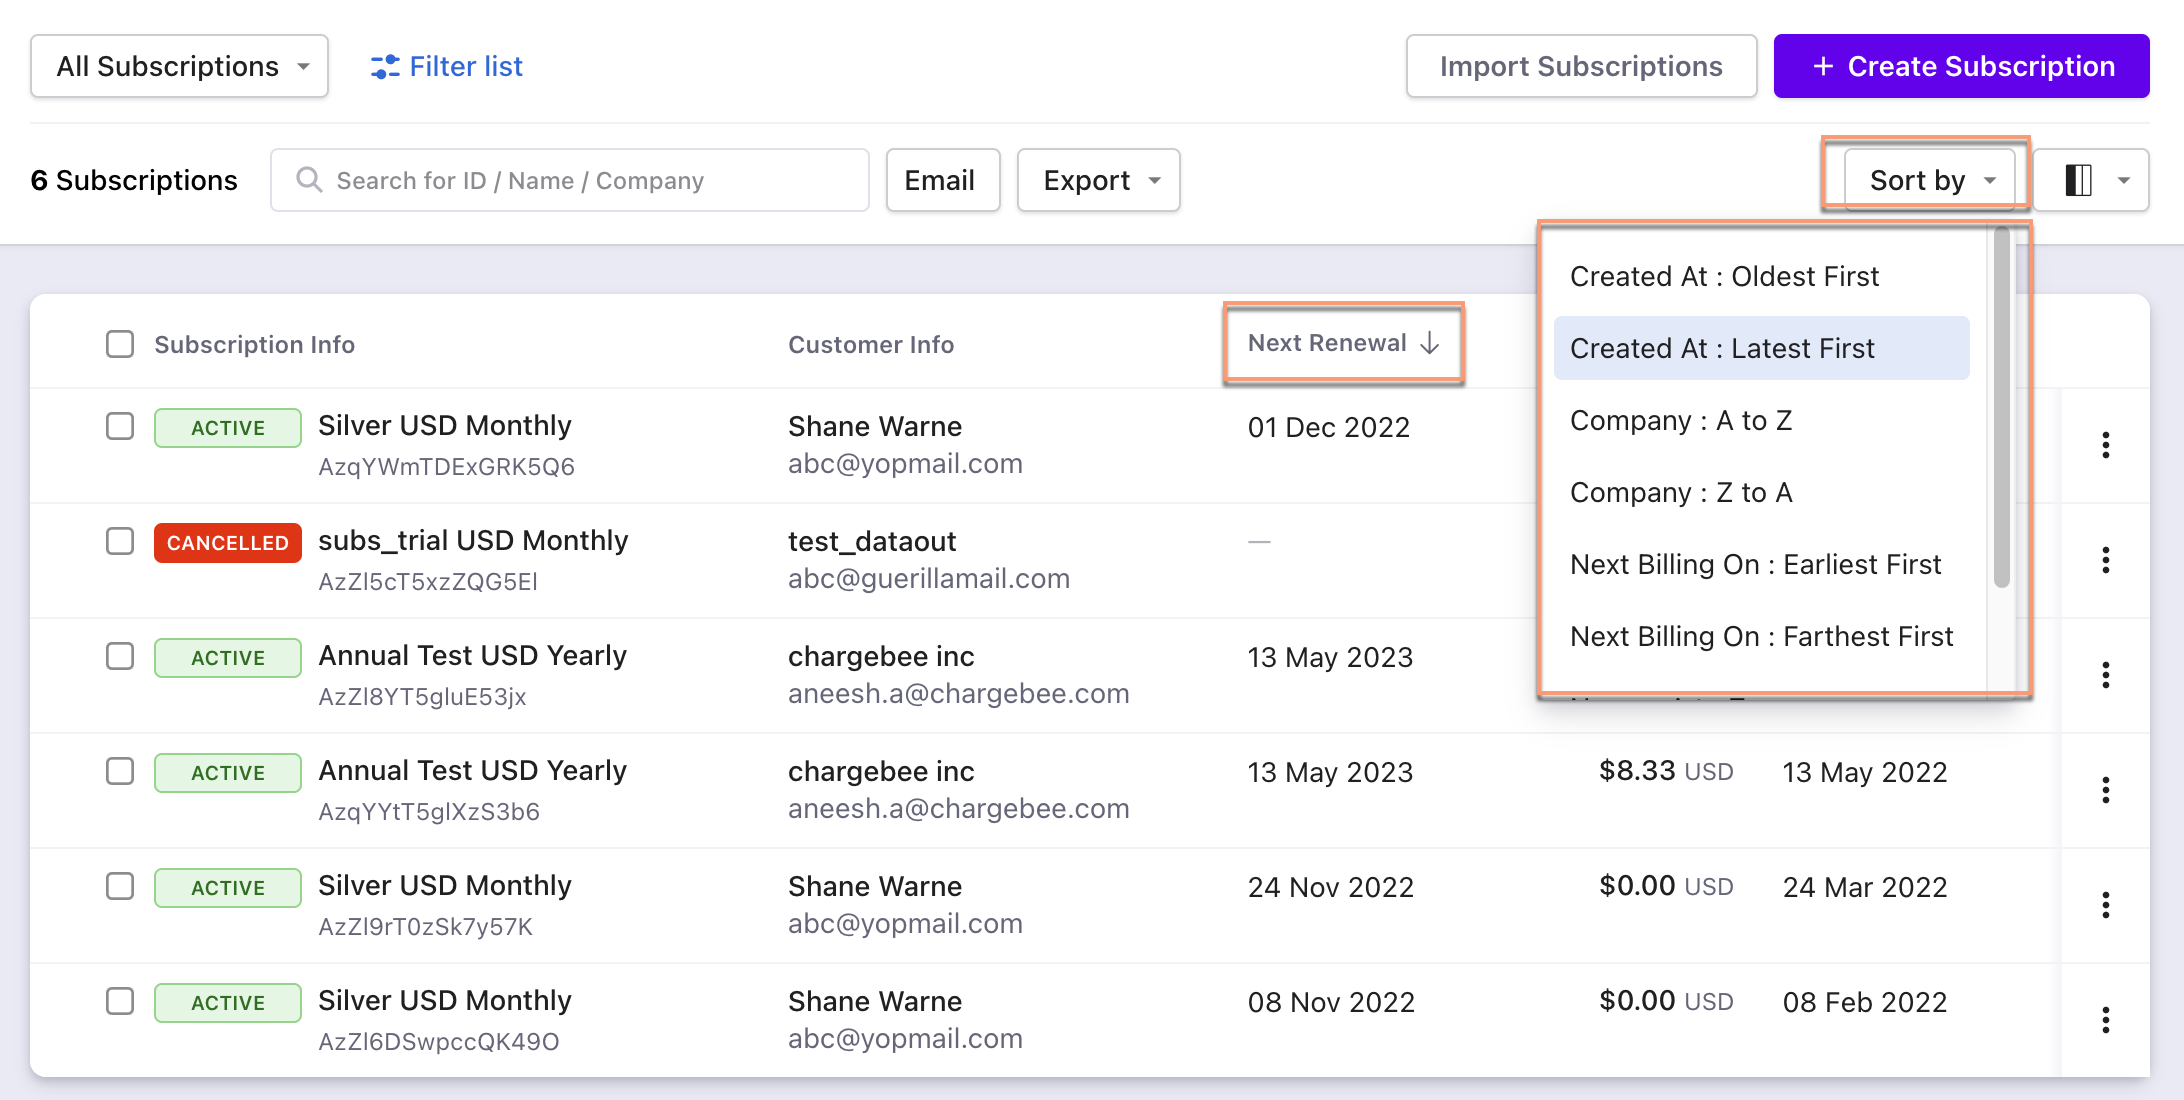 | Use the Sort By drop-down options to sort the entries. 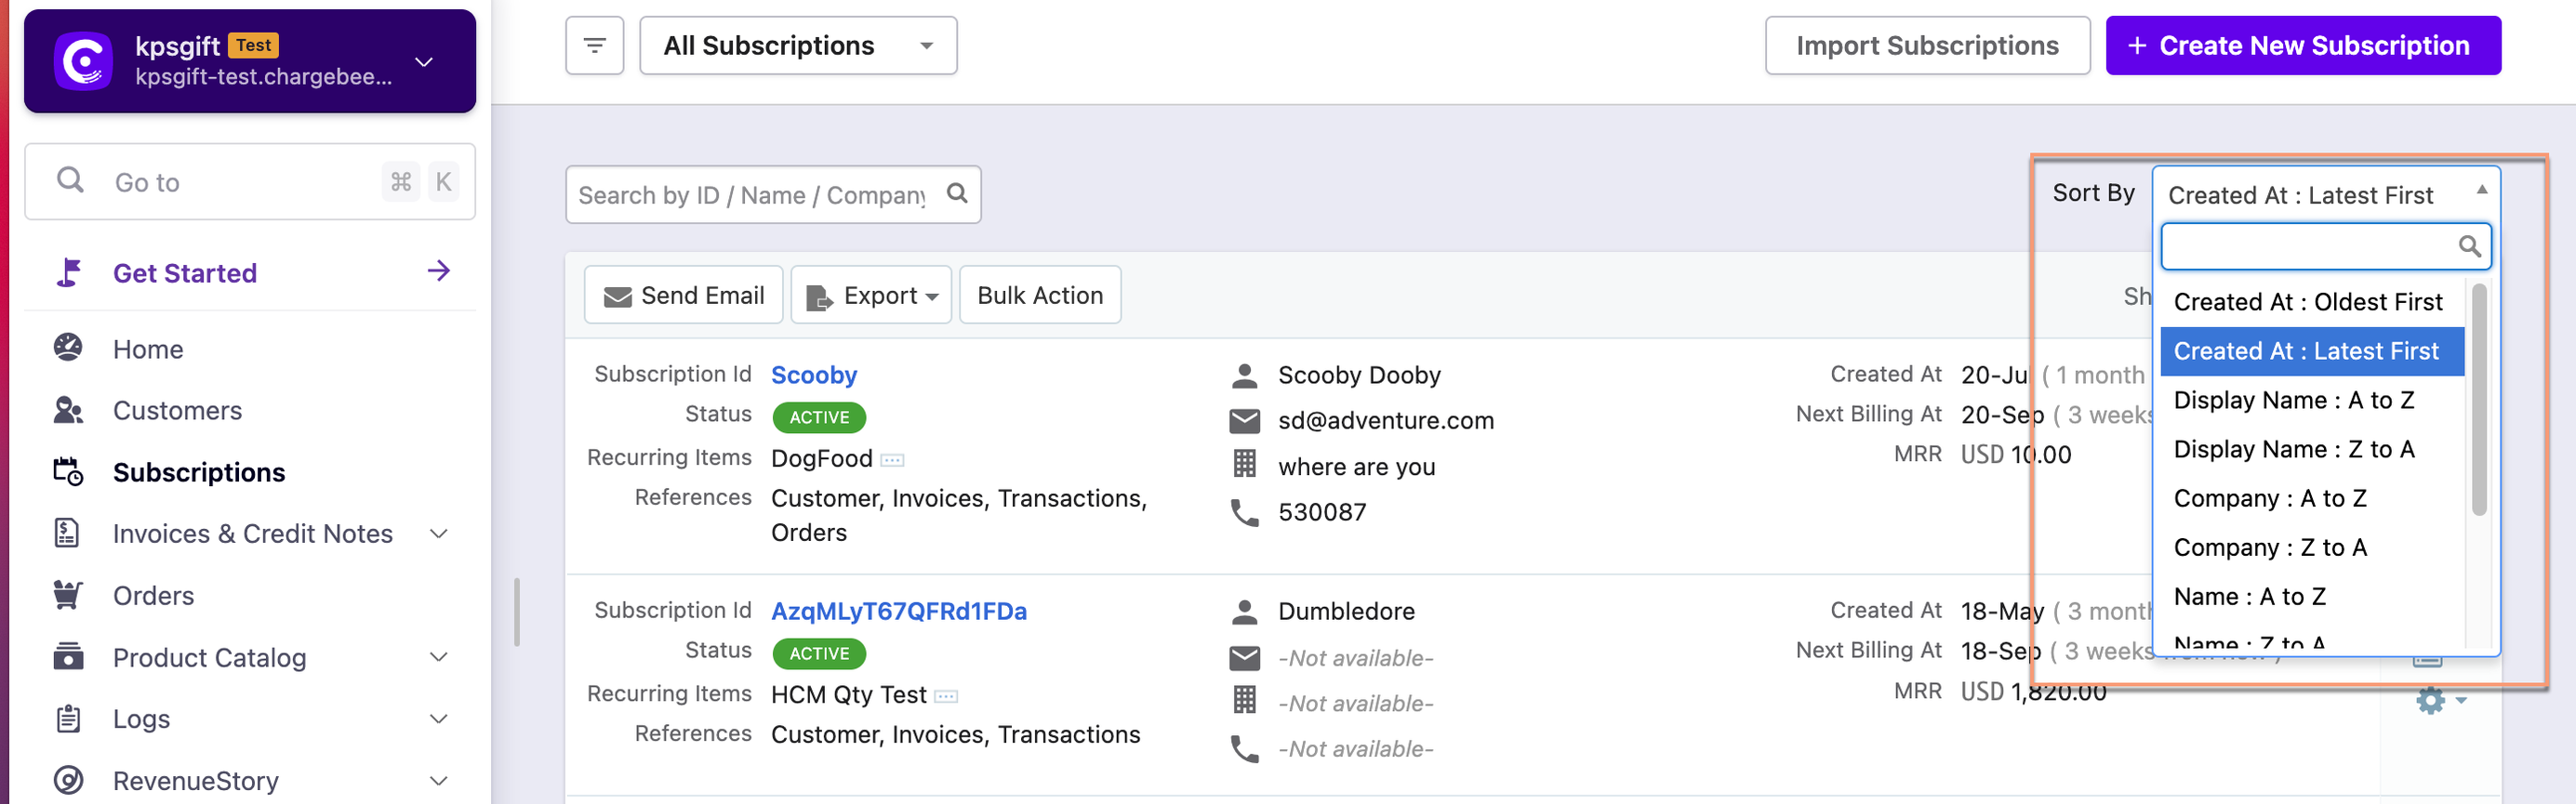 |
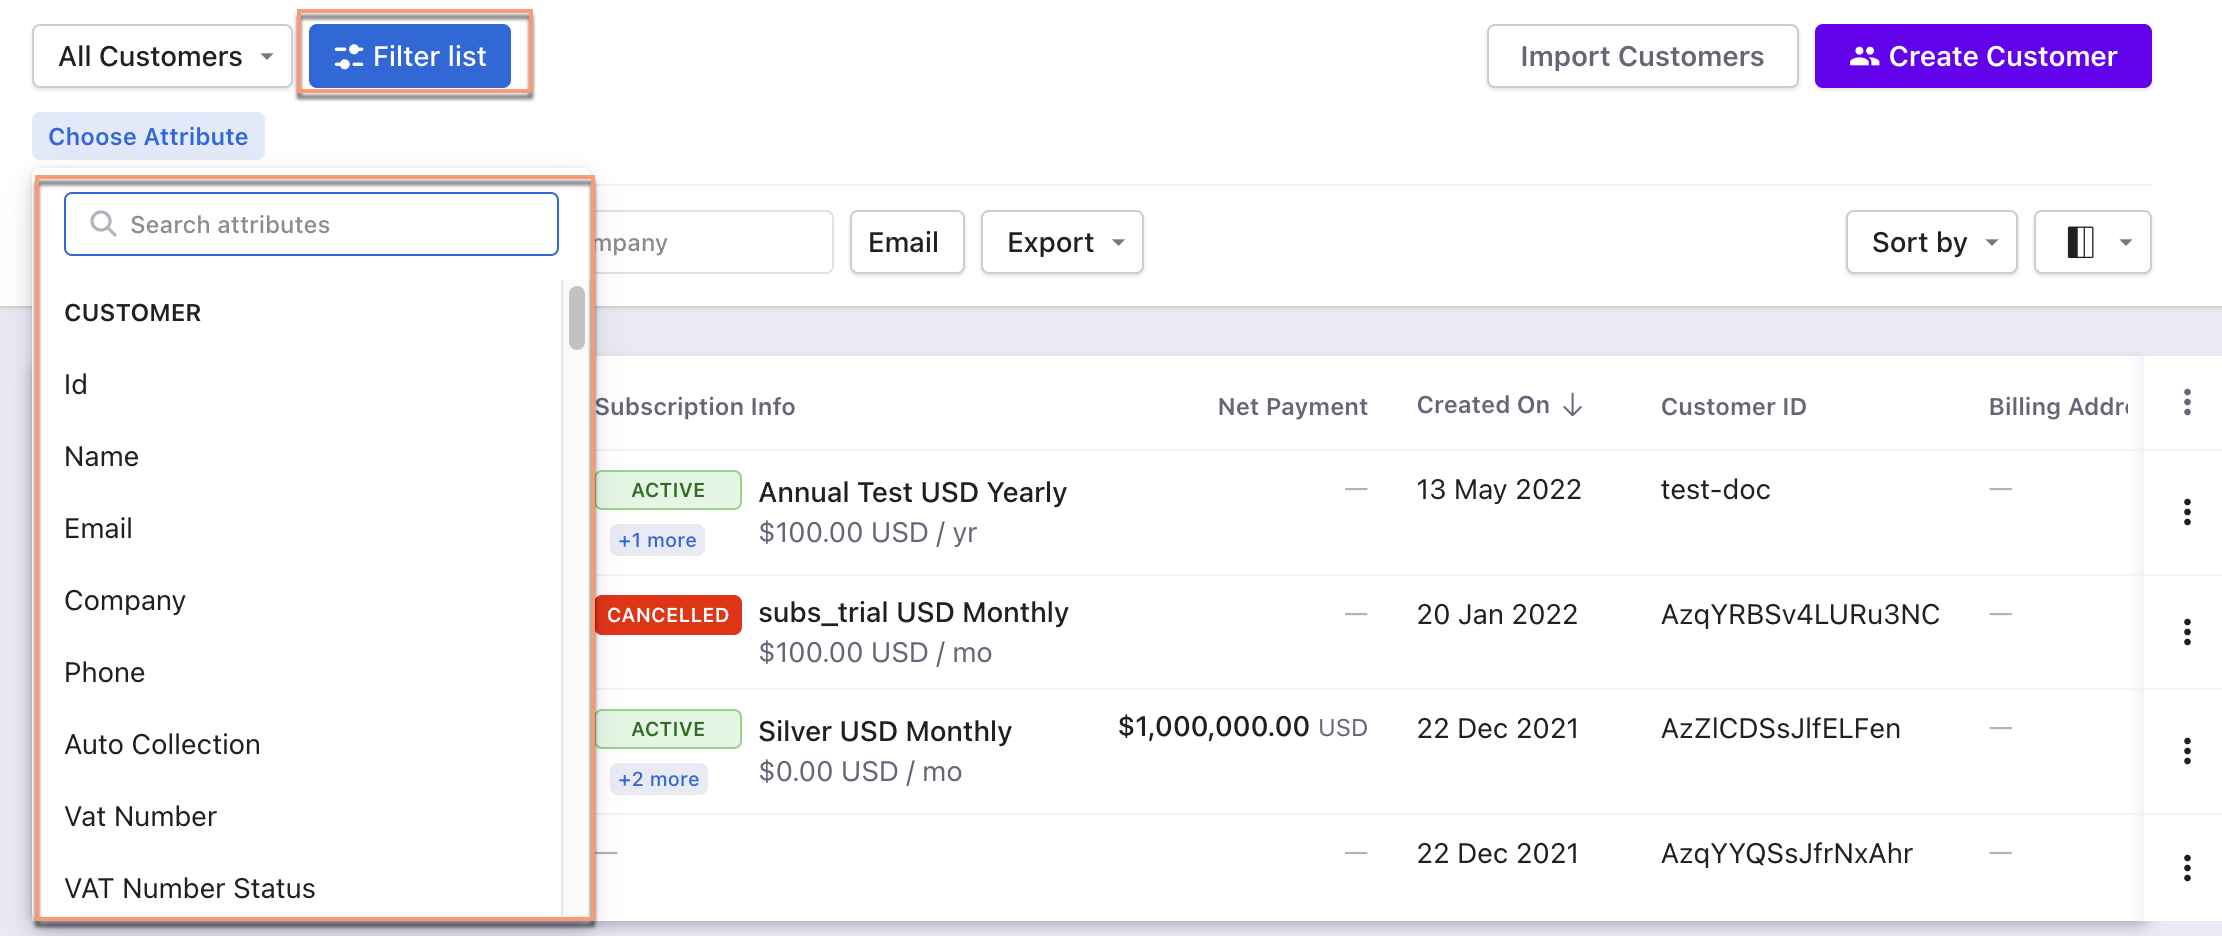
| Column | Customize the column appearance. Enable, disable or rearrange columns as required. You can also search by column name. 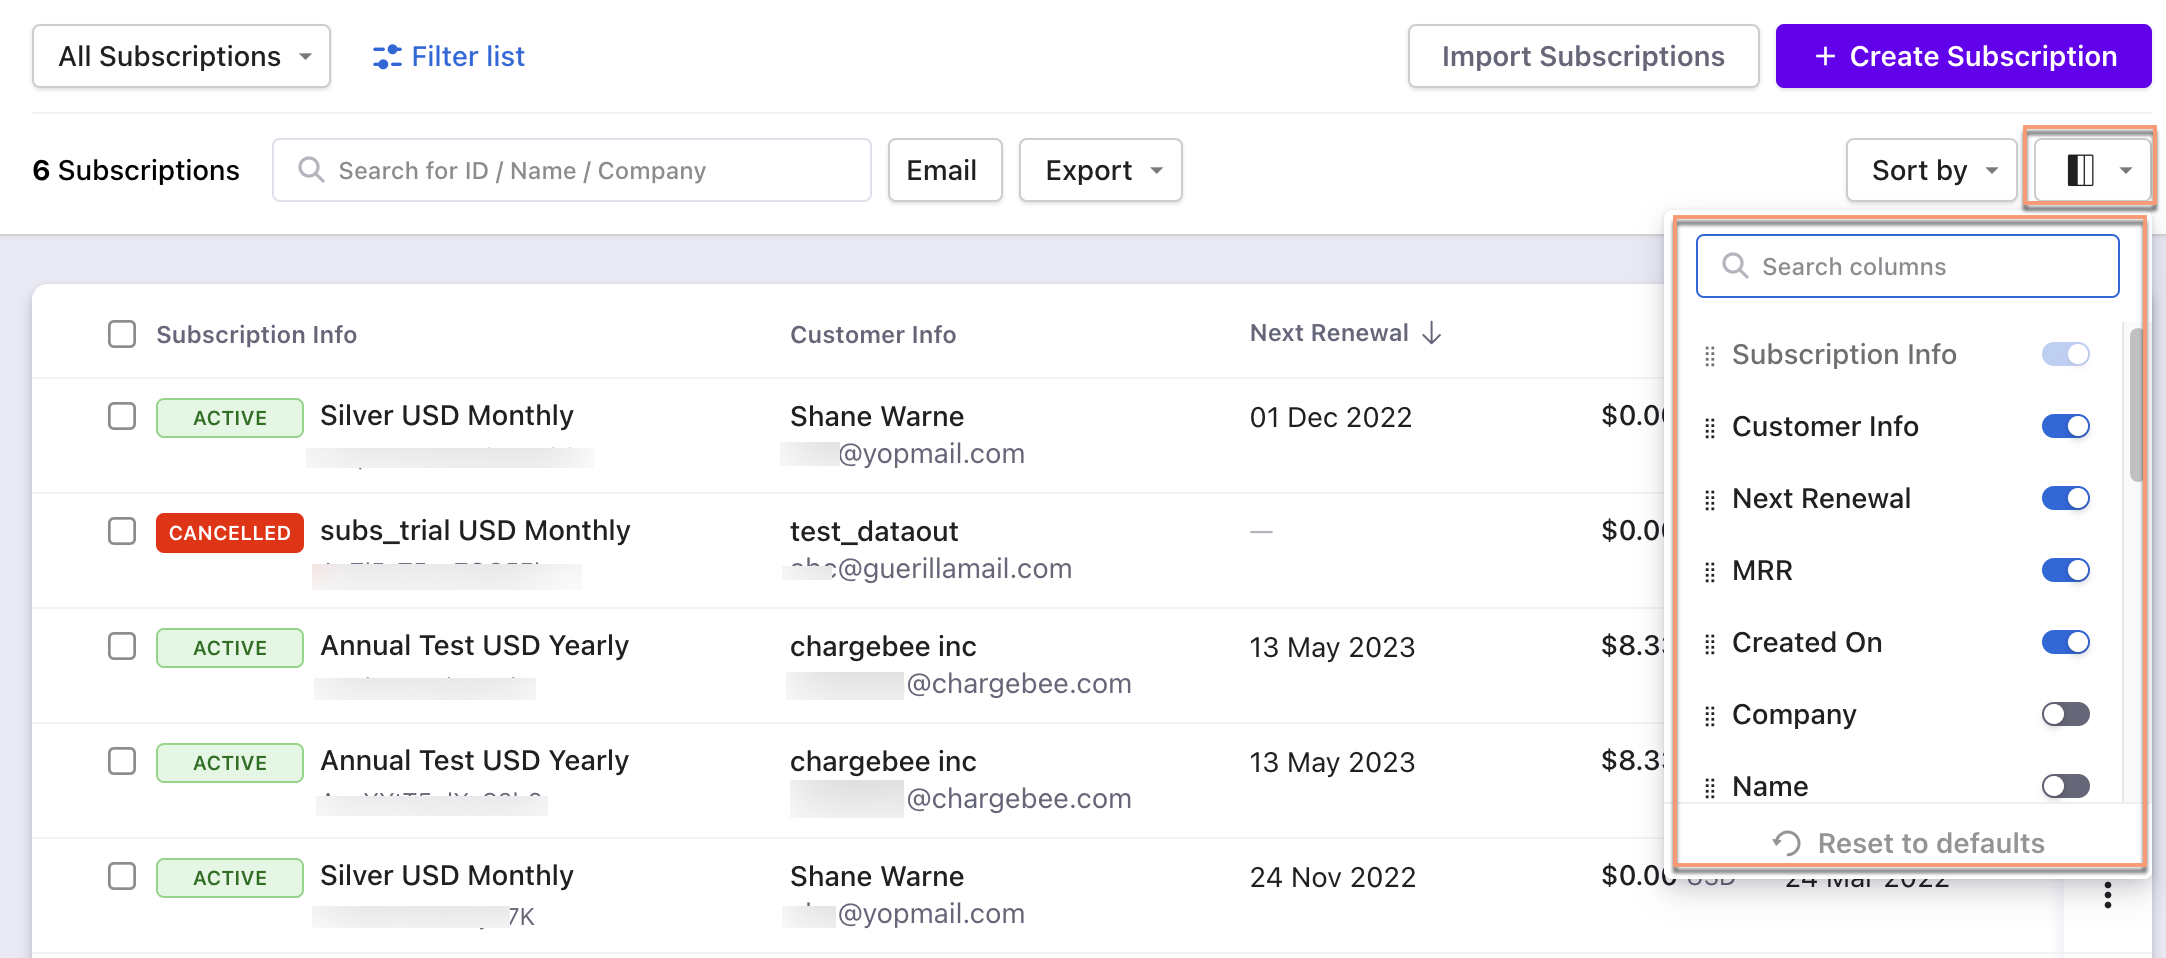 | All the column fields appear at a single place. 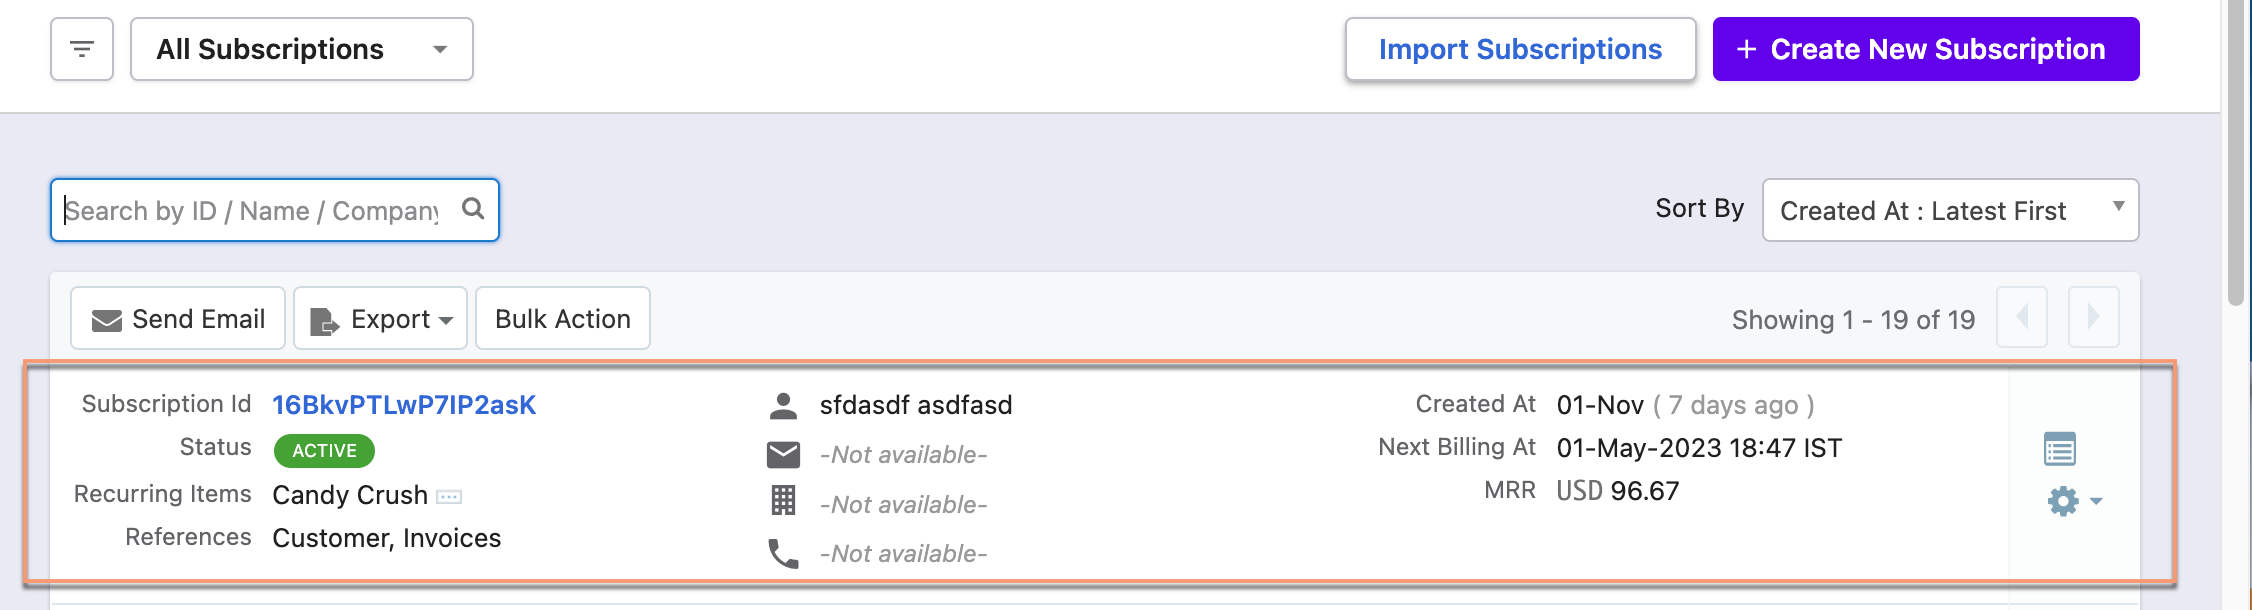 |
| Filters | The following are the steps:
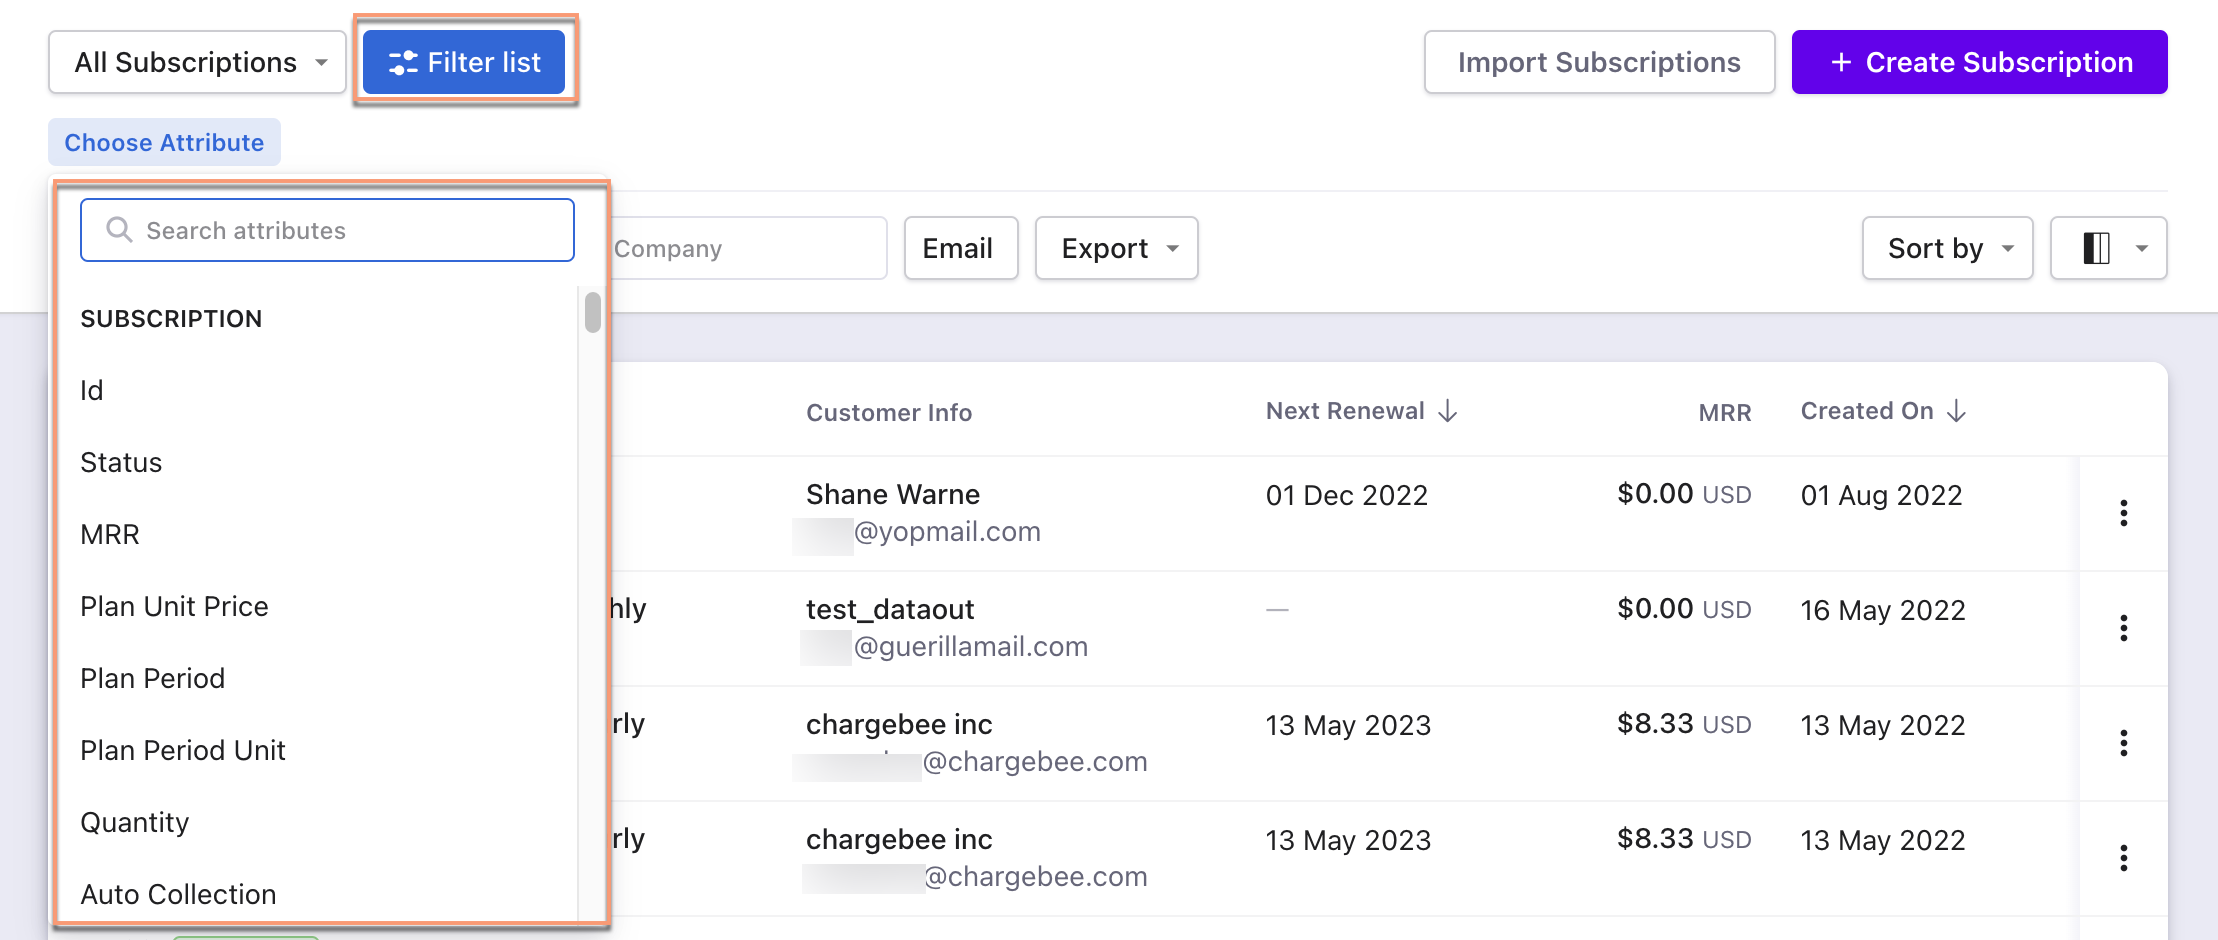 | The following are the steps:
 |
Customers
| Feature | Leap UI | Classic UI |
|---|---|---|
| Bulk Actions | The following are the steps:
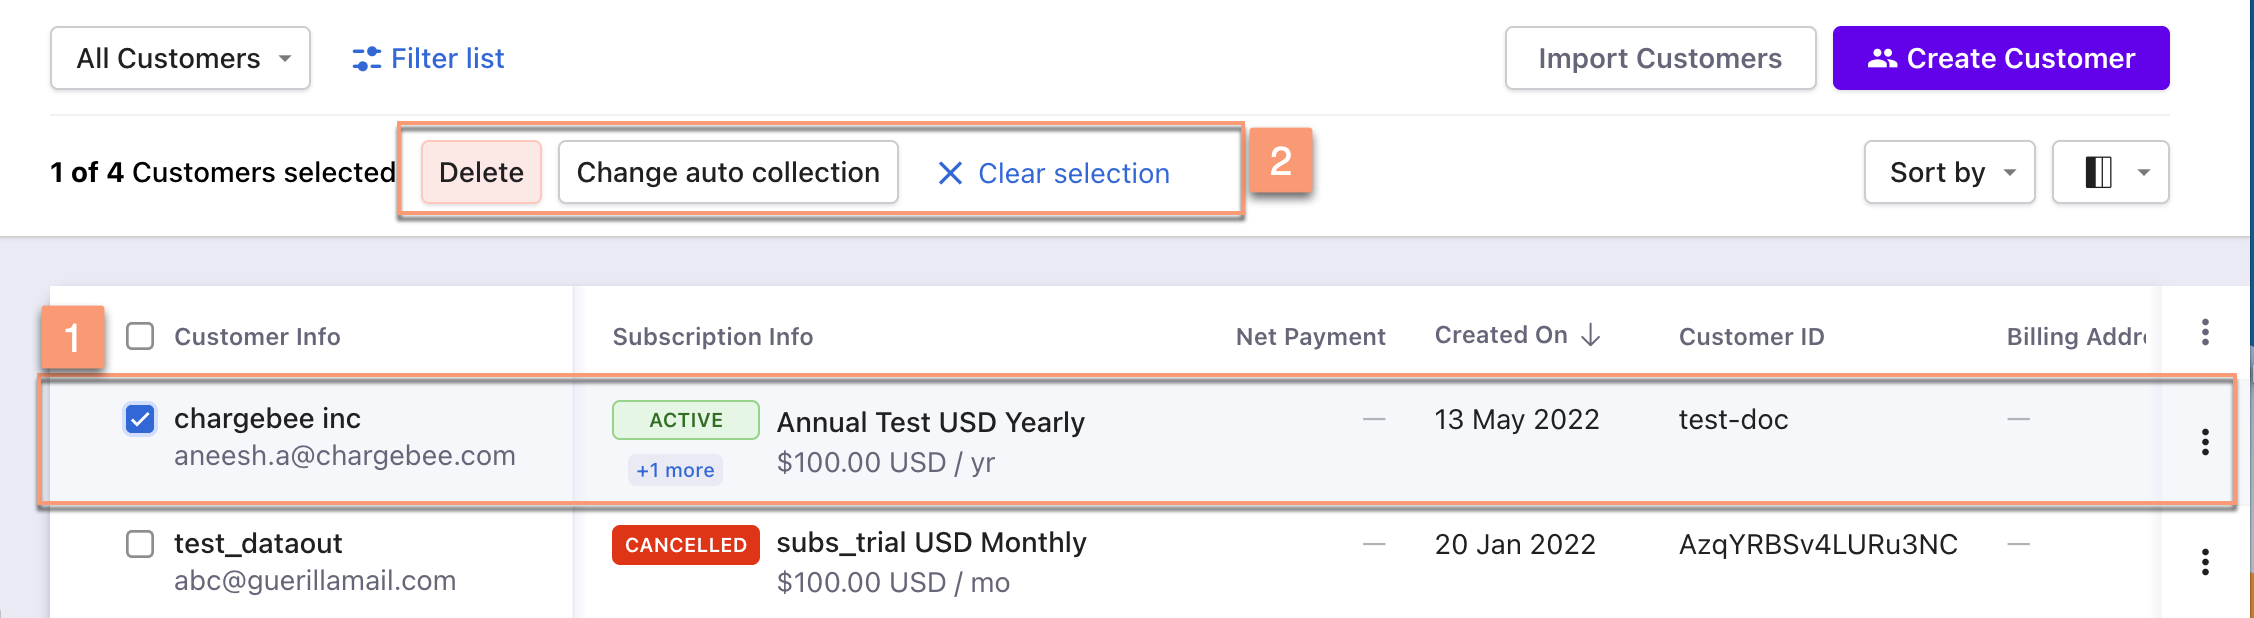 Summary: Delete or Change auto collection operations appear automatically after selecting one or more entries. | The following are the steps:
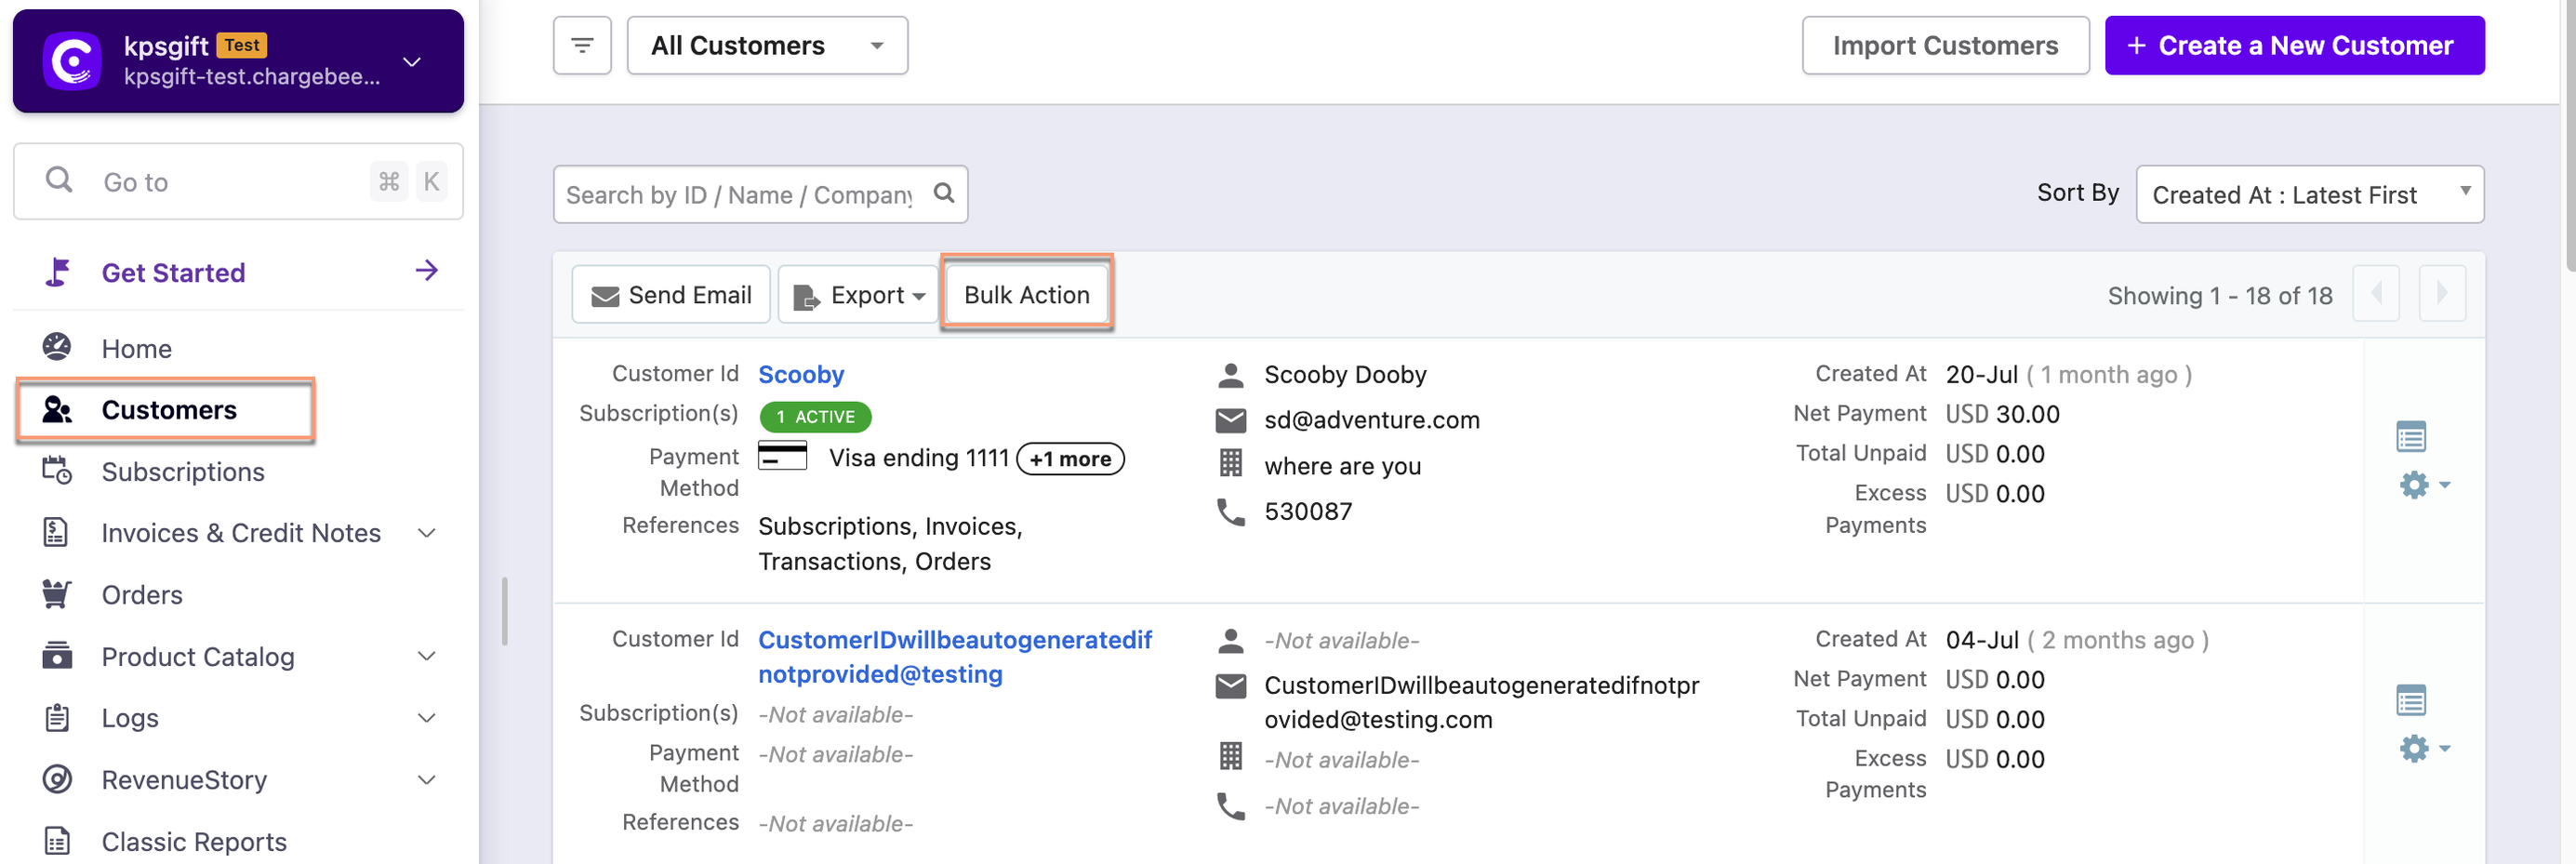
Summary: Bulk action operations appear by clicking the Bulk Actions button. These operations are enabled after selecting one or more entries. |
| Sorting | Click the column name or the arrow beside the column name to sort the column in ascending or descending order. Also, use Sort By drop-down options to sort the entries. 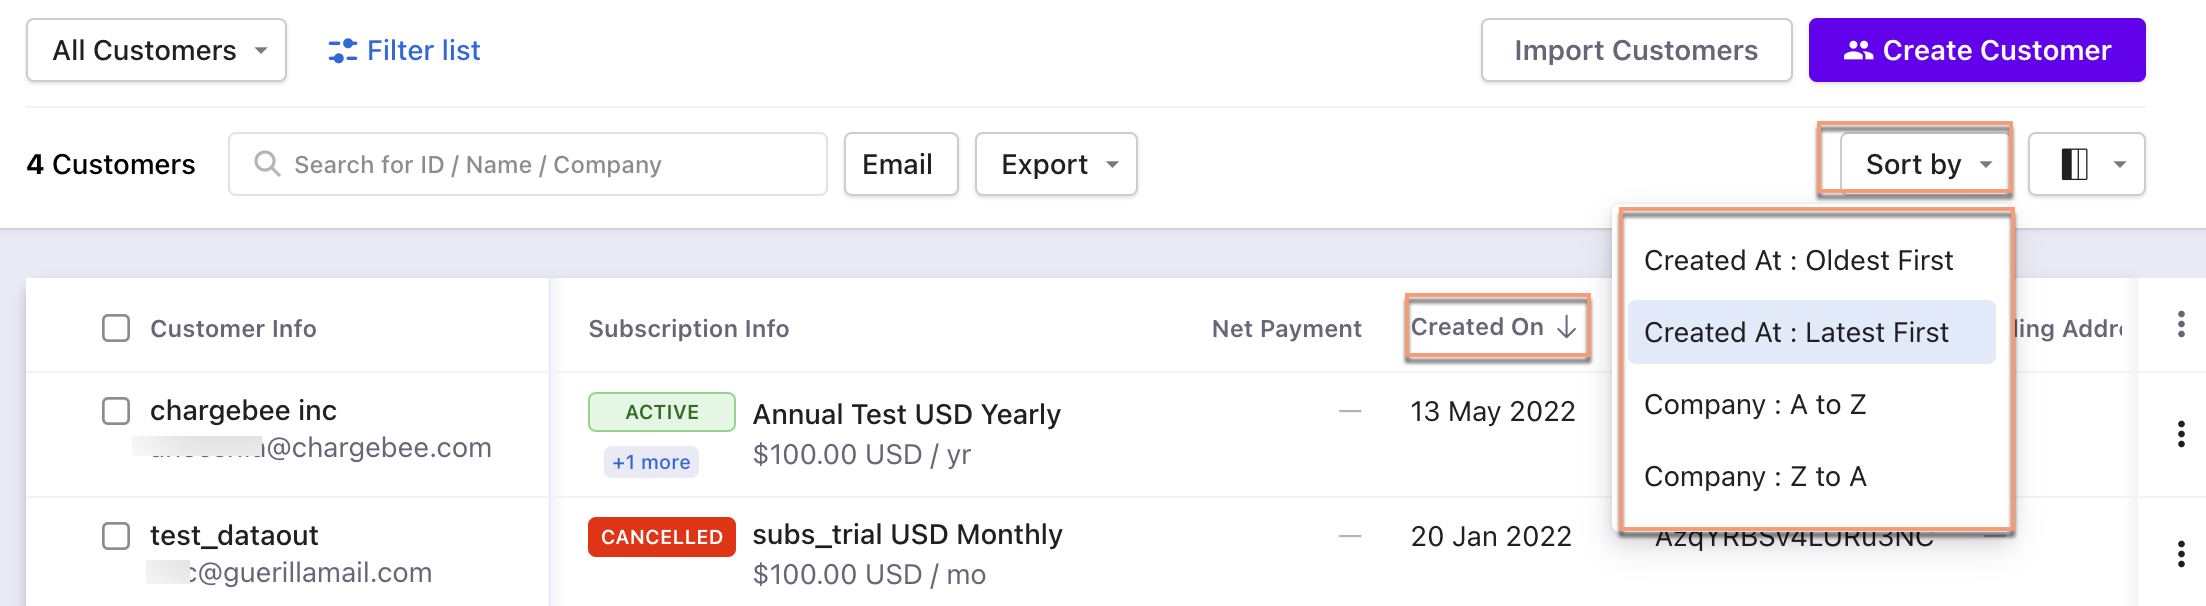 | Use the Sort By drop-down options to sort the entries. 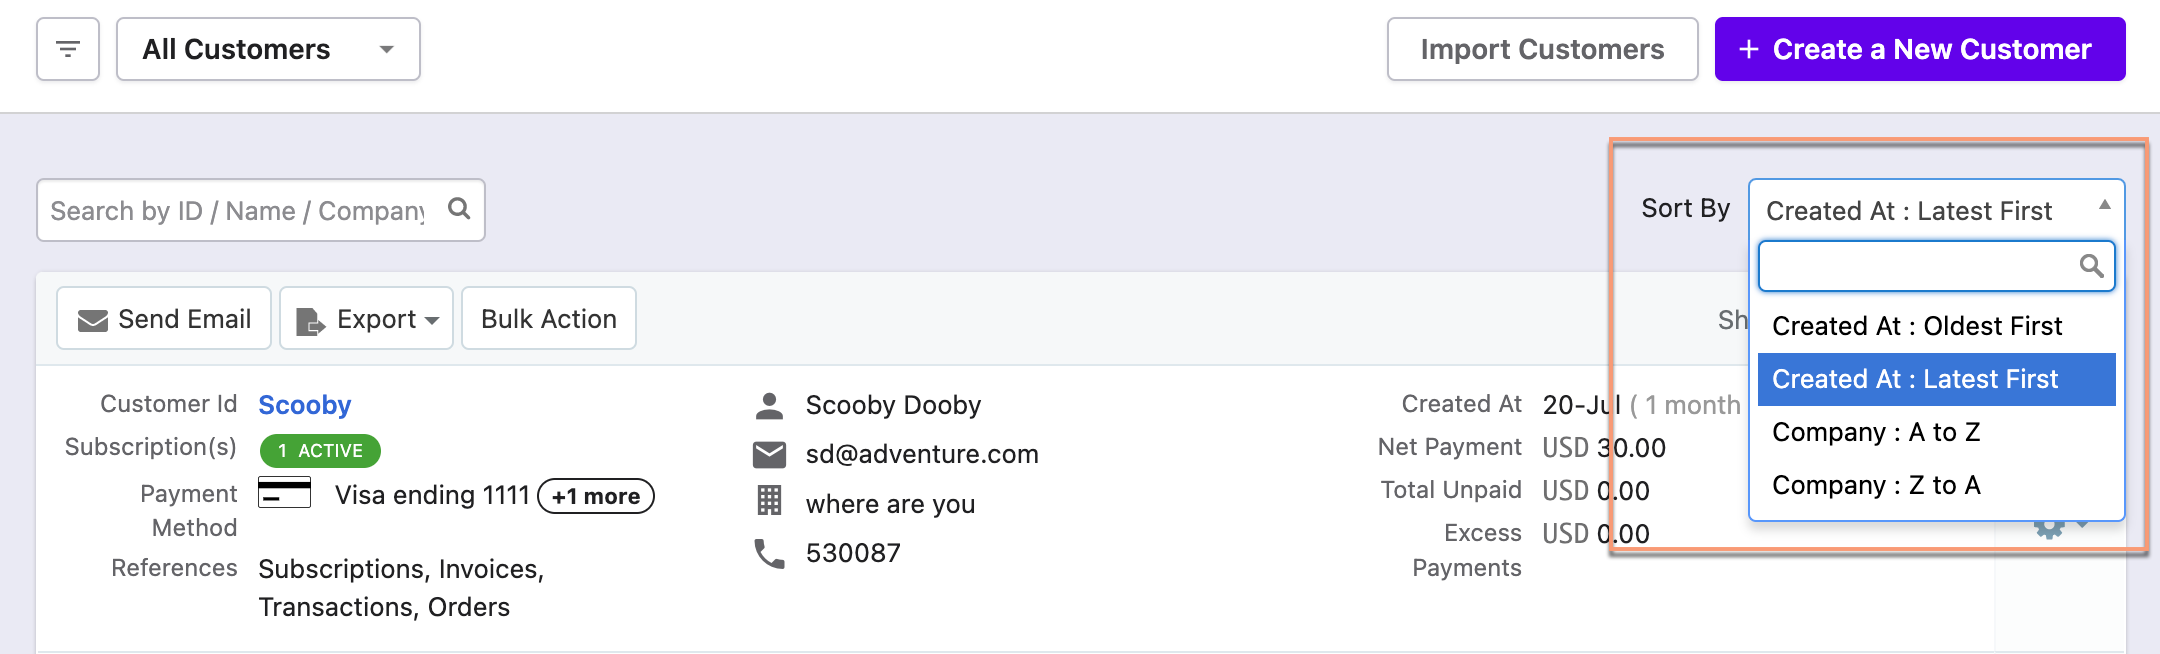 |
| Column | Customize the column appearance. Enable, disable or rearrange columns as required. You can also search by column name. 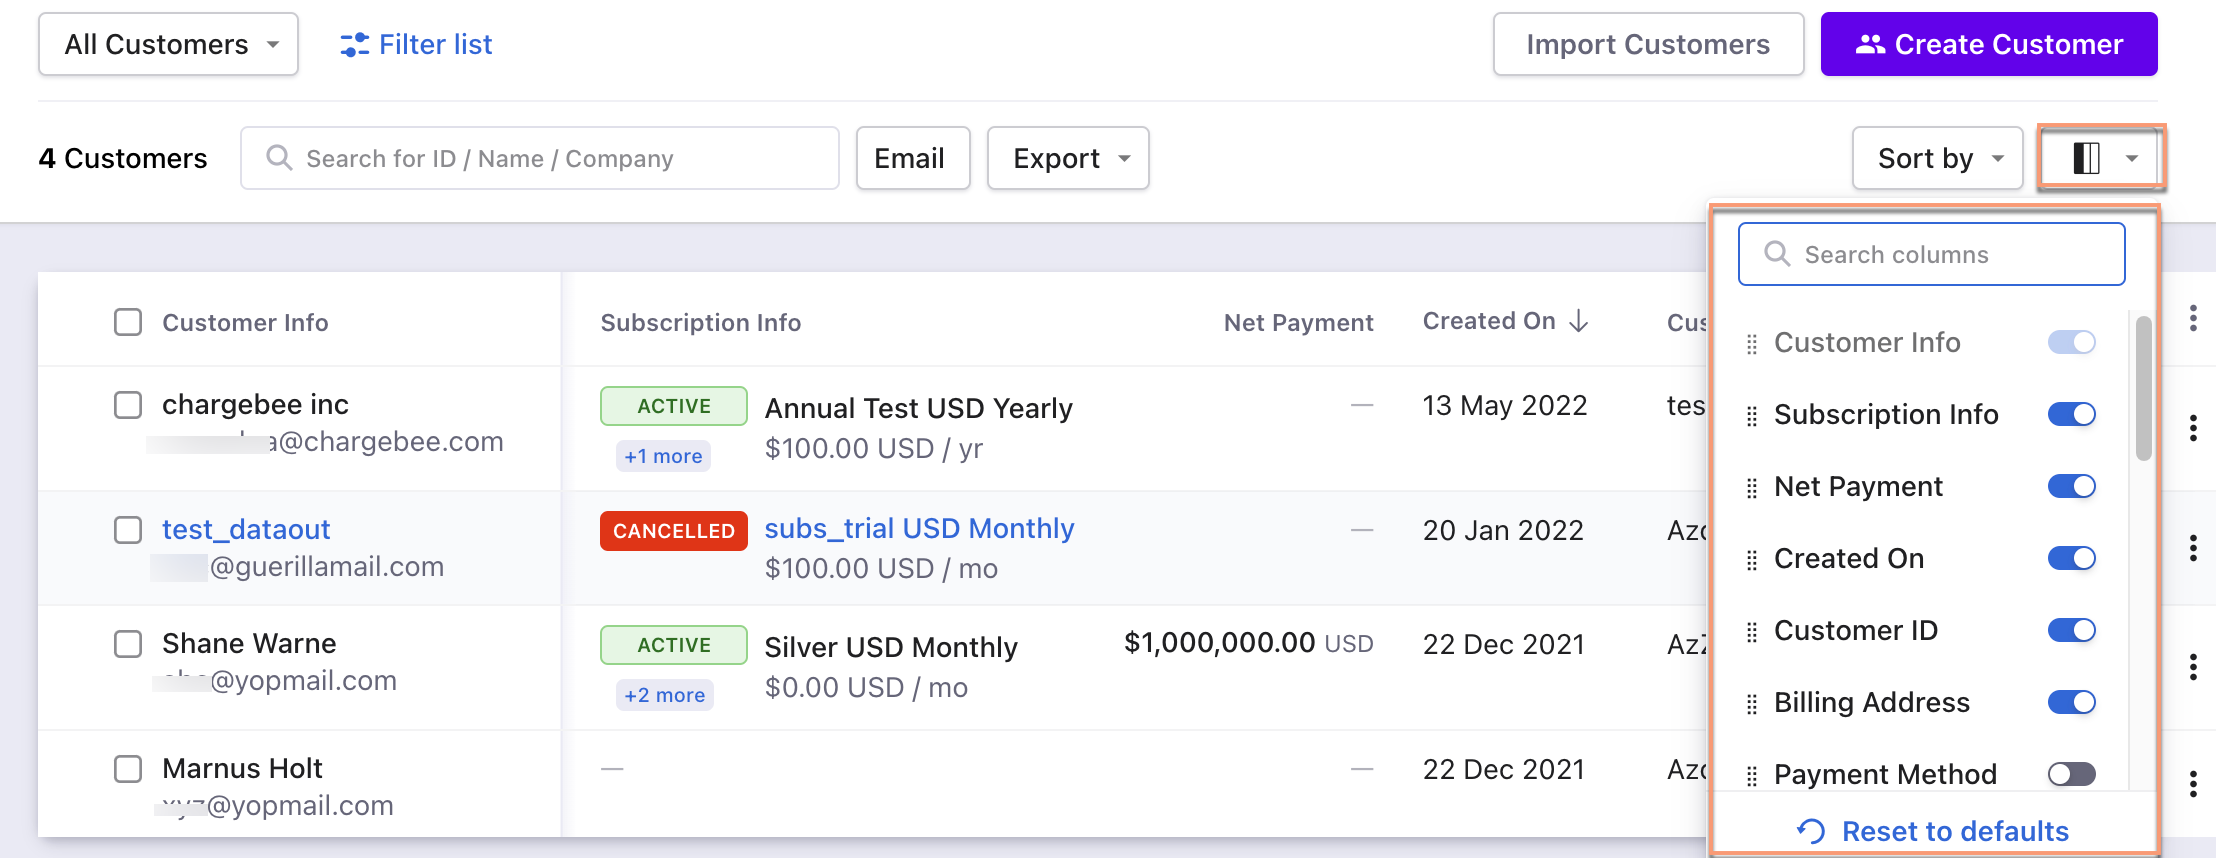 | All the column fields appear at a single place. 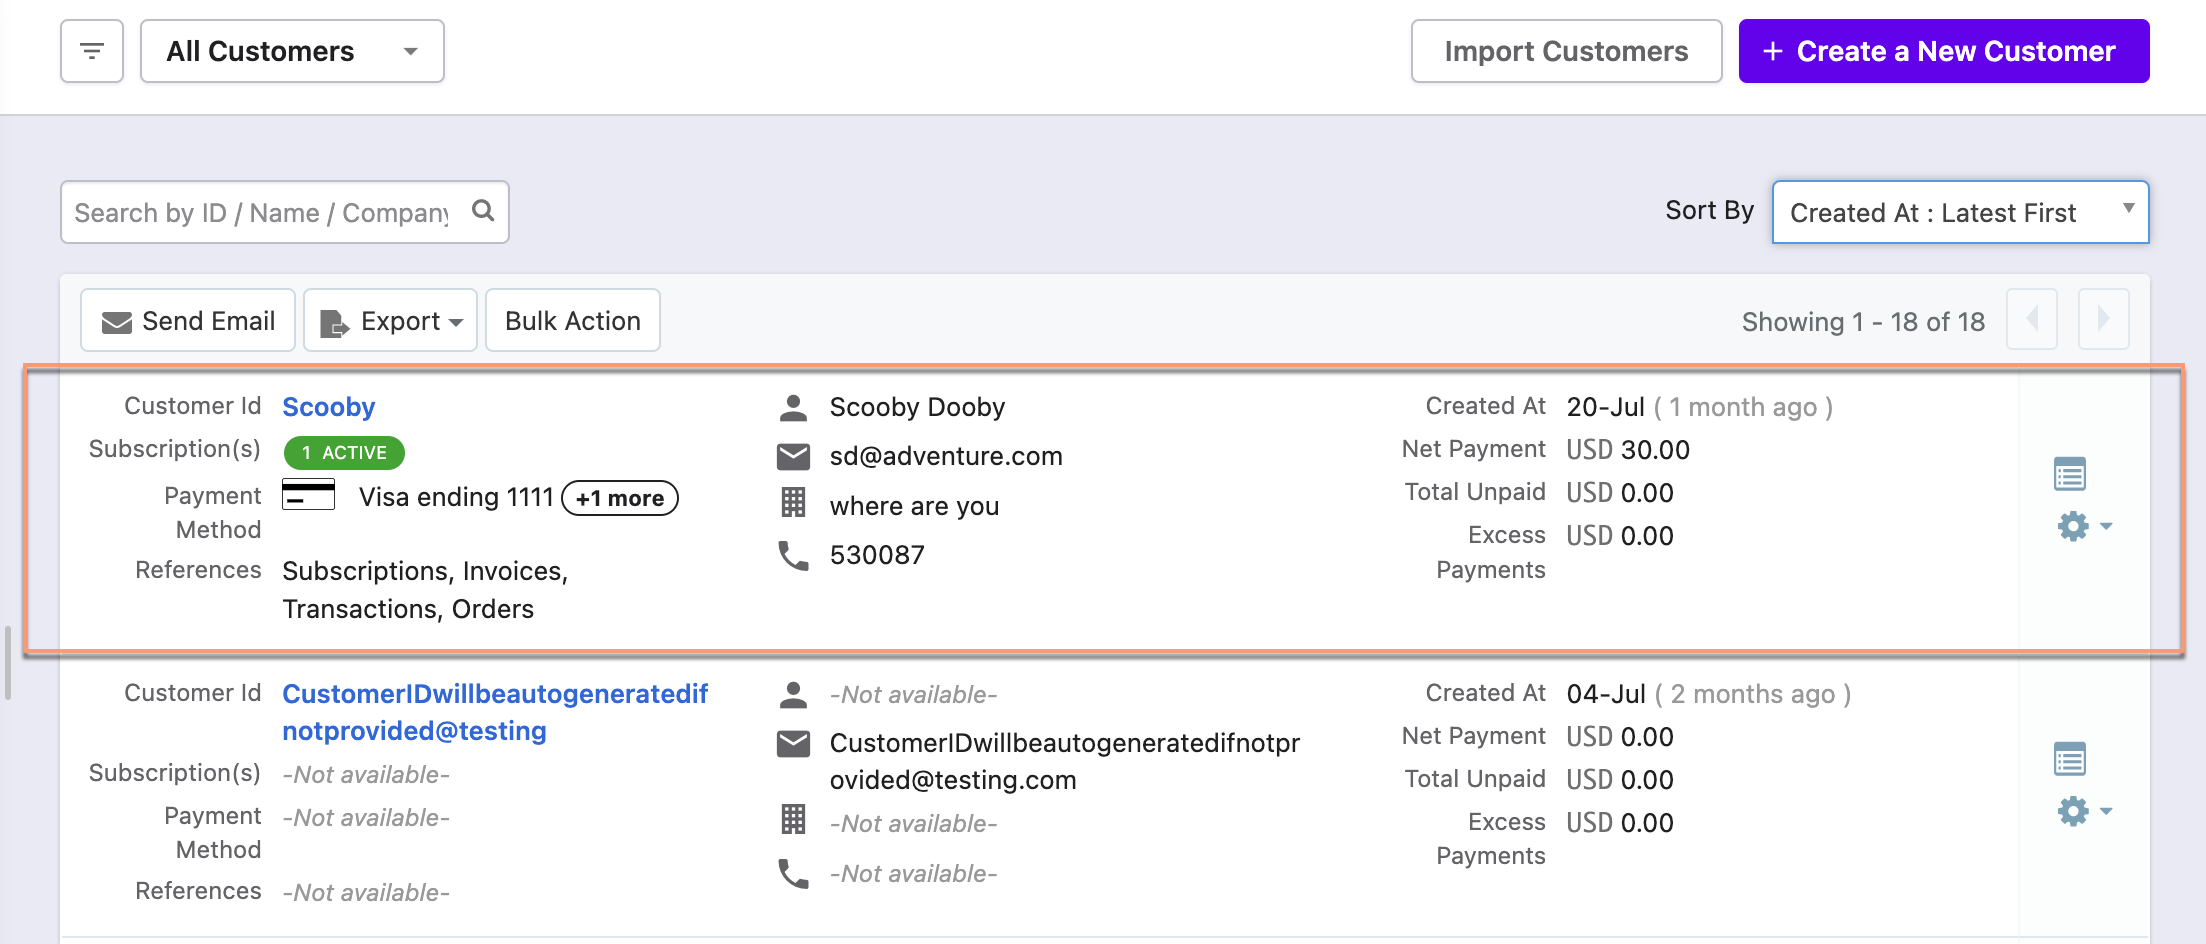 |
| Filters | The following are the steps:
 | The following are the steps:
 |
| Subscription Status Count | Information about the subscriptions if a customer has more than one. The most recent subscription details appears in the Subscription Info column. 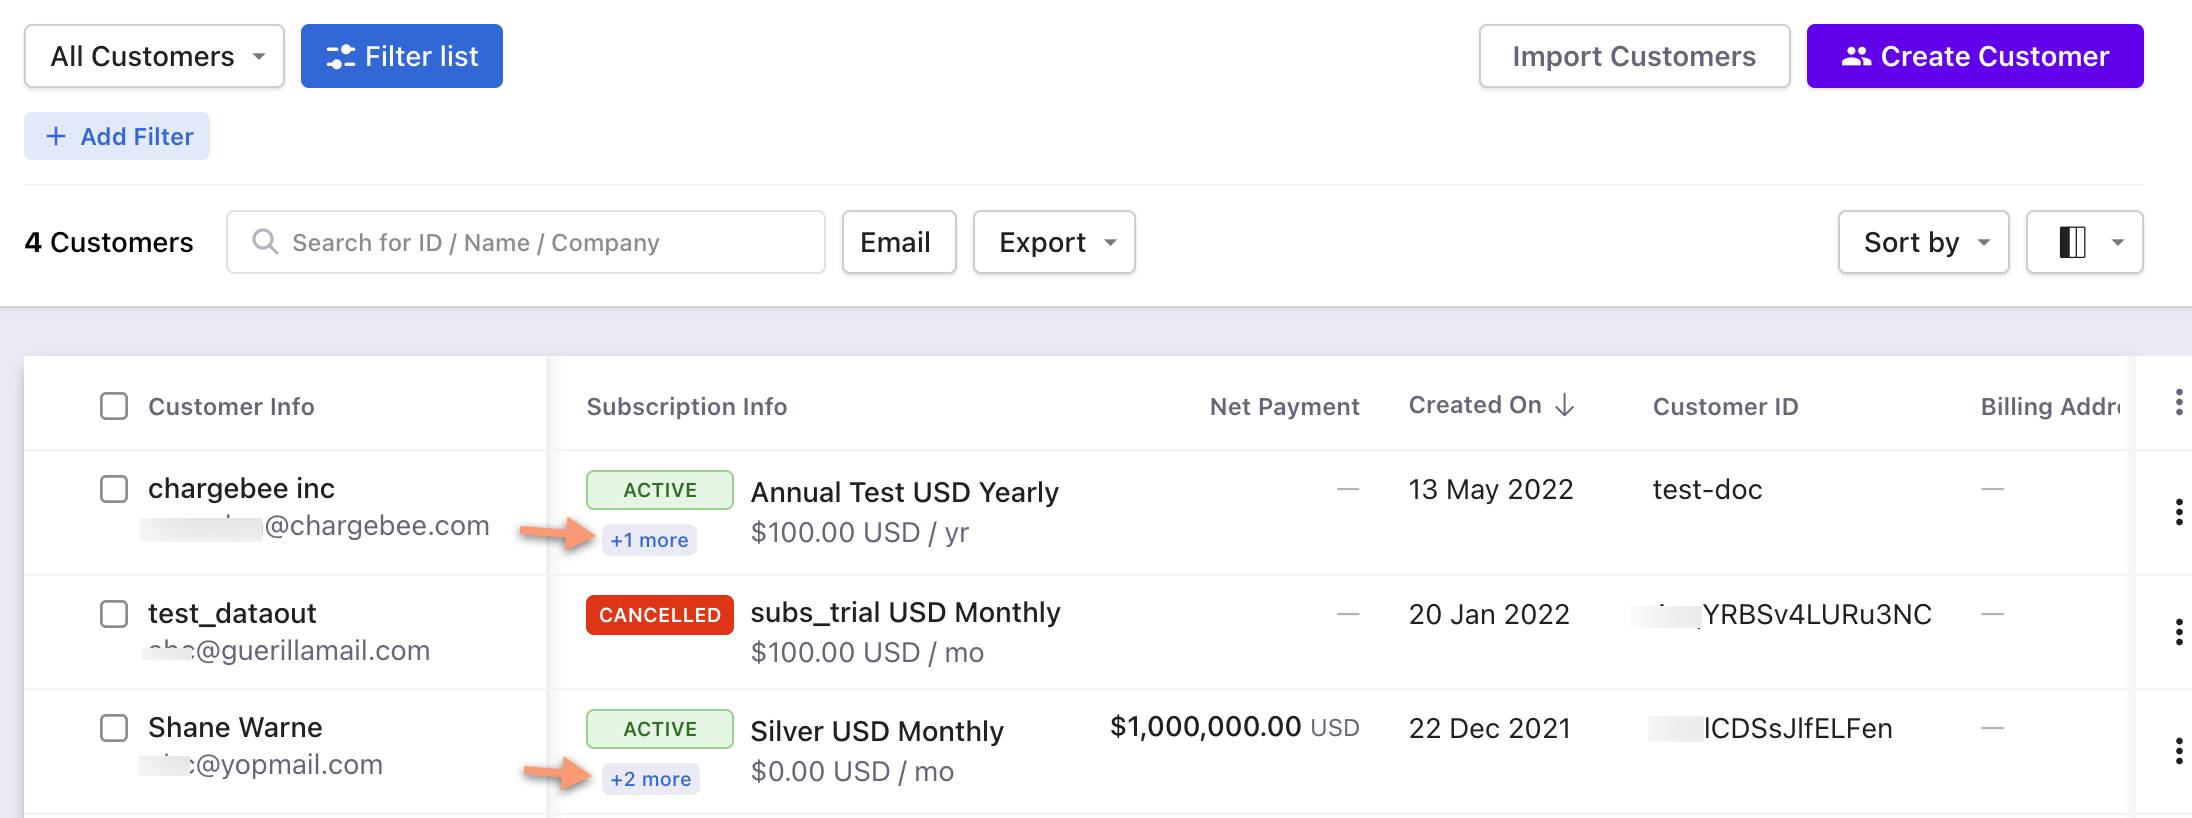 | All the subscription information appears in a single place.  |
Invoices
| Feature | Leap UI | Classic UI |
|---|---|---|
| Bulk Actions | The following are the steps:
 Summary: Delete, Mark as Void, or More Actions operations appear automatically after selecting one or more entries. | The following are the steps:
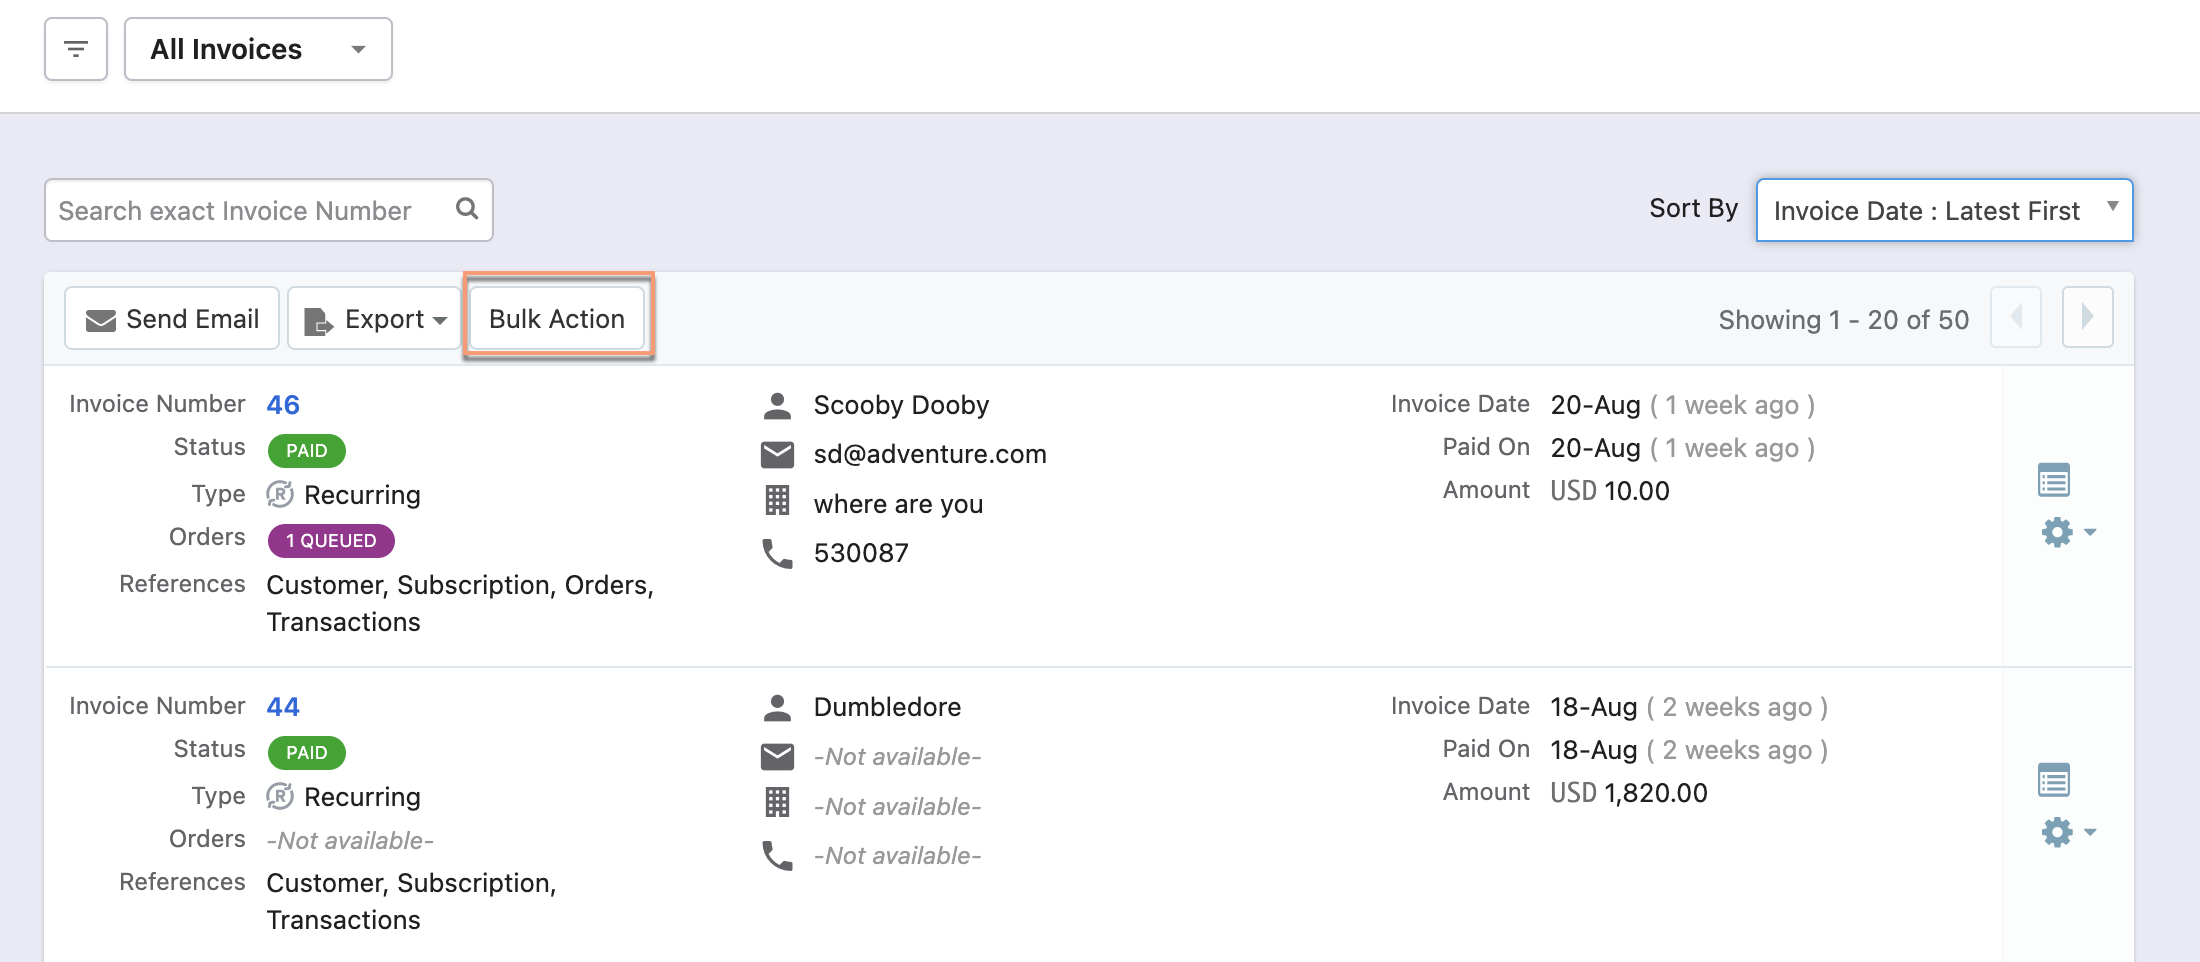
Summary: Bulk action operations appear by clicking the Bulk Actions button. These operations are enabled after selecting one or more entries. |
| Sorting | Click the column name or the arrow beside the column name to sort the column in ascending or descending order. Also, use Sort By drop-down options to sort the entries. 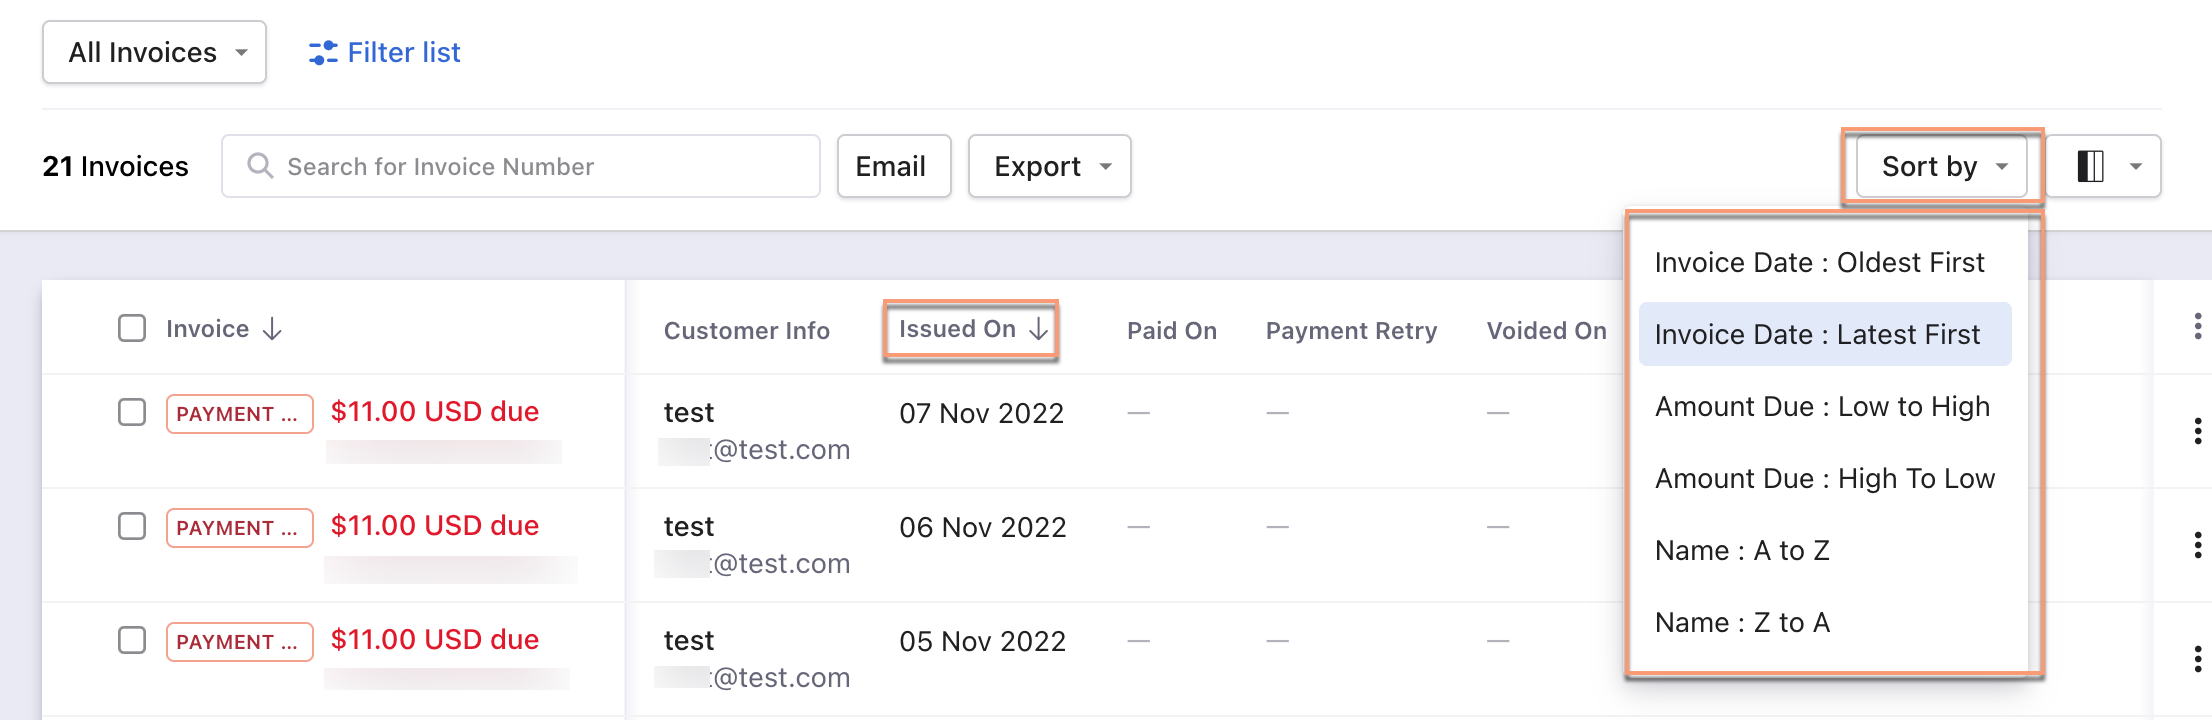 | Use the Sort By drop-down options to sort the entries. 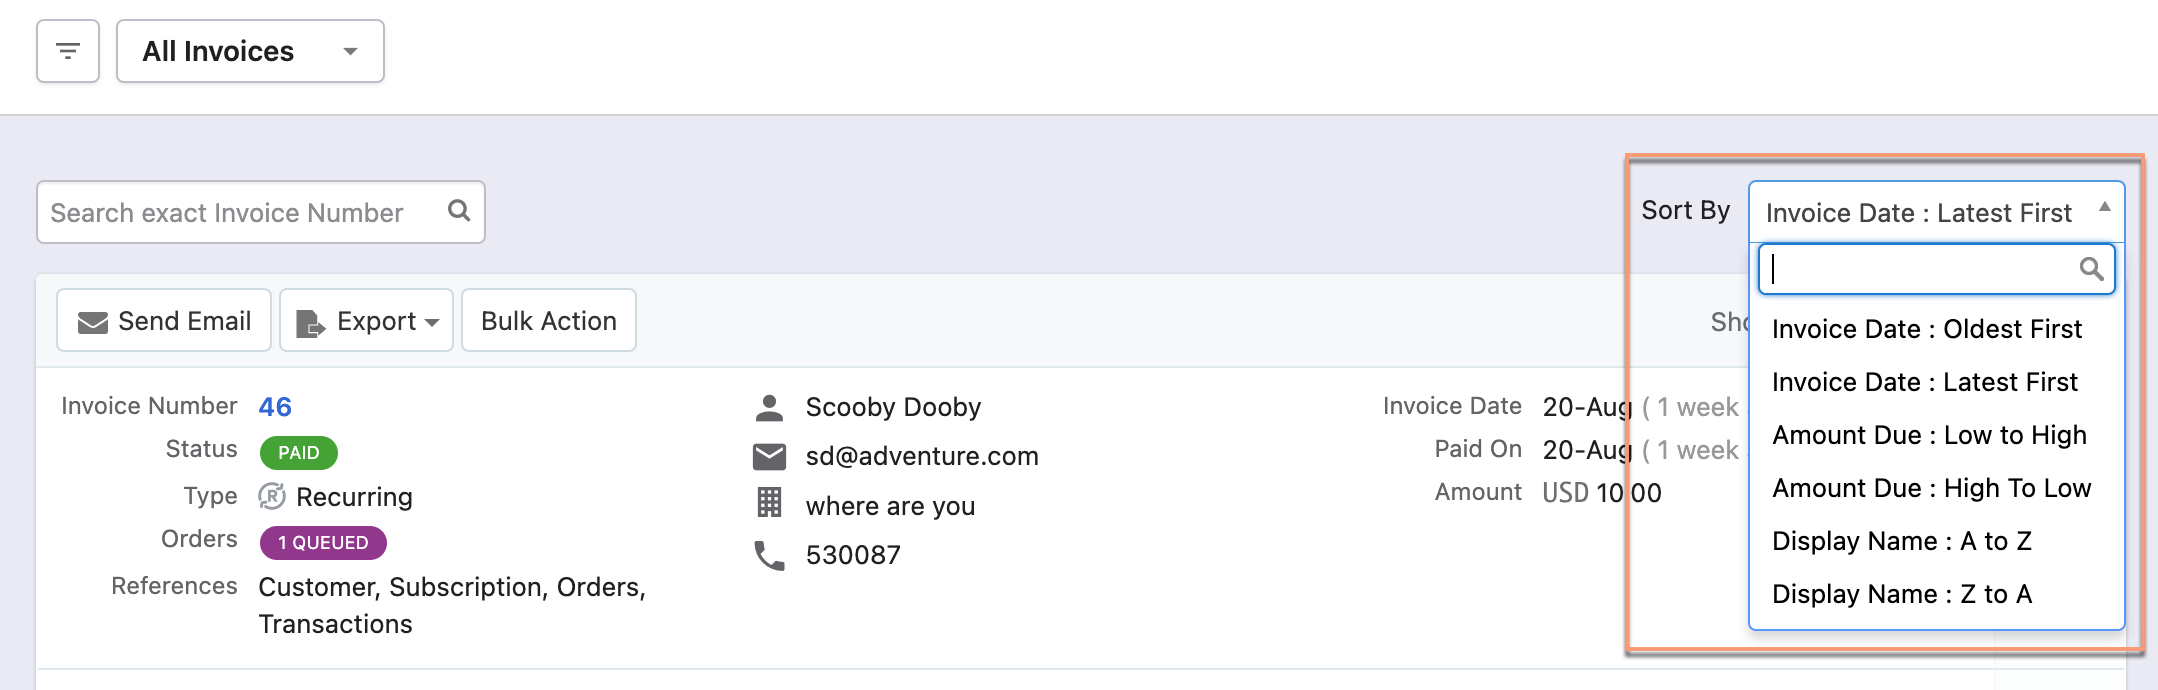 |
| Column | Customize the column appearance. Enable, disable or rearrange columns as required. You can also search by column name. 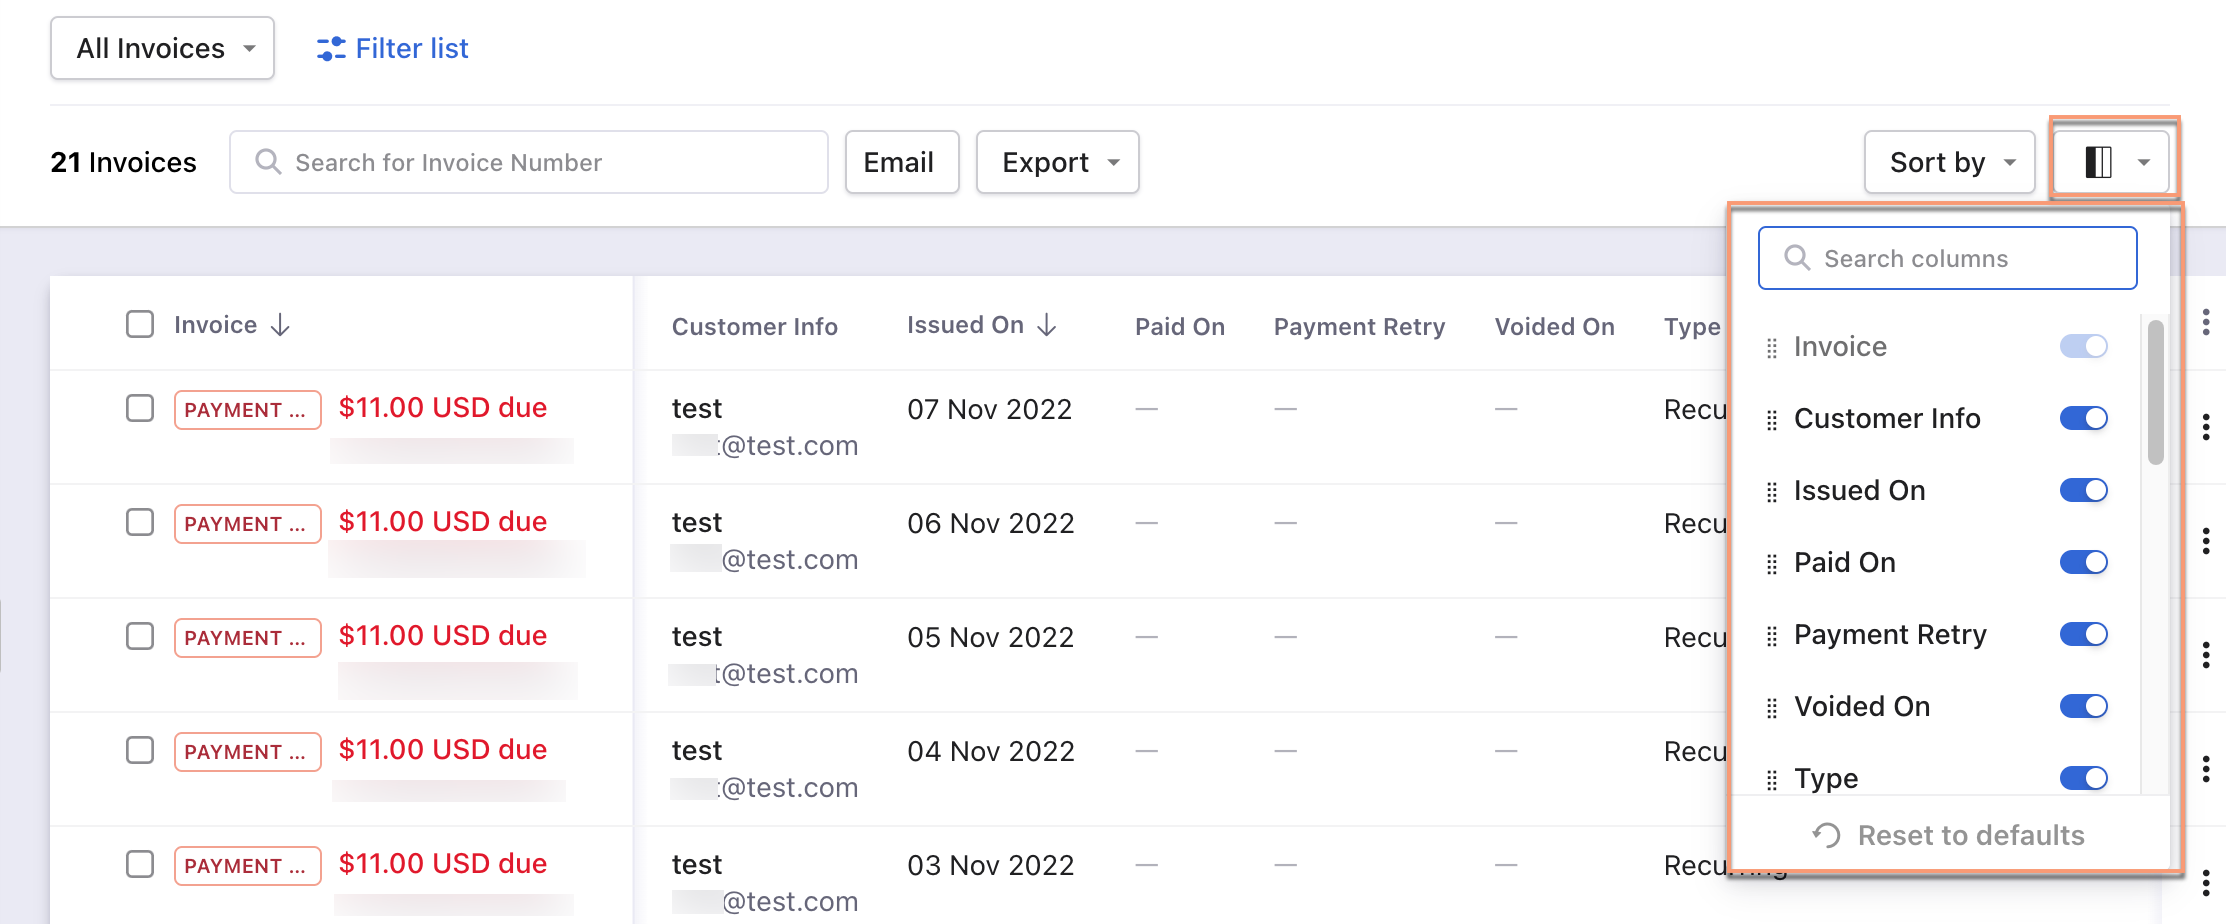 | This feature is not available in the classic user interface. |
| Filters | The following are the steps:
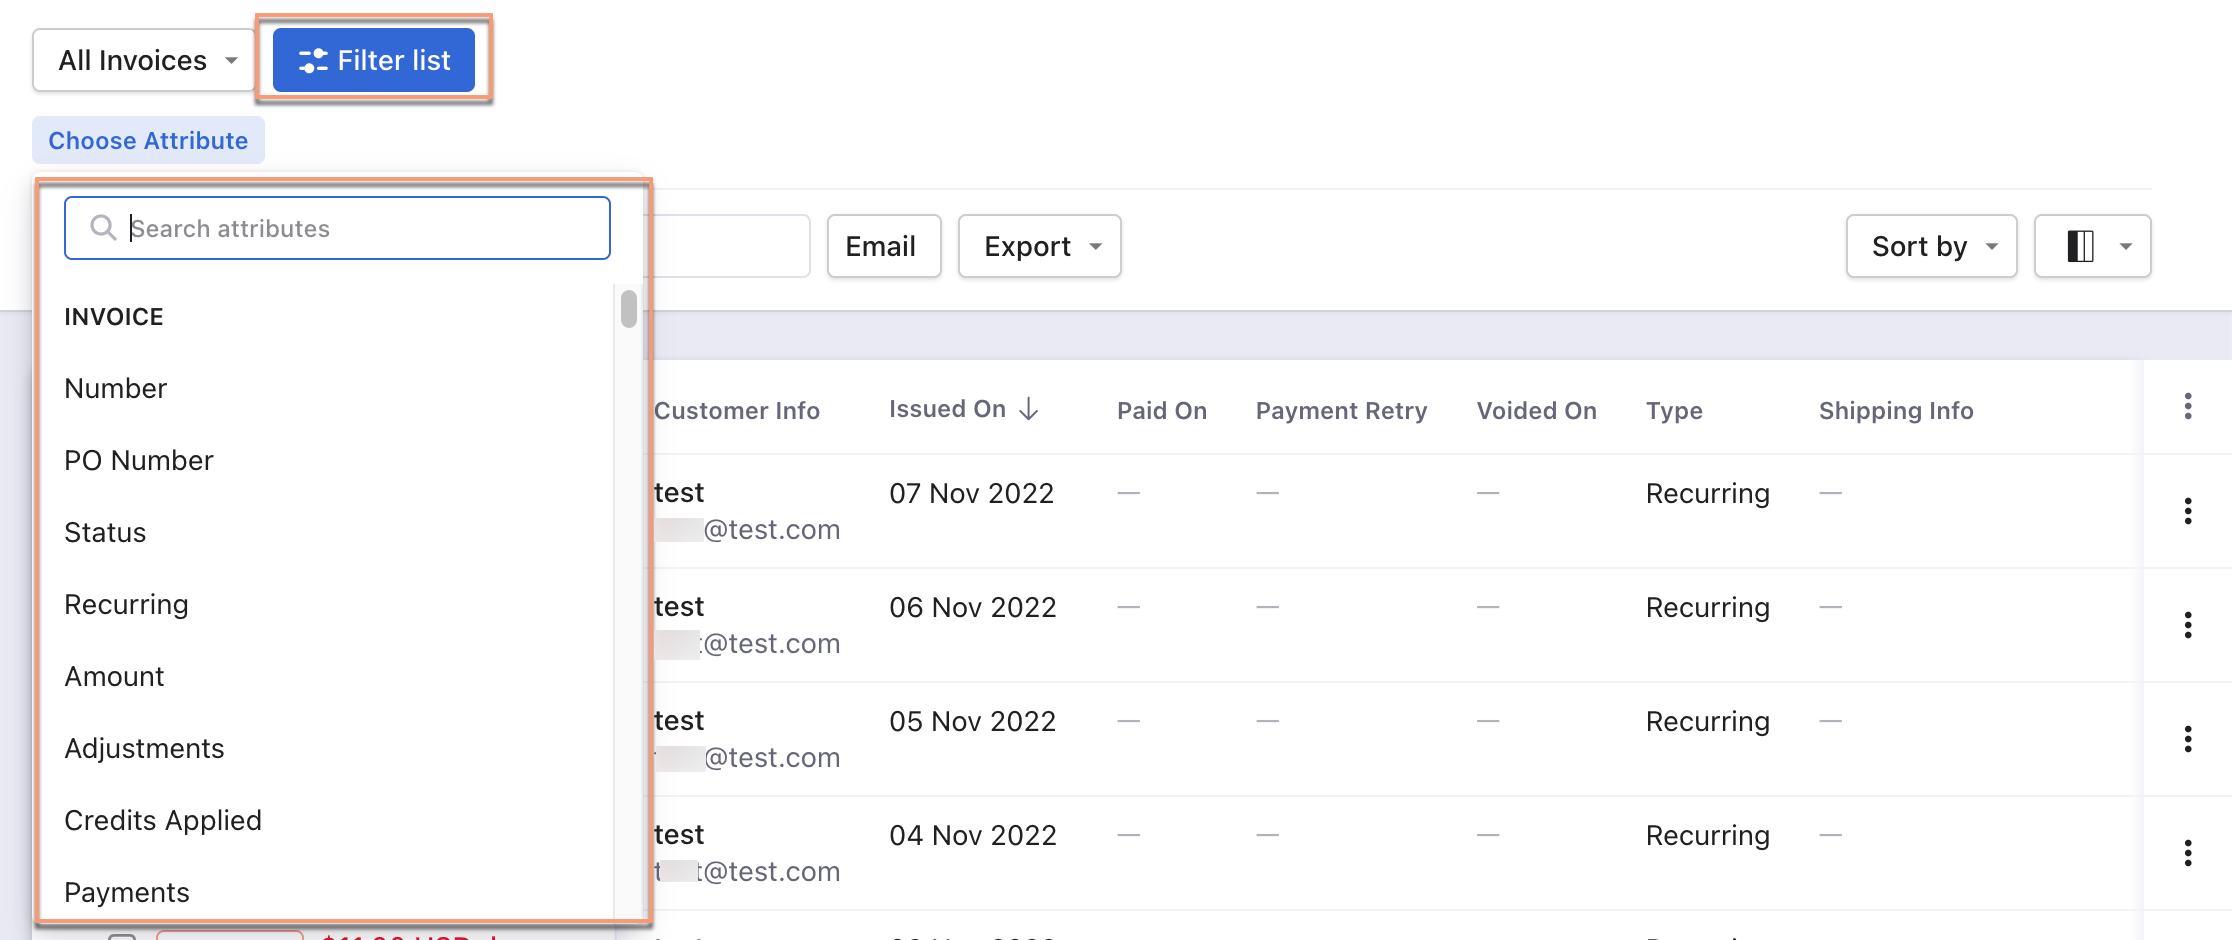 | The following are the steps:
 |
Credit Notes
| Feature | Leap UI | Classic UI |
|---|---|---|
| Bulk Actions | The following are the steps:
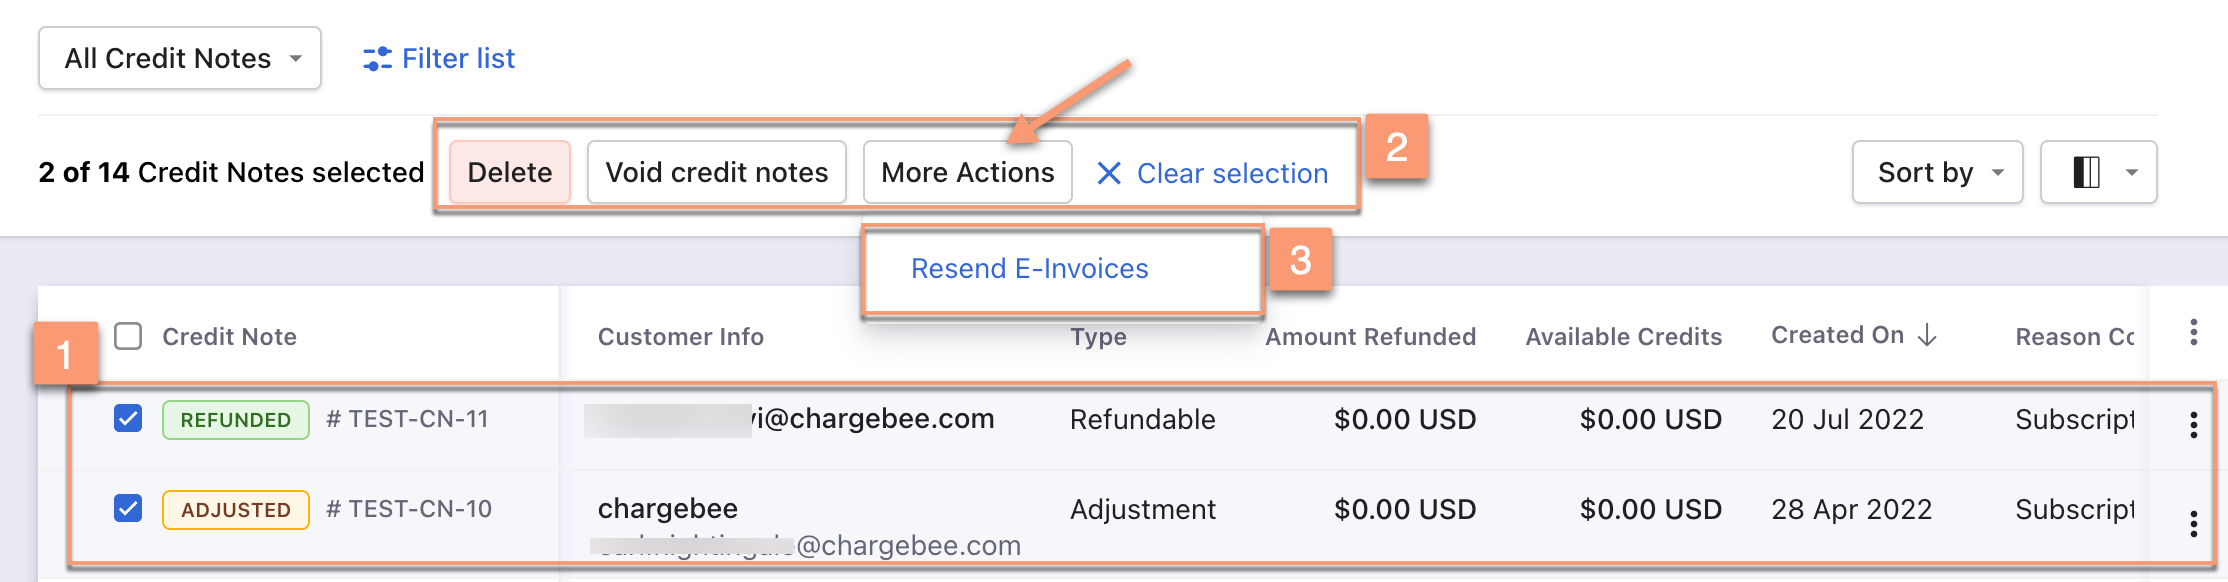 Summary: Delete, Void credit notes, or More Actions operations appear automatically after selecting one or more entries. | The following are the steps:
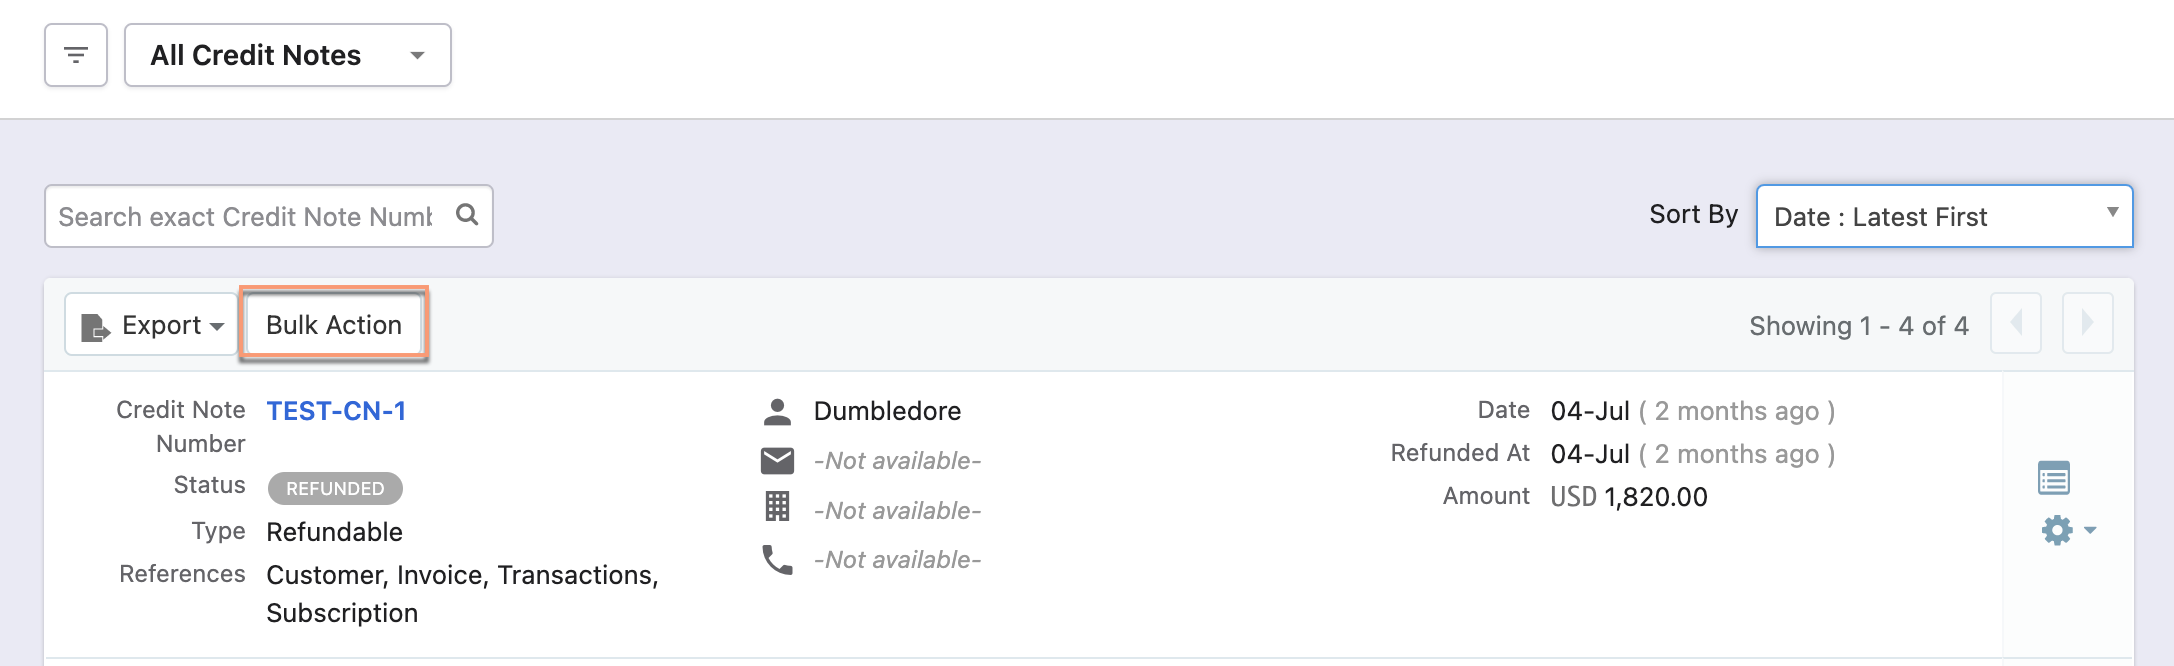
Summary: Bulk action operations appear by clicking the Bulk Actions button. These operations are enabled after selecting one or more entries. |
| Sorting | Click the column name or the arrow beside the column name to sort the column in ascending or descending order. Also, use Sort By drop-down options to sort the entries. 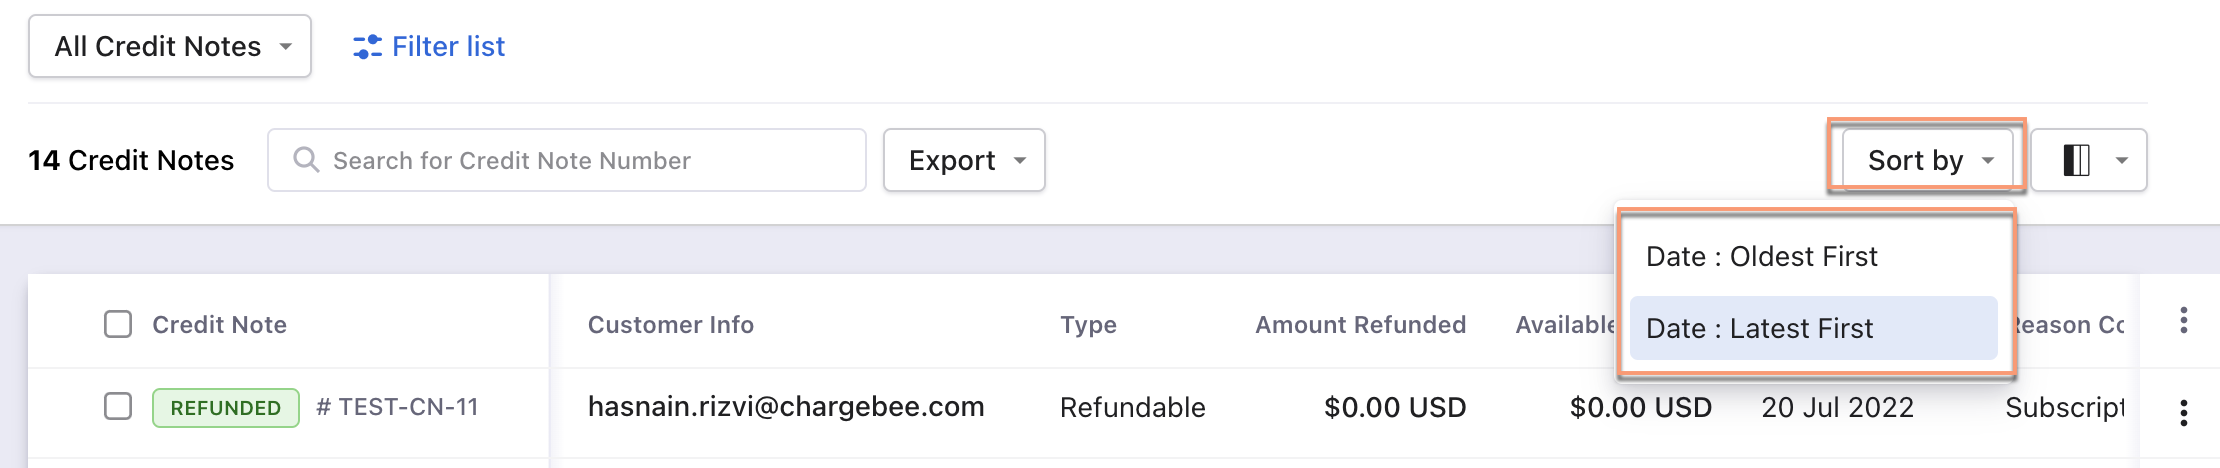 | Use the Sort By drop-down options to sort the entries. 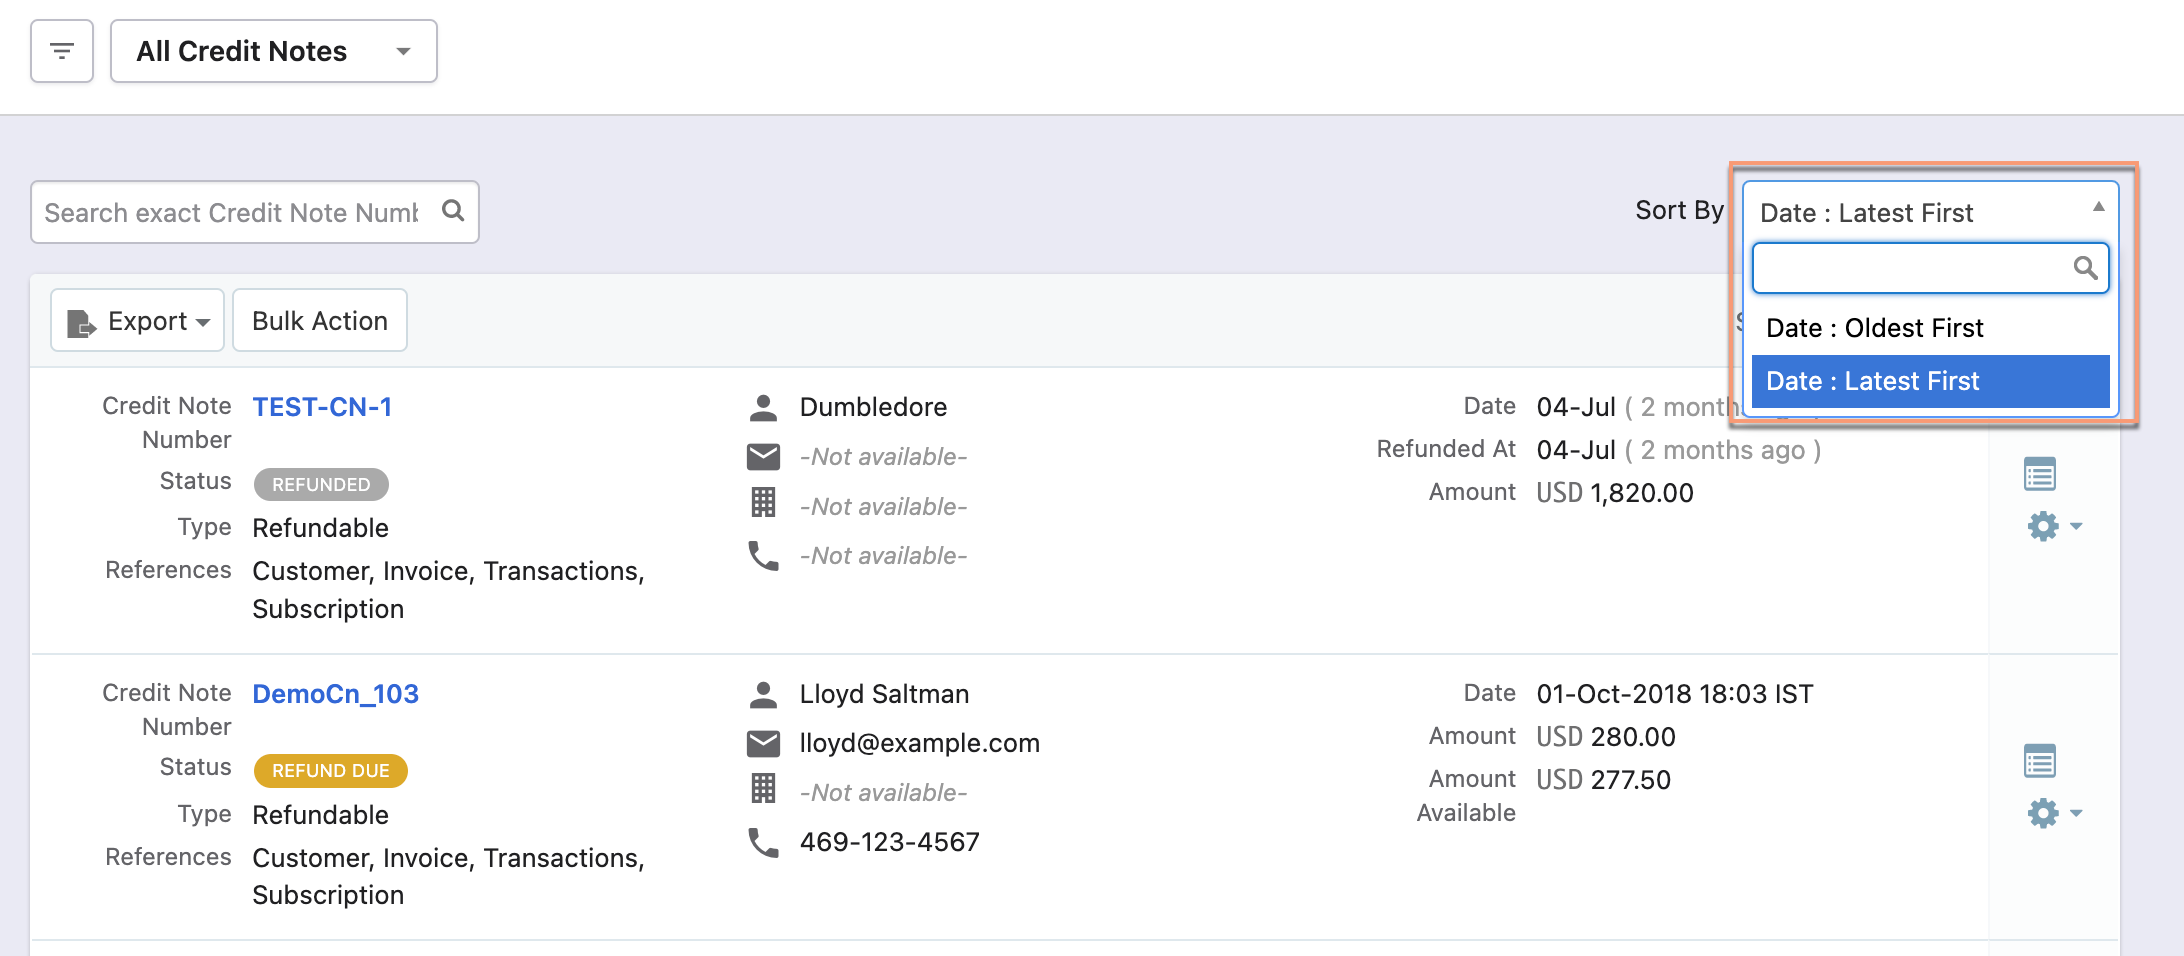 |
| Column | Customize the column appearance. Enable, disable or rearrange columns as required. You can also search by column name. 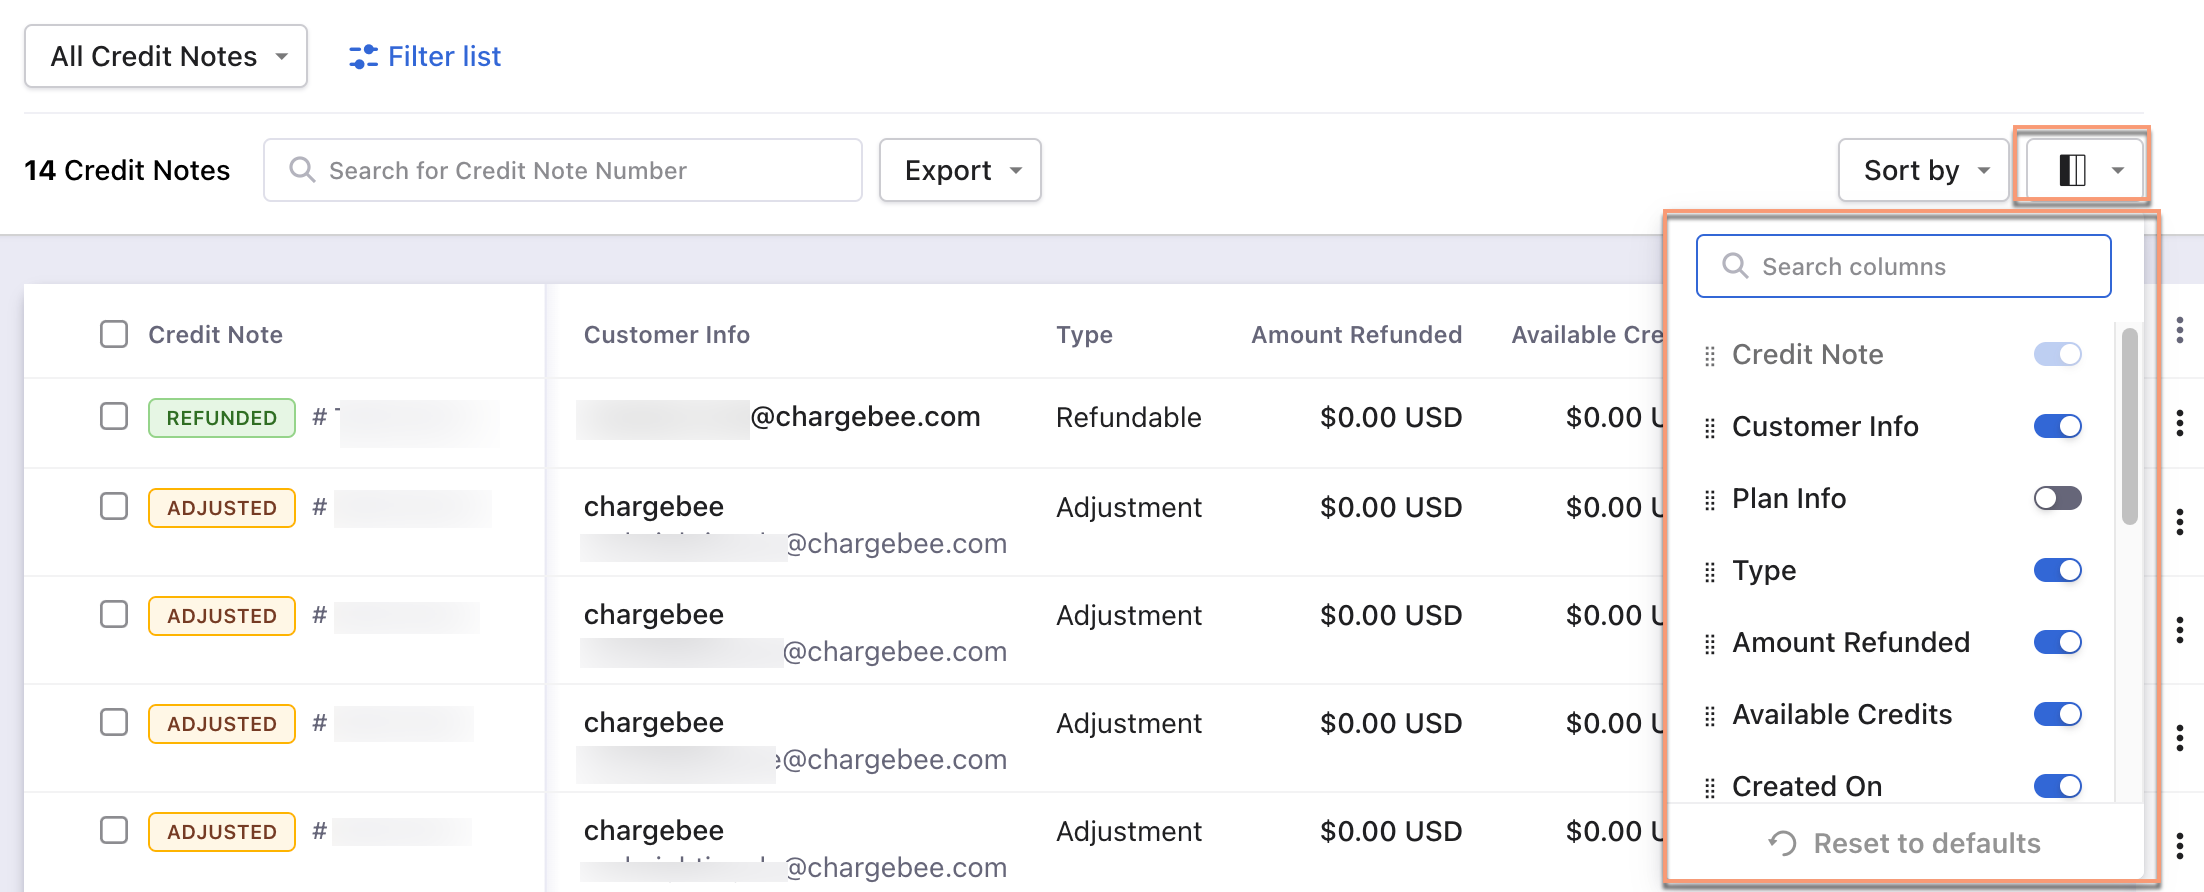 | All the column fields appear at a single place. 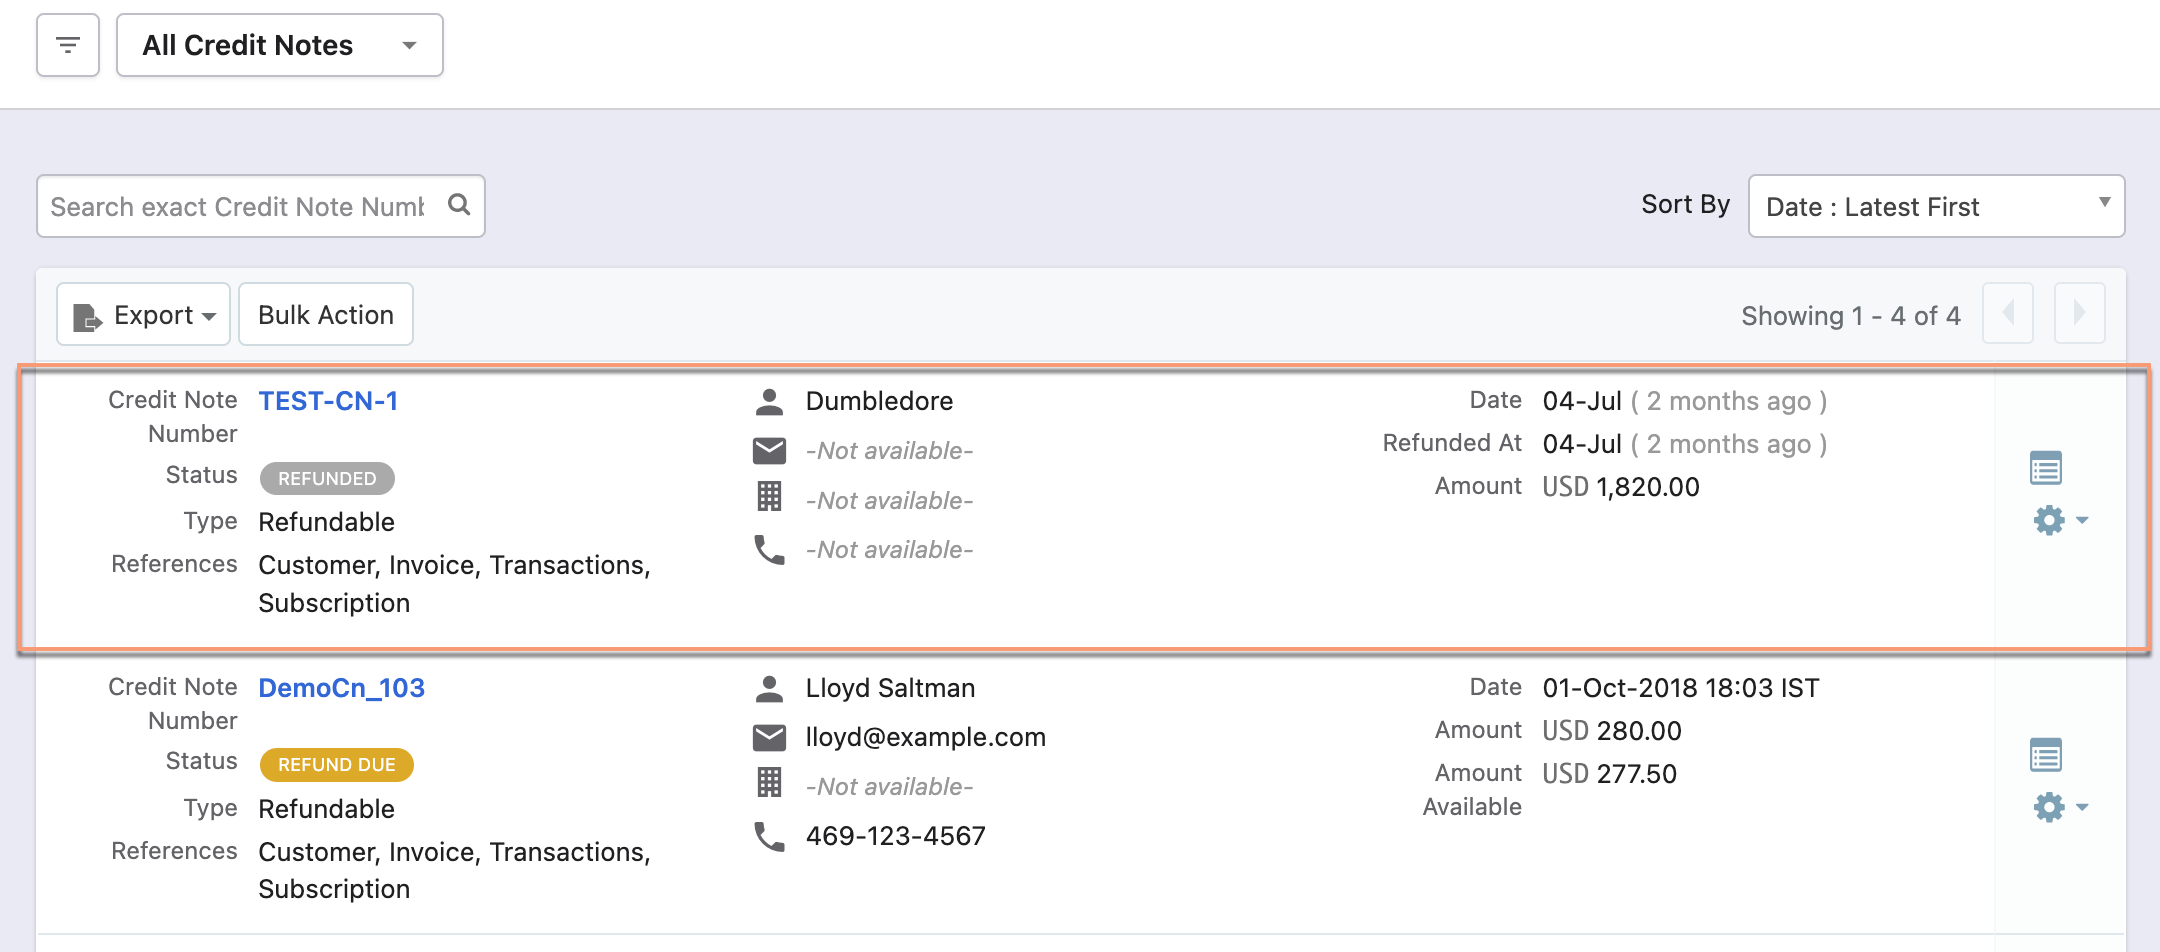 |
| Filters | The following are the steps:
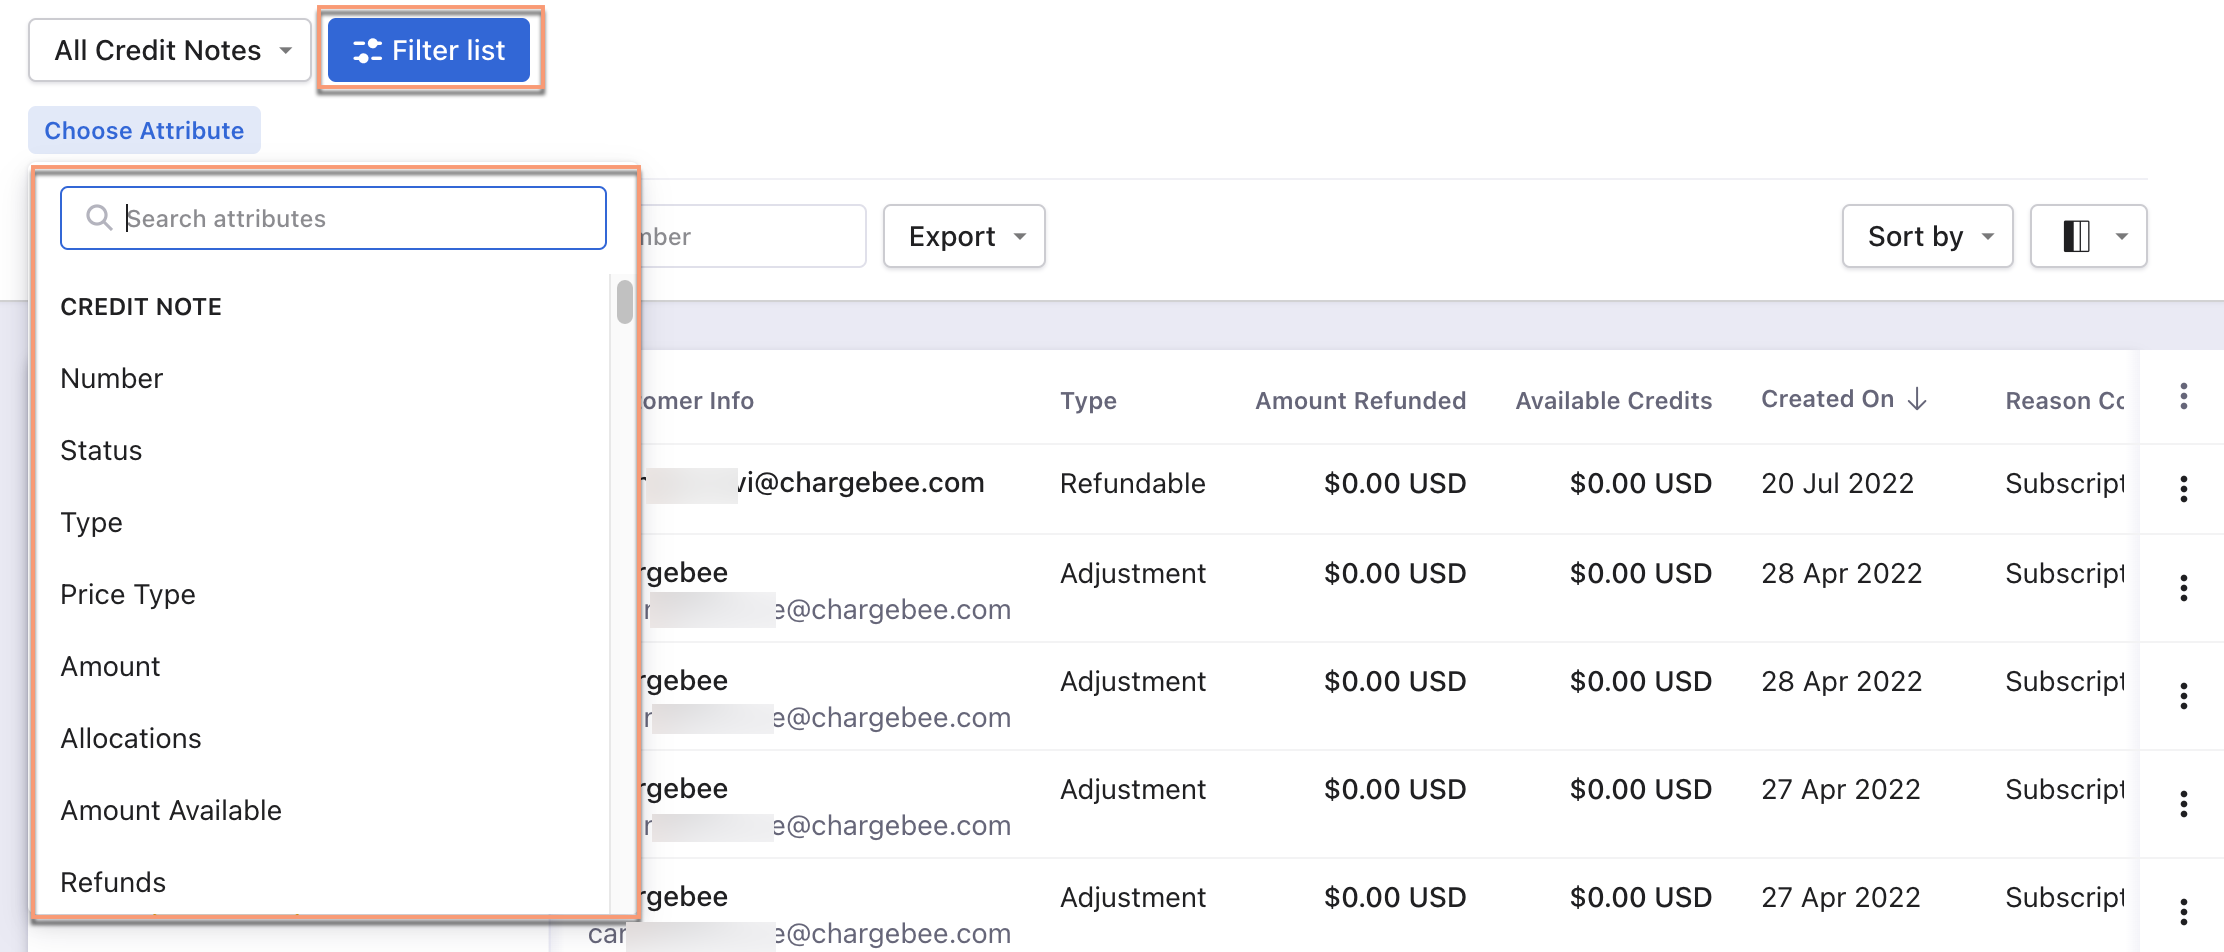 | The following are the steps:
 |
## Events

<Table>
  <TableHeader>
    <TableRow>
      <TableHead>Feature</TableHead>
      <TableHead>Leap UI</TableHead>
      <TableHead>Classic UI</TableHead>
    </TableRow>
  </TableHeader>
  <TableBody>
    <TableRow>
      <TableCell>Sorting</TableCell>
      <TableCell>
        Click the column name or the arrow beside the column name to sort the column in ascending or descending order. Also, use **Sort By** drop-down options to sort the entries.

        <Icon height={80} width={200}  alt="Image" src="/assets/screenshots/billing/upgrade-to-leap-ui/leap-ui-events-sorting.png" />
      </TableCell>
      <TableCell>
        Use the **Sort By** drop-down options to sort the entries.

        <Icon height={80} width={200}  alt="Image" src="/assets/screenshots/billing/upgrade-to-leap-ui/classic-ui-events-sorting.png" />
      </TableCell>
    </TableRow>
    <TableRow>
      <TableCell>Column</TableCell>
      <TableCell>
        Customize the column appearance. **Enable, disable or rearrange** columns as required. You can also search by column name.

        <Icon height={80} width={200}  alt="Image" src="/assets/screenshots/billing/upgrade-to-leap-ui/leap-ui-events-column.png" />
      </TableCell>
      <TableCell>
        This feature is not available in the classic user interface.
      </TableCell>
    </TableRow>
    <TableRow>
      <TableCell>Filters</TableCell>
      <TableCell>
        The following are the steps:

        1. Click on the Filter list.

        2. Select attributes(filter and condition) to apply the filter.

        <Icon height={80} width={200}  alt="Image" src="/assets/screenshots/billing/upgrade-to-leap-ui/leap-ui-events-filters.png" />
      </TableCell>
      <TableCell>
        The following are the steps:

        1. Click on the filter icon.

        2. Select attributes(filter and condition).

        3. Click **Apply Filter**.

        <Icon height={80} width={200}  alt="Image" src="/assets/screenshots/billing/upgrade-to-leap-ui/classic-ui-events-filters.png" />
      </TableCell>
    </TableRow>
  </TableBody>
</Table>


## Transactions

<Table>
  <TableHeader>
    <TableRow>
      <TableHead>Feature</TableHead>
      <TableHead>Leap UI</TableHead>
      <TableHead>Classic UI</TableHead>
    </TableRow>
  </TableHeader>
  <TableBody>
    <TableRow>
      <TableCell>Sorting</TableCell>
      <TableCell>
        Click the column name or the arrow beside the column name to sort the column in ascending or descending order. Also, use **Sort By** drop-down options to sort the entries.

        <Icon height={80} width={200}  alt="Image" src="/assets/screenshots/billing/upgrade-to-leap-ui/leap-ui-transactions-sorting.png" />
      </TableCell>
      <TableCell>
        Use the **Sort By** drop-down options to sort the entries.

        <Icon height={80} width={200}  alt="Image" src="/assets/screenshots/billing/upgrade-to-leap-ui/classic-ui-transactions-sorting.png" />
      </TableCell>
    </TableRow>
    <TableRow>
      <TableCell>Column</TableCell>
      <TableCell>
        Customize the column appearance. **Enable, disable or rearrange columns** as required. You can also search by column name.

        <Icon height={80} width={200}  alt="Image" src="/assets/screenshots/billing/upgrade-to-leap-ui/leap-ui-transactions-column.png" />
      </TableCell>
      <TableCell>
        This feature is not available in the classic user interface.
      </TableCell>
    </TableRow>
    <TableRow>
      <TableCell>Filters</TableCell>
      <TableCell>
        The following are the steps:

        1. Click on the Filter list.

        2. Select attributes(filter and condition) to apply the filter.

        <Icon height={80} width={200}  alt="Image" src="/assets/screenshots/billing/upgrade-to-leap-ui/leap-ui-transactions-filters.png" />
      </TableCell>
      <TableCell>
        The following are the steps:

        1. Click on the filter icon.

        2. Select attributes(filter and condition).

        3. Click **Apply Filter**.

        <Icon height={80} width={200}  alt="Image" src="/assets/screenshots/billing/upgrade-to-leap-ui/classic-ui-transactions-filters.png" />
      </TableCell>
    </TableRow>
  </TableBody>
</Table>


## Upgrade to Leap UI

To upgrade from Classic UI to Leap UI:

1. Navigate to your profile image or icon.
2. Click **Explore Leap UI**.

   <Image src="/assets/screenshots/billing/upgrade-to-leap-ui/explore-leap-ui.png" alt="Explore Leap UI screenshot"/>

Alternatively, click the **TRY IT NOW** banner to upgrade directly.

<Image src="/assets/screenshots/billing/upgrade-to-leap-ui/try-it-now-banner.png" alt="Try It Now banner screenshot"/>
Was this article helpful?