Salesforce Integration Guide
Introduction
Flexibility is one of the greatest strengths of Salesforce and that's how you are able to effectively model your organization and its processes in Salesforce. Chargebee's integration with Salesforce offers a high level of adaptability to meet your business workflows.
This page will help you understand the configuration options that are available for the integration and how to set them up.
Note
On connecting multiple sites: If you are connecting multiple Chargebee sites to the same Salesforce organization, the considerations discussed in this page are applicable to all the sites.
Changes aren't applied retrospectively: Unless otherwise specified, the changes made to the configuration are applicable only for newly synced records. The new set of configurations are applied in the next sync after the change. Previously synced records are not affected.
Case-sensitivity for comparisons: Whenever field values are compared between Chargebee and Salesforce to find matching records, the comparison is performed in a case-sensitive or case-insensitive manner depending on the property set for the field in Salesforce. Chargebee ID and Salesforce ID are case sensitive, while the rest are not.
Syncing Customer Records
Customer records in Chargebee are mapped and synced to accounts in Salesforce. The mapping is one-to-one, which means that any given customer or account record cannot participate in more than one customer-account relationship (including Person accounts.)
Note
Chargebee - Salesforce Integration follows a 1:1 mapping. This means that a customer in Chargebee can be linked to only 1 account in Salesforce. The condition remains true even if multiple Chargebee sites are connected to Salesforce.
The data is synced in a bi-directional manner. That is, the information can flow from:
- Chargebee to Salesforce
- Salesforce to Chargebee
Chargebee to Salesforce (Self-Serve)
In the self-serve model, the customers land on your website and sign-up for the subscriptions themselves. In such cases, the customer and their subscription information is created in Chargebee directly. The integration pulls data from Chargebee into Salesforce. You can choose to run this manually or automatically.
Salesforce to Chargebee (Sales-Driven)
If you have a sales-driven model, your sales team starts the cycle in Salesforce. They work through the opportunities or accounts in Salesforce and create Chargebee customers and subscriptions from them. Data is pushed from Salesforce to Chargebee according to the field mapping.
Prerequisites
Configuring v1.38 and above, requires you to complete the following prerequisites:
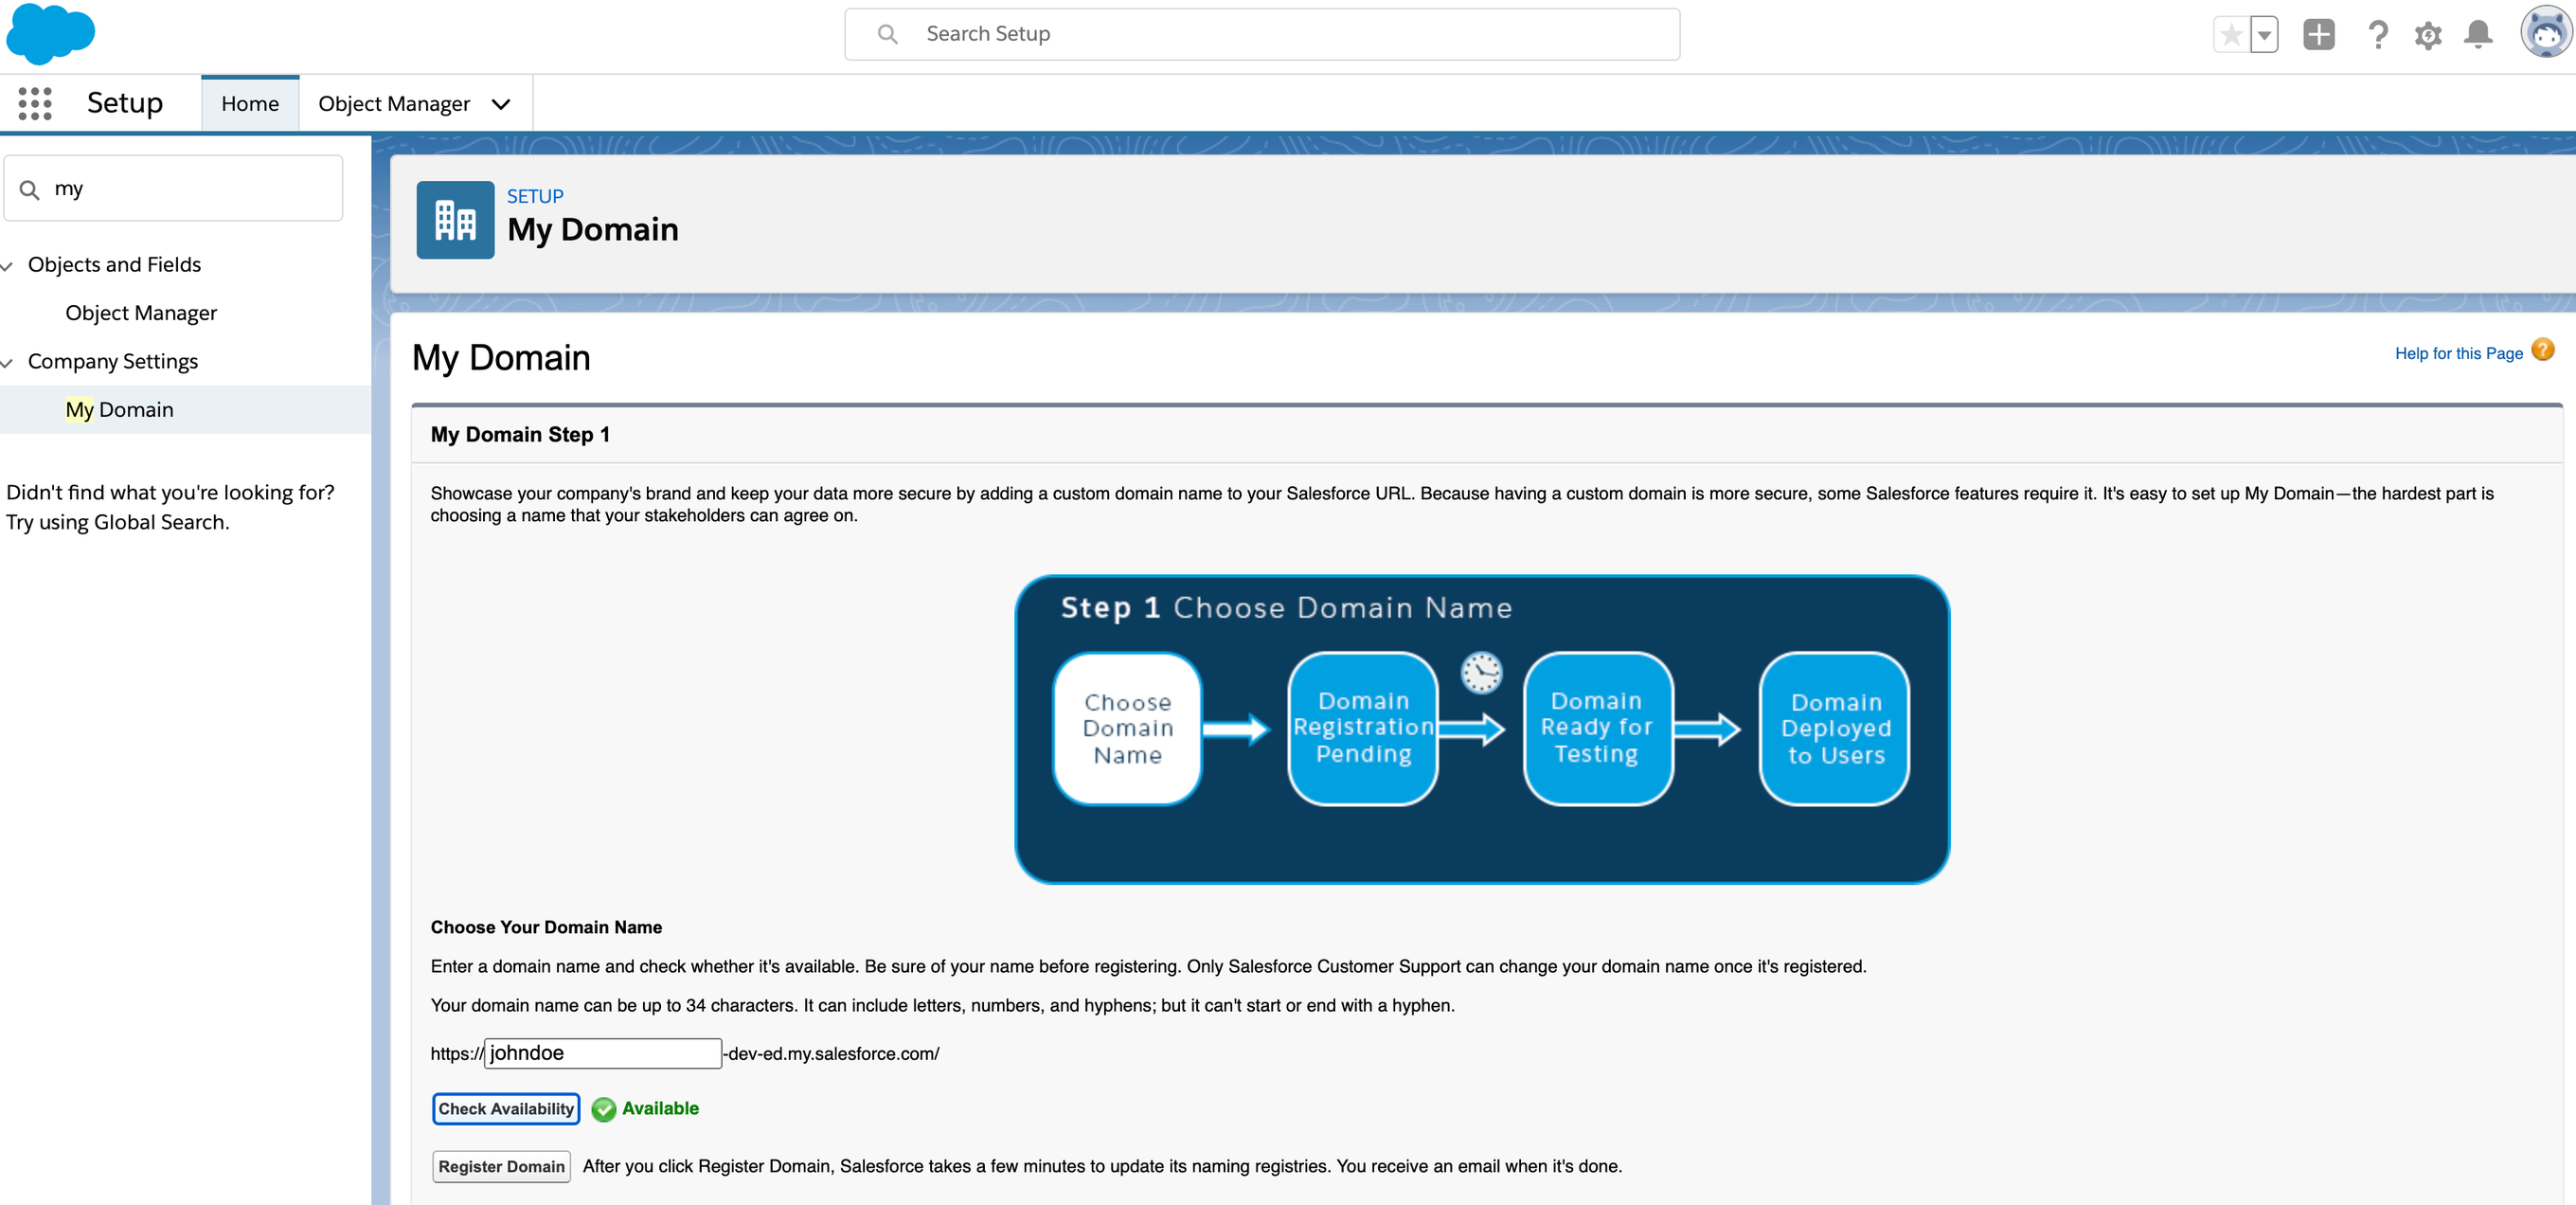
My Domain registration
My Domain gives you a point-and-click way to brand the page that prompts users to log in to your Salesforce organization. Learn more
To add a domain, follow the below steps:
-
Search for My Domain in the Quick Find box from Setup and select it.
-
Click Add a Domain.
-
Enter the domain name and click Check Availability.
-
Click Register Domain. You will receive an email once the domain is registered.

-
Once you receive the email deploy it to your users.
Enable Chargebee Integration tab
Note
This option will be available only if you have installed the package. Refer to our installation guide to learn more.
Enabling the Chargebee Integration tab is necessary to configure the integration settings.
To do this, follow the below steps:
-
Search for Profiles in the Quick Find box from Setup and select the System Administrator profile.
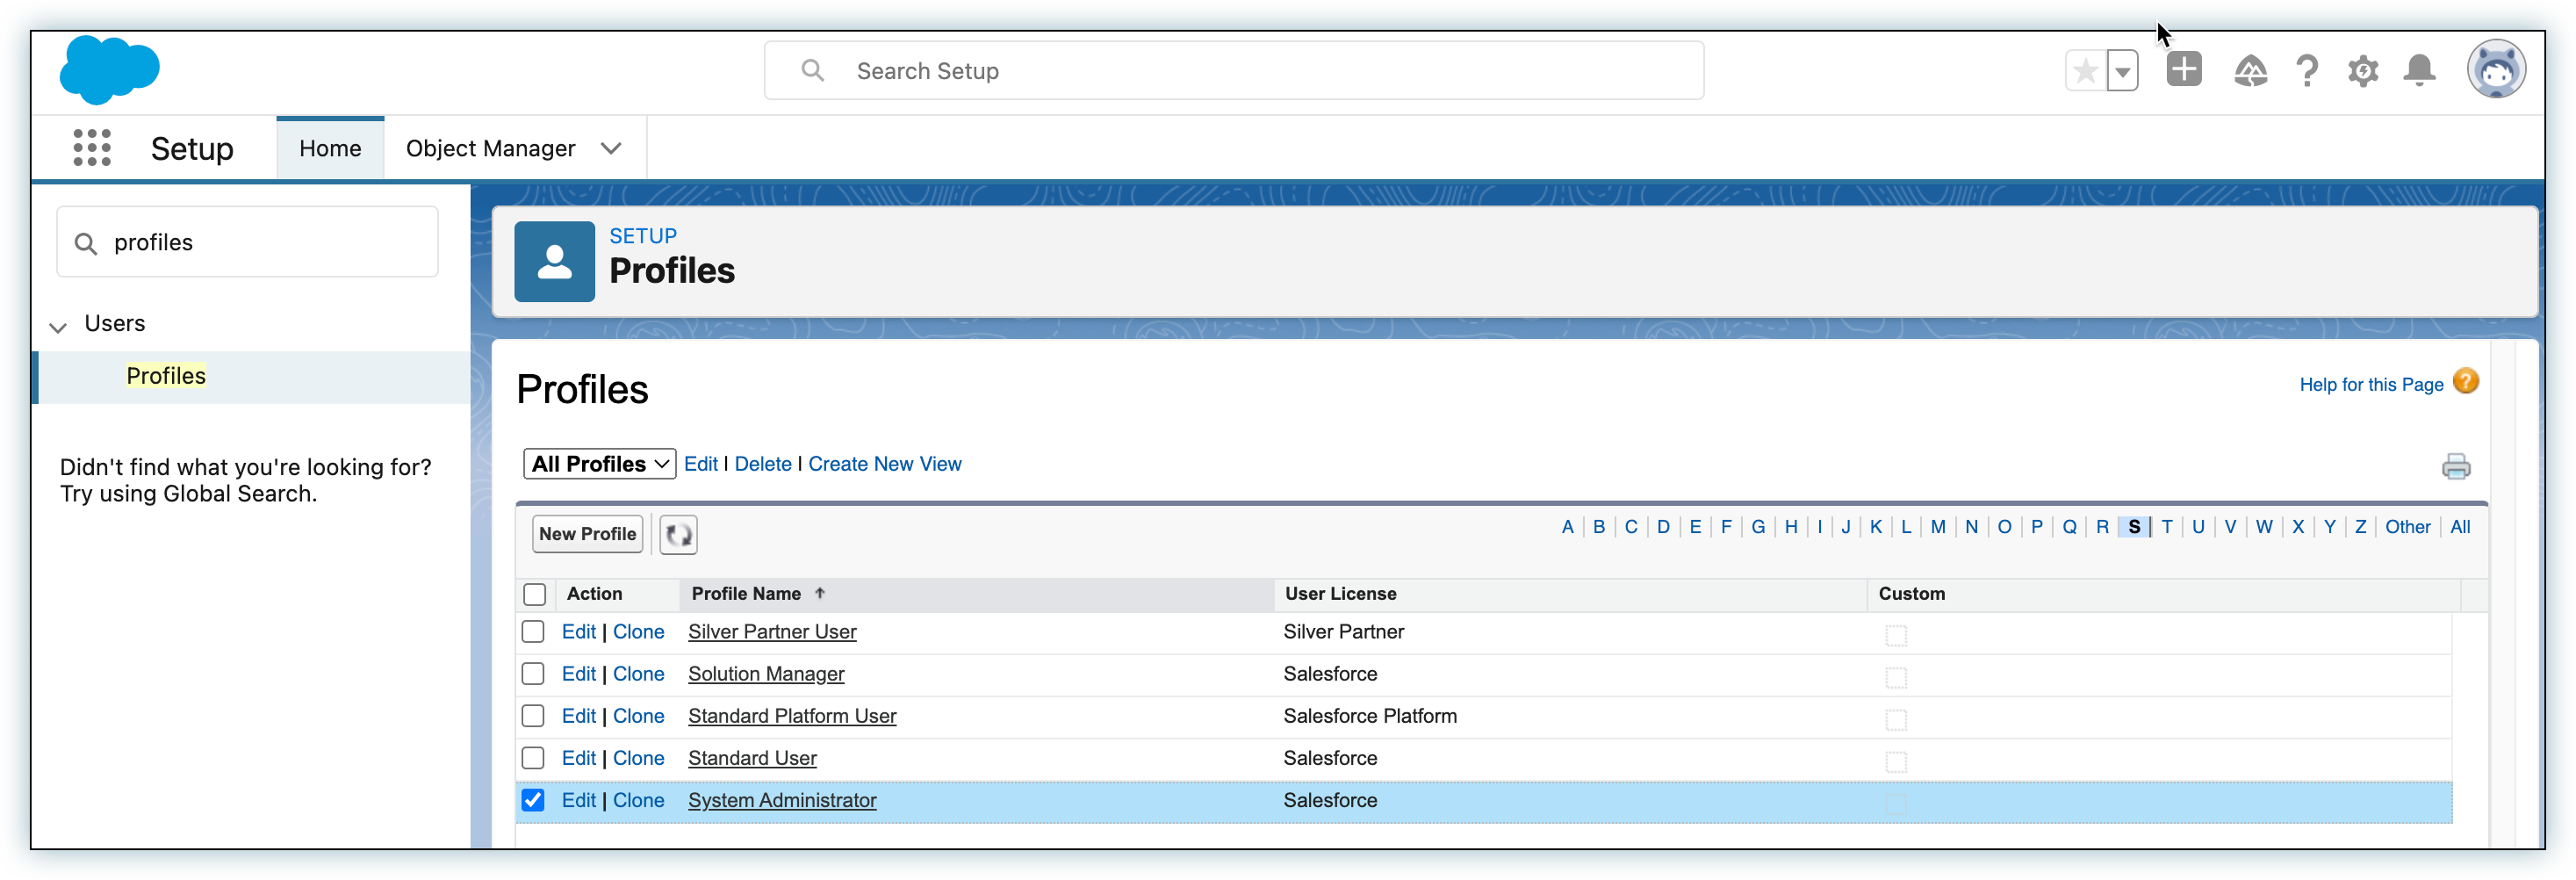
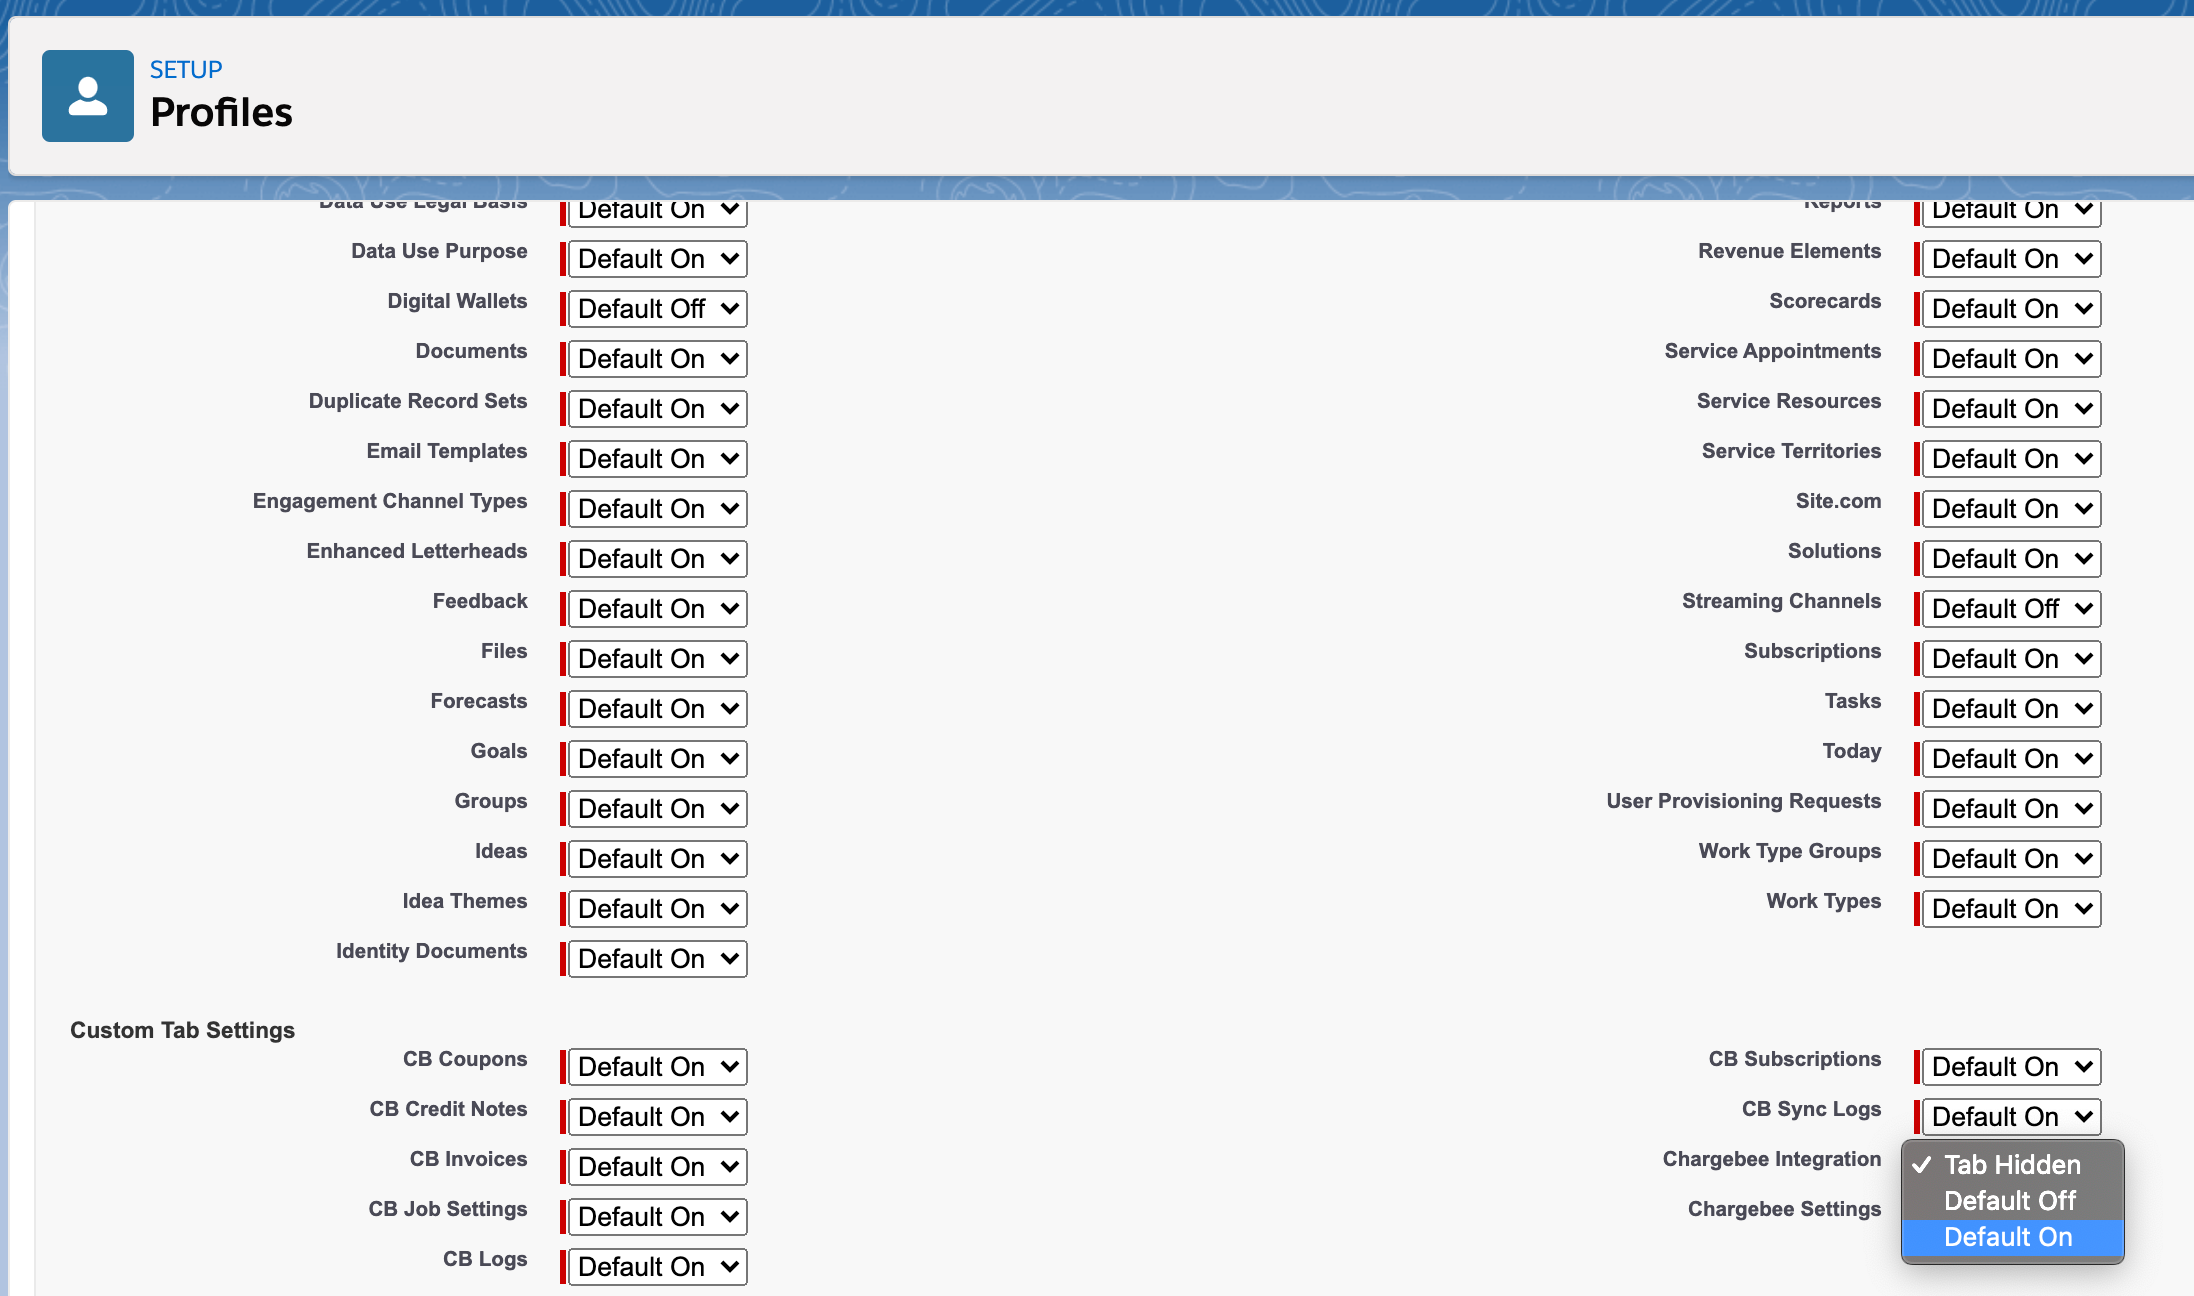
-
Click Edit and change the Chargebee Integration setting from Tab Hidden to Default on.
Assigning Permission Sets
Note
This option will be available only if you have installed the package. Refer to our installation guide to learn more.
You can assign permissions to users with administrators and standard user privileges based on the tasks they perform using the Chargebee Salesforce integration. Users granted permission at this step will be able to set up the integration.
Follow the steps to assign permission sets for users:
-
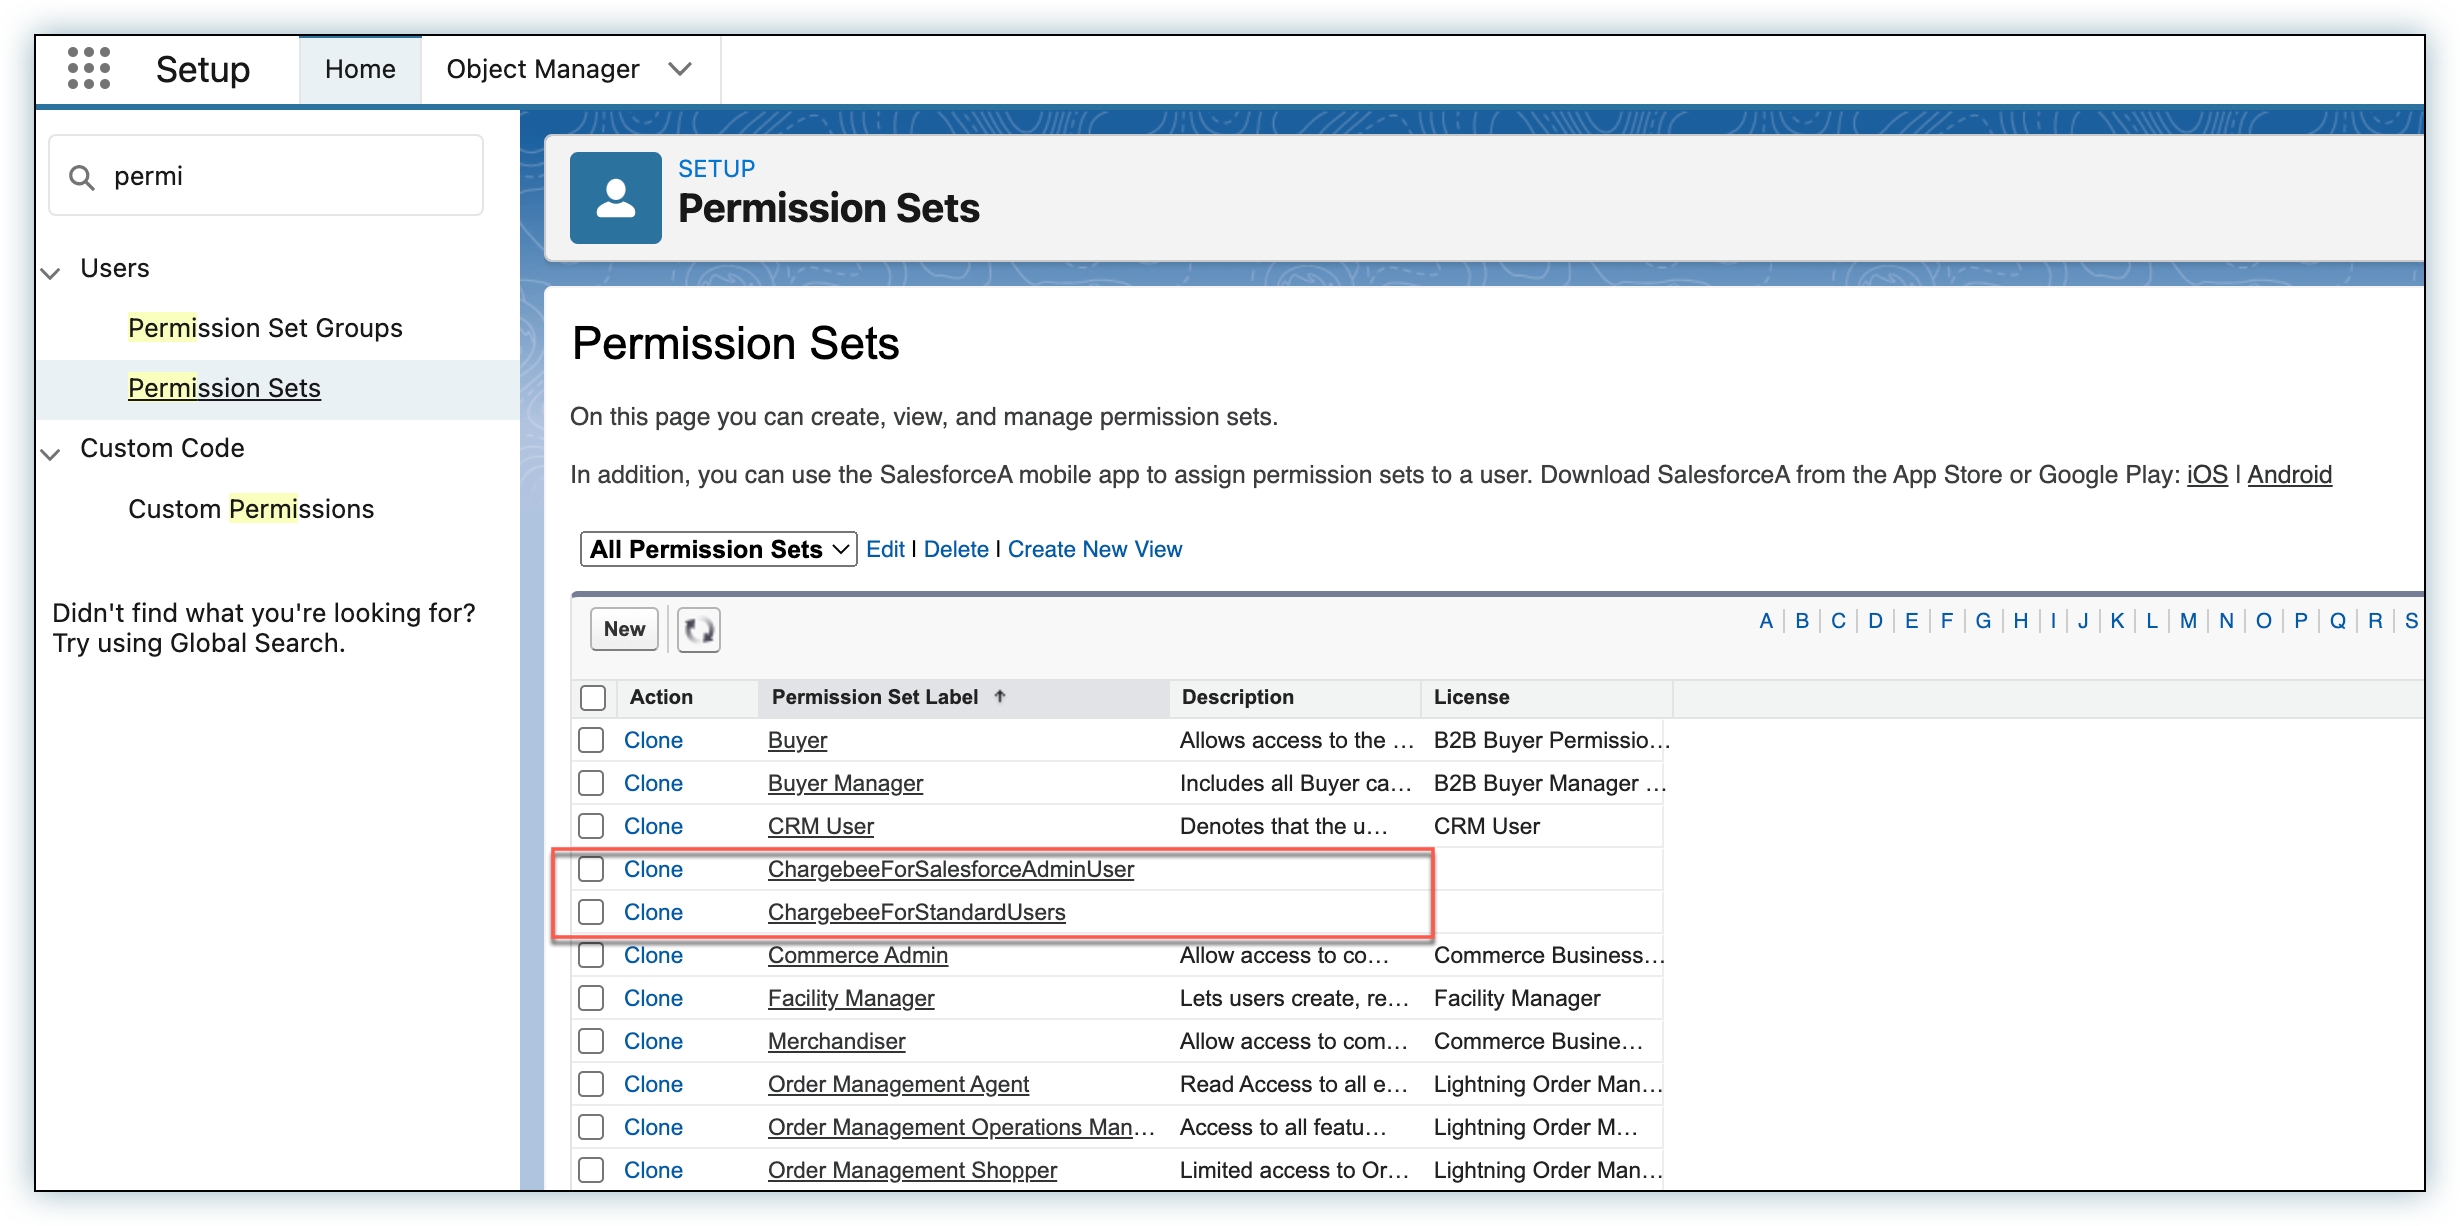
Go to Setup, type 'permission sets' in the Quick Find search box.
-
On the Permission Sets page, select the required permission sets. -Select ChargebeeForSalesforceAdminUser for admins. -Select ChargebeeForStandardUsers for standard users.
-
Click Manage Assignments.
-
Click Add Assignments.
-
Select users and then click Assign.
The following table lists the permissions granted to users based on the tasks they perform using the integration.
| Permissions | Chargebee For Salesforce Admin User | Chargebee For Standard Users |
|---|---|---|
| Visualforce page and Lightning actions supported by the Chargebee managed Salesforce package | Yes | Yes |
| Permissions to Chargebee custom objects | Create, Read, Edit, Delete, View All, Modify All | Create, Read, Edit |
| Chargebee custom fields on the standard objects | Read, Edit | Read, Edit |
| View or modify sync dashboard, logs, and settings available on the Chargebee Settings tab on Salesforce | Yes | No |
| Run any sync actions from the Chargebee Settings tab on Salesforce | Yes | No |
| Write into Chargebee site settings object "CB-Site" | Yes | No |
Note
The integration package cannot include permissions for custom objects with master-detail relationships with standard objects. Therefore, it is advised that admins create a separate permission set for the following custom objects:
- CB Subscription
- CB Opportunity Coupon
- CB Opportunity Product
- Coupon Line Item
- Subscription Addon
Configuration
To integrate Chargebee with Salesforce, you need to initiate the package installation from Chargebee.
Once you have installed the package, you will be redirected to log into your Salesforce account.
You can now configure the settings from Salesforce.
In Salesforce
Step 1: Get Started
Once you log into your account in Salesforce, you are taken to the Getting Started screen. If not, navigate to the App Launcher and search for Chargebee Integration.
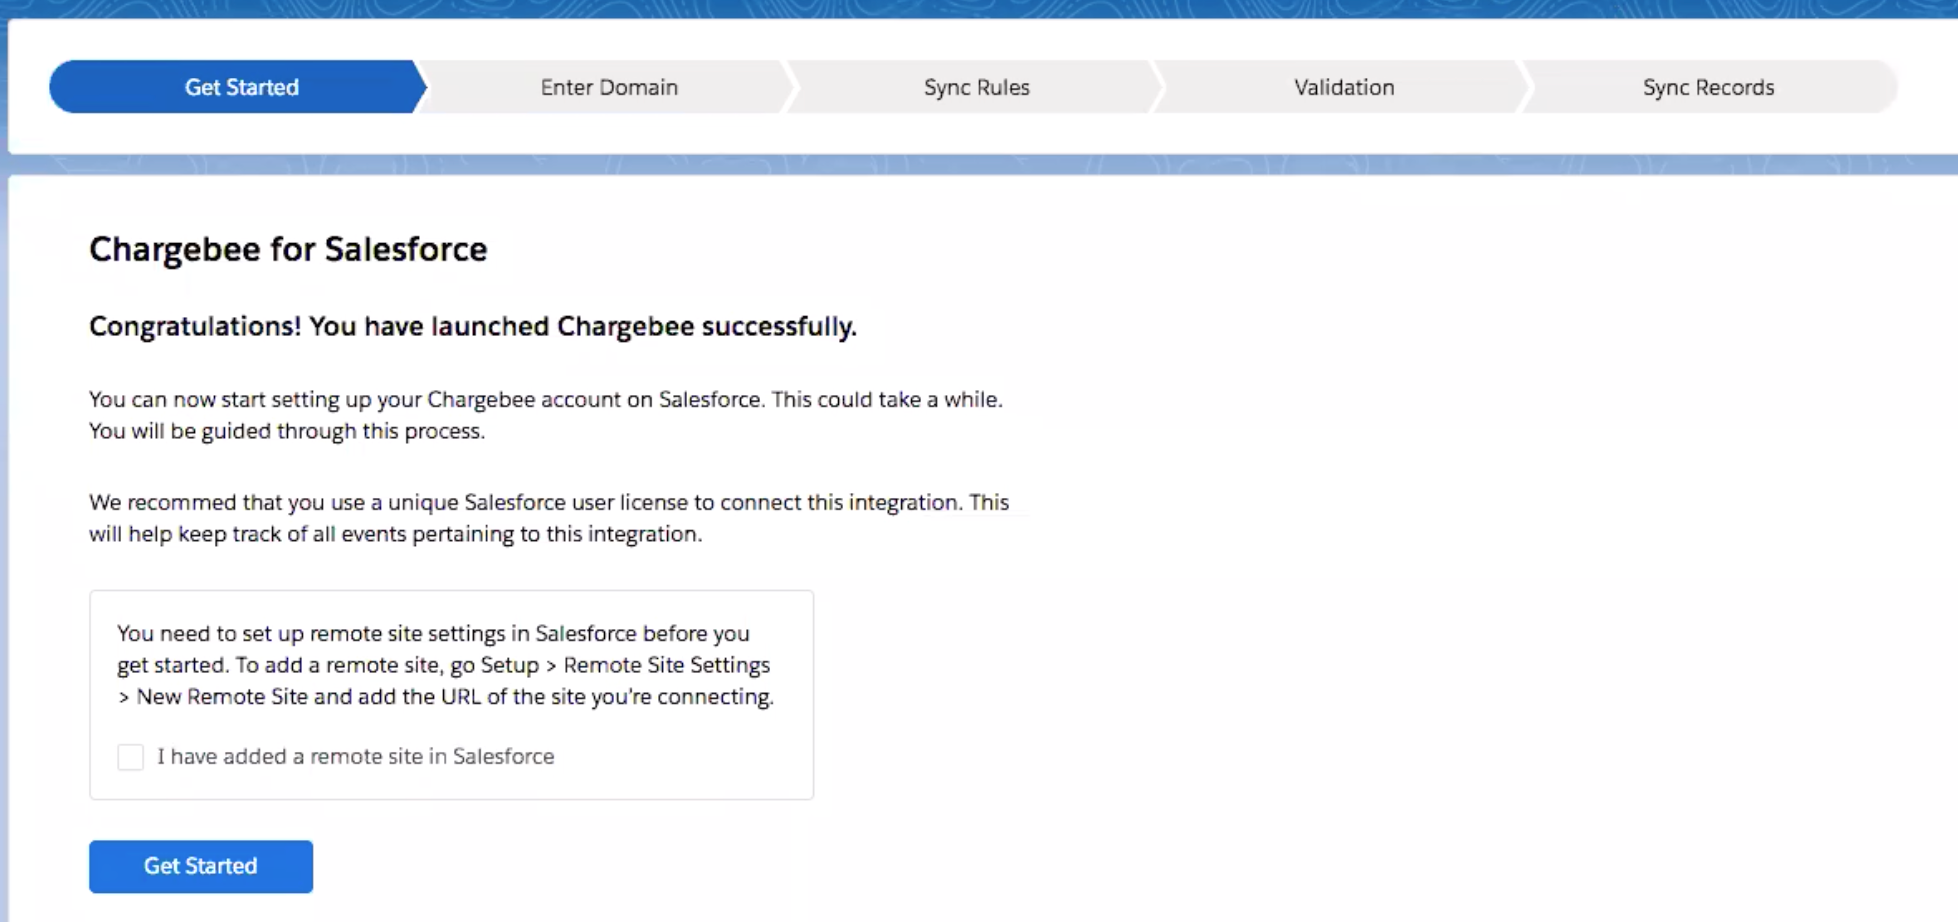
Allow-List
It is necessary to set up a remote site to allow-list your Chargebee site in Salesforce. To set up a remote site
-
Search for Remote Site Settings in the Quick Find box and click New Remote Site.

-
Add the URL of your Chargebee's site. (Example:
https://acme-test.chargebee.com)
Click Get Started.
Step 2: Enter Domain
-
Enter your Chargebee Domain ID. For Sandbox sites, assuming the URL is
https://acme-test.chargebee.com, enter the value asacme-test.chargebee.com. For Production sites,enter only the subdomain value asacme-test. -
Create an API Key with full access in Chargebee and enter it in the API Key section. Here's how you can get an API key. Click Connect.
-
If you've set up multiple business entities on your Chargebee site, choose the specific entities you want to link to your Salesforce account.
Warning
An error occurs if you connect multiple Chargebee sites with configured business entities to the same Salesforce org.
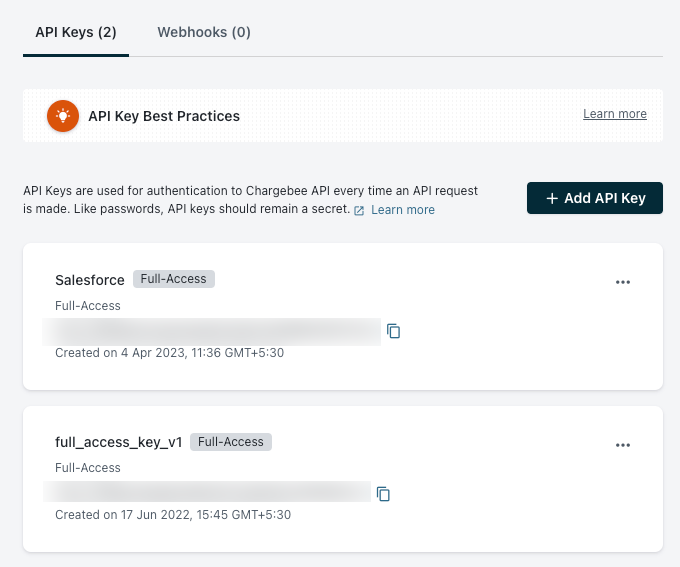
Note
It is recommended that you create a separate API key for Salesforce.
Step 3: Sync Rules
These settings determine how customers and subscriptions in Chargebee map or interact with the custom and standard objects in Salesforce such as accounts and opportunities. In case you do not configure these settings, the default options will be considered. You can edit the settings any time.
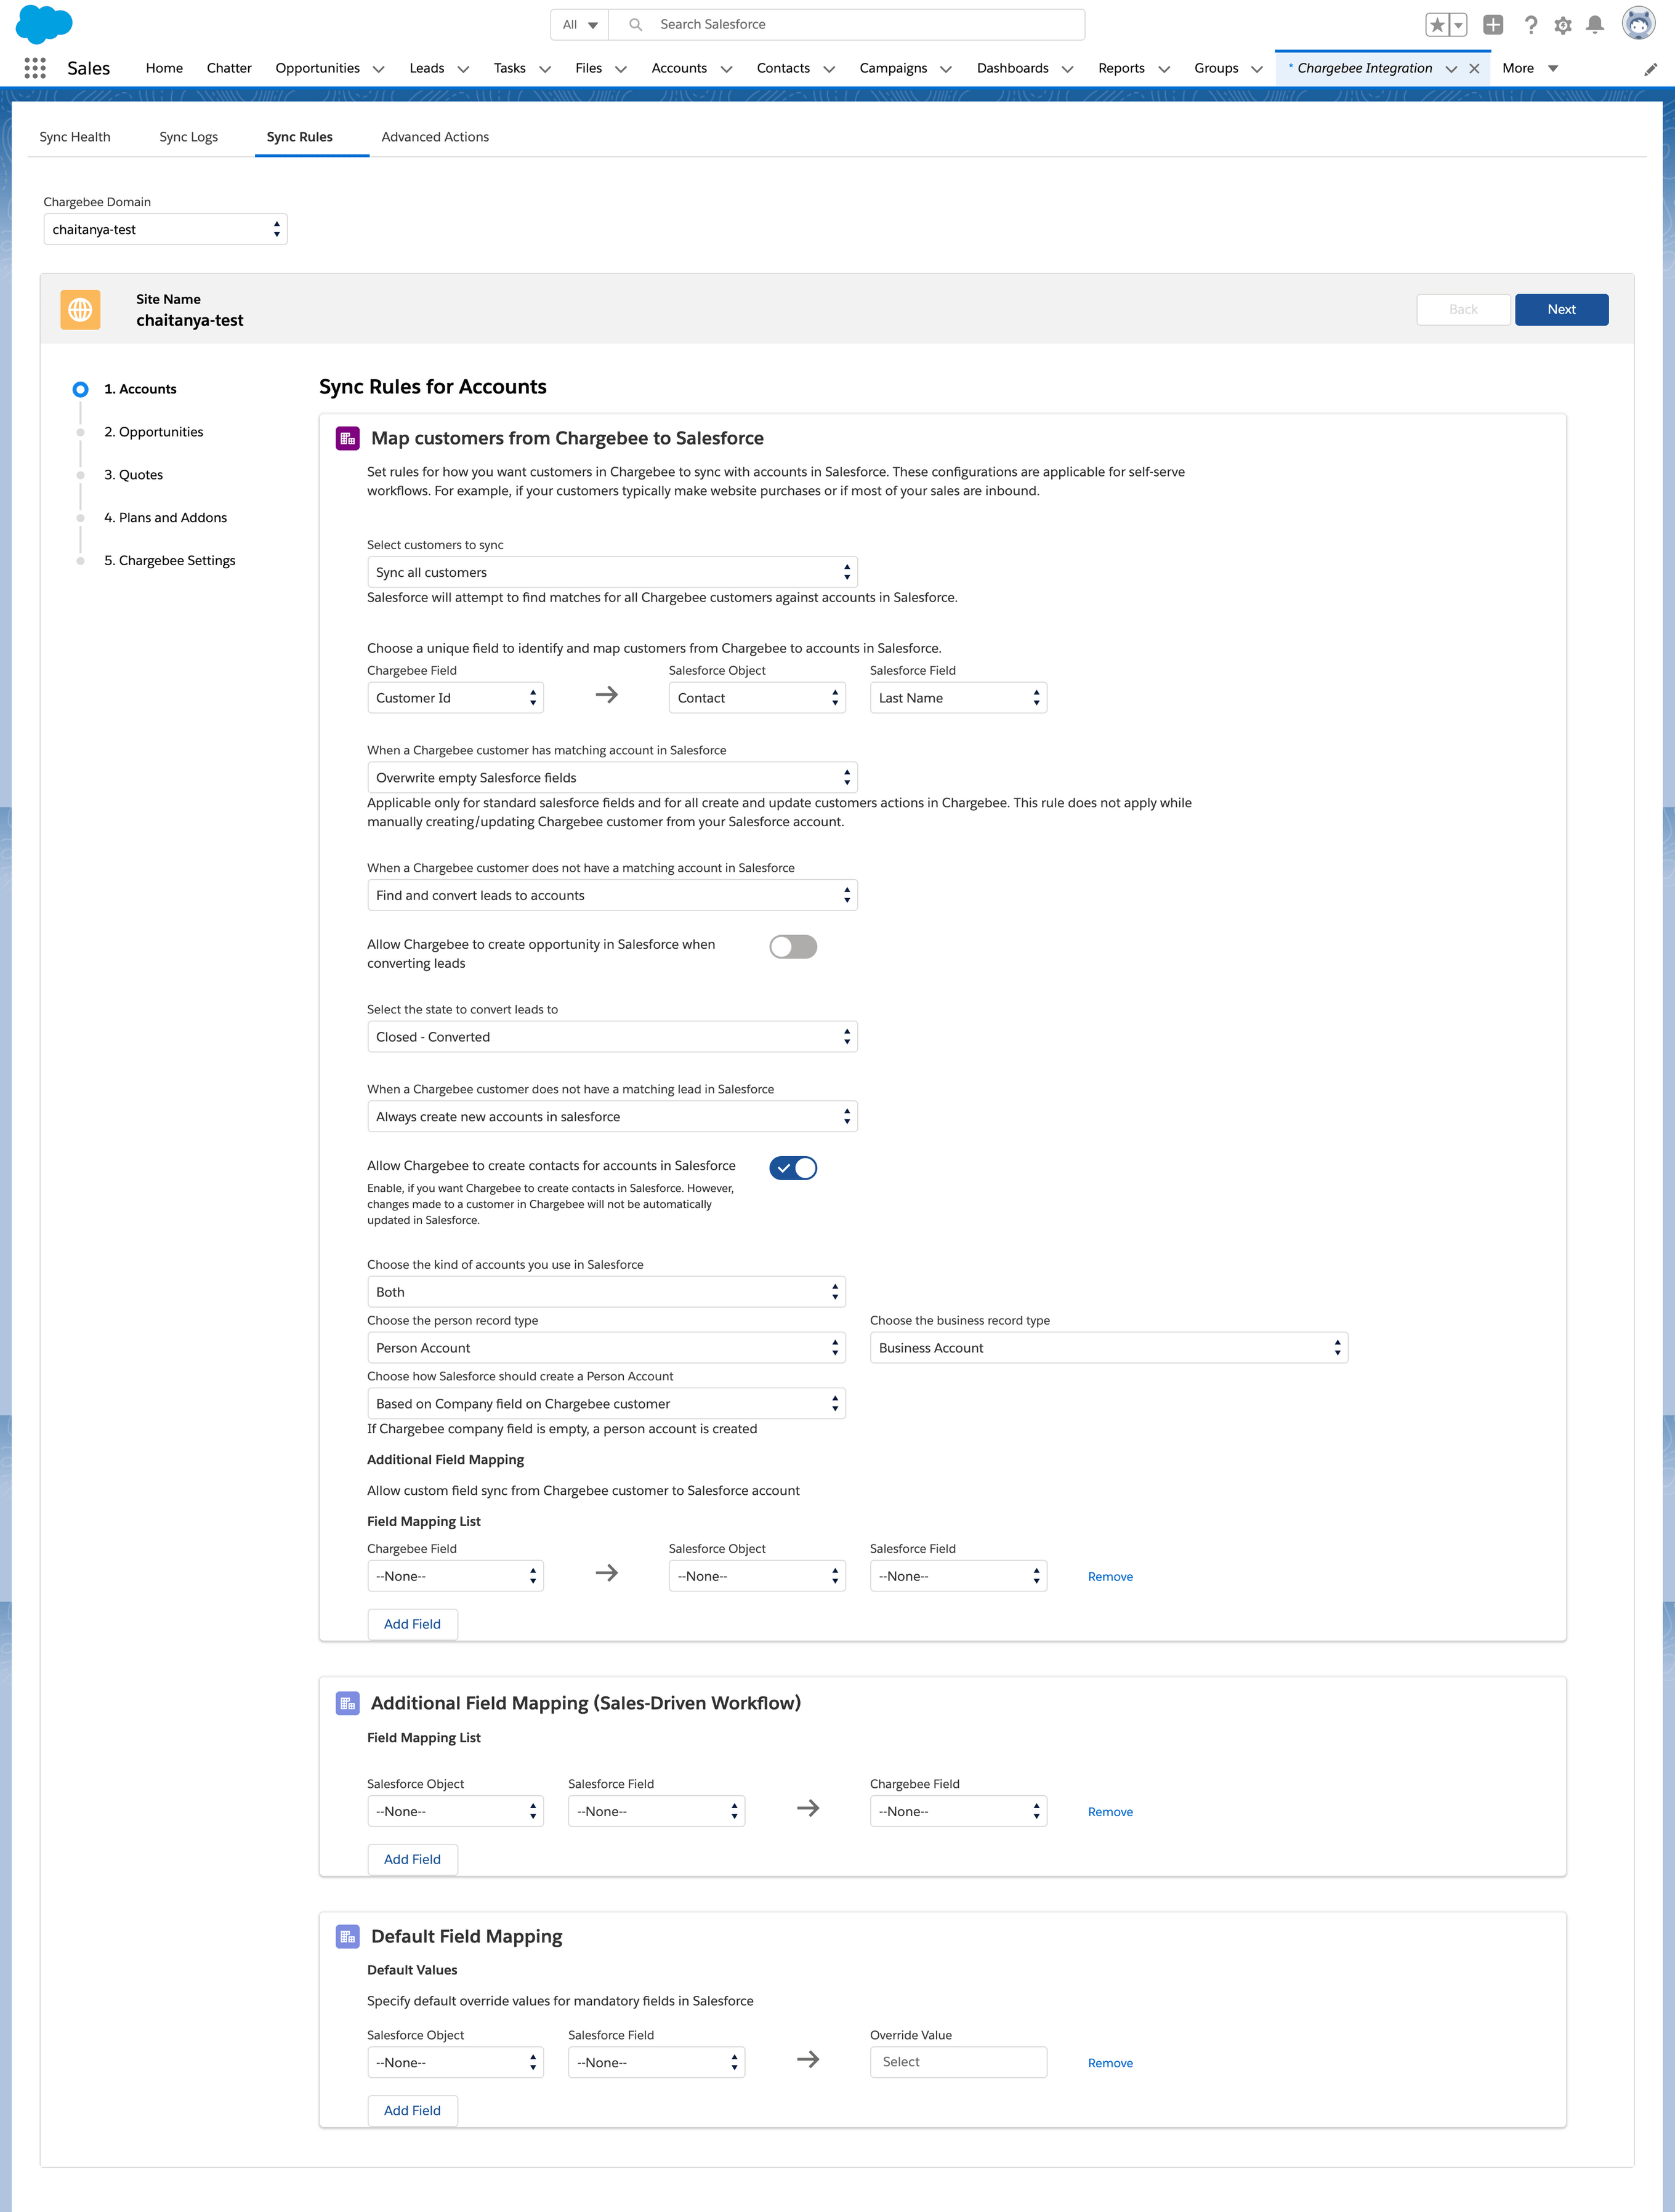
Sync rules for Accounts (Self-Serve model)
These settings determine how customers that are directly created in Chargebee sync to Salesforce. The rules mentioned in this section govern how the customer data syncs with Salesforce during different scenarios.
Sync rules for business entities Sync rules configured for plans, addons, and Chargebee settings apply to all the configured business entities for the Chargebee site that is connected to your Salesforce account. However, you can configure the sync rules for accounts, opportunities, and quotes for a specific business entity.
Note
The Multi Business Entity feature is a private beta release. Contact Chargebee Support to enable it.
Select the business entity for which you want to configure sync rules and click Proceed.
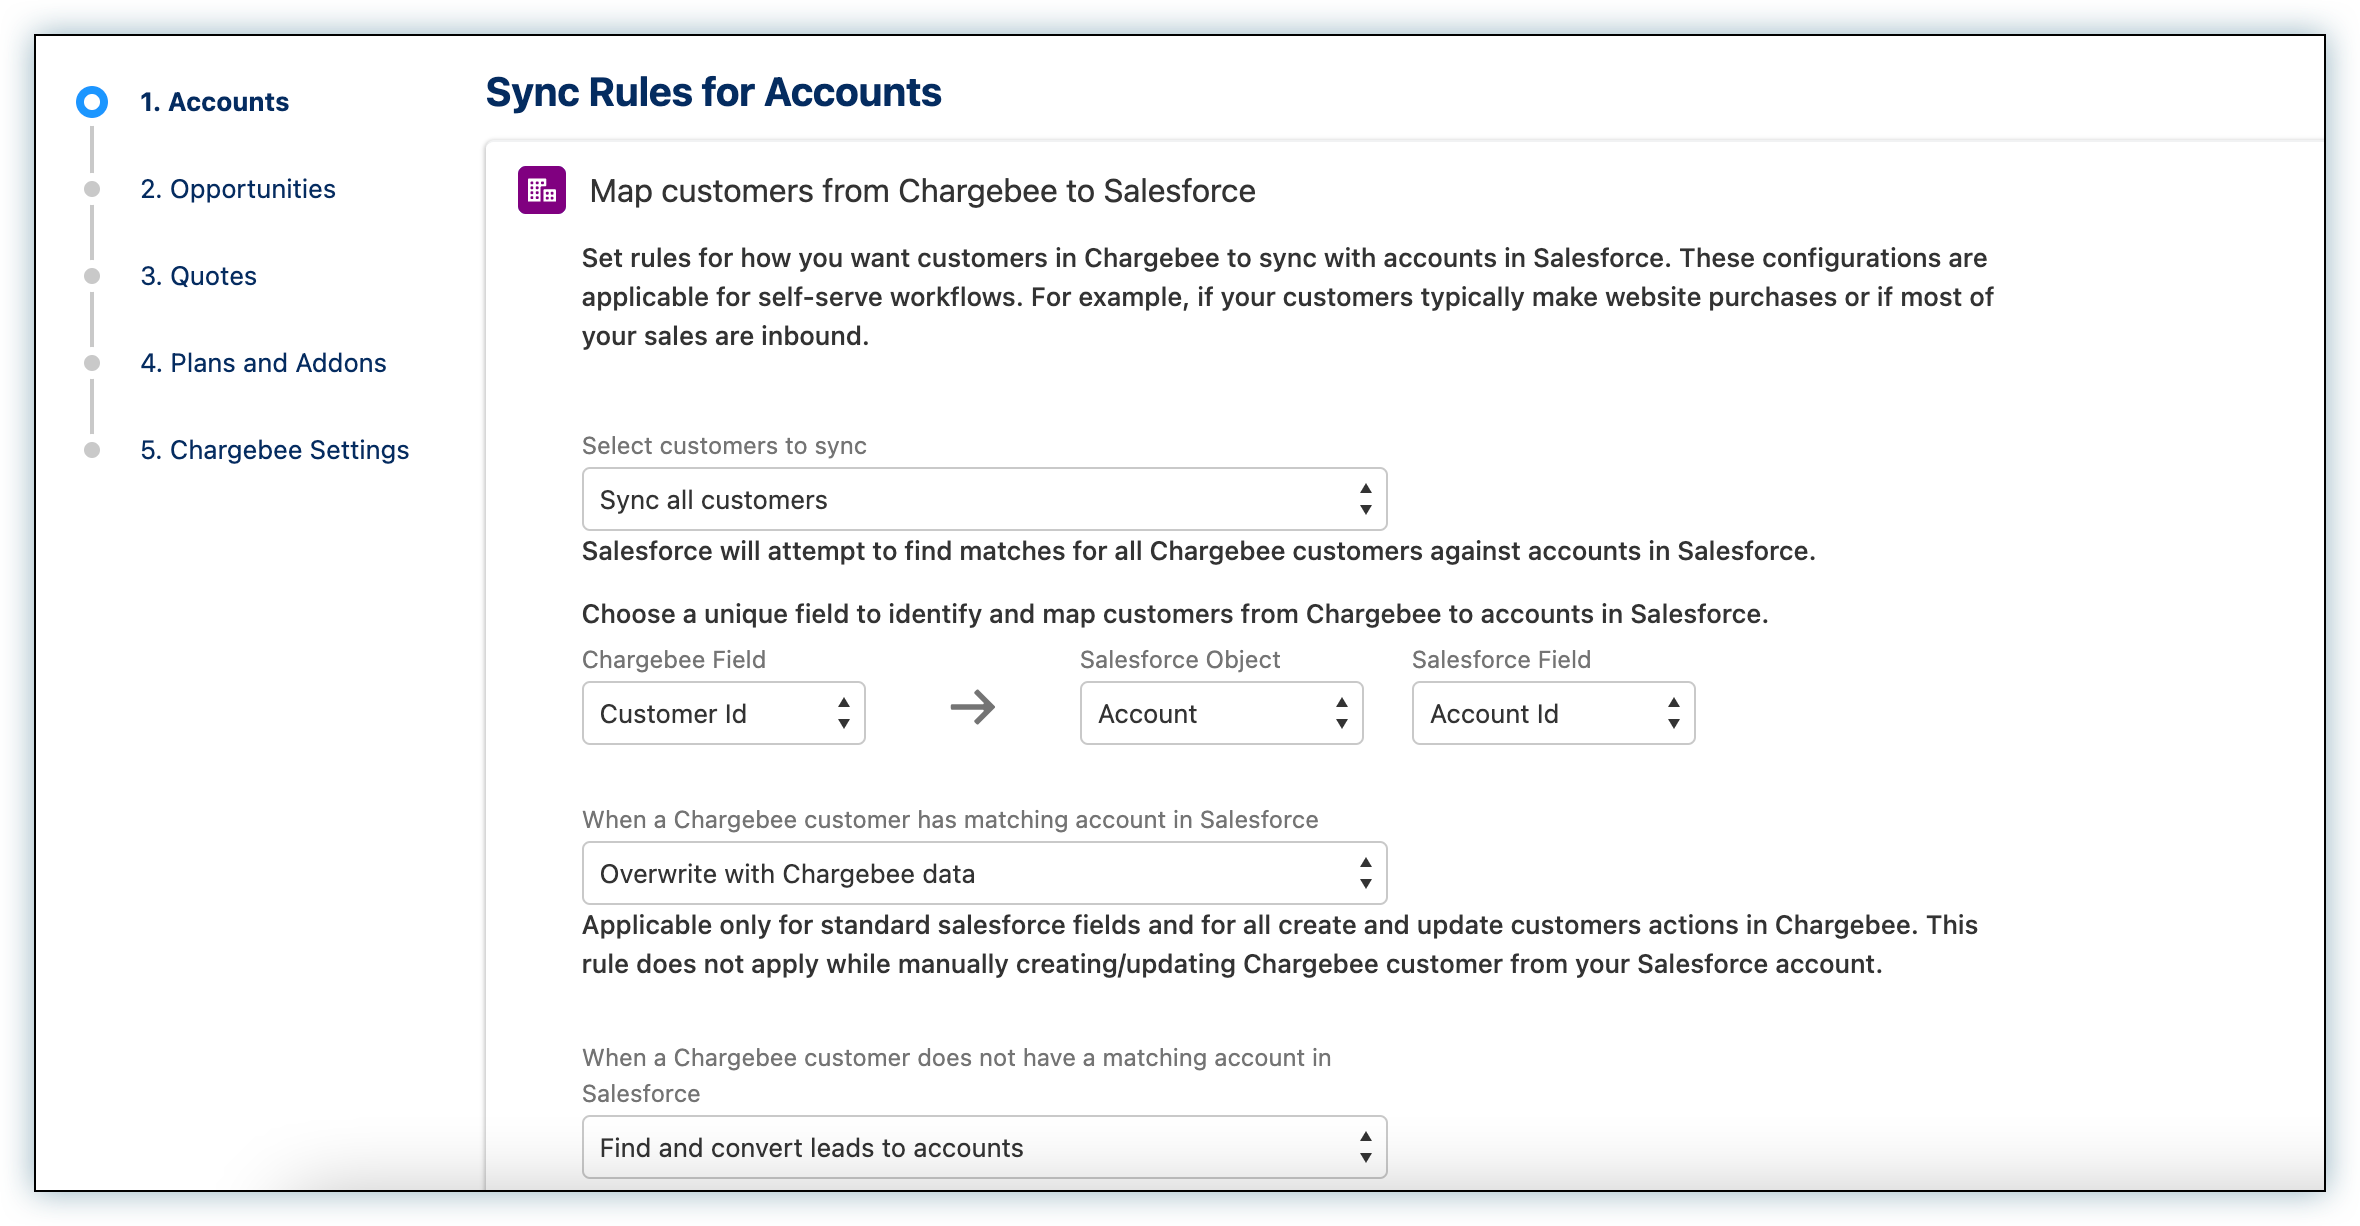
1. Select customers to sync
This setting applies to only those customer records that have never been synced to Salesforce. Available options are:
a. Sync all customers - All customer records in Chargebee are synced to Salesforce.
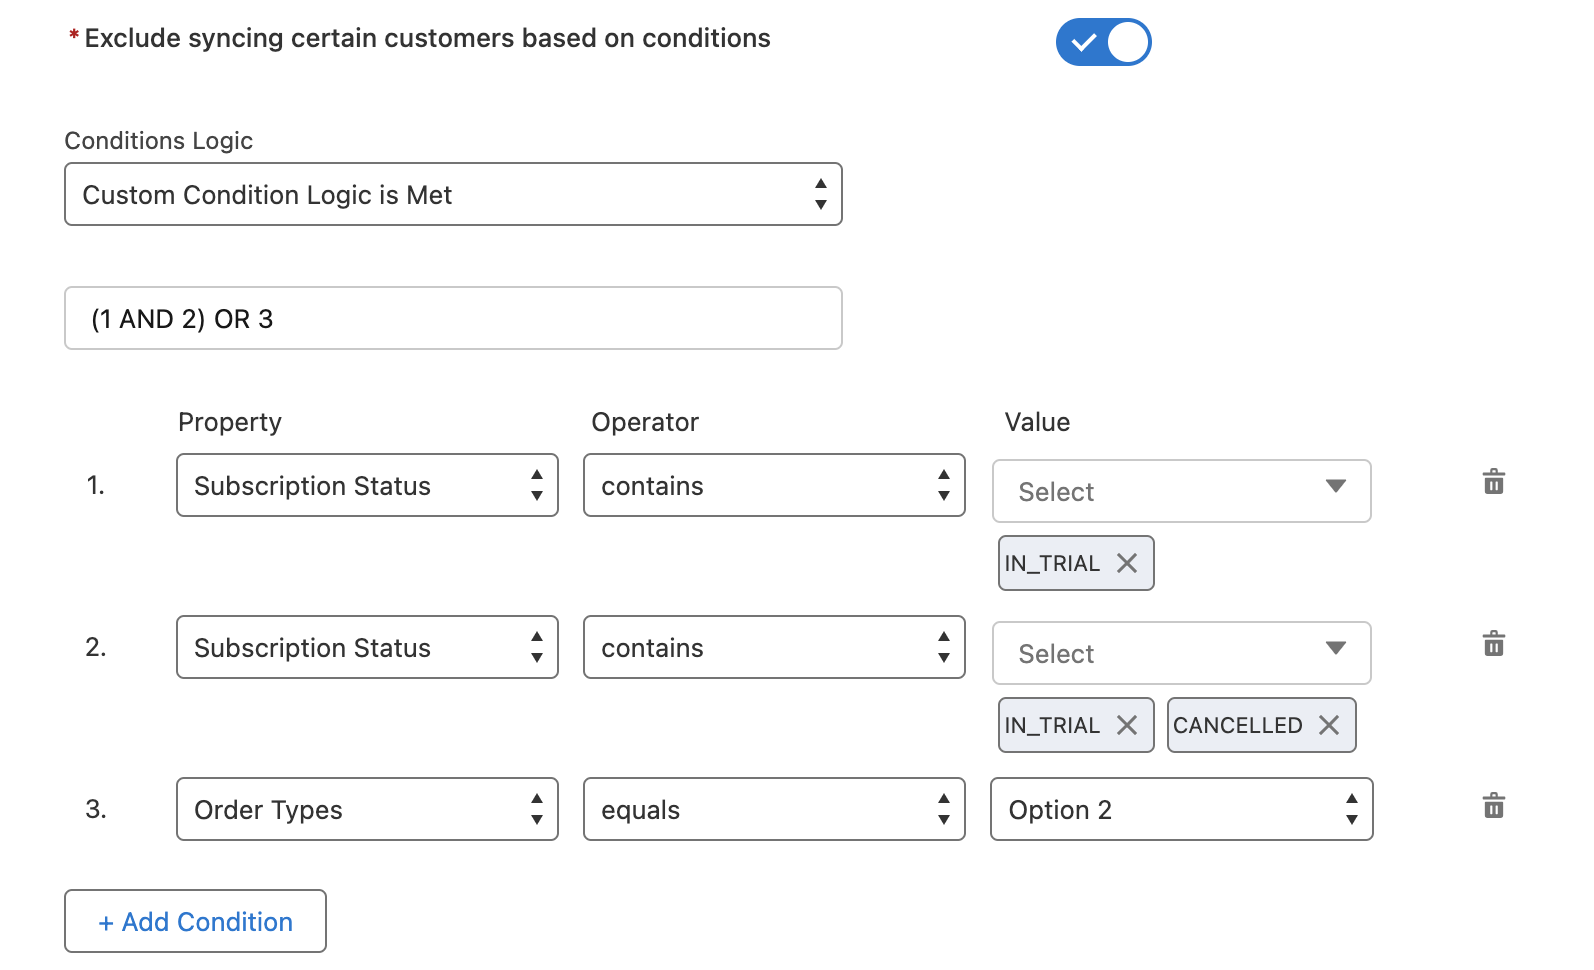
b. Sync only customers with subscriptions - Only those customer records that have at least one subscription are synced to Salesforce. When selecting Sync Only Customers with Subscriptions there is also the option to Exclude syncing certain customers based on conditions.
- Exclude syncing certain customers based on conditions gives users the granularity to choose exactly what customer records sync into Salesforce based on the following Chargebee Fields
- Subscription Status
- Plan Price Point
- Chargebee Customer Level Custom Fields
The above can be used in combination with other field sync options as well as support for Advanced Condition Logic. The Advanced Condition Logic supports AND, OR, and Custom Logic.
2. Choose a unique field to identify and map customers from Chargebee to accounts in Salesforce
Here you choose the field in Chargebee (on the left) and Salesforce (on the right) that are used to find matches between customer records in Chargebee and accounts in Salesforce.
This setting only determines the pair of fields used to find matches. It does not alter the field-mapping for actual data sync in any way.
The available fields are as follows:
Fields available in Chargebee:
- Customer ID
- Phone
- Company
- Any other String or Number data type custom fields configured in the Chargebee customer module.
Fields available for Accounts Object in Salesforce: All standard and custom fields on the Salesforce account of type string or number are available for selection. Custom fields created by Chargebee on the Salesforce account such as Chargebee email, Chargebee first name, Chargebee last name, Chargebee customer ID etc are not supported.
It is recommended that you choose a pair of fields that are unique. Avoid using company names to match the records as any difference due to data entry/typos (For example: 'Acme Inc' in Chargebee and 'Acme Inc.' in Salesforce) affects the mapping.
Fields available for Contacts Object in Salesforce: All standard and custom fields on the Salesforce account of type string or number are available for selection. Custom fields created by Chargebee on the Salesforce account such as Chargebee email, Chargebee first name, Chargebee last name, Chargebee customer ID etc are not supported.
Note
On skipping records If the email field is populated for a Chargebee customer, then it searches and attempts to convert a matching lead, provided the lead conversion setting is turned on. You can leave the field empty to skip records from syncing and populate the field for a customer record once you know it should be synced to Salesforce. Remember that if lead lookup is enabled for the integration, the email address field must also be left blank to guarantee that the record is skipped from syncing.
Note
When a Chargebee customer record is to be synced to Salesforce:
-
The contacts are looked up to find a match.
-
If a match is found and if that contact is attached to an account, then the latter is deemed as the mapped account and action is taken as per 'Choose what happens when a customer in Chargebee has a matching 'account' in Salesforce' setting.
-
If a contact is not found in step 1 or no account is found to be attached at step 2, the account is deemed to be not found and action is taken as per Choose what happens when a customer in Chargebee does not have a matching 'account' in Salesforce setting.
3. When a Chargebee customer has a matching account in Salesforce

a. Overwrite with Chargebee data: Push data to all standard fields on the account that are part of the standard field mapping.
b. Overwrite empty Salesforce Fields: Push data only to those Standard fields (that are part of the field map) in Salesforce accounts that are empty.
c. Map only: Do not push any data to fields in Salesforce accounts. This setting is useful if you want to establish a link between the Chargebee customer and Salesforce account without field level data interchange.
4. When a Chargebee customer does not have a matching account in Salesforce

When the sync runs, it is possible that account matches are not found for certain customer records. This setting determines the behavior for such conditions. Available options are:
- Find and convert leads to accounts
- Always create 'account' in Salesforce
- Do nothing
a. Find and convert 'leads' to account: Chargebee looks up lead records using the email address for a match. The account that results from the conversion is mapped to the Chargebee customer record.
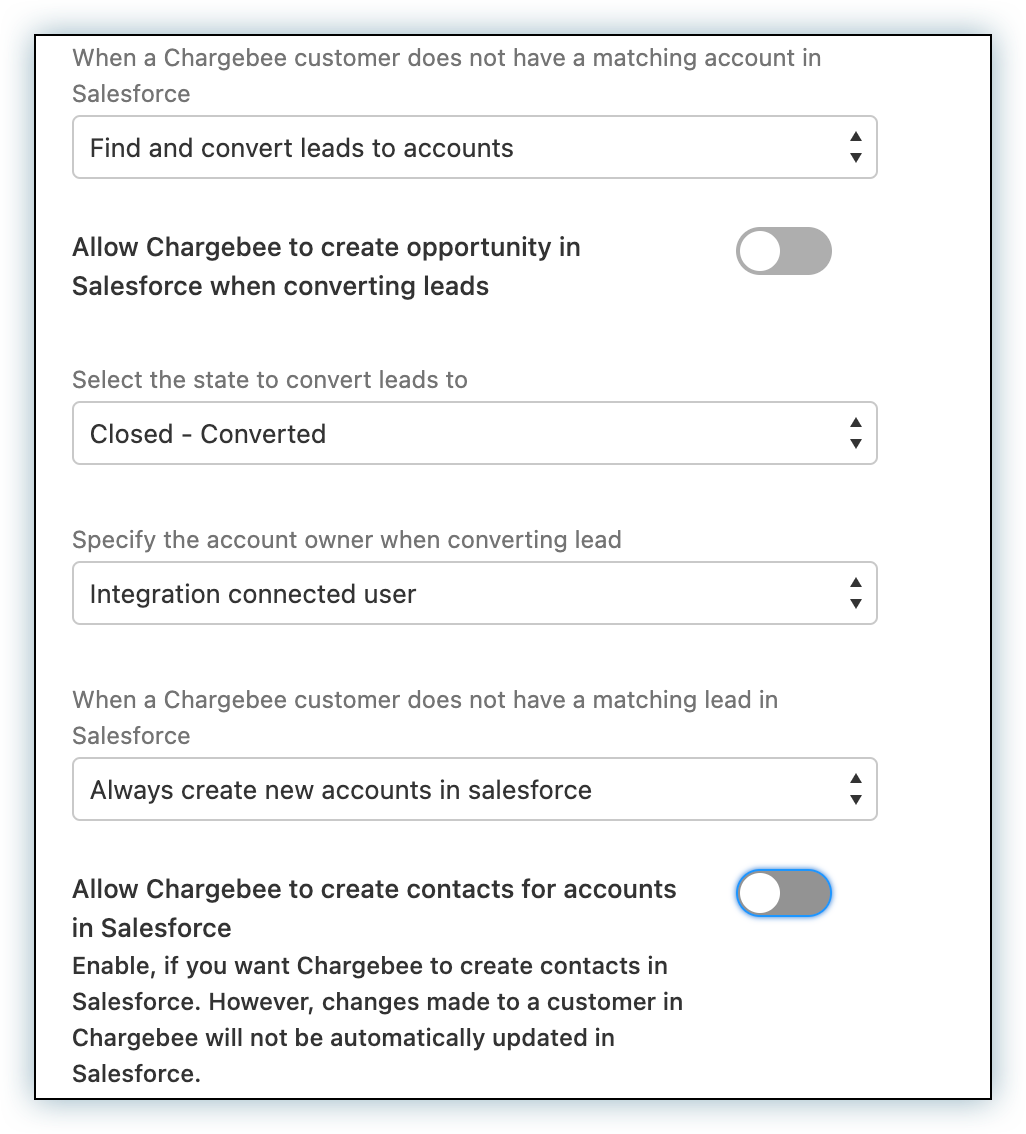
Enable the option "Allow Chargebee to create opportunity in Salesforce when converting leads", if you want to create opportunities in Salesforce.
Next, select the stage that the leads must be converted to.
When a Chargebee customer does not have a matching lead in Salesforce: Select the action to be performed when Chargebee customer does not have a matching lead in Salesforce.

Available options are:
- Always create 'account' in Salesforce
- Do nothing
b. Always create 'account' in Salesforce: Create a new account in Salesforce and sync data to it as per setting 3 (When a Chargebee customer has a matching account in Salesforce). If you select this option, you can choose to Allow Chargebee to create contacts for accounts in Salesforce by enabling the toggle highlighted in the image below.
c. Do nothing: Does not do anything.
Note
Duplicate accounts: When choosing this option, beware of Chargebee customer records with duplicate values for the field chosen in setting 2. Duplicate records do not sync if Salesforce validation rules prevent duplication of account names. We recommend that you setup your processes and automation such that only unique customer records are maintained in Chargebee to prevent issues with integrations.
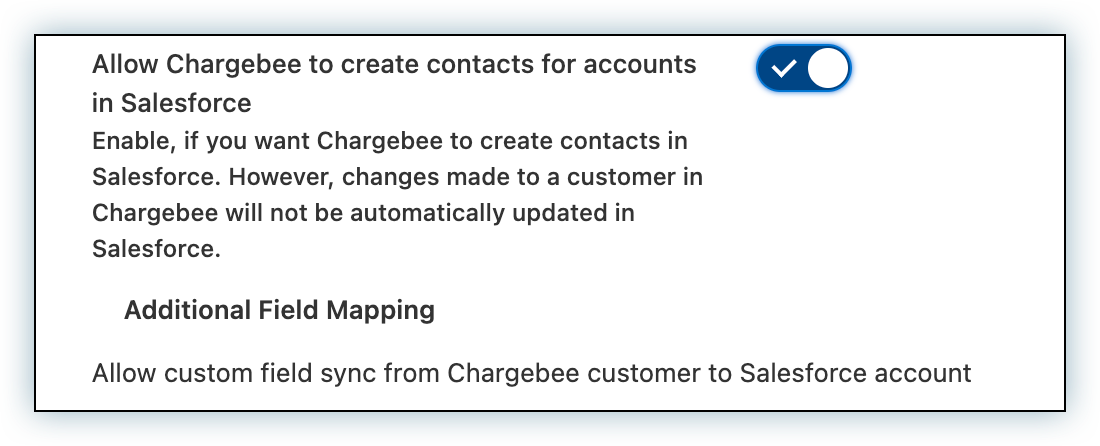
5. Allow Chargebee to create contacts for Accounts in Salesforce: Enable the toggle if you want to allow Chargebee to create a contact for accounts in Salesforce. However, changes made to a customer in Chargebee will not be automatically updated to the contact in Salesforce
Next, choose the kind of account that you have in Salesforce. Available options are Business account, Person account, and Both. The option to select Person account or Both will be displayed only if Person accounts are enabled, or if a different record type for accounts is configured in Salesforce. This setting will not be visible, if otherwise.
Person Accounts
If you are a business that sells to consumers, then you may be using person accounts in Salesforce. Enable person accounts in Salesforce. Use this guide from Salesforce to see how.
a. Under Choose the kind of accounts you use in Salesforce, select any one of the following:
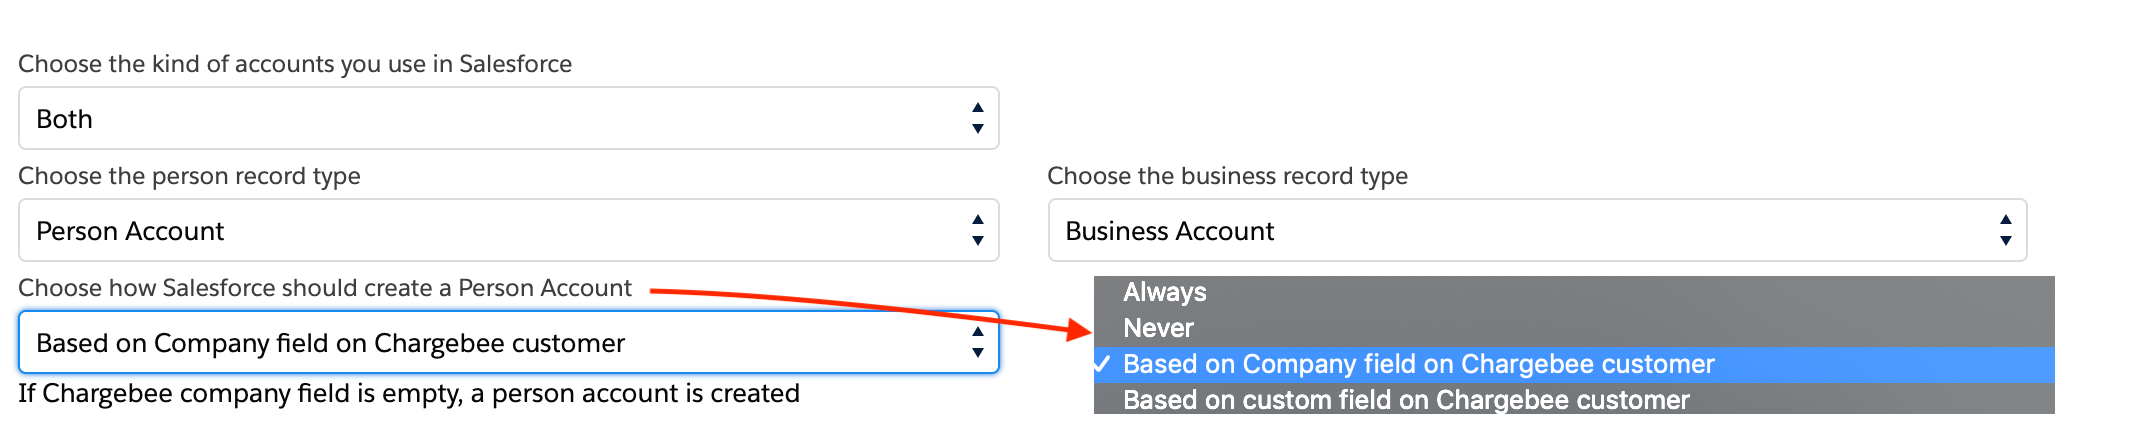
- Business Accounts: This is the default option and is used if you only sell to businesses.
- Person Accounts: This is good if you only sell to consumers.
- Both: In case you select Both, then you need to specify when Salesforce should create a Person Account. This option is visible only if you have enabled Person accounts.
b. Select a record type under Choose the person record type and Choose the business record type.
c. For person accounts, select an option under Choose how Salesforce should create a Person Account:
- Always
- Never
- Based on Company field on Chargebee customer: Chargebee creates a business account when the Company field of the Chargebee customer record is populated. If the Company field is empty, a person account is created.
- Based on Custom field on Chargebee Customer: Chargebee creates a business account when a custom field in Chargebee is populated. Select the custom field to be used. If the field is not populated, a person account is created.
6. Select the custom fields that you want to sync from Chargebee to Salesforce
The custom fields can sync only in one direction. This means that you should not choose the same pair of fields selected here for setting 7.
7. Select the custom fields that you want to sync from Salesforce to Chargebee The custom fields can sync only in one direction. This means that you should not choose the same pair of fields selected in setting 6.
8. Default mapping
If you have certain mandatory fields configured for Salesforce objects such as accounts and/or contacts, specify default values for them here so that the integration does not run into errors when attempting to create them.
Fields Supported in Salesforce
The table below lists the field types and fields that are available for selection in the above two steps.
Supported types
- Number (Integer, Double, Long)
- Currency
- Checkbox
- URL
- Date
- Date/Time
- Text
- Picklist
- Text Area (with length < =255 characters)
- ID
- Formula
Unsupported types
-
All the Salesforce fields listed in the field-mapping reference. For example, you cannot specify the auto-collection field for mapping because it is already mapped to a custom field in the account object.
-
For the account object alone:
- Fields whose names end with
__pc(Custom fields in Person Account). - All fields whose names start with
person(case insensitive).
- Fields whose names end with
Sync Rules for Opportunities
These settings determine how subscriptions created or updated directly in Chargebee or via the integration from Salesforce, interact with opportunities in Salesforce under various conditions.
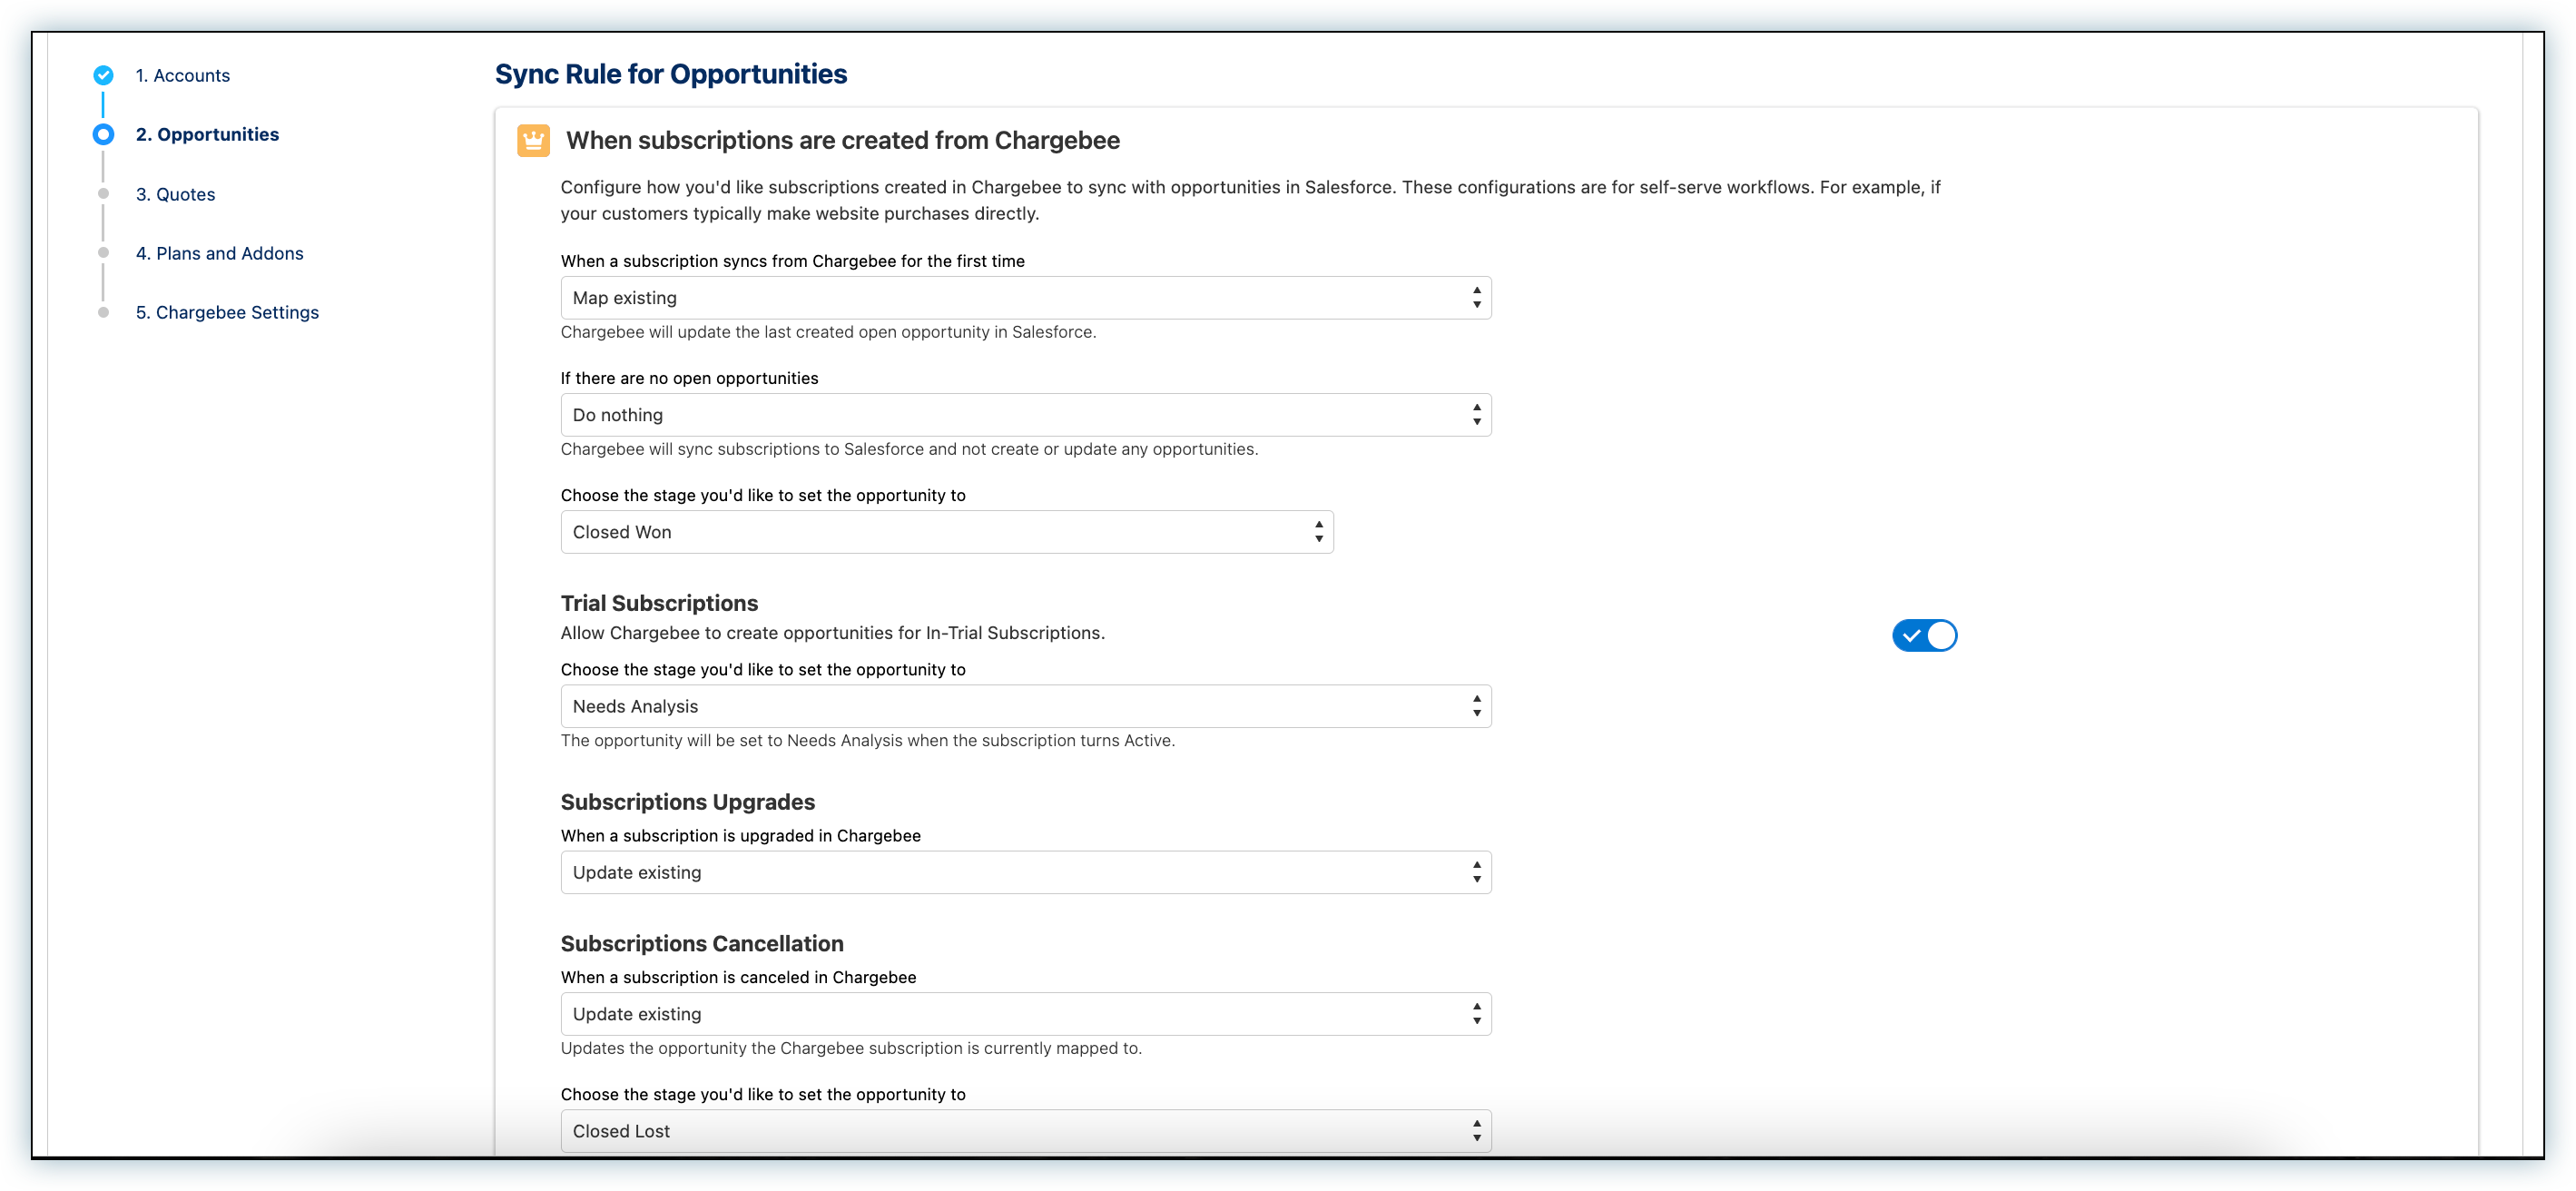
When subscriptions are created from Chargebee:
If you have a self serve model where customers purchase subscriptions or sign up for a free trial directly via your website, then subscriptions are created in Chargebee first. Alternatively, you may have a sales model where the sales team creates opportunities in Salesforce, but subscriptions are created by the finance or operations team directly in Chargebee. In this section, we are going to see the settings that one needs to configure to determine how these subscriptions map to or create opportunities in Salesforce.
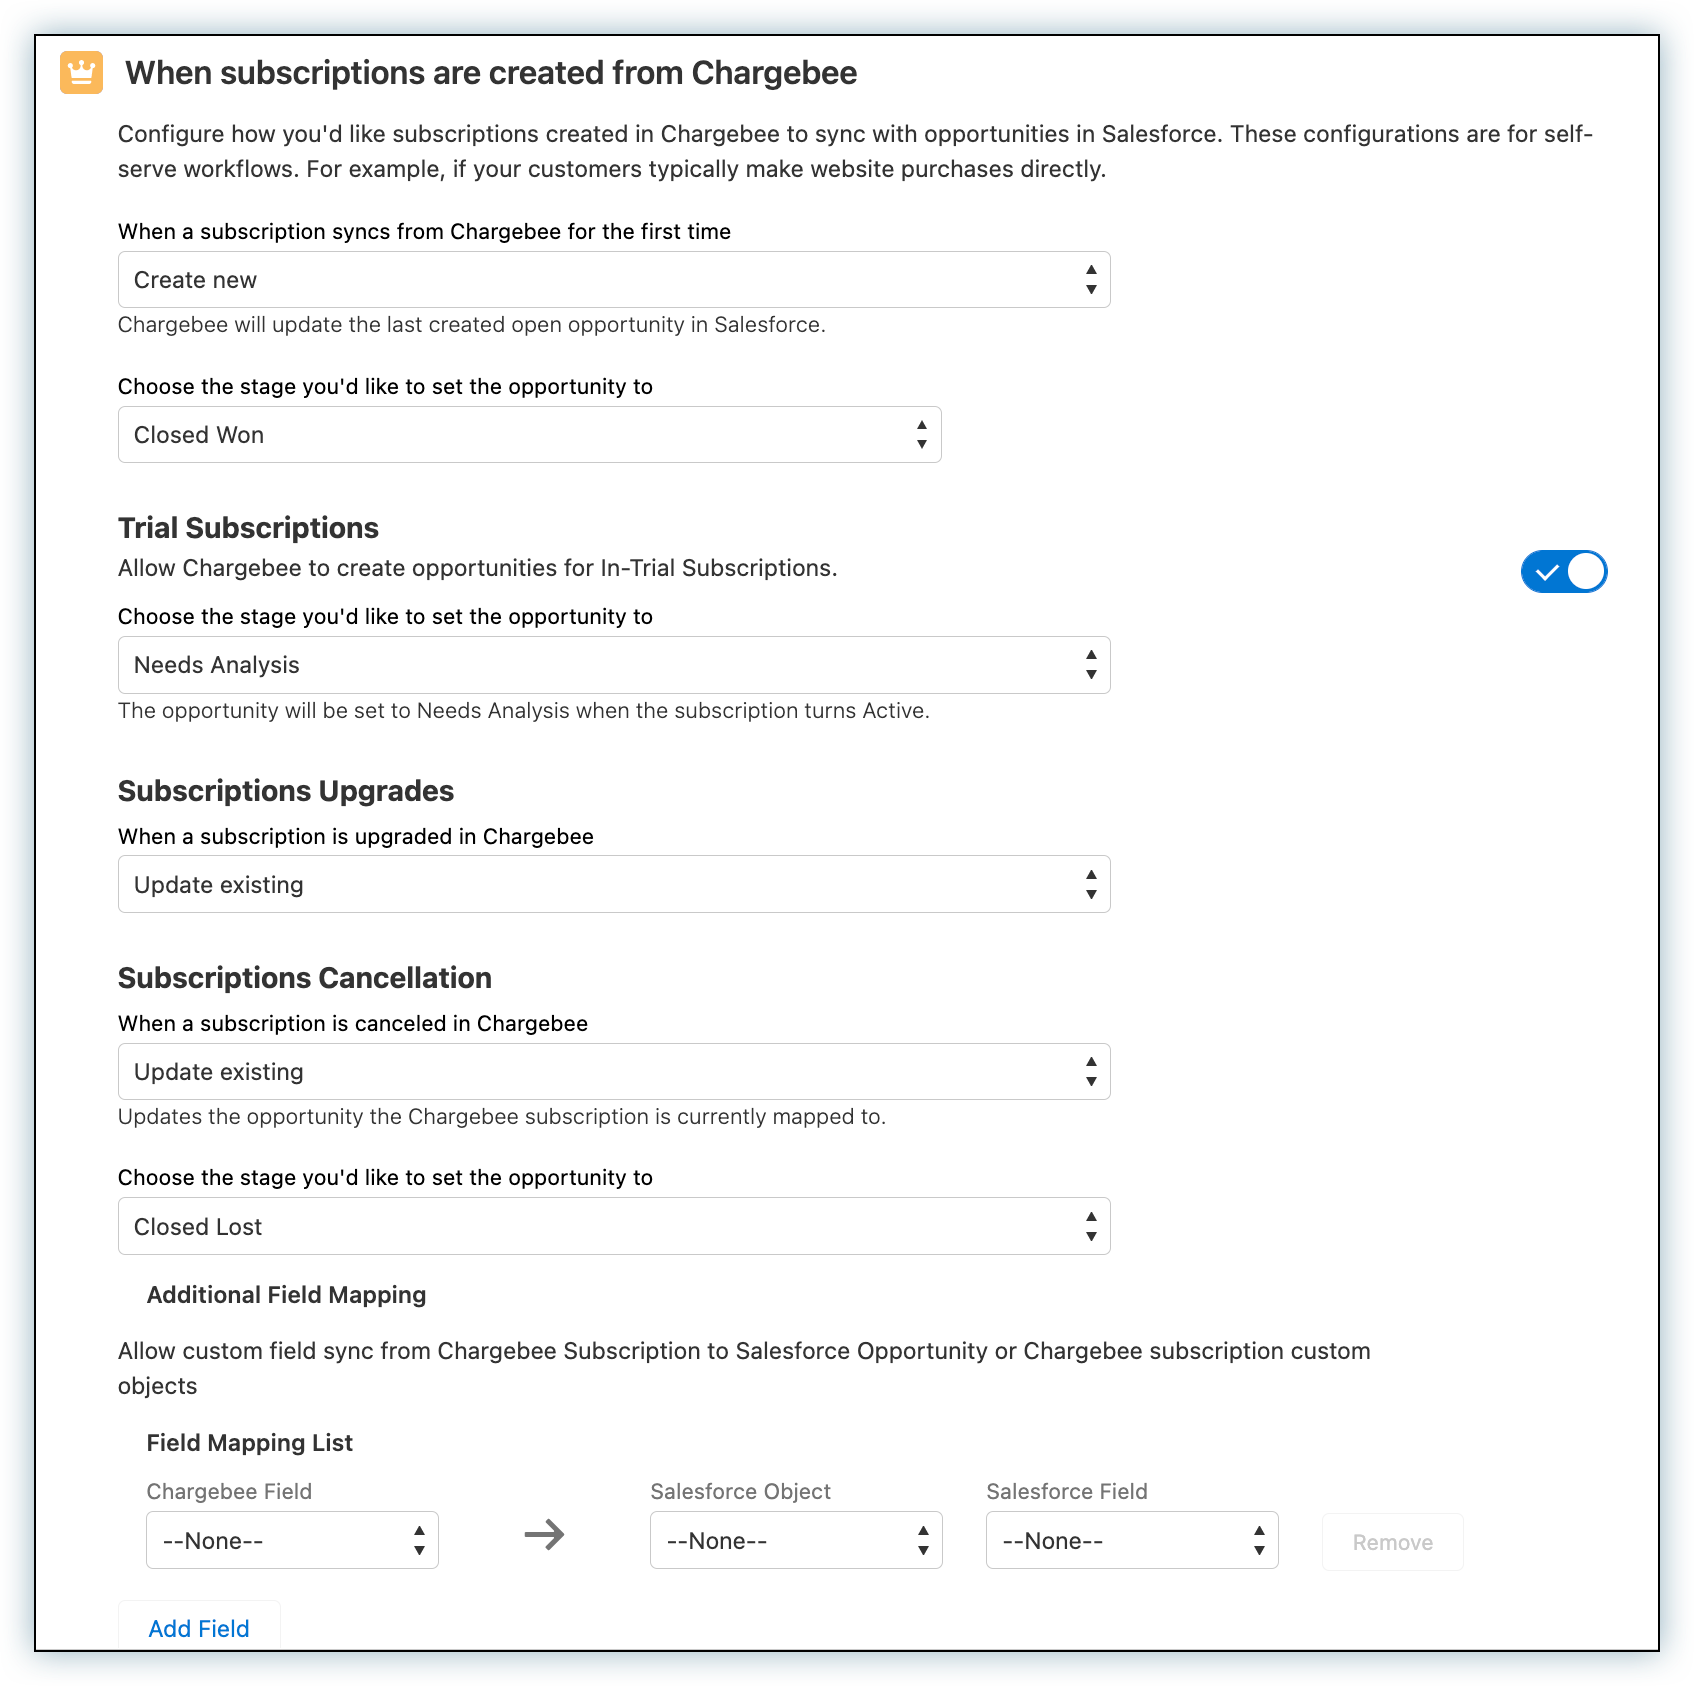
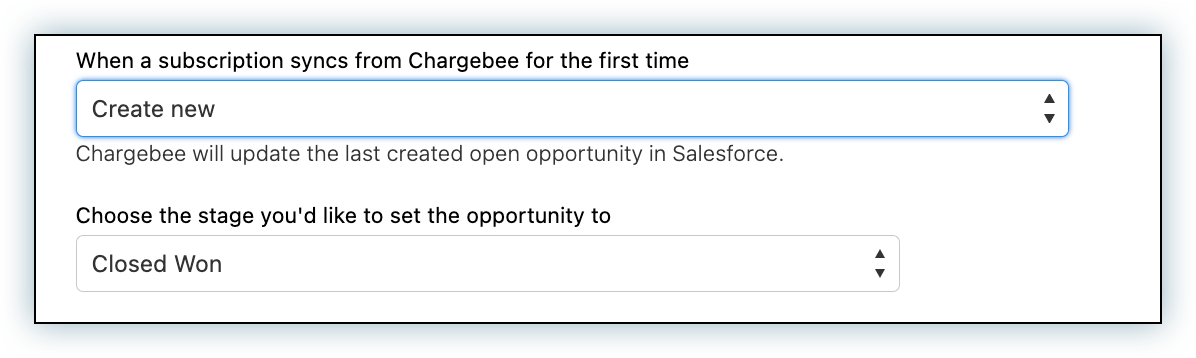
1. When a subscription syncs from Chargebee for the first time: Select an option to determine what the integration does when a subscription syncs from Chargebee for the first time. The available options are:
- Create New
- Map Existing
- Do not create
a. Create New: Use this option to create a new opportunity in Salesforce. You need to specify the stage to be set for the newly created opportunity. Selecting this option updates the stage, opportunity products and price book. And, the subscription has a lookup relationship to the opportunity.
The new opportunity is updated as follows:
- The opportunity products and price book are set as described here.
- The stage of the opportunity is updated as selected.
- The subscription is updated with a lookup field to the opportunity.
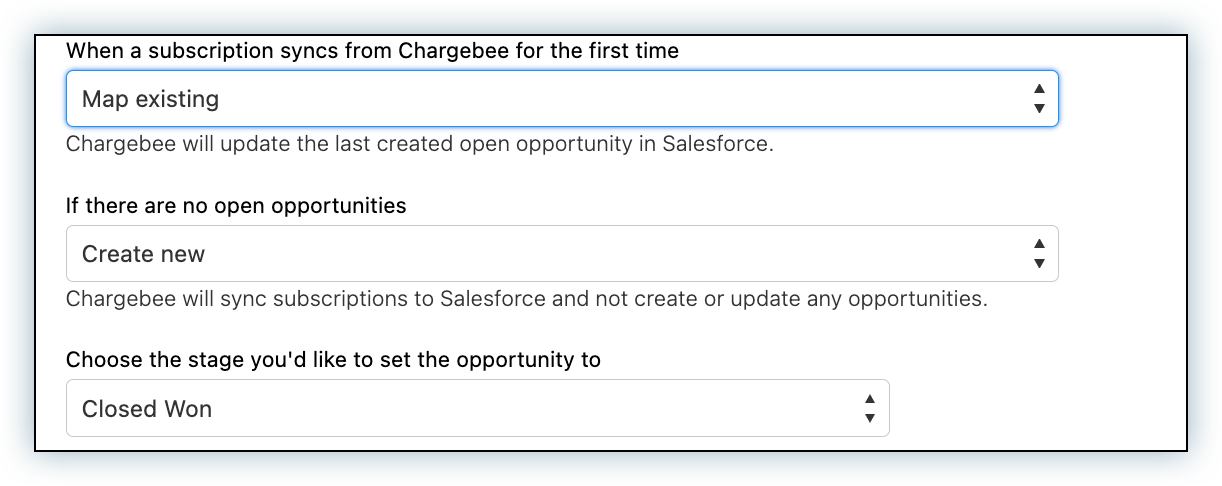
b. Map Existing: Under the account mapped to the customer, Chargebee looks for open opportunities that
- are not linked to other subscriptions or quotes
- do not have checkout links sent for them
It then updates the last created of such opportunities as follows:
- The opportunity products and price book are set as described here.
- The stage of the opportunity is updated.
- The opportunity is linked to the subscription so that one can be seen in the other's related list.
When you select map existing, Salesforce will check for an existing opportunity for the subscription and map with it. You need to specify the action to perform in case there is no existing opportunity. Available options are Create New, and Do Nothing. If you select Create New, then specify the stage to set to the opportunity. If you select Do nothing, then it does not update anything.
c. Do Nothing: Does not update anything in Salesforce. While this does not update any opportunity or create a new one, it does sync the subscription itself.
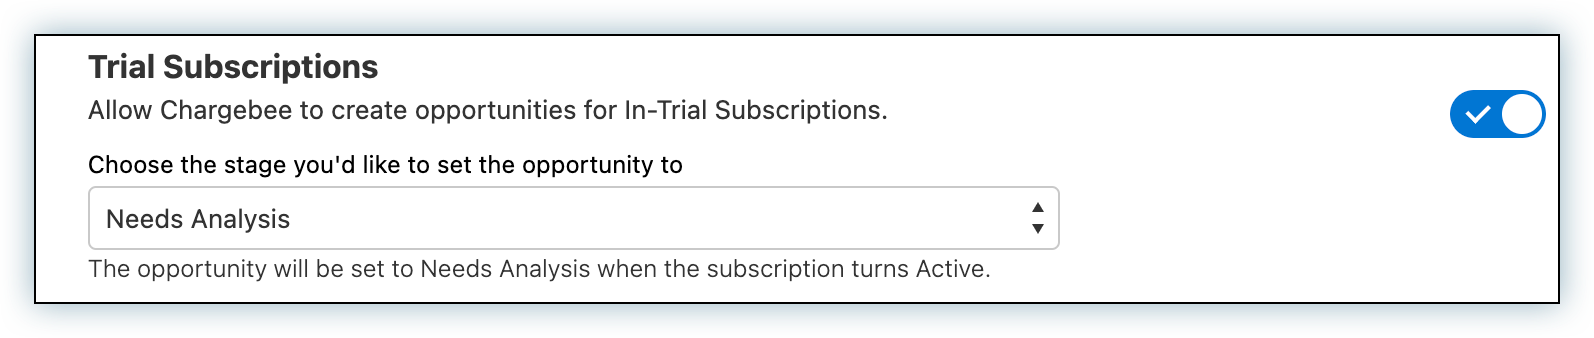
2. Trial Subscription: Enable this option if you want to create opportunities for subscriptions that are in trial including canceled subscriptions that have been reactivated with a trial period.
Assign a stage that should be set for the opportunity for in-trial subscription. Note that this is different from stage set for subscriptions that are not in-trial.
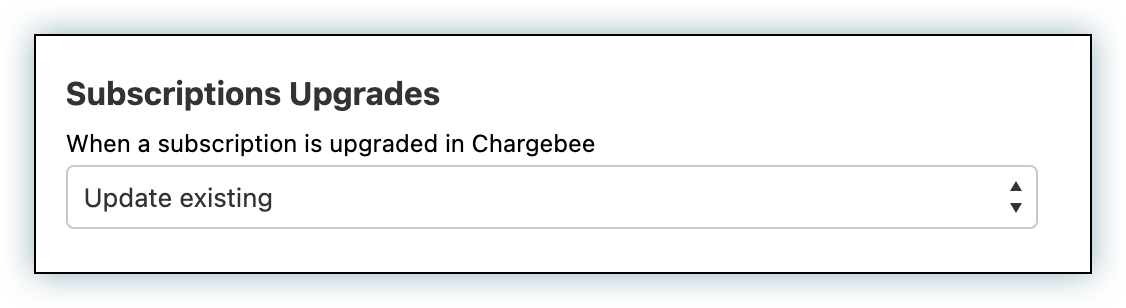
3. Subscription Upgrades: Choose how you want to handle the opportunity related to a subscription that is upgraded in Chargebee. A subscription is "upgraded" when one or more of the following occur:
- The plan changes from metered to non-metered.
- The plan amount increases without changing the plan, and it is non-metered.
- The plan amount increases, and the plan changes from non-metered to non-metered.
- The total amount for the non-metered addons increases.
Available options are: Create New, Update Existing, Do nothing.
The following options are available under this setting:
a. Create a new opportunity
A new opportunity, linked to the same account as the customer, is created in Salesforce. Its opportunity products and price book are set as described here. You can use this option when you want to track every upgrade done in Chargebee as a full value opportunity in Salesforce.
b. Update existing opportunity
The opportunity to which the reference is found on the subscription is updated as described here and its stage is set as per setting 3. If no opportunity is linked to the subscription then nothing happens.
c. Do Nothing
No change is made to the linked opportunity nor is a new opportunity created.
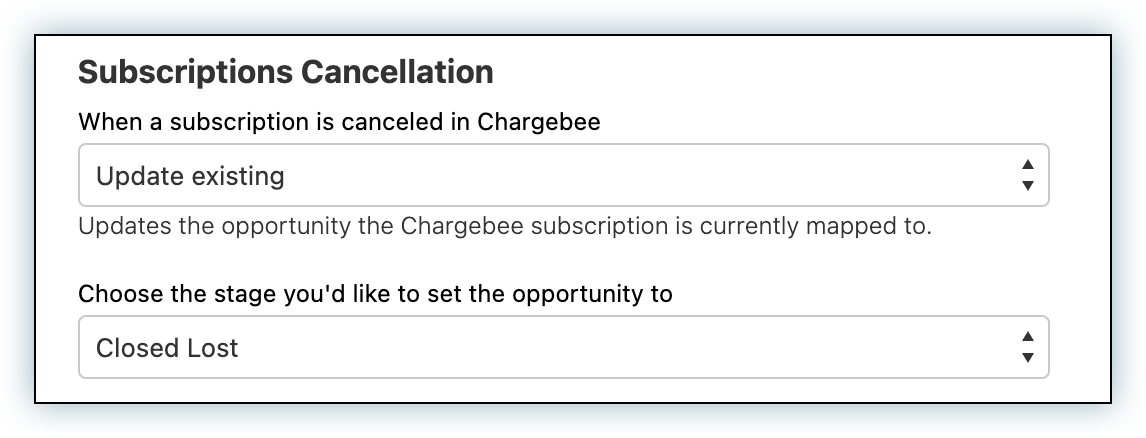
4. Subscription Cancelations: Choose how you want to handle opportunities when a subscription is canceled in Chargebee. Available options are Update Existing and Do nothing. If you choose to update an existing opportunity, select the stage.
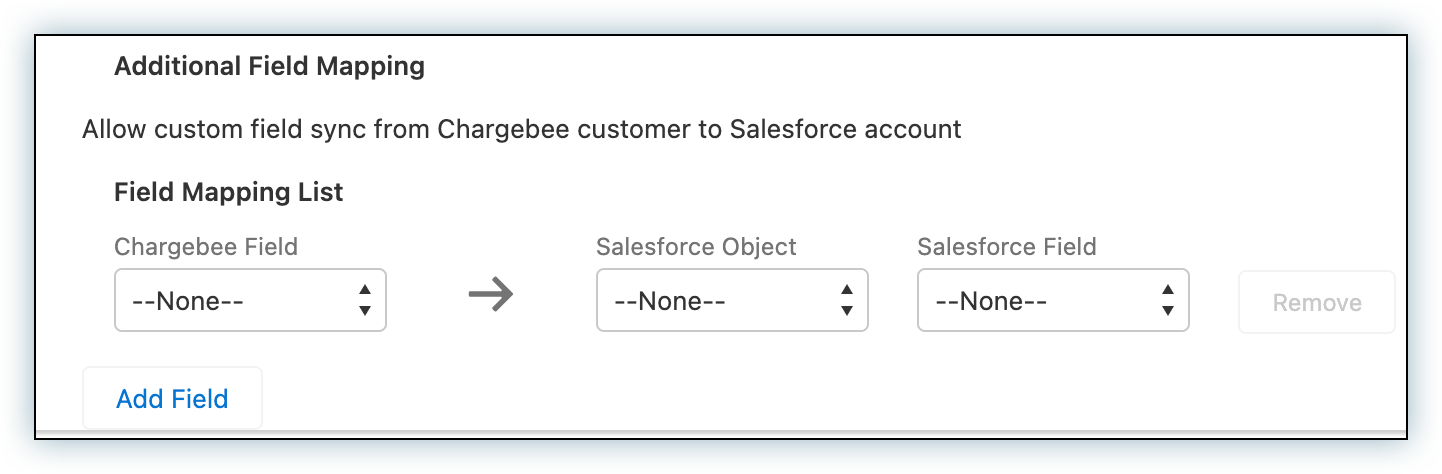
5. Additional Field Mapping: Select the Custom fields to sync from Chargebee to Salesforce. You can map the standard or custom fields in Salesforce objects to the standard or custom fields in a Chargebee object.
When subscriptions are created from Salesforce:
In this section, we describe the settings that determine how subscriptions that are created from a Salesforce opportunity interact with that opportunity. These settings apply if you have a sales model where all your subscriptions are directly created from Salesforce opportunities.
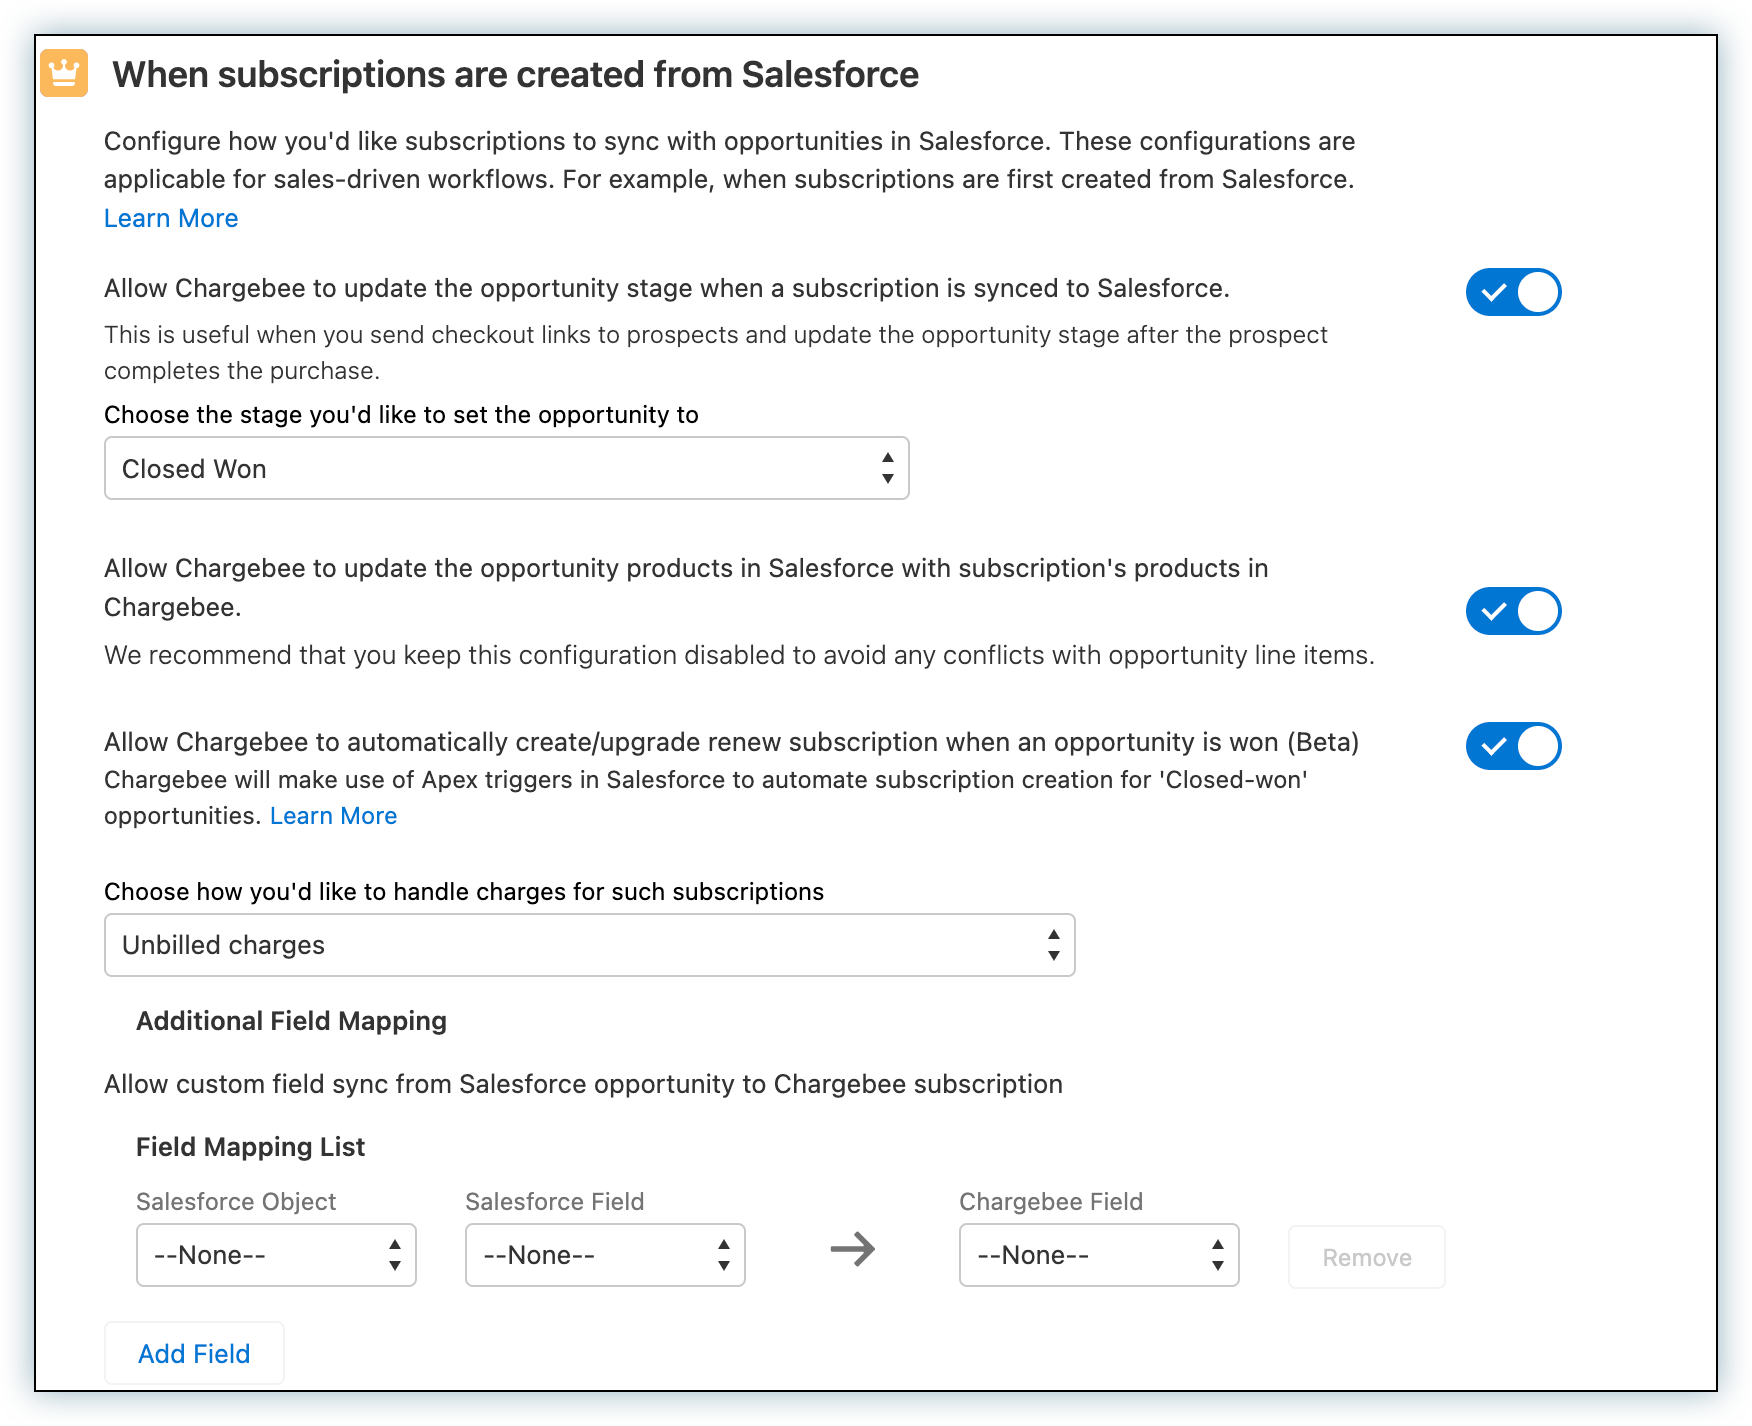
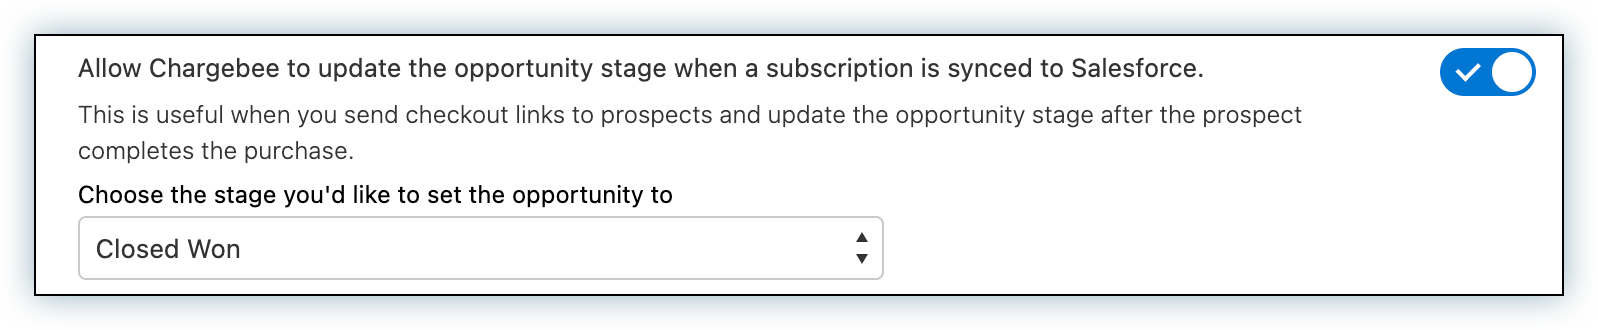
1. Allow Chargebee to update the opportunity stage when a subscription is synced to Salesforce: If you send checkout links to your customers then you may want Chargebee to automatically update the stage of the opportunity once the customer has subscribed. On enabling this, Chargebee will be able to move the opportunity to the selected stage once the customer makes the payment.
2. Allow Chargebee to update the opportunity products in Salesforce with subscription's products in Chargebee: Enable this if you want to override the products added in the Opportunity with those in Chargebee's subscription.
3. Allow Chargebee to automatically create/upgrade/renew subscription when an opportunity is won: This option automatically creates (when the opportunity is for a new subscription) or updates (when the opportunity is for an existing subscription) subscriptions in Chargebee when opportunities are "won" in Salesforce.

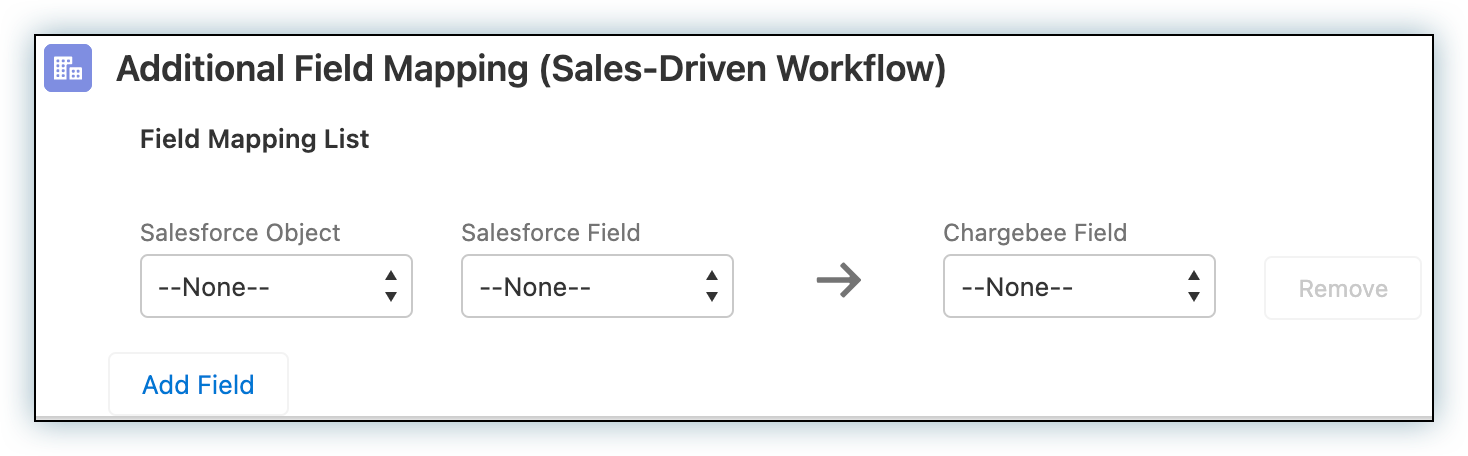
4. Additional Field Mapping: Choose the custom field sync from Salesforce opportunity to Chargebee subscription.
Information
Chargebee allows you to define additional field-mapping. You can map standard or custom fields in Salesforce objects to standard or custom fields in a Chargebee object.
Renewal Opportunities
Subscriptions can have a set duration, meaning they last for a specific number of billing cycles. When these subscriptions approach their final billing cycle, your account managers might want to discuss renewal with the customer. Activate this feature to let Chargebee automatically generate renewal opportunities for these subscriptions. Once active, determine how often Chargebee should schedule the renewal opportunity task. You can choose between Daily and Weekly.

Renewal opportunity creation
The automation generates renewal opportunities for all active and non-renewing subscriptions that have a set number of billing cycles. However, there are exceptions. The automation skips creating a renewal opportunity for a subscription if:
- A renewal opportunity already exists for the subscription.
- The subscription has a contract term that is set to auto-renew.
Renewal opportunity update
For each existing renewal opportunity, the automation checks if the corresponding subscription has changeed since the last opportunity update. If changes are found, the renewal opportunity is updated as follows:
- The opportunity, opportunity products, and price book are updated based on the subscription details. This ensures that any upgrades or modifications made in Chargebee are mirrored in the renewal opportunity.
- If the subscription has a renewed contract term, the opportunity status is set to closed-won.
- If the subscription is canceled, the opportunity is marked as closed-lost.
Customizing renewal opportunity updates
If you change products within a renewal opportunity and the opportunity remains open, the integration reverts those changes once the corresponding Chargebee subscription is updated. This update inevitably occurs when the subscription hits its next billing cycle.
You might want to prevent this reversal if you're likely to close the opportunity after:
- The subscription's next billing date, or
- Any other upcoming subscription modification event in Chargebee.
Adjust the Renewal Opportunity Behavior field on the opportunity to control this behavior.
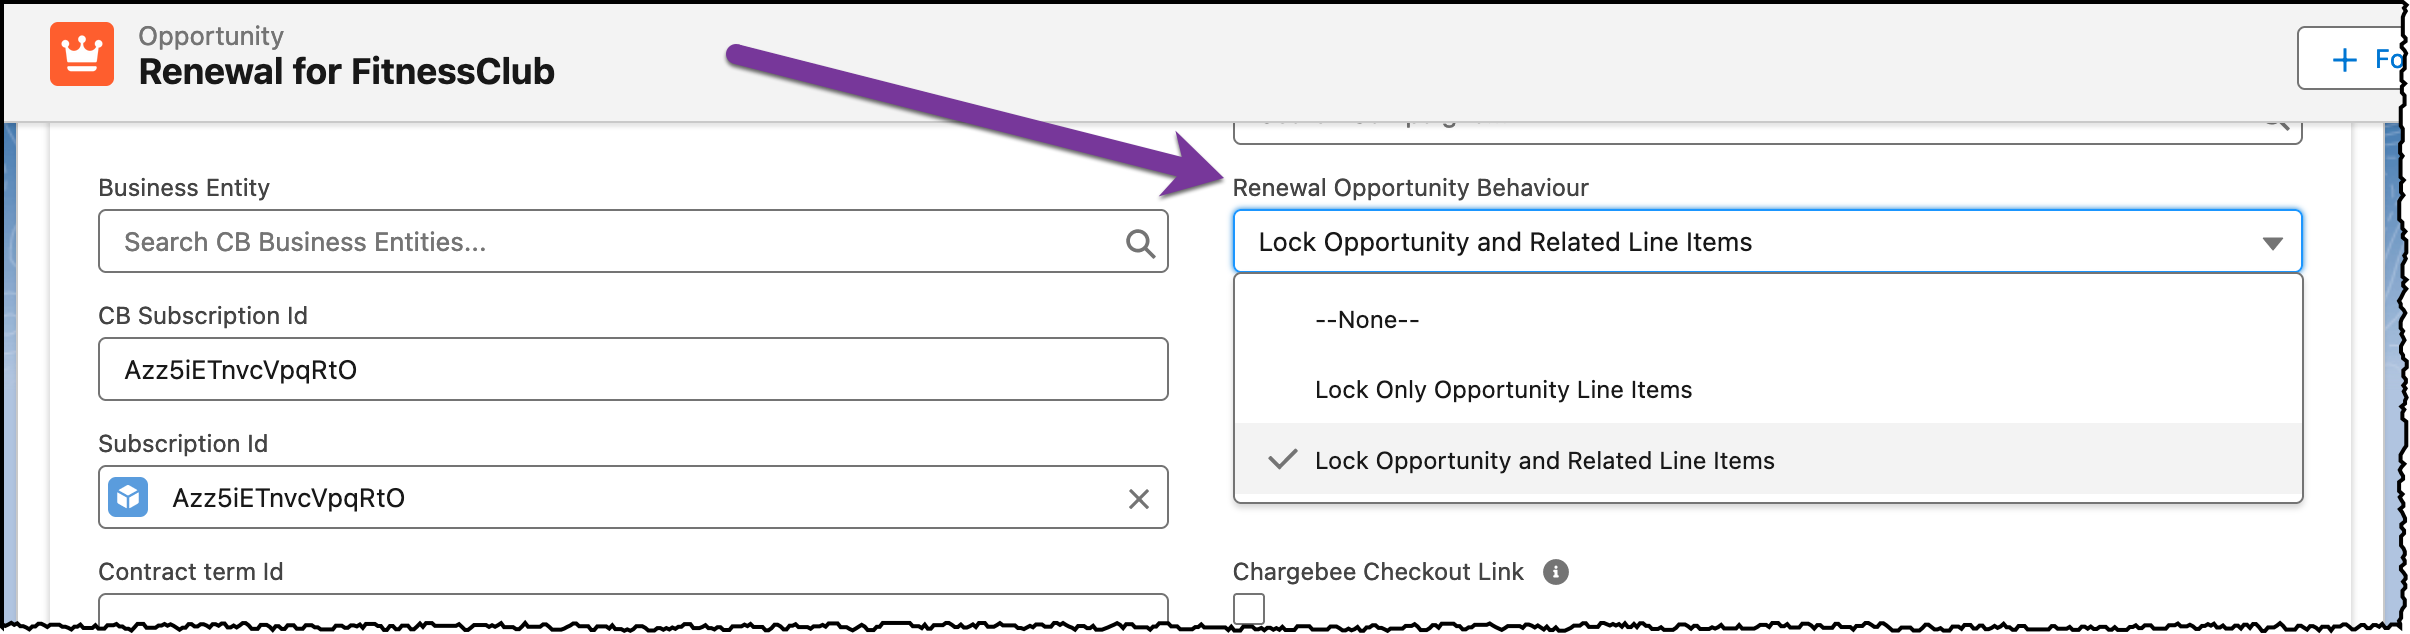
The field value determines how the renewal opportunity reacts if its corresponding Chargebee subscription changes before the opportunity closes. Here are the available options:
None
The integration updates both the opportunity fields and its products. This is the default setting.
Lock only opportunity line items
Updates opportunity fields but keeps opportunity products unchanged.
Lock opportunity and related line items
Excludes the opportunity and its opportunity products from the renewal opportunity update task.
Skip Renewal Opportunity Stage, and Close Date Updates
This advanced configuration allows organizations to prevent Chargebee from automatically updating Opportunity Stage and Close Date fields on Salesforce Opportunities during renewal events.
This is especially useful for sales teams that manage these fields manually and want to ensure external systems do not override their data.
How to Enable
-
Locate the Chargebee Site Object in Salesforce.
-
In the Chargbee Site record, locate the setting:
- Label:
Skip Renewal Stage Update - API Name:
Skip_Renewal_Stage_Update__c
- Label:

- Set the value to True.
When this setting is True, Chargebee will not update the Opportunity Stage or Close Date during renewals.
Additional subscription settings
Default values

Use this section to specify default values for Salesforce fields that are mandatory. These values are populated when no value is available from Chargebee.
Allow one time and limited period coupons to be used in opportunity product discount calculations
This toggle determines how the value for the discount field in opportunity products is calculated:
-
If the toggle is enabled: coupons with duration type one-time and limited period are included when calculating the value for the discount field.
-
If the toggle is disabled: only coupons with duration type "forever" are included while calculating the value for the discount field.
How opportunities are updated from a subscription
Whenever Chargebee updates an opportunity from its related subscription, the following actions are performed:
- The opportunity price book is updated with the relevant Chargebee site's CB Standard price book.
- All the opportunity products are replaced with those that correspond to the recurring items in the subscription. As a limitation of the integration, the charges are not added to the opportunity. This is applicable only for self-serve subscription sync cases where Chargebee creates or updates the opportunities. Let's look at an example:
-
Consider that the subscription has the following products:
- Plan: "Basic" ($100/month)
- A charge: "Setup fee" ($250)
- An addon: "Extra data" ($50)
- An addon: "Extra user" ($25/month)
-
Now, if a linked opportunity is updated when the integration syncs a subscription into Salesforce, the opportunity would have the following opportunity products:
- Plan: "Basic" ($100/month)
- An addon: "Extra user" ($25/month)
- For a total opportunity amount of $125
-
The opportunity stage is updated per the setting.
-
The lookup to opportunity in CB Subscription and the lookup to CB Subscription in the opportunity are updated.
Sync Rules for Quotes
A quote in Chargebee is a document used to let a potential buyer know how much the goods or services will cost before they commit to the purchase.
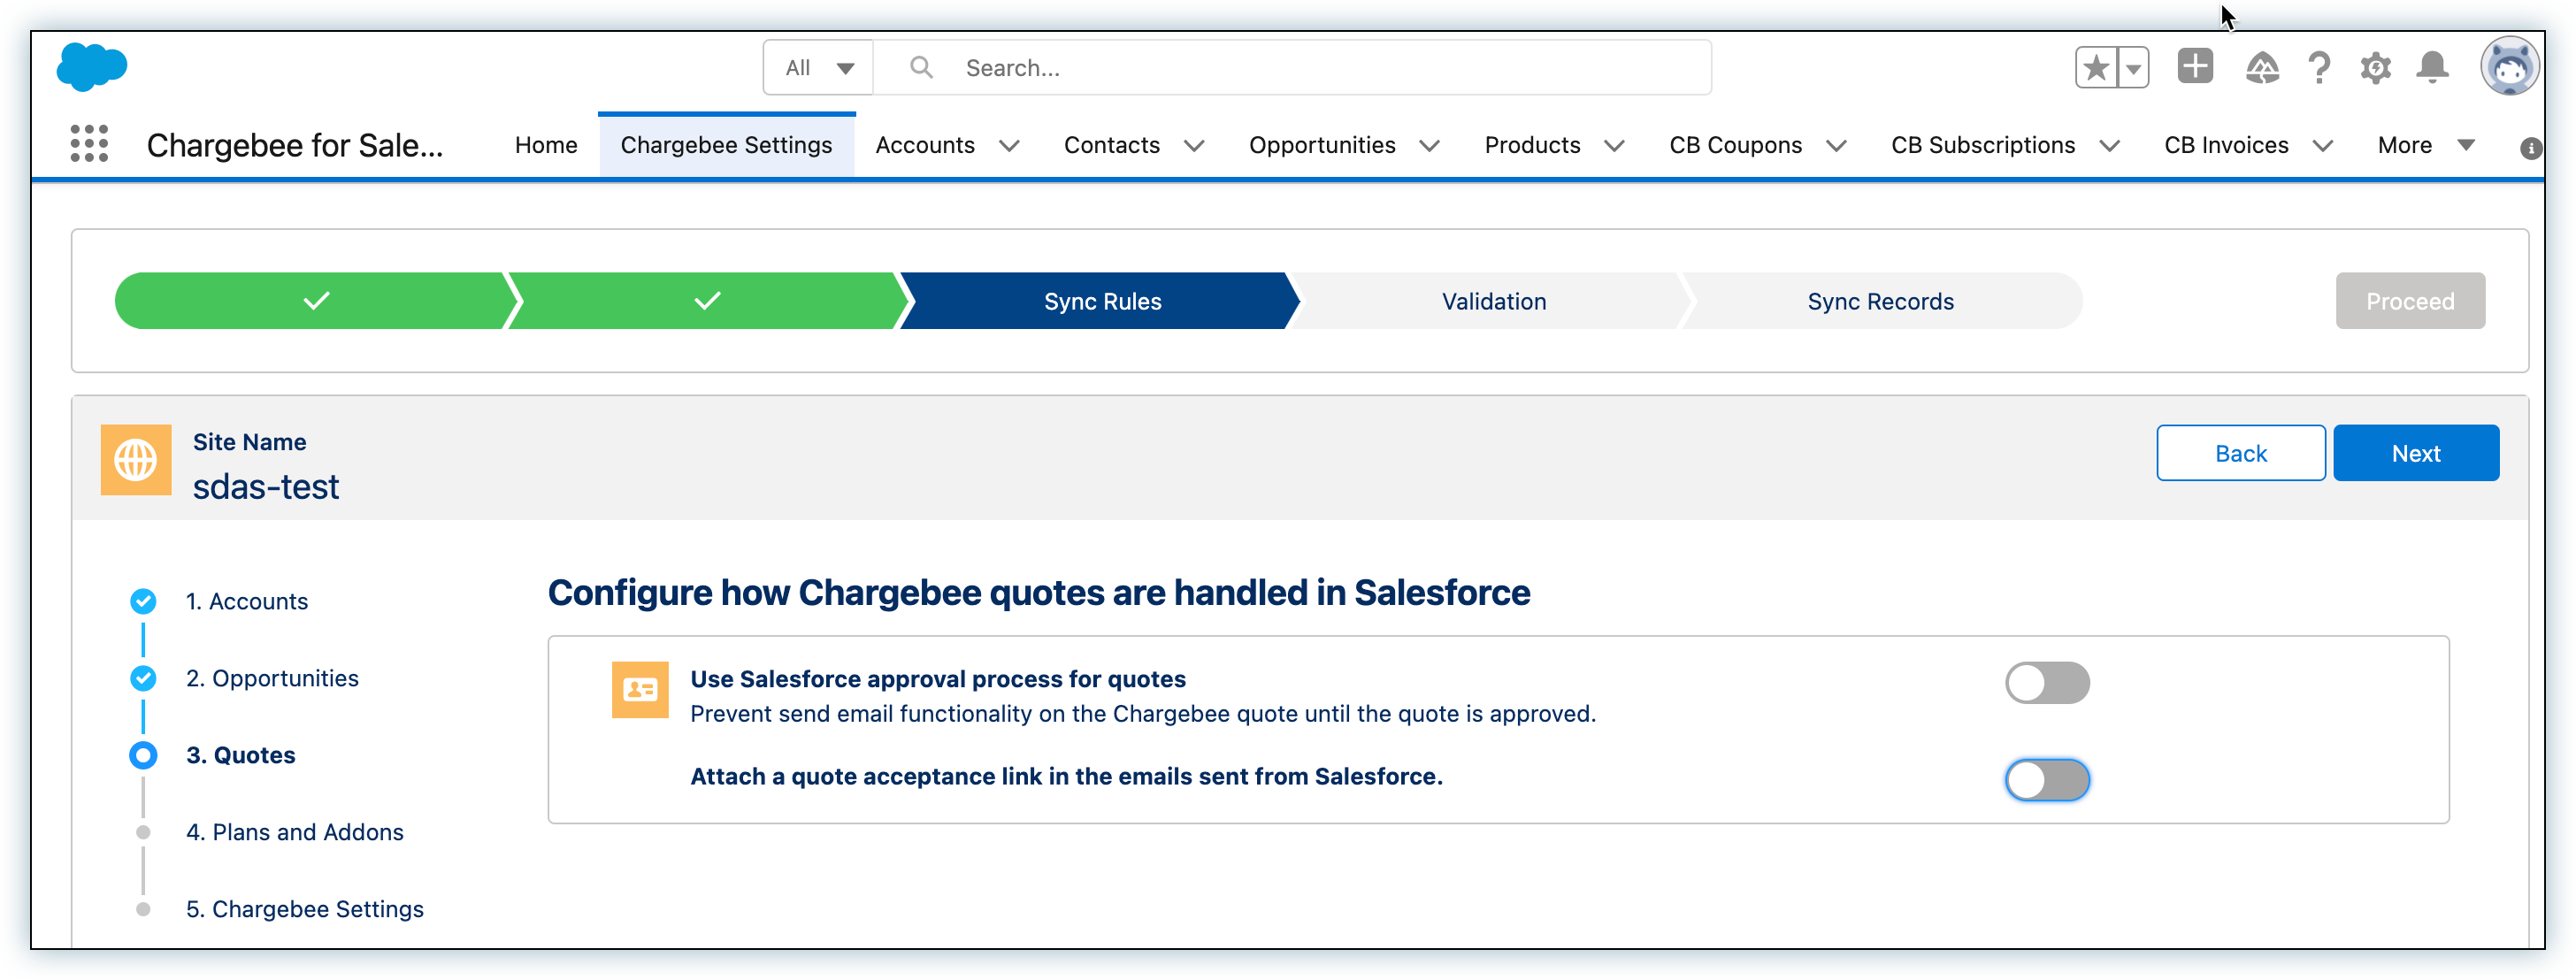
Use Salesforce approval process for quotes: Enable this if you want the Send email operation for Chargebee quotes to be restricted until the quote is approved via a Salesforce approval process.
Attach a quote acceptance link in the emails sent from Salesforce: Enabling this option will include the quote acceptance link in the email body while composing it.
Configure Sync Rules for Plans and Addons
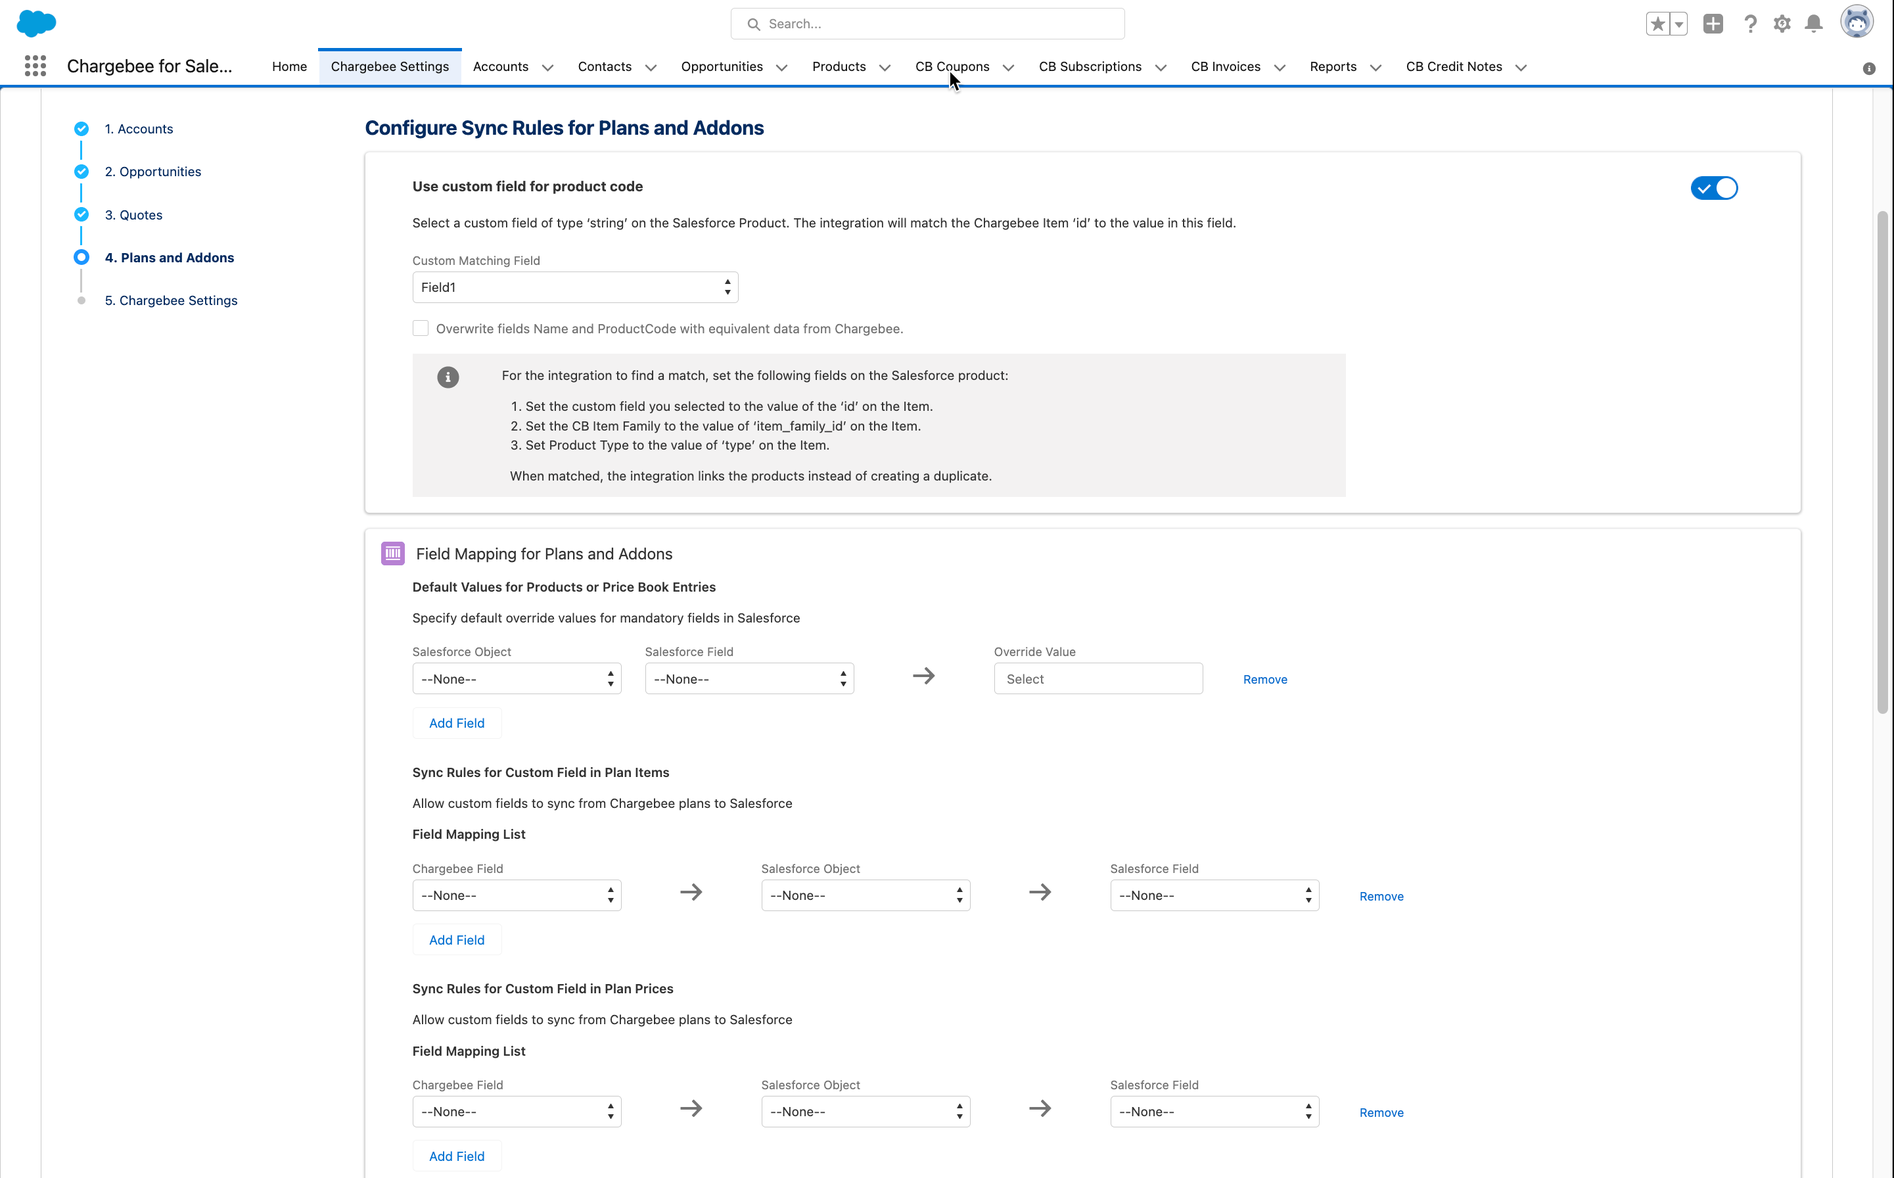
Use a custom field to match products: Enable this option to use custom fields on the Salesforce product for matching Chargebee items.
Default Values for Products or Price Book Entries: Specify default values for mandatory fields in Salesforce. Available objects are Price Book, Price Book Entry, Product.
Sync Rules for Custom Field in Plan Items: Allow custom fields to sync from Chargebee plans items to Salesforce. Available objects are Pricebook Entry, and Product.
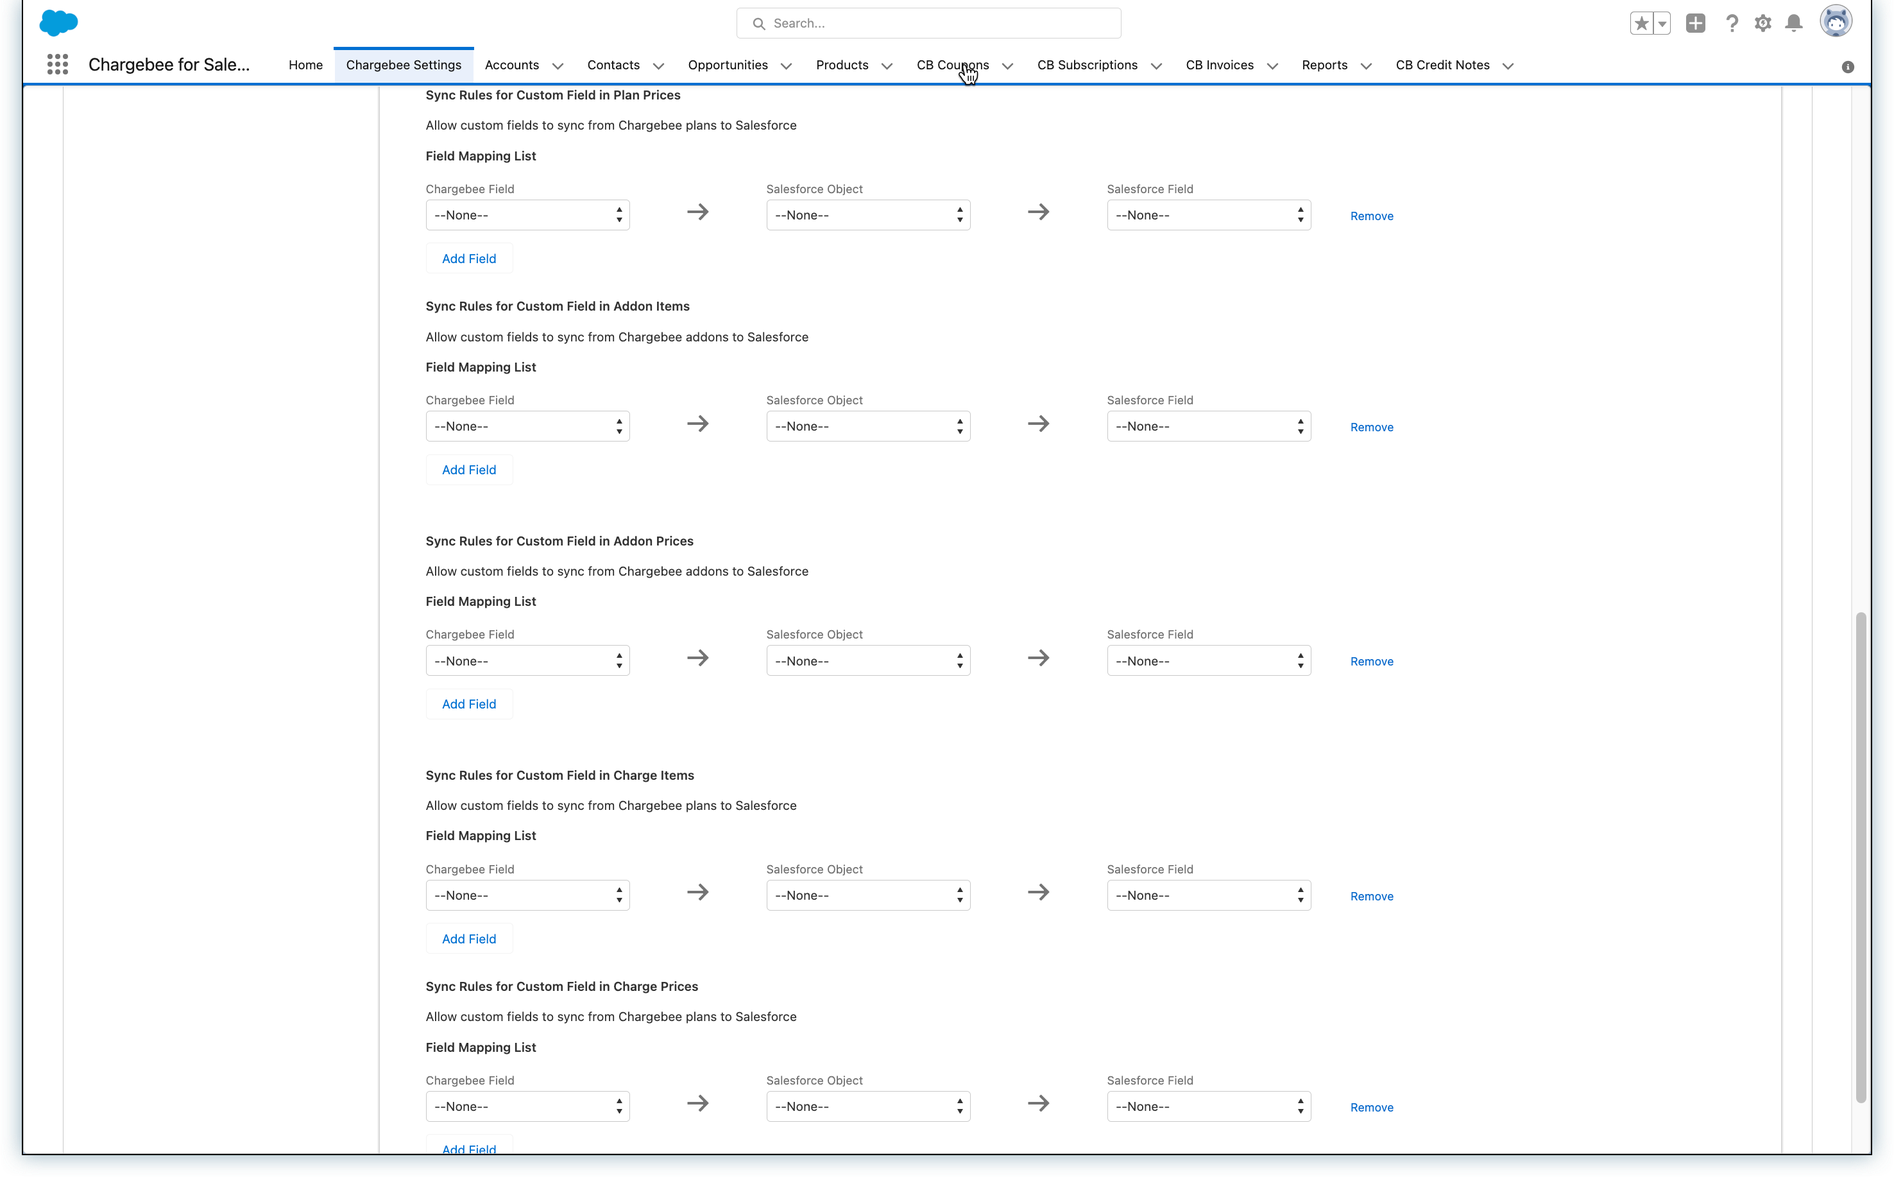
Sync Rules for Custom Field in Plan Prices: Allow custom fields to sync from Chargebee plans price to Salesforce. Available objects are CB Item Price.
Sync Rules for Custom Field in Addons: Allow custom fields to sync from Chargebee addons to Salesforce. Available objects are Price Book Entry, and Product.
Sync Rules for Custom Field in Addon Prices: Allow custom fields to sync from Chargebee plans price to Salesforce. Available objects are CB Item Price.
Sync Rules for Custom Field in Charge Items: Allow custom fields to sync from Chargebee addons to Salesforce. Available objects are Price Book Entry, and Product.
Sync Rules for Custom Field in Charge Prices: Allow custom fields to sync from Chargebee plans price to Salesforce. Available objects are CB Item Price.
Chargebee Settings

Chargebee site settings: This section displays information of the connected Chargebee site.
Email Notifications: Notifications can be configured to alert admins or other users of an auto-sync job failure. Add any email address and choose the notification interval. If the sync frequency for the integration is more frequent than the email notification frequency you receive will be a summary of sync failures.
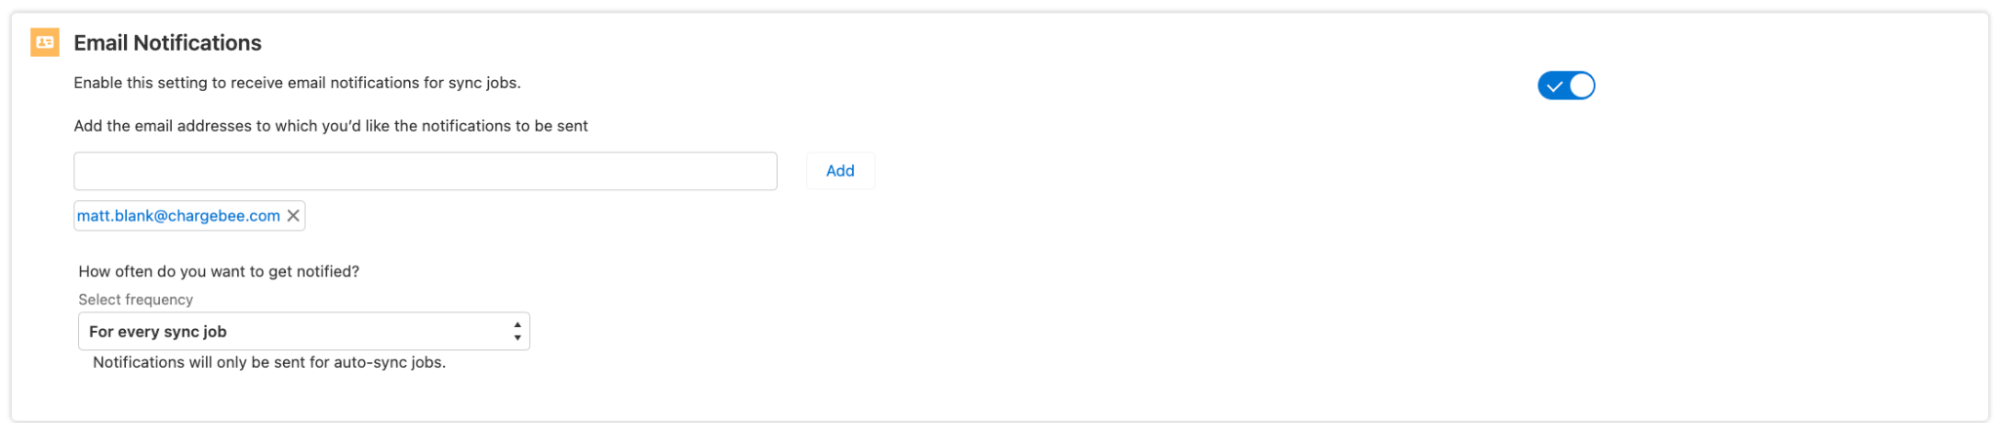
Note
When choosing an interval, your organisation's email limit will count against this. In this situation, with a sync time of 10 minutes and an alert frequency of every job in one day, you would receive 144 emails in a day.
Chargebee Sync Jobs and Logs: The number of logs generated by the integration could build up overtime. You can use the Chargebee sync Jobs and Logs section to set a frequency to automatically clean up the logs for the records that were successfully synced. Available options are Daily, Weekly, and Monthly.
Multi-Price Book Support
Chargebee's Salesforce integration now supports the ability to use multiple pricebooks! This is considered an Advanced feature and should only be used by users familiar with multiple pricebooks in Salesforce.
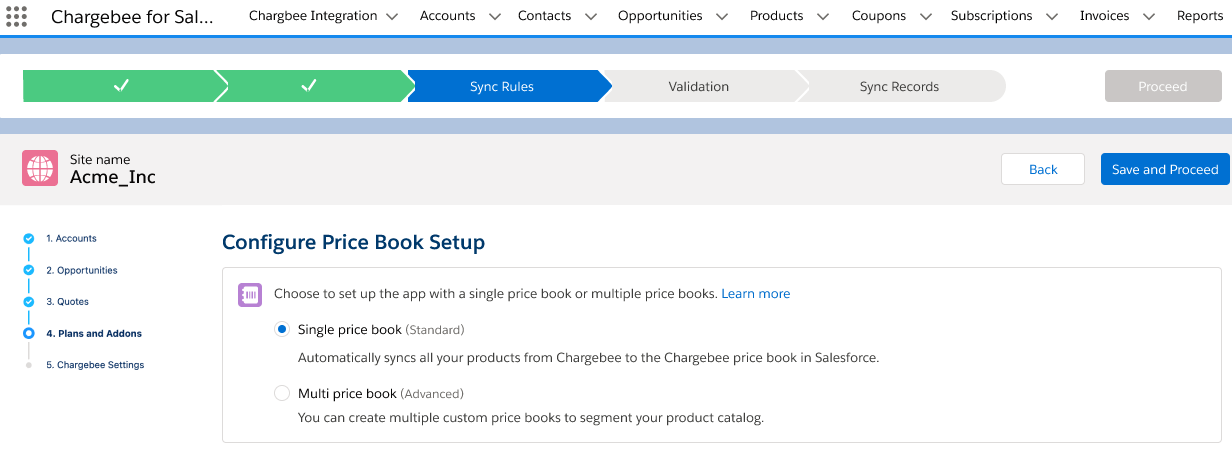
The Integration will now have two options when configuring products / plans.
1. Standard - No change from existing behavior today, Chargebee will sync all products into the Chargebee Pricebook.
2. Advanced - You can choose which Plans, Addons and Charges are available in which pricebooks. These products should be manually added to pricebooks the same way you would add standard Salesforce products. Once your products are configured into their respective price books, at the opportunity level choose what pricebook you would like to use. The Chargebee visual force pages will only show the Plans, Addons and Charges available in the associated pricebook.
Note
If you split a mandatory add on from a plan in Salesforce and it does not get pushed to Chargebee the subscription creation may throw an error.
Step 4: Validation
Once you set the rules and click proceed, a pre-validation to sync the records will be established. In the case of errors, it will be displayed. It is recommended that you fix the issues and retry the validation. Learn more about how/what information is validated
Step 5: Sync Records
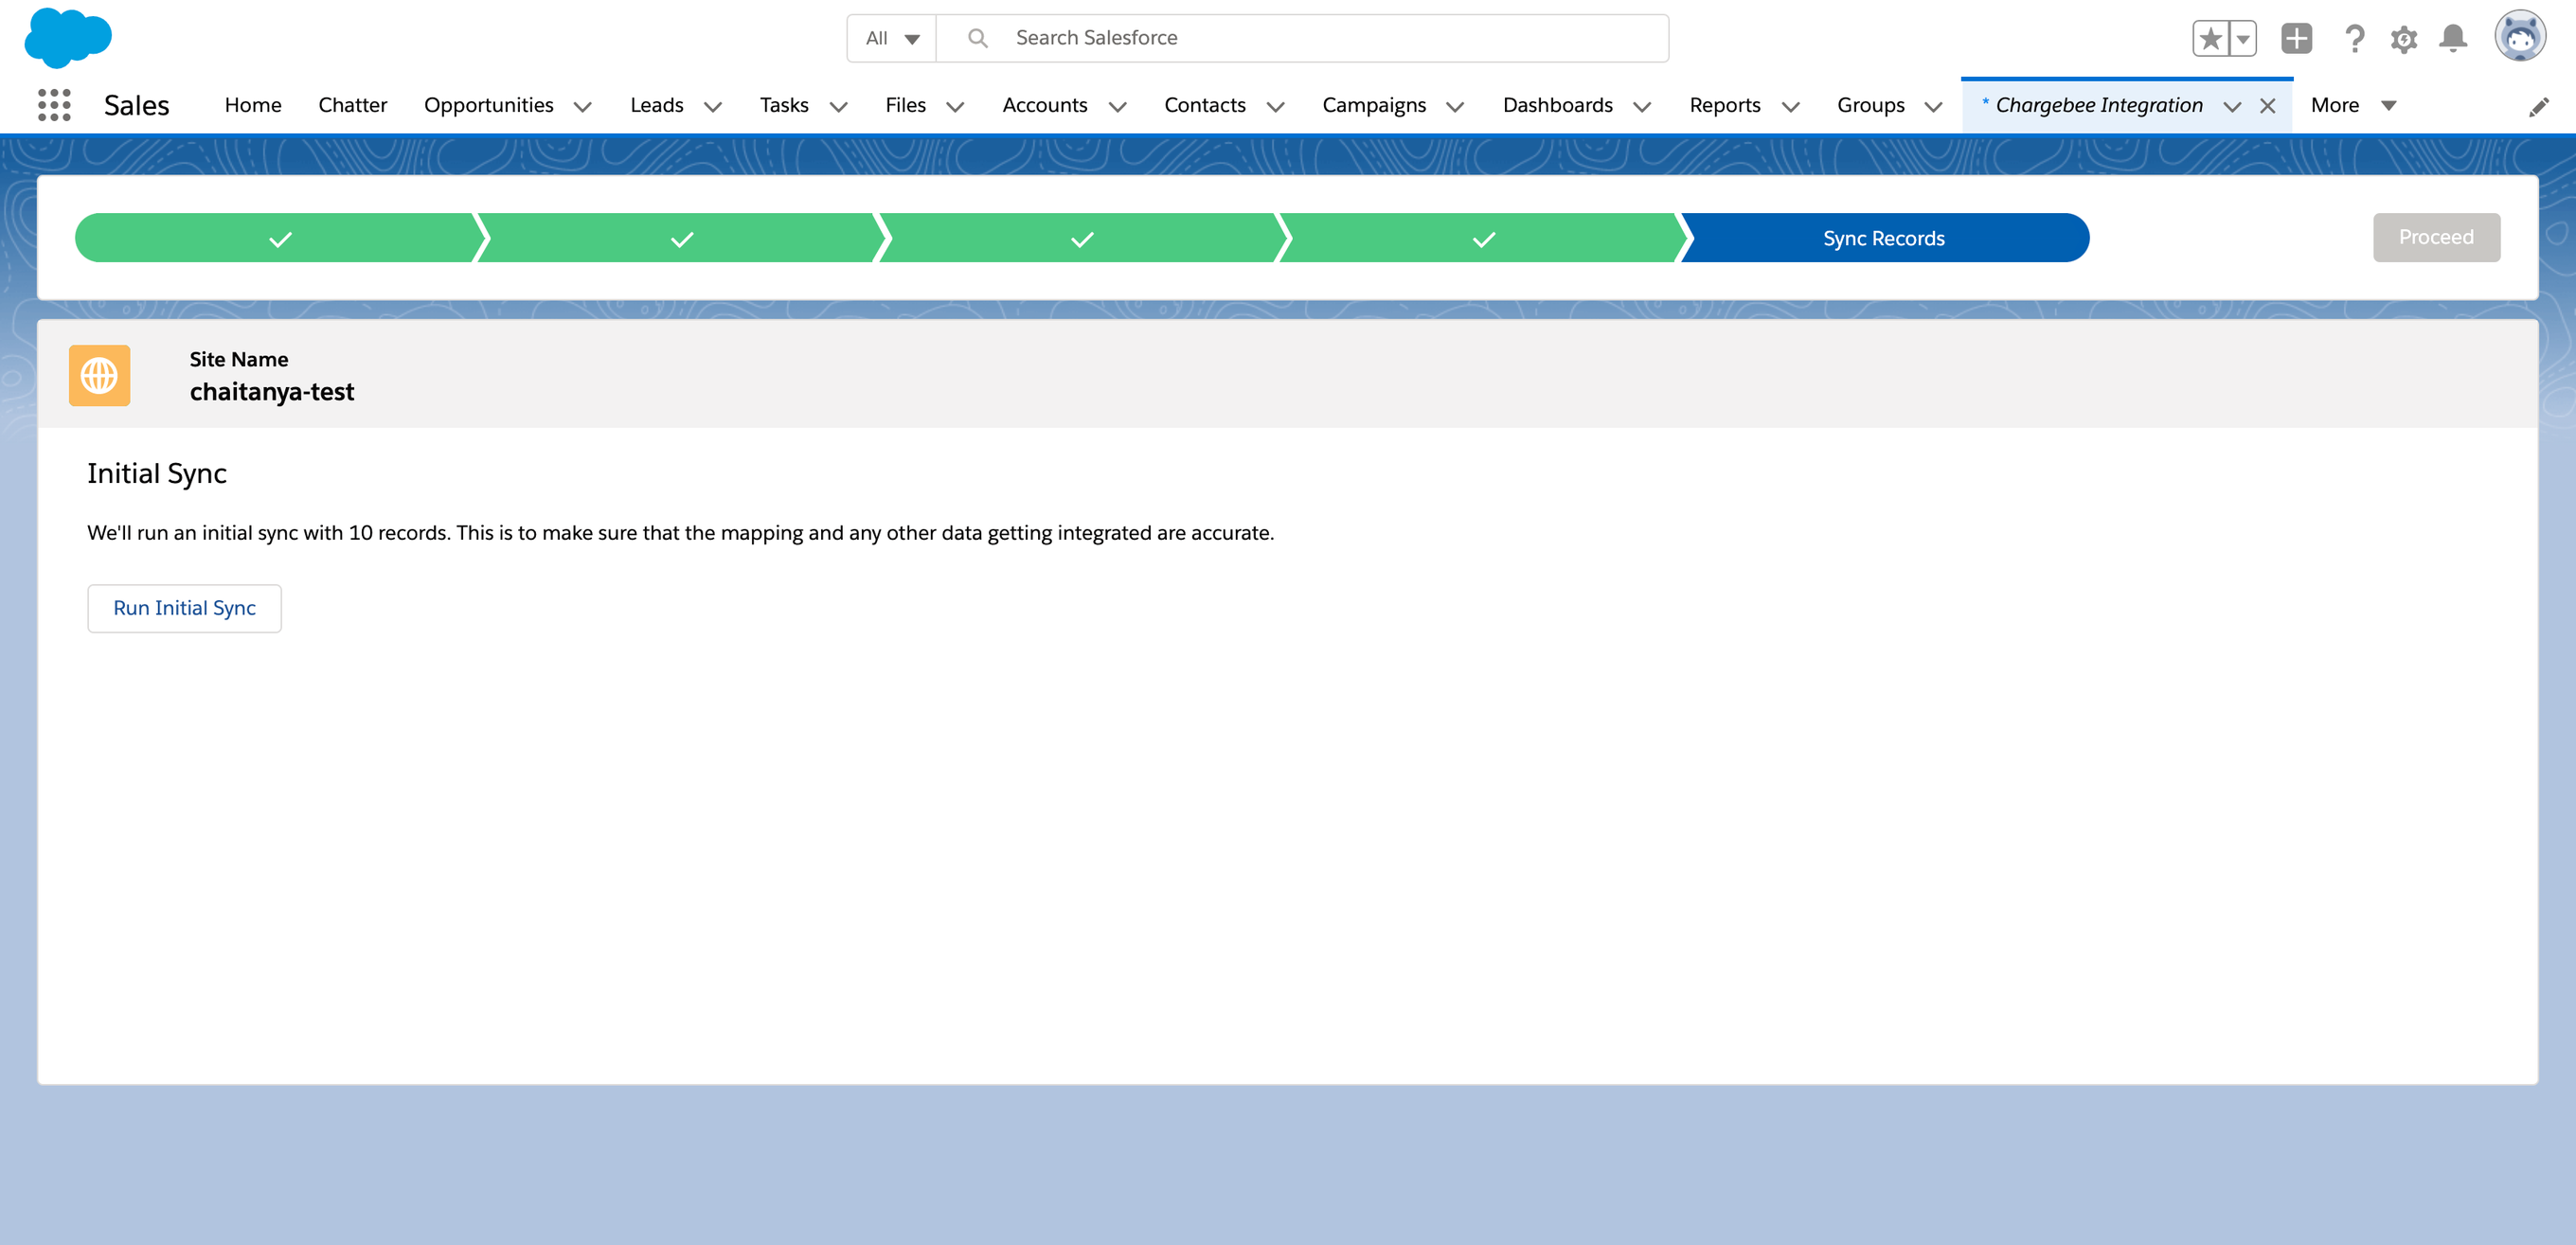
The first 10 records will be synced between Chargebee and Salesforce. Information such as Subscriptions, Plans, Add-ons, Customer, and Invoices will be synced. Using this feature you can ensure that the data sync happens as per the settings that you have configured. Click Run Initial Sync.
In case you face any issues, you can fix them and retry or choose to ignore them and proceed with the full sync. You can address these issues any time.
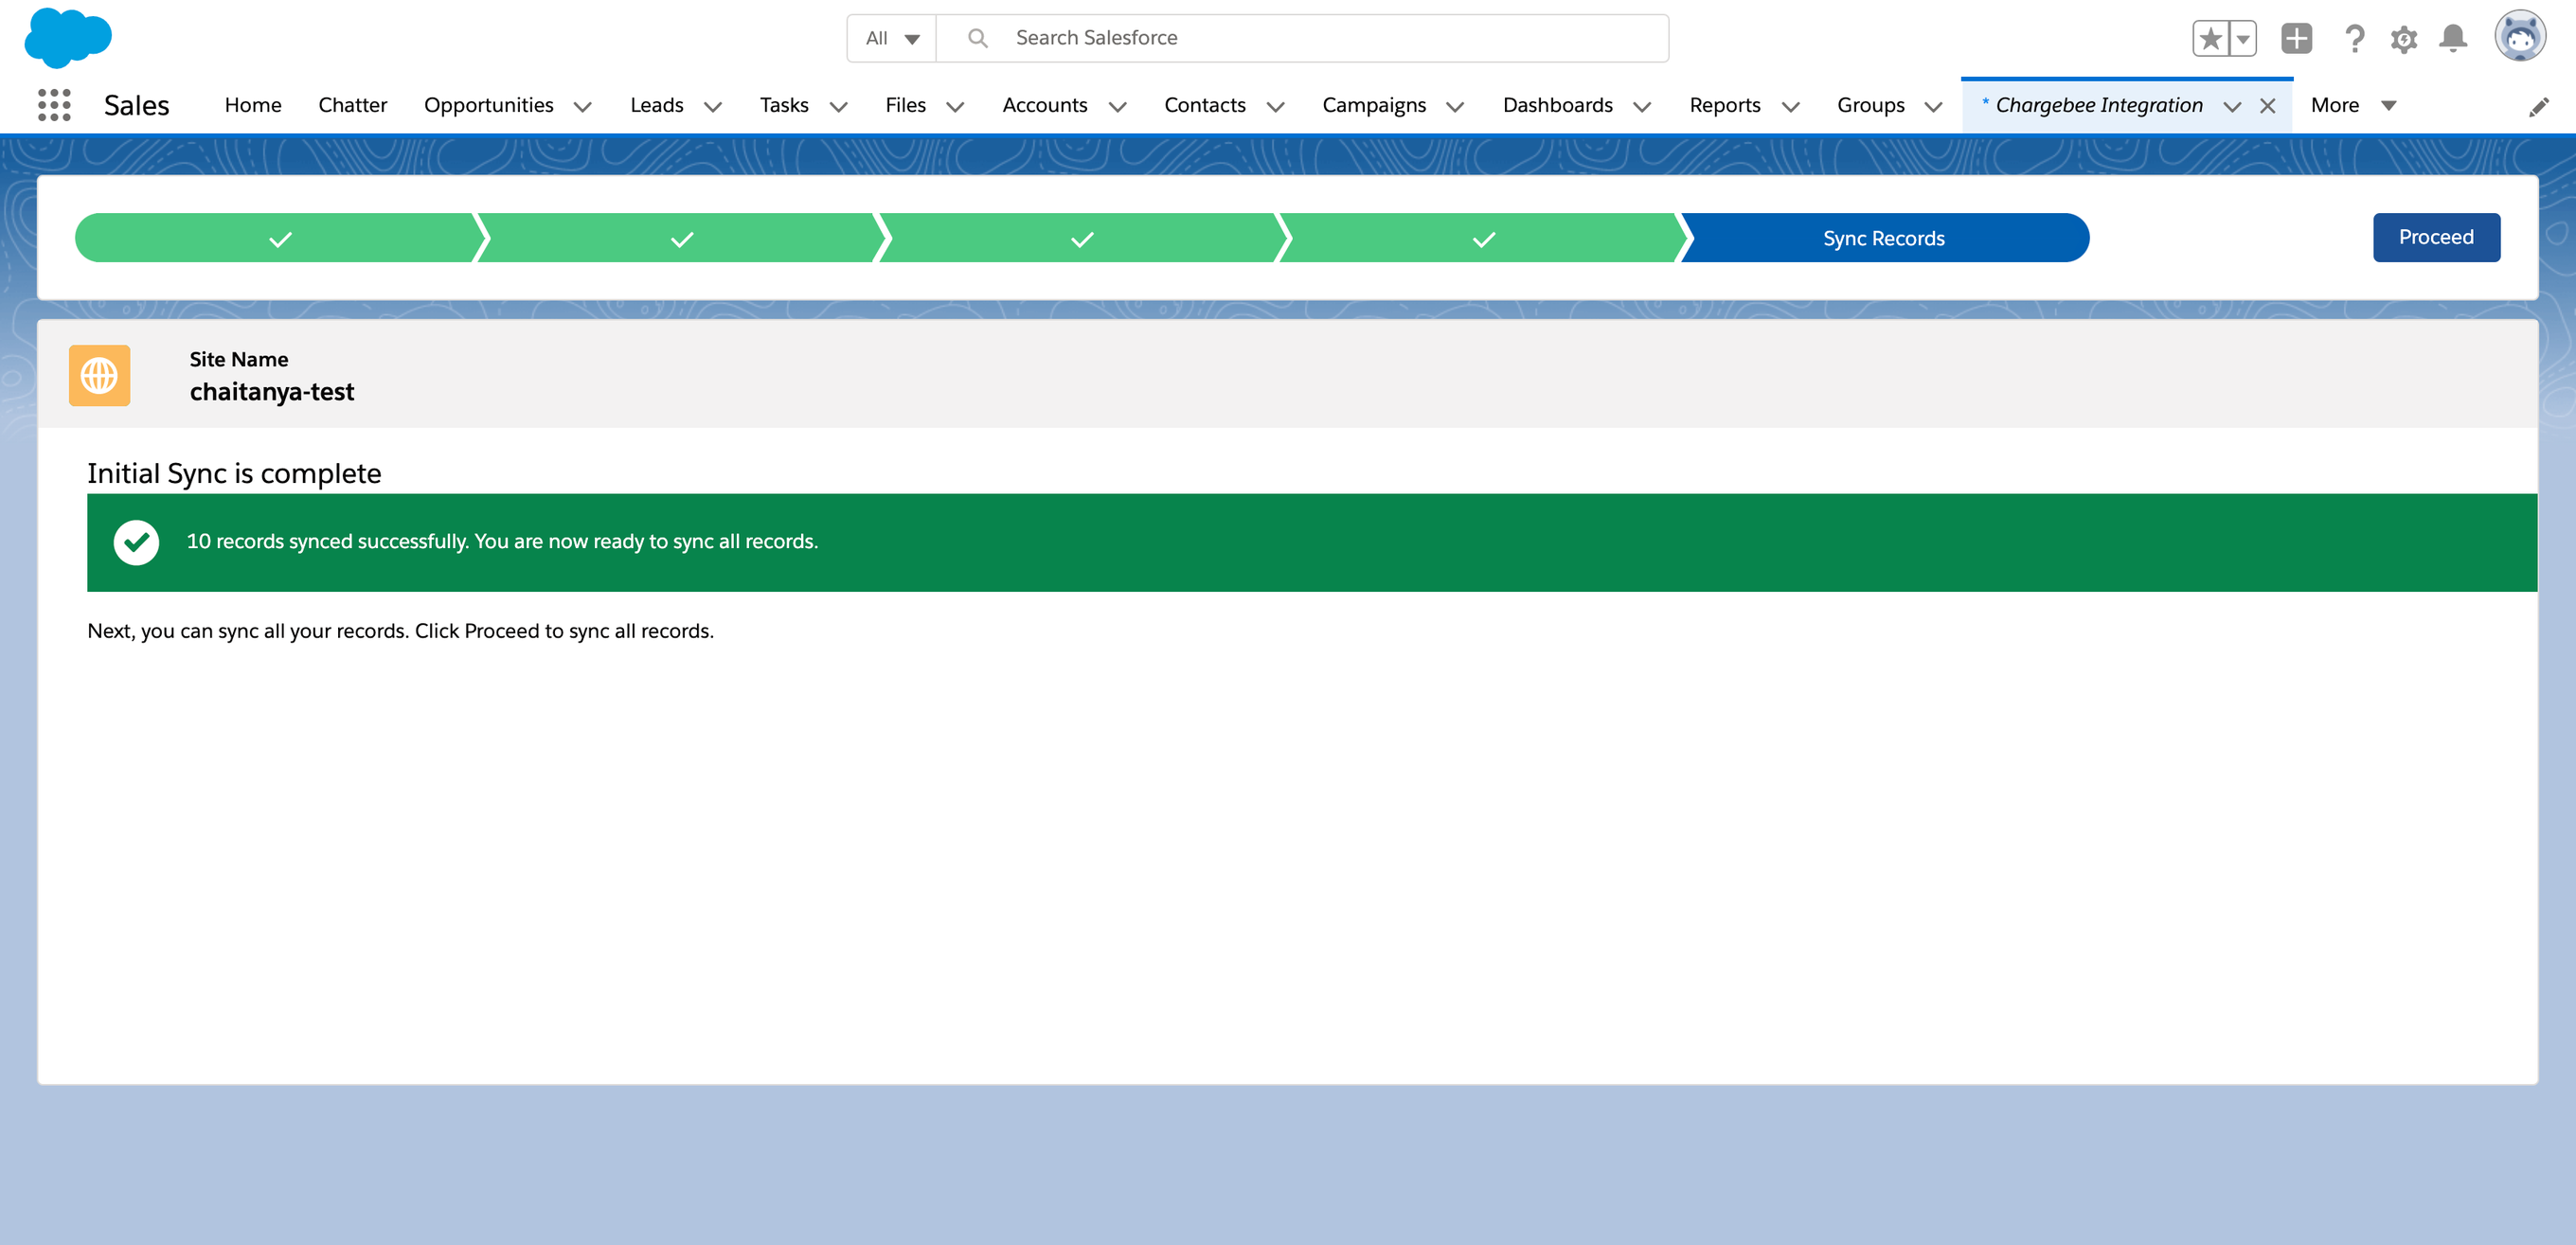
Once the initial sync is successful, click Proceed to run the full sync. This operation syncs all Subscriptions, Plans, Add-ons, Customer, Invoices, and Credit note data from Chargebee into Salesforce as per the configuration rules specified. That said, the first full sync will not create or update opportunities in Salesforce.
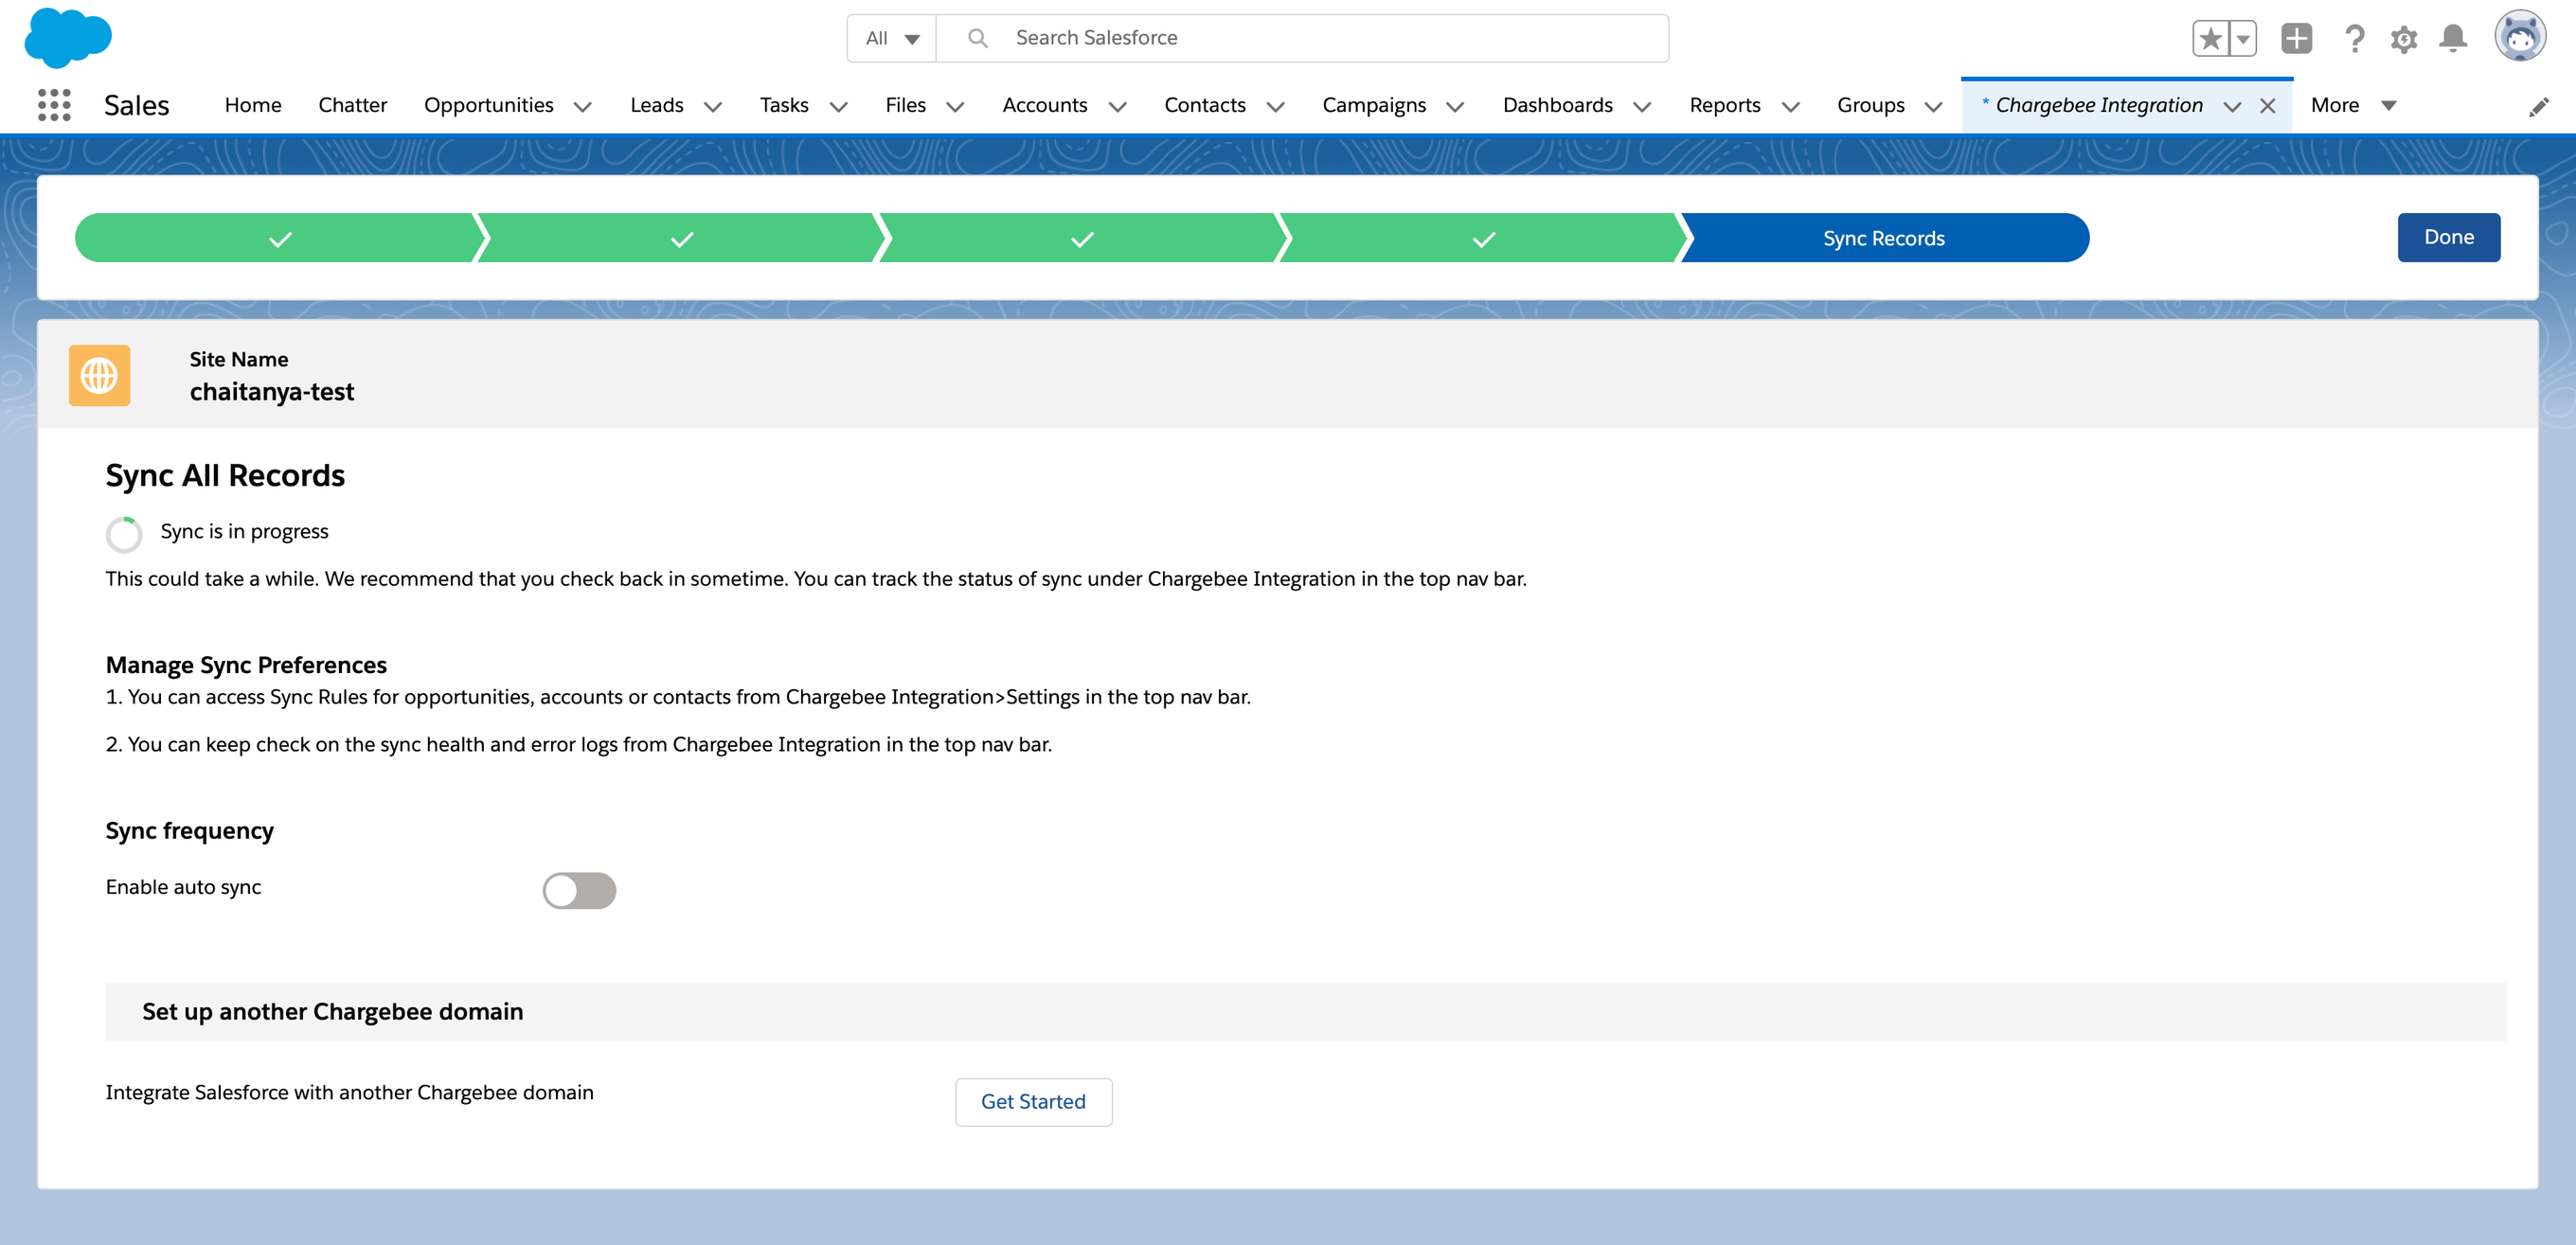
Next, enable** Auto sync** and set the frequency for the sync. You can choose to sync the data every hour, every 6 hours or once a day. When auto-sync is enabled, records are created or updated under the user's name who initiated the toggle.
Managing Preferences
Note
Once the settings are changed, historical records are unaffected unless mentioned otherwise.
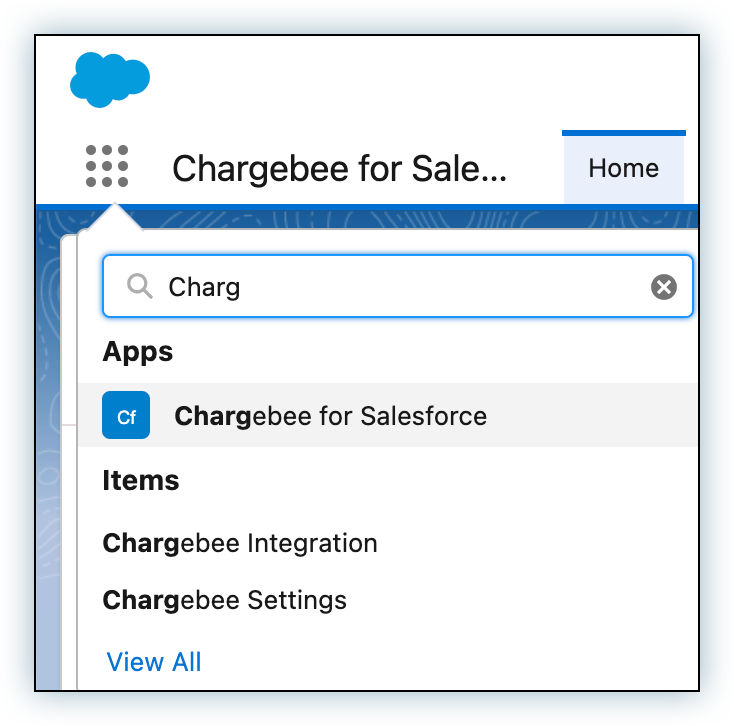
Chargebee's Salesforce integration can be configured by navigating to the Chargebee Settings item under the Chargebee for Salesforce app. You can reach the item by clicking on the Salesforce App Launcher and typing its name. (See the steps in the screenshot below.)
Sync Health
This dashboard gives the following details
- Sync Status shows when the last sync was run, how many records were synced, and how many errored out. Click on Sync Records to start the sync process again. Records are created and updated under the name of the user clicking 'Sync Records'.
- Sync Settings provides an option to enable automatic syncing and specify the frequency at which the auto-sync should run. The available frequencies are Every 10 minutes, Every 1 hour, Every 6 hours, and Daily.
- Sync Overview summarizes the last 5 sync jobs that were run.

Sync Logs
The Sync Logs tab contains record-level logs for the syncing process, thereby providing an audit trail for the integration. If you have multiple Chargebee sites connected to the Salesforce org, click on the Chargebee domain dropdown to see the data for the appropriate Chargebee site. By default, logs with Error Status as Failed are displayed. You can change the setting by clicking the filter icon and modifying the filters as appropriate.
Note
The Sync Logs tab shows activity for data synchronized from Salesforce to Chargebee. To review logs for data flowing from Chargebee to Salesforce, use the CB Sync Log object instead. For details, see the Chargebee to Salesforce Sync Logs section.
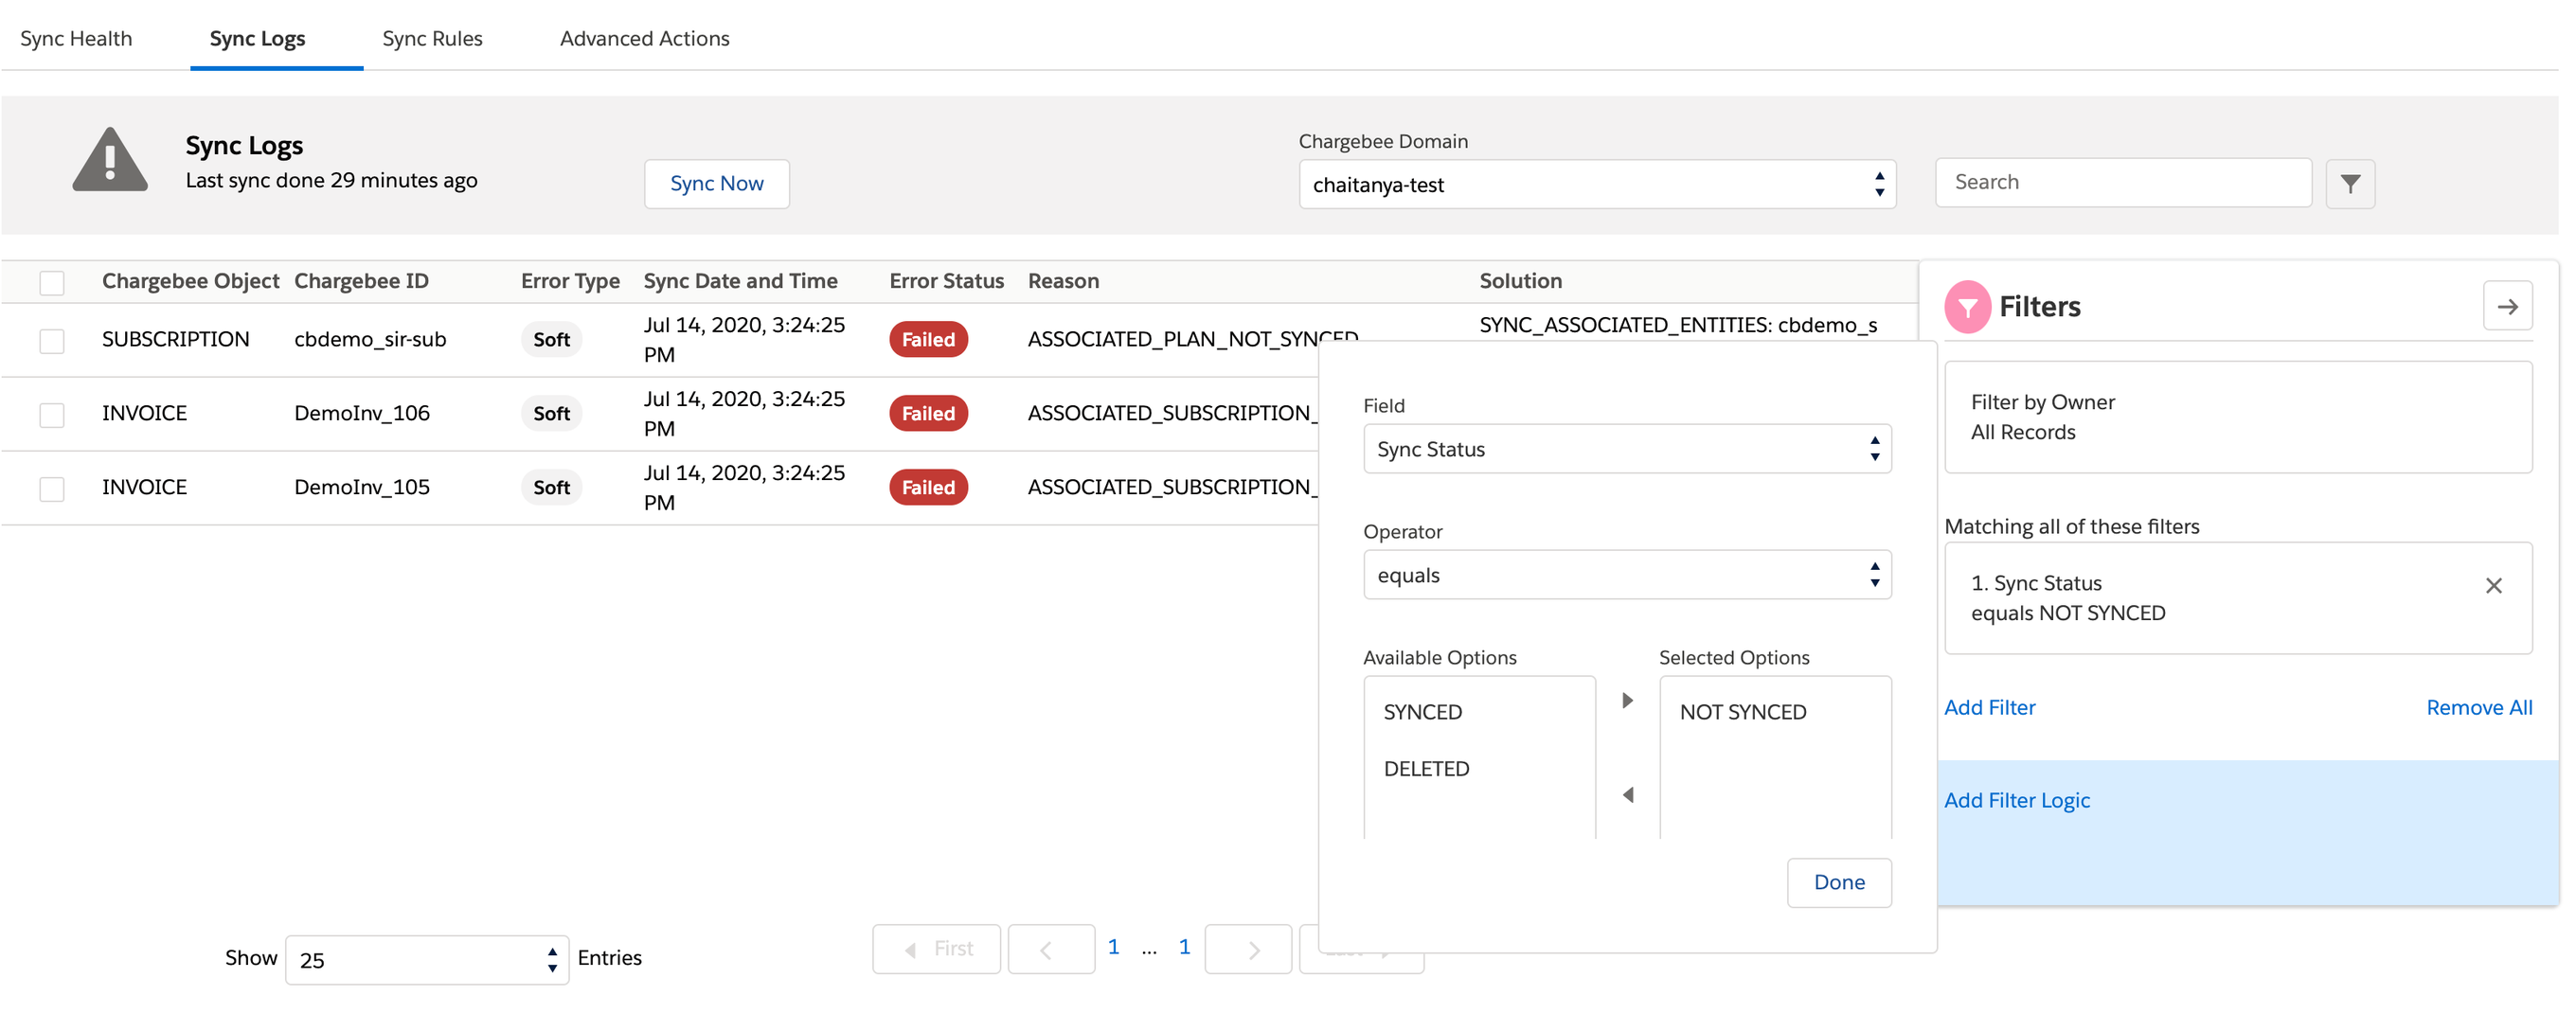
Each record in Sync Logs has the following fields:
-
Chargebee Object: The type of Chargebee record. This is always one among the Chargebee objects shown in the object-mapping diagram.
-
Chargebee ID: The unique identifier of the Chargebee record that failed to sync.
-
Error Type: Whenever a record fails to sync, an attempt to resync the record is made twice a day. For the first 9 times that a record is attempted to sync, its Error Type is Soft. If the record does not sync on the 10th attempt, the Error Type is marked Hard. Such records are not automatically retried again. However, you can retry syncing any record, including Hard failures, by selecting the checkbox in the first column of the record(s) and clicking Sync Now. If you click Sync Now with all checkboxes cleared, then all the Failed records are retried.
-
Sync Date and Time: The last time an attempt to sync this record was made.
-
Error Status: If the sync has failed in the last attempt, the status shows Failed; if it was successful in the last attempt, the status shows Success.
-
Reason: Explains the reason for the sync failure. The possible values are tabulated below. There are also some unclassified errors for which you would see a descriptive error message in this field. Contact Support to help fix such errors.
-
Solution: Often, a record fails to sync because another record (of a different Chargebee object) that the former is dependent on, has not synced yet. While the Reason field indicates the name of this required object, the Solution field gives the unique identifier for the object record.
Error Reason Reference
The table below lists and explains all the possible values of the Reason field on the Sync Logs page.
| Chargebee Object | Reason | Description |
|---|---|---|
| Credit Notes | ASSOCIATED_INVOICE_NOT_SYNCED | The record failed to sync since the associated invoice has not synced yet. |
| Customer | MULTIPLE_ENTITIES_MATCHING | The Chargebee customer matches more than one Salesforce account or contact. |
| Customer | DUPLICATE_CUSTOMER | The Chargebee customer matches an account that is already mapped to another customer. |
| Customer | MULTIPLE_CUSTOMERS_MATCHING | Multiple Chargebee customers match the same contact. |
| Customer | MATCHING_FIELD_EMPTY | The Chargebee customer does not have a value populated for the field used for matching. |
| Customer | MULTIPLE_LEADS_MATCHING | The Chargebee customer matches more than one lead in Salesforce. |
| Invoice | ASSOCIATED_SUBSCRIPTION_NOT_SYNCED | The record failed to sync since the associated subscription has not synced yet. This can be multiple subscriptions when it's a consolidated invoice. |
| Item | PRICEBOOK_DOES_NOT_EXIST | Price book creation can fail due to certain validations and processes. This error is seen in such cases. |
| Item Price | ITEM_DOES_NOT_EXIST | The record failed to sync because a Chargebee item record (plan/addon/charge) has not synced yet. |
| Subscription, Quotes | ASSOCIATED_COUPONS_NOT_SYNCED | The record failed to sync since the associated coupon(s) have not synced yet. |
| Subscription, Quotes | ASSOCIATED_ITEMPRICE_NOT_SYNCED | The record failed to sync since the associated item price(s) have not synced yet. |
| Subscription, Quotes, Invoice, Credit Notes | ASSOCIATED_CUSTOMER_NOT_SYNCED | The record failed to sync since the associated customer has not synced yet. |
Sync Rules
The** Sync Rules** tab lists the sync settings that you have initially configured. You can edit the sync rules from this page.
Advanced Actions
The Advanced Actions tab allows you to:
- Access control
- Add/remove domains
- Retrieve historic data
- Disconnect business entities
- Reconnect disconnected business entities
- Connect a new business entity
- Post-update scripts
- Configure Quote Note Prefilling
Access Control
You can grant access to users who are part of a Salesforce public group like system administrators or sales managers to view and modify fields, or buttons while they create subscriptions or manage subscriptions. A Salesforce user can be part of multiple public groups. When a user belongs to multiple groups and has different permissions, the system assigns that user the highest permission across all groups. A sales manager, for example, belongs to the sales user group with Read Only access and the sales admin group with Write access. In this case, the system grants the sales manager Write access for both the groups as it is the highest permission. Listed below are the access types available to users in a public group on the fields.
-
Read Only: The user can only view the field.
-
Write: The user can view and modify the field.
-
Default Value: This is applicable to the read only access type. The user granted read only access can view the default value that has been set for the field. For more information, see fields and accessibility. Additionally, as part of the Access Control, you can also provide more granular control over what pages these permissions apply to. Currently, you can only apply Read or Write to a field across the applicable pages, meaning you cannot have "Billing Cycles" with Read permissions on Create Quote, but Write permissions on Change Subscription. Please see the list of pages these permissions can be applied to below.
-
Manage CB Products (New Subscriptions - Opportunities)
-
Manage CB Products (Existing Subscription _ Opportunities)
-
Create Subscriptions (Opportunities)
-
Create Subscriptions (Account)
-
Create Quote
-
Edit Quote (New Subscription)
-
Edit Quote (Update Subscription)
-
Change Subscription
-
Create Quote Update
-
Create Subscription From Quote
-
Change Subscription From Quote
-
Create One Time Quote
-
Add Charge From Account
-
Add Charge from Opportunity
Note
In case of a newly created public group or the initial setup of the integration, default permissions is set to Write for all fields.
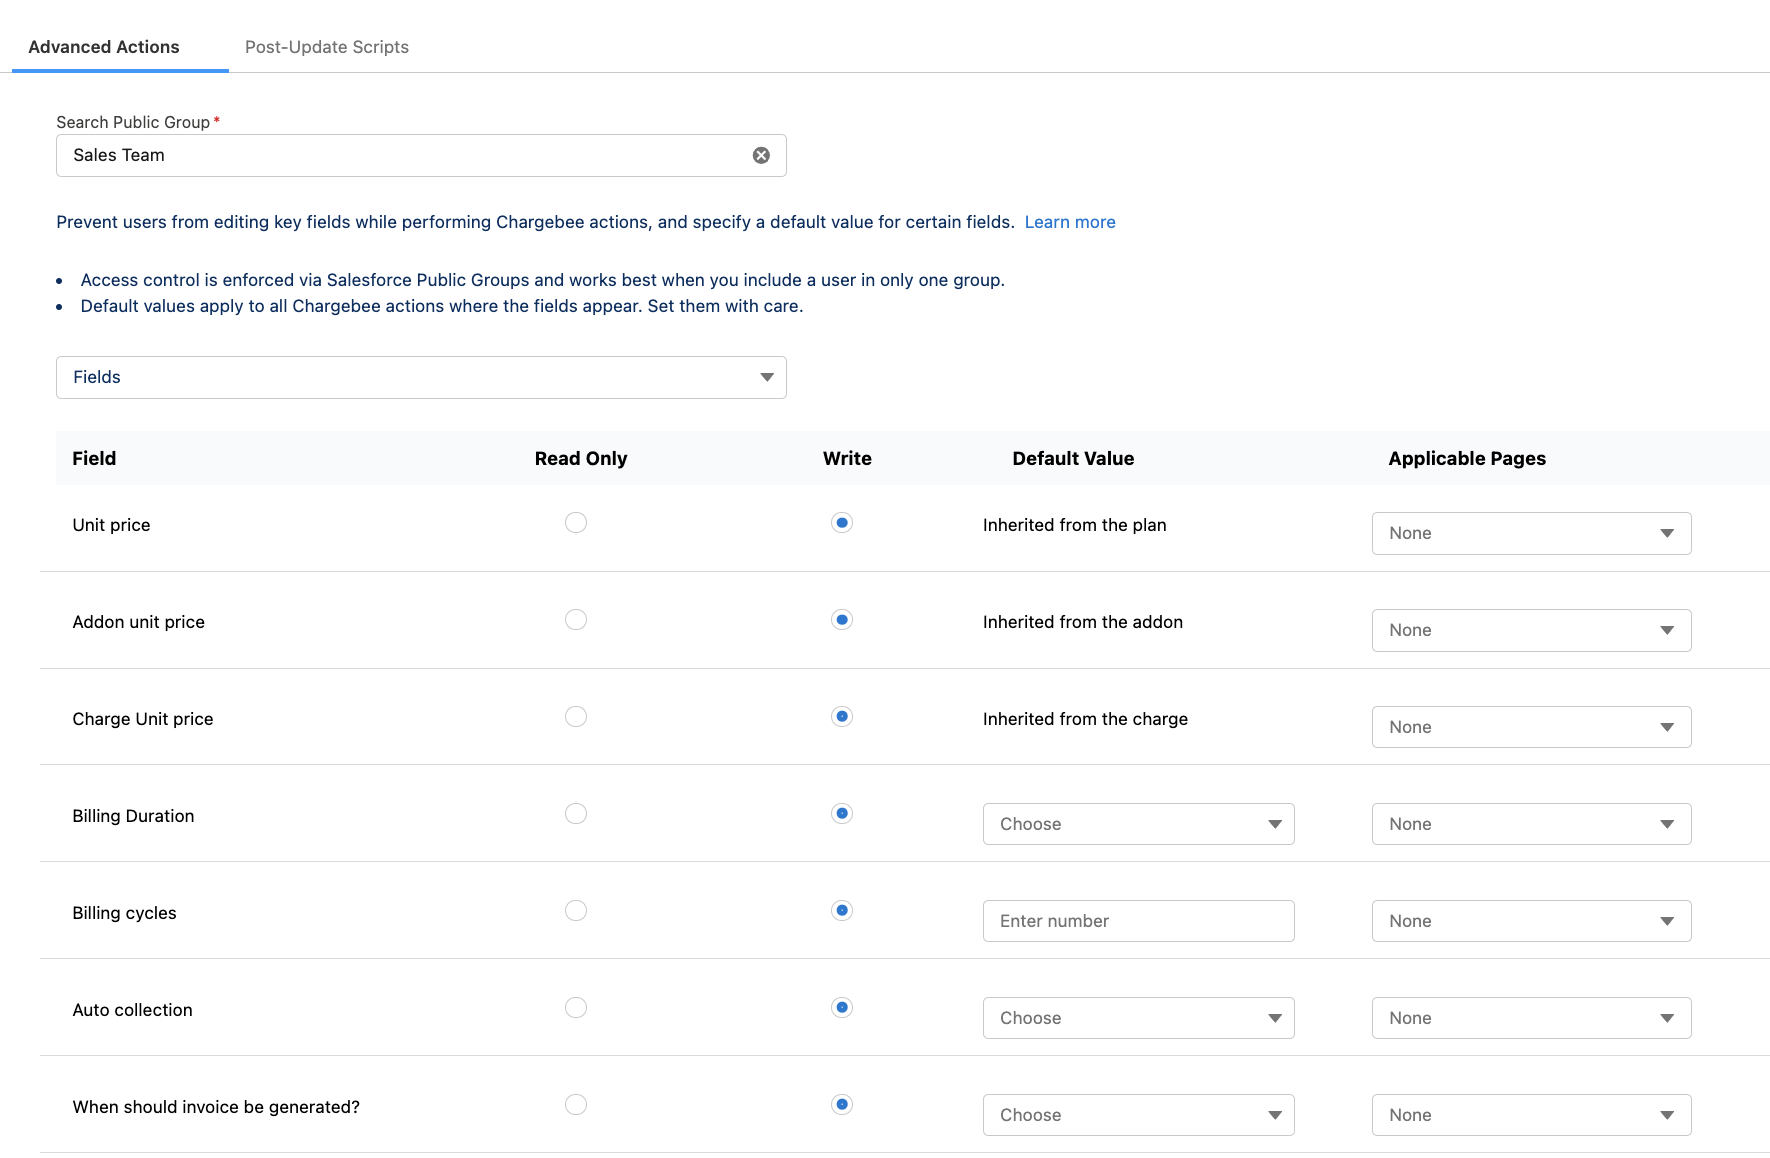
Fields and accessibility
To grant access:
- Use Search Public Group to search a public group and grant access to users in that group.
- Click Save Settings and Apply.
Note
You can view the contract terms fields only when you enable contract terms for your Chargebee site.
The following table lists field name, accessibility, and their default values.
| Field Name | Accessibility | Default Value |
|---|---|---|
| Unit price | Read Only / Write | Inherited from the plan |
| Addon unit price | Read Only / Write | Inherited from the addon |
| Charge unit price | Read Only / Write | Inherited from the charge |
| Billing duration | Read Only / Write | Select from the available values:
|
| Auto collection | Read Only / Write | Select from the available values:
|
| When should invoice be generated? | Read Only / Write | N/A |
| On Contract Term End | Read Only / Write | N/A |
| No of Billing Cycles on Renewal | Read Only / Write | N/A |
| Cut Off Period for Cancellation | Read Only / Write | N/A |
| Do not auto-close invoices | Read Only / Write | N/A |
| Generate all renewals in a pending state | Read Only / Write | N/A |
| Generate first invoice in a pending state | Read Only / Write | N/A |
Add/Remove Domain
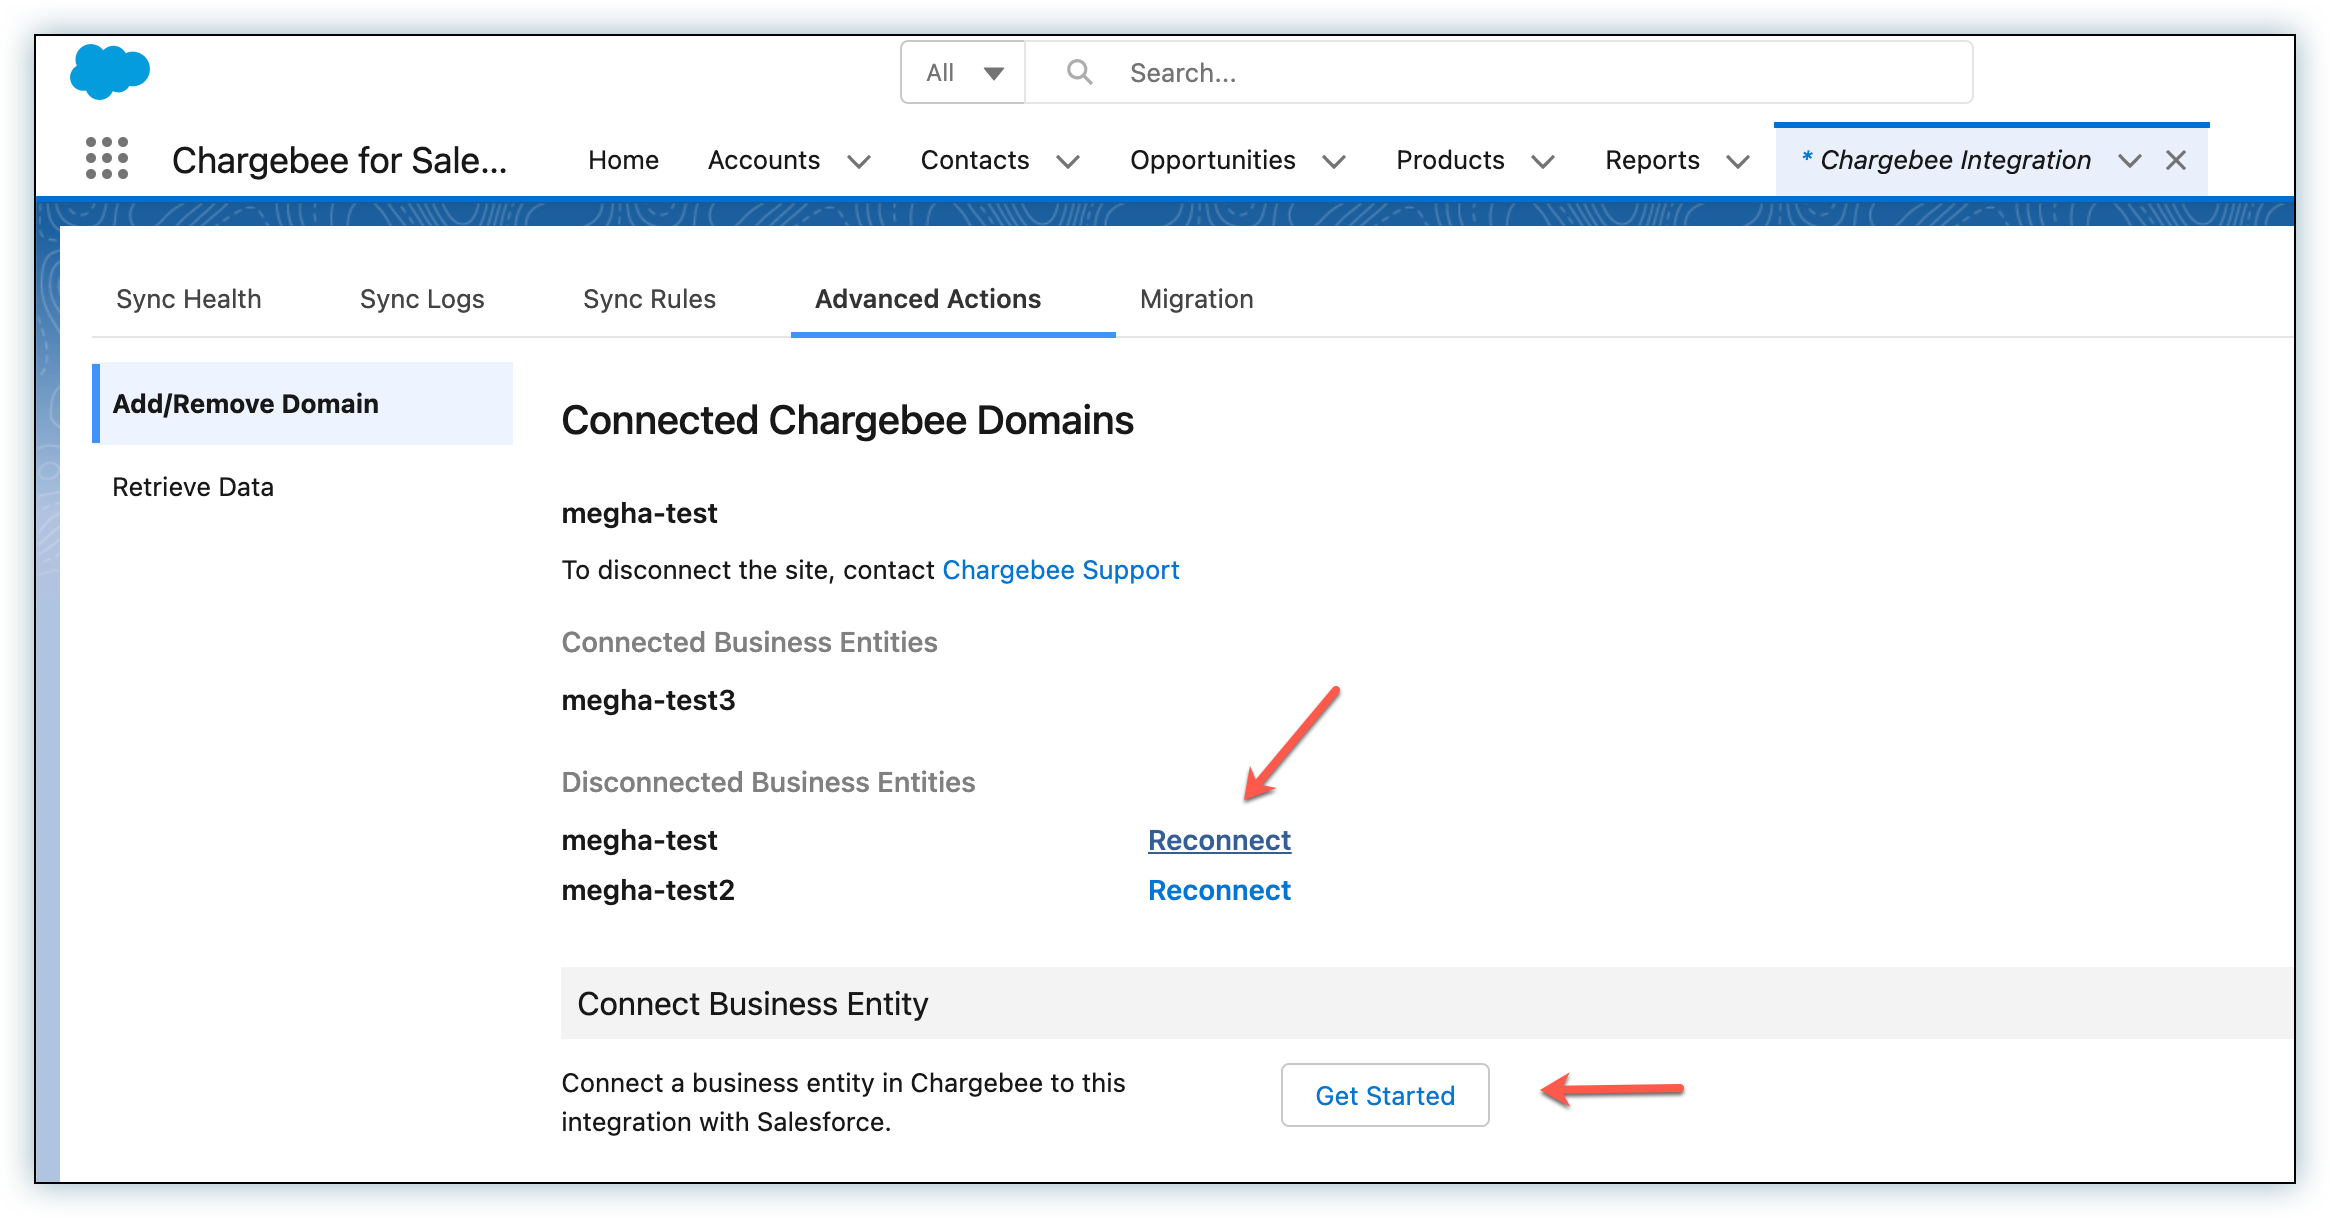
You can unlink an integration by clicking the Unlink Integration option. If you want to add a new Chargebee domain, click Get Started.
The Unlink Integration option is useful if you want to temporarily disconnect the integration for some reason. 'Unlinking' does not clear any Chargebee data on Salesforce, but it will clear the stored Chargebee API key and remove scheduled sync jobs for the connected Chargebee site.
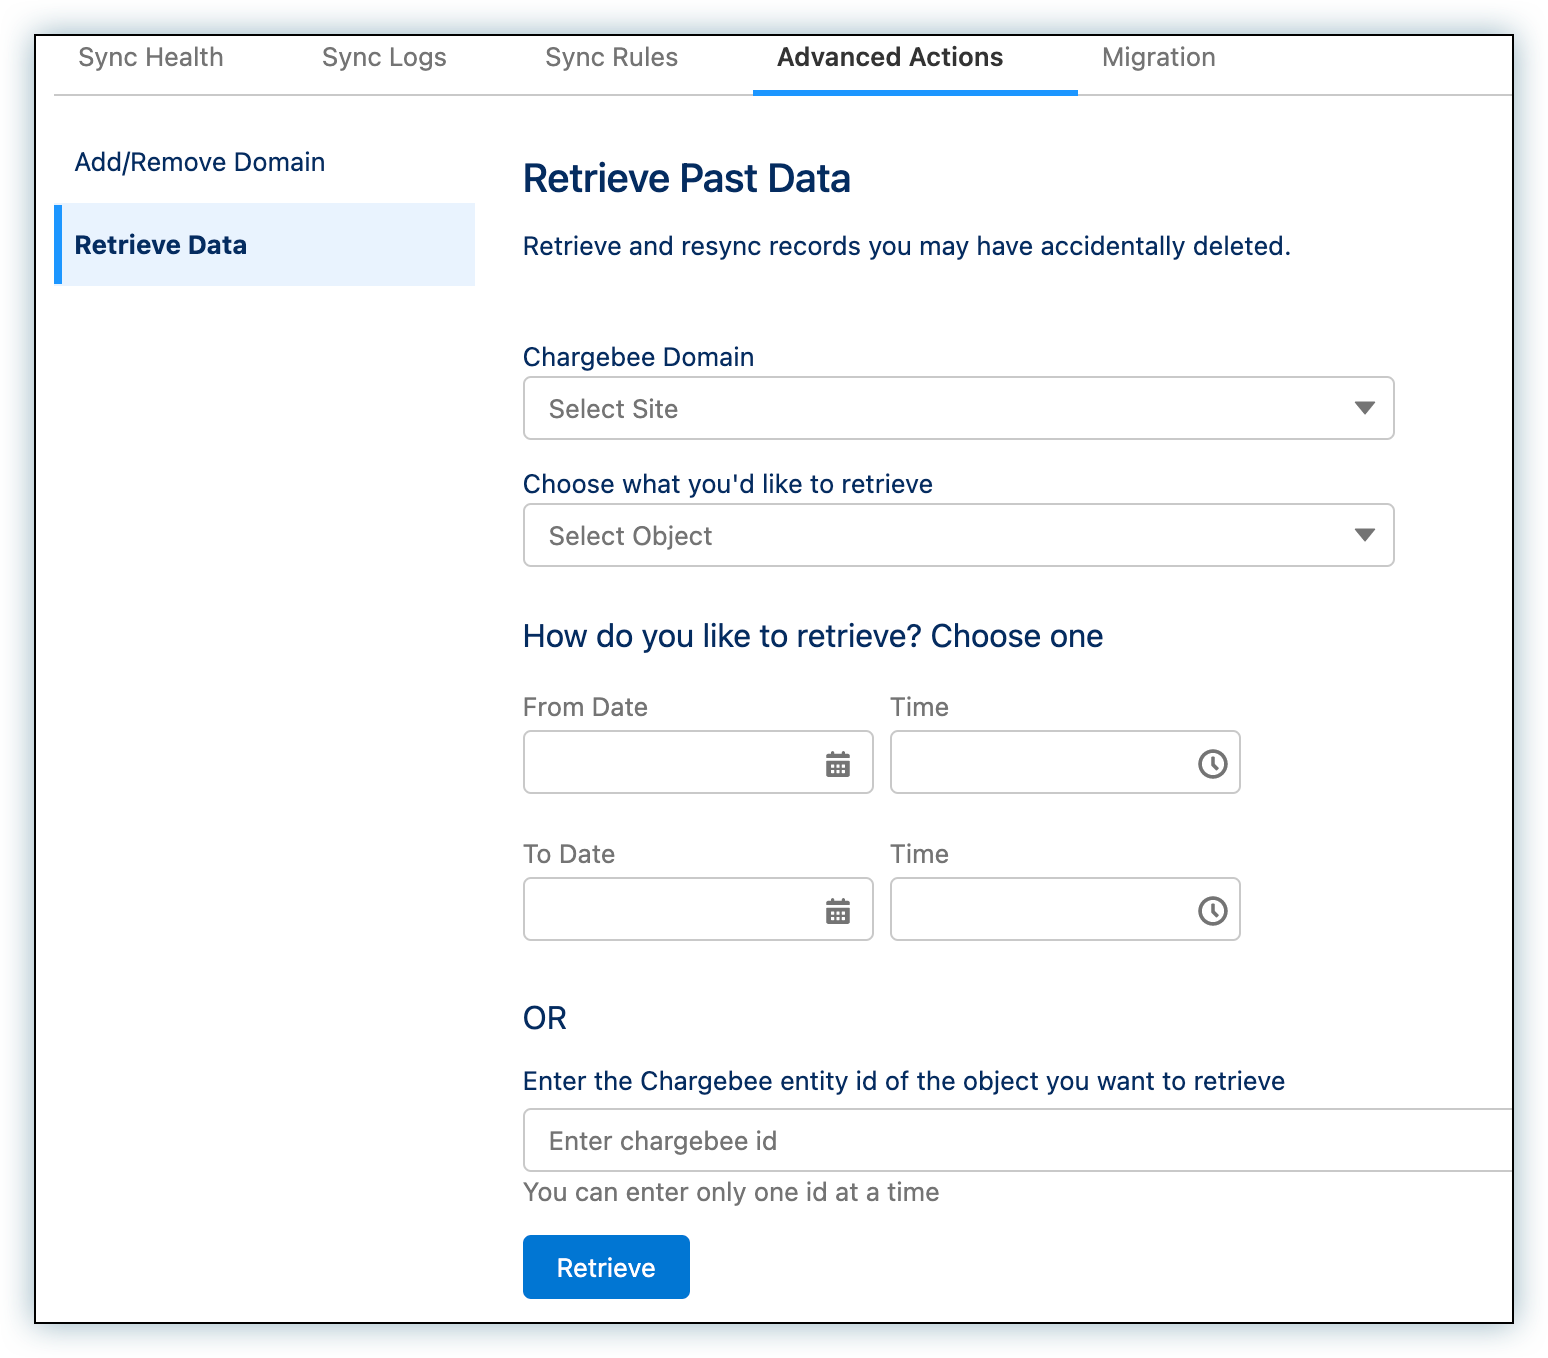
Retrieve Data
When records synced from Chargebee have been accidentally deleted or need to be resynced due to any other reason, use the options in the Retrieve Data tab to do so. You can do one of the following:
- Retrieve records all records that were last updated within a time range.
- Retrieve a specific record based on the record id in Chargebee.
The following Chargebee objects are supported:
- Plans
- Addons
- Charges
- Coupons
- Customers
- Subscriptions
- Invoices
- Credit Notes
- Quotes
Connect Business Entity
Chargebee allows you to connect to business entities that were not previously connected to your Salesforce org during the initial setup. You can select a single business entity at a time and configure sync rules for it.
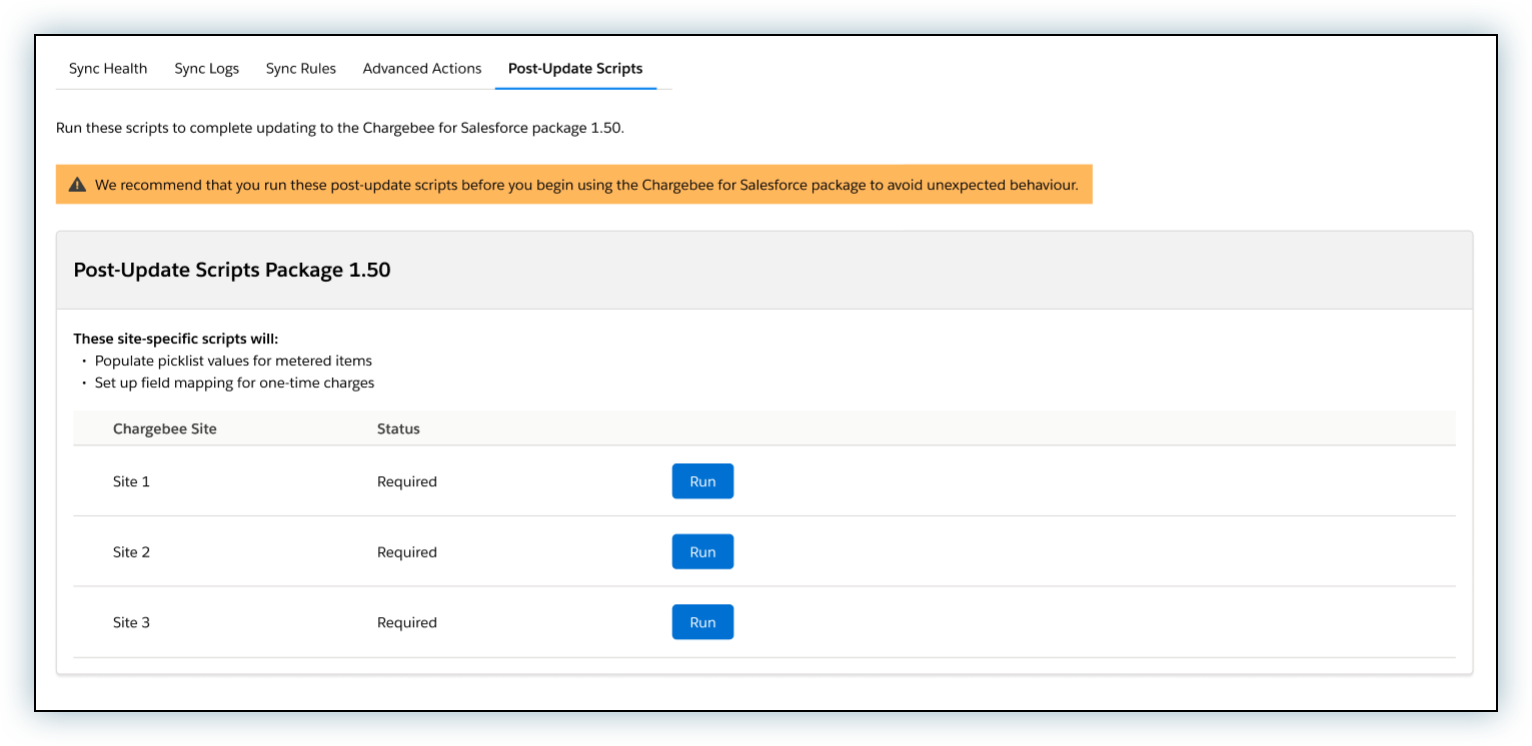
Post-Update Scripts
This section displays the required post-upgrade migration scripts for the newly upgraded Chargebee Salesforce integration package. The scripts will not appear if the package is up-to-date and no action needs to be taken.
You can perform the following actions:
- Initiate the migration.
- Review the error messages encountered during the migration and retry the process.
- Check the success or failure of the migration.
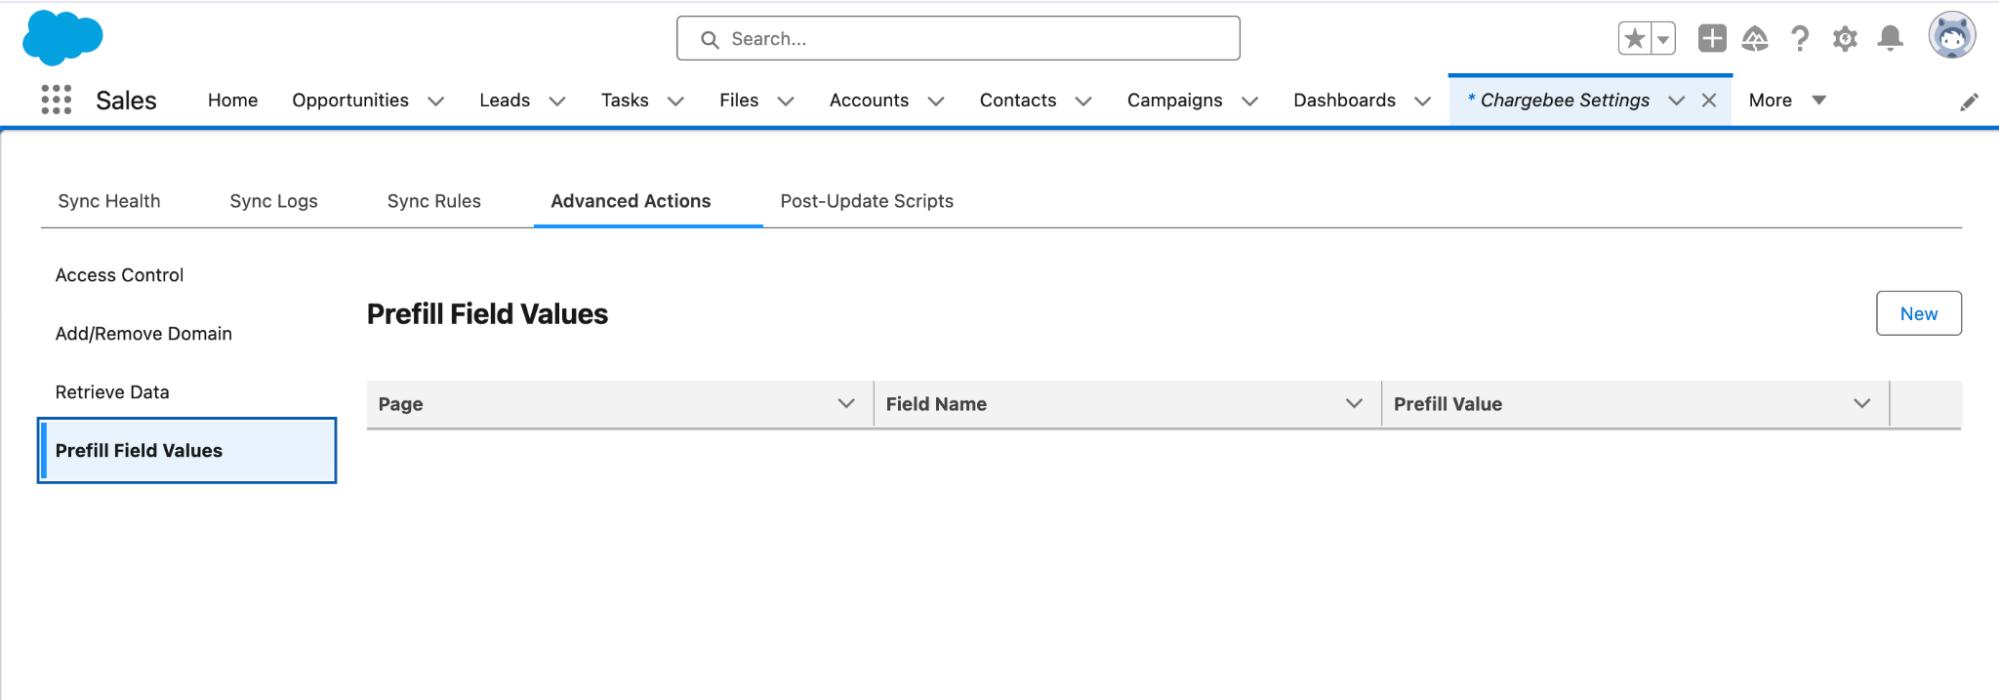
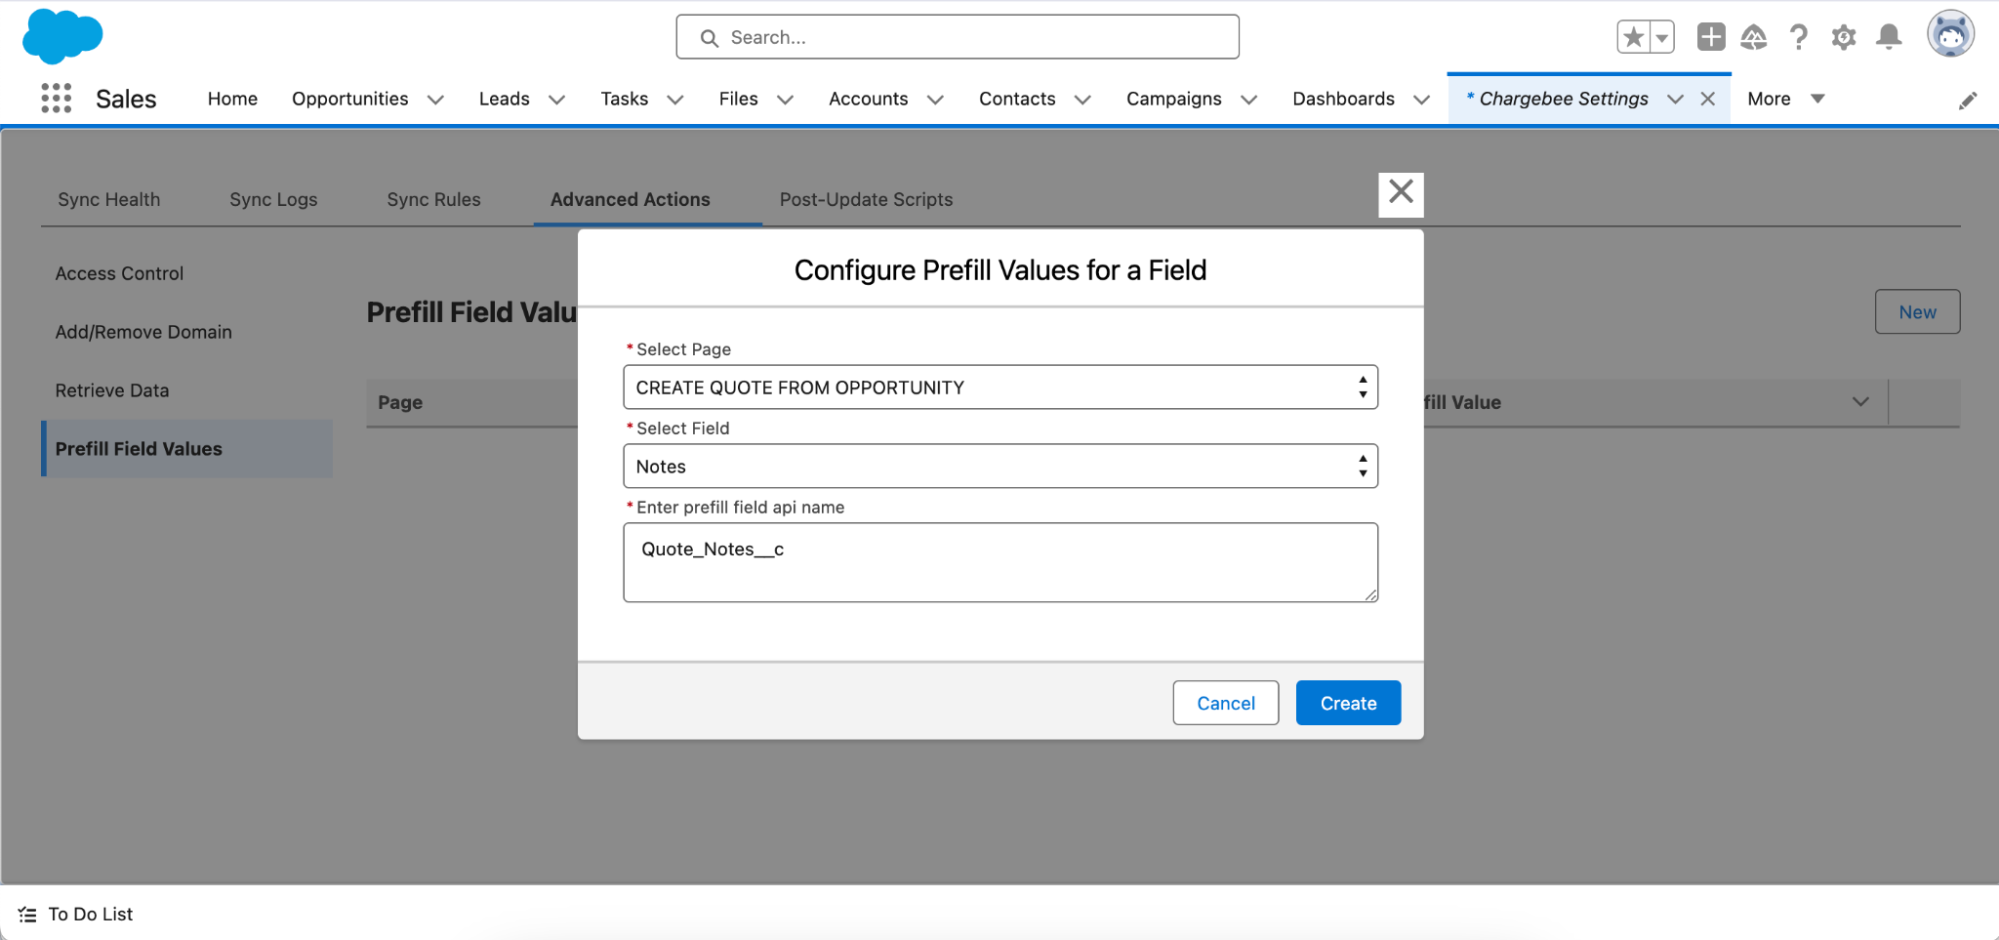
Prefilled Field Values
This option allows you to prefill the Quote Notes section on the Chargebee Quote Visualforce Page using a custom field from the Opportunity level in Salesforce. Follow the steps below to configure.
-
Identify the Opportunity Field API: Locate the custom field on the Opportunity that you want to use for prefilling Chargebee Notes Field and copy its API name, for example
Quote_Notes_c.
-
Access Chargebee Settings: Navigate to the Chargebee Settings in your Salesforce screen.
-
Add a New Advanced Action: Select Advanced Actions from the menu. Click New to create a new configuration.
-
Enter the Prefill Field API Name: In the Enter prefill field API name field, paste the API name of the Opportunity custom field you identified in Step 1.
-
Save the Configuration: Click Save to apply the changes.
-
Verify the Prefill Configuration: Create a new Chargebee Quote. The value from the selected Opportunity field (For example, Opportunity.Quote_Notes ) will now appear automatically in the CB Quote Notes field on the Chargebee Quote Visualforce Page.
Note
Currently, this feature supports only the CB Quote Notes field and the Create Quote screen. Additional fields or pages may be supported in future releases. Check release notes for updates.
Other Considerations
Data Validation
If you use picklists for fields in Salesforce then there are chances of sync errors if the Chargebee data flowing in, does not conform to the picklist options.
Example
Say a field country is a picklist in Salesforce with "United States" as an option. If the data coming in from the mapped Chargebee field happens to be "USA", it results in a sync error.
It is recommended that you:
- either ensure the synced fields on the Salesforce side are text fields and not picklists.
- or, if the Salesforce-side field is a picklist and the Chargebee-side field is a custom field, then see if the latter can be made into a dropdown custom field.
Considerations when using Account Hierarchy
- Account Hierarchy as a feature exists separately in both Salesforce and Chargebee. You can sync an account hierarchy relationship that's set in Salesforce over to Chargebee.
- When a Chargebee invoice or credit note is synced to Salesforce, it is linked to the account that corresponds to the invoice owner in the Account Hierarchy in Chargebee. For example, if say, Acme-Asia is invoiced for all charges incurred by Acme-India, then though a subscription shows up as related to Acme-India, the invoice for it (and any credit notes) would be related to Acme-Asia.
- Also see notes under the following Chargebee actions in Salesforce:
Chargebee to Salesforce Sync Logs
The Chargebee to Salesforce Sync Log allows you to review records syncing between Chargebee and Salesforce. This log provides details on whether a record has successfully synced and the type of entity involved.
Note
How to View the Sync Logs
- After a sync has completed, go to the CB Sync Logs object in Salesforce.
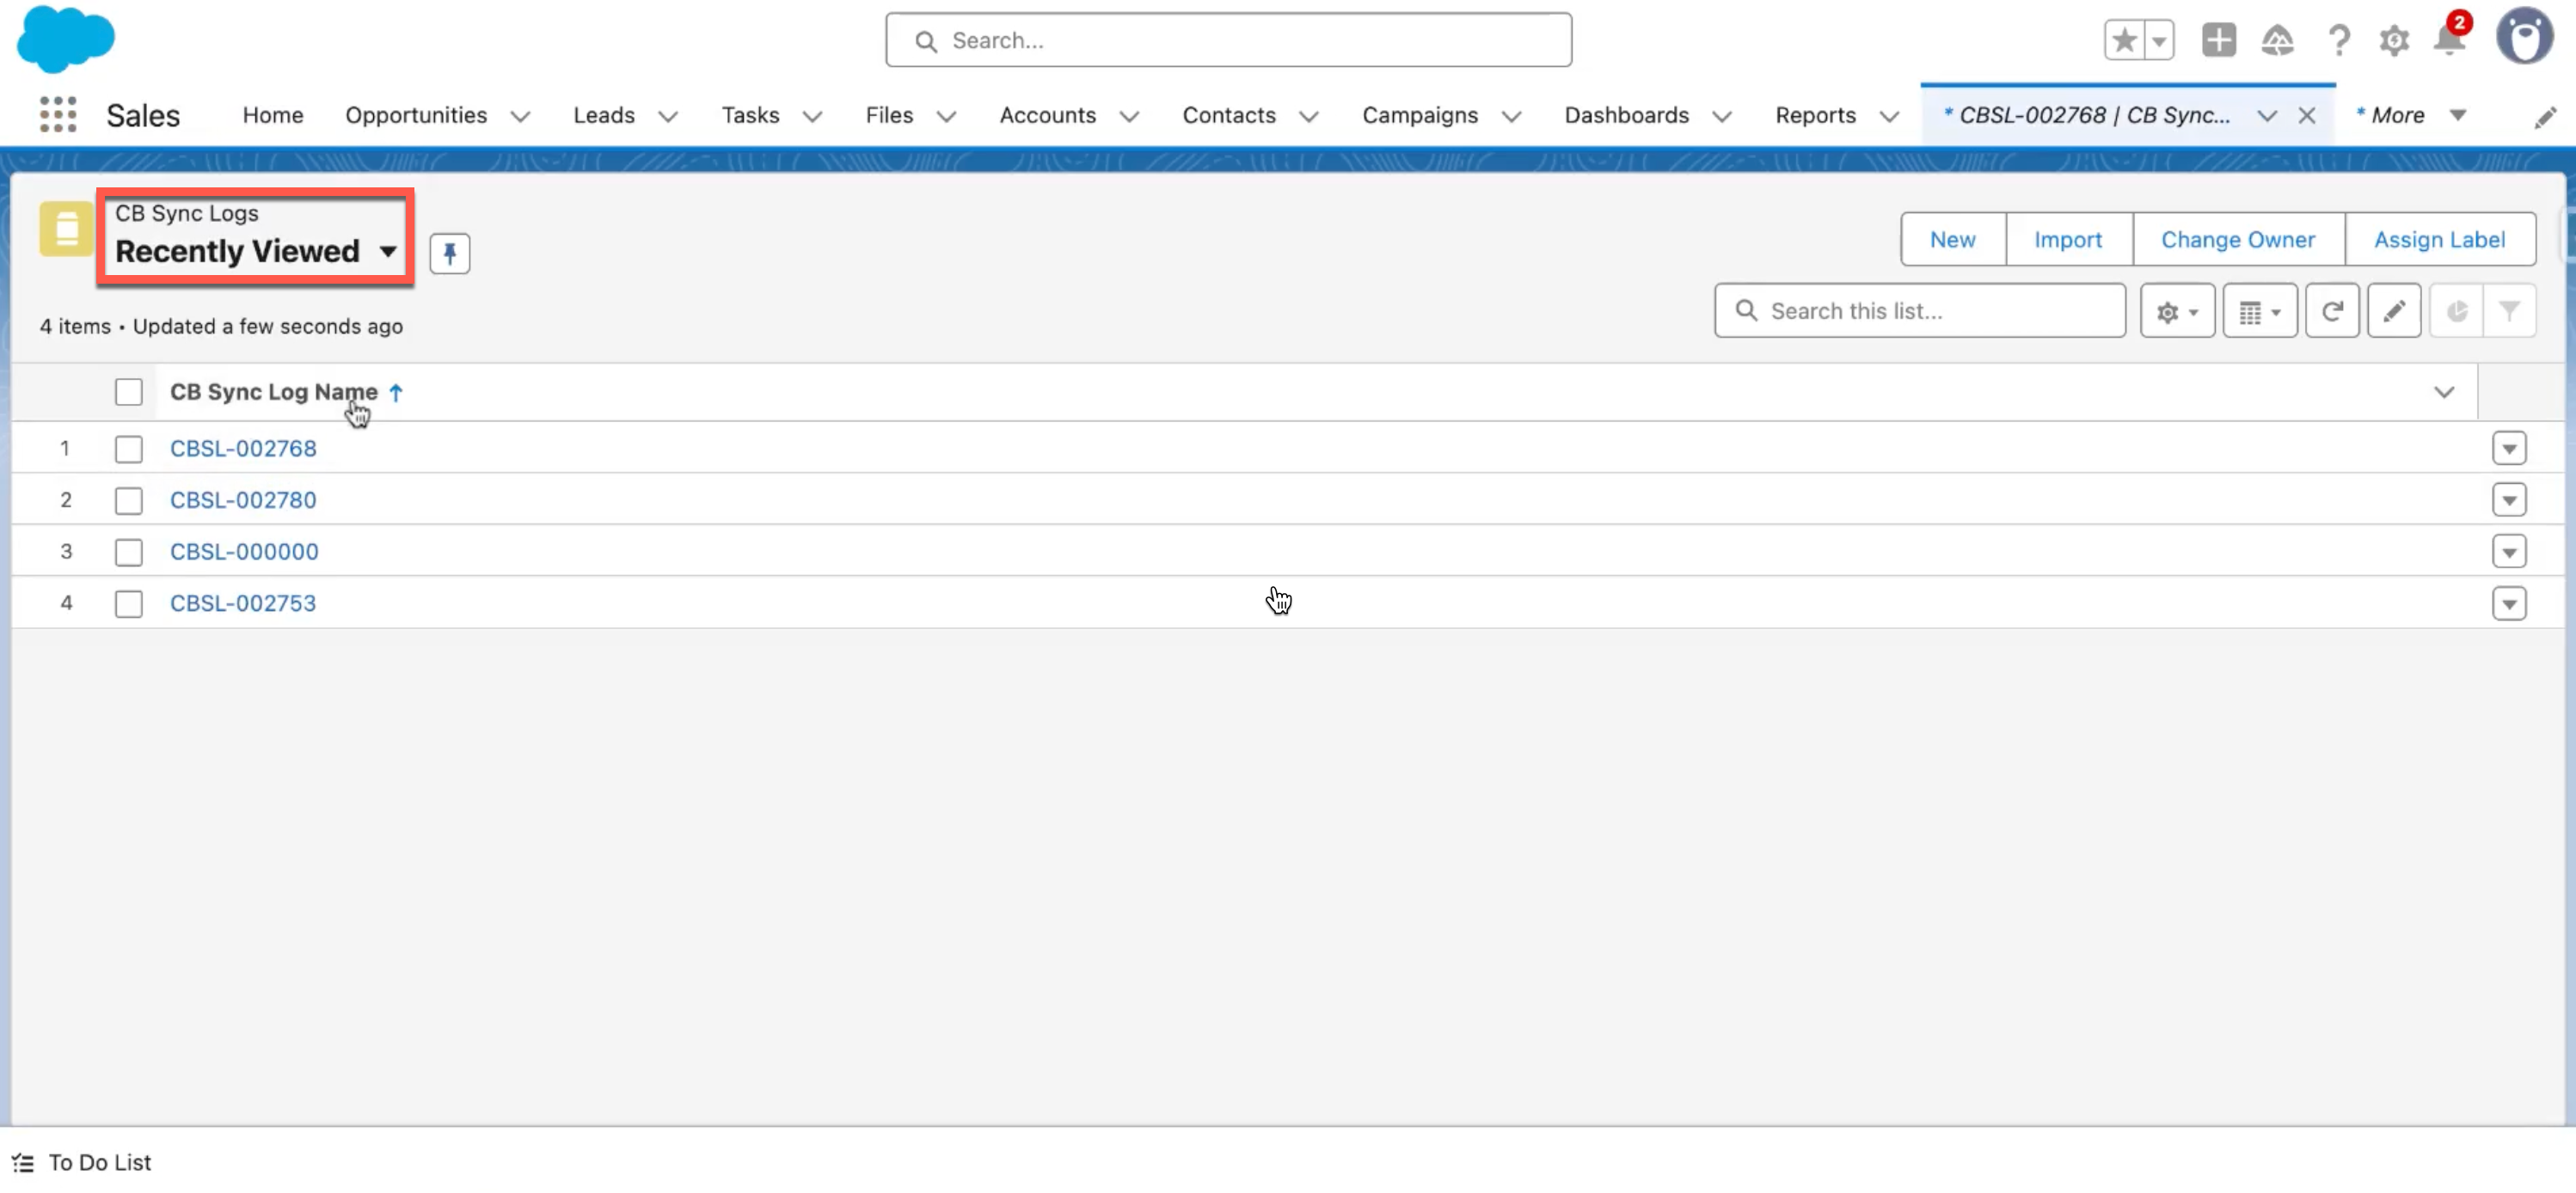
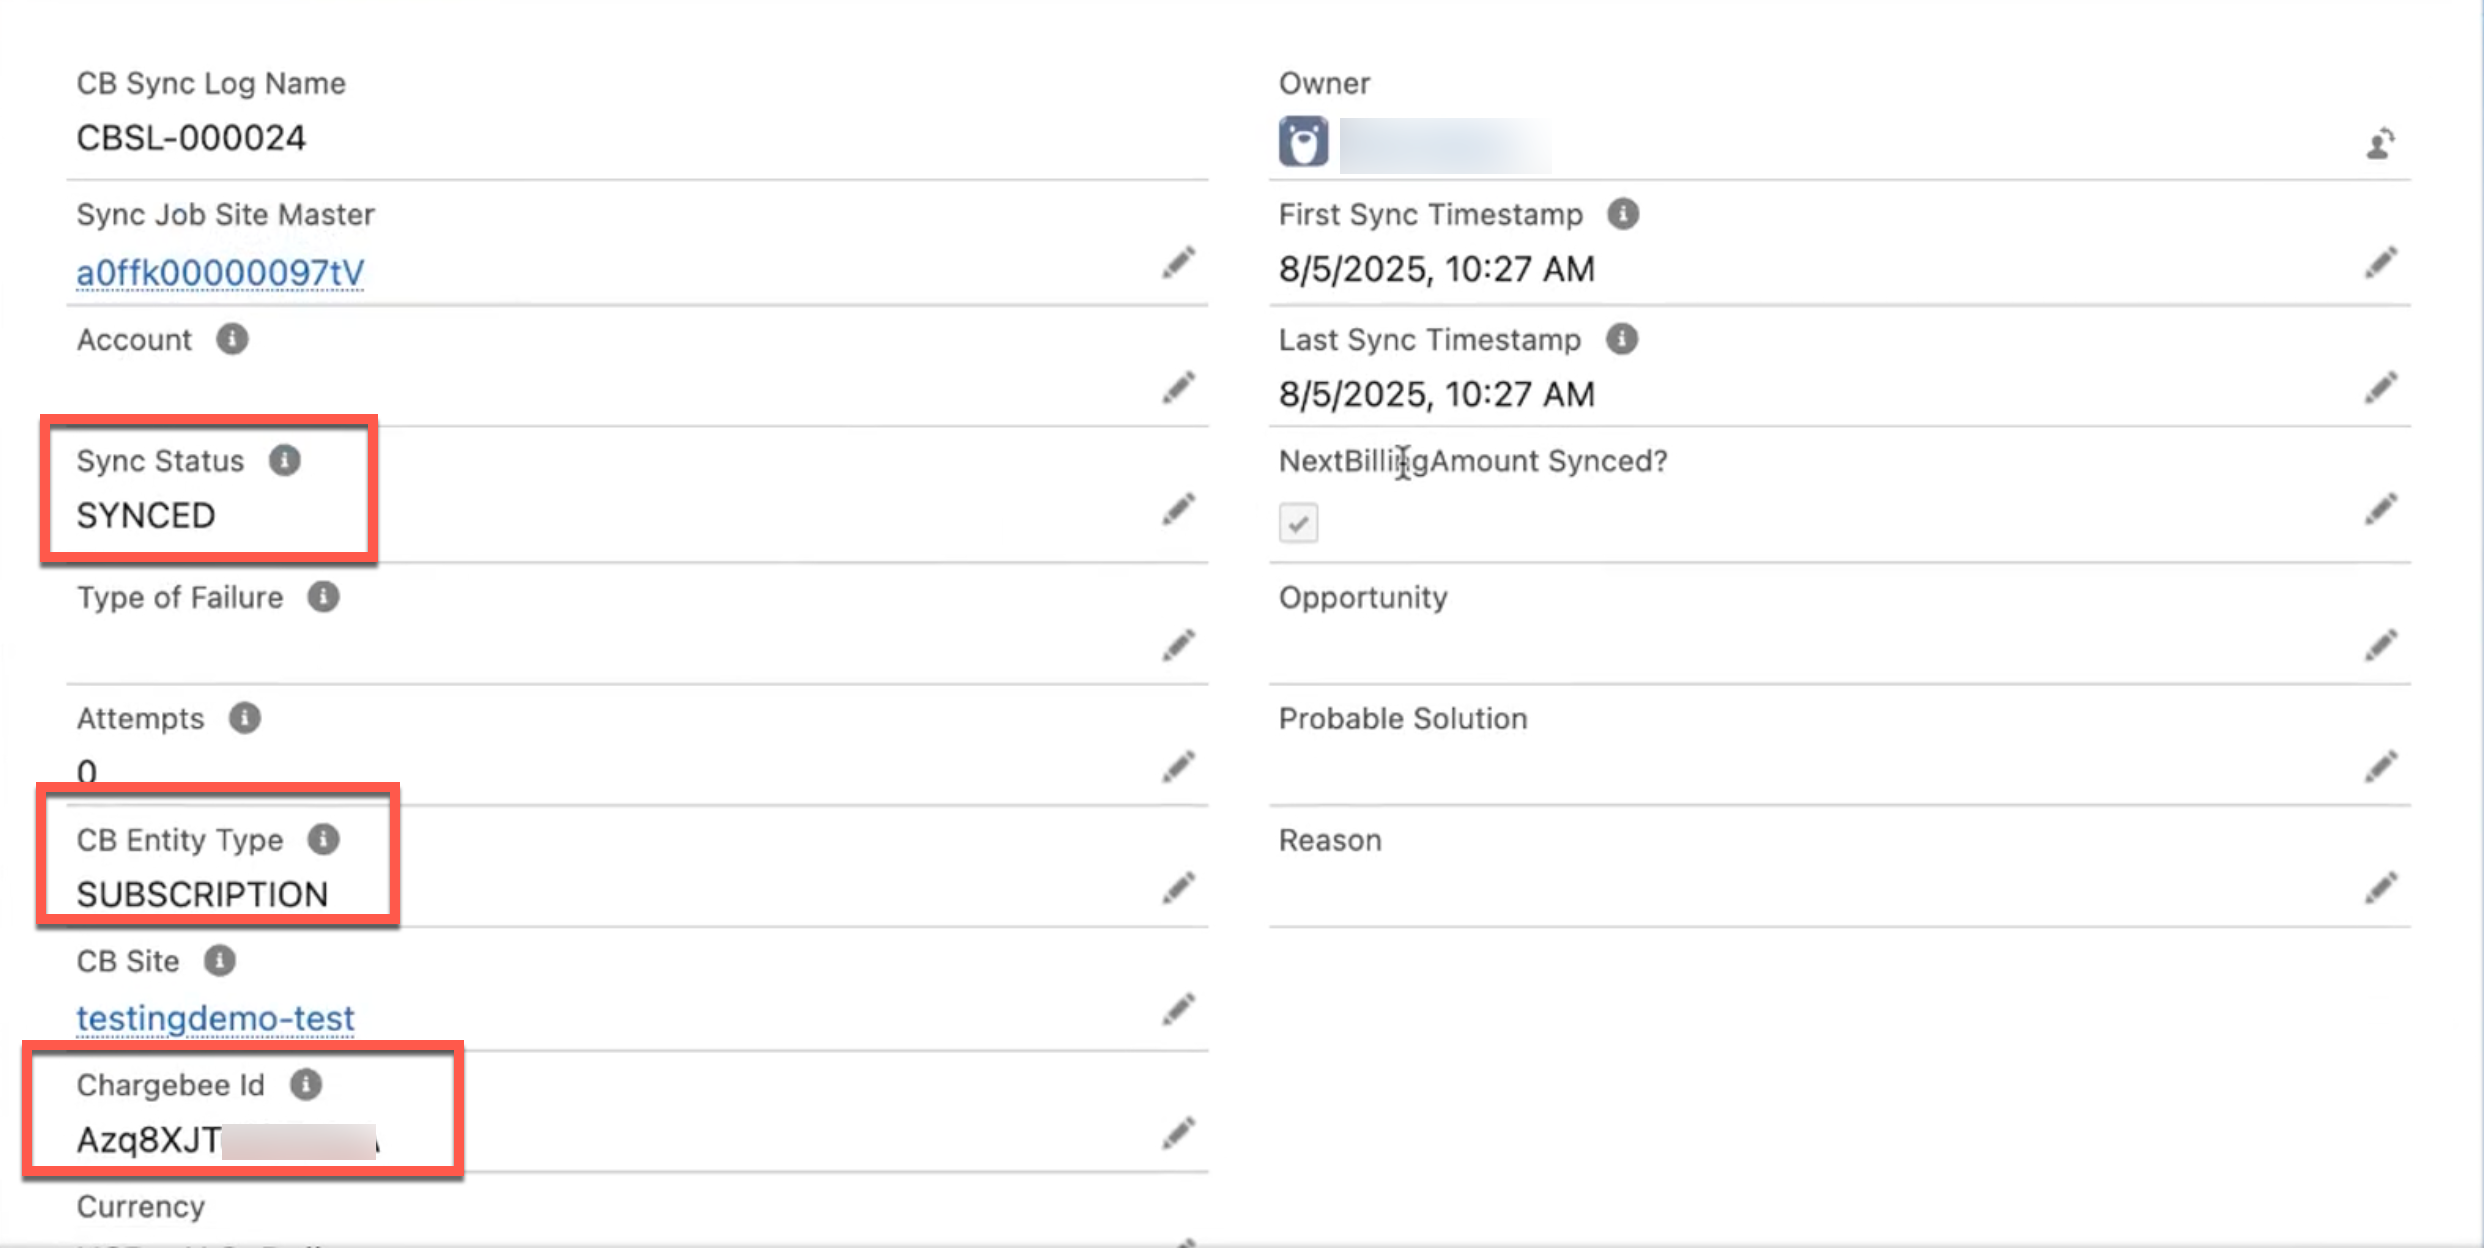
- Create or update a list view to ensure the following fields are displayed:
- 2(a) Sync Status
- Synched
- Not Synced
- Deleted
- Migration Failed
- 2(b) CB Entity Type
- PLAN
- ITEM
- ITEM_PRICE
- ADDON
- SUBSCRIPTION
- CUSTOMER
- INVOICE
- COUPON
- CREDITNOTES
- QUOTE
- RAMP
- PRICE_VARIANT
- 2(c) Chargebee ID
- 2(a) Sync Status
Ramps in Salesforce
Note
Ramps is currently in the Chargebee EAP Program, please reach out to eap@chargebee.com to have this enabled on your Chargebee site, ensure you're on version 1.60+ an above. Once Ramps are enabled within Chargebee, a sync from the Salesforce integration must be completed before they can be used from Salesforce.
Features currently available
-
Unified Workflow for Subscription and Ramps: Create subscriptions and define ramps seamlessly in a single workflow.
-
Enhanced Subscription Management UI: Easily create or update subscriptions using the intuitive subscription management interface.
-
Ramp Details in Salesforce: Salesforce objects store ramp-related details, enabling integration with PDFs, eSignatures, reporting, and automation through Flows.
-
Ramp Synchronization: Automatically sync ramps from Chargebee to the Chargebee Subscription Object in Salesforce for up-to-date data.
-
Ramp Management in Salesforce: Manage ramps directly from the Chargebee Subscription Object in Salesforce with the following actions:
-
View Existing Ramps: Access and review ramps already associated with the subscription.
-
Remove Existing Ramps: Remove outdated or unnecessary ramps.
-
Add New Ramps: Add additional ramps as needed to meet customer requirements.
-
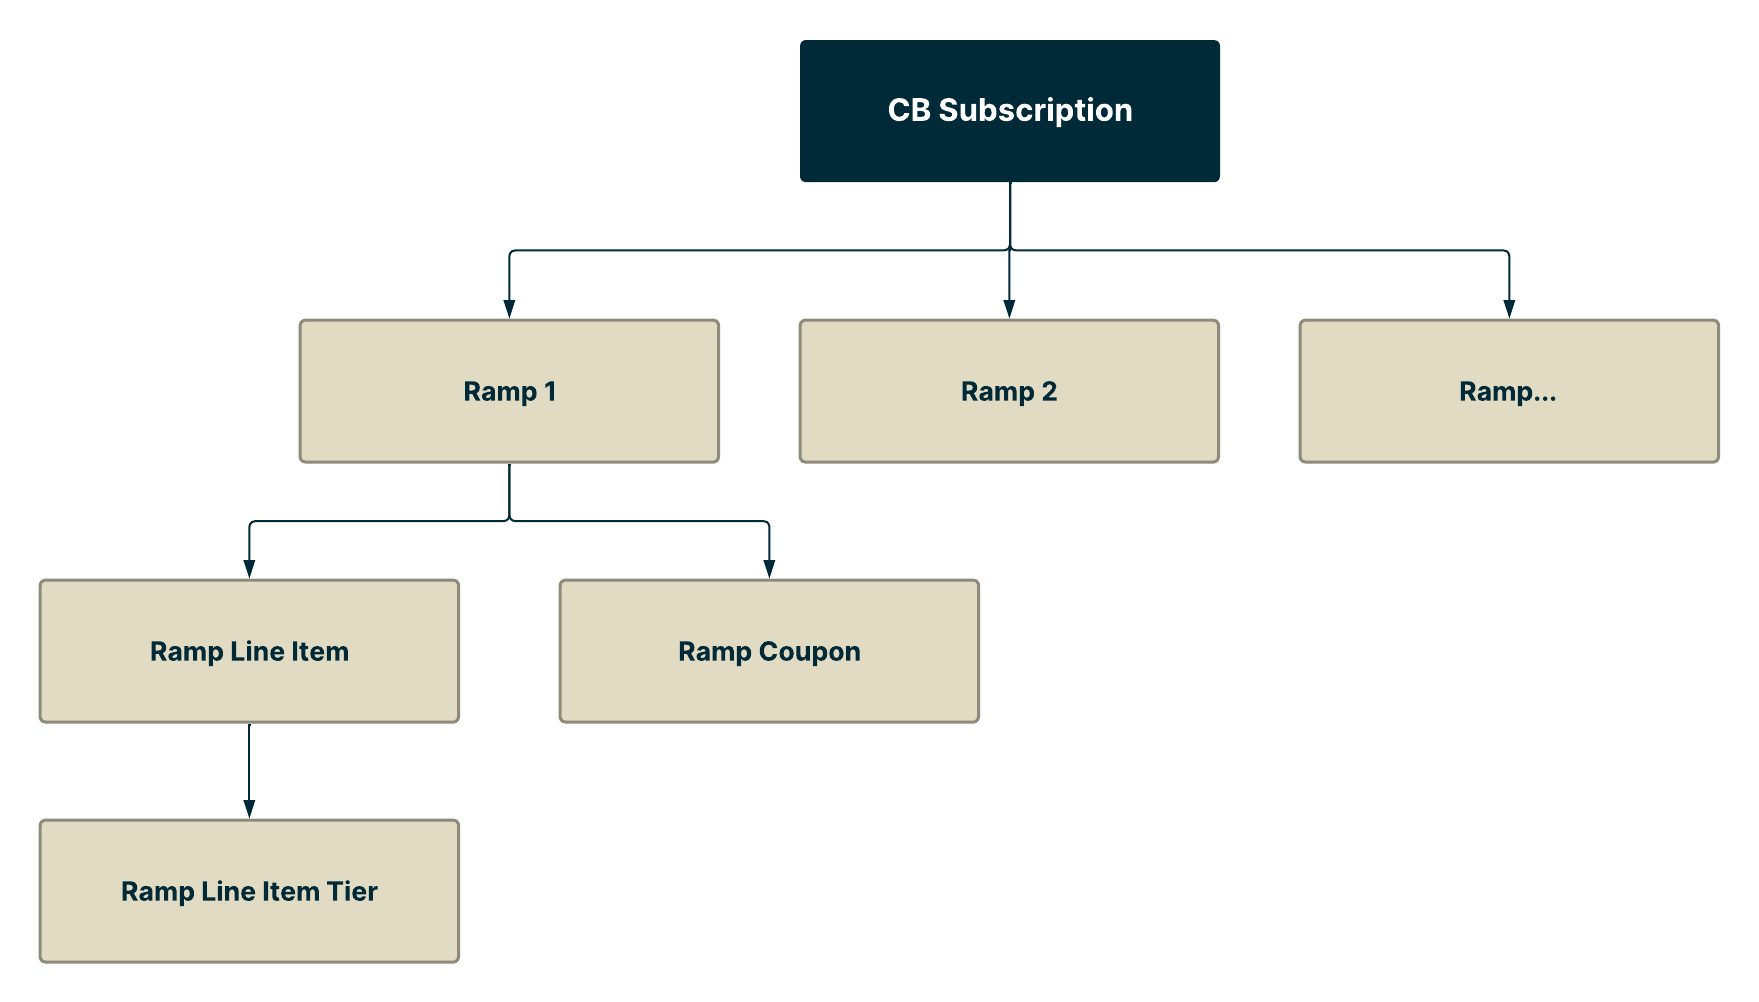
Ramp object structure
With the introduction of Ramp Pricing to the Chargebee-Salesforce integration, new objects have been added to support this feature effectively:
-
CB Ramp: Represents the ramp structure within a subscription.
-
CB Ramp Line Item: Stores details of individual line items, including product information.
- CB Ramp Line Item Tier: Captures tier-specific details for line items.
-
CB Ramp Coupon: Holds information about coupons applied to the ramp.
-
For a comprehensive overview of field mapping between Chargebee and Salesforce for these objects, refer to the Salesforce Field Mapping page.
Limitations
-
Existing ramps cannot be modified directly. To make adjustments, the ramp must be removed and re-added.
-
Chargebee Quoting does not yet support Ramps
-
The Create/Change Subscription screen only supports adding new ramps. It does not allow modifications to existing ones.
-
Pausing a subscription automatically removes all associated ramps. When the subscription is resumed, the ramps need to be re-added manually.
Articles & FAQs
Was this article helpful?