New in Chargebee: Explore Reveal and understand your payment performance end-to-end.Try Now
Docschargebee docs
HomeBillingPaymentsRevRecGrowthReveal
Support

Product Updates


  • Release Notes

Getting Started


  • Overview
  • Chargebee Billing Data Centers
  • Object Relationship Model
  • Understanding Sites
  • Chargebee Tech Glossary
  • Articles and FAQ

Implementing Chargebee


  • Implementation Guide
  • Go-live Checklist
  • Articles and FAQ

AI in Chargebee


  • Chargebee Agents
  • Chargebee Copilot
  • Chargebee MCP Server (Model Context Protocol)

Developer Resources


  • Developer Resources Overview
  • Articles and FAQ

Product Catalog


  • Product Catalog Overview
  • Coupons
  • Articles and FAQ

Subscriptions


  • Working with Subscriptions
  • Billing
  • Orders
  • Articles and FAQ

Customers


  • Managing Customers
  • Account Hierarchy
  • Email Notifications
  • Branding
  • Configure Multiple Languages
  • Articles and FAQ

Entitlements


  • Entitlements Overview
  • Features Overview
  • Feature Management
  • Managing Product Entitlements
  • Subscription Entitlements
  • Customer Entitlements
  • Grandfathering Entitlements
  • Articles and FAQ

Usage Based Billing


  • Understanding Usages
  • Setting up Usage Based Billing
  • Usage Alerts
  • Metered Billing
  • Articles and FAQ

Chargebee CPQ


  • Chargebee CPQ
  • Chargebee CPQ for Salesforce
  • Chargebee CPQ for HubSpot

Invoices, Credit Notes, and Quotes


  • Invoices
  • Credit Notes
  • Quotes [Legacy]
  • Transactions
  • Articles and FAQ

Taxes


  • Overview
  • Configuring Taxes
  • Country-specific Taxes
  • Articles and FAQ

Hosted Capabilities


  • Overview
  • Hosted Checkout
  • Hosted Self-Serve Portal
  • Hosted Pages Features
  • Additional Hosted Pages
  • Payment Components
  • Pricing Table
  • Managing Payments with Chargebee.js
  • Mobile-Optimized Hosted Pages
  • Articles and FAQ

Site Configuration


  • Users & Roles
  • Custom Fields & Metadata
  • Approvals
  • Mandatory Fields
  • File Attachments & Comments
  • Advanced Filter Options
  • Multicurrency Pricing
  • Multi-decimal Support
  • Configuring Reason Codes
  • Events and Webhooks
  • API Keys
  • Time Zone
  • Time Machine
  • Transfer Configurations
  • Articles and FAQ

Multi Business Entity


  • Multi Business Entity Overview
  • Customer Transfer Overview
  • Articles and FAQ

Mobile Subscriptions


  • Overview
  • Omnichannel Subscriptions
  • Omnichannel One-Time Orders
  • Mobile Subscriptions (Legacy)

Reports and Analytics


  • RevenueStory
  • Home Dashboard
  • Frequently Asked Questions
  • FAQs for Classic Reports Sunset
  • Articles and FAQ

Integrations


  • Sales
  • Customer Support and Success
  • Finance
    • QuickBooks Online
    • Xero
    • Sage Intacct
      • Pre-implementation Settings in Sage Intacct
      • Configuring Sage Intacct
      • Record Mapping in Sage Intacct
      • Sync Log Dashboard for Sage Intacct
      • Sales Order Invoice object mapping
      • Accounts Receivable Invoice object mapping
    • Oracle NetSuite
  • Tax
  • eInvoicing
  • Marketing
  • Stitch
  • Collaboration
  • Contract Management
  • Ecommerce Management
  • Articles and FAQ

Data Privacy & Security


  • Two Factor Authentication
  • SAML Single Sign-On
  • System for Cross-Domain Identity Management (SCIM)
  • EU-GDPR
  • Consent Management
  • Personal Data Management
  • Compliance Certificates
  • HIPAA Guidelines
  • PCI Recommendations and Integration Types
  • Articles and FAQ

Data Operations


  • Bulk Operations
  • Migration
  • Articles and FAQ
  1. Billing
  2. Integrations
  3. Finance
  4. Sage Intacct
  5. Record Mapping in Sage Intacct
  1. Billing
  2. Integrations
  3. Finance
  4. Sage Intacct
  5. Record Mapping in Sage Intacct

Record Mapping in Sage Intacct

Chargebee provides you with a user-friendly interface for managing Object-to-Record mapping. This feature streamlines tasks such as migration and correcting mapping errors, reducing your dependency on Chargebee support and significantly speeding up your processes. This enhancement alleviates bottlenecks, ensuring smoother transitions and error resolutions. Consequently, you may experience increased satisfaction, and your support requests will be minimized, fostering a more seamless user experience.

This feature enhancement addresses your daily needs and pain points by enabling you to manage record mapping through an intuitive user interface.

Key benefits include:

  • Migrating smaller batches of data at your convenience

  • Correcting incorrect record mappings post-migration

  • Reducing your dependency on support for routine mapping tasks

Setting up the Record Mapping feature

Step 1: Set up the Integration

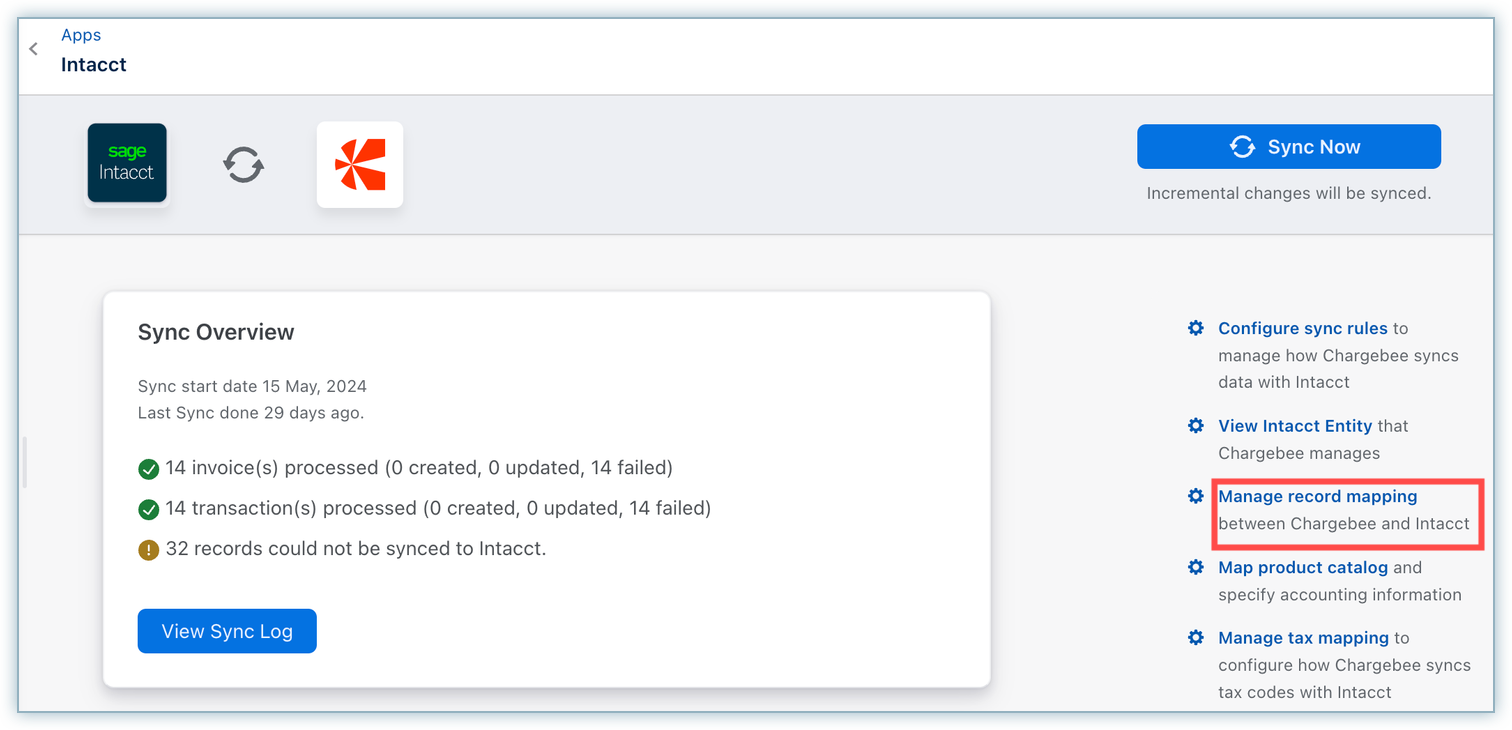
  • Log into your Chargebee site.
  • Navigate to Apps > Sage Intacct.
  • Go to the Manage Intacct Integration page and click the Manage Record Mapping button on the right side of the navigation bar, as shown below.
    image

Step 2: Map Objects Between Chargebee and Intacct

  • Once you click the Manage Record Mapping button, you will be redirected to this page.
  • Select the object type (customers, invoices, credit notes, or transactions) for mapping from the drop-down menu.
    image
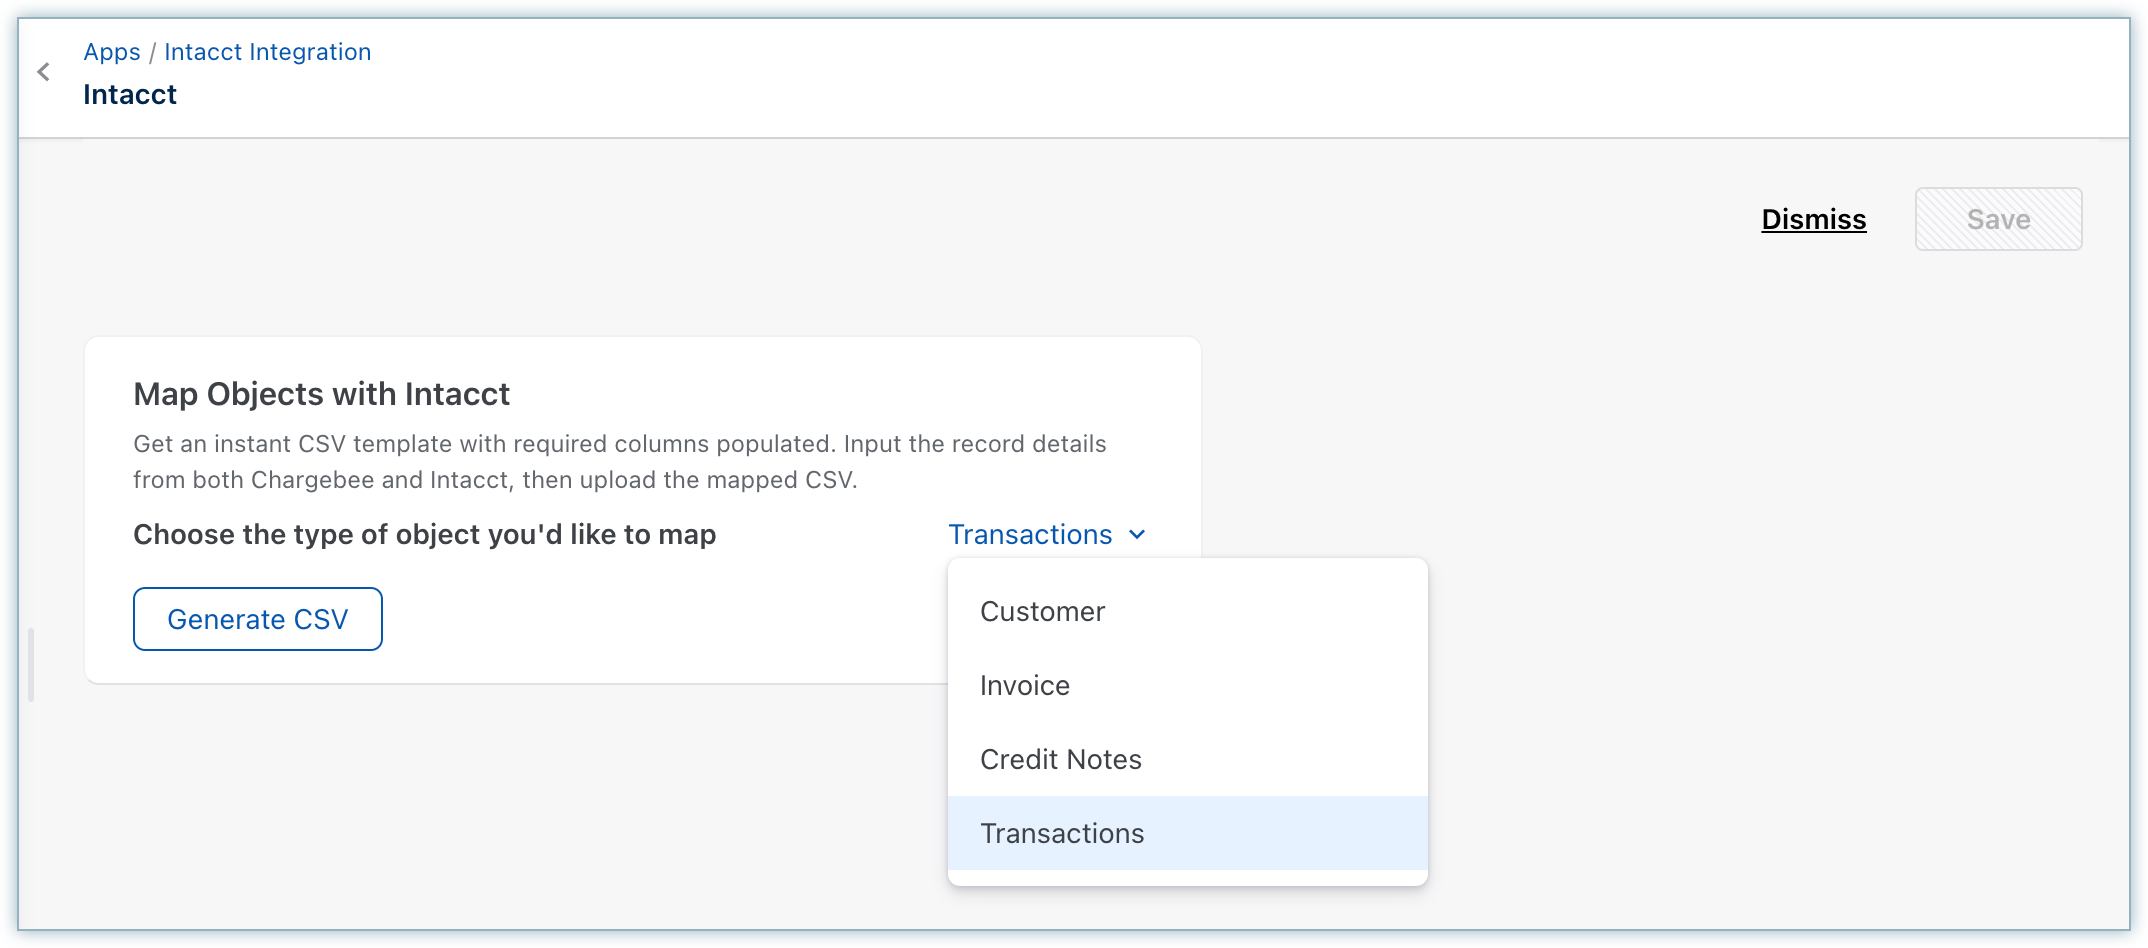
  • Click Generate CSV to generate a downloadable CSV file containing the record type and integration-based empty CSV template.
  • An empty CSV with the following headers is created:
    • Chargebee ID - Add the Chargebee Customer/Invoice/Credit Note/Transaction ID.
    • Intacct ID (enter only one of either):
      • Record ID (recommended) - Add the corresponding Customer/ARInvoice/Credit Memo/Payment/Refund visible on the Intacct UI as the identifier.
      • Intacct Record API ID - This refers to the the internal ID for that object in Intacct ("recordno"). You can retrieve this ID for a Customer/ARInvoice/Credit Memo/Payment/Refund using the Intacct API.
      image

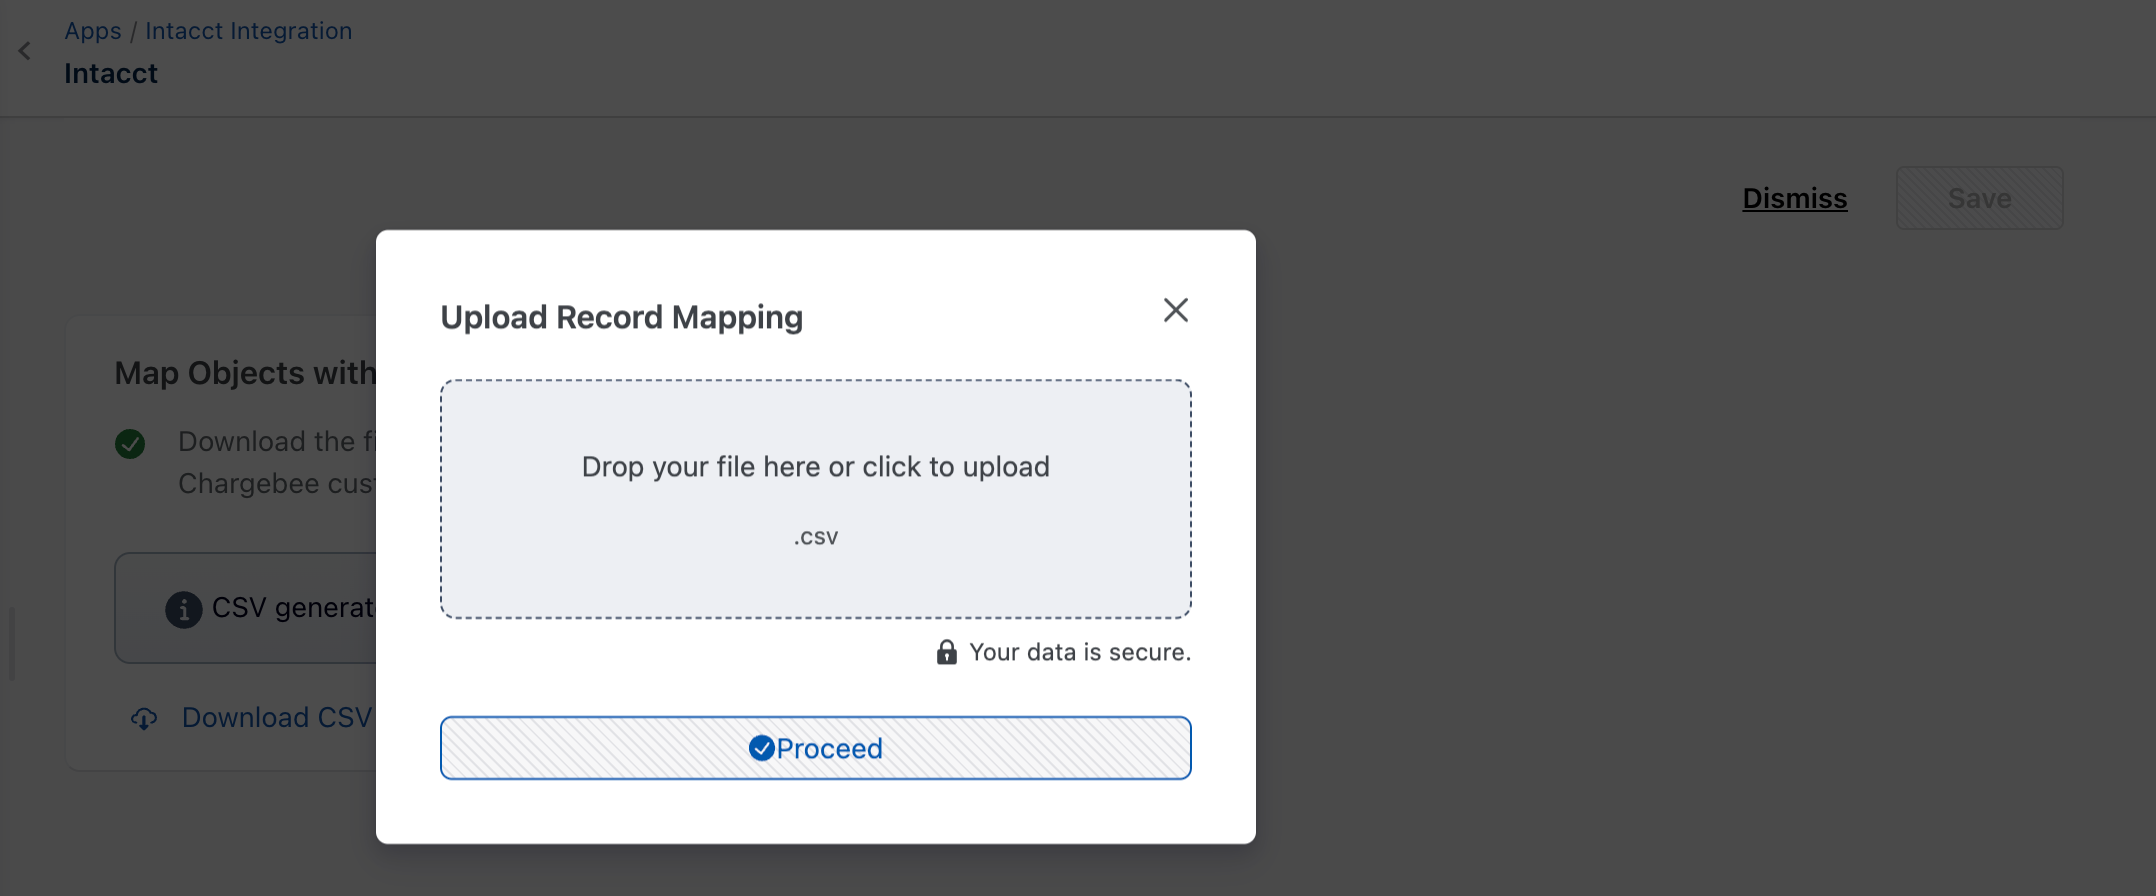
Step 3: Upload Record Mapping

  • You can upload the mapping changes to perform the following operations:
    • Basic validation of the data uploaded to the CSV file
    • Update for subsequent syncs
      image

Note

You can restart the mapping process from the beginning at any time by clicking Generate CSV again.

Step 4: Mapping Completion

  • After completing the mapping process:
    • You receive a confirmation.
    • The system displays the number of records successfully mapped, indicating the completion and success of the process.
      image
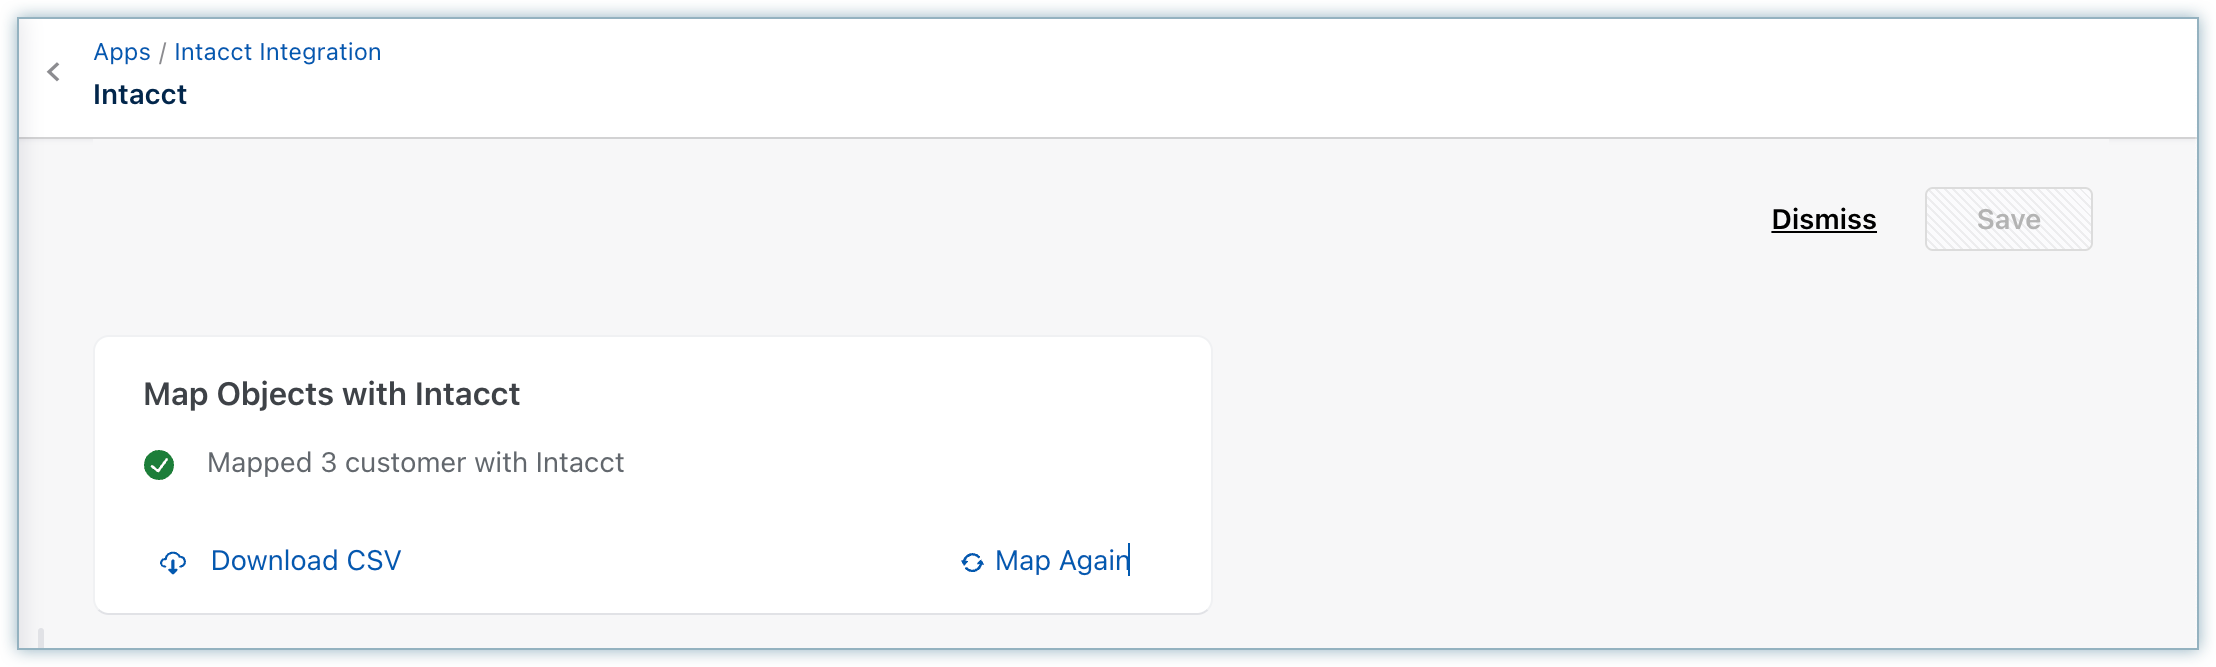
    • The system will include any errors in the provided data in a new CSV, which you can download by clicking the Download CSV button.
      image

Was this article helpful?