Configuring RevRec
Based on how you use Chargebee RevRec, our Support team will be in touch with you through the implementation and configuration steps. The following sections cover what you need to do to get started and configure any advanced settings as required.
Configuring Revenue Rules
Revenue rules in RevRec help manage the allocation of the transaction price and methods for revenue recognition. As per ASC 606, the total contract value must be allocated to each product sold in the contract, based on their relative standalone selling price.
After RevRec is enabled, you will have access to a RevRec environment where you can set up RevRec in the following two steps:
- Setting up Standard Rules
- Setting up Advanced Rules
Setting Up Standard Rules
By default, RevRec uses the selling price specified at the product level in the contract for allocation and applies the ratable recognition if a product is recurring, and point-in-time recognition if a product is not recurring.
| Transaction Price Allocation | Based on sales price - the price listed on the invoice at each sold product item level. |
| Recognition method | Recurring Product - Ratable Non Recurring Product - Point-in-time |
For Chargebee users, the sales prices, recurring, and non-recurring products are auto-synced and recognized in RevRec. If you use other third-party systems, the RevRec implementation support team will help you identify the data points for the setup.
Setting Up Advanced Rules
RevRec provides advanced revenue rule features to support more complicated contract arrangements, including more ways for transaction price allocation and additional recognition methods, such as the proportion performance method.
Contact revrec-support@chargebee.com to enable Advanced Rules on your RevRec site.
As part of the Advanced Rules, you can set up the following in RevRec:
- Standalone Selling Price (SSP)
- Revenue Recognition Rule
The Standalone Selling Price is the price at which you would sell a promised good or service individually to a customer. In the case of sole product order, the entire contract value is allocated to the single product. ASC 606 requires you to recognize revenue based on the delivery or transfer of the products and services. For example, revenue for a SaaS product should be recognized over the subscription period.
To see how this works, let's look at an example. Suppose you have sold a customer a bundled order with a total price of $10,000, as shown in the table below. RevRec will allocate the transaction price to each item in the order based on its stand-alone selling price, and then apply the respective revenue recognition rule based on the recognition rule configuration.

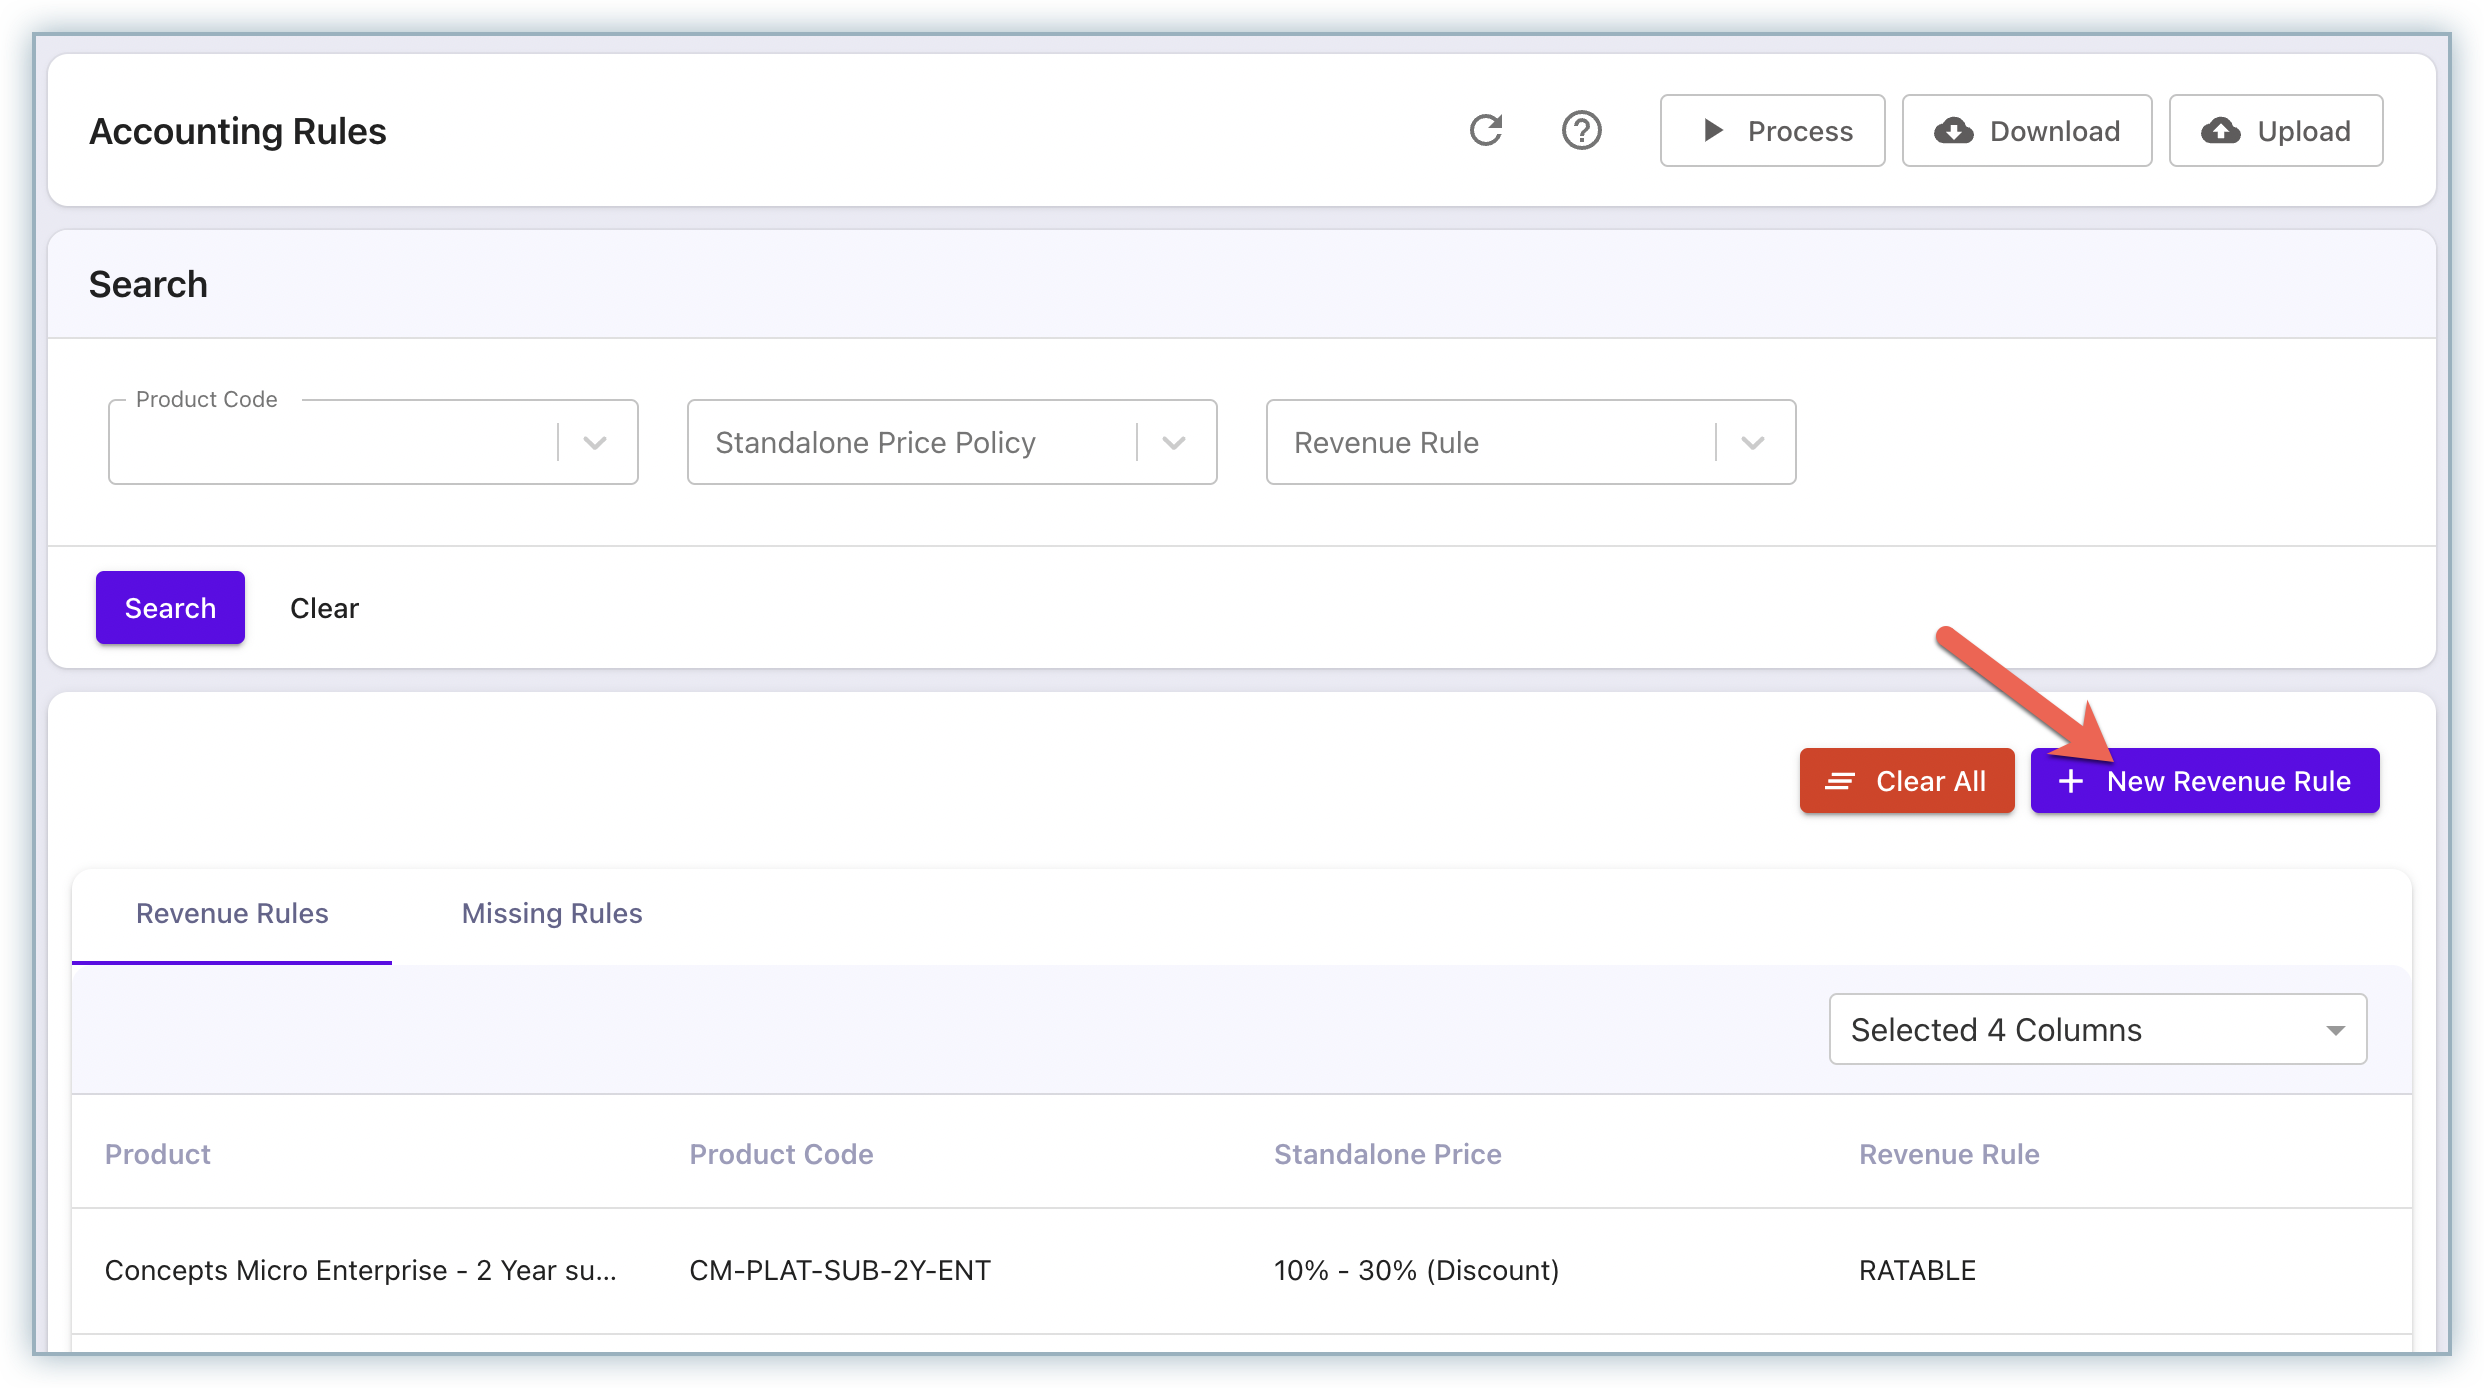
To configure a new SSP rule in your RevRec environment, follow these steps:
-
Click Settings > Configure > Configure Accounting Rules > Configure.
-
Click + New Revenue Rule and define your revenue rule settings.
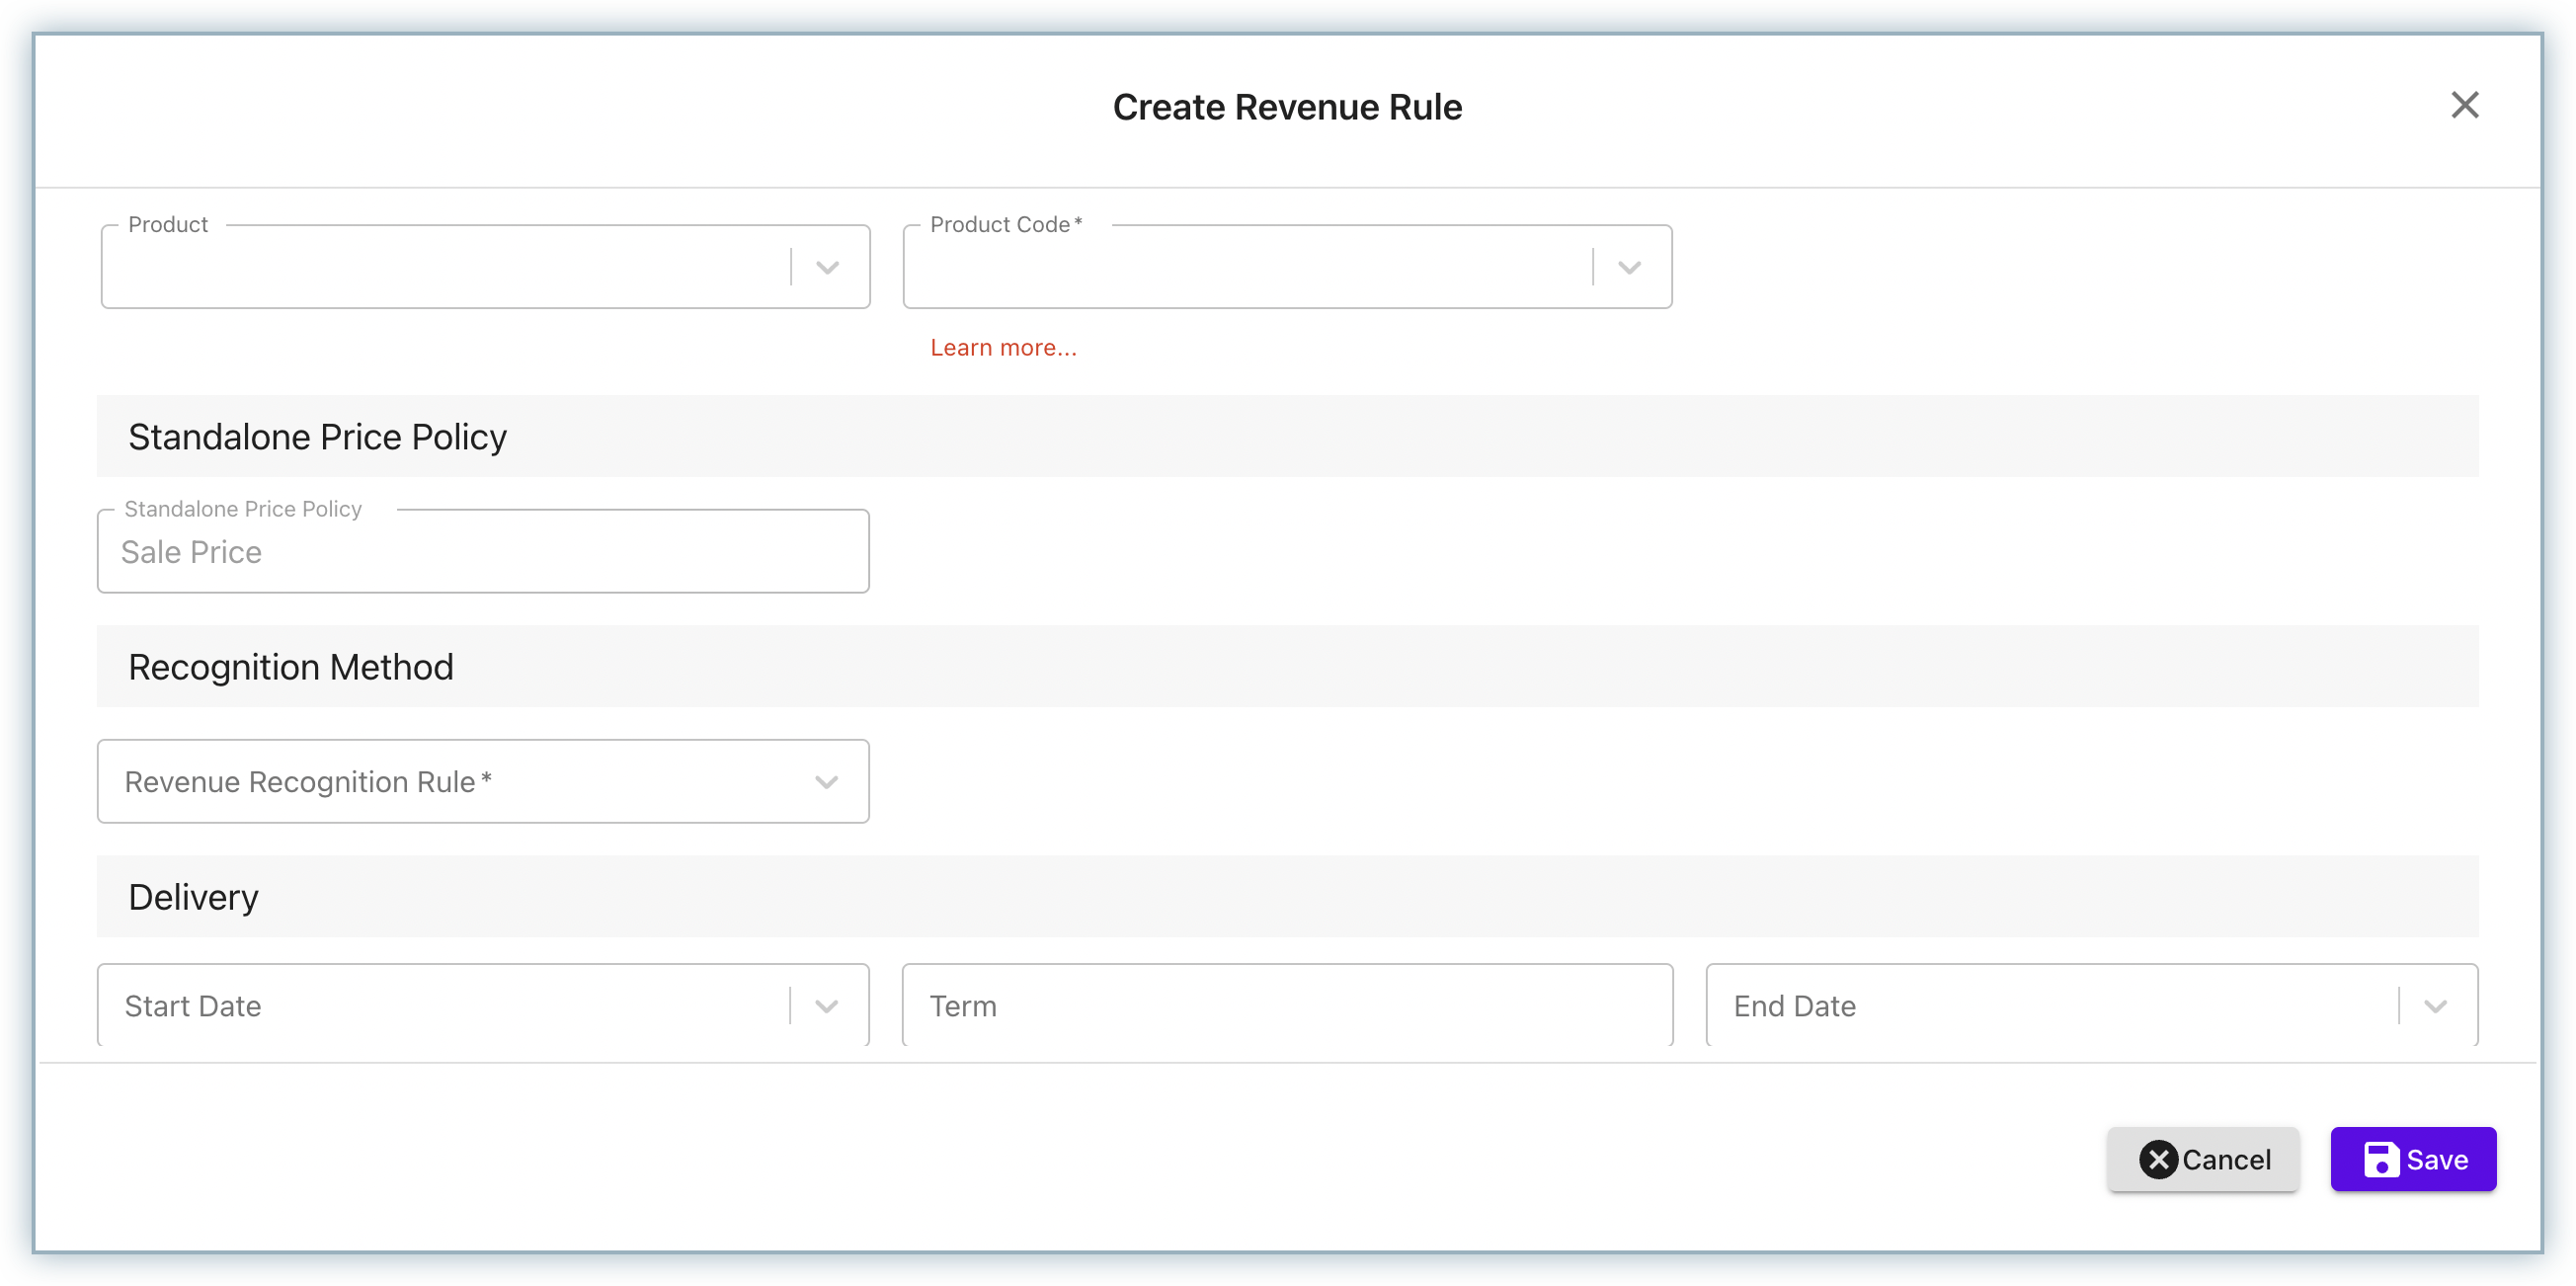
RevRec supports a variety of SSP allocation methods, as described in the table below:
| SSP Allocation | Rules |
| Standalone | Use the sale price and not be subject to allocation. |
| Sales Price | Use the actual sale price in order as SSP. |
| Discount Percentage | Apply a discount percent to the list price as SSP. |
| Dollar amount | Use a specific numeric price as SSP. |
| Dollar amount range | Use a range of numeric prices as SSP. |
| Simple percent net | Use a percentage of the list price of another product as SSP. |
| Apportioned percent net | Use a percentage of the list price and the term of another product for SSP. |
| Residual | Use the remaining unallocated transaction price for SSP. Applicable to the products with highly uncertain prices. |
- After selecting the SSP policy, select a Recognition Method from the drop-down. RevRec supports the following Revenue Recognition methods:
| Revenue Recognition | Rules |
| Ratable | Revenue is split and earned through a period of time. |
| Point-in-time | Revenue is earned in full amount at time of delivery or transfer of control of the contracted product. |
| Proportional Performance | Revenue is based on the proportion of the work that has be performed according to the contract. |
You can also update the SSP rules while adding new products or you can update the rules for existing products.
Alternatively, you can do a bulk upload of the SSP configuration.
Note
We understand that revenue recognition can become highly technical. Feel free to reach out to your RevRec support team member if you'd like to discuss any specifics of your revenue treatment.
Processing Transaction Data
RevRec automatically processes your sales orders and billing data for revenue recognition through its direct integration with Chargebee and other popular CRM and billing management systems on the market. In addition, you can upload batch files to RevRec or enter and edit data directly through the RevRec application User Interface (UI).
Chargebee Users
If you use Chargebee as your contract and billing system, RevRec automatically processes the transaction data in Chargebee on a daily basis for revenue recognition. It uses the subscription and billing data to identify the contract, transaction price, the contract items and applies the respective SSP rules for each item or product.
For example, on 4/15/2021, customer A signs up for a three-month subscription plan for a total price of $600, and the invoice is billed upfront and collected through Chargebee. On the same day, RevRec will book $100 revenue, which is half of the monthly price for April (assuming 4/1 to 4/30 is the accounting period), and the respective earned revenue for the remaining contract periods as shown in the table below.
| Period | Revenue |
| April | $100 |
| May | $200 |
| June | $200 |
| July | $100 |
Integration with Third-party Systems
You can configure RevRec to connect with third-party systems to enable the automatic data sync. You can connect RevRec with third-party systems such as:
- Salesforce/CPQ to leverage opportunity-related data to identify the sales order or contact.
- Xero, Quickbook, NetSuite, and Sage Intacct to fetch billing or invoice data.
The table below lists all the third-party systems that RevRec currently integrates with:
| Invoices | NetSuite, Quickbooks, Sage Intacct, and Xero |
| Sales | Salesforce/CPQ, HubSpot (availability in 2022) |
| Commissions | RevRec is actively looking at potential systems for commission data. You can submit your system through your support contact. |
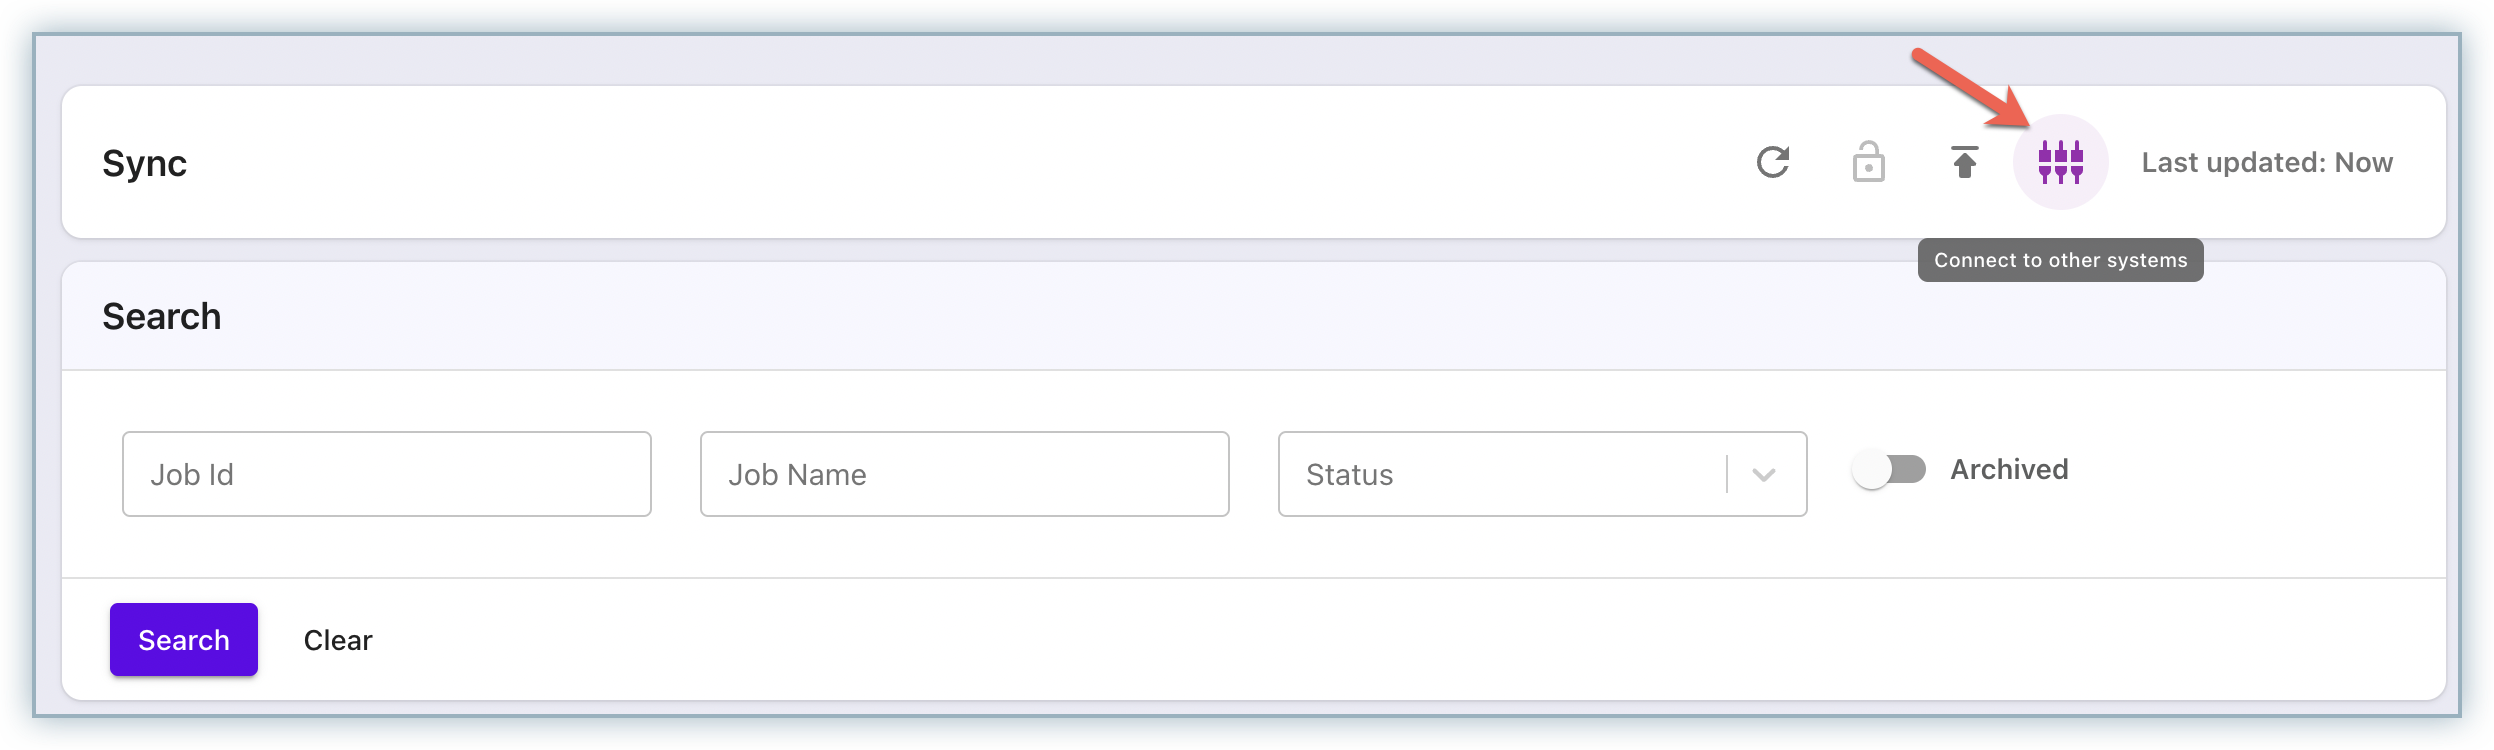
To integrate your RevRec environment with any of the third-party systems, follow these steps:
-
Login to your RevRec environment, and click Sync.
-
Click the Connect to other systems icon.
-
On the Connect your data pop-up, select the type of data you'd like to connect with. You can select from the following options:
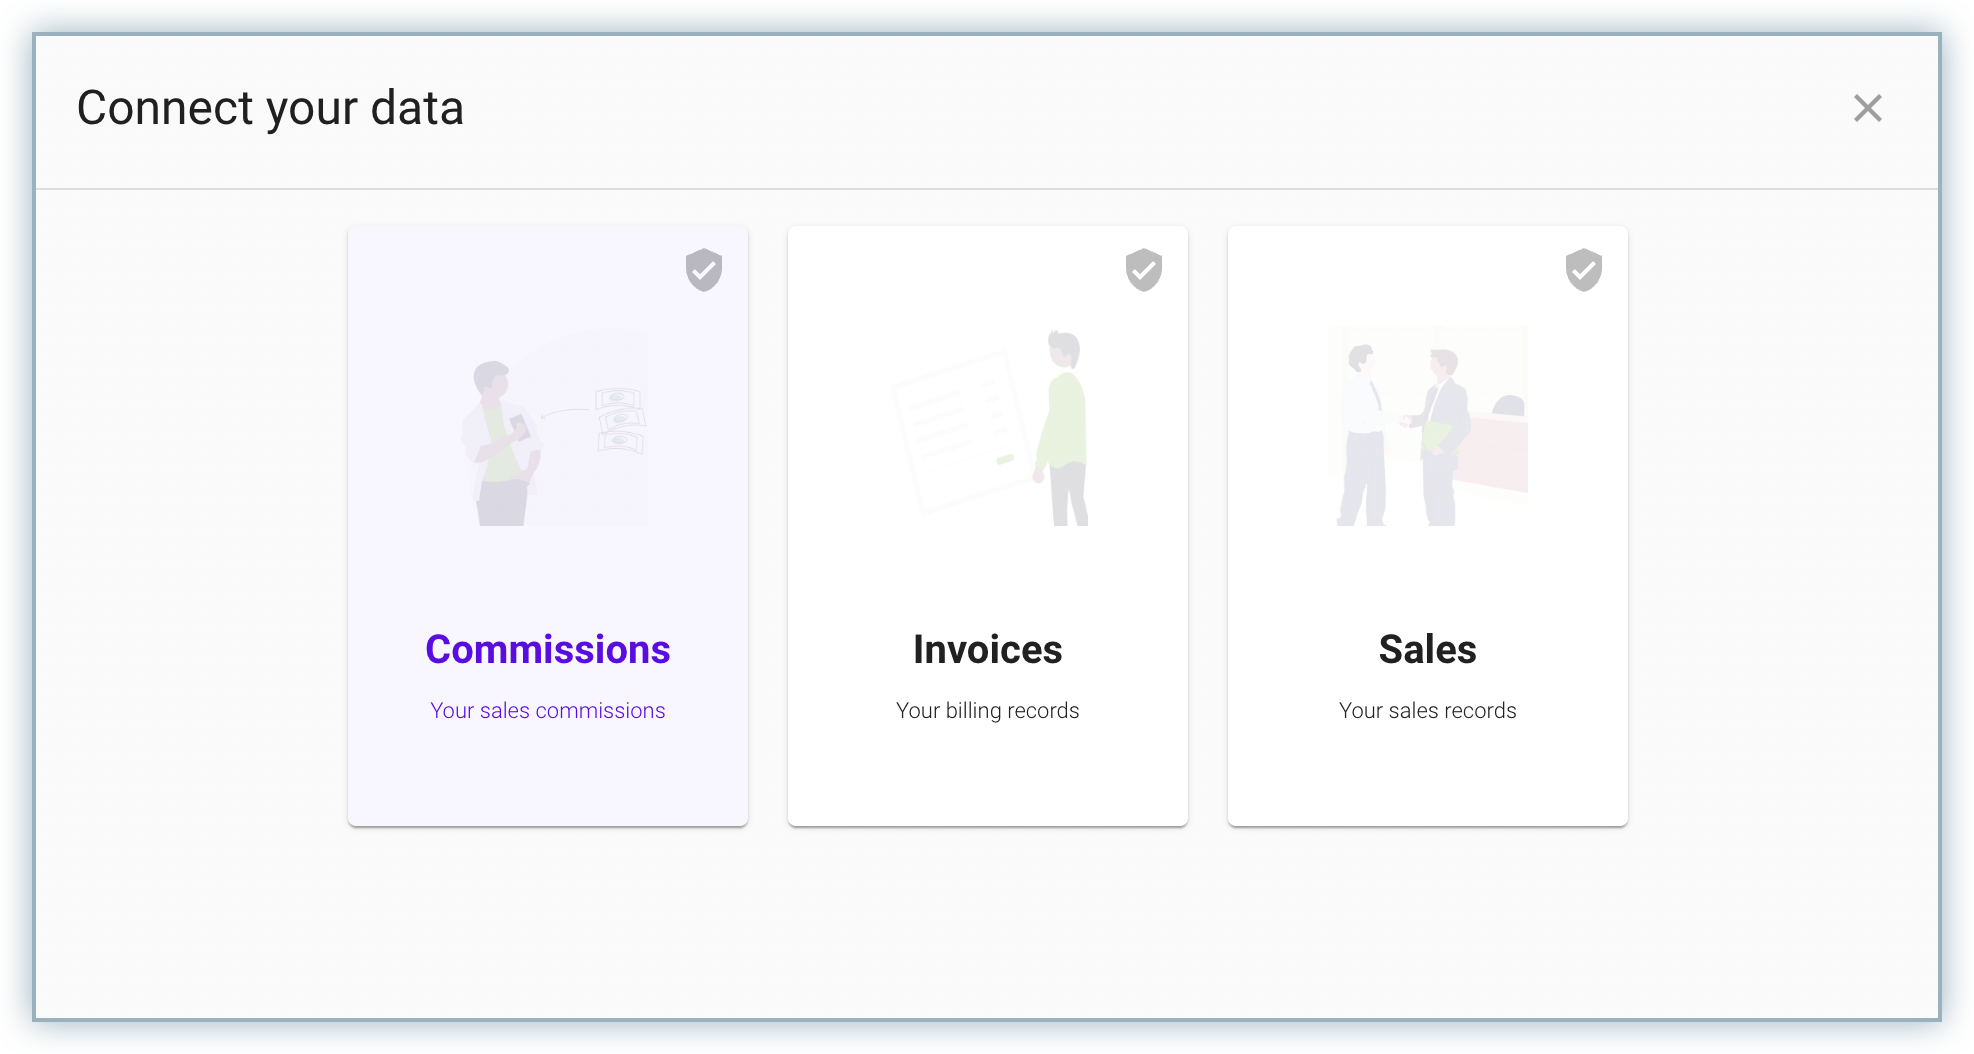
- Commissions: Select Commissions to sync your sales commissions data into RevRec.
- Invoices: Select invoices to sync your billing records into RevRec from billing systems.
- Sales: Select Sales to sync your sales records into RevRec from Salesforce or other CRMs.
-
Based on your selection, the next pop-up displays all the available systems.
-
On the Configure App screen, specify the third-party application details and click Connect. You can find more details on integrations here.
After the integration is set up, RevRec synchronizes with the respective third-party application on a daily basis and automatically processes revenue recognition.
Bulk Upload of Data
In case a direct integration with the third-party system that you're using to manage your subscription or billing data is not currently supported(we are adding more integration capabilities, so please always check back!), RevRec offers bulk upload capability to import your data.
You can capture the transaction data from your source systems with RevRec's Microsoft Excel-based bulk upload template including orders, billings, and deliveries. You can view more details about the template here.
Note
The RevRec implementation team will help you with the preparation of these files for the initial setup.
Once the file is ready to be uploaded, follow the steps below to carry out a bulk upload:
- Login to your RevRec environment and click Sync.
- Click the Import Data icon, specify a Job Name for the upload job, and drag and drop your file.
- Click Import for RevRec to process your file.
Once the upload is complete, you can see the results under the Data process summary.
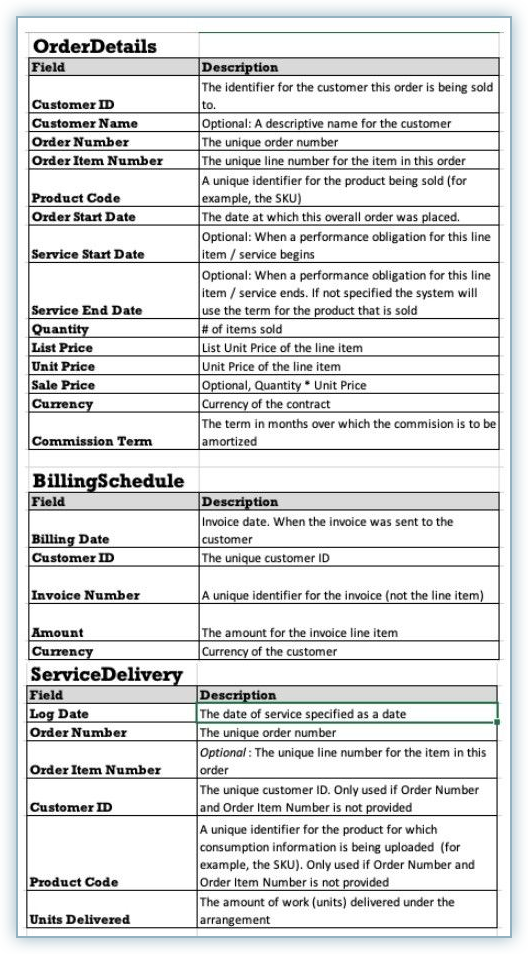
RevRec processes three types of transaction data for revenue recognition:
- OrderDetails: This represents the sales order details. All the data is presented at a line-item level.
- BillingSchedule: This represents the amounts that are invoiced against the orders. This is also tracked at a line-item level.
- ProfessionalServicesDelivery: This refers to the delivery of "work" against professional services type activity, expressed in units of work (e.g hours, or units shipped)
Note
RevRec also processes the following data:
- Customer-related data for General Ledger (GL) and reporting purposes.
- Product pricing data as discussed in the configuration section.
Input via User Interface
RevRec also allows you to directly enter your transaction data via the application User Interface(UI).
For example, to create a new Sales Order, follow the steps below:
-
Click Sales Order > +New Order.
-
On the Sales Order Details page, enter the order information.
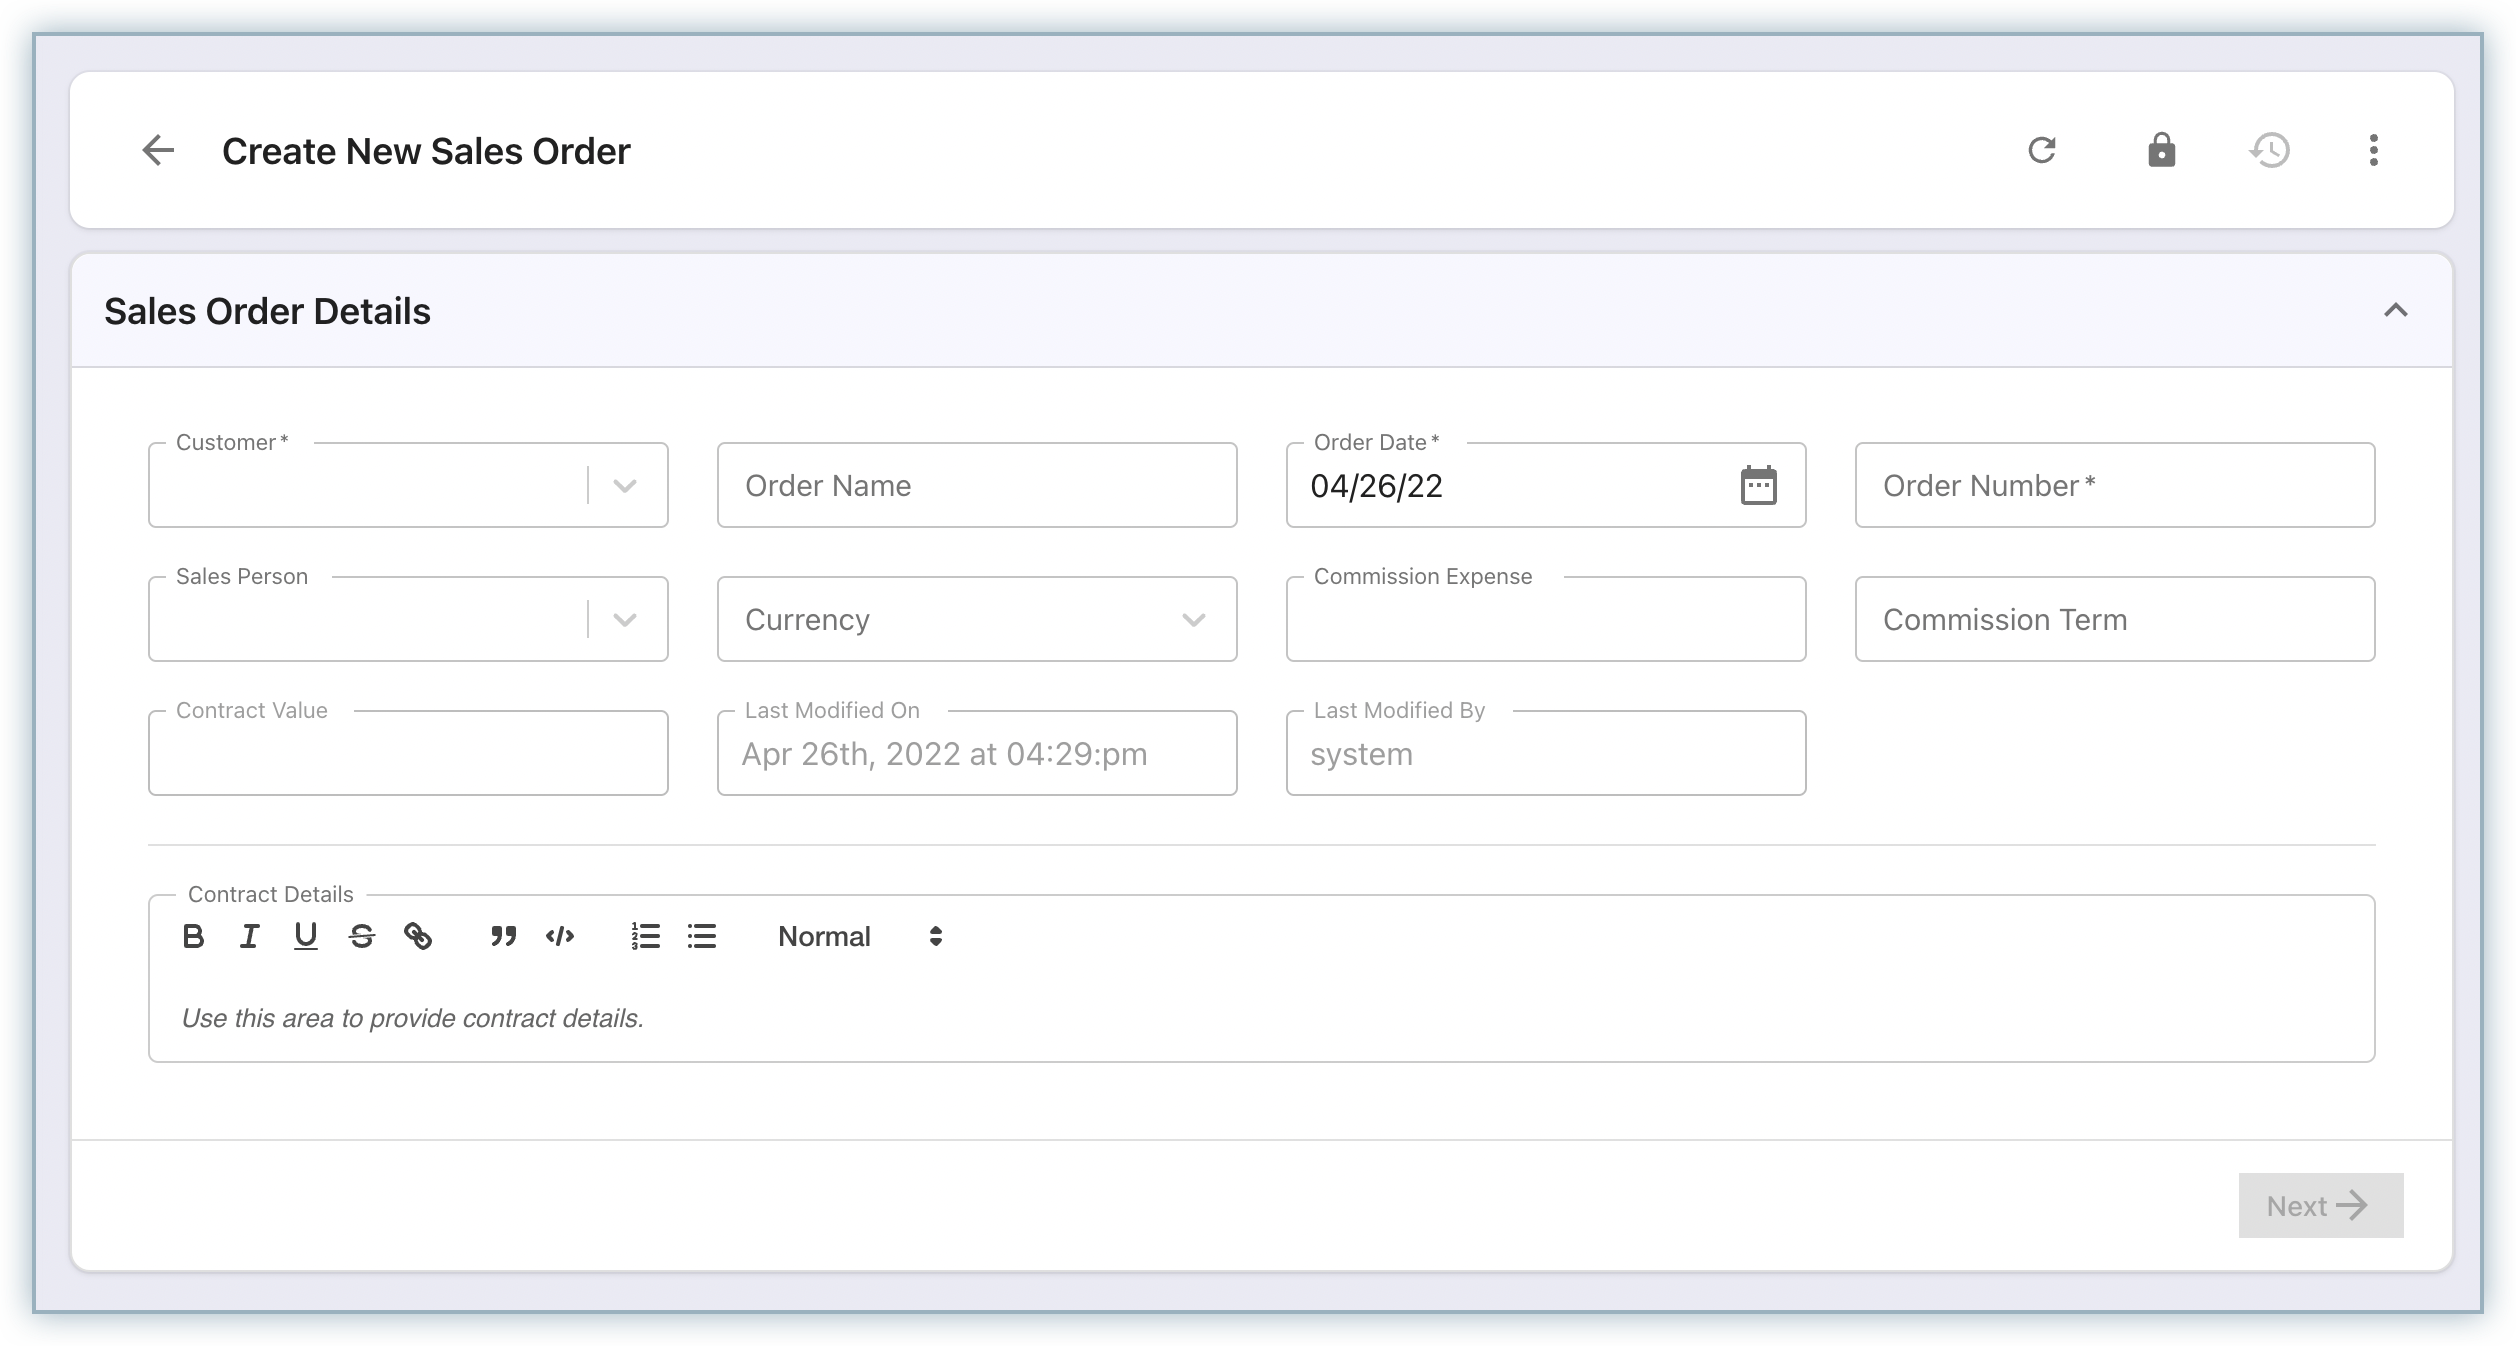
-
Click Save.
Once you save the data, RevRec processes the revenue recognition for the record added.
In addition to creating new transaction data, you can update existing data and trigger the re-process of the revenue recognition with the updated data, directly from RevRec UI.
For example, to update an existing Sales Order record in your RevRec UI, follow the steps below:
-
Click Sales Order and open the Sales Order record that you want to update.
-
Click the ellipsis icon and select Reprocess Sales Order.
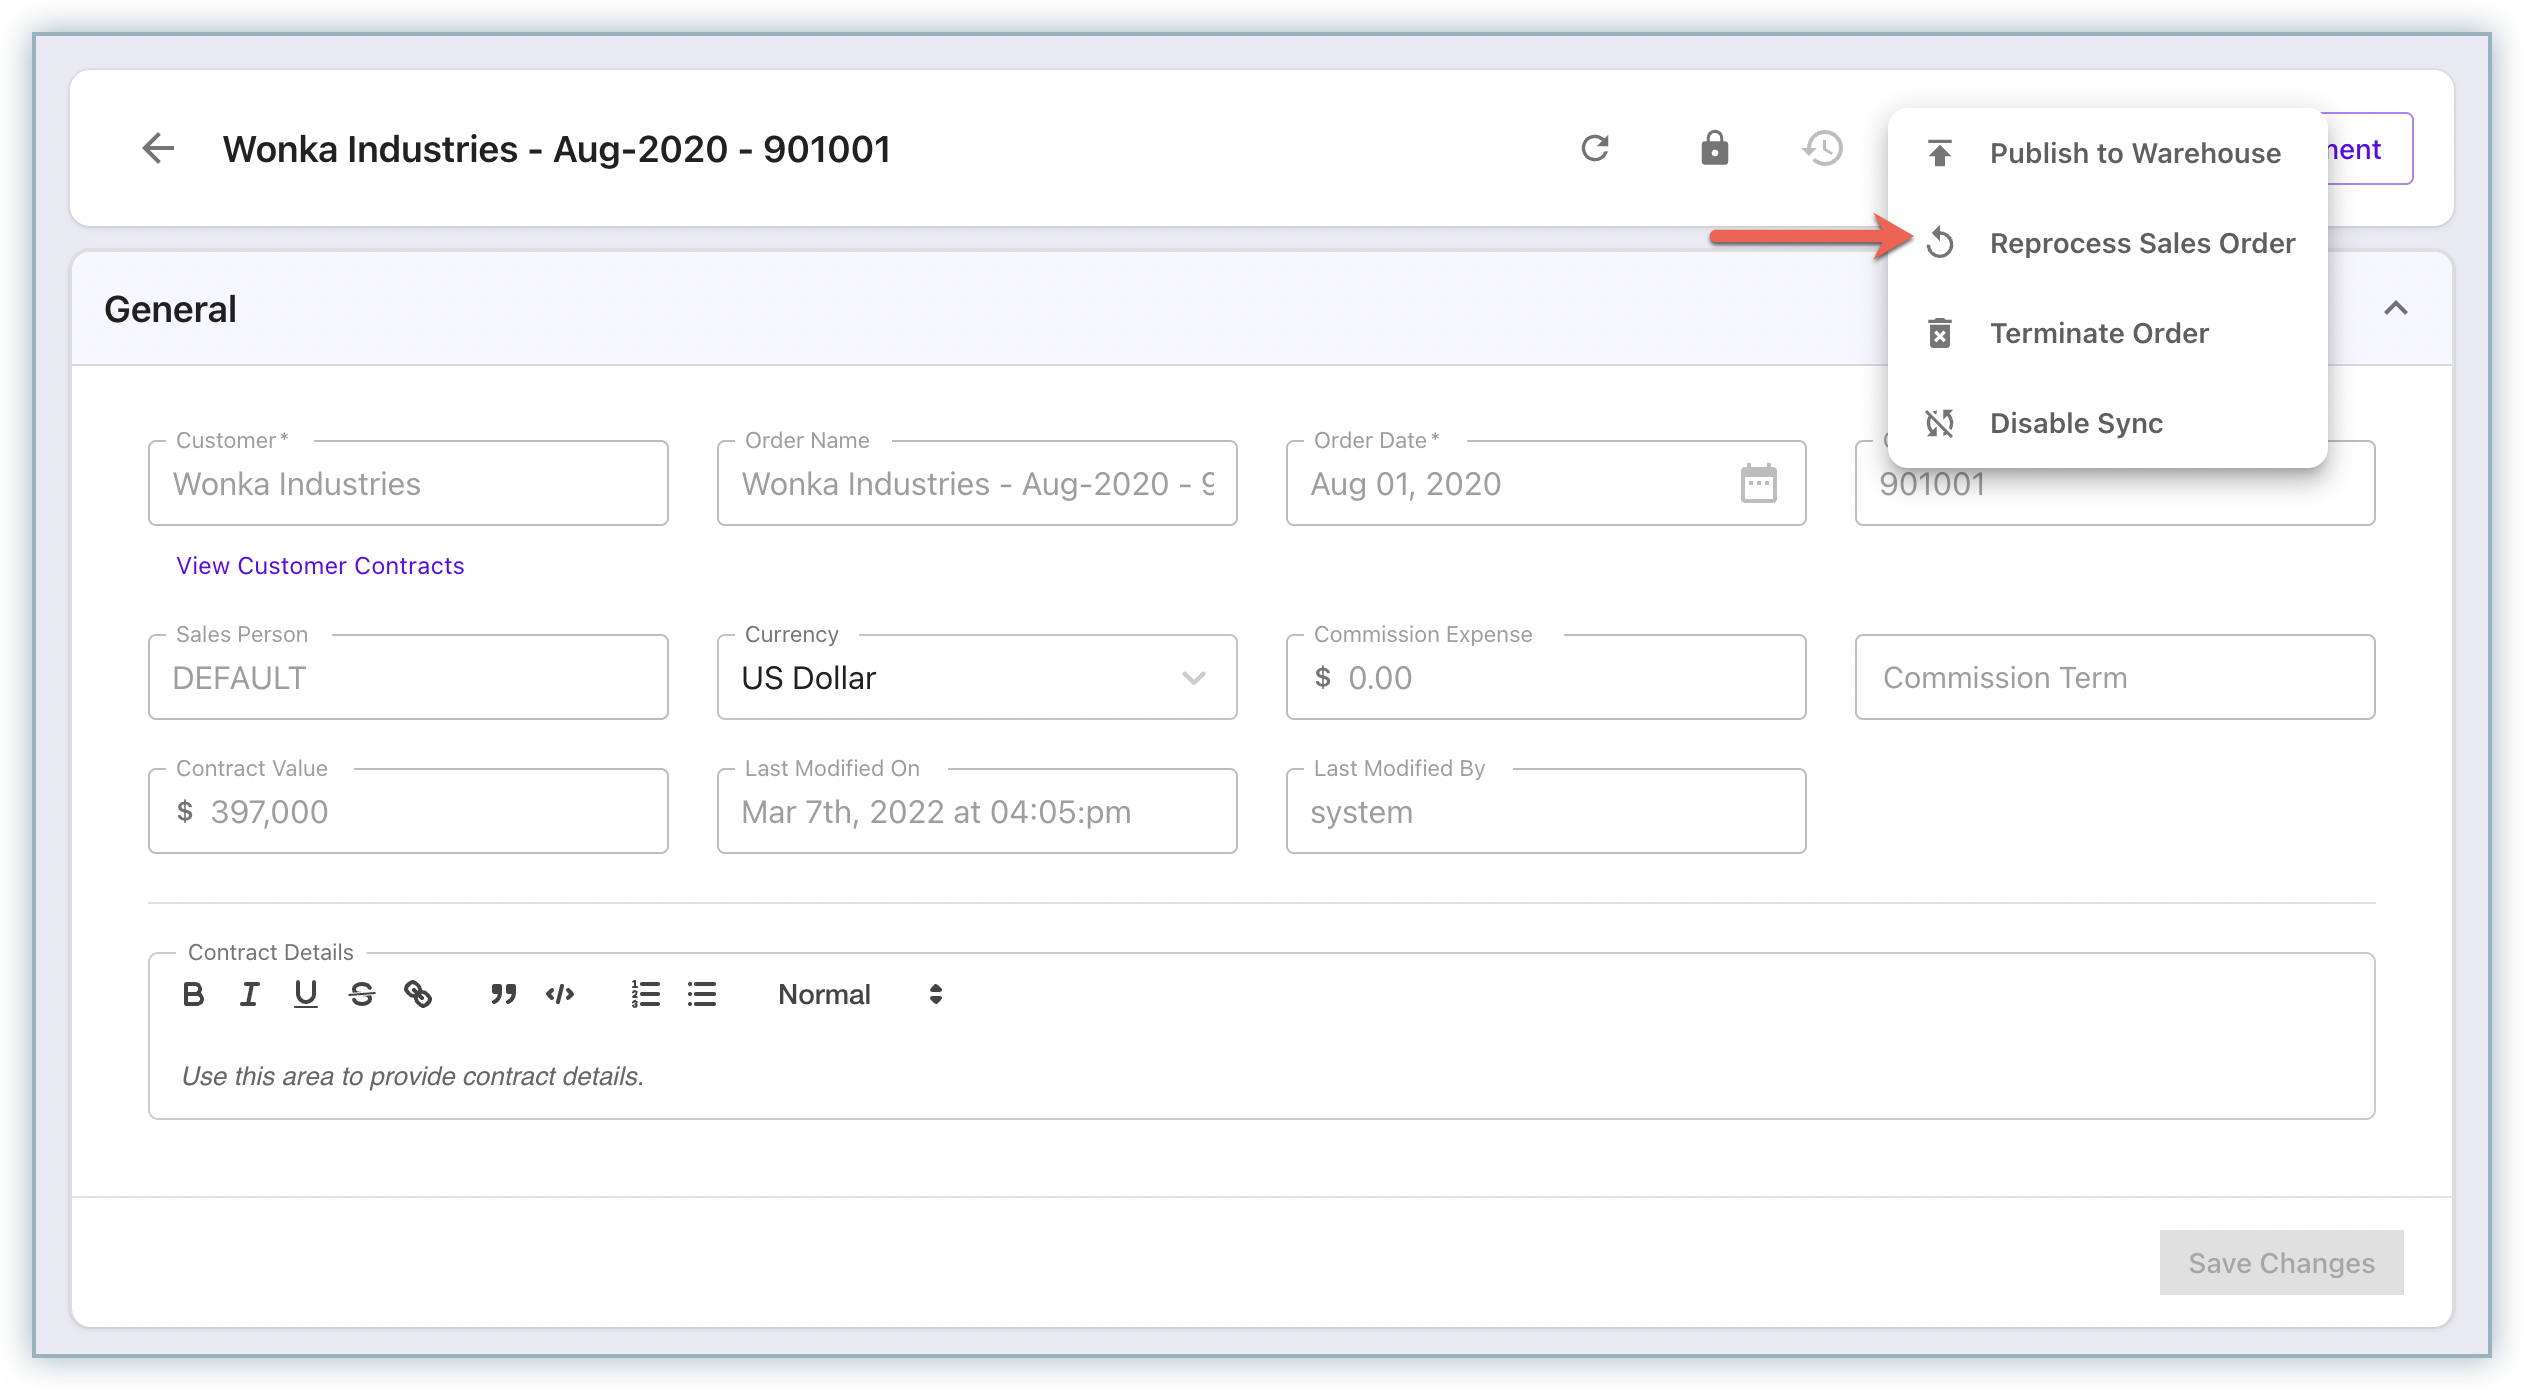
-
Make the necessary changes to the Sales Order record and click Save Changes.
RevRec re-calculates SSP allocation, generates the new revenue schedule, and updates the revenue recognition impact from the data change.
You can also search for a customer, order, or product, and review the data, including revenue arrangement (which shows the items in an order, SSP allocation, revenue recognition rules, and more details) and deferred revenue roll forward.
Was this article helpful?