New in Chargebee: Explore Reveal and understand your payment performance end-to-end.Try Now
Docschargebee docs
HomeBillingPaymentsRevRecGrowthReveal
Support

Product Updates


  • Release Notes

Getting Started


  • Overview
  • Chargebee Billing Data Centers
  • Object Relationship Model
  • Understanding Sites
  • Chargebee Tech Glossary
  • Articles and FAQ

Implementing Chargebee


  • Implementation Guide
  • Go-live Checklist
  • Articles and FAQ

AI in Chargebee


  • Chargebee Agents
  • Chargebee Copilot
  • Chargebee MCP Server (Model Context Protocol)

Developer Resources


  • Developer Resources Overview
  • Articles and FAQ

Product Catalog


  • Product Catalog Overview
  • Coupons
  • Articles and FAQ

Subscriptions


  • Working with Subscriptions
  • Billing
  • Orders
  • Articles and FAQ

Customers


  • Managing Customers
  • Account Hierarchy
  • Email Notifications
  • Branding
  • Configure Multiple Languages
  • Articles and FAQ

Entitlements


  • Entitlements Overview
  • Features Overview
  • Feature Management
  • Managing Product Entitlements
  • Subscription Entitlements
  • Customer Entitlements
  • Grandfathering Entitlements
  • Articles and FAQ

Usage Based Billing


  • Understanding Usages
  • Setting up Usage Based Billing
  • Usage Alerts
  • Metered Billing
  • Articles and FAQ

Chargebee CPQ


  • Chargebee CPQ
  • Chargebee CPQ for Salesforce
  • Chargebee CPQ for HubSpot

Invoices, Credit Notes, and Quotes


  • Invoices
  • Credit Notes
  • Quotes [Legacy]
  • Transactions
  • Articles and FAQ

Taxes


  • Overview
  • Configuring Taxes
  • Country-specific Taxes
  • Articles and FAQ

Hosted Capabilities


  • Overview
  • Hosted Checkout
  • Hosted Self-Serve Portal
  • Hosted Pages Features
  • Additional Hosted Pages
  • Payment Components
  • Pricing Table
  • Managing Payments with Chargebee.js
  • Mobile-Optimized Hosted Pages
  • Articles and FAQ

Site Configuration


  • Users & Roles
  • Custom Fields & Metadata
  • Approvals
  • Mandatory Fields
  • File Attachments & Comments
  • Advanced Filter Options
  • Multicurrency Pricing
  • Multi-decimal Support
  • Configuring Reason Codes
  • Events and Webhooks
  • API Keys
  • Time Zone
  • Time Machine
  • Transfer Configurations
  • Articles and FAQ

Multi Business Entity


  • Multi Business Entity Overview
  • Customer Transfer Overview
  • Articles and FAQ

Mobile Subscriptions


  • Overview
  • Omnichannel Subscriptions
  • Omnichannel One-Time Orders
  • Mobile Subscriptions (Legacy)

Reports and Analytics


  • RevenueStory
  • Home Dashboard
  • Frequently Asked Questions
  • FAQs for Classic Reports Sunset
  • Articles and FAQ

Integrations


  • Sales
  • Customer Support and Success
  • Finance
  • Tax
  • eInvoicing
  • Marketing
  • Stitch
  • Collaboration
  • Contract Management
  • Ecommerce Management
  • Articles and FAQ

Data Privacy & Security


  • Two Factor Authentication
  • SAML Single Sign-On
  • System for Cross-Domain Identity Management (SCIM)
  • EU-GDPR
  • Consent Management
  • Personal Data Management
  • Compliance Certificates
  • HIPAA Guidelines
  • PCI Recommendations and Integration Types
  • Articles and FAQ

Data Operations


  • Bulk Operations
  • Migration
  • Articles and FAQ
  1. Billing
  2. Invoices, Credit Notes, and Quotes
  3. Articles and FAQ
  4. Invoices
  1. Billing
  2. Invoices, Credit Notes, and Quotes
  3. Articles and FAQ
  4. Invoices

Void and regenerate an invoice

Problem Statement

This article helps you understand void and regenerate an invoice.

Solution

This article also covers

I want to cancel the invoice and regenerate it. How to do it?

Summary

You can void and regenerate an invoice if it is generated incorrectly or if you have missed including the customer's billing, tax, or PO number information, etc.

Note

 We recommend voiding an invoice against deleting it as you will retain the invoice number sequence for auditing purposes whereas deleting will disrupt the sequence. Also, see the difference between deleting and voiding an invoice.

If you are a business selling in Nordic countries, use the void invoice with credit note workflow. A credit note is created and applied to the voided invoice automatically. Refer to this link to avail the Void invoice with credit note setting on your Chargebee site.

Solution

Steps to void and regenerate an invoice

  1. Go to Dashboard > Invoices > Select the invoice that is in Payment Due. Alternatively, you could access the invoice from the Subscription details page > Invoices.

    1. To void an invoice that is in Paid status remove the payments linked to the invoice.

    2. The payment amount initiated will go to Customer Excess Payment and will be applied to the new invoice you generate

  2. From the top right corner of the invoice, click on "Void this invoice":

    image
    image
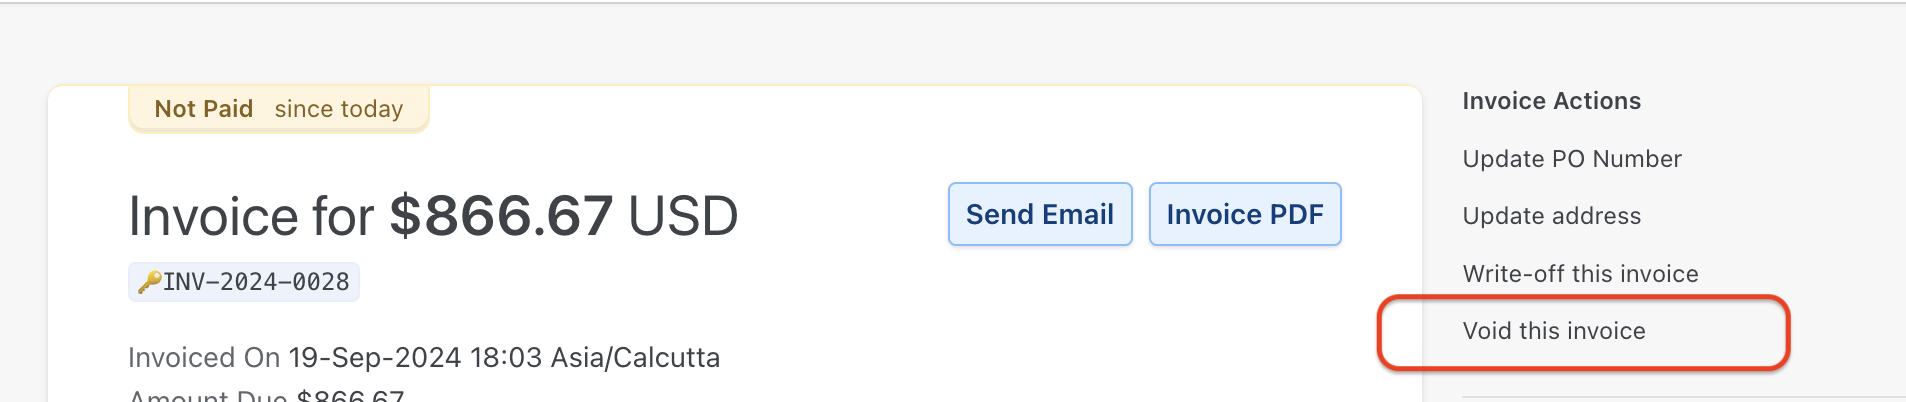
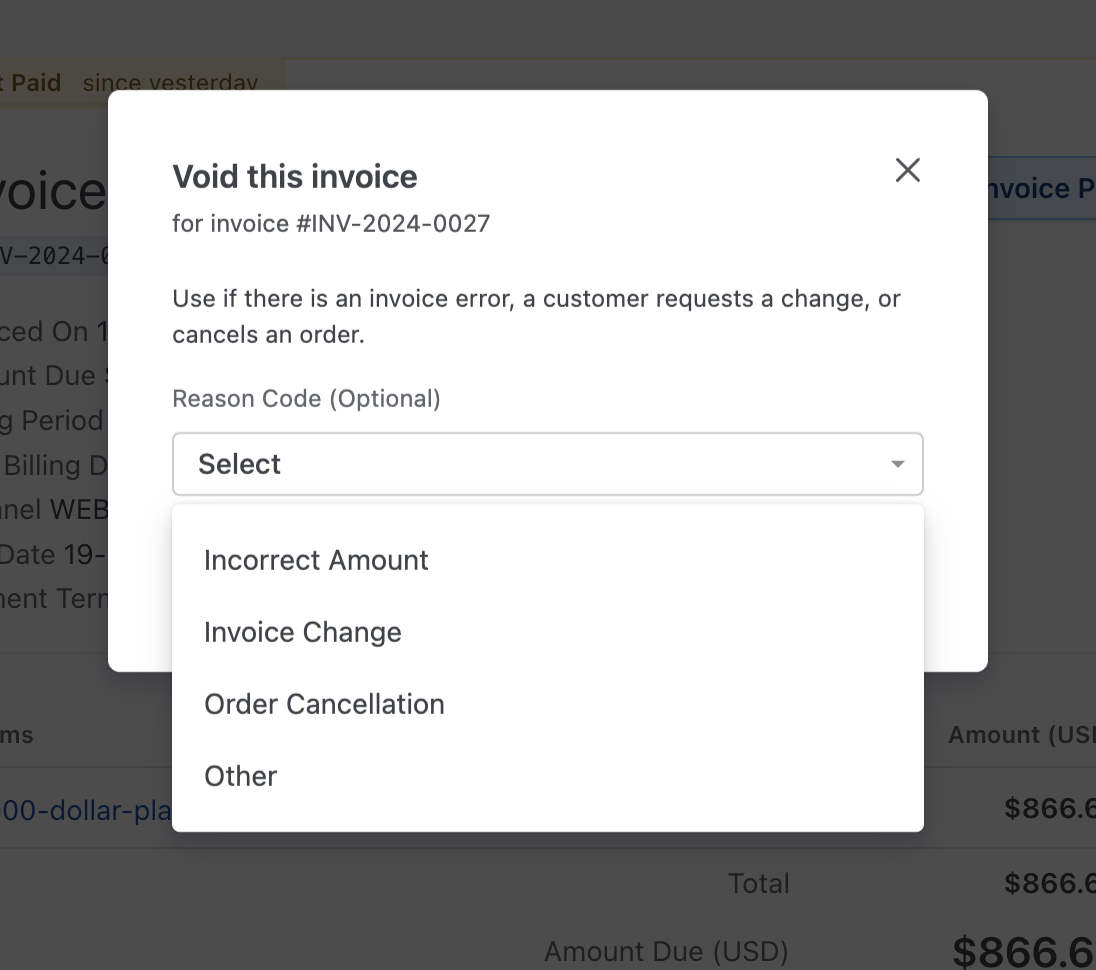
  3. A status message that reads "This invoice has been successfully voided" is generated.

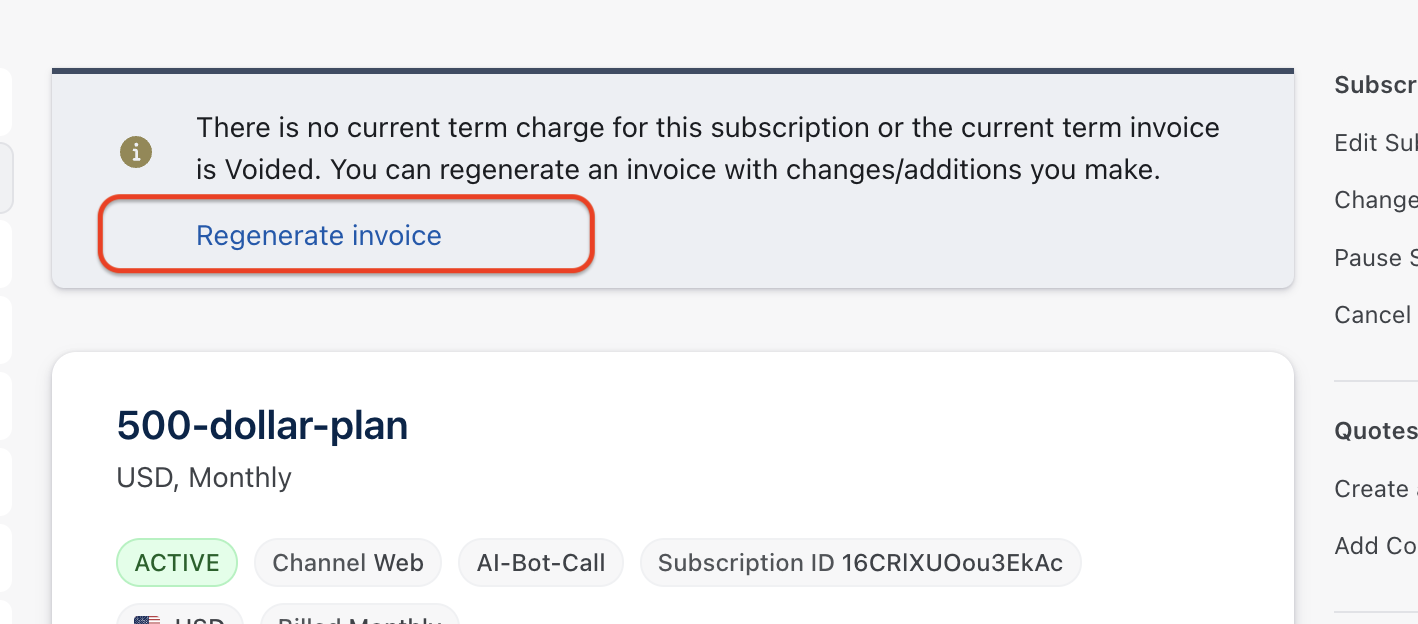
  4. You can go back to the Subscriptions details page, click the Subscription ID to the top of the invoice

  5. Make the necessary changes to the subscription ie. adding billing information or configuring taxes etc.

Steps to void and regenerate an invoice

  1. Open the invoice: Dashboard > Invoices and select the invoice (or open it from Subscription details > Invoices). The invoice must be in Payment Due (or Not Paid) to void. If it is Paid, first remove the payments linked to the invoice; the amount becomes customer excess and can be applied to the new invoice.

  2. On the invoice, click Void this invoice (top right).

  3. Confirm. You will see a message that the invoice has been voided.

  4. Go to the Subscription details page (click the subscription ID above the invoice).

  5. Make the required changes (e.g. billing address, tax, PO number).

  6. Click Regenerate Invoice.

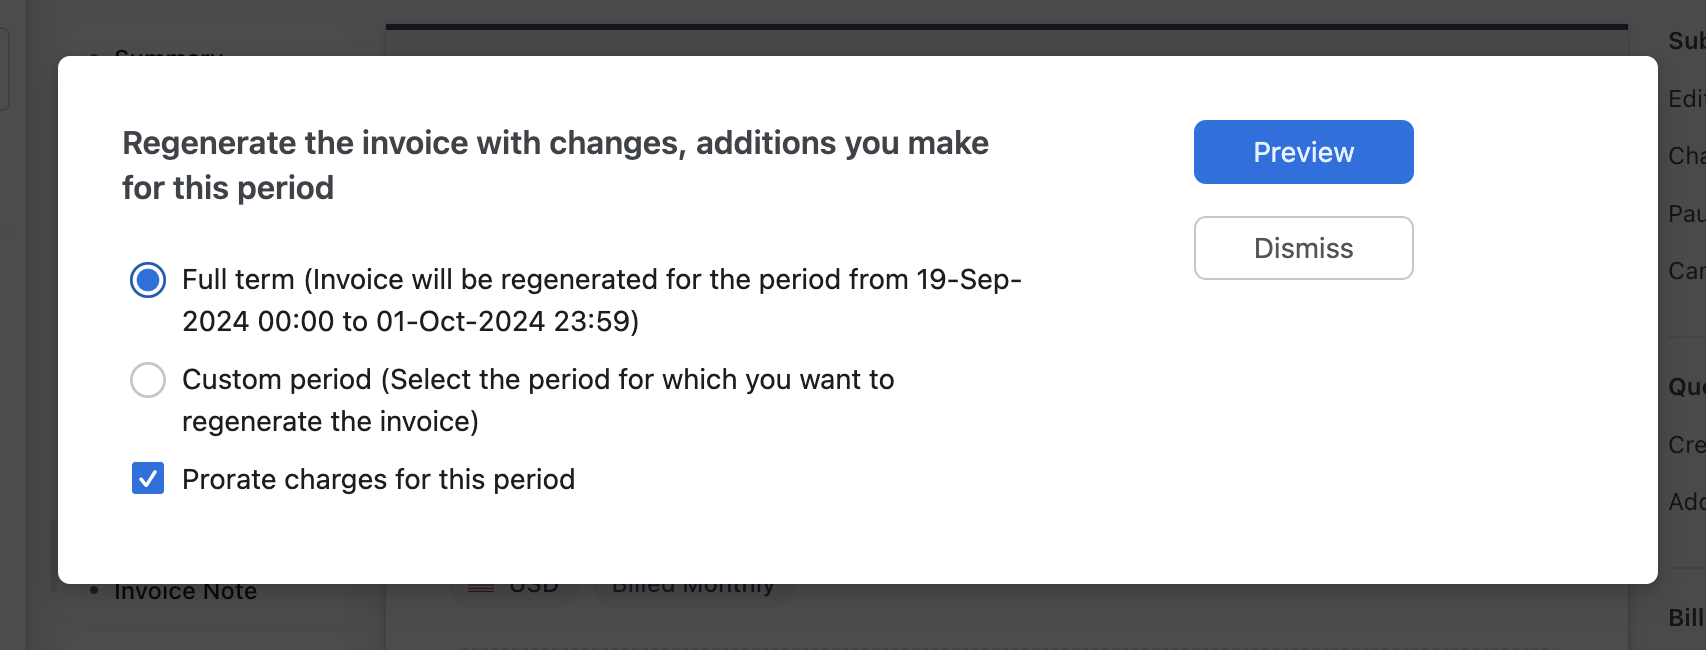
  7. Choose Full term (entire term) or Custom period (specific days, prorated).

  8. Click Generate. The new invoice is generated; the old one remains voided.

    image
  9. Choose the option Full term or Custom Period Full-term - To regenerate the invoice for the full term Custom period - To regenerate the invoice for a specific time in days(pro-rated)

  10. Click Generate. Now, the old invoice gets voided and the new invoice is generated on top of it.

image

Here is a video on how to do this.

Regenerating invoices using bulk operation:

Invoices can also be regenerated using bulk operation.

To regenerate the invoice using bulk operations, go to Settings > Import & Export data > Choose a bulk operation > Select 'Subscriptions' from the dropdown > Regenerate an invoice > Proceed

image

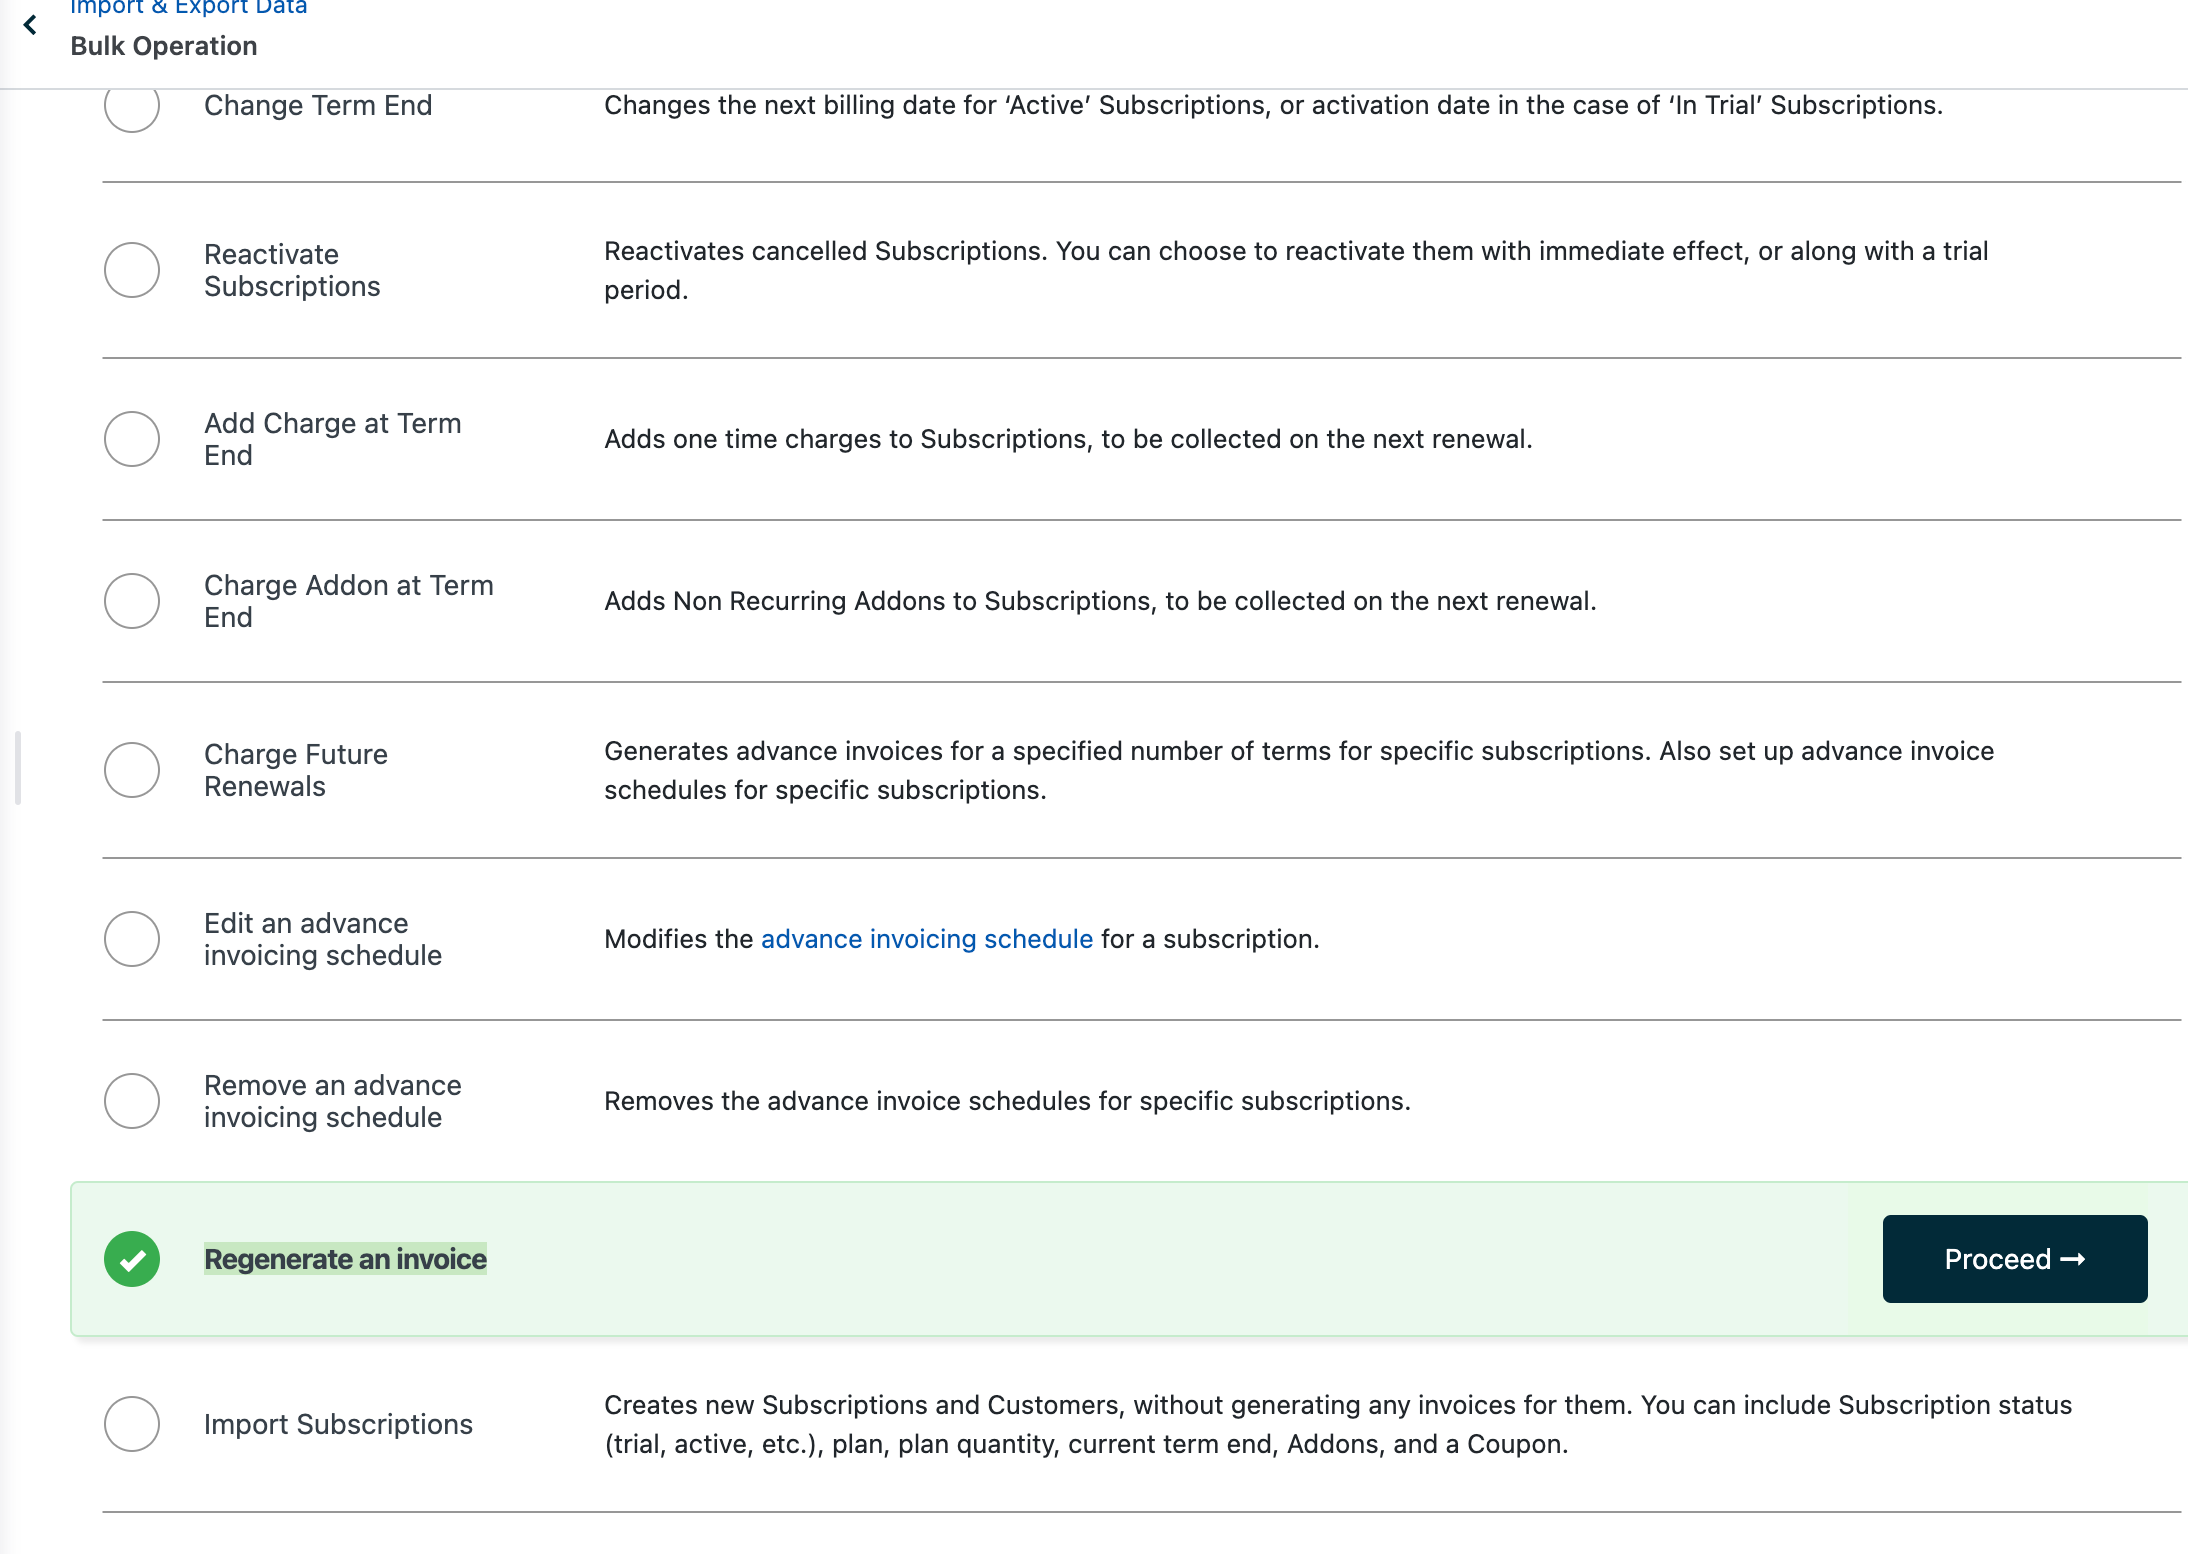
You may download the sample file, fill in the required columns and re-upload it to proceed with the bulk operation.

Note

Only current term invoices will have the option for regeneration from the UI.

Only current term invoices can be regenerated from the UI. Video walkthrough: Void and regenerate.

Was this article helpful?