New in Chargebee: Explore Reveal and understand your payment performance end-to-end.Try Now
Docschargebee docs
HomeBillingPaymentsRevRecGrowthReveal
Support

Product Updates


  • Release Notes

Getting Started


  • Overview
  • Chargebee Billing Data Centers
  • Object Relationship Model
  • Understanding Sites
  • Chargebee Tech Glossary
  • Articles and FAQ

Implementing Chargebee


  • Implementation Guide
  • Go-live Checklist
  • Articles and FAQ

AI in Chargebee


  • Chargebee Copilot
  • Chargebee Model Context Protocol (MCP) Server

Developer Resources


  • Developer Resources Overview
  • API Explorer
  • Articles and FAQ

Product Catalog


  • Product Catalog Overview
  • Coupons
  • Articles and FAQ

Subscriptions


  • Working with Subscriptions
  • Billing
  • Orders
  • Articles and FAQ

Customers


  • Managing Customers
  • Account Hierarchy
  • Email Notifications
  • Branding
  • Configure Multiple Languages
  • Articles and FAQ

Entitlements


  • Entitlements Overview
  • Features Overview
  • Feature Management
  • Managing Product Entitlements
  • Subscription Entitlements
  • Customer Entitlements
  • Grandfathering Entitlements
  • Articles and FAQ

Usage Based Billing


  • Understanding Usages
  • Setting up Usage Based Billing
  • Usage Alerts
  • Metered Billing
  • Articles and FAQ

Chargebee CPQ


  • Chargebee CPQ
  • Chargebee CPQ for Salesforce
  • Chargebee CPQ for HubSpot

Invoices, Credit Notes, and Quotes


  • Invoices
  • Credit Notes
  • Quotes [Legacy]
  • Transactions
  • Articles and FAQ

Taxes


  • Overview
  • Configuring Taxes
  • Country-specific Taxes
  • Articles and FAQ

Hosted Capabilities


  • Overview
  • Hosted Checkout
  • Hosted Self-Serve Portal
  • Hosted Pages Features
  • Additional Hosted Pages
  • Payment Components
  • Pricing Table
  • Managing Payments with Chargebee.js
  • Mobile-Optimized Hosted Pages
  • Articles and FAQ

Site Configuration


  • Users & Roles
  • Custom Fields & Metadata
  • Approvals
  • Mandatory Fields
  • File Attachments & Comments
  • Advanced Filter Options
  • Multicurrency Pricing
  • Multi-decimal Support
  • Configuring Reason Codes
  • Events and Webhooks
  • API Keys
  • Time Zone
  • Time Machine
  • Transfer Configurations
  • Articles and FAQ

Multi Business Entity


  • Multi Business Entity Overview
  • Customer Transfer Overview
  • Articles and FAQ

Mobile Subscriptions


  • Overview
  • Omnichannel Subscriptions
  • Omnichannel One-Time Orders
  • Mobile Subscriptions (Legacy)

Reports and Analytics


  • RevenueStory
  • Home Dashboard
  • Frequently Asked Questions
  • FAQs for Classic Reports Sunset
  • Articles and FAQ

Integrations


  • Sales
  • Customer Support and Success
  • Finance
  • Tax
  • eInvoicing
  • Marketing
  • Stitch
  • Collaboration
  • Contract Management
  • Ecommerce Management
  • Articles and FAQ

Data Privacy & Security


  • Two Factor Authentication
  • SAML Single Sign-On
  • System for Cross-Domain Identity Management (SCIM)
  • EU-GDPR
  • Consent Management
  • Personal Data Management
  • Compliance Certificates
  • HIPAA Guidelines
  • PCI Recommendations and Integration Types
  • Articles and FAQ

Data Operations


  • Bulk Operations
  • Migration
  • Articles and FAQ
  1. Billing
  2. Subscriptions
  3. Articles and FAQ
  4. Payment Gateways
  1. Billing
  2. Subscriptions
  3. Articles and FAQ
  4. Payment Gateways

How to change the net payment terms for customers in bulk?

Problem Statement

You want to know how to change the net payment terms for customers in bulk.

Scope

How to change the net payment terms for multiple customers?

What is the process to update the payment terms for customers in bulk?

How to perform the import & export option to manually update Net D terms for customers?

Summary

Bulk Operations allow you to perform an action for multiple records in one go. It uses a CSV upload method for inputs, which will contain a list of the new data (with the desired changes) that you'd like to perform.

A quick instruction to update Net-D in bulk,

  • Select the Update Customer operation and click 'Proceed'

  • Download the sample CSV file

  • Populate the customers' data and update the net payment terms in the column 'customer[net_term_days]' (for the current data you can export it from Chargebee)

  • Import the CSV file to carry out the action

Solution

Step 1: To perform this action, navigate to Settings > Import & Export data > Choose a bulk operation > Choose an Operation > Customers > Update Customers > Proceed.

image

Step 2: Download the sample CSV file

image

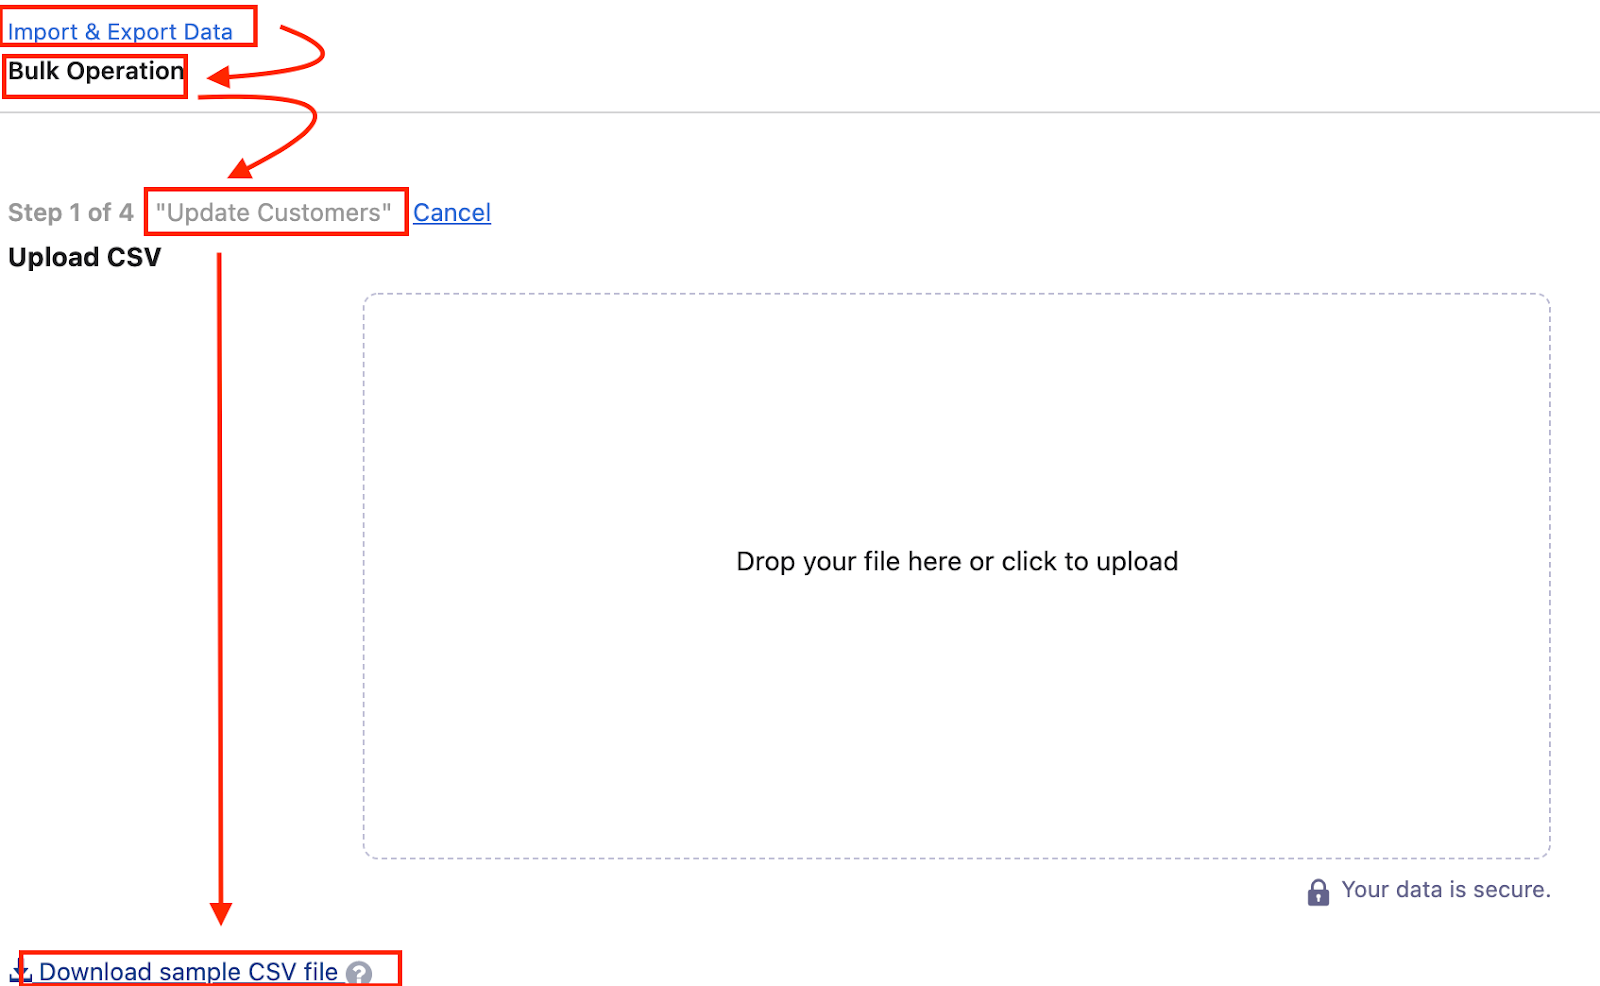
This file will contain sample records that you can replace with your own records (Refer to Step 3).

Note: The data needs to be added to the sheet in the same format as the sample data.

Step 3: To export the current customers' data, you can export it from the Customers Index Page.

Navigate to Customers index page, 'Filter list > Customers > Payment Terms > is present > Apply Filter' and then click 'More Actions > Export Customers CSV'.

image

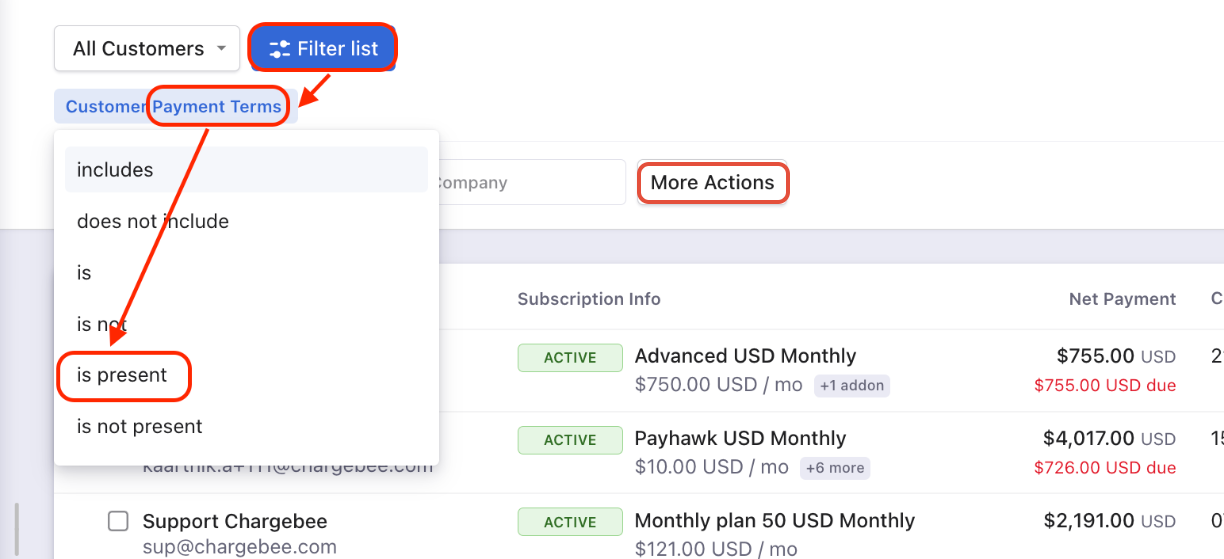
This sheet will give your actual customers' data to update on the sample sheet referred on Step 2.

Note

On the recent UI enhancement you On the recent UI enhancement you can now scroll the index pages - Customers, Subscriptions, Invoices, and Credit Notes vertically. Earlier, the pages will be paginated which may prolong your search however with the new enhancement as you scroll down the list it will load all other data in a single page. Refer to this link for more information.

Step 4: Manually update Net D terms for customers on the sample sheet CSV file.

image

Note

  1. It is not mandate to update all the fields. You can add relevant parameters that you would like to update the values such as customer[id], customer[net_term_days], leaving the columns blank will keep the previous configurations.
  2. Passing net term days as 0 (zero), means that the customer will not be given any grace period to make the payment, and will have to pay upon receipt/invoice generation. You can only add the predefined lists of default & custom payment terms enabled on your site. For reference, navigate to Settings > Configure Chargebee > Billing LogIQ > Payment Terms > Choose Default Payment Term.

Step 5: Drag and drop your data file into the web interface:

image

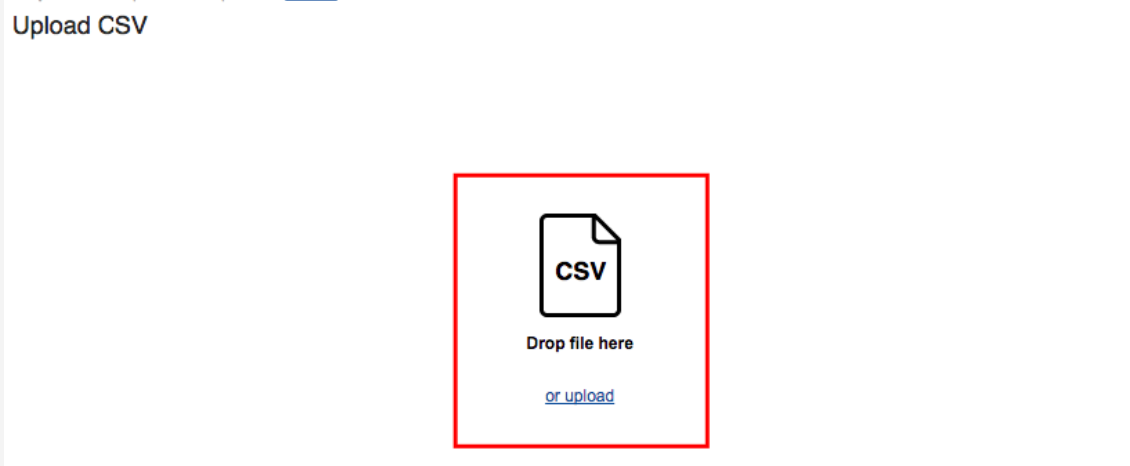
Once you've added all the information and the data file is ready, upload it.

If you face any errors after uploading the file, please refer to this link Bulk Operations for more information.

Was this article helpful?