Salesforce plugin for Chargebee - Installation Guide
Problem Statement
This article helps you understand salesforce plugin for chargebee - installation guide.
Solution
Overview
This plugin connects Salesforce with Chargebee and syncs data between the 2 systems. The purpose of this guide is to make you familiar with the usage for Chargebee for Salesforce app.
Chargebee for Salesforce app is a 2-way SFDC-to-Chargebee and vice-versa connector that enables to create and update Subscription directly from Salesforce for any plan in Chargebee.
This app will retrieve all the Subscription, Plans, Addons, Coupons, Transaction, Invoices from Chargebee and sync with Salesforce data.
Installing the Chargebee for Salesforce App
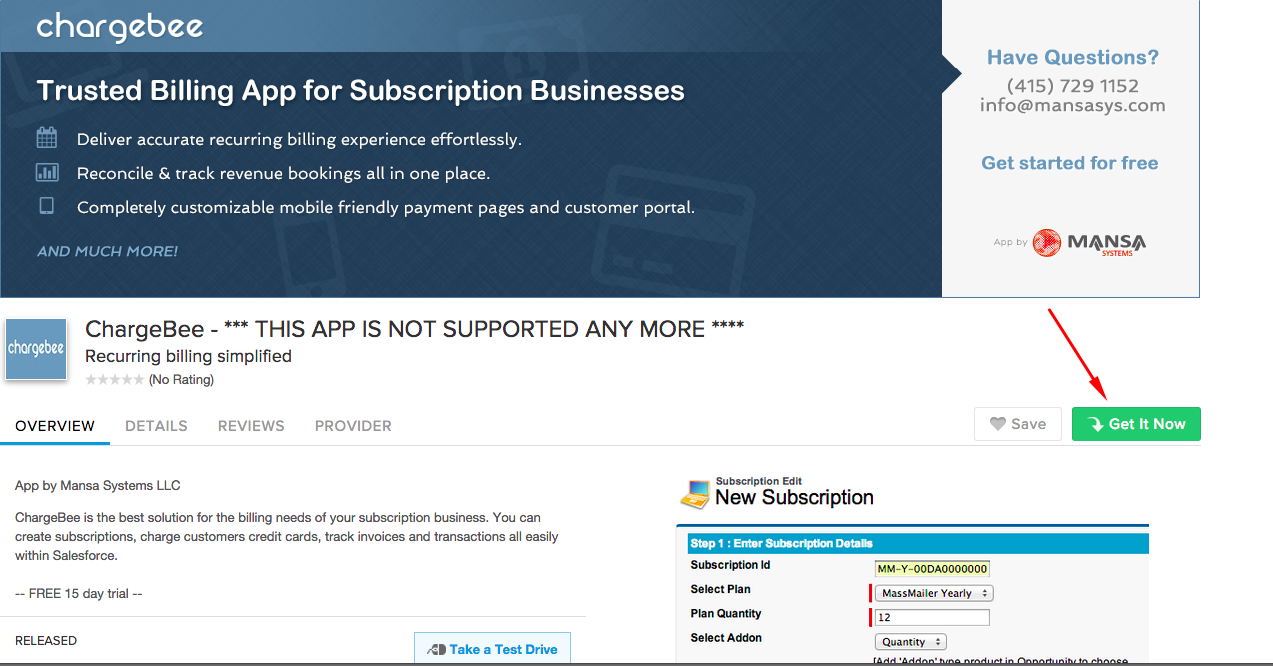
Chargebee for Salesforce is a private application that cannot be found by searching the Salesforce App Exchange. It can only be installed using the link below:
Steps to Install Chargebee for Salesforce
- After clicking on the link above, click on Get It Now, then choose to install in your production or sandbox Salesforce org:
-
Indicate that you have read and agreed to the terms, and click Confirm and Install!
-
When prompted, provide your Salesforce login credentials
-
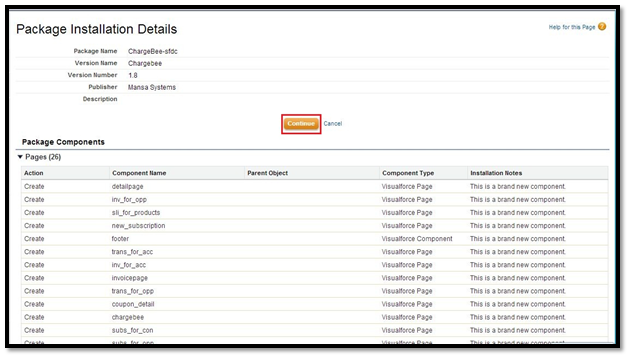
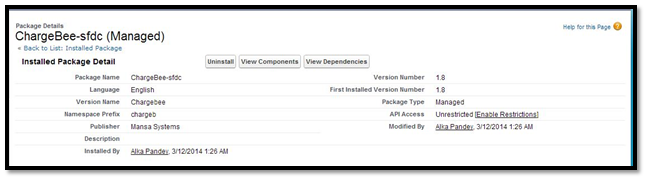
The Package Installation Details page shows the Chargebee for Salesforce components that will be added. Click Continue.
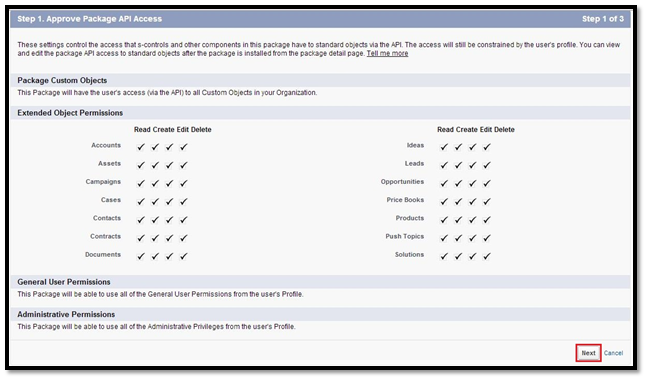
- Chargebee for Salesforce will use your Salesforce credentials and redirect you to the Approve Package API Access page. Click Next.
- From the Choose security level page, you can grant access to:
· Admins Only
· All users
· Specify your own settings
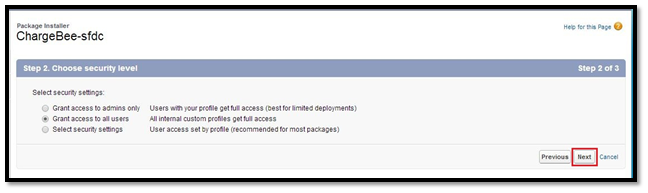
Select the security level you want to use and click Next.
- From the Installation Package page, click Install.

- You will receive an email from support@salesforce.com when the installation is complete.
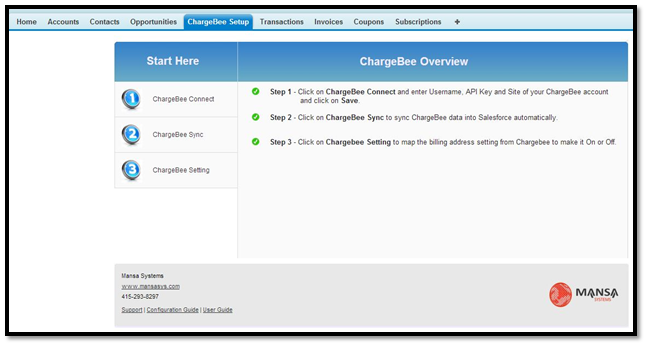
Chargebee for Salesforce Quick Setup
From the Chargebee Setup tab, you can perform the following functions:
-
Set up your Chargebee information. You must have a Chargebee login to use Chargebee for Salesforce app.
-
Set up your data sync now and hourly from Chargebee.
-
Set up Address Requirement setting as On or Off as per Chargebee account settings.
- Chargebee Connect
**
Click on "Chargebee Setup" tab and then "Chargebee Connect" to connect with a Chargebee account and enter Chargebee Username, API Key and Site which you get from the Chargebee account.
But before saving the credentials you have to create a remote site setting with the same site of Chargebee account as below
Remote Site Setting
Add Chargebee Site in Remote site setting From:
Setup => Administration Setup => Remote Site Settings

From Remote Site Settings Page Click on New Remote Site add Chargebee site URL and Click on Save.
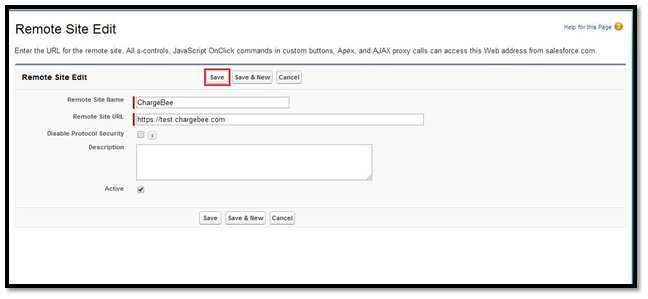
And now you can save the Chargebee credentials.
Once you save your credentials on this screen, you will not have to provide them again.
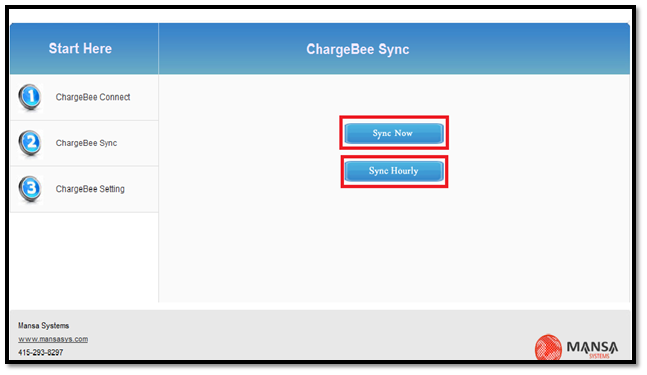
- Chargebee Sync
**
Now click on "Chargebee Sync" tab and then click on "Sync Now" button to sync Salesforce with Chargebee at the same moment to setup all the data from Chargebee. By clicking "Sync Hourly" you can sync Salesforce with Chargebee at every hour automatically.
- Chargebee Setting
**
And now save the setting of Address Requirements as if there is any address required at Chargebee side then you have to make it as ON in the Chargebee Setting in Salesforce.
-
Fill in the email address in the 'Email Address to Send Error Report' field.
-
To display the image of your organization on Payment Form you need to select the image from "Payment Form Logo" field. Also, you first need to add the image in "Documents".
-
Fill in "Payment Form Page Header" to display the header of the form.
-
Fill in "Payment Form Page Footer(Line 1)" and "Payment Form Page Footer(Line 2)" fields to fill the address related information.
-
Fill in "Payment Form Terms and Conditions" field to display the organization's terms & conditions. For this, you need to first upload a text document in the "Chargebee" folder in DOCUMENTS.
-
Click on Save.
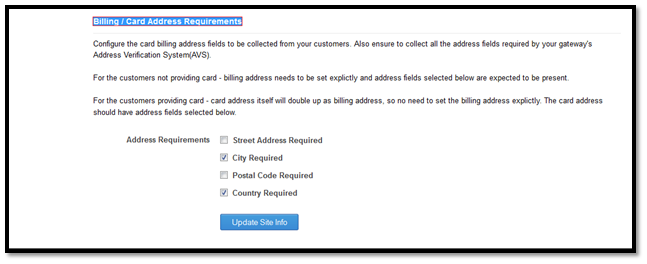
For Chargebee Address Requirements in Chargebee account go to SETTINGS -> SITE SETTINGS-> SITE INFO and check for Billing / Card Address Requirements.
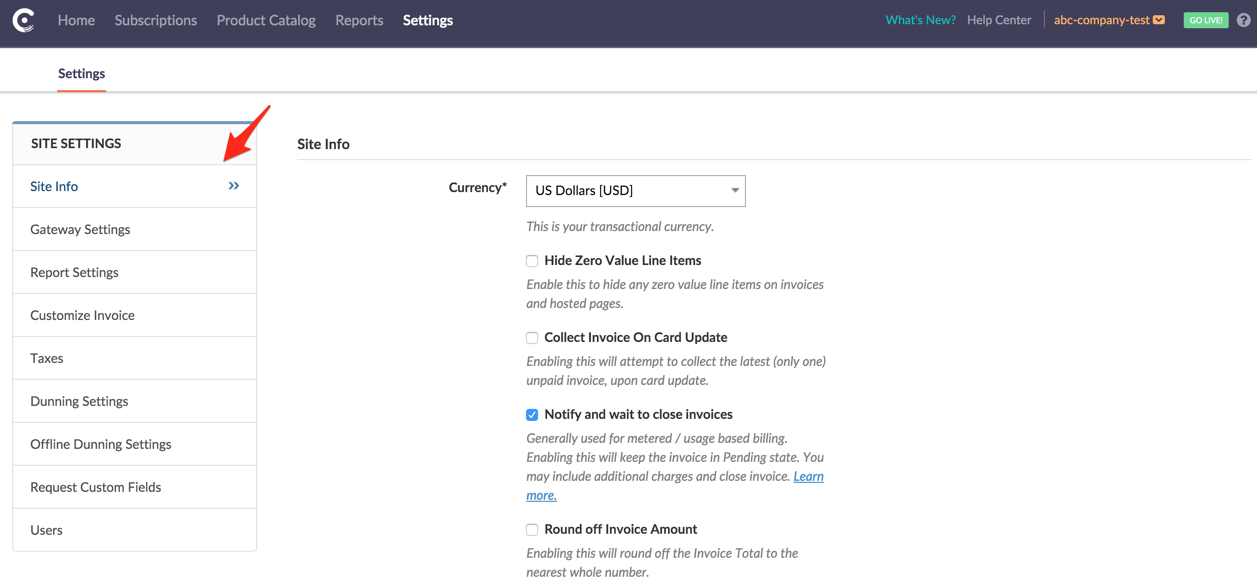
Here you can verify the Address requirements setting and can change the setting as needed.
For this make the changes in Salesforce as shown below:
Webhook Setting
If you want to sync for every operation (e.g subscription creation or update, transaction or invoice creation etc.) from Chargebee to Salesforce, you need to update your webhook URL in Chargebee.
For this you need to create a public site in Salesforce if you do not have one already.
Setting Up the Force.com Site
- To create a site click Setup => Develop => Sites

- On the Sites page, enter a domain name, then click Check Availability to verify that the domain name has not yet been used.
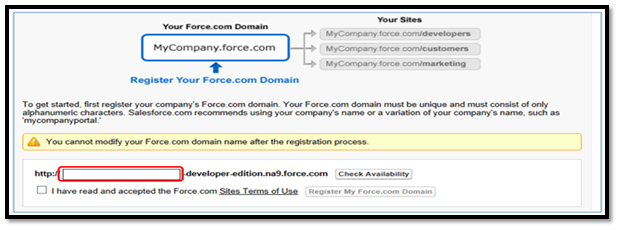
-
Once you choose a domain name that is available, select the box to indicate that you have read and accepted the Site Terms of Use and then click Register My Force.com Domain.
-
Enter all the Information and use "Chargebee" as Active Site Home page.

-
Select Active and click on Save.
-
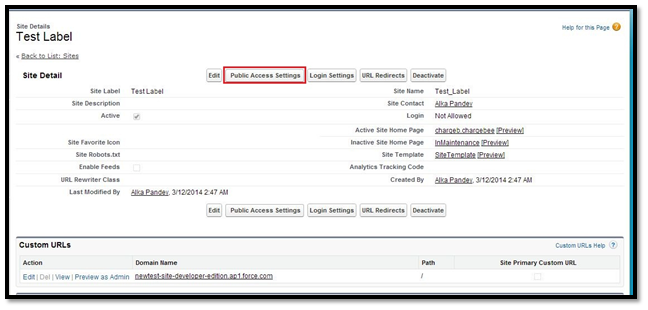
Now click on the Site Label.

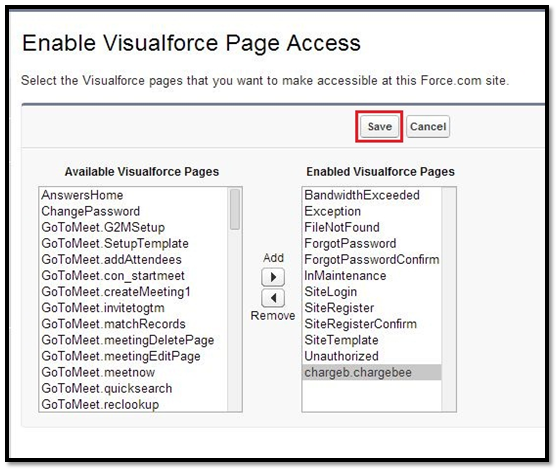
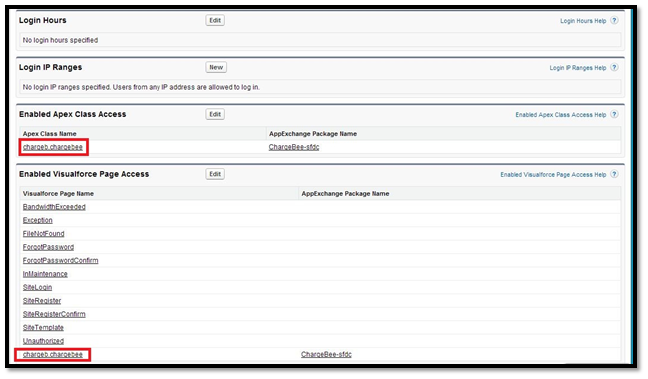
- On the resulting Site Details page, click Edit in the Site Visualforce Pages area if chargeb.chargebee is not already in Site Visualforce Pages area.
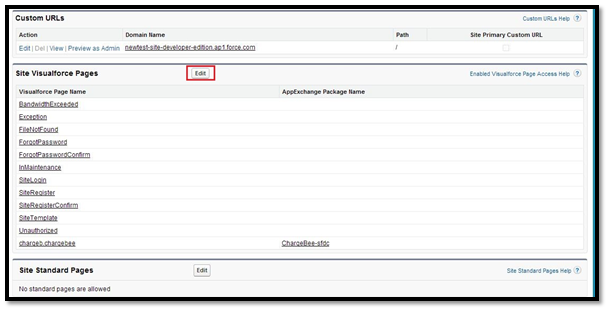
- On the resulting Enable Visualforce Page Access page, select chargeb.chargebee and use the Add arrow to move to the Enabled Visualforce Pages. Click Save.
- Now click on Public Access Settings.
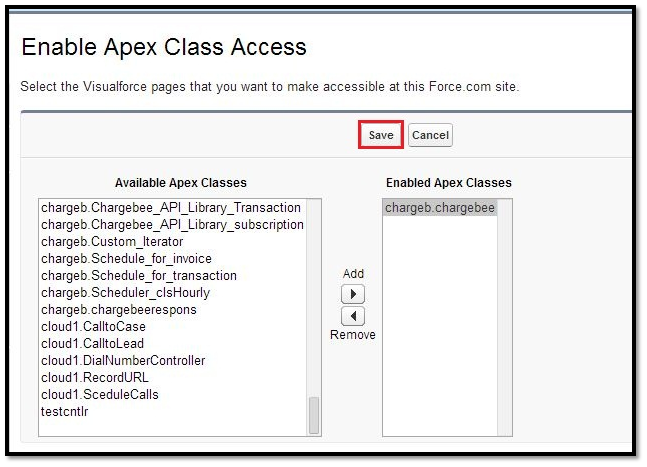
- Then, on the profile page, scroll to the Enable Apex Class Access section of the screen and click Edit.
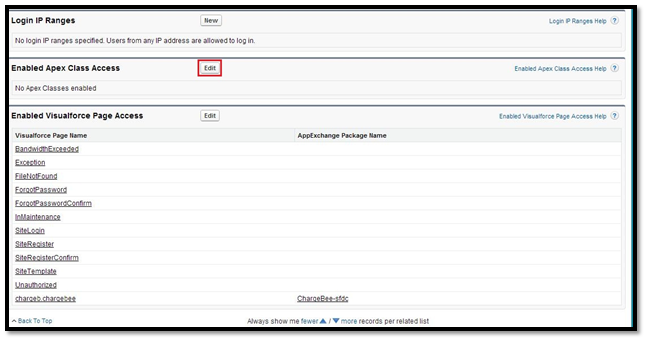
- On the resulting Enable Apex Class Access page, select chargeb.chargebee and use the Add arrow to move to the Enabled Apex Classes. Click Save.
Your Salesforce Site is now created and your webhook URL for Chargebee would be:
If your domain name contains the word"secure," then maintain that in your Event Notification URL. For example, if your domain is:
Then your webhook URL would be:
Note your webhook URL will be in the format:
{Your Default Web Address from your Site}/services/apexrest/chargebee_webhook
Note: If you already have a Salesforce Public Site and do not want to create a new one then you just need to add "Chargebee" Visualforce page and class in site setting and can use this site as above.
Webhook Setting in Chargebee
To add the URL in Chargebee, go to "Settings > API and Webhooks > Webhook Settings" and enter the URL in the "Webhook URL" field.
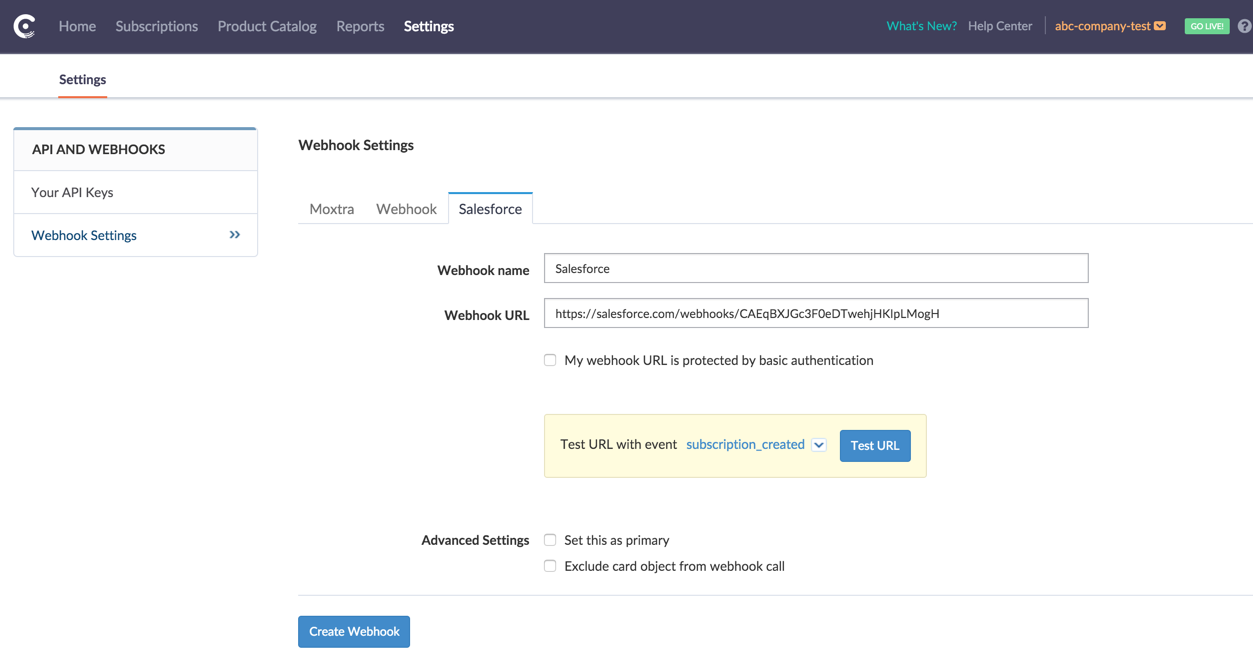
Click on Test URL and check if you are are receiving an OK response. If you get an OK, then click on Update Webhook URL button to save the URL.
Related Articles
Show more
Was this article helpful?