Configuring Sage Intacct
To enable automatic synchronization of invoices, customers, and other data from Chargebee to Intacct, integrate your Intacct account with Chargebee for financial management and analysis.
We recommend consulting your accounting advisor before configuring the integration. You can test the integration on the Test Site before setting up the integration on the Live Site.
Setup the Integration in Chargebee
To set up the integration in Chargebee, follow these steps:
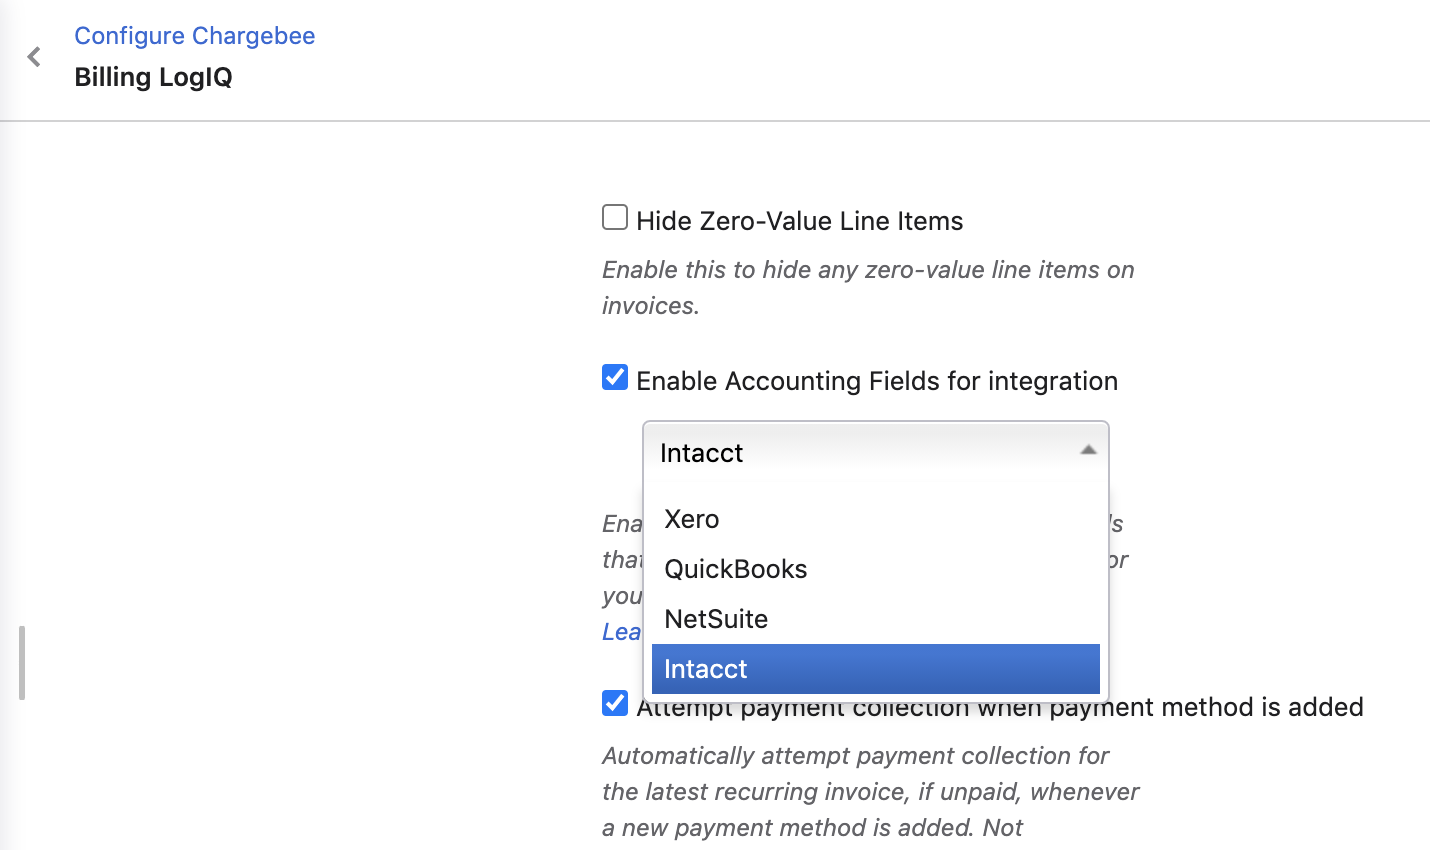
- Click Settings > Configure Chargebee > Billing LogIQ and Enable Accounting fields integration by selecting Intacct from the drop-down.
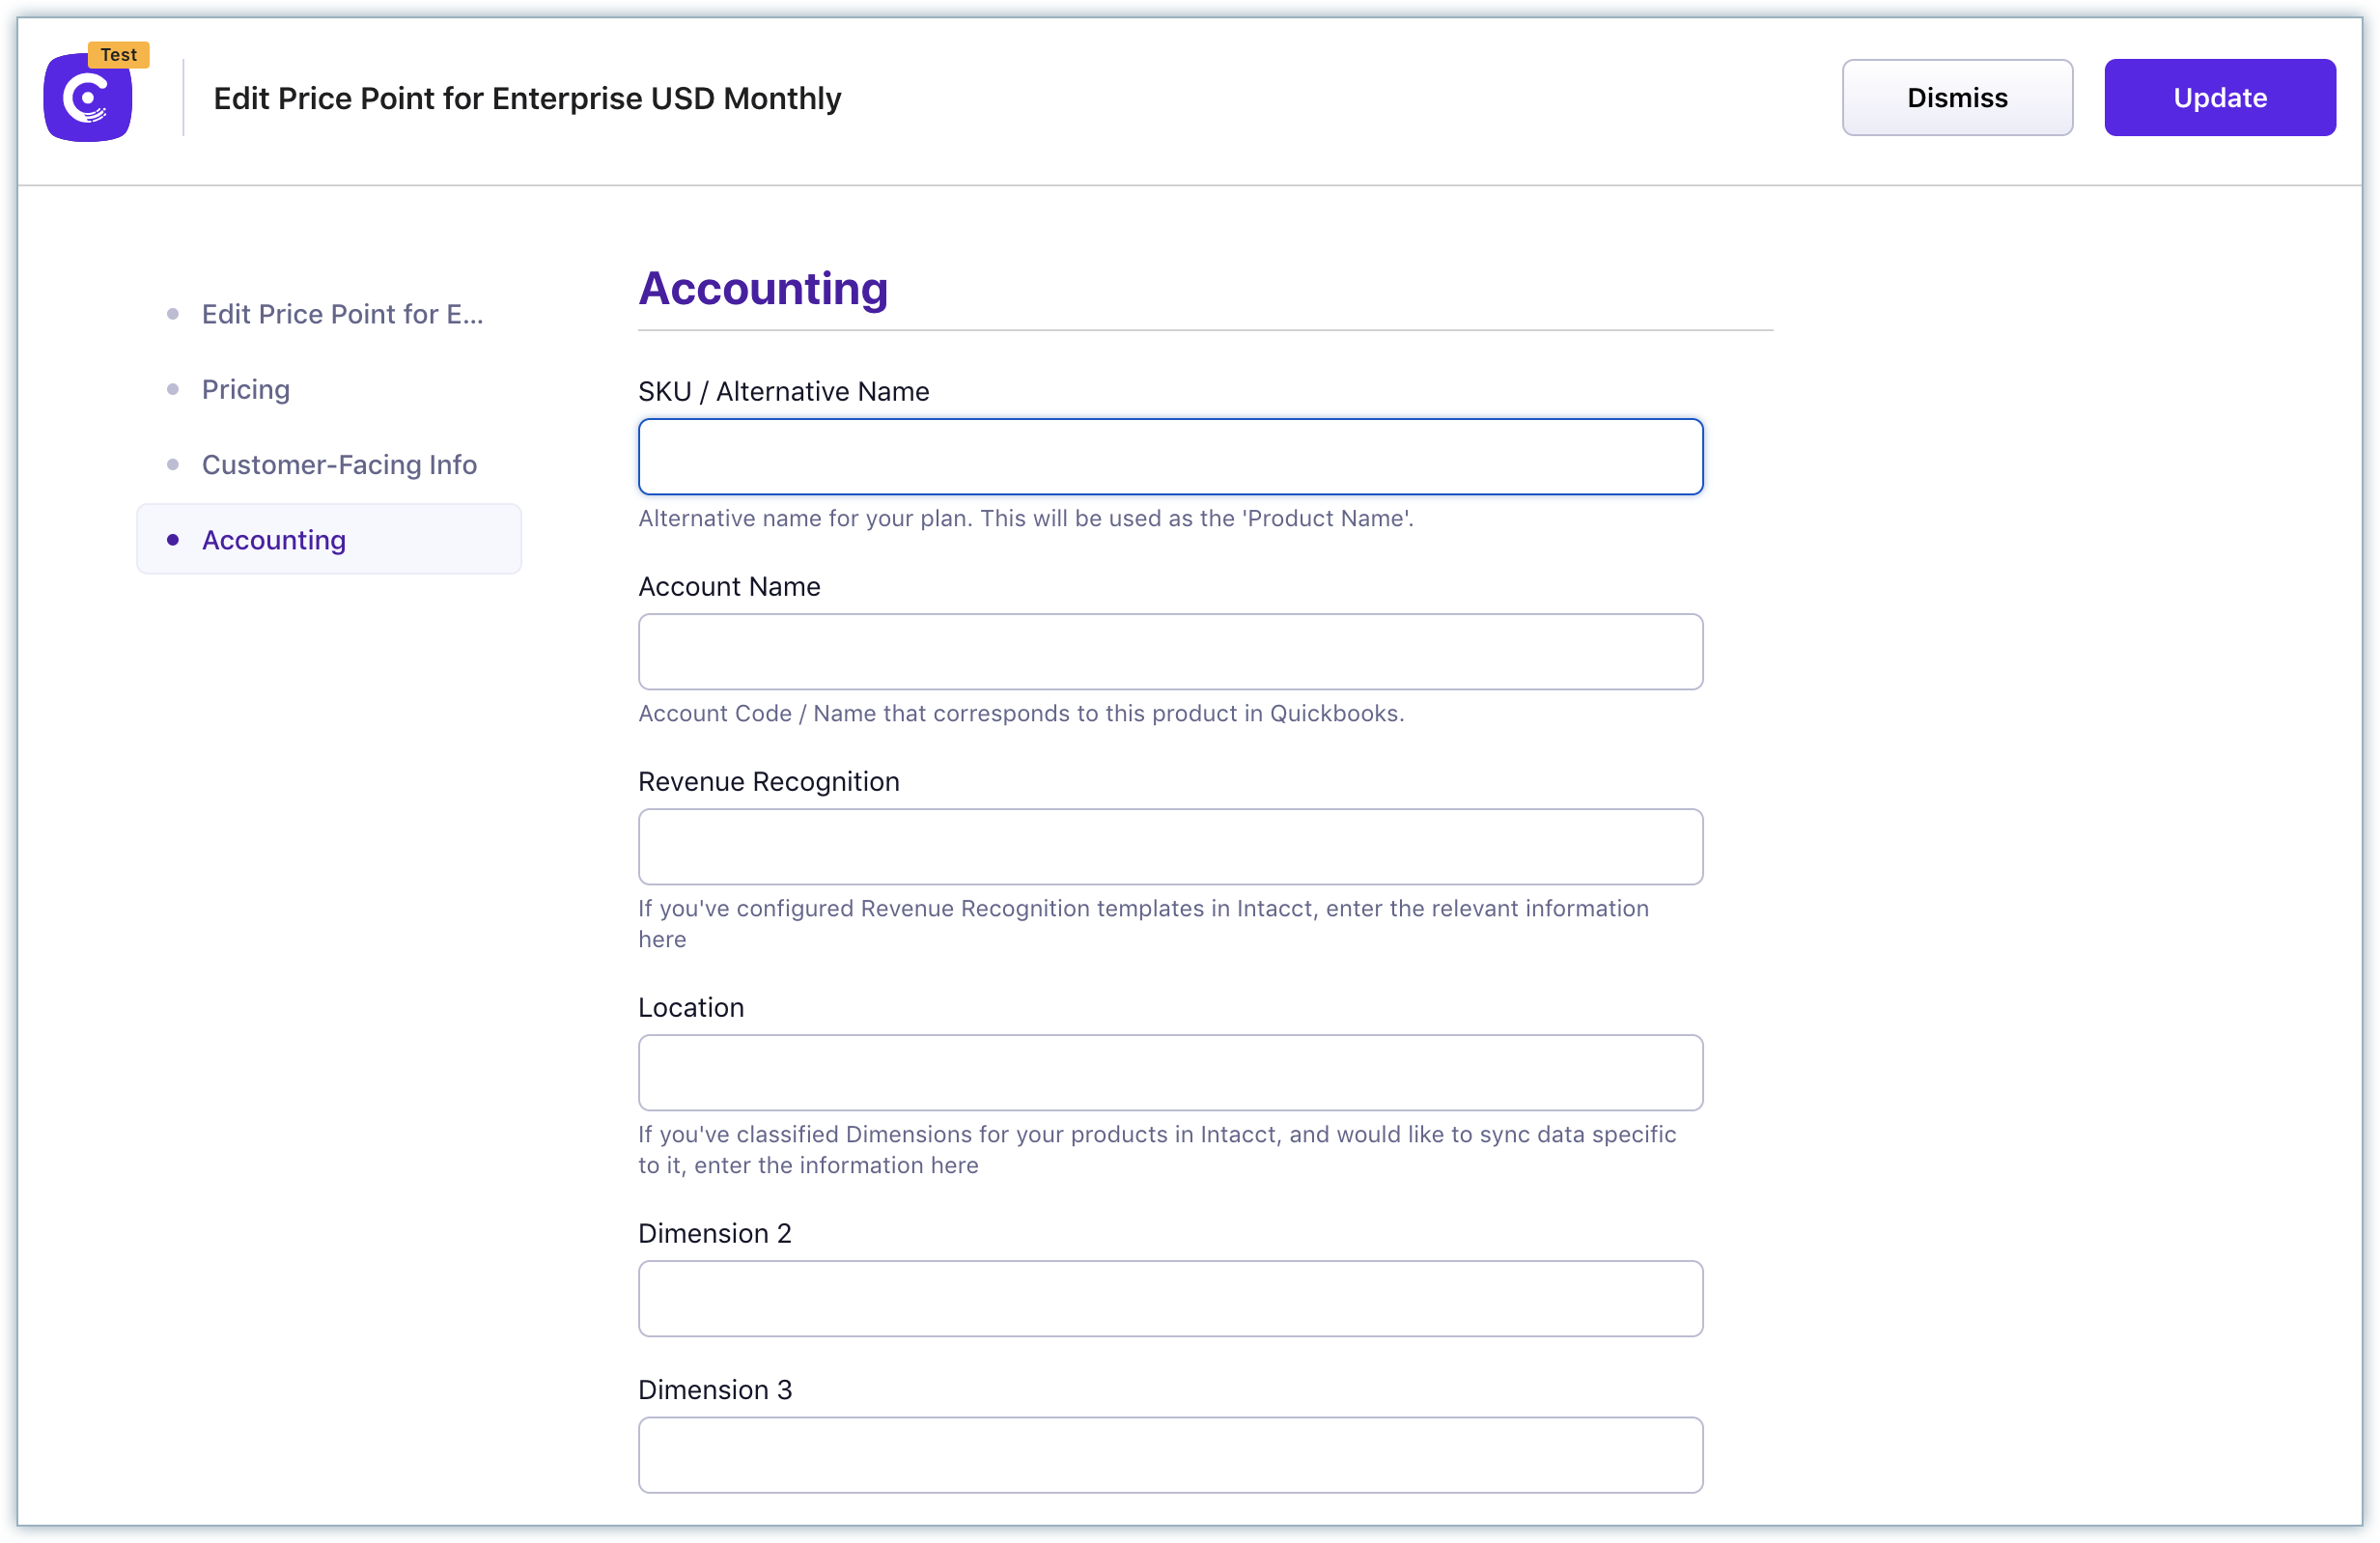
- Enter a GL Account for each Plan/Add-on in Chargebee. Click Product Catalog > Plans/Add-ons > Select a Plan/Add-on > Select a Plan/Add-on Price Point > Accounting Information > enter the GL Account Name. You can also provide a Revenue Recognition Template ID for Plan/Add-on Price Points.
- If the Plan ID/Add-on Price Point ID is greater than 30 characters, you should provide an alternative name in the Alternative Name/SKU field.
Caution!
- When you add new plans, add-ons, and price points in Chargebee anytime after the integration is set up, do not forget to enter the GL Account Name and SKU fields.
- If you make any changes to the GL Account Name in your Intacct account anytime after the integration is set up, you need to update them in Chargebee as well. Failing to do so could lead to a sync error.
-
If the Plan ID/Add-on ID is greater than 30 characters, you should provide an alternative name in the Alternative Name/SKU field.
-
Verify if the base currency in Chargebee and Intacct are the same. If you have multiple currencies enabled in Chargebee, then you should ensure these currencies are enabled in Intacct as well. You can view the currencies in Chargebee by navigating to Settings > Configure Chargebee > Currencies.
Setup the Integration in Intacct
- You require Full Admin access to Sage Intacct, with user role permissions to set up the integration.
- Chargebee is listed in Intacct's Marketplace. You can integrate your Chargebee site with Intacct using Chargebee's license, or you can also choose to integrate using your own web services developer license. Subscribe to Web Services by following these steps:
- Once you have logged in to your Intacct account, click Company > Subscriptions.
- Find Web Services and click to Subscribe.
- Add your company's Sender ID (this is the Sender ID assigned to you by Sage Intacct) to the allowed list by following these steps:
- Click Company > Company Info > Edit.
- Navigate to the Security tab > Web Services Authorizations section and add the Sender ID.
Follow these steps to connect Chargebee with Intacct.
Step 1: Connecting Chargebee to Sage Intacct
-
Log in to your Chargebee site.
-
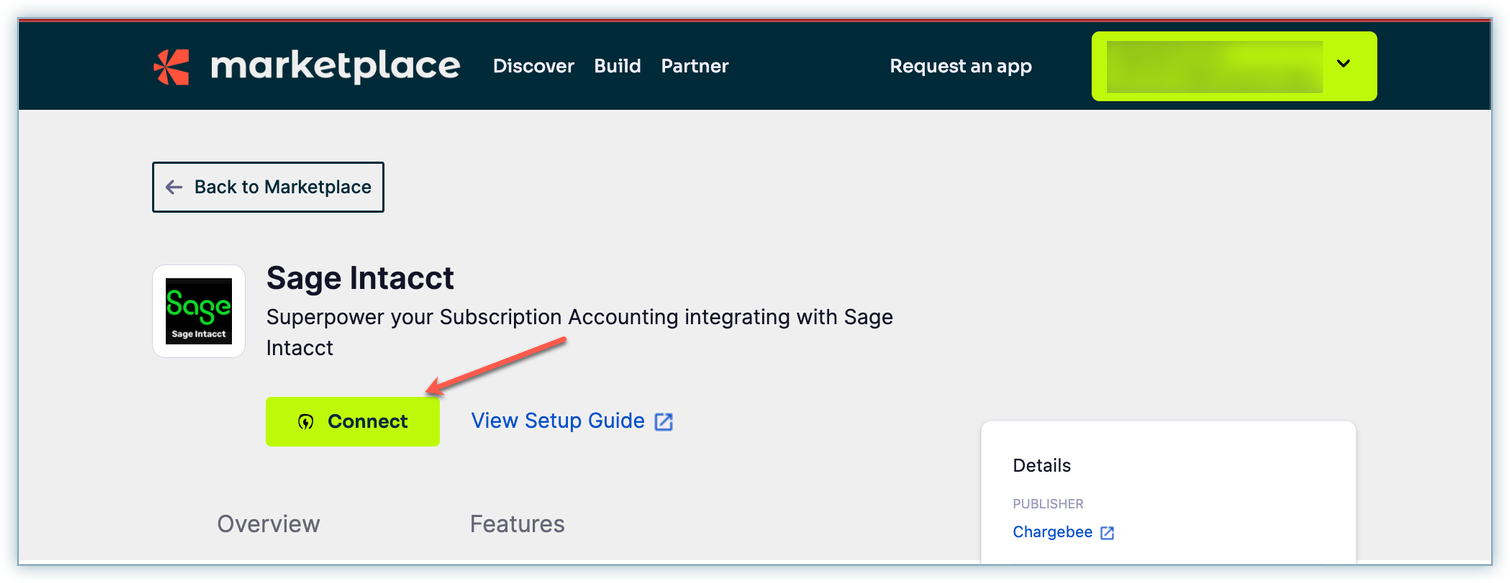
Connect to the Sage Intacct application listed on Chargebee's app marketplace by selecting Apps > Marketplace > Sage Intacct.
-
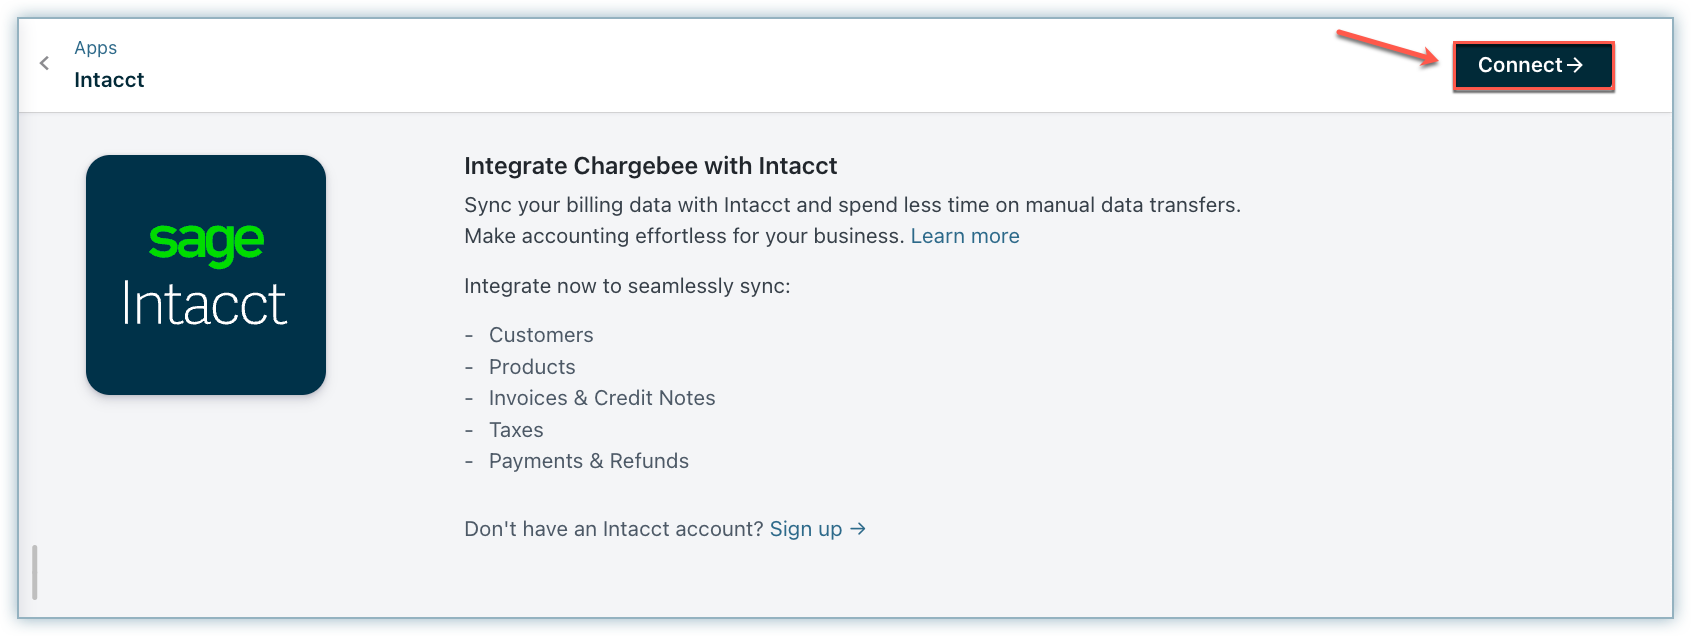
Click Connect to integrate Chargebee with Sage Intacct.
-
Enter the Intacct login credentials on the Connect Chargebee to Intacct screen.
-
You can connect your Chargebee site with Intacct either using Chargebee's license or using your own web services developer license, as required. If you already have a developer license with Intacct, select the Use developer license option and enter the required details.
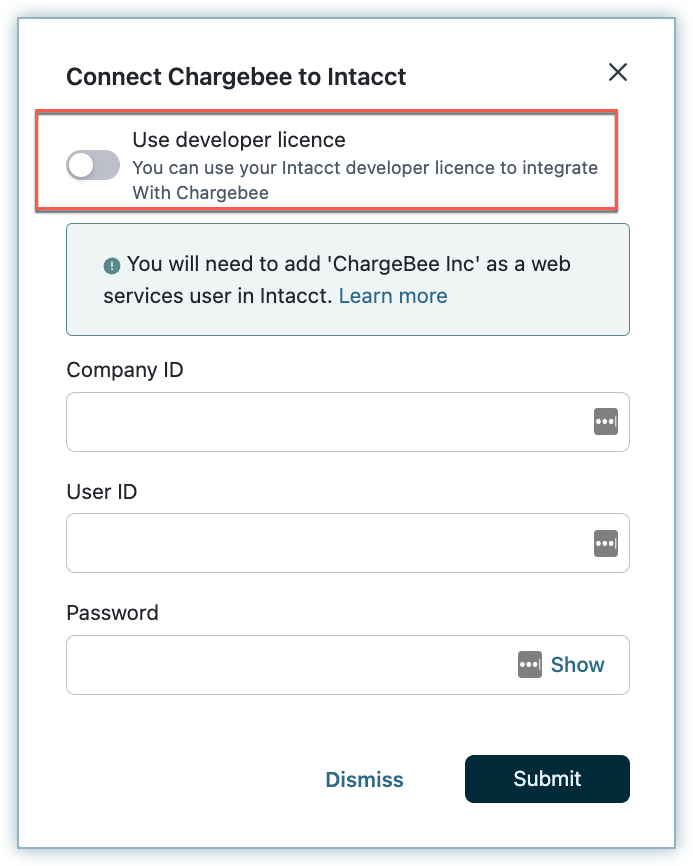
Once you have entered the credentials, click Submit.
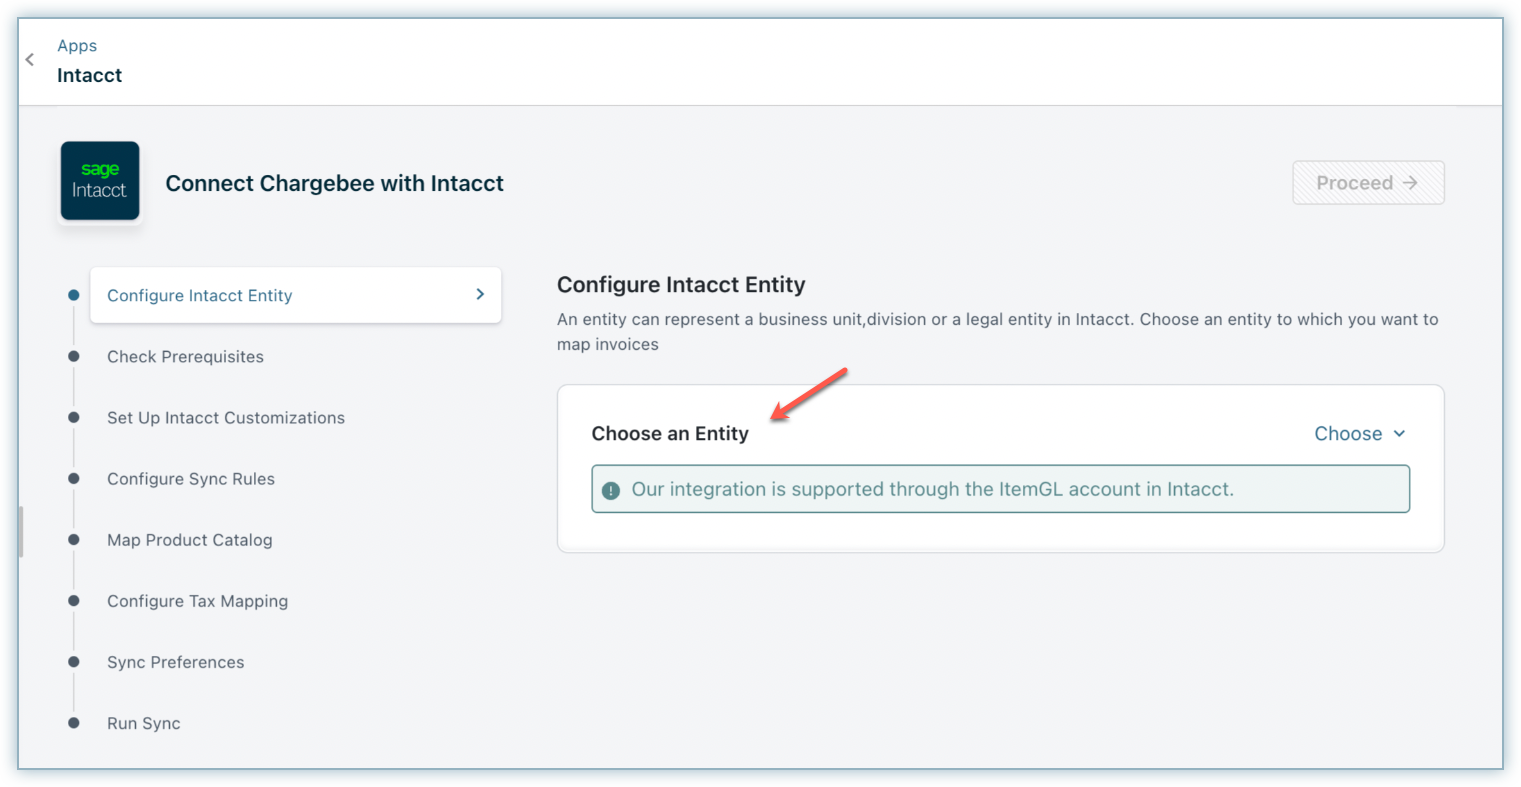
Step 2: Configure Intacct Entity
Choose a default subsidiary
Select a default entity in Sage Intacct where Chargebee should post customer and invoice information.
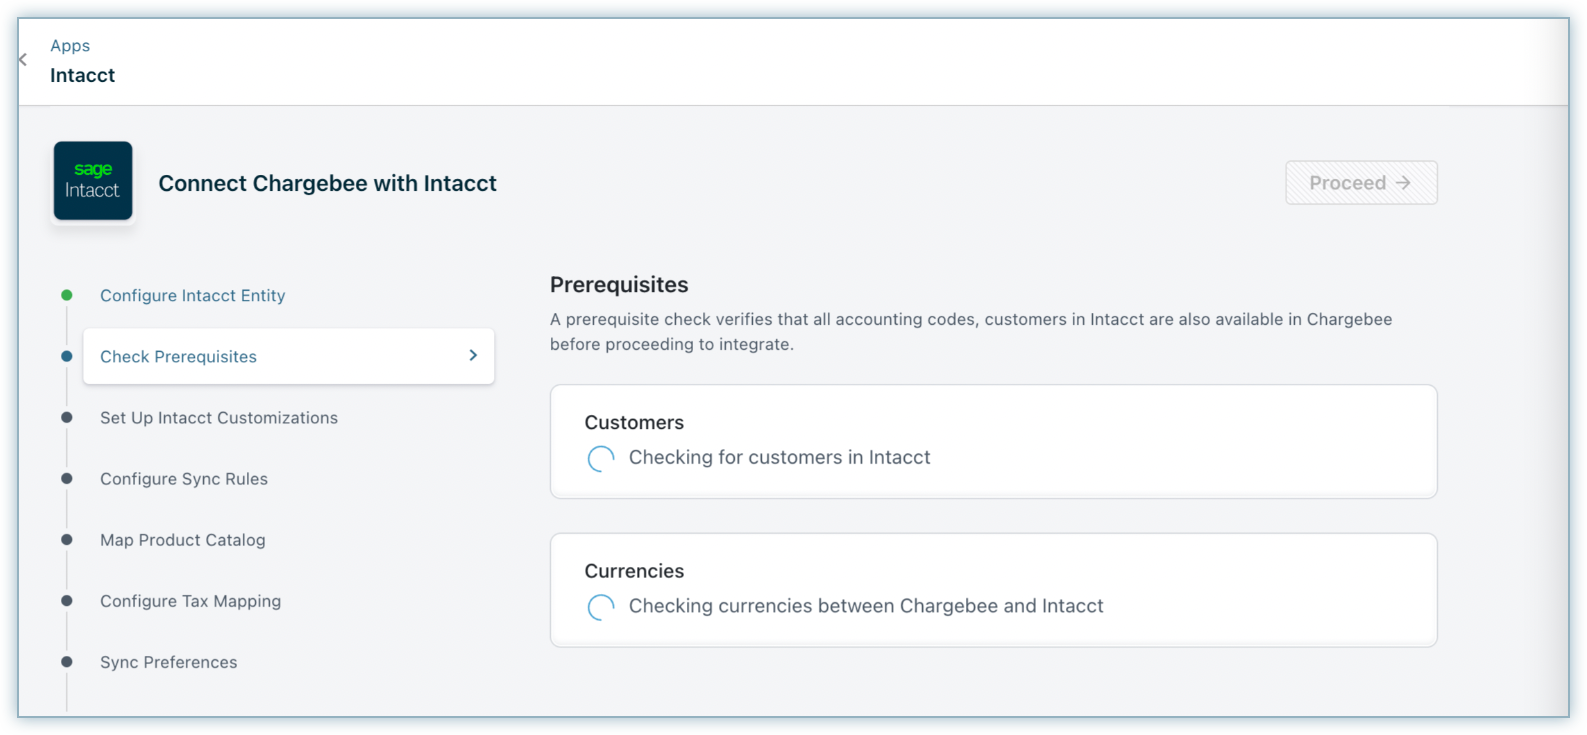
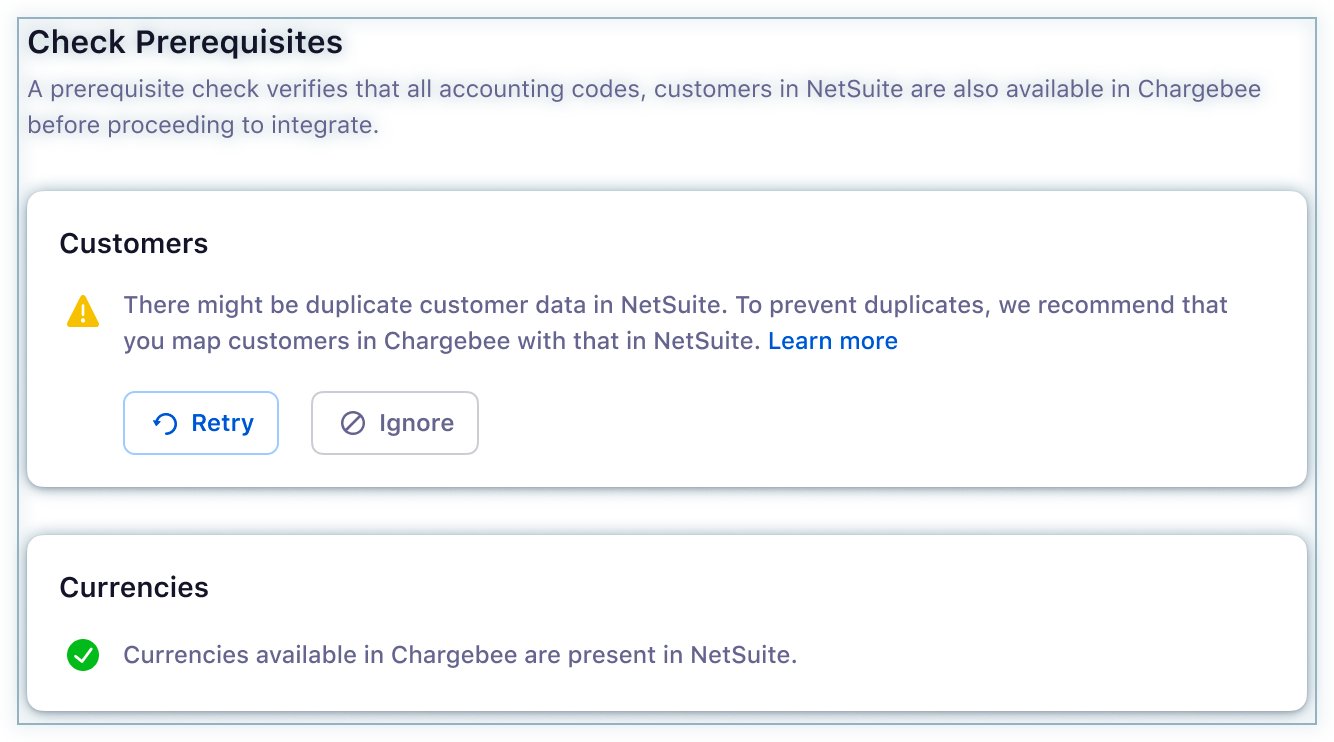
Step 3: Check Prerequisites
Chargebee performs a list of checks in Intacct. This prerequisite check verifies if the accounting codes, customers, and their currencies in Intacct are available in Chargebee before proceeding with the integration.
-
Customer duplicate check: If invoices from Chargebee are already available in Intacct, customers will be present as well. To avoid duplicates, you should map the customer records between both systems. You can download the list of customers as a CSV file, map the customers, and upload the updated sheet in Chargebee. If there is no possibility of duplicates, ignore this step and proceed.
-
Currency check: The currencies present in Chargebee should be present in Intacct. Chargebee does not compare the currencies via API. You need to manually compare and add the currencies in Intacct.
If customer data already exists in Sage Intacct, the following error message will be displayed. In such cases, you can contact our support.
Step 4: Set up Intacct customizations
In Sage Intacct, it's possible to activate the tax solutions add-on for designated regions. This add-on ensures that accounts receivable invoices are generated for those regions. Additionally, within Intacct, you have the capability to establish and customize transaction definitions for both Chargebee invoices and credit notes.
Tax Solutions
Intacct's tax solution helps in generating Accounts Receivable invoices for regions using the tax solutions add-on available in Intacct. You can activate Intacct's tax solution by toggling the Tax Solutions button.
Note:
Tax Solutions setting will be displayed only if the user account has Tax Solutions access.
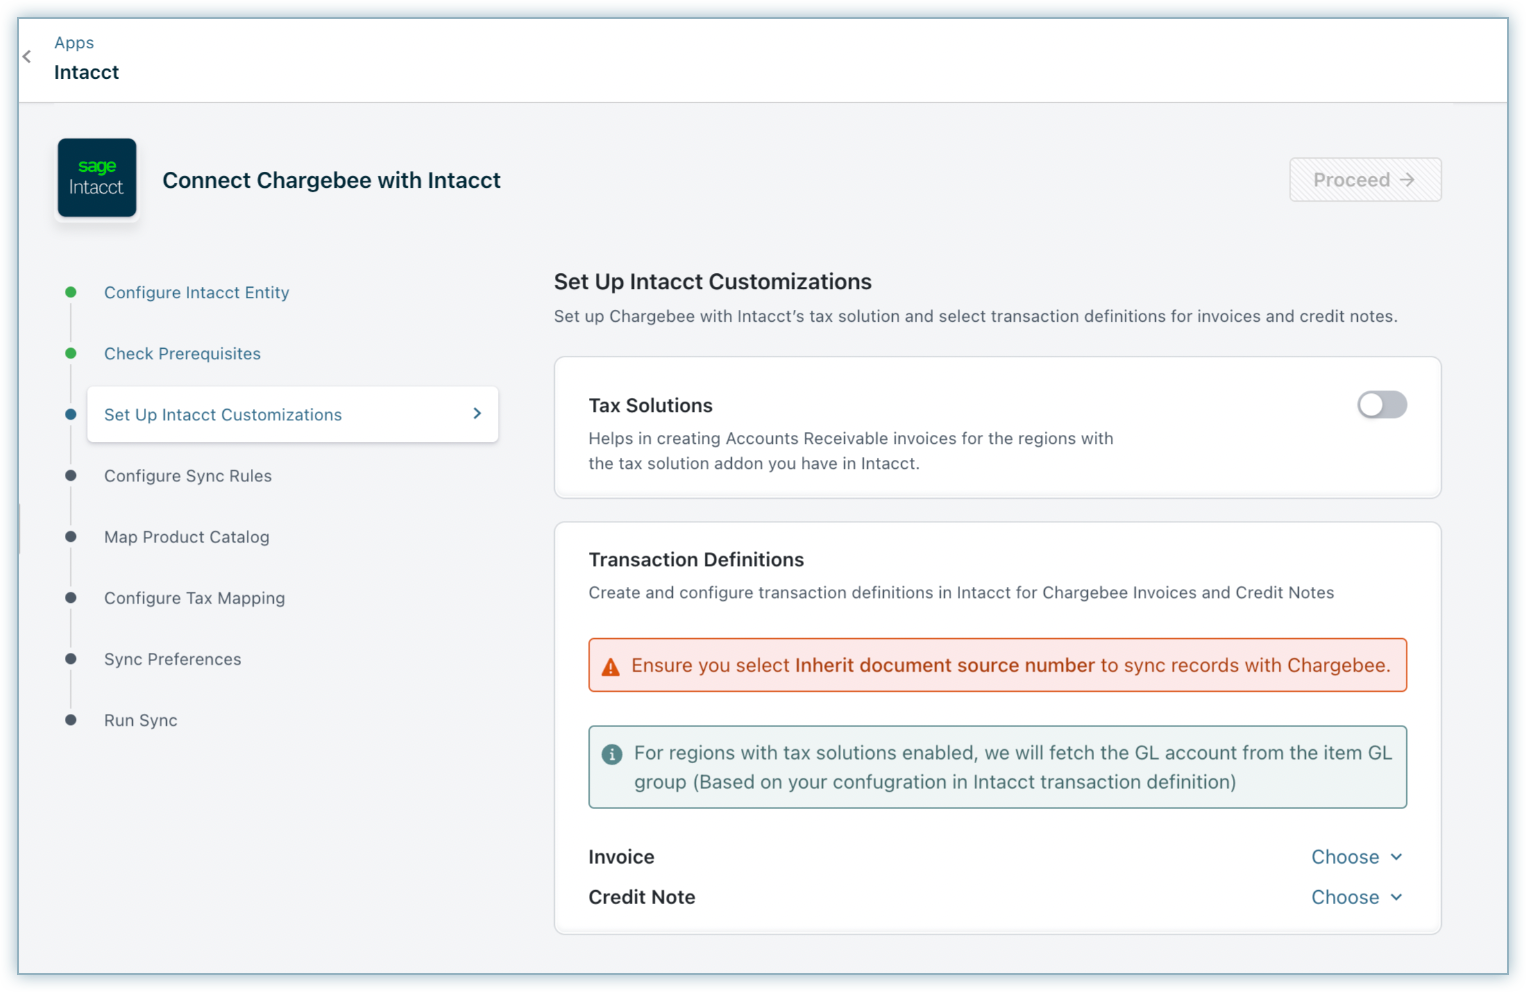
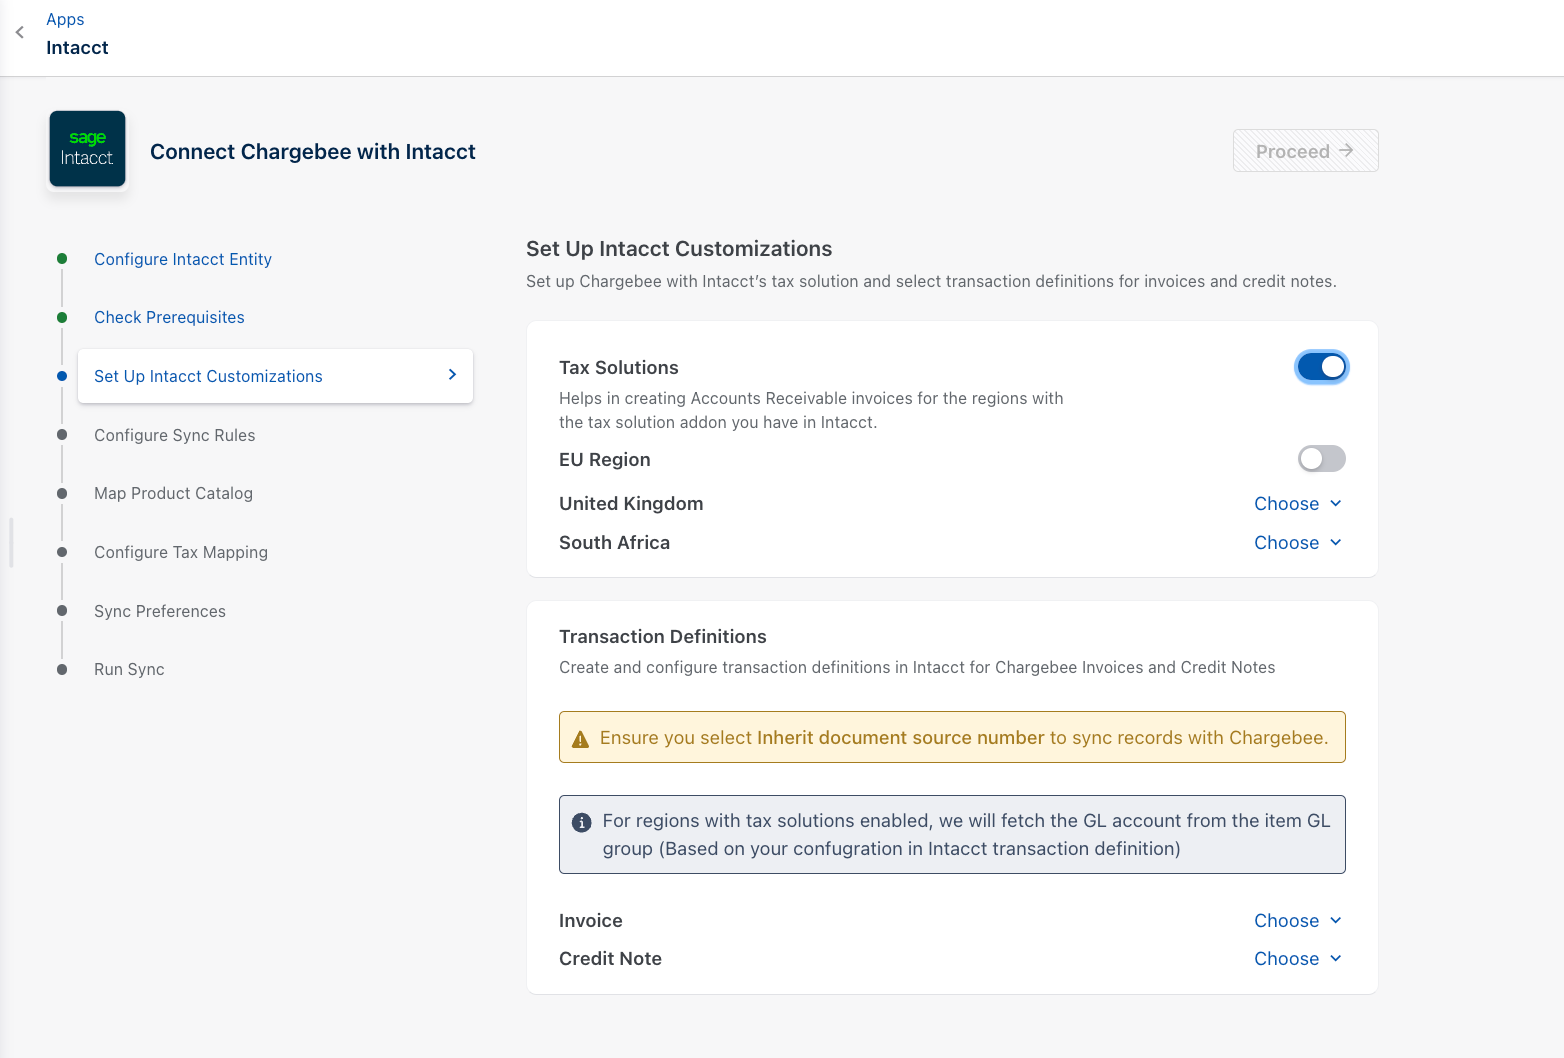
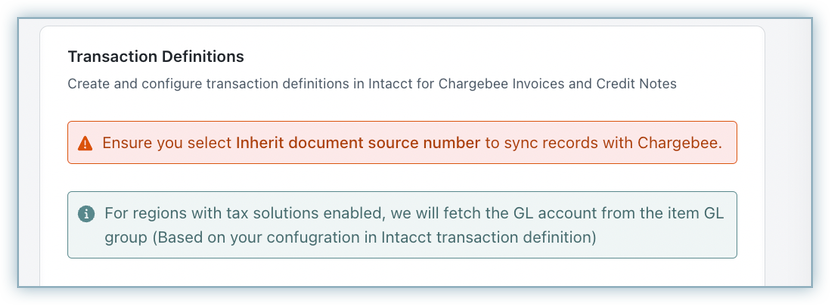
Transactions Definitions
You can map Transaction Definitions in Intacct for Chargebee invoices and credit notes from the drop-down. Click Proceed after selecting all the required fields.
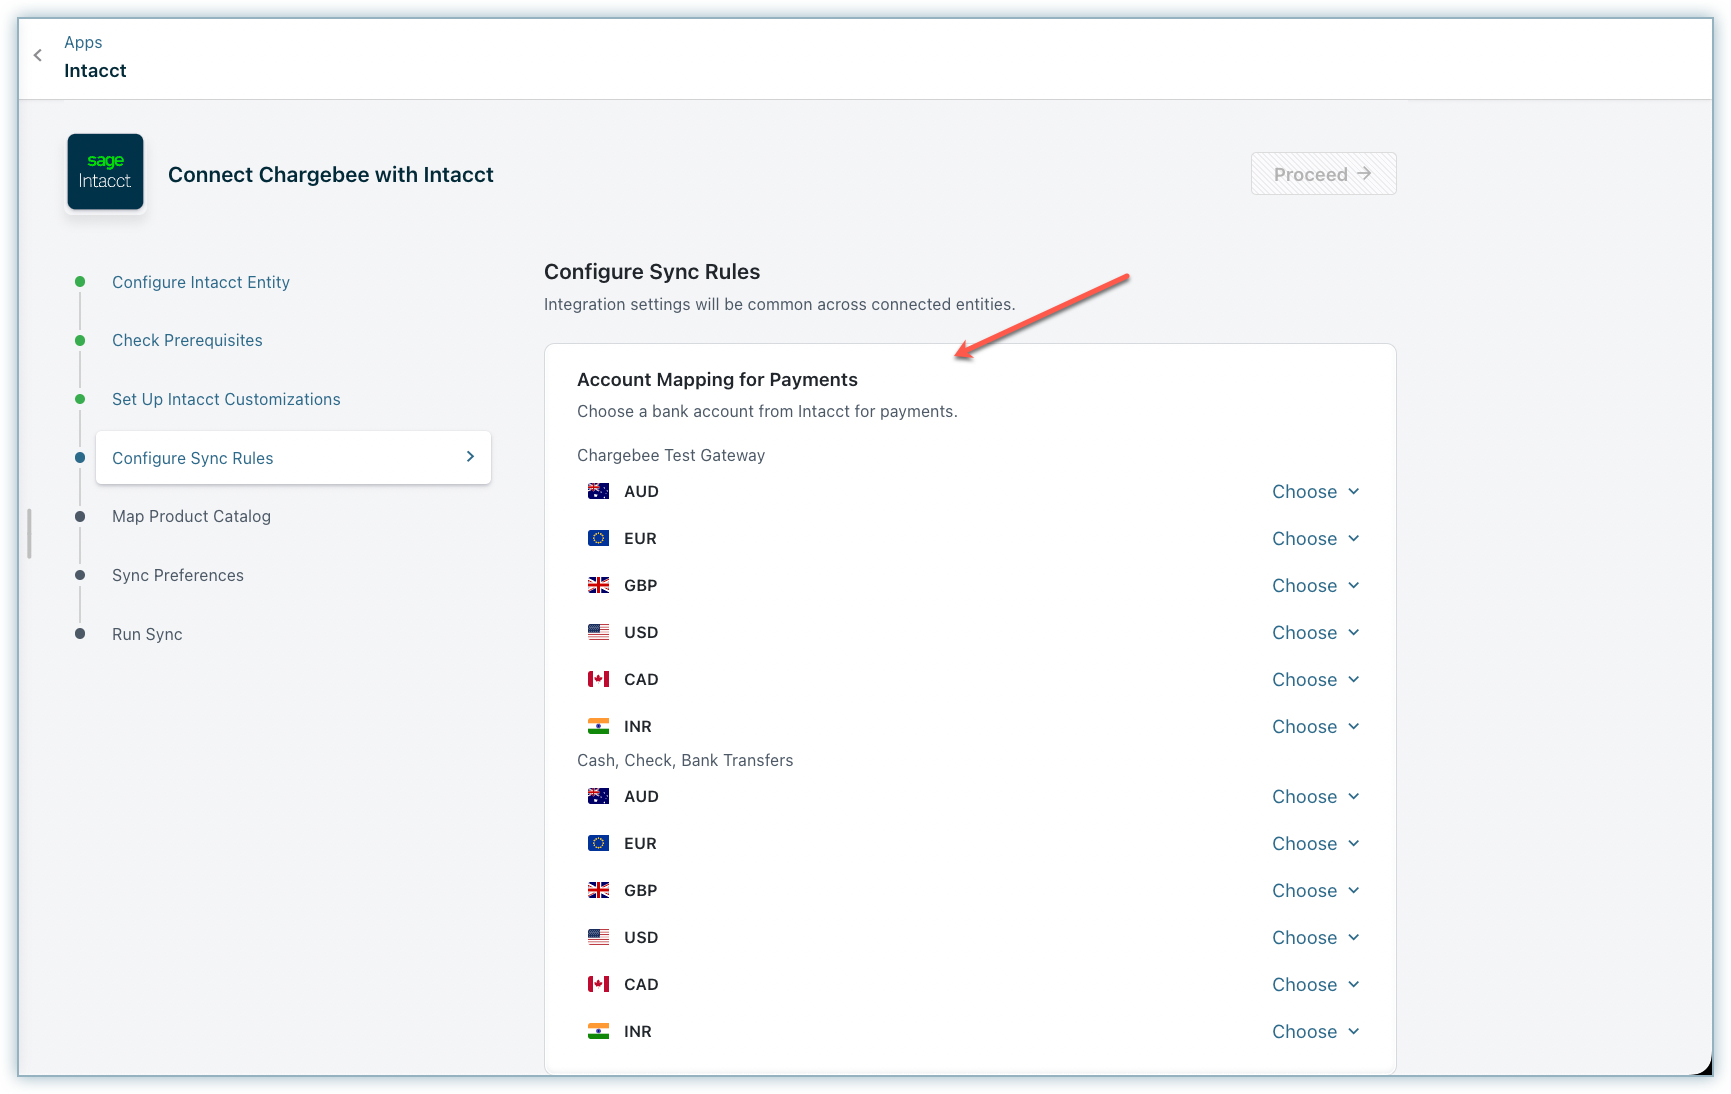
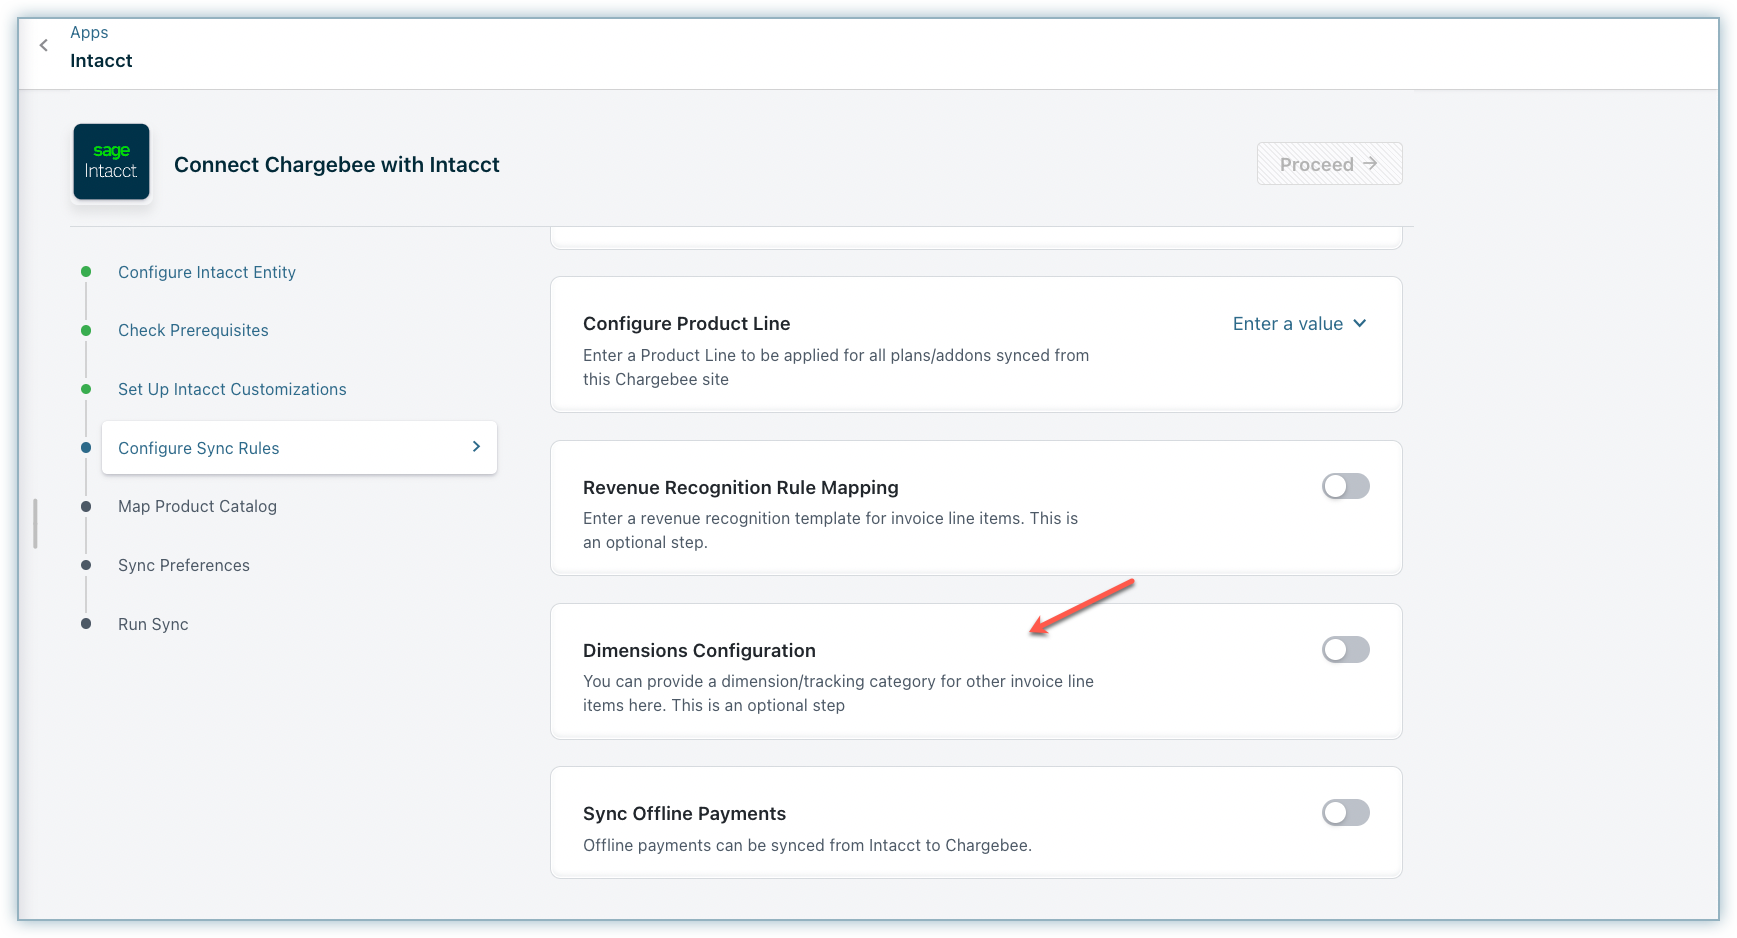
Step 5: Configure sync rules
To ensure that the integration settings are common to all the connected entities, you need to perform account mapping for payments, invoice line items, and refunds.
Account Mapping for Payments
Payment transactions recorded in Chargebee can be mapped to payment accounts in Intacct. For reconciliation purposes, you can select a clearing or undeposited funds account. If you have multiple currencies, payment gateways, or payment methods enabled, you can choose specific payments or checking accounts.
Refund Mapping
Refunds are created as vendor payments in Intacct. You can configure the following for mapping refunds:
Check number: The check number is a reference number. When there is a refund, the number you provide here is automatically incremented.
Vendor ID: Enter a vendor ID for the refund.
Refund clearing account: Select a clearing or temporary account to map refund transactions.
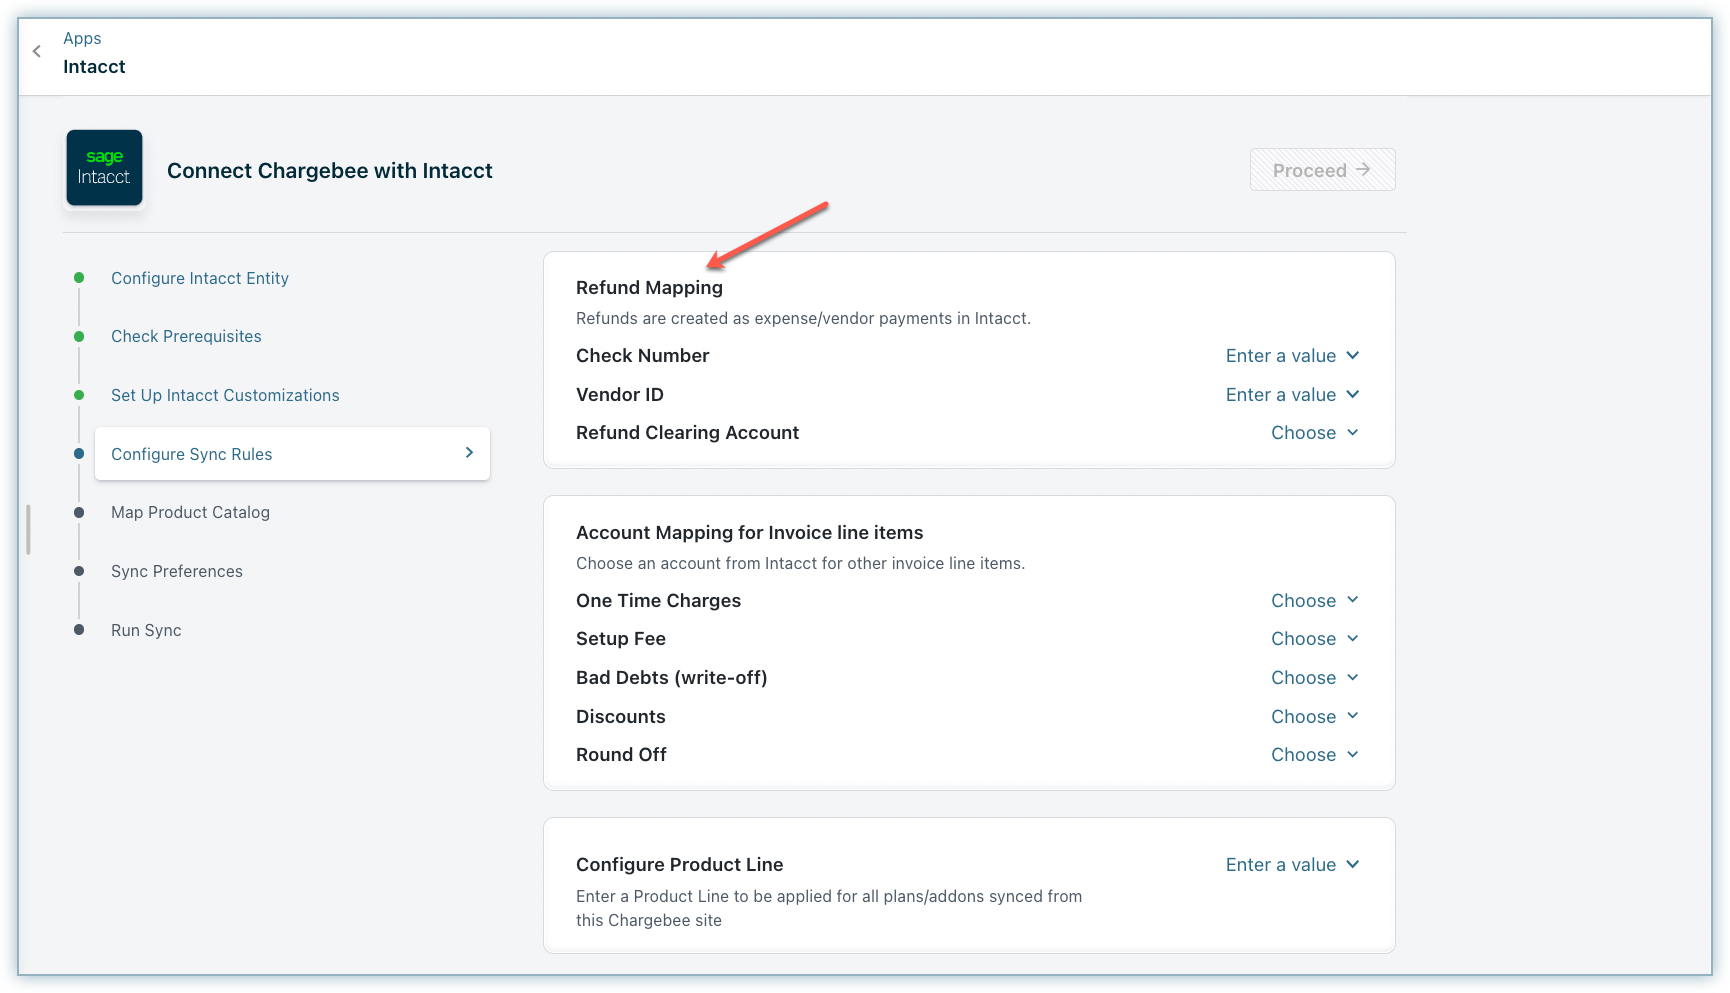
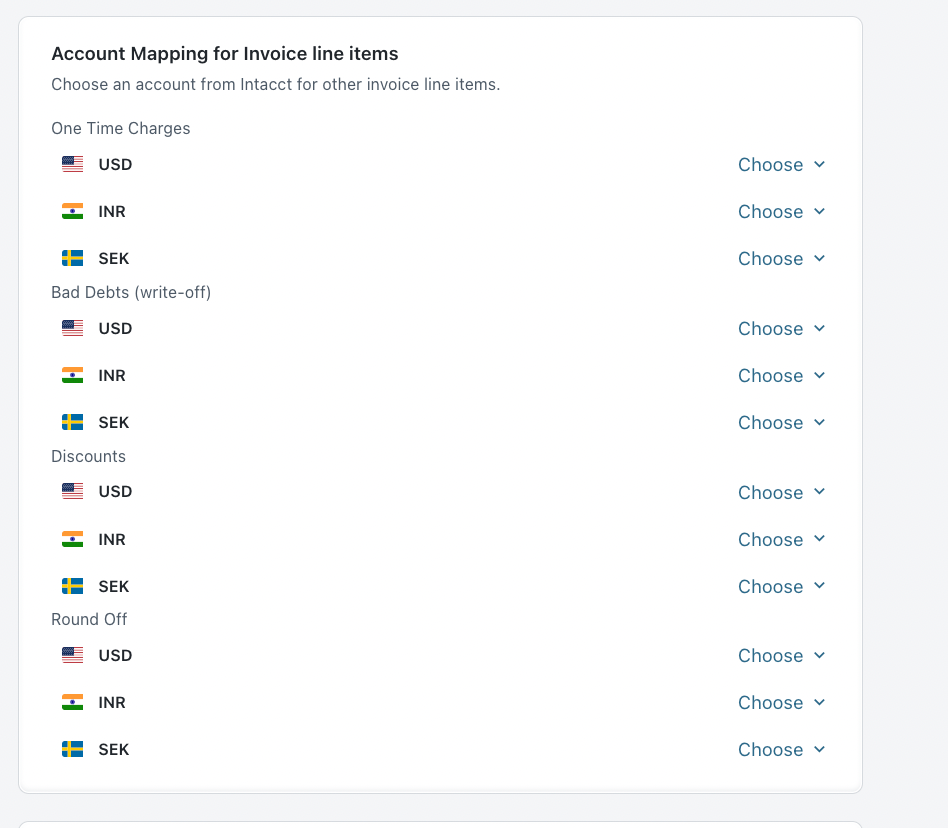
Account Mapping for Invoice Line Items
One-time charges: One-time or ad hoc charges created in Chargebee can be mapped to a GL Account in Intacct.
Bad debts (write-offs): You can choose where bad debts should be mapped in Intacct.
Discounts: Select an account to map discounts/Cost of Goods (COGs) in Intacct.
Round-off: If the invoice total calculation between Chargebee and Intacct differs, Chargebee will add a round-off item automatically. You can select an account to map these round-off line items.
You need to select the invoice line items in the itemGL group only if the feature multi-entity with a different base currency is enabled.
Note:
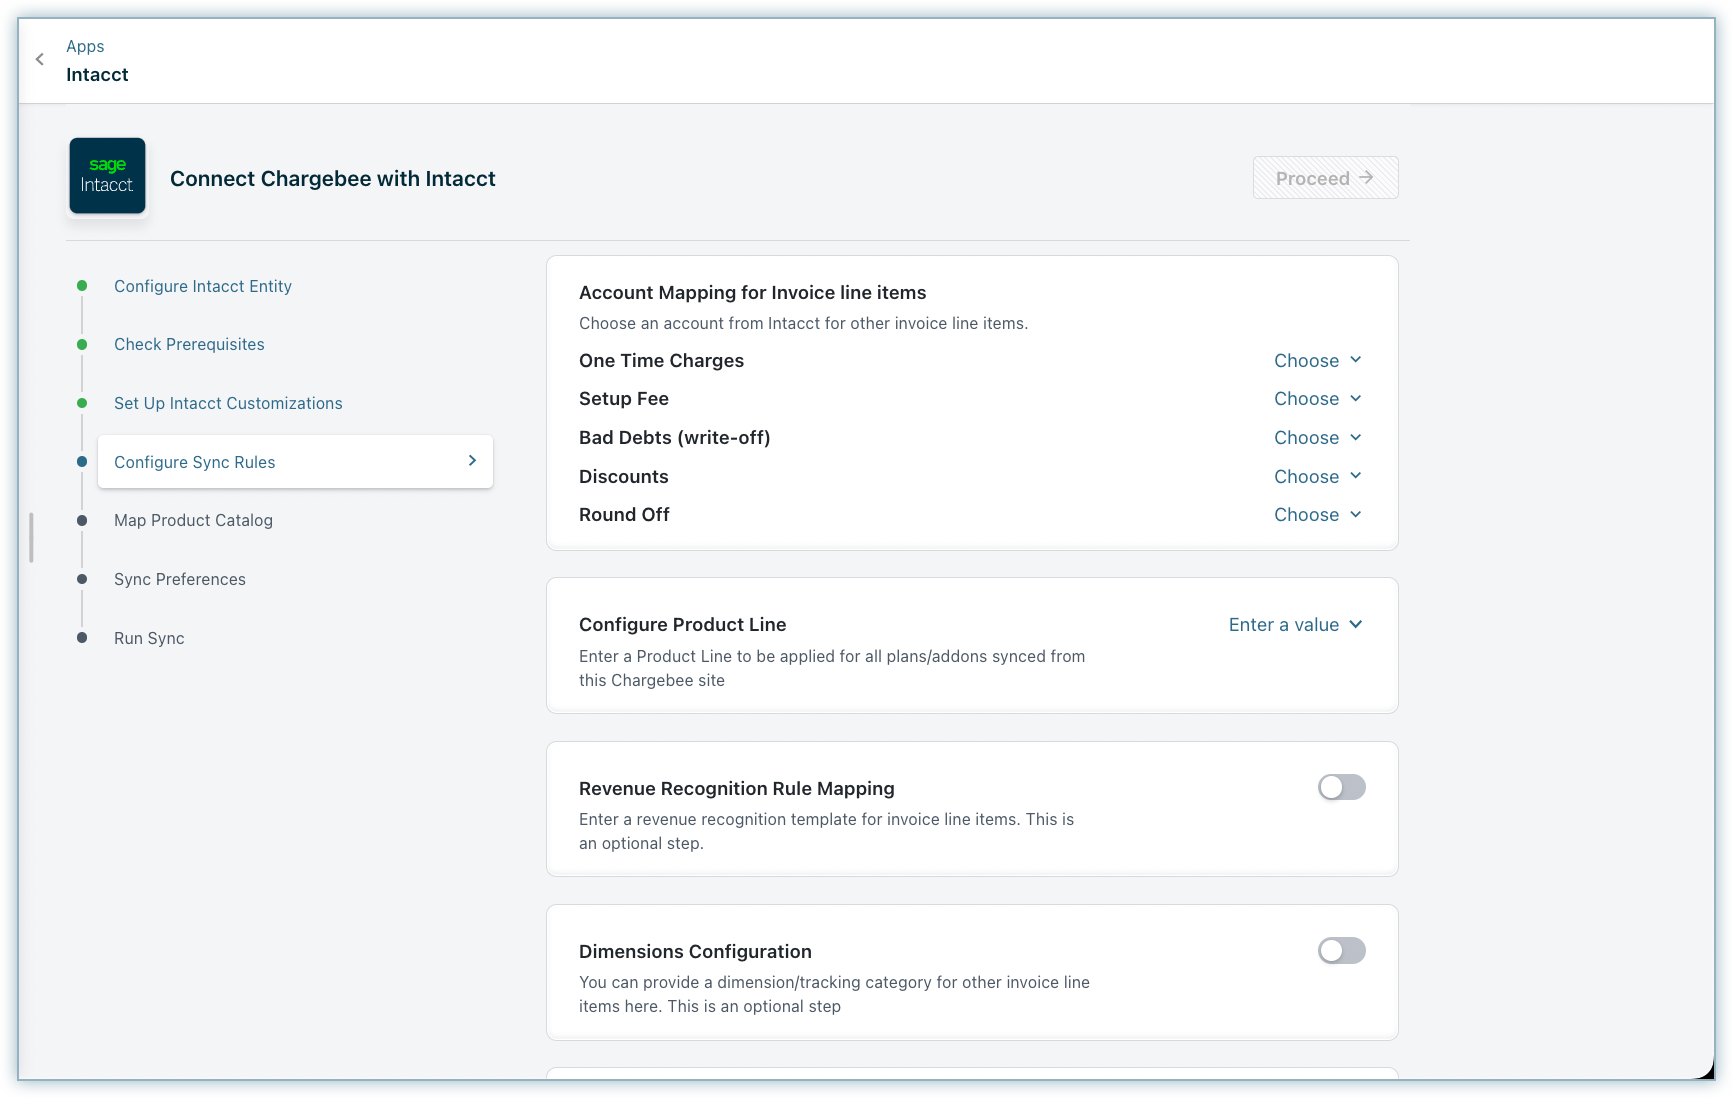
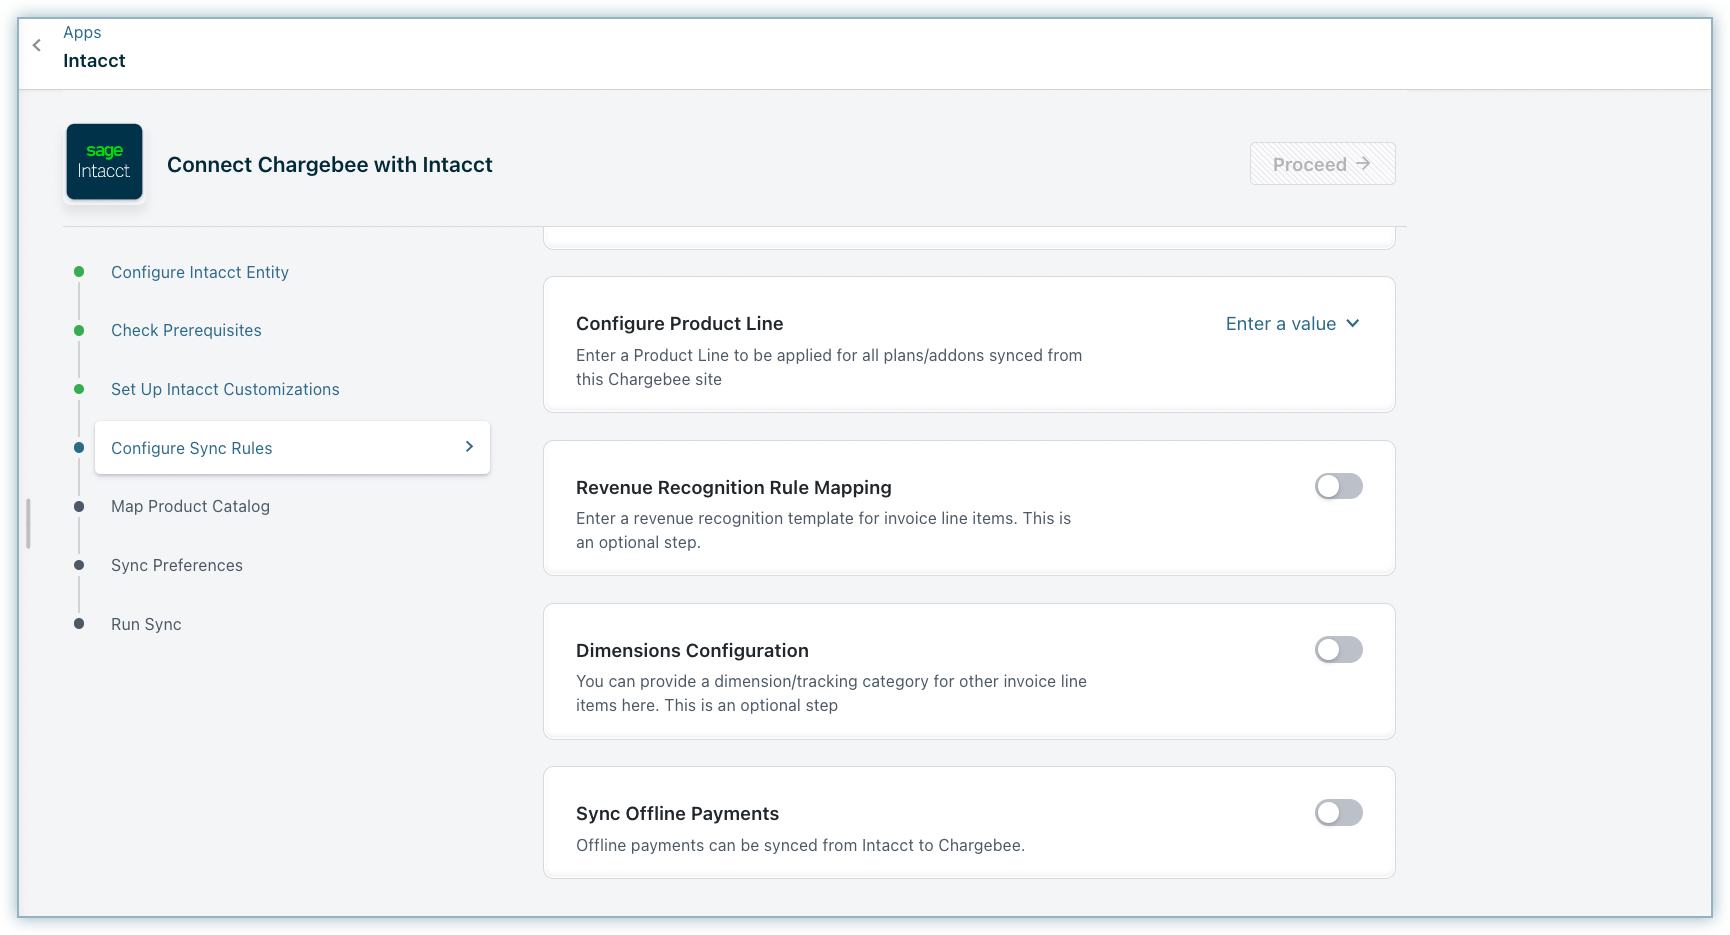
Configure Product Line
If you have multiple Chargebee sites, you can configure product line per Chargebee site.

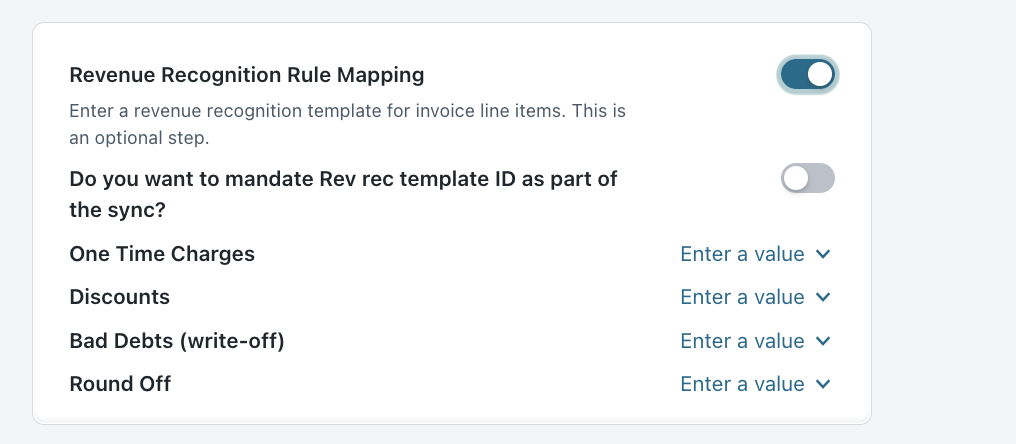
Revenue Recognition Rule Mapping
If necessary, you can choose a Revenue Recognition template for the invoice line items.
This is a screenshot of Revenue Recognition Rule mapping when enabled.
Dimensions configuration
You can configure the dimensions for invoice line items within the Dimensions Configuration.
- Location
- One-time charges
- Setup fee
- Round-off
- Refund
This is a screenshot of Dimensions Configuration when enabled.

Note:
Dimensions can be configured for each currency based on a backend setting. Contact support if you need mapping at the currency level.
Over Payment Mapping
When excess payments are added in Chargebee, they are synced to Intacct as overpayments. When the Top Level is chosen, Intacct mandates the inclusion of the 'Overpayment Location ID' and optionally the 'Overpayment Department ID'.
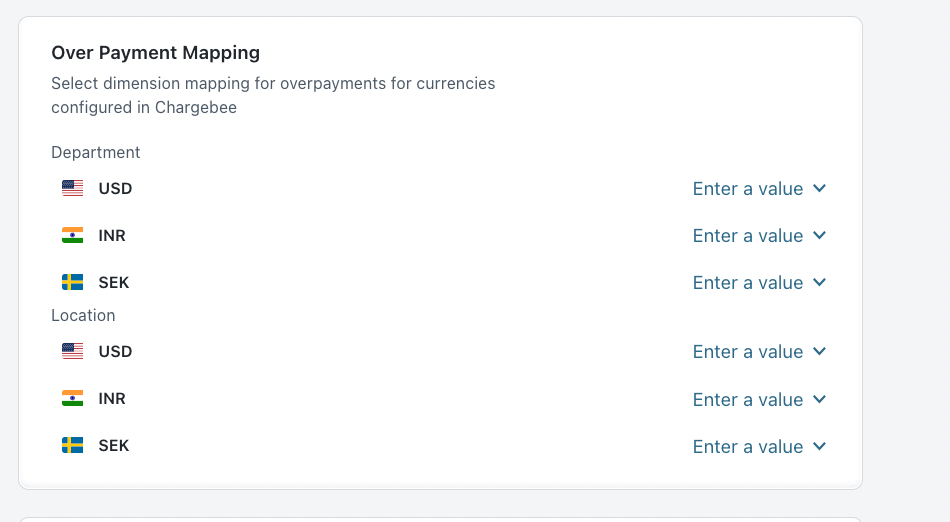
Note:
Over Payment Mapping is accessible if a backend setting is enabled to be used when Intacct's multi-base currency feature is enabled. Reach out to support to enable this feature.
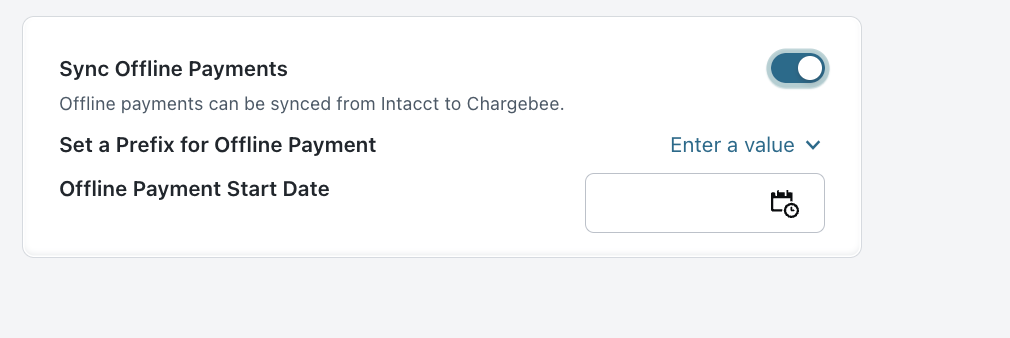
Sync offline payments
When offline payments are reconciled against payment due invoices in Intacct, invoices get updated as paid in Intacct. These payments can be synced back to close payment_due invoices in Chargebee. You can choose to enable this option using the toggle button.
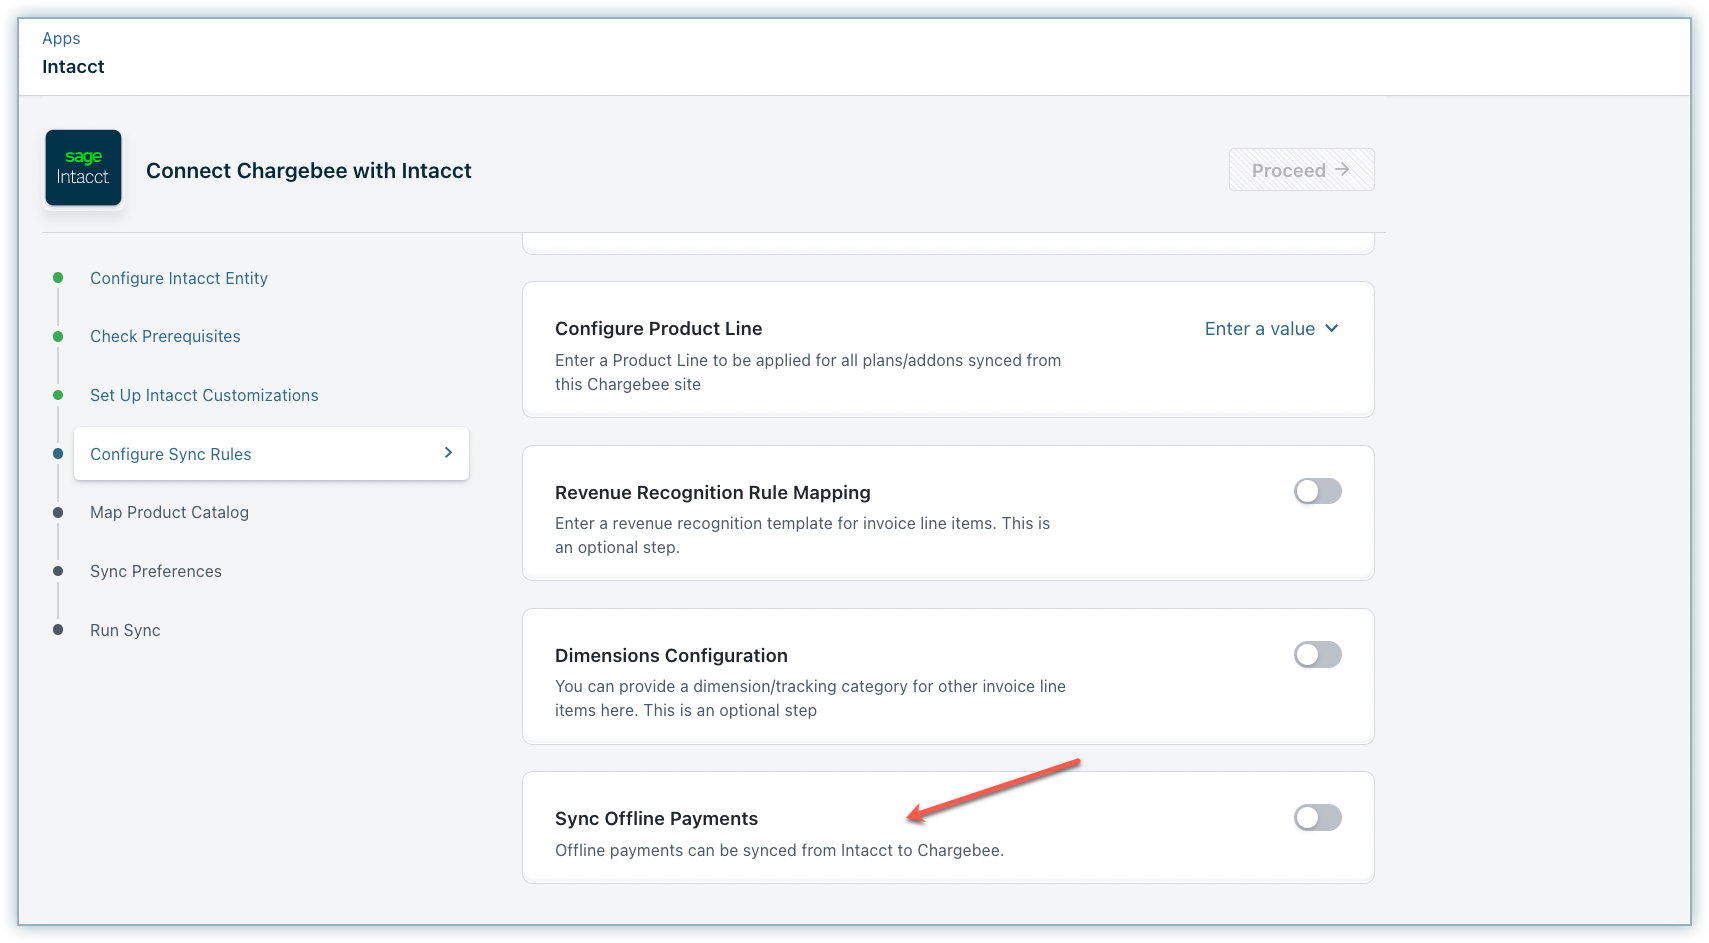
This is a screenshot of Sync Offline Payments when enabled.
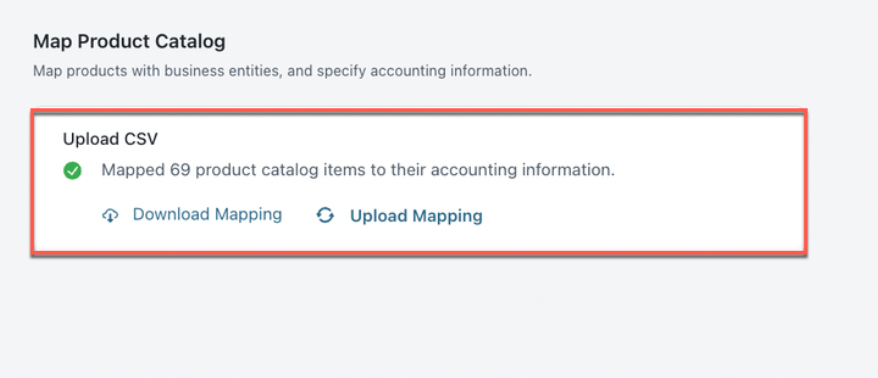
Step 6: Map Product Catalog
Update the accounting details for plans and add-ons price points in Chargebee. This information is necessary to set up the integration between Chargebee and Intacct. Ensure all required fields are completed.
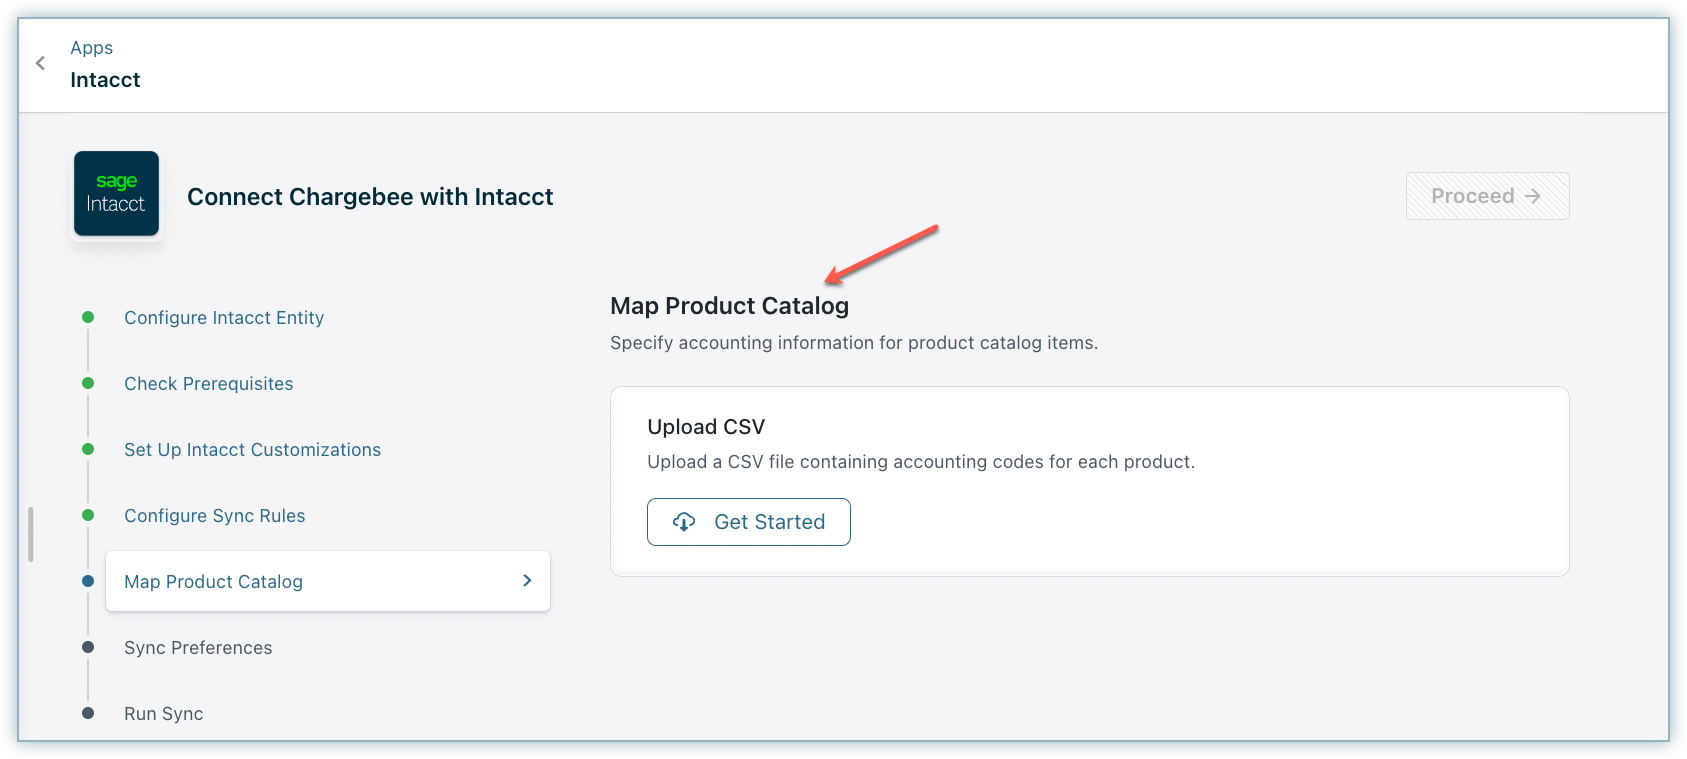
You can upload a CSV file containing mapping details of products. Within these mappings, you can specify accounting codes for each entry.
-
Download the sample CSV template.
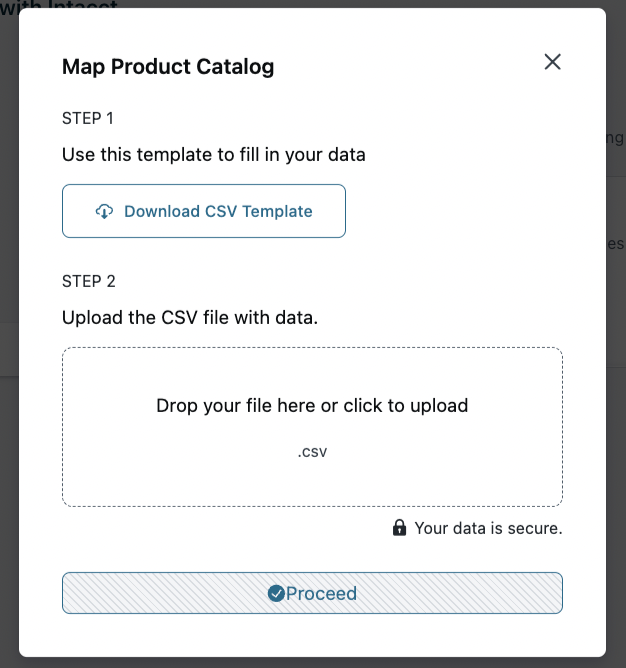
The downloaded CSV file contains the following fields:
| CSV Field Name | Description | Additional Info |
|---|---|---|
| PRODUCT_ID | Unique identifier for Chargebee's item prices. | |
| PRODUCT_NAME | Name of the Item price in Chargebee's Product catalog. | |
| SKU | SKU of the product | |
| ACC_CODE | Accounting code associated with the item | |
| ACCOUNTING_FIELD1 | Revenue Recognition | If you've configured Revenue Recognition templates in Intacct, enter the relevant template ID here. |
| ACCOUNTING_FIELD2 | Location | If you've classified Dimensions for your products in Intacct and would like to sync data specific to it, enter the information here |
| ACCOUNTING_FIELD3 | Dimension3 | |
| ACCOUNTING_FIELD4 | Dimension4 |
-
Populate the file with the required data and upload it using the option provided here.
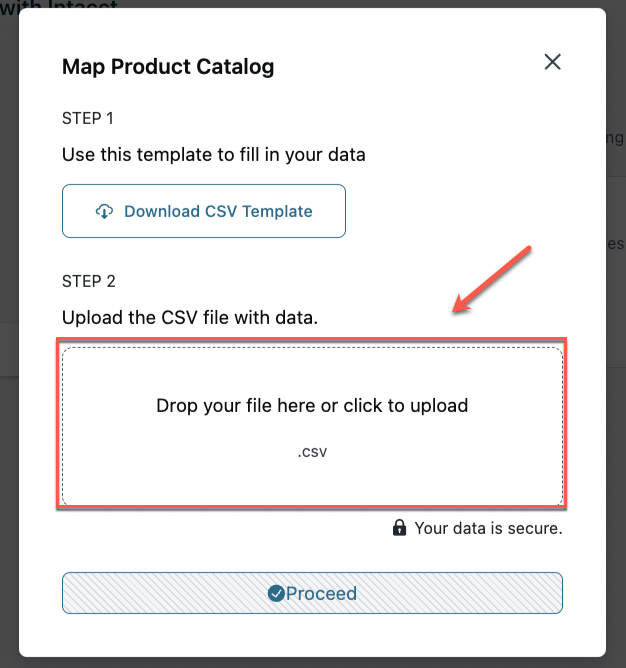
-
Once you have uploaded the file, click Proceed. Once the upload is successful, the following screen appears.
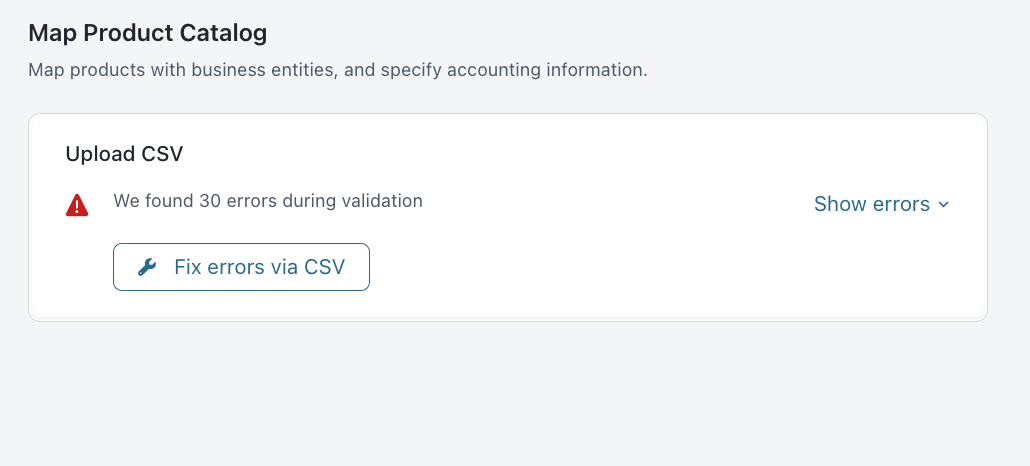
If you perform any validations, you will receive an error message, as shown below. This error can be fixed by re-uploading the file with the correct mapping.
Note:
Once PCM is used, the configurations on the item details page will no longer be honored. To save time, we pre-populate the CSV with the information from the UI filled out on the item prices page accounting details tab. Even if there are no changes, we need to re-upload the file for the first time.
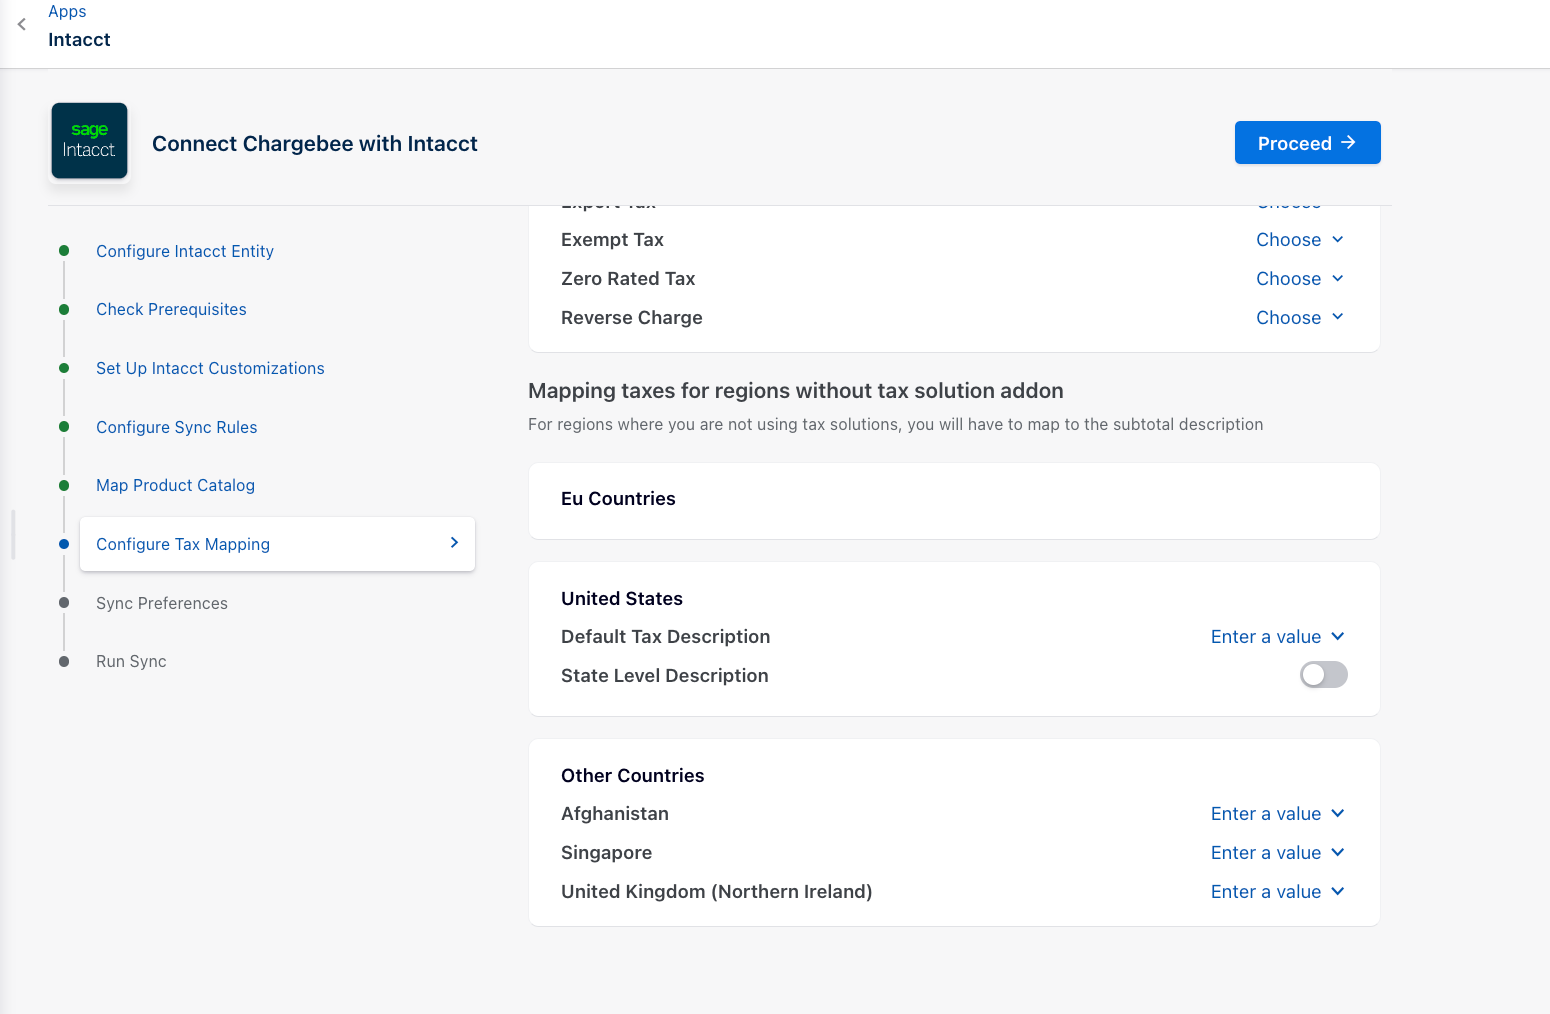
Step 7: Configure Tax Mapping
You can add taxes as sub-totals in Intacct for accounting or ERP modules. For example, if you are remitting sales tax in New York (which is based in the US), you can create a sub-total item for each tax jurisdiction within that region.
- For the sales invoice, the subtotal description is mapped for countries that have tax solutions disabled.
- Tax details from Chargebee will be mapped as AR invoices with taxes for countries that have tax solutions enabled.
You can map the subtotal description for regions without tax solutions as shown here.

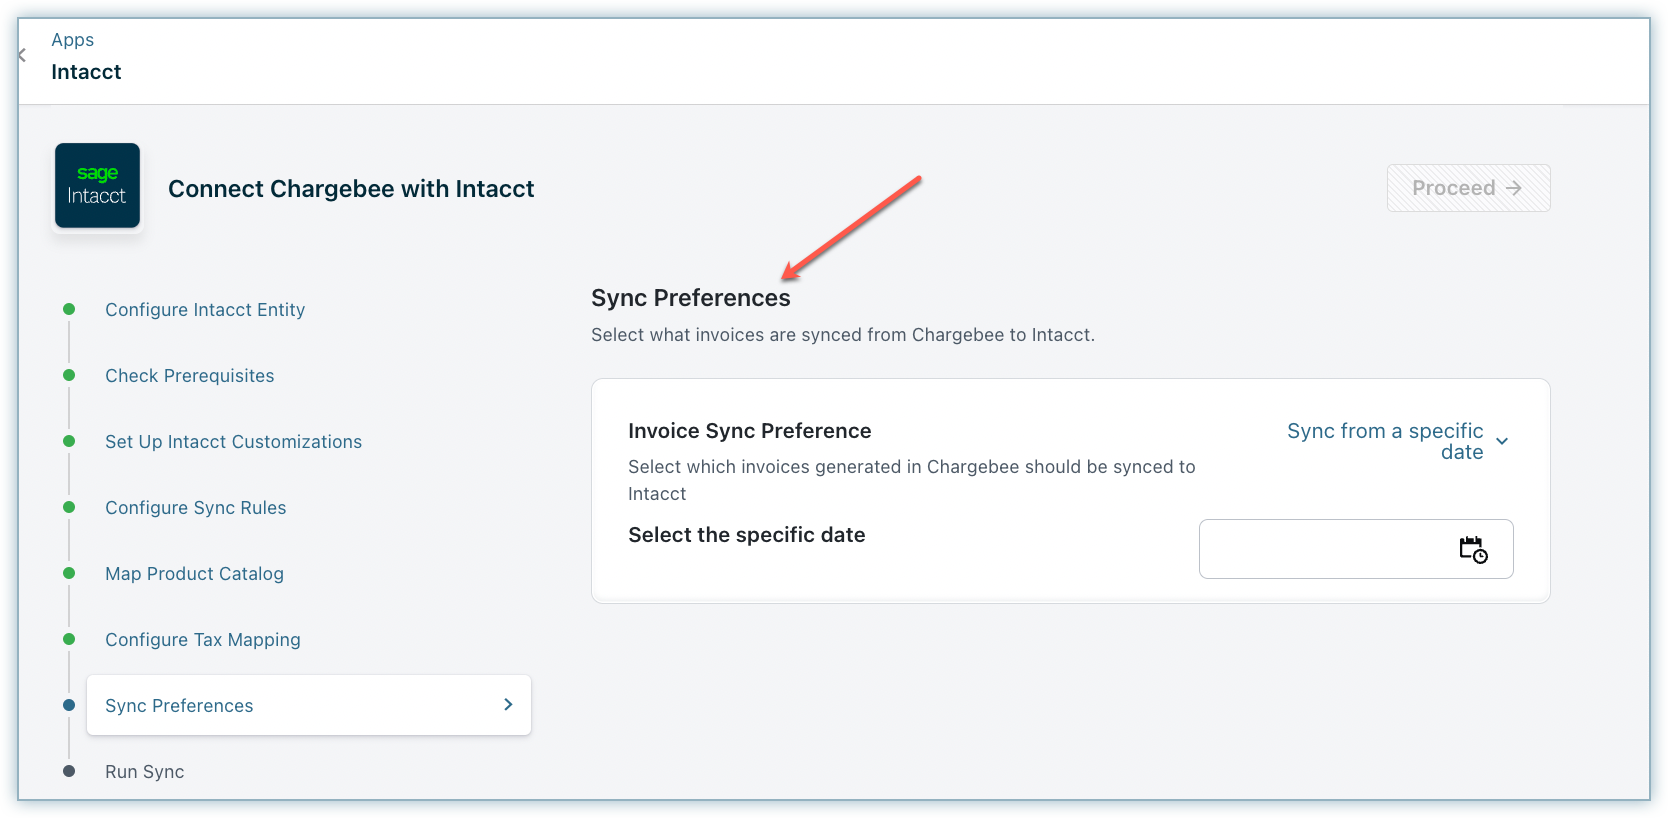
Step 8: Sync Preferences
You can select a specific date from the drop-down menu to sync invoices from Chargebee to Intacct.
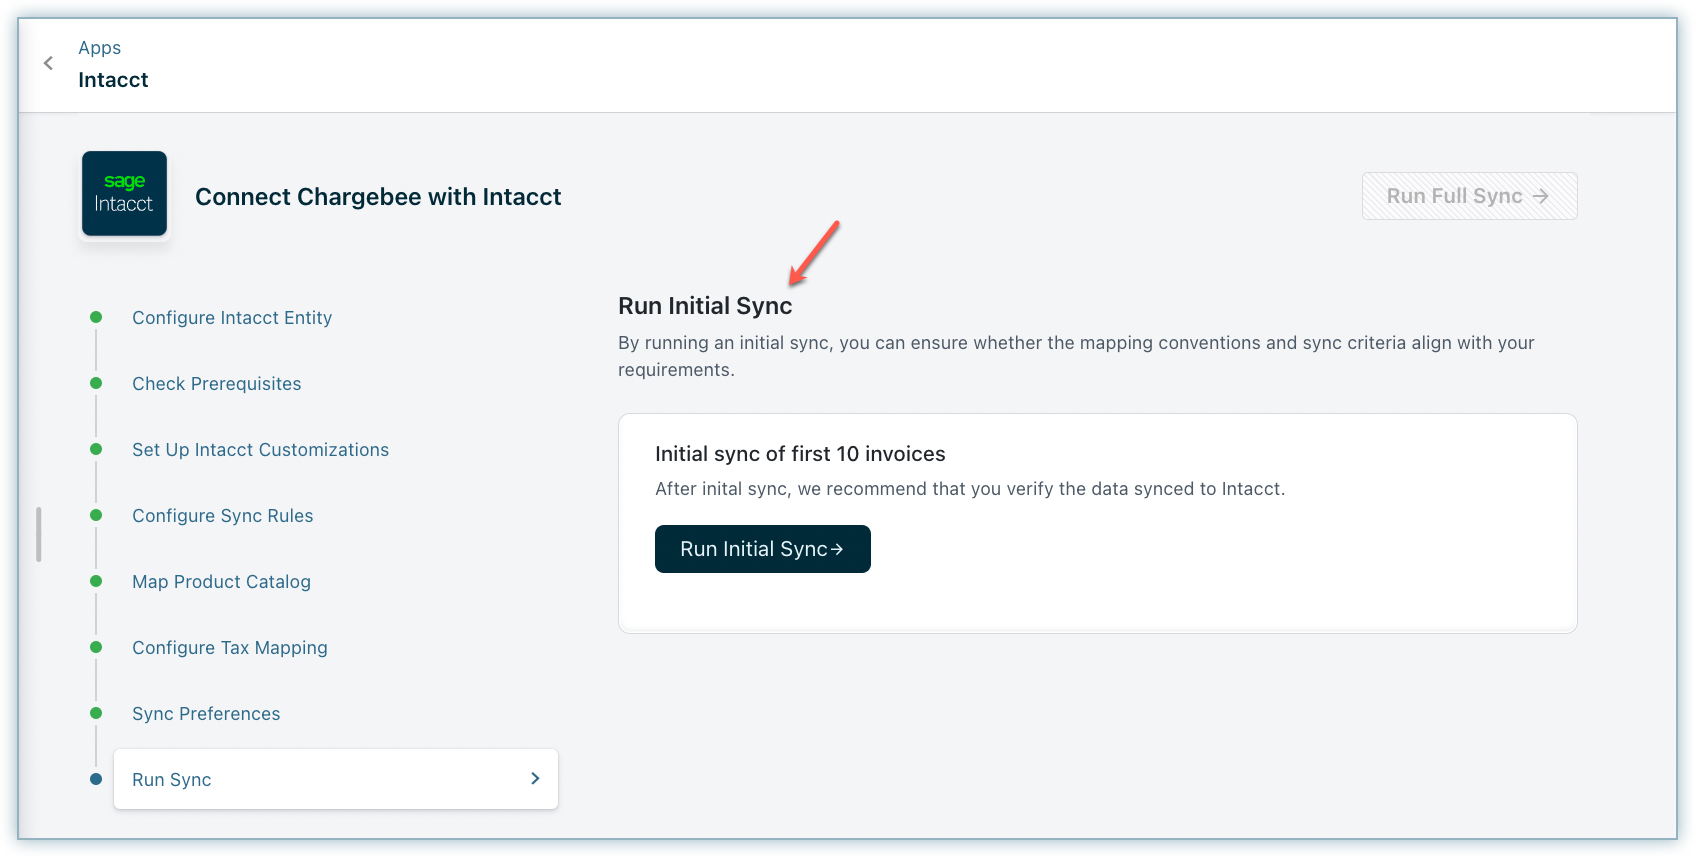
Step 9: Run Sync
- Once the configuration is complete, to begin the sync, click Run Initial Sync.
- Chargebee will sync the first 10 invoices, to ensure that mapping, conventions, and sync criteria align with your requirements.
We recommend that you review these invoices in Intacct. If the sync works as expected, you can click Run Full Sync.
 The Intacct setup is now complete.
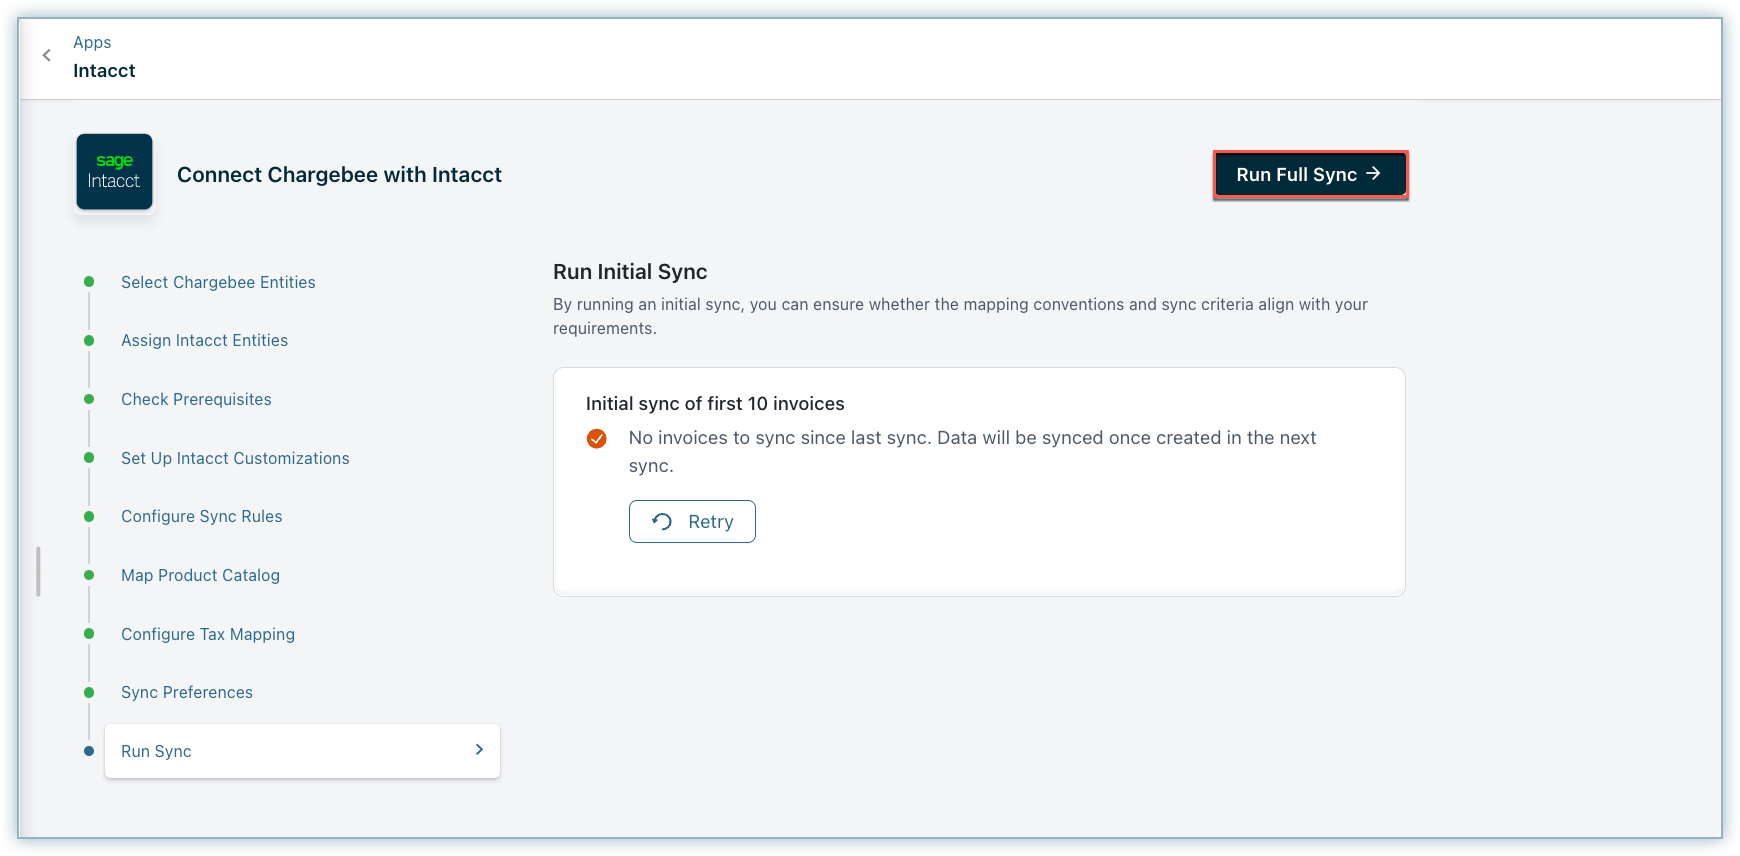
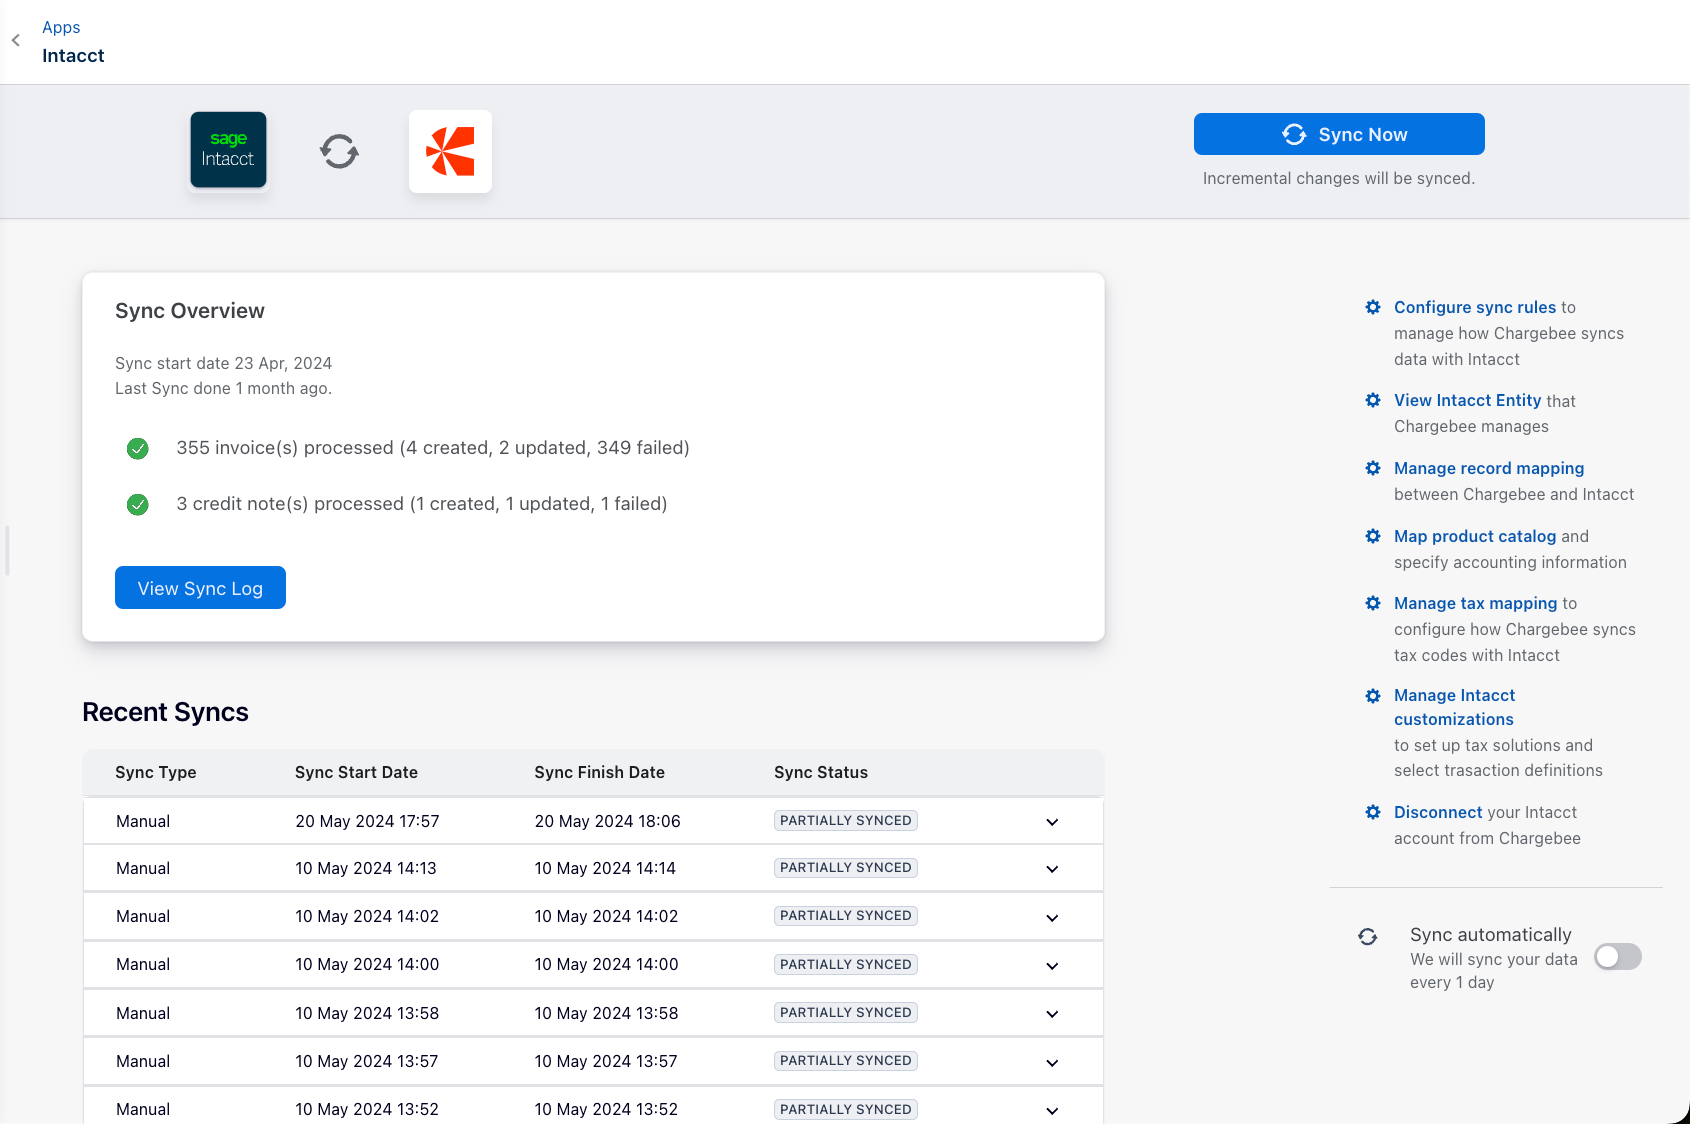
Enable/Disable Auto Sync
After setting up the integration, you can configure the daily schedule to sync all the information to Intacct automatically. Invoices and related information will be synced once every 24 hours. You can choose to disable auto-sync if required.
Sync Now
For on-demand sync, you can sync data from Chargebee to Intacct immediately.
Manage mapping
You can edit the configurations or GL Account mapping provided during the setup process.
Manage record mapping
Link to record mapping document.
Manage tax mapping
You can modify the tax sub-totals provided during the setup process. If you have added tax regions in your Chargebee settings, you can provide new tax sub-totals in this section.
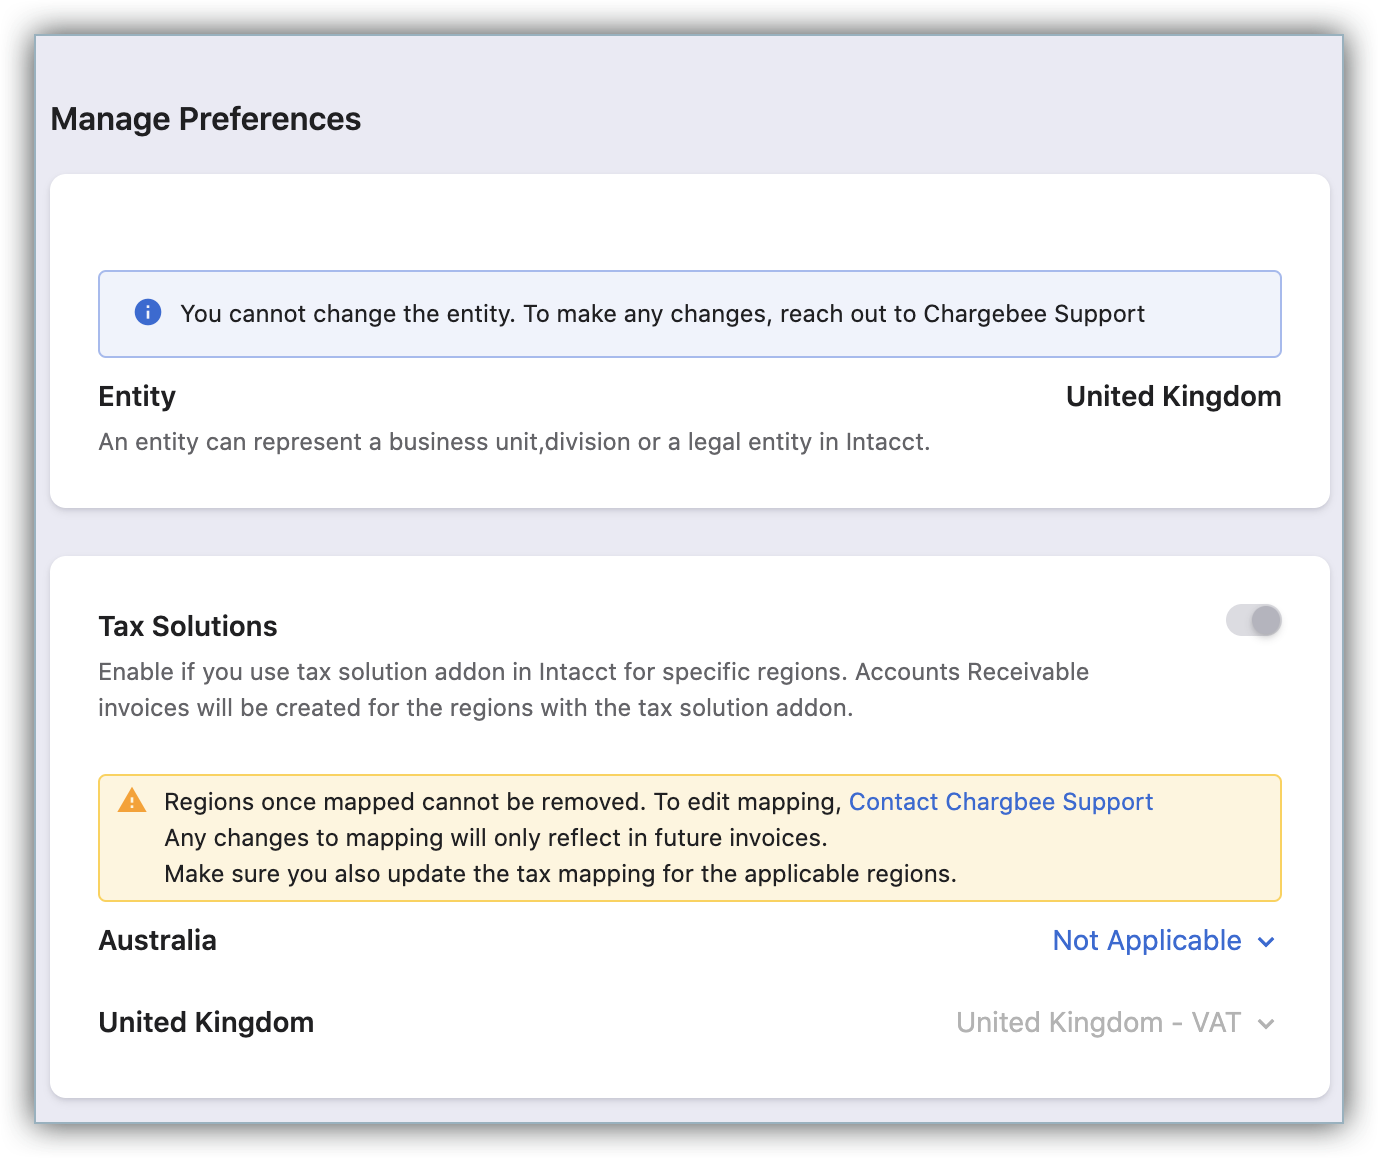
Manage preferences
You can enable the tax solutions for the countries that do not have it enabled previously using Manage Preferences.
Map product catalog
Manage and update the product catalog.
Disconnect
Disconnecting will unlink this integration. If you want to reconnect, you must perform all the above-listed steps again.
Sync Preferences
Once the integration is set up, you can see when the last sync was run, success or errors in the sync, and options to edit the configurations:
Enable/Disable Auto Sync: After setting up the integration, you can configure a daily schedule to sync all the information to Intacct automatically. Invoices and related information will be synced once every 24 hours. You can choose to disable auto-sync if required.
Sync Now: For on-demand sync, you can sync data from Chargebee to Intacct immediately.
Manage Mapping: You can edit the configurations or GL Account mapping provided during the setup process.
Manage Tax Mapping: You can modify the tax sub-totals provided during the setup process. If you have added tax regions in your Chargebee settings, you can provide new tax sub-totals here.
Manage Preferences: You can enable the tax solutions for the countries that do not have it enabled previously.
Unlink: In case you want to stop syncing data from Chargebee to Intacct, you can unlink the integration.
Offline Payment Sync (Sage Intacct to Chargebee)
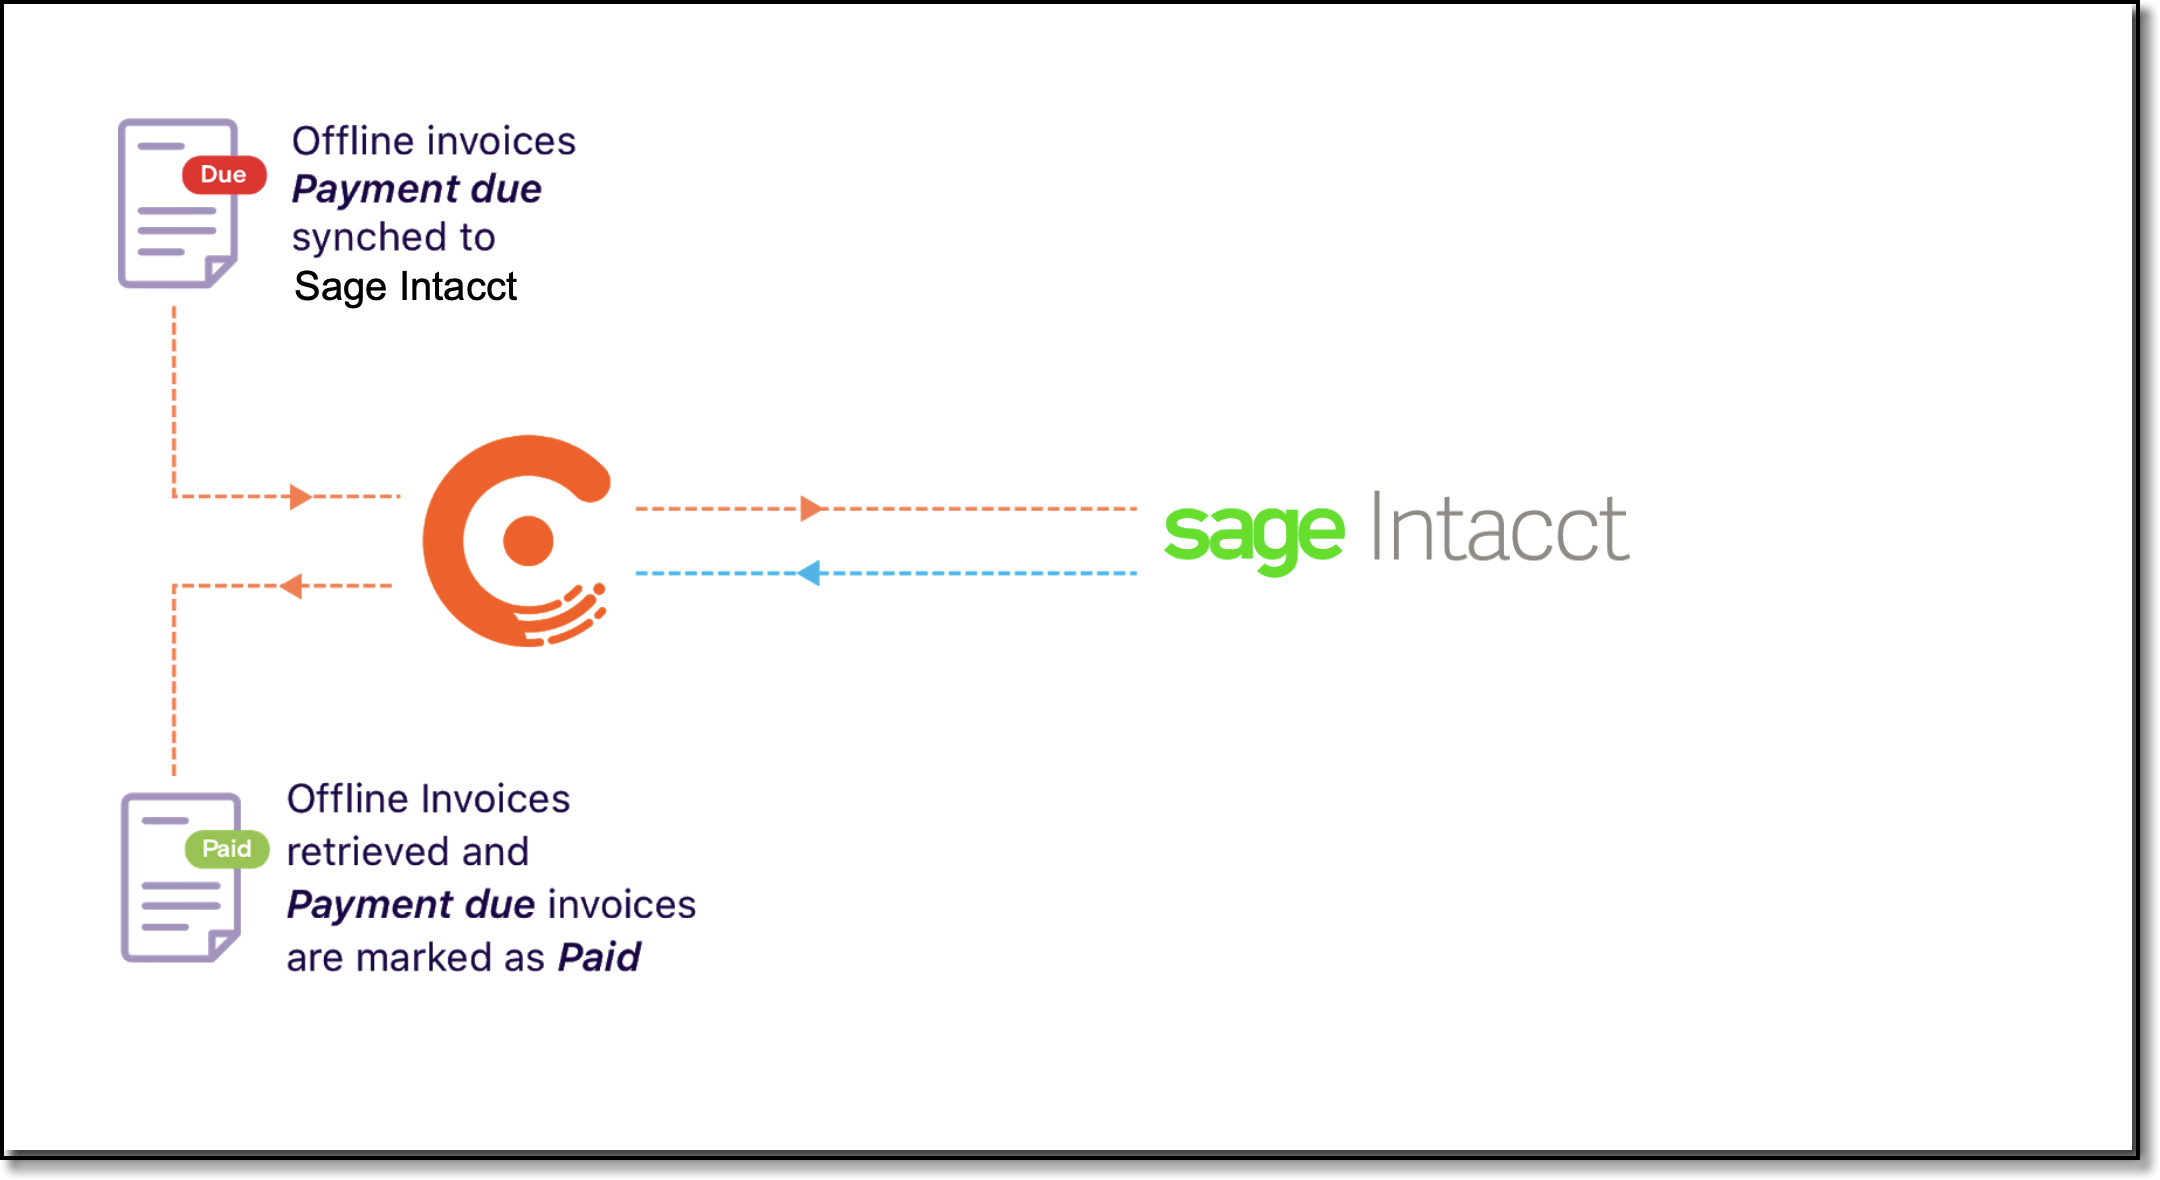
- Chargebee syncs the invoices to Sage Intacct (all statuses including PAYMENT DUE invoices).
- When you pay offline payments against payment due invoices in Sage Intacct, the invoice is marked as Paid.
- In order to update the due invoice in Chargebee, you would have to manually record a payment against the payment due invoice in Chargebee. But with the Sync Offline Payments option enabled, Chargebee will read the AR payments in Sage Intacct and mark the invoice as PAID, so you need not record a payment in Chargebee manually.
Note:
The exchange rate applied in Sage Intacct is not imported into Chargebee when the offline payment is imported.
FAQ
1. We create Sales Orders for fulfillment, how does this work as part of this integration?
Sales orders are not created as part of the integration. Sales invoices are only created when they are synced from Chargebee.
2. How does Chargebee sync data and invoices when you're using Sage Intacct's Tax Solution
Currently, Chargebee syncs all billing-related information to Sage Intacct including tax line items for US and Canada regions only. If you're using Sage Intacct's tax solution module for the United Kingdom (UK), Australia, and South Africa regions, you can use this integration to sync your invoices and other data from Chargebee to Sage Intacct. This allows creating the AR invoice instead of a sales invoice.
-
Contact Sage Intacct to determine if using the AR invoice in the integration will meet your requirements.
-
Contact support for any further details.
3. What happens if the customer has the Intacct configured with multiple entities where the base currency is different and has some entities with the tax solution enabled?
We recommend the customer to have an individual Chargebee site to select each entity.
4. What is the limitation in Intacct for syncing the overpayment once you enable the multi-entity support with different base currency features?
To sync the overpayment, invoice location, payment location, bank account, and location currency should be the same.
See also
Was this article helpful?