Multi Business Entity Overview
Introduction
Businesses are continually exploring opportunities to grow and generate higher profits. Business expansion strategies include expansion to new markets, locations, product offerings, or mergers & acquisitions. To meet regional requirements based on compliance, taxation, and legal guidelines or internal operational criteria, most businesses choose to establish independent entities.
Let's review this example, AcmeFarms a farm-tech company headquartered in Texas, USA decides to operate from India, Singapore, and Australia. To ensure compliance with the legal and taxation guidelines established by each of these countries, it is recommended to set up independent entities. In addition to the benefits associated with compliance, each entity will cater to its unique market needs and help measure performance separate from its parent organization.
Chargebee's Multi-Business Entity solution enables you to manage such multiple businesses as independent entities from a single Chargebee site. This solution is built to ensure you can manage each of your entities as you would an independent Chargebee site. This feature aims to improve the overall functionality of your Chargebee site with the following benefits:
- Manage all entities from a single site offering a unified view.
- Implement stringent Role-Based Access Controls (RBAC) across multiple entities.
- Address Billing and Taxation challenges associated with multiple entities.
- Customized Invoicing options including invoice numbering, invoice notes, and payment instructions.
- Configure entity-specific smart routing settings.
- Configure entity-specific checkout settings.
- Associate customers and subscriptions to specific entities including self-serve checkout.
- Use Next Gen Checkout or Full Page Checkout for the Multi-Business Entity feature-enabled site and associated business entities.
- Advanced reporting to highlight performance metrics globally and entity level.
- Configure brand styles for each of your business entities.
- Record your transactions in the time zone of your business entity.
- Transfer a mapped subscriber from one business entity to another within a site.
- Configure the e-invoicing at the business entity level for a Multi-Business Entity feature-enabled site.
- The Multi-Business Entity (MBE) feature can be enabled for your Chargebee site if the Apple App Store or Google Play Store integrations are enabled, and vice versa. Subscriptions from Apple and Google will always be associated with the default business entity. To enable these stores on an MBE-enabled site, please request access.
Enable Multi Business Entities for New Users
Note:
- Enabling the Multi-Business Entity feature is an irreversible action.
- Conduct a thorough smoke test of Chargebee's Multi-Business-Entity feature on a new or test site to understand the impact it carries on your business processes and requirements. After validating the capability on a trial site, you can proceed with testing on your test site for a smooth transition.
- If you want to self-enable Multi-Business Entity but have an active site merge request, you must first resolve the pending merge request before proceeding with self-enablement.
- Limitations of the Multi-Business Entity feature.
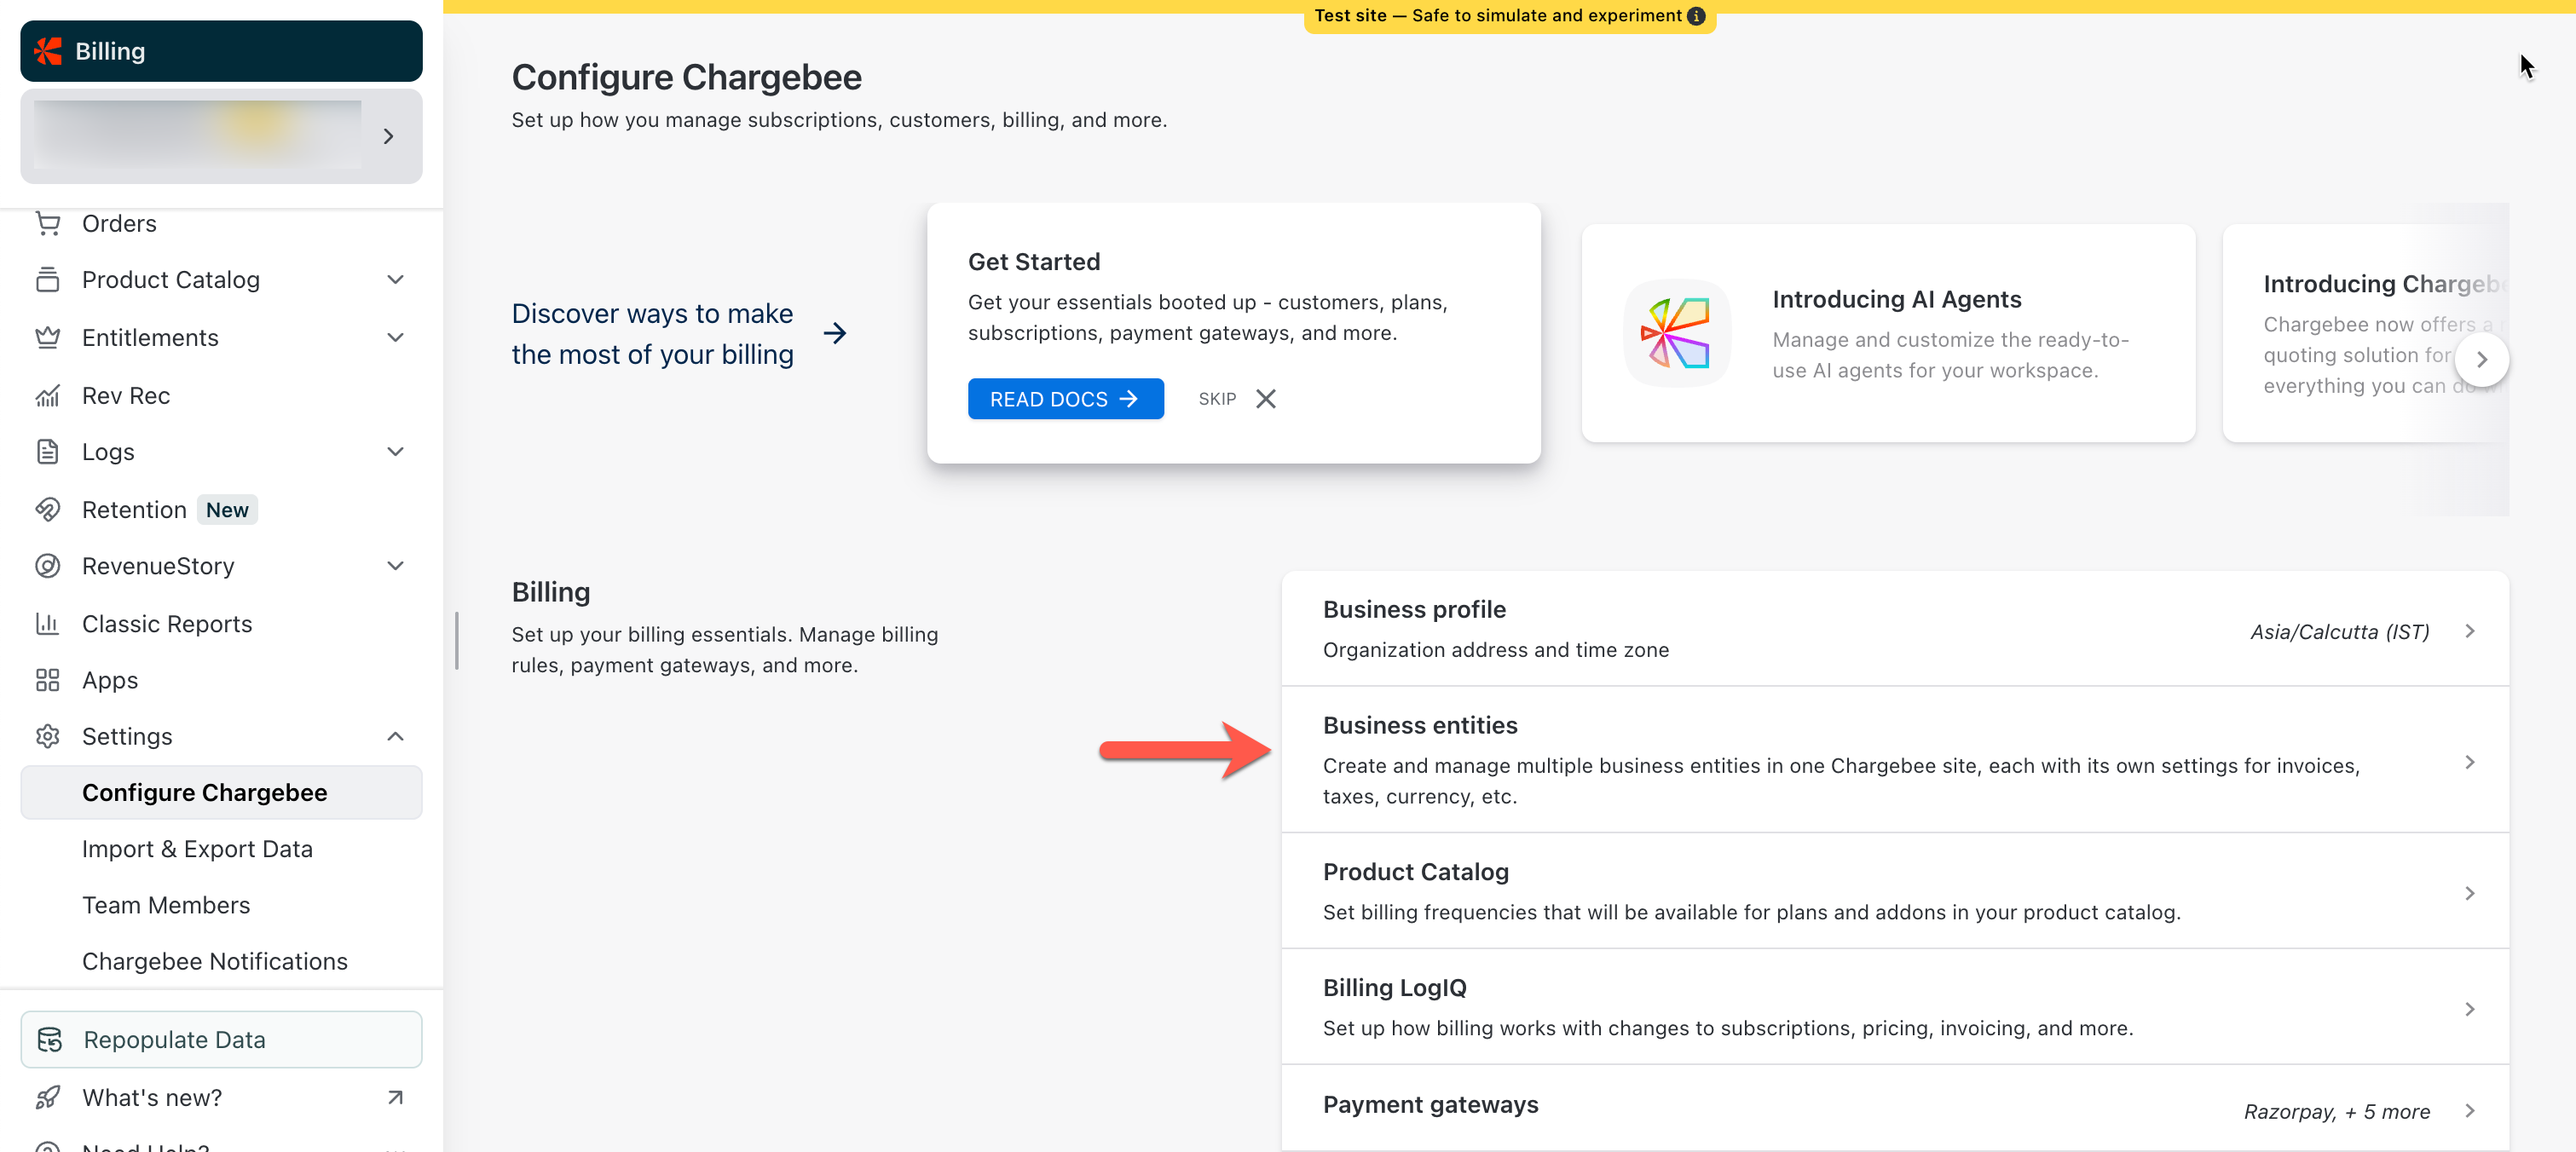
To enable Multi Business Entity for your Chargebee site, follow these steps:
-
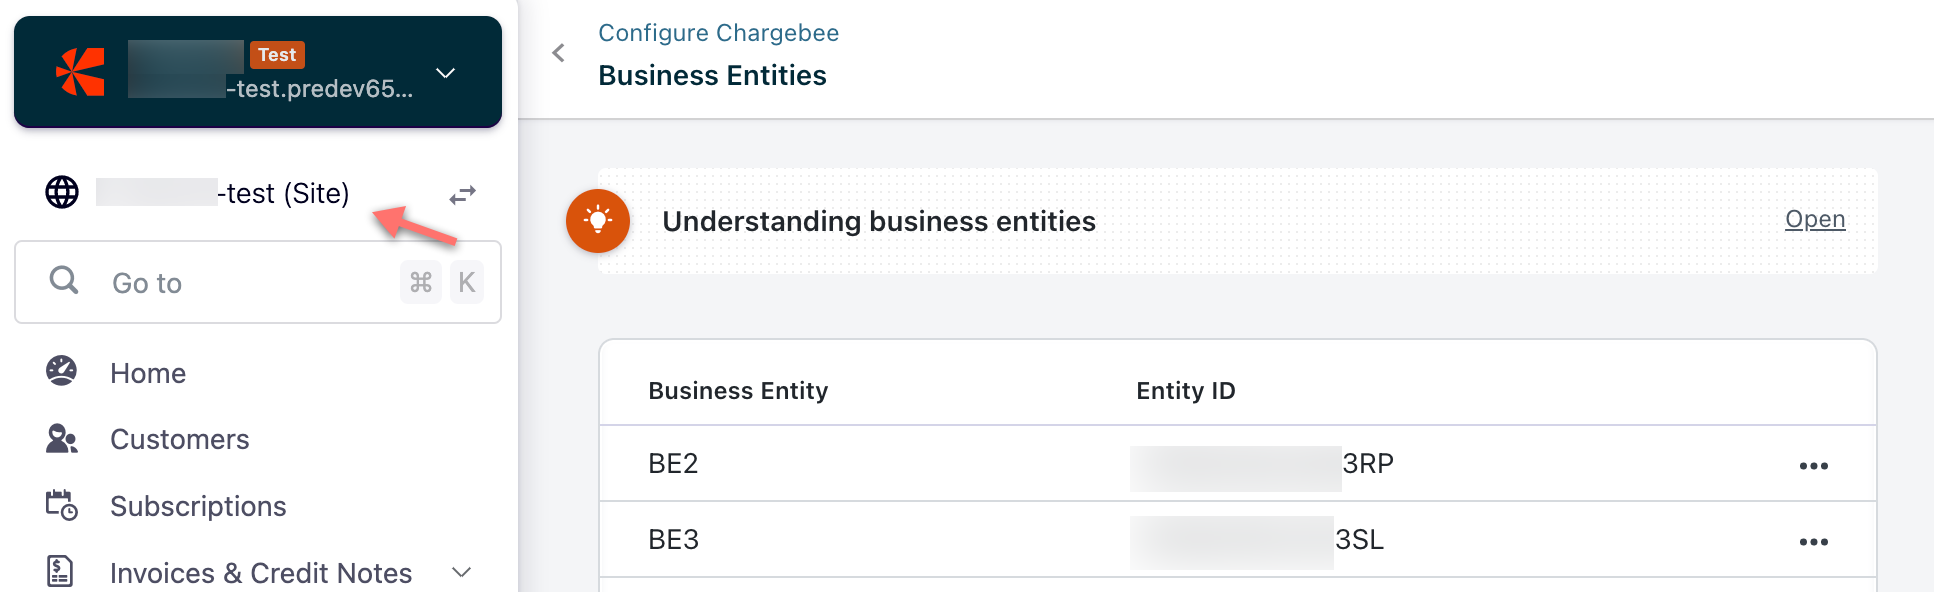
Log in to your Chargebee site. Click Settings > Configure Chargebee > Business Entities. You will come across the screen shown below.
-
Click the Request Access to this Feature button. Note: Once your request is submitted, a default business entity will be automatically created on your behalf to help you get started with Multi Business Entity. You can modify this entity's details when you enable Multi Business Entity for your site. During this setup, all existing data from your site will be migrated to the default business entity—this process involves no downtime.
-
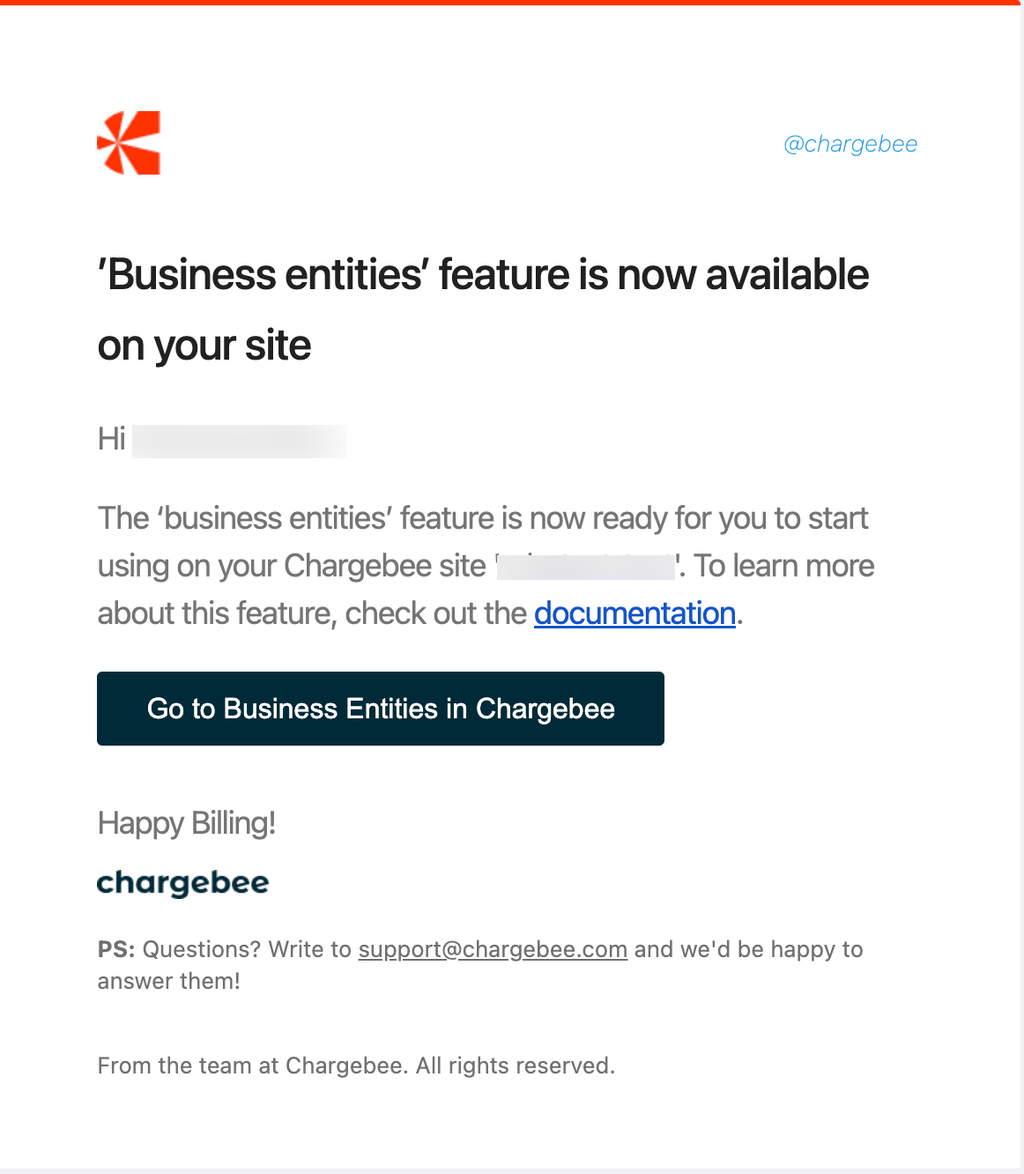
Once this activity completes, you will receive an email notification to proceed with Multi Business Entity enablement. Refer to the screenshot below.
Note:
Once the default business entity is created, if the organization address is specified at the site, it will be set as the organization address for the default business entity as well.
Create Multi Business Entities for Existing Users
To create multiple business entities for your Chargebee site, follow the steps below:
-
Log in to your Chargebee site.
-
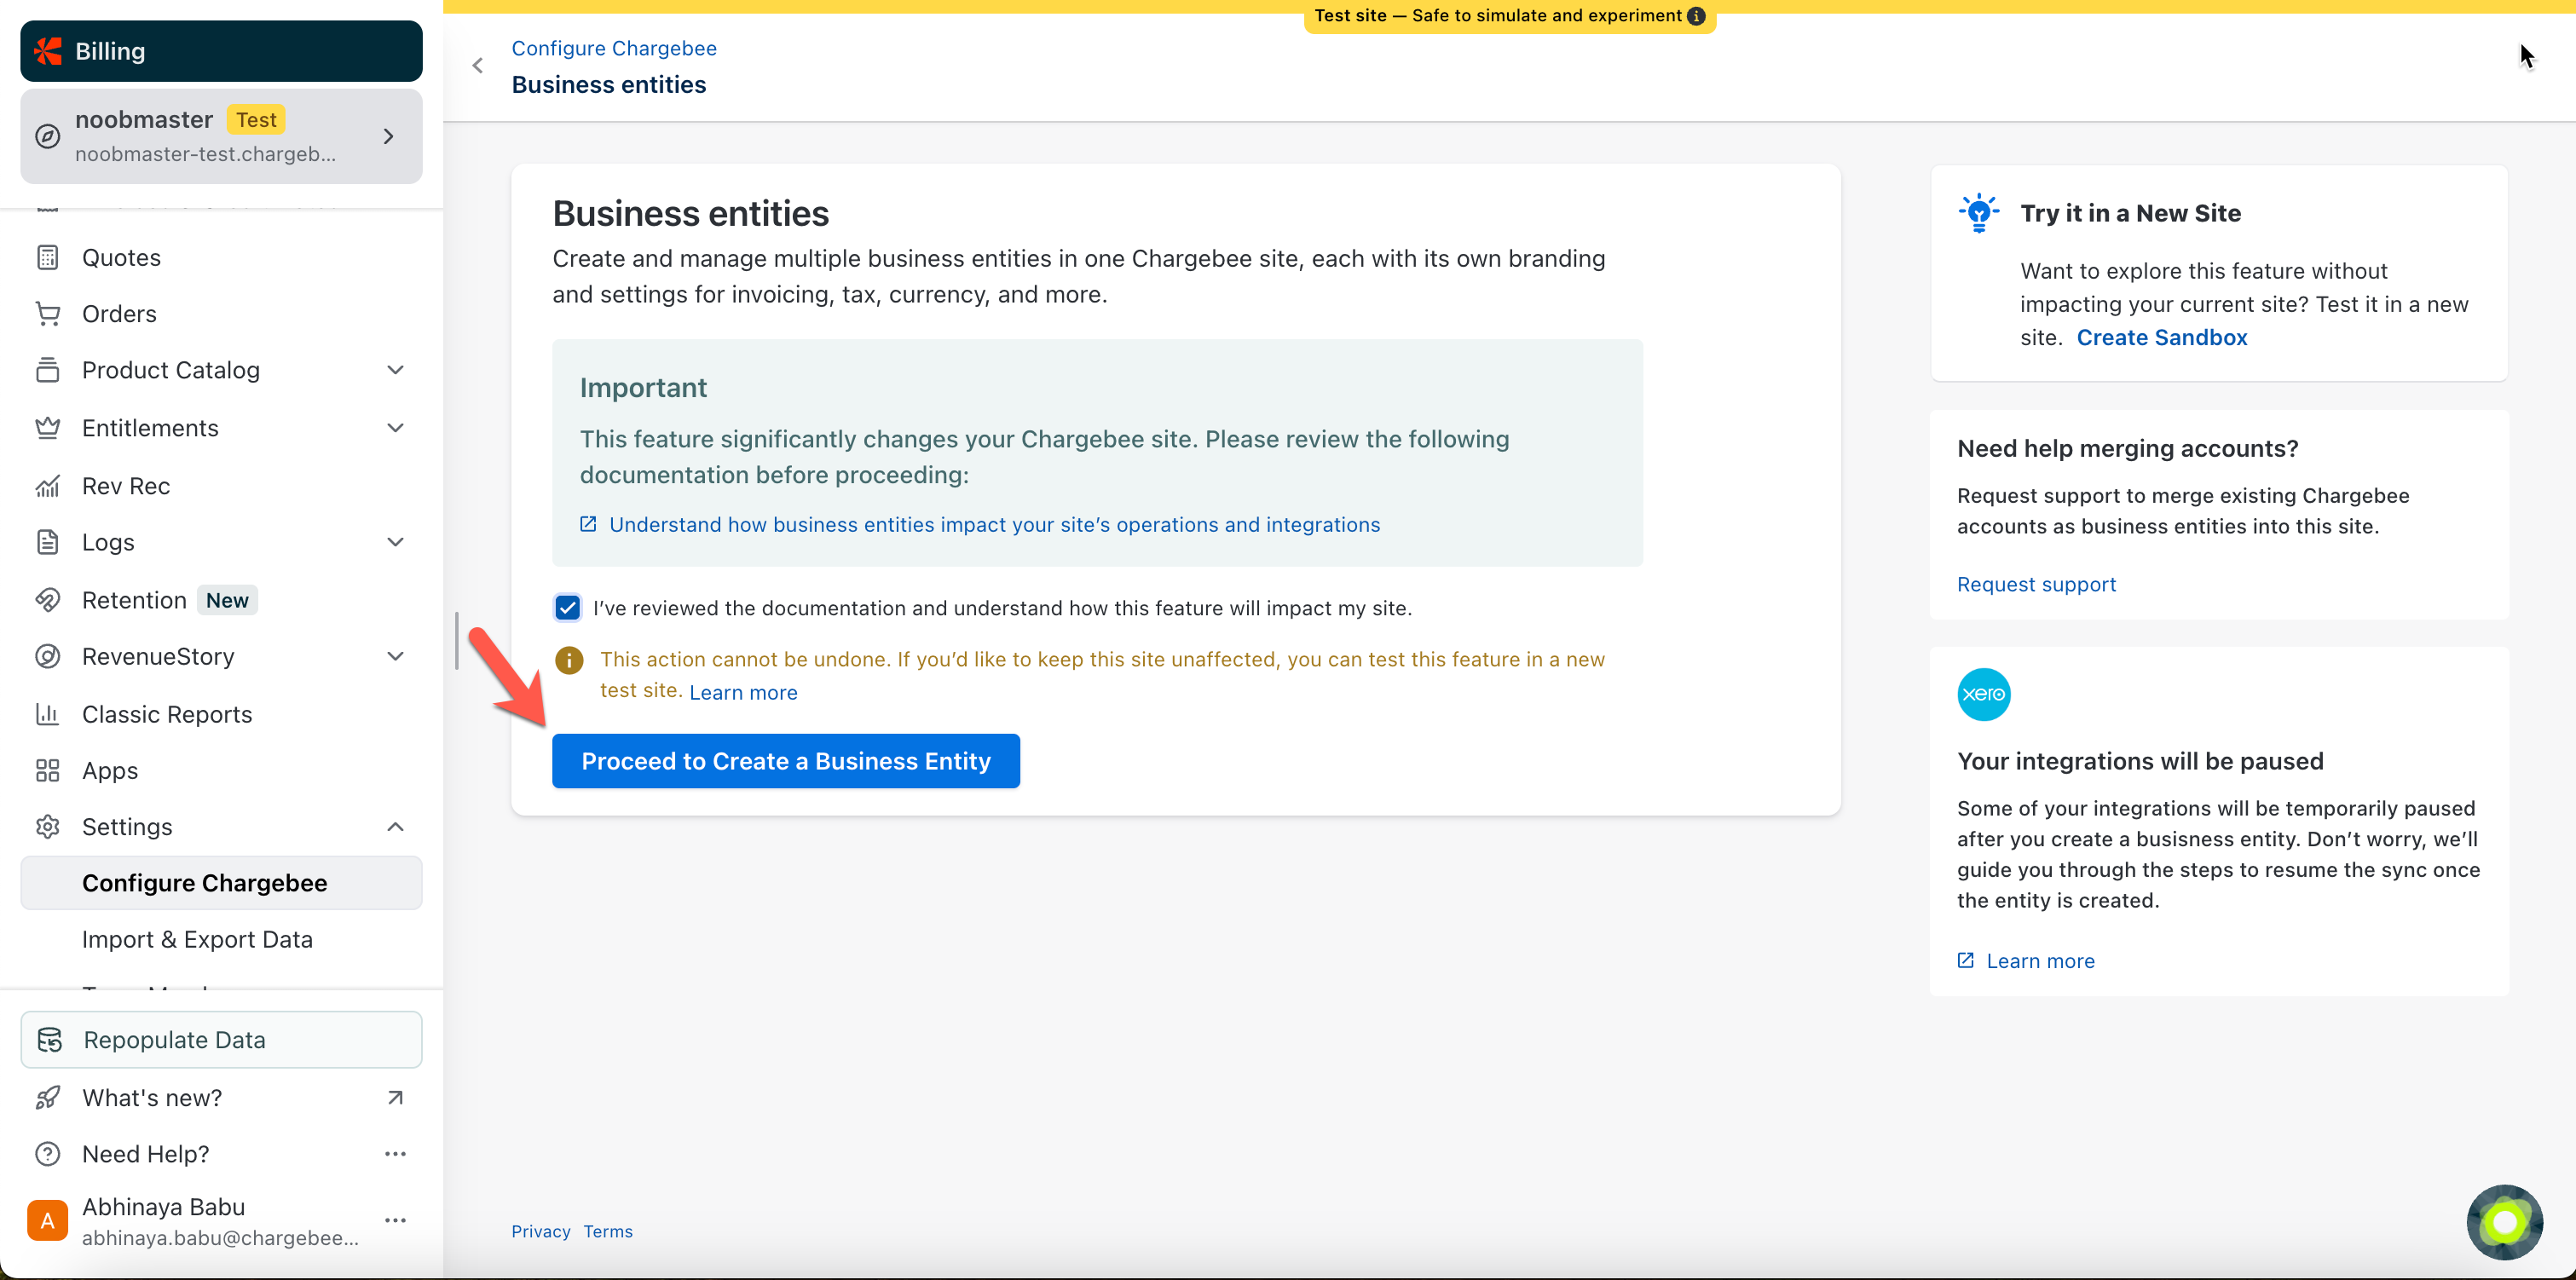
Click Settings > Configure Chargebee > Business Entities
-
Select the checkbox and click Proceed to Create a Business Entity.
-
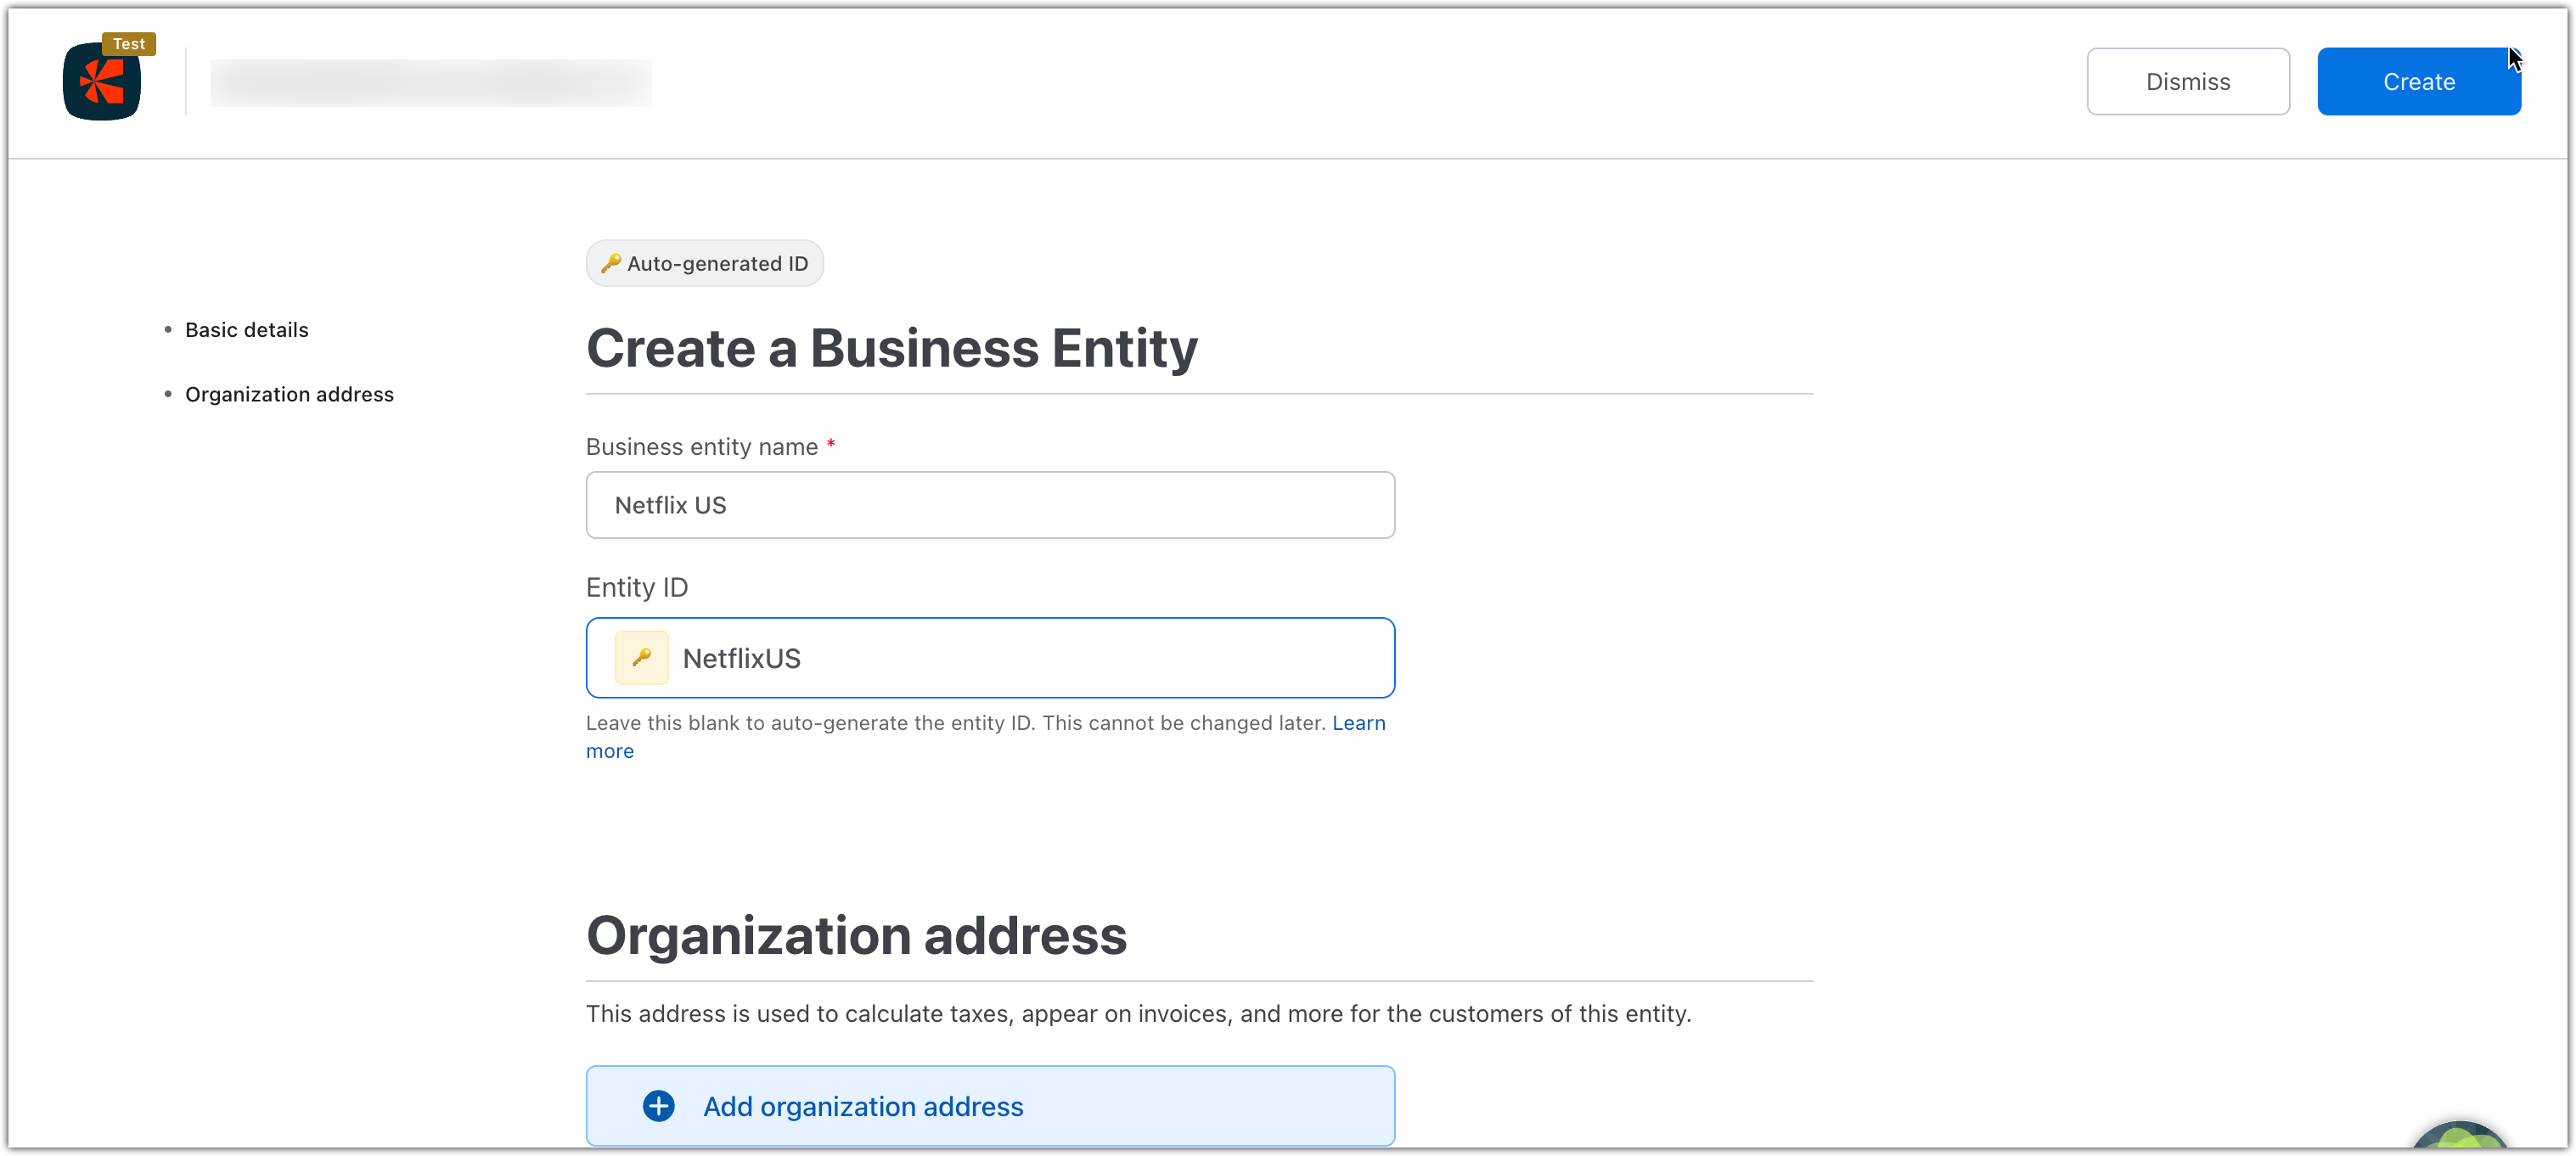
Enter the name in the Business entity name field. In the Entity ID field, enter a unique entity ID. If you do not enter any value in the Entity ID field, Chargebee will automatically generate a unique identifier. Click Confirm and Enable. Learn more about Entity ID.
-
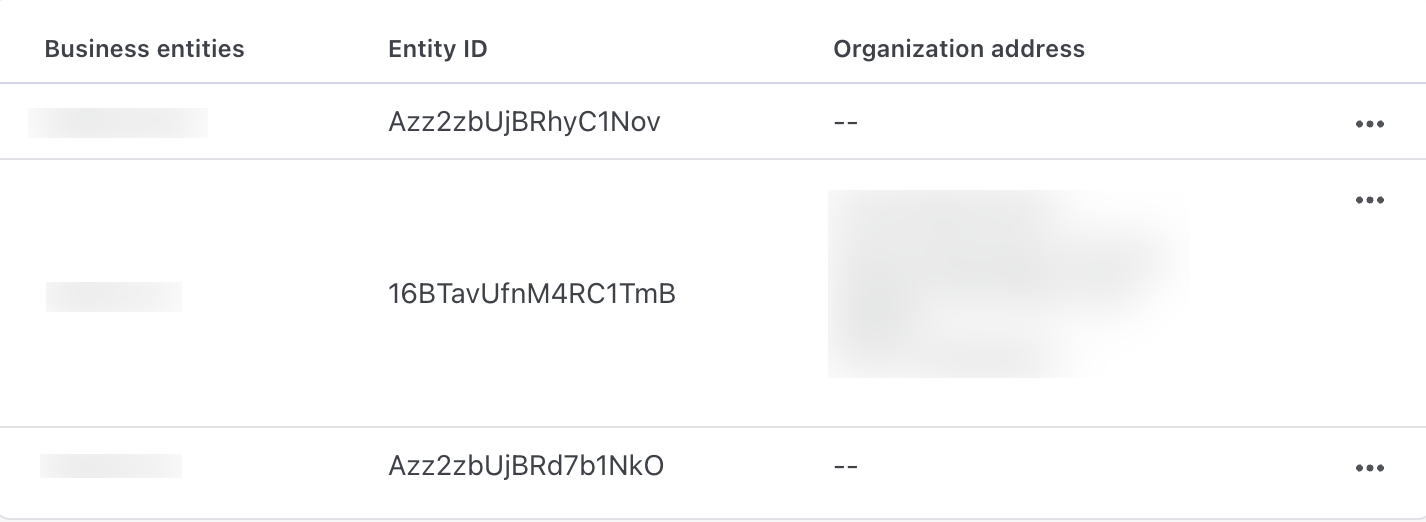
Repeat steps 1 to 4 to create multiple entities for your business sites. A list of all added entities appears on the Business Entities page as shown below. Note: An entity ID once chosen cannot be changed later. Once the default business entity is created, if the organization address is specified at the site, it will also be set as the organization address for the default business entity.
-
To view all your business entities in one place, click Settings > Configure Chargebee > Multiple Entity Support.
-
View the first and default business entity with details. You can also manage and add new entities as required.
Entity ID: This is a unique business entity ID that helps you identify a specific business entity.
Modify Multiple Business Entities
Follow the steps below to update business entities for your Chargebee site:
-
Login to your Chargebee site.
-
Click Settings > Configure Chargebee > Business entities.
-
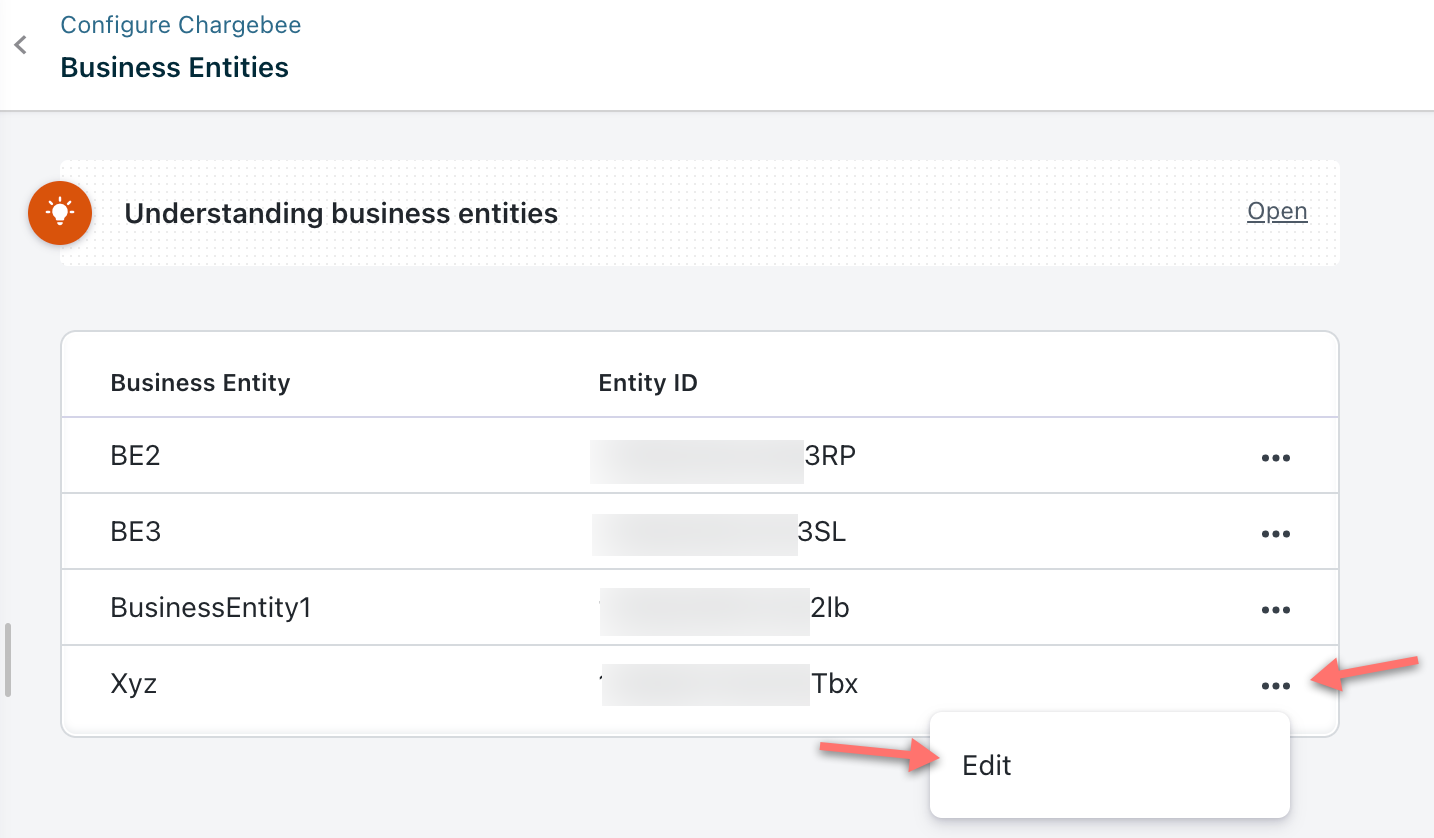
View all entities and click Edit to update any specific entity.
-
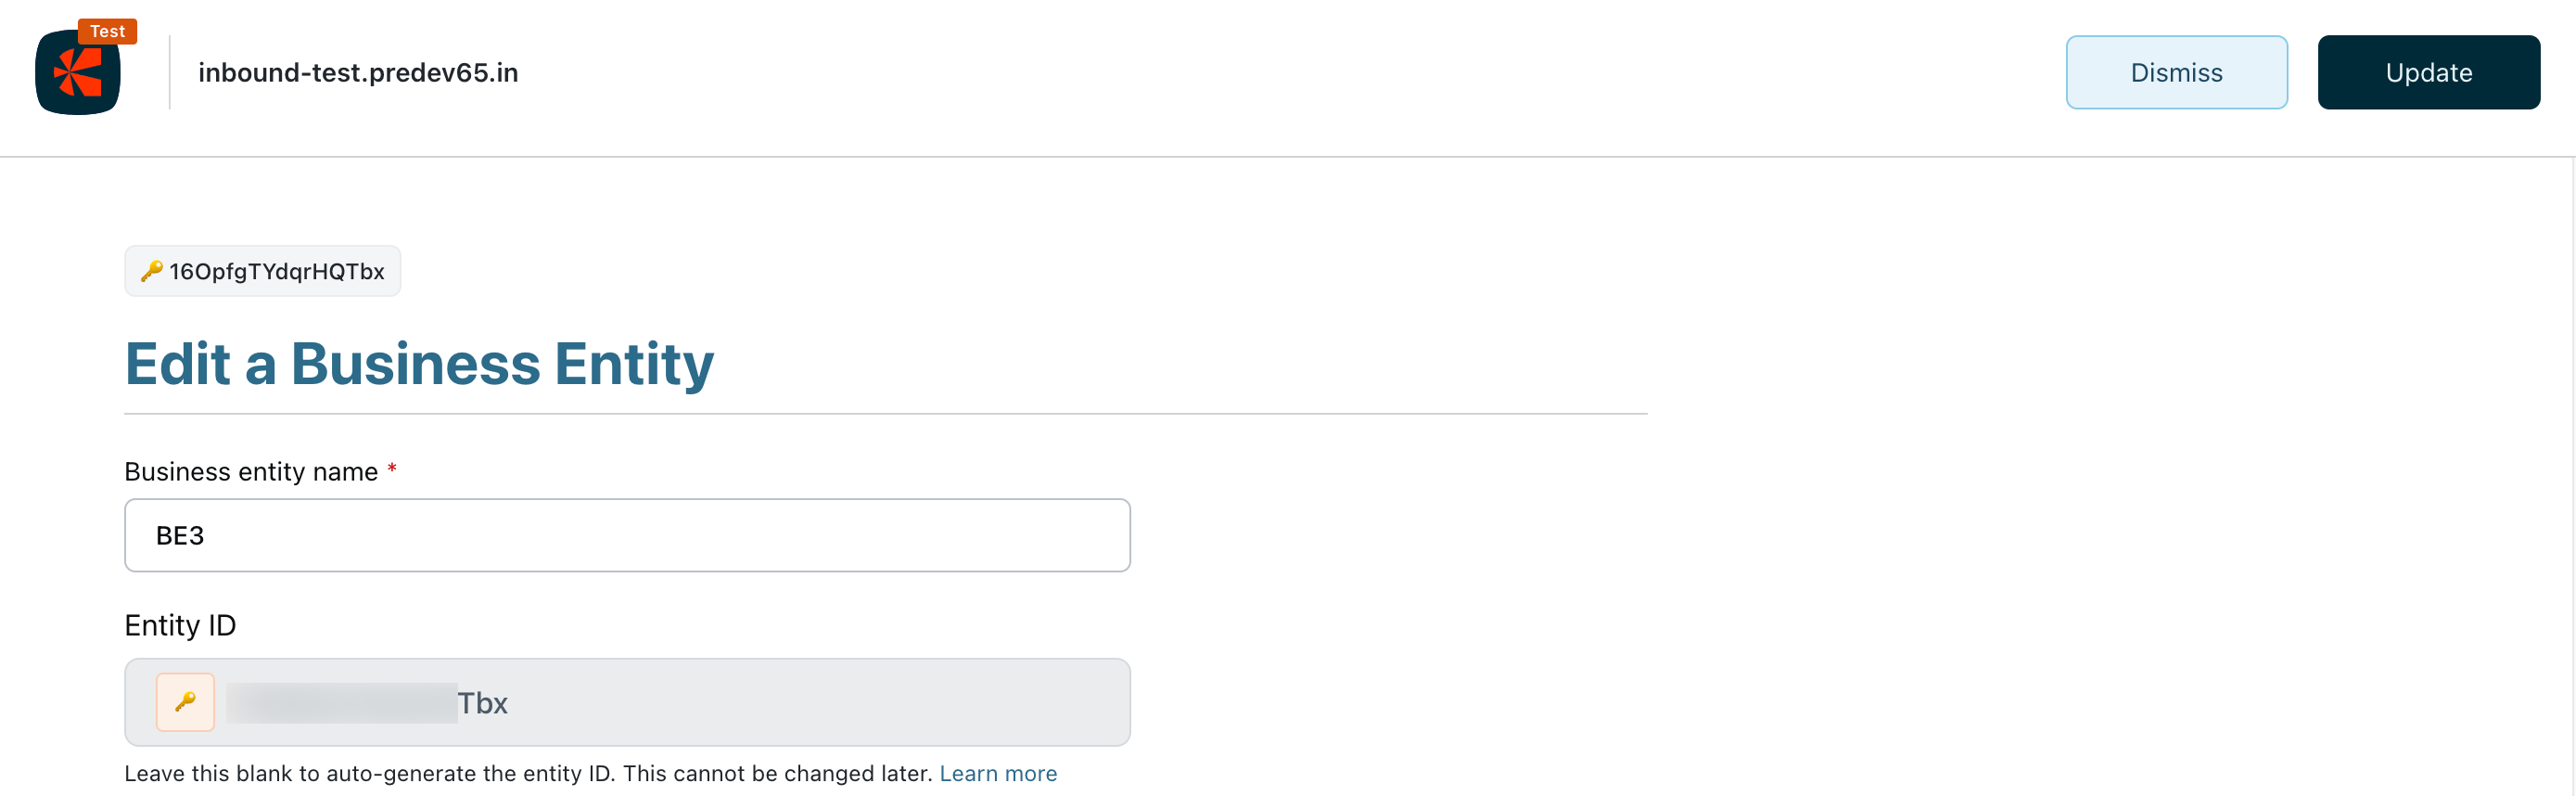
Change the Business entity name and click Update.
-
The name of the updated entity appears on the Business Entities page.
Switch between Multiple Entity and Profiles
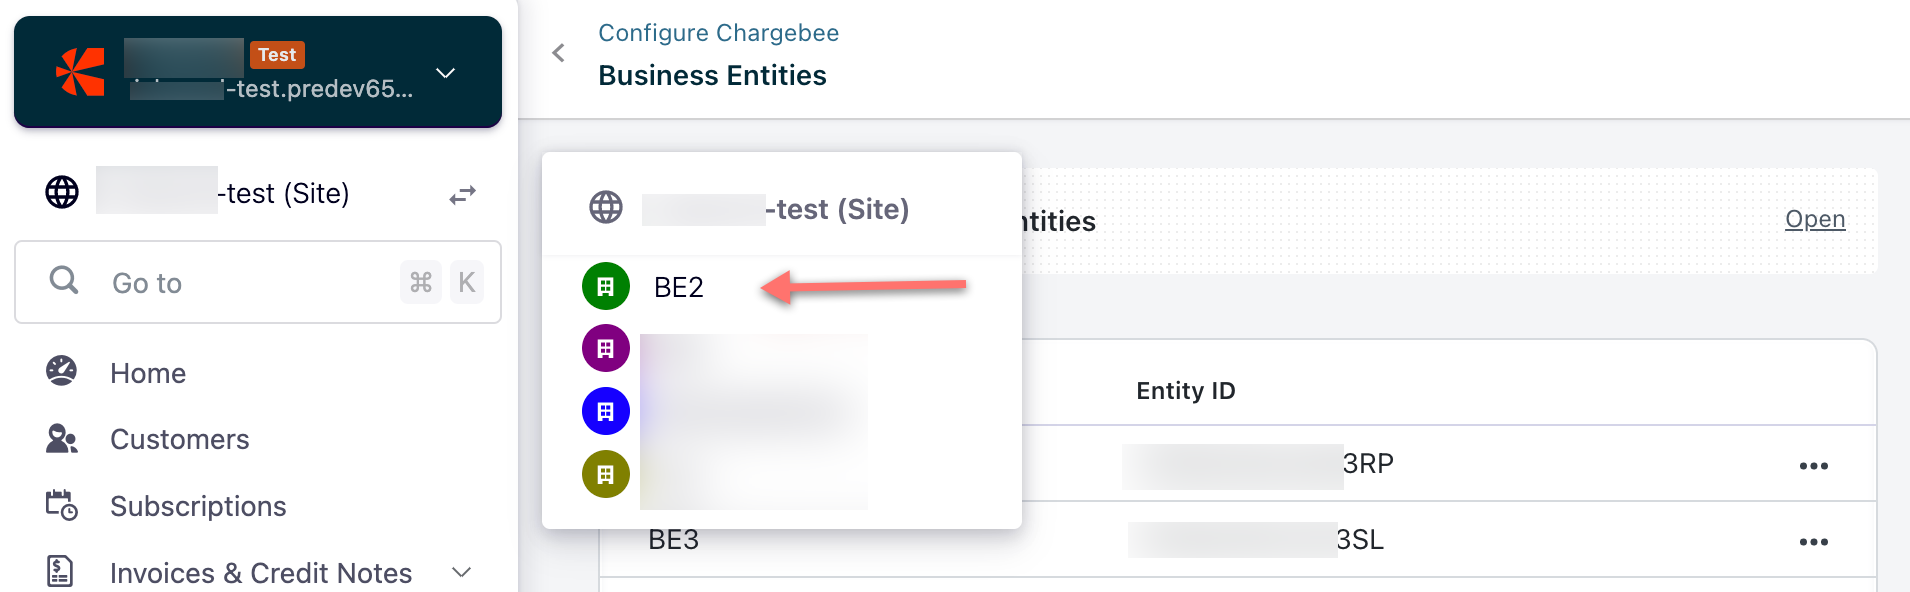
Once the business entities are created, your left navigation pane includes an additional option that allows you to switch between your entities.
Follow the steps below to switch between entities:
-
Click the switch icon in the left navigation menu to view a list of entities.
-
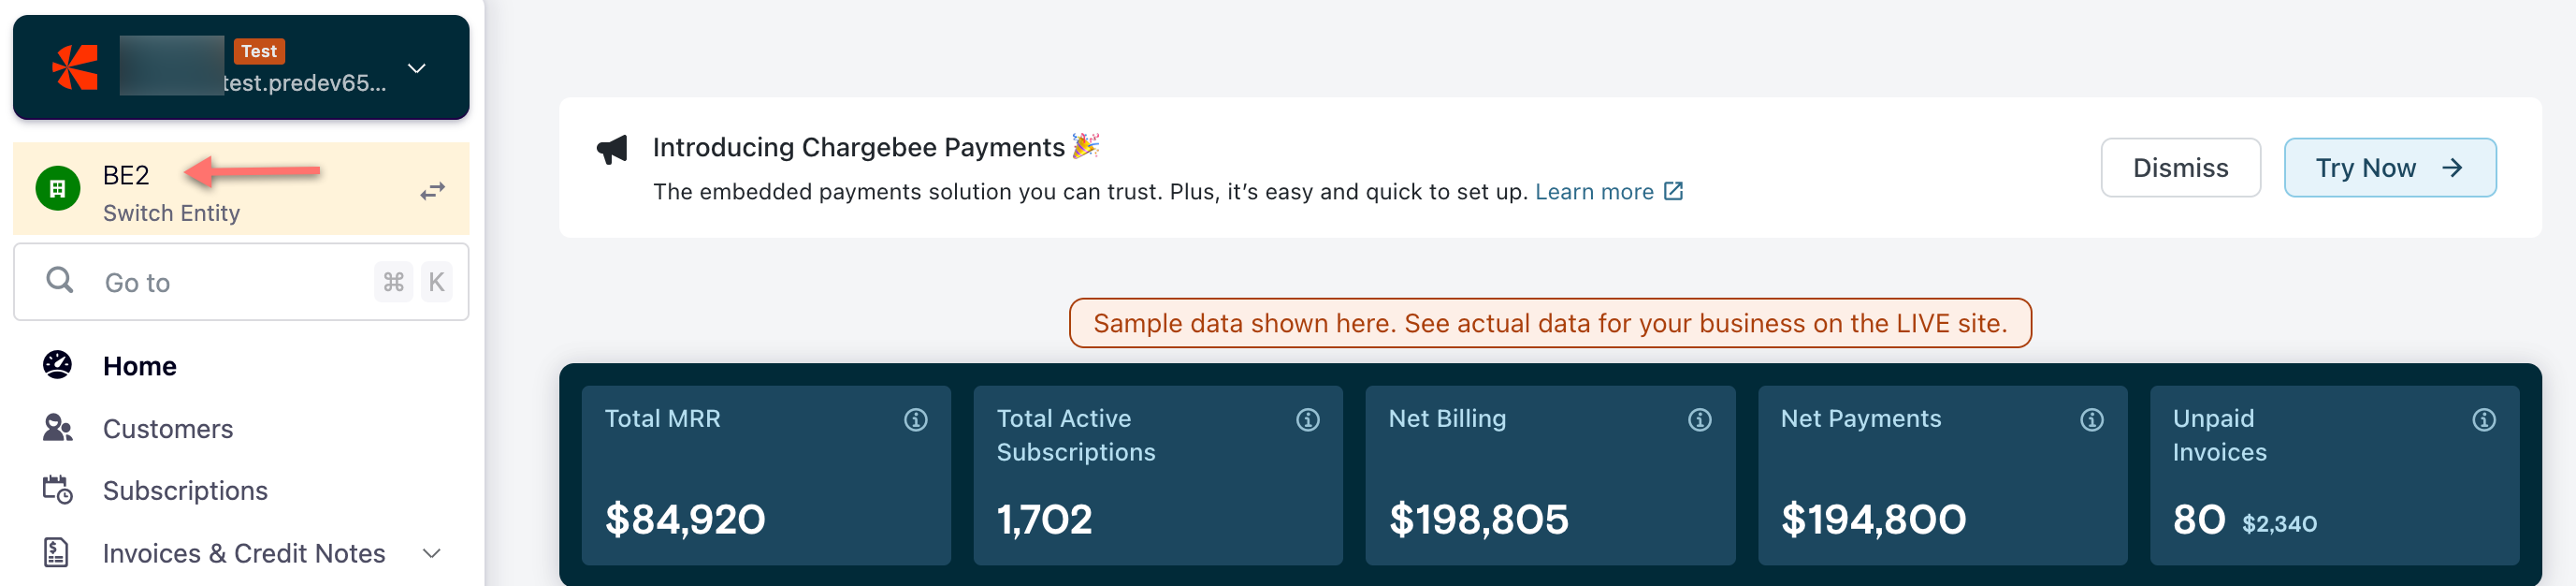
Select the entity to access from the list that displays.
-
Review or update necessary details associated with Business Entity.
Note:
The ability to switch between entities is dependent on the access assigned to the user. Users can only view entities for which they are assigned access.
Assign Access Role
Follow the steps below to invite team members to a site or entity and assign access levels:
Site Admin User
A Site admin user can invite another user to have the same access as themselves or lower. In this example, we will review a Site Admin providing Entity Admin access to a user.
-
Login to your Chargebee site.
-
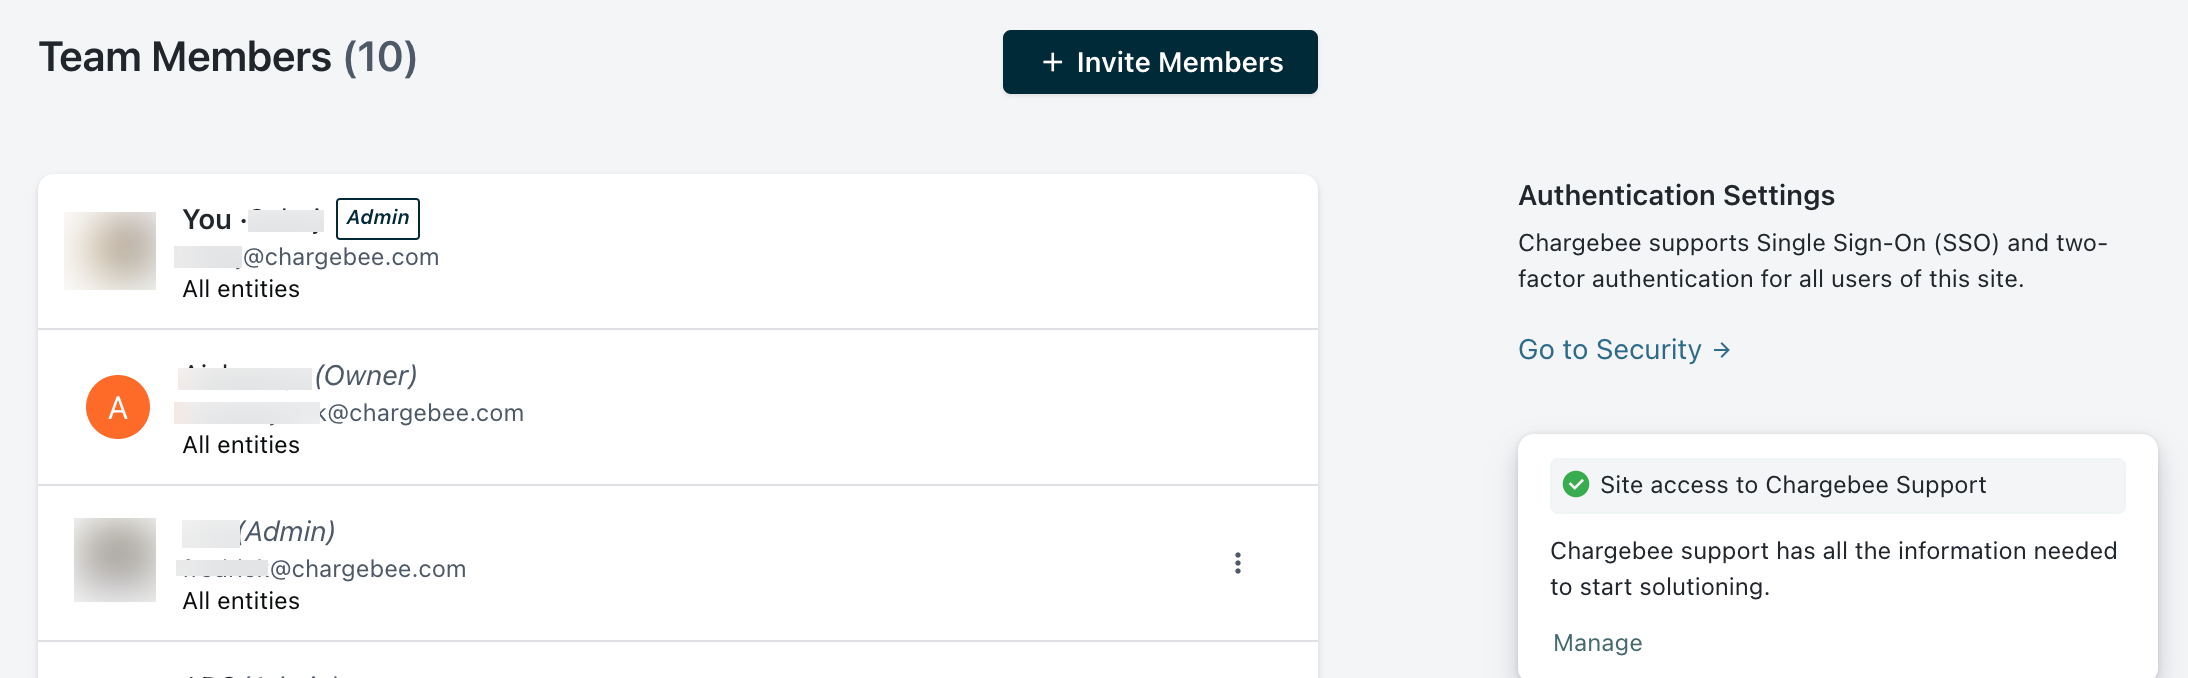
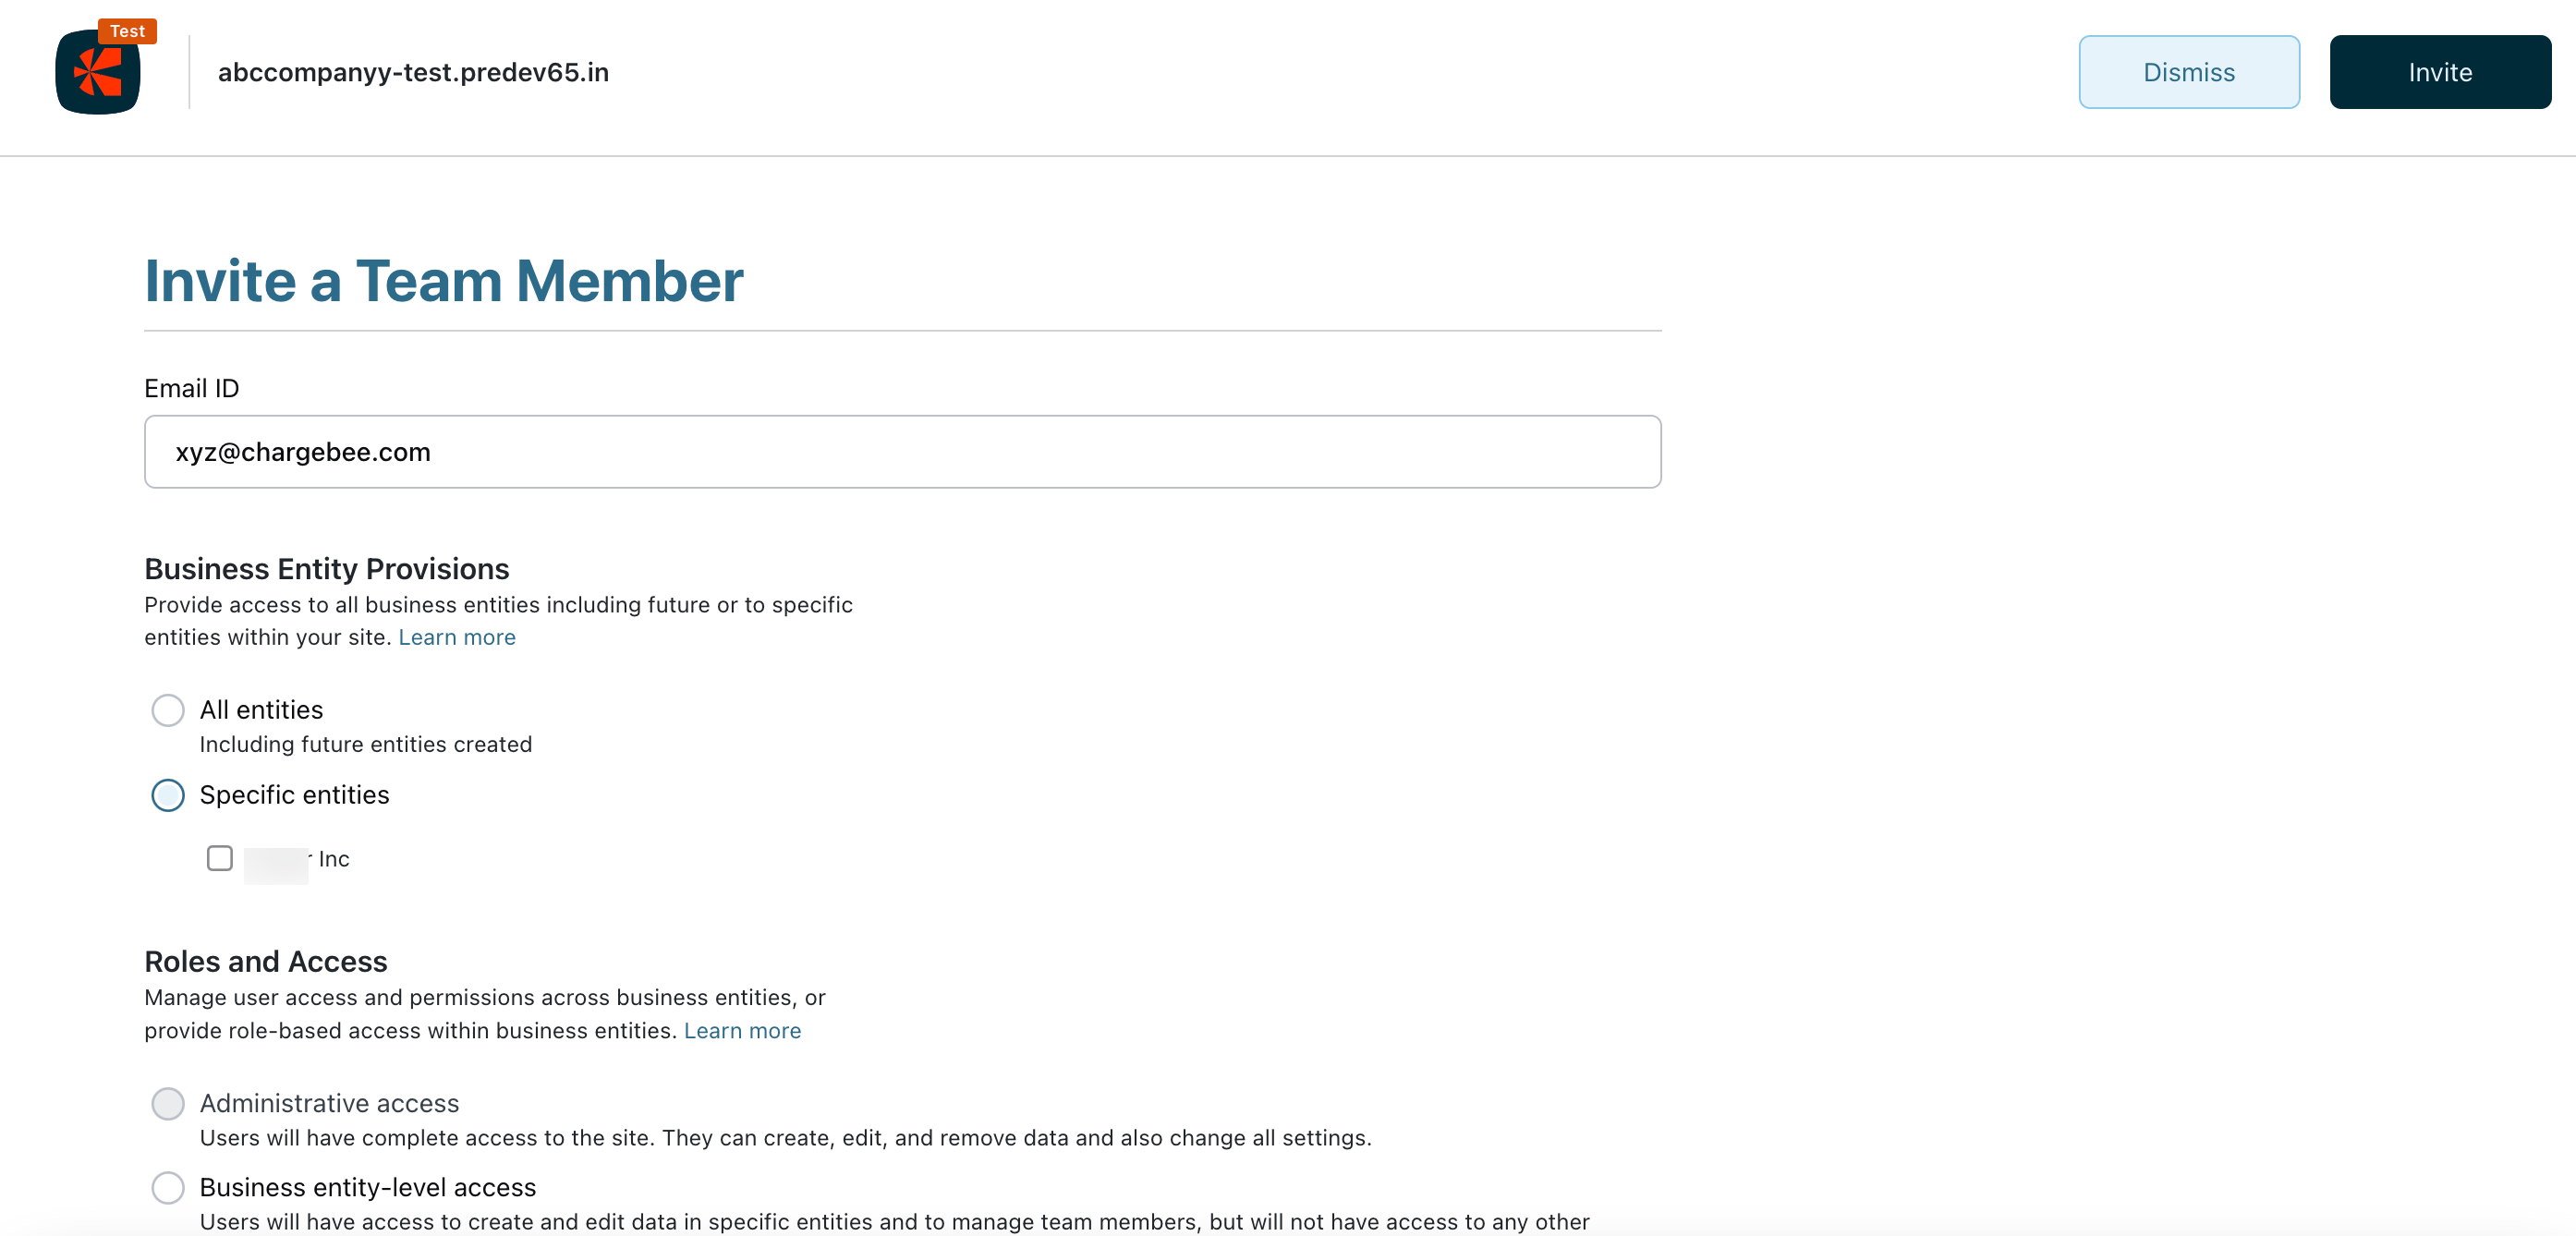
Click Settings > Team Members to invite new users.
-
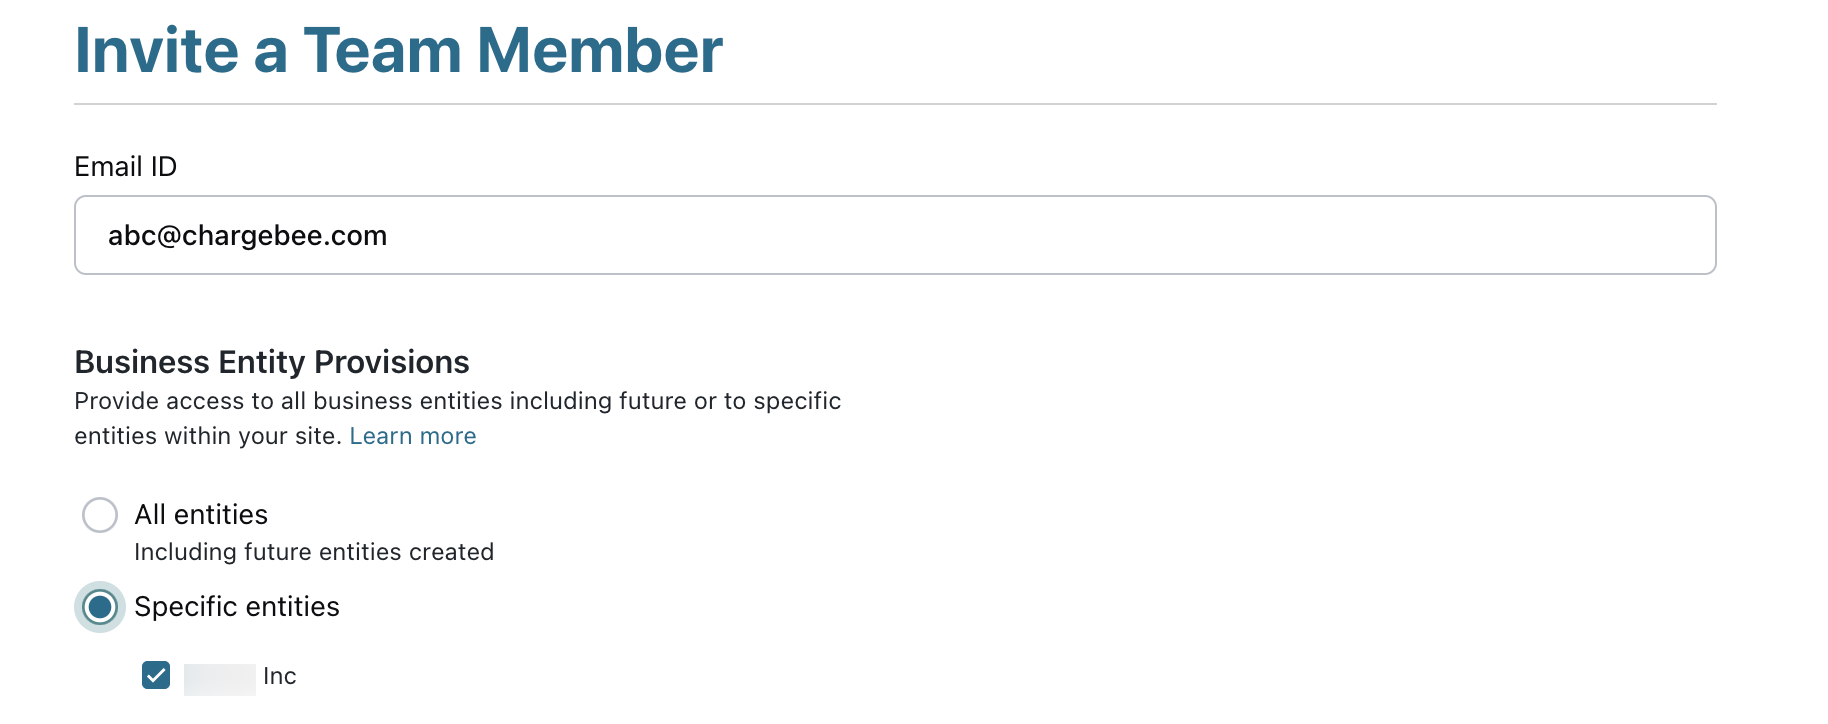
Click Invite Members to assign business entity or entities and their access levels.
-
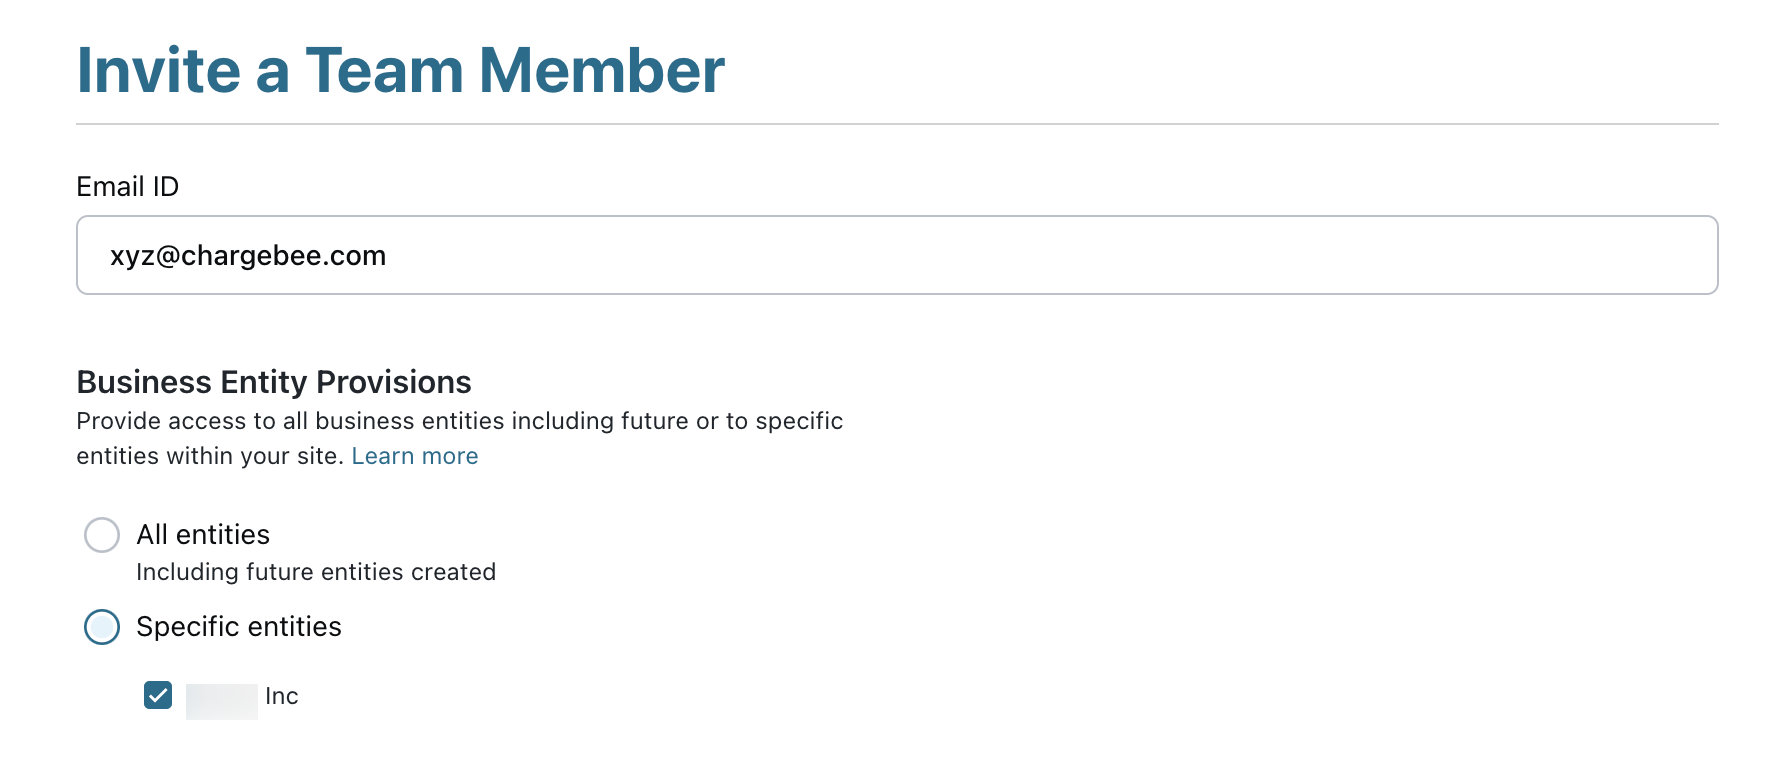
Enter the email address of the invitee in the Email field and select the applicable radio button to give access to business entity and click Add Entities to select entities.
-
Select applicable entities and click Add.
-
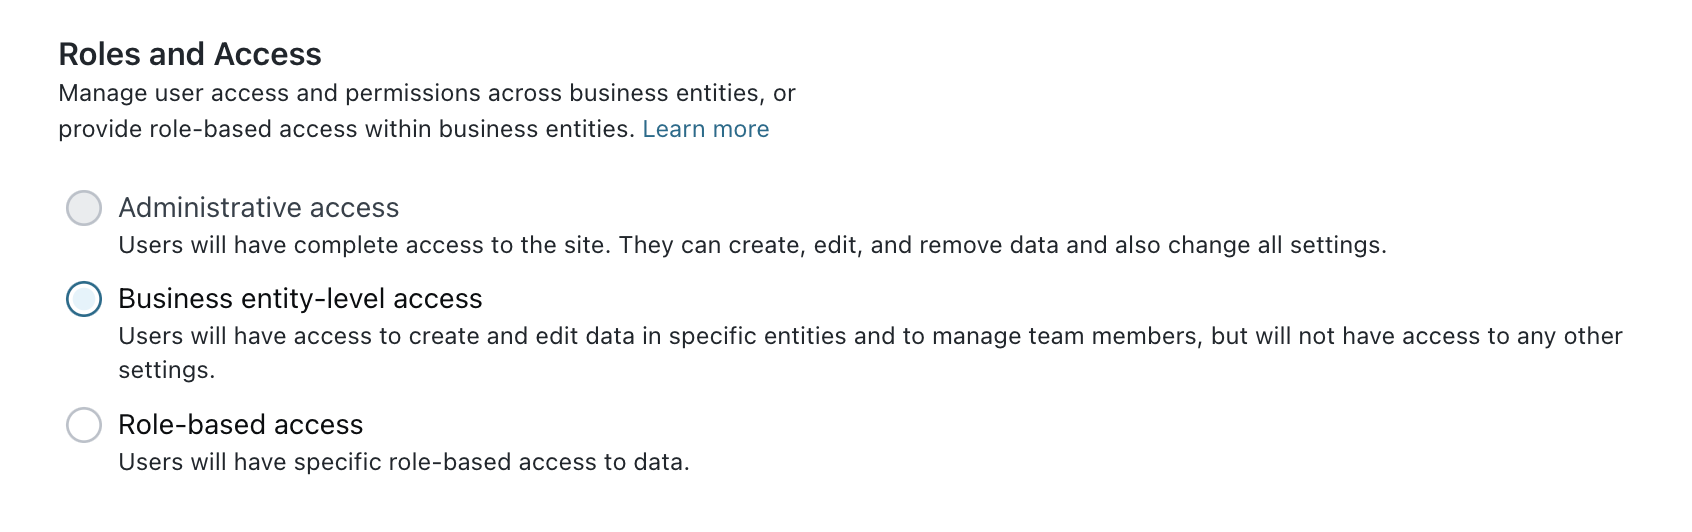
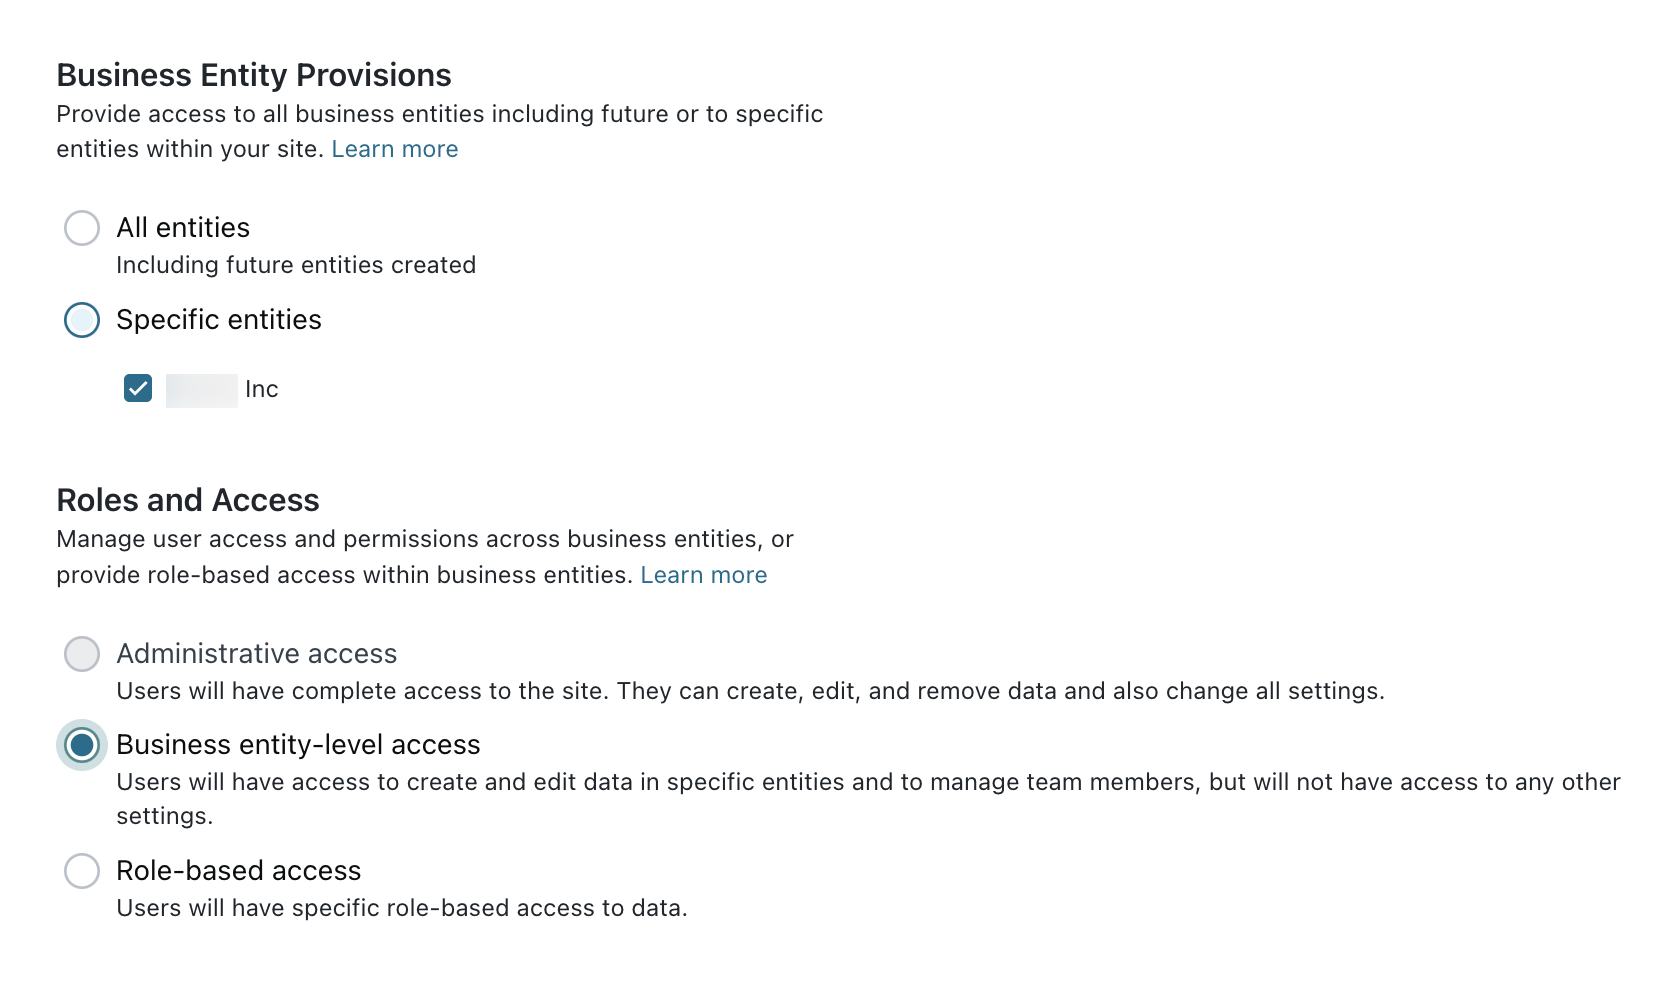
Click the applicable radio button to assign Roles and Access.
-
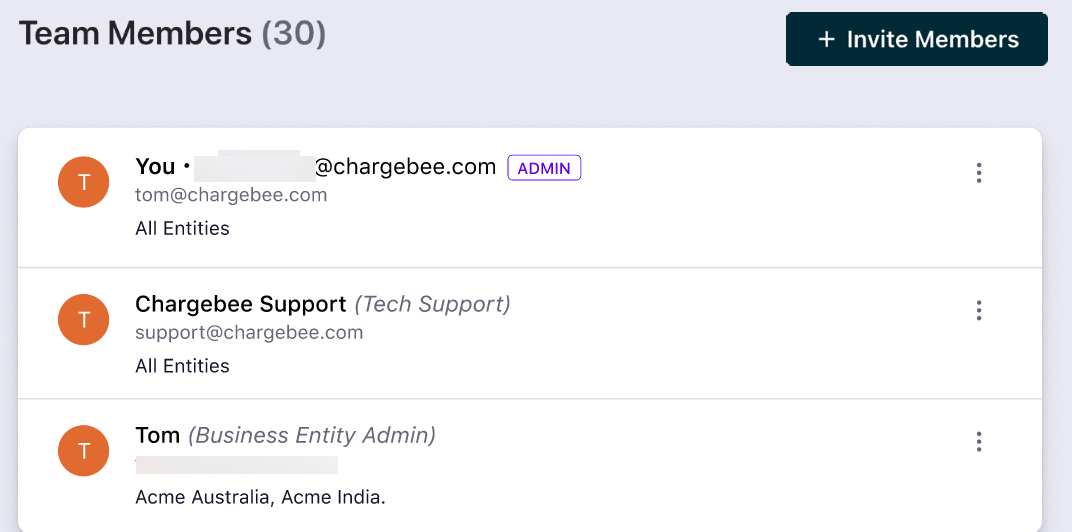
Click Create to send the email invite and review the access view page that lists current users and their access levels.
Business Entity Admin User
A Business Entity Admin user can invite users to have the same access or lower. In this example, we will review a Business Entity Admin providing Business Entity Admin access to a user.
-
Login to your Chargebee site.
-
Ensure you have selected the site view from the switch icon.
-
Click Settings > Team Members to invite new users.
-
Click Invite Members.
-
Enter the email address of the invitee in the Email field and select the entities the user would access.
-
Select the applicable radio button to assign Roles and Access.
-
Click Create to send the email invite and review the access view page that lists current users and their access levels.

Role Based Access Control
The configuration of your site and the addition of business entities are now complete. It is now imperative that you add team members and assign them access to the site or entities created.
| Select Entities | Assign Roles |
|---|---|
| All entities | Administrative access:
|
Business entity-level access:
| |
Role-based access: This allows you to assign access based on the roles configured on your site.
| |
| Specific entities | Business entity-level access:
|
Role-based access: This allows you to assign access based on the roles configured on your site.
|
Note:
It is important to note that the access level that a user can assign while inviting a new user is limited to their own access or lower.
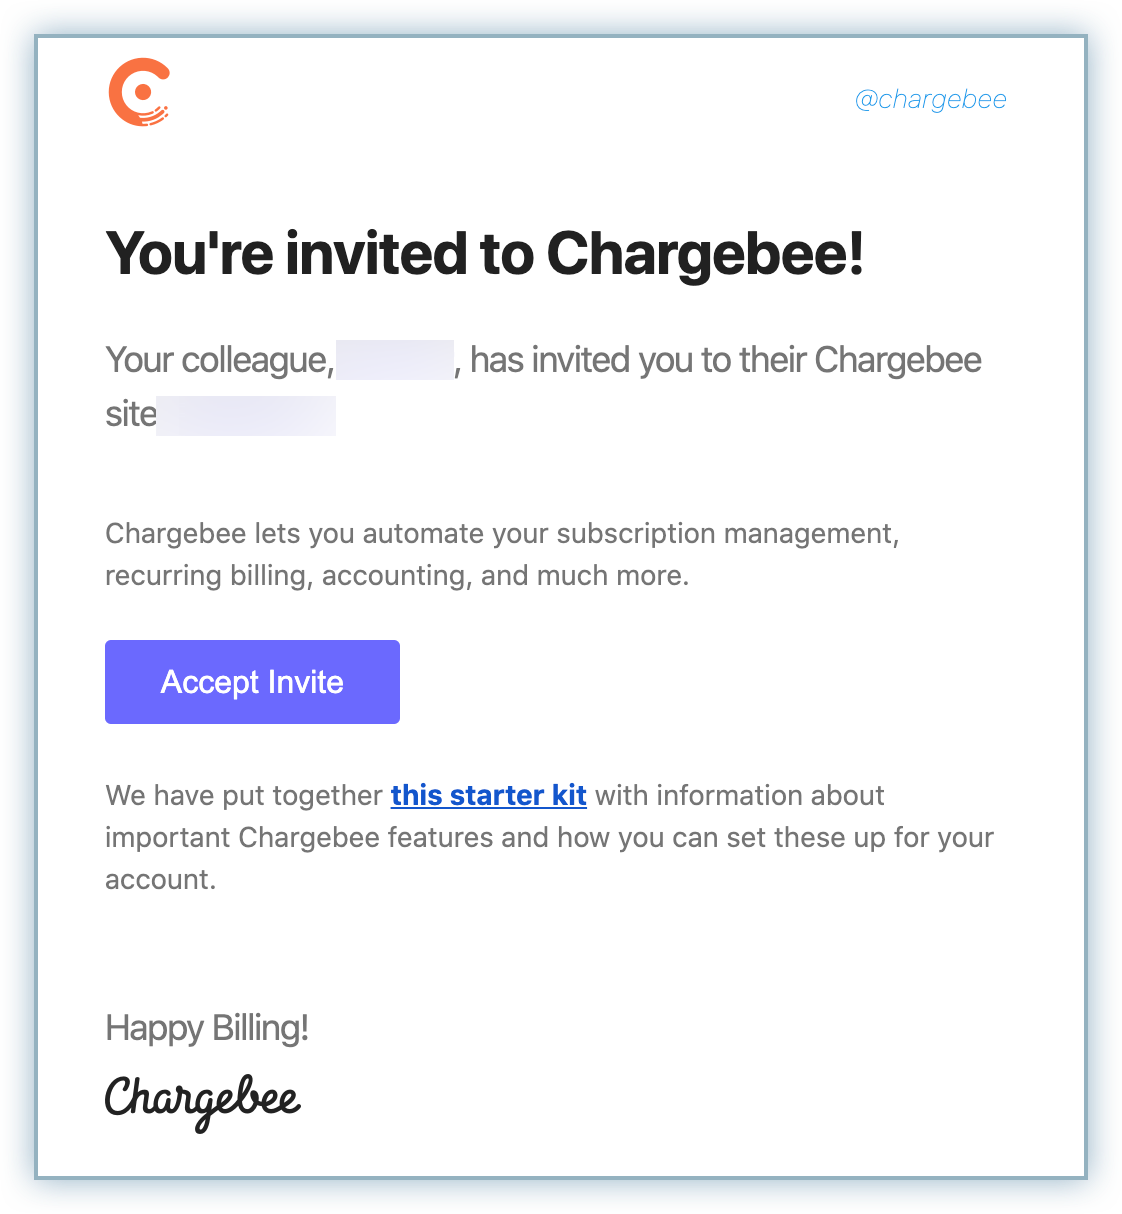
Accepting an Invite
Advise your team members to review the receipt of an email and click Accept Invite to be added to the Chargebee site.
Product Catalog Management
Early Access This feature is in Early Access. For enabling this feature reach out to eap@chargebee.com.
When creating a product family in the product catalog, you can specify whether it is available across the entire site or only within a specific business entity.
All the existing product families are shared across entities. The newly created product family can be marked as shared across entities or specific to a business entity.
All products associated with the product family---including plans, addons, charges, their prices, and variants---inherit this property from the product family.
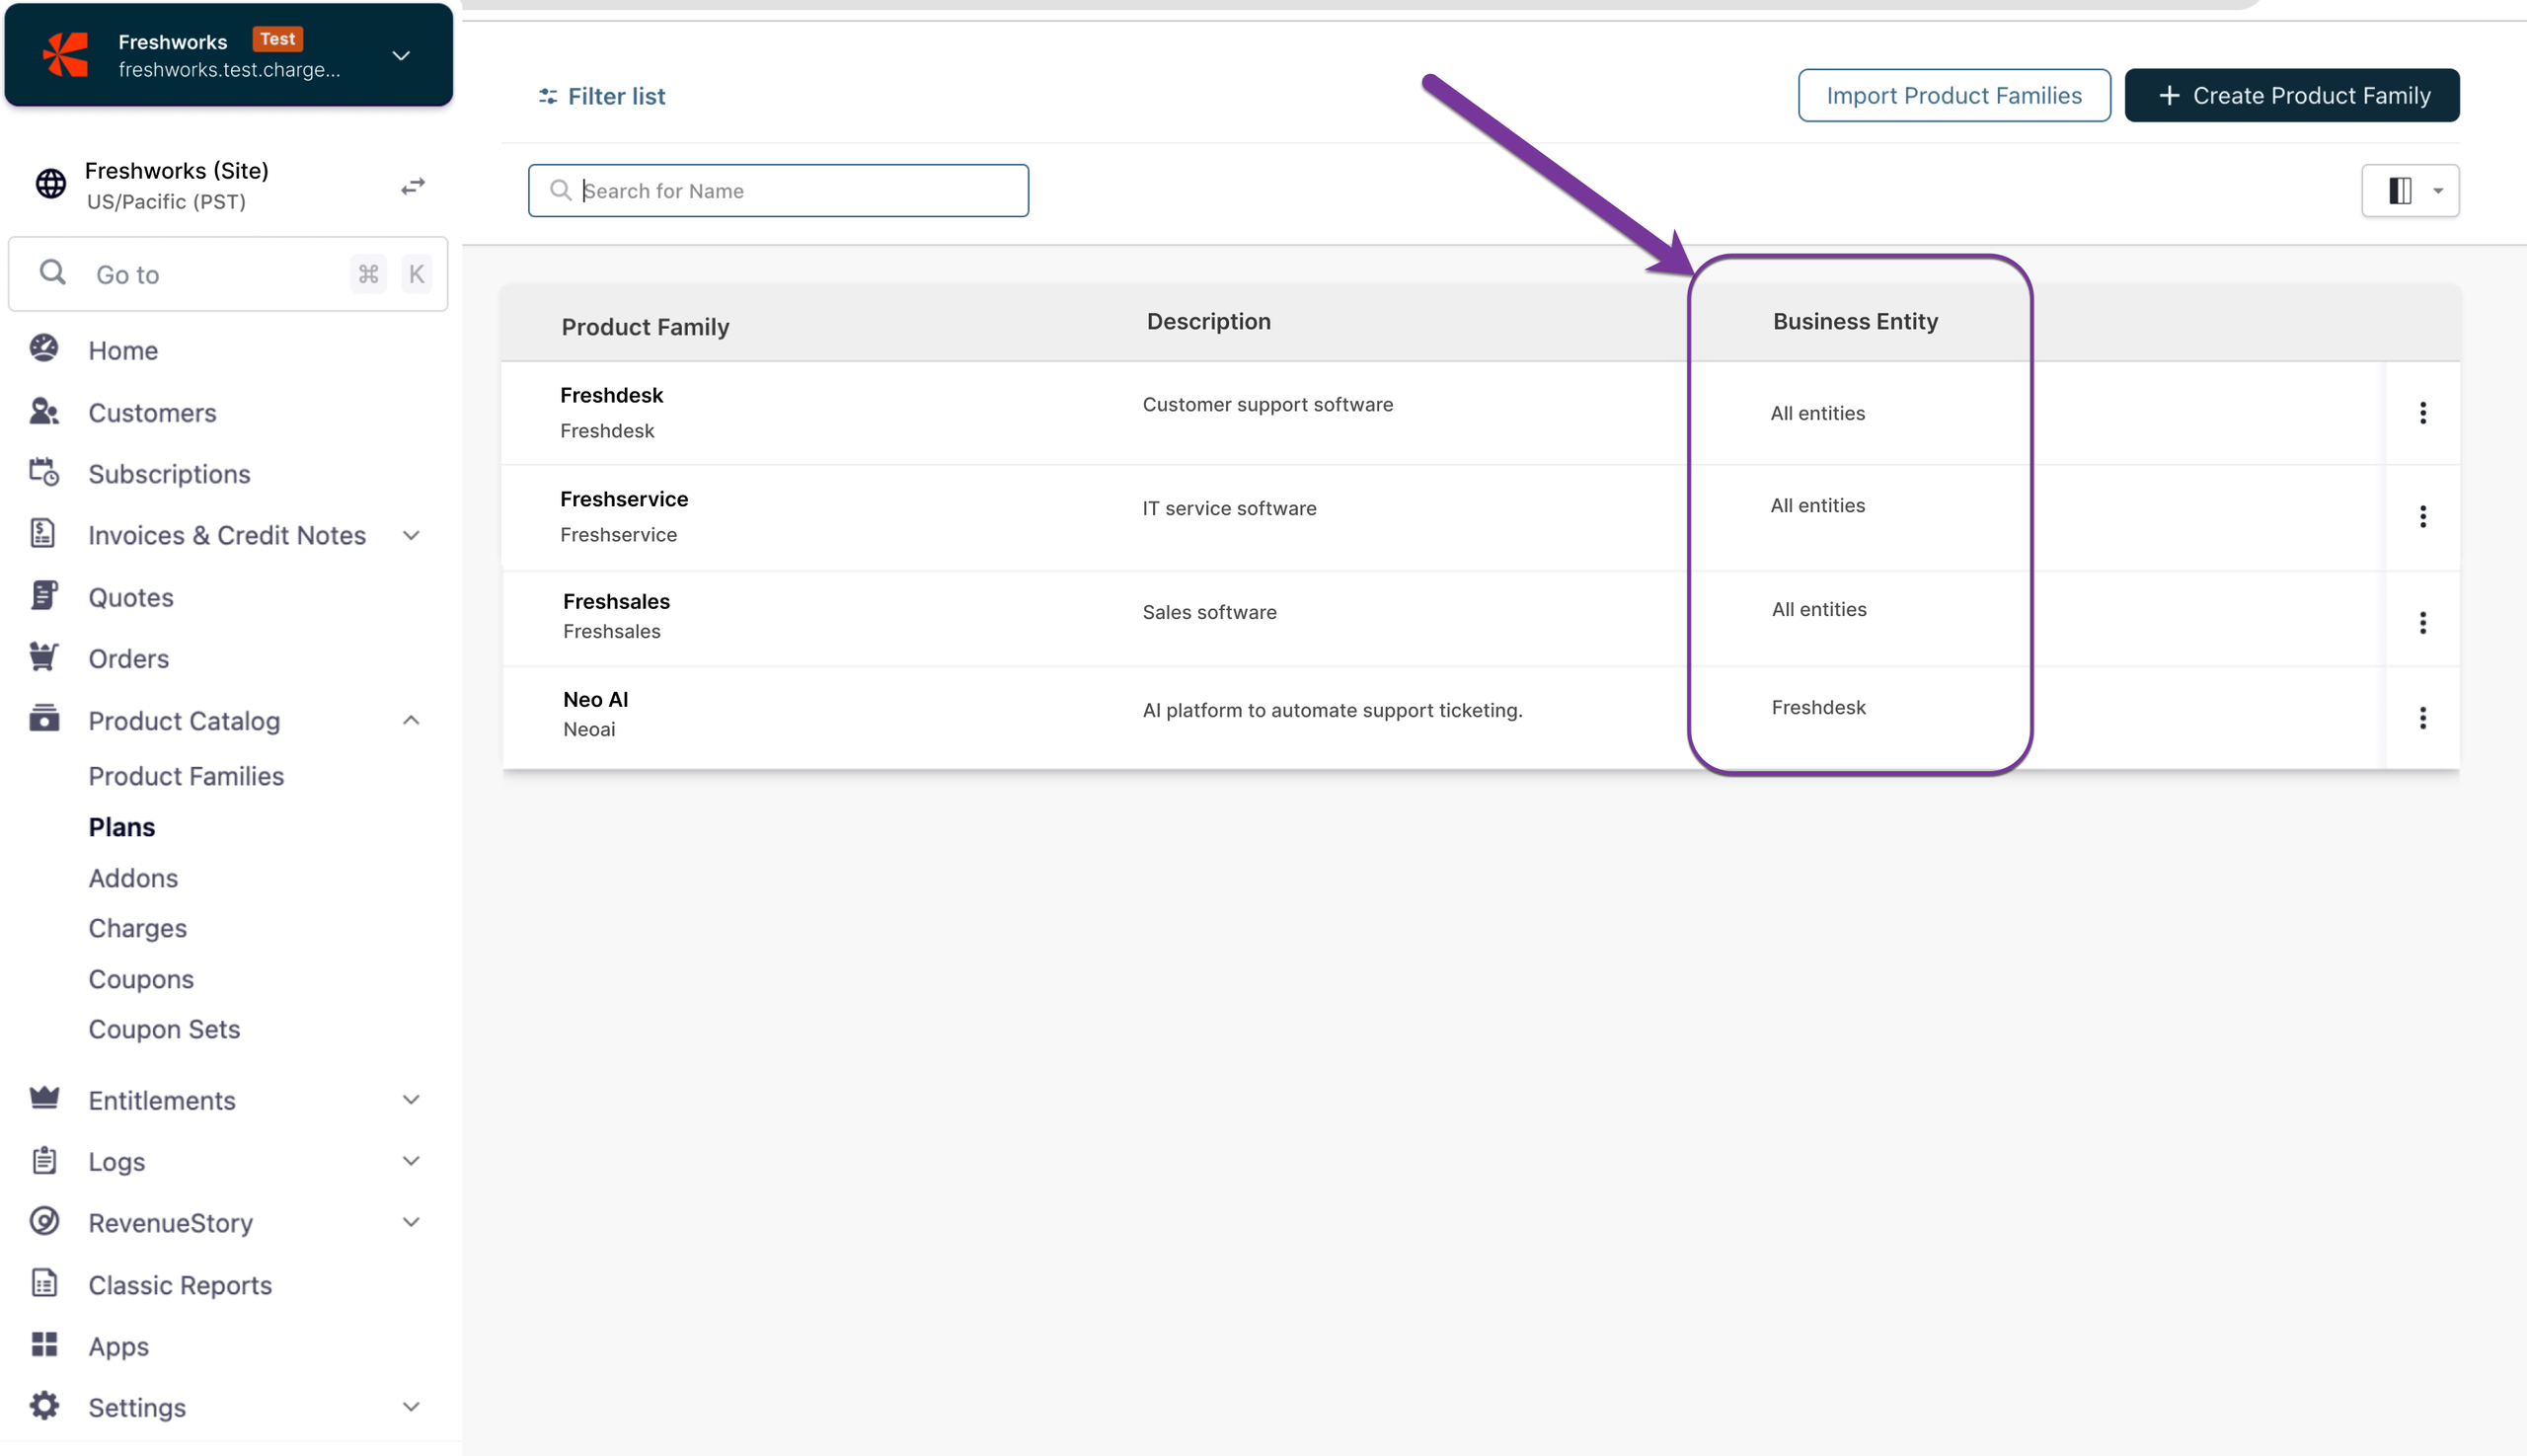
The Product Family list page with the Business Entity column.
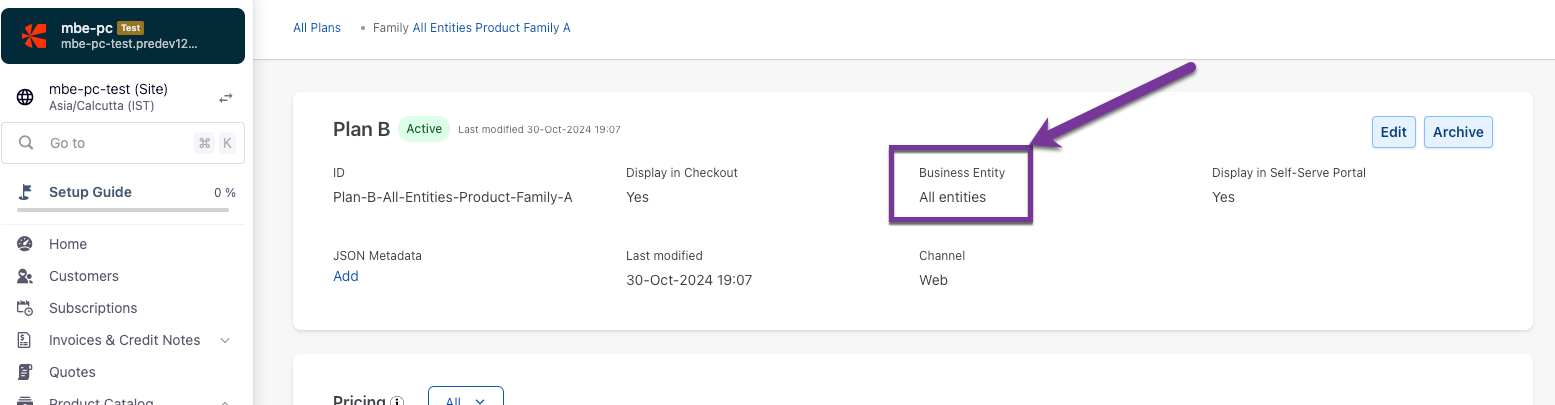
The details page of a plan showing the Business Entity field.
Use case
Create generic products at the site level that can be accessed by all business entities. Additionally, create business entity-specific products to address entity-specific market needs.
Example
Suppose your company, Acme, sells project management software with four generic plans and two plans specifically for the EU business region. A recommended setup is as follows:
- Set up a business entity for each region, such as Acme EU and Acme US.
- Set up a site-wide product family with the four generic plans.
- Set up a product family specifically for the Acme EU entity, which contains the two EU-specific plans.
Important considerations
- Once set, the business entity of a product family (including all associated products) cannot be changed.
- A product family can either be site-wide or specific to one business entity. To make a product family available in multiple business entities, but not all, create separate product families for each desired business entity.
- Features are always created at the site level and cannot be limited to a specific business entity.
- Support for coupons, coupon sets, product catalog settings, portals, and price variants is not available yet but will be added in the future.
See also: Upcoming features
Create site-wide products
Information
User role required: Site Admin
You can create site-wide products that are available across all business entities.
Information
Tip: Use site-wide products for core offerings that are available to all business entities.
Warning
Once set, the business entity of a product family (and all its products) cannot be changed. If you need to make changes, you must delete and recreate the product family.
Steps to create site-wide products
-
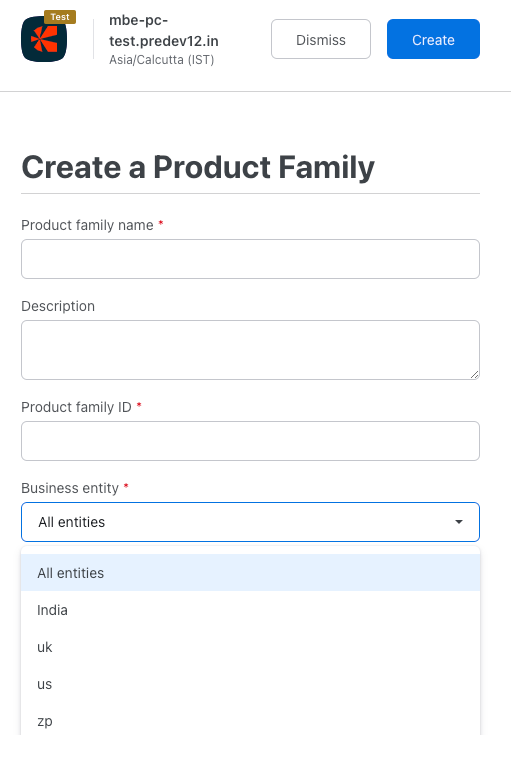
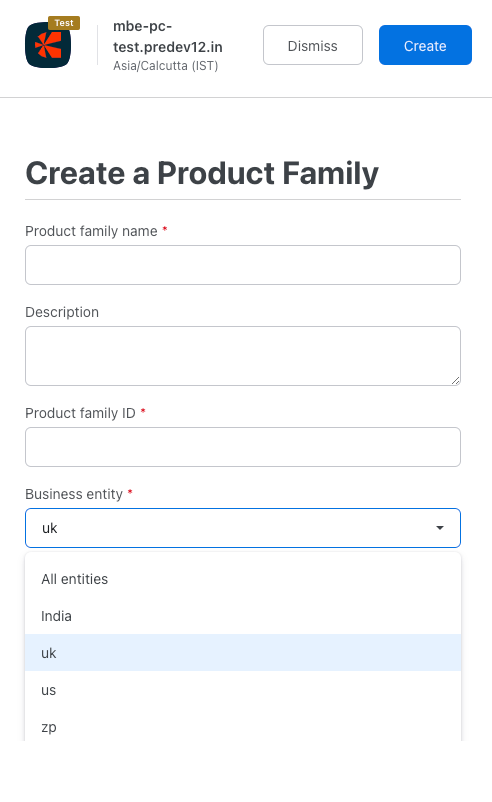
Create the product family. In the Business Entity dropdown, select All Entities.
-
Create the plans, addons, and charges. The business entity field is automatically derived from the product family and cannot be modified.
-
Set up the product prices.
Create entity-specific products
Information
User role required: Buisness Entity Admin or higher
You can create products that are specific to a single business entity.
Information
Tip: Create entity-specific products to meet localized market requirements.
Warning
Once set, the business entity of a product family (and all its products) cannot be changed. If you need to make changes, you must delete and recreate the product family.
Steps to create entity-specific products
-
Create the product family.
-
In the Business Entity dropdown, select the specific business entity from the list of entities you have access to.
-
Create the plans, addons, and charges. The business entity field is automatically derived from the product family and cannot be modified.
-
Set up the product prices.
Customer Management
The creation and management of customers can be fulfilled by users based on the access that is assigned to them.
To elaborate, a site admin can add customers to any of the entities while an entity-level user can only add customers to the entity to which access is provided.
Site Admin User
In this example, the site admin user with access to multiple entities is creating a customer for the Australian entity:
-
Login to the Chargebee site.
-
Click Customers from the left navigation menu.
-
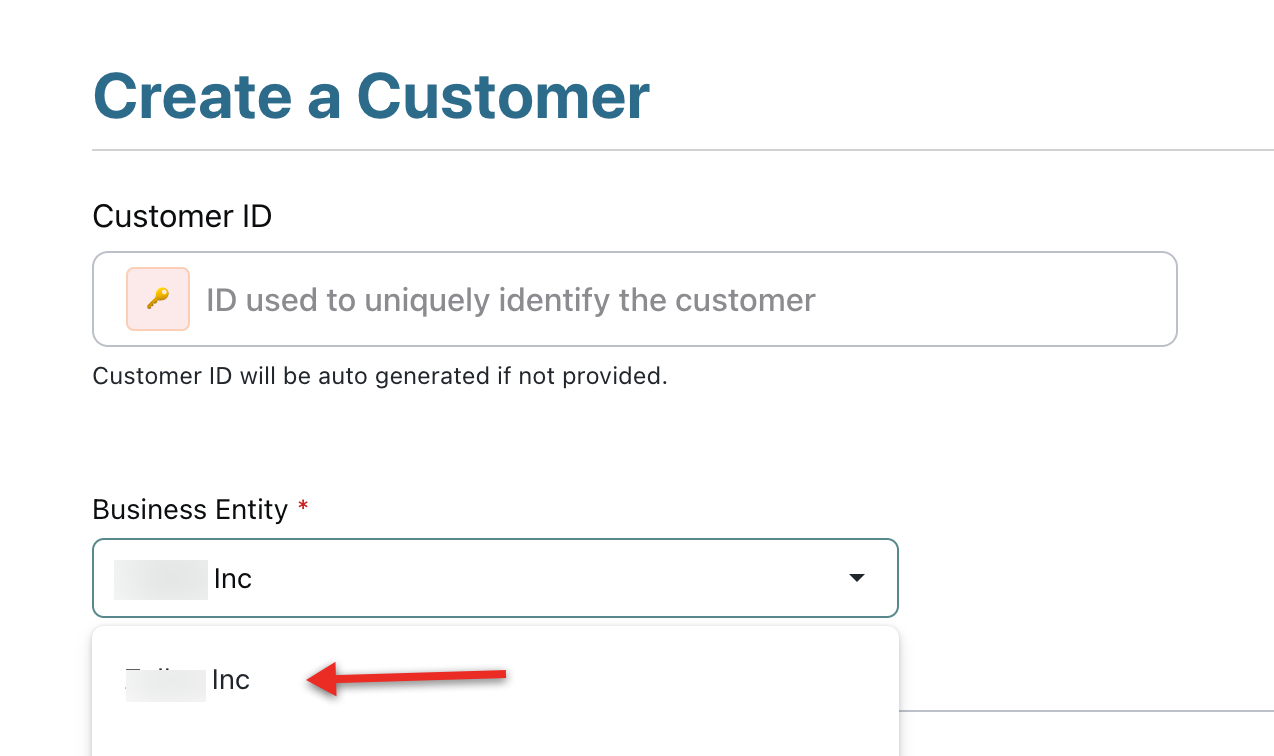
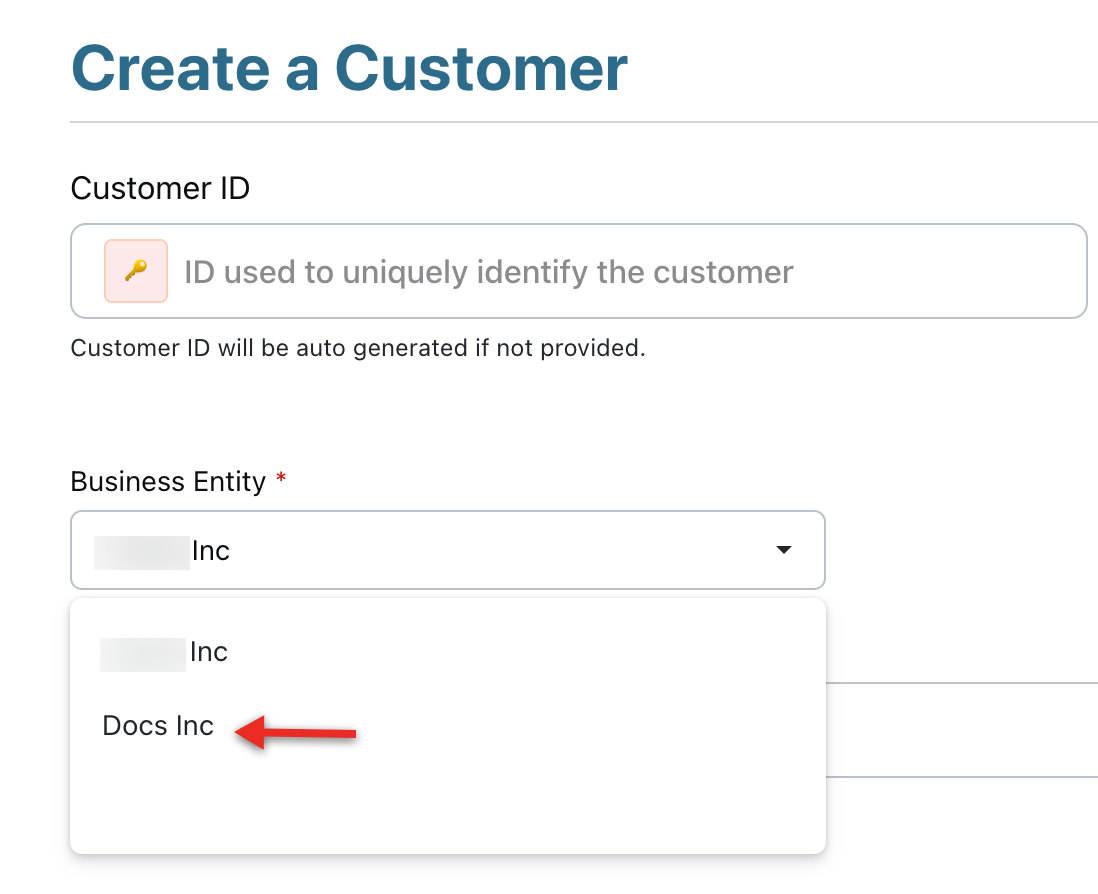
Click Create Customer to add a new customer.
-
Select the applicable option from the Business Entity drop-down list.
-
Type the required details into other fields and click Create.
View Customer List
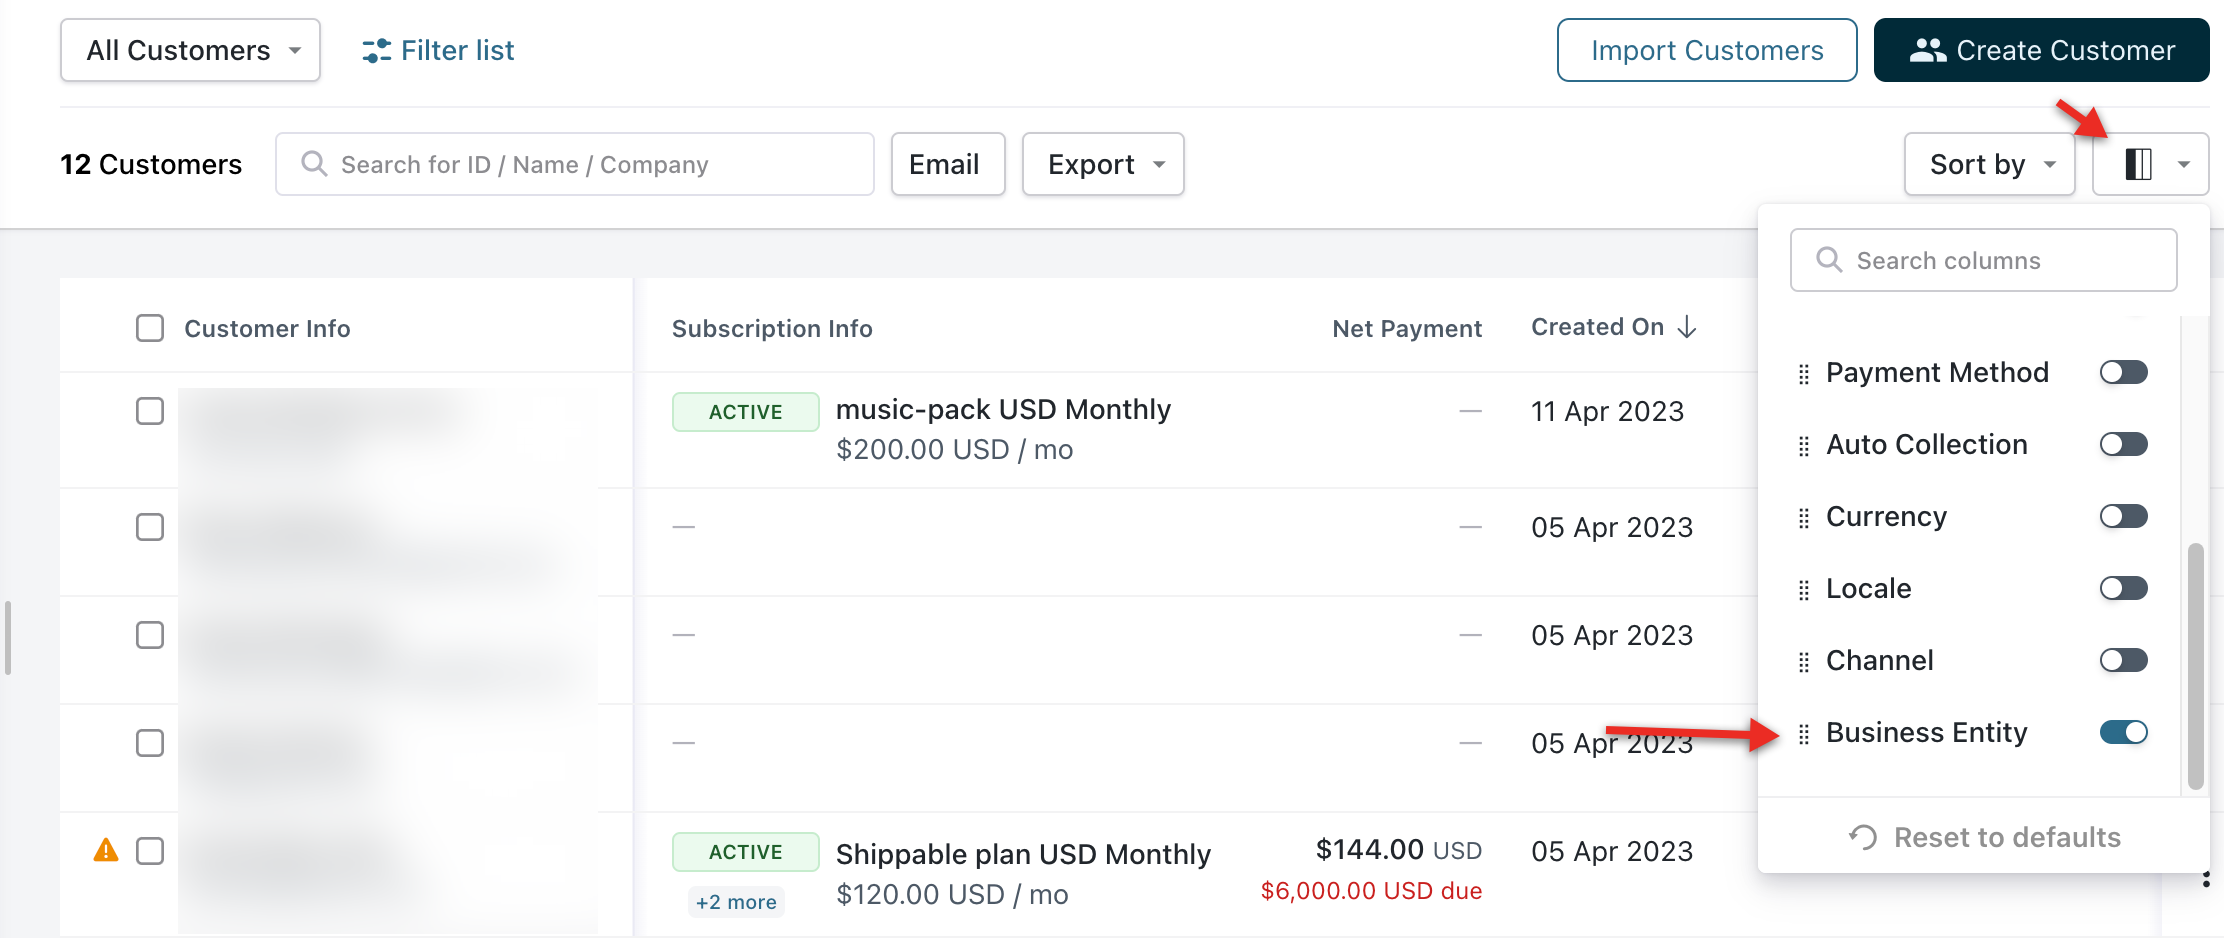
When using the site view, the All Customers list is an effective way of viewing all customer records associated with the site and/or entity.
However, the increased number of entities may result in additional records making it harder to navigate and locate a required customer record. The filter options have been optimized to now include Business Entity allowing you to view customers associated with a business entity.
Entity-Level User
An entity admin can create customers, however, the customers can be created only for entities that the user has access to. Review the screenshot below for user limited to creating customers for associated entities only.
Subscription Management
Subscriptions are created based on the access levels that are associated with the user. Follow the steps below based on the access level assigned to you:
Site Level Admin
A site admin user may have access to multiple entities and can create a subscription using the customer base from all entities. However, it is important to note that the entity of the customer determines the entity of the subscription too.
Follow the steps below to create a subscription for a customer:
-
Login to your Chargebee site.
-
Click Subscriptions.
-
Click Create New Subscription.

-
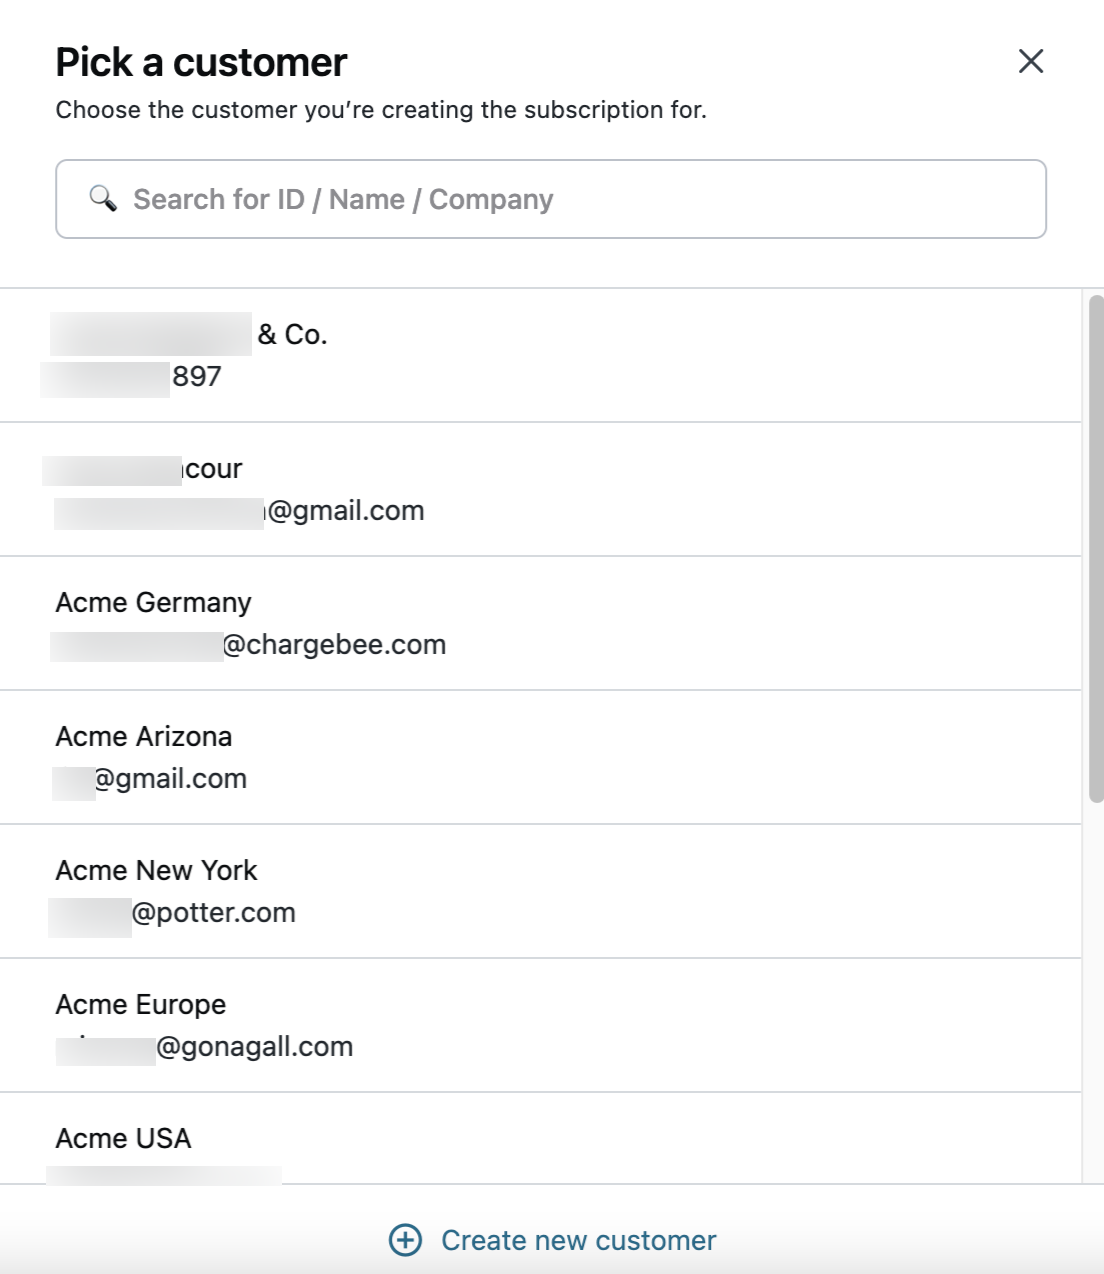
Select an applicable customer from the Customer List or click Create new customer.
Entity-Level User
A business entity admin can only create subscriptions for entities assigned only. Follow the steps below to create a subscription for a customer associated with an entity.
-
Login to your Chargebee site.
-
Click Subscriptions.
-
Click Create New Subscription.
-
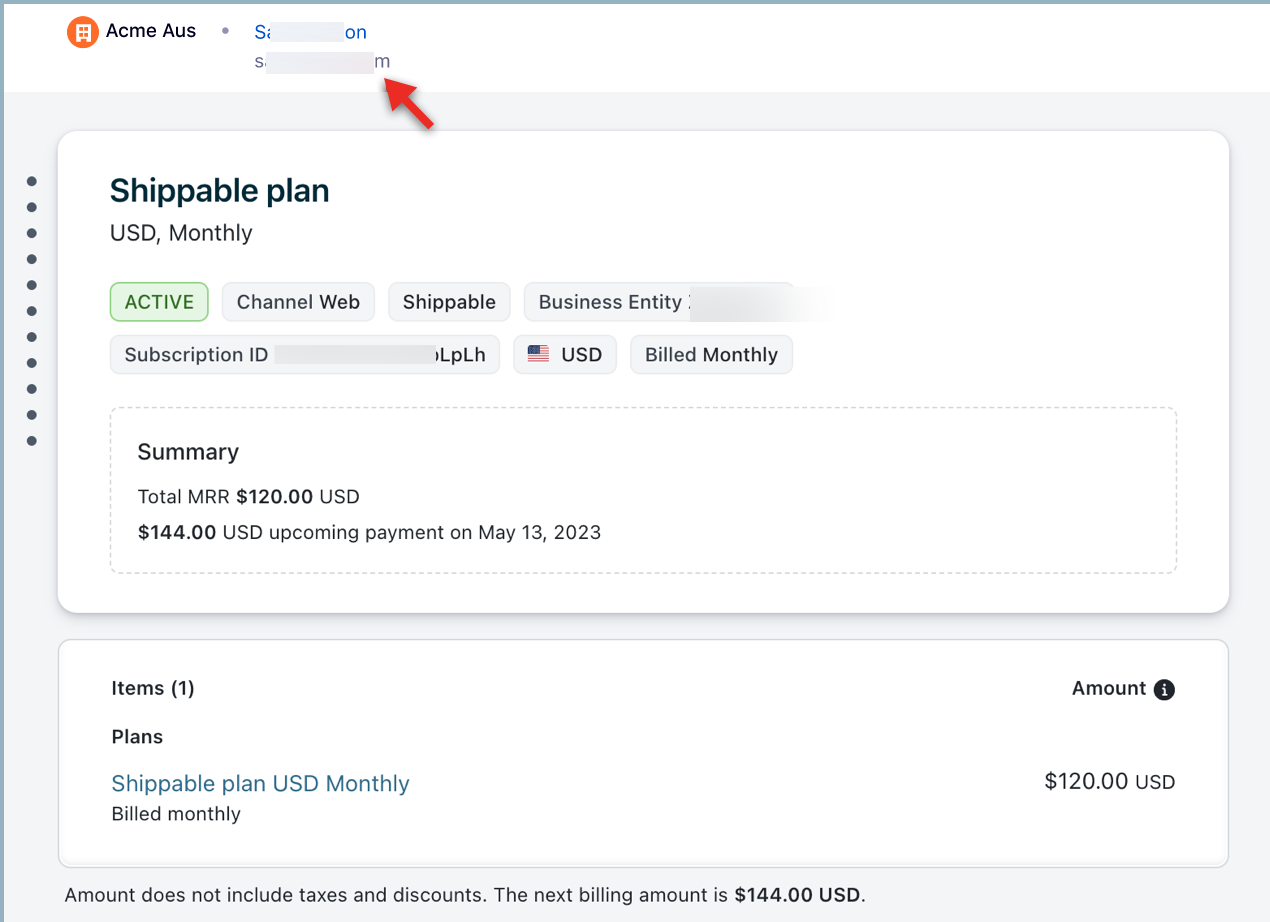
The associated with the customer displays at the top, enter the subscription details required, and click Create.
-
The entity associated with the subscription displays at the top of the subscriptions page with the subscription details.
Brand Style Management
Branding is a key element of your business while interacting with your prospects and customers. While using Chargebee for your billing automation, you can ensure that all the customer-facing essentials such as emails, invoices, checkout pages, and portal that are generated and managed by Chargebee reflects your brand logo, icon, and color schemes.
If you are a business with multiple entities, you could be using the same branding across all your entities, or you could be using exclusive branding for each of your entity. Either way, Chargebee allows you to configure brand styles for your business with ease. By default, the brand style for each entity is inherited from your site. You can override this default brand style and create a custom style for each entity as required.
Click here to learn more about branding.
Note:
The site admins have access to the brand style management for the site and all entities, and the business entity admins can only access and update the brand styles of their respective entities.
Configuring Brand Styles for Site
To configure brand styles at the site-level, follow these steps:
-
Login to your Chargebee Billing site.
-
Click Settings > Configure Chargebee > Brand styles.
-
On the Brand Styles page, click the tabs Logo & Color, Email, Invoice, Checkout, and Self-serve Portal to customize your brand styles for each of them respectively.
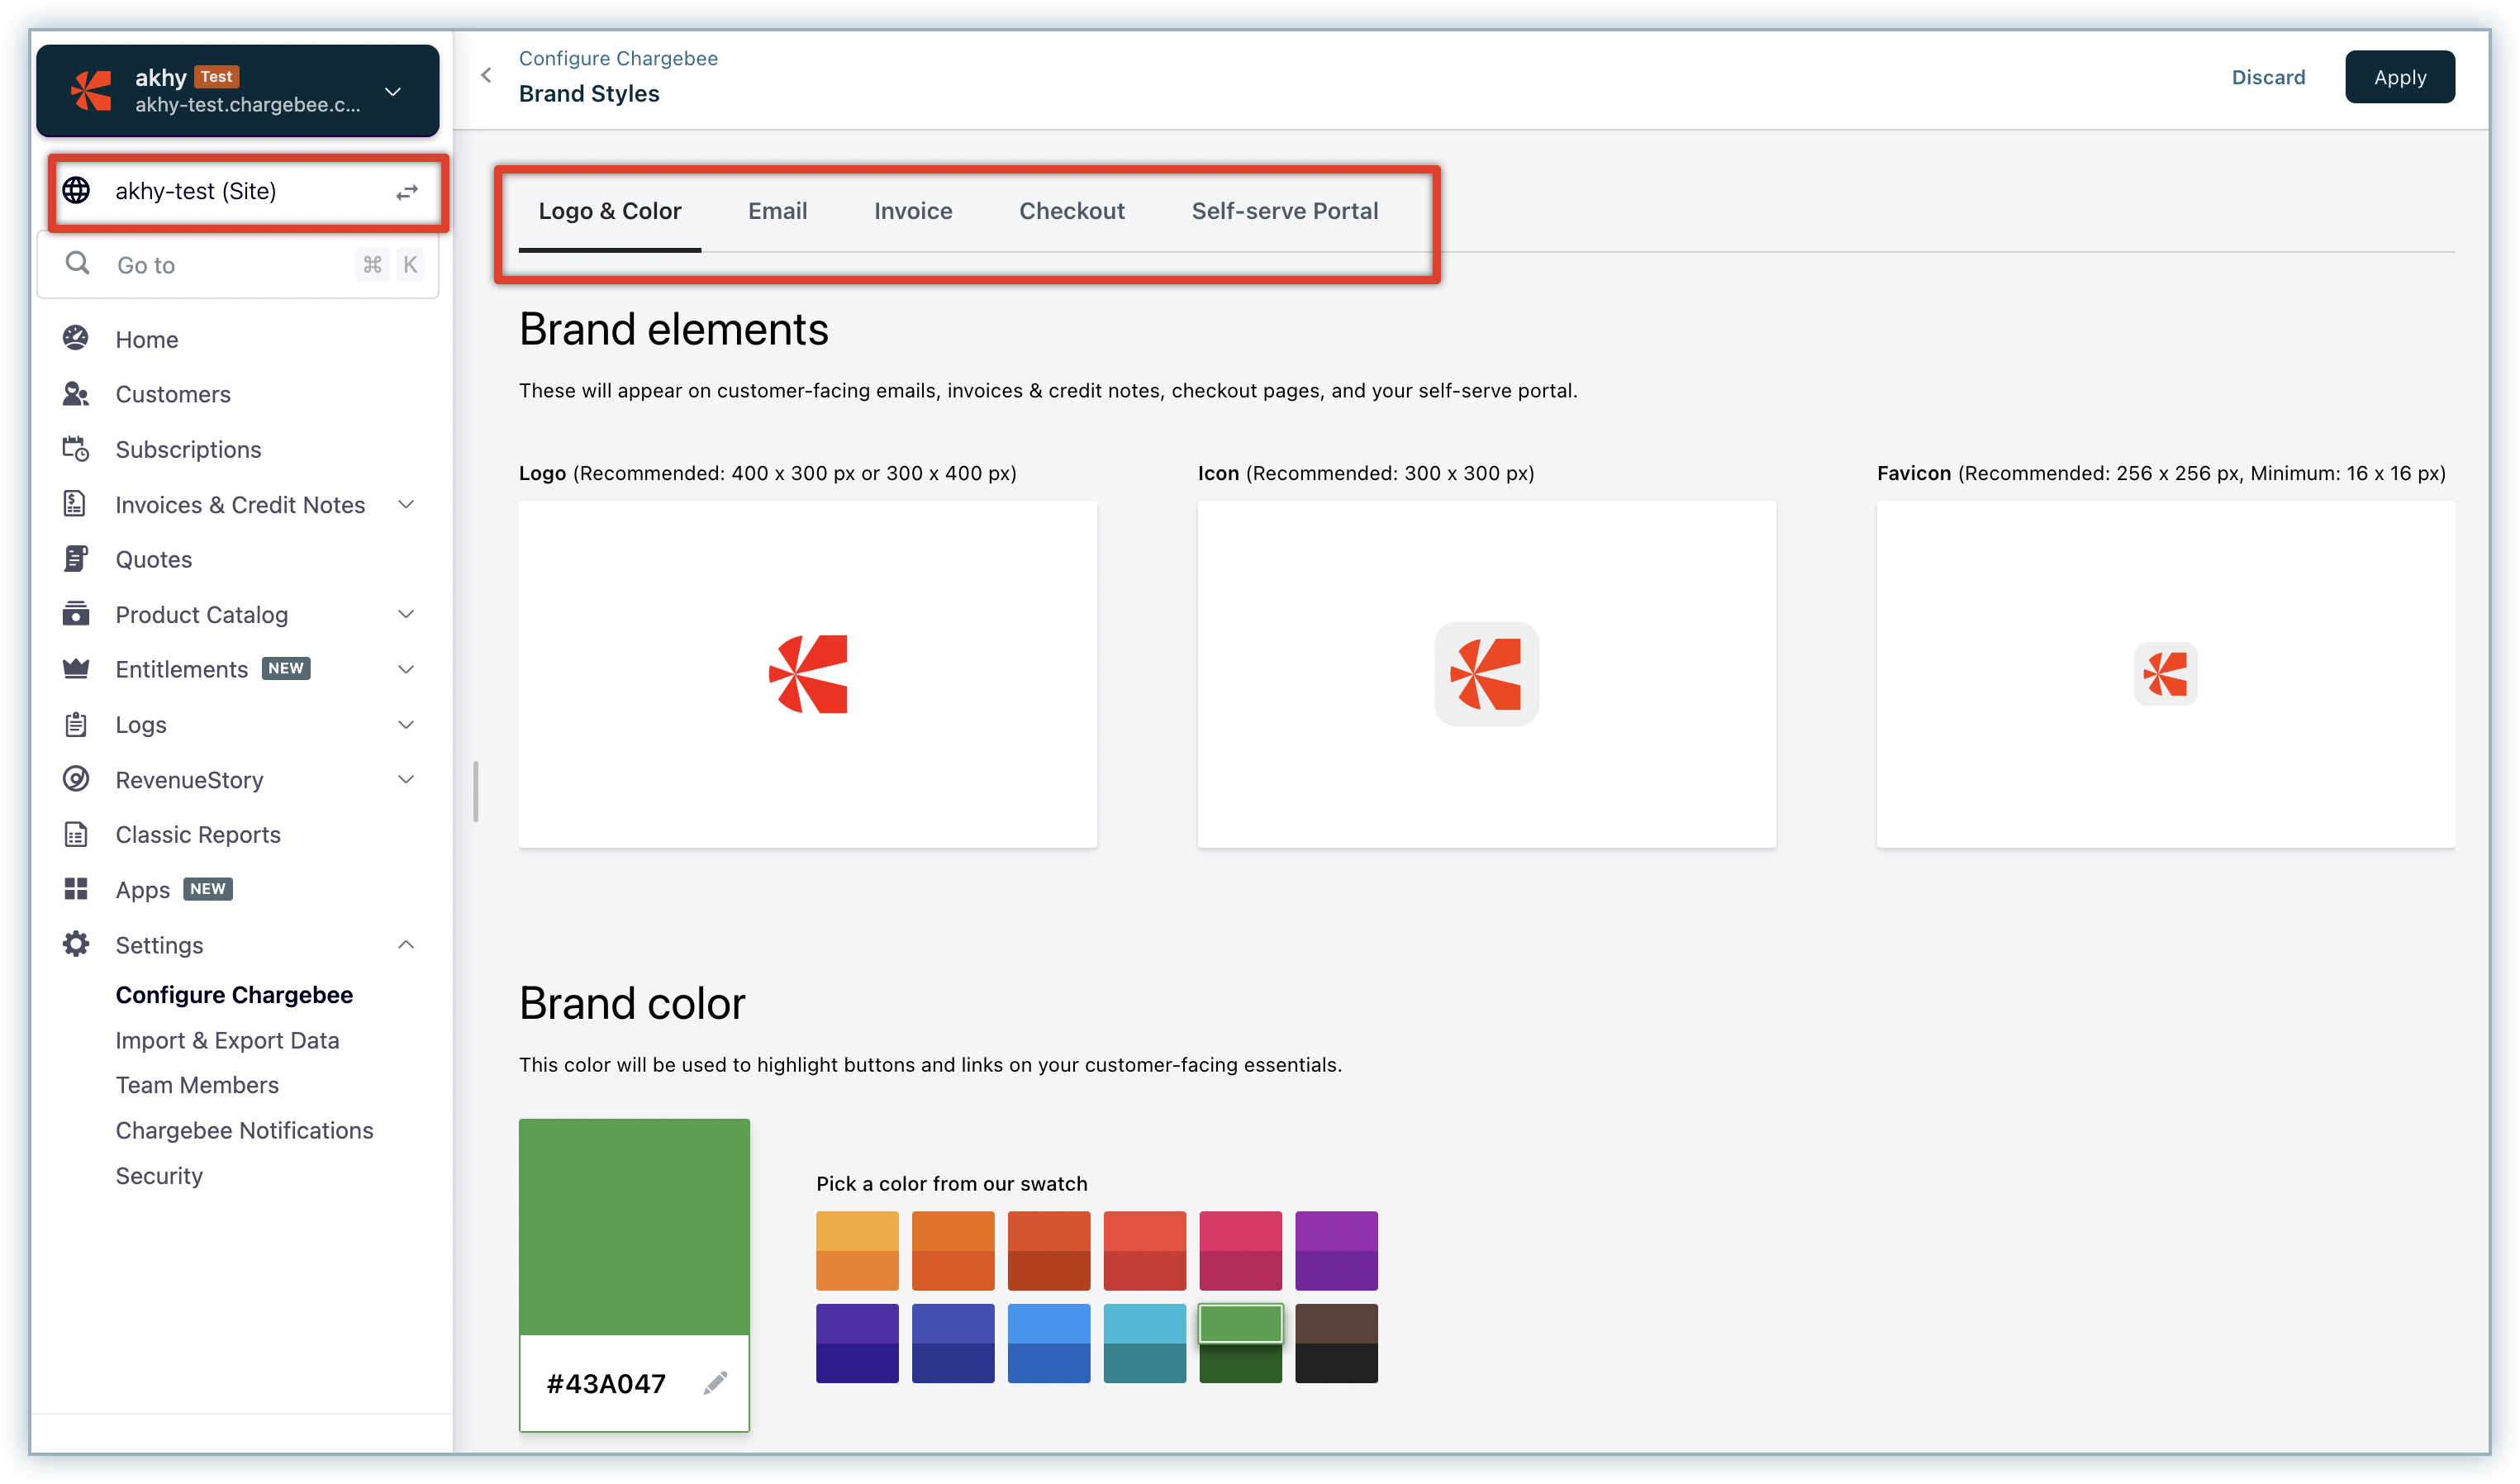
Click here to learn more about configuring brand styles for your Logo & Color, Email, Invoice, Checkout, and Self-serve Portal.
-
After customizing the layout for all features, you can use the Send test email (for Email), Preview sample invoice (for Invoice), to verify your brand style configuration for the respective features. The See it in action button is not available for Checkout & Self Serve Portal at the Site level as there is no site level checkout/self serve portal when MBE is enabled. The button will be disabled if the new checkout feature is not enabled.
Overriding the Brand Style of Site for Entities
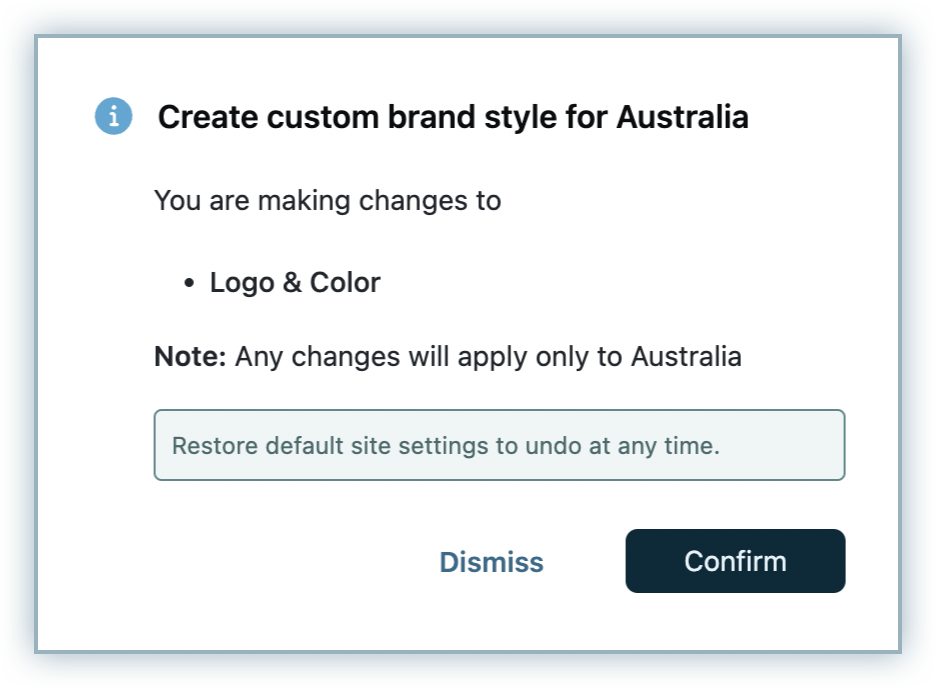
Once you've configured the brand style for your site, your entities will inherit this same style automatically. While the site-level branding carries your parent or the core brand elements, your business entities could each have a brand style of its own. Using a single brand style across all your entities might not serve you entirely right.
In such cases, you can override the default site style for each of your entities thereby enabling them to speak for themselves with relevant customers. You can choose to override one or all of your brand elements. For instance, you can override the brand elements for checkout and self-serve portal alone at the entity-level to display your entity branding, while your emails and invoices inherit your site branding. While updating the brand elements for entity, you will be prompted with an additional alert message to confirm the override operation as follows:
Note:
If you've overridden the brand style of invoices, email, or any other tab for one or more entities, any changes that you make further to the site-level branding will not be updated to these entity changes.
To configure brand styles at the entity-level, follow these steps:
- Login to your Chargebee Billing site and select the business entity for which you want to configure the brand style.
- Click Settings > Configure Chargebee > Brand styles.
- On the Brand Styles page, navigate to Logo & Color, Email, Invoice, Checkout, and Self-serve Portal tabs to customize your brand styles for the respective customer facing features. Click here for more details.
- After customizing the layout for all features, you can use the Send test email (Email), Preview sample invoice (Invoice), and See it in action (Checkout, and Self-serve Portal) to verify your brand style configuration for the entity's respective features.
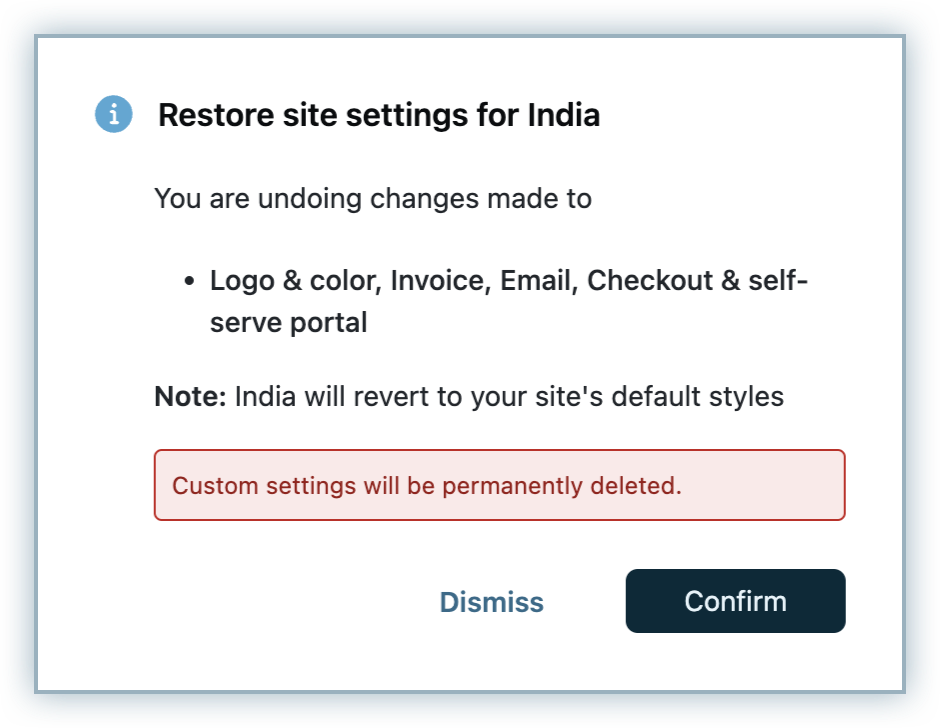
Restoring the Brand Style of Site for Entities
At any point, if you want to consolidate your branding or do it all over again for an entity, click Restore default styles to remove the custom brand style that you've added to your entity and restore the default style of your site for this entity.
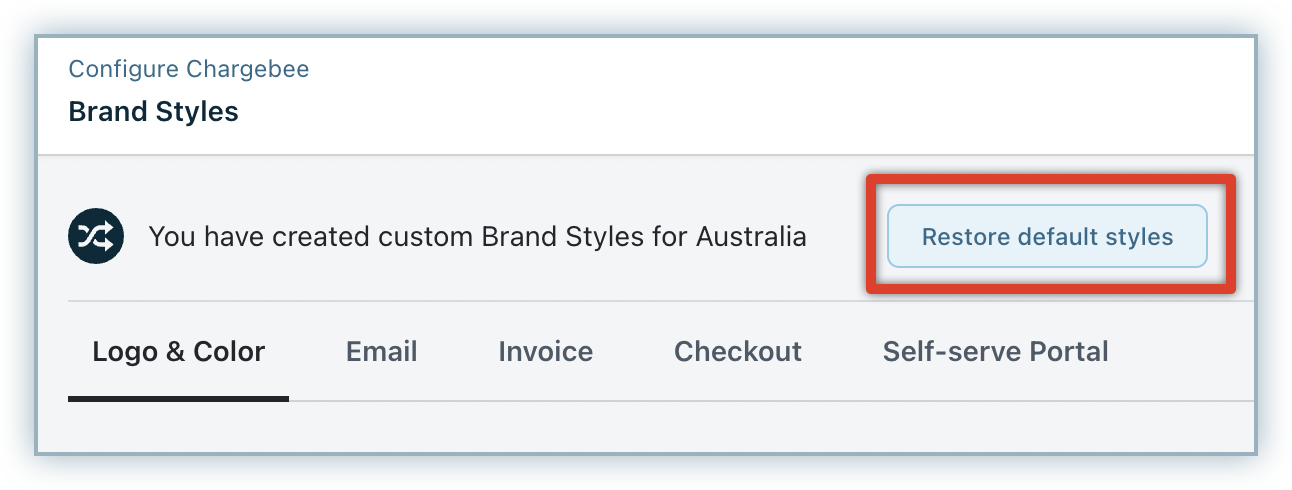
Note that the Restore default styles option will restore the brand elements for all the tabs - Logo & Color, Email, Invoice, Checkout, and Self-serve Portal and not any single tab in particular.
Time Zone Management
Welcome to Chargebee's business entity-specific time zone feature, where precision meets flexibility. Set distinct time zones for each of your business entities, ensuring impeccable time tracking and seamless customer communication. This is a game-changer, especially for multi-business entity organizations that span the globe.
How it Works Dates and times are transformed to match the time zone of the owning business entity. Here's how to leverage this feature:
- Dual Levels of Control: There are two levels of control:
- Site Level Time Zone: Ideal for users juggling multiple entities.
- Business Entity Level Time Zone: Perfect for transactions and accounting accuracy.
- Tailored Time zones: Your site admin can fine-tune time zones for each business entity, customizing the experience to suit your unique needs.
- Time on Your Terms: When you have access to multiple entities, the date and time will gracefully adjust to the time zone set at the site level, ensuring you are always in sync.
- Business Entity-Centric View: If you are focused on a single business entity, the date and time will effortlessly match the time zone associated with that business entity. It's all about precision.
Key Considerations:
- Business entity-specific time zones step in when you are at the business entity level, providing the context you need. But when you are looking at things from a site-wide perspective, the site-level time zone reigns supreme.
- Need to peek at the big picture? The site-level time zone comes into play when viewing global data using the Site/Global filter.
- Dive into a business entity's specifics. The business entity-specific time zone confirms you are in sync with your records.
- The User Interface (UI) makes it crystal clear. It displays the time zone for dates and times within the app.
- And here's the icing on the cake: When you hover over a date or time, you will see just one time zone -- the site time zone at the site level and the business entity's time zone when you are exploring within a business entity. We keep it sleek and straightforward.
Get ready to experience precise time management and localized communication like never before with Chargebee's business entity-specific time zones.
Navigating Business Entity-Specific Time zones: What You Need to Know
Wondering how business entity-specific time zones in Chargebee will impact you? Let's follow the impacts and changes you can expect across various features.
There is no impact on Chargebee APIs for the following feature tables.
Impacts on Subscriptions
| UI Display | User Inputs | Backend Logic | Import | Export |
|---|---|---|---|---|
Subscription List:
Subscription Details:
Edit Subscription:
| Create Subscription (Billing Info - Start Date): Choose the date & time zone | All dates are stored in UTC format, there's absolutely no impact | Inputs will be given as per the time zone (No change in current behavior) | If the UTC Option is "NOT" checked, then Export has dates in saved time zone format |
Impact on Customers
| UI Display | User Inputs | Backend Logic | Import | Export |
|---|---|---|---|---|
Customer List:
Customer Details:
| Not Applicable | All dates are stored in UTC format, there's absolutely no impact | Inputs will be given as per the time zone (No change in current behavior) | If the UTC Option is "NOT" checked, then Export has dates in saved time zone format |
Impact on Invoices
| UI Display | User Inputs | Backend Logic | Import | Export |
|---|---|---|---|---|
Invoice List:
| Invoice Details:
| All dates are recorded in UTC format, taking into account the specific time zone associated with each business entity | Inputs will be given as per the time zone (No change in current behavior) | If the UTC Option is "NOT" checked, then Export has dates in saved time zone format |
Impact on Credit Notes
| UI Display | User Inputs | Backend Logic | Import | Export |
|---|---|---|---|---|
Credit Notes List:
| Credit Notes Details:
| All dates are recorded in UTC format, taking into account the specific time zone associated with each business entity | Inputs will be given as per the time zone (No change in current behavior) | If the UTC Option is "NOT" checked, then Export has dates in saved time zone format |
Impact on Quotes
| UI Display | User Inputs | Backend Logic | Import | Export |
|---|---|---|---|---|
Quotes List:
| Create Quote, For a new subscription (Essentials ~ Start Date): Choose the date & time zone Quote Details:
| All dates are stored in UTC format, there's absolutely no impact | Not Applicable | Not Applicable |
Impact on Transactions
| UI Display | User Inputs | Backend Logic | Import | Export |
|---|---|---|---|---|
Transactions List:
| Transactions Details:
| All dates are stored in UTC format, there's absolutely no impact | Not Applicable | If the UTC Option is "NOT" checked, then Export has dates in saved time zone format |
Impact on Events
| UI Display | User Inputs | Backend Logic | Import | Export |
|---|---|---|---|---|
Events List:
| Events Details:
| All dates are stored in UTC format, there's absolutely no impact | Not Applicable | If the UTC Option is "NOT" checked, then Export has dates in saved time zone format |
Impact on Accounting
- It will continue to function just as it does today.
- Invoices and Credit Notes will pass on the time zone per transaction.
Impact on Custom Date Filters
- Custom filters are saved without a time zone reference, just like they are today.
- The saved filter can be used for different time zone entities.
- You can save custom filters individually for each business entity.
Impact on Checkout
- There is no impact on the checkout process. Checkout considers your customers' time zone.
Impact on Calendar Billing
- The subscription renewal job is scheduled at the time of subscription creation and is saved in the Job table. The time is converted into UTC and then saved in the job table.
- With the introduction of business entity-specific time zones, this process will wrap in the business entity-specific time zone during both subscription creation and updates.
Impact on Revenue Reports (RevenueStory)
- Much like Chargebee's app itself, RevenueStory has its own defined time zone specifically for generating reports.
- Currently, RevenueStory uses this reporting time zone for data reporting, whether it's at the site level or business entity level since the site time zone is inherited by all entities. This practice remains unchanged.
Configuring Business Entity-Specific Time zones
You have the flexibility to set distinct time zones for your business entities on both Test and Live sites.
For Test Sites, Chargebee initially follows your browser's time zone during sign-up. This time zone is then applied to the associated business entities. You can later modify the time zone settings for these entities.
As for Live Sites, when you transition from a Test Site to a Live Site, you will be prompted to adjust the time zone for your business entities. You can customize this setting as needed.
It's essential to note that the chosen time zone applies to all users within the business entity, regardless of their physical location. For example, if your business entity's time zone is set to EST, all users under that business entity will view records in EST.
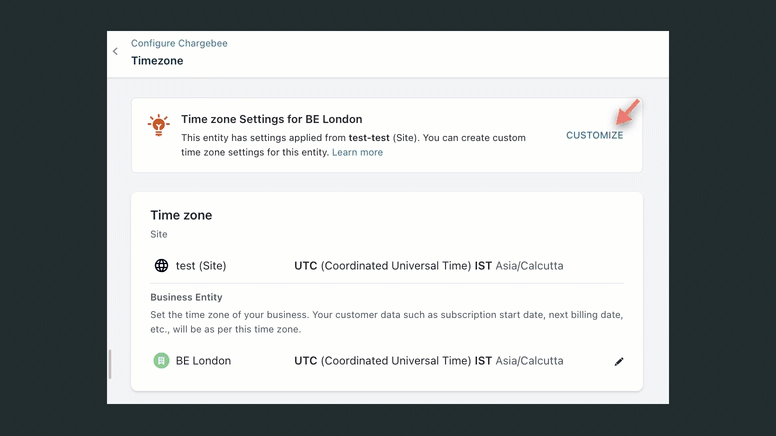
To change the time zone for a specific business entity on your site, follow these steps:
-
Select the business entity for which you wish to modify the time zone.
-
Go to Settings > Configure Chargebee > Time zone.
-
Click Customize to update the time zone for your business entity. If you prefer to use UTC for data exports, enable the checkbox. This option ensures that time and date columns in data exports are recorded in UTC.
-
Click Confirm.
-
Click Restore, if you wish to revert to the default time zone set at the site level for all associated business entities.
The above information will help you to tailor time zone settings for optimal efficiency in managing your business entities across different regions.
Was this article helpful?