New in Chargebee: Explore Reveal and understand your payment performance end-to-end.Try Now
Docschargebee docs
HomeBillingPaymentsRevRecGrowthReveal
Support

Product Updates


  • Release Notes

Getting Started


  • Overview
  • Chargebee Billing Data Centers
  • Object Relationship Model
  • Understanding Sites
  • Chargebee Tech Glossary
  • Articles and FAQ

Implementing Chargebee


  • Implementation Guide
  • Go-live Checklist
  • Articles and FAQ

AI in Chargebee


  • Chargebee Agents
  • Chargebee Copilot
  • Chargebee MCP Server (Model Context Protocol)

Developer Resources


  • Developer Resources Overview
  • Articles and FAQ

Product Catalog


  • Product Catalog Overview
  • Coupons
  • Articles and FAQ

Subscriptions


  • Working with Subscriptions
  • Billing
  • Orders
  • Articles and FAQ

Customers


  • Managing Customers
  • Account Hierarchy
  • Email Notifications
  • Branding
  • Configure Multiple Languages
  • Articles and FAQ

Entitlements


  • Entitlements Overview
  • Features Overview
  • Feature Management
  • Managing Product Entitlements
  • Subscription Entitlements
  • Customer Entitlements
  • Grandfathering Entitlements
  • Articles and FAQ

Usage Based Billing


  • Understanding Usages
  • Setting up Usage Based Billing
  • Usage Alerts
  • Metered Billing
  • Articles and FAQ

Chargebee CPQ


  • Chargebee CPQ
  • Chargebee CPQ for Salesforce
  • Chargebee CPQ for HubSpot

Invoices, Credit Notes, and Quotes


  • Invoices
  • Credit Notes
  • Quotes [Legacy]
  • Transactions
  • Articles and FAQ

Taxes


  • Overview
  • Configuring Taxes
  • Country-specific Taxes
  • Articles and FAQ

Hosted Capabilities


  • Overview
  • Hosted Checkout
  • Hosted Self-Serve Portal
  • Hosted Pages Features
  • Additional Hosted Pages
  • Payment Components
  • Pricing Table
  • Managing Payments with Chargebee.js
  • Mobile-Optimized Hosted Pages
  • Articles and FAQ

Site Configuration


  • Users & Roles
  • Custom Fields & Metadata
  • Approvals
  • Mandatory Fields
  • File Attachments & Comments
  • Advanced Filter Options
  • Multicurrency Pricing
  • Multi-decimal Support
  • Configuring Reason Codes
  • Events and Webhooks
  • API Keys
  • Time Zone
  • Time Machine
  • Transfer Configurations
  • Articles and FAQ

Multi Business Entity


  • Multi Business Entity Overview
  • Customer Transfer Overview
  • Articles and FAQ

Mobile Subscriptions


  • Overview
  • Omnichannel Subscriptions
  • Omnichannel One-Time Orders
  • Mobile Subscriptions (Legacy)

Reports and Analytics


  • RevenueStory
  • Home Dashboard
  • Frequently Asked Questions
  • FAQs for Classic Reports Sunset
  • Articles and FAQ

Integrations


  • Sales
    • Chargebee Salesforce Integration
    • Chargebee Salesforce (v1.41+)
      • Salesforce Installation Guide
      • Salesforce Integration Guide
      • Chargebee Actions in Salesforce
      • Salesforce Field-Mapping
    • Chargebee Salesforce CPQ
    • HubSpot Quote-to-Cash
    • HubSpot
    • Pipedrive
  • Customer Support and Success
  • Finance
  • Tax
  • eInvoicing
  • Marketing
  • Stitch
  • Collaboration
  • Contract Management
  • Ecommerce Management
  • Articles and FAQ

Data Privacy & Security


  • Two Factor Authentication
  • SAML Single Sign-On
  • System for Cross-Domain Identity Management (SCIM)
  • EU-GDPR
  • Consent Management
  • Personal Data Management
  • Compliance Certificates
  • HIPAA Guidelines
  • PCI Recommendations and Integration Types
  • Articles and FAQ

Data Operations


  • Bulk Operations
  • Migration
  • Articles and FAQ
  1. Billing
  2. Integrations
  3. Sales
  4. Chargebee Salesforce (v1.41+)
  5. Salesforce Installation Guide
  1. Billing
  2. Integrations
  3. Sales
  4. Chargebee Salesforce (v1.41+)
  5. Salesforce Installation Guide

Salesforce Installation Guide

Note

Multiple Chargebee sites If you are connecting multiple Chargebee sites with the same Salesforce org, perform the steps given below for each of the Chargebee sites.

Step 1: Connect Chargebee to Salesforce

Test then Live Before integrating your Chargebee live site(s) with your Salesforce production org, it is imperative that you test your workflows fully using the Chargebee test site(s) connected with a Salesforce sandbox account loaded with a copy of your production data.

  1. On your Chargebee site, navigate to Apps > Go to Marketplace > Sales & CRM > Salesforce. Click Connect. You are redirected to the Salesforce sandbox or Salesforce production login page based on whether you are connecting from a Chargebee test site or live site respectively.

    Tip If you don't see the option to connect, write to support or contact your Chargebee Sales or Customer Success representative to enable the integration.

  2. Sign into the Salesforce sandbox/production org using a user account created exclusively for the Chargebee integration. This ensures that changes made by the integration are clearly identified and not mistaken for changes made by other users.

Step 2: Install the package.

Once logged into Salesforce, the package installation process starts.

When you see the Install Chargebee for Salesforce page, choose Install for Specific Profiles.

image

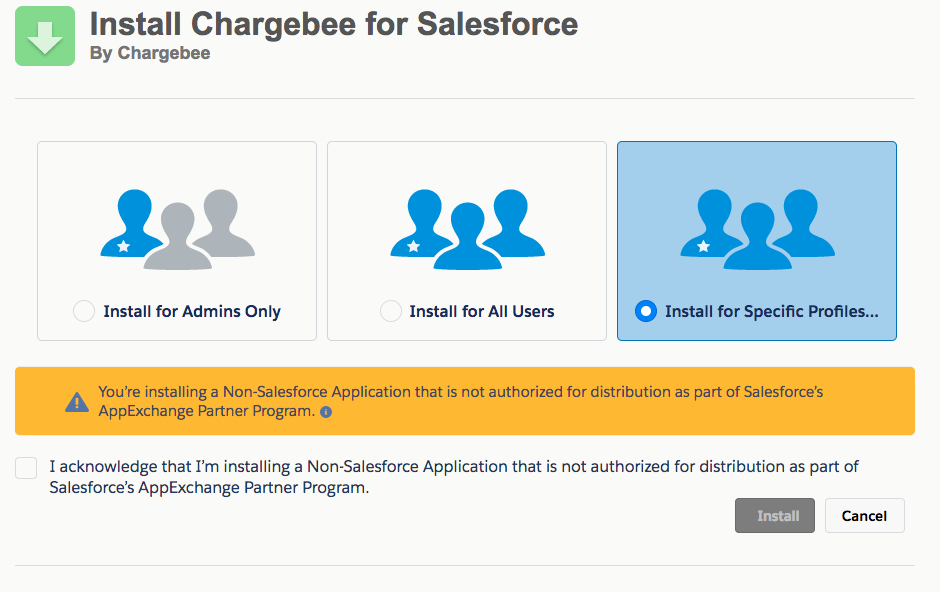
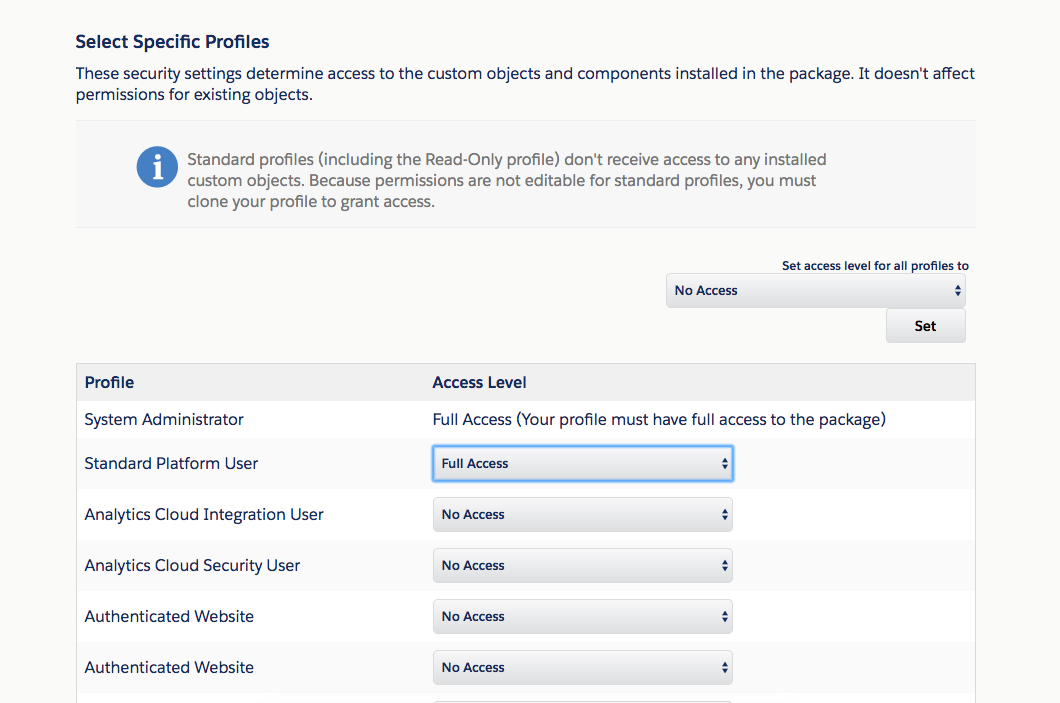
Scroll down and enable access to the package for the appropriate Salesforce user profiles and click on Install.

image

Tip The installation could take a few minutes to finish. Once the installation is successful, proceed to the next step.

Step 3: Data and configuration validation

Login to Chargebee and navigate to Apps > Go to Marketplace > Sales & CRM > Salesforce.

Chargebee checks if certain prerequisites are met for syncing.The following checks are done and any failures are reported:

In Chargebee

Customer records in Chargebee are checked to see if email addresses are present.

Any records without email addresses are listed and you can either add email addresses to those records or choose to not sync those records and continue.

Note

The email address is the default lookup-field used to match customers in Chargebee with contacts in Salesforce. You can change this to another field.

In Salesforce

The following checks are performed within Salesforce:

  1. Currencies are checked to ensure that all those enabled in Chargebee are also enabled in Salesforce.

  2. The Salesforce user account used to set up the integration must have access permissions to the necessary objects and their fields in Salesforce.

  3. Mandatory Custom Fields in Salesforce must be mapped to fields in Chargebee. Any unmapped ones are flagged.

Step 4: Configure the sync mechanism

Once you have reached this far in setting up the integration, it is now time to think through how Chargebee for Salesforce must be configured so that your Salesforce business workflows are supported.

Read the Integration Guide to understand the configuration options available and set them up.

Articles & FAQs

Was this article helpful?