GA4 for In-App Checkout and Portal
Chargebee supports Google Analytics 4 (GA4) by sending checkout and portal events to GA. You can customize your GA4 data collection to meet your business needs using Chargebee's built-in GA integration or custom GA integration. By analyzing user behavior, you can optimize customer experiences, improve conversion rates, and drive growth.
Information
Using Google Tag Manager (GTM)?
If you use Google Tag Manager to connect to your GA4 account, use this separate integration. Do not use both integrations simultaneously.
Set up GA4 for the first time
Follow these steps to set up analytics data collection on your website:
Prerequisites
-
Set up a GA4 account and then a GA4 property.
Option 1: Setting up analytics data collection for the first time.
Option 2: Migrating from UA to GA4. Learn more. -
Add the Google tag script: Add the Google tag to your web pages to begin seeing data in your new Google Analytics 4 property. Follow the steps under add the Google tag directly to your web pages on this page. See the video below as a reference to get the Google tag script:

-
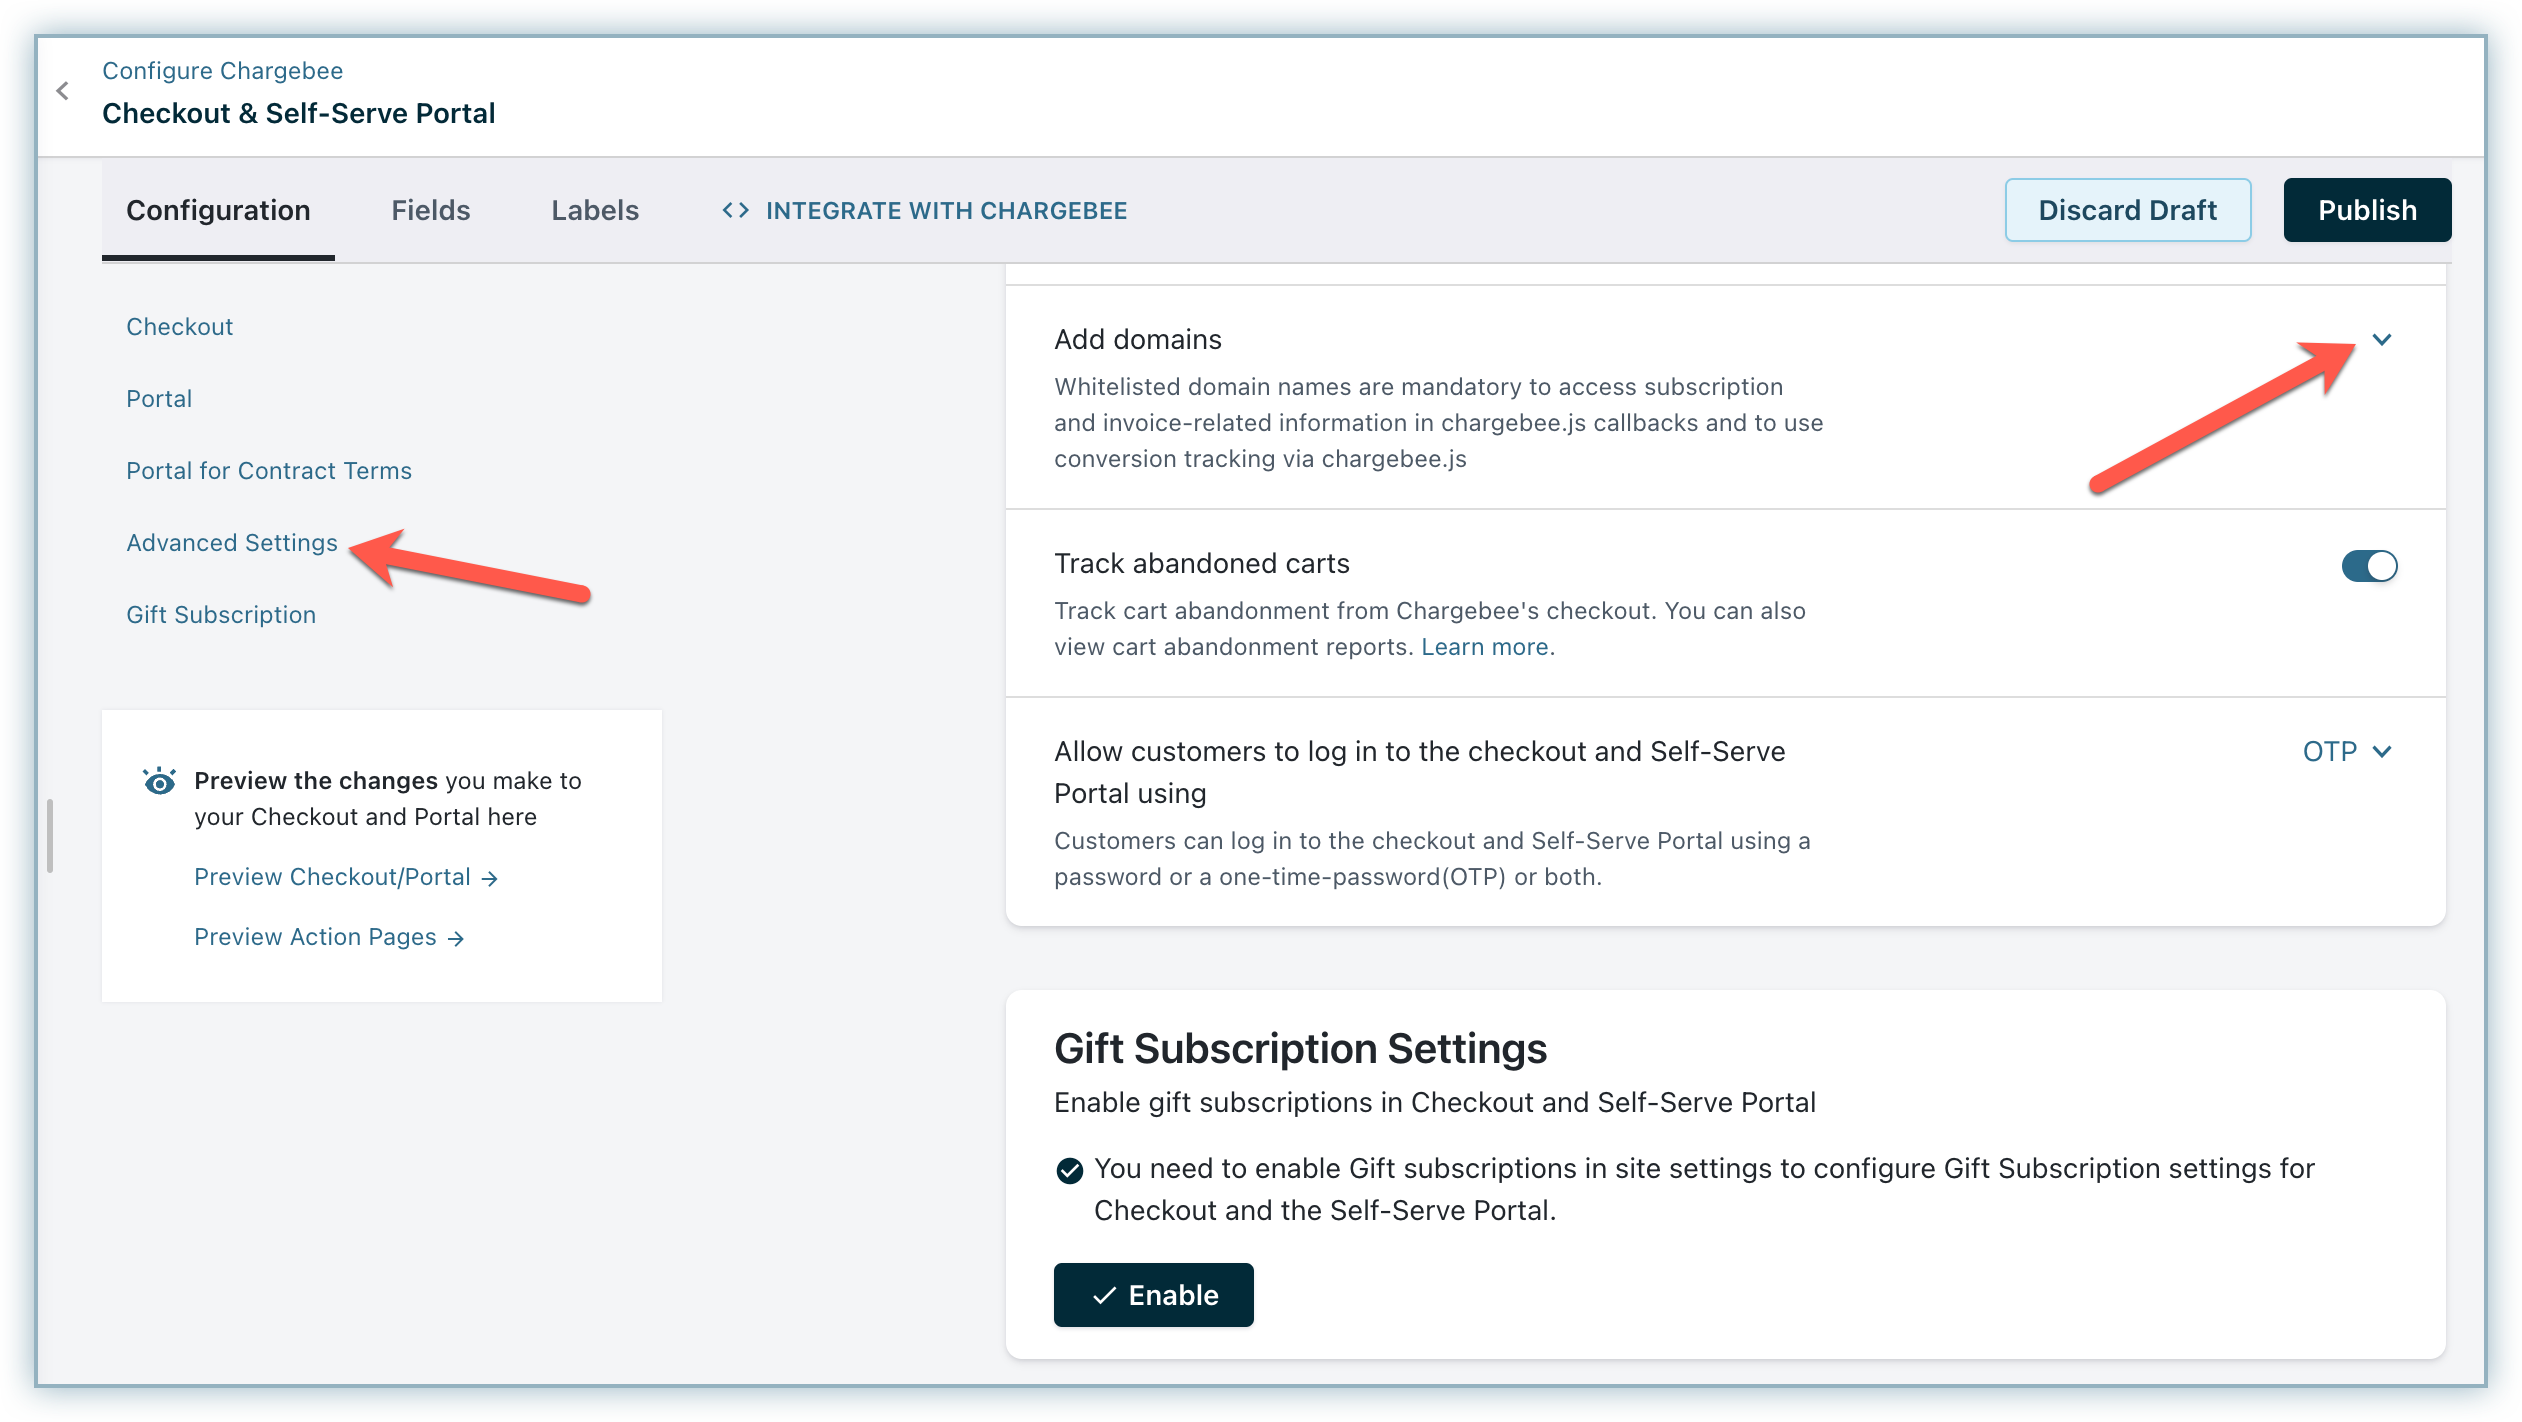
Go to Settings > Configure Chargebee > Checkout & Self-Serve Portal.
-
To track and measure purchase events in Chargebee, select the Configuration tab and add your domain under the Add Domain option under Advanced Settings.
Browser tracking blockers:
Ad blockers or privacy software installed on customers' browsers may prevent tracking data from being sent.
Set up GA integration
After completing the prerequisites, use Chargebee's built-in GA event tracking or your own custom GA integration to send events to GA using Chargebee JS callbacks.
Built-in GA integration
When enabled, Chargebee triggers events to GA based on page interactions in the Chargebee checkout or portal.
Note
This integration tracks customer interactions with Chargebee checkout and portal. Backend operations, such as subscription renewals, do not trigger events.
You can integrate using a drop-in script or API.
A. Using drop-in script
Enable the data-cb-ga-enabled attribute to true when invoking Chargebee JS in the page headers of your site.
<script src="https://js.chargebee.com/v2/chargebee.js"
data-cb-site="your-chargebee-subdomain" data-cb-ga-enabled="true">
</script>
Note
Replace your-chargebee-subdomain with your Chargebee site subdomain. For example, if your site is bigshopper-test.chargebee.com, the script will be:
<script src="https://js.chargebee.com/v2/chargebee.js"
data-cb-site="bigshopper-test" data-cb-ga-enabled="true">
</script>
B. Using API
Pass the enableGATracking parameter as true when initializing the Chargebee instance.
var chargebeeInstance = Chargebee.init({
site: "your-chargebee-subdomain",
enableGATracking: true
});
See also
The list of events passed to GA using the built-in integration.
Limitations of built-in GA integration
- Built-in GA support is limited to checkout and portal pages. Modal-type action pages, such as Pay Now or Extend Subscription, are not supported.
- If checkout or portal is launched via Chargebee emails (e.g., accept quote email or cart abandonment notification), built-in tracking will not work because Chargebee JS is not loaded.
- If checkout or portal is opened in a new tab/window, GA integration will not work because Chargebee JS is not loaded.
Custom GA integration
To address the limitations of built-in GA integration, set up GA event tracking using Chargebee JS callbacks.
Refer to the following pages for guidance:
- Chargebee JS drop-in code reference.
- Chargebee JS API-based integration reference.
- Help pages for sending data to GA using gtag.js.
You can combine customized event tracking with built-in tracking to extend functionality. For example, track successful checkouts by passing information to your site via query parameters in the redirect URL in your plans.
Warning
Avoid duplicate tracking
If you implement checkout success tracking on the plan redirect pages, you must not use built-in GA tracking as it would lead to duplication of checkout success events.
Note
Testing the GA tag:
Test your GA tag using real-time reports. Note that non-real-time reports may take 24 to 48 hours to process.
Track Chargebee Checkout and Portal Events
Events passed to GTM/GA
The table below lists the events fired when the GA/GTM integration enabled:
| Event Category | Event Action | Triggered When |
|---|---|---|
| begin_checkout | The first screen of checkout appears showing the cart. |
engagement | lead | A subscription has been created with a trial period and no payment has been made. Additionally, this event is triggered in lieu of the purchase event if the domain where the checkout is invoked has not been . |
cb-checkout | cart_screen | The first screen of checkout appears showing the cart. |
cb-checkout | check_user_screen | Used to verify the status or display of a user's screen or interface. |
cb-checkout | otp_authentication | The screen for OTP authentication appears. |
cb-checkout | add_account_info | The screen for entering the account details of the customer appears. |
cb-checkout | add_billing_address | The screen for entering the billing address appears. |
cb-checkout | add_payment_method | The screen for entering the payment method details appears. |
cb-checkout | add_subscription_cf_info | The screen for entering any custom fields is shown. |
cb-checkout | review_screen | The summary screen for the sign-up is shown. |
cb-checkout | edit_order_screen | The order is edited. |
cb-checkout | edit_account_info | The account information edit screen is shown. |
cb-checkout | edit_subscription_cf_info | The custom field edit screen is displayed. |
cb-checkout | edit_payment_method | The payment method edit screen appears. |
cb-checkout | edit_billing_address | The screen for editing the billing address appears. |
cb-checkout | edit_shipping_address | The shipping address entry screen appears. Also when the edit screen for the shipping address appears. |
cb-checkout | thankyou_screen | The final screen appears that prompts the user to close the window or redirects them to the redirect URL. Learn more about redirect URL while creating plans |
cb-portal | login | The login screen appears. |
cb-portal | home | The Manage Subscriptions screen appears. |
cb-portal | sub_details | The subscription details page is displayed. |
cb-portal | portal_edit_subscription_cf | A custom field edit screen is displayed. |
cb-portal | edit_subscription | The change subscription screen is displayed. |
cb-portal | add_addons | The screen for adding addons to a subscription is displayed. |
cb-portal | estimate_display_screen | The new order estimate screen is displayed. |
cb-portal | portal_payment_methods | The payment method lists screen is viewed. |
cb-portal | portal_choose_payment_method | Choose payment method screen is displayed. |
cb-portal | portal_view_payment_method | A particular payment method is viewed. |
cb-portal | account_details | The details of the customer account are displayed. |
cb-portal | portal_edit_account | The edit account screen is displayed. |
cb-portal | portal_address | The billing/shipping address screen is displayed. |
cb-portal | portal_edit_billing_address | The billing address edit screen is displayed. |
cb-portal | portal_edit_shipping_address | The shipping address edit screen is displayed. |
cb-portal | sub_cancel | The subscription cancel screen is displayed. |
Purchase Event Parameters
This table lists the additional parameters passed as part of the purchase event:
| Parameter | Description |
|---|---|
transaction_id | The unique id generated by Chargebee for the checkout or portal session. |
value | The invoice total. This is the invoiced amount after discounts and taxes. |
currency | When sending a UA event to a GA4 property, this currency value will be used for the GA4 items[].currency parameter. |
tax | Total tax amount for this invoice. |
items[] | Array of products (plan and addons) ordered via Checkout. |
Each array element for items[] is composed of the following:
| Parameter | Description |
|---|---|
items[].item_id | The id of the plan or addon. |
items[].item_name | Name of the plan or addon. |
items[].item_list_name | Always set to Chargebee checkout. |
items[].item_category | The category of the item. Either plan or addon depending on the product type. |
items[].price | The value depends on the pricing model of the plan/addon. Here's how: For per unit pricing model: the unit price of the plan or addon is set as the parameter value. For flat fee: the catalog price for the plan or addon is set here. For volume: the unit price of the tier the quantity falls under is set. For tiered and stairstep: the average unit price of the plan or addon, determined as (catalog price ÷ quantity) is set. |
items[].quantity | The quantity of the product purchased. It is set to 1 when the pricing model is a flat fee. |
Add GA4 to a Site with Universal Analytics (UA)
Add GA4 to your existing UA setup to enhance the tracking and analytical capabilities of your website.
Note
- The Google Setup Assistant Wizard does NOT change or modify your UA account.
- It also does not backfill your new GA4 property with historical data.
- Your GA4 property will only collect data from the point where you set up the integration.
Prerequisite
You should have at least an Edit role for your GA account.
Information
If you use Google's analytics.js on your site, then ecommerce events will not be sent by the built-in GA integration. You must have gtag.js instead.
Steps to migrate
Follow these steps to add GA4 to a site with UA:
-
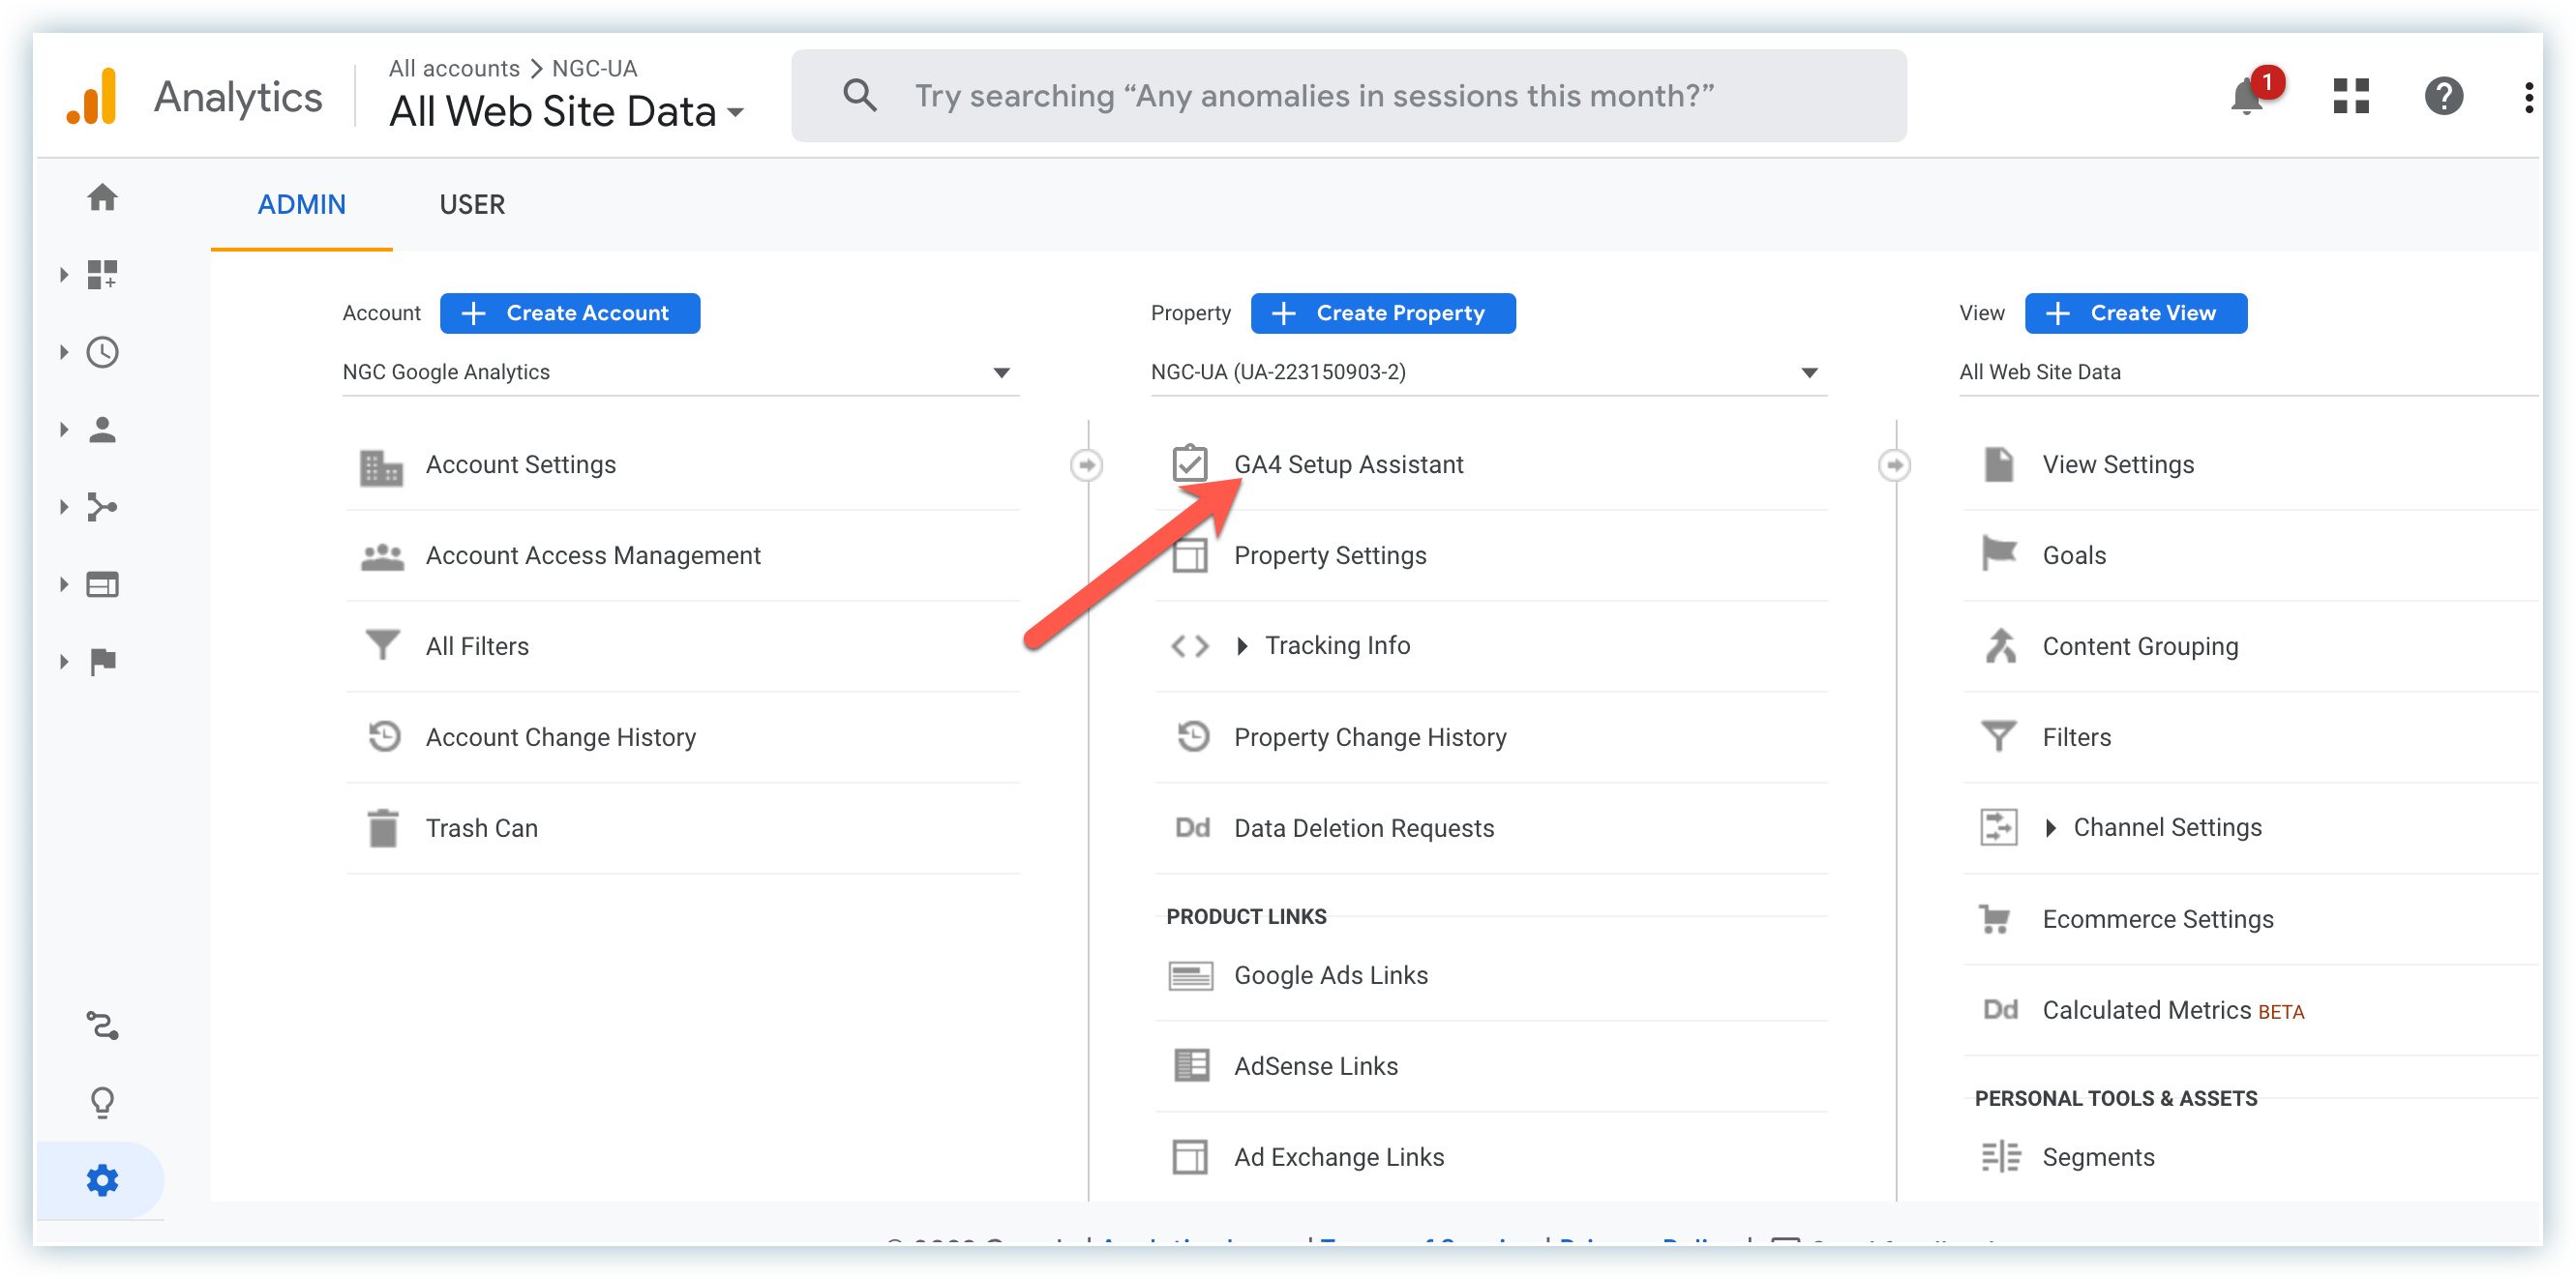
In the UA property interface, click Admin.
-
Under the property column, select the property that you'd like to migrate and click GA4 setup assistant. If you're doing this for the first time, you can either create a new GA4 Analytics property or connect your existing UA property to the GA4 property.
-
Click Create property.
Learn more about adding a Google Analytics 4 property (to a site that already has Analytics).
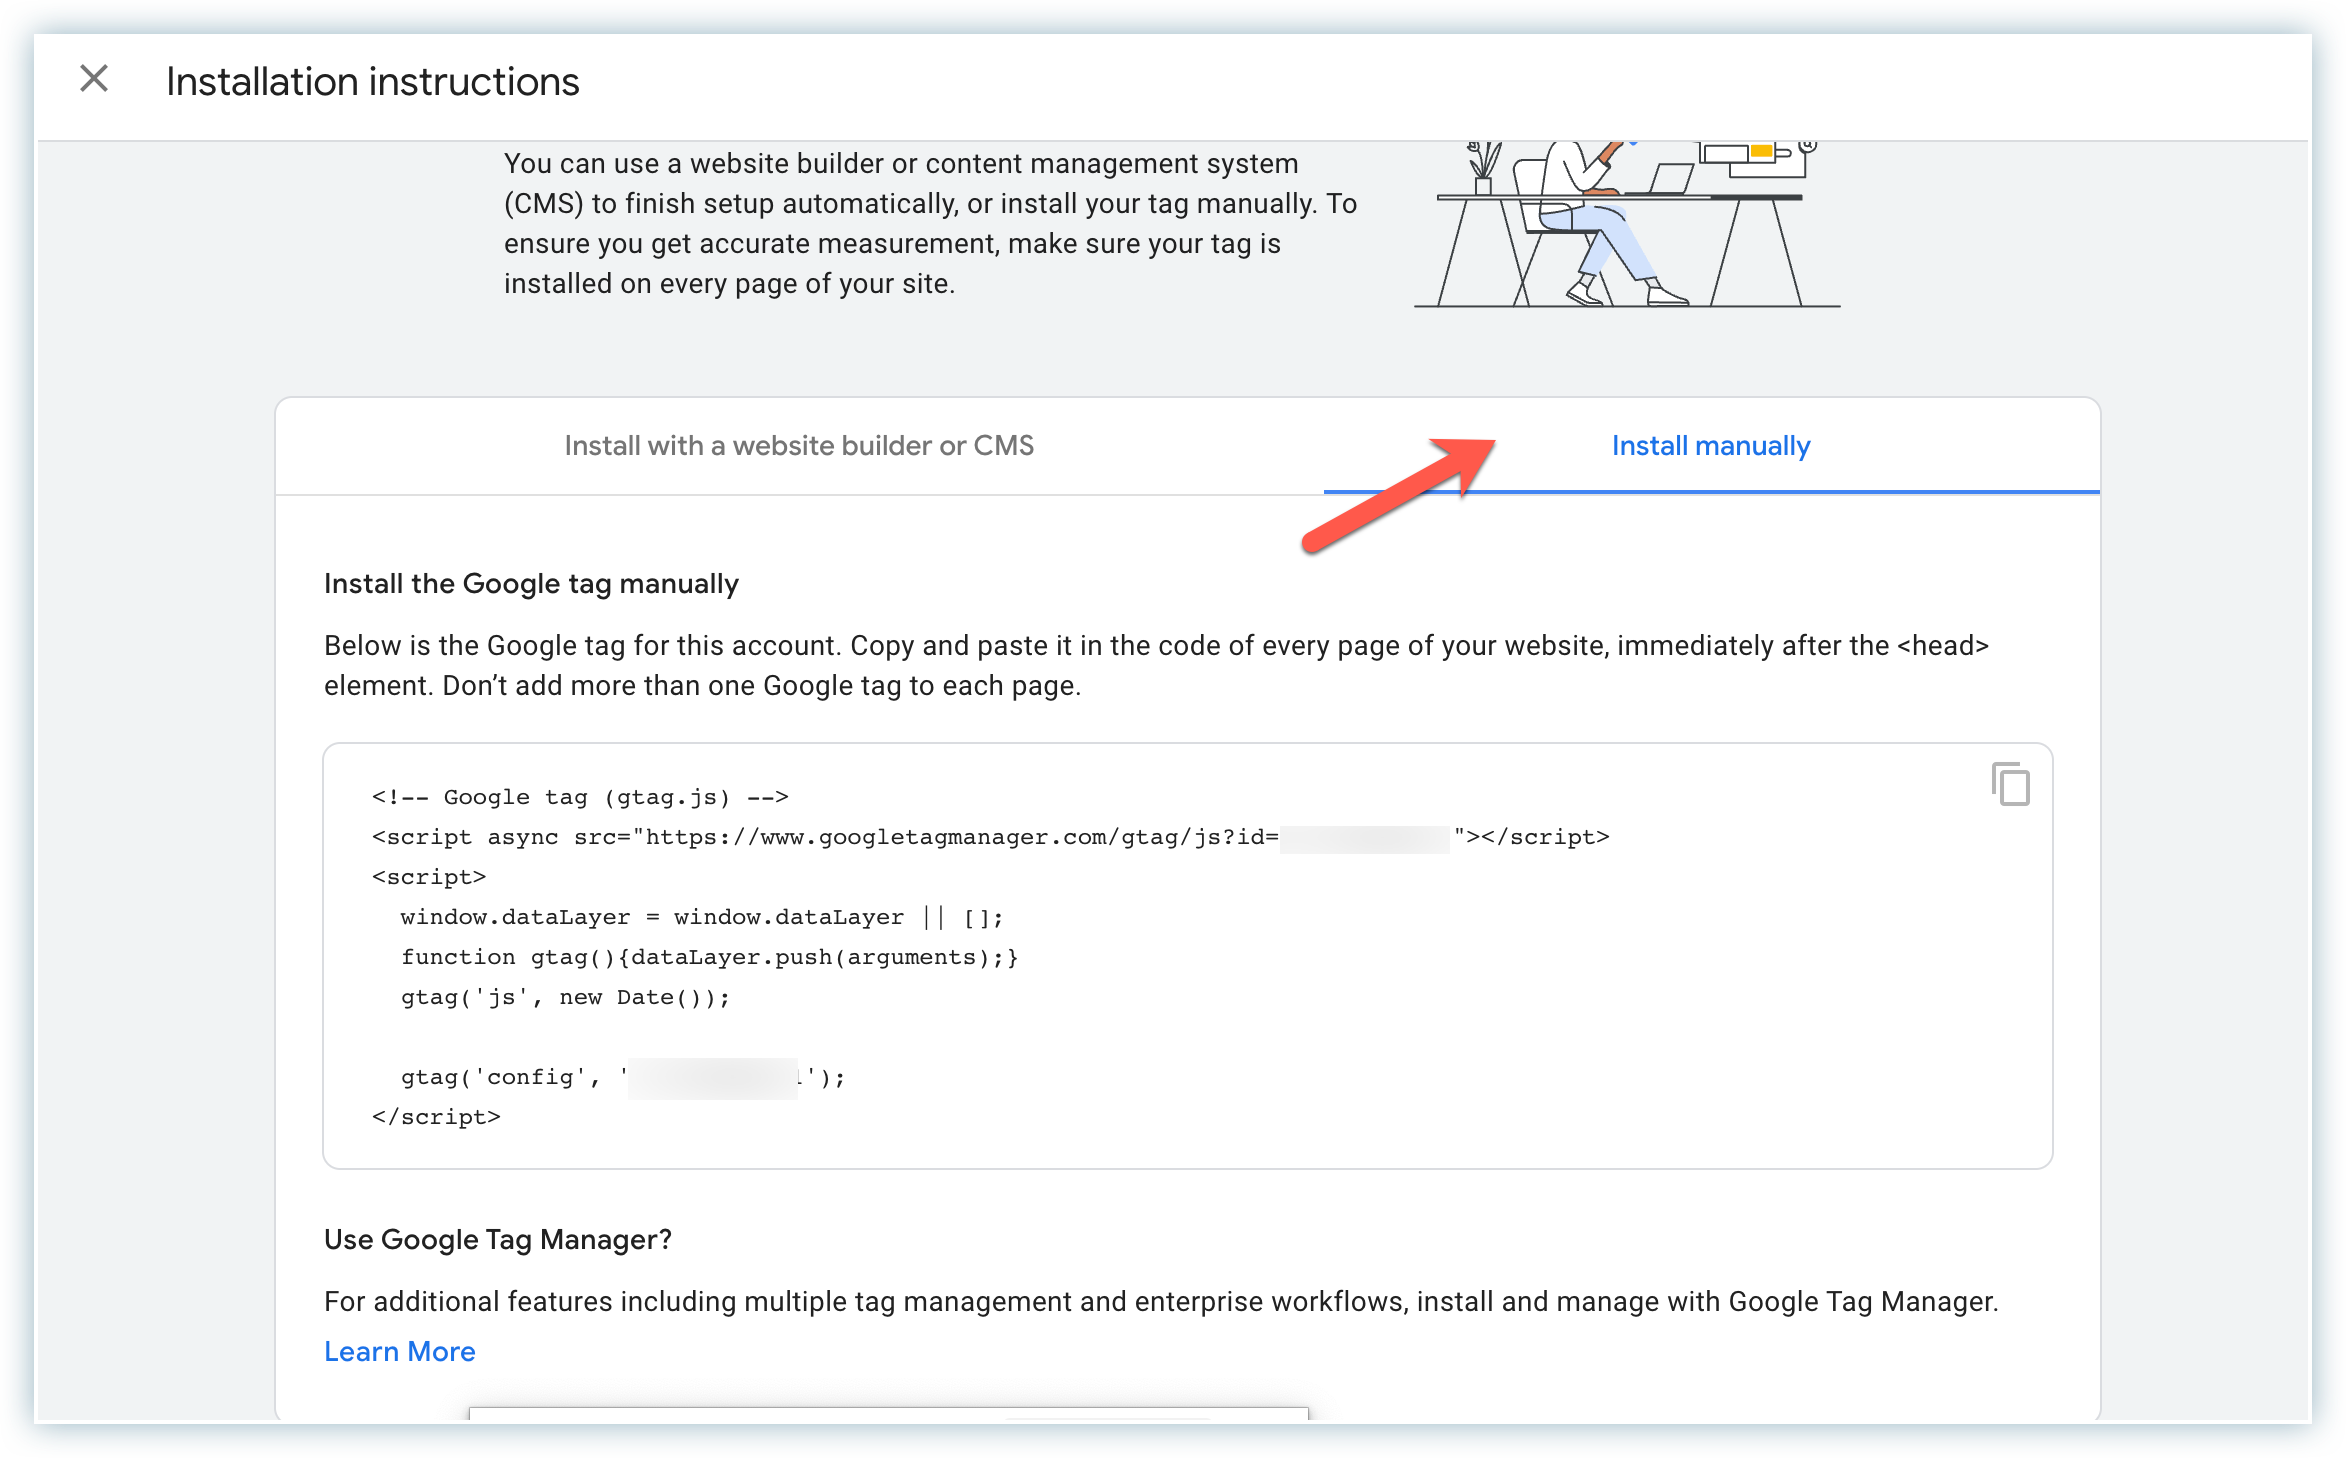
How to get GA4 measurement ID
You can use the Measurement ID to send data to a specific web data stream.
Follow these steps to get your GA4 Measurement ID:
-
Log in to your GA4 analytics account.
-
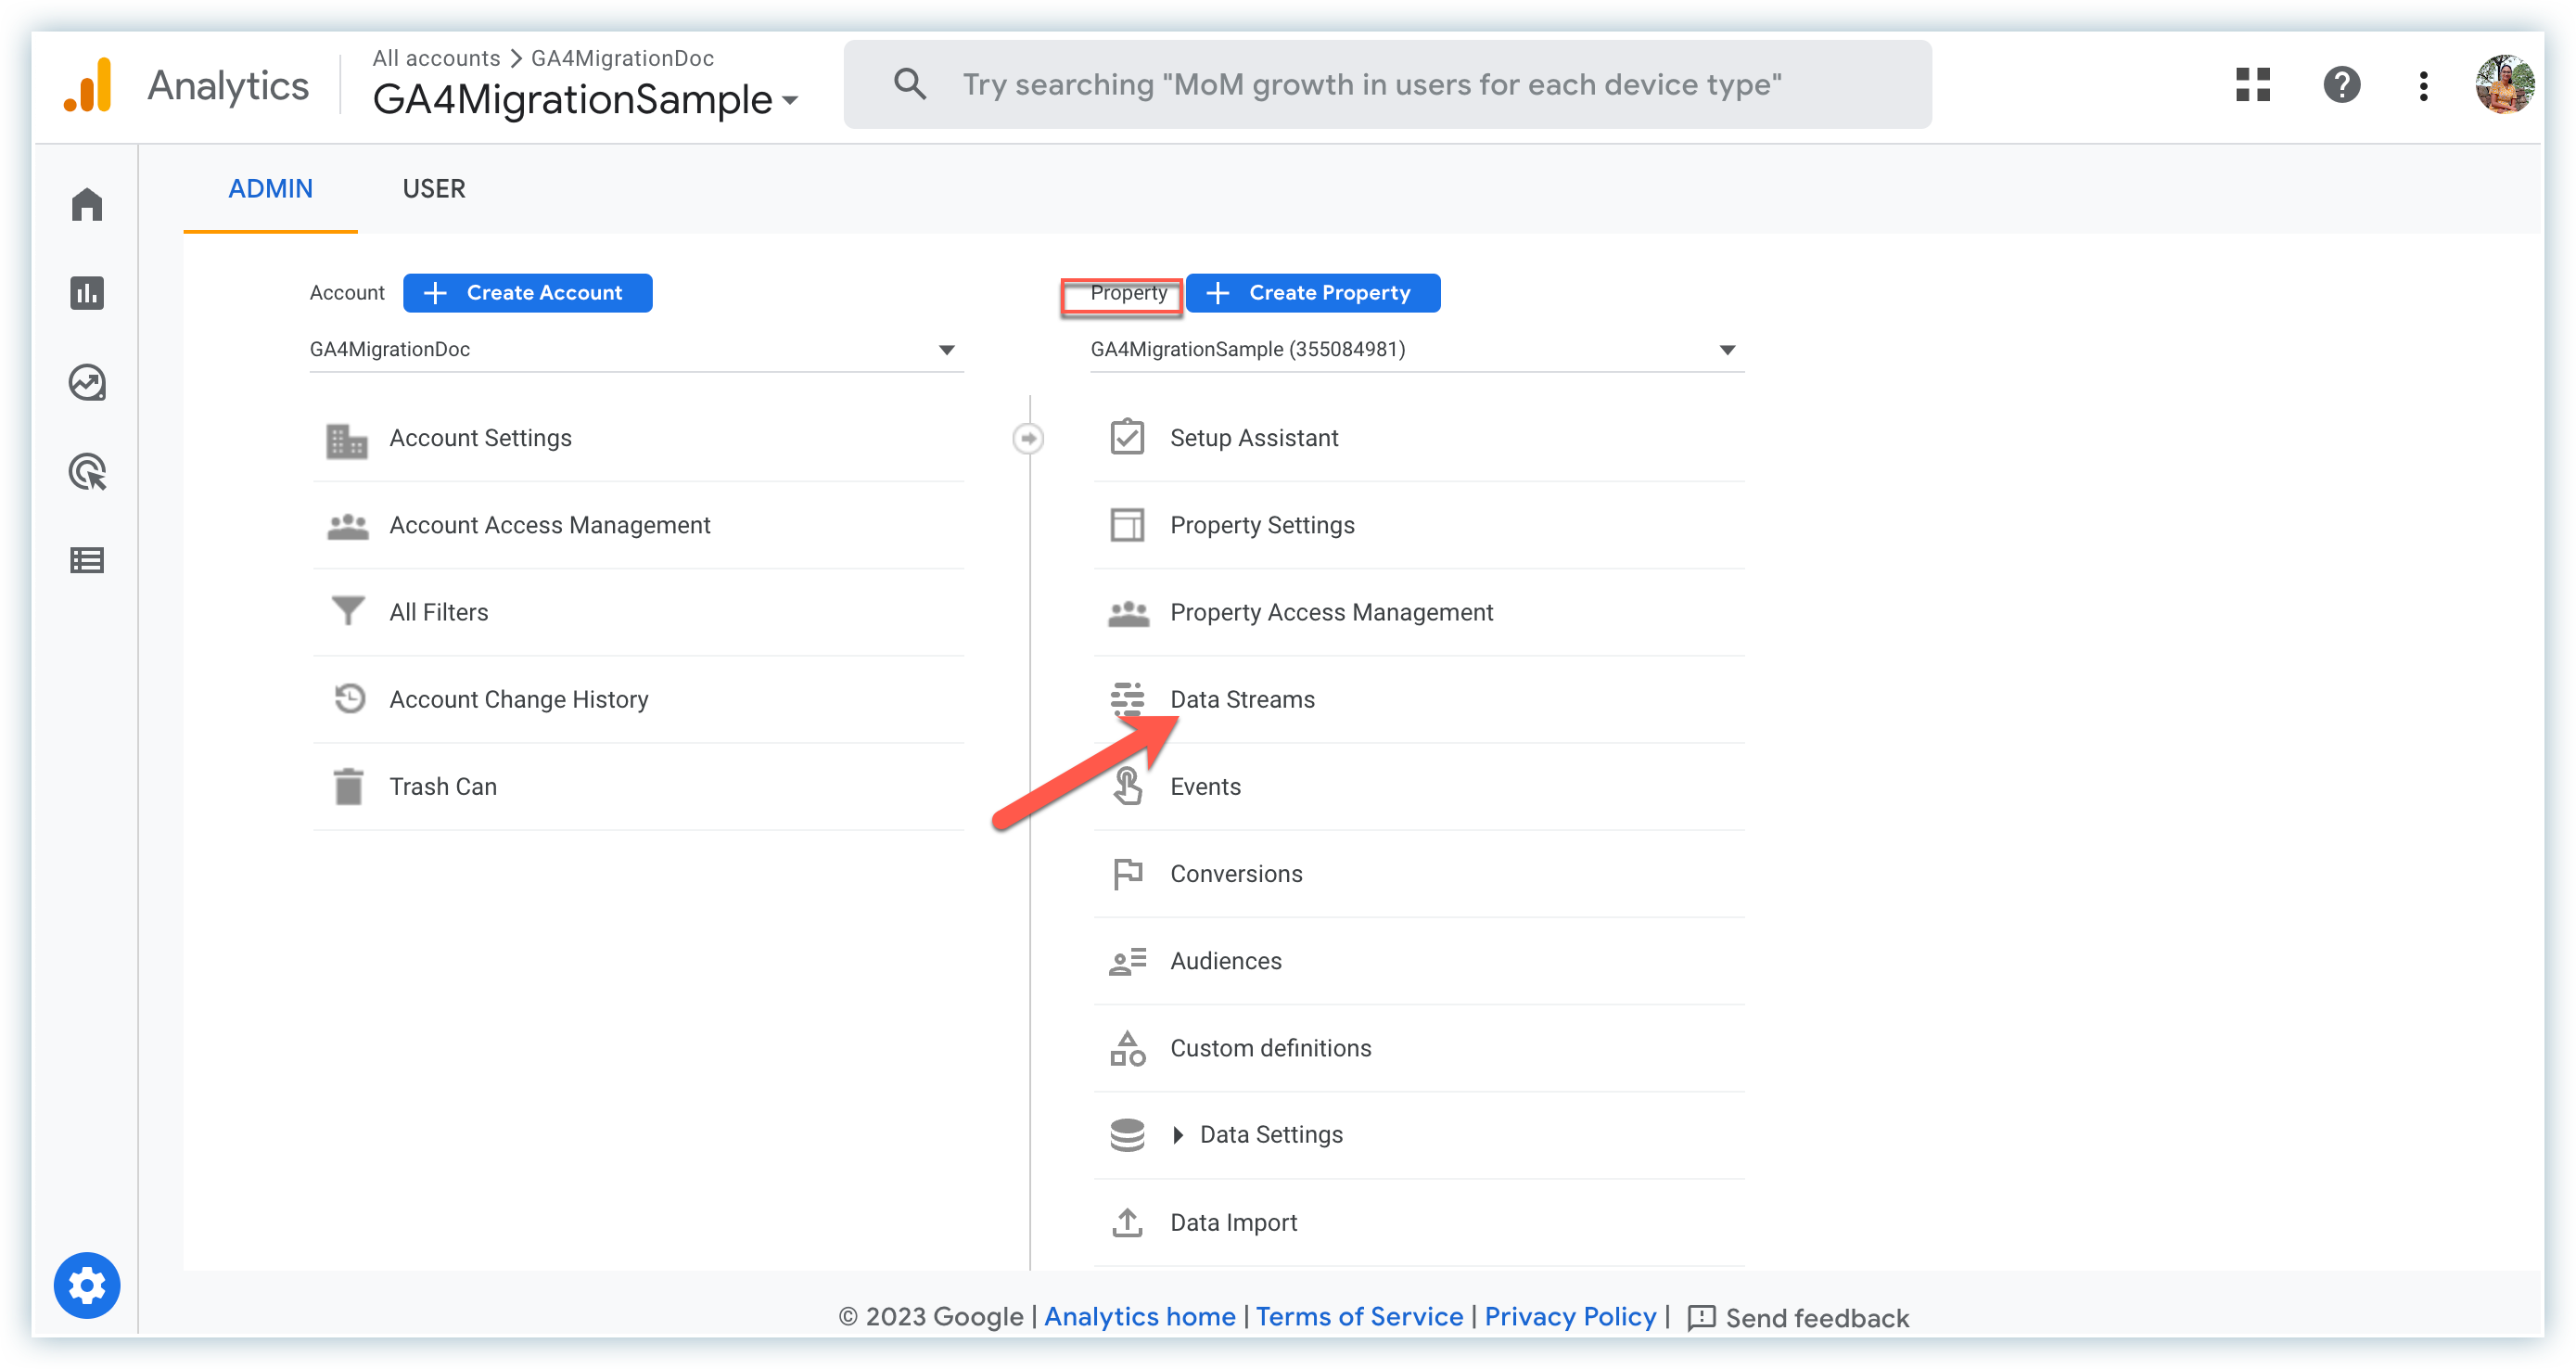
Navigate to the Admin section.
-
Under the property section, click Data streams.
-
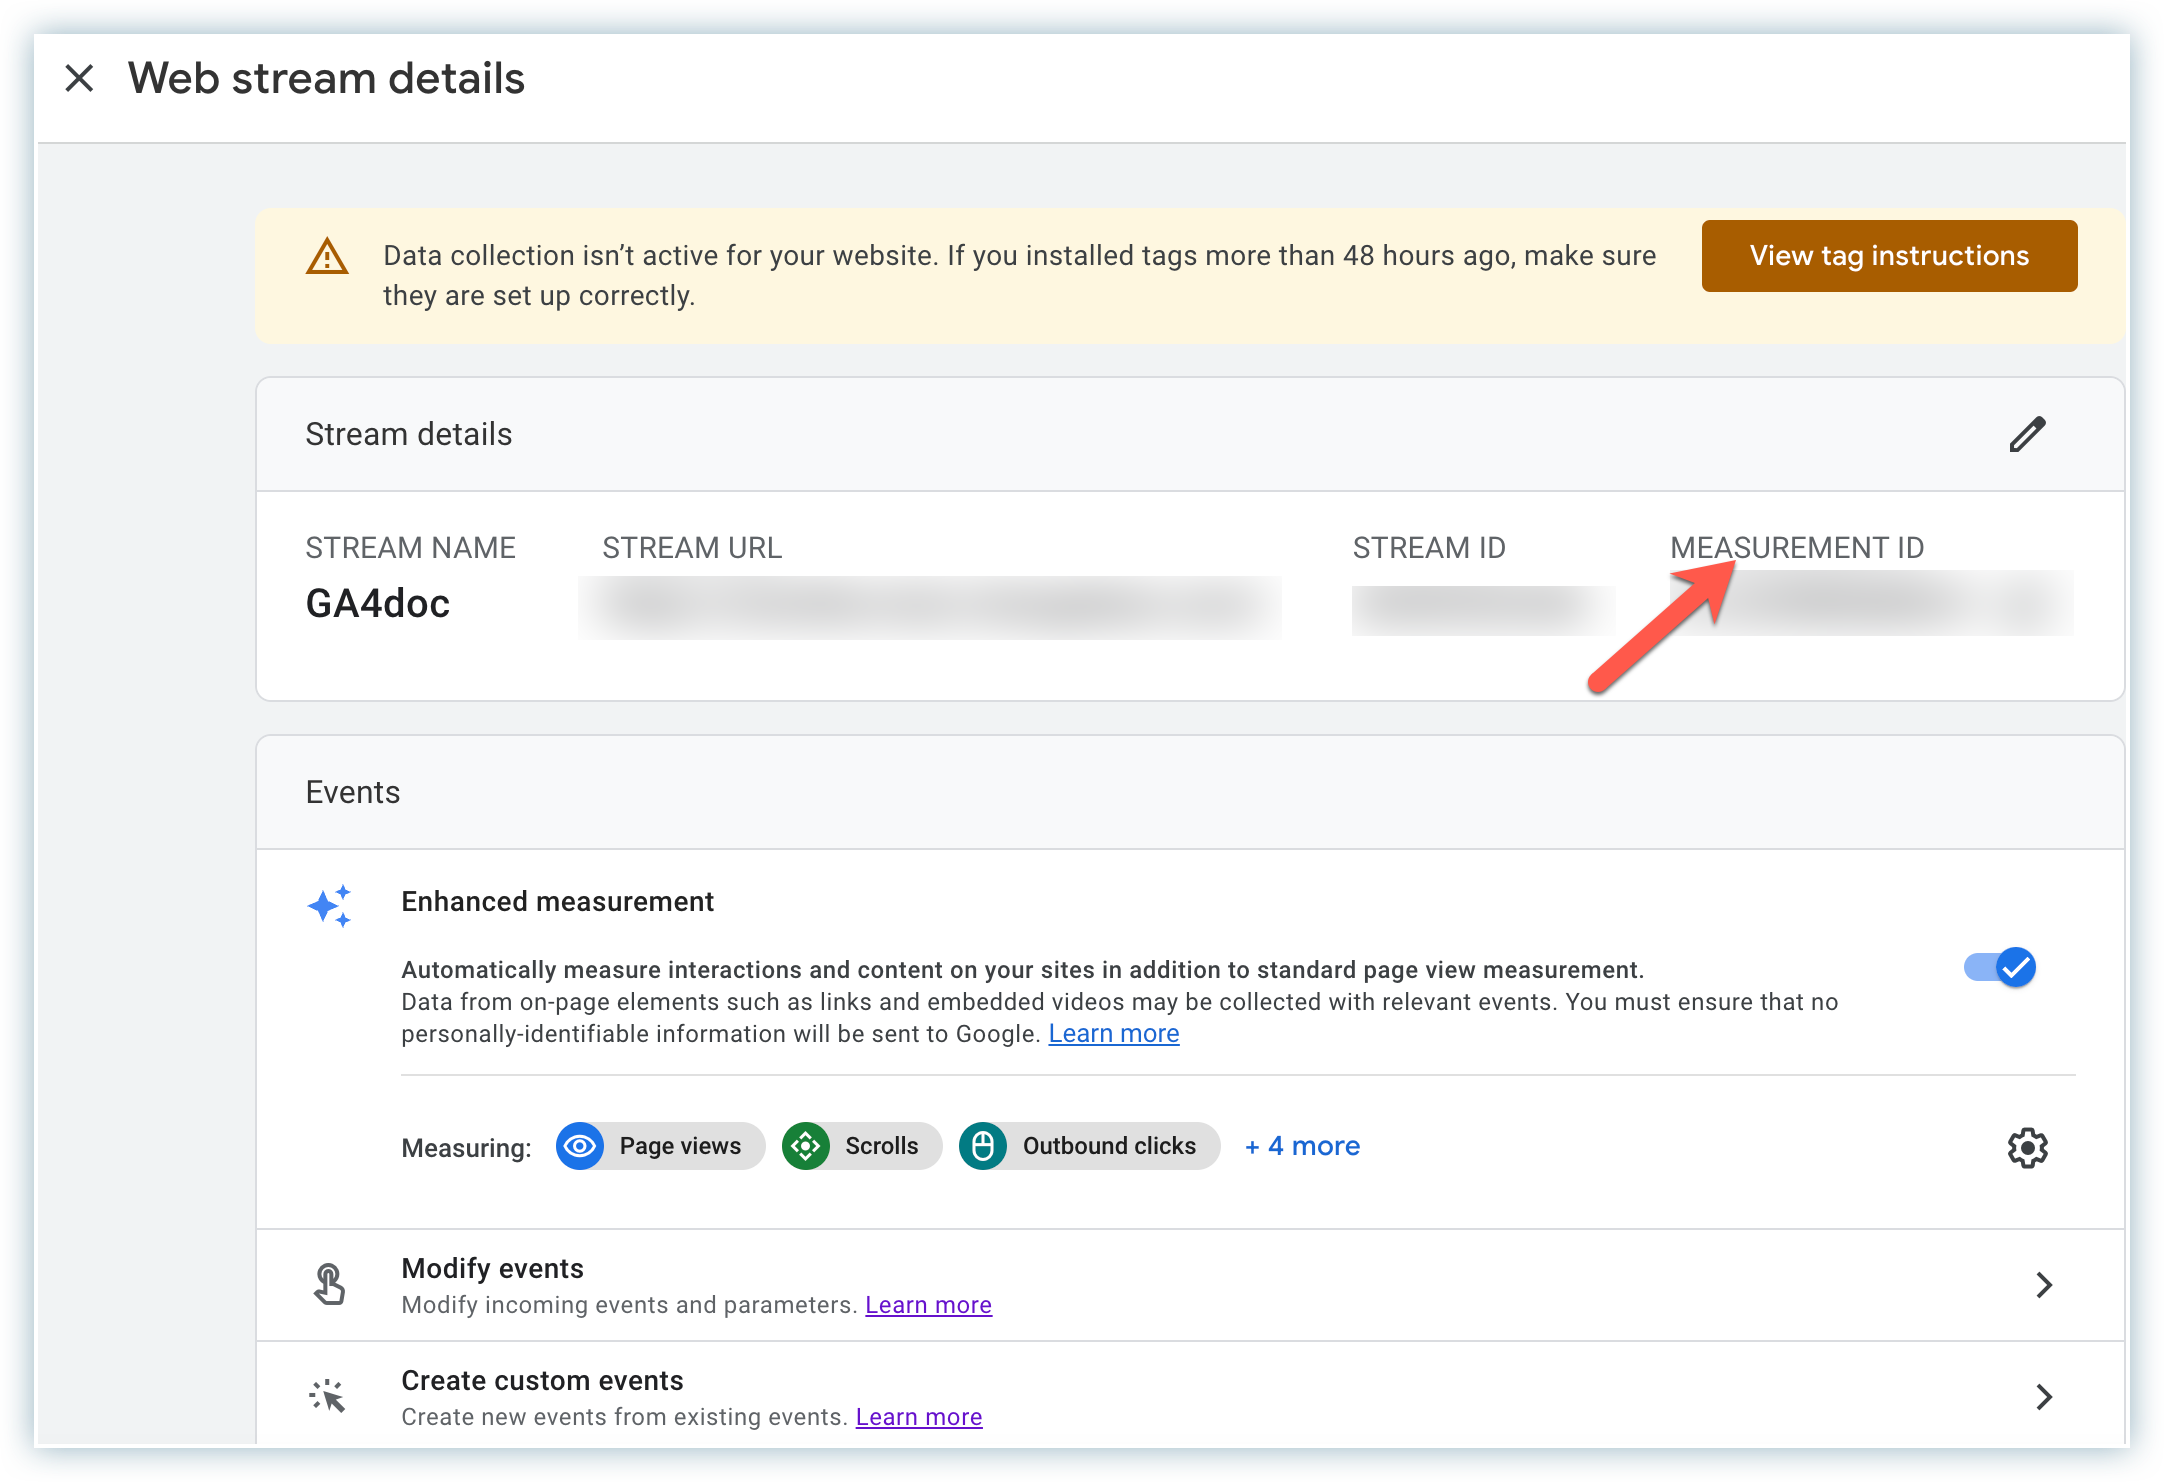
Select the data stream that you wish to track (likely to be your website). Then in the upper-right corner, you can see your measurement ID. Learn more about G-ID.
-
Click View tag instructions > Install manually and replace the existing GA script with this one.
Dual tagging for Google Analytics
If you wish to track both UA and GA4 properties, update the existing script of your analytics to add the new Google tag ('G-XXXXXXXXXX') on each page of your website from the JavaScript snippet for your account along with the existing script for your website.
Example:
<script async src="https://www.googletagmanager.com/gtag/js?id=UA-XXXXXXXXX-X"></script>
<script>
  window.dataLayer = window.dataLayer || [];
  function gtag(){dataLayer.push(arguments);}
  gtag('js', new Date());
  gtag('config', 'UA-XXXXXXXXX-X');
  gtag('config', 'G-XXXXXXXXXX');
</script>
How to migrate UA goals to GA4 conversions
-
Under the GA4 property, click Setup Assistant.
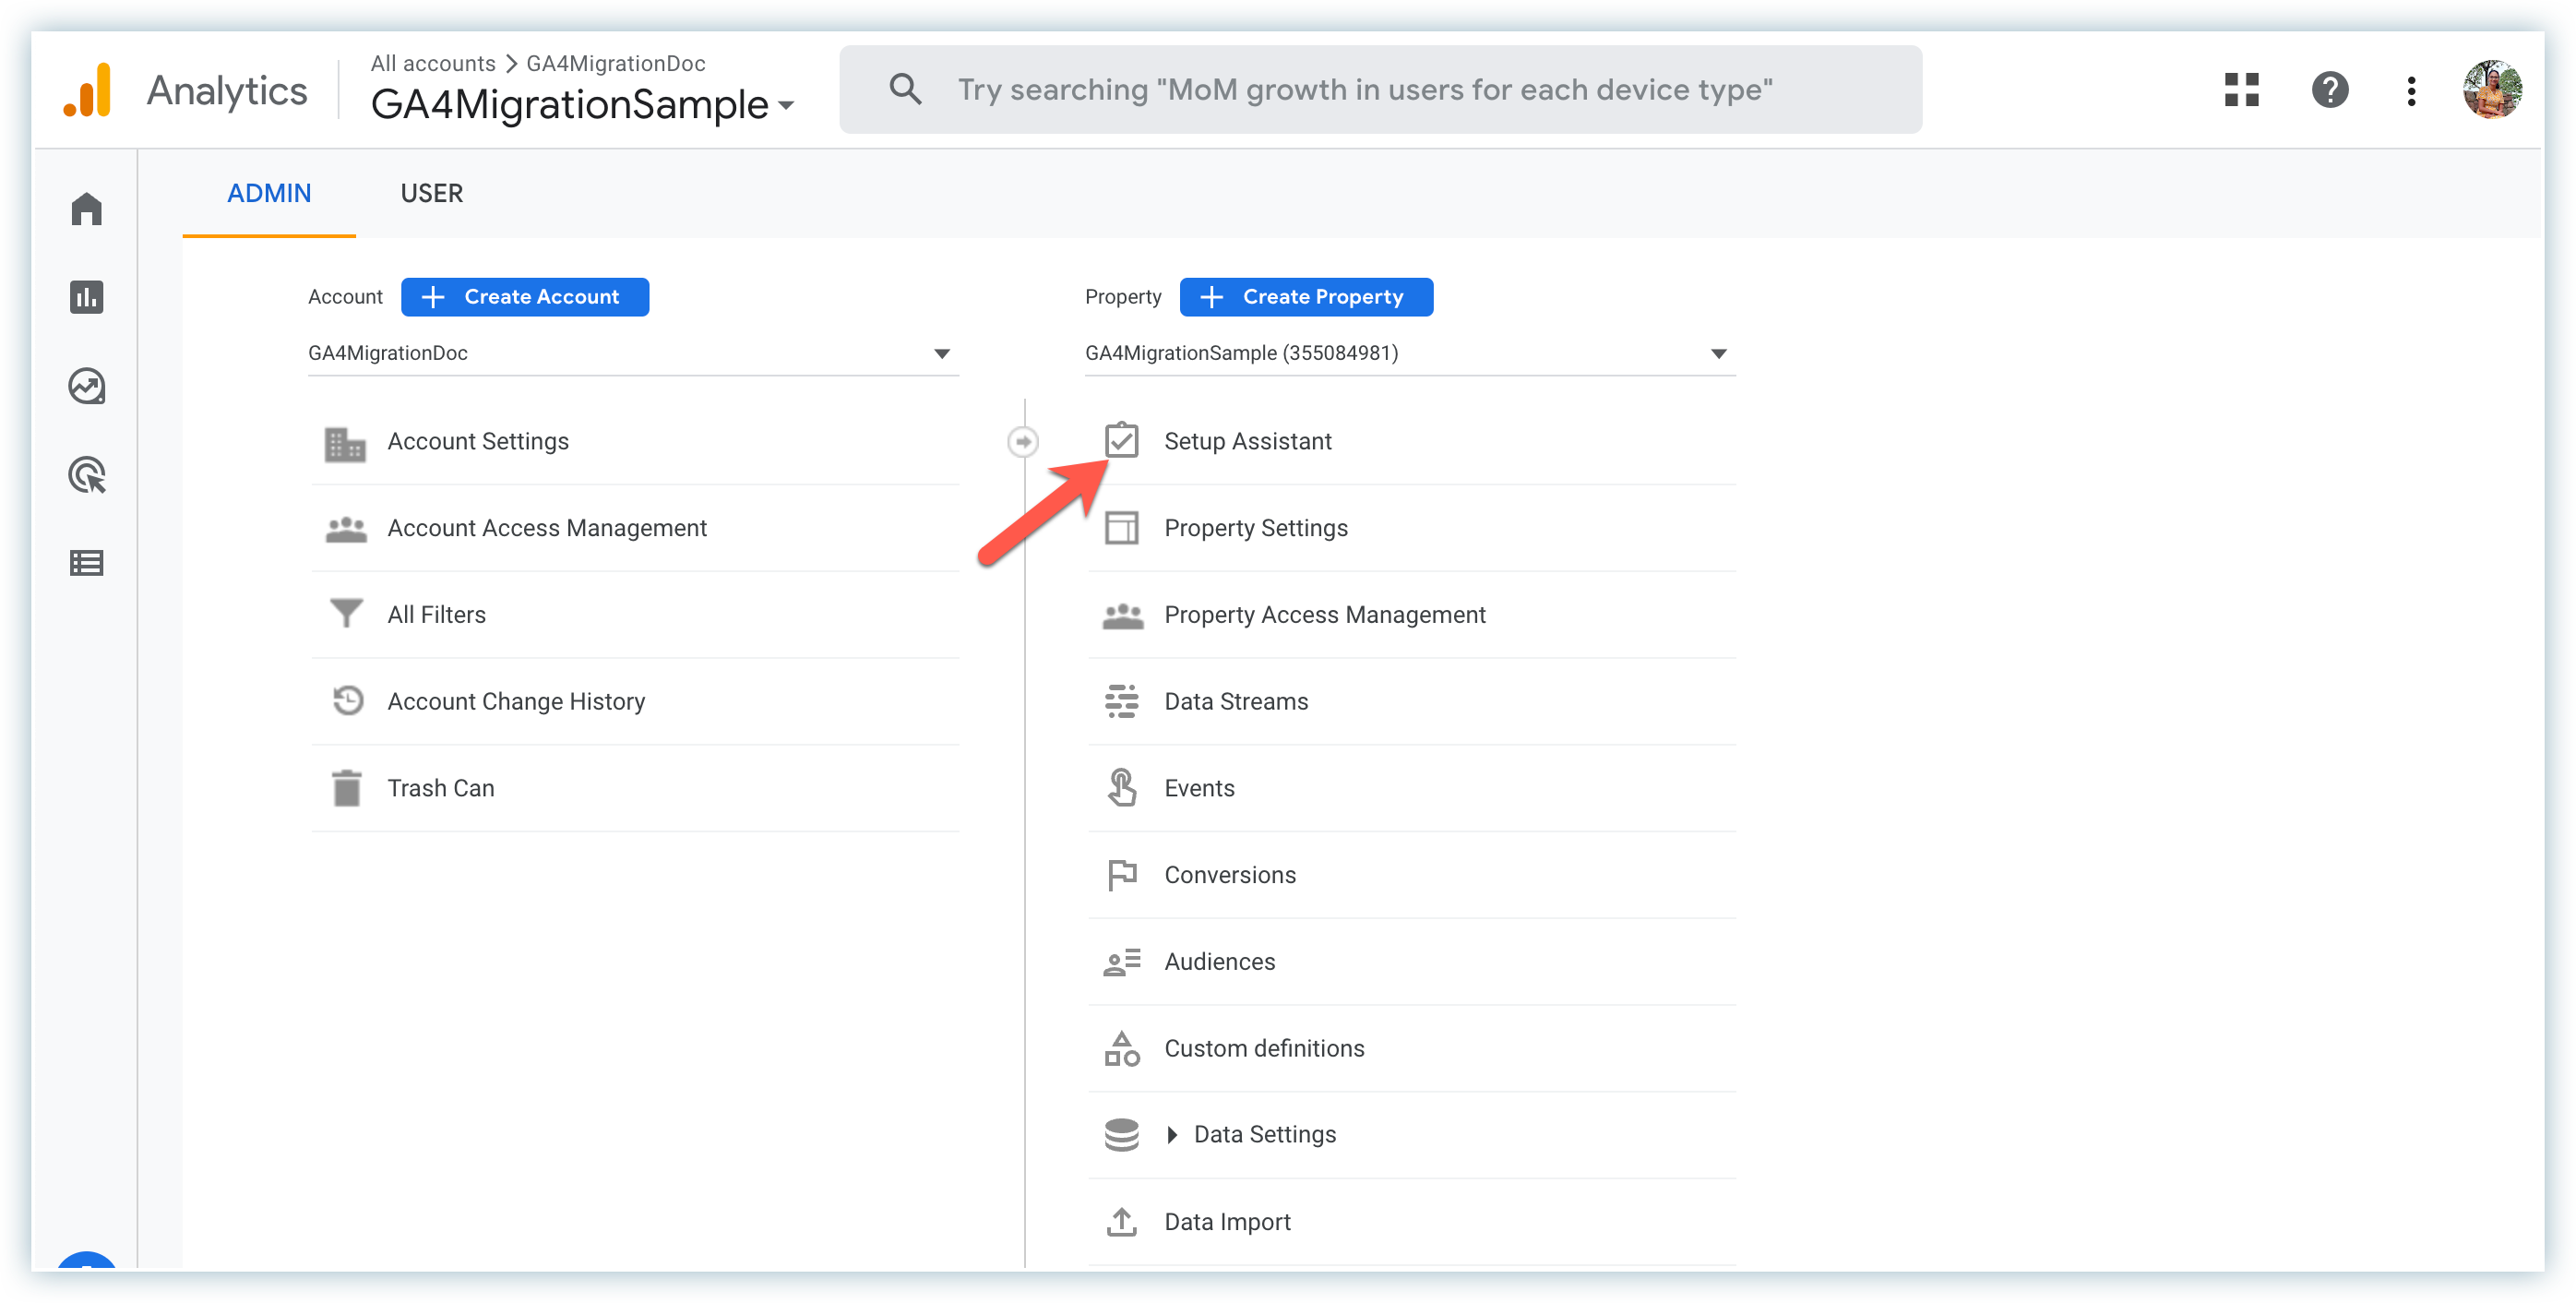
-
In the Setup Assistant, scroll down to Property Settings.
-
Select Setup Conversions.
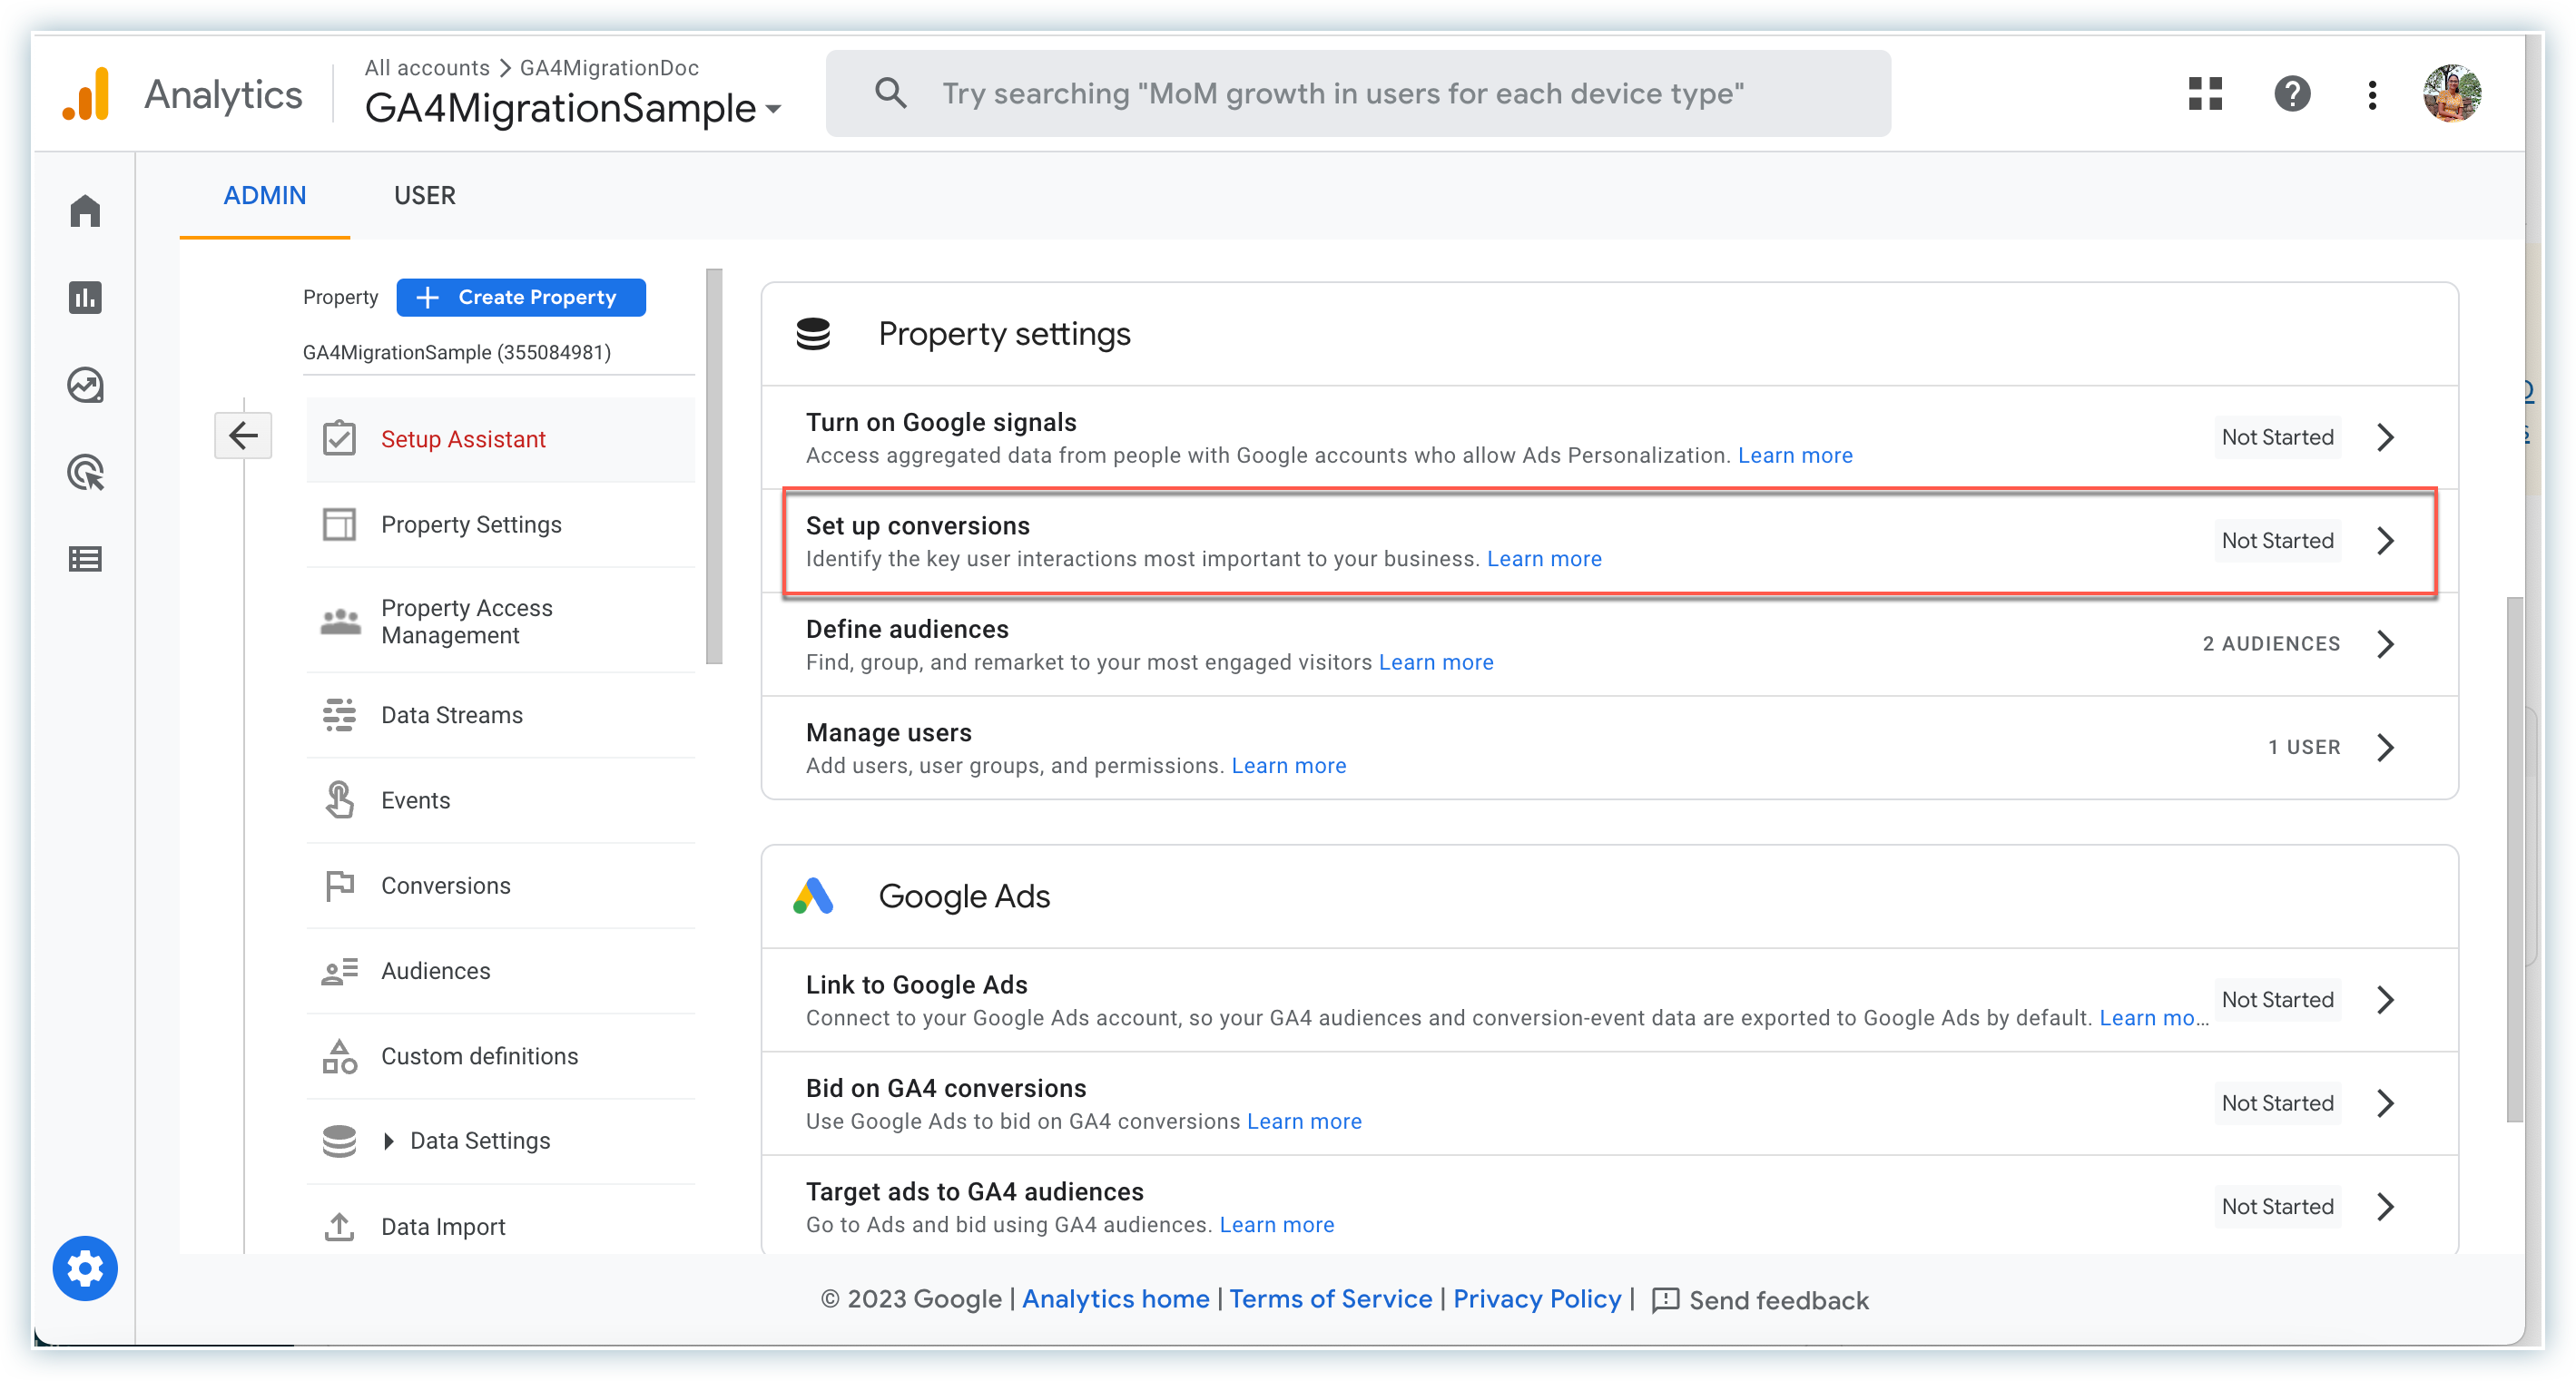
-
Click > Actions and select Import from Universal Analytics. Note that this option will appear if you are already connected to your UA ID and you have goals set up under the UA property.
Learn more about setting up conversions.
Analyze data in GA4
After you have configured GA4 tracking for Chargebee Checkout and Portal, you can analyze the data in your GA4 account. You can view reports related to customer behavior, subscription trends, and revenue metrics, among others.
Was this article helpful?