New in Chargebee: Explore Reveal and understand your payment performance end-to-end.Try Now
Docschargebee docs
HomeBillingCPQPaymentsRevRecGrowthReveal
Support

Product Updates


  • Release Notes

Getting Started


  • Overview
  • Chargebee Billing Data Centers
  • Object Relationship Model
  • Understanding Sites
  • Chargebee Tech Glossary
  • Articles and FAQ

Implementing Chargebee


  • Implementation Guide
  • Go-live Checklist
  • Articles and FAQ

Agentic AI


  • Chargebee Copilot
  • MCP Servers

Developer Resources


  • Developer Resources Overview
  • API Explorer
  • Articles and FAQ

Chargebee Apps


  • Chargebee Apps CLI Developer Guide

Product Catalog


  • Product Catalog Overview
  • Coupons
  • Articles and FAQ

Subscriptions


  • Working with Subscriptions
  • Billing
  • Orders
  • Articles and FAQ

Customers


  • Managing Customers
  • Account Hierarchy
  • Email Notifications
  • Branding
  • Configure Multiple Languages
  • Articles and FAQ

Entitlements


  • Entitlements Overview
  • Features Overview
  • Feature Management
  • Managing Product Entitlements
  • Subscription Entitlements
  • Customer Entitlements
  • Grandfathering Entitlements
  • Articles and FAQ

Usage Based Billing


  • Understanding Usages
  • Setting up Usage Based Billing
  • Usage Alerts
  • Prepaid credits

Invoices and Credit Notes


  • Invoices
  • Credit Notes
  • Quotes [Legacy]
  • Transactions
  • Articles and FAQ

Taxes


  • Overview
  • Configuring Taxes
  • Country-specific Taxes
  • Articles and FAQ

Hosted Capabilities


  • Overview
  • Hosted Checkout
  • Hosted Self-Serve Portal
  • Hosted Pages Features
  • Additional Hosted Pages
  • Payment Components
  • Pricing Table
  • Managing Payments with Chargebee.js
  • Mobile-Optimized Hosted Pages
  • Articles and FAQ

Site Configuration


  • Users & Roles
  • Custom Fields & Metadata
  • Approvals
  • Mandatory Fields
  • File Attachments & Comments
  • Advanced Filter Options
  • Multicurrency Pricing
  • Multi-decimal Support
  • Configuring Reason Codes
  • Events and Webhooks
  • API Keys
  • Time Zone
  • Time Machine
  • Transfer Configurations
  • Articles and FAQ

Multi Business Entity


  • Multi Business Entity Overview
  • Customer Transfer Overview
  • Articles and FAQ

Mobile Subscriptions


  • Overview
  • Omnichannel Subscriptions
  • Omnichannel One-Time Orders
  • Mobile Subscriptions (Legacy)

Reports and Analytics


  • RevenueStory
  • Home Dashboard
  • Frequently Asked Questions
  • FAQs for Classic Reports Sunset
  • Articles and FAQ

Integrations


  • Sales
  • Customer Support and Success
  • Finance
  • Tax
  • eInvoicing
  • Marketing
  • Stitch
  • Collaboration
  • Contract Management
  • Ecommerce Management
  • Articles and FAQ

Data Privacy & Security


  • Two Factor Authentication
  • SAML Single Sign-On
  • System for Cross-Domain Identity Management (SCIM)
  • EU-GDPR
  • Consent Management
  • Personal Data Management
  • Compliance Certificates
  • HIPAA Guidelines
  • PCI Recommendations and Integration Types
  • Articles and FAQ

Data Operations


  • Bulk Operations
  • Migration
  • Articles and FAQ
  1. Billing
  2. Site Configuration
  3. Articles and FAQ
  4. Custom Fields & Metadata
  1. Billing
  2. Site Configuration
  3. Articles and FAQ
  4. Custom Fields & Metadata

Can custom fields be displayed in the customer portal and checkout pages?

Problem Statement

This article helps you understand can custom fields be displayed in the customer portal and checkout pages.

Solution

Yes, this is possible. Based on your requirement, you can set the custom field status in the customer portal & checkout pages.

If you're using the V2 checkout pages & V1 portal, this option is available under Settings >> Checkout & Self-Serve Portal (under Customer-facing essentials section) >> Field Configurations (on the left panel) >> Custom Fields for Customer/Subscription. Here's a screenshot.

image

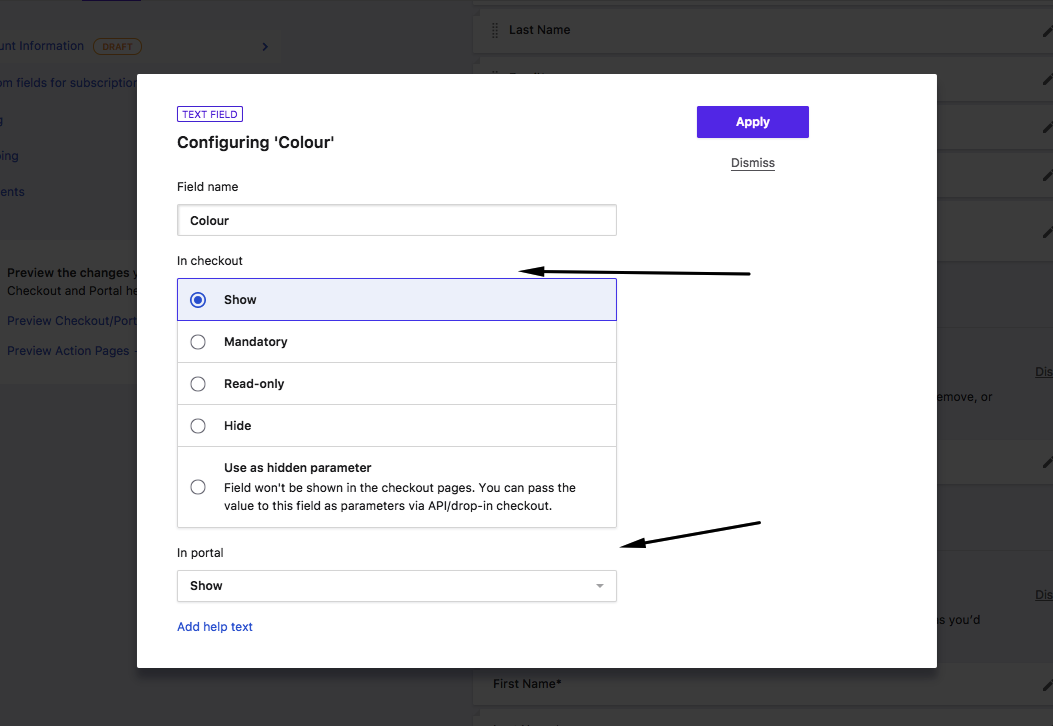
Similarly, if you are using the V3 checkout pages and V2 portal, navigate to *Settings >> Checkout & Self-Serve Portal (under Customer-facing essentials section) >> Fields.

You will find the customer level custom fields under Account Information and the subscription level custom fields under Custom fields for subscription tabs respectively on the left panel. Just pick the appropriate custom field, enable it and click the edit icon to set the status. When you're done making changes, just Publish it. Screenshot is below.
image

Related Articles

How can I display the custom fields on an invoice?
Custom field does not display on the invoice.
Custom fields in invoice customisation not configured
How to create a custom field for password?
How to pass values to custom fields using in-app scripts?
'Error message: "There were errors while submitting" "cannot be blank".drop-in script with custom fields'

Show more

Was this article helpful?