Ingesting Usage Events into Chargebee
Introduction
Chargebee Billing makes it easy to ingest and manage usage data for your products or services. You don't need to set up complex configurations or create metering in advance to start bringing in your usage data. Simply upload your data as-is, and then use it to enable usage-based billing or gain valuable insights.
Chargebee Billing is built to handle high-volume usage ingestion reliably, while giving you full visibility into how usage events are processed and consumed. It also supports:
- Schemaless ingestion.
- Throughput of up to 12,000 events per second.
- Up to 100 million free usage events per month.
Core Concepts for Usage Ingestion
Understanding the following concepts will help you ingest usage events accurately and avoid common errors.
-
De-duplication ID Each usage event must include a de-duplication ID. A de-duplication ID is a unique identifier for a usage event that occurred within a subscription at a specific millisecond. Chargebee uses this ID to ensure that duplicate usage events are not recorded. For example, if two usage events occur for the same subscription at
2026-01-10T10:15:30.123, each event must have a unique de-duplication ID. If both events share the same ID, only one event is recorded. -
Usage Timestamp and Ingestion Timestamp Chargebee tracks both usage time and ingestion time in milliseconds.
| Concept | Description | Used For |
|---|---|---|
| Usage Timestamp | The usage timestamp represents the time when the customer consumed the service / when the usage occurred. | Billing, reporting, processed event filters |
| Ingestion Time | The Ingestion Time represents the time when Chargebee received the event. | Failed event filters |
Generating Timestamps for Testing: For testing or manual entry, you can use an epoch timestamp converter to generate timestamps in milliseconds. Ensure that the value you use is in milliseconds, and not seconds.
Ingesting Usage Events
Chargebee offers three straightforward methods to bring your usage events into the system:
These methods ensure you can bring in usage events efficiently and accurately, whether you prefer automation, bulk import, or manual entry.
Usage Events API
You can use the Usage events API resource to send your usage data to Chargebee Billing. It supports both individual and batch ingestion of usage events, accommodating your data as-is without requiring adherence to a specific schema. Regardless of your business type, you can easily send usage data for your products or services to Chargebee. This is a one-time setup with no ongoing maintenance required.
Importing Usage Events in Bulk
Chargebee Billing allows you to import usage events in bulk, making it easy to upload large volumes of usage data quickly and efficiently. This method is ideal for your business if you have accumulated historical usage data, or you need to process a significant volume of usage records at once using the application.
To import usage events in bulk, simply prepare your data in a supported file format, ensuring it includes required attributes such as:
- Deduplication ID
- Subscription ID
- Usage timestamp in milliseconds
Note
- Please note that there are no validations in place to check and map usage data that gets imported.
- Ensure that the size of the file that you import does not exceed 5 mb.
Once your data file is ready, follow the steps below to import your usage events into Chargebee Billing:
- Navigate to Usages > Usage Events > Add Usage Events. Select the Quick file upload tab.
Alternatively, you can click Settings > Import & Export Data > Choose a Bulk Operation in your Chargebee Billing site. Select Usages > Create a Usage and click Proceed.
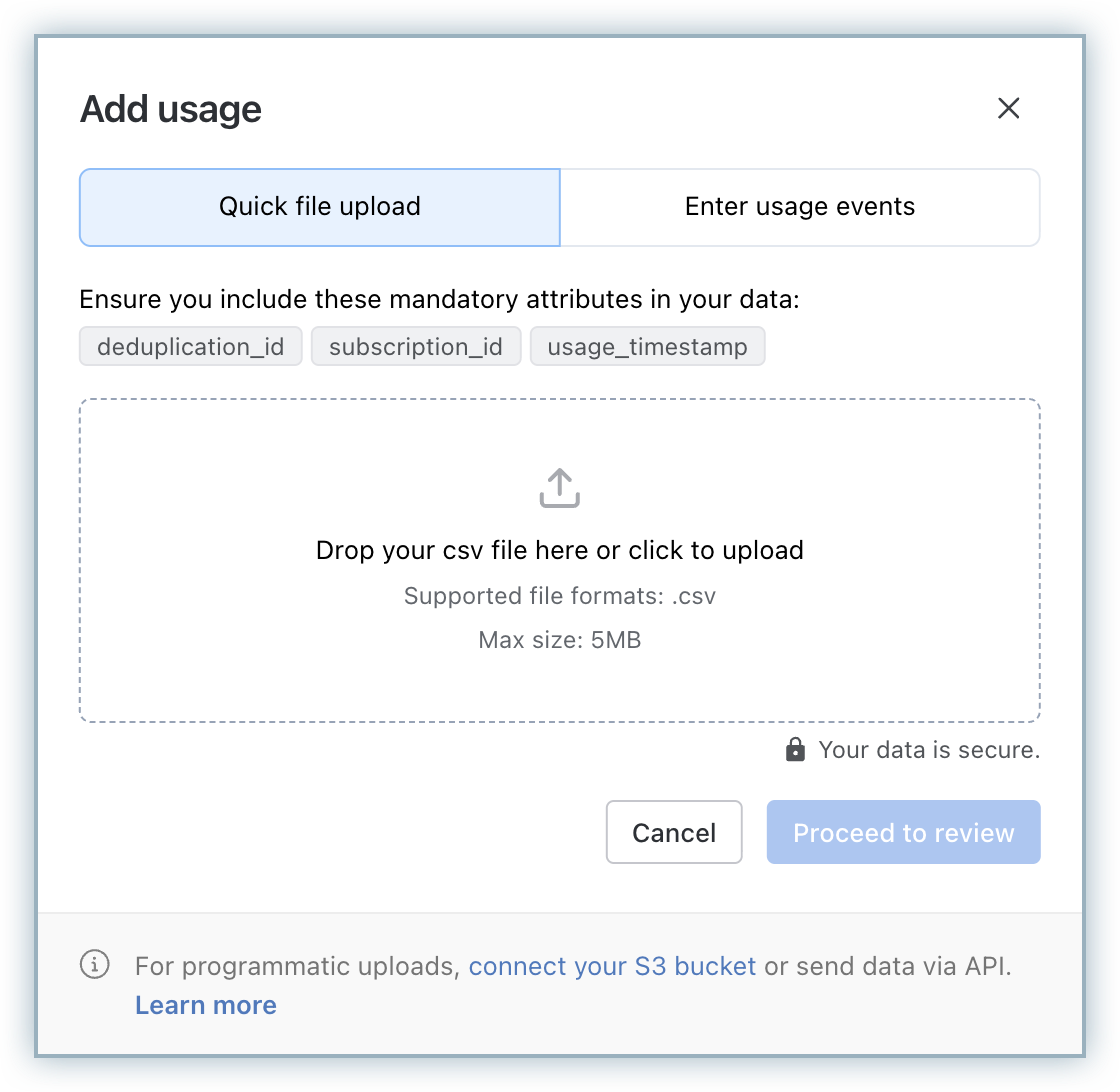
- Drag and drop your data file into the web interface, or click Browse to select your file and upload it. Click Proceed to review.
- On the next screen, you can review your data and make changes if required. You can:
- Click Edit Data to modify any values.
- Click Add Column to add missing fields for the data.
- Click Add Row to add more usage events.
- Once you have reviewed the data, click Import Events.
Your usage events data will get imported into your Chargebee Billing site. You can use the Processed events tab to view usage events that were successfully processed.
Chargebee Billing immediately allows you to filter the usage events based on the event details/properties with which they were imported. Click the Event_id to view the usage event record in detail. The usage event details can be viewed both in Properties and JSON format.
Usage events that were not imported are listed under the Failed events tab along with the failure reason. You can correct the respective data and attempt to import them again.
Adding Usages Manually via UI
Chargebee Billing gives you the flexibility to manually add usage events for smaller datasets or to make quick updates directly within the application user interface. This method is particularly useful for you when you occasionally need to record usage data without relying on automated or bulk processes.
To add usage events manually in your Chargebee Billing site:
- Click Usages > Usage Events > Add Usage Events. Select the Enter usage events tab > Proceed.
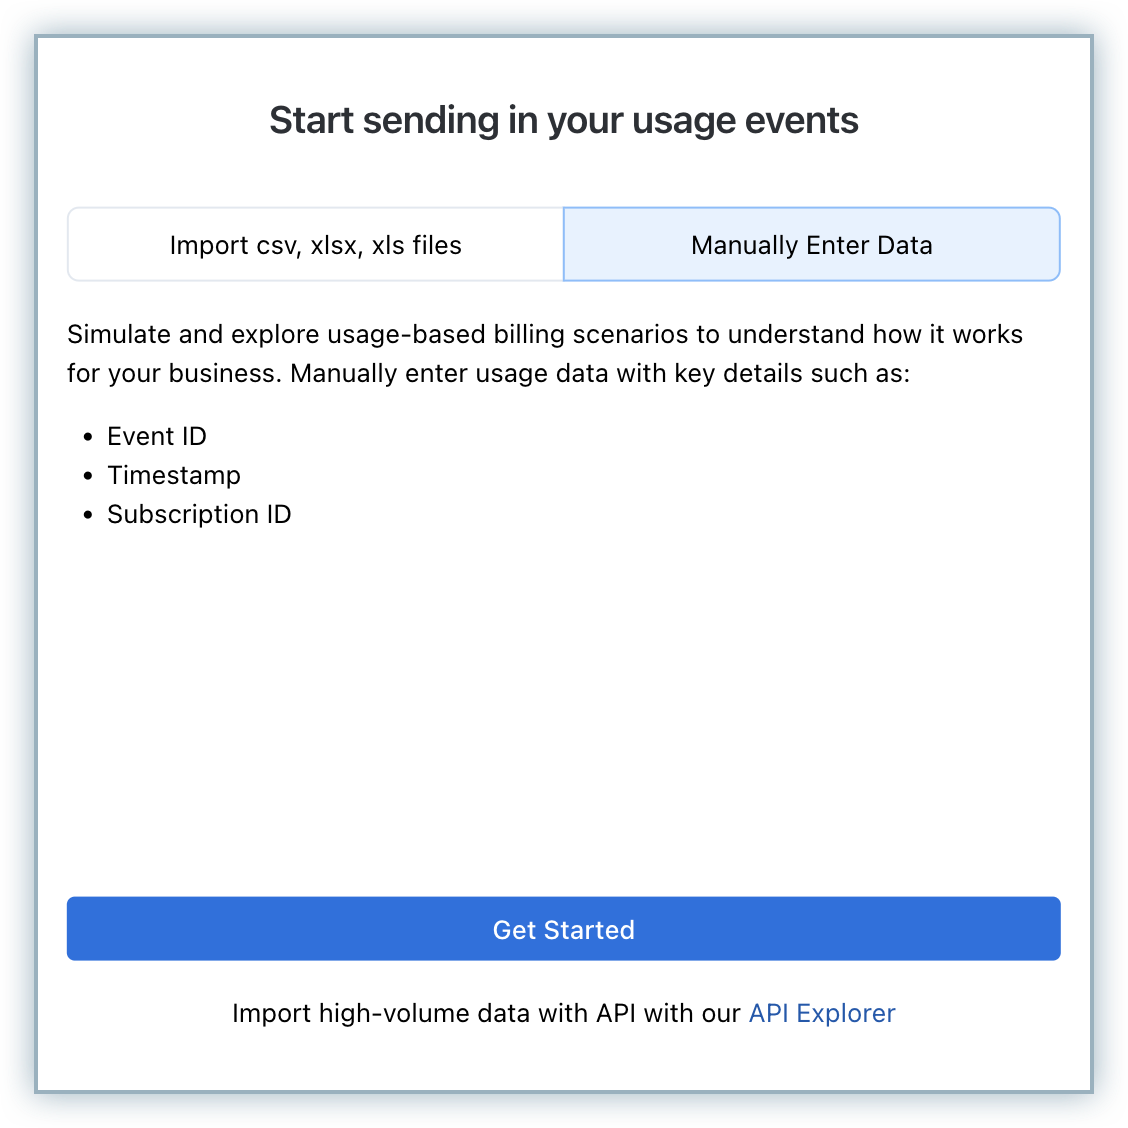
- On the Enter usage events page, enter the required details such as the usage deduplication_id, subscription_id, usage_timestamp, and so on.
- Click Import Events.
Your usage data gets recorded successfully.
You can now start tracking and managing usage data in a way that works best for your business.
Reserved Keywords
While Chargebee Billing supports schemaless usage ingestion, there are certain reserved keywords and restricted field names that cannot be used within usage event properties.
Chargebee aligns with ANSI SQL standards. The following keywords are currently reserved and should not be used as property names in your usage events:
- SELECT
- FROM
- WHERE
- AVG
- MAX
- MIN
- SUM
- COUNT
- DISTINCT
- AND
- OR
As a general guideline, all ANSI SQL reserved keywords should be considered restricted. This helps avoid potential conflicts as new features and query capabilities are introduced.
In addition to SQL keywords, the following terms are restricted due to their specific roles within Chargebee:
- events
- subscription_id
- deduplication_id
- usage_timestamp
- file_id
- batch_id
- failed_reason
Best Practices
Following these guidelines ensures smooth ingestion, accurate querying, and future compatibility with Chargebee’s usage-based billing features:
- Avoid using any reserved or restricted keywords as property names in your usage events.
- Use clear, descriptive, and unique field names for your custom properties.
- If unsure, prefer namespaced or prefixed fields (e.g., custom_region, app_event_type) to reduce the risk of conflicts.
Read Next
See also
API References
Was this article helpful?