FAQ
1. What happens when my customer's immediate checkout amount is different from the subscription amount?
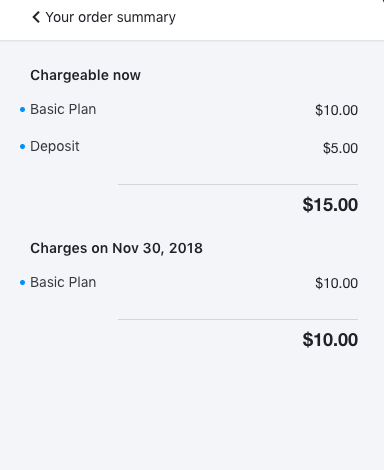
Chargebee provides a detailed summary of the current charge and the recurring charge if there is a difference in the amount.
For example, if you run an eBook subscription business where the subscription costs $10 and there is an additional $5 deposit for the first month, you can create this deposit as a non-recurring addon and make it mandatory for the plan. Learn more.
When your customer checks out, the Orders screen displays the subscription charge, the total amount to pay now, and the amount due at renewal.
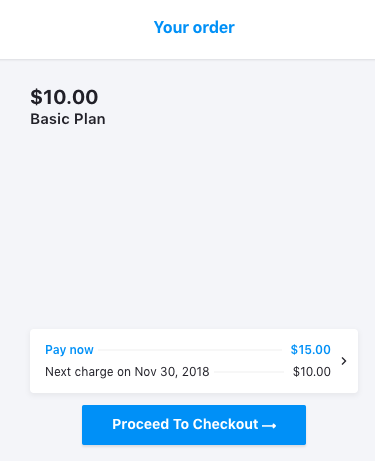
Clicking the Pay now link shows a detailed charge summary.
Customers can proceed to payment by clicking Proceed to Checkout on the Orders page.
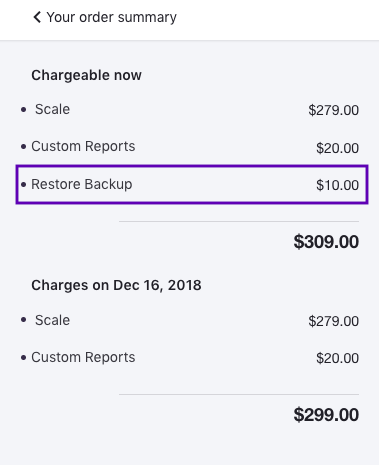
2. My plan has mandatory addons. How will they appear during checkout?
Chargebee allows you to create plans and associate addons. Learn more.
When customers check out, mandatory recurring addons are added by default as individual line items. Customers cannot remove these addons.
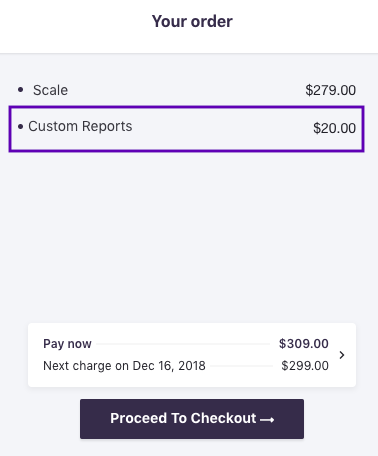
Non-recurring addons are added to the checkout, but their details appear only on the Order Summary page.
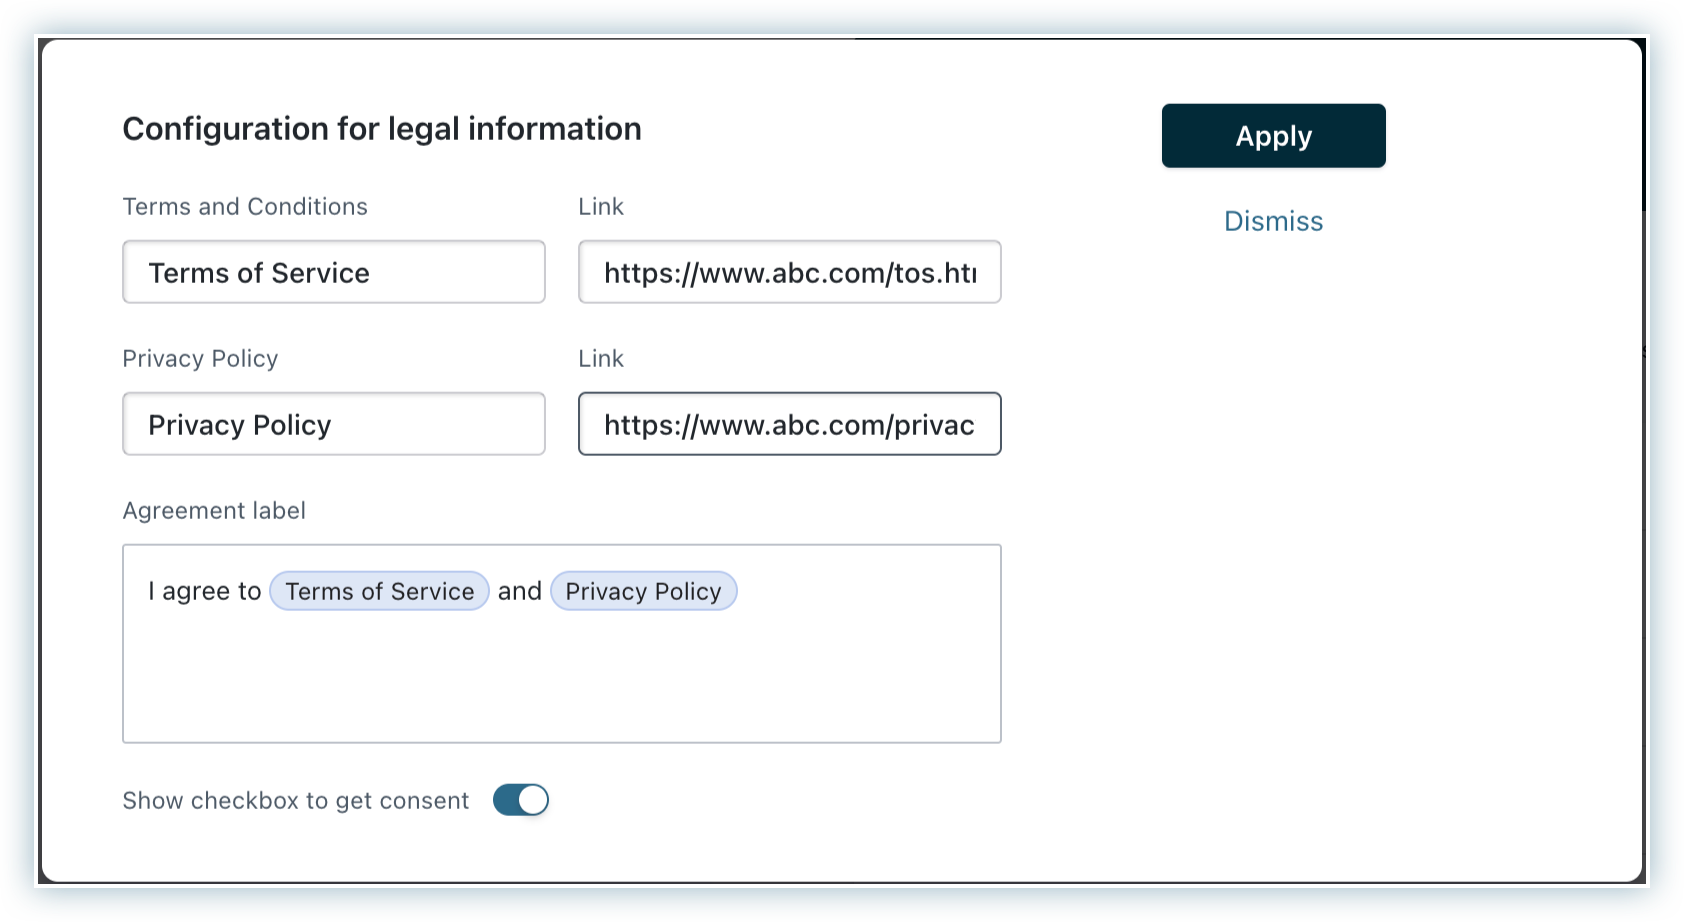
3. What can be customized in the legal terms shown in the portal?
You can:
- Add URLs for Privacy Policy and Terms & Conditions.
- Configure the text displayed in the portal.
- Choose whether to show the "I agree to..." checkbox.
4. How do I set up ACH as a payment method for Chargebee Checkout and the portal?
Plaid is required to display ACH as a payment option via Stripe in Chargebee's Checkout and Portal.
To set up ACH:
- Enable the Stripe payment gateway in your Chargebee site.
- Enable ACH payments via Stripe in your Chargebee account.
- Navigate to Settings > Configure Chargebee > Payment Gateways > Stripe > Edit, enable Use Plaid for instant authentication, and enter your Plaid credentials.
Plaid is not required for ACH payments via GoCardless.
5. How can I restrict my customers from switching between plans while editing subscription in customer portal?
By default, there are no options available in your Chargebee site to restrict your customers from switching between plans while editing the subscription. However, you can contact support and Chargebee will set it up for you. Say, plan upgrades and downgrades can be restricted. Editing a subscription is very flexible in the portal, hence restricting your customers from switching between plans can be done in various ways.
6. How do I enable Checkout Without Payment Method as a white-label (custom doman) user?
If you are a white-label or custom domain user, enabling the Checkout Without Payment Method feature in the Checkout & Self-Serve Portal will not have any effect.
To activate this feature:
- Register for Google Invisible reCAPTCHA.
- Email Support with your Google reCAPTCHA Secret Key and Site Key. Learn more about these keys.
Our support team will enable this feature and notify you.
7. If I enable Checkout Without payment method, how can I collect the payment information in case I want to charge my customer in the future?
You can use our or Pay Now feature to collect payments in the future.
8. If I enable Checkout Without payment method for plans with free trials, will an automatic email be triggered asking for payment information at the end of the trial?
No, automatic emails will not be sent by Chargebee asking for payment information at the end of the trial. That said, you can add the update payment method button in your trial expiry emails to get the payment information from your customers.
9. I have configured Abandoned Cart, but, I do not get any emails while testing it from my personal account. Why?
We do not send re-targeted emails while testing. To view the details of the abandoned carts report in Chargebee Billing:
- Enable the Track abandoned carts setting in Settings > Configure Chargebee > Checkout and Self-Serve Portal > Configuration > Advanced Settings.
- You can then view the report at Settings > Configure Chargebee > Checkout and Self-Serve Portal > Reports > Abandoned Carts.
10. Can I see how, say, an addon/plan with tiered pricing looks like on Chargebee Checkout and Self-Serve Portal?
Yes, you can check the tiered pricing on Chargebee Checkout and Self-Serve Portal using Pricing Models.
11. How can a customer checkout a gift subscription?
Gift subscriptions can be checked out by your customers as shown in this section.
12. What are the login methods available with Chargebee?
Chargebee allows your customers to login to their self serve portal using a password or an OTP (one time password). This depends upon the configuration that you have setup in your Chargebee account.
Note: This is applicable only for users who have not set up single sign on.
To configure:
- Select Settings > Configure Chargebee > Checkout and Self-Serve portal > Advanced Settings
- Choose an option under ‘Allow customers to log in to the checkout and Self-Serve Portal using'
Available options are:
-
OTP: A one time password will be sent to the customer's email address (or phone number, based on your configuration). Your customer will have to enter that to login to the self serve portal.
-
Password or OTP: Your customers can choose to authenticate via One time password or a password. In case you have set a password, your customers will be prompted for that first. They can choose to login using an OTP by clicking the Login via one time password link.
You can set/change your password from the portal.
13. How can my customers set a password for their self serve portal?
To set a password for your self serve portal, your customers need to login to their portal using an OTP. Next, select Account information > Set up Password.
They can login to their portal using this password from next time.
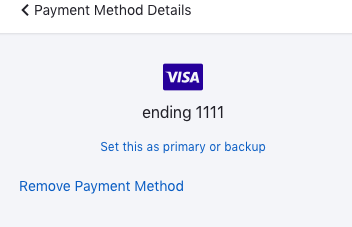
14. How can my customers set a primary/backup payment method using their self serve portal?
To add a primary/backup method:
- Navigate to Settings > Configure Chargebee > Checkout and Self-serve portal > Advanced settings
- Enable ‘Allow customers to add multiple payment methods' setting.
Note
- Allow customers to add multiple payment methods is available only in selected plans. To know more, visit Chargebee's Plans and Pricing page.
Once this is done your customer can choose to mark a payment as Primary or Backup by logging in to their self-serve portal.
In case your customer has already added multiple payment methods to their subscription, they can set primary/backup payment method by selecting the corresponding card and clicking the ‘Set this as primary or backup' link.
Note
- You can also set a payment method as primary or backup using the Chargebee app. .
15. How do I redirect to the next page in my app after making a successful payment via the checkout plugin?
You can set a redirect URL while creating a plan. Chargebee redirects your customers to this URL (say your website or any other page you specify) once they successfully complete the checkout.
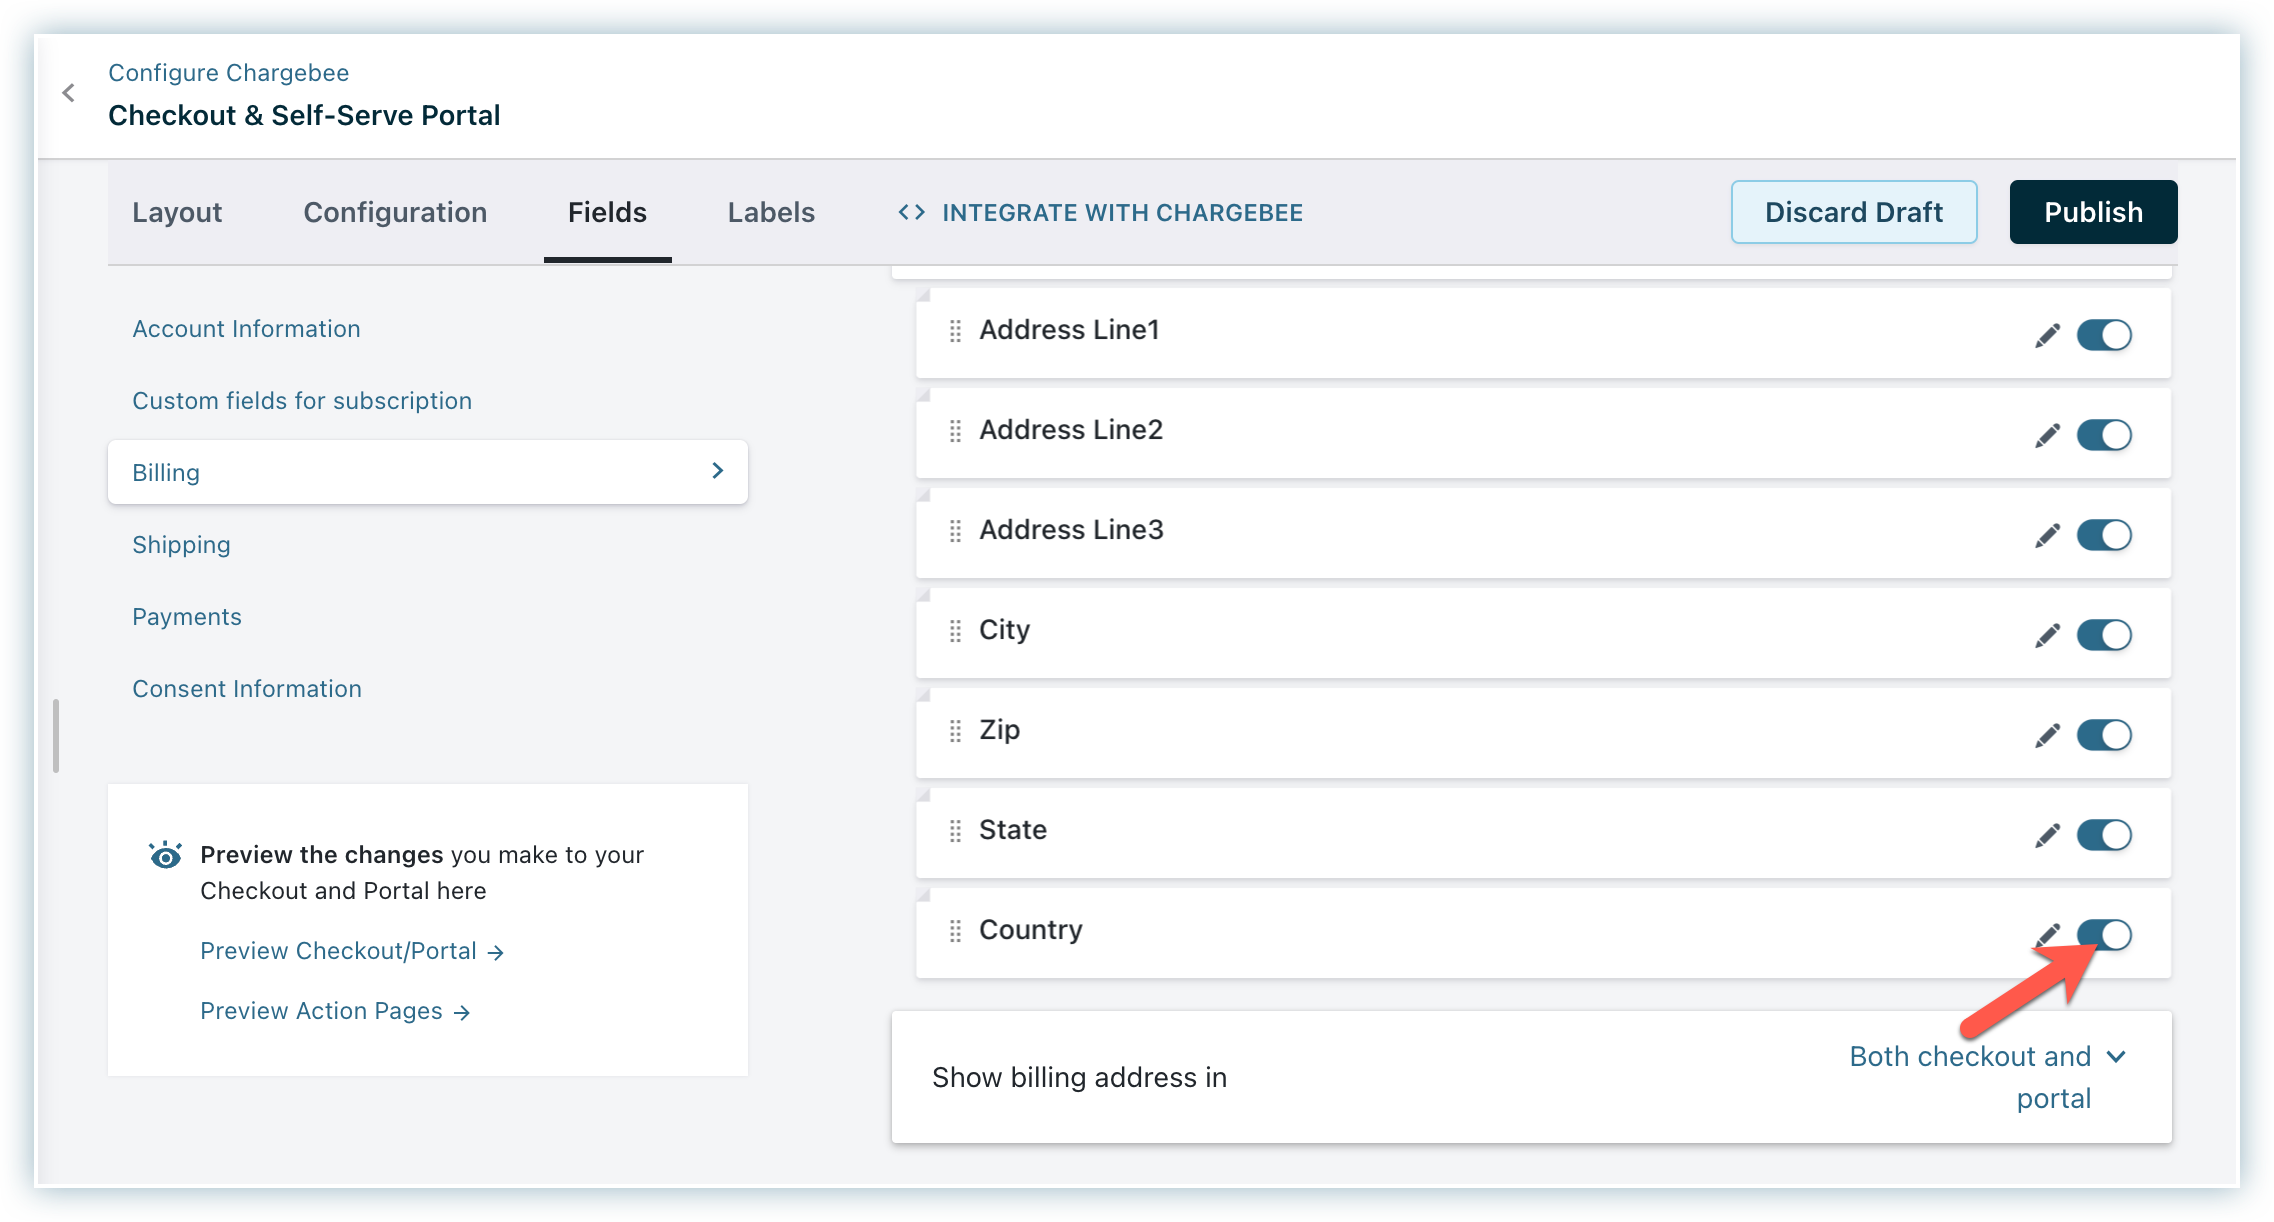
16. How can I restrict countries for billing, shipping, and card addresses?
To restrict countries for billing addresses:
-
Navigate to Configure Chargebee > Checkout & Self-Serve Portal > Fields > Billing > Address Fields > Country.
-
Click the Edit icon.
Configure country list
-
Select All countries available or Include specific countries from the Country list dropdown.
-
If you select Include specific countries, choose the required countries from the dropdown.
-
Click Apply.
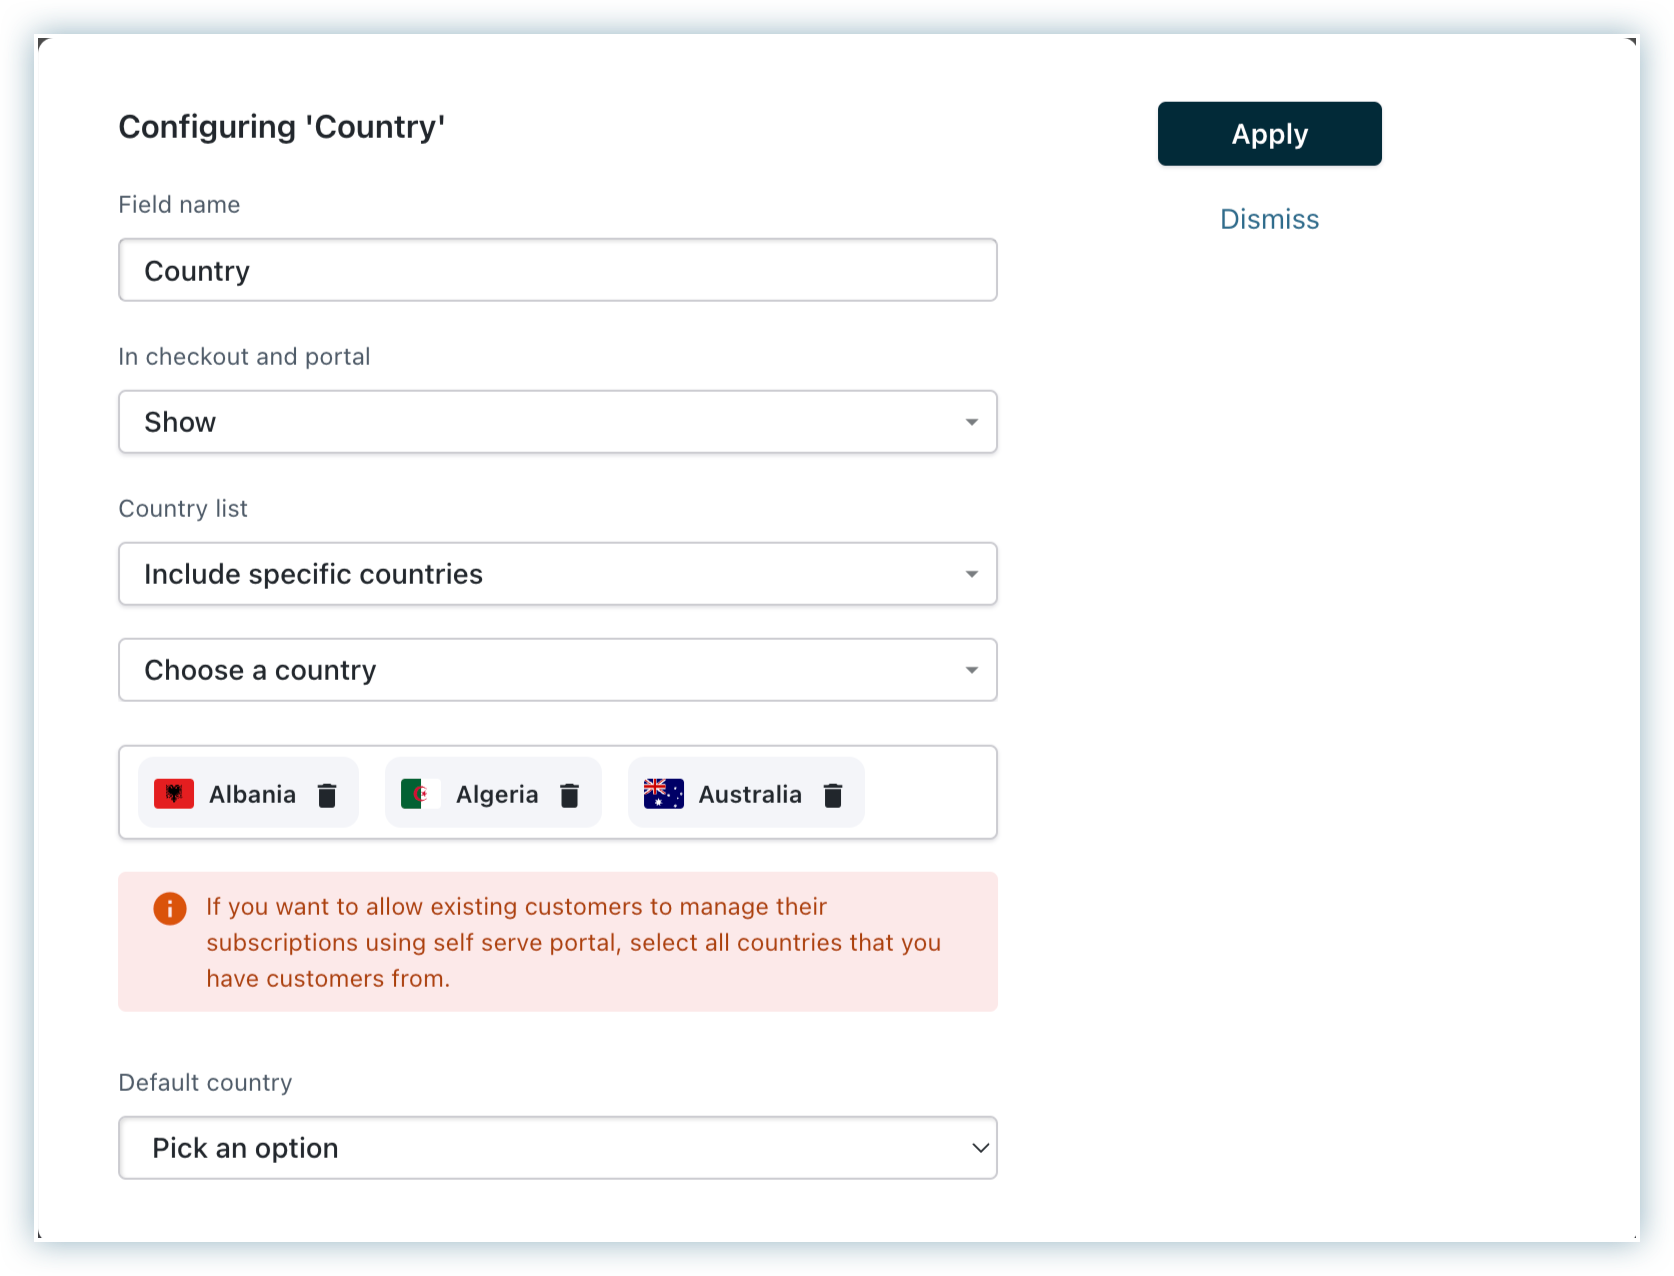
Information
If you want to allow existing customers to manage their subscriptions using the self-serve portal, select all countries where you have customers.
Choose the default country
Select the default country to display in the billing address fields from the dropdown. The dropdown shows only the countries selected in the Country list.
- Repeat these steps for shipping addresses by navigating to Configure Chargebee > Checkout & Self-Serve Portal > Fields > Shipping > Address Fields > Country.
- Repeat these steps for card addresses by navigating to Configure Chargebee > Checkout & Self-Serve Portal > Fields > Payments > Address Fields > Country.
Was this article helpful?