Configure Fields and Labels
Customize fields and labels on Checkout and Portal to collect required customer information.
Working with fields
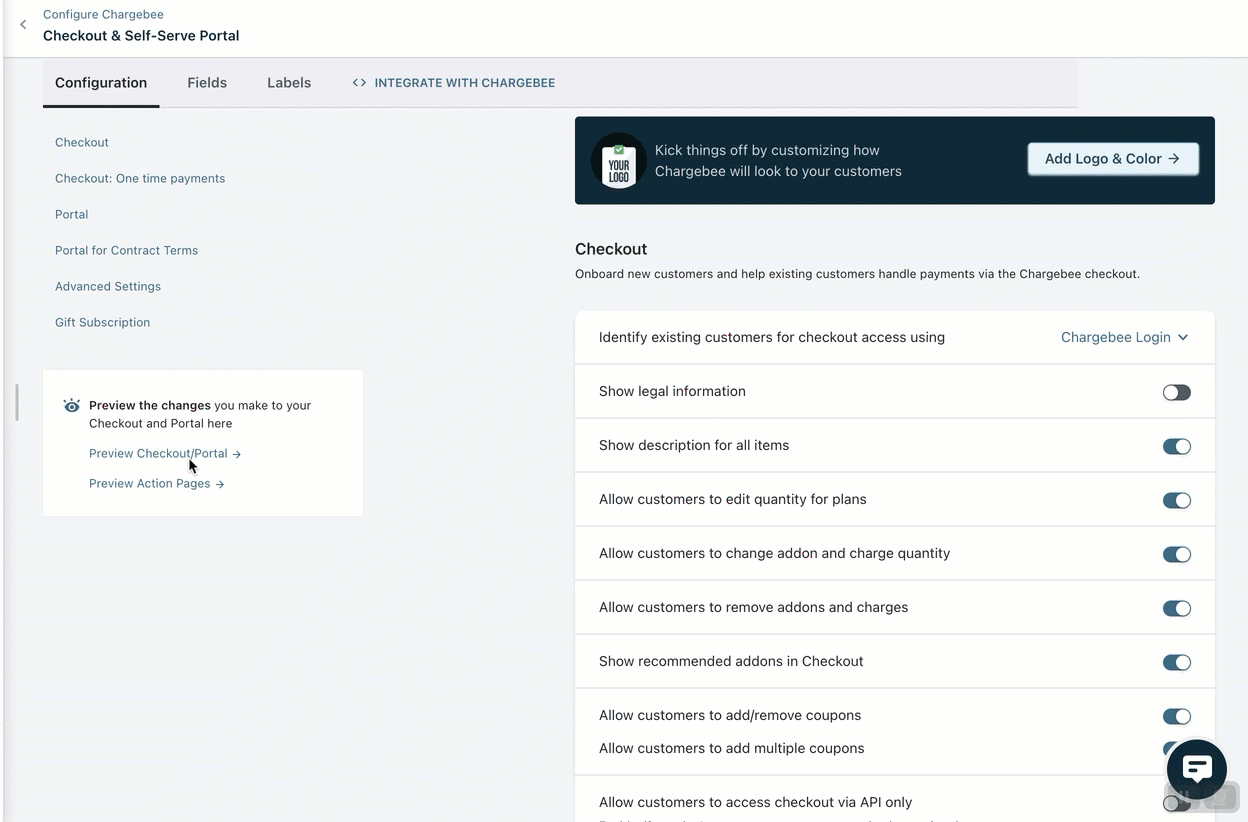
Configure fields
Sign in to Chargebee Billing, then go to Settings > Configure Chargebee > Checkout and Self-Serve Portal > Fields.
See also
Add product images to display them on Checkout pages.
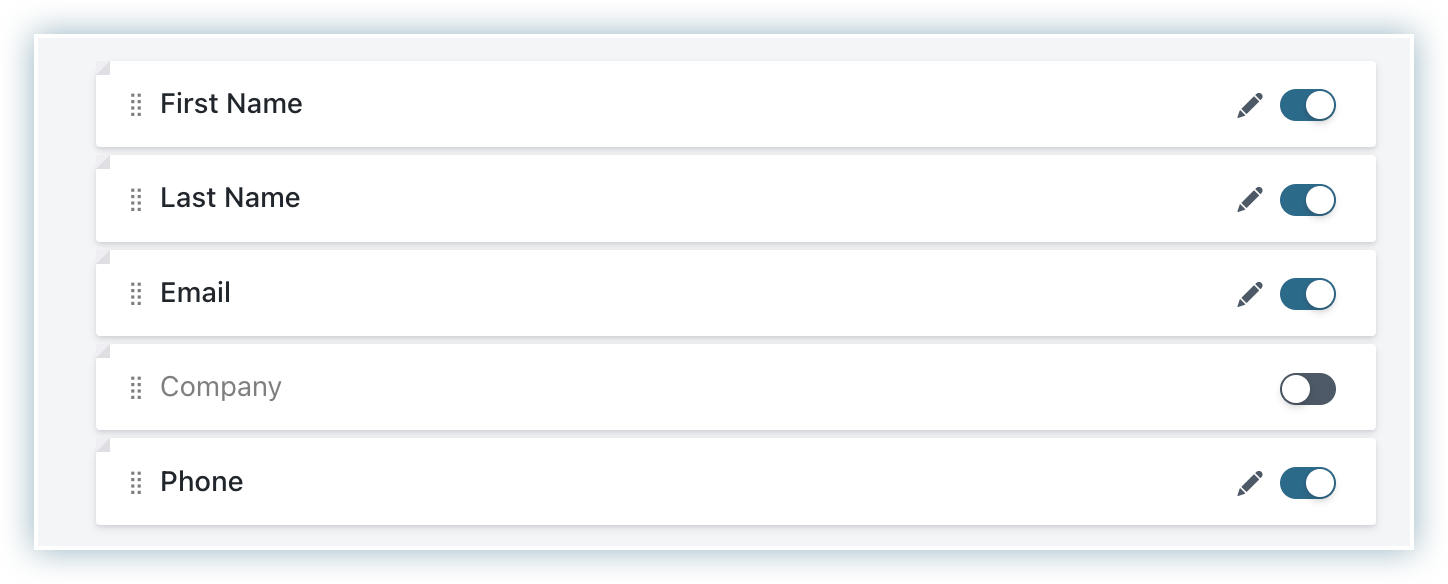
Enable a Field
Use the toggle button to enable or disable a field.
The screenshot below shows toggles for enabling or disabling fields in the billing or shipping address.
Reorder fields
Drag and drop fields to change their order on the Checkout page.
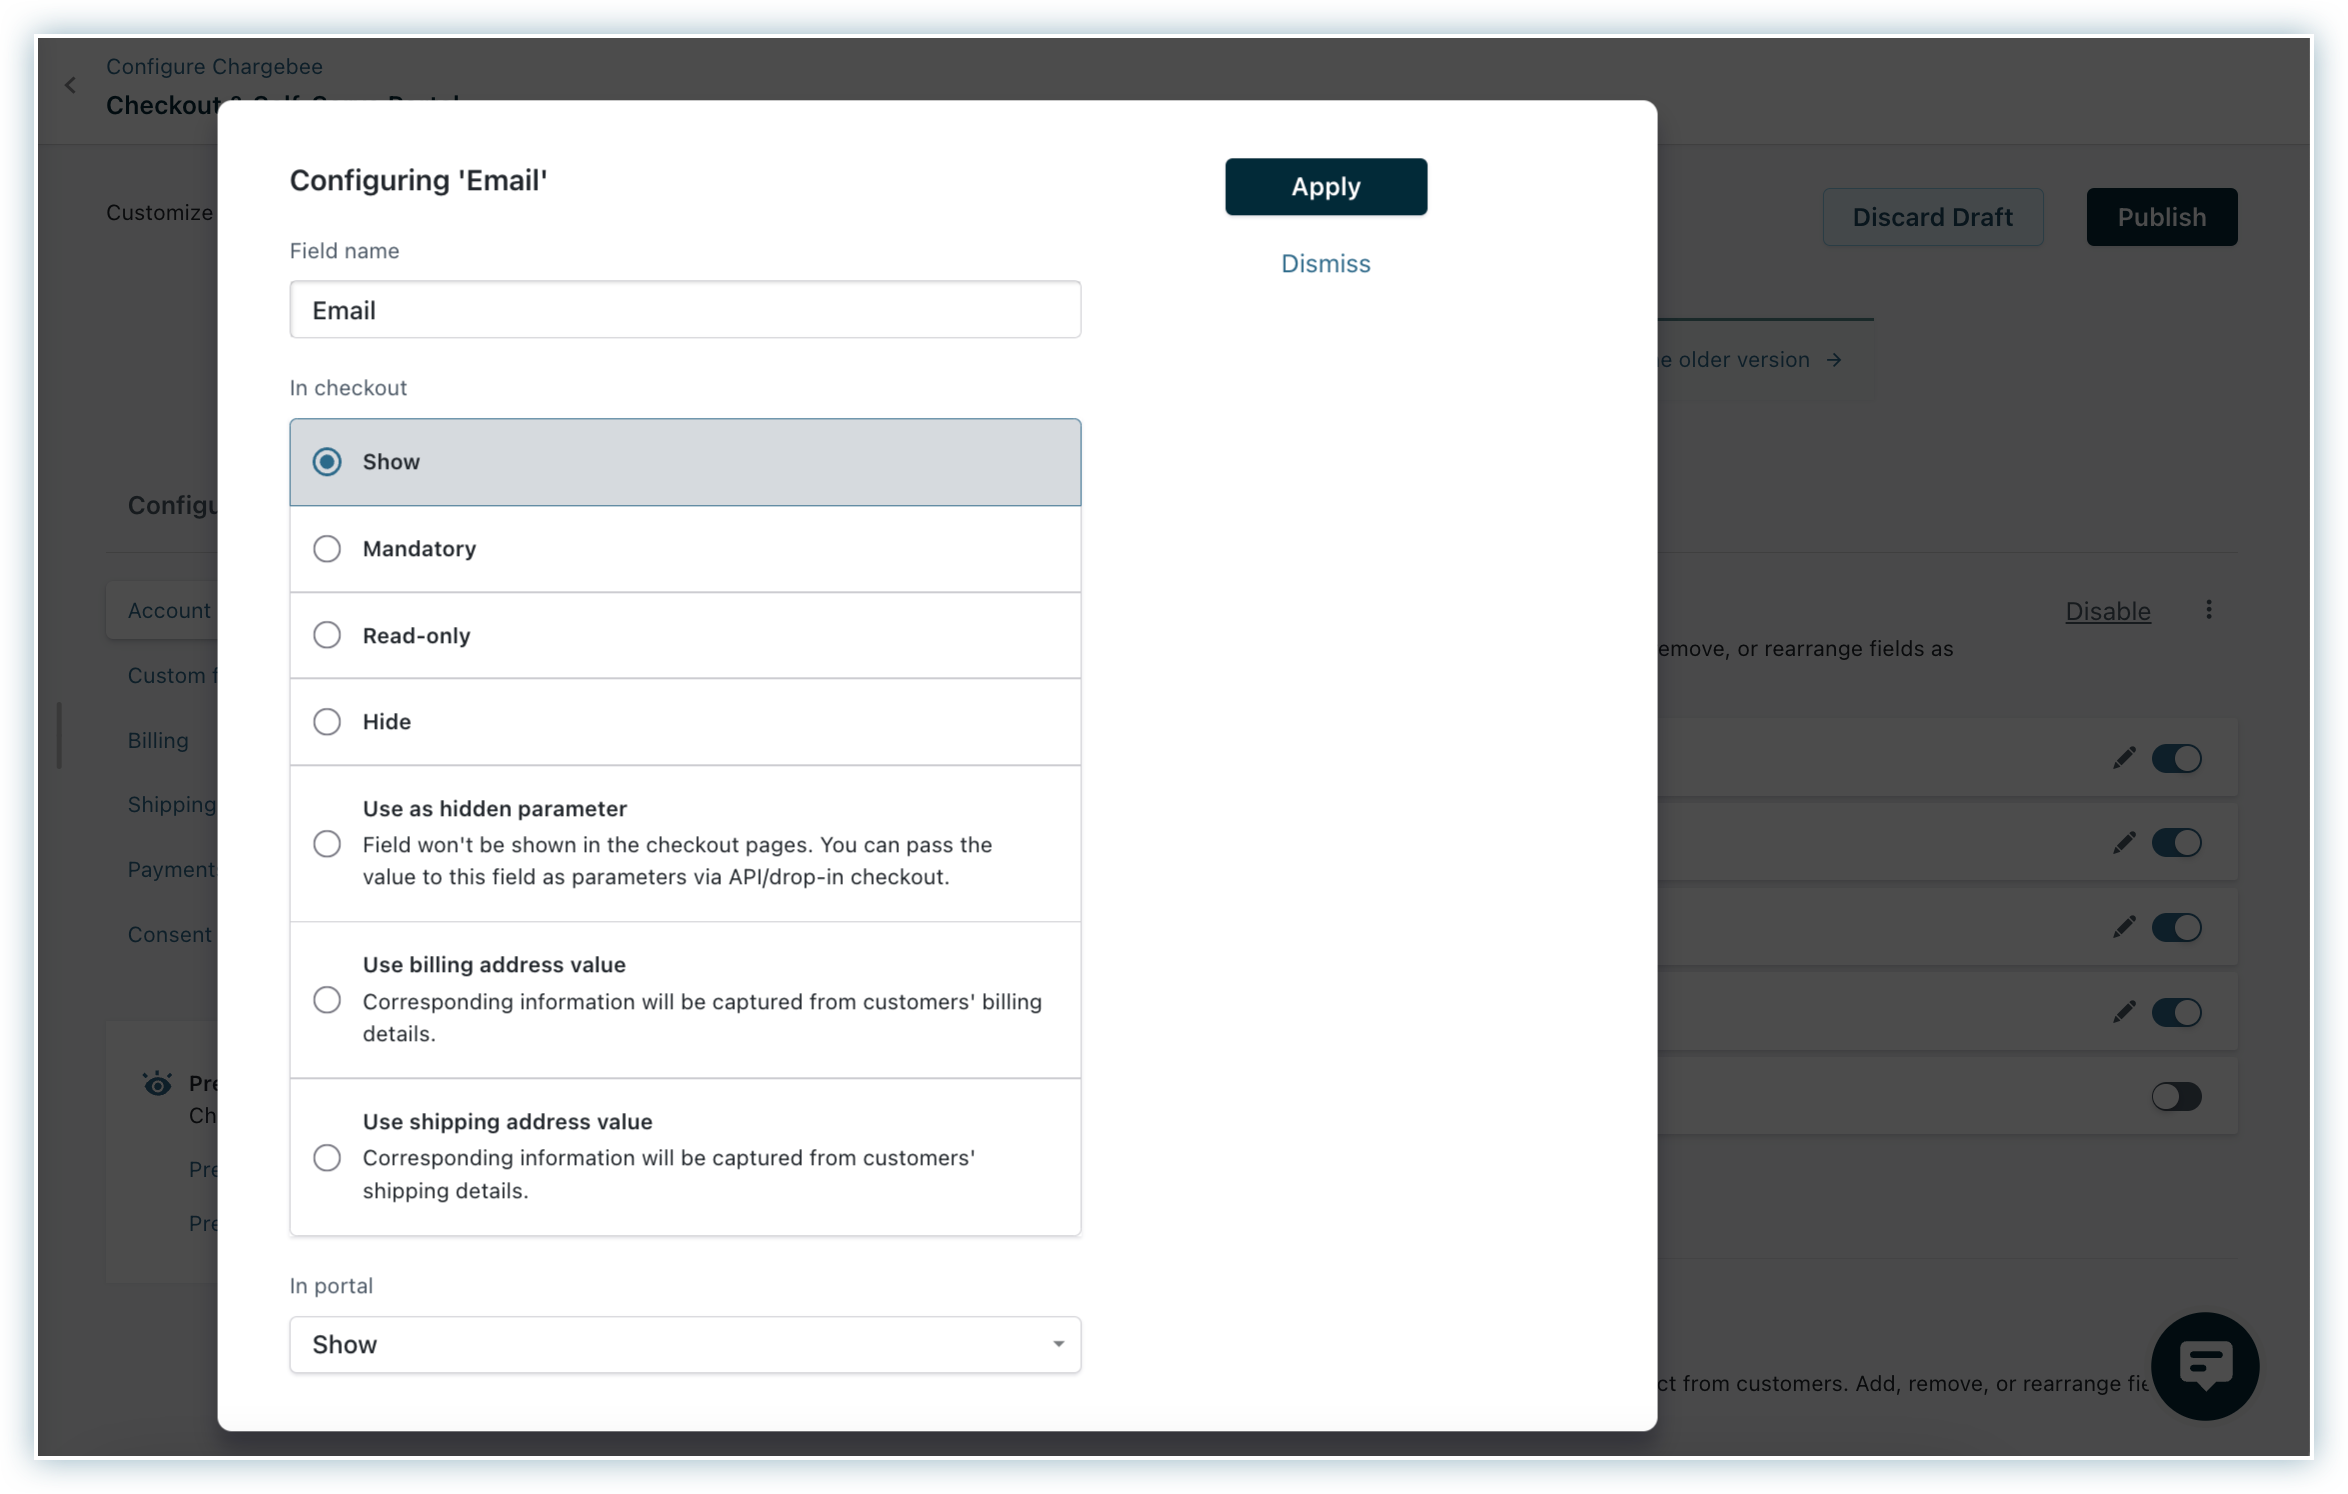
Edit a field name
Edit a field's name and set properties like mandatory, read-only, and show/hide. For example, set the email field as mandatory during checkout.
Note
Available properties depend on the field.
Configurable fields in Checkout
You can configure the fields for the following sections.
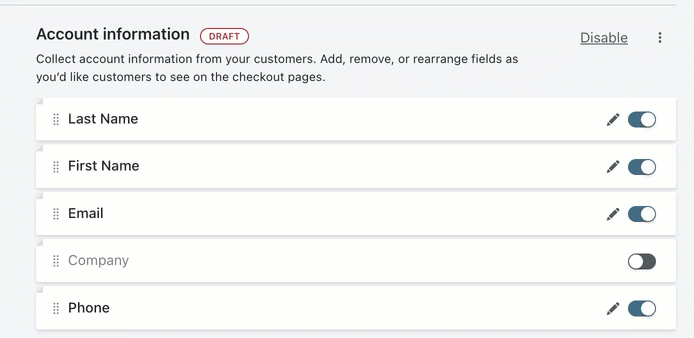
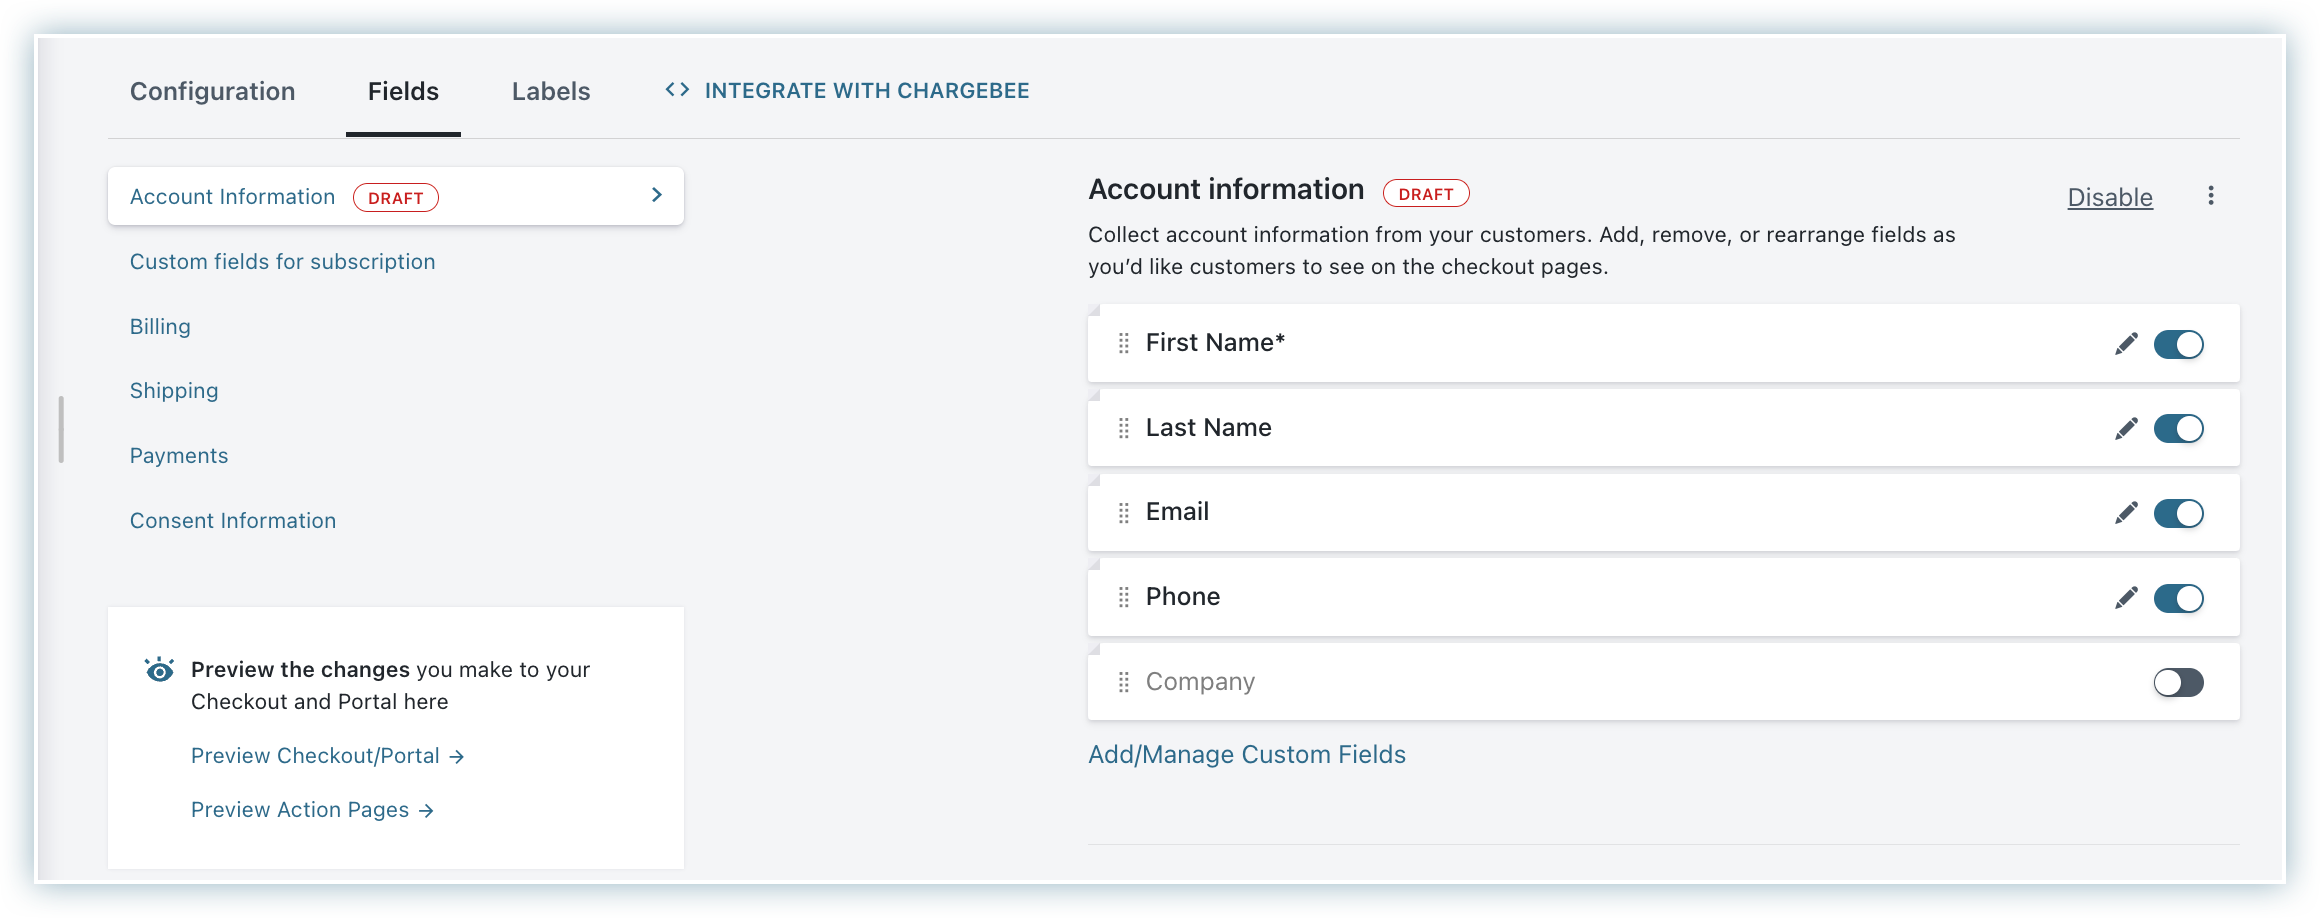
Account Information
Account fields collect primary customer information, such as name, email, company, and phone. They also collect custom fields from the checkout page.
Note
- Set at least one field under Account Information to Show or Mandatory when you set field properties. Otherwise, the account information page is skipped during checkout, but it appears as read-only on the final checkout page.
- When customers select UPI or Netbanking, and the payment gateway is Razorpay, these fields always appear: First Name, Last Name, Email, Phone. If Chargebee has already captured the customer's information, it's prefilled in Checkout.
Custom fields for subscription
Configure custom fields to collect subscription-related information from your customers.
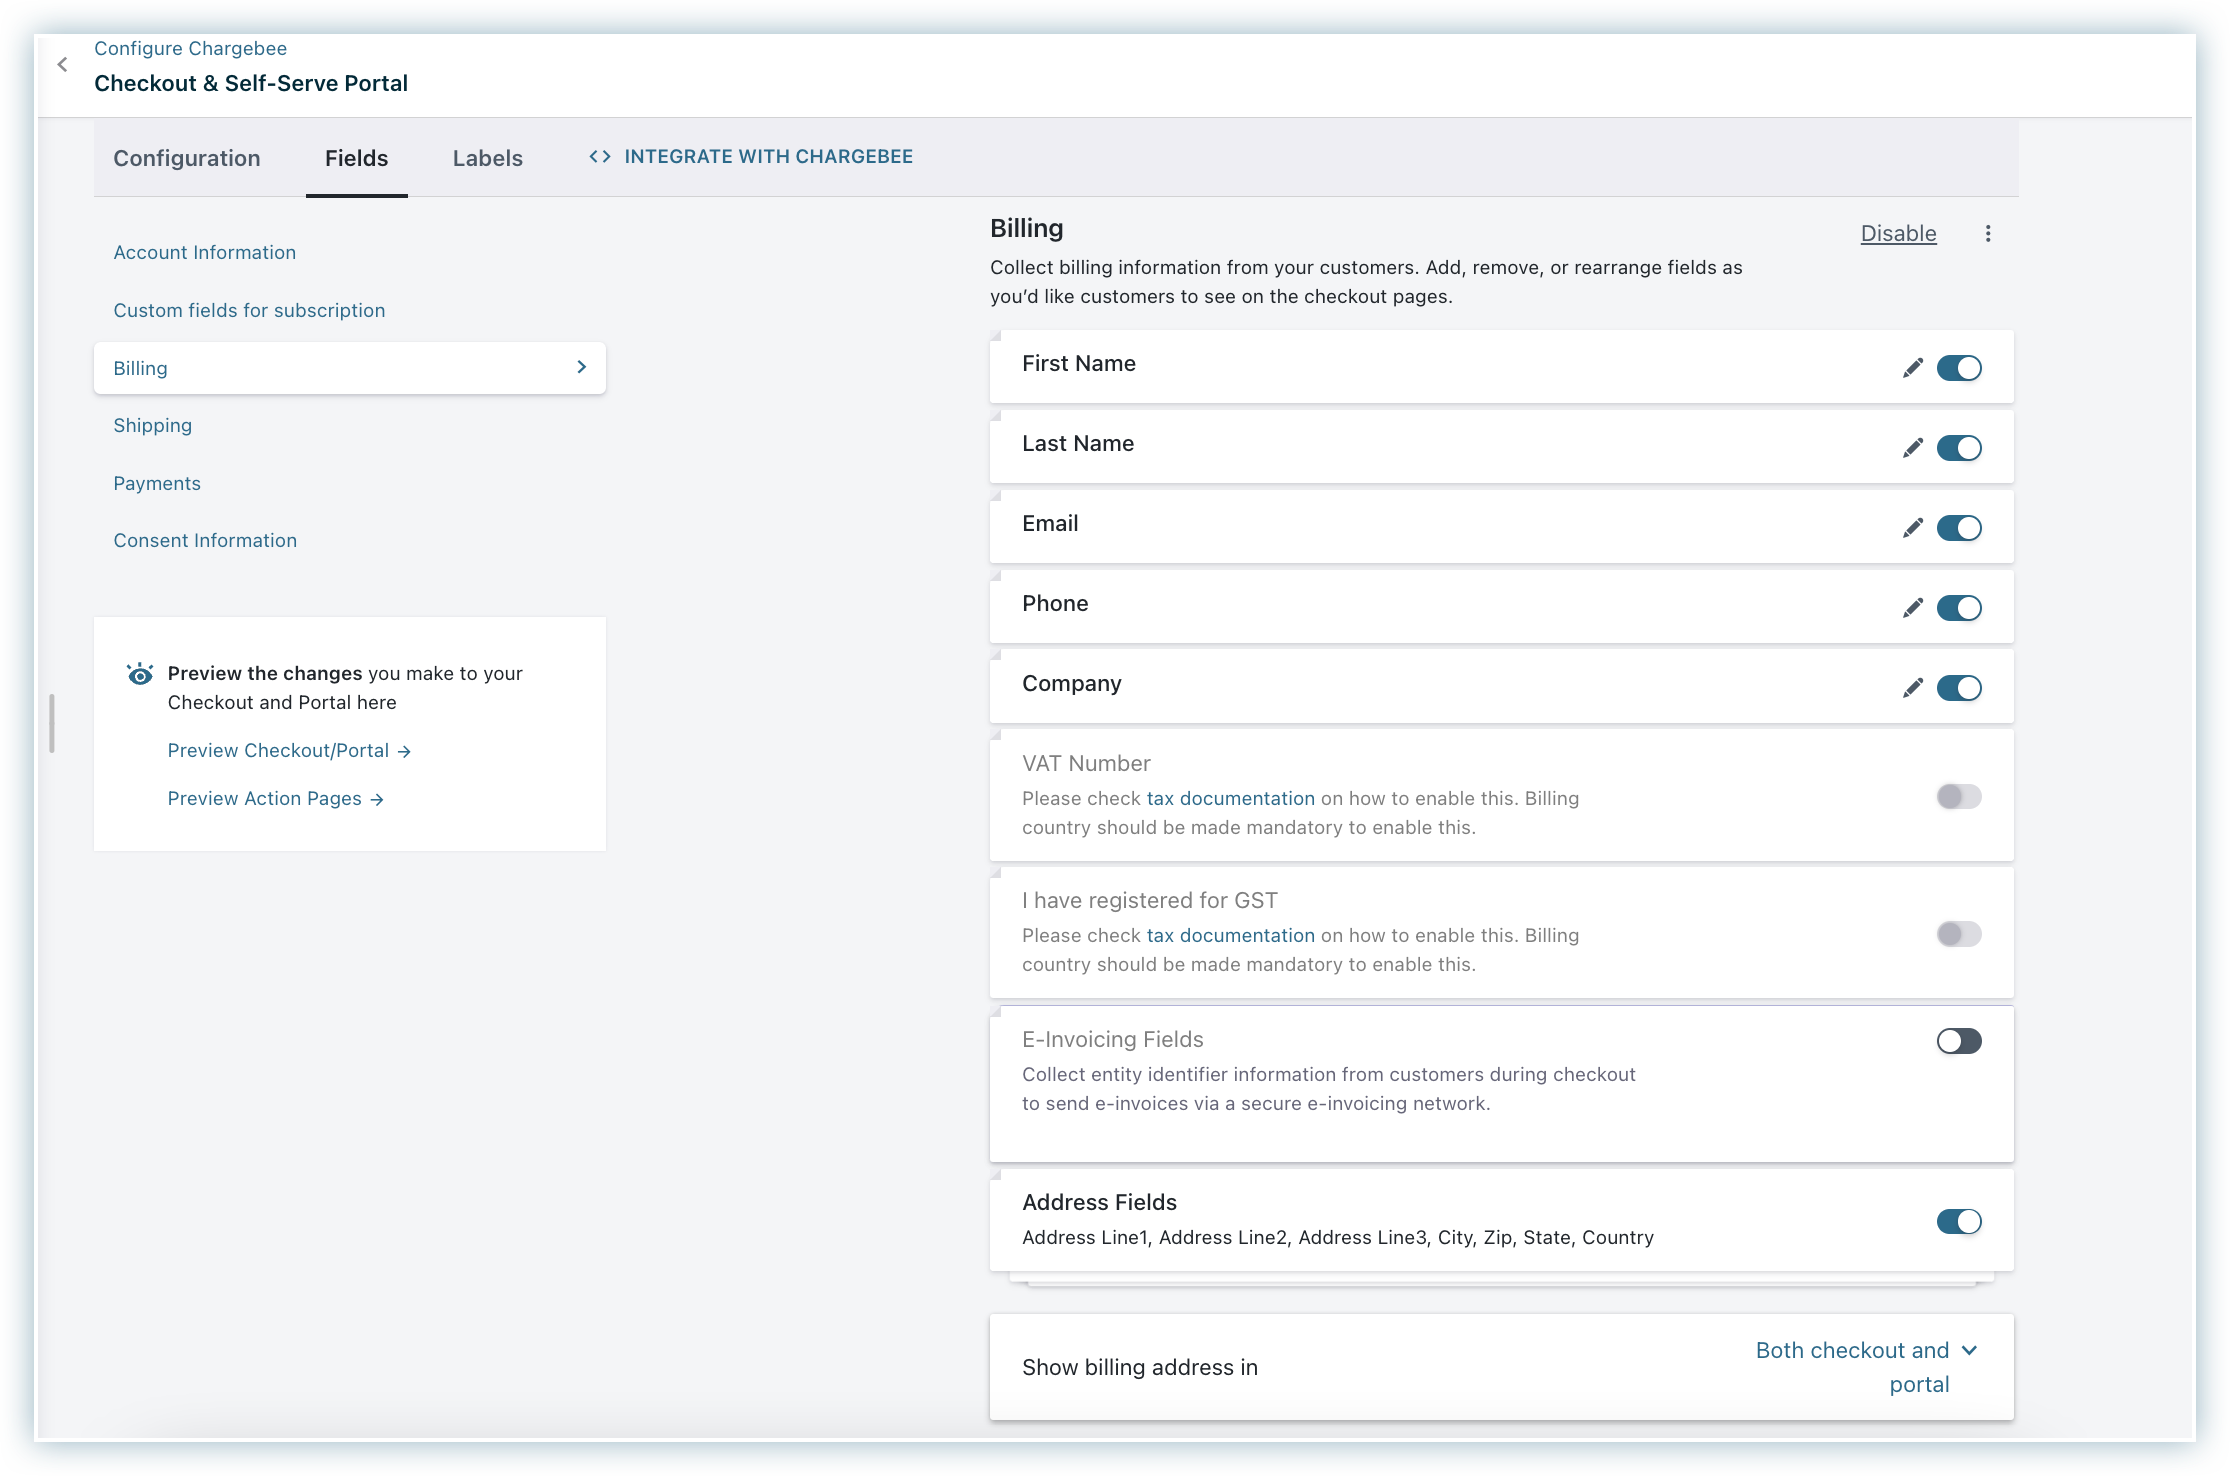
Billing
Configure billing fields to collect your customer's billing information such as an address, phone number, name, VAT number, and more. Turn the toggle buttons on or off to enable or disable granular components of the address.
Note
- To configure tax details such as VAT or GST, you must set billing country as mandatory in your tax settings.Furthermore, you can select to display the addresses on the checkout page, self-serve portal, or both.
- Billing fields cannot be reordered.
Billing address for existing customers
When Checkout is created via API for an existing customer who already has a complete billing address, or when all mandatory billing address fields are passed in the API request, the billing address is treated as final and is not editable by the customer during checkout.
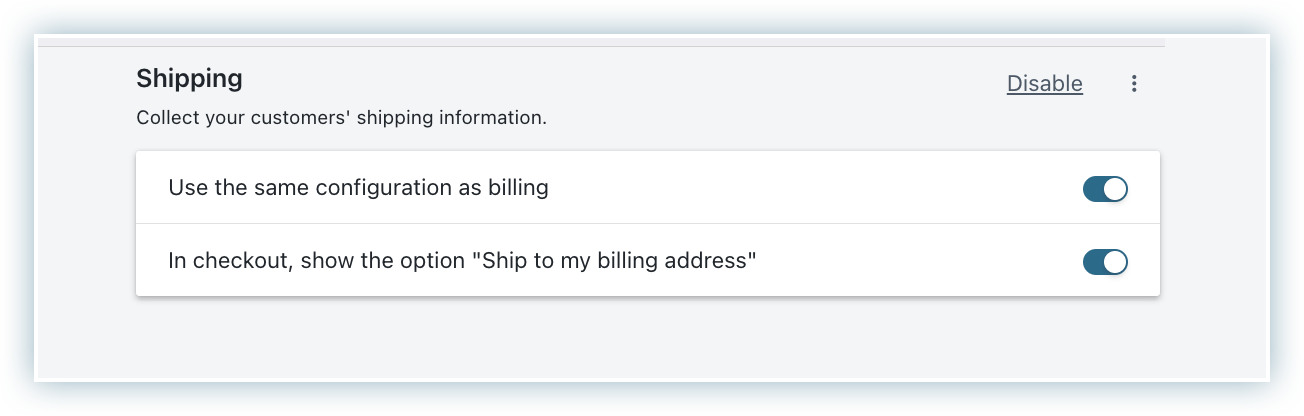
Shipping
Set up shipping fields to collect customer shipping information, such as address, name, and phone number. Use toggle buttons to enable or disable granular components of the address.
- Enable Use the same configuration as billing to apply billing address properties to the shipping address.
- Enable In checkout show the option "Ship to my billing address" to let customers choose the billing address as the shipping address during checkout.
Note
- The Ship to my billing address option doesn’t appear in the In-App layout for Checkout when the Checkout is created via API for an existing customer with one or more billing address fields in Chargebee.
- Shipping fields cannot be reordered.
- The shipping address section is hidden entirely when Collect shipping address only for shippable products is enabled and the cart contains no shippable products.
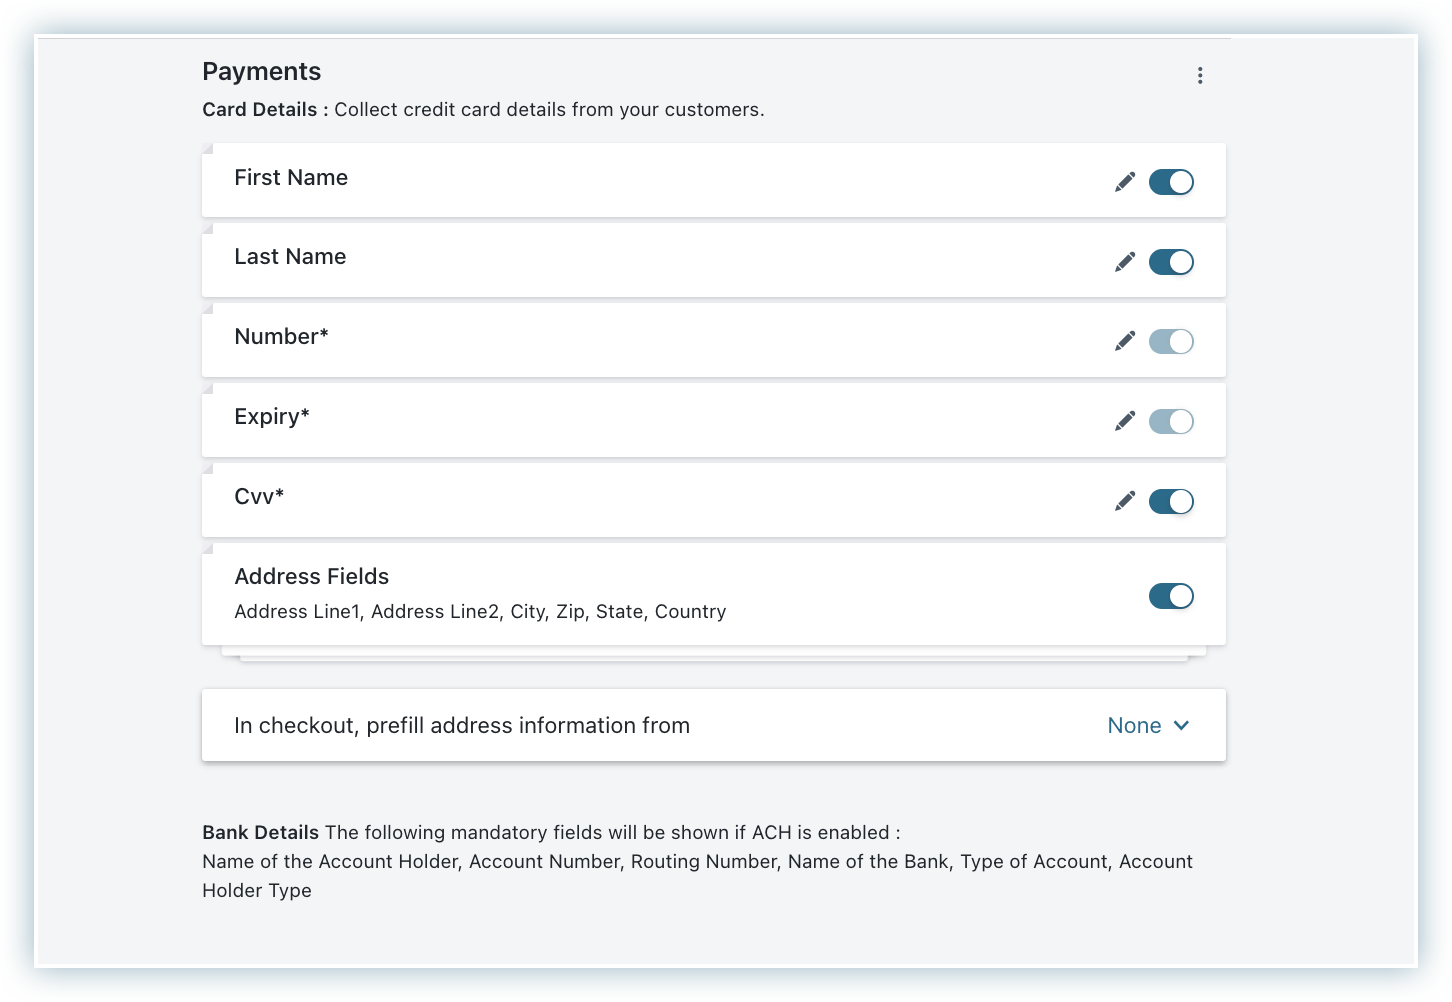
Payments
Set up payment fields to collect customer payment information, such as card number, expiry, and CVV. Card Number and Expiry are collected by default and stored in your payment gateway.
Note
Payment fields cannot be reordered.
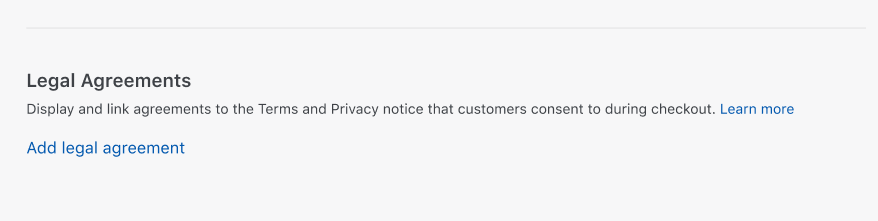
Legal Agreements
Overview
Checkout supports presenting legal agreements to customers during the purchase process.
You can add and manage multiple agreements, such as a terms of service, a privacy policy, or a refund policy, to meet various regulatory requirements. This helps you comply with legal standards around the world, such as those outlined by the Federal Trade Commission (FTC), which require businesses to provide clear, truthful, and accessible information about agreements and offer cancellation methods that are as easy as the sign-up process.
Agreements support rich text formatting, including hyperlinks to additional resources or policies, as needed. Support for multiple languages based on the customer's locale is also included.
Chargebee logs timestamped data of customer agreement during checkout, which serves as proof in cases of disputes or chargebacks. An audit log of changes made to the legal agreements is also available to help improve transparency and compliance.
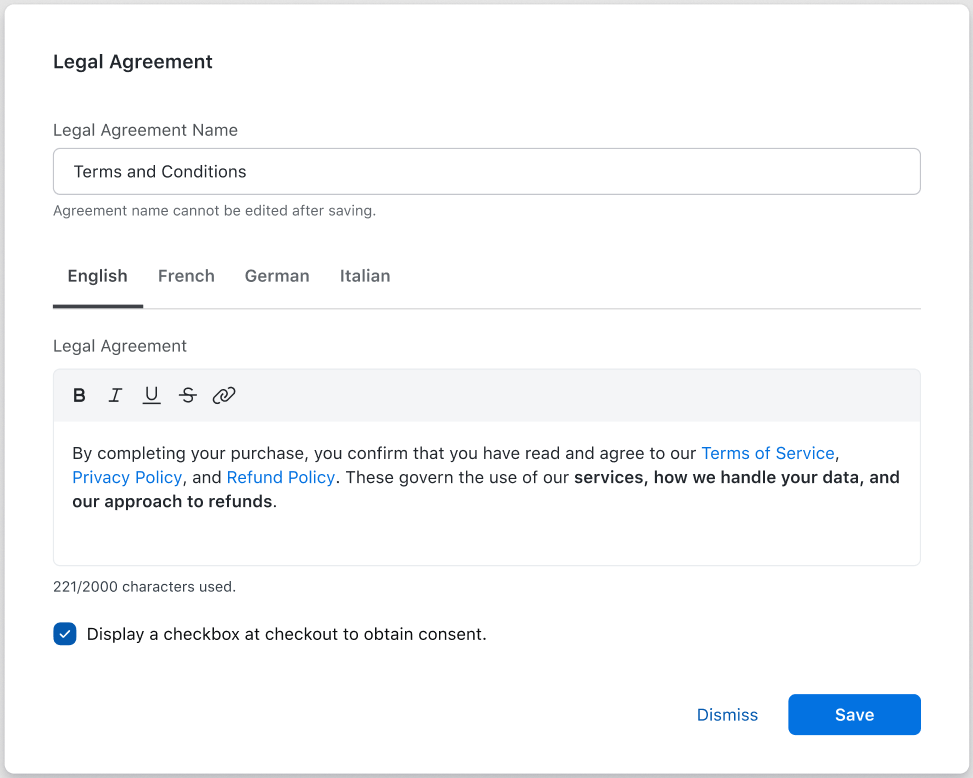
Add a legal agreement
To add a legal agreement to Checkout:
- Select Add legal agreement.
- Under Legal Agreement Name, enter a name to identify the agreement within Chargebee. This name, once saved, cannot be edited later.
- Click the tab for the language in which you want to add the legal agreement.
- Under Legal Agreement, enter the agreement text. Use rich text formatting as needed.
- Select Display a checkbox at checkout to obtain consent if you want the customer to explicitly agree before completing checkout.
- Repeat the steps for each configured language.
- Select Save.
- Repeat the steps to add more agreements.
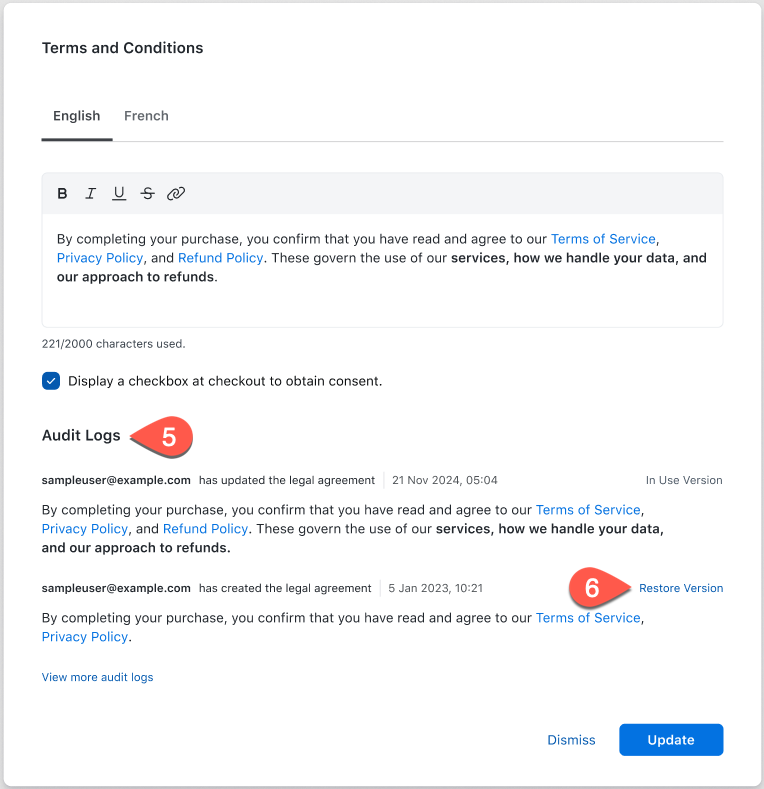
Edit a legal agreement
You can edit a legal agreement, view its audit log, and restore previous versions. To do so:
- Click the more options menu for the agreement you want to edit.
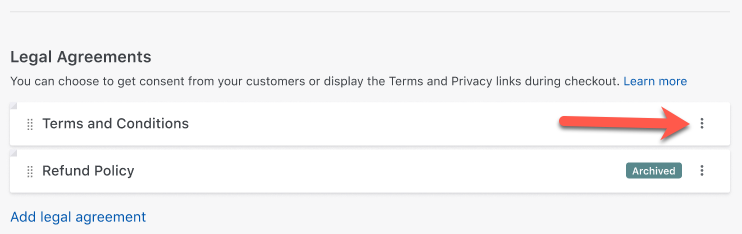
- Select View.
- Edit the agreement text as needed.
- Select Update.
- Alternatively, under Audit Logs, find previous versions of the agreement listed in reverse chronological order.
- Select Restore Version next to the version you want to restore.
- Click Confirm in the dialog that appears.
Archive or restore a legal agreement
Archived legal agreements aren't displayed on Checkout pages. Restored agreements become visible again. To archive or restore a legal agreement:
- Click the more options menu for the agreement you want to archive or restore.
- Select Archive or Restore.
- Click Confirm in the dialog that appears.
View consent history
Each time a customer agrees to a legal agreement and completes a Checkout session, a log of the event is created in Chargebee Billing. To view this:
- Log in to Chargebee Billing.
- Select Customers in the left navigation.
- Click the customer name to open the details page.
- Scroll to Legal Information. Legal agreements are listed in descending order by date of consent.
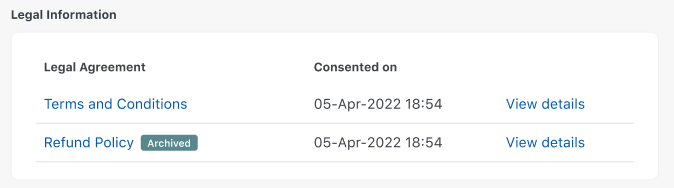
- Click View details to view event information for the Checkout session.
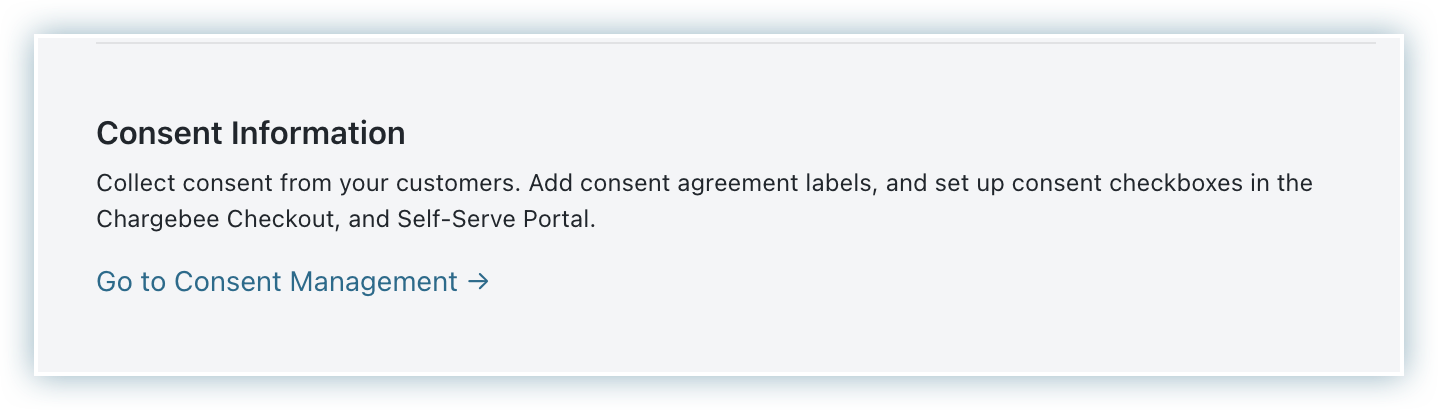
Consent Information
Set up consent fields to collect customer agreement during checkout. You can add consent, agreement labels, and checkboxes for Checkout and Self-Serve portal.
Working with Labels
Customize field labels and messages displayed on Checkout and the Self-Serve Portal.
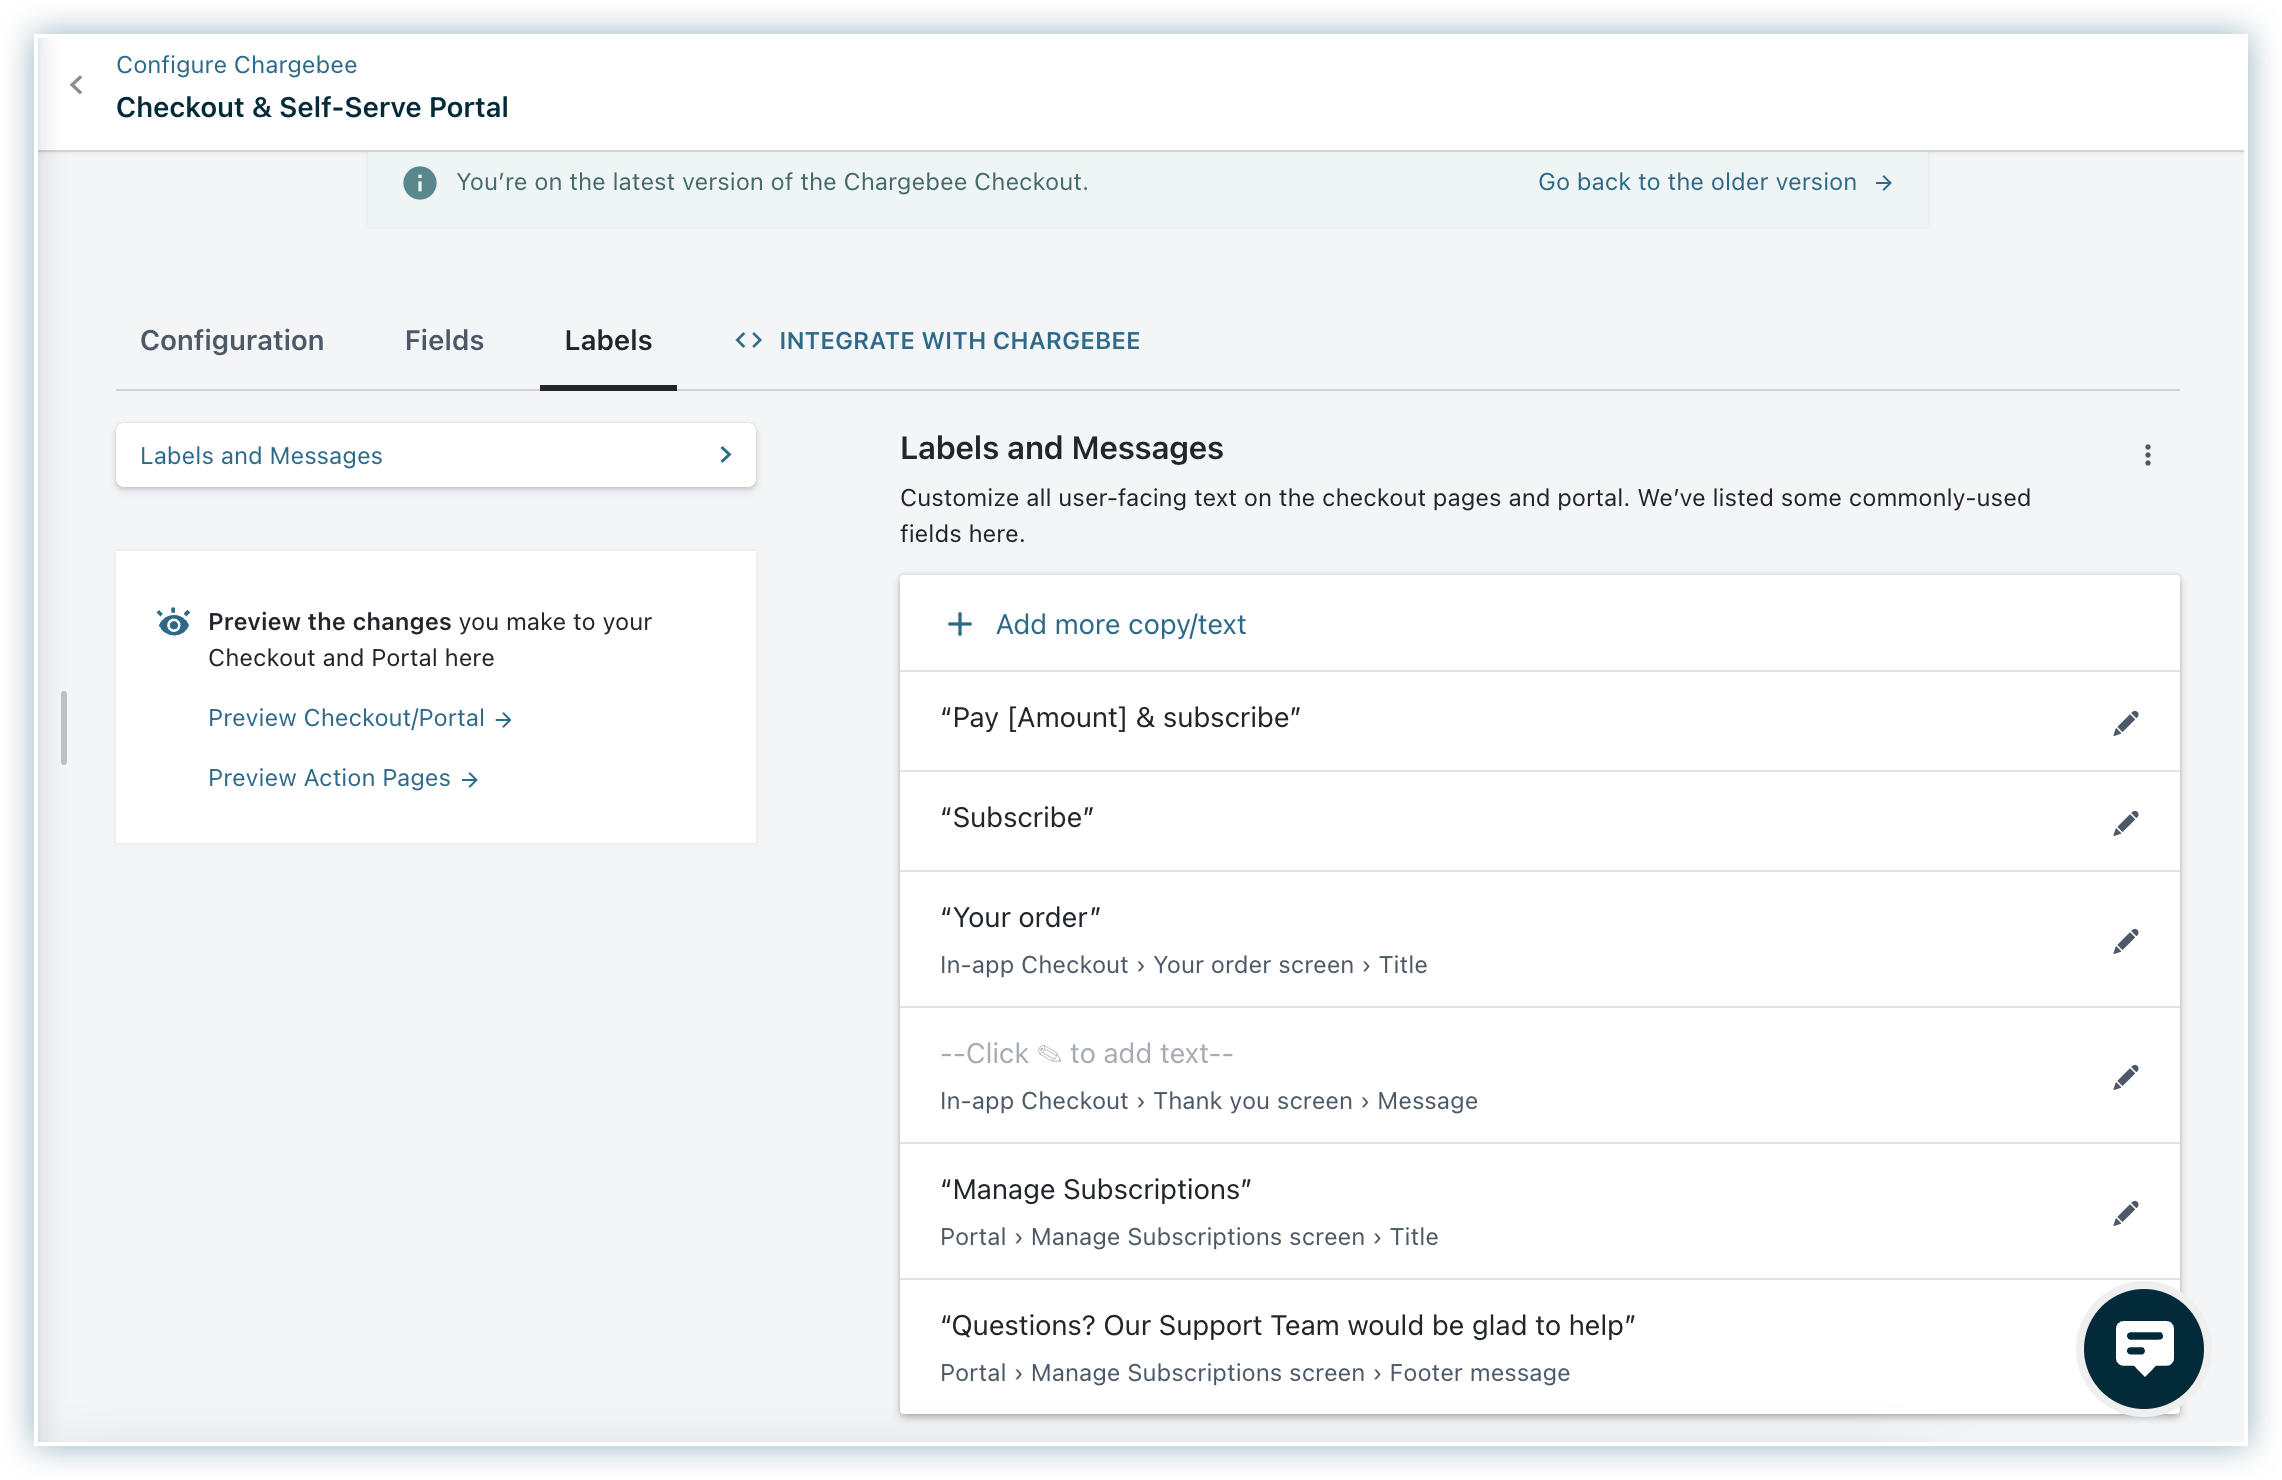
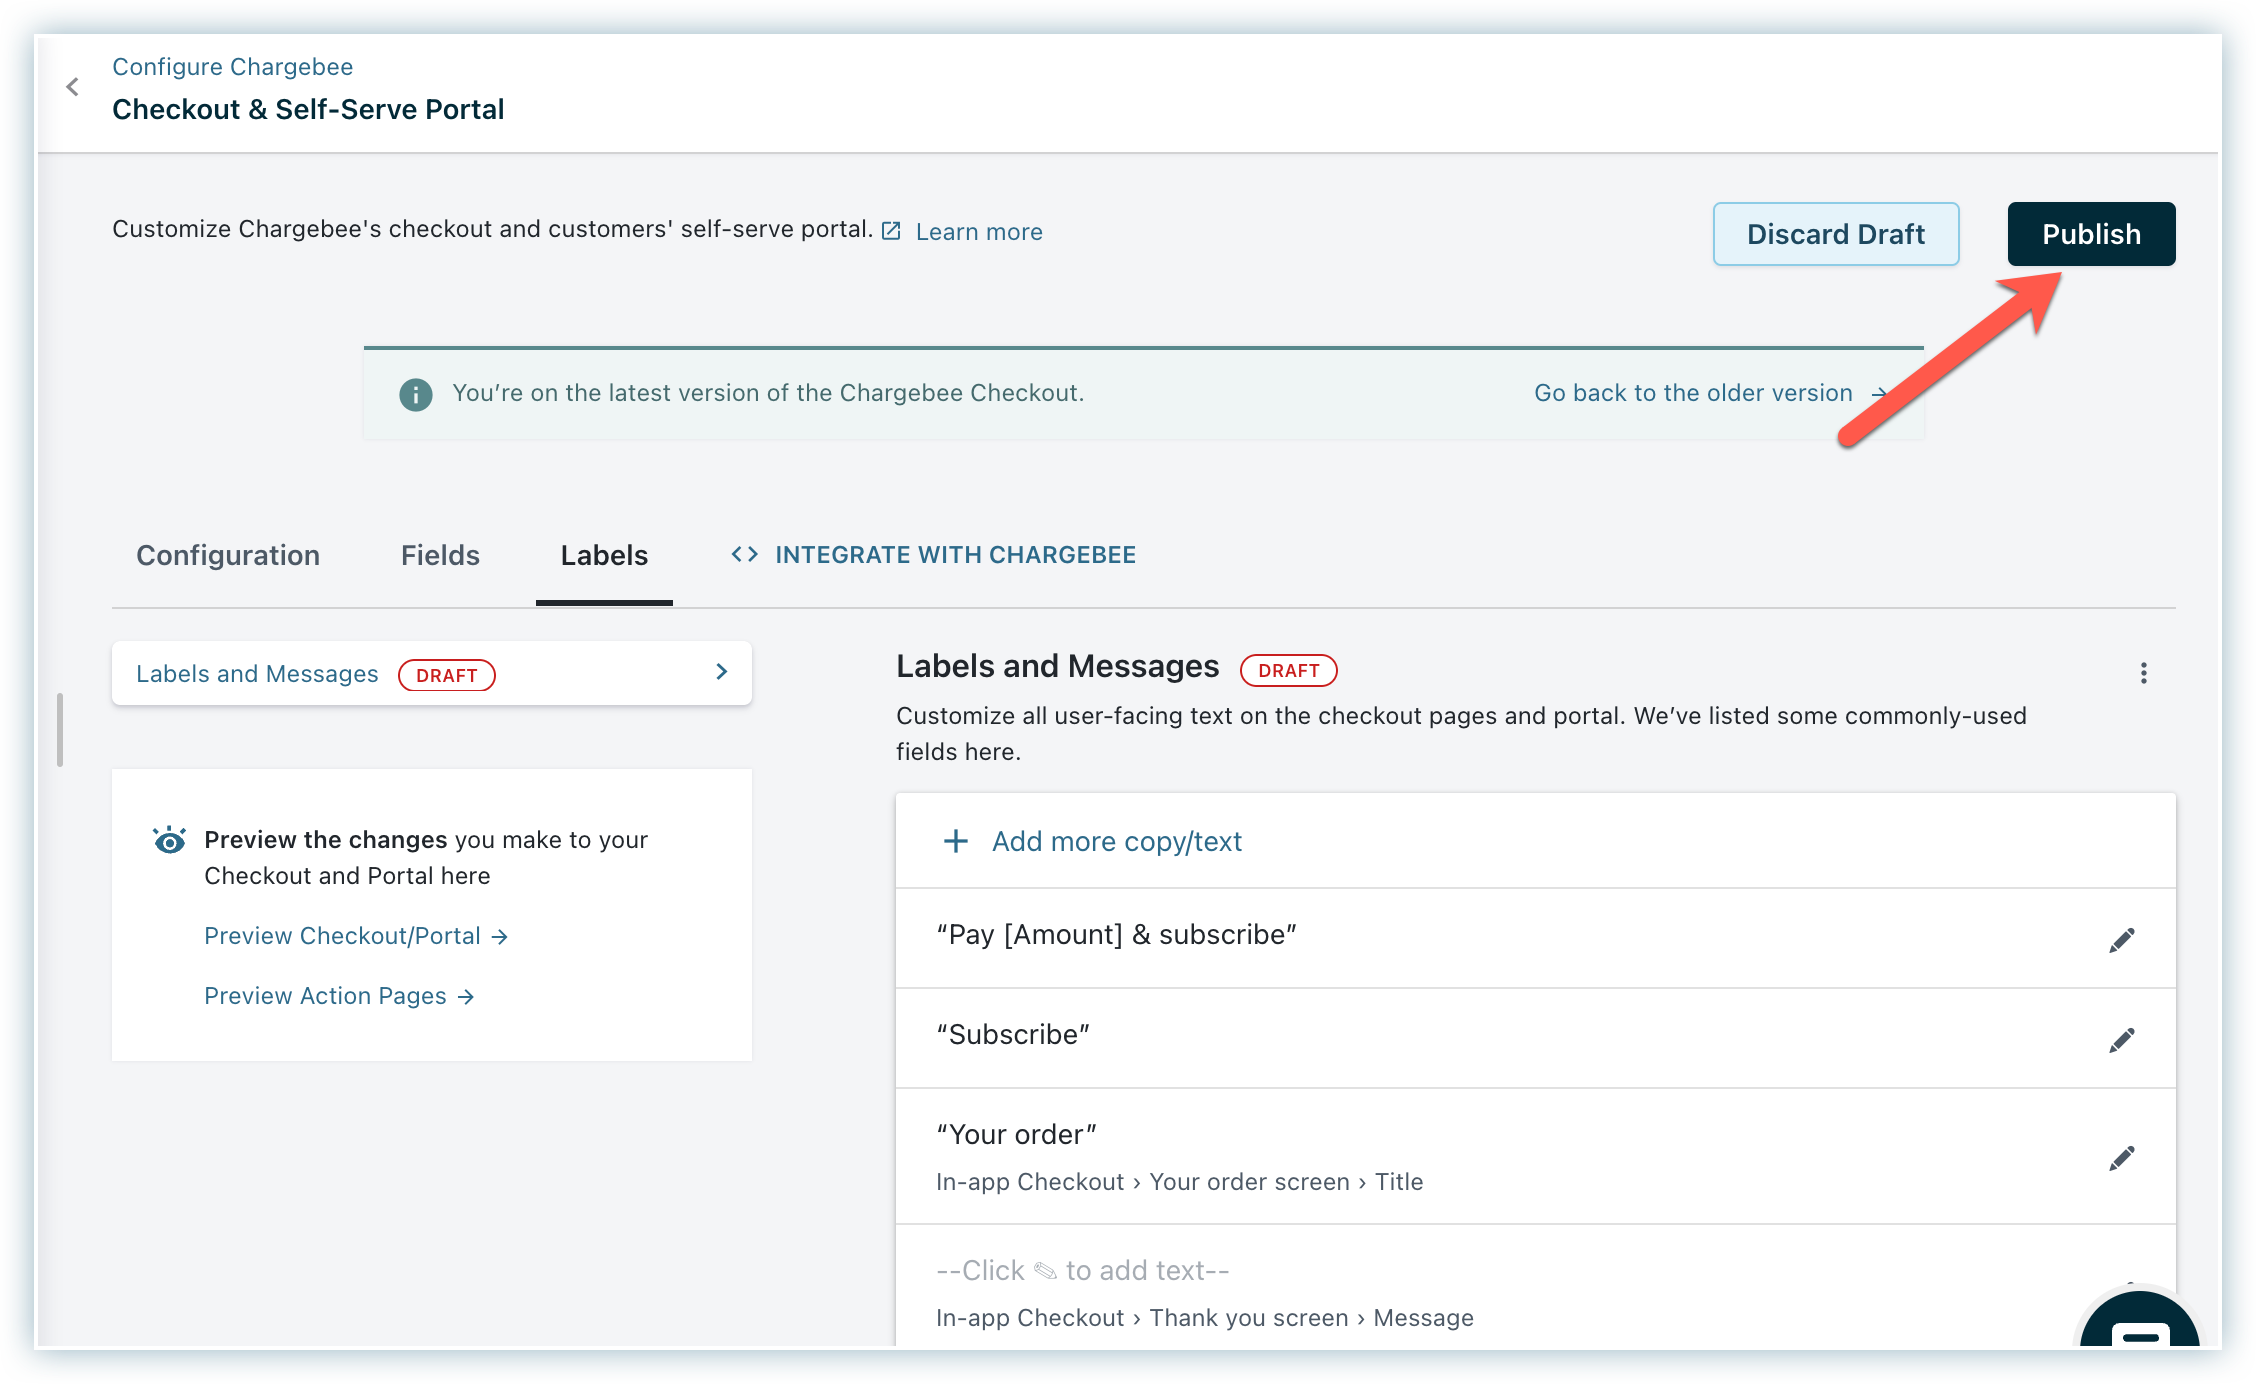
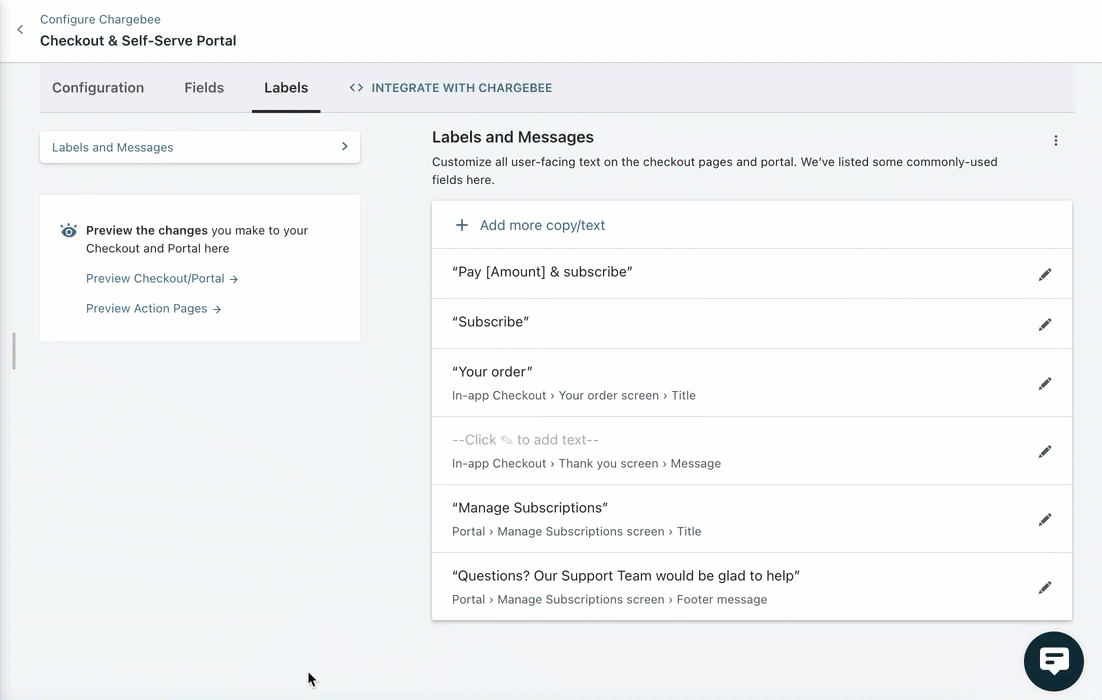
Access labels
Sign in to Chargebee, then go to Settings > Configure Chargebee > Checkout and Self Serve Portal > Labels.
Note
Available checkout labels depend on the layout selected on the Layout tab.
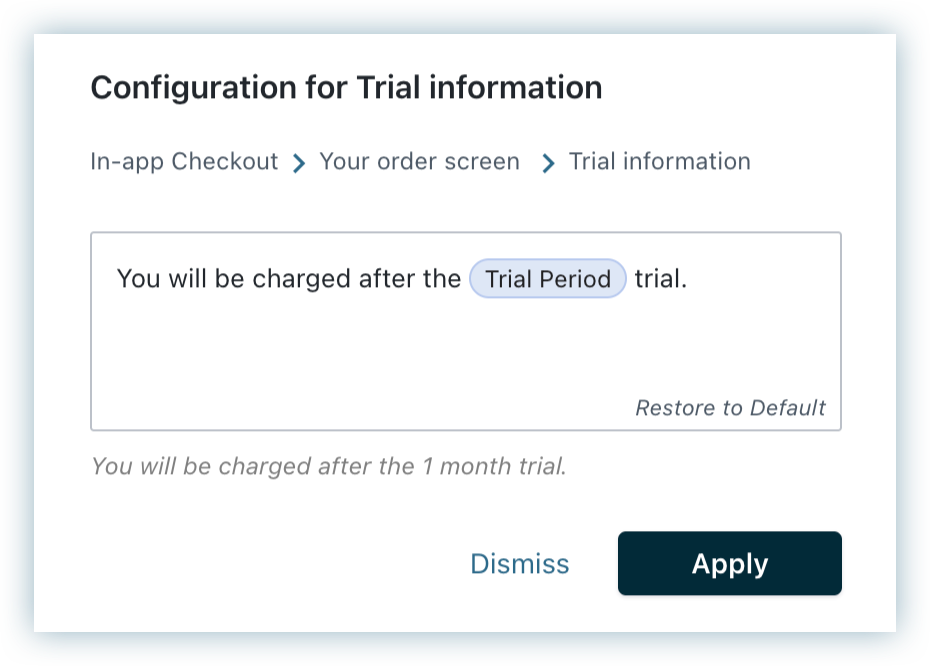
Add a label
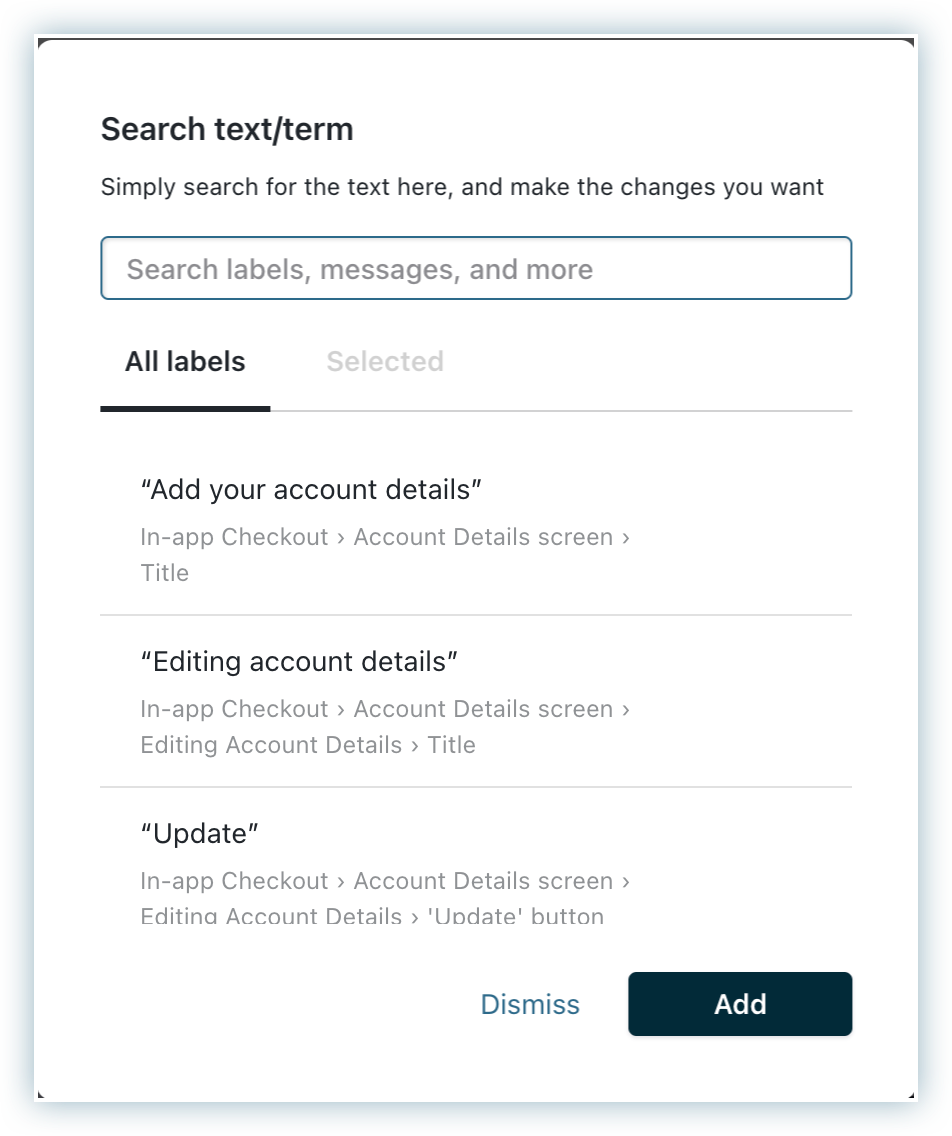
To add a label:
-
Click +Add more copy/text.
-
Search for the required labels in the search box.
-
Click Add.
-
Click Apply.
-
Click Publish.
The label changes are now visible to customers.
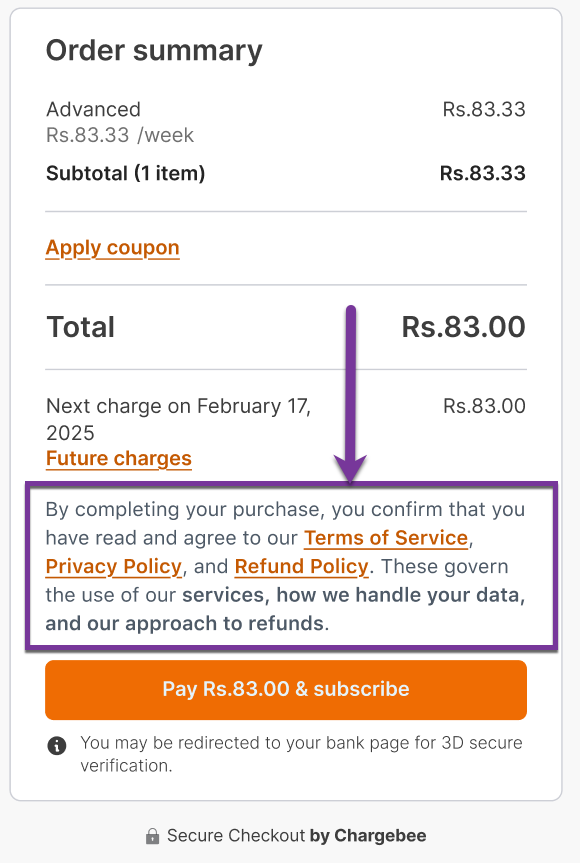
Here's an example of how Checkout labels work:
The illustration below shows adding a note to the payment method screen during checkout. This note will appear for all users on the Payment method screen.
During checkout, the note appears as shown:
Labels for specific scenarios
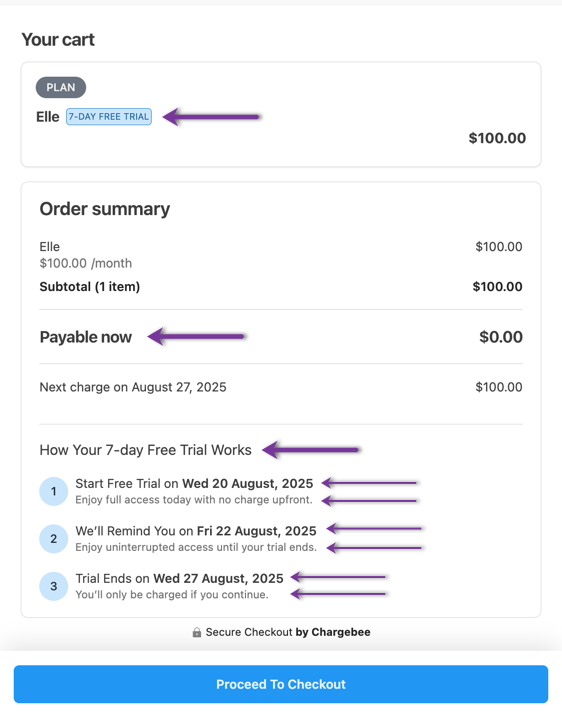
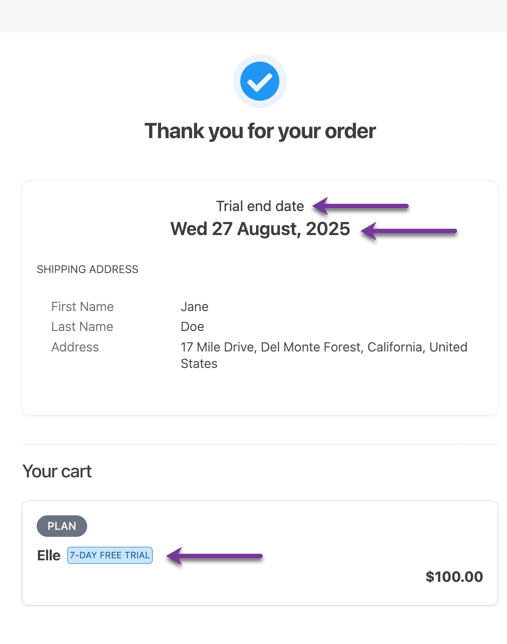
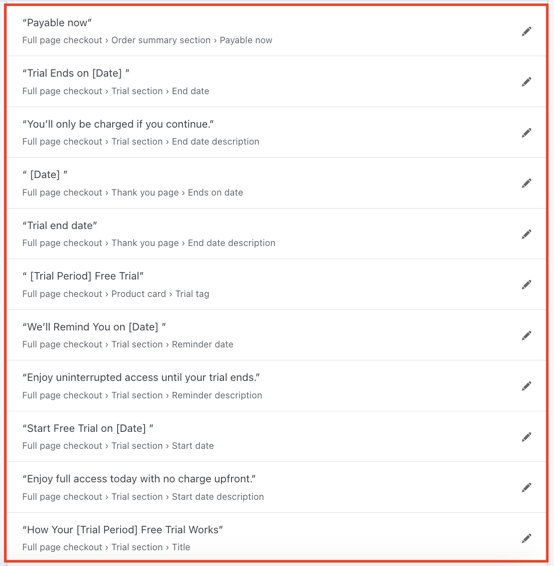
Labels for optimized trial sign-up
When optimized trial sign-up is enabled for Checkout, additional labels are available for customization.
Details
The screenshot below shows the additional labels on the order summary page:
The screenshot below shows the additional labels on the thank-you page:
You can customize them by searching for the label text in the search box while adding the label. See screenshot below for reference:
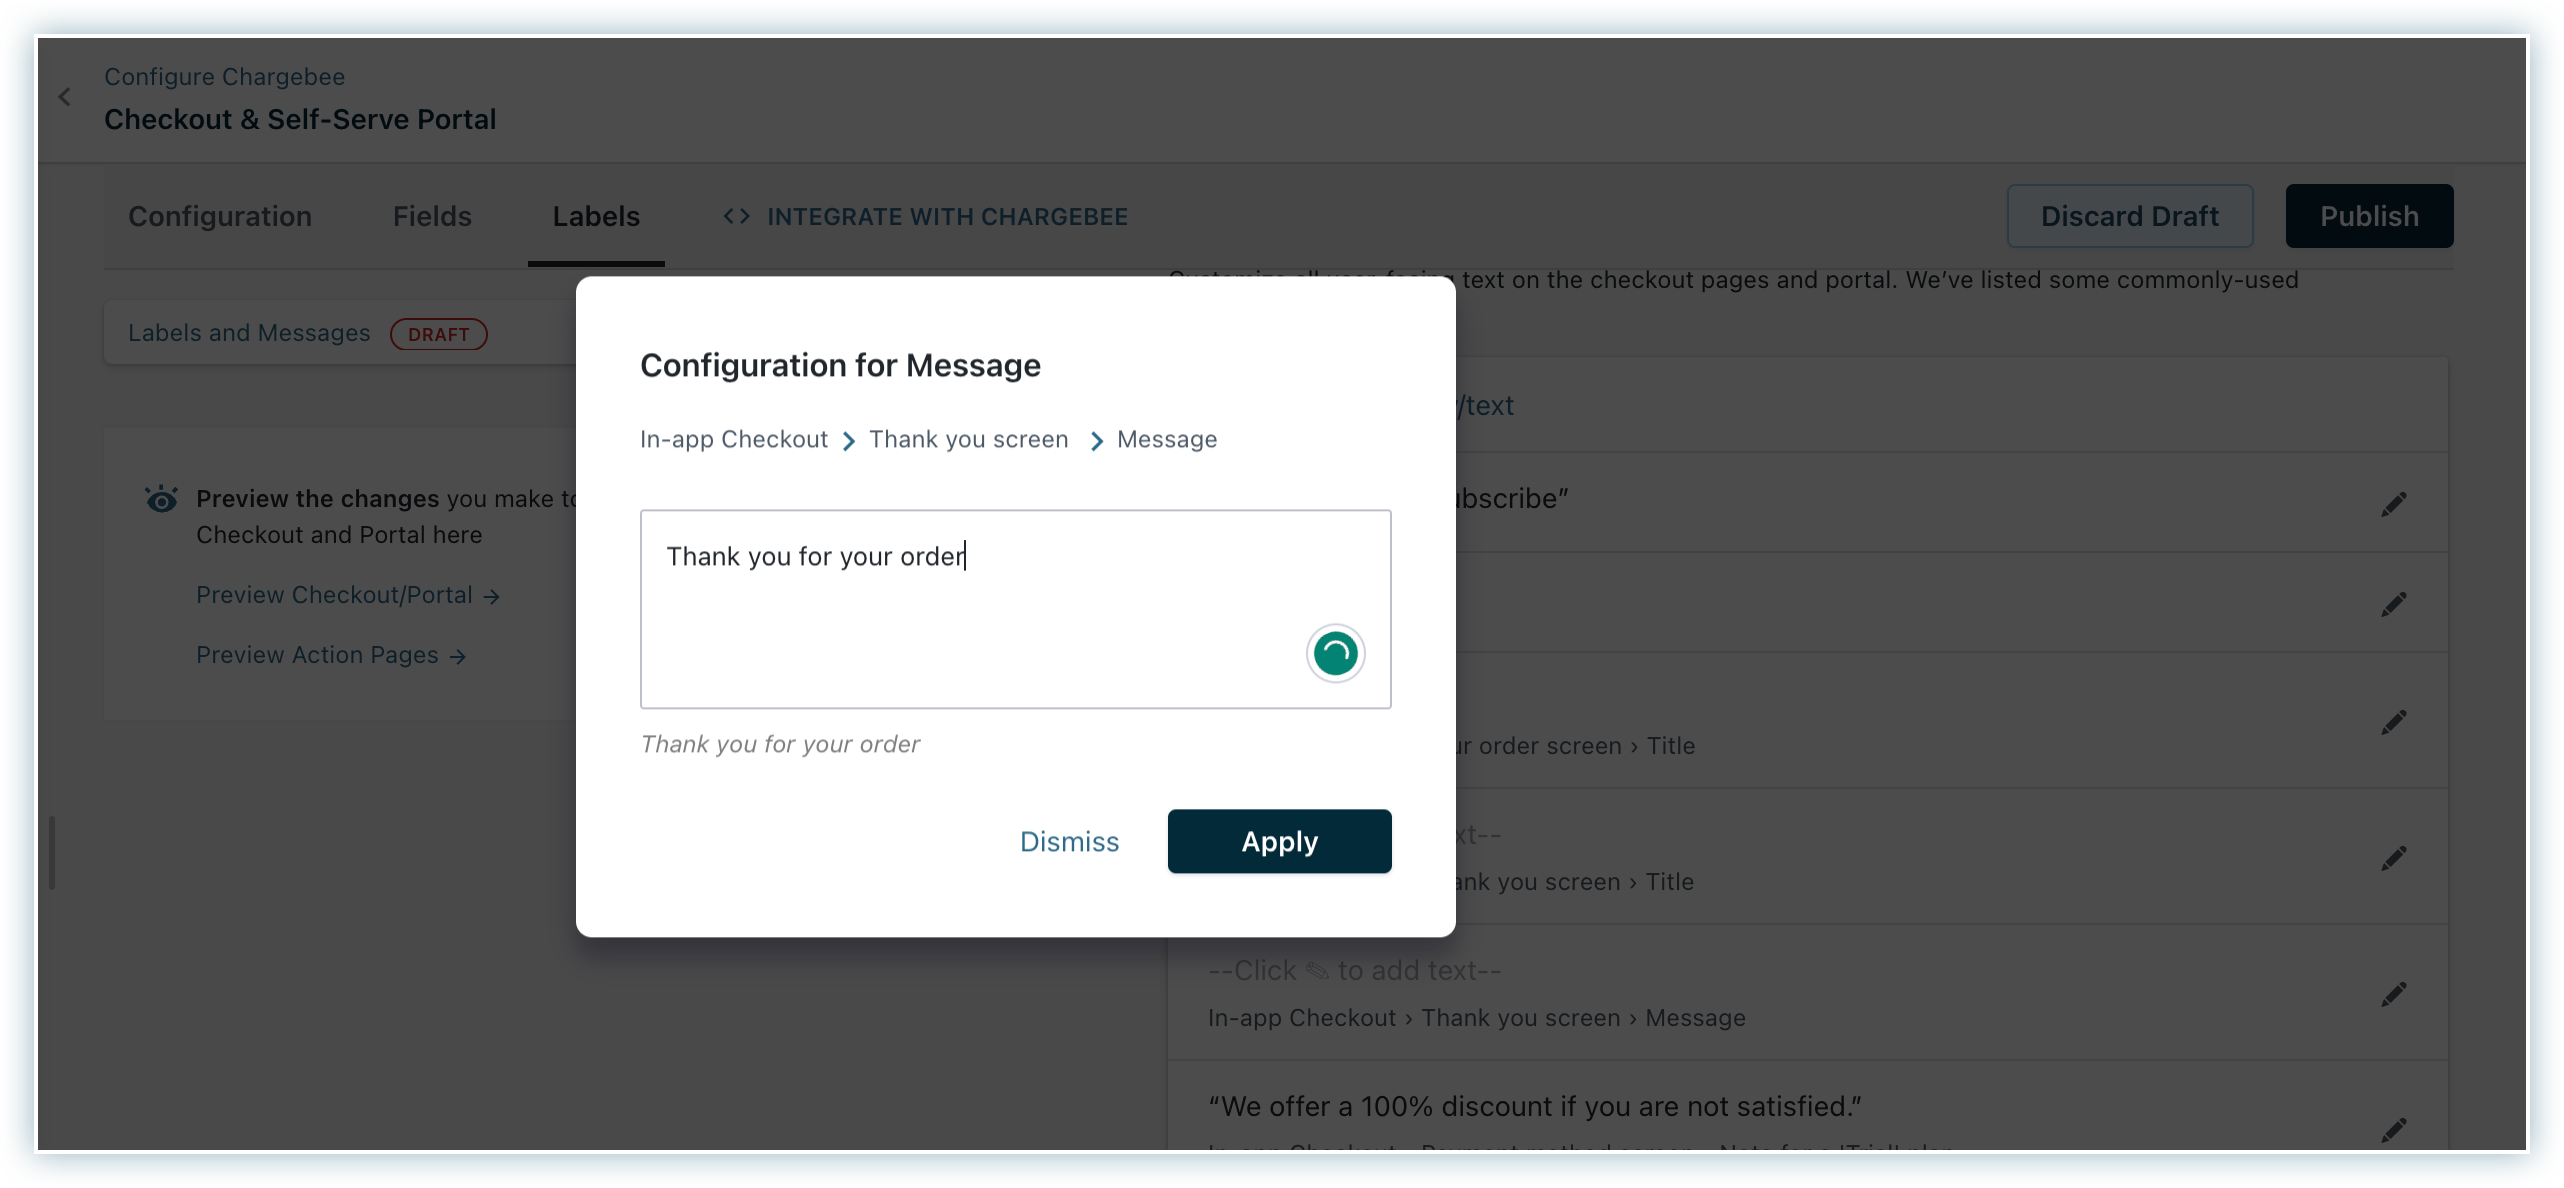
Labels for thank-you page
Set up messages to display after customers complete checkout. Full-page checkout supports both Thank You Title and Thank You Message labels.
Details
To add a Thank You message or title:
- Go to Messages.
- Click Edit and add the message.
- Click Apply.
- Click Publish.
Was this article helpful?