Bulk Operations
You can import and export sizable volumes of your subscription billing data into Chargebee using the Bulk Operations feature. You can also export subscription and product catalog information in an import-friendly format suitable for bulk import operations.
Here are some bulk operations you can perform by uploading information in CSV format.
Caution: Bulk operations are not available while Time Machine is in use.
Available Bulk Operations
You can perform bulk operations for the following Chargebee components:
- Subscriptions
- Customers
- Payment Methods
- Virtual bank accounts
- Promotional credits
- Invoices
- Credit notes
- Orders
- Gifts
- Transactions
- Coupons
- Addresses
- Usages
- Comments
- Thirt party entity mappings
- Tp site users
- Item families
- Items
- Item prices
- Attached Items
- Differential prices
- Features
- Subscription entitlements
- Item entitlements
- Entitlements
- In app subscriptions
- Non subscriptions
- Entitlement overrides
- Purchases
- Medias
- Taxes
- Recorded purchases
You can also use this feature to:
- Import information into Chargebee from another system.
- Check operations performed till date by you and other users and their respective statuses.
Importing Process
- Select the operation you want to perform.
- Download the sample CSV file and replace the content with your data.
- Upload the file after adding your data.
- Chargebee will validate the CSV file. If errors are found, you will be notified. Fix the errors and upload the data file again.
- Chargebee will initially process the first three valid records when you perform a Bulk Operation on your LIVE site. This allows you to review the imported records before importing the rest.
Perform an Operation
To perform a Bulk Operation, navigate to Settings > Import & Export Data > Choose a Bulk Operation in your Chargebee site. Select the operation that you'd like to perform.
Information
We recommend trying out major operations such as creating, importing, or updating subscriptions in your Test Site before actually performing these operations in your LIVE site.
Chargebee will require you to go through a set of steps to complete the selected operation:
Step 1: Prepare the data file
A sample CSV file is available to download and use:

This file contains sample records that you can replace with your own records. Note that the data needs to be added to the sheet in the same format as the sample data. You can use an import-friendly file file with pre-filled information, making it easier to migrate existing subscriptions to Chargebee without format conversion.

Note
- All date/time values filled should be in the yyyy-mm-dd hh:mm:ss format
- The details pertaining to time in the CSV file should follow the same time zone as your Chargebee site.
- The column headers in the CSV should not be edited as the system will look for these fields during data validation (Step 3) and editing them will generate errors.
- While importing item prices in standard currencies, Chargebee divides the specified amount value by 100 to get the original price. However, in the case of zero decimal currencies, the price specified are imported as-is. Let's look at an example. For an item price specified as 100 while importing:
- if the currency is USD, the price imported in Chargebee would be 1 USD.
- if the currency is JPY, the price imported in Chargebee would be 100 JPY.
- When opening the sample CSV file using applications such as MS Excel or OpenOffice Calc, the column type used should be "Text". So ensure that the column data type remains "Text". Changing the column type could possibly affect data in columns with numbers such as dates, IDs, address, and phone numbers.
Once you've added all the information and the data file is ready, upload it. Contact support if you need help at any step of the operation.
Step 2: Upload CSV
Drag and drop your data file into the web interface or upload it:
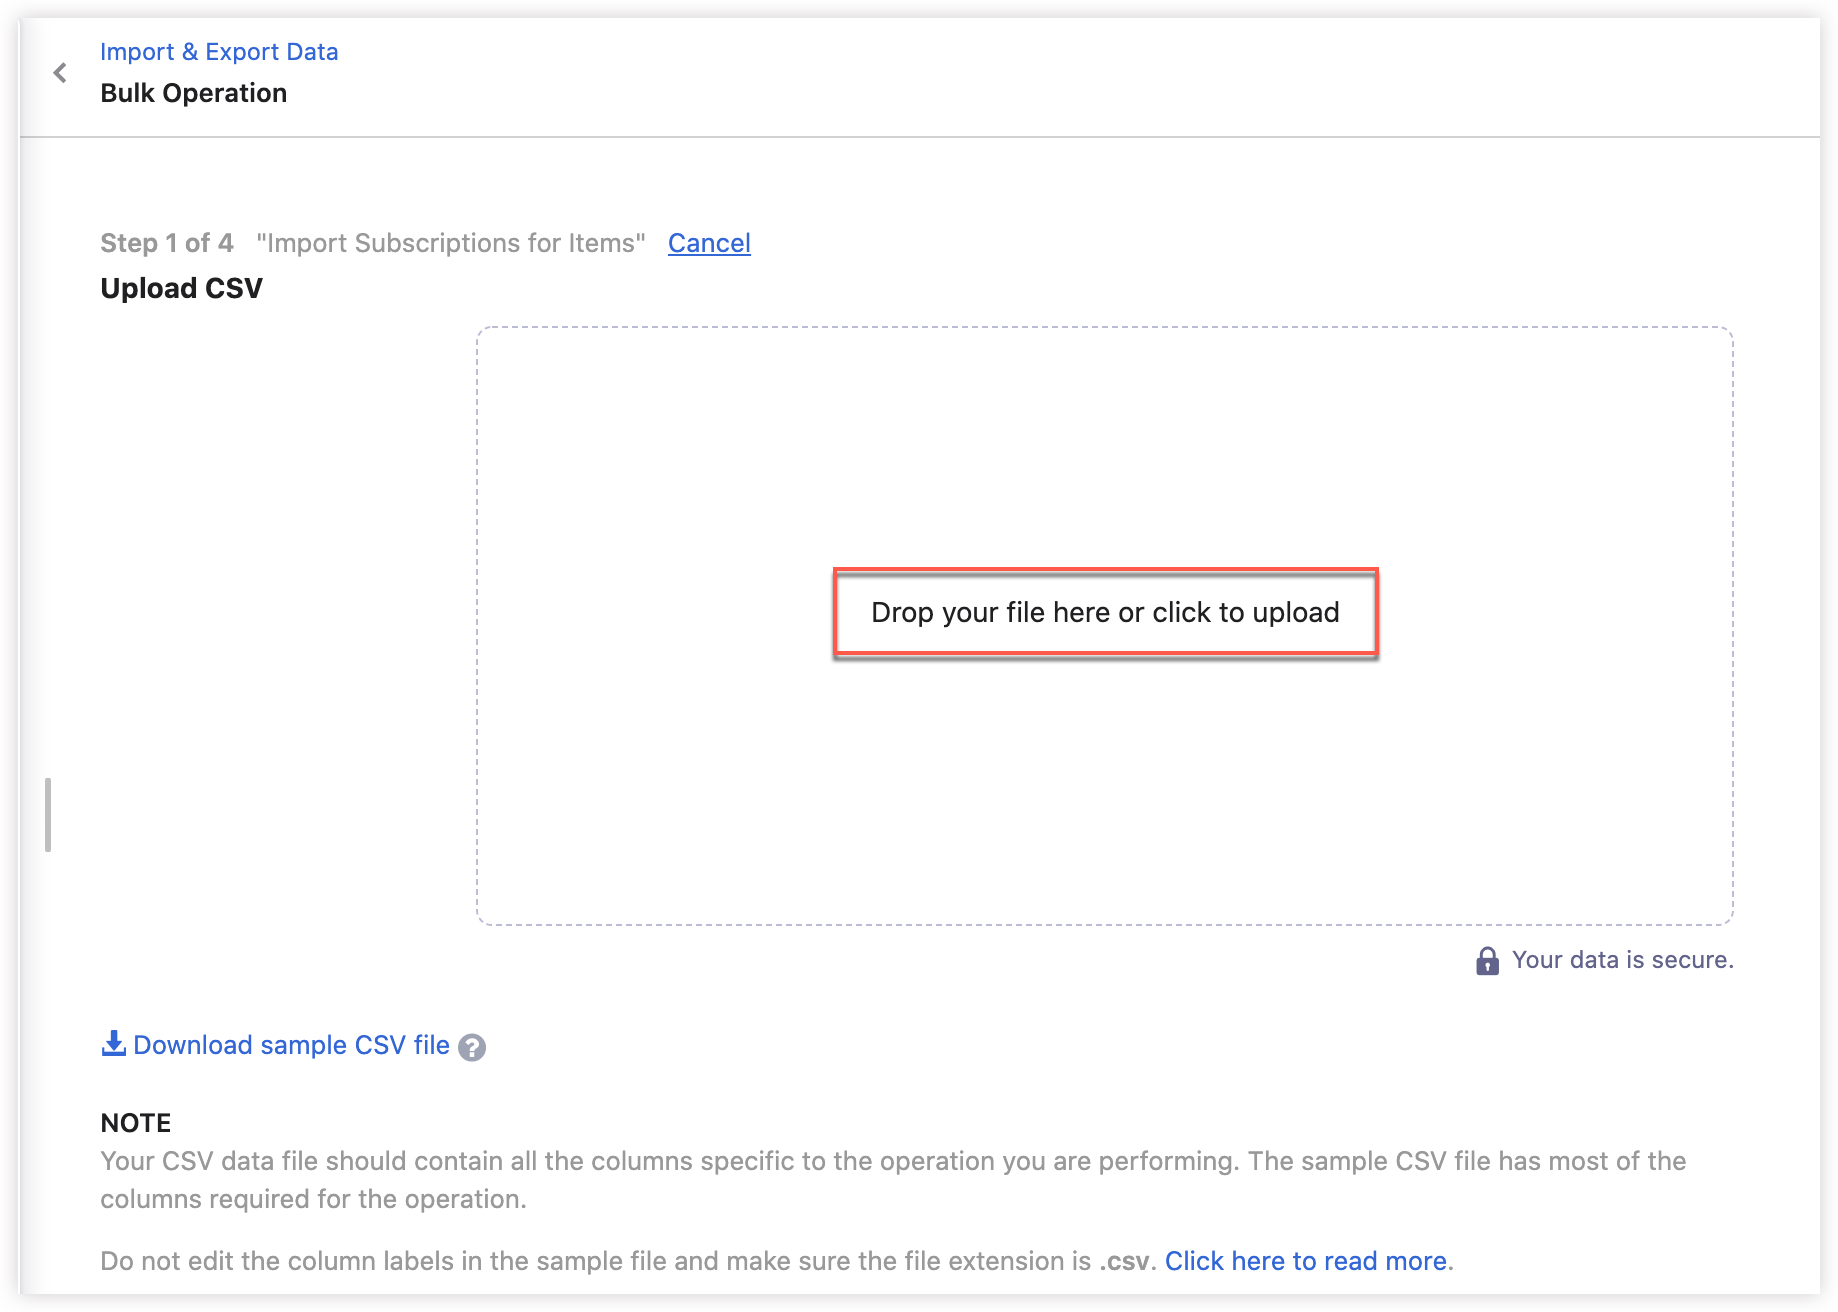
Warning
For the Update Subscriptions bulk operation, make sure to remove canceled subscriptions from the CSV before uploading it. Not doing so will result in reactivating the canceled subscriptions.
Step 3: Configure your preferences
Specify your preferences on how Chargebee will perform certain actions when the Bulk Operation is underway:
- Disable Webhooks: If you're an API user, you might be using Chargebee's webhooks to notify your system of any events that occur in your Chargebee account through the webhook URL.
During a Bulk Operation, events will be generated and if you want to keep your system in sync with Chargebee, you shouldn't disable the webhooks. But if you do not want the corresponding webhooks to be sent to your system, turn them off.
- Disable Email Notifications: If you've enabled Email Notifications in Chargebee and you are performing an operation (such as creating new subscriptions) that could trigger one of the enabled email notifications, your customers might receive an email notification.
Note
We recommend that you check this option so your customers do not accidentally get an email.
- Advanced Transformations: If your data file is in a format that is different from the format provided in Chargebee's sample CSV file. And if you would like to transform it to the recommended format with minimal effort, use this option. Contact support and we will provide you with the JSON code that you need to paste in Advanced Transformations text box.

Once you have configured your preferences, click Continue to validate the uploaded CSV file.
Note
For operations such as creating new Subscriptions or Customers, if there are email addresses present, the addresses will be masked to avoid accidentally emailing customers. This is done only on your Test site. When the operation is performed on the live site, the correct email addresses will be used.

The validation time depends on the number of records that need to be processed. During validation, the most recently found errors will be listed as shown below:
Once the validation is complete, you will be notified via email.
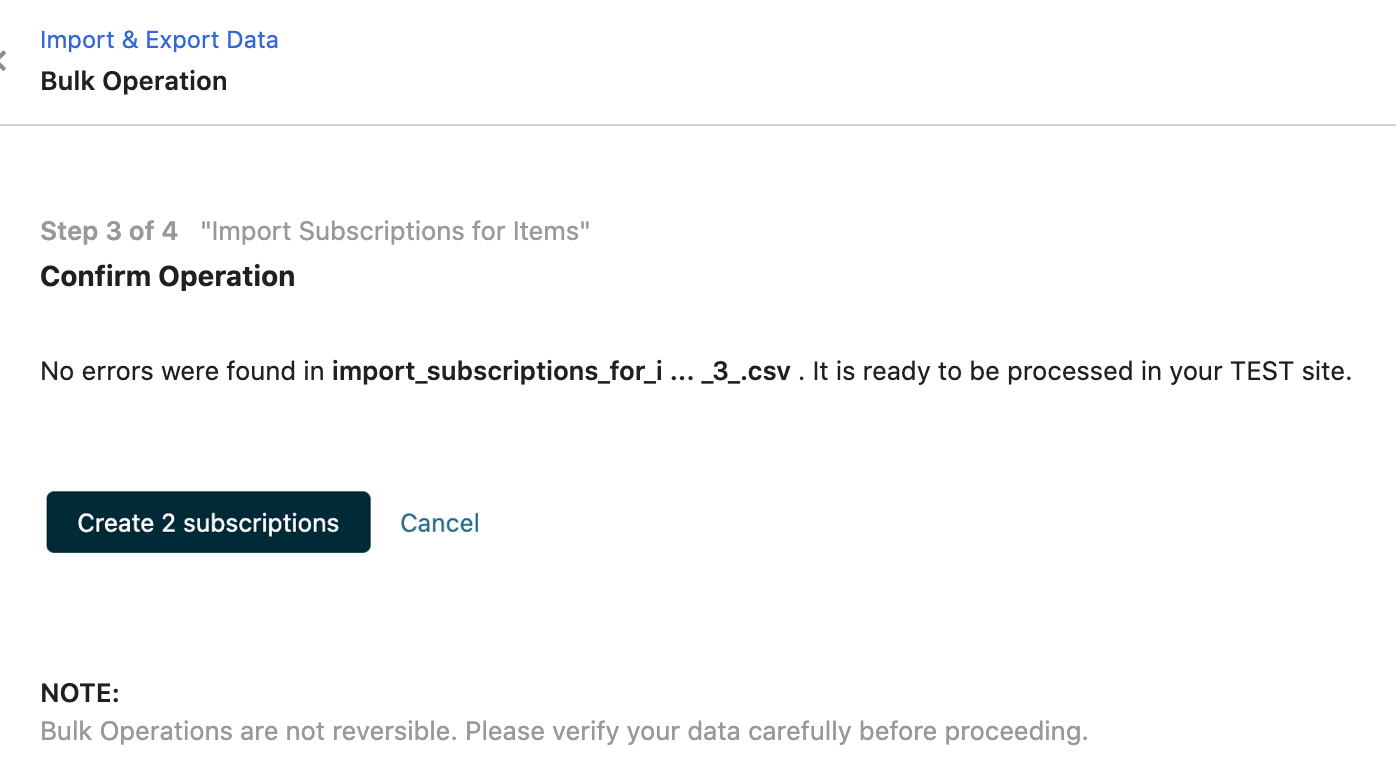
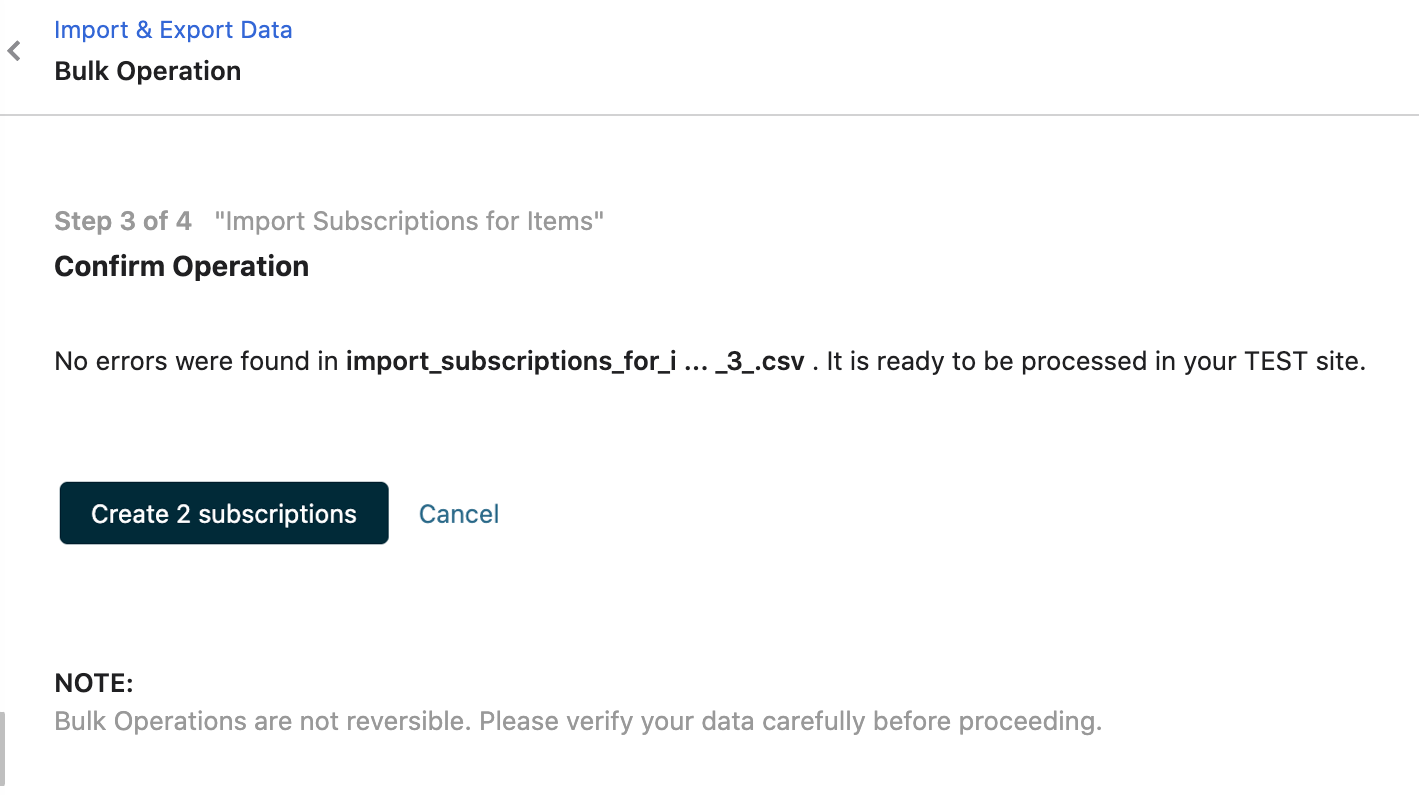
Step 4: Confirm Operation
Review the results of the validation:
If Chargebee does not find any errors, proceed with the operation. When doing this in your test site, you will have the option to wipe out all the existing Subscription data before performing the operation.
Note
Chargebee will carry out another check for errors in the file during the final step of the operation.
If there are errors in the data file, you could either choose to fix the errors and upload another data file or skip the rows with errors and continue with the operation.
Click How do I fix this? to view the last 10 errors.
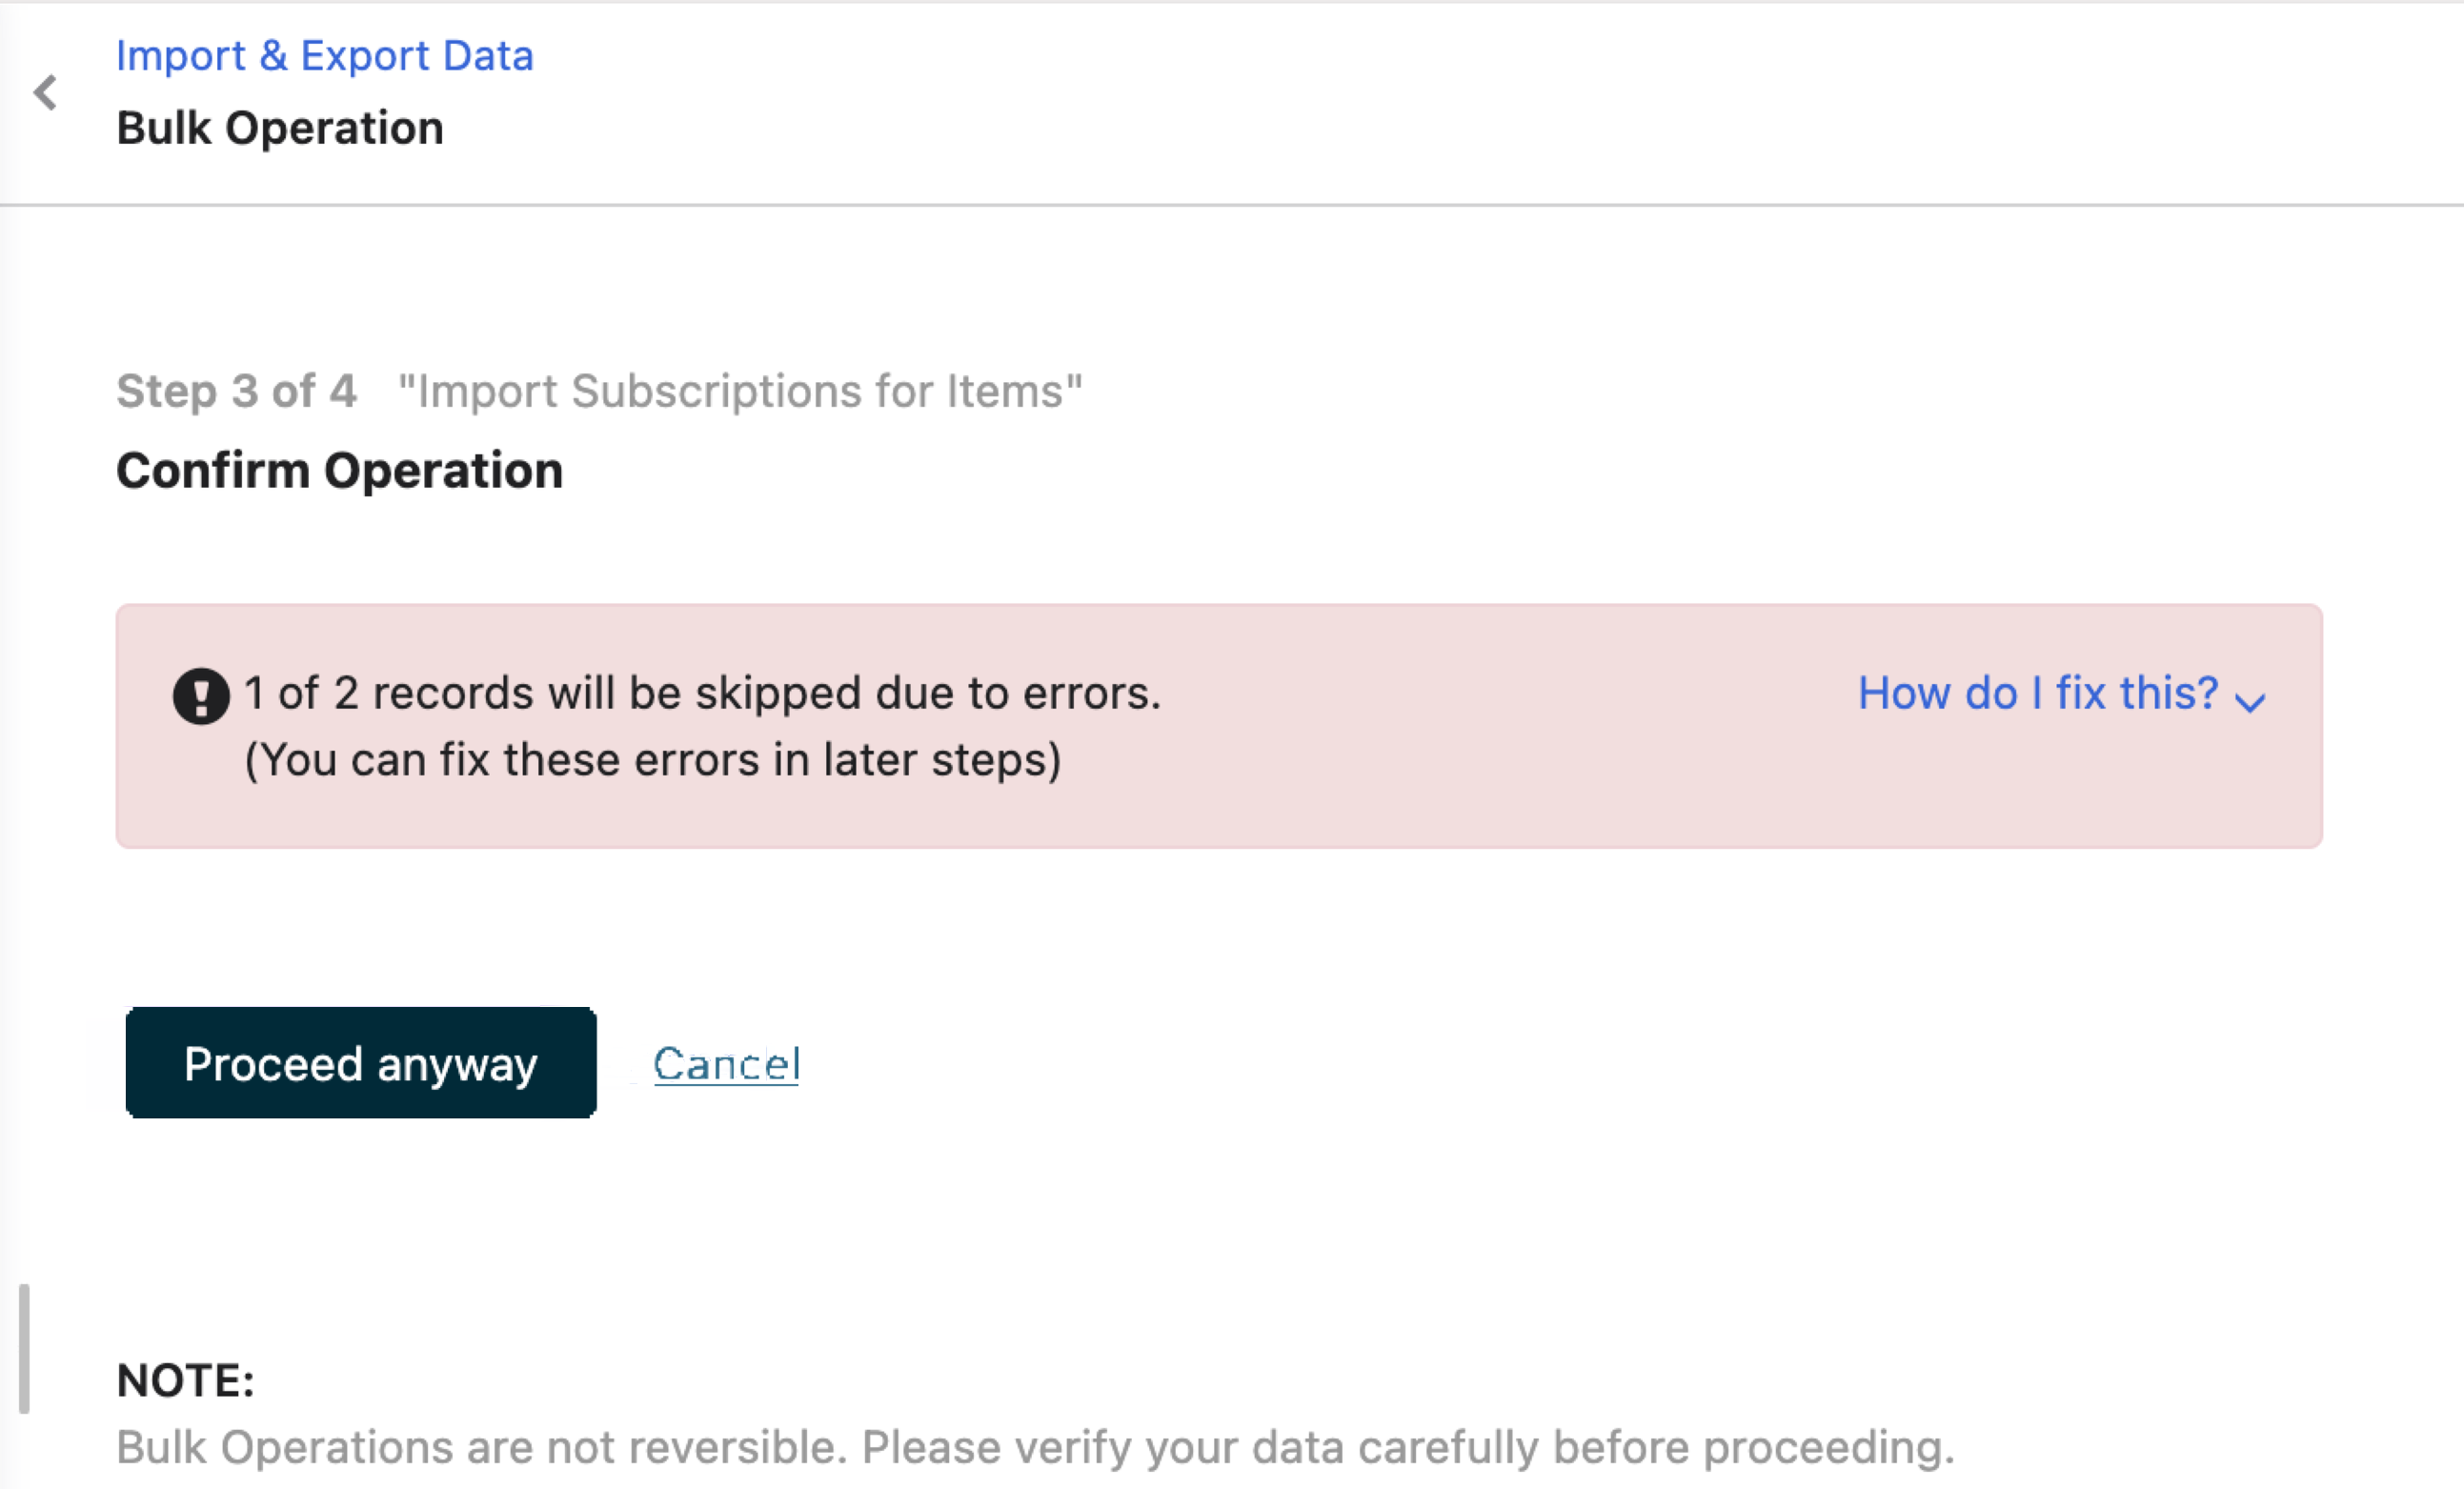
This section will also provide you with the options to download the validated file and to upload a corrected file.
Validated File: The validated CSV file will have an additional column (cb_validation_errors) added at the end of the sheet. This will contain details of the errors for the rows with issues in them.

The error content will indicate the column name(s), value(s) present, and what the errors are.
Error Parameters
paramName - column header name paramValue - value present in the cell columnReferenceHeader - column label errors - error message
Sample Error
[\{"paramName":"subscription[plan_id]","paramValue":"gold_plan","columnReferenceHeader":"B","errors":["The gold_plan referenced in parameter subscription[plan_id] is not present "]}]
In this error, subscription[plan_id] is the column header name and the value in the cell is gold_plan and this is in column B. The second part of the error message says that the plan id specified is not present. To fix this, edit the cell and enter the correct plan id.
Similarly, check all the rows that have errors in them and correct them. After you've corrected all the errors, save the file and upload it again. This will take you to Step 2 and you can resume the operation.
Step 5: Processing
This is the final step where the data file is validated again to ensure a smooth import and the operation is performed. The completion time depends on the number of records that need to be processed. You could go to a different tab and come back to this page later.
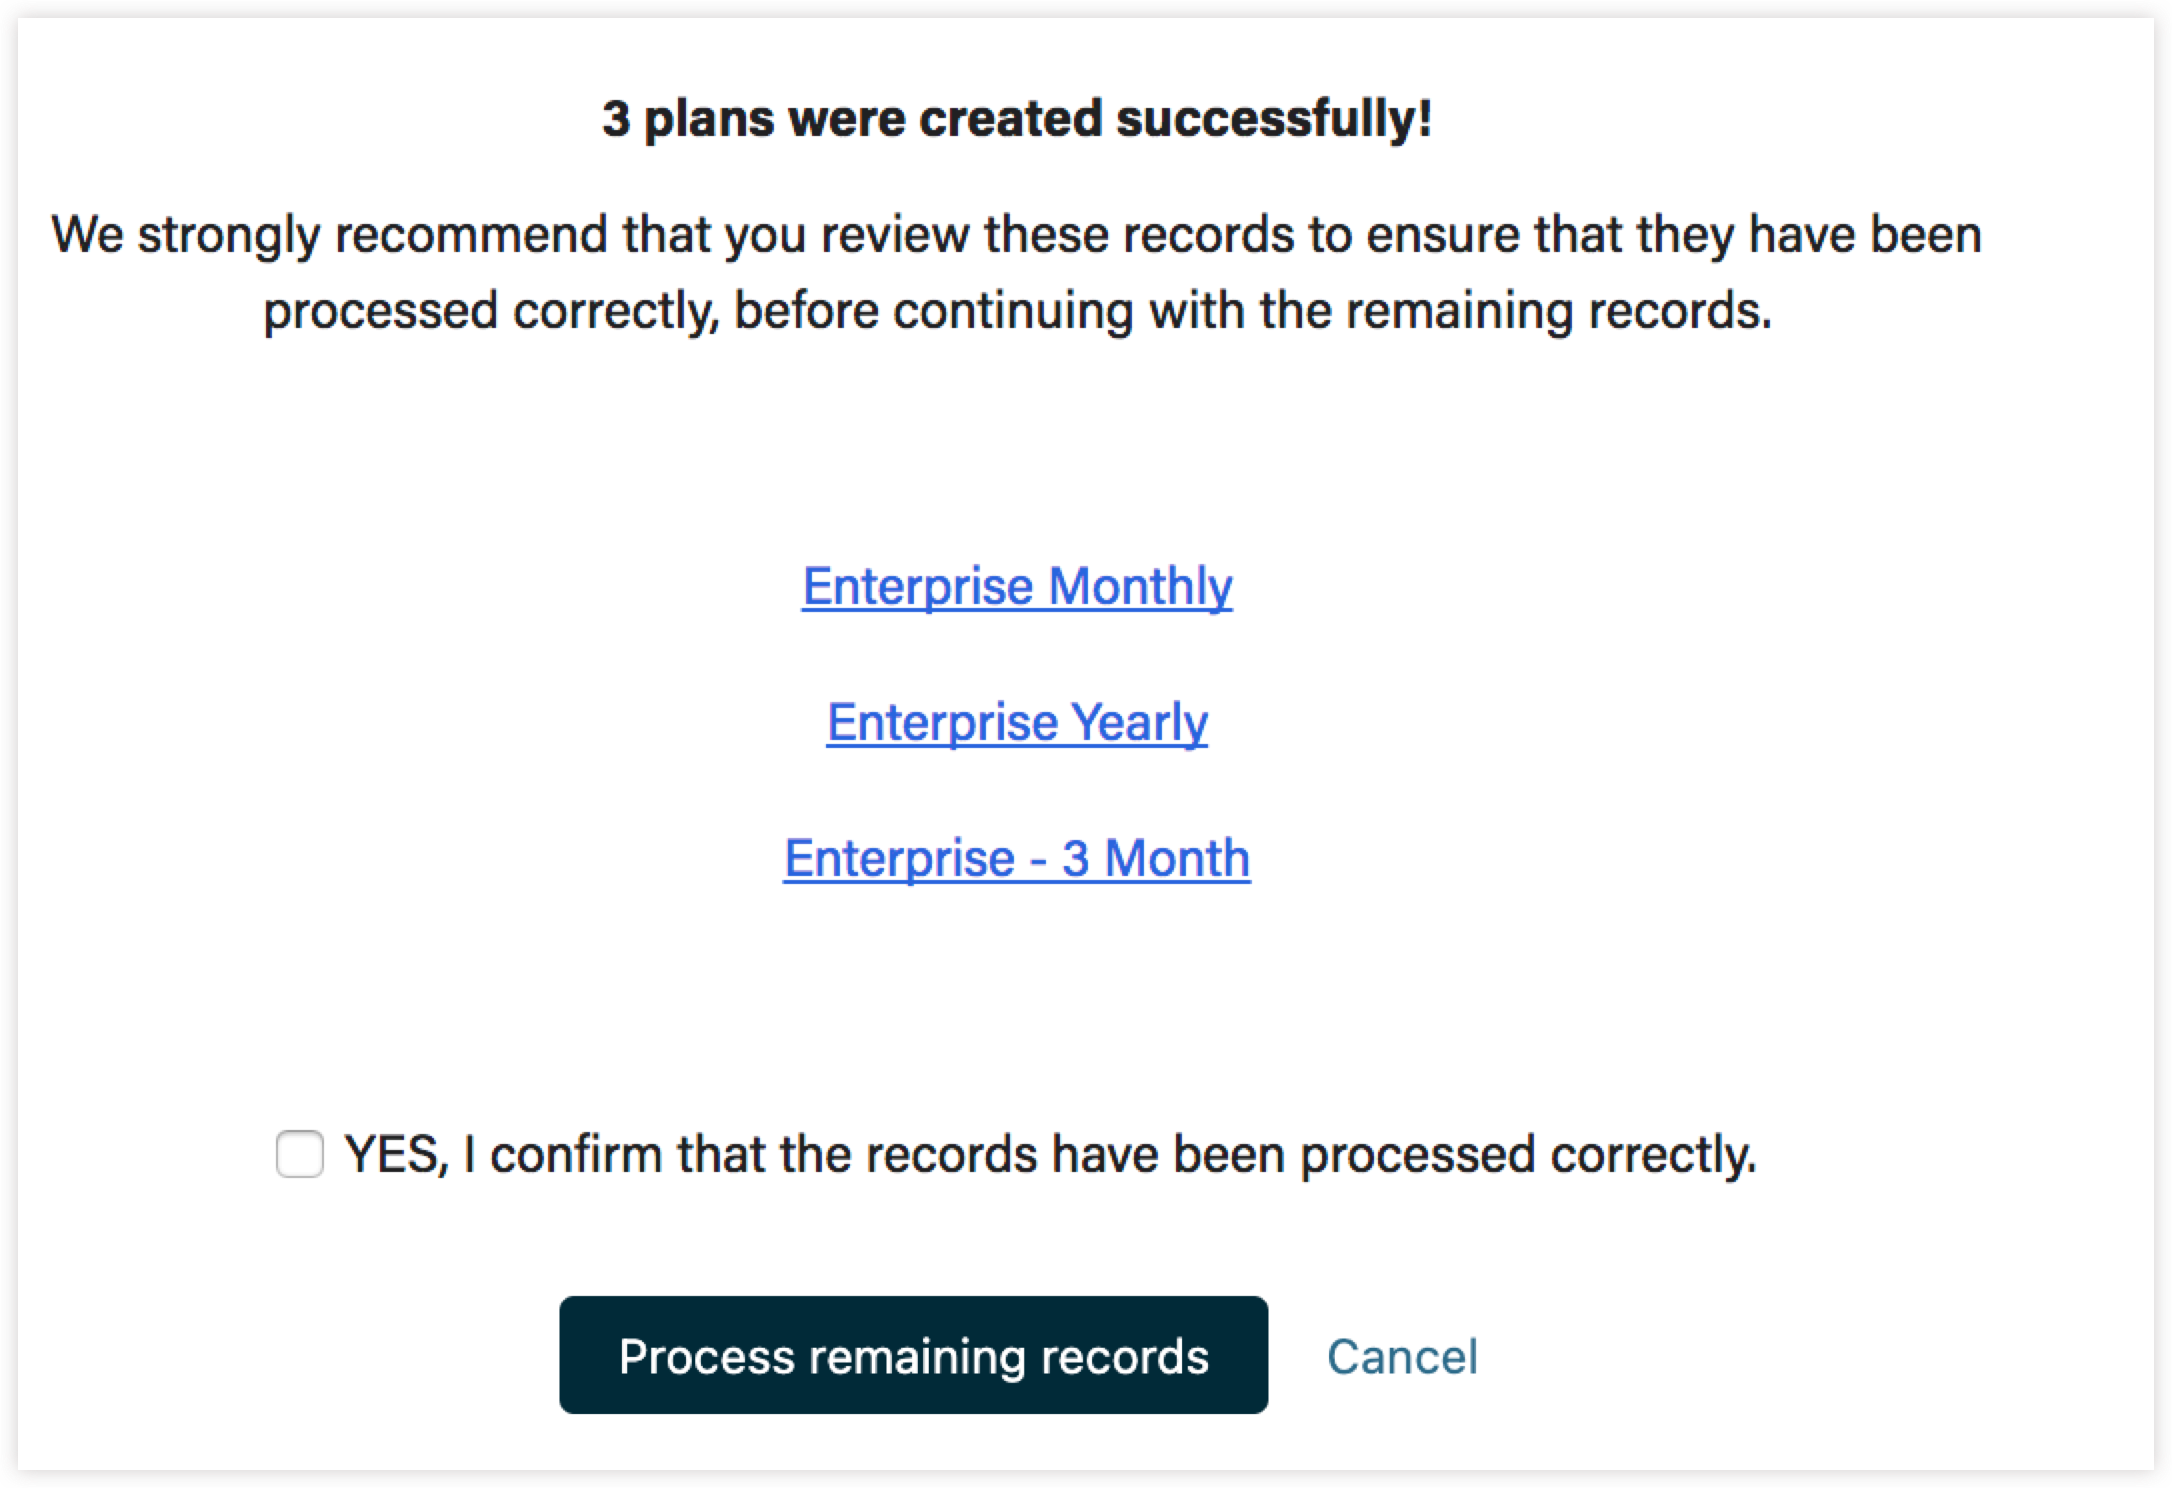
If you're performing a Bulk Operation in your TEST site, all the successfully validated records will be processed. However, if you're doing it in your LIVE site, only the first three valid records will be processed. This is to ensure that you can review the data once before the remaining records are processed.
Click the records to view the imported data. For example, if you have imported subscriptions, clicking the records would display the Subscription details page for that record. Once you're ready, check the option 'YES, I confirm that the records have been processed correctly' and click on Process remaining records.
Once the operation is complete, a success message will be displayed as shown:

You will also be notified via email.
However, if there are errors during this operation, you will find the following screen where you can fix them in the Chargebee app.
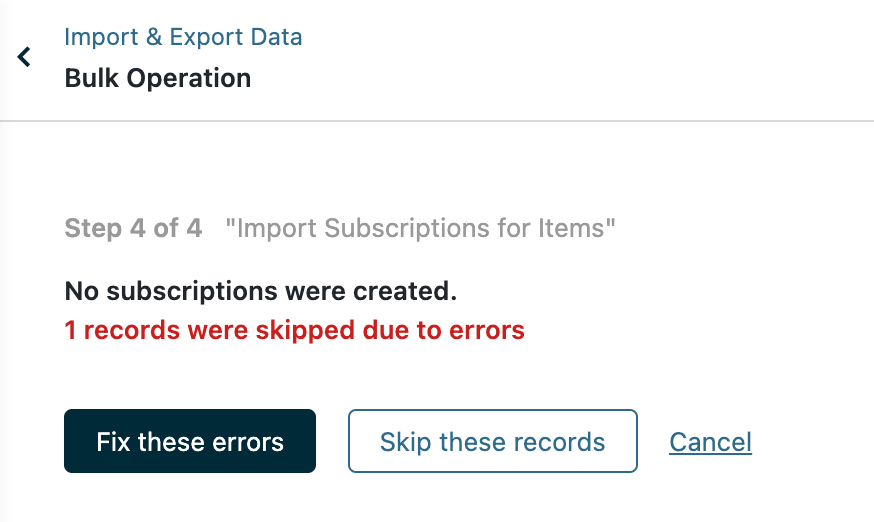
Click ‘Fix these errors' and the next screen is where you can make your corrections.
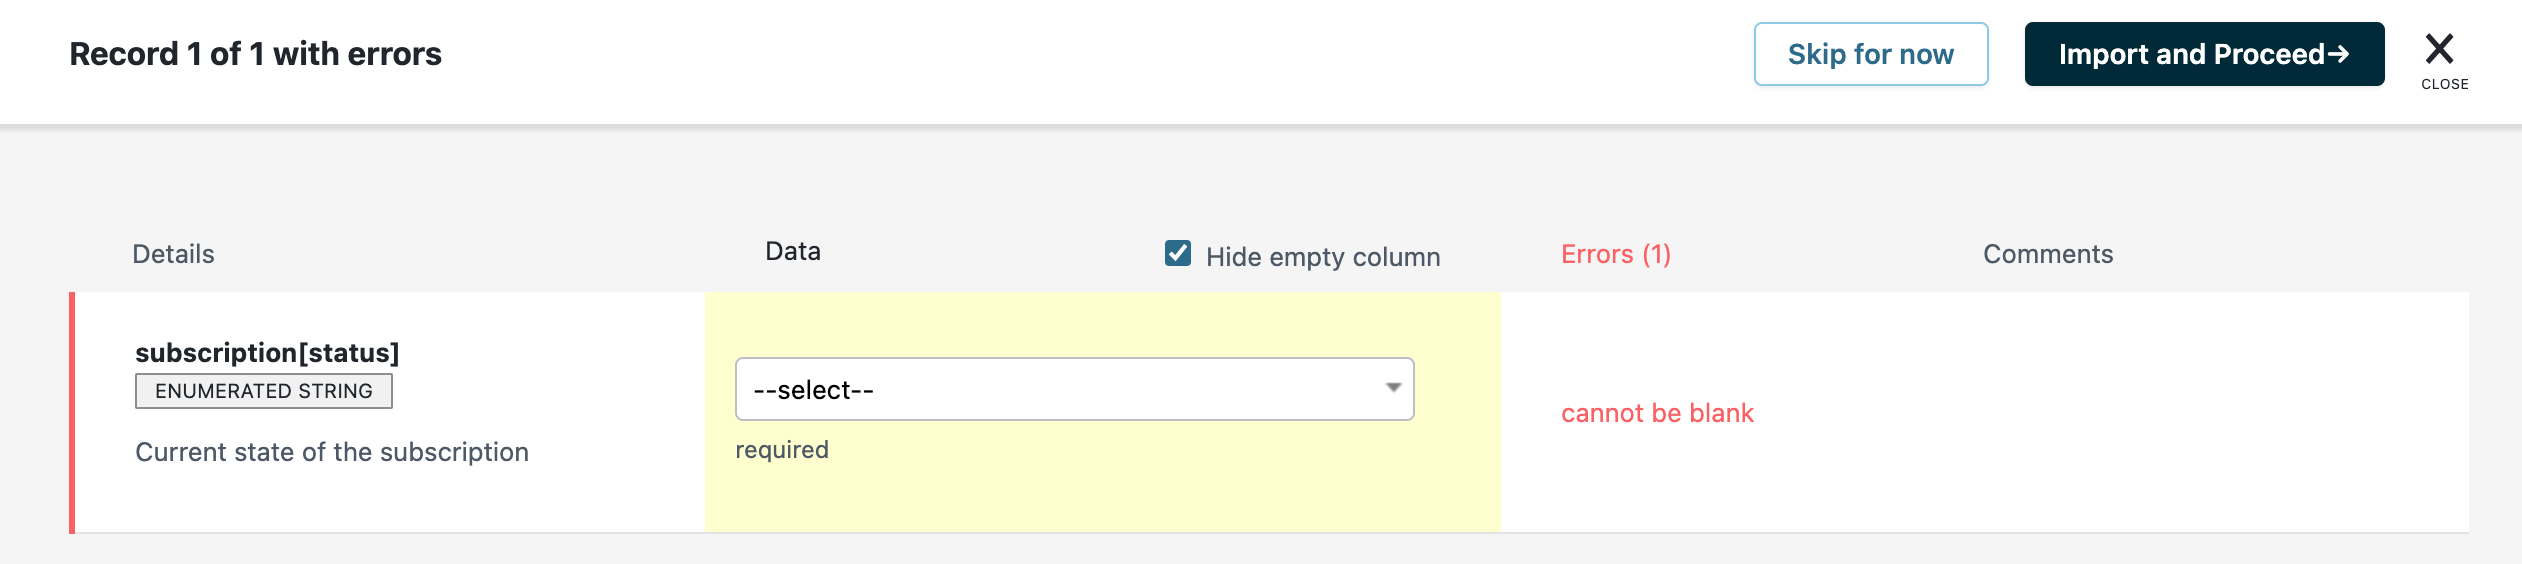
If there are too many errors, you can download a data file listing both processed rows and those with errors.
To download the file, close the screen and hit Skip these records > Show errors > Download
When you download the file and open it, there will be 2 additional columns (cb_validation_errors and cb_operation_status) at the end of the sheet, containing details of the rows having errors and details of rows that were completed/skipped. You can correct the rows with the errors and repeat the operation from Step 1.
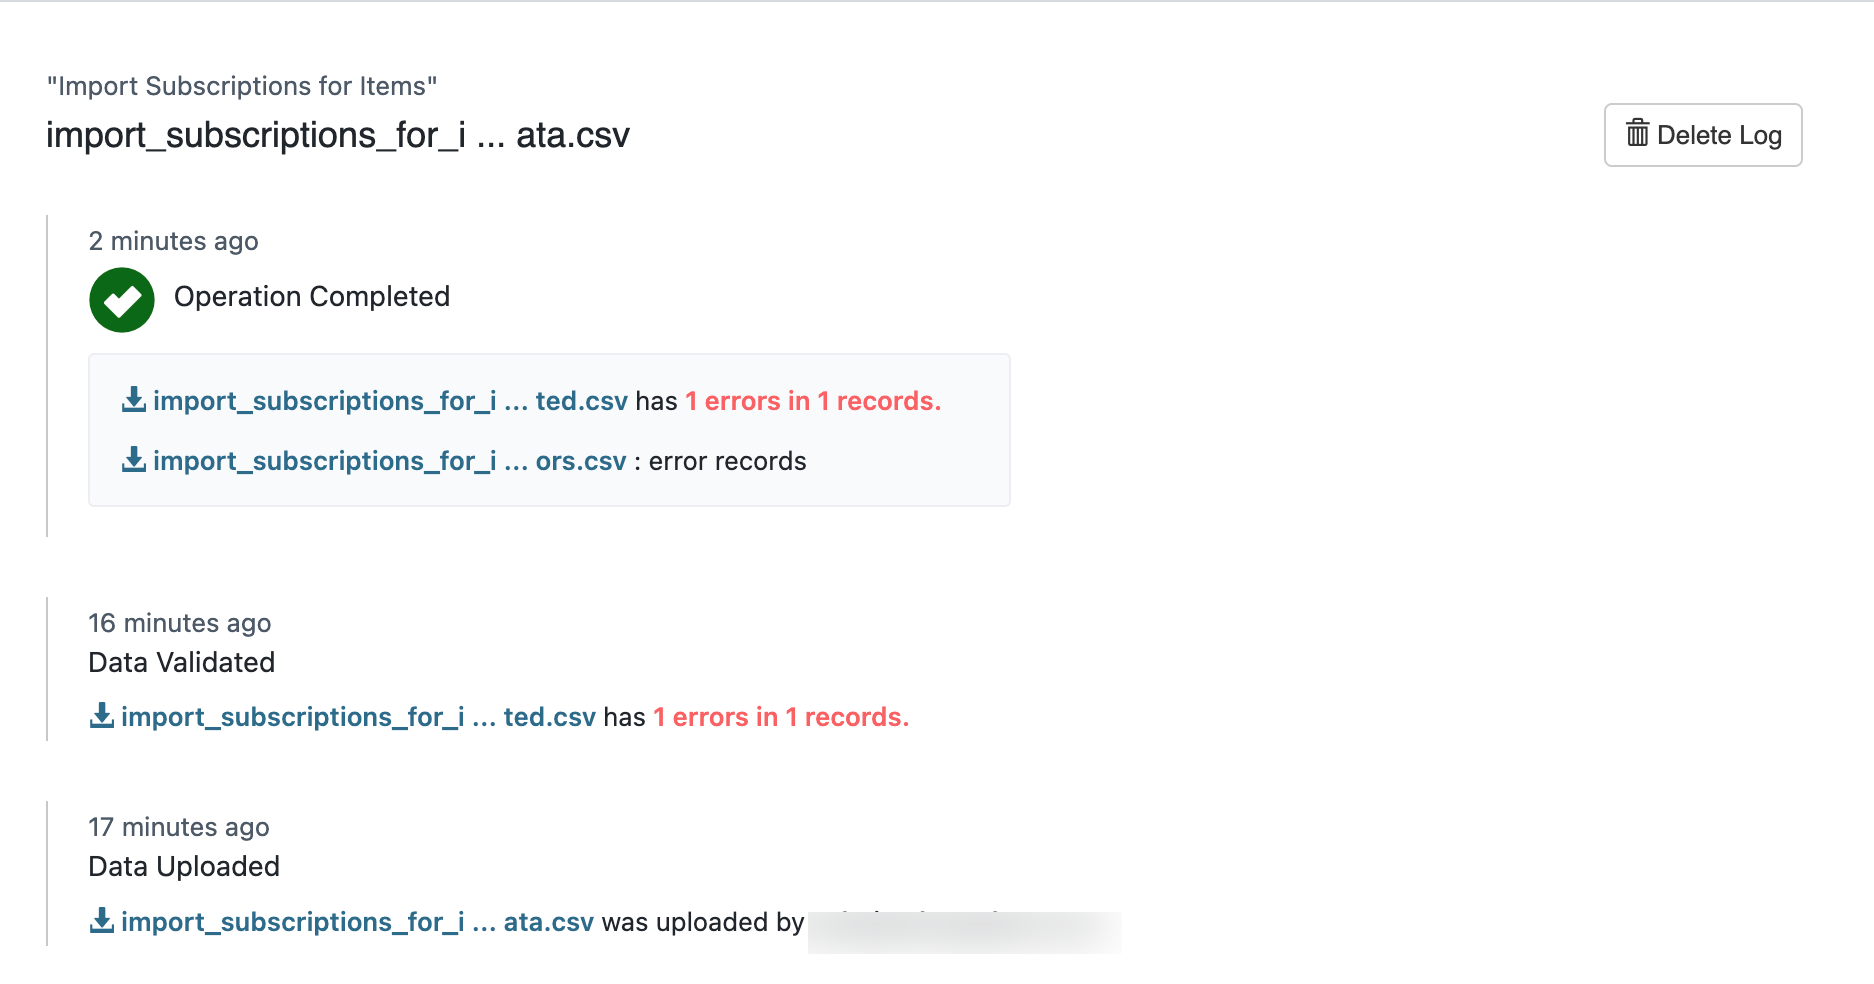
Operations Log
Navigate to Settings > Import & Export Data > Operations Log to view a log of all the operations performed along with the status:
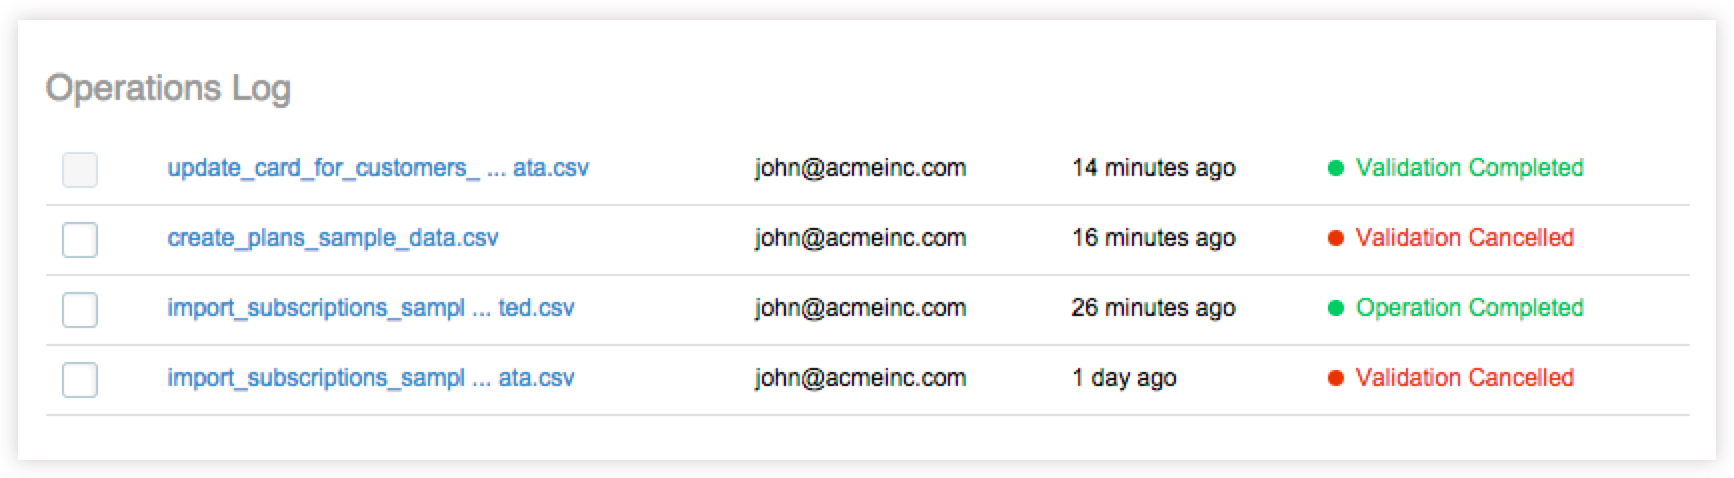
Click a log entry to view more details. You will have the option to download the data file that was uploaded. If you have navigated to a different page and the file has been validated, you will have an option here to resume the operation.
Export Data
This feature allows you to export data in a user or import-friendly format.
The following are the export options:
- Download data: This CSV format will help you to understand the CSV headers/field names and fields easily.
- Download import-friendly file: The import-friendly format matches the CSV headers/field names and fields of the import format and reduces the need for format conversion. In addition, the CSV fields are now pre-filled with information, based on which you can add your existing data to migrate subscriptions to Chargebee using bulk import operations without format conversion.
Note
- Currently, Download Import-friendly file option is only available for Subscriptions, Customers, and Product Catalog export.
- Download Import-friendly file option will not appear If any filter is applied to the list. You can use Export API to export import-friendly data with filters.
To perform export operations,
- For Subscriptions and Customers, download these CSV files from the Subscriptions and Customers Index pages.

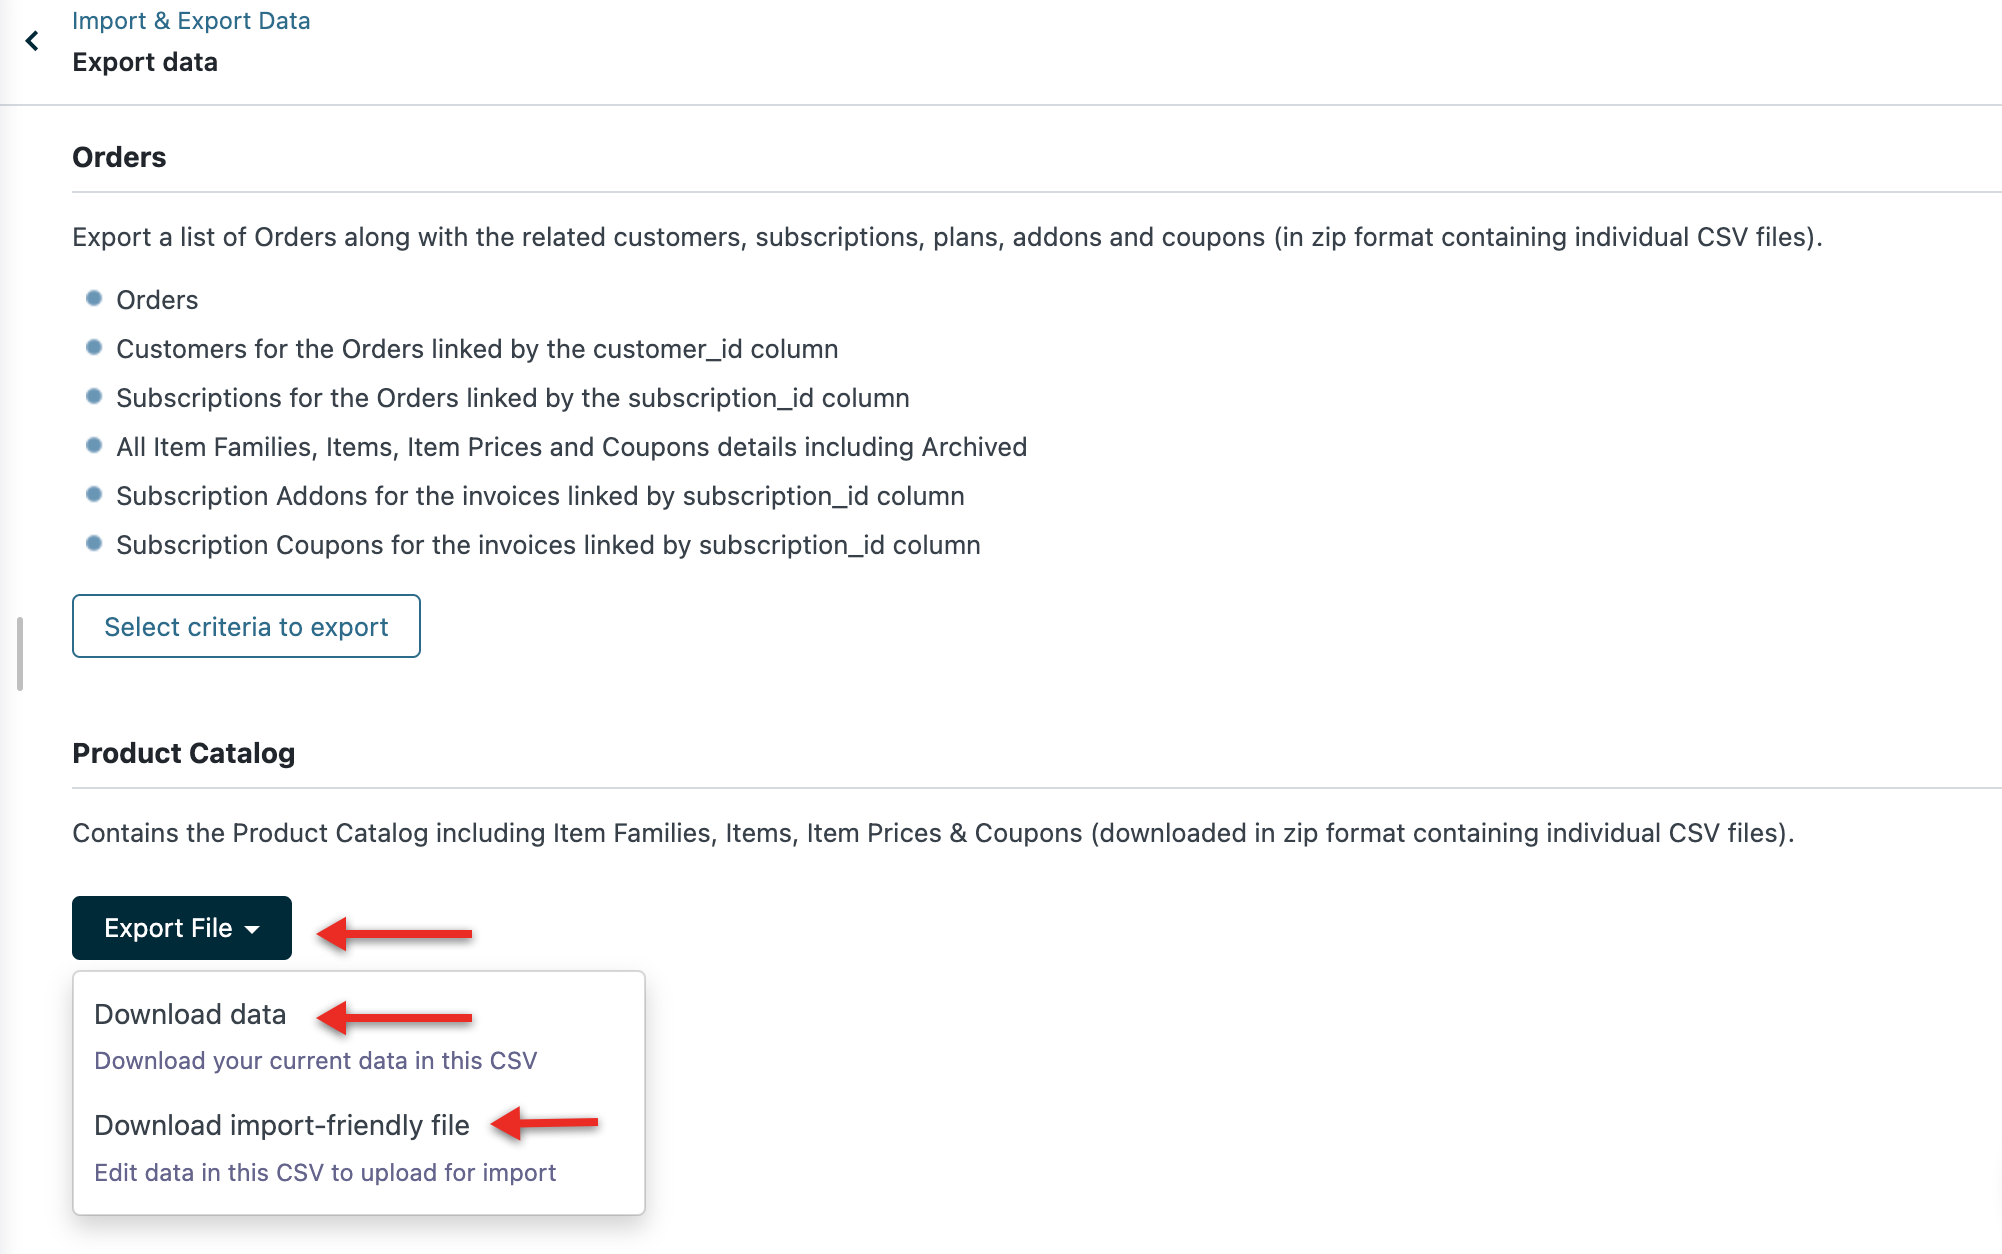
- For Product Catalog, download these CSV files from Settings > Import & Export Data > Export data > Product Catalog > Export File.
Export History
The export history table displays a list of all exports that have been initiated within the last 14 days. To use this feature, navigate to Settings > Import & Export Data > Export history.
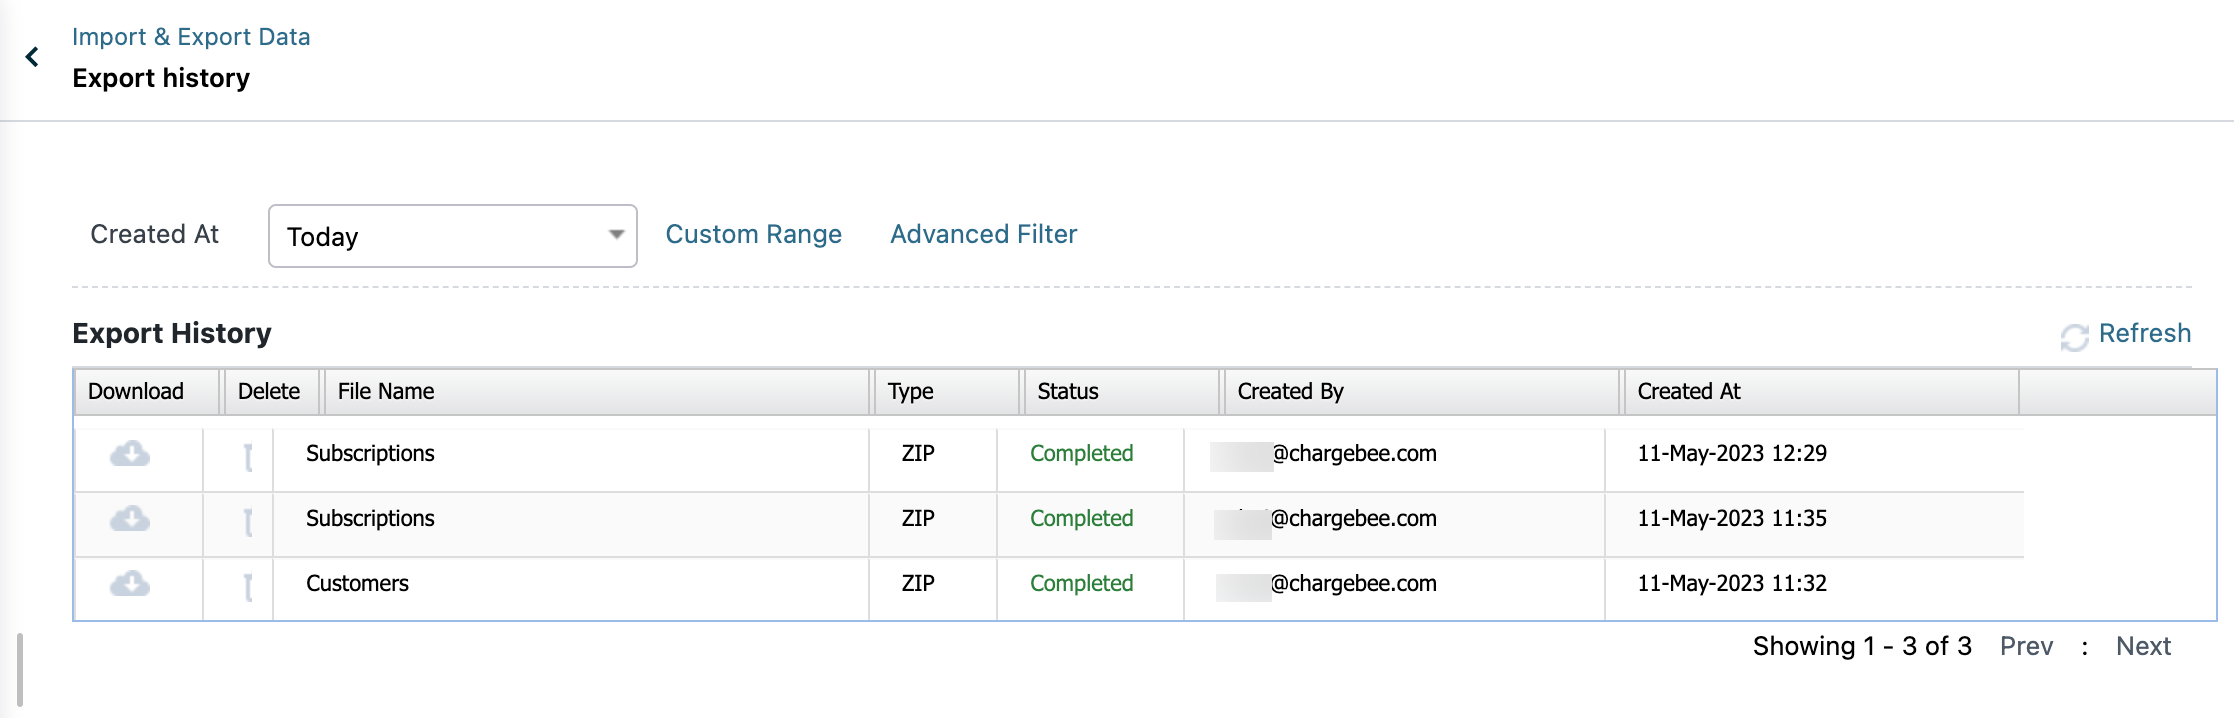
It contains the following fields:
- Download: Download the requested export.
- Delete: Remove the export from the export history list. It will delete the export permanently if performed.
- File Name: Name of the exported file.
- Type: Type of downloaded file format. ZIP is the only format that we support.
- Status: Indicates the status of the export process.
- Created By: Email address of the exporter.
- Created At: Date on which the export is completed. You can also use it to filter the export history.
Please get in touch with support if you're unsure at any step of the operation.
Was this article helpful?