Integration options
Chargebee offers the following options to integrate the Checkout based on your application or website's framework and business model:
- Hosted Pages API: Recommended if you want to authenticate the user on your end, override payment-related information, handle returning users, and collect additional information.
- Drop-in Script.
- Via Payment Link.
Regardless of the integration option you choose, to embed checkout in your website or application, use embedded checkout with Chargebee.js to mount checkout in a container on your page. Do not place hosted page URLs in your own iframe elements—Chargebee.js creates and manages the iframe for you.
When to use API vs. drop-in script
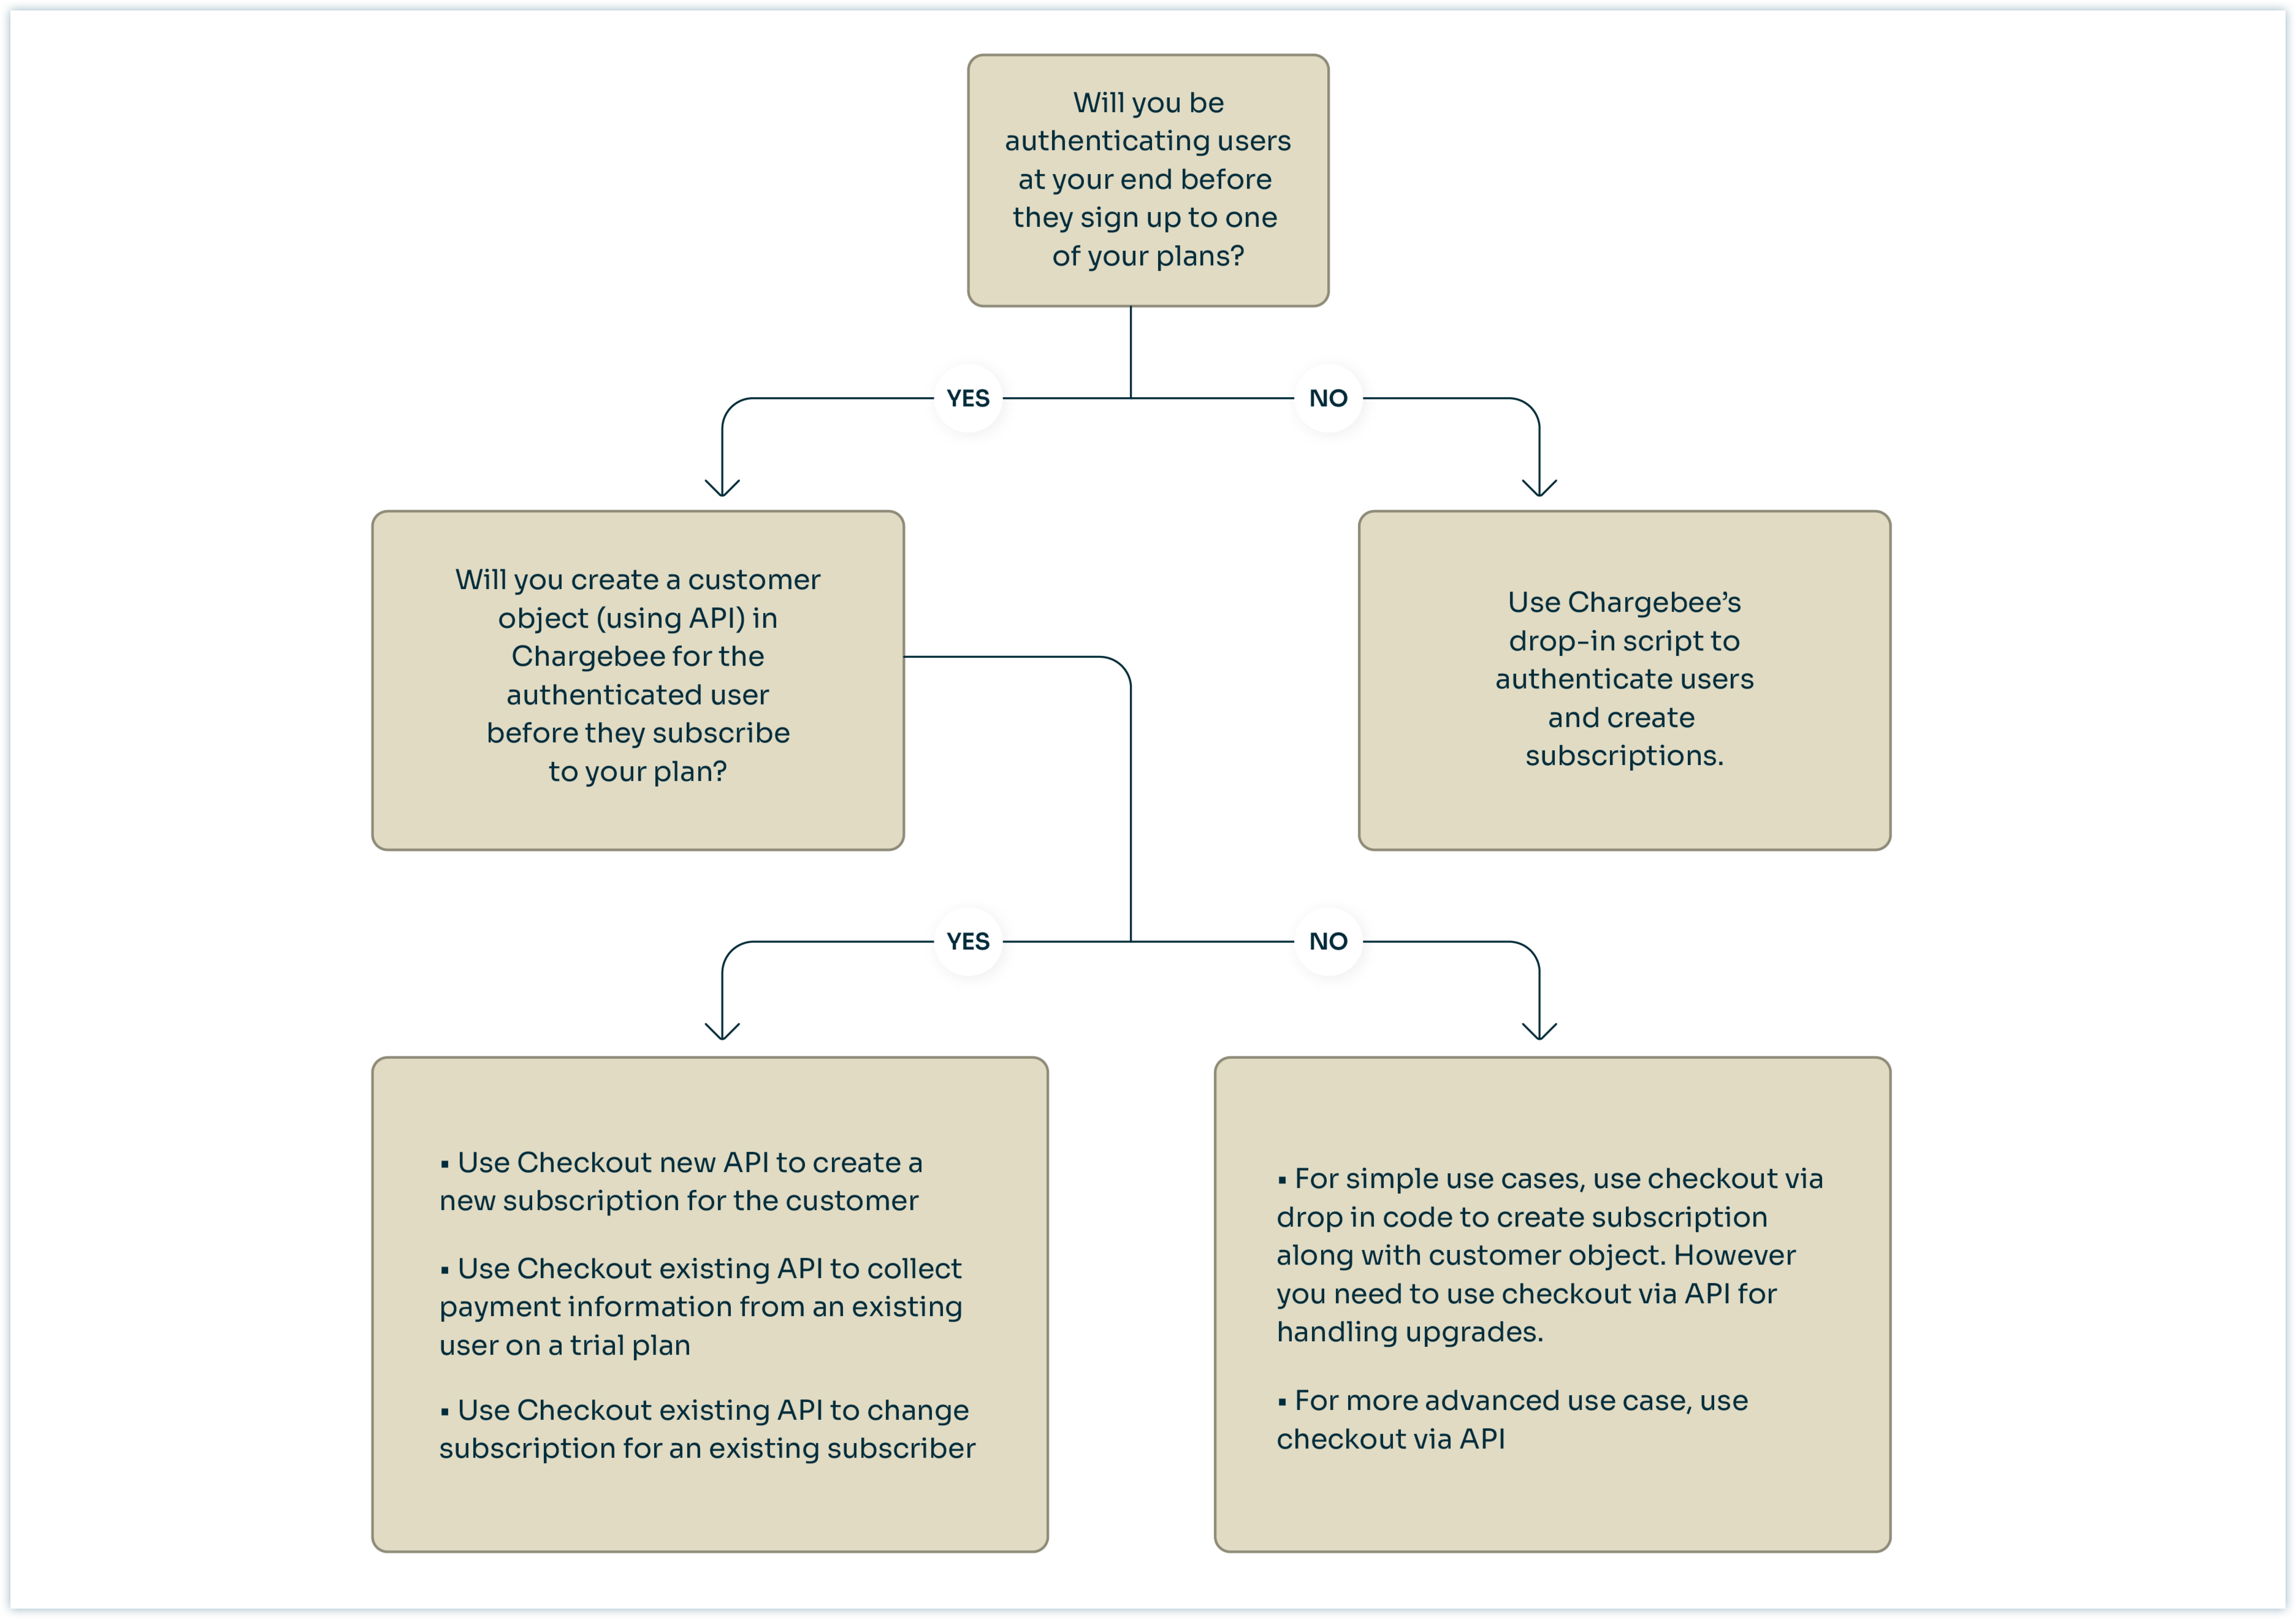
Hosted Pages API
Using the Hosted Pages API to create in-app checkout is the recommended approach when you already maintain a user-management or authentication system.
Note
The API generates a Checkout URL that expires 3 hours after creation.
Benefits of using API integration:
- Manage authentication and collect additional information in your application or website.
- Override plan and add-on pricing during checkout.
- Optimize trial tenure. For example, you can offer a 14-day trial to one customer and a one-month trial to another.
Example
Here's an example of when you might choose Checkout via API over the Drop-in Script:
Jenna runs a digital weight loss and fitness app. She wants to collect user information such as the client's height, weight, food habits, and so on, along with their address and email, and store it in her database instead of Chargebee. She would still like to use Chargebee's Checkout as she does not want to handle the details of PCI Compliance.
Jenna can use the API integration to collect additional information on the frontend and rely on Chargebee's Hosted Pages API for payment details.
To learn more about the integration and implementation of Checkout via API, read our developer documentation.
You can use Checkout via APIs for the following workflows:
- Checkout for new subscriptions
- Checkout for existing subscription upgrades
- Checkout for one-time purchases
Drop-in script
The Drop-in Script is a plug-in type, easy-to-use solution that requires minimal developer help. You can easily create a checkout page by adding a script generated for the plan item on your HTML page.
Checkout integrated using the Drop-in Script is Level 1 PCI compliant. Therefore, you need to fill out this questionnaire before integrating.
Note:
You should review the following documents from the above page before integrating Checkout using the Drop-in Script:
- SAQ Instructions and Guidelines
- Understanding SAQs for PCI DSS
The SAQs must be filled out based on the applicability as per the guideline document and shared with the payment gateway. No document needs to be submitted to Chargebee.
To use the Drop-in Script to integrate Checkout, follow these steps:
- Click Settings > Configure Chargebee > Checkout and Self-Serve Portal > Integrate with Chargebee.
- Select the Product Family, Plan, Currency, and Frequency from the drop-down list.
- Add Addons and Charges if applicable using Add Addon and Add Charge options.
- Copy the Header Script and paste it within the
<head>element of your website's HTML.
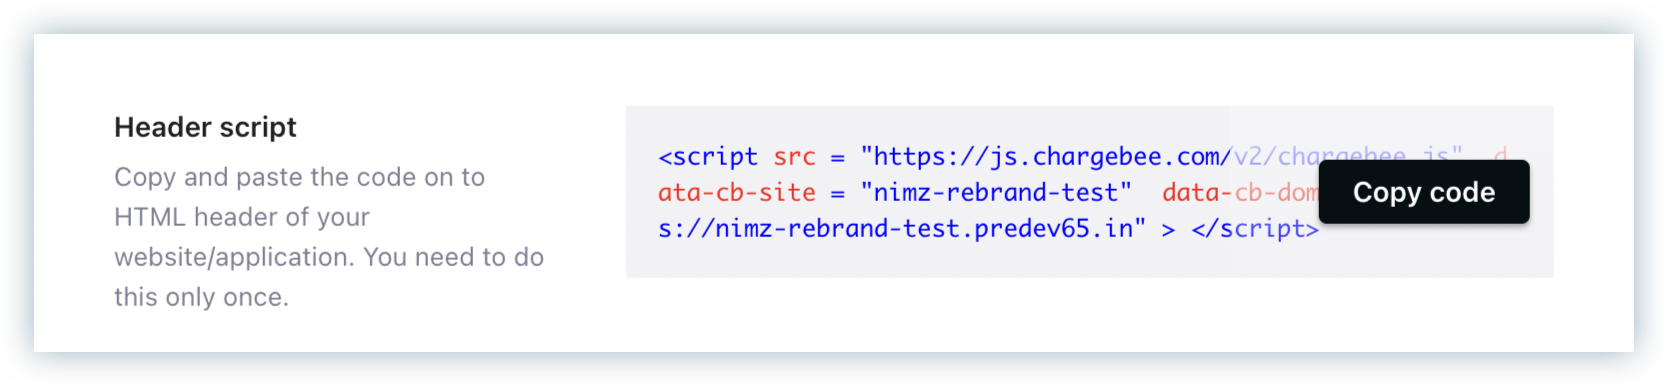
- Copy the generated Checkout Button Code and hyperlink it in the Subscribe button on your website's HTML. This way, when a customer clicks the Subscribe button, the Checkout opens and displays the selected parameters of plan name, frequency, addons, and so on.
Information
Checkout Button Code for a particular plan item can also be copied from the respective plan page. Follow these steps to copy the code from a plan page:
- Click Product Catalog > Plans > Select a Plan > Select a Price Point.
- Navigate to the Customer-Facing Information section, and click Grab Script.
- Select addons if necessary and click Copy Code.
- The copied script can now be embedded on your website's checkout page.
You can use Checkout via Drop-in for the following workflows:
- Checkout for new subscriptions
- Checkout for one-time purchases
Learn more on how to integrate Checkout using the Drop-in Script.
Via payment link
When you're looking for a simple and effective way to collect payments from your customers, a payment link can be an excellent solution.
Chargebee lets you create a custom URL to pass product details, customer information, and subscription data during checkout. The resulting Checkout URL can then be embedded into your application or website. You can also share this URL directly with customers through email and text messages.
To use the Payment Link to integrate Checkout, follow these steps:
-
Click Settings > Configure Chargebee > Checkout & Self-Serve Portal > INTEGRATE WITH CHARGEBEE > Via Payment Link
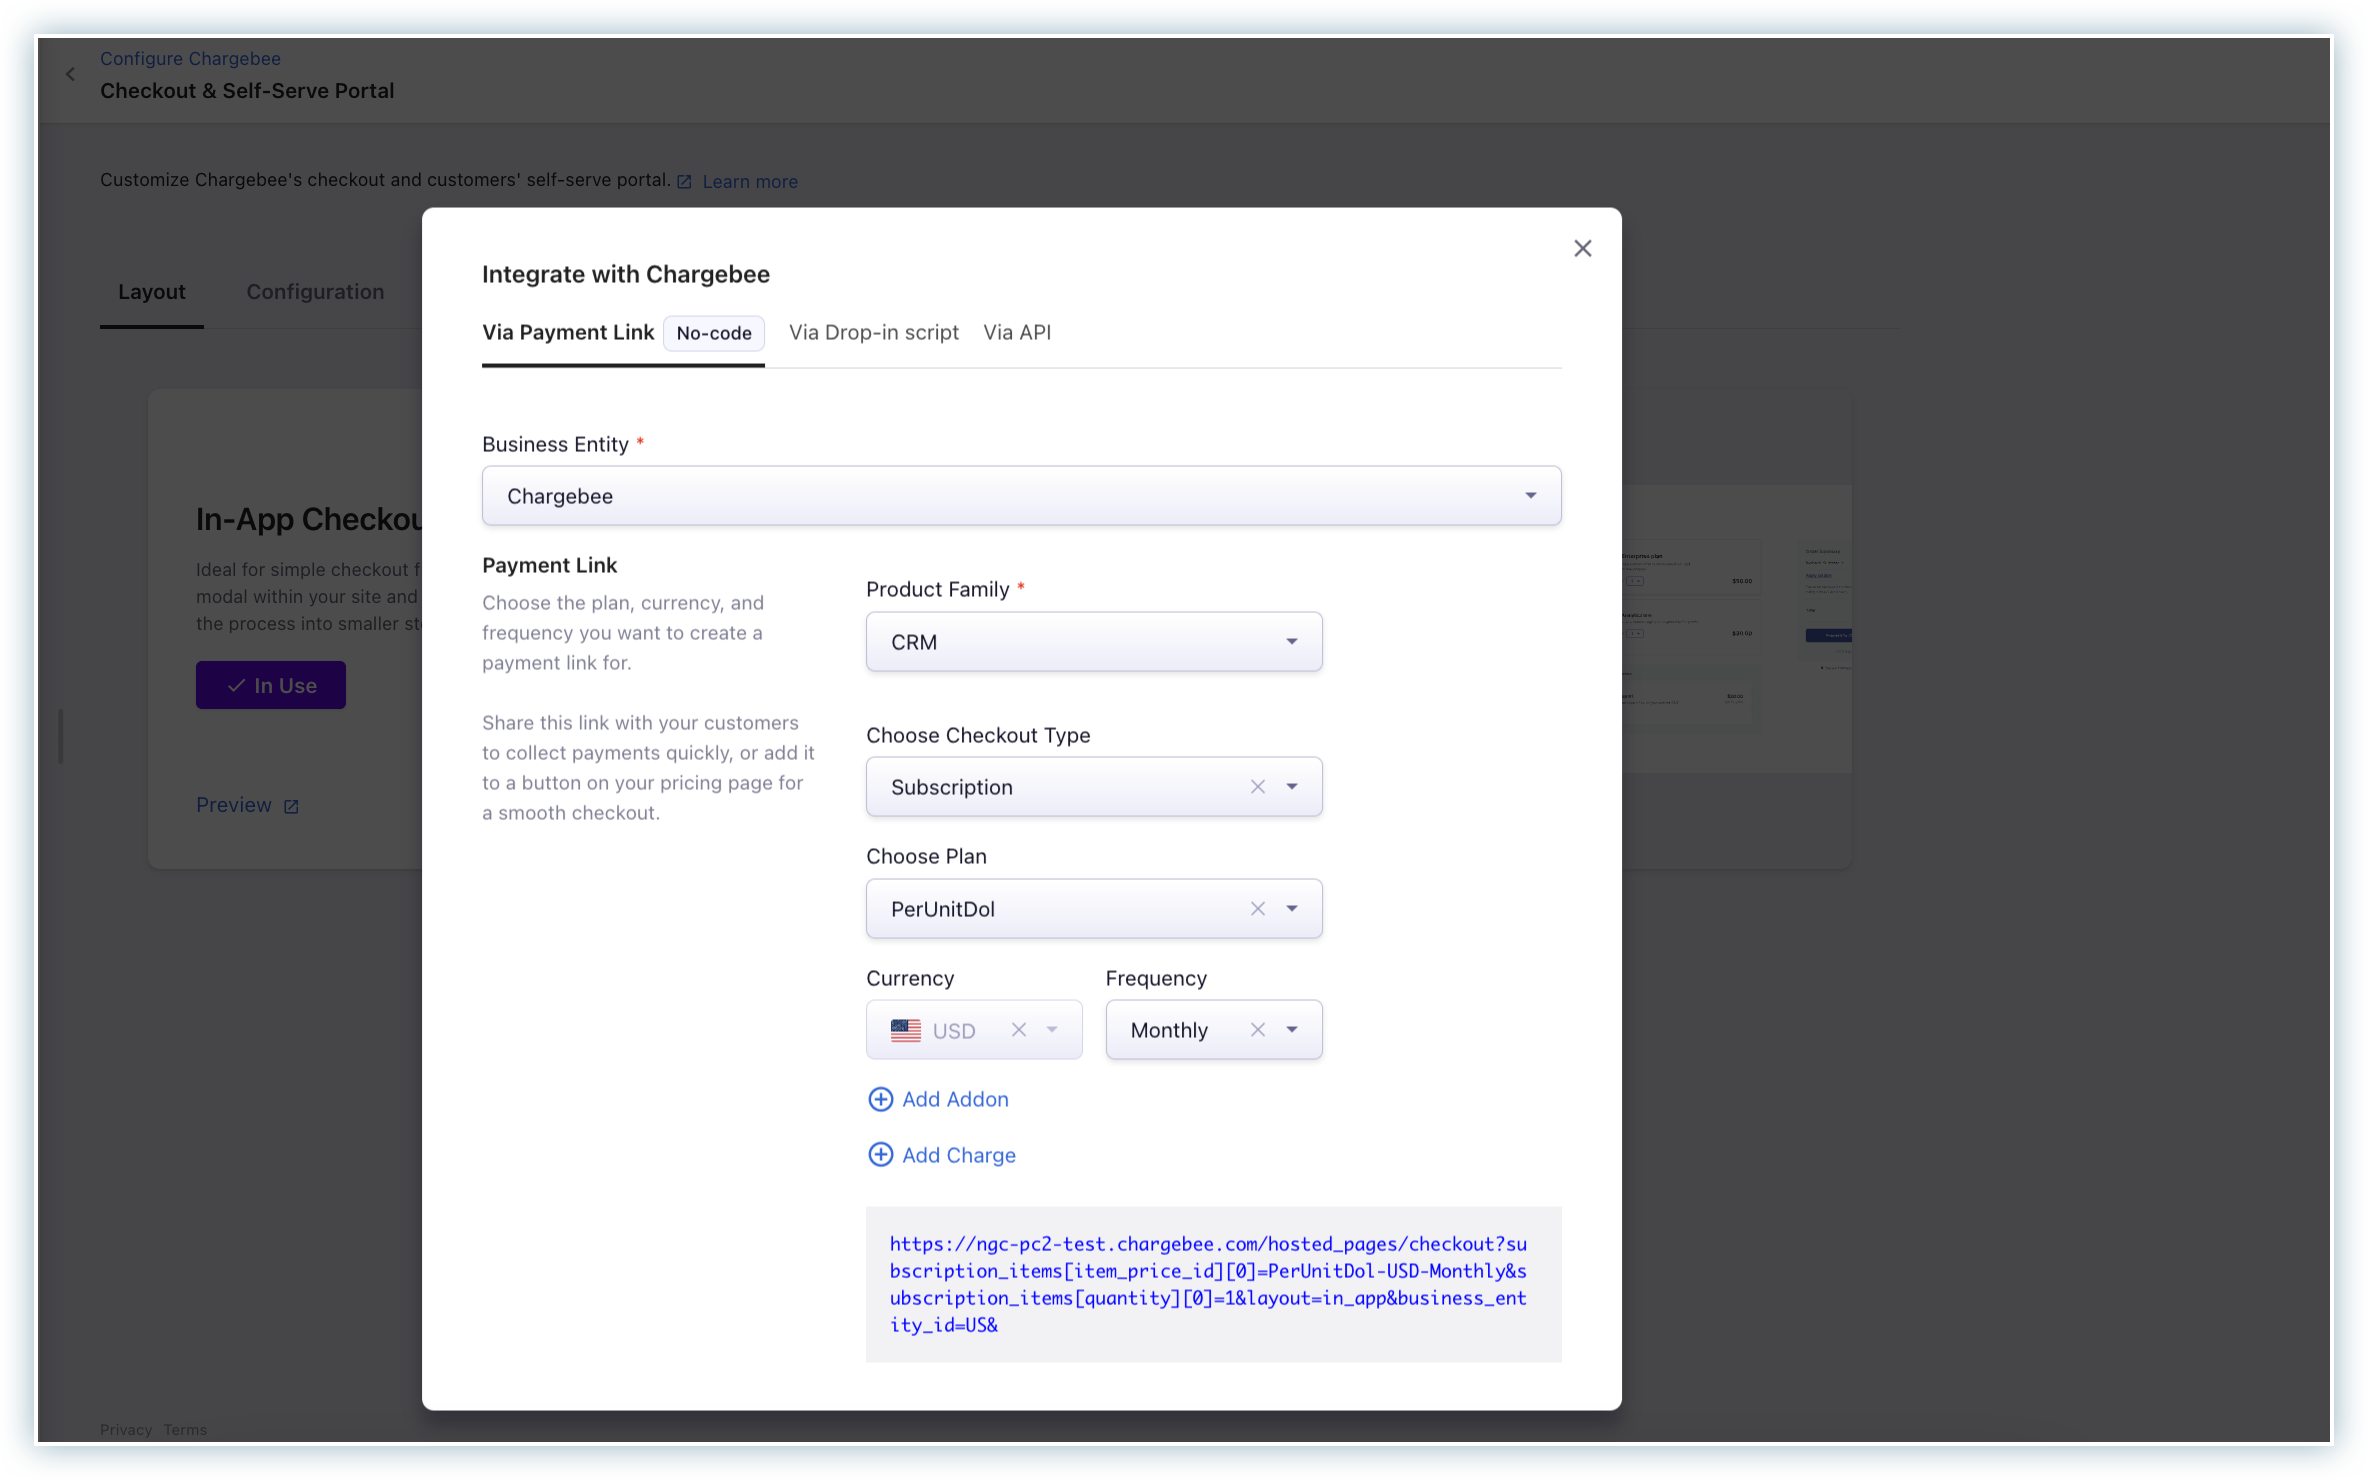
-
Choose the Business Entity if applicable. Learn more about multiple business entities.
-
Choose Checkout Type.
- If Subscription,
- Select the Product family, Plan, Currency, and Frequency from the drop-down list.
- Add Addons and Charges if applicable using Add addon and Add charge options.
- You can also add any parameters to pass additional information to the customer or subscription. Sample URL:
https://honeydukes-test.chargebee.com/hosted_pages/checkout?subscription_items[item_price_id][0]=cbdemo_advanced-USD-monthly&subscription_items[quantity][0]=1&customer[first_name]=Minerva&customer[last_name]=McGonagall&subscription[cf_butterbeer_type]=Frozen Butterbeer - If One-Time Payment:
- Choose Currency.
- Add Charges if applicable using Add charge options. Sample URL:
https://honeydukes-test.chargebee.com/hosted_pages/checkout?subscription_items[item_price_id][0]=cbdemo_setup-charge-USD&subscription_items[quantity][0]=1&customer[first_name]=Minerva&customer[last_name]=McGonagall
- If Subscription,
List of supported query parameters
Here is an API spec of query parameters supported, which can be used in the plan URL:
| Module | Query Parameter |
|---|---|
| Subscription Item |
|
| Coupons |
|
| Customer | All parameters in Create checkout for a new subscription endpoint can be used. Exceptions: |
| Subscription |
|
| Billing address | All Exceptions: |
| Shipping Address | All Exceptions: |
| Business Entity ID |
|
You can integrate hosted checkout via Payment Link for the following workflows:
- Checkout for new subscriptions
- Checkout for one-time purchases
Was this article helpful?