GA4 through GTM (in-app Checkout)
Integration of Google Analytics 4 (GA4) with Chargebee-hosted pages can be done through Google Tag Manager (GTM).
Scope
Please note that the in-app layout of checkout functionality does not inherently include a built-in integration with Google Analytics 4 (GA4) or Google Tag Manager (GTM). Instead, we leverage Chargebee.js to facilitate this capability.
Chargebee.js offers two primary functionalities to support analytics integration within the checkout process:
- Callbacks for custom analytics integrations: You can utilize callbacks triggered by various events during checkout to implement custom analytics integrations tailored to specific needs.
- GA/GTM integration: Chargebee.js also provides native integration capabilities specifically designed for Google Analytics 4 (GA4) and Google Tag Manager (GTM).
To harness analytics capabilities within our in-app layout of checkout, developers can leverage Chargebee.js to create a seamless and tailored analytics experience for their applications.
Warning
CSP enforcement: Chargebee implements an allowlist/strict Content Security Policy (CSP) across Checkout, Portal, other payment pages, and all components loaded by Chargebee.js such as Payment Components and Card Components.
If you want to use GTM to deploy additional scripts or other assets on Checkout or Portal, allowlist the assets. Otherwise, the assets will be blocked.
Note
Browser-based blocks: Ad blockers or privacy-focused software installed on your customer's browser might block tracking data.
Install GTM tag
Initialize and install GTM on your website by performing steps 1 and 2 of this guide by Google.
See also
If you are setting up GTM for the first time, here are some considerations before you install GTM.
Enable GTM integration in Chargebee.js
Note
The GTM integration records customer interactions with Chargebee checkout and portal. Backend operations such as subscription renewals do not trigger any events to GTM.
You can integrate Chargebee with GTM via a drop-in script or API.
A. Using drop-in script
Enable the data-cb-gtm-enabled attribute to true when invoking Chargebee JS in the page headers of your site.
<script src="https://js.chargebee.com/v2/chargebee.js"
data-cb-site="your-chargebee-subdomain" data-cb-gtm-enabled="true">
</script>
Replace your-chargebee-subdomain in the code snippets on this page with your Chargebee site subdomain name.
For example, if your Chargebee site is bigshopper-test.chargebee.com, then replace your-chargebee-subdomain with bigshopper-test.
B. Using API
Pass the enableGTMTracking parameter as true when initializing the Chargebee instance.
var chargebeeInstance = Chargebee.init({
    site: "your-chargebee-subdomain",
    enableGTMTracking: true
});
See also
- The list of events passed to GA/GTM.
- Limitations of the GTM integration.
Set up GTM for GA4 tracking
Prerequisite
- Sign in to your GTM account.
- Create a new GTM container or select an existing one.
After selecting your GTM container, follow the steps below to create Google tags, publish the GTM container, and apply the changes to Chargebee-hosted pages. You can then track data in Google Analytics 4 (GA4).
Custom event trigger
-
Click Triggers > New.
-
Click Trigger Configuration and choose the Custom Event trigger type.
-
Enter the event name as
cb_*and check Use regex matching.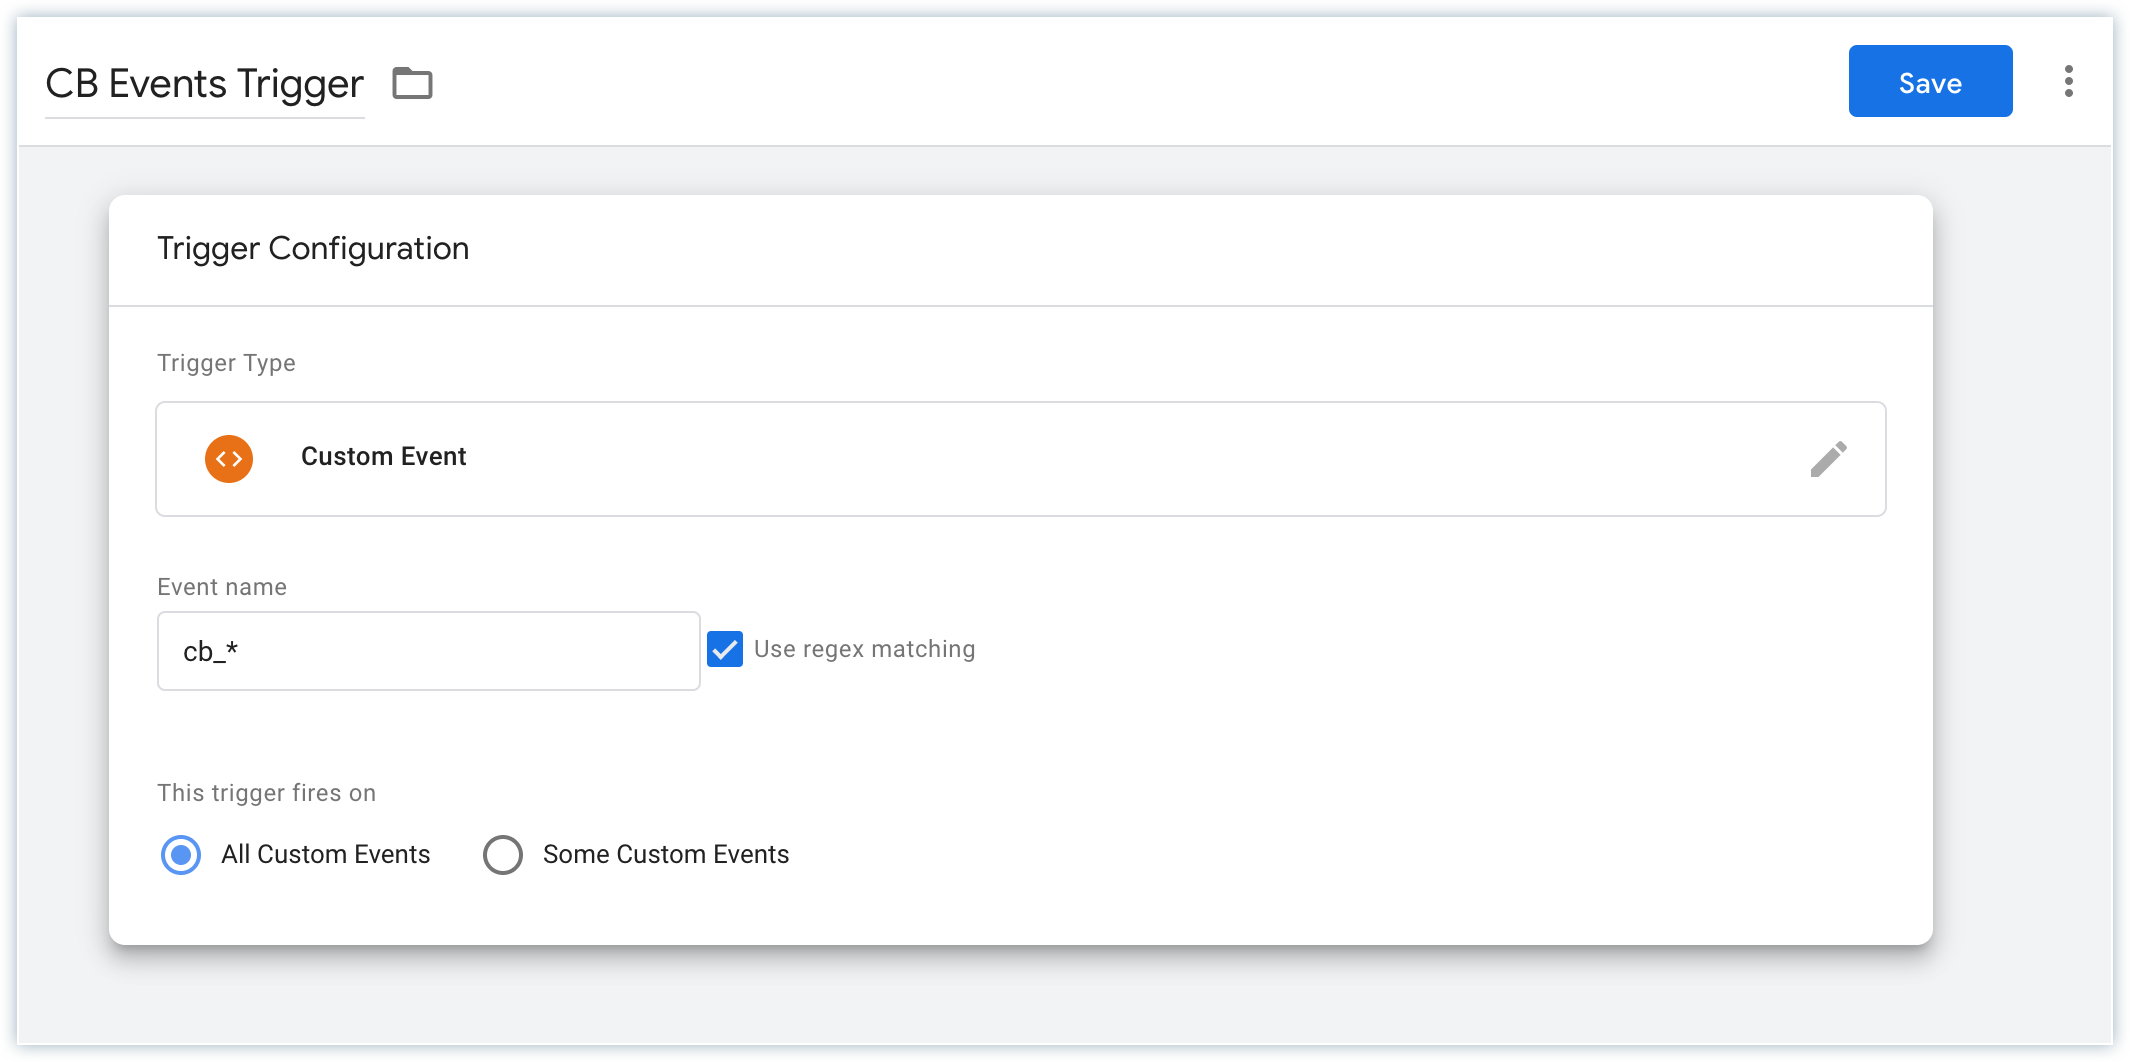
-
Name the trigger, say CB Event Trigger.
-
Click Save.
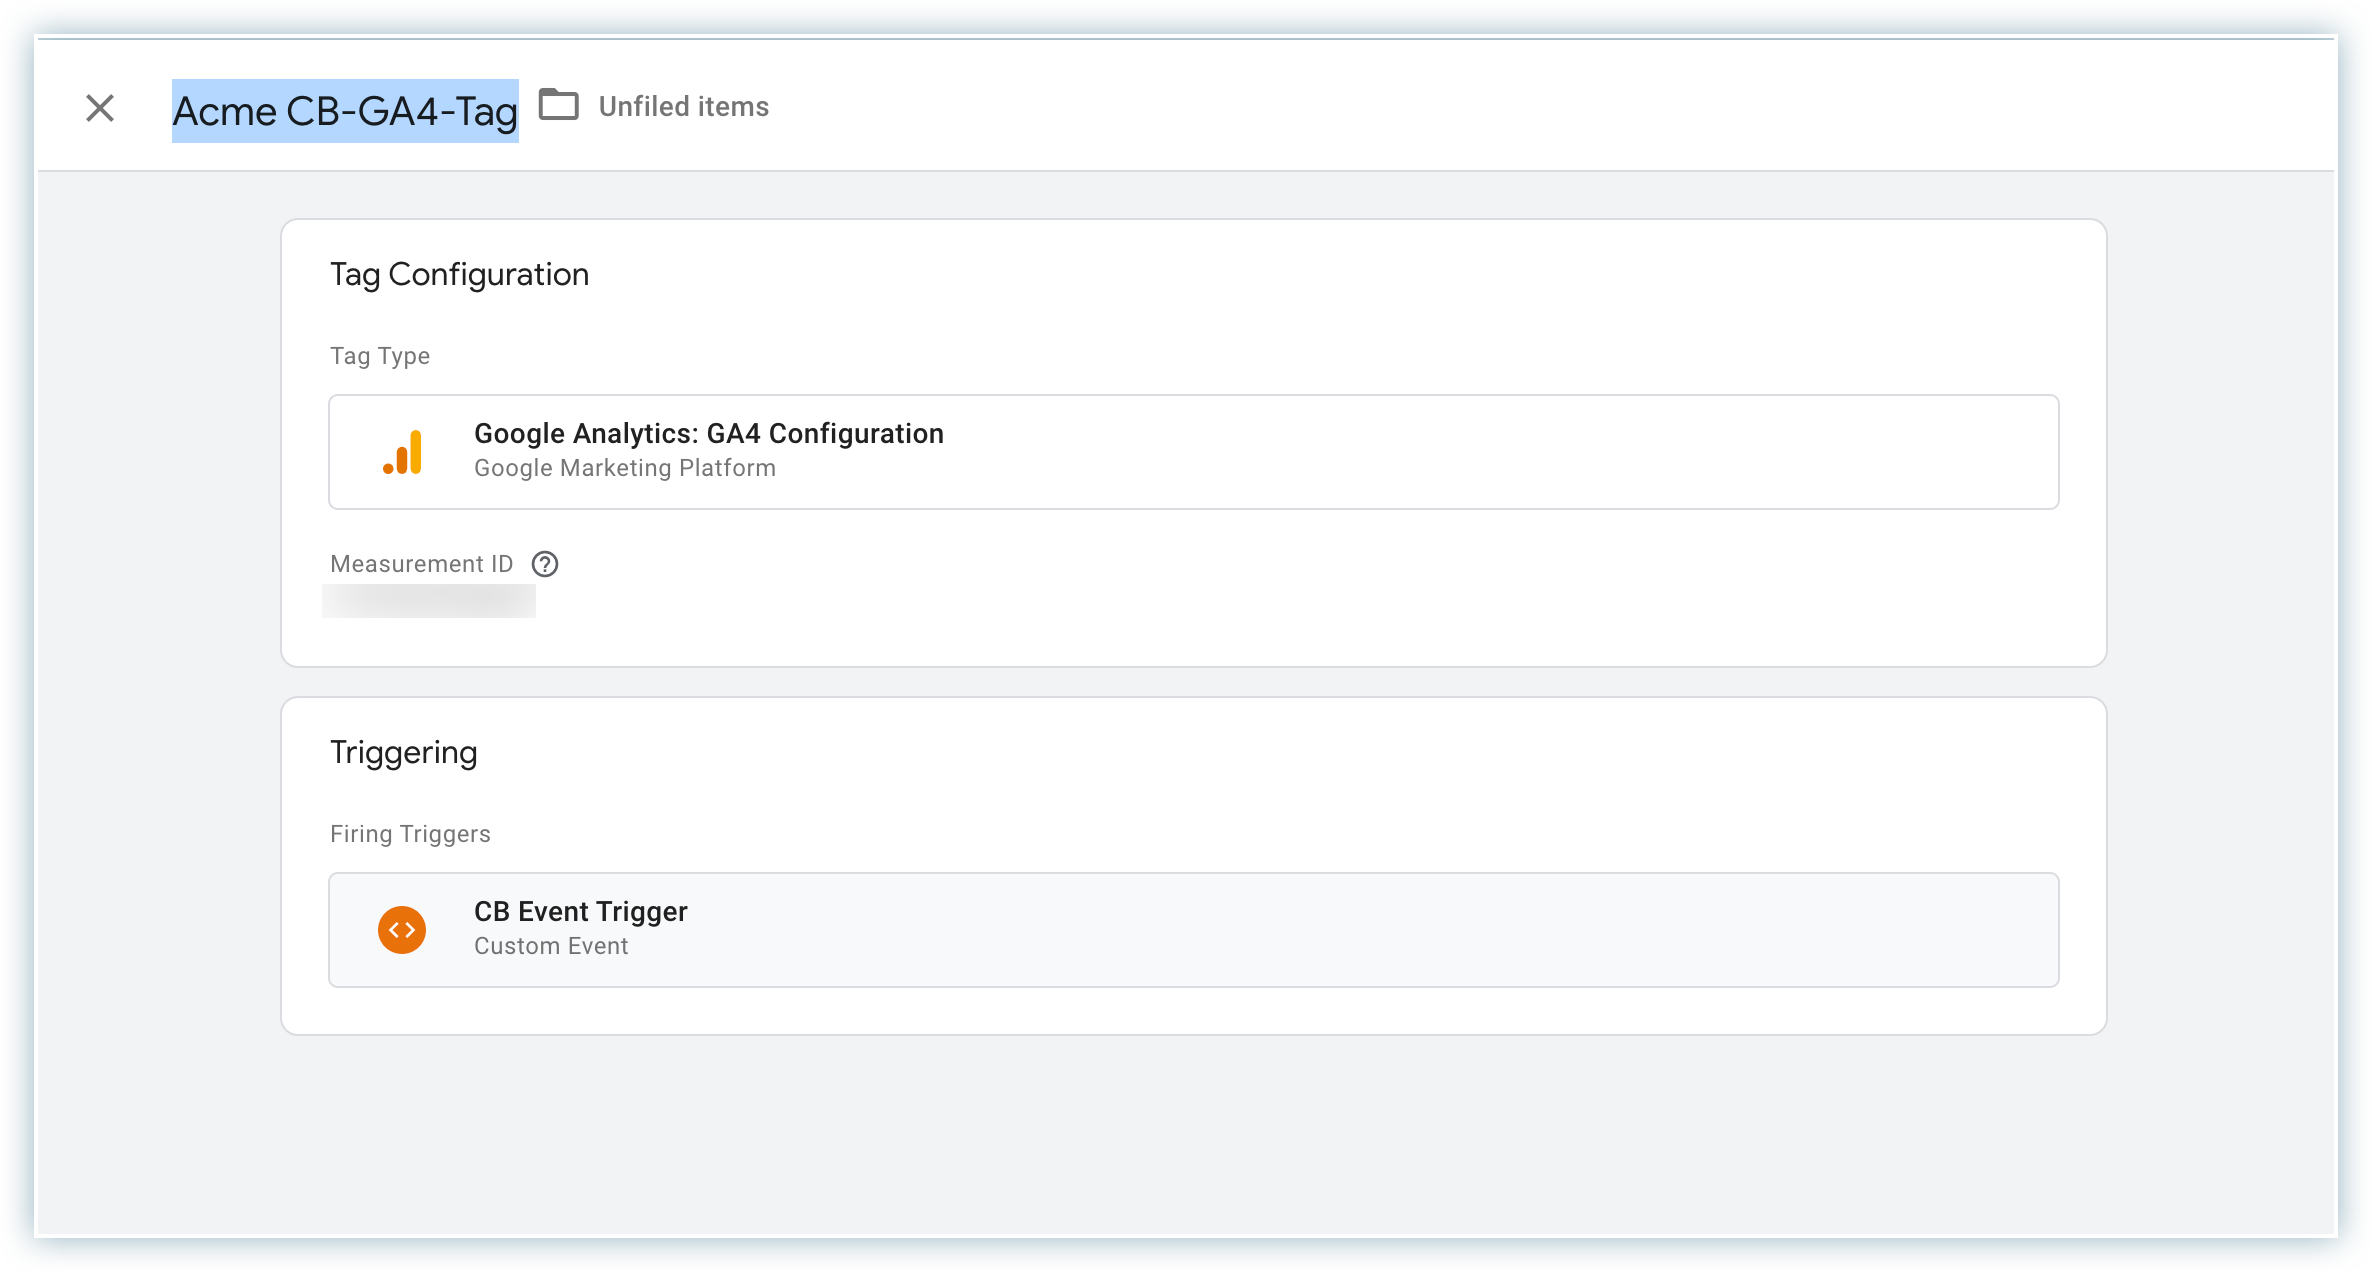
Google Analytics configuration tag
The GA4 configuration tag loads Google Analytics for your Google Analytics 4 property.
- Click Tags > New.
- Click Tag Configuration and choose Google Analytics: GA4 Configuration.
- Enter your GA4 measurement ID.
- Click Triggering and choose the CB Event Trigger created earlier.
- Name the tag, say, Acme CB-GA4-Tag.
- Click Save.
Non-ecommerce GA events
This subsection explains how to configure GTM so that events are tracked in GA4 properly. This does not include any transaction or product data. To track transactions, product information, and ecommerce events, implement the steps in the next subsection as well.
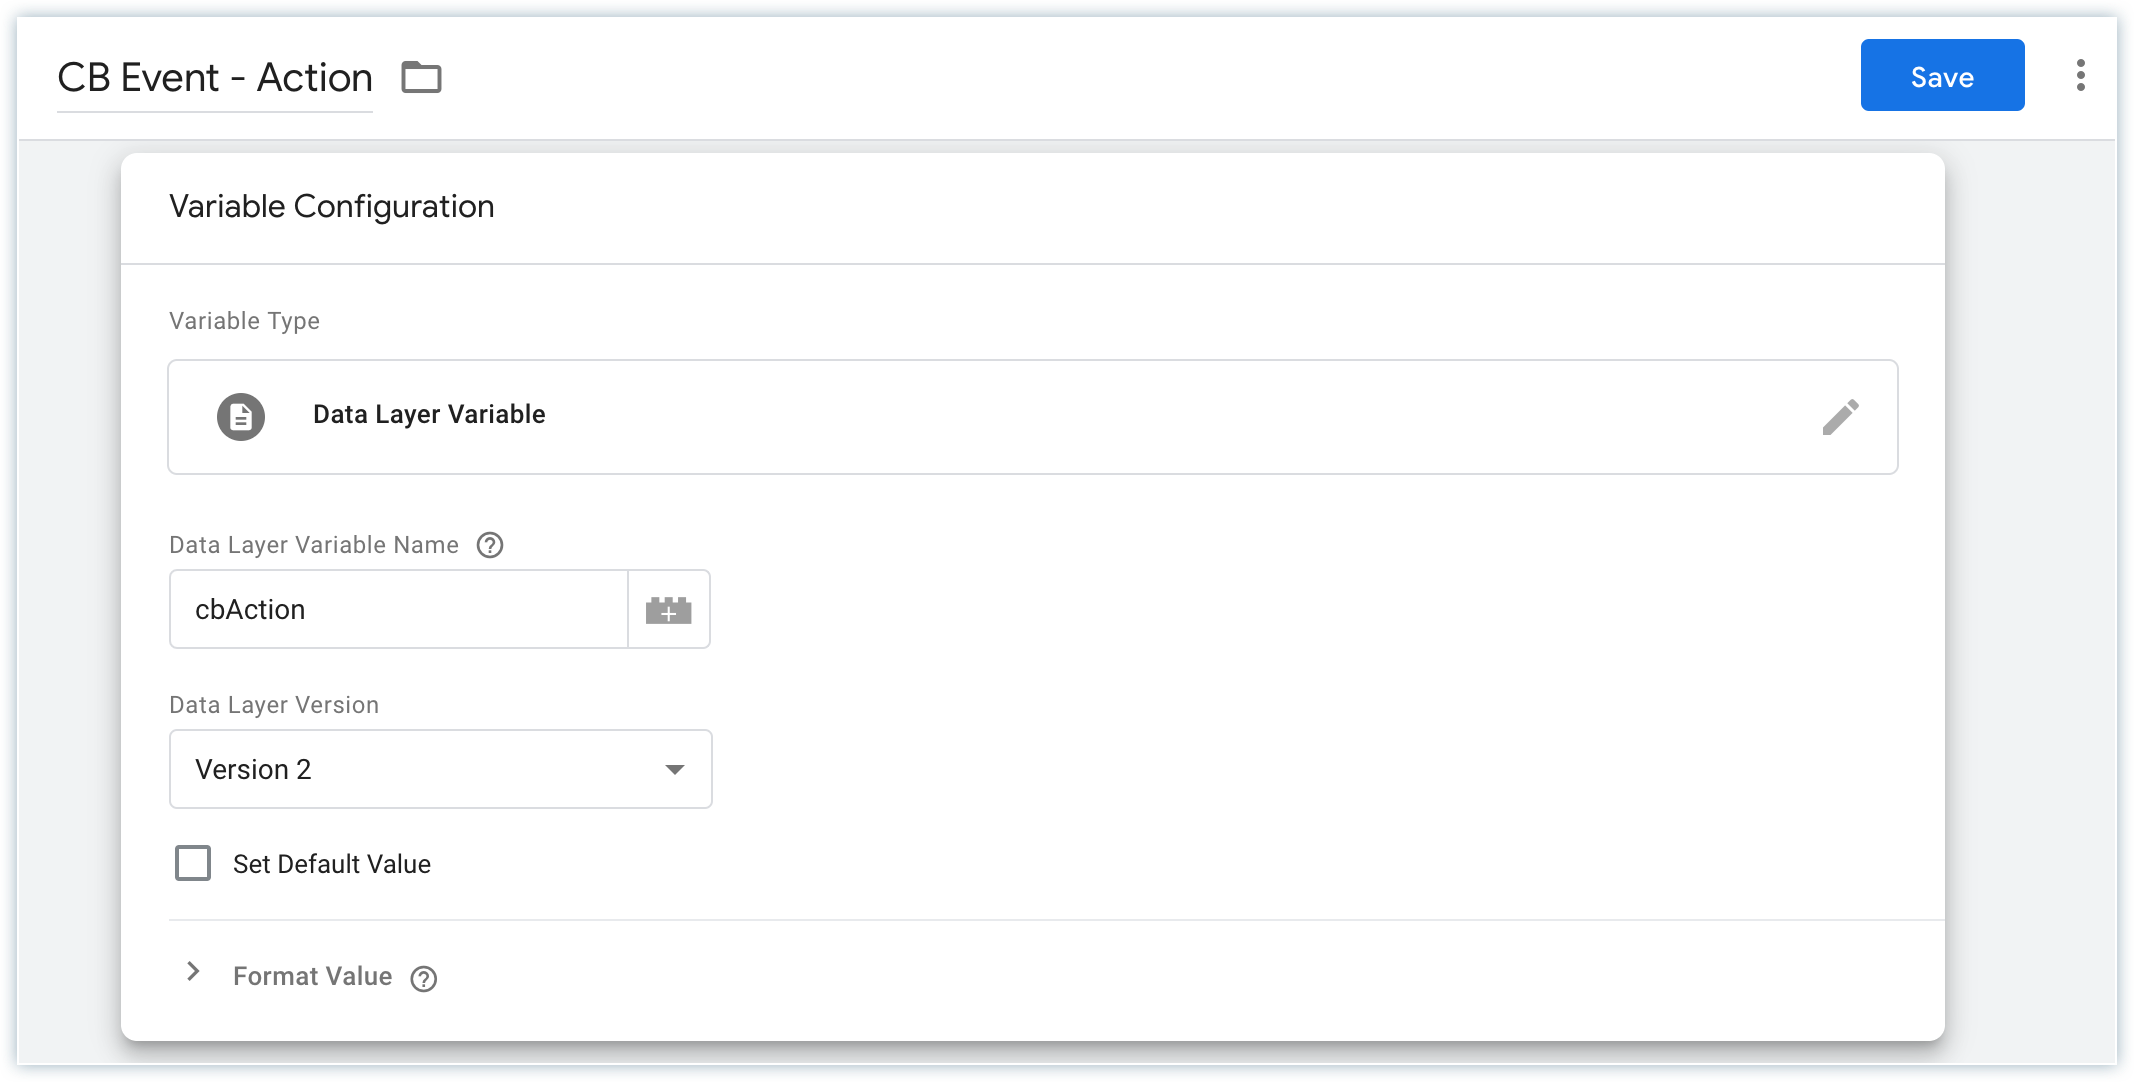
Data layer variables
- In the GTM left navigation, click Variables.
- In the User-Defined Variables section, click New.
- Click Variable Configuration and select Data Layer Variable.
- Under Data Layer Variable Name, enter
cbAction. - Name the variable, say CB Event - Action.
- Click Save.
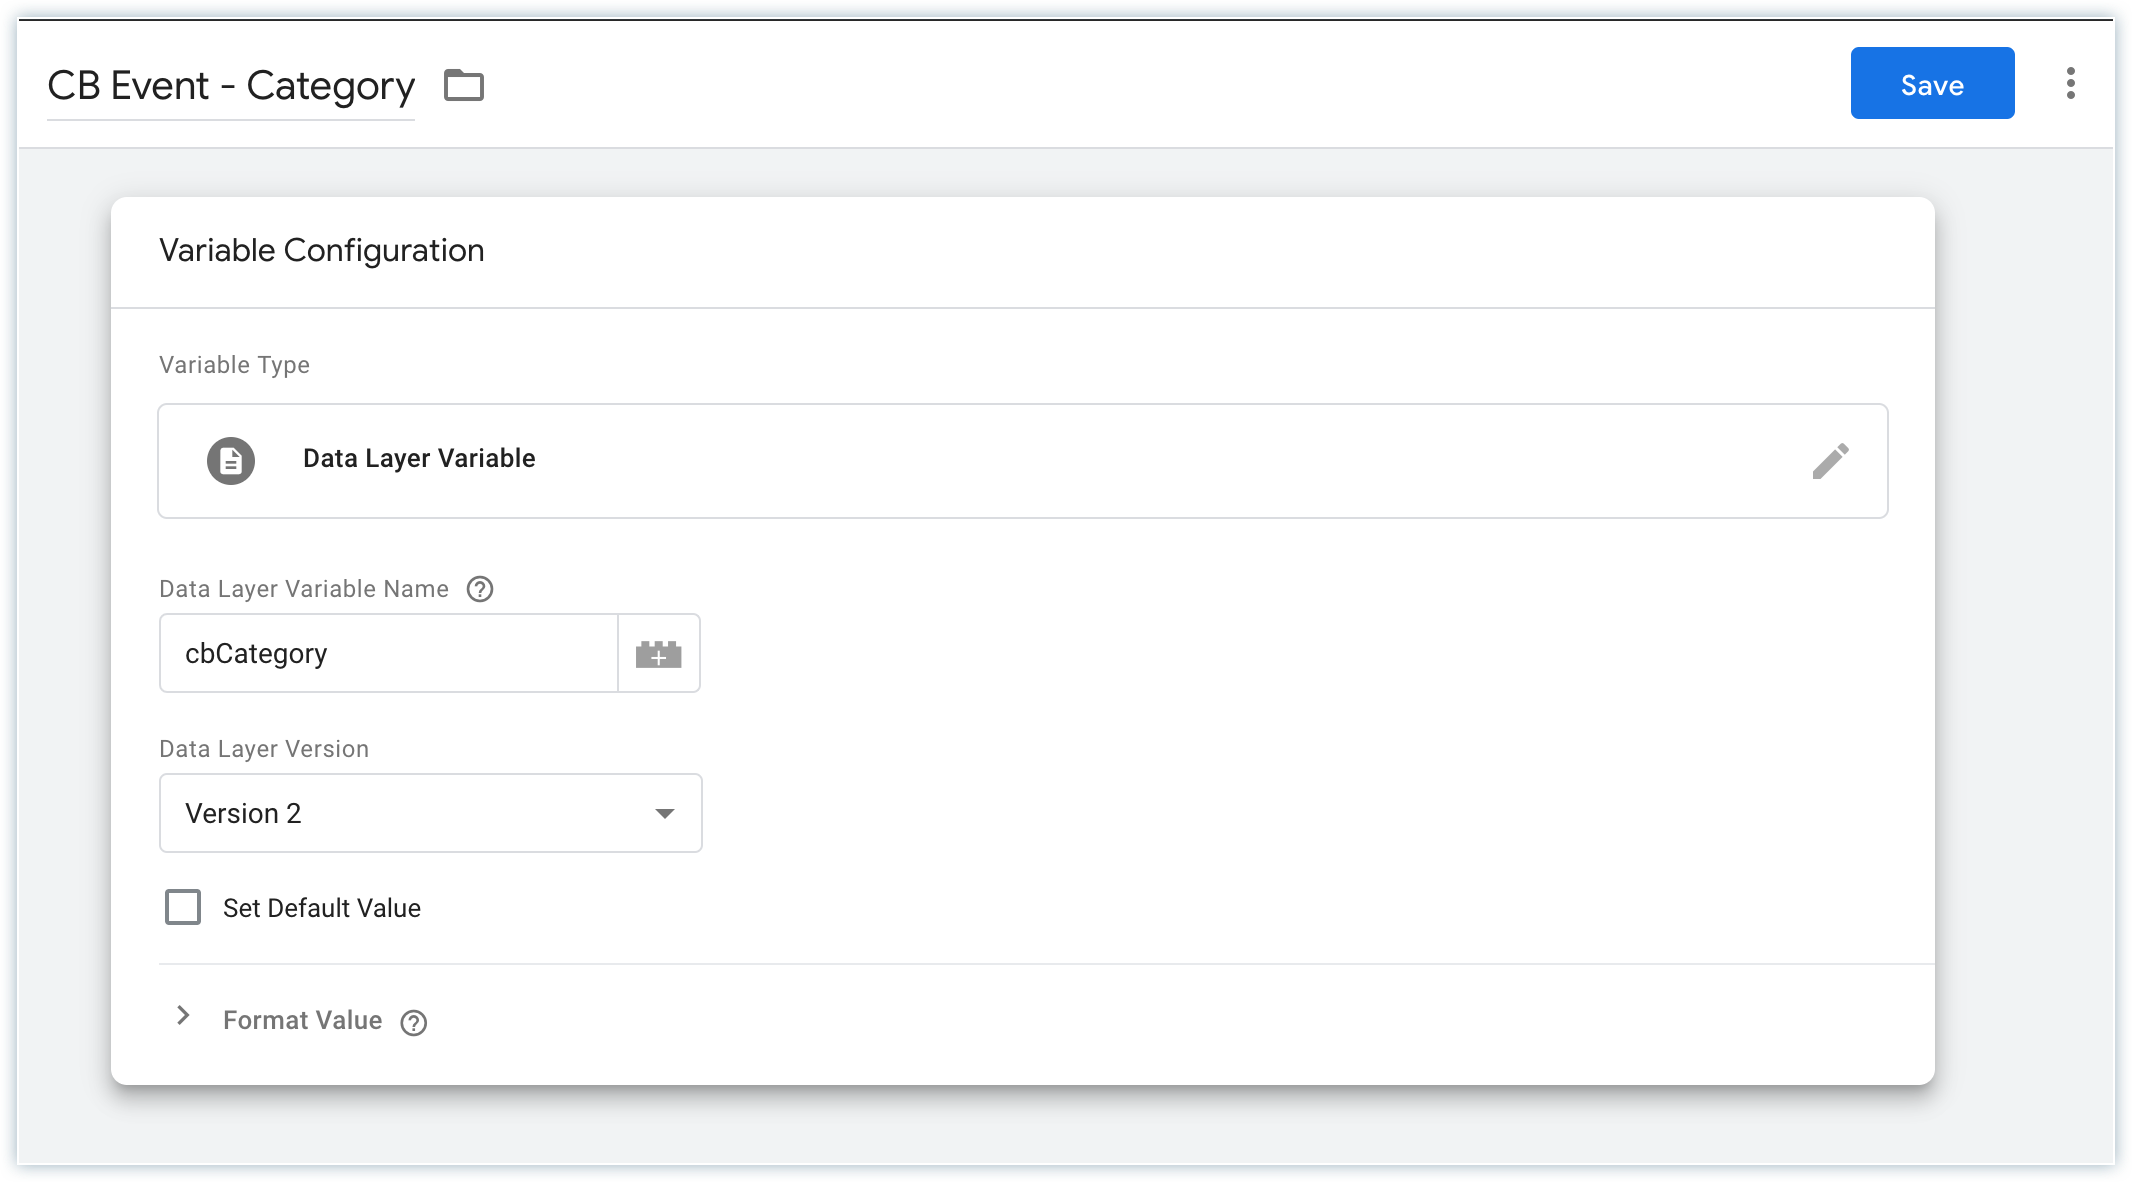
Perform the above steps again to create another data layer variable. This time, enter the Data Layer Variable Name as cbCategory and name the variable, say CB Event - Category.
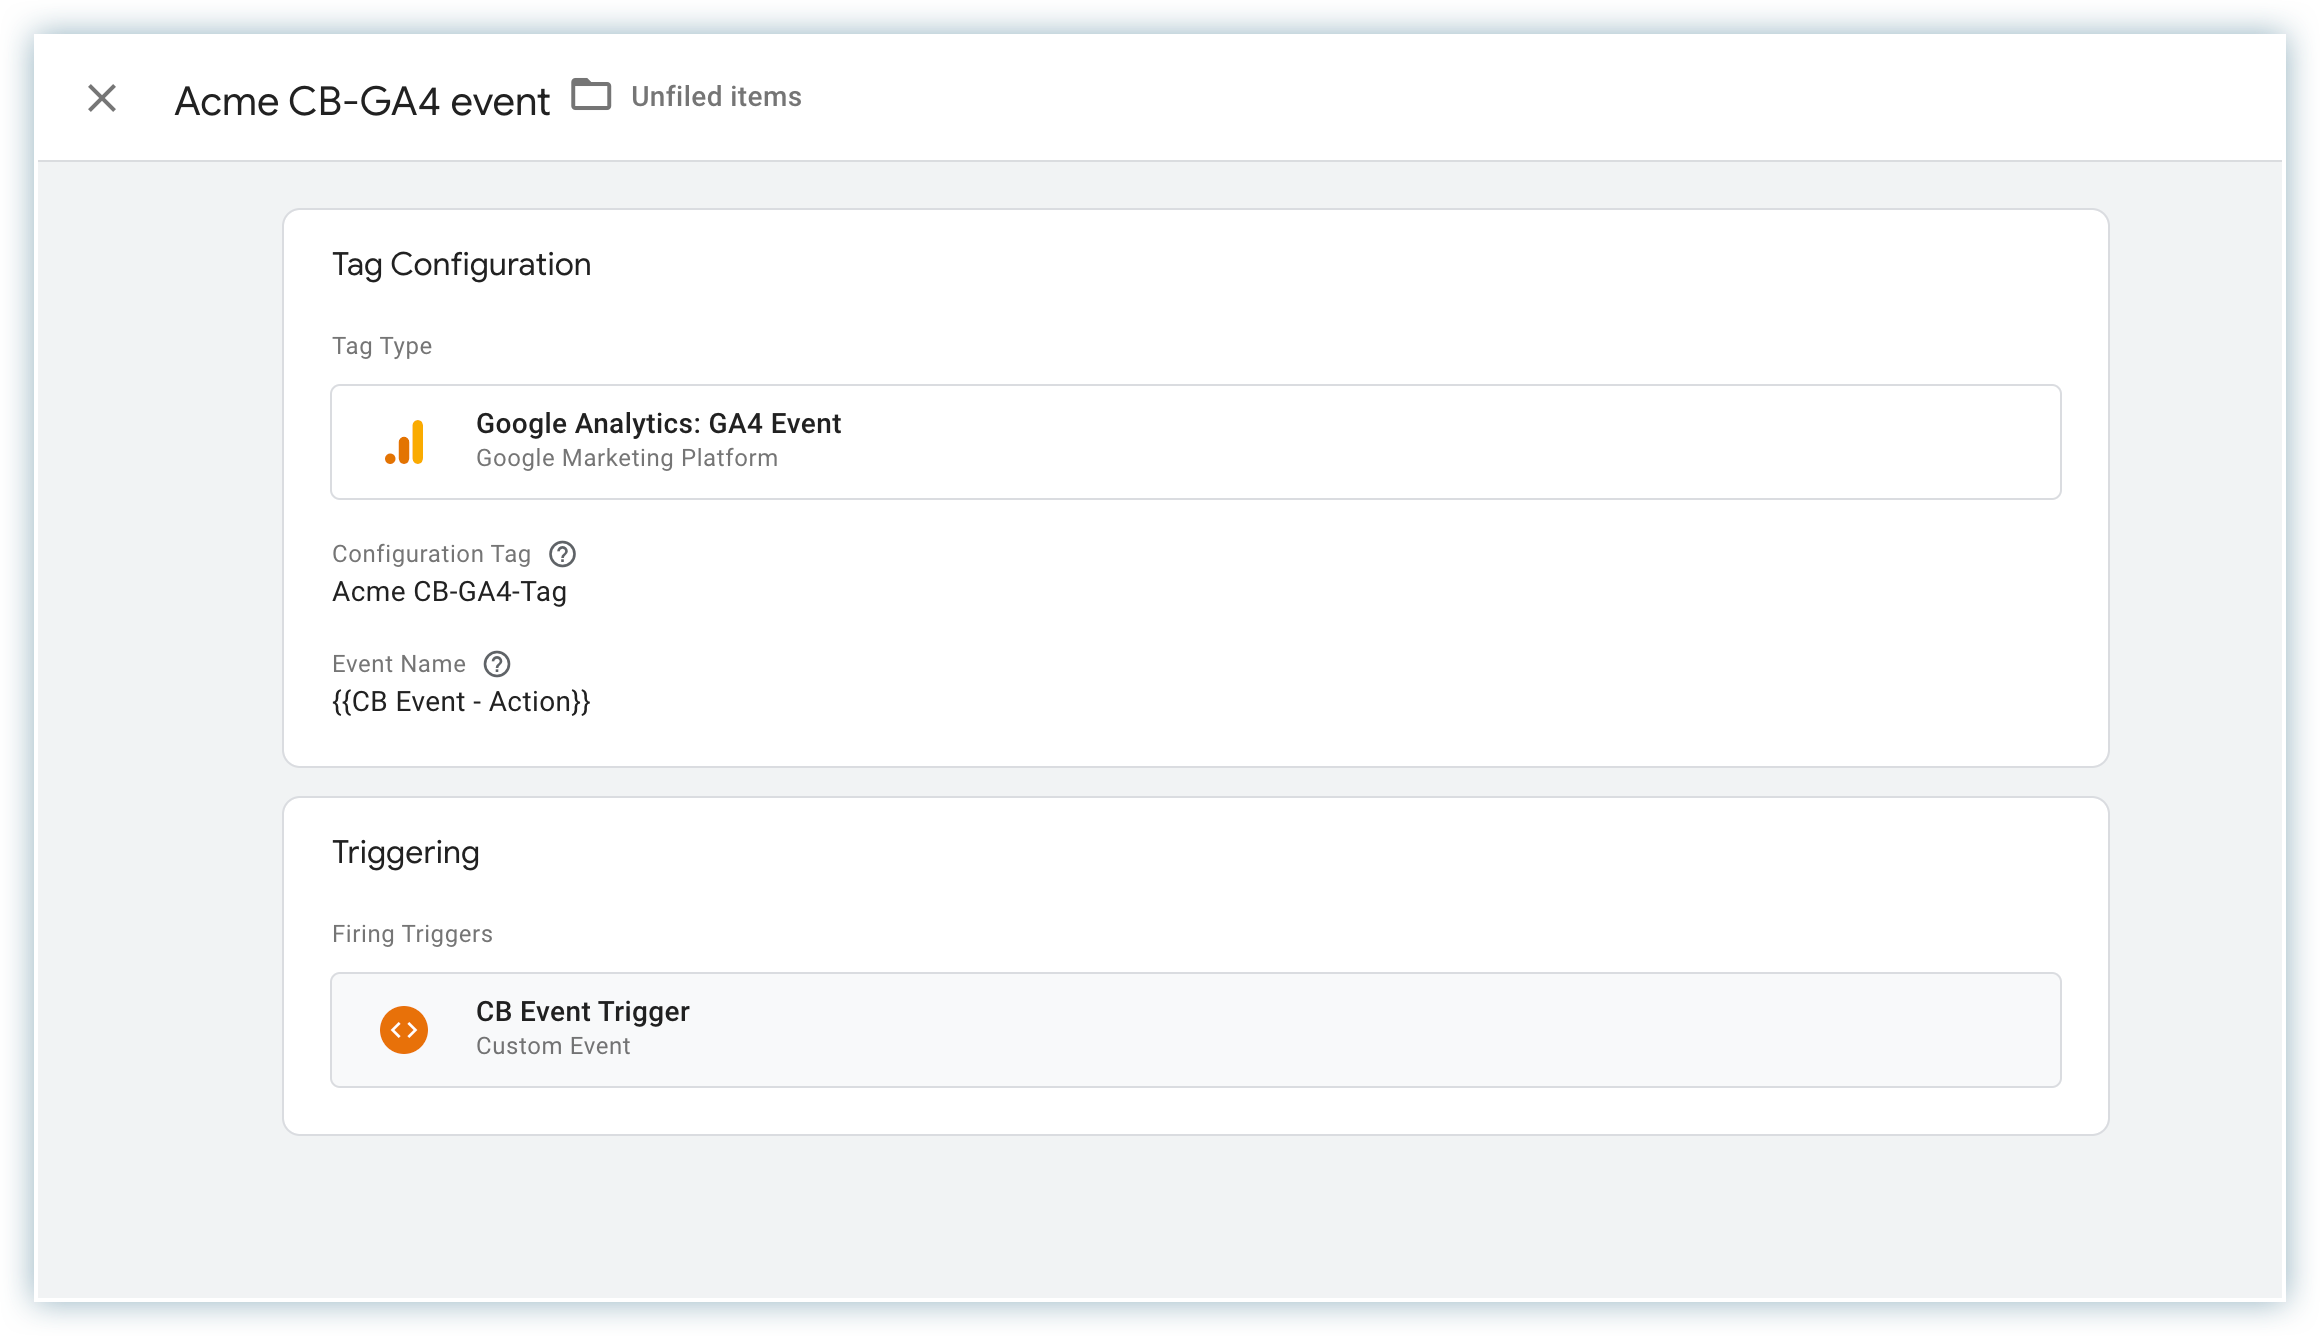
Create a GA4 event tag
Adding these events to your website or mobile app helps you measure additional features and behavior as well as generate useful reports.
- Click Tags > New.
- Click Tag Configuration and choose Google Analytics: GA4 Event.
- Select the configuration tag created earlier, Acme CB-GA4-Tag in our example.
- In the variables, select CB Event - Action.
- Click Triggering and choose the CB Event Trigger created earlier.
- Name the tag, say, Acme CB-GA4 event.
- Click Save.
Ecommerce GA events
The first section covered the basic setup for tracking non-ecommerce GA events. This section helps you set up additional GTM configurations required for tracking ecommerce events.
Prerequisite
- Add your domain under Settings > Configure Chargebee > Checkout and Self-Serve Portal > Advanced Settings > Add domains in Chargebee to track and measure purchase events.
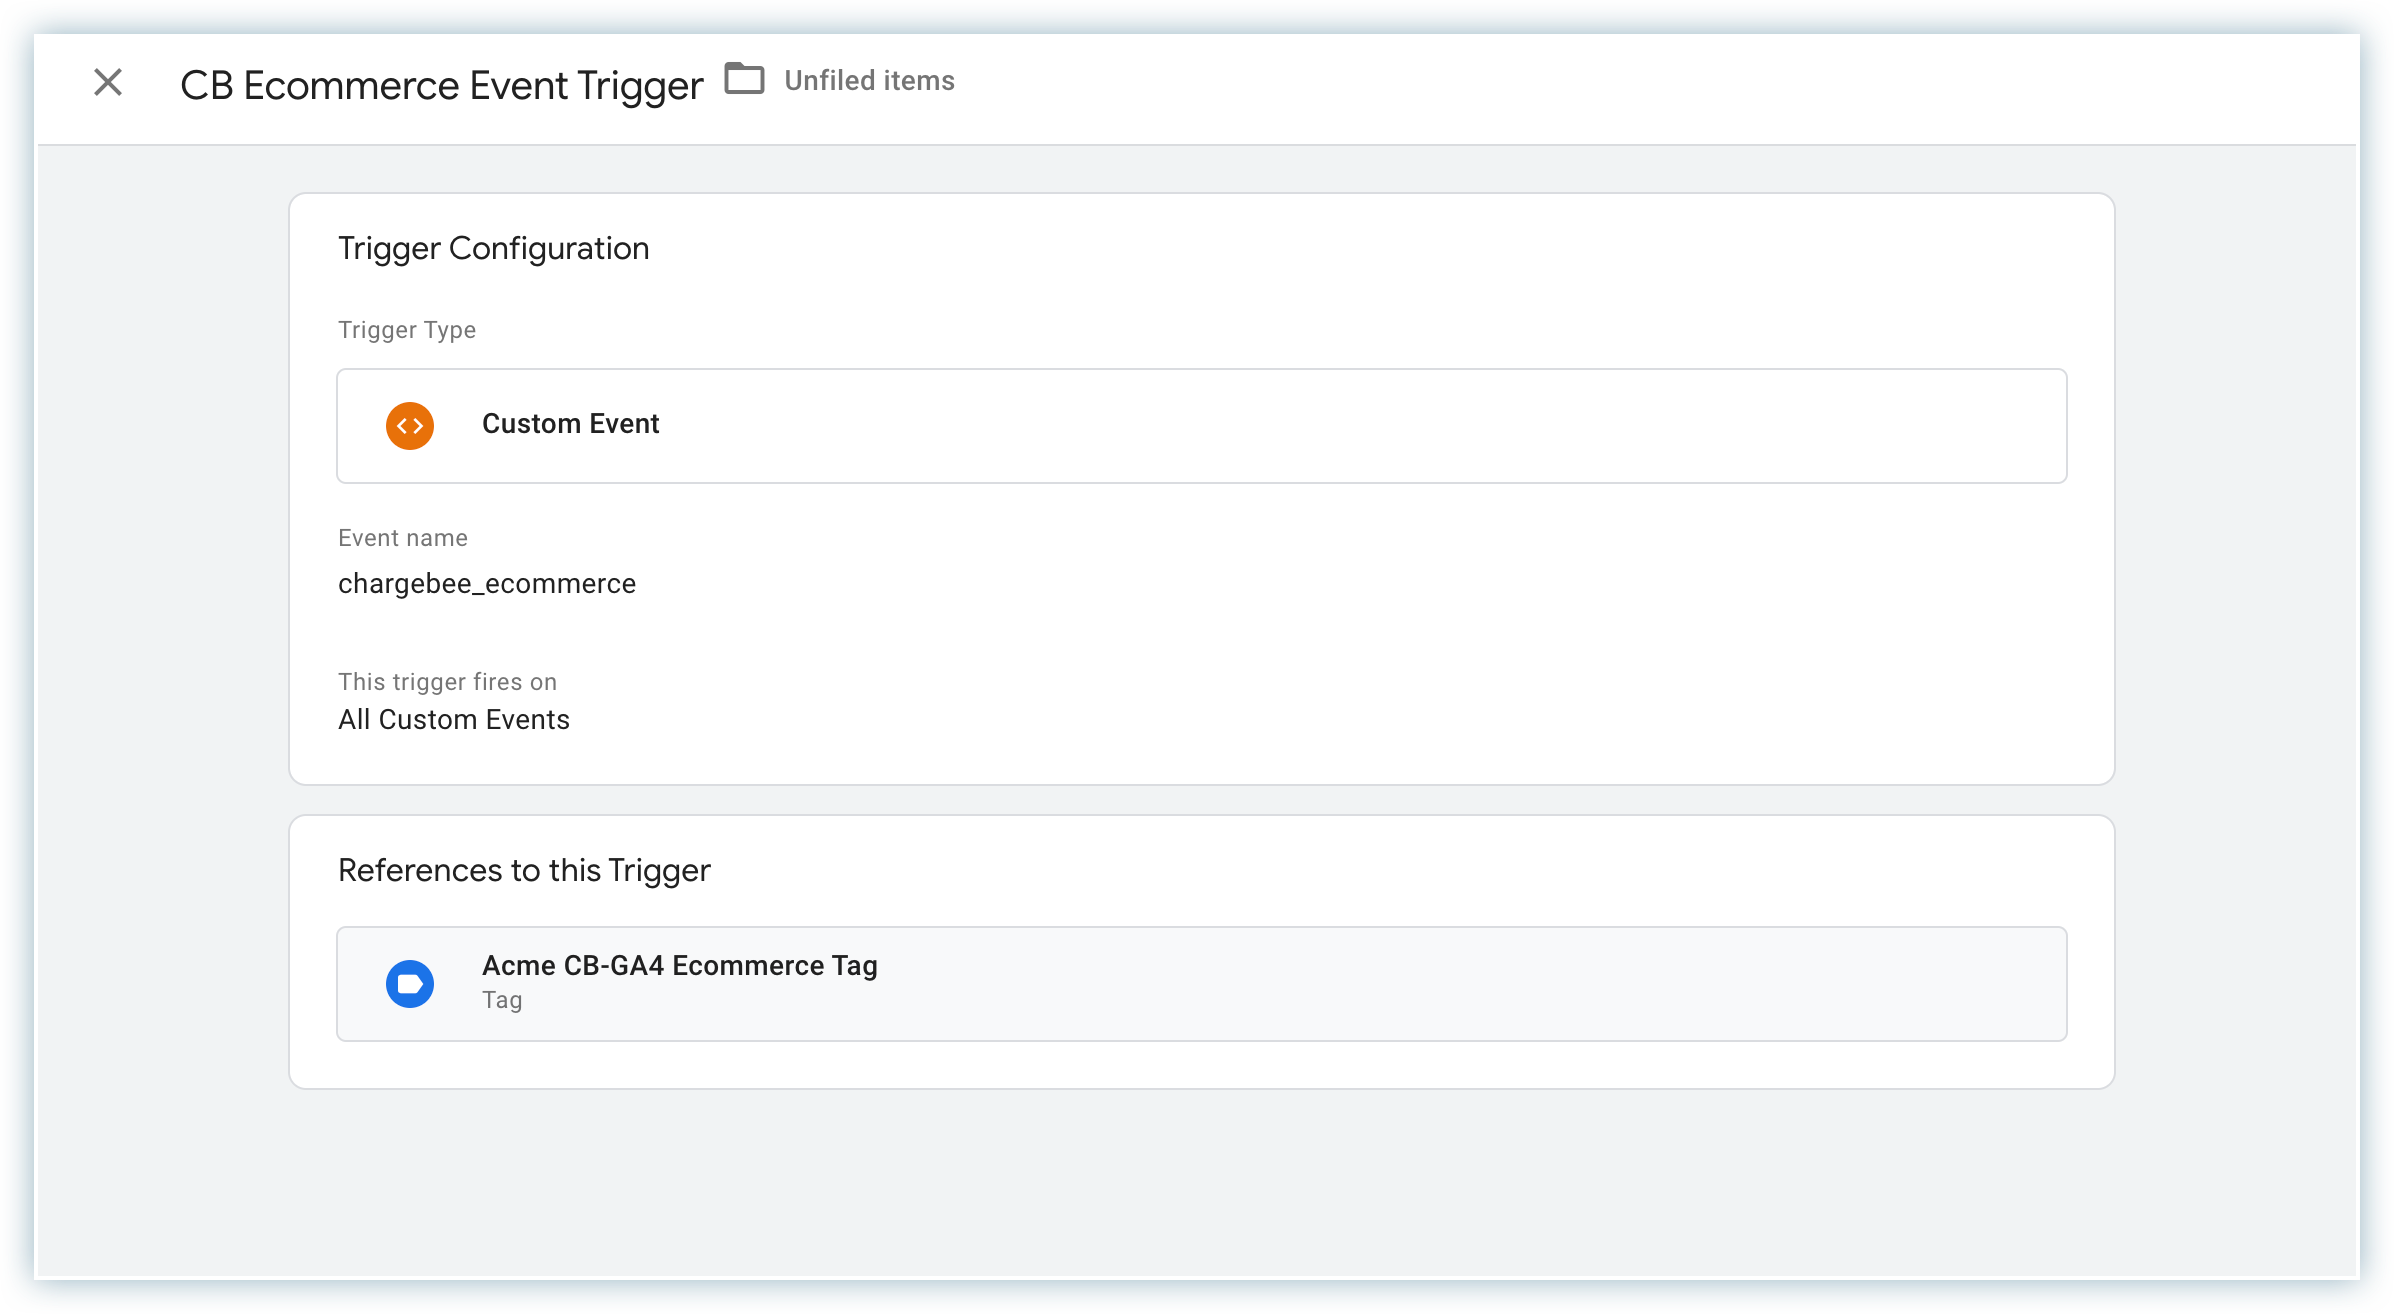
Custom ecommerce event trigger
- Click Triggers > New.
- Click Trigger Configuration and select the Custom Event trigger type.
- Enter the Event name as
chargebee_ecommerce. - Name the trigger, say CB Ecommerce Event Trigger.
- Click Save.
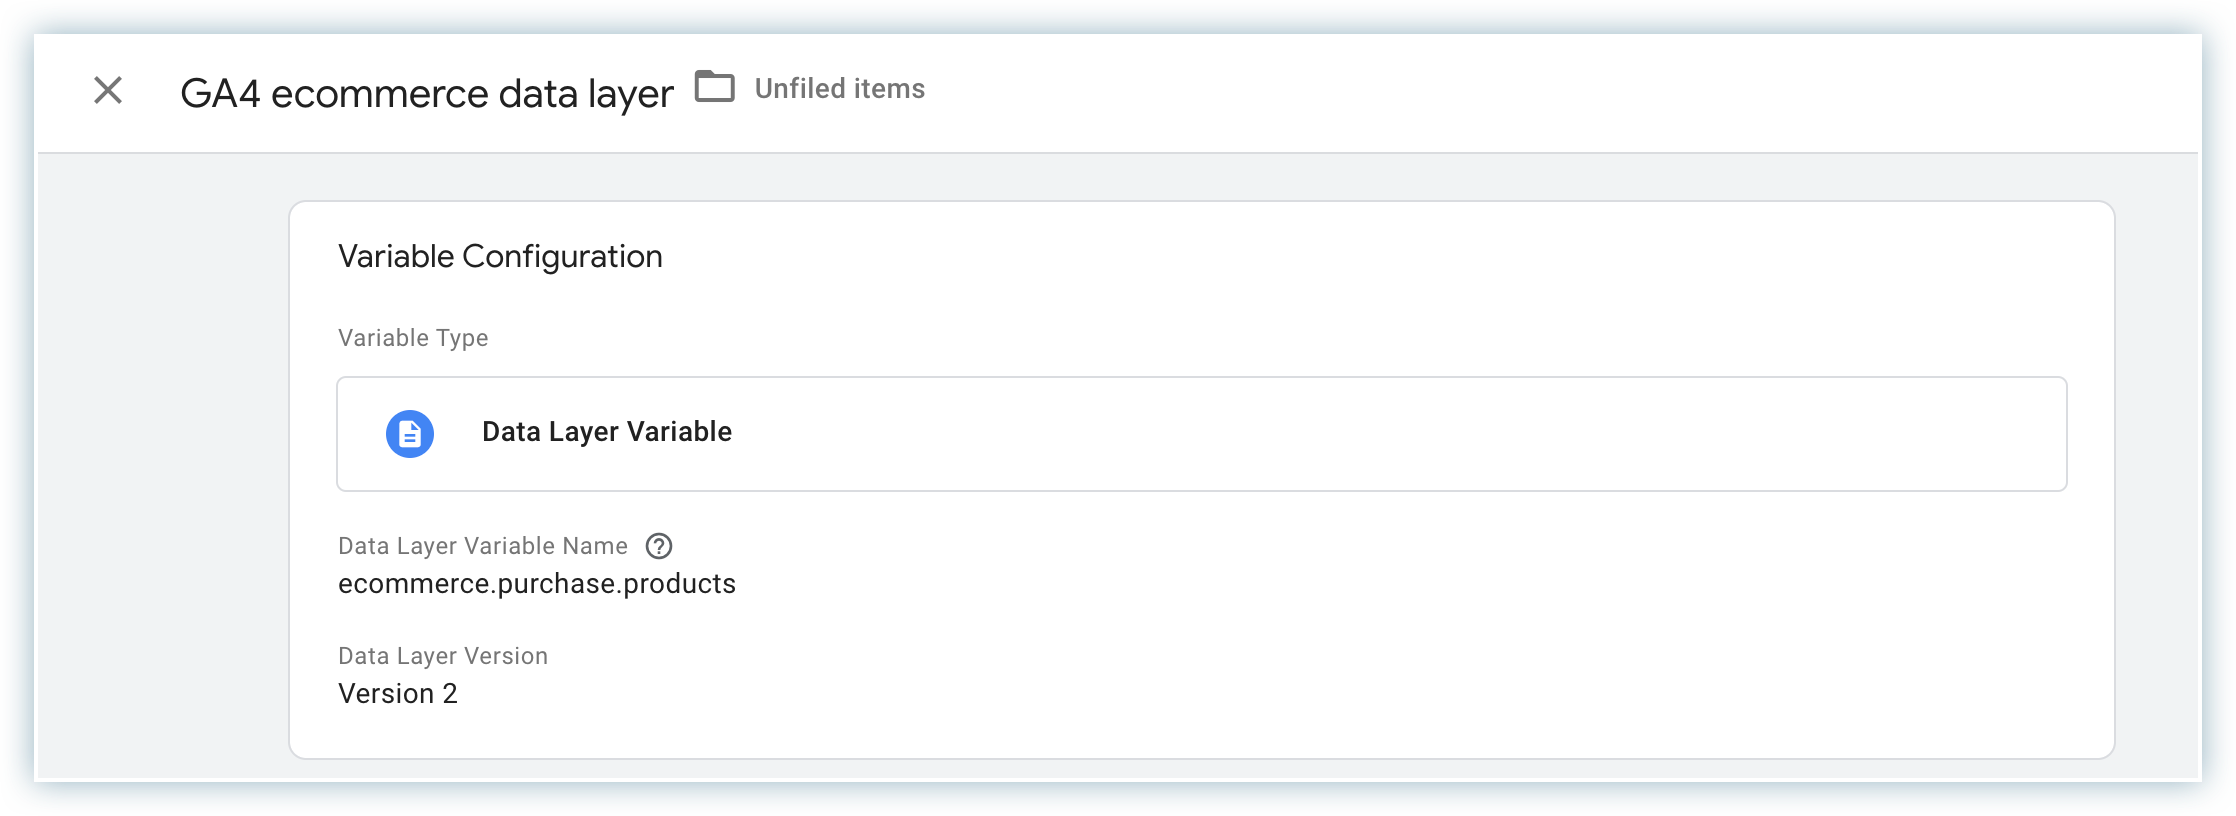
Data layer variable
- In the GTM left navigation, click Variables.
- In the User-Defined Variables section, click New.
- Click Variable Configuration and select Data Layer Variable.
- Under Data Layer Variable Name, enter
ecommerce.purchase.products. - Name the variable, say GA4 ecommerce data layer.
- Click Save.
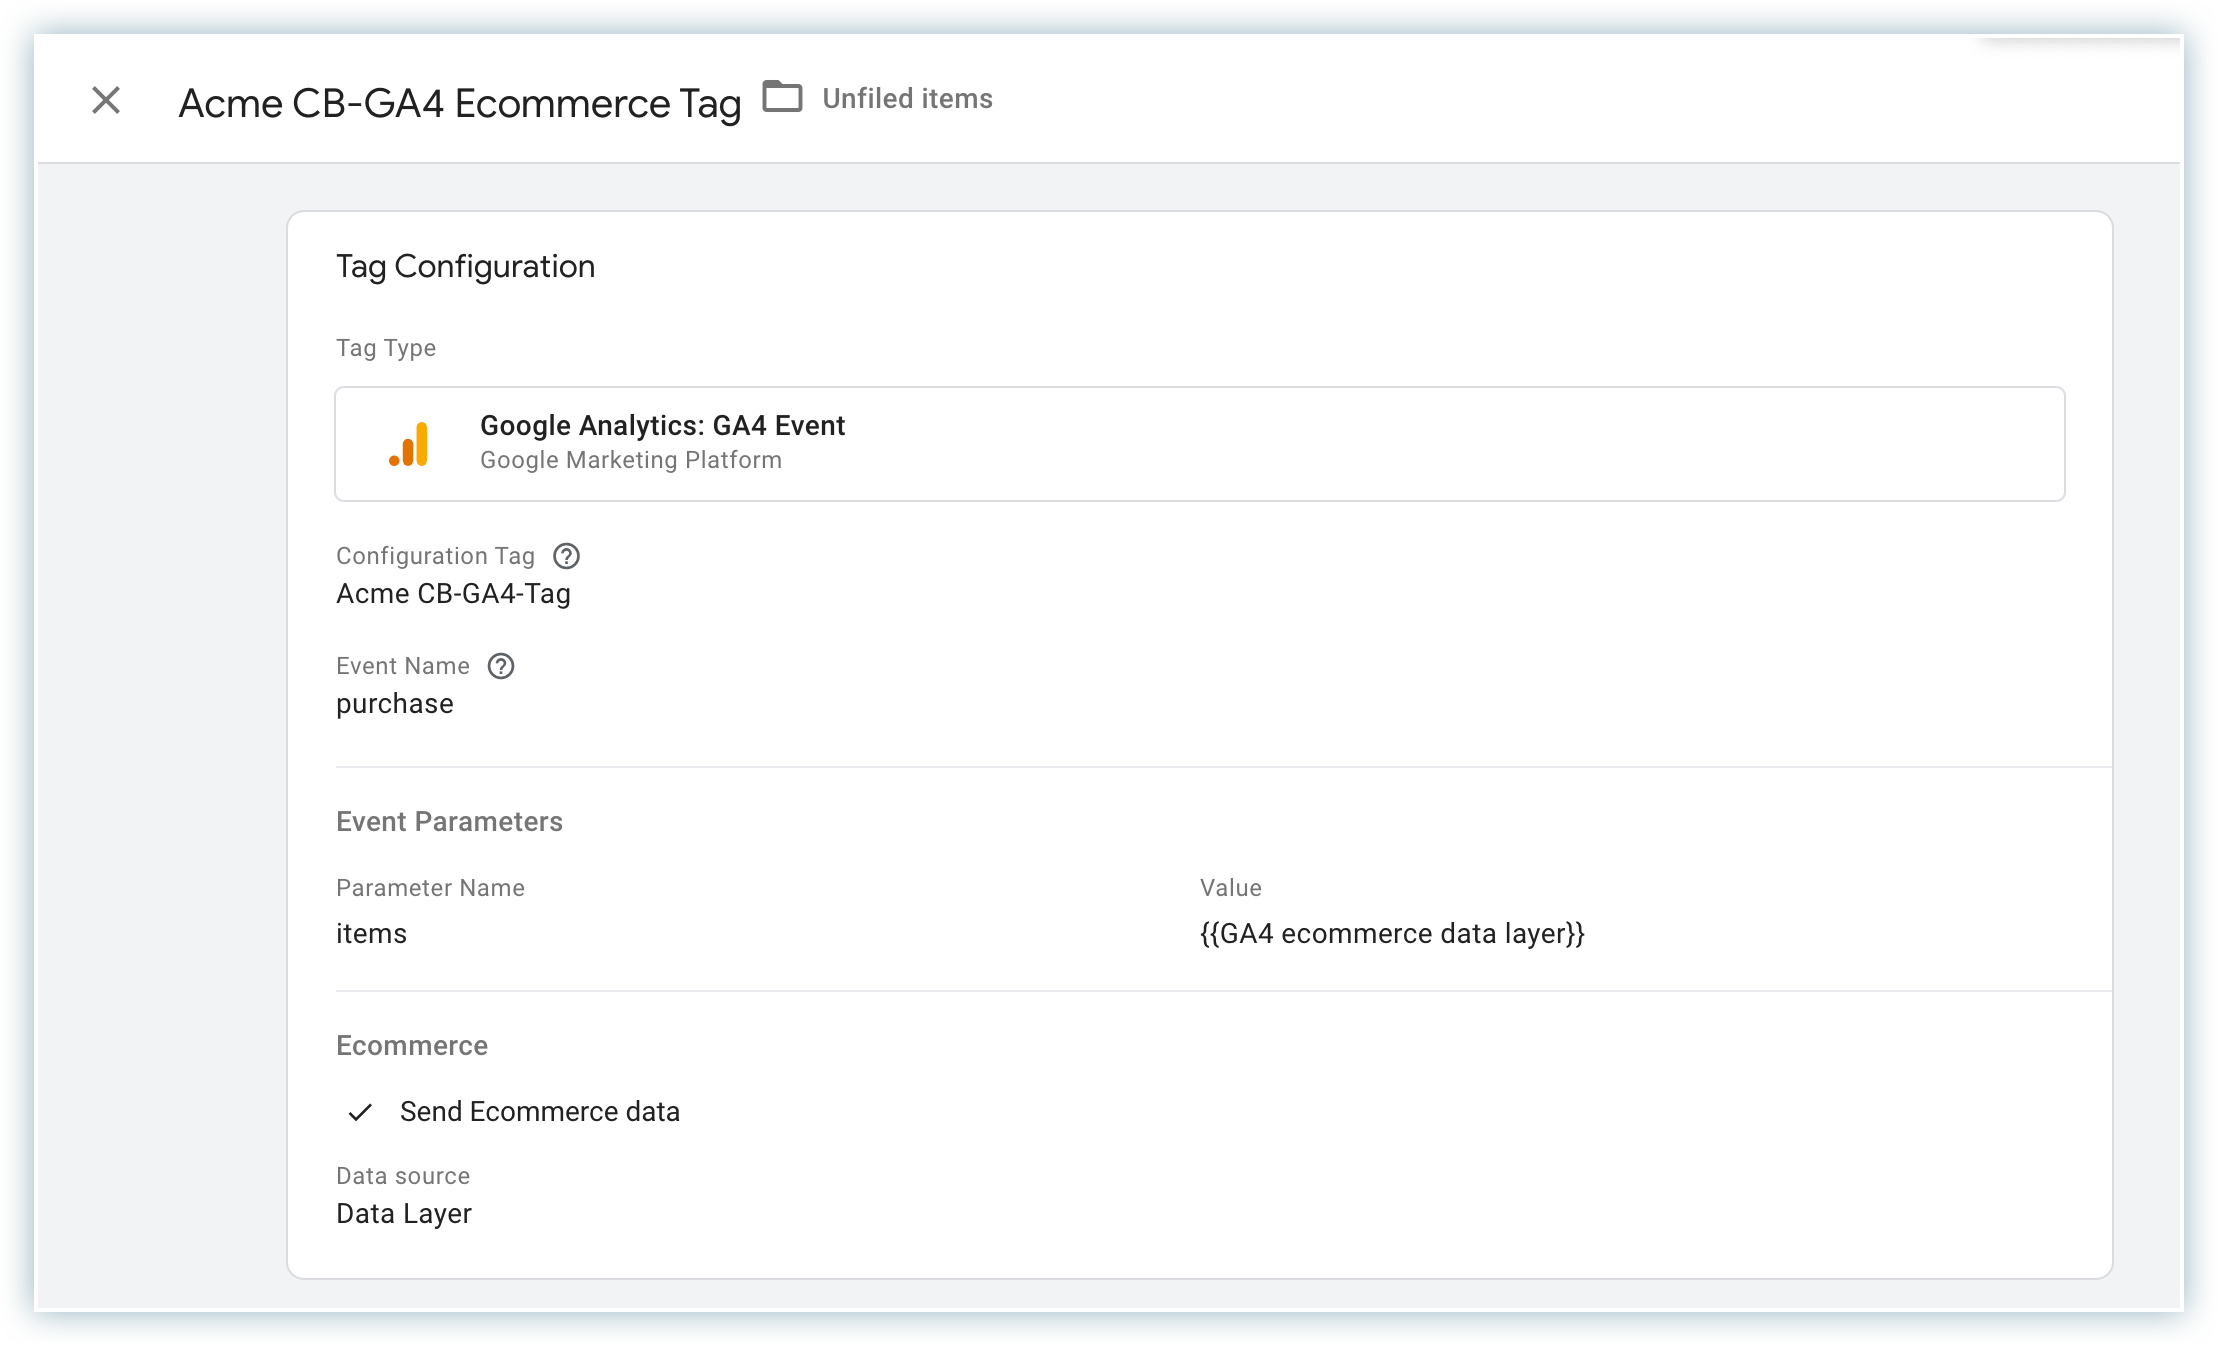
Create a GA4 event tag for ecommerce events
- Click Tags > New.
- Click Tag Configuration and choose Google Analytics: GA4 Event.
- Select the configuration tag created earlier, Acme CB-GA4-Tag in our example.
- In the event name, enter
purchase. - In the event parameters, give the parameter name as
items, and in the value, select the ecommerce data layer variable created earlier. In our example, GA4 ecommerce data layer. - Click on More Settings > Ecommerce > Check Send Ecommerce data > Also select Data Layer from the dropdown for Data Source.
- Click Triggering and choose the CB Ecommerce Event Trigger created earlier. In our example, CB Ecommerce Event Trigger.
- Name the tag, say, Acme CB-GA4 Ecommerce Tag.
- Click Save.
Publish the Google Tag Manager container
Once you have created the tag, publish the GTM container to make the changes live on the Chargebee-hosted pages.
To publish the GTM container, follow these steps:
- Go to the Overview section of your GTM account.
- Click the Submit button in the top-right corner of the screen.
- Select the Publish option.
- Click Publish to publish the container.
You have now successfully integrated Google Analytics 4 with Chargebee-hosted pages through Google Tag Manager. You can now track visitor behavior and user engagement on your website to gain valuable insights into user behavior and make data-driven decisions.
Information
Whenever you make changes to the GTM configuration, ensure that you reload your site, ignoring cached content (i.e., hard refresh). The keyboard shortcuts are:
Mac: ⌘ + Shift + R
Windows/Linux: Ctrl + F5 or Ctrl + Shift + R
Watch data in GA4
You can test your GA tag by checking real-time reports. Remember that it takes 24–48 hours to process non-real-time reports. Refer to checking your tag setup in Google Analytics.
Limitations
Learn more about the limitations of GA4 tracking.
Events passed to GTM/GA
Learn more about the events passed to GTM/GA.
Articles & FAQs
Was this article helpful?