Stripe
Click here if you are looking for information associated with RBI's e-mandate.
If you are using Stripe.js as your checkout solution and need to be SCA-compliant under the European PSD2 regulation, take a look at 3DS implementation for Stripe.js in Chargebee.
Supported payment methods
Stripe supports a wide range of payment methods to help you accept payments around the world. Each payment method varies in the authentication process. As a merchant, you can seamlessly integrate Stripe with Chargebee to process your payments.
Click on the links below to learn more about configuring the desired payment method:
- Direct Debit (SEPA)
- ACH Payments
- Apple Pay
- Google Pay
- Amazon Pay
- Stablecoin
- iDEAL
- Bancontact
- Klarna
- Sofort
- BACS
- BECS
- BECS NZ
- Boleto
- PayPay
- South Korean Cards
Configuring payments via Stripe
The following steps will help you configure Stripe with Chargebee.
- Click Settings > Configure Chargebee > Payment Gateway > Add payment gateway > Stripe. You can configure Stripe either from your test or live account.
- Log in to an existing account or create a new one.
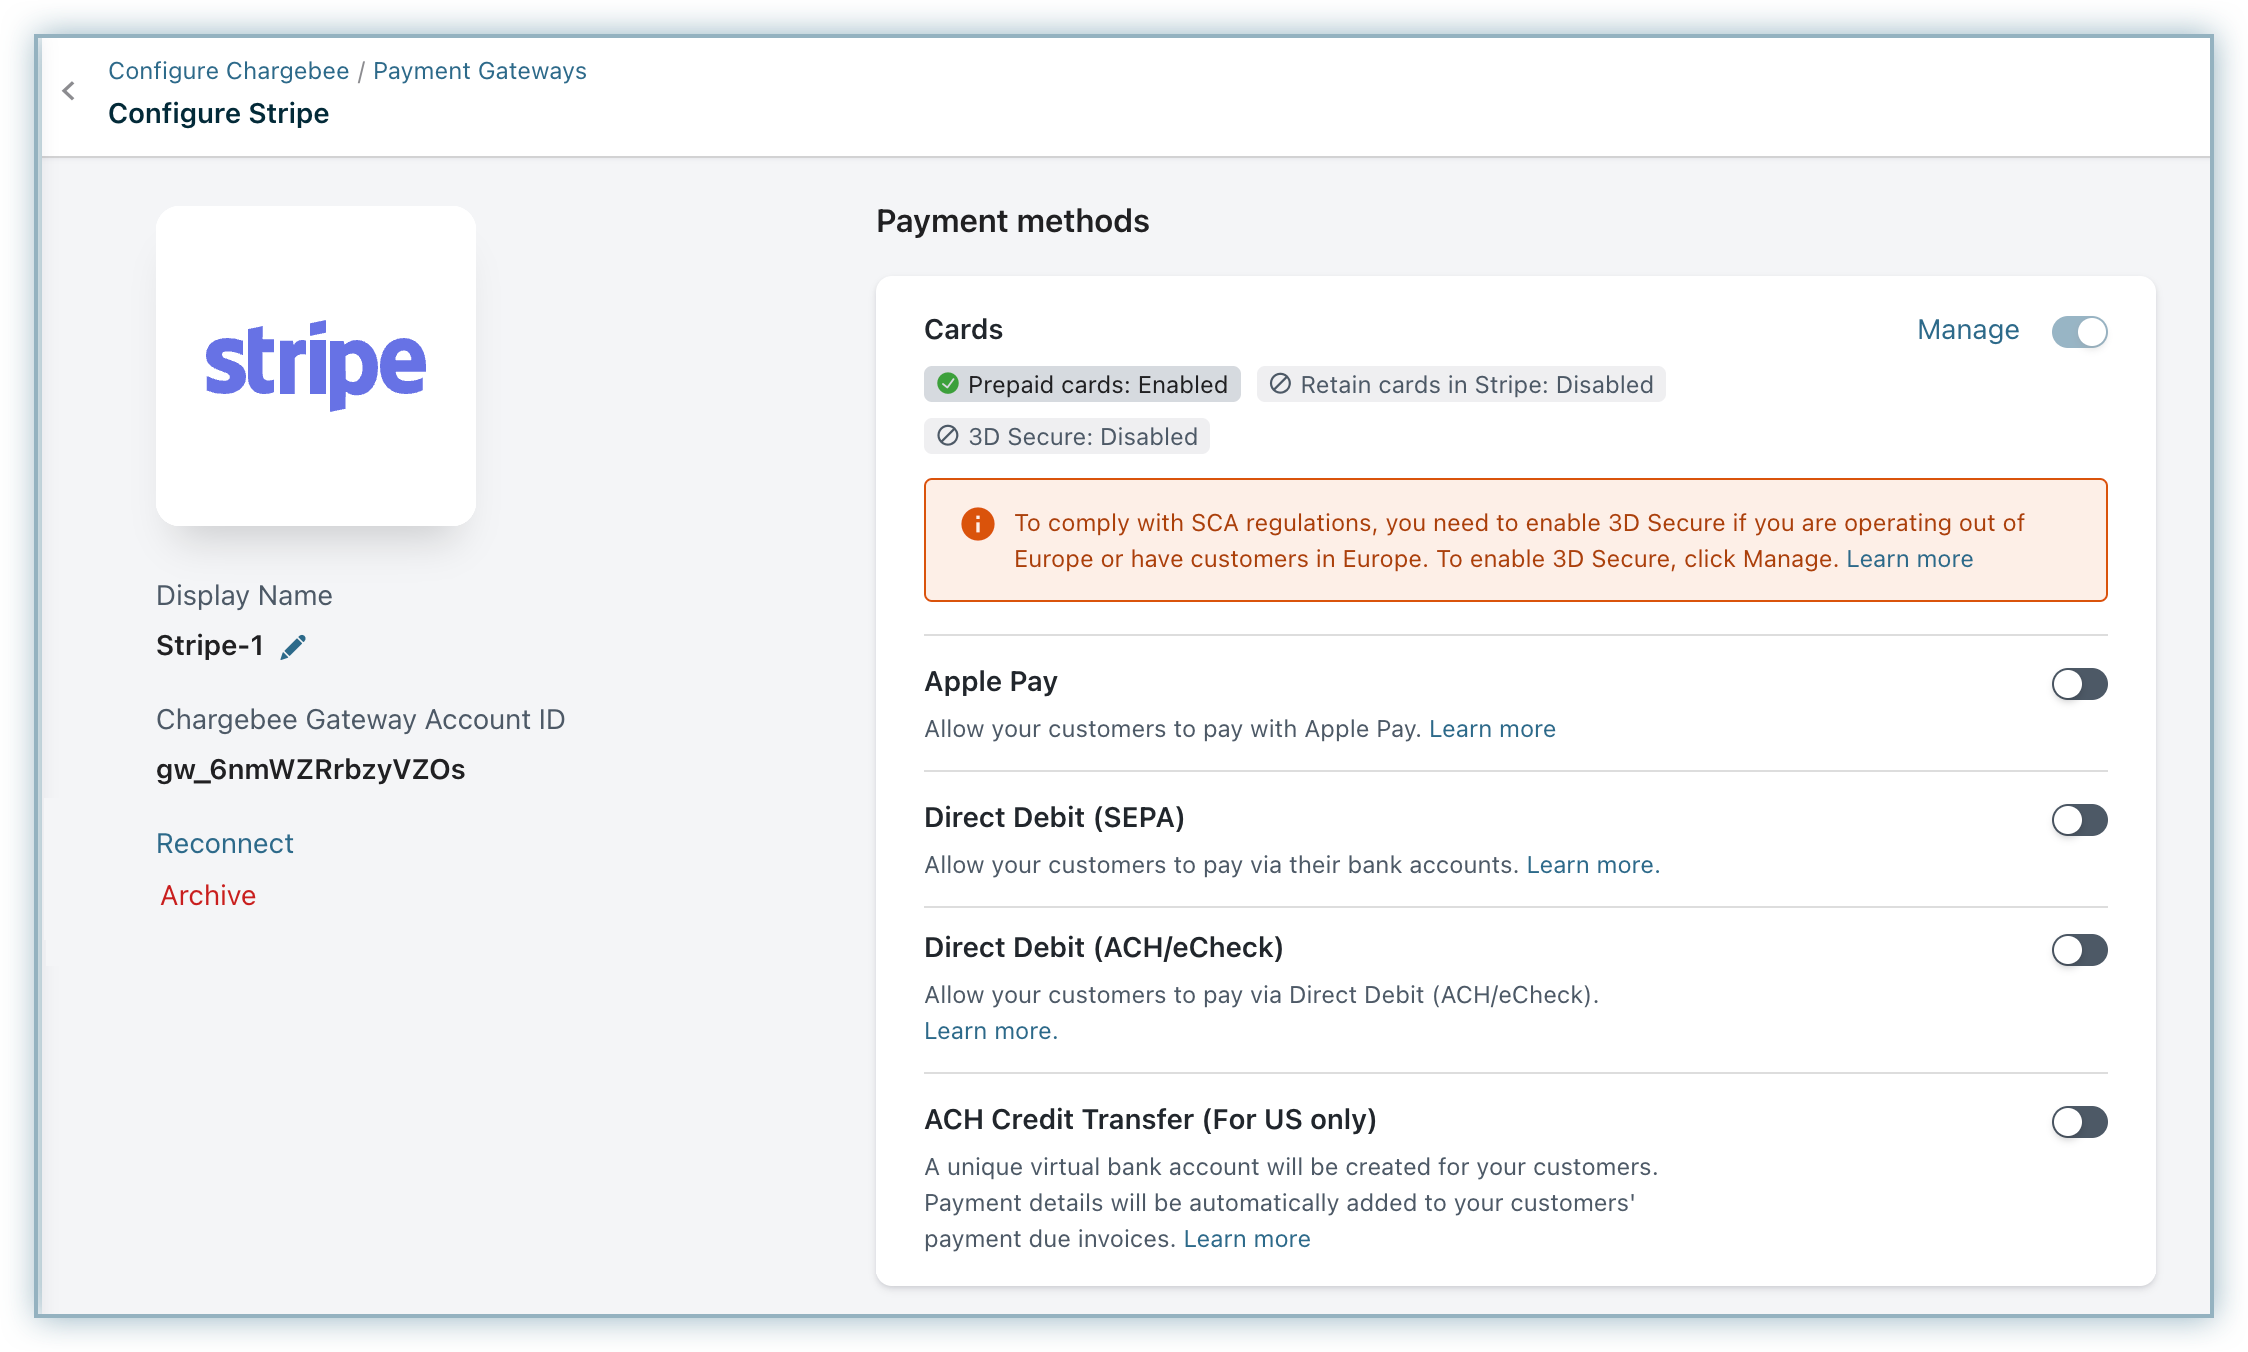
- The Configure Stripe page will open as shown below.
Note
For a seamless customer experience, disable Stripe's direct debit notifications and enable them in Chargebee if you prefer Chargebee to manage them. Enabling notifications in both systems will result in duplicate emails being sent to customers.
Due to recent world events, you may experience failures for payments originating from Russian financial institutions or instruments. We recommend reviewing guidelines issued by respective payment gateways for additional information.
Cards
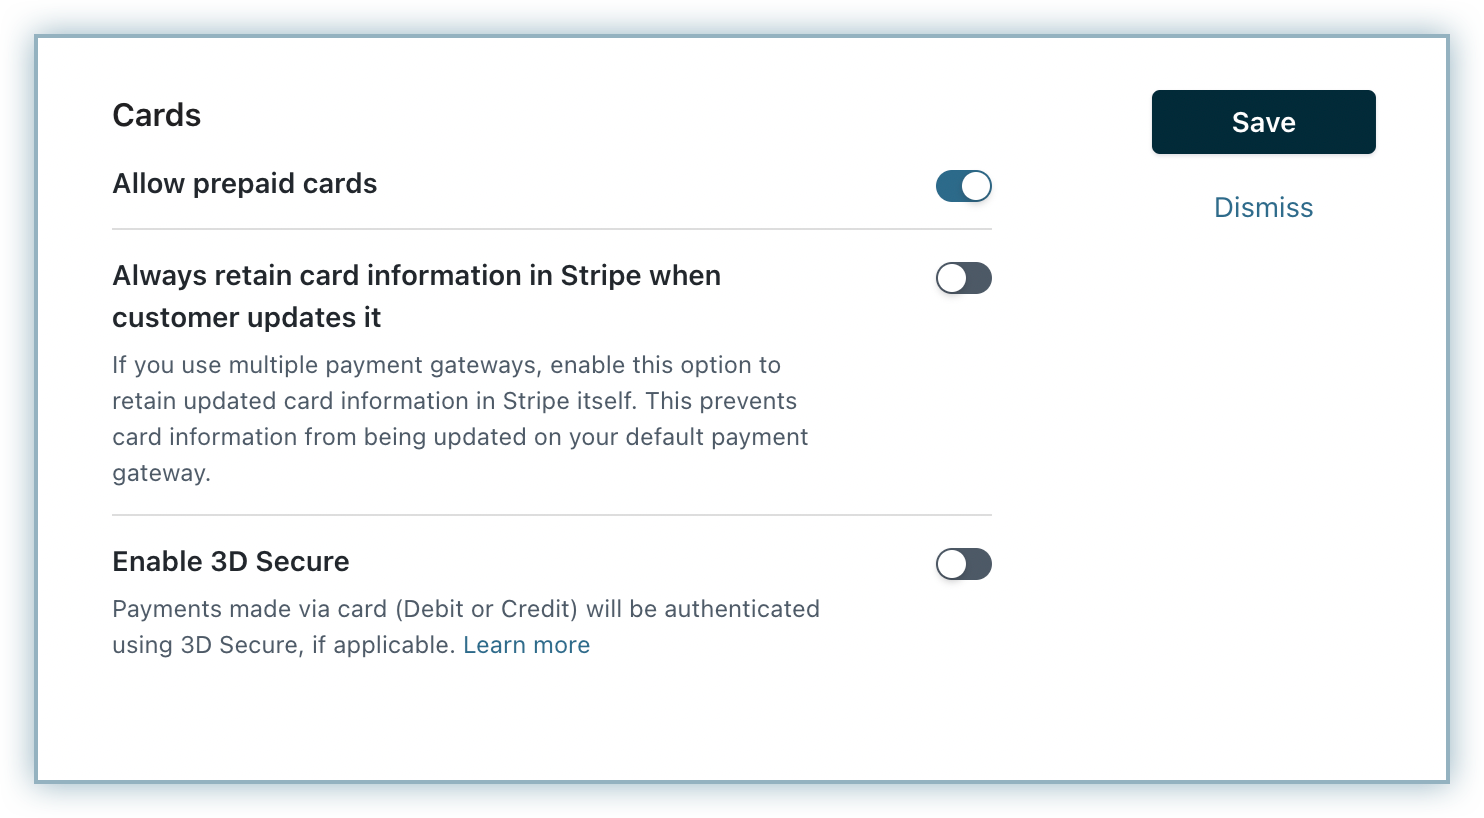
Click the Manage link next to cards to configure them.
- Prepaid cards: Enable this option to allow your customers to pay via prepaid cards.
- Always retain card information in Stripe: This option determines where updated cards will be vaulted for existing customers when using multiple gateways. Enable to retain cards in Stripe, even if smart routing is updated to a new gateway. Disable to gradually migrate customers to the new gateway as they update their cards. Learn more.
Configuring webhooks
Webhooks notify Chargebee of changes to transactions on Stripe, ensuring your payment information stays up to date.
Follow these steps to configure webhooks in your Stripe account:
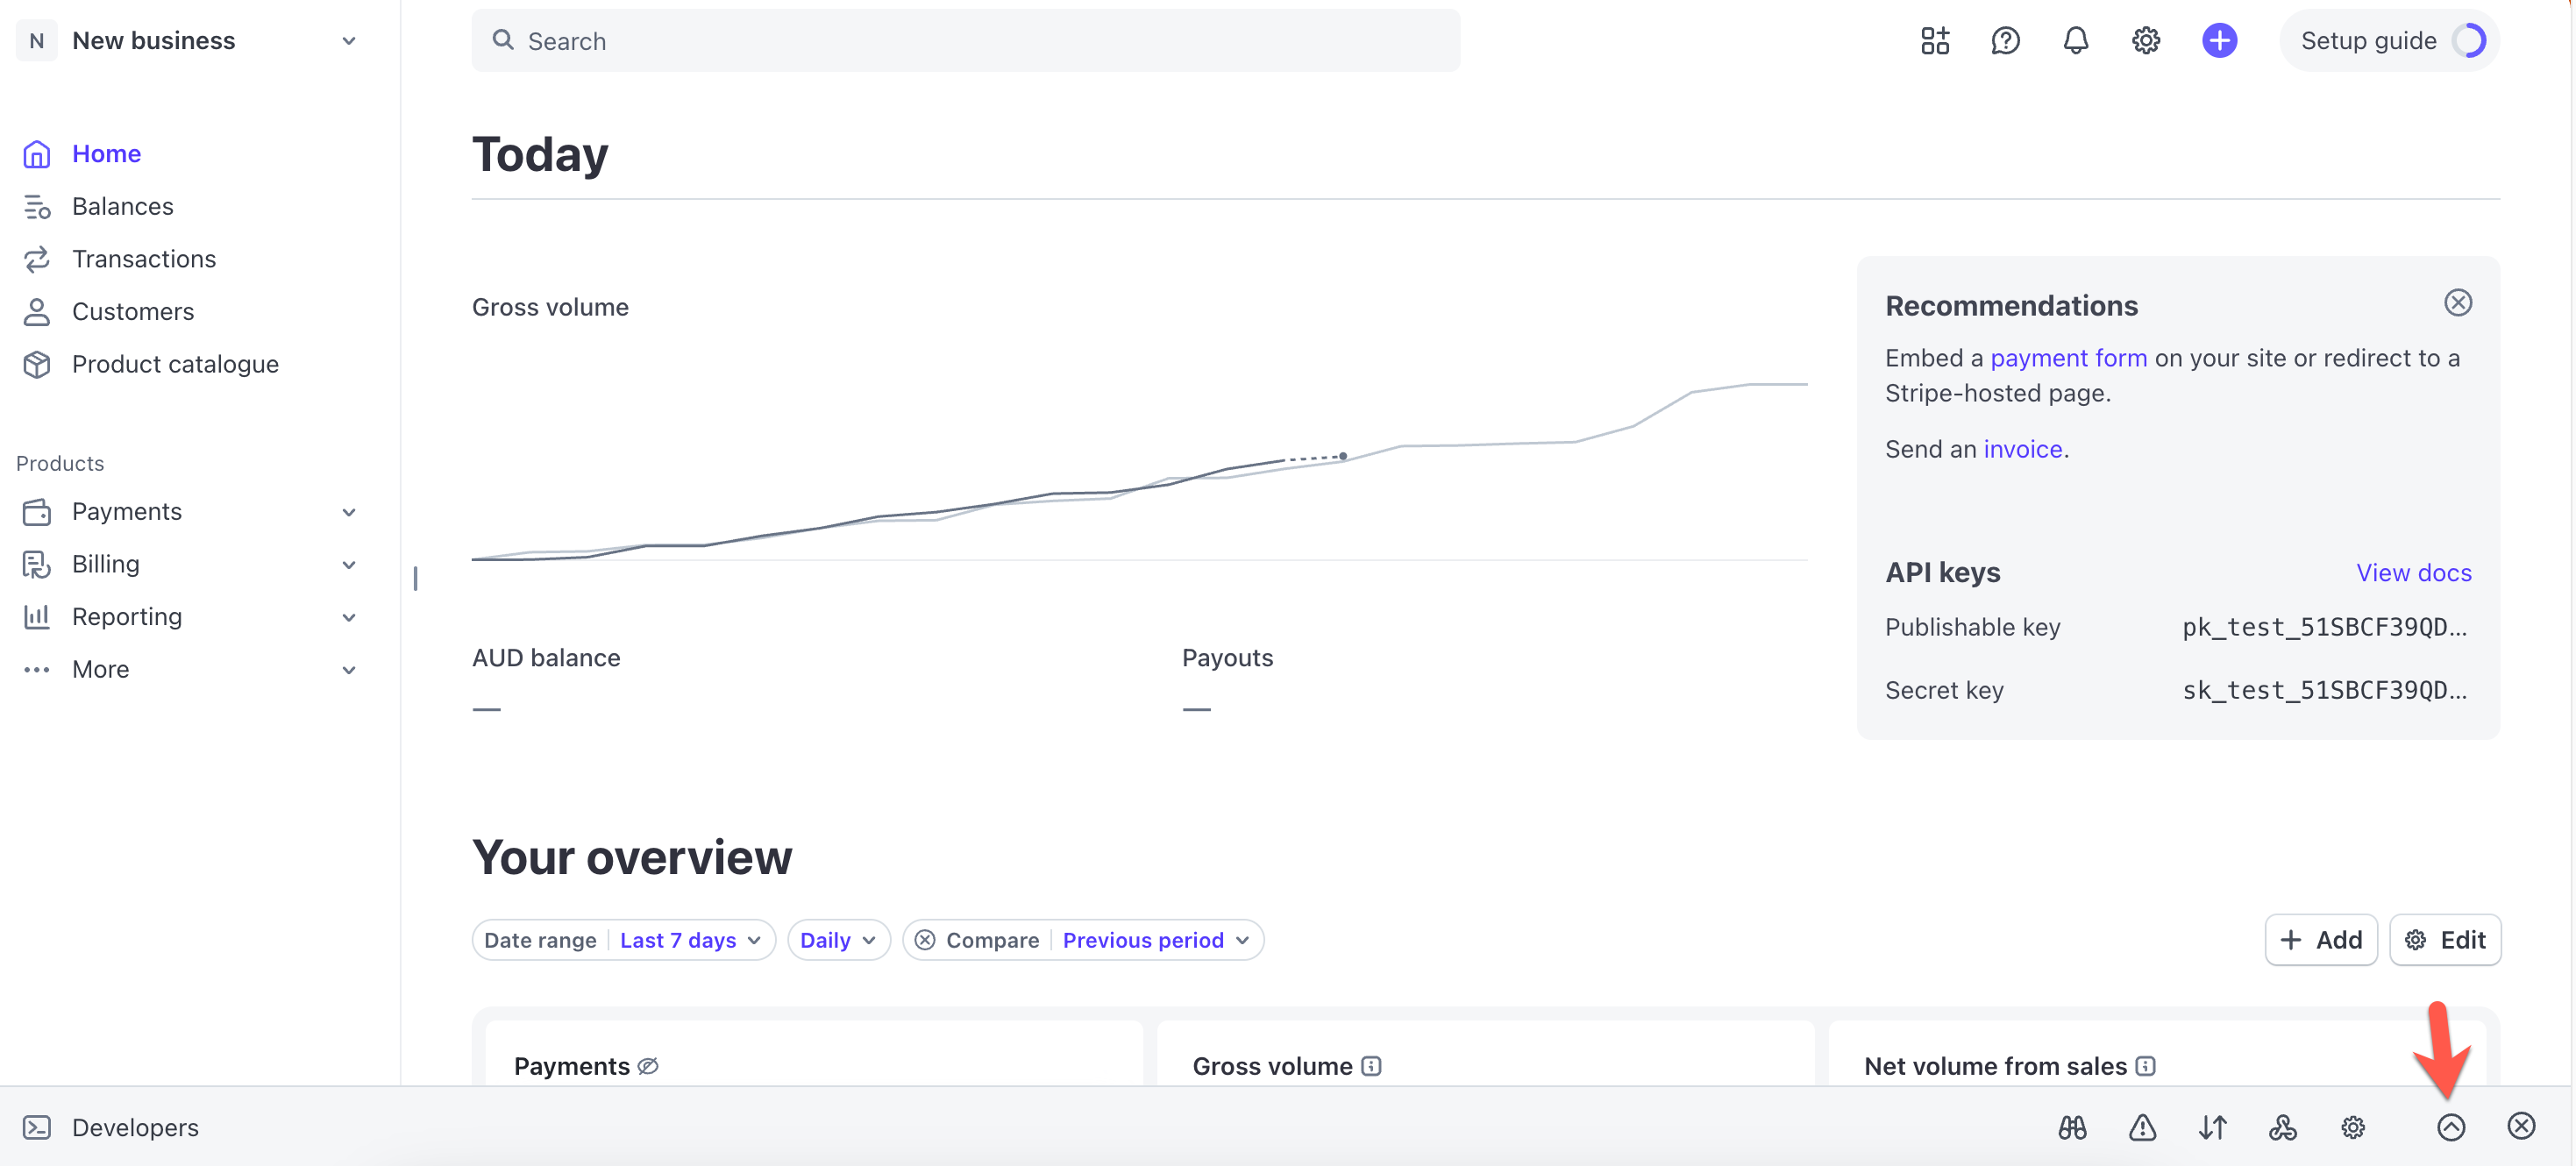
- Log in to your Stripe account.
- On the Home page, click the Open Workbench icon.
- Click + Add destination under the Webhooks tab.
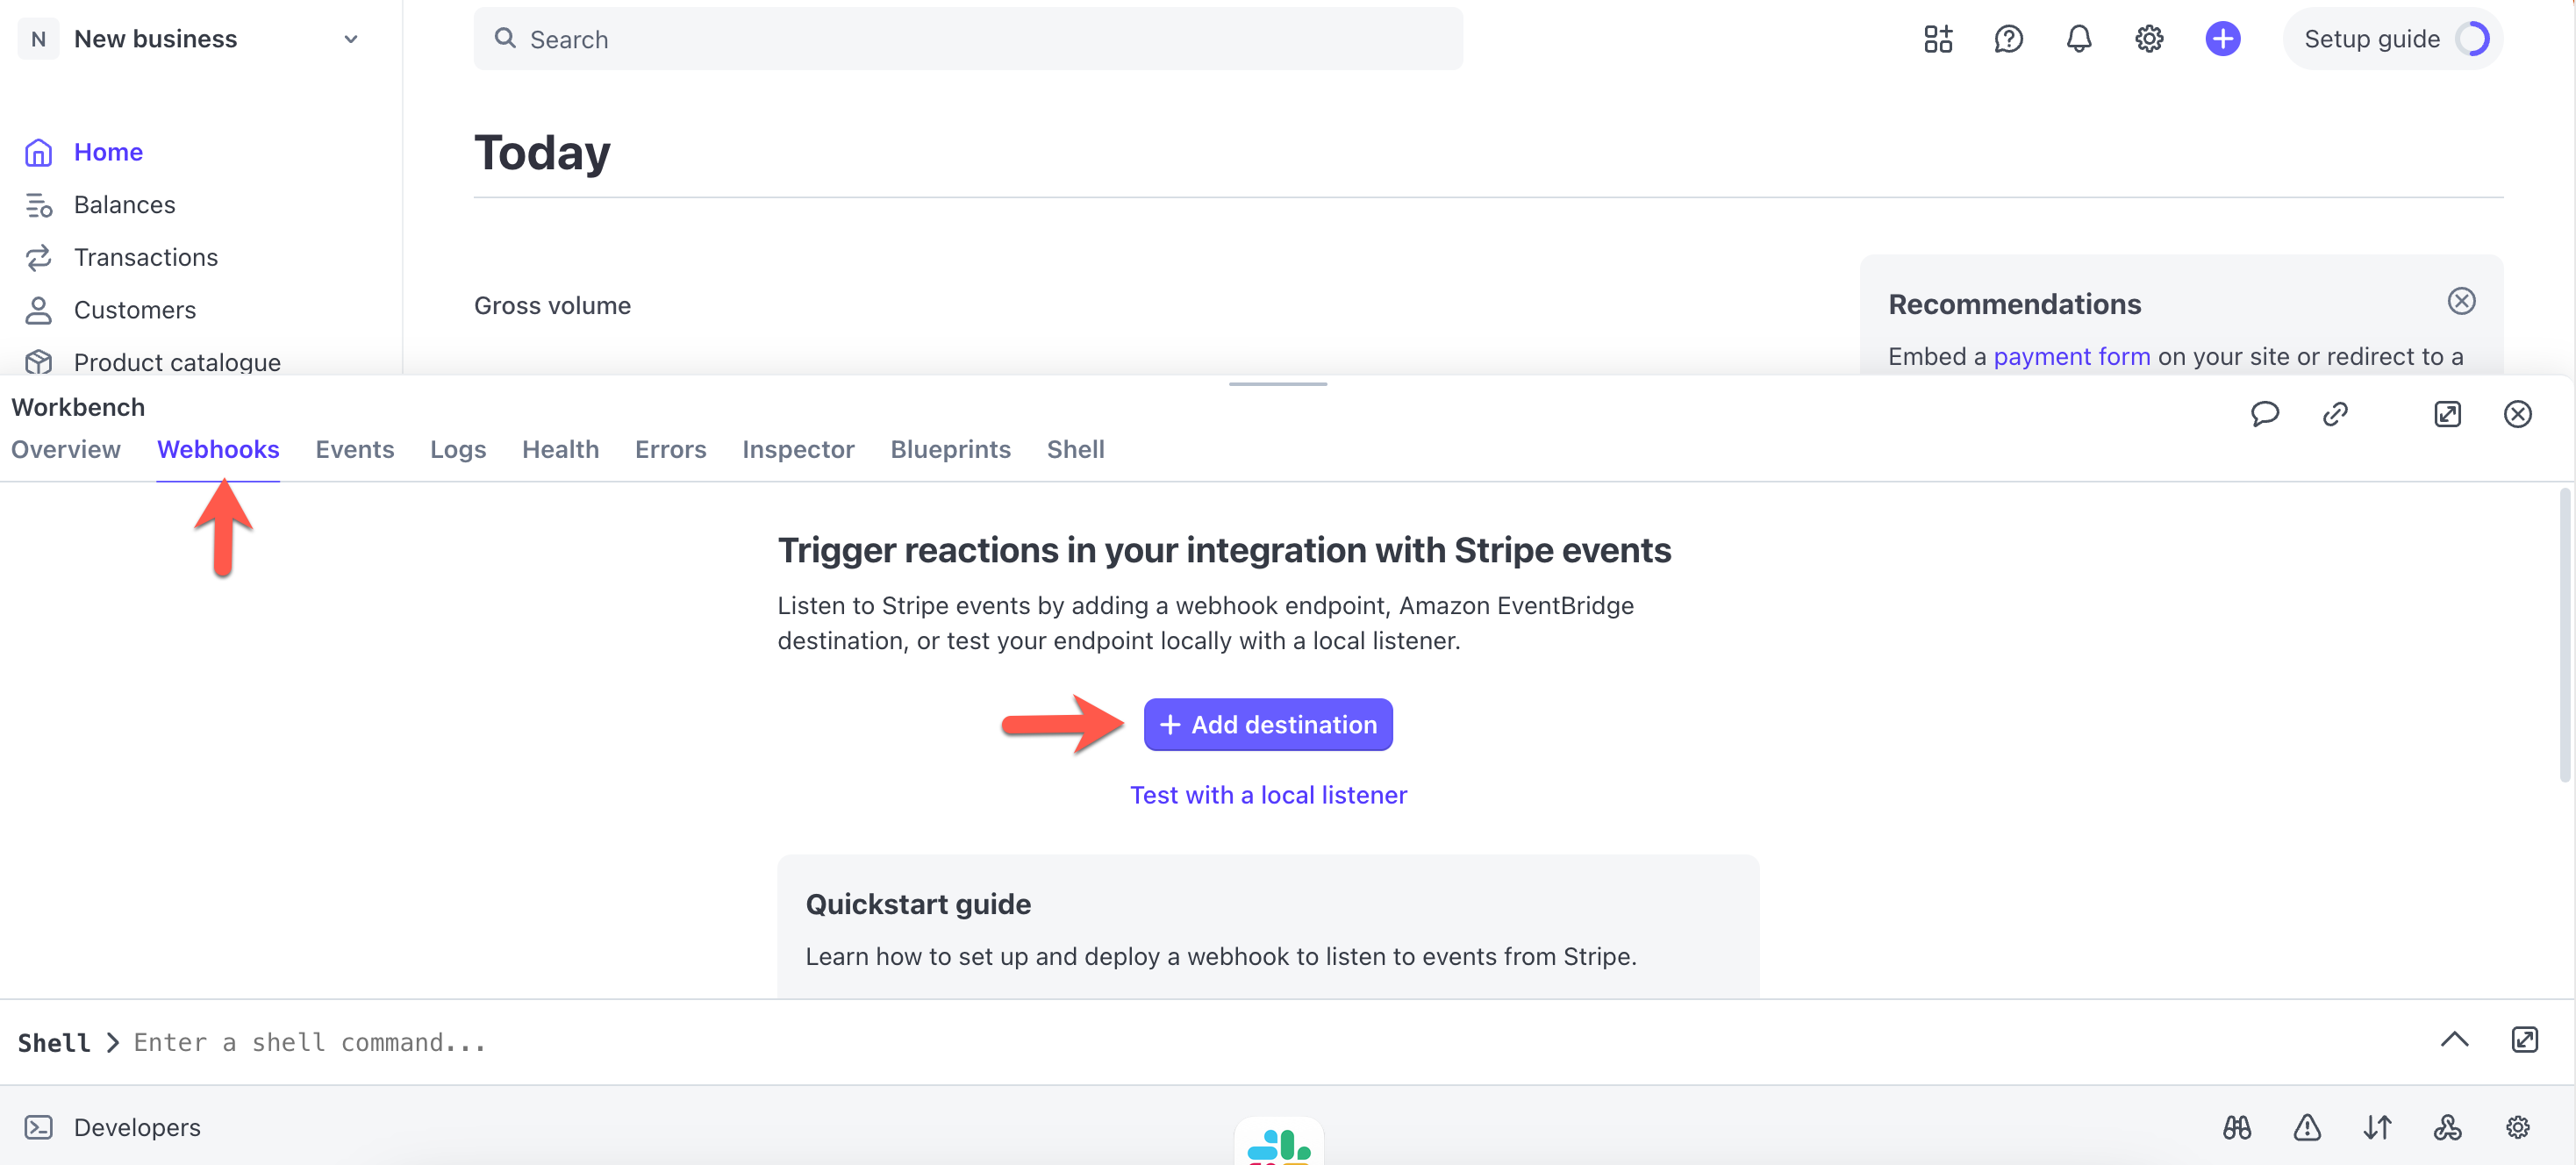
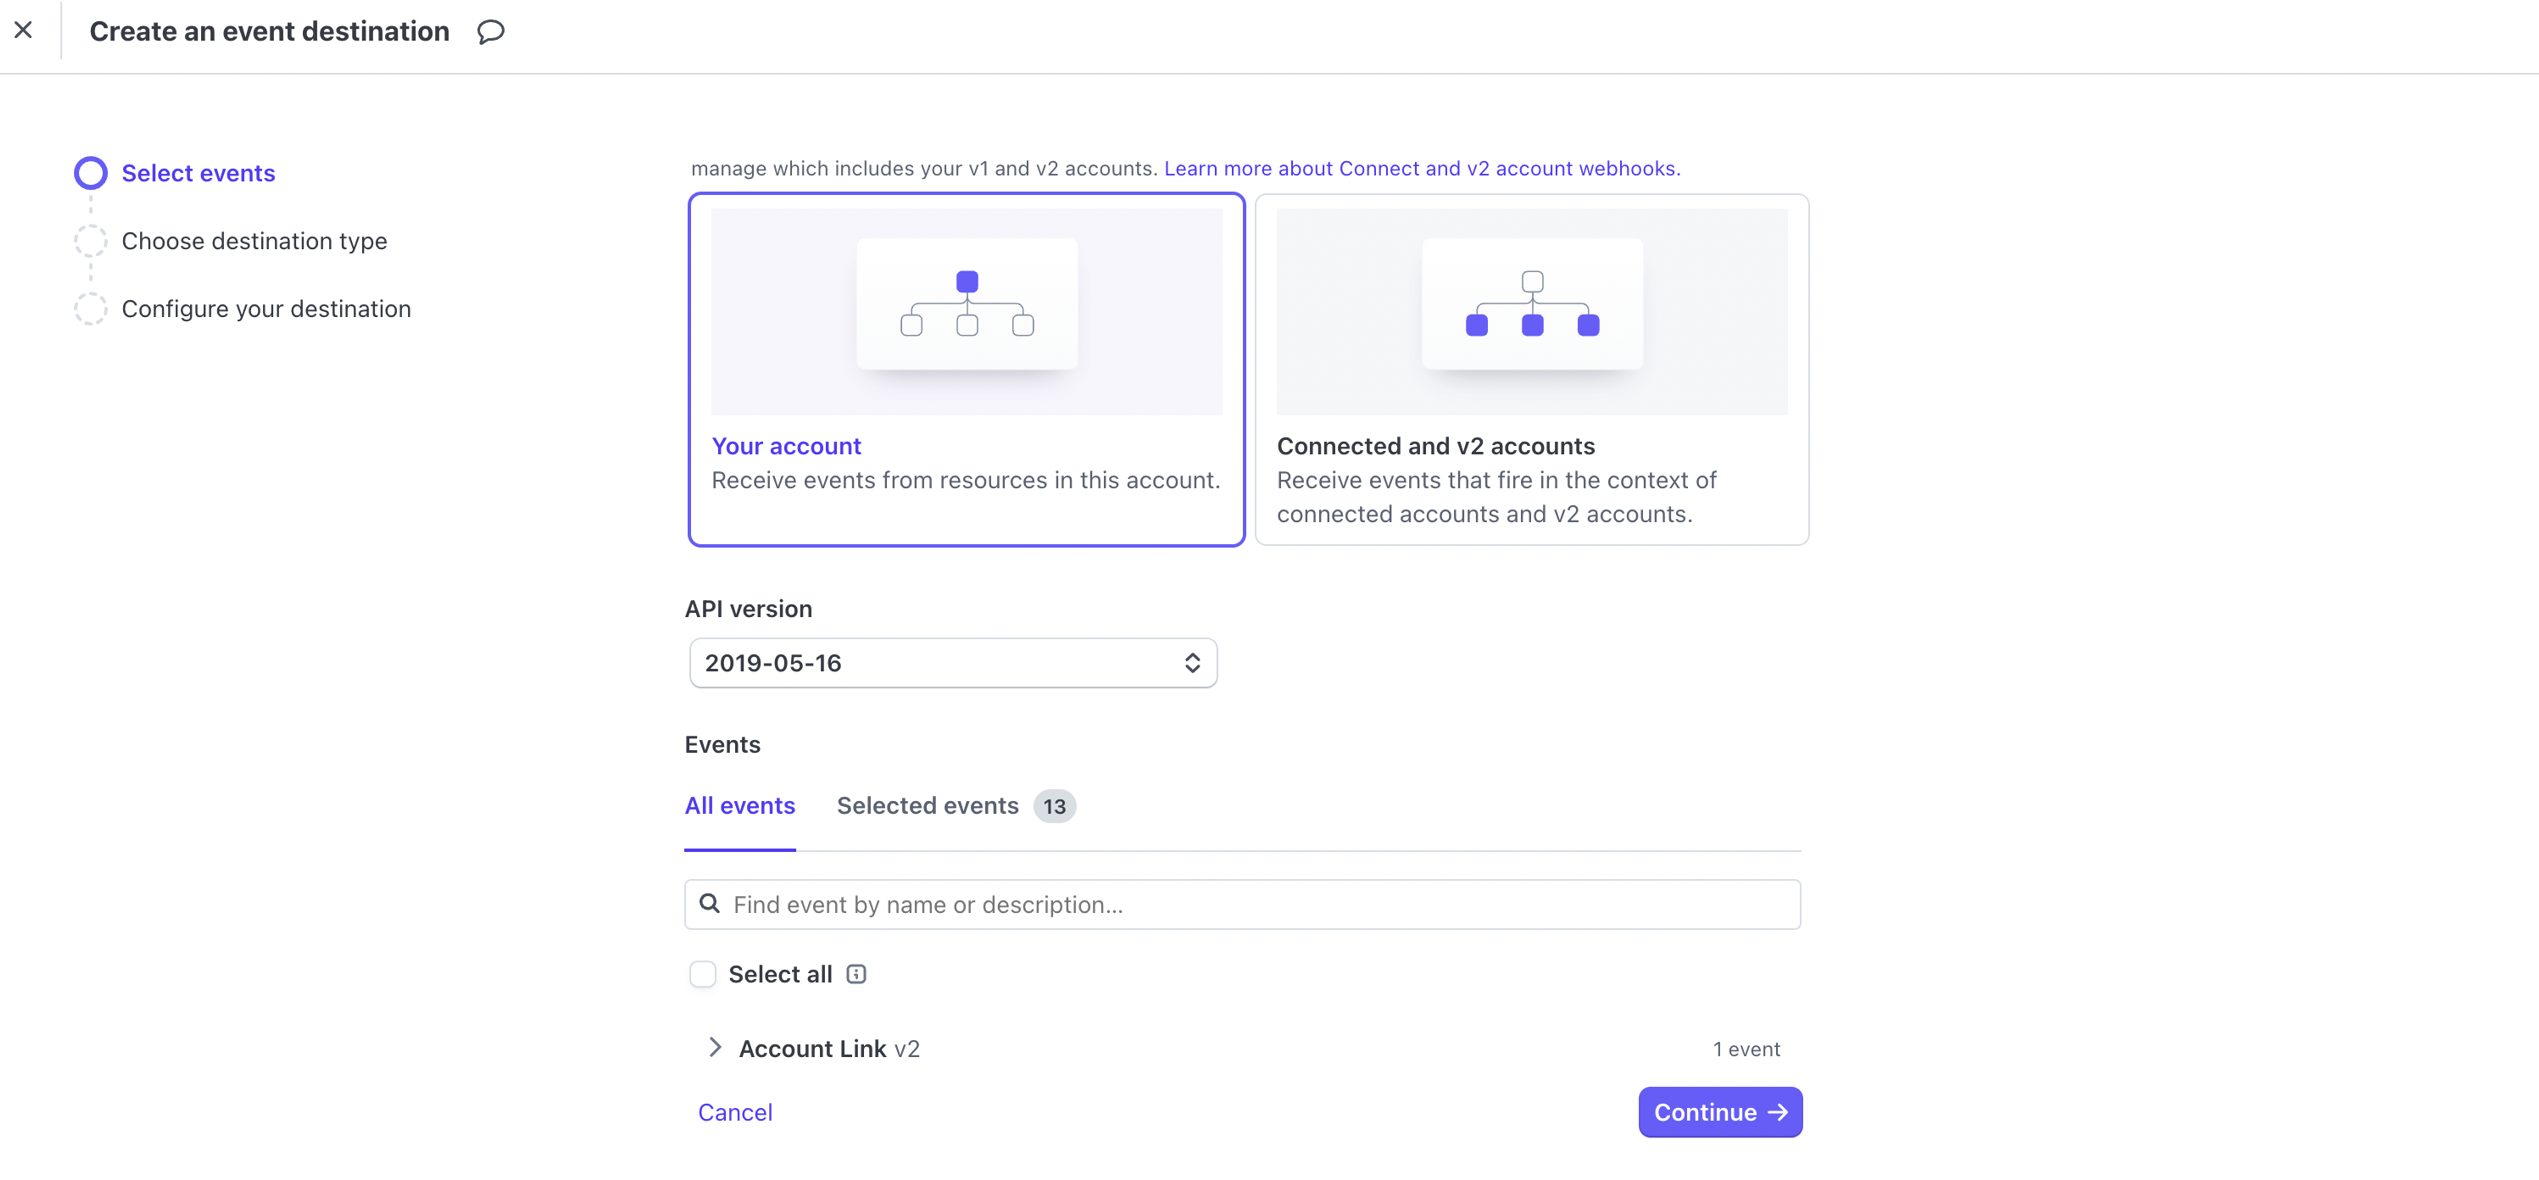
- In the Events form, select Your account, choose the necessary event type, and click Continue to receive events from your account's resources.
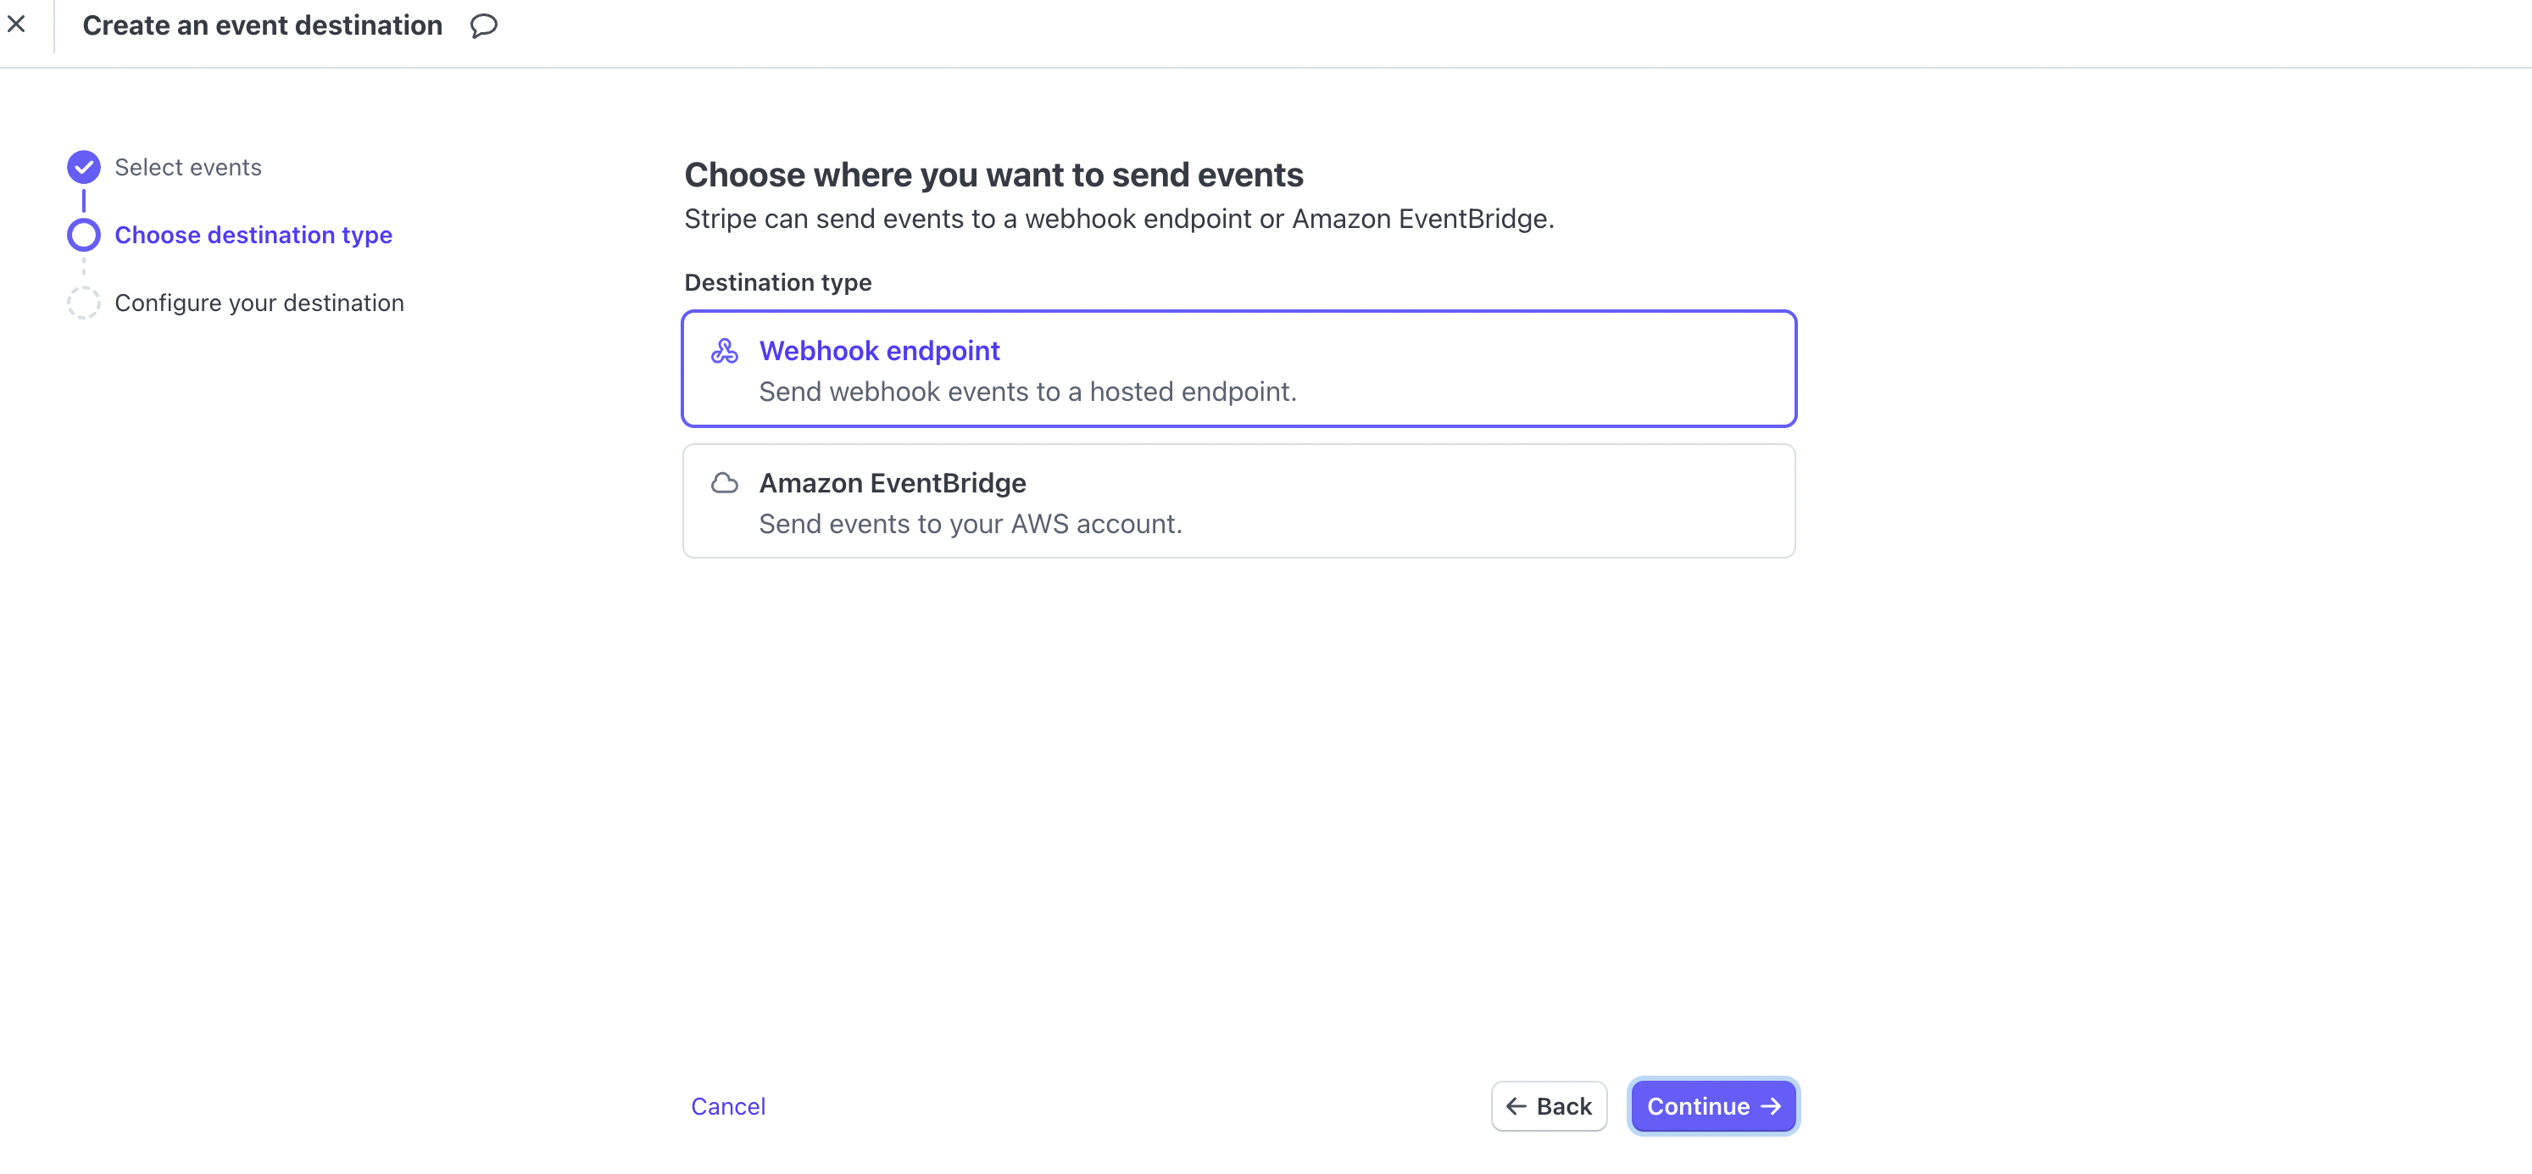
- Select the Webhook endpoint under Destination type to send webhook events to a hosted endpoint.
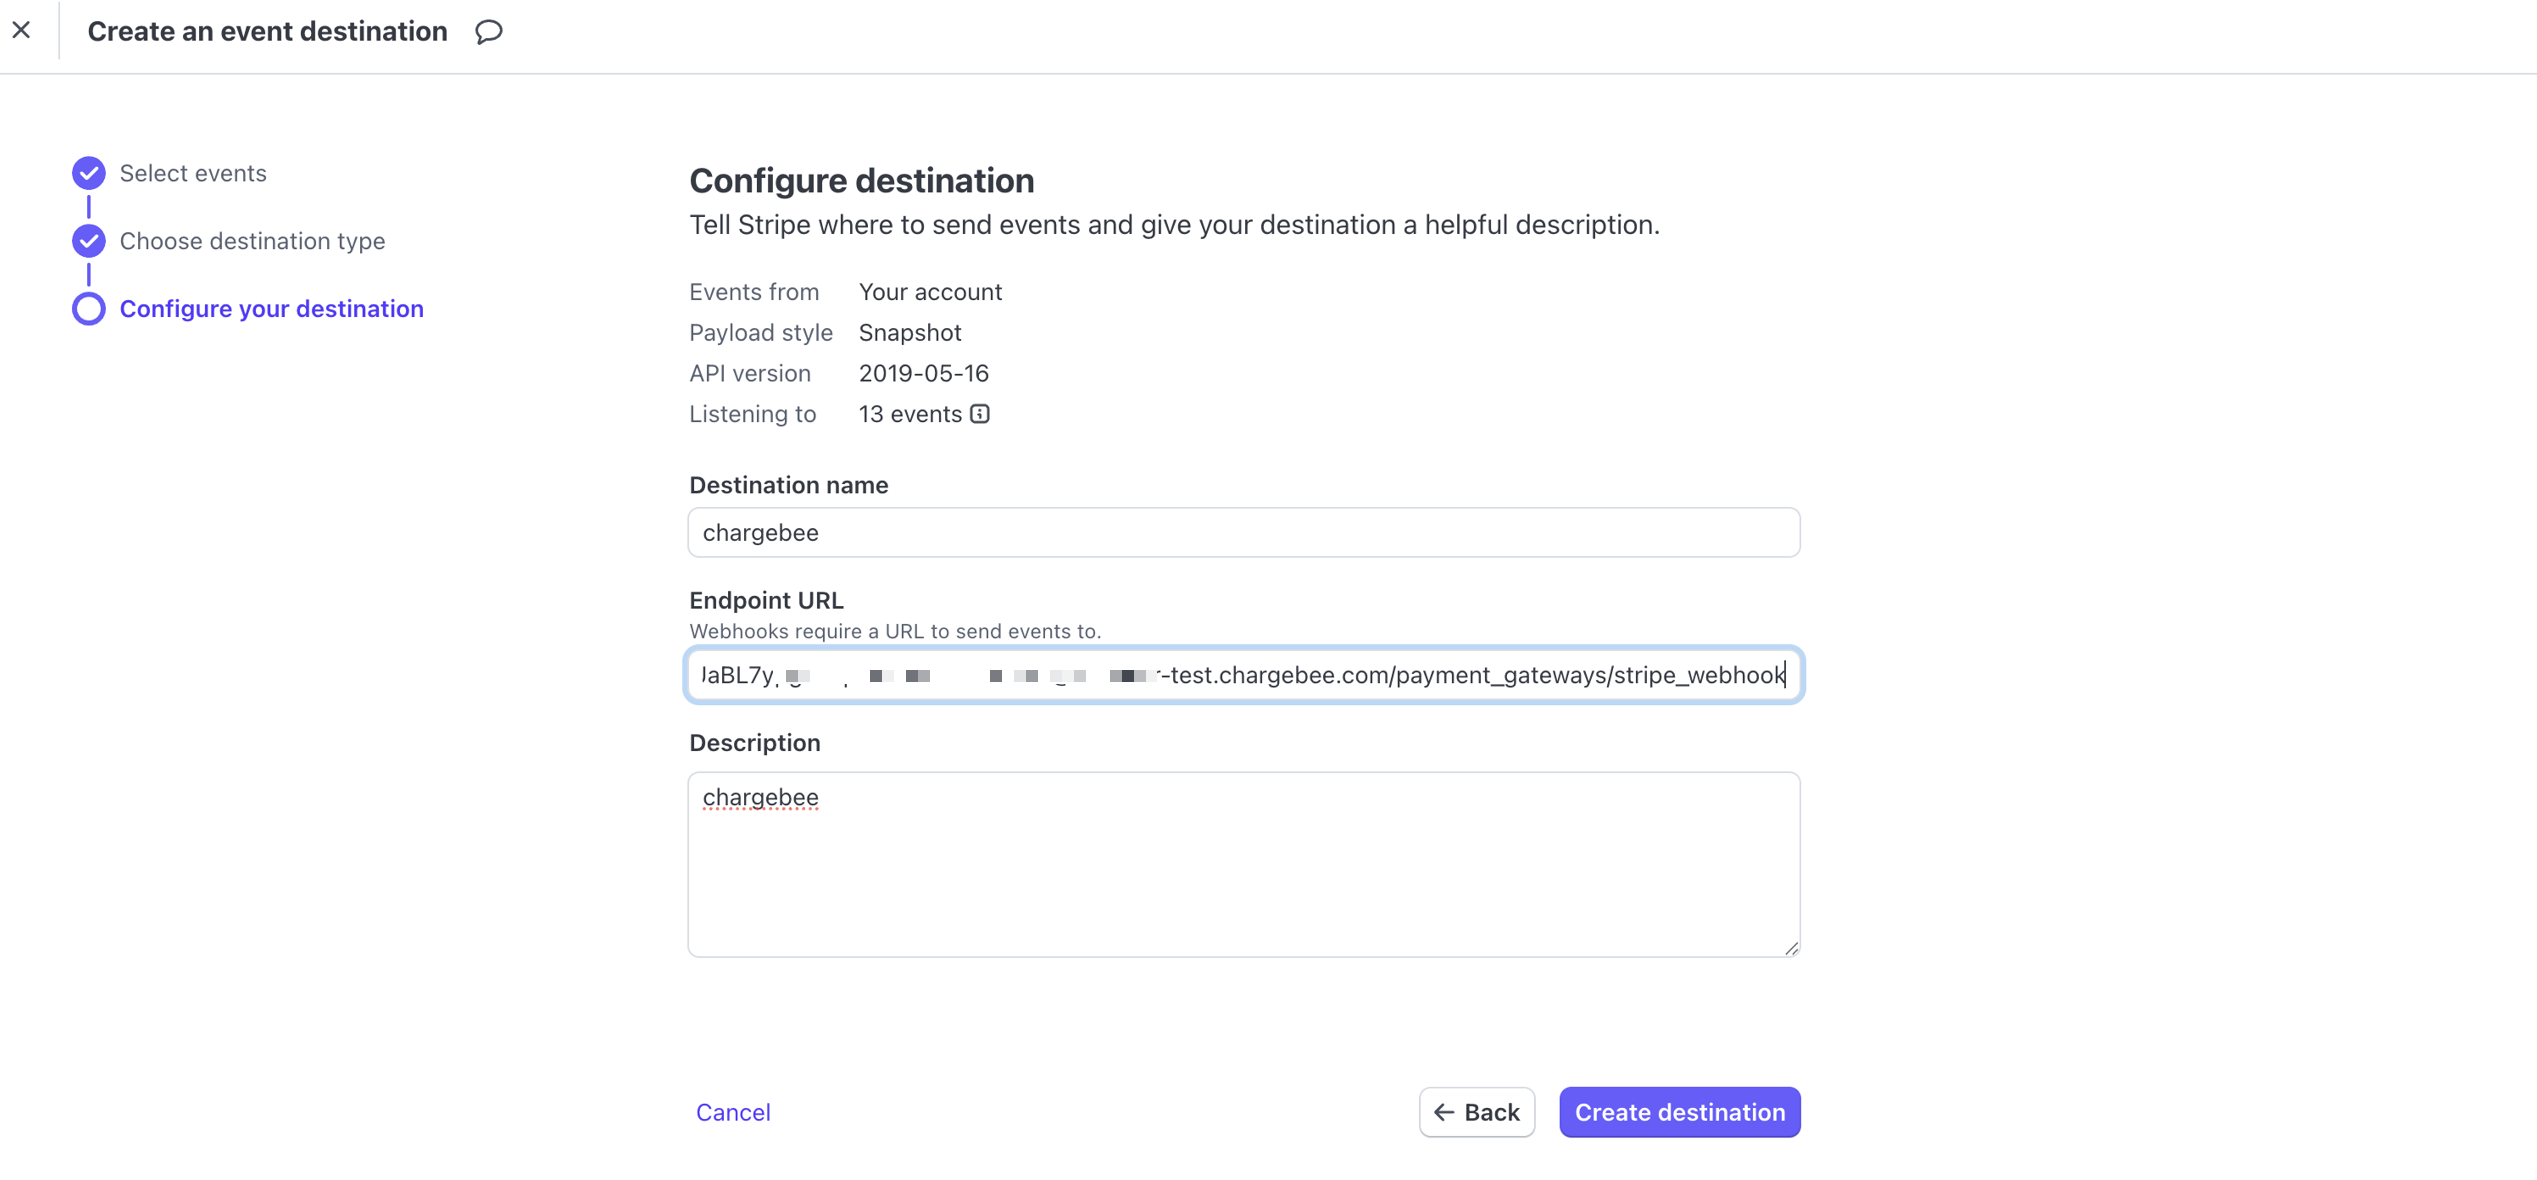
- Enter the Destination name, Endpoint URL (Paste the Notification URL copied from Chargebee), and also provide a description for future reference.
Follow these steps to get the Notification URL from Chargebee:
- Login to your Chargebee account.
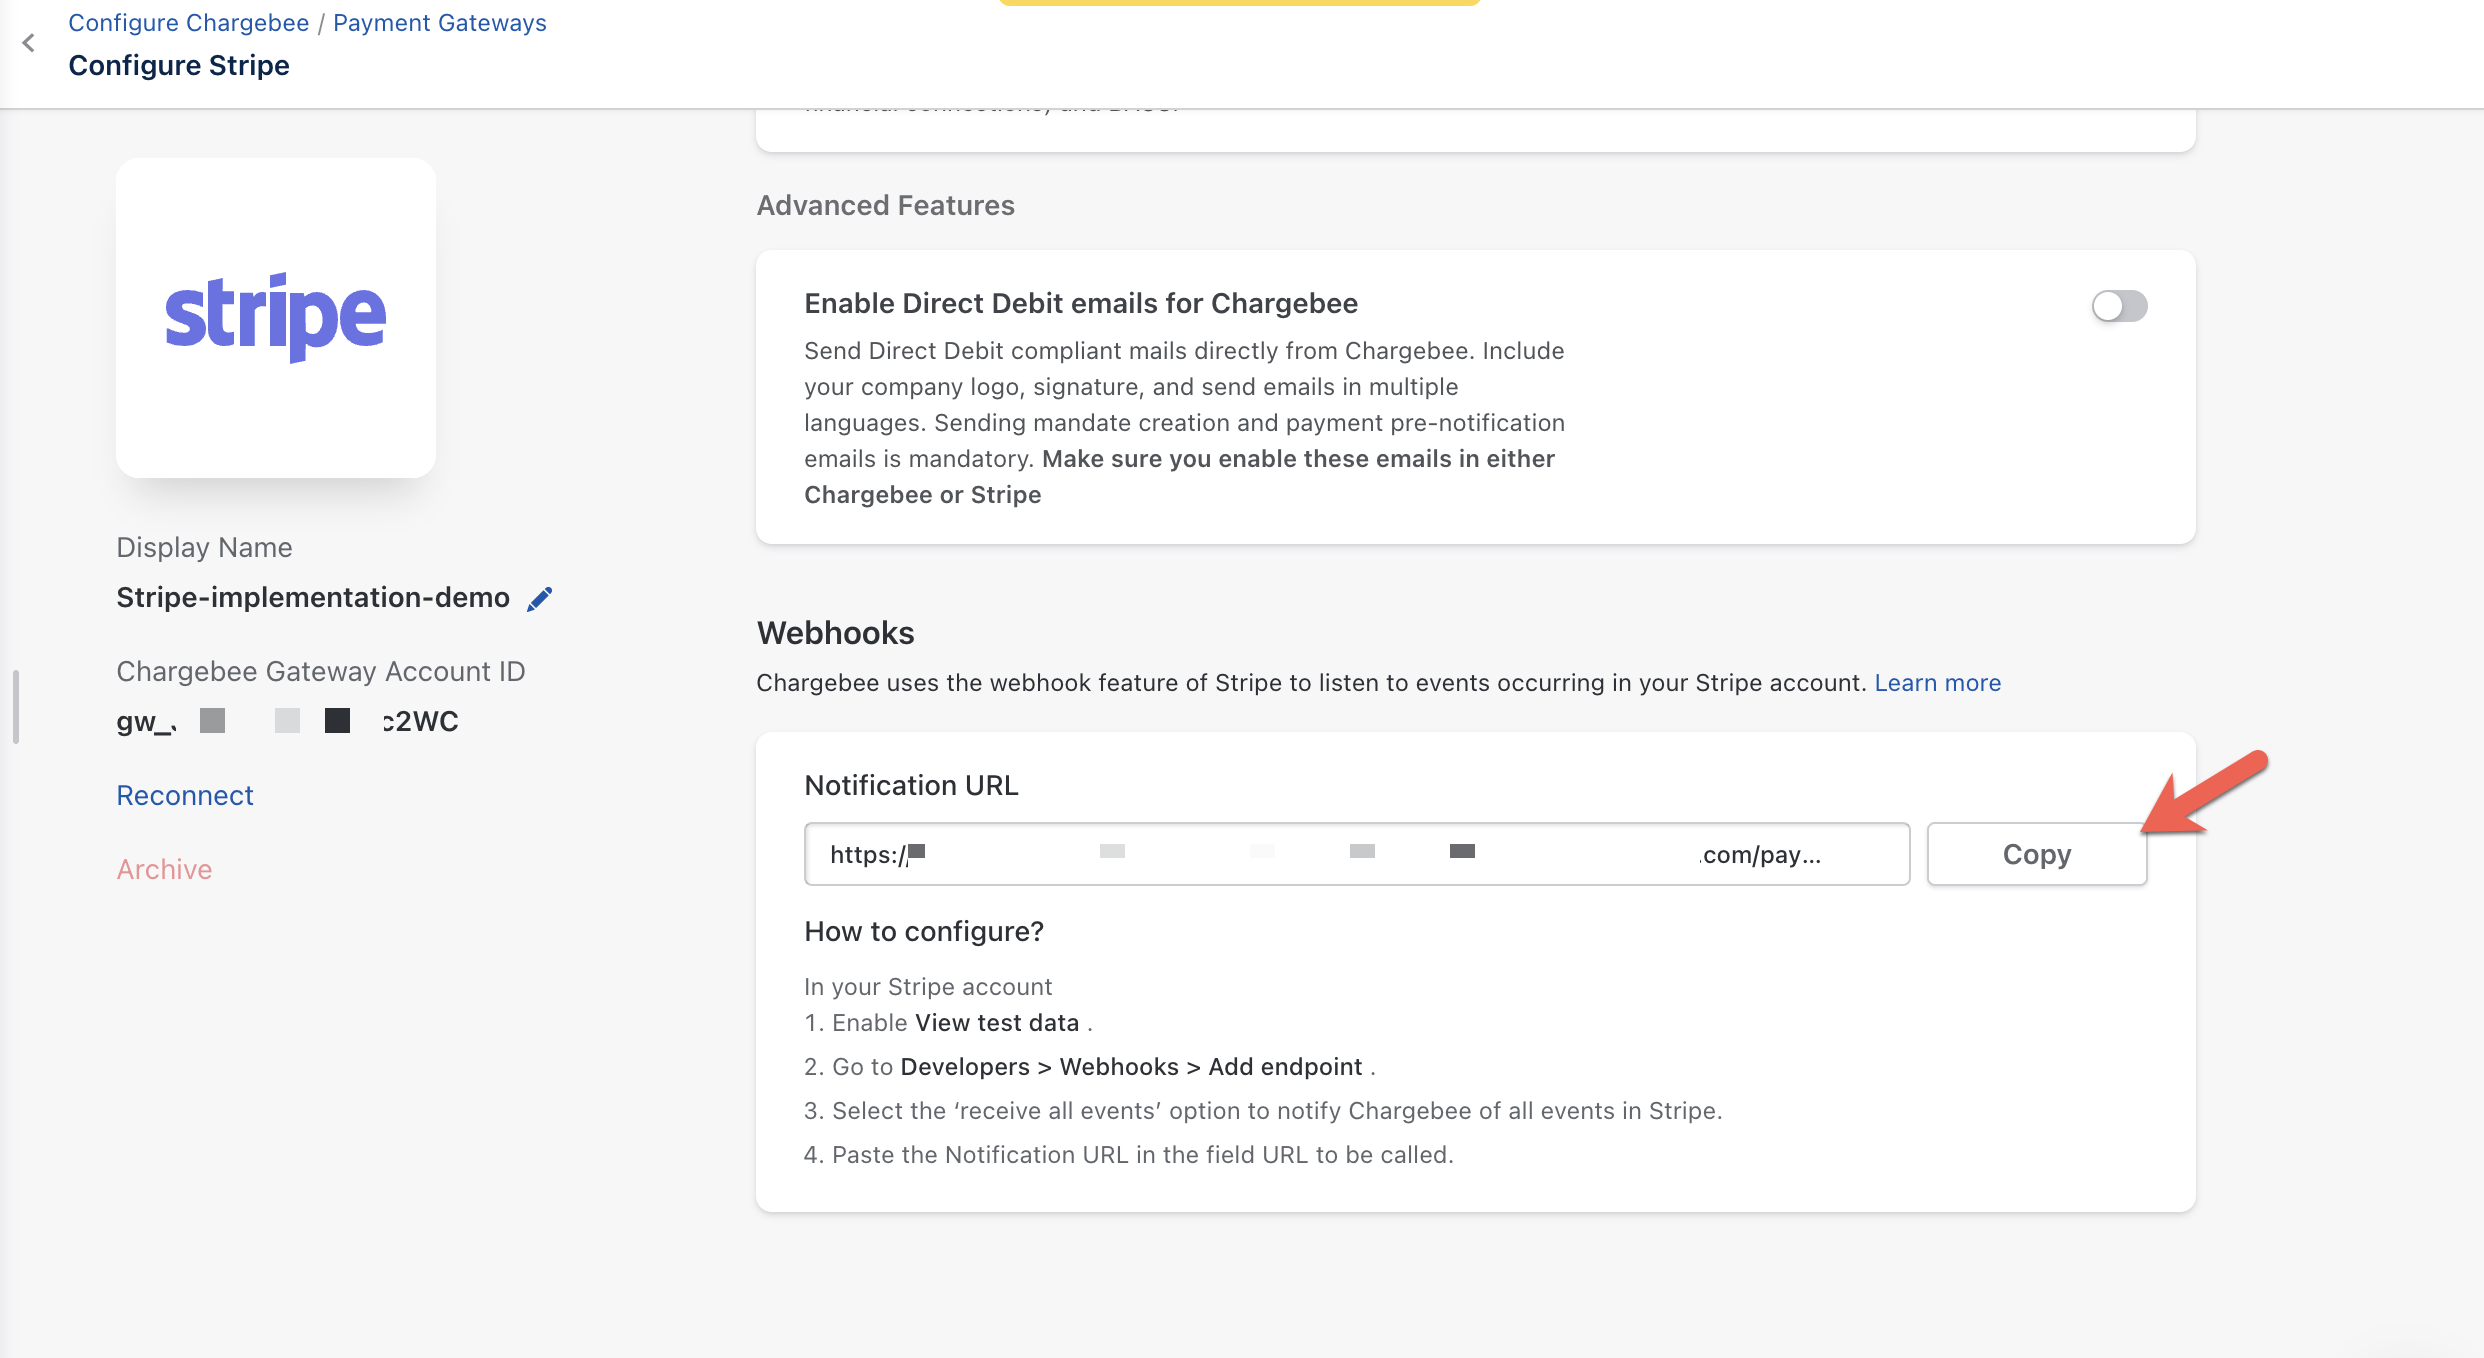
- Navigate to Settings > Configure Chargebee > Payments gateway > Stripe.
- Under the Webhooks section, copy the Notification URL from Chargebee and paste it in the Endpoint URL.
- Click Create destination.
Necessary event types for webhook configuration
| Webhook Events |
|---|
| customer.card.updated |
| customer.source.updated |
| charge.succeeded |
| charge.failed |
| charge.expired |
| charge.refunded |
| charge.refund.updated |
| review.closed |
| source.transaction.created |
| payment_method.updated |
| charge.dispute.funds_withdrawn |
| charge.dispute.closed |
| payment_method.automatically_updated |
| payment_method.card_automatically_updated |
| source.chargeable |
| payment_intent.succeeded |
| payment_intent.payment_failed |
| mandate.updated |
| setup_intent.succeeded |
| setup_intent.setup_failed |
| customer_cash_balance_transaction.created |
Note
If you remove your Stripe account from Chargebee, this URL will no longer be valid. Adding Stripe to Chargebee again will generate a new URL that you will need to paste in your Stripe account.
See also
Configuring webhooks in Chargebee. Stripe events
Currencies supported
Stripe and Chargebee support 100+ different currencies for charging customers across different geographical locations. If you intend to use Stripe with Chargebee for your business, ensure that your transactional currencies are supported by both. Find the complete list of currencies supported by:
Stripe India integration
Chargebee allows you to integrate with Stripe India to process card payments. Stripe India categorizes accounts based on the currency (INR and non-INR).
If you are selling to customers in INR, you must configure 3DS. This is to ensure that you are compliant with multi-factor authentication. Learn more.
If you are selling in a different currency other than INR, it is mandatory to collect certain information such as plan name, billing address, and shipping address. This is to comply with the local regulation.
Non-INR accounts in Stripe are classified into Goods and Services. Based on your account type, you will have to configure the following settings in Chargebee.
- Billing and card address should be made mandatory during checkout if you are selling services. Configure the Billing and Payment (Card) address fields in the Checkout and Self-Serve Portal configurations to make sure these mandatory details are collected during the checkout process. This information is passed on to Stripe as soon as it is updated in Chargebee.
- Billing, shipping, and card address should be made mandatory during checkout if you are selling physical goods. Configure the Billing, Shipping, and Payment (Card) address fields in the Checkout and Self-Serve Portal configurations to make sure these mandatory details are collected during the checkout process. Here, the billing address is passed on to Stripe whenever it is updated. The shipping address is sent individually for every transaction.
- The plan name will be shared with Stripe for every transaction. Stripe will use this information for auditing.
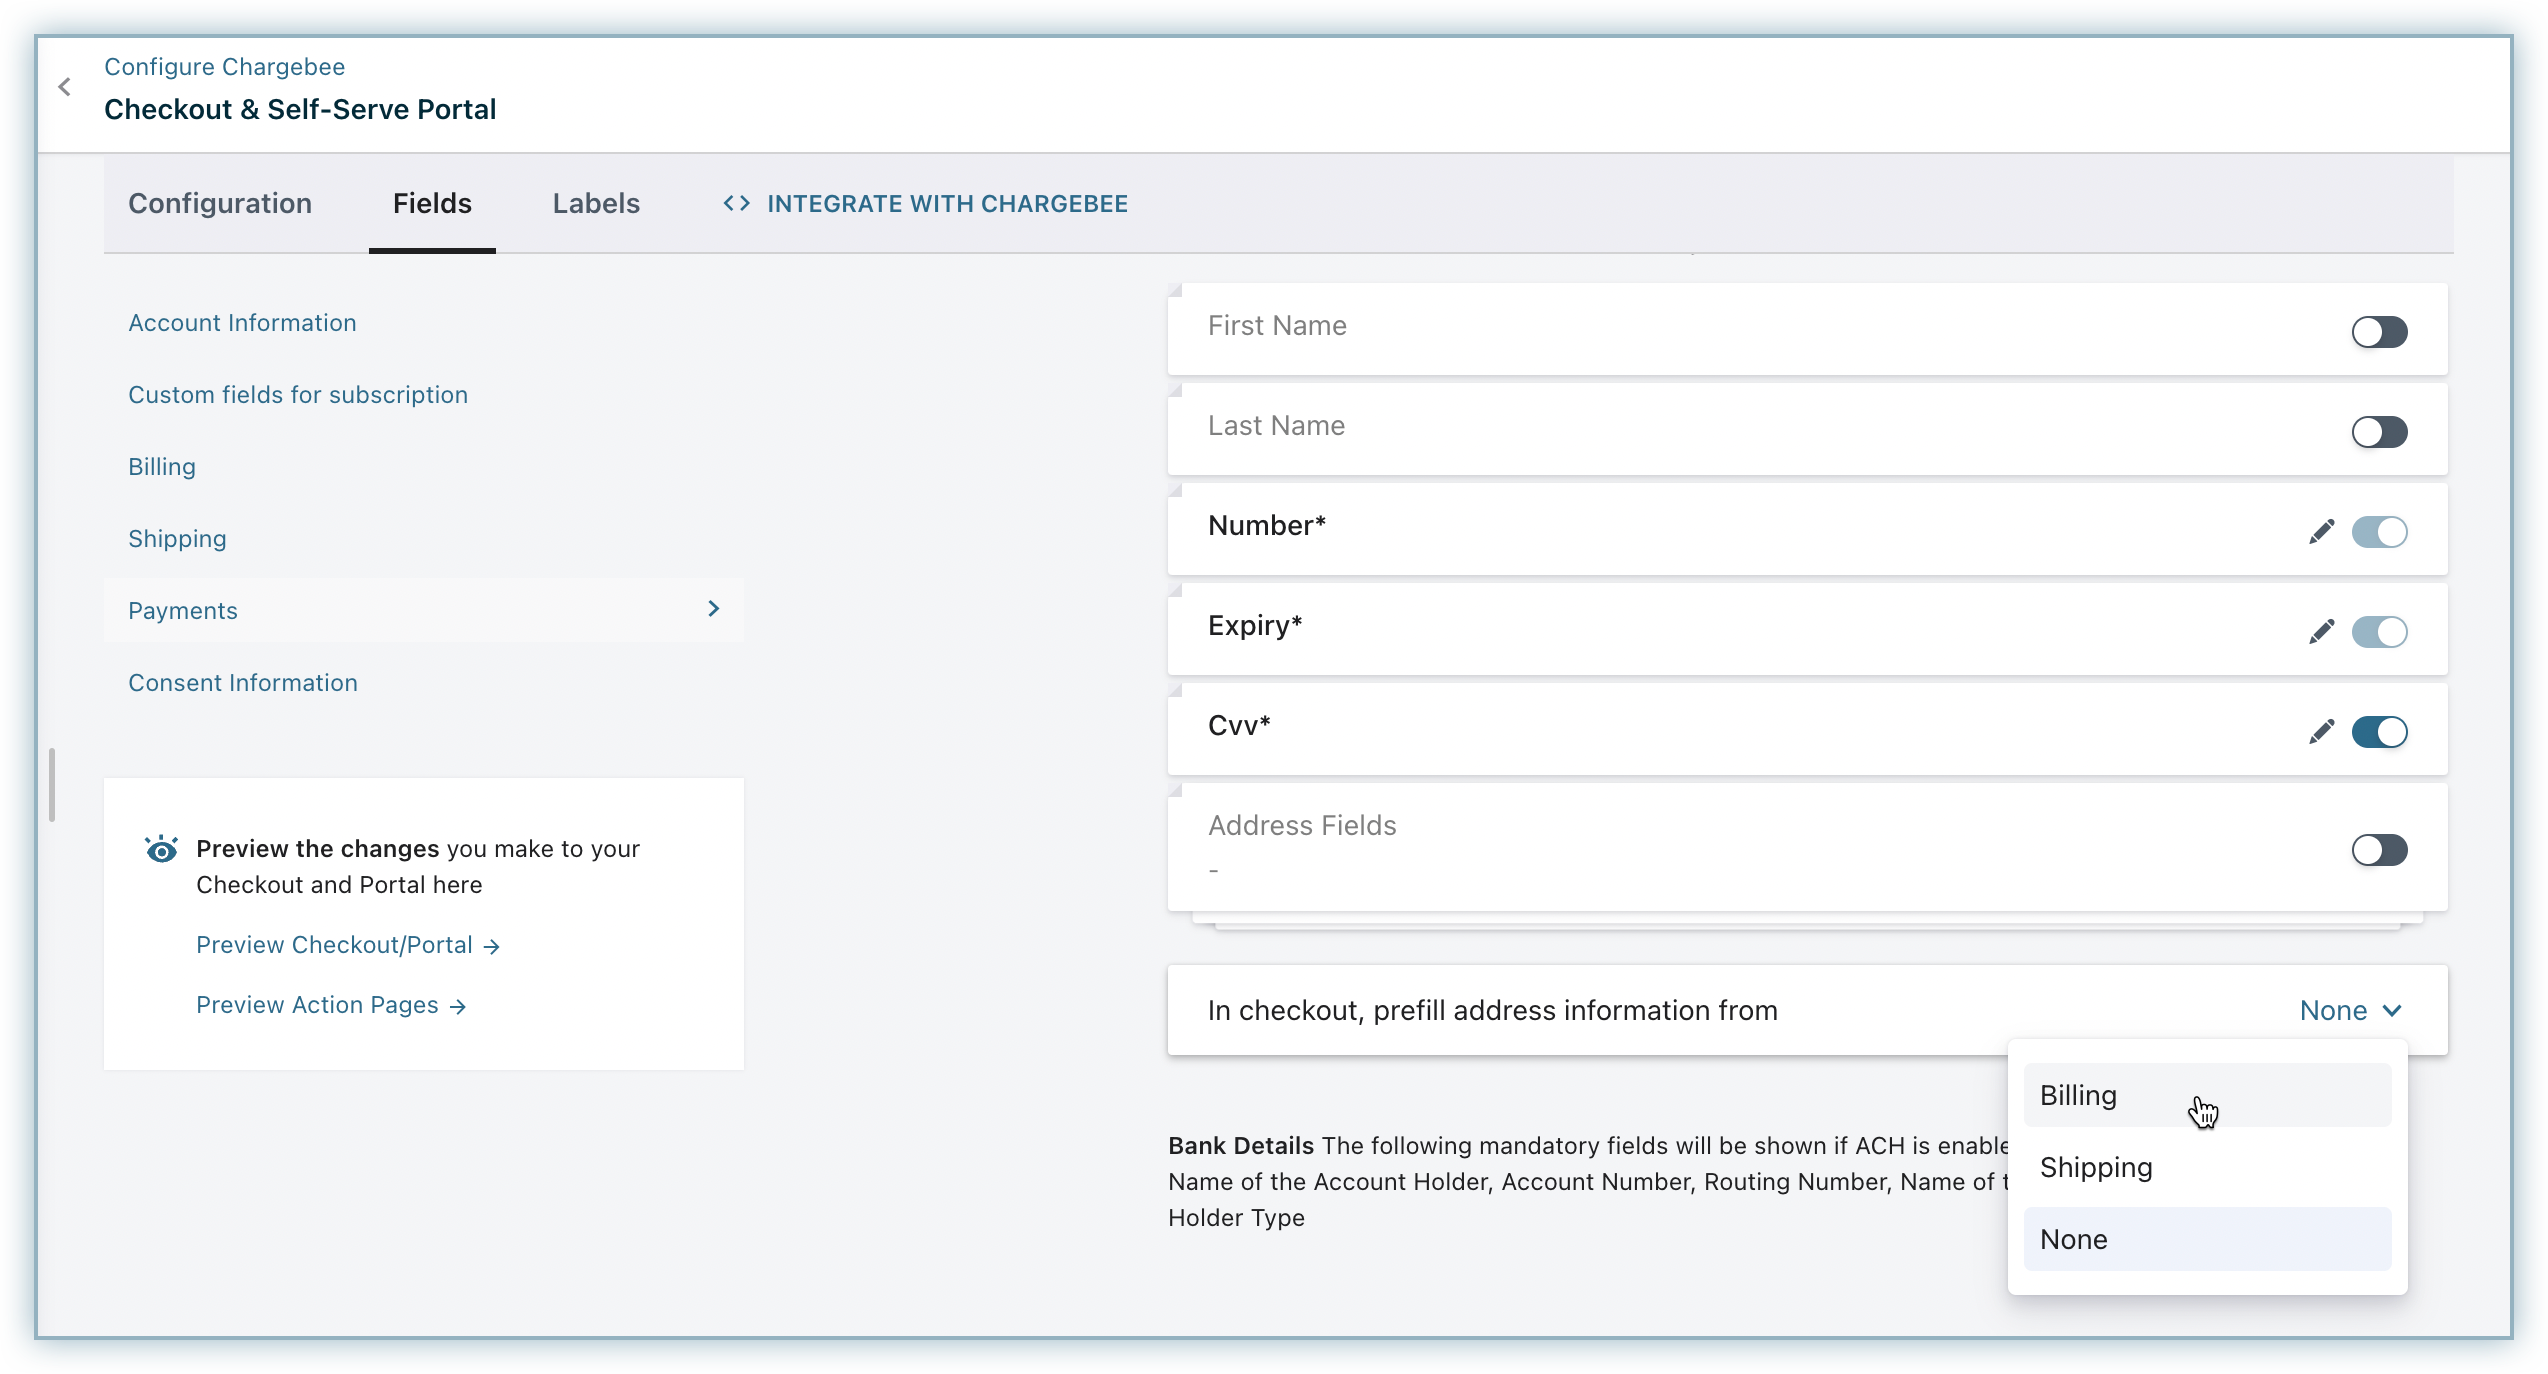
Enabling the In checkout, prefill address information from setting in the Payment section under the fields tab on Checkout and Self-Serve Portal settings will enhance the checkout experience for your customers by pre-filling the address information from earlier sections and help them complete checkout faster.
Limitations (Goods account)
- Charges (one-time charges) against customers without subscriptions will not go through because they do not have a shipping address linked to it.
- Consolidated invoicing with different shipping addresses is not supported.
- Pay now option with a different shipping address is not supported.
Test card numbers
The card numbers provided here can be used for testing card transactions in Chargebee's test site in the test mode of your Stripe account.
While testing, use any number for CVV and a valid future date for the expiry date.
Card Number | Card Type | Response Description |
4242 4242 4242 4242 | Visa | Successful Transaction. |
4000 0000 0000 0002 | Visa | Attempts to charge will be declined with a Card Declined error. |
4000 0000 0000 0341 | Visa | Card can be added but attempts to charge will fail. |
4000 0000 0000 0069 | Visa | Charge will be declined with an "Expired Card" error. |
See also
Auth and capture
Auth and capture is a process where funds in your customer's card are authorized and earmarked for a duration of 7 days for a transaction. The merchant can claim the authorized amount within this tenure. This is extremely useful for merchants who have a delayed fulfillment process.
Note
- Currently supported only for one-time charges.
- Auth and capture is available via API only.
Authorize – When a merchant authorizes a transaction, Chargebee will check the customer's credit card to check the availability of authorized amount. Then, a hold will be placed on the card for that amount for a particular tenure.
- You can hold the funds only for a maximum of 7 days.
- Authorizations expire automatically after 7 days.
Capture – During this tenure, the merchant can issue a capture request to collect the authorized funds. The merchant must collect the funds within the authorized tenure. If not, they cannot collect them later. A new auth and capture request must be called. Uncollected funds will be released back to the card.
- You cannot capture more than the authorized amount.
- Partial and multiple captures are not supported.
Void – In case you do not want to capture the authorized amount, you can choose to void it.
Check out the Auth and Capture API.
3DS implementation for card payments
Check with your gateway whether 3DS is enabled for your account. If not, enable it at your gateway and then in Chargebee. Also, make sure you complete the SCA checklist in Chargebee before accepting 3DS payments. This is to ensure that you can recover failed payments easily, without compromising your revenue.
1) For new cards with immediate payment
The implementation for respective integrations given here are for 3DS payments which involve a new card and immediate charge.
a) Stripe.js + Chargebee APIs:
- Complete 3DS flow for the card using Stripe's Payment Intents API.
- Pass the PaymentIntent
idtopayment_intent[gw_token]parameter of Chargebee APIs and perform the necessary operation.
You can take a look at our tutorial for the detailed set of steps on completing a 3DS payment for a new card using Stripe.js in your checkout.
b) Chargebee hosted pages + Stripe gateway:
Chargebee's hosted pages (in-app checkout, portal) take care of tokenizing the card details and performing 3DS verification if needed.
All you need to do is complete configuration 3DS in your Chargebee site.
c) Chargebee APIs + Stripe gateway:
Sending raw card details to Chargebee is not a recommended way to carry out 3DS transactions. The reason being: Gateway JS or Chargebee.js sends your customer's background data and tries for a 3DS frictionless flow, which is typically not possible when you send raw card details directly to Chargebee.
We recommend you go with the gateway JS + Chargebee API option, as your payment approval rate would be better with this approach. For more information, reach out to support.
d) Chargebee.js + Stripe gateway:
Chargebee.js takes full responsibility for tokenizing the card details and performing 3DS verification when necessary. All you need to do is integrate Chargebee.js in your checkout.
2) For new cards without immediate payment
The implementation for respective integrations given here are for 3DS authorization which involves a new card without an immediate charge.
a) Stripe.js + Chargebee APIs:
Stripe's Setup Intent API does not accept amount as a parameter, and can only be used for performing 3DS verification for a card which is not associated with an immediate payment. The stored card can then be tapped for payment in the future.
- Complete 3DS flow for the card using
SetupIntent. - Pass the SetupIntent
idtopayment_intent[gw_token]parameter of Chargebee APIs and perform the necessary operation.
b) Chargebee hosted pages + Stripe gateway:
- Chargebee's hosted pages (in-app checkout, portal) take care of tokenizing the card details and performing 3DS authorization for a minimum amount.
- The amount authorized is automatically released to the customer on 3DS flow completion.
All you need to do is complete configuring 3DS in your Chargebee site.
c) Chargebee.js + Stripe gateway:
- Chargebee.js takes full responsibility for tokenizing the card details and performing 3DS authorization for a minimum amount.
- The amount authorized is automatically released to the customer on 3DS flow completion.
All you need to do is integrate Chargebee.js in your checkout.
3) For stored cards
The implementation for respective integrations given here are for 3DS payments made using a stored card.
a) Stripe.js + Chargebee APIs:
- Follow the steps to fetch the card details and charge it via 3DS flow.
- Pass the PaymentIntent
idtopayment_intent[gw_token]parameter of Chargebee's APIs to perform the necessary operation.
b) Chargebee hosted pages + Stripe gateway:
Chargebee uses the card's Reference ID to retrieve the payment method and charge the customer.
c) Chargebee.js + Stripe gateway:
- Retrieve the card's Reference ID and pass it to Chargebee's PaymentIntent API.
- Use Chargebee.js'
handleCardPaymentfunction as a callback function.
Refer to our Chargebee.js documentation to know more on charging a stored card via 3DS flow.
Handling 3DS fallback
Fallback flow comes into play when 3DS verification attempt fails for stored cards, due to the customer being offline. The invoice would then get into dunning and the customer would be followed up for payment, based on your reminder email configuration. Enable 3DS and dunning email configuration in Chargebee to take care of fallback flow.
Automated account updater
This integration supports automated account update for cards.
Payment failures and recovery are the most difficult aspects of recurring billing businesses due to the sheer complexities involved. In most cases, payment failures occur as a result of an expired or updated card. Chargebee supports an automated account update for Stripe. Each time there is an update to the customer's card number, expiry, or Customer Verification Value (CVV), the details are updated in Chargebee (in real time) with the help of card networks and the Stripe gateway. This helps avoid any manual efforts for your customers and, more importantly, avoid payments failing due to outdated card information.
Frequently Asked Questions
1. How do I configure Chargebee's webhook in Stripe?
See this section in our support documentation for more information on how to configure a webhook in Stripe.
Was this article helpful?